Xoro HTC 1926D – страница 6
Инструкция к Xoro HTC 1926D
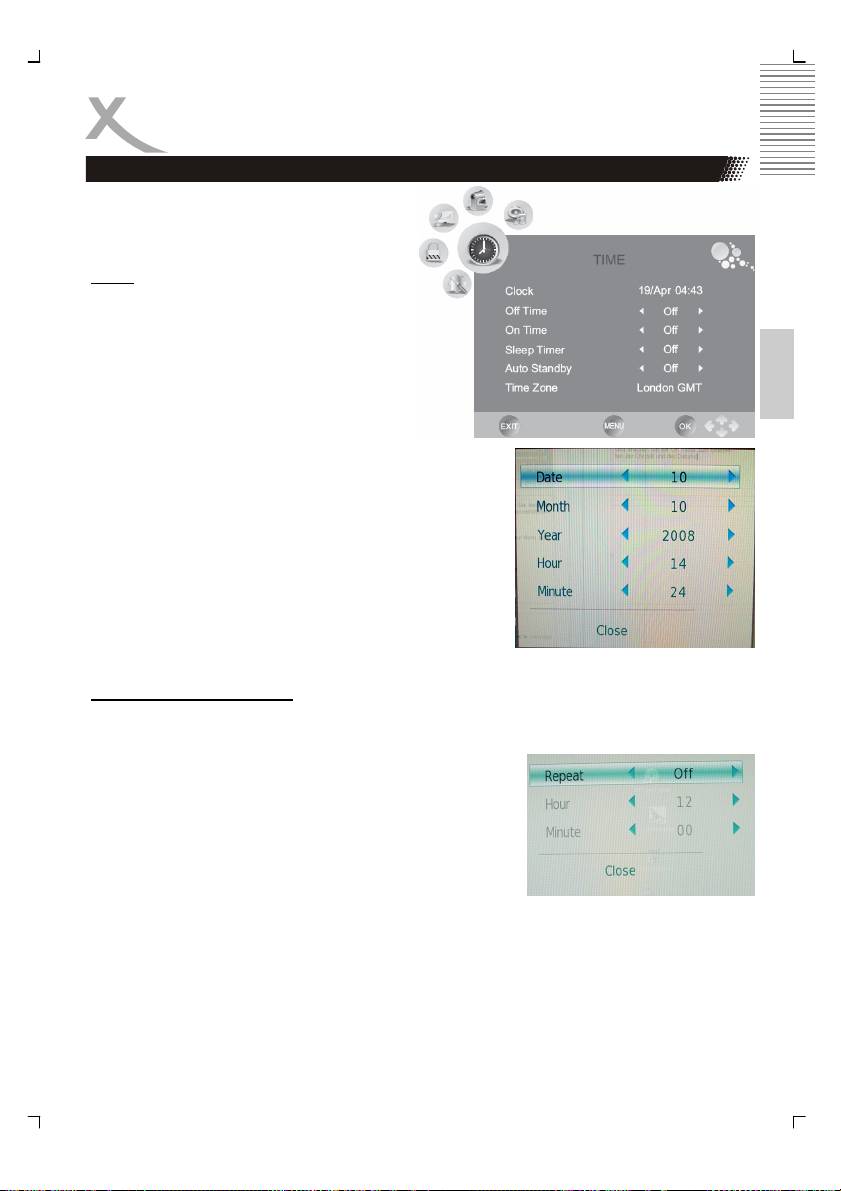
LCD Settings
Time setting
The Time settings includes the options for
“Clock”, “Off Time”, “On Time”, “Sleep Timer”,
“Auto Stand-By” and “Time Zone”.
Clock
Choose the clock setting with the ▼ button
and start to change the clock by pressing the
OK button. An additional popup window ap-
English
pears on the screen.
With the ▲/▼ buttons you can choose every
sub-option. With the ◄ or ► buttons you can
change the options. The sub-options are:
• Date
• Month
• Year
• Hour
• Minute
If you had change some settings, please navigate to the ▼
button to “Close” and press the OK button for the saving
the changes.
Off Time of the HTC TV set
With this option you can program the TV set for automatically switch off. Start the option by
pressing the ► button and a new popup window appears on the screen. There you can de-
fine each setting to program the off time. The settings are:
• Repeat
Here you can define the cycle of the off time:
A. Once
B. Every Day
C. Monday-Friday
D. Monday-Saturday
E. Saturday-Sunday
F. Sunday
G. Off
• Hour
Define the clock in hour (e.g. 18 o’clock)
• Minute
Define the clock in minutes (e.g. 15 minutes)
39

LCD Settings
Time setting
On Time of the HTC TV set
With this option you can program the TV set for auto-
matically switch on. Start the option by pressing the ►
button and a new popup window appears on the
screen. There you can define each setting to program
the on time. The settings are:
• Activate
Here you can define the cycle of the on time:
A. Once
B. Every Day
English
C. Monday-Friday
D. Monday-Saturday
E. Saturday-Sunday
F. Sunday
G. Off
• Hour
Define the clock in hour (e.g. 18 o’clock)
• Minute
Define the clock in minutes (e.g. 15 minutes)
• Volume
Here you can define the volume level by switch on the HTC TV set
• Mode
Here you can define the Mode, in which the HTC TV set starts by On Time. You can
choose DTV, ATV and Radio
For example, you define the settings to Monday-Friday, 8:05 o’clock, Volume 40 and DTV.
Than the HTC TV set starts between Monday and Friday at 8:05 o’clock with the last active
DTV channel by a volume of 40.
Sleep Timer
With the option you can program the Sleep Timer to switch off the HTC TV set. The preset
steps are defined in minutes.
Note:
You can also start the Sleep Timer by pressing the SLEEP button on the remote control. By
repeatedly pressing the SLEEP button you can change the presets minutes.
Auto Stand-By
With this option you can program the HTC TV set for automatically switch off, when after
several minutes no active signal provided by the source (HDMI, DVD, VGA, ect.)
40
LCD Settings
Time setting
Time Zone
With this option you can set the Time Zone. If you had chosen by the first time installation
the country, than the Time Zone is defined already.
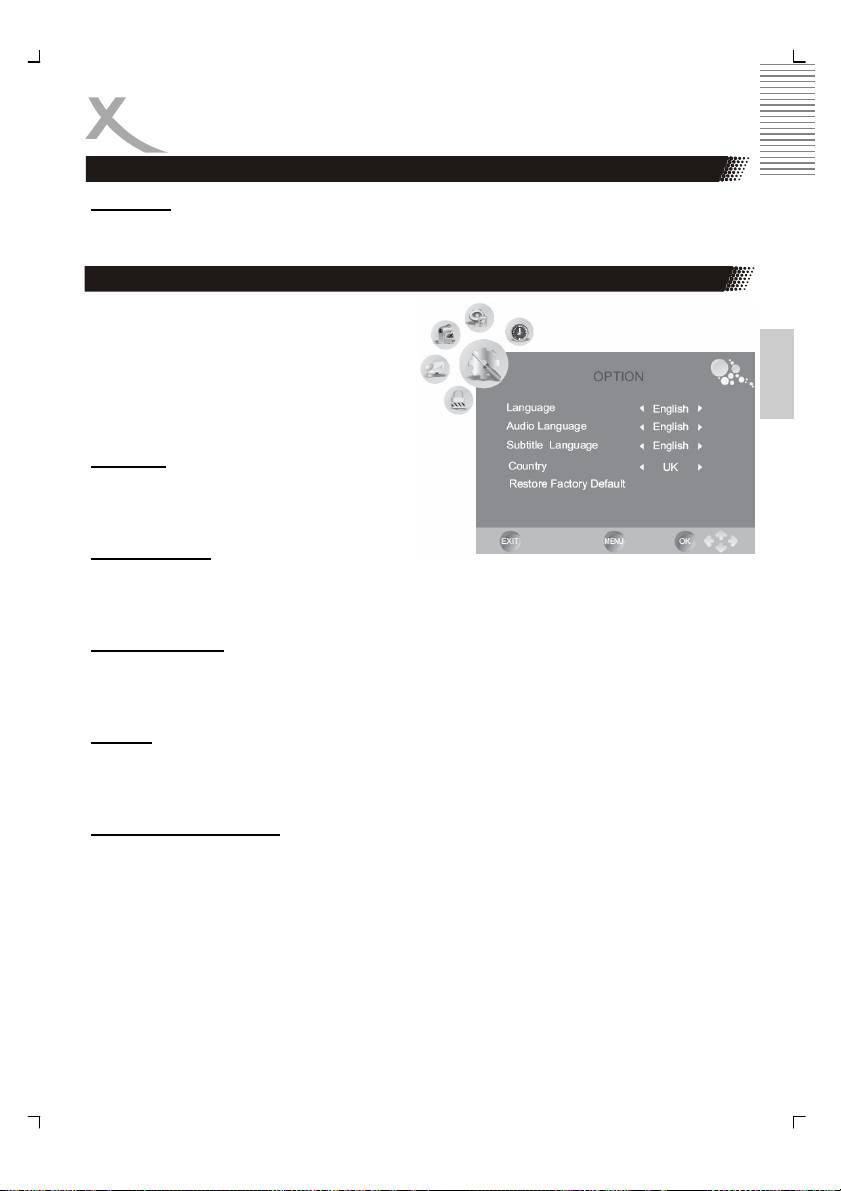
Options
The Option Settings includes the “Language”,
“Audio language”, Subtitle language”,
English
“Country” and the “Factory Default”.
You can change each setting by using the ◄
or ► buttons.
Language
Here you can select the language for the
OSD.
Audio language
This option is important in DVB-T mode and you can select the audio language. Some
broadcast TV stations supports multi-lingual TV programs.
Subtitle language
This option is important in DVB-T mode and you can select the subtitle language. Some
broadcast TV stations supports subtitles in TV programs.
Country
Here you can define the country. The country setting has influence by other options, like
Time Zone or the searching of ATV and DTV channels.
Restore Factory Defaults
With this option you can load and reset the factory default settings. All personally settings
are deleted.
41
LCD Settings
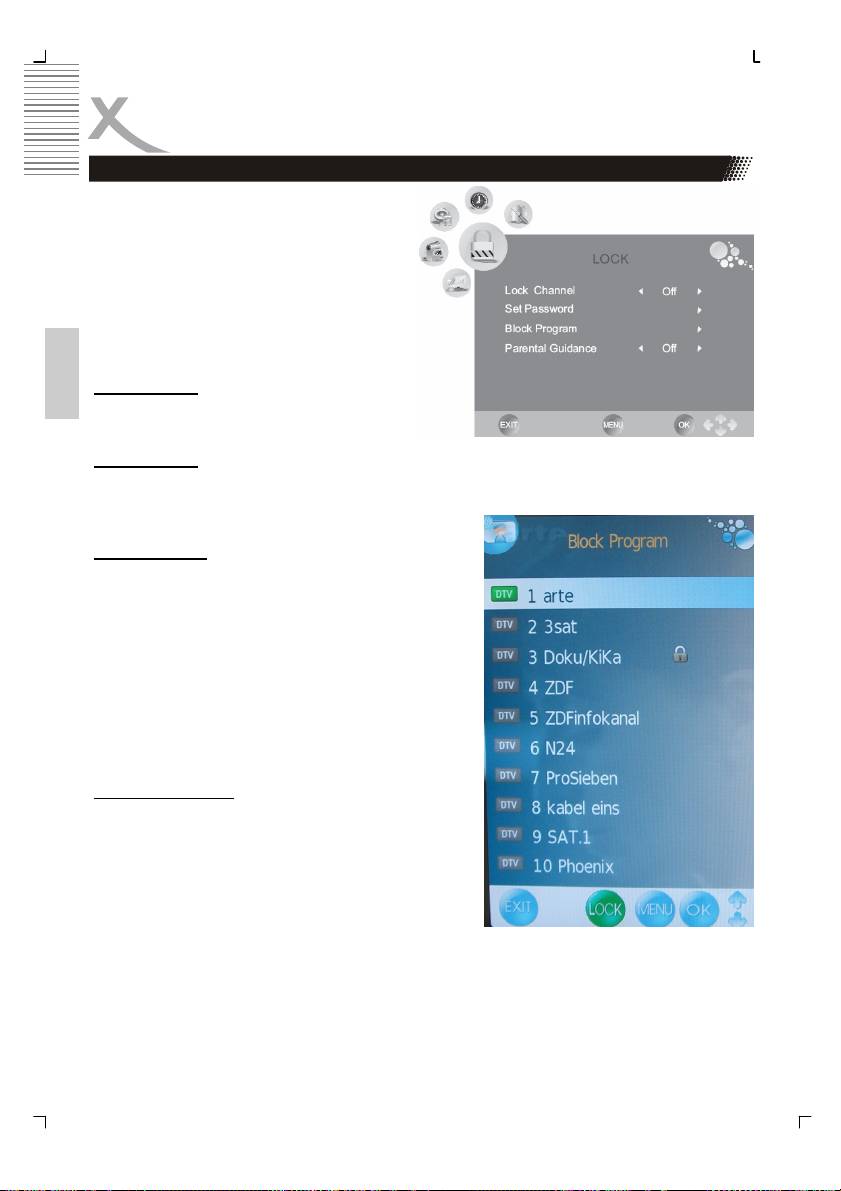
Lock setting
The LOCK settings includes the option for
“Lock Channel”, “Set Password”, “Block
Program” and the “Parental Guidance”.
Before you can change the settings, you
have to insert the preset password if you
enter into the menu. The password is “0 0 0
0”
Lock Channel
English
With this option you can lock a channel.
Set Password
With this option you can change the preset password. Please insert the new password and
confirm the new password again.
Block Program
With this option you can block single TV channels.
After starting the option the channel list appears on
the screen. With the ▲/▼ buttons you can choose TV
channel which you want to block. To block a channel
please press the GREEN button on the remote con-
trol. On the chosen TV channel appears a lock sym-
bol. Save the settings by pressing the TV MENU but-
ton.
The block TV channel can not choose anymore.
Parental Guidance
With this option you can define the level of the paren-
tal control. The parental control can be only than ac-
tive when the TV broadcaster supports this function.
42
Troubleshooting
Check the following guide for the possible cause of a problem before contacting service.
Technical Support of Xoro/MAS:
• Tel.: 040/77 11 09 17
• Internet: www.xoro.de/support.htm
English
Problem Solution
TV won’t switch on
• Check the mains cable is connected properly to both the mains
supply and the mains adapter
• Check the cable from the mains adapter is connected properly
to the set.
• The electronic circuit may have reset. Pull the plug out, wait for
60 seconds, then plug back again.
No picture
• Check the aerial or other input is connected properly.
• Check that the correct input is selected, using the SOURCE
button.
• Check the brightness and contrast settings in the Picture Set-
ting.
No sound
• Check that the VOLUME isn’t turned down, or the MUTE but-
ton pressed.
• Check that the audio cables are connected to the correct in-
puts.
Picture is wrong
• Check that the correct input is selected, using the SOUECE
colour
button.
The picture is un-
• Check the Picture Setting and adjust the view by Auto Adjust
stable when used
match the video output settings of the PC.
with a PC
There are a few
• High resolution LCD screens often have a small number of
coloured spots on
faulty pixels.
the screen
• This is normal and within the bounds of our quality control
checks.
Picture with wrong
• The LCD has the wrong aspect ratio. Please press the Size
scaling
button to switch the aspect ratio from 16:9 to 4:3.
43
Troubleshooting
Symptom Correction
No DVB-T reception
• Switch the player into the DVB-T mode.
• No DVB-T reception in your region.
• Realign the antenna. Please pay attention to the
direction of the antenna tower.
• Please use an active indoor aerial or a roof antenna.
• Retry the Auto Scan.
Picture freezes
• Realign the antenna. Please pay attention to the
English
direction of the antenna tower.
• Please use an active indoor aerial or a roof antenna.
Strong mosaics or
• Realign the antenna. Please pay attention to the
artefacts
direction of the antenna tower.
No searching possible
• Realign the antenna. Please pay attention to the
direction of the antenna tower.
• Control the Country selection
No Audio or no second
• Press the AUDIO button. Many TV broadcaster
audio language
supports just only one language.
No subtitles
• Press the SUB-T button. Many TV boradcaster does
not support subtitles.
44

DVB-T
Picture Quality
Die picture quality by DVB-T depends on the different areas and the different conditions.
Some parameters are important for the picture quality, the bit rates, the resolution and the
reception of the transmitted DVB-T signals.
Bit rate
The bit rates is fixed by the TV broadcaster and can be different between each TV program.
Also the different TV broadcaster define the bit rate different to each others. If you see by
English
watching DVB-T strong mosaics structures, artefacts or an un sharp picture, than you can
try to increase the Signal strength and Signal quality by searching a better position of the
indoor aerial. Maybe you can try also to change a passive indoor aerial to an active indoor
aerial. But, if you can realizes optimal condition by receiving the DVB-T signals and you
have anymore the artefacts or mosaics structures, than is the transmitted bit rates to low.
In Germany the values are very different by the bit rates:
ZDF 2700 until 4500 kbps
ARD 2000 until 4500 kbps
HR 1800 until 3500 kbps
Private TV Stations 1800 until 2700 kbps
If the bit rate is higher, than the picture quality is mostly better and the picture is more than
less by artefacts or mosaic structures.
Resolution
The second influence by the picture quality is the transmitted resolution. If the resolution is
higher than you can see a more sharper picture. For example:
ARD / ZDF 720x576 or 704x576 (that’s PAL Full D1 resolution)
Other 544x576or 528x576
Receiving Condition
If you see by the information Signal strength and Signal quality some low values, you can try
to find another antenna position to increases the reception quality. Visible indicators for a
worst reception of the DVB-T signals is for example the a freeze picture or the message “No
Signal”.
The reception quality depends for example on the kind of the antenna. Three different kind
of antenna are available, the passive and active indoor aerial and the roof antenna. Realign
your indoor aerial in this way, that you get the best reception as possible. Helpfully it to know
in which direction are the public antenna power and than you can adjust the antenna to this
direction.
If a passive indoor aerial can not receive the DVB-T signal strong enough, please try an
active indoor aerial. The best reception results are by the roof antenna possible.
45
DVD-Player / USB / Card Reader
Press the SOURCE button on the remote control and choose DVD for using the inter-
nal DVD Player.
The DVD Slot-In loader opens and produces now some noise. The
Slot-In loader is on the left side of the HTC xx26D. Place the disc
with the printed side to the rear into the loader and push very slightly
to the right side. You can see the silver side. The loader moves in
the disc automatically and reads the disc information.
Notes:
• If the disc is inserts with the wrong side, than the loader tries
English
to read the disc. This procedure needs more time than in a
normal way. The loader can not read the disc content and
displays the message “No disc” and moves out the disc.
• To be able to eject a CD or DVD it is necessary to enable
the DVD mode. Otherwise the pressing of the OPEN/CLOSE button (▲
) will be
without function. Switch on the unit and press the SOURCE button and choose
“DVD” in the source menu. Now the HTC xx26d is in DVD mode.
USB Port and Card Reader
Please connect the USB Stick or the Card media in order to the description
by the USB Port and Card Reader on the right side of the device. Normally,
the printed side of the memory shall be show to the rear side.
Start the USB Port or Card Reader by pressing the DVD-SETUP and go to
the System Setting and choose by the option SOURCE the USB or CARD.
Note:
Due to the legal requirements of CE-conformity, the customer is asked
to only connect USB-Sticks to the USB port.
Function
An On Screen Display (OSD) indicator will be displayed at the upper part TV screen
when certain functions are executed, or when pressing the OSD button on the re-
mote control.
The OSD indicator is a user friendly interface designed to display the status of play-
back type . When a different disc is loaded (DVD, CD, Music ready); the OSD indicator
bar will be different.
The OSD bar will appear automatically if it is activated by pressing the D.DISPLAY button,
Press the D.DISPLAY again and a new status bar will appear. Press D.DISPLAY a third time
and the OSD bar will disappear. When OSD indicator bar appears, press other button, the
OSD indicator bar will disappear automati-
cally.
46
DVD-Player / USB / Card Reader
Function
By pressing the D.DISPLAY button again the following picture is shown by Video –DVD:
1. Active sound track
2. Format of sound track DD 5.1 CH (channel)
3. Subtitle (not included in this example) (OFF)
English
4. More aspects (in this example there are no aspects activate at moment)
By MPEG-4 video files the information is a bit different than with a video DVD.
Important information for a ISO Data disk with MPEG-4 files are:
1. Disc Format (here CDROM)
2. Number of tracks and which one is just played
3. With or without sound
4. Running time
Open/Close
To open and close the disc tray. Press OPEN/CLOSE button on the front panel or the
remote.
Notes:
• Player will not skip forward or backward during “WARNING” section of a DVD disc.
• Single chapter DVD or single track CD cannot skip
Play/Pause
Press PLAY button to play the disc. Press PLAY/PAUSE button again to pause (still
picture). Press PLAY/PAUSE button to playback the content.
Stop
Press STOP button to stop in two modes:
• Press STOP button once. Stop memorizes the interrupt position and
the OSD shows PRESTOP. Resume play by pressing PLAY button.
• Press STOP button twice completely stop disc. The OSD shows “STOP” and
the PLAY button will resume disc.
47
DVD-Player / USB / Card Reader
Function
Press this button skip advance DVD chapter or CD track.
Press this button skip backward DVD chapter or CD track.
Fast Backward/Fast Forward
Press this button to fast backward through the disc. Repeatedly press the button.
Press this button to fast forward through the disc. Repeatedly press the button will
increase the search speed.
Notes:
English
• The changes in speed by fast backward or fast forward are from Normal —> x2 —>
x4 —> x8 —> 20 —> Normal
• The player is muted in fast forward or fast backward this mode.
• Player will not fast forward or fast backward during WARNING section of a DVD disc
DVD Menu
While playing a DVD, press the DVD.MENU button return to the DVD disc menu.
Numeric Buttons
Numerical key pad (Random Program access)
1. To direct access a DVD chapter or a CD track, input the desired
DVD chapter or CD track number using the numerical key pad.
2. Input data for the DVD disc start menu or the player’s setup menu.
Title
While playing a DVD, press the DVD.TITLE button return to the DVD disc title menu.
Audio Track
While playback a DVD disc, press AUDIO button repeatedly to select the desired
audio sound track. A DVD disc may contains up to 8 selectable audio sound tracks.
48
DVD-Player / USB / Card Reader
Function
Repeat section A-B
To repeat playback a specific section of a disc.
• Press the A-B button at the starting point of the desired section, “REPEAT A-”
display on screen.
• Press the A-B button again, at the end of the desired section, “REPEAT A-B” display on
screen. The desired section A to B until the function is cancelled.
English
• To cancel the function, Press the A-B button again return to normal play.
Note:
Some DVD discs do not allow A-B function
Repeat Mode
Press PEPEAT button repeatedly to select the repeat mode.
In DVD mode In CD mode
REP. CHAPTER Repeat chapter REP. 1 Repeat track
REP. TITLE Repeat title REP. ALL Repeat disc
REP. OFF Repeat off REP. OFF Repeat off
Note:
Some DVD discs do not allow repeat function
.
Angle
While playback a DVD disc, press ANGLE button repeatedly to select the desired
camera angle. A DVD disc may contain up to 9 selectable camera angles.
Subtitle
While play a DVD disc, press SUB-T button repeatedly to select the desired subtitle, A DVD
disc may contains up to 32 selectable subtitles.
Note:
DVD disc start menu may contains set up of angle, Subtitle and Audio soundtrack selection.
You may do the selection in the disc start menu.
Zoom
Press the ZOOM button repeatedly TV Screen display:
ZOOM x2 —> ZOOM x3 —> ZOOM x4 —>ZOOM x1/2 —> ZOOM x1/3 —> ZOOM
x1/4 —> ZOOM OFF
When playback the JPEG. Press the ZOOM button display the zoom x1/2, x1/3, x1/4, press
direction button to rotate picture. While display the zoom x2, x3, x4, press direction button to
move picture position.
49
DVD-Player / USB / Card Reader
Function
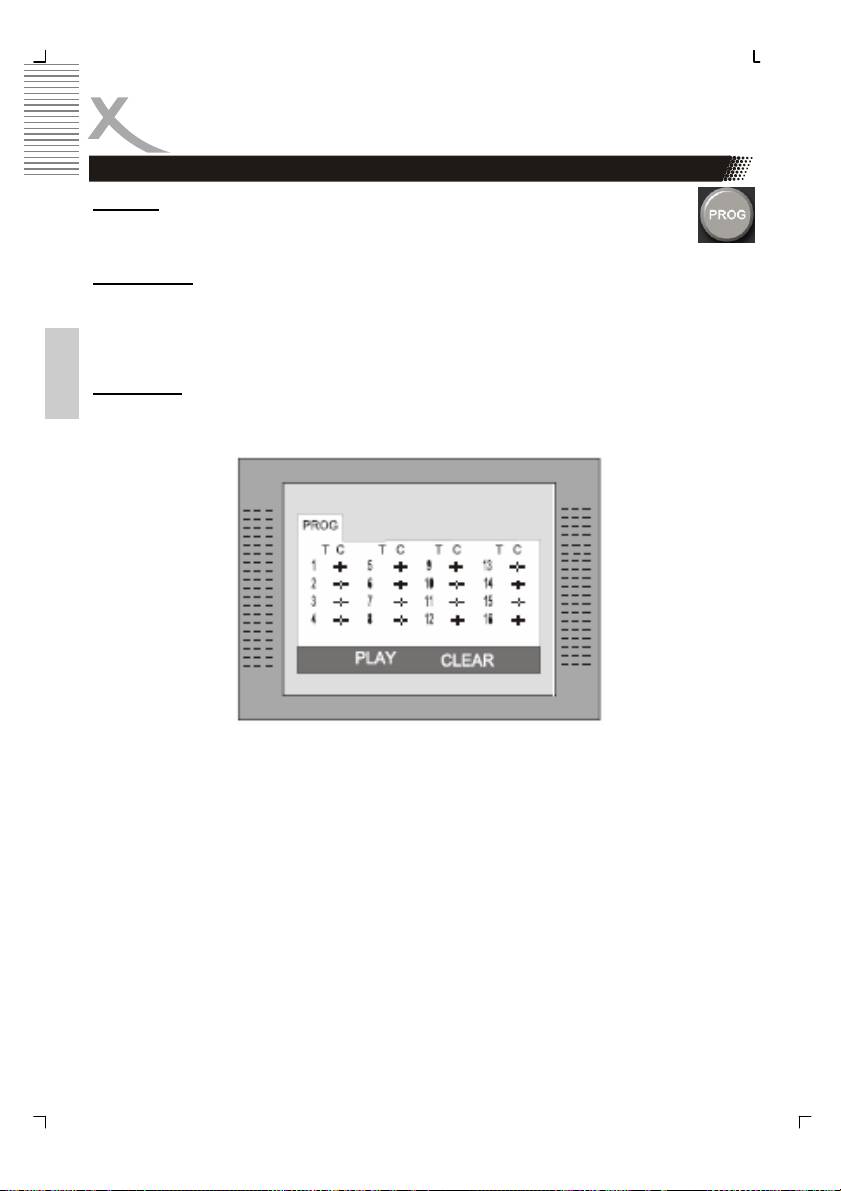
Program
Press PROG button to quit the program menu.
In DVD mode
When the program menu appears input the Title and Chapter Number
PLAY: Press PLAY button to start program play.
CLEAR: Navigate to the CLEAR button if you want to cancel the wrong information you in-
put. Press ENTER again to cancel all the tracks.
In CD mode
English
When the program menu appears, input the Track number, press ENTER, when the pro-
gramming is completed.
50
DVD-Player / USB / Card Reader
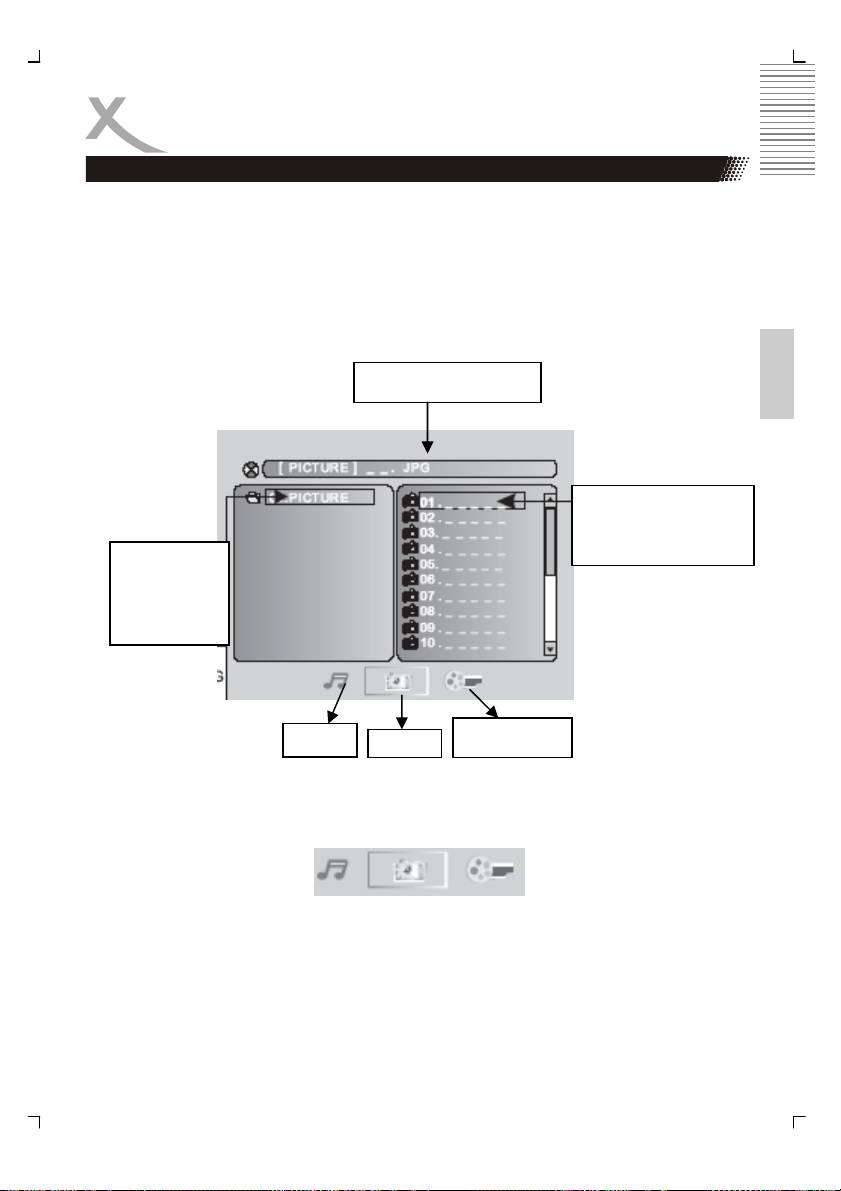
Data memory with Music, JPEG or Video files
Insert the a disc or connect a USB-Stick or connect a card memory (SD, MMC or MS card)
and the player will auto search the directories saved Video/Music/JPEG files. After search-
ing, it will auto go to the first directory saved Music files (to the disc containing both Music
and JPEG files. To the disc containing single type of files, it will go to the first directory) and
play the first song in the directory (File name is highlighted). The screen displays as the
picture below:
If the internal DVD-player does not read the USB-Stick or read the Card media, please press
the DVD-SETUP button and choose in the system setting the option SOURCE. There you
English
can activate the USB port or Card Reader.
Current file name
Track or file list.
Label of the
folder
Video file
Music
JPEG
Notes:
• With the arrow key to the right you can change between the catalogue window, the
Chops and Track window and to the file format. File formats are of the order: music
(mark (note)), pictures (camera) and video (arrow).
• The DVD player starts with the playback of Music files.
• If the internal DVD-player does not read the USB-Stick or read the Card media,
please press the DVD-SETUP button and choose in the system setting the option
SOURCE. There you can activate the USB port or Card Reader.
• Due to legal requirements of CE-conformity, the customer is asked to only connect
USB-Sticks to the USB port.
51

DVD-Player / USB / Card Reader
Data memory with Music, JPEG or Video files
1. Use the Arrow buttons to enter the Directory Region and highlight the desired
directory, then the first track under it starts playback. You also can use the arrow
buttons to enter the File Region and select the file you want to play.
Notes:
• With pressing the Left and Right arrow buttons, you can activate Directory
Region, File Region and File Switch Region separately.
• The highlight in Directory Region and File Region is shown as the picture on
left page; While highlighted, a transparent rectangle appears
English
• In File Switch Region, you can press the Left and Right arrow buttons to switch
the highlight, then press Enter; the ” ” “ ” and “ ”Button is illustrated in
the left side picture. For example, if a disc with Music and JPEG files but with-
out any Video files is loaded, the color of the letter “ ” and “ ” will be
white and “ ” black. If a Music file playing, “ ” turns red.
• When playing a JPEG picture on discs containing Music and JPEG files, press
the Return button to return to JPEG list.
• You can press the Numeric buttons to select the file you want to play. For
th
example, if you desire the 15
track in current list, press the 10+ Button once,
th
then press “5”, the 15
starts playback.
• A folder or the root of a disc, USB-Stick or Card Media may not more than 400
files inside. Otherwise all files below them will be ignored.
Notes:
• When playing a disc with Music files, no video can be displayed at the same
time.
• You can press the “PREVIEW” buttons to get helpful message.
• When playing JPEG picture, press the Program button to choose the picture
transition mode. There are 17 transition modes available. Press Program
repeatedly to activate the function and choose the desired switch mode. Fol-
lowing transition modes are available :Spread from Left Up to Down, Spread
from Down to Left, spread from Left to Right, Spread from Right to Left,
Spread from Left Up to Right Down, spread from Right UP to Left Down,
Spread Left Down to Right Up, Spread From Right Down to Left Up, Spread
from Center to Up /Down, Fold from Up /Down to Center, old from Left/ Right
to Center, Horizontal Shutter, Vertical Shutter, Fold from the Corners to the
Center, and Play, Off.
• Do not insert more than 400 files in a folder or root directory of a disc or other
kind of memories. Otherwise, the player can not recognizes the files above
400.
52
DVD Player Setup
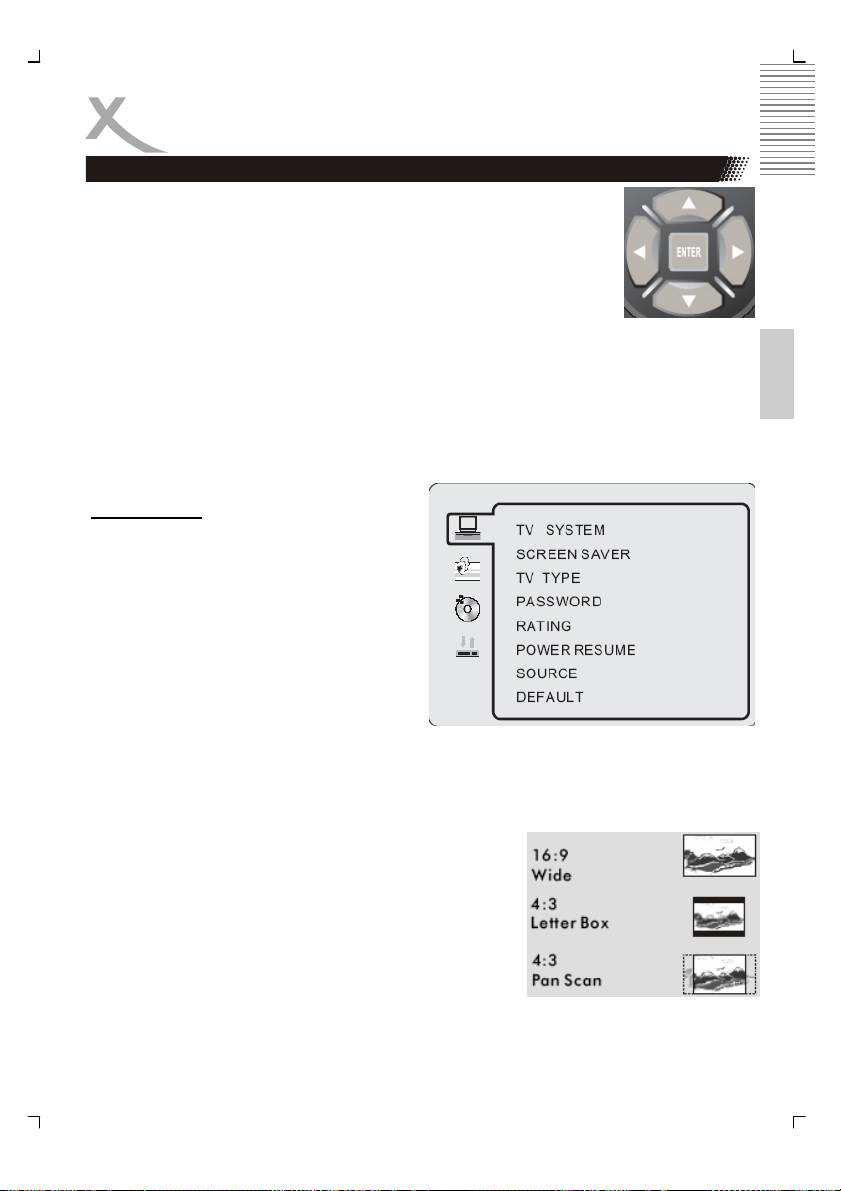
Press the DVD-SETUP button to enter the player's setup menu. Setup
menu is a facility for the owner to adjust the detail setting of the player.
For the detail of Setup menu see "SET UP MENU" of this instruction man-
ual. Various features of the player can be adjusted in the SETUP menu.
1. Press DVD SETUP button SETUP menu appears.
2. Press the UP/DOWN button to highlight the desired menu.
English
In STOP mode, press DVD SETUP button Highlight SYSTEM SETUP. Press UP/DOWN button
to select the subtitle. Press ENTER button, the screen displays submenu.
• Press UP/DOWN button to highlight the desired time
• Press ENTER confirm your selected item.
System Setup:
TV System
There are NTSC / PAL / AUTO three modes,
and choose one mode according your TV
mode.
If the TV mode is not suitable as the DVD
player screen will blink and become colorless.
The default setting: PAL
SCREEN SAVER
This setting activates or deactivates the screen saver. If the screen saver is ON, than ap-
pears the screen saver automatically when the playback stops for a longer time or when no
disc is inside.
TV Type
1. 4 : 3 Pan Scan: It is suit to the common size TV. When
playing, the picture will be cut . so that the TV
screen is filled with the picture.
2. 4 : 3 Letter box: when the player connect to the com-
monly size TV, please select the type. The top and
bottom of TV screen will display black frame.
3. 16 : 9 Wide Screen: When the player connects to the
wide screen TV.
The default setting: 4 : 3 Pan Scan.
53

DVD Player Setup
System setup
Password
Move the cursor the PASSWORD item and press ENTER button to confirm and then input
the secret code “0 0 0 0” (if it is the first use). After confirmation, you are required to input
new secret code and then press ENTER button to confirm.
Warning:
Please remember the new secret code, otherwise you will not be able to change the paren-
tal control. Please contact the agent or our company if you forget the secret code.
RATING
English
There are total eight levels of this control. Eight levels as follow:
1. KID-SAFE
2. G
3. PG
4. PG13
5. PG-R
6. R
7. NC-17
8. ADULT
The first level discs are open to people of average and eight level only suitable for the adult .
If you want to change the Parental control setting, enter the user’s age control item and then
enter four digital secret code. The default secret code is 8357(if you are using this player for
the first time, just input this code ). If the input code has been confirmed, the level setting up
menu will appear. Move the cursor to choose the expected level and press ENTER button to
confirm and store it.
Source
With this option you can activate the DVD loader, USB port or Card Reader. Choose one of
the source and confirm by pressing the ENTER button. If you uses the AUTO setting, the
player starts every time the source which has insert a media.
Resume
This option starts the resume function.
Default
This is the factory default setting up . When choose “RESTORE”, the previous setting up, by
the user will be cancelled and the player will come to the factory setting up state.
54
DVD Player Setup
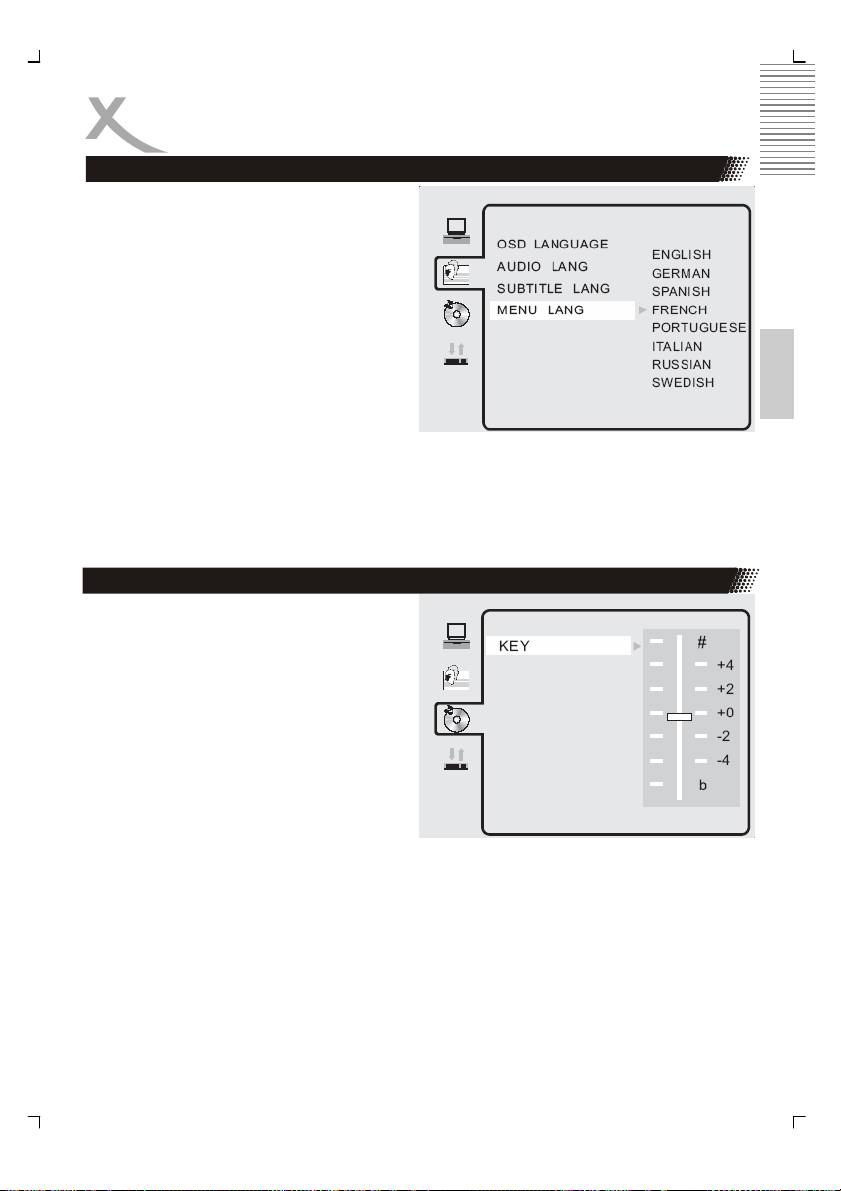
Language Setup
In STOP mode, press DVD SETUP button
and Highlight LANGUAGE.
• Press UP/DOWN button
• Press ENTER button, the screen
displays submenu.
• Press UP/DOWN button to highlight
the desired item in the LANGUAG
English
menu.
• Press ENTER to confirm your se-
lected item.
• Press SETUP button SETUP to quit.
Audio setup
The setting “KEY” adjust the bass audio out-
put.
Positive values for decreasing the bass.
Negative values for increasing the bass.
55
DVD Player Setup
Digital setup
In STOP mode, press DVD SETUP button
and Highlight DIGITAL SETUP.
• Press UP/DOWN button
• Press ENTER button, the screen
displays submenu.
• Press UP/DOWN button to highlight
the desired item in the LANGUAG
menu.
• Press ENTER to confirm your se-
lected item.
English
• Press SETUP button SETUP to quit.
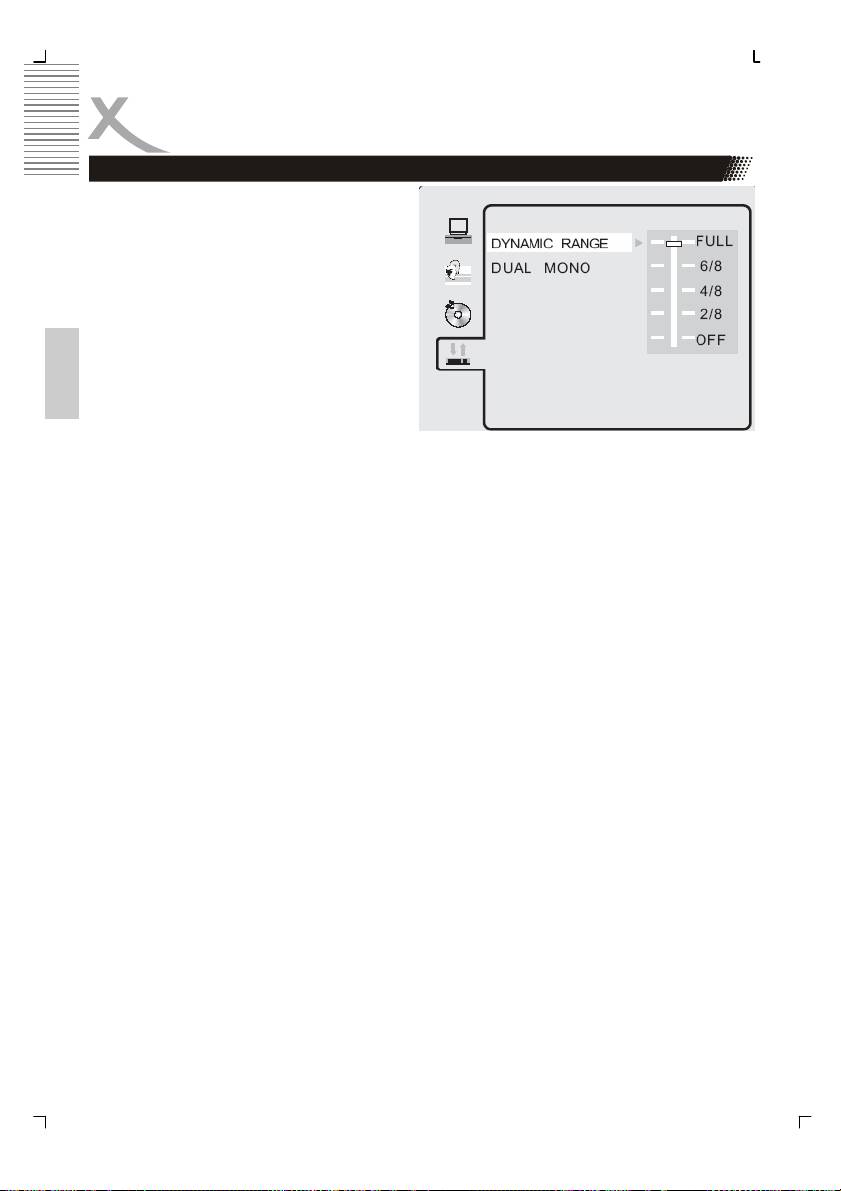
Dynamic Range
Here you can change the audio compression. If you choose the setting “FULL” than the
audio gets the biggest limitation. A kind of “NIGHT MODE”. By using the setting “OFF”, the
audio gets no compression.
Dual Mono
The options here are Stereo, Mono L, Mono R and Miy Mono.
If you have Dolby digital output your amplifier/decoder, you may select stereo, left, right and
mixed sound accordingly.
56
Troubleshooting DVD
Our custom service will help you. Did you already read the Troubleshooting pages?
Technical custom service of Xoro/MAS:
• Phone: +49 40 77 11 09 17
• Internet: www.xoro.de/support.htm
Symptom Check and Action
English
• No disc, load a disc.
• Disc has been loaded upside down. Place the disc with the label
side up.
• Disc’s region code does not match to the player.
Does not play
• Disc’s rating level is higher than the player’s rating level setting.
• Disc is not correct type for the player.
• Disc is damaged or power on for one or two hours.
• Moisture may be condensed inside the player. Remove the disc
and leave the unit power on for one or two hours.
• Check the system connection is proper and secure.
No Picture
• Check if the connection cables are damaged.
• Clean the disc.
Picture
Noise /
• The disc is dirty or damaged. Clean the disc or try another disc.
distorted
• Select the screen format from the player’s SETUP MENU.
Picture not full
• See “SETUP MENU” of this manual.
screen
• Select the screen format from DVD disc menu.
Following message will display when there is a problem with the loaded
disc”
1. “WRONG REGIONAL DISC
”: Disc’s region code is not match to the
Problem
player.
message dis-
2. “WRONG PASSWORD
”: The player refuse to play a disc with rating
play
level higher than the player’s rating level setting.
on screen
3. “WRONG DISC
”: The player is equipped with automatic disc quality
detection software. When the player detects a problem disc or a
damaged disc, the player may keep playing the disc at lower quality
or stop playing, depending on the damage level of the disc.
57
Troubleshooting DVD
Symptom Check and Action
Cannot SKIP
• Some discs are programmed that do not allow users to SKIP
or SEARCH
or SEARCH a some sections, especially at the beginning
WARNING section
• Single Chapter disc cannot apply SKIP function.
Remote control
• Remove the obstacles between the remote control and the
des not function
player.
• Point the remote control towards the remote sensor on the
English
player.
• Check if the batteries of the remote control have been loaded
with correct polarities.
• Replace the batteries of the remote control.
No playback from
• Activates the USB port (System Setup —> Source —> USB)
USB
• Connect the USB-Stick
• Connect the USB Stick in order to the description. Label side
to the rear.
• Content are not conform
No playback from
• Activates the Card Reader (System Setup —> Source —>
Card Media
Card)
• Connect the Card Media
• Use only SD, MMC or MS cards
• Connect the Card Media in order to the description. Label
side to the rear.
• Content are not conform
58
