Xoro HTC 1926D – страница 4
Инструкция к Xoro HTC 1926D

GLOSSAR
Dolby Digital® um ein diskretes Verfahren, bei dem die verschiedenen Kanäle während der
Codierung und Decodierung vollständig voneinander getrennt bleiben. Dolby Digital 5.1 ist
Deutsch
der Industriestandard für die Codierung von DVD-Filmen mit Surround-Sound.
DSP
Digital Signal Processor. Abkürzung für Mikrochips, die Signale (z.B. den Ton) digital weiter-
verarbeiten (z.B. wird Virtual Surround durch einen DSP erzeugt)
DVD
Die DVD (Digital Versatile Disc) kam 1995 auf den Markt und ist ein Datenträger mit grosser
Speicherkapazität. Eine gewöhnliche CD-ROM, die einen Speicherplatz von 650 MB auf-
weist, wird durch den Speicherplatz der DVD von bis zu 9 GB in den Schatten gestellt. Gera-
de bei der Wiedergabe von Videoformaten spielt die Speicherkapazität eine große Rolle.
Neben dem hohen Speicherplatz genießt der Konsument bei der Wiedergabe von DVDs
zusätzlich hochwertige digitale Bild- und Tonqualität. Bis zu acht Audiokanäle kann eine
DVD ansteuern. Das heißt im besten Fall, dass ein Film in 8 Sprachen gehört werden kann.
Foto-CD (JPEG CD)
Eine Foto-CD ist ein Aufzeichnungsverfahren zur Speicherung von Fotos auf einer CD-ROM
in einer plattformabhängigen Multiresolutions-Struktur (Unterstützung verschiedener Auflö-
sungen und Formate z.B.: JPEG, BMP, etc). Da ein einzelner Foto-Film kaum ausreicht, um
eine CD zu füllen, können nachträglich weitere Filme auf eine noch nicht vollständig gefüllte
CD übertragen werden. Damit ein CD-ROM-Laufwerk diese Bilder laden kann, muss es
multisessionfähig sein.
GUI
Graphic User Interface Siehe OSD.
Helligkeit
Das Wort Helligkeit wird meist für die subjektive Lichtempfindung benutzt. Diese Sinnesemp-
findung ist physikalisch etwa dem Logarithmus des Reizes proportional, kann aber bei ver-
schiedenen Personen etwas unterschiedlich sein. Sie hängt insbesondere von der spektra-
len Empfindlichkeit der Sehzellen ab, die bei den meisten Menschen in der Wellenlänge
0,47 µm (gelb-grün) am höchsten ist. Das menschliche Auge arbeitet in einem sehr großen
-13
Helligkeitsbereich, der Lichtintensitäten von 1 : 10 Milliarden entspricht (Sehschwelle 10
Lumen). Dennoch können wir verschiedene Helligkeiten als unterschiedlich wahrnehmen,
sobald sich ihre Lichtmenge um mehr als 10 % unterscheidet.
HUE
engl. Farbton. Mit HUE kann man den Farbton einstellen.
Interlaced
Bildaufbauverfahren im Zeilensprungverfahren. Hierbei werden nacheinander zwei um eine
Bildzeile versetzte Halbbilder erzeugt. Dies ist das übliche Verfahren bei herkömmlichen 50
Hz TV Geräten.
61

GLOSSAR
Kodak Picture CD®
Die KODAK Picture CD® ist ideal für den Allroundfotografen. Alle Bilder werden in exzellen-
ter Auflösung von 1024 x 1536 Pixel gespeichert. Auf der KODAK Picture CD® werden Ihre
Bilder bei Abgabe Ihres Kleinbild- oder APS-Farbnegativfilms gespeichert (Anzahl der Abzü-
ge kann je nach Film variieren). Sie können keine weiteren Bilder auf derselben CD spei-
Deutsch
chern.
Hinweis: Es gibt von Kodak auch „Kodak Foto CDs®“. Diese haben ein propriätäres Datei-
format und können daher nicht auf Ihrem DVD Player wiedergegeben werden.
Kontrast
Kontrast bezeichnet den Unterschied zwischen hellen und dunklen Bereichen, präziser die
Steilheit der Tonwertkurve einer visuellen Darstellung. Der Kontrast ist ein Unterscheidungs-
merkmal für den Helligkeitsverlauf eines Bildes, oder zwischen zwei Bildpunkten. Der Kon-
trastumfang oder die Dynamik beschreiben den Intensitätsunterschied zwischen dem hells-
ten und dunkelsten Punkt eines Bildes.
Seitenverhältnis: 4:3 und 16:9
"Vollbildformat" ("Full Frame") bezieht sich auf Inhalte, die für die Darstellung auf TV-
Geräten mit einem Seitenverhältnis von 4:3 entwickelt wurden.
"Breitbildformat" ("Widescreen") bezieht sich auf Inhalte, die für die Darstellung auf Bild-
schirmen mit einem Seitenverhältnis von 16:9 (wie z. B. Breitbild-Fernsehgeräte) entwickelt
wurden.
Werden Inhalte im Breitbildformat auf einem 4:3-Bildschirm angezeigt, so erscheinen im
entstehenden Leerraum am oberen und unteren Bildrand schwarze Streifen.
Super Video CD (SVCD)
SVCD steht für "Super VideoCD". SVCDs sind den VCDs sehr ähnlich; sie fassen (auf 650-
bzw. 700-MB-CDs) etwa 35 bis 60 Minuten sehr hochwertige Videodaten sowie bis zu 2
Stereo-Tonspuren und 4 wählbare Untertitel. SVCDs können auf allen Xoro DVD-Playern
abgespielt werden.
Video CD(VCD)
VCD steht für "Video Compact Disc". VCDs bauen auf dem CD-Format auf und enthalten
Bewegtbilder mit Ton. Eine VCD fasst bis zu 74 bzw. 80 Minuten (650- bzw. 700-MB-CDs)
Video mit Stereosound. Zur Speicherung der Video- und Audiodaten verwenden VCDs ei-
nen Komprimierungsstandard namens MPEG. VCDs können auf allen Xoro DVD-Playern
abgespielt werden.
62

Deutsch
63


Contents
Safety information
Safety informations.................................................................................................5
Notes
Compatibility of Discs, USB and Card Reader .......................................................9
Recycling ..............................................................................................................10
In the box..............................................................................................................11
Features................................................................................................................11
English
Mounting the Stand ......................................................................................................12
Quick Start Guide .........................................................................................................13
Connectors
Rear connection panel ..........................................................................................14
Right Side .............................................................................................................14
Front Side .............................................................................................................15
The Remote Control
Insert Battery.........................................................................................................16
Operation range ....................................................................................................16
Buttons..................................................................................................................17
Connection
Power....................................................................................................................19
Antenna ................................................................................................................19
SCART..................................................................................................................19
HDMI.....................................................................................................................19
YUV ......................................................................................................................20
S-Video.................................................................................................................20
VGA ......................................................................................................................21
Service Port ..........................................................................................................21
First Time Installation...................................................................................................22
Sources..........................................................................................................................23
DVB-T Mode
Getting into DVB-T mode......................................................................................24
Important buttons and there functions ..................................................................24
Videotext...............................................................................................................25
EPG ......................................................................................................................26
Analog TV Tuner
Getting into analog TV mode................................................................................28
Important buttons and there functions ..................................................................28
Videotext...............................................................................................................29
3

Contents
LCD Settings
General.................................................................................................................30
Channel Setting.................................................................................................... 31
Picture Setting......................................................................................................35
Sound Setting....................................................................................................... 38
Time Setting .........................................................................................................39
Options .................................................................................................................41
Lock Setting..........................................................................................................42
Troubleshooting ...........................................................................................................43
English
Troubleshooting DVB-T ...............................................................................................44
DVD Player / USB / Card Reader
Getting into DVD mode ........................................................................................46
Getting into USB or Card Reader.........................................................................46
Important buttons and there functions..................................................................47
Data memories with Music-, JPEG or Video files................................................. 51
System Setup.......................................................................................................53
Troubleshooting DVD / USB / Card Reader.........................................................57
Specifications ...............................................................................................................59
4
Safety Information
The lightning flash with an arrowhead symbol within an equilateral triangle is
intended to alert the user of the presence of uninsulated
"dangerous voltage" within the product's enclosure that may be of sufficient
magnitude to constitute a risk of electric shock to persons.
English
The exclamation point within an equilateral triangle is intended to alert the
user of the presence of important operating and
maintenance (servicing) instructions in the literature accompanying the ap-
pliance.
THIS DEVICE COMPLIES WITH PART 15 OF THE FCC RULES. OPERA-
TION IS SUBJECT TO THE FOLLOWING TWO CONDITIONS: (1)THIS
DEVICE MAY NOT CAUSE HARMFUL INTERFERENCE, AND (2) THIS
DEVICE MUST ACCEPT ANY INTERFERENCE RECEIVED. INCLUDING
INTERFERENCE THAT MAY CAUSE UNDESIRED OPERATION.
User Manual
1. All the safety and operating instructions should be read before the product is oper-
ated.
2. Retain Instructions - The safety and operating instructions should be retained for
future reference.
3. All warnings on the product and in the operating instructions should be adhered to.
4. All operating and use instructions should be followed.
Laser
This Digital Video Disc Player employs a Laser System of the class 1.
1. Make sure the device is shut down prior to opening player lid.
2. Do not open the appliance. Do not attempt to dismantle the appliance.
3. In order to avoid any danger: Have service work only carried out by the manufac-
turer or an authorized service workshop.
4. Visible laser radiation when open and interlocks defeated.
5. Use of controls or adjustments or performance of procedures other than those speci-
fied herein may result in hazardous radiation exposure.
Operation
1. Receiving analogue or digital TV broadcast
2. Playing of Video DVD, Video CD or Audio-CD. USB and card reader are part of the
internal DVD-Player.
3. Connecting external devices by HDMI, video components (YUV), SCART, S-VIDEO
or VGA.
4. No other operation are allowed.
5

Safety Information
Power Supply
1. Never touch the plug with wet hands.
2. If you want to pull the plug out of the plug socket, always pull directly on the plug.
Never pull on the cable as it could tear.
3. Make sure that the power cable is not bent, caught or run over and that it does not
come into contact with heat sources.
4. Make sure that the power cable is not wound around the device while in operation.
5. Never place the machine on the power cable while it is being operated.
6. Only use extension cables that are designed for the power consumption level of the
machine.
7. Keep the appliance away from rain and any moisture.
English
8. Only operate the machine if the electrical voltage stated on the type plate beneath
the machine agrees with the voltage on your plug socket. The wrong voltage can
destroy the machine.
9. Do not stand vases etc. on the appliance.
10. Water could seep into the appliance.
11. Do not open the appliance.
12. Pull out the mains plug if the appliance is not to be used over a longer period of
time.
13. Take care that nobody can trip over the power supply cable.
Antenna
The device can be connected to an antenna.
1. Unplug the power cord cable from the mains outlet before connecting or disconnect-
ing the DVB-T to/from the antenna, otherwise both might be damaged.
2. If an outside antenna or cable system is connected to the product, be sure the an-
tenna or cable system is grounded so as to provide some protection against voltage
surges and built-up static charges.
3. Pull out the antenna connection if the appliance is not to be used over a longer pe-
riod of time.
6

Safety Information
Operation and Position
1. During playback, the disc rotates very fast. Do not open or do not move the player
during playback. Otherwise the disc can be damaged.
2. Do not connect accessories on the player which are not defined by the manufacture.
3. Do not place this product on an unstable cart, stand, tripod, bracket, or table. The
product may fall, causing serious injury to a child or adult, and serious damage to the
product. Use only with a cart, stand, tripod, bracket, or table recommended by the
manufacturer, or sold with the product.
English
4. Any mounting of the product should follow the manufacturer's instructions, and
should use a mounting accessory recommended by the manufacturer.
5. A product and cart combination should be moved with care. Quick stops, excessive
force, and uneven surfaces may cause the product and cart combination to overturn.
6. The internal player or a connected DVD-Player is able to show a still image on the
TV screen or monitor over an unlimited period of time. This can cause damage to the
screen. It is therefore advisable to activate the screen saver. Or switch the player off,
if the device is not in use.
7. Do not uses the device permanent in the 4:3 mode. This can cause damage to the
screen.
8. Do not increase the volume when the device is just playing very quiet sections. This
cold damage the speaker if very loud passages starts all of a sudden after the quiet
section.
9. Place only CDs or DVDs into the tray.
10. Switch the device off by the Off/On switch if it is not going to used for a longer period
of time.
11. Disconnect the main plug during thunderstorms.
12. Slots and openings in the cabinet are provided for ventilation and to ensure reliable
operation of the product and to protect it from overheating, and these openings must
not be blocked or covered.
13. The openings should never be blocked by placing the product on a bed, sofa, rug, or
other similar surface.
14. This product should not be placed in a built-in installation such as a bookcase or
rack unless proper ventilation is provided or the manufacturer's instructions have
been adhered to.
15. Protect the device against weather influences, moistures and high temperature.
16. Never spill liquid of any kind on the product.
17. Do not expose the device and the remote control to direct sunlight.
18. If an outside antenna or cable system is connected to the product, be sure the an-
tenna or cable system is grounded so as to provide some protection against voltage
surges and built-up static charges.
19. Due to the legal requirements of CE-conformity, the customer is asked to only con-
nect USB-Sticks to the USB port.
7

Safety Information
Defect
1. Servicing - Do not attempt to service this product yourself as opening or removing
covers may expose you to dangerous voltage or other hazards. Refer all servicing to
qualified service personnel.
2. Damage Requiring Service - Unplug this product from the wall outlet and refer ser-
vicing to qualified service personnel under the following conditions:
a. When the power-supply cord or plug is damaged.
b. If liquid has been spilled, or objects have fallen into the product.
c. If the product has been exposed to rain or water.
d. If the product does not operate normally by following the operating instruc-
tions. Adjust only those controls that are covered by the operating instructions as an
English
improper adjustment of other controls may result in damage and will often require
extensive work by a qualified technician to restore the product to its normal opera-
tion.
e. If the product has been dropped or damaged in any way, and
3. When the product exhibits a distinct change in performance this indicates a need
for service.
4. When replacement parts are required, be sure the service technician has used re-
placement parts specified by the manufacturer or have the same characteristics as
the original part. Unauthorized substitutions may result in fire, electric shock, or
other hazards.
5. Please read in the section Troubleshooting our service address and phone number.
6. Nicotine can be destroyed the electronically components and can pollute the LCD
TFT panel.
Dolby
Manufactured under license from Dolby Laboratories. “Dolby” and the double-D symbol are
trademarks of Dolby Laboratories. Confidential Unpublished works. 1992-1997 Dolby
Laboratories, Inc. All rights reserved.
8

Notes
Disc Compatibility
1. Depending on the conditions of the recording equipment or the CD-R/RW (or DVD -
R, DVD +R, DVD -RW, DVD +RW) disc itself, some CD-R/RW (or DVD -R, DVD +R,
DVD -RW, DVD +RW) discs cannot be played on the unit.
2. Do not attach any seal or label to either side (the labelled side or the recorded side)
of a disc.
3. Do not use irregularly shaped CDs (e.g., Heart shaped or octagonal) since they may
result in malfunctions.
English
4. Some playback operations of DVDs and Video CDs may be intentionally pro-
grammed by software manufacturers. This unit plays DVDS and Video CDs accord-
ing to disc content designed by the software manufacturer, therefore some playback
features may not be available or other functions may be added.
Compatibility of the integrated USB port
1. Due to legal requirements of CE-conformity, the customer is asked to only connect
USB-Sticks to the USB port.
2. The USB port can be supported up to 2 GB flash memory size. In order to the many
different USB-Sticks and the build-in electronics components a support of all USB-
Sticks can not guaranteed.
3. Please format the USB-Sticks only with FAT 32 file system. NTSC file system is not
supported and can not recognizes by the USB port.
Compatibility of the integrated Card Reader
1. Please uses only SD, MMC or MS card media.
2. The card reader can be supported up to 2 GB memory size. In order to the many
different card medias and the build-in electronics components a support of all SD,
MMC or MS cards can not guaranteed.
3. Do not use SDHC card medias.
4. Do not use MS Pro or MS Duo card medias.
5. Please format the cards only with FAT 32 file system. NTSC file system is not sup-
ported and can not recognizes by the card reader.
Macrovision
U.S. Patens Nos. 4,631,603; 4,577,216; 4,819,098; 4,907,093; 5,315,448 and 6,516,132
"This product incorporates copyright protection technology that is protected by U.S. patents
and other intellectual property rights. Use of this copyright protection technology must be
authorized by Macrovision, and is intended for home and other limited viewing uses only
unless otherwise authorized by Macrovision. Reverse engineering or disassembly is prohib-
ited."
9

Notes
Recycling Information
Recycling of electronic devices
This product is designed and manufactured with high quality materials and
components which can be recycled and reused.
This symbol means that electrical and electronic equipment, at their end-of-
life, should be disposed of separately from your household waste.
Please, dispose of this equipment at your local community waste collection/
recycling centre. In the European Union there are separate collection systems
for used electrical and electronic product. Please, help us to conserve the
environment we live in!
English
Recycling of paper and carton
The material recycling symbol on the carton and user manual denotes that
they are recyclable. Dispose them not with the normal household waste.
Recycling of plastic parts
The material recycling symbol on the plastic parts denotes that they are
recyclable. Dispose them not with the normal household waste.
Green Dot
The “Grüne Punkt” denotes that the MAS Elektronik AG pays a duty to the
“Gesellschaft für Abfallvermeidung und Sekundärrohstoffgewinnung“.
10

Notes
In the box
Following accessories should be in the box:
• HTC 1526D / HTC1926D / HTC 2226D LCD-TV
• Remote Control with Battery
• Manual
• Main adapter
• Wire for the main adapter
English
• Warranty card
If any of the accessories are missing, then contact your dealer as soon as possible. Keep all
the original packaging in case you need to return the set to the dealer.
Features
• High quality display
• Many Connections: VGA, RF, Y Pb Pr with progressive scan, S-VIDEO, SCART and
HDMI
• HDMI Supports up to 1080p input resolutions
• Stereo audio input
• Integrated analog TV Tuner with videotext
• Integrated digital terrestrial TV Tuner (DVB-T) with EPG and videotext
• Automatic or manual channel search
• Auto-shutdown to save power when no signal input
• DVD-Player inside with Slot-in technology
• Integrated USB port and Card Reader for SD, MMC and MS cards (US and Card
Reader are part of the DVD-Player)
11
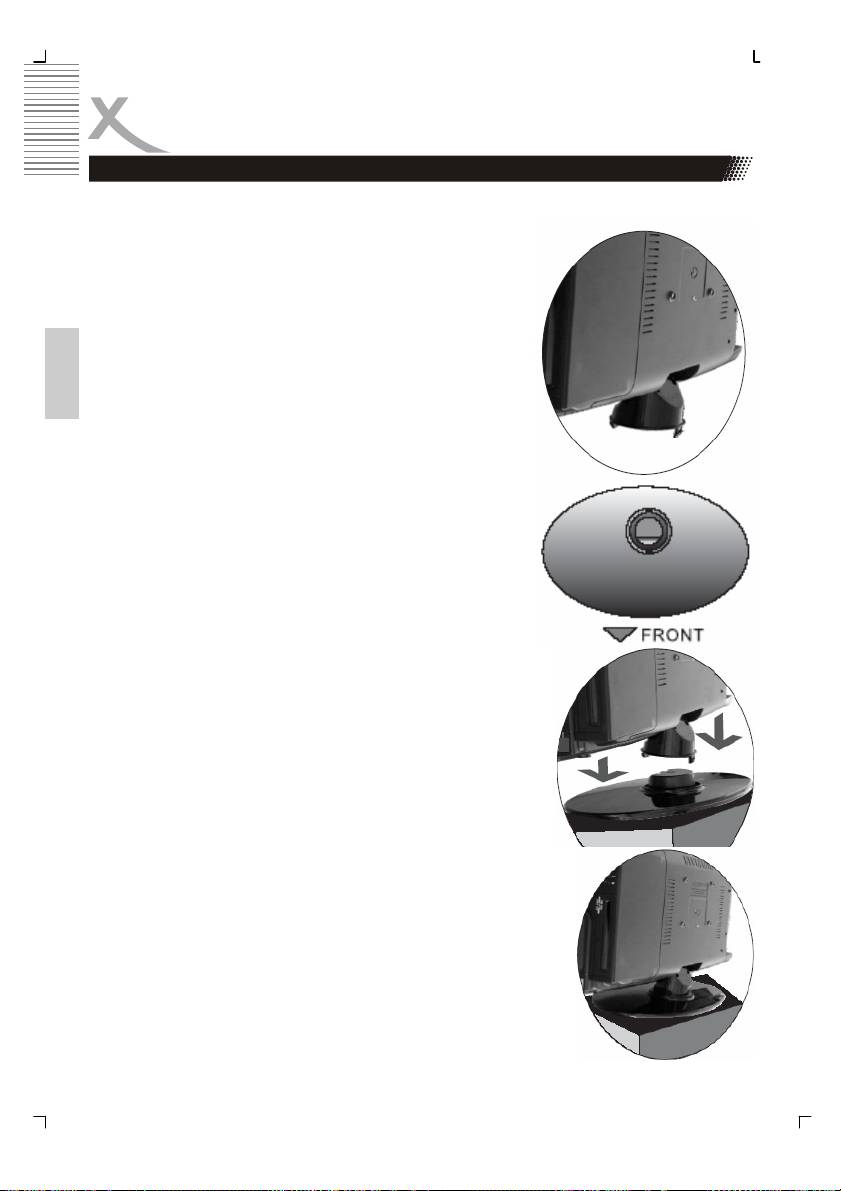
Mounting the Stand
The TV set will be delivered without mounted stand. The stand can be mounted easily in
four steps
1. Please unpack the TV set carefully out off the box.
The stand bracket is pre-assembled. On the bottom
side of the bracket you can find two plug-and-socket
connectors. This connectors must not damaged.
English
2. Place the stand on a stable ground and arrange the
stand in order to the picture.
3. Arrange the TV set above the stand and connect the
stand bracket carefully with the stand. Please refer the
picture.
4. Press carefully the TV set down until the plug-and-socket
connectors locked into the stand. Control the mounting and
fitting of the stand and lift the stand carefully. The stand
does not drop off from the TV set.
12

Quickstart Guide
1. Connect the stand in order to the instruction on the previous page.
2. Connect the aerial or input source to the appropriate input socket at the rear of the set.
3. Connect the small round plug on the power adaptor cable to the power input socket at
the rear of the set.
4. Connect the main cable between the power adapter and the main supply. The LED will
show a red light.
5. Switch the power on by pressing the POWER button on the front panel or the remote
control. The LED will show a green light.
English
6. Use the SOURCE button on the front panel or the remote control and a popup window
with the sources appears on the screen. You can select following sources:TV, PC-RGB,
YUV, S-Video, SCART, DTC or DVD. You can use the front panel control to adjust the
volume or select a channel, as shown below, or you may use the remote control and
confirm by OK button.
A. Analog TV tuner (for example: cable system)
After switched on and press the SOURCE button and choose “TV” by pressing the
navigation button UP/DOWN and confirm by the OK button. Now the HTC xx26D
is in TV Mode. By the first using of the TV set, the systems starts automatically the
menu for searching the TV channels (please refer page 22).
B. DVD-Player:
Switch on the unit and press the SOURCE button and choose “DVD” by pressing
the navigation button UP/DOWN and confirm by the OK button. Now the HTC
xx26D is in DVD Mode.
C. DVB-T mode:
Switch on the unit and press the SOURCE button and choose “DTV” by pressing
the navigation button UP/DOWN and confirm by the OK button. Now the HTC
xx26D is in DVB-T mode. By the first using of the TV set, the systems starts auto-
matically the menu for searching the TV channels (please refer page 22).
6. To switch the set off a short time, press the POWER button, the set will go into stand-by
and the LED will show red . lf you are not going to use the set for some time, switch the
power off completely by unplugging the mains cable.
13
Connectors
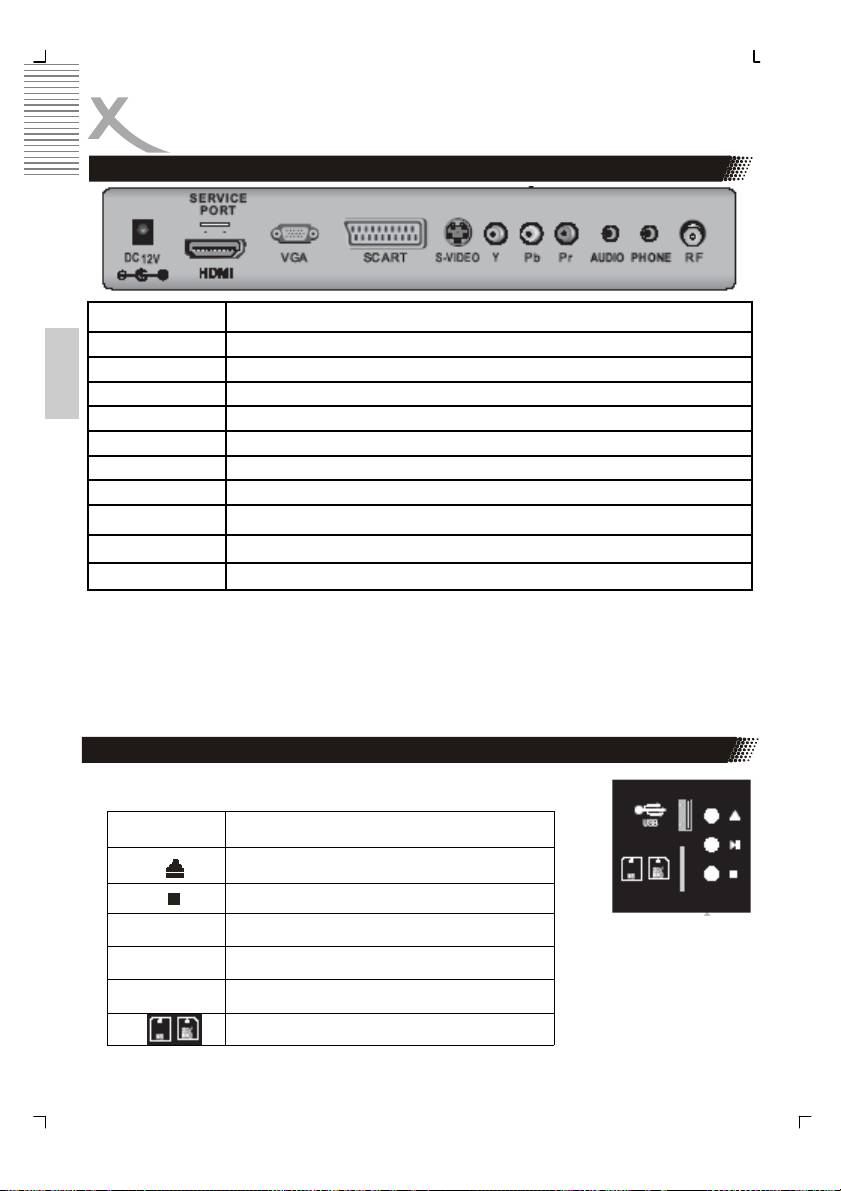
Rear Connection Panel
Name Function Description
DC In
Connect to Power Adapter
HDMI
HDMI input
English
Service Port
USB port for installing new upgrades
VGA
VGA signal of computer input
SCART
Euro AV (Audio/Video) input
S-Video
S-video input
Y Pb Pr
Video components signal input
AUDIO
Audio signal input for YPbPr, VGA and S-Video
PHONE Headphone
RF
Connect to cable or air
Note:
The service port is only for installation of new firmware required. This is not a USB port for
playback music, pictures or video.
Buttons on the right side
On the right bottom side are the following buttons:
Button Function
Open / Close the loader
Stop
>|| Play / Pause
DVD DVD Slot-in loader
USB USB Port
Card Reader for SD, MMC and MS cards
14
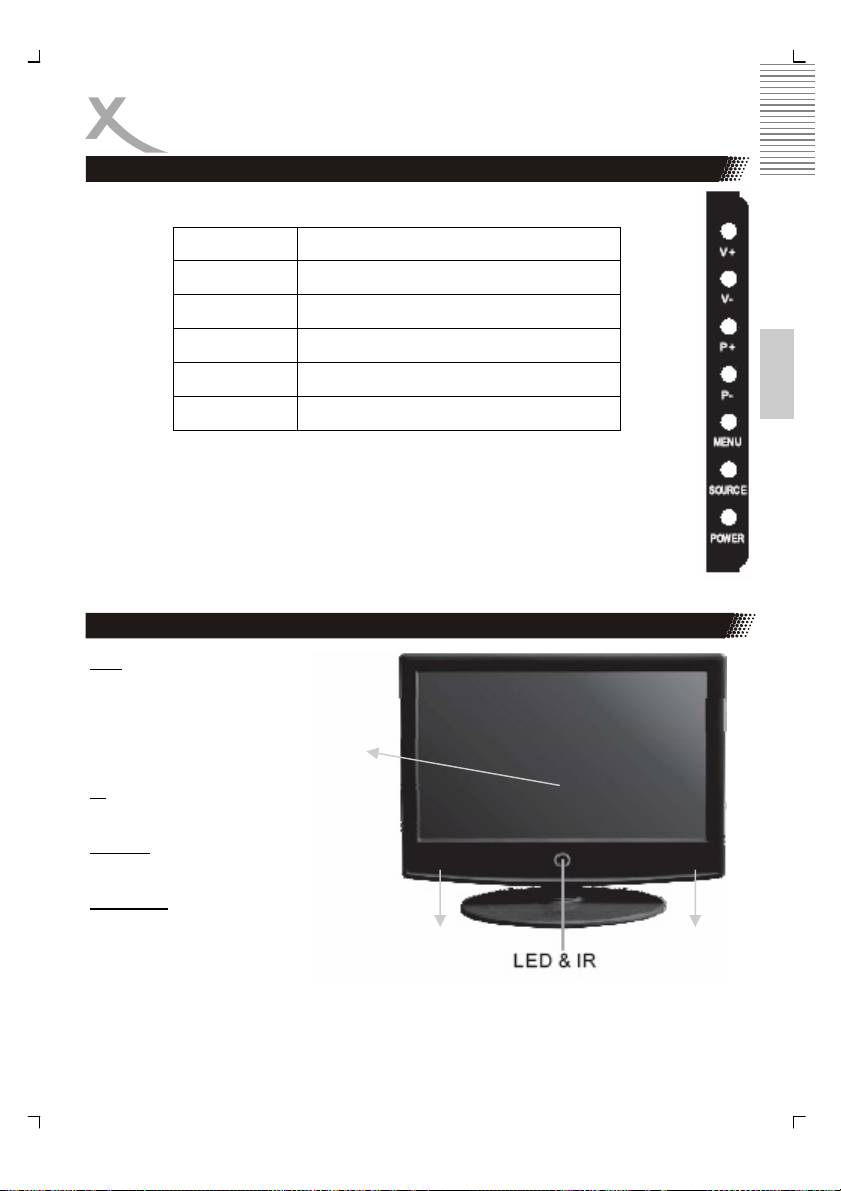
Control Elements
Buttons on the right side
On the right upper side are the following buttons:
Button Function
Power Power On/Off (StandBy)
Menu LCD Setup Settings
English
V+ / V+ Change Volumen
P+ / P- Change TV channel
SOURCE Choose Source
Note:
Select source by pressing the SOURCE button from TV, SCART, AV, S-Video, PC,
HDMI DVB-T and DVD.
Front Side
LED
The LED shows the status of
the device. RED indicates the
Stand-By mode and GREEN
indicates that the device is
LCD Panel
ON.
IR
Infrared receiver
Speaker
Right and left speaker
LCD Panel
LCD TFT Panel
Speaker Speaker
15
Remote Control
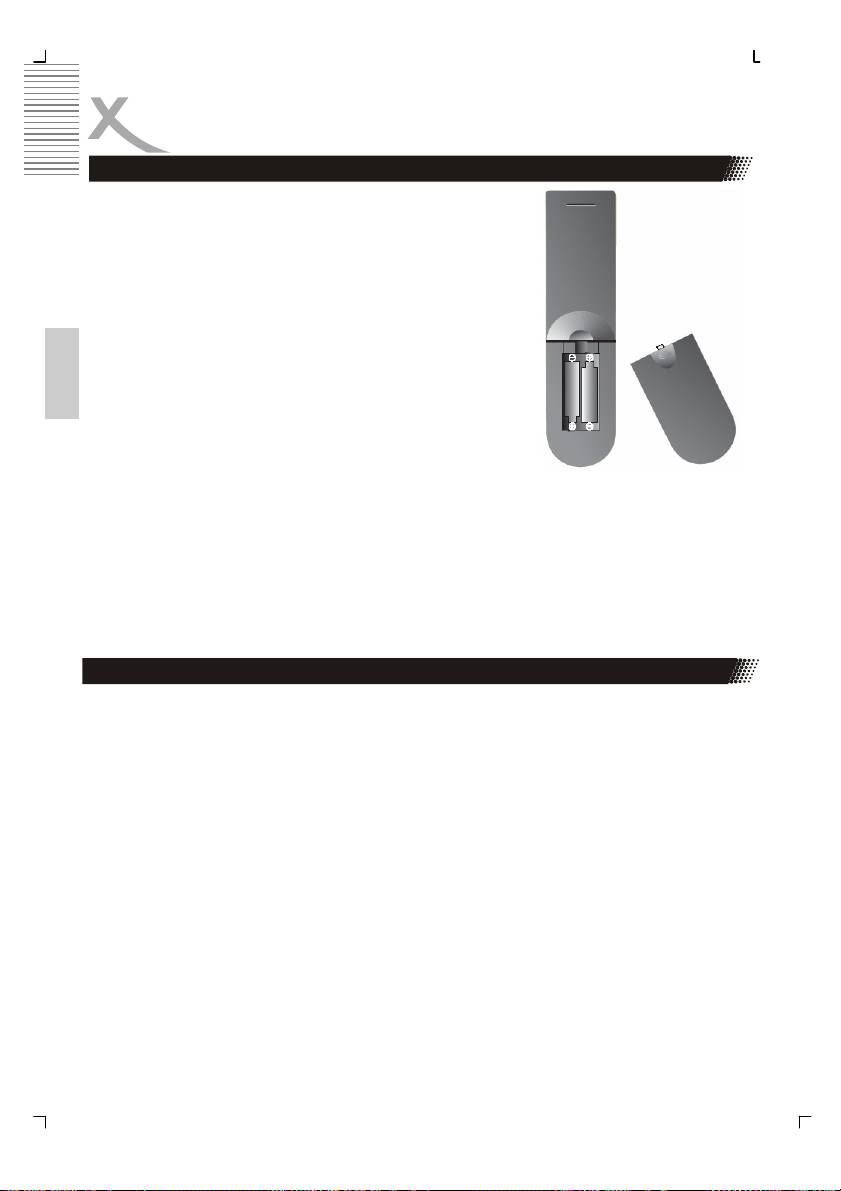
Insert battery into the remote control
Insert the batteries in the remote control:
1. Open the cover.
2. Insert the batteries. Make sure to match - and +.
3. Close the cover
English
Notes on batteries:
Improper use may cause battery leakage and corrosion.
Please follow the instructions below:
• Do not insert the batteries in the wrong direction
• Do not use different types of batteries together
• If you do not use the remote control for a long time, remove the batteries
• If the remote control operates not correctly, replace the batteries
• lf battery leakage occurs, wipe the battery liquid from the battery compartment, then
insert new batteries
• Make sure that the used batteries are disposed properly according to you local regu-
lations.
Operation range
Point the remote control at the IR:
1. Within about 5 m with angle about 30 grade in both direction.
Notes:
• Do not expose the IR of the device to a strong light source or direct sunlight.
• Direct the remote control at the infrared receiver (IR) of the player
• Do not drop the remote control.
• Do not spill water or put anything wet on it.
• Do not disassemble the remote control.
16
Remote Control
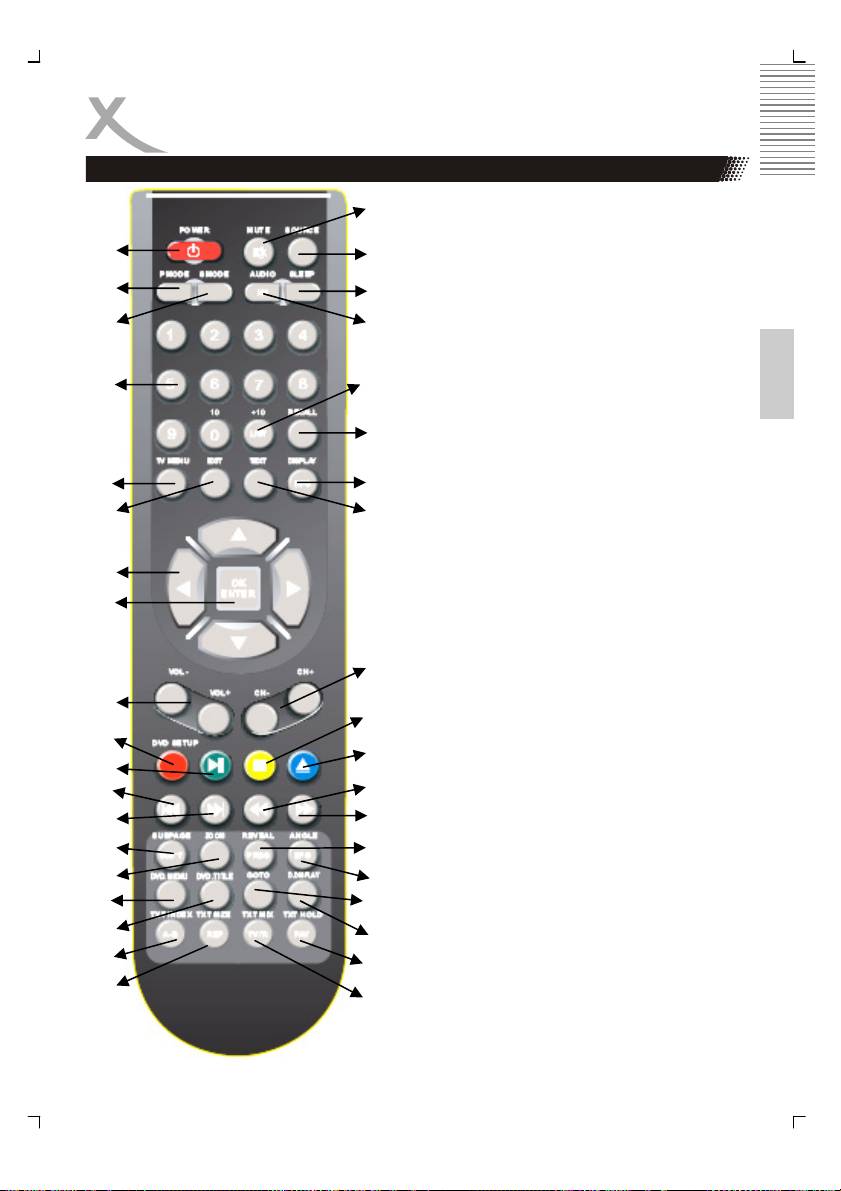
Buttons of the remote control:
20.
ATV: Analogue TV Tuner
1.
21.
DVB-T: Digital TV Tuner
DVD: DVD Player
2.
22.
1. POWER button
3.
23.
2. Picture mode (PMODE)
English
3. Sound mode (SMODE)
4. Numeric buttons (0—9)
4.
24.
5. TV settings (TV MENU)
6. Exit button (EXIT)
7. Navigation cross
25.
8. ENTER button
9. Volume (Vol- / Vol+)
10. ATV + DVB-T: Red Teletext button;
5.
26.
DVD: DVD Settings (DVD SETUP)
6.
27.
11. ATV + DVB-T: Green videotext
button; DVD: Play/Pause button
12. DVD: Previous Track/chapter
7.
13. DVD: Next track/chapter
14. ATV + DVB-T: Videotext sub page
8.
button; DVD: Subtitle button (SUB-
T)
15. ATV + DVB-T: Aspect Ratio LCD
4:3 / 16:9 / Zoom 1 / Zoom 2 (SIZE);
28.
DVD: Zoom button
16. DVD: Video DVD Menu
9.
29.
17. DVD: Video DVD Title menu
10.
18. ATV + DVB-T: Videotext Index but-
30.
ton; DVD: A-B segment playback
11.
(A-B)
31.
12.
19. ATV + DVB-T: Videotext zoom
(TEXT SIZE); DVD: Repeat function
13.
32.
(REP)
14.
20. MUTE button
33.
21. SOURCE button
15.
34.
22. Sleeptimer button
16.
23. ATV: Audio system; DVB-T: Audio
35.
language; DVD: Audio language
17.
36.
18.
37.
More button description on the next
19.
38.
page.
17
Remote Control
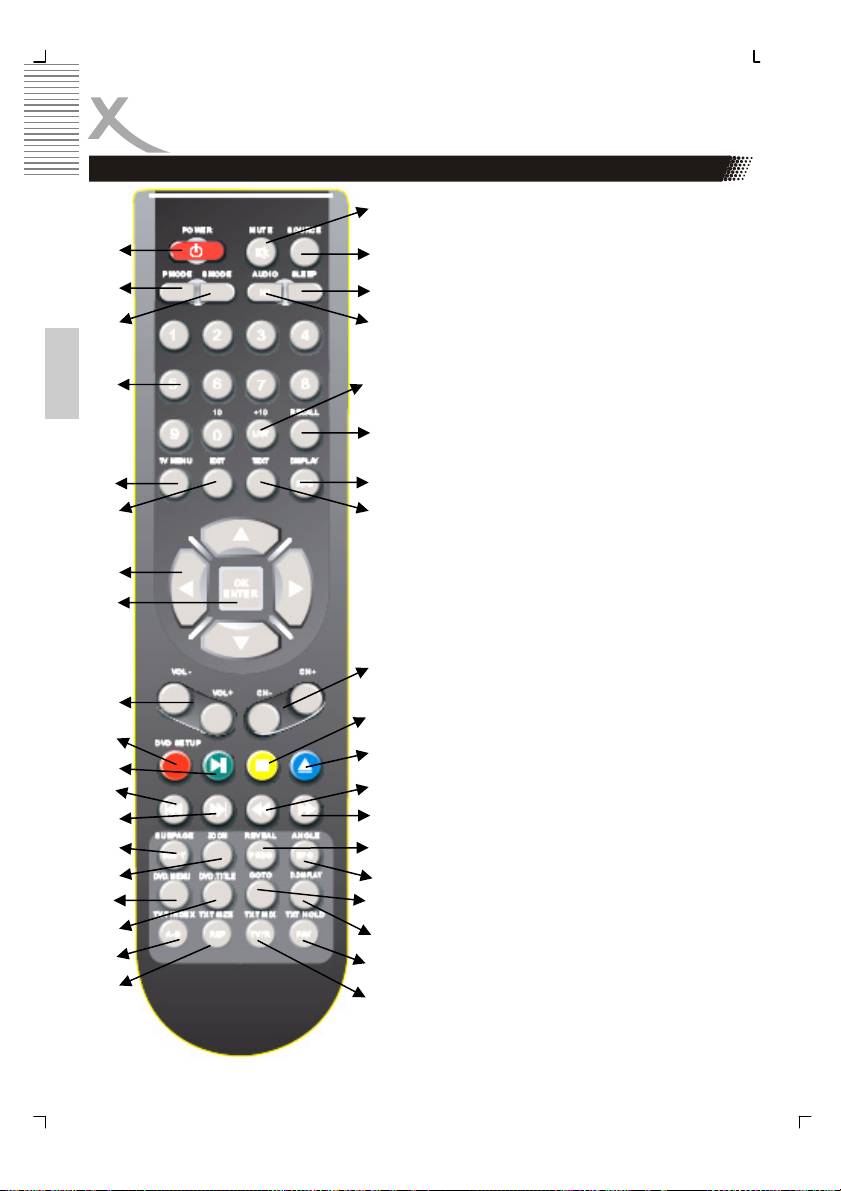
Buttons of the remote control:
20.
ATV: Analogue TV Tuner
1.
21.
DVB-T: Digital TV Tuner
DVD: DVD Player
2.
22.
24. ATV + DVB-T: TV channel list
3.
23.
(LIST); DVD: Quick navigation in file
browser (+10)
25. Last TV channel (RECALL)
4.
24.
26. ATV: Source information (Display);
English
DVB-T: Information
27. ATV + DVB-T: Videotext (TEXT)
25.
28. ATV + DVB-T: Channel (CH- / CH+)
29. ATV + DVB-T: Yellow Videotext
button; DVD: Stop button
5.
26.
30. ATV + DVB-T: Blue Videotext but-
6.
27.
ton; DVD: Open/Close
31. DVD: Fast Backward (<<)
32. DVD: Fast Forward (>>)
7.
33. ATV + DVB-T: Videotext Reveal
function: DVD: Program playback
8.
(PROG)
34. DVB-T: EPG button; DVD: Angle
button
35. DVD: GOTO button
28.
36. DVD: DVD Information button
(D.DISPLAY)
9.
29.
37. ATV: Videotext Mix displaying;
10.
DVB-T: Switch to TV and Radio
30.
channels
11.
38. ATV: Videotext Hold function; DVB-
31.
T: Favourite channel view (FAV)
12.
13.
32.
14.
33.
15.
34.
16.
35.
17.
36.
18.
37.
19.
38.
18
