Gigabyte GA-MA78LMT-S2H: Chapter 4 Unique Features
Chapter 4 Unique Features: Gigabyte GA-MA78LMT-S2H
Chapter 4 Unique Features
4-1 Xpress Recovery2
Xpress Recovery2 is a utility that allows you to quickly compress and
back up your system data and perform restoration of it. Supporting NTFS,
FAT32, and FAT16 le systems, Xpress Recovery2 can back up data on
PATA and SATA hard drives and restore it.
Before You Begin:
(Note)
• Xpress Recovery2 will check the rst physical hard drive
for the operating system. Xpress Recovery2
can only back up/restore the rst physical hard drive that has the operating system installed.
• As Xpress Recovery2 will save the backup le at the end of the hard drive, make sure to leave enough un-
allocated space in advanced (10 GB or more is recommended; actual size requirements vary, depending
on the amount of data).
• It is recommended to back up your system soon after the operating system and drivers are installed.
• The amount of data and hard drive access speed may affect the speed at which the data is backed up/
restored.
• It takes longer to back up a hard drive than to restore it.
System Requirements:
• At least 512 MB of system memory
• VESA compatible graphics card
• Windows XP with SP1 or later, Windows Vista
• Xpress Recovery and Xpress Recovery2 are different utilities. For example, a backup le created
with Xpress Recovery cannot be restored using Xpress Recovery2.
• USB hard drives are not supported.
• Hard drives in RAID/AHCI mode are not supported.
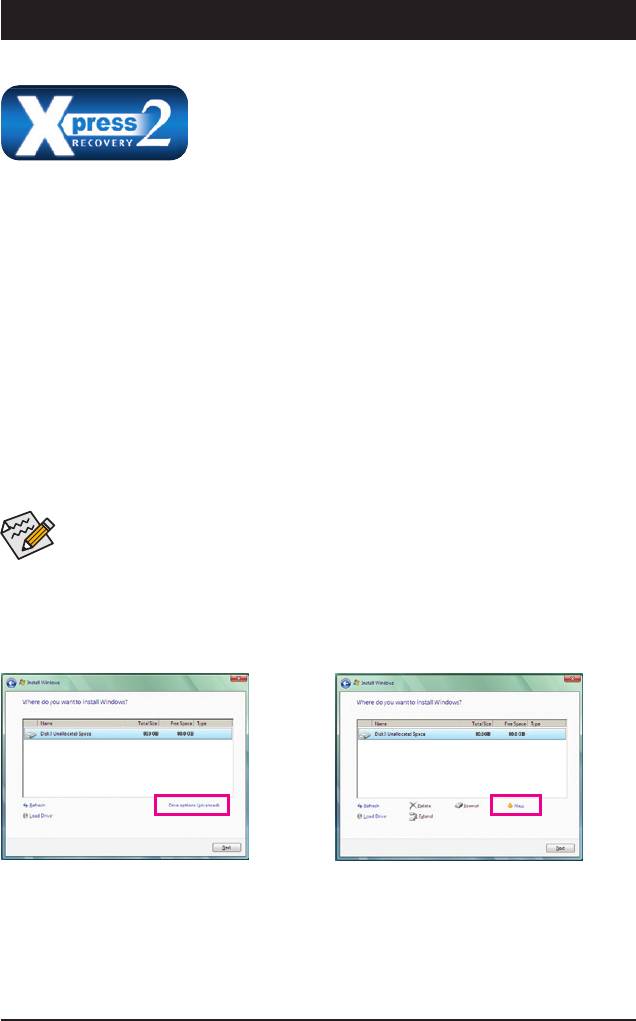
Installation and Conguration:
Turn on your system to boot from the Windows Vista setup disk.
A. Installing Windows Vista and Partitioning the Hard Drive
Step 1:
Step 2:
Click Drive options.
Click New.
(Note) Xpress Recovery2 checks the rst physical hard drive in the following sequence: The rst PATA IDE connector, the
second PATA IDE connector, the rst SATA connector, the second SATA connector and so forth. For example, when hard
drives are attached to the rst IDE and the rst SATA connectors, the hard drive on the rst IDE connector is the rst physical
drive. When hard drives are attached to the rst and second SATA connectors, the hard drive on the rst SATA connector is
the rst physical drive.
- 65 - Unique Features
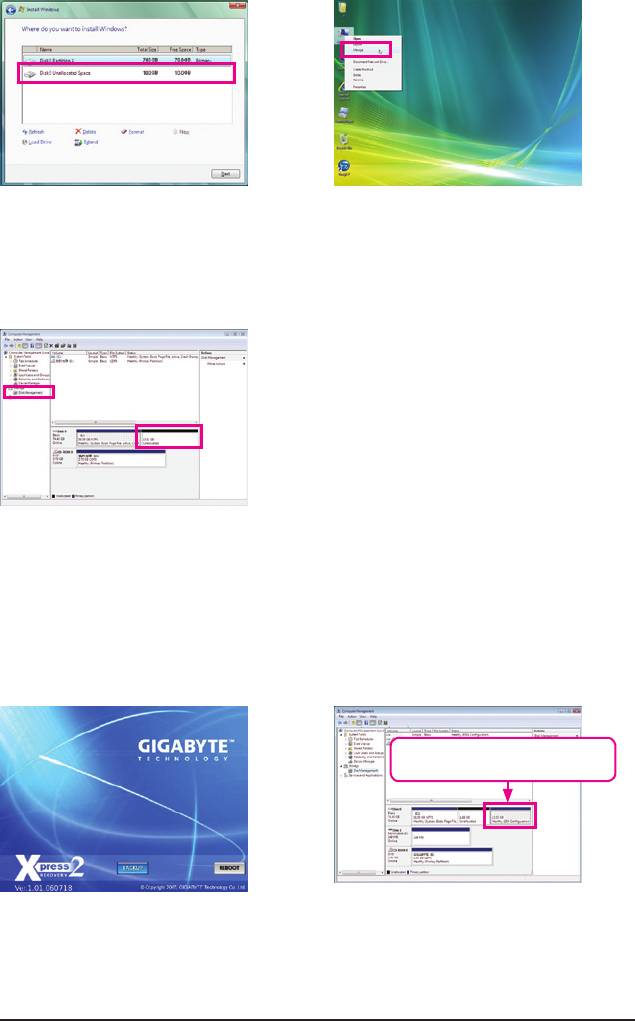
Step 3:
Step 4:
When partitioning your hard drive, make sure to
After the operating system is installed, right-click
leave unallocated space (10 GB or more is recom-
the Computer icon on your desktop and select
mended; actual size requirements vary, depending
Manage. Go to Disk Management to check disk
on the amount of data) and begin the installation of
allocation.
the operating system.
Step 5:
Xpress Recovery2 will save the backup le to the unallocated
space (black stripe along the top). Please note that if there is no
enough unallocated space, Xpress Recovery2 cannot save the
backup le.
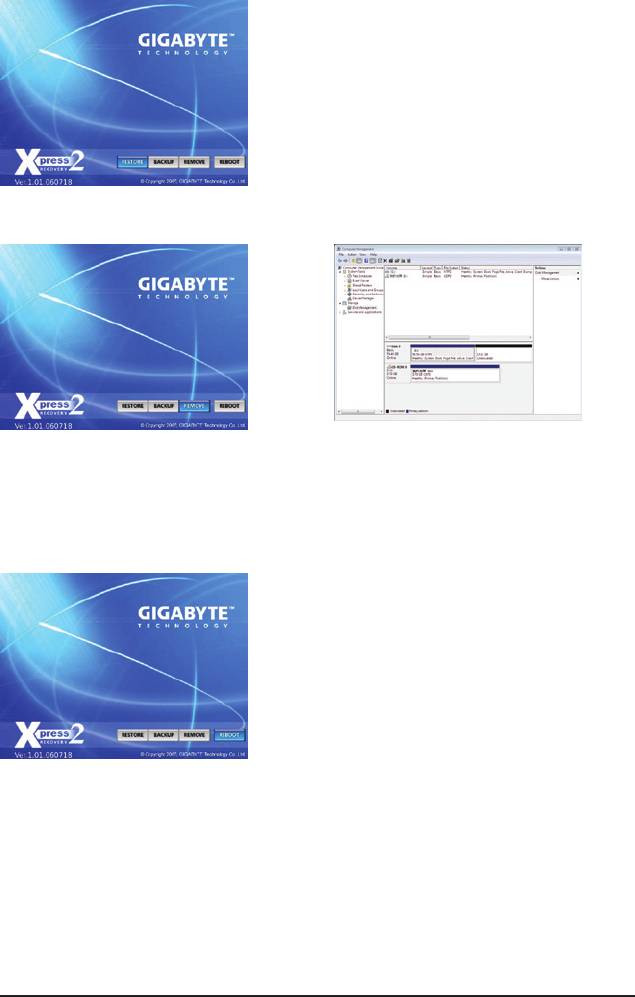
B. Accessing Xpress Recovery2
1. Boot from the motherboard driver disk to access Xpress Recovery2 for the rst time. When you see the
following message:
Press any key to startup Xpress Recovery2
, press any key
to enter Xpress Recovery2.
2. After you use the backup function in Xpress Recovery2 for the rst time, Xpress Recovery2 will stay
permanent in your hard drive. If you wish to enter Xpress Recovery2 later, simply press <F9> during the
POST.
C. Using the Backup Function in Xpress Recovery2
Xpress Recovery2 will automatically create a
new partition to store the backup image le.
Step 1:
Step 2:
Select BACKUP to start backing up your hard drive
When nished, go to Disk Management to check
data.
disk allocation.
Unique Features - 66 -
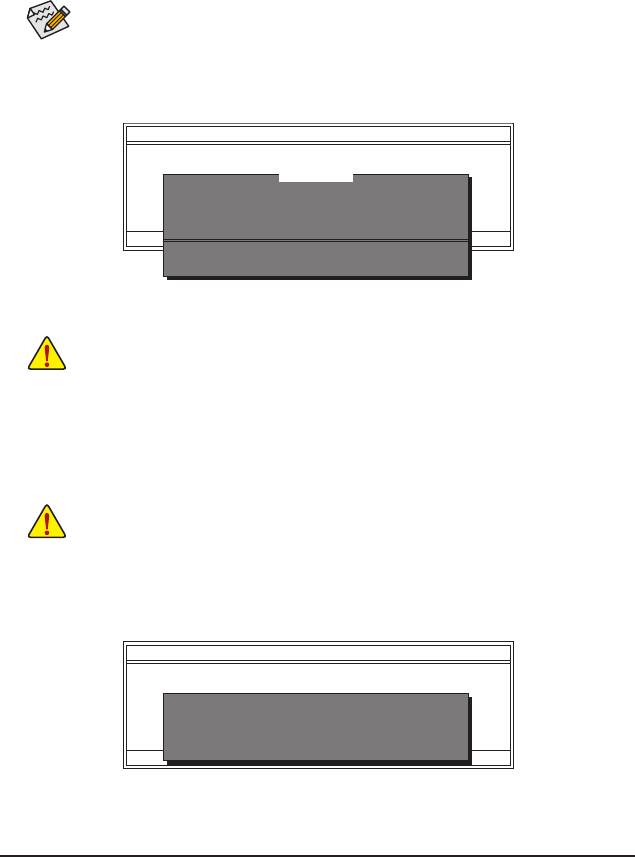
D. Using the Restore Function in Xpress Recovery2
Select RESTORE to restore the backup to your hard drive in
case the system breaks down. The RESTORE option will not be
present if no backup is created before.
E. Removing the Backup
Step 1:
Step 2:
If you wish to remove the backup le, select
After the backup le is removed, no backup image
REMOVE.
le will be present in Disk Management and hard
drive space will be freed up.
F. Exiting Xpress Recovery2
Select REBOOT to exit Xpress Recovery2.
- 67 - Unique Features

4-2 BIOS Update Utilities
™
™
GIGABYTE motherboards provide two unique BIOS update tools, Q-Flash
and @BIOS
. GIGABYTE
Q-Flash and @BIOS are easy-to-use and allow you to update the BIOS without the need to enter MS-DOS
™
mode. Additionally, this motherboard features the DualBIOS
design, which enhances protection for the
safety and stability of your computer by adding one more physical BIOS chip.
™
What is DualBIOS
?
Motherboards that support DualBIOS have two BIOS onboard, a main BIOS and
a backup BIOS. Normally, the system works on the main BIOS. However, if the
main BIOS is corrupted or damaged, the backup BIOS will take over on the next system boot and copy the
BIOS le to the main BIOS to ensure normal system operation. For the sake of system safety, users cannot
update the backup BIOS manually.
™
What is Q-Flash
?
With Q-Flash you can update the system BIOS without having to enter operating
systems like MS-DOS or Window rst. Embedded in the BIOS, the Q-Flash tool
frees you from the hassles of going through complicated BIOS ashing process.
™
What is @BIOS
?
@BIOS allows you to update the system BIOS while in the Windows environ-
ment. @BIOS will download the latest BIOS le from the nearest @BIOS server
site and update the BIOS.
4-2-1 Updating the BIOS with the Q-Flash Utility
A. Before You Begin
1. From GIGABYTE's website, download the latest compressed BIOS update le that matches your moth-
erboard model.
2. Extract the le and save the new BIOS le (e.g. 78LTUS2H.F1) to your oppy disk, USB ash drive, or
hard drive. Note: The USB ash drive or hard drive must use FAT32/16/12 le system.
3. Restart the system. During the POST, press the <End> key to enter Q-Flash. Note: You can access
Q-Flash by either pressing the <End> key during the POST or pressing the <F8> key in BIOS Setup.
However, if the BIOS update le is saved to a hard drive in RAID/AHCI mode or a hard drive attached to
an independent IDE/SATA controller, use the <End> key during the POST to access Q-Flash.
Award Modular BIOS v6.00PG, An Energy Star Ally
Copyright (C) 1984-2009, Award Software, Inc.
GA-MA78LMT-US2H D1c
.
.
.
.
<DEL>: BIOS Setup <F9>: XpressRecovery2 <F12>: Boot Menu <End>: Qash
12/02/2009-RS785-SB710-7A66AG0XC-00
Because BIOS ashing is potentially risky, please do it with caution. Inadequate BIOS ashing may
result in system malfunction.
Unique Features - 68 -
B. Updating the BIOS
When updating the BIOS, choose the location where the BIOS le is saved. The following procedure as-
sumes that you save the BIOS le to a oppy disk.
Step 1:
1. Insert the oppy disk containing the BIOS le into the oppy disk drive. In the main menu of Q-Flash, use
the up or down arrow key to select Update BIOS from Drive and press <Enter>.
• The Save Main BIOS to Drive option allows you to save the current BIOS le.
• Q-Flash only supports USB ash drive or hard drives using FAT32/16/12 le system.
• If the BIOS update le is saved to a hard drive in RAID/AHCI mode or a hard drive attached to
an independent IDE/SATA controller, use the <End> key during the POST to access Q-Flash.
2. Select Floppy A and press <Enter>.
Q-Flash Utility v2.14
Flash Type/Size................................. MXIC 25L8005 1M
0le(s)found
Keep DMI Data Enable
Load CMOS Default Enable
Floppy A <Drive>
Update BIOS from Drive
HDD 1-0 <Drive>
Save BIOS to Drive
Enter : Run
hi
:Move ESC:Reset F10:Power Off
Total size : 0 Free size : 0
3. Select the BIOS update le and press <Enter>.
Make sure the BIOS update le matches your motherboard model.
Step 2:
The process of the system reading the BIOS le from the oppy disk is displayed on the screen. When the
message "Are you sure to update BIOS?" appears, press <Enter> to begin the BIOS update. The monitor will
display the update process.
• Do not turn off or restart the system when the system is reading/updating the BIOS.
• Do not remove the oppy disk, USB ash drive, or hard drive when the system is updat-
ing the BIOS.
Step 3:
When the update process is complete, press any key to return to the main menu.
Q-Flash Utility v2.14
Flash Type/Size................................. MXIC 25L8005 1M
Keep DMI Data Enable
Load CMOS Default Enable
!! Copy BIOS completed - Pass !!
Update BIOS from Drive
Save BIOS to Drive
Please press any key to continue
Enter : Run
hi
:Move ESC:Reset F10:Power Off
- 69 - Unique Features

Step 4:
Press <Esc> and then <Enter> to exit Q-Flash and reboot the system. As the system boots, you should see
the new BIOS version is present on the POST screen.
Step 5:
During the POST, press <Delete> to enter BIOS Setup. Select Load Optimized Defaults and press <Enter>
to load BIOS defaults. System will re-detect all peripheral devices after a BIOS update, so we recommend
that you reload BIOS defaults.
CMOS Setup Utility-Copyright (C) 1984-2009 Award Software
MB Intelligent Tweaker(M.I.T.)
Load Fail-Safe Defaults
Standard CMOS Features
Load Optimized Defaults
Advanced BIOS Features
Set Supervisor Password
Integrated Peripherals
Set User Password
Power Management Setup
Save & Exit Setup
Load Optimized Defaults (Y/N)? Y
PnP/PCICongurations
Exit Without Saving
PC Health Status
ESC: Quit
higf
: Select Item F11: Save CMOS to BIOS
F8: Q-Flash F10: Save & Exit Setup F12: Load CMOS from BIOS
Load Optimized Defaults
Press <Y> to load BIOS defaults
Step 6:
Select Save & Exit Setup and then press <Y> to save settings to CMOS and exit BIOS Setup. The proce-
dure is complete after the system restarts.
Unique Features - 70 -
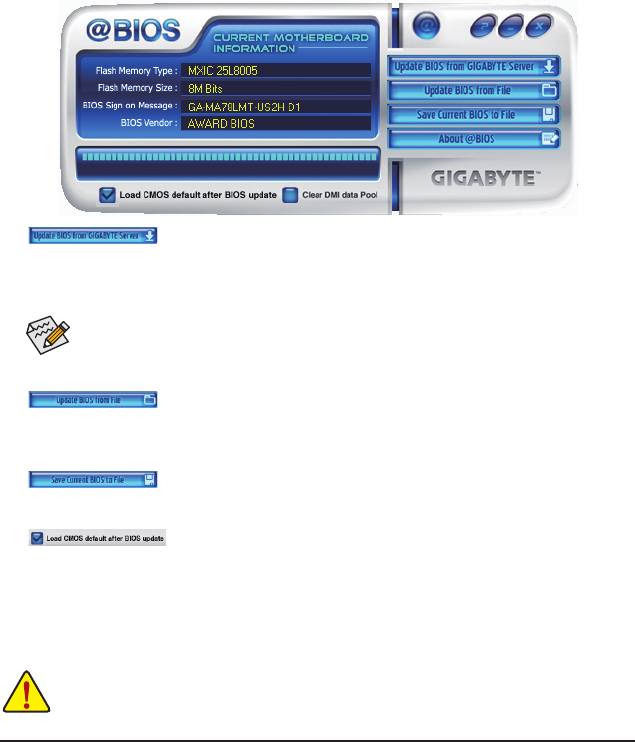
4-2-2 Updating the BIOS with the @BIOS Utility
A. Before You Begin
1. In Windows, close all applications and TSR (Terminate and Stay Resident) programs. This helps prevent
unexpected failures when performing a BIOS update.
2. During the BIOS update process, ensure the Internet connection is stable and do NOT interrupt the
Internet connection (for example, avoid a power loss or switching off the Internet). Failure to do so may
result in a corrupted BIOS or a system that is unable to start.
3. Do not use the G.O.M. (GIGABYTE Online Management) function when using @BIOS.
4. GIGABYTE product warranty does not cover any BIOS damage or system failure resulting from an inad-
equate BIOS ashing.
B. Using @BIOS
1. Update the BIOS Using the Internet Update Function:
Click Update BIOS from GIGABYTE Server, select the @BIOS server site closest to your location and
then download the BIOS le that matches your motherboard model. Follow the on-screen instructions to
complete.
If the BIOS update le for your motherboard is not present on the @BIOS server site, please
manually download the BIOS update le from GIGABYTE's website and follow the instructions in
"Update the BIOS without Using the Internet Update Function" below.
2. Update the BIOS without Using the Internet Update Function:
Click Update BIOS from File, then select the location where you save the BIOS update le obtained
from the Internet or through other source. Follow the on-screen instructions to complete.
3. Save the Current BIOS File:
Click Save Current BIOS to File to save the current BIOS le.
4. Load BIOS Defaults after BIOS Update:
Select the Load CMOS default after BIOS update check box and then the system will automatically
load BIOS defaults after BIOS update and after the system restarts.
C. After Updating the BIOS
Restart your system after updating the BIOS.
Make sure that the BIOS le to be ashed matches your motherboard model. Updating the
BIOS with an incorrect BIOS le could cause your system not to boot.
- 71 - Unique Features
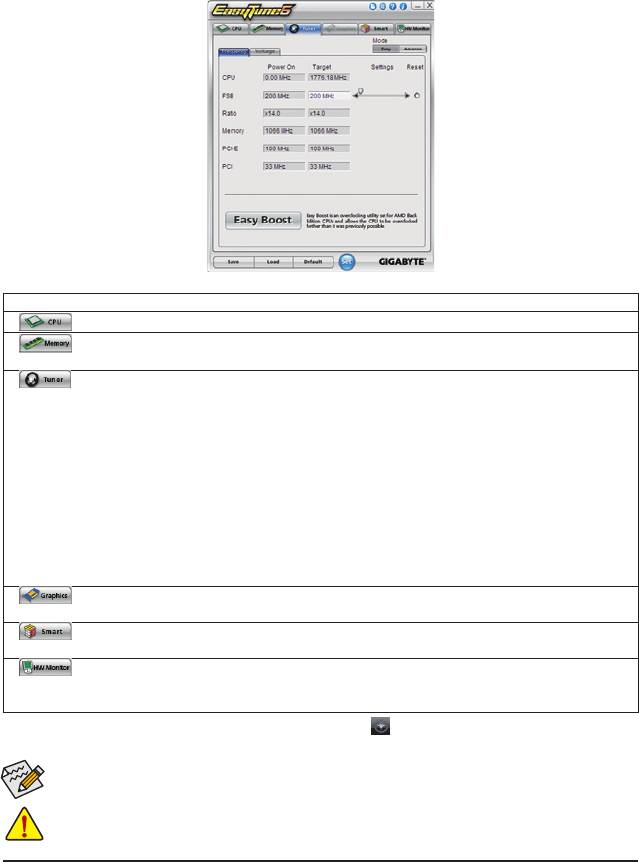
4-3 EasyTune 6
GIGABYTE's EasyTune 6 is a simple and easy-to-use interface that allows users to ne-tune their system
settings or do overclock/overvoltage in Windows environment. The user-friendly EasyTune 6 interface also
includes tabbed pages for CPU and memory information, letting users read their system-related information
without the need to install additional software.
The EasyTune 6 Interface
Tabs Information
Tab Function
The CPU tab provides information on the installed CPU and motherboard.
The Memory tab provides information on the installed memory module(s). You can select memory
module on a specic slot to see its information.
The Tuner tab allows you to change system clock settings and voltages.
• Easy mode allows you to adjust the CPU FSB only.
• Advanced mode allows you to individually change system clock settings and voltages settings
using the sliders.
(Note)
• Easy Boost is an easy-to-use auto-overclocking function
. When activated, the system
automatically experiments all sorts of overclocking congurations till it hangs. After restart, the
system will operate with the optimum congurations tested to let the CPU reach the best
overclocking performance.
• Save allows you to save the current settings to a new prole (.txt le).
• Load allows you to load previous settings from a prole.
After making changes in Easy mode/Advanced mode, be sure to click Set for these changes to take
effect or click Default to restore to default values.
The Graphics tab allows you to change the core clock and memory clock for your ATI or NVIDIA
graphics card.
The Smart tab allows you to specify a C.I.A.2 level and a Smart Fan mode. Smart Fan Advance Mode
allows the CPU fan speed to be changed linearly based on the CPU temperature thresholds you set.
The HW Monitor tab allows you to monitor hardware temperature, voltage and fan speed and set
temperature/fan speed alarm. You can choose the alert sound from the buzzer or use your own sound
le (.wav le).
(Note) Before enabling Easy Boost, right-click the EasyTune 6 icon in the notication area. Select Auto overclock
last tune on the next reboot to allow the system to work with the optimum overclocking conguration after restart.
Available functions in EasyTune 6 may differ by motherboard model. Grayed-out area(s) indicates that the item is
not congurable or the function is not supported.
Incorrectly doing overclock/overvoltage may result in damage to the hardware components such as CPU, chipset,
and memory and reduce the useful life of these components. Before you do the overclock/overvoltage, make sure
that you fully know each function of EasyTune 6, or system instability or other unexpected results may occur.
Unique Features - 72 -

4-4 Easy Energy Saver
GIGABYTE Easy Energy Saver
is a revolutionary technology that delivers unparalleled power savings with
a click of the button. Featuring an advanced proprietary software design, GIGABYTE Easy Energy Saver is
able to provide exceptional power savings and enhanced power efciency without sacricing computing per-
formance.
The Easy Energy Saver Interface
A. Meter Mode
In Meter Mode, GIGABYTE Easy Energy Saver shows how much power they have saved in a set period of
time.
Meter Mode - Button Information Table
Button Description
1 Easy Energy Saver On/Off Switch (Default: Off)
(Note 1)
2 Dynamic CPU Frequency Function On/Off Switch (Default: Off)
3 CPU Throttling Display
4 CPU Voltage Display
(Note 2)
5 3-Level CPU Voltage Switch (Default:1)
6 Current CPU Power Consumption
7 Meter Time
8 Power Saving (Calculate power savings based on time)
9 Meter/Timer Reset Switch
10 Meter Mode Switch
11 Total Mode Switch
12 Close (Application will enter Stealth Mode)
13 Minimize (Application will continue to run in taskbar)
14 INFO/Help
15 Live Utility Update (Check for the latest utility version)
• The above data is for reference only. Actual performance may vary depending on motherboard model.
• CPU Power and Power Scores are for reference only. Actual results may vary based on testing method.
- 73 - Unique Features

B. Total Mode
In Total Mode, users are able to see how much total power savings they have accumulated in a set period of
(Note 3)
time since activating Easy Energy Saver for the rst time
.
Total Mode - Button Information Table
Button Description
1 Easy Energy Saver On/Off Switch (Default: Off)
(Note 1)
2 Dynamic CPU Frequency Function On/Off Switch (Default: Off)
3 CPU Throttling Display
4 CPU Voltage Display
(Note 2)
5 3-Level CPU Voltage Switch (Default:1)
6 Current CPU Power Consumption
7 Time/Date Easy Energy Saver Enabled
(Note 4)
8 Total Power Savings (Total power saving with Easy Energy Saver enabled)
9 Meter Mode Switch
10 Total Mode Switch
11 Close (Application will enter Stealth Mode)
12 Minimize (Application will continue to run in taskbar)
13 INFO/Help
14 Live Utility Update (Check for the latest utility version)
C. Stealth Mode
In Stealth Mode, the system continues to work with the user-dened power saving settings, even after the
system is restarted. Re-enter the application only if you want to make any changes or completely close the
application.
(Note 1) Maximize system power saving with Dynamic CPU Frequency Function; system performance may
be affected.
(Note 2) 1: Normal Power Saving (default); 2: Advanced Power Saving; 3: Extreme Power Saving.
(Note 3) The total amount of power saved will be recorded until re-activated when only the Easy Energy
Saver is under the enable status, and power savings meter is unable to reset to zero.
(Note 4) Easy Energy Saver Meter will automatically reset when the total power saving reaches 99999999
Watts.
Unique Features - 74 -
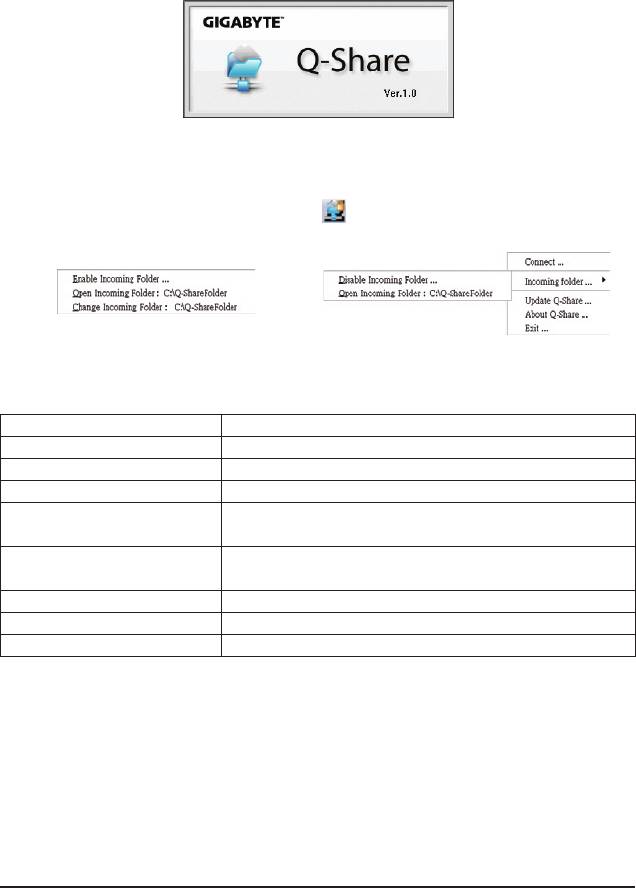
4-5 Q-Share
Q-Share is an easy and convenient data sharing tool. After conguring your LAN connection settings and
Q-Share, you are able to share your data with computers on the same network, making full use of Internet
resources.
Directions for using Q-Share
After installing Q-Share from the motherboard driver disk, go to Start>All Programs>GIGABYTE>Q-Share.
exe to launch the Q-Share tool. Find the Q-Share icon in the notication area and right-click on this icon
to congure the data sharing settings.
Figure 1. Data Sharing Disabled Figure 2. Data Sharing Enabled
Options Descriptions
Option Description
Connect ... Displays the computers with data sharing enabled
Enable Incoming Folder ... Enables data sharing
Disable Incoming Folder ... Disables data sharing
Open Incoming Folder : Accesses the shared data folder
C:\Q-ShareFolder
(Note)
Change Incoming Folder : Changes the data folder to be shared
C:\Q-ShareFolder
Update Q-Share ... Updates Q-Share online
About Q-Share ... Displays the current Q-Share version
Exit... Exits Q-Share
(Note) This option is available only when data sharing is NOT enabled.
- 75 - Unique Features
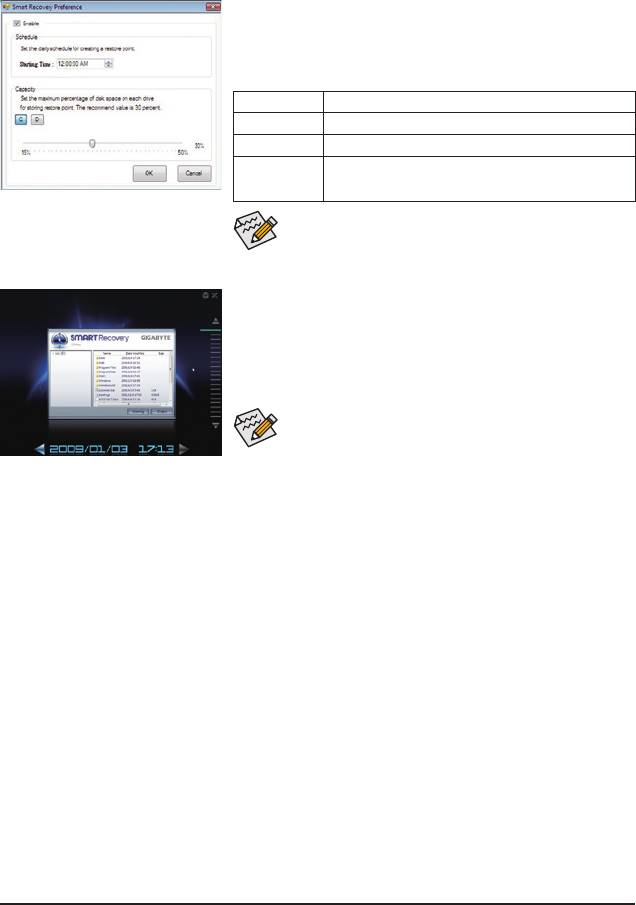
4-6 SMART Recovery
(Note 1)
With SMART Recovery, users can quickly create backups of changed data les
or copy les from a spe-
cic backup on PATA and SATA hard drives (partitioned on NTFS le system) in Windows Vista.
Instructions:
In the main menu, click the Cong button to open the Smart Recov-
ery Preference dialog box.
The Smart Recovery Preference dialog box:
Button Function
(Note 2)
Enable Enables automatic daily backup
Schedule Sets a daily backup schedule
Capacity Sets the percentage of hard drive space used for
(Note 3)
saving backups
• The hard drive must have more than 1 GB of capacity.
• Each partition can accommodate up to 64 backups (the actual
limit depends on the size of each partition). When this limit is
reached, the oldest backup will be ovewritten.
Instructions for copying les/folders from a backup:
To browse through your backups made at different time, select a
backup time using the time scroll bar on the right or at the bottom of
the screen. If you want to copy back a le/folder, select the le/folder
you wish to copy and click the Copy button.
The les/folders listed on the screen are read-only so you cannot edit
their contents.
(Note 1) The changed data refers to the data that has been modied, deleted, or newly added since the last backup.
(Note 2) The system will make an automatic backup on changed data only once everyday. If the computer is turned on for
a long time, the backup will be performed at the scheduled backup time. If the computer is turned off before the
scheduled backup time, the backup will be performed on the next boot.
(Note 3) We recommend that you preserve at least 25 percent of the hard drive space to optimize the storage space for
the backups. The backups of the changed data will be stored in the original partition of the data.
Unique Features - 76 -


