Cheetah Siesta – страница 3
Инструкция к Хлебопечке Cheetah Siesta

SK
VIII. OTÁZKY A ODPOVEDE K PEKÁRNI
Problém Príčina Riešenie
Z priestoru na pečenie V priestore na pečenie Odpojte elektrický prívod
alebo z ventilačných alebo na vonkajšej strane a nečistoty odstráňte.
otvorov stúpa dym. formy sa pripekajú
nečistoty.
Stred chleba klesá Chlieb zostal po upečení Vyberte chlieb z formy na pečenie
a spodná strana pridlho vo forme. ešte pred skončením prihrievaceho
je vlhká. cyklu.
Chlieb sa ťažko Spodná strana bochníka Opakovane pohybujte hriadeľmi hore
vyberá z formy. je prilepená na dole, kým chlieb nevypadne. Po
miesiacich hákoch. pečení očistite miesiace háky aj
hriadele. Podľa potreby naplňte
formu na pečenie teplou vodou
a nechajte 30 minút odmočiť. Potom
ľahšie vyberiete háky a očistíte ich.
Prísady nie sú dobre Nesprávne nastavený Skontrolujte zvolený program
premiešané a chlieb program. a ostatné nastavenia.
sa nepečie správne.
Počas prevázdky pekárne Neotvárejte veko po poslednom
bolo veko častokrát otv. nakysnutí.
Dlhodobý výpadok Pozri text IV. Funkcia pekárne.
elektrickej energie počas
činnosti spotrebiča.
Zablokovalo sa otáčanie Skontrolujte, či miesiace háky
miesiacich hákov. nezablokovali zrnká a podobne.
Vyberte formu na pečenie
a skontrolujte, či sa hriadele voľne
otáčajú. Ak nie, obráťte sa na
špecializovaný servis.
Forma na pečenie sa Cesto je veľmi husté. Otvorte veko a do cesta prilejte
počas miesenia Miesiace háky sú trošku tekutiny. Potom veko
nadvihuje. zablokované a forma na opäť uzatvorte.
pečenie je vytláčaná nahor.
Spotrebič nemožno Domáca pekáreň je ešte Stlačaním tlačidla START/STOP
zapnúť, displej horúca z predchádzajúceho zrušíte zvukový signál. Vyberte formu
zobrazuje HHH. pečenia. na pečenie a spotrebič nechajte
vychladnúť. Potom formu na pečenie
vložte späť, zvoľte program a zapnite
domácu pekáreň.
41
/ 210

SK
IX. EKOLÓGIA
Ak to rozmery umožňujú, na všetkých dieloch sú vytlačené znaky materiálov, ktoré sú
použité na obalový materiál, komponenty a príslušenstvo, ako aj na ich recyklovanie.
Uvedené symboly na výrobku alebo v sprievodnej dokumentácii znamenajú, že použité
elektrické alebo elektronické výrobky nesmú byť likvidované spoločne s komunálnym
odpadom. Za účelom správnej likvidácie výrobku ho odovzdajte na určených zberných
miestach, kde budú prijaté zdarma. Správnou likvidáciou tohto produktu pomôžete
zachovať cenné prírodné zdroje a napomáhate prevencii potenciálnych negatívnych
dopadov na životné prostredie a ľudské zdravie, čo by mohli byť dôsledky nesprávnej
likvidácie odpadov. Ďalšie podrobnosti si vyžiadajte od miestneho úradu alebo najbližšieho
zberného miesta (vid www.envidom.sk). Pri nesprávnej likvidácii tohto druhu odpadu
môžu byť v súlade s národnými predpismi udelené pokuty. Ak má byť spotrebič definitívne
vyradený z činnosti, odporúča sa po jeho odpojení od elektrickej siete odrezať napájací
prívod. Spotrebič tak bude nepoužiteľný.
Údržburozsiahlejšiehocharakterualeboúdržbu,ktorávyžadujezásahdo
vnútornýchčastíspotrebiča,musívykonaťibašpecializovanýservis!Nedodržaním
pokynovvýrobcuzanikáprávonazáručnúopravu!
Prípadné ďalšie informácie o spotrebiči a servisnej sieti získate na infolinke
+420 577 055 333 alebo na internetovej adrese www.eta.sk.
X. TECHNICKÉ ÚDAJE
Napätie (V) uvedené na typovom štítku
Príkon (W) uvedený na typovom štítku
Spotrebič triedy ochranny I.
Hmotnosť (kg) asi 6,5
Deklarovaná hodnota emisie hluku tohto spotrebiča je 65 dB, čo predstavuje hladinu „A“
akustického výkonu vzhľadom na referenčný akustický výkon 1 pW.
Na výrobok bolo vydané ES vyhlásenie o zhode podľa zákona č. 264/1999 Z.z. v platnom
znení. Výrobok spĺňa požiadavky nižšie uvedených nariadení vlády v platnom znení:
— NV č. 308/2004 Z.z., ktorým sa ustanovujú podrobnosti o technických požiadavkách
a postupoch posudzovania zhody pre elektrické zariadenia, ktoré sa používajú v určitom
rozsahu napätia (zodpovedá Smernici Rady č. 2006/95/ES v platnom znení).
— NV č. 245/2004 Z.z. o podrobnostiach o technických požiadavkách na výrobky
z hľadiska elektromagnetickej kompatibility (zodpovedá Smernici Rady č. 2004/108/ES
v platnom znení).
Na výrobok bolo vydané vyhlásenie o zhode podľa zákona č. 272/1994 Z.z. o ochrane
zdravia ľudí v platnom znení. Výrobok je v súlade s Nariadením Európskeho parlamentu
a Rady č. 1935/2004/ES o materiáloch a predmetoch určených pre styk s potravinami.
Výrobcasivyhradzujenepodstatnézmenyštandardnéhovyhotovenia,ktorénemajú
vplyvnafunkciuvýrobku.
42
/ 210

SK
HOUSEHOLD USE ONLY — Len na použitie v domácnosti.
DO NOT IMMERSE IN WATER OR OTHER LIQUIDS — Neponárať do vody alebo iných
tekutín.
TO AVOID DANGER OF SUFFOCATION, KEEP THIS PLASTIC BAG AWAY FROM
BABIES AND CHILDREN. DO NOT USE THIS BAG IN CRIBS, BEDS, CARRIAGES OR
PLAYPENS. THIS BAG IS NOT A TOY.
Nebezpečenstvo udusenia. Nepoužívajte toto vrecúško v kolískach, postieľkach, kočíkoch
alebo detských ohrádkach. PE vrecko odkladajte mimo dosahu detí. Vrecko nie je na
hranie.
VÝROBCA: ETA a.s., Zelený pruh 95/97, 147 00 Praha 4-Braník, Česká republika.
VÝHRADNÝDOVOZCAPRESR: ETA — Slovakia, spol. s r.o., Stará Vajnorská 8,
831 04 Bratislava 3.
UPOZORNENIE
43
/ 210

SK
XI. OTÁZKY A ODPOVEDE TÝKAJÚCE SA RECEPTOV
Problém Príčina Riešenie
Chlieb kysne príliš — Priveľa droždia, priveľa múky, málo soli. a/b
rýchlo — Kombinácia týchto príčin a/b
Chlieb vôbec — Žiadne droždie alebo primálo droždia a/b
nevykysne alebo kysne — Staré droždie alebo po záruke e
len nedostatočne — Príliš horúca tekutina c
— Droždie sa dostalo do styku s tekutinou d
— Nesprávny druh múky alebo múka po záruke e
— Príliš mnoho tekutiny alebo jej nedostatok a/b/g
— Nedostatok cukru a/b
Chlieb nakysne priveľmi — Ak je voda veľmi mäkká, droždie je účinnejšie e
a rozleje sa na formu — Priveľa mlieka ovplyvní kysnutie droždia c
na pečenie
Stred chleba klesá — Objem cesta je väčší ako forma a chlieb poklesne a/f
Hotový chlieb je — Pridali ste priveľa tekutiny a/b/h
v strede preliačený — Kysnutie je priveľmi krátke alebo nedostatočné,
keď je voda veľmi teplá, je jej priveľa, alebo priestor
na pečenie je veľmi vyhriaty c/h/i
— Priveľa droždia k
Štruktúra chleba — Pridali ste priveľa múky alebo málo tekutiny a/b/g
je ťažkáa hrudkovitá. — Pridali ste málo droždia alebo cukru a/b
— Pridali ste priveľa ovocia, hrubej múky alebo jednej
z ostatných prísad b
— Múka bola po záruke e
Stred chleba — Priveľa alebo primálo tekutiny a/b/g
nie je upečený — Vysoká vlhkosť h
— Recept uvádza vlhké prísady f
Popraskaný chlieb — Priveľa vody alebo tekutiny g
— Žiadna soľ b
— Vysoká vlhkosť, respektíve veľmi horúca voda h/i
Chlieb je na povrchu — Objem je priveľký do formy na pečenie a/f
nedopečený — Priveľa múky najmä na biely chlieb f
— Priveľa droždia, málo soli a/b
— Priveľa cukru a/b
— Sladké prísady navyše k cukru b
Krajce sú nerovnomerné
alebo hrudkovité — Chlieb nebol dostatočne vychladnutý (neunikla para) j
Usadeniny múky na kôrke — Počas miesenia sa na bokoch múka dobre
nespracovala g
44
/ 210

SK
Riešenieproblémov:
a) Prísady odmeriavajte správne.
b) Nastavte dávkovanie prísad a overte, či ste nezabudli niektoré suroviny pridať do cesta.
c) Použite inú tekutinu, alebo ju nechajte vychladnúť na izbovú teplotu.
d) Prísady pridávajte v správnom poradí, tak ako uvádza recept. Uprostred múky vytvorte
malú jamku a do nej vložte rozmrvené alebo suché droždie. Dajte pozor, aby sa
droždie nedostalo do priameho styku s tekutinou.
e) Používajte iba čerstvé a správne skladované prísady.
f) Zredukujte celkové množstvo surovín, v žiadnom prípade nepoužívajte viac múky, než
je uvedené. Množstvo všetkých prísad prípadne znížte o 1/3.
g) Upravte množstvo tekutiny. Ak pridávate prísady obsahujúce tekutiny, musíte dávku
vody znížiť.
h) V prípade veľmi vlhkého počasia znížte množstvo vody o 1 až 2 polievkové lyžice.
i) Pri veľmi teplom počasí nepoužívajte funkciu odloženého štartu. Používajte studené
tekutiny. Aby ste skrátili čas kysnutia, zvoľte program 5—RÝCHLY alebo 10—ULTRA
RÝCHLY.
j) Chlieb vyberte z formy hneď po upečení. Pred rozkrájaním ho nechajte 15 minút
vychladnúť, najlepšie na drevenej podložke.
k) Použite menšie množstvo droždia, eventuálne zredukujte množstvo všetkých surovín
o 1/4 z uvedeného množstva.
XII. POZNÁMKY K RECEPTOM
1.Suroviny
Pretože všetky prísady majú svoju úlohu pri úspešnom pečení chleba, je ich meranie
a váženie rovnako dôležité ako poradie, v ktorom sa pridávajú.
• Základné suroviny — tekutiny, múku, cukor, soľ, cukor a droždie (možno použiť suché
aj čerstvé droždie) ovplyvňujú úspešný výsledok prípravy cesta a chleba. Vždy použite
správne množstvo v správnom pomere.
• Ak chcete pripravovať cesto hneď, použite zohriate suroviny. Ak si prajete nastaviť
funkciu odloženého zapnutia, odporúčame použiť chladné suroviny, aby sa predišlo príliš
skorému kysnutiu droždia.
• Margarín, maslo a mlieko ovplyvňujú chuť a vôňu chleba.
• Aby kôrka bola svetlejšia a tenšia, môžete znížiť množstvo cukru až o 20 % a výsledok
bude stále dobrý. Ak uprednostňujete mäkšiu a svetlejšiu kôrku, cukor nahraďte medom.
• Ak chcete pridať cereálie, nechajte ich cez noc napučať. Uberte z množstva múky
a tekutiny (až o pätinu). Ak pečiete z ražnej múky, droždie je nevyhnutné
• Ak chcete chlieb veľmi ľahký, bohatý na živiny povzbudzujúce činnosť čriev, pridajte do
cesta pšeničné otruby. Dávkujte 1 lyžicu polievkovú lyžicu na 500 g múky. Na uvedené
množstvo múky pridajte 1 polievkovú lyžicu tekutiny viac.
• Pri použití žitnej múky je nutný kvások. Obsahuje baktérie kyseliny mliečnej a octovej,
ktoré spôsobujú, že je chlieb ľahký a jemne nakyslý. Kvások si môžete vyrobiť sami (v
programe 13−KVAŠENÍ), je však nutné počítať s časom potrebným na jeho prípravu.
V našich receptoch preto používáme kvások v prášku, koncentrát, ktorý je možné kúpiť
v balíčku s obsahom 15 g (na 1 kg múky). Údaje v recepte je nutné dodržovať, inak
sa chlieb bude drobiť. Pokiaľ použijete kvások v prášku v inej koncentrácii (balíček
s obsahom 100 g na 1 kg múky), je potrebné zredukovať množstvo múky: 1 kg asi o 80 g,
príp. ďalej prispôsobiť recept.
45
/ 210

SK
2.Prispôsobeniedávok
Ak chcete dávku jednotlivých prísad zväčšiť alebo zmenšiť, dbajte na to, aby ste dodržali
pomer surovín podľa pôvodného receptu. Na dosiahnutie perfektného výsledku sa držte
uvedených základných pravidiel prispôsobovania dávok jednotlivých prísad:
•Tekutiny/múka
Cesto by malo byť ľahké (ale nie veľmi) a ľahko miesiteľné, nesmie však zostať vláknité.
Ľahkým miesením by ste mali získať pekný, okrúhly bochník, ktorý sa nelepí na steny
formy. Neplatí to v prípade cereálnych alebo celozrnných ciest, ktoré sú ťažšie. Cesto
po prvom miesení asi po 5 minútach skontrolujte. Ak je veľmi vlhké, po troške pridávajte
múku, aby ste dosiahli správnu konzistenciu. Ak je príliš suché, po lyžiciach pridávajte
vodu. Tieto úpravy by mali byť prevádzané postupne (nie viac ako 1 lyžicu naraz) a vždy
je treba počkať, či sa pridaníe prejaví. Cesto môžete zhodnotiť ešte pred začiatkom
pečenia tak, že sa ho ľahko dotknete končekmi prstov. Cesto by malo klásť mierny odpor
a otlačky prstov by postupne mali zmiznúť.
•Nahrádzanietekutín
Ak recept predpisuje použitie vlhkých prísad (napríklad tvaroh, jogurt), zmenšite
množstvo tekutín na predpokladaný celkový objem. Ak pridávate vajcia, vyšľahajte ich
v odmerke a potom doplňte na predpokladané množstvo tekutiny.
•Akžijetevovýškeviacako750mnadmorom,cestovykysnerýchlejšie.
V takomto prípade odoberte z predpísaného množstva droždia štvrtinu až polovicu
kávovej lyžičky. Tieto pokyny rešpektujte aj v prípade, že použitá voda je veľmi mäkká.
•Zlepšujúceprípravky
Pri pečení môžete do zmesi pridávať rôzne zlepšujúce prípravky (napr. chlebostar,
chlebovit, topmix, essirol, vital, falco, emulger a pod.).
3.Váženieaodmeriavanieprísad,postupichpridávania
• Tekutiny odmerajte priloženou odmernou nádobou. Pre odmeriavanie čajových lyžičiek
a polievkových lyžíc použite dvojstrannú odmerku. Množstvo odmerané odmerkou musí
byť zarovnané, nie vrchovaté. Nesprávne množstvo má za následok zlé výsledky.
• Vždy ako prvé odmerajte a pridajte tekutiny, potom sypké prísady a na záver droždie.
Pri priamom kontakte s tekutinou droždie príliš rýchlo reaguje (je to chyba pri použití
odloženého zapnutia), preto treba priamemu kontaktu zabrániť.
• Pri meraní používajte vždy rovnaké merné jednotky. To znamená, že ak recept
predpisuje použiť 1 lyžicu prísad (kávovú alebo polievkovú), používajte na dávkovanie
buď odmerku na sypké prísady dodávanú spolu s elektrickou pieckou, alebo lyžice, ktoré
máte doma.
• Hmotnosti v gramoch musia byť odvážené presne.
• Ovocie, orechy alebo cereálie: Ak chcete počas miesenia pridať ďalšie prísady, môžete
tak urobiť pomocou zvláštnych programov, po zaznení zvukového signálu. Ak prísady
pridáte priskoro, pri miesení sa rozdrvia.
4.Hmotnosťaobjempecňovchleba
• V receptoch nájdete údaje, ktoré sa týkajú chleba. Uvidíte, že hmotnosť bieleho chleba je
menšia ako celozrnného. Spôsobuje to skutočnosť, že cesto z bielej múky ľahšie a viac
kysne, a preto nemusí kysnúť tak dlho ako cesto z celozrnnej múky.
46
/ 210

SK
• Napriek tomu, že všetky suroviny odvážite a odmeriate, hmotnosť upečeného pecňa
bude rozdielna. Jeho skutočnú hmotnosť totiž ovplyvňuje aj vlhkosť v miestnosti počas
prípravy.
• V prípade najvyššej prípustnej dávky cesto s prevažujúcim podielom pšeničnej múky
narastie do značného objemu a prerastie po poslednom kysnutí okraj nádoby. Cesto sa
však nerozleje. Časť cesta, ktorá pri kysnutí vyrástla z formy, pri pečení len viac zhnedne,
ako keby bola chránená formou.
• Kde je pre sladké chleby navrhnutý program 5—RYCHLÝ, môžete použiť ingrediencie
v menších množstvách aj pre program 6—SLADKÝ, 7—DORT (torta), 12—DEZERT na
prípravu ľahšieho chleba.
5.Výsledkypečenia
• Výsledok pečenia závisí od miestnych podmienok (mäkká voda, vysoká relatívna
vlhkosť vzduchu, vysoká nadmorská výška, konzistencia prísad a podobne). Preto údaje
v receptoch po získaní skúseností môžete sami vhodne upraviť. Ak sa vám nepodarí
výrobok podľa receptu dokonale pripraviť na prvý raz, nenechajte sa odradiť, nájdite
dôvod neúspechu, zmeňte napríklad pomer surovín a skúste to znovu.
• Ak je chlieb príliš svetlý, nechajte ho zhnednúť programom 11—PEČENÍ (pečenie)
funkciou pečenie.
• Pred prvým použitím programu, ktorý pracuje v noci, vám odporúčame najskôr postup
vyskúšať cez deň, aby ste sa oboznámili s priebehom funkcie a mohli urobiť prípadné
zmeny. Overený postup potom môžete používať v noci.
• Prípadné ďalšie informácie a recepty určené osobám trpiacimi alergiami na lepok alebo
diétnym režimom pre bezlepkovú diétu získate na telefónnom čísle 02/55415668,
094638100 (Občianske združenie celiatikov, Jégého 9, 821 08 Bratislava).
• Pretože nemôžeme nijako ovplyvniť kvalitu používaných surovín ani ďalšie faktory ako
napr. okolitú teplotu, vlhkosť vzduchu a pod., nemôžeme prevziať zodpovednosť za to,
či sa chlieb pečený podľa našich receptov skutočne stopercentne podarí.
47
/ 210

GB
Electric bread maker
eta
2147
USER MANUAL
Dear customer, thank you for purchasing our product. Prior to putting this device into
operation, please read these instructions for use carefully and be sure to store well
these instructions along with the warranty card, receipt and, if possible, also the product
packaging and its inner contents.
I. SAFETY PRECAUTIONS
– Consider these instructions to be a part of the appliance and pass them on to any other
user of the device.
– Please check if product label data conforms to voltage of your plug socket.
– Do not plug and unplug the electric socket plug with wet hands and do not pull the plug
with the power cord!
– The product is intended for home use and similar (in shops, offices and similar
workplaces, in hotels, motels and other residential environments, in facilities providing
accommodation with breakfast). It is not intended for commercial use!
– This product can be used by children at the age of 8 years and
older and people with re duced physical or mental abilities or lack
of experience and knowledge if they are supervised or if they
were instructed regarding use of the appliance in a safe way and
if they understand possible risks. Children must not play with
the appliance. Cleaning and maintenance by the user cannot be
carried out by unsupervised children.
– If the power cord of the appliance is corrupted, it has to be
replaced by the manufacturer, its service technician or a similarly
qualified person so as to prevent dangerous situations.
– Do not operate any appliance with a damaged cord or plug or
after the appliance malfunctions, or is dropped or damaged in
any manner. Return appliance to manufacturer or the nearest
authorized service agent for examination, repair or electrical or
mechanical adjustment.
– Before replacing accessories or accessible parts, which move
during operation, before assembly and disassembly, before
cleaning or maintenance, turn off the appliance and disconnect it
from the mains by pulling the power cord from the power socket!
– Always unplug the appliance from power supply if you leave it
unattended and before assembly, disassembly or cleaning.
– When the appliance is in operation, prevent pets, plants or insects
to get in contact with it.
– Metal housing of the appliance (especially its longer walls) may become hot during
operation!
48
/ 210

GB
– After finishing work and before cleaning, always switch off the appliance and disconnect it
from power supply by taking the power cord connector out of the electric socket.
– Do not use the appliance for heating of rooms!
– Do not place any objects onto the bread maker.
– Do not use the appliance with a program, timer or any other component which switches the
appliance automatically as there is a risk of fire if the appliance is covered or incorrectly
placed.
– We recommend checking the appliance when making a new recipe!
– Do not immerse the appliance fully or partially to water! Do not wash under running water!
– Do not turn the appliance on without the pan inserted.
– Suitable baking ingredients must be inside the appliance before connecting it to electric
power socket. Heating of the appliance when dry may result in potential damage.
– Remove packaging from ingredients before use (e.g. paper, PE sack etc.).
– Use the appliance in a manner preventing any injury (e.g. burning, scalding). During use,
hot steam escapes the ventilation slots and the appliance surface is hot.
– During use, avoid splashing water or any other liquid on the hot glass lid.
– Do not move the appliance when hot; potential tipping over may result in burning injury.
– If smoke generated by burning of ingredients escapes from the appliance, do not open the
lid, turn the appliance off immediately and disconnect from power source.
– Do not use the appliance for purposes other than indented (e.g. drying of animals, fabric
products, shoes etc.) by the manufacturer.
– Do not heat water in the appliance; calcic deposits and non-removable stains may occur
on the pan. However, these stains are not dangerous and influence normal function of the
appliance.
– Do not place the appliance onto unstable, fragile or flammable surfaces (e.g. glass, paper,
plastic, wooden painted boards and various fabrics/tablecloths).
– Use the bread maker only on places without the risk of tipping over and at sufficient
distance from flammable materials (e.g. curtains,drapes,wood etc.) and hot sources (e.g.
oven,electricorgasstove) and moist surfaces (sinks,washbasins).
– It is not permissible to adjust the surface of the appliance in any way (e.g. by means of self-
adhesivewall-paper,foil, etc.)!
– Use only original accessories made by the producer. Use of any other accessories may
pose a danger to the operator.
– Never cover the space between the housing and the baking pan and do not insert any
objects here (e.g. fingers, spoons etc.). The space between the housing and the baking pan
must be free.
– Never cover the appliance in order to prevent internal fire hazard.
– When in use, do not touch edges of the pan and places with escaping steam; danger of
burning and scalding.
– The bread maker conforms to fire safety requirements according to EN 60 335-2-6.
Pursuant to this standard, this is an appliance that may be operated on a table or similar
surface provided that: Safe distance from surfaces of flammable materials at least 500 mm
in the direction of main heat radiation and 100 mm for other directions.
– Disconnect the appliance from electric socket after use.
– Do not reel the power cord around the appliance to increase product lifecycle.
– The power cord must not be damaged by sharp or hot objects, open flame and must neither
be submerged into water nor bent over sharp edges.
– Avoid free hanging of the power cord over edge of a worktop so that the power cord is
accessible to children.
– The appliance is portable and is fitted with a movable power cord with the plug providing
bi-polar disconnection from the electric power grid.
49
/ 210
– If use of an extension cable is needed, please make sure the cable is in perfect condition
and conforming to applicable standards.
– Disconnect the appliance from power source immediately if the power cord is damaged.
– Use the appliance only with genuine accessories from the manufacturer.
– Do not use the appliance for purposes other than defined and described in this manual!
– The manufacturer will not be liable for defects caused by improper use of the appliance
and accessories (e.g. degraded foods, injury, damage, fire etc.) and the warranty
provisions will void in case of non-adherence to safety measures.
II. DESCRIPTION OF THE APPLIANCE AND ACCESSORIES (Fig.1)
A–breadmaker
A1 – control panel A4 – view window
A2 – baking area A5 – power cord
A3 – lid
B–bakingpan (2x)
B1 – holder
C–kneadingblades (4 small, 2 big)
D–measuringspoonsmall/large (5/15 ml)
E–measuringcup (200 ml)
F–hookremover
G – baguettebakingform
III. CON|TROL PANEL
This is a touch control panel. Therefore, no pressure needs to be applied to touch the
buttons (symbols) displayed.
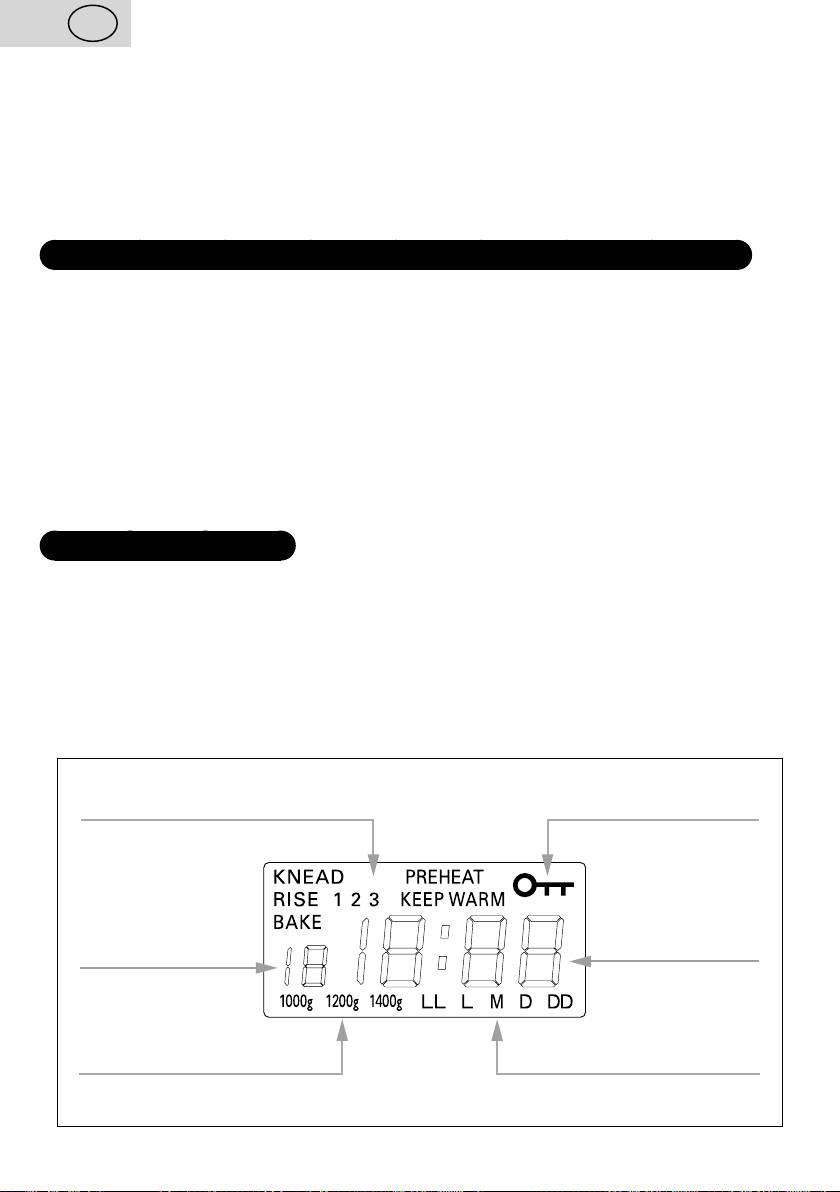
DISPLAY-BASICSETTINGS
After turning the appliance on, the display will show basic settings (i.e. 1-VITAL program),
the display will lit and a beep sound will be heard. The colon between the numbers does
not flicker.
– Number 1 shows what program was selected.
– Numbers 3:00 show completion time for the program selected.
Activated lock of control
Current preparation phase indicator
panel indicator
Time until end
of preparation
Selected program
indicator
indicator
Selected crust colour
Weight/size indicator
level indicator
GB
50
/ 210
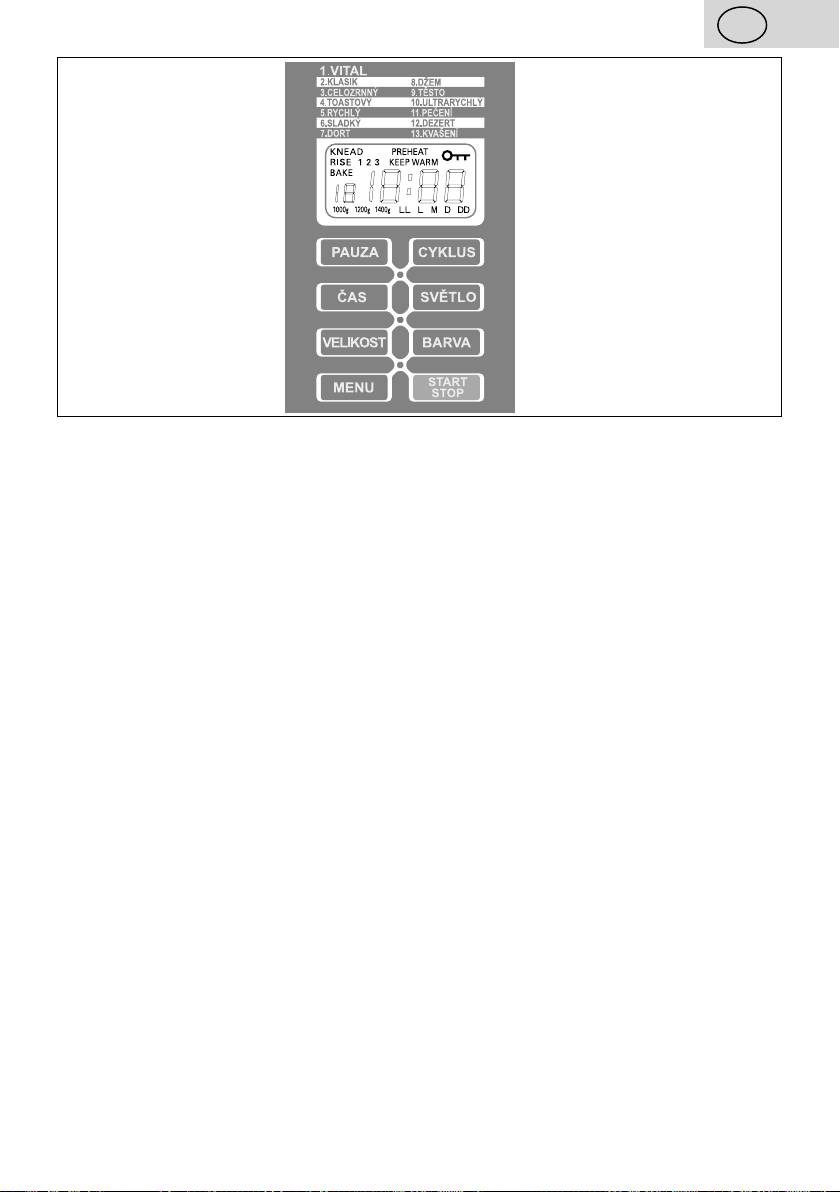
List of pre-selected
programs
Display shows current status
at the moment of setting
and during preparation
Used for movement between
Used for pausing of activity
setup phases in program 1-VITAL
Used for setup of time
Used for lighting of baking
and temperature required
space
Used for required bread
Used for required bread
weight setting
browning colour settin
Used for program
Used for turning a program
required setting
on and off
GB
Note
During use, the display can be used to monitor the progress of the program selected. As
the program progresses, the numbers of time shown are decreasing. For one-hour heating,
0:00 is displayed on the display and the colon between the number flickers. Following
heating the programmed time is displayed on the display.
Informationdisplayedonthedisplay
PREHEAT – preheating of liquid and ingredients initiated.
KNEAD 1, 2, 3 – dough processing initiated (kneading, mixing, smoothing).
Adding – after a beep signal, ingredients may be added (e.g. nuts, fruits, herbs, seeds,
cheese, chocolate, smoked meats). The beep signal time depends on the
program selected.
RISE 1, 2, 3 – rising started, dough resting. Early in the RISING 3 phase, the blades may
be removed (except for 1 – VITAL).
BAKE 1, 2 – baking started.
KEEP WARM - keeping warm for one hour started.
START/STOPbutton
The button is used for turning the program on and off.
– A beep signal will be heard after pressing the START/STOP button (short beep) and
mixing/kneading will activate within three seconds (does not apply to the program
1-VITAL, 8-DŽEM (JAM), 11-PEČENÍ (BAKE), 13-KVAŠENÍ (FERMENTATION).
– A beep signal for about 3 seconds (long beep) will be heard after pressing and holding
the START/STOP button for 1.5 seconds and the program will end. The same procedure
applies for termination of 60 minutes keeping warm of the bread maker.
BARVA(COLOUR)button
The button is used for setting of requested browning colour of your bread. A letter on the
display shows selected bread colour (L=LIGHT, M=MEDIUM, D=DARK). Does not apply
to programs 8–DŽEM (JAM), 9–TĚSTO (DOUGH) and 13–KVAŠENÍ (FERMENTATION).
51
/ 210

GB
The program 1–VITAL allows setting of browning colour in five levels (LL=VERY LIGHT,
L+M+D=see above, DD=VERY DARK).
VELIKOST(SIZE)button
This button is used for setting required bread weight for individual programs, i.e. 1000
g, 1200 g, 1400 g (see the recipes table). The text on the display shows selected
bread size. Does not apply to programs 1–VITAL, 7-DOTR (CAKE), 8-DŽEM (JAM),
9-TĚSTO (DOUGH), 11-PEČENÍ (BAKING), 12-DEZERT (DESSERT), 13–KVAŠENÍ
(FERMENTATION).
– 1000 g size (2.2 LB) = for small bread (use double pan with relevant kneading blades)
– 1200 g size (2.64 LB) = for medium-sized bread (use the big pan with small kneading
blades)
– 1400 g size (3.08 LB) = for large-sized bread (use the big pan with big kneading blades)
Note
- Bread weight 1000 g (2.2 LB) is regarded as total weight of all ingredients used for baking
of the bread (e.g. when a bread mix is used it is water, bread mix 500 g and yeast).
- When double pan is used for preparation of 2 x 500 g of bread the ingredients should
be equally divided into both baking chambers, i.e. each chamber will house 250 g of the
bread mix + corresponding volume of water and yeast.
- The content of the pan enables preparation of food (bread, cake, dough, meat loaf) up to
the maximum weight of 1.4 kg.
MENUbutton
The button is used for selection of the program required. Numbers of the display show the
program selected and its pre-set baking time. You can also use the BARVA(COLOUR)
button to define crust colour and the VELIKOST(SIZE) button to set the bread weight.
Modification of these parameters will automatically change baking times (more time or less
time required).
ČAS(TIME)button
- button is used for setting the time required for bread baking and preparation time and
other foods for program 1–VITAL.
- The button is used for setting of required temperature in program 13–KVAŠENÍ
(FERMENTATION).
- For remaining programs (except for 11–PEČENÍ(BAKING) and 13–KVAŠENÍ
(FERMENTATION)it is used for setting of delayed start. Maximum delayed start time is
13 hours. The setup time will be added to the preparation time, i.e. the display will show
time required for the program to run.
Example:
It is 20:30 and the bread has to be finished at 7:00 in the morning, i.e. in 10 hours and 30
minutes. Press and hold the ČAS(TIME) button until 10:30 is shown on the display (i.e.
time between now (20:30) and the bread finish time). Confirm setting with the START/
STOP button. The time can be set in 10-minute increments.
52
/ 210

GB
Attention
- The timer function (i.e. the delayed start) should be used only for recipes already
successfully tried; do not change the recipes for future breads.
- Excessive amount of dough may overflow and bake on heating element.
- When adding the ingredients in the pan, first pour liquids, then add flour and finally
add dried yeast. Before turning the program on, the yeast may not contact the liquid,
otherwise rising would start prematurely and the dough or bread would collapse later
during baking.
- When working with the time function, do not use perishable ingredients such as milk,
eggs, fruits, yoghurt, cheese, onion etc. as they could be spoiled!
- Use the bread maker in rooms heated to more than 18 °C. Yeast is effective at about
17 °C and more only. If you place the appliance to a cooler room, good dough rising
would not be guaranteed.
- The acoustic signal (beeping) signalling adding of ingredients and completion of the
program may not be turned off; it will sound at night as well.
PAUZA(PAUSE)button
The button is used for termination of bread maker activity (e.g. for easier addition of
ingredients, removal of kneading blades from dough). Operation of the bread baker will
terminate (remaining time for the program will flash on the display) but the setup will be
stored in the memory. Press the PAUZA(PAUSE) button again to restart the operation.
Warning
We recommend interrupting the program for max 5 minutes. If you terminate the program
for longer time, dough rising and the baking result may be deteriorated. When the PAUZA
(PAUSE) function is activated (the display flashes), the START/STOP button is disabled
and the program may not be terminated.
SVĚTLO(LIGHT)button
The button is used for illumination of the baking space. You can check condition of the
dough or of bread at any time without necessity of opening the appliance. The baking
space is not illuminated all long the program runs. To check the dough in regular intervals,
just press the SVĚTLO(LIGHT) button to turn on the light. After one minute or after the
next button press, the light will turn off.
CYKLUS(CYCLE)button
The button is used for movement between each phase of the 1–VITAL program setting.
LISTOFPROGRAMS
1. VITAL
The program is used for individual setting of all phases for preparation of bread (e.g. of
gluten-free), challah, mincemeat, soya cheese and cultivation of cheese cultures. The
scope for time setting for each individual phase (i.e. PREHEAT / KNEAD 1, 2, 3 / RISE 1, 2
/ BAKE 1, 2 / KEEP WARM) is specified in the table of programme phases and procedure
for programming with the use of CYKLUS(CYCLE),ČAS(TIME) and BARVA(COLOUR)
buttons is described in section A, B, and C.
This program allows setting of time, temperature and colour and not the bread size.
53
/ 210
GB
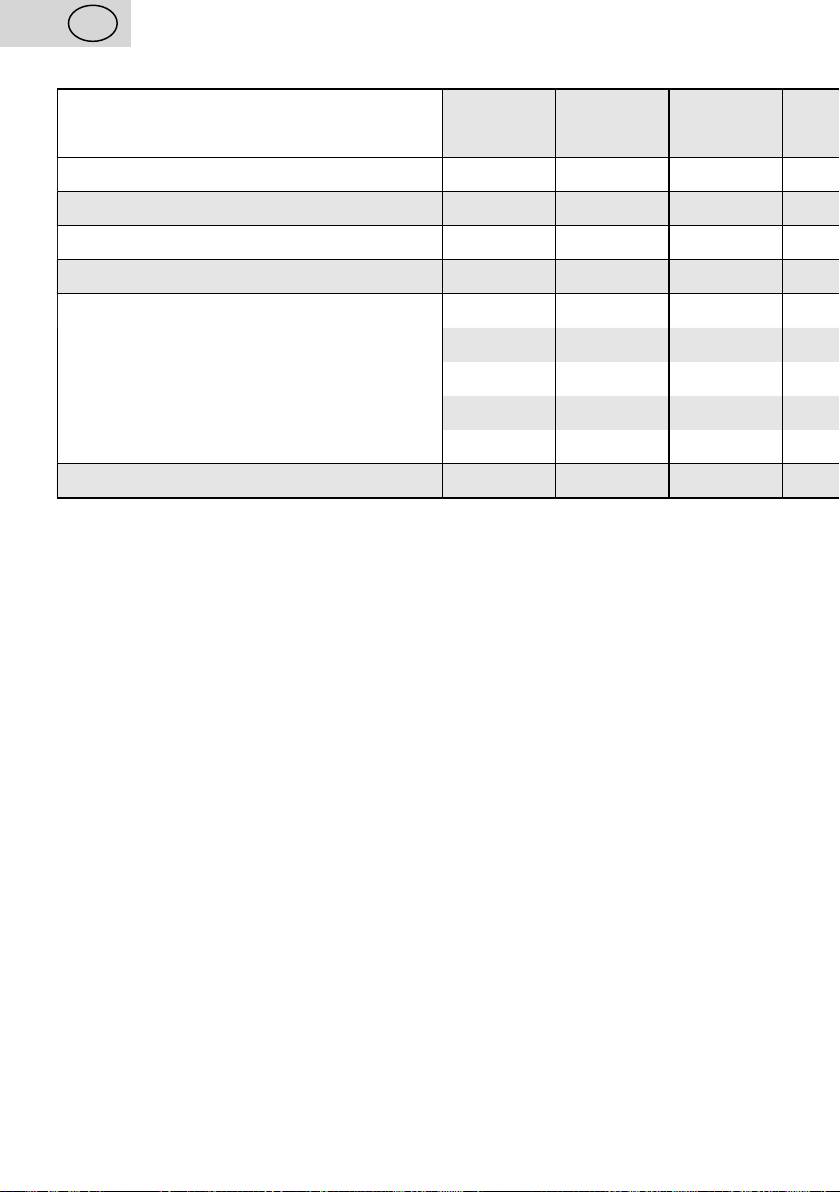
1-VITAL - table of programmed phases
PREHEAT KNEAD 1 KNEAD 2 RISE 1 KNEAD 3 RISE 2 BAKE 1 BAKE 2 KEEP
Preparation phase WARM
Time scope setting (min.) 0 - 30 0 - 30 0 - 5 - 20 0 - 360 0 - 5 0 - 360 0 - 120 0 - 120 0 - 60
Preset (min.) 0FF 0FF 0FF 0FF 0FF 0FF 60 0FF 0FF
Temperature scope setting (°C) - - - 20 - 50 - 20 - 50 - - -
Preset (°C) - - - 30 - 30 - - -
- - - - - - LL LL -
- - - - - - L L -
Crust colour setting - - - - - - M M -
- - - - - - D D -
- - - - - - DD DD -
Preset - - - - - - M M -
A) For all PREHEAT / KNEAD 1,2,3 / RISE 1,2 / BAKE 1,2 / KEEP WARM, the procedure
for time programming is as follows:
- Press CYKLUS(CYCLE) button to display PREHEAT and time programmed for this work
cycle OFF on the display (time data will be permanently displayed on the display).
- Press ČAS(TIME) button to setup the cycle duration (see table) or the phase may be
removed from the program (if you enter OFF), (time code flashes on the display).
- Press CYKLUS(CYCLE) button to move to the next phase of programming.
For programming of RISE 1, 2 phase, proceed according to section B.
For programming of BAKE 1, 2 phase, proceed according to section C.
B) For all phases RISE 1, 2 you can also set internal temperature of the bread maker from
20 to 50 °C in 2 °C increments in addition to time. To set the required temperature:
- Press ČAS(TIME) button to set the cycle time (time flashes on the display).
- Press BARVA(COLOUR) button (°30 displays on the display).
- Press ČAS(TIME) button to set required temperature.
- Then, press CYKLUS(CYCLE) to confirm and to move to the next programming phase.
C) For all phases BAKE 1, 2 you can also set crust colour in five increments (LL / L / M / D
/ DD) in addition to time. Required crust colour is set as follows:
- Press ČAS(TIME) button to set the cycle time (time flashes on the display).
- Press BARVA(COLOUR) button to set required crust colour.
- Then, press CYKLUS(CYCLE) to confirm and to move to the next programming phase.
Following setup of all phases press START/STOP button and preparation time
(e.g. 1:50) will display on the display; press START/STOP one more time and the set
program will start (the colon starts flickering).
54
/ 210
GB
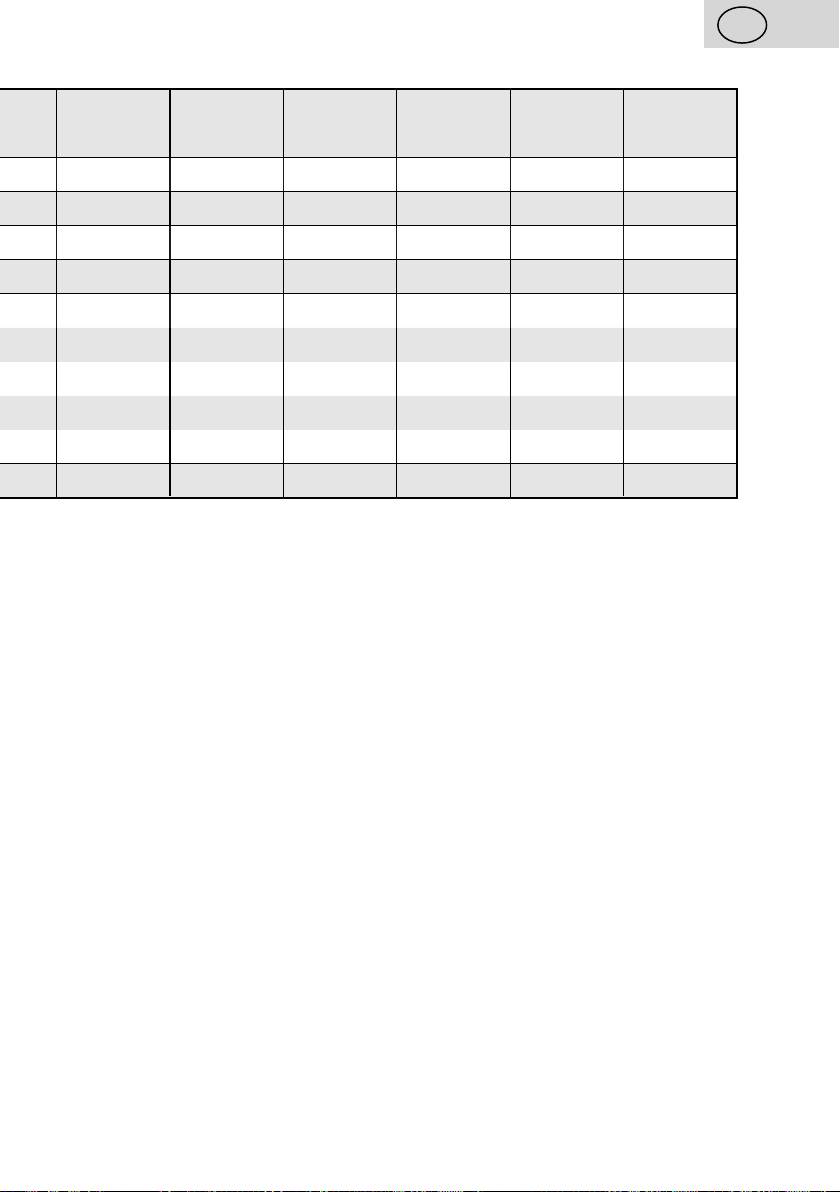
PREHEAT KNEAD 1 KNEAD 2 RISE 1 KNEAD 3 RISE 2 BAKE 1 BAKE 2 KEEP
Preparation phase WARM
Time scope setting (min.) 0 - 30 0 - 30 0 - 5 - 20 0 - 360 0 - 5 0 - 360 0 - 120 0 - 120 0 - 60
Preset (min.) 0FF 0FF 0FF 0FF 0FF 0FF 60 0FF 0FF
Temperature scope setting (°C) - - - 20 - 50 - 20 - 50 - - -
Preset (°C) - - - 30 - 30 - - -
- - - - - - LL LL -
- - - - - - L L -
Crust colour setting - - - - - - M M -
- - - - - - D D -
- - - - - - DD DD -
Preset - - - - - - M M -
2. KLASIK (CLASSIC)
The program intended for white wheat and brown rye bread; also for breads flavoured by
herbs and raisins. This is the most often used program.
3.CELOZRNÝ(WHOLEWHEAT)
The program indented for baking of whole wheat bread from flour with low gluten content.
This setup allows longer time for kneading/mixing, rising (i.e. swelling up the grains) and
pre-heating. TIMEfunctionisnotrecommendedforthisprogramme.
4.TOASTOVÝ(TOAST)
The program is intended for light bread, French bread with crispy crust and light crumb.
This setup allows more time for kneading/mixing and rising required for „fluffy“ structure of
French bread. Note: A baguette is not the final form.
5.RYCHLÝ(QUICK)
The program is intended for baking of white, wheat and rye bread. This bread is smaller
with denser crumb.
6.SLADKÝ(SWEET)
For baking of sweet breads with crust crispier than with KLASIK (CLASSIC) program.
7.DORT(CAKE)
The program is intended for kneading/mixing of ingredients (e.g. for cake) then baked for
a set time. We recommend first mixing the ingredients into two portions and pouring them
to the baking pan. Cake size may not be set in this program.
55
/ 210

GB
8.DŽEM(JAM)
The program is intended for jam or marmalade production from fresh fruits. Cake size and
colour may not be set in this program. For frequent preparation of jam we recommend
obtaining another pan used exclusively for this purposes. Acids released during cooking of
fruits may cause that bread prepared in the same pan will not release easily.
9.TĚSTO(DOUGH)
The program is intended for kneading/mixing and rising of dough without baking. Various
ingredients for various types of bakery products may be used (e.g. bread croissants, pizza
etc.). If subsequent baking is required, set crust colour and program type. Cake size and
colour may not be set in this program.
10.ULTRARYCHLÝ(ULTRAQUICK)
The program is intended for baking of white, wheat and rye bread. This setup shortens
time required for kneading/mixing, rising and subsequent baking to minimum. This bread is
smaller with denser crumb. Water (or other liquid ingredients) of temperature
48 – 50 °C must be used for this program.
11.PEČENÍ(BAKING)
The program is intended for baking of brown bread, cakes or mincemeat. The program is
preset to 10 minutes. However, baking time may be adjusted by the ČAS(TIME) button if
needed. Max baking time is one hour. Cake size may not be set in this program.
12.DEZERT(DESSERT)
The program is intended for kneading/mixing of ingredients (e.g. for cake) then baked for
a set time. We recommend first mixing the ingredients into two portions and pouring them
to the baking pan. Cake size may not be set in this program.
13.KVAŠENÍ(FERMENTATION)
The program is intended for preparation of yoghurt and corn malt ferment (amasaké) etc.
Optimum temperature for preparation is set by the ČAS(TIME) button. The temperature
can be set from 20 °C to 50 °C (in 2 °C increments). The maximum setup time is 20 hours.
Size, colour and time may not be set in this program.
Note
Please note that setting fermenting temperatures in program 1-VITAL and
13-FERMENTING are approximate only. If you work with cultures requiring exact
temperature setting, we recommend using a quality kitchen knife with a probe
IV. BREAD MAKER FUNCTIONS
Thebeepsoundwillactivate:
– if you press any of the program buttons (one short or long beep) and the display will
illuminate for about 10 seconds;
– at beginning of three kneading cycle of program 1-VITAL signalling that cereals, fruits,
nuts or other ingredients may be added (10 beeps):
– during the second kneading cycle of programs 2-KLASIK(CLASSIC),3-CELOZRNNÝ
(WHOLEGRAIN),4-TOASTOVÝ(TOAST),5-RYCHLÝ(QUICK),6-SLADKÝ(SWEET),
7-DORT(CAKE),10-ULTRARYCHLÝ(ULTRAQUICK) and 12-DEZERT(DESSERT)
signalling that cereals, fruits, nuts or other ingredients may be added (10 beeps),
56
/ 210

GB
– when the program set is completed (10 beeps),
– when the one-hour keeping warm set is completed (1 beep),
– when the safety function activates (continuous beeping).
Safetyfunction
- When a program is selected, all buttons are disabled except for PAUZA(PAUSE),
CYKLUS(CYCLE),SVĚTLO(LIGHT), and START/STOP.
- If you want to use the bread baker immediately after previous baking and if the appliance
baking space temperature is too high (over40°C), pressing the START/STOP button will
show HHH on the display and continuous beeping will be heard. The appliance may not
be operated. Therefore, open the lid or remove the baking pan and wait for cooling the
appliance down.
- If EEO or E E1 appears on the display following the START/STOP button is pressed,
bring the appliance to a service centre.
- In case of power failure during operation, the appliance remembers the program setup for
about ten minutes. In case of power failure for more than 10 minutes (the display shows
basic settings), the process will not recover and the bread baker must be turned on again.
This is possible only when the program was not interrupted later than during the kneading
phase. Then, you can continue by setting your own program (delete already finished
working cycles). However, if the dough was in the last rising phase and the power failure
lasts for longer time, the dough may not be used again and restart with new ingredients is
required.
- Please note that for safety reasons the bread maker does not have upper heating and
therefore, upper bread crust is not as dark as from the bottom and all sides.
Controlpanellock
The control panel may be protected against unintentional manipulation with the CYKLUS
(CYCLE) button followed by the BARVA(COLOUR) button. A „key“ symbol will appear
on the display and three beeps will be heard. With the control panel locked, all buttons are
disabled except for the buttons CYKLUS(CYCLE) and BARVA(COLOUR). Unlock the
control panel using the same procedure.
V. PREPARATION FOR USE AND PROGRESS OF BAKING
Unpack the bread baker and accessories. Remove all adhesive foils, stickers or paper
from the appliance. Before first use, wash the parts in contact with foods in hot water with
a detergent, rinse properly with fresh water and wipe or let it dry. Putalldriedpartsback
tothebreadbakerandletthelidopen. Then, set the program 11-PEČENÍ(BAKING)
and turn it on for 10 minutes without ingredients inserted and then let the appliance cold.
Potential short and mild smoking is not a defect and a reason for complaint.
Place the bread baker on a flat and dry surface (e.g. a table) at height min 85 cm, out of
reach of children. Plug the power cord A5 to an electric socket. Hold the pan B with both
hands, slide it to the appliance and push to lock it in the centre of the baking space A2.
We recommend greasing the shafts and blades with suitable heat-resistant fat/margarine
for easier removal of the blades from the bread. Then, insert two kneading blades C on
the shafts in the baking pan. Slide the blades on the shafts with the flat area down and
either towards or apart each other in the baking pan. Use the spoon and cup D, E to insert
ingredients in order specified in your recipe.
57
/ 210

GB
Pleasealwaysadheretothebasicrule-firstallliquidingredientsfollowedby
looseingredients. Close the lid A3. Using suitable buttons MENU(SELECT),BARVA
(COLOUR),VELIKOST(SIZE),ČAS(TIME), set the required program on the control panel
A1. Then, press the START/STOP button. The appliance automatically mixes and kneads
the dough until proper consistence is reached. When the last kneading cycle is completed,
the bread maker heats to an optimum temperature to rise the dough. Then, the appliance
automatically sets temperature and time for bread baking. After baking, the sound signal
(ten beeps) will be heard and the bread or speciality may be removed from the appliance.
Then the appliance turns one hour keeping warm program; if you require no keeping warm
program, press the START/STOP button for about 1.5 seconds to finish the program.
Note
- For heavy type dough, e.g. those of high content of rye flour, we recommend changing
of addition of the ingredients - first dried yeast, then flour and add water as the last
ingredient to ensure proper kneading. If you use delayed start function, the yeast must
not come in premature contact with water.
- If you are adding ingredients after the beep signal is heard, we recommend:
1) dried fruit, cheese, chocolate = cut into ca. 5 mm cubes,
2) nuts = chop finely (do not use too many of them, they degrade the performance of gluten),
3) herbs = follow the recipe, max. 1 – 2 teaspoons,
4) oily ingredients, smoked meat and bacon = cut into ca. 5 mm cubes and sprinkle them
lightly with flour, it will work better,
5) olives, fresh fruit, fruit preserved in alcohol = follow the recipe, the water contents in
these ingredients could influence the final quality of bread.
6) seeds = the use of big and hard seeds may damage (while kneading = clicking, while
baking or heating up = cracking). the surface finish of the baking pan and kneading
blade. This change however does in no way impact on the quality of the surface and is
not a reason for the appliance to be replaced for this purpose under warranty.
- If the bread is too light at the end of the baking program, use the PEČENÍ(BAKING)
program for further browning. To do this, press the START/STOP button, then select
11–PEČENÍ(BAKING) and press the START/STOP button again.
- When using the appliance, you will hear an inherent clicking sound. This is normal and
the appliance will not be replaced for this purpose under warranty.
- Pets (e.g. exotic birds) may be responsive to the smell/odour, vapours and smoke arising
during the preparation of food. Therefore it is recommended that the food should be
prepared in another room.
- If unusual signs appear on the display, disconnect the appliance from the electric socket
and connect it again.
Endofprogrammedphases
Open the lid after program end. Pull the holder B1 to remove the baking form B, put it
upside down on a heat-resistant solid surface (e.g. cutting board). If the bread will not
go out to the board, move the kneading blades backward and forward until the bread is
released. If the kneading blades are stuck in the bread, use F to remove them easily. Then,
let the bread cold down. Use electric slicer or a special toothed blade knife for slicing the
bread. Store remaining bread in a plastic bag or a utensil. You can store the bread for
up to three days at room temperature. If longer storage of the bread is needed, wrap it
in the plastic bag or utensil and store it in a freezer. Store for max 10 days. Whereas the
home-made bread does not contain any preservatives, its shelf life is not generally longer
than the same of shop-purchased bread.
58
/ 210

GB
Note: use suitable personal protective equipment (e.g. kitchen gloves) for handling the hot
baking pan, holder, blades etc. Do not use gross force on walls of the baking pan to
release finished bread!
Baguettebakingform(G)
Assemble the wire rack and insert both the baguette baking forms in it (pic. 1).
- Following an appropriate recipe, prepare the dough (e.g. using the DOUGH programme).
The well-risen dough must then be kneaded properly, shaped into the appropriate size
and form of a baguette and put into the form.
To enhance the taste, you can work (e.g. sesame/ flax / sunflower seeds, walnuts /
hazelnuts, poppy seeds, bits of cheese or bacon, or olives) in the dough. Before you add
the ingredients in the dough, cut them to a suitable size. Glaze the baguette surface with
a bit of water, butter, oil, honey or whisked egg yolk to achieve gold-coloured surface, or
alternatively you can garnish the baguette surface (make a lengthwise/ crosswise cut)
using a sharp serrated knife or form points or loops using scissors.
- Remove the bread-baking form from the bread maker, insert the form with the baguettes
to the baking area and close the lid.
- On the control panel, set the BAKING programme and the appropriate baking time of ca.
55 minutes.
- By pressing the START/STOP button, switch on the bread maker.
Basicingredientsforbaguettes(4x100g)
Very fine wheat flour 280 g, water 170 ml, salt 6 g, fresh yeast or yeast powder 12 g.
VI. FREQUENTLY ASKED QUESTIONS RELATED TO BAKING
Bread stuck on the pan after baking?
Let the bread cool down for about 10 minutes after baking and then turn the pan upside
down. If needed, move the kneading blade shafts forward and backward. Grease the pan
including the kneading blades for the next baking.
How to avoid holes in the bread due to the kneading blades?
You can remove the kneading blades with flour coated fingers before the last dough rising
phase. (See timing of the program phases and information on the display).
Dough rises over the pan edge?
It happens especially when wheat flour with higher gluten content is used.
– Reduce amount of flour and adapt other ingredients. Finished bread will be of sufficient
volume.
– Spread a tablespoon of dissolved margarine on the dough.
Bread is not risen sufficiently?
a) If a V-shaped groove appears in the centre of the bread, the flour does not contain
sufficient amount of gluten. It means the flour contains a few protein (it happens during
rainy summer) or because of moist flour. Measures: add a tablespoon of wheat gluten to
each 500 g of flour.
59
/ 210

GB
b) If the bread is constricted in the centre, the reasons may be:
– too high temperature of water;
– too much water used;
– gluten-low flour used.
When it is possible to open the lid during operation?
Generally, the lid can be opened at any time during the kneading phase. Small amounts of
flour or liquids can be added during this phase. Proceed as follows if you require the bread
has to have some aspects: Open the lid before the last kneading phase and make a cut on
newly forming crust using a pre-heated knife, distribute cereals or mixture of potato flour
and water in order to achieve shiny crust. However, this is the last chance for opening the
lid, otherwise the crumb will collapse.
Flour
The most important flour element in baking of the bread is gluten. This is a natural agent
thanks to which dough has its shape and allows keeping carbon dioxide produced by
yeast. „Strong/solid“ flour is flour with high gluten content.
Whatiswheatwholegrainflour?
The whole grain flour is produced from all types of cereals, including wheat. The term
„whole grain“ means the flour was ground from whole grains and therefore, it has higher
proportion of non-digestible particles and darker colour. However, darker colour of the
bread is not caused by the use of the whole grain flour.
Whatneedstobedonewhenusingryeflour?
The rye flour contains certain gluten level; this level is, however, lower than for other flours.
To produce easily digestible bread, the whole grain rye bread has to be produced with
higher yeast content.
Howmanydifferentfloursexistandhowaretheyused?
a) Corn, rice and potato flour is suitable for people allergic to gluten or for those suffering
from low-absorption syndrome or stomach diseases.
b) Flour from spelt is expensive but without any chemical substances because this wheat
grows on poor soil and requires no fertilizers. The spelt flour is especially suitable for
allergic people. It can be used for all recipes described in the recipe book and replaces
flour 405, 550 and 1050.
c) Millet flour is particularly suitable for persons suffering from many allergies. It can be
used for all recipes described in the recipe book and replaces flour 405, 550 and 1050.
Durum flour is suitable for baguettes thanks to its consistency and it may be replaced by
durum semolina.
Numbercodesofflourtypes
00 Wheat fine-ground flour, light
T 400 Wheat semi-coarsely ground flour, selection
T 405 Wheat semi-coarsely ground flour made from grains with sprouts and bran removed;
it is the „lightest“ and „the least“ whole grained.
T 450 Coarse ground flour
T 512 Bakery special wheat flour
T 530 Light fine-ground wheat flour - bakery special
T 550 Semi-coarsely ground light wheat flour
60
/ 210
