Elica ICO: инструкция
Раздел: Бытовая, кухонная техника, электроника и оборудование
Тип: Вытяжка
Инструкция к Вытяжке Elica ICO

DE Montage- und Gebrauchsanweisung
EN Instruction on mounting and use
FR Prescriptions de montage et mode d’emploi
NL Montagevoorschriften en gebruiksaanwijzingen
IT Istruzioni di montaggio e d'uso
ES Montaje y modo de empleo
PT Instruções para montagem e utilização
EL ΟΔΗΓΙΕΣ ΣΥΝΑΡΜΟΛΟΓΗΣΗΣ ΚΑΙ ΧΡΗΣΗΣ
PL Instrukcja montażu i obsługi
CS Návod na montáž a používání
SK Návod k montáži a užití
HU Felszerelési és használati utasítás
RU Инструкции по монтажу и эксплуатации
BG Инструкции за монтаж и употреба
RO INSTRUCTII DE MONTAJ SI FOLOSIRE
SL Navodila za montažo in uporabo
HR Uputstva za montažu i za uporabu
NO Instrukser for montering og bruk
SV Monterings- och bruksanvisningar
DA Bruger- og monteringsvejledning
TR Montaj ve kullanım talimatları

(Diese Bedienungsanweisungen sind in den USA und in Kanada nicht
anwendbar)
(This manual is not for use in USA and Canada)
(Ce manuel n’est pas valable aux USA et au Canada)
(Deze handleiding kan niet gebruikt worden in de V.S. en in Canada)
(Questo manuale non è utilizzabile in USA e Canada)
(Este manual no es utilizable en USA y Canadá)
(Este manual não é utilizável nos EUA e Canadá)
(Το παρόν εγχειρίδιο δεν πρέπει να χρησιμοποιείται στις ΗΠΑ και στον Καναδά)
(Tej instrukcji nie używa się w USA i Kanadzie)
(Tato příručka není použitelná v USA a Kanadě)
(Táto príručka nie je použiteľná v USA a v Kanade)
(A használati útmutató az Amerikai Egyesült Államokban és Canadában való
felhasználásra nem alkalmas)
(Настоящее руководство не применяется в США и Канаде)
(Този наръчник не може да бъде използван в САЩ и Канада)
(Acest manual nu este utilizabil în SUA şi Canada)
(Ta priročnik ne velja za Združene države in Kanado)
(Ovaj priručnik se ne koristi u SAD-u i Kanadi)
(Denne håndboken gjelder ikke for bruk i USA og Canada)
(Denna handbok är inte avsedd för användning i USA och Kanada)
(De
nne vejledning finder ikke anvendelse i USA og Canada)
(Bu Kullanma kılavuzu Amerika Birleşik Devletleri ve Kanada’da kullanılamaz)
DE - Montage- und Gebrauchsanweisung
Die Instruktionen, die in diesem Handbuch gegeben
brennstoffbetriebenen Geräten genutzt werden.
werden, müssen strikt eingehalten werden. Es wird
Es ist strengstens verboten, unter der Haube mit offener
keinerlei Haftung übernommen für mögliche Mängel, Schäden
Flamme zu kochen.
oder Brände der Dunstabzugshaube, die auf die
Eine offene Flamme beschädigt die Filter und kann Brände
Nichtbeachtung der Vorschriften in diesem Handbuch
verursachen, daher ist dies in jedem Fall zu vermeiden.
zurückzuführen sind. Die Dunstabzugshaube ist
Das Frittieren muss unter Aufsicht erfolgen, um zu vermeiden,
ausschliesslich zum Einsatz im privaten Haushalt vorgesehen.
dass das überhitzte Öl Feuer fängt.
Der Dunstabzugshaube kann von der aesthetischen Seite
Zugängliche Teile können beim Gebrauch mit Kochgeräten
her ander sein als die Zeichnungen die in diesem
heiss werden.
Bedienungsanleitung geschrieben sind.
In Bezug auf technische und Sicherheitsmaßnahmen für die
Die Bedienungsanleitungen , die Wartung und die
Ableitung der Abluft sind die Vorschriften der zuständigen
Installation sind aber gleich.
örtlichen Behörden strengstens einzuhalten.
! Es ist wichtig diese Bedienungsanleitung zu behalten um
Die Haube muss regelmäßig innen und außen gereinigt
sie in jedem Moment nachzuschlagen. Im Fall von
werden (MINDESTENS EINMAL IM MONAT, diesbezüglich
Verkaufen, Abtretung oder Umziehen, versichern Sie sich
sind in jedem Fall die ausdrücklichen Angaben in der
bitte dass Sie mit dem Produkt zusammen bleibt.
Wartungsanleitung dieses Handbuchs zu beachten).
! Die Bedienungsanleitungen richtig lesen: es gibt
Eine Nichtbeachtung der Vorschriften zur Reinigung der
wichtige Informationen ueber die Installation, Benutzen
Haube sowie zur Auswechselung und Reinigung der Filter
und Sicherheit.
führt zu Brandgefahr.
! Keine elektrische oder mechanische Aenderungen auf
Um das Risiko eines Stromschlages zu vermeiden, darf die
dem Produkt oder auf die Fluchtleitungen machen.
Dunstabzugshaube ohne richtig eingesetzte Lampen nicht
Hinweis: Die mit dem (*) gekennzeichneten Teile sind
betrieben
Zubehörteile, die nur bei einigen Modellen im Lieferumfang
werden.
enthalten sind oder Teile, die nicht im Lieferumfang enthalten
Es wird keinerlei Haftung übernommen für Fehler, Schäden
sind, und somit extra erworben werden müssen.
oder Brände des Gerätes, die durch Nichteinhaltung der in
diesem Handbuch aufgeführten Anweisungen verschuldet
Warnung
wurden.
Achtung! Das Gerät nicht an das Stromnetz anschließen,
In Übereinstimmung mit den Anforderungen der Europäischen
solange die Installation noch nicht abgeschlossen ist.
Richtlinie 2002/96/EG über Elektro- und Elektronik-Altgeräte
Vor Beginn sämtlicher Reinigungs- oder Wartungsarbeiten
(WEEE) ist vorliegendes Gerät mit einer Kennzeichnung
muss das Gerät durch Ziehen des Steckers oder Betätigen
versehen.
des Hauptschalters der Wohnung vom Stromnetz getrennt
Sie leisten einen positiven Beitrag für den Schutz der Umwelt
werden.
und die Gesundheit des Menschen, wenn Sie dieses Gerät
Bei allen Installations- und Instandhaltungsarbeiten immer
einer gesonderten Abfallsammlung zuführen. Im unsortierten
Schutzhandschuhe tragen.
Siedlungsmüll könnte ein solches Gerät durch unsachgemäße
Kinder nicht mit dem Gerät spielen lassen.
Entsorgung negative Konsequenzen nach sich ziehen.
Erwachsene und Kinder dürfen nie unbeaufsichtigt das Gerät
Auf dem Produkt oder der beiliegenden
betreiben,
– wenn sie körperlich oder geistig dazu nicht in der Lage sind,
– oder wenn ihnen Wissen und Erfahrung fehlen, das Gerät
Produktdokumentation ist folgendes Symbol
einer
richtig und sicher zu bedienen.
durchgestrichenen Abfalltonne abgebildet. Es weist darauf
Die Dunstabzugshaube niemals ohne korrekt montiertes Gitter
hin, dass eine Entsorgung im normalen Haushaltsabfall nicht
in Betrieb setzen!
zulässig ist. Entsorgen Sie dieses Produkt im Recyclinghof mit
Die Dunstabzugshaube darf NIEMALS als Abstellfläche
einer getrennten Sammlung für Elektro- und Elektronikgeräte.
verwendet werden, sofern dies nicht ausdrücklich angegeben
Die Entsorgung muss gemäß den örtlichen Bestimmungen zur
wird.
Abfallbeseitigung erfolgen.
Der Raum muss über eine hinreichende Belüftung verfügen,
Bitte wenden Sie sich an die zuständigen Behörden Ihrer
wenn die Dunstabzugshaube mit anderen gas- oder
Gemeindeverwaltung, an den lokalen Recyclinghof für
brennstoffbetriebenen Geräten gleichzeitig verwendet wird.
Haushaltsmüll oder an den Händler, bei dem Sie dieses Gerät
Bei gleichzeitigem Betrieb der Dunstabzugshaube im
erworben haben, um weitere Informationen über Behandlung,
Abluftbetrieb und Feuerstätten darf im Aufstellraum der
Verwertung und Wiederverwendung dieses Produkts zu
-5
erhalten.
Feuerstätte der Unterdruck nicht größer als 4 Pa (4 x 10
bar) sein.
Die angesaugte Luft darf nicht in Rohre geleitet werden, die
für die Ableitung der Abgase von gas- oder
10
Betriebsart
Elektrischer Anschluss
Die Haube kann sowohl als Abluftgërat als auch als
Die Netzspannung muss der Spannung entsprechen, die auf
Umluftgërat eingesetzt werden.
dem Betriebsdatenschild im Innern der Haube angegeben ist.
Sofern die Haube einen Netzstecker hat, ist dieser an
zugänglicher Stelle an eine den geltenden Vorschriften
entsprechende Steckdose auch nach der Montage
Abluftbetrieb
anzuschließen. Bei einer Haube ohne Stecker (direkter
Die Luft wird mit Hilfe eines an den Abluftstutzen
Netzanschluss) oder falls der Stecker nicht zugänglich ist, ist
anzubringenden Rohres ins Freie geleitet.
ein normgerechter zweipoliger Schalter auch nach der
Das Abluftrohr wird hierbei nicht geliefert und soll separat
Montage anzubringen, der unter Umständen der
angekauft werden.
Überspannung Kategorie III entsprechend den
Das Abluftrohr muß denselben Durchmesser wie der
Installationsregeln ein vollständiges Trennen vom Netz
Abluftstutzen aufweisen.
garantiert.
Das Abluftrohr muß muß in waagrechter Lage leicht nach
Hinweis! Vor der Inbetriebnahme muss sichergestellt sein,
oben geneigt sein (ca. 10%), damit die Luft ungehindert ins
dass die Netzversorgung (Steckdose) ordnungsgemäß
Freie abgeleitet werden kann.
montiert wurde.
Note. Sollte die Dunstabzugshaube mit Aktiv-kohlefilter
versehen sein, so muß dieser entfernt werden.
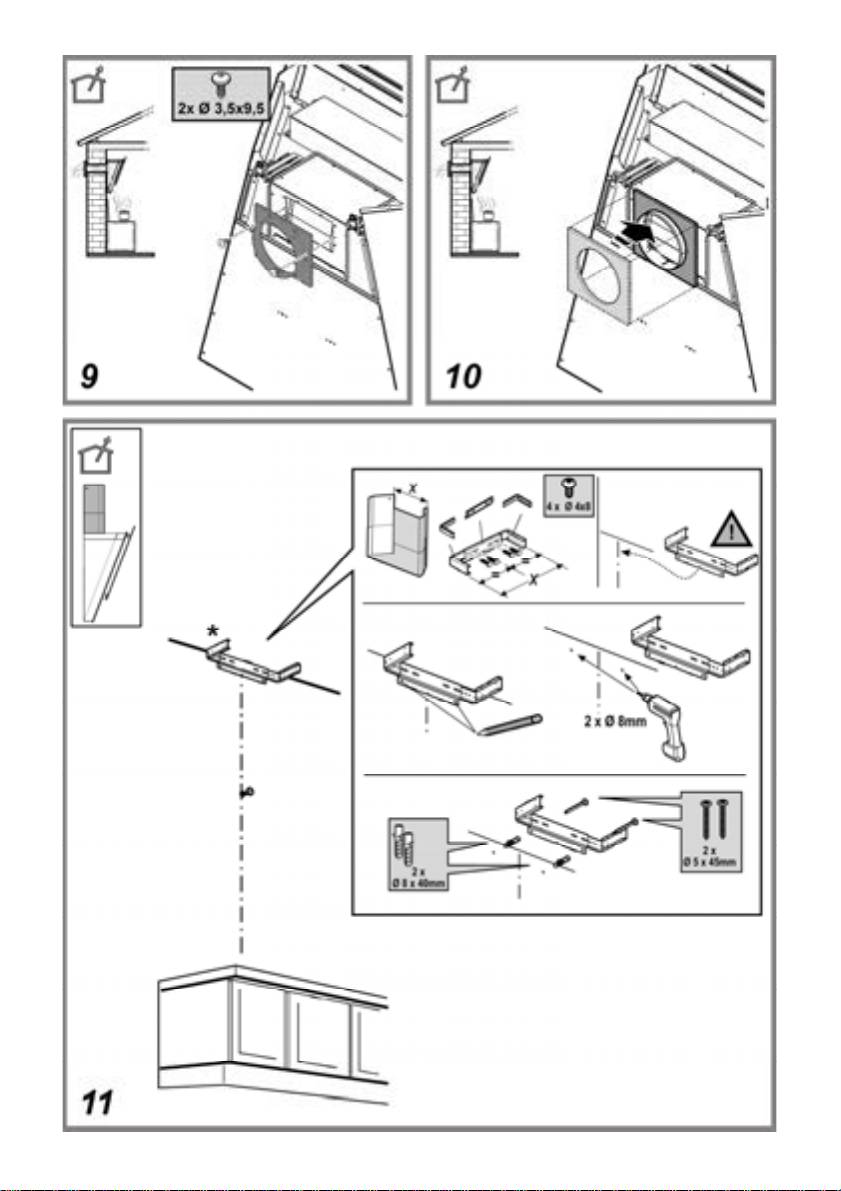
Montage
Die Dunstabzugshaube an Abluftrohre und
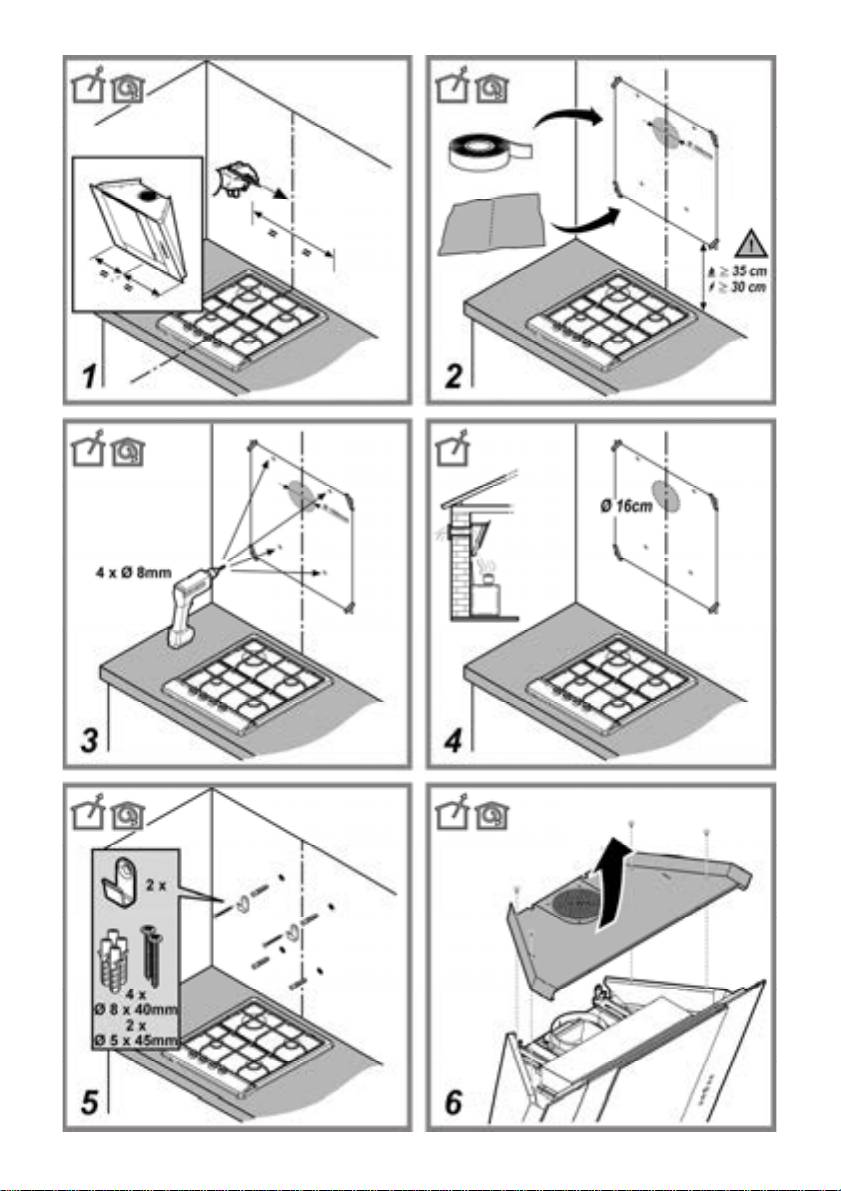
Die Abzugshaube ist mit Dübeln ausgestattet, die für die
Wandabluftauslass mit dem selben Durchmesser wie der
meisten Wände/Decken geeignet sind. Trotzdem sollte ein
Luftausgang verbinden (Anschlussflansch).
qualifizierter Techniker hinzugezogen werden, der
Die Benutzung von Rohren und Wandabluftauslass mit
entscheidet, ob die Materialien für die jeweilige Wand/Decke
geringerem Durchmesser, verursacht eine Verringerung der
geeignet sind. Außerdem muß die Wand/Decke das Gewicht
Abluftleistung und eine drastische Zunahme der
der Abzugshaube tragen muss.
Geraeuschentwicklung.
Jegliche Verantwortung diesbezueglich wird daher abgelenkt
Im Fall von Abdeckungen und/oder Wänden und/oder
! Eine möglichst kurze Leitung verwenden.
seitlichen Schränken vergewissern Sie sich bitte, dass
! Eine Leitung mit einer möglichst geringen Anzahl von
genügend Raum vorhanden ist, um die Dunstabzugshaube
Krümmungen verwenden (max. Winkel der Krümmung:
anzubringen und dass Sie jederzeit Zugriff auf das Bedienfeld
90°).
haben.
! Starke Änderungen des Leitungsdurchmessers sind zu
vermeiden.
Nur für einige Modelle
! Die Innenfläche der Leitung muss so glatt wie möglich
Als optionales Zubehör kann ein Designkamin erworben
sein.
werden, beim Verkäufer überprüfen (Genehmigter
! Das Material der Leitung muss von den Normen
Verkaeufer), ob bei Ihrem Modell diese Möglichkeit
zugelassen sein.
vorgesehen ist.
Es wird empfohlen, die Haube erst nach dem Kauf dieses
Kamins zu installieren, um die am besten geeignete
Installationsweise auszuwählen.
Umluftbetrieb
Es ist ein Aktiv-Kohlefilter zu benutzen, der bei Ihrem
Fachhändler erhältlich ist.
Betrieb
Der Aktiv-Kohlefilter reinigt die angesaugte Luft von
Bei starker Dampfentwicklung die höchste Betriebsstufe
Fettpartikeln und Kochdünsten bevor diese durch das obere
einschalten. Es wird empfohlen, die Dunstabzugshaube schon
Gitter in die Küche zurückströmt.
fünf Minuten vor Beginn des Kochvorganges einzuschalten
und sie nach dessen Beendigung noch ungefähr 15 Minuten
Modelle ohne Saugmotor funktionieren nur mit Abluftbetrieb
weiterlaufen zu lassen.
und müssen an eine externe Saugeinheit (nicht im
Lieferumfang enthalten) angeschlossen werden.
Die Anschlussanleitungen liegen der externe Saugeinheit bei.
Befestigung
Der Abstand zwischen der Abstellfläche auf dem Kochfeld und
der Unterseite der Dunstabzugshaube darf 30cm im Fall von
elektrischen Kochfeldern und 35cm im Fall von Gas- oder
kombinierten Herden nicht unterschreiten.
Wenn die Installationsanweisungen des Gaskochgeräts einen
größeren Abstand vorgeben, ist dieser zu berücksichtigen.
11
• “Slow cooking” Led L1 eingeschaltet
Diese Taste beim Braten von Gemüsen, beim
Erwärmen oder Erhitzen von Speisen oder Getränken
(Milch, Kaffee, Tee) betätigen..
• “Boiling” Led L2 eingeschaltet
Diese Taste beim Kochen von Sossen, Brühen,
gekochtem Gemüse, Suppen oder von Speisen wie
Pasta betätigen..
• “Grilling” Led L3 eingeschaltet
Diese Taste beim Grillen betätigen.
• “Frying” Led L4 eingeschaltet
Diese Taste beim Frittieren (z.B. Fleisch, Kartoffeln,
Gemüse) betätigen.
Um die ausgewählte Betriebsweise zu beenden, die folgenden
Tasten betätigen:
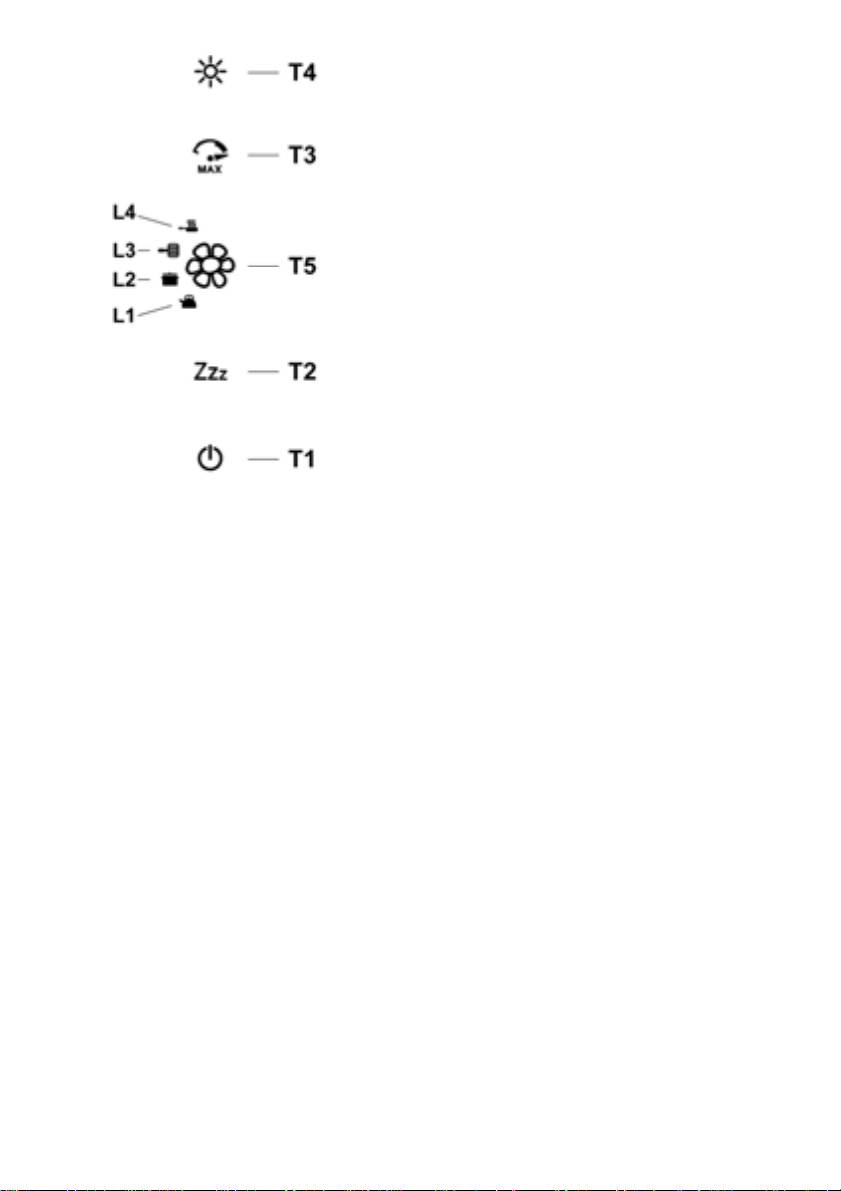
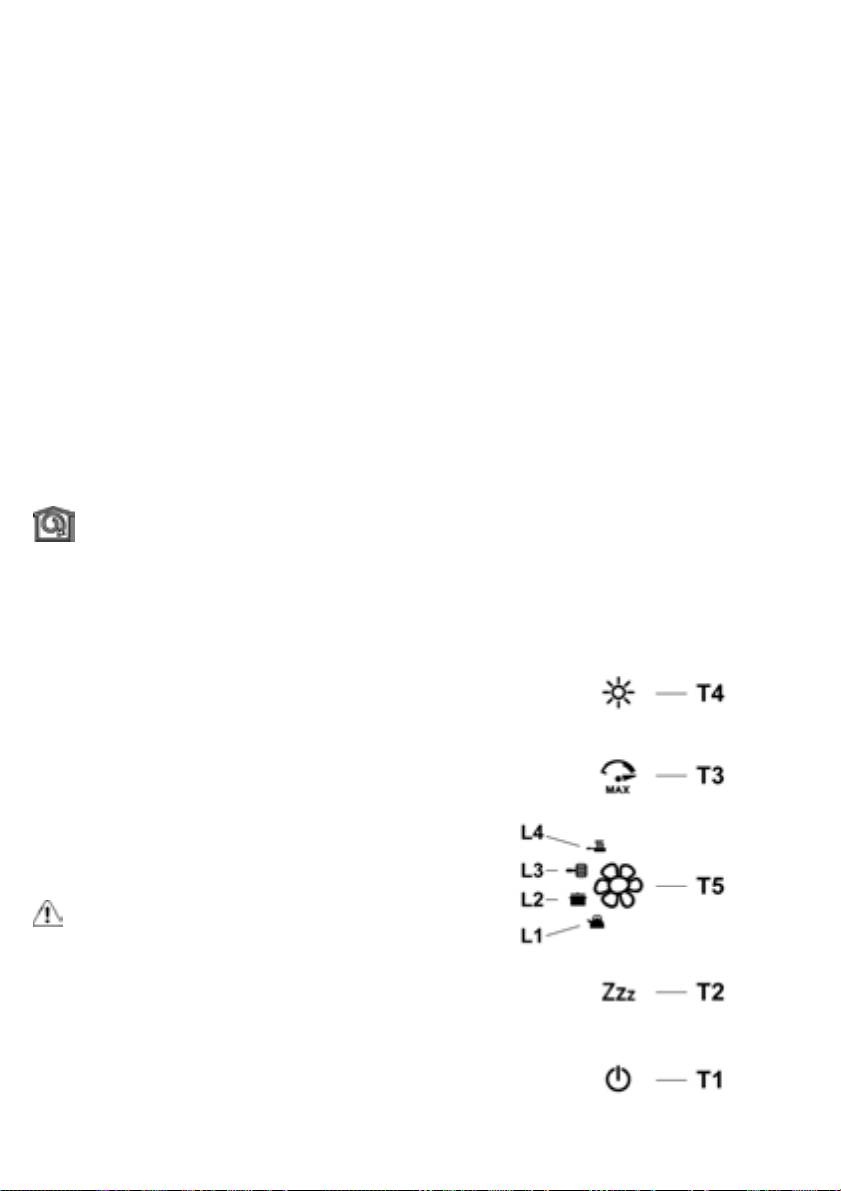
Taste T1 Haube auf OFF
Taste T2 Einschaltung des “Silent”-Modus
Taste T3 Einschaltung des “Boost” Modus
Alarm in Fehlerfällen
Bei einem Fehler des Motors (Block, Überhitzung, usw.)
werden alle Funktionen des Motors abgeschaltet (ausser der
T1.Haube AUS
Beleuchtung); die Taste T2, T3, T5 und die LEDs L1, L2, L3,
Durch das Betätigen dieser Taste wird die Abzugshaube
L4 werden blinken.
unabhängig von der aktuellen Betriebsweise ausgeschaltet.
Ist der Alarm beendet, schaltet sich die Haube wieder aus.
Durch das Betätigen der Taste T1 wird die Haube
T2. “Silent”-Modus
ausgeschaltet.
Dieser Betriebsweise entspricht keine bestimmte Kochweise
Wenn der Fehler nicht gelöst wird, bleibt die Haube im
Diese Taste betätigen, um den “Silent”-Modus (leise)
Alarmzustand und alle Funktionen bleiben gesperrt. In diesem
einzuschalten.
Fall setzen Sie sich mit dem Kundendienst in Verbindung.
Durch das Betätigen der Taste T1 oder T2 wird die Haube
ausgeschaltet.
Wartung
Hinweis ! Vor jeder Reinigung und Pflege ist die
T3. “Boost”-Modus
Dunstabzugshaube durch Ziehen des Netzsteckers oder
Dieser Betriebsweise entspricht keine bestimmte Kochweise
Ausschalten der Sicherung stromlos zu machen.
Diese Taste im Falle von besonders intensiven Kochdünsten
betätigen.
Reinigung
Durch das Betätigen der Taste T1 oder T3 wird die Haube
Die Dunstabzugshaube muss sowohl innen als auch außen
ausgeschaltet.
häufig gereinigt werden (etwa in denselben Intervallen, wie die
Wartung der Fettfilter). Zur Reinigung ein mit flüssigem
T4. Beleuchtung ON/OFF
Neutralreiniger getränktes Tuch verwenden. Keine Produkte
Diese Taste betätigen, um die Beleuchtung ein- oder
verwenden, die Scheuermittel enthalten.
auszuschalten.
KEINEN ALKOHOL VERWENDEN!
Die Beleuchtung schaltet sich graduell ohne Zwischenstufen
Achtung: Nichtbeachtung dieser Anweisungen zur Reinigung
ein.
des Gerätes und zum Wechsel bzw. zur Reinigung der Filter
kann zum Brand führen. Diese Anweisungen sind unbedingt
T5. Kochweisen
zu beachten!
Zyklisch diese Taste betätigen, um die verschiedenen
Der Hersteller übernimmt keine Haftung für irgendwelche
Betriebsweisen einzuschalten.
Schäden am Motor oder Brandschäden, die auf eine
Jeder Betriebsweise entspricht eine bestimmte Kochweise.
unsachgemäße Wartung oder Nichteinhaltung der oben
Grund dafür ist es, eine optimale Abzugsleistung bei den
angeführten Sicherheitsvorschriften zurückzuführen sind.
verschiedenen Kochweisen zu erhalten.
Dunstschirm
Jeder Betriebsweise entspricht eine Anzeige-LED.
Der Dunstschirm ist stets geschlossen zu halten und nur zu
Wartungszwecken zu öffnen (z.B.: Filterreinigung oder
Filterwechsel).
12

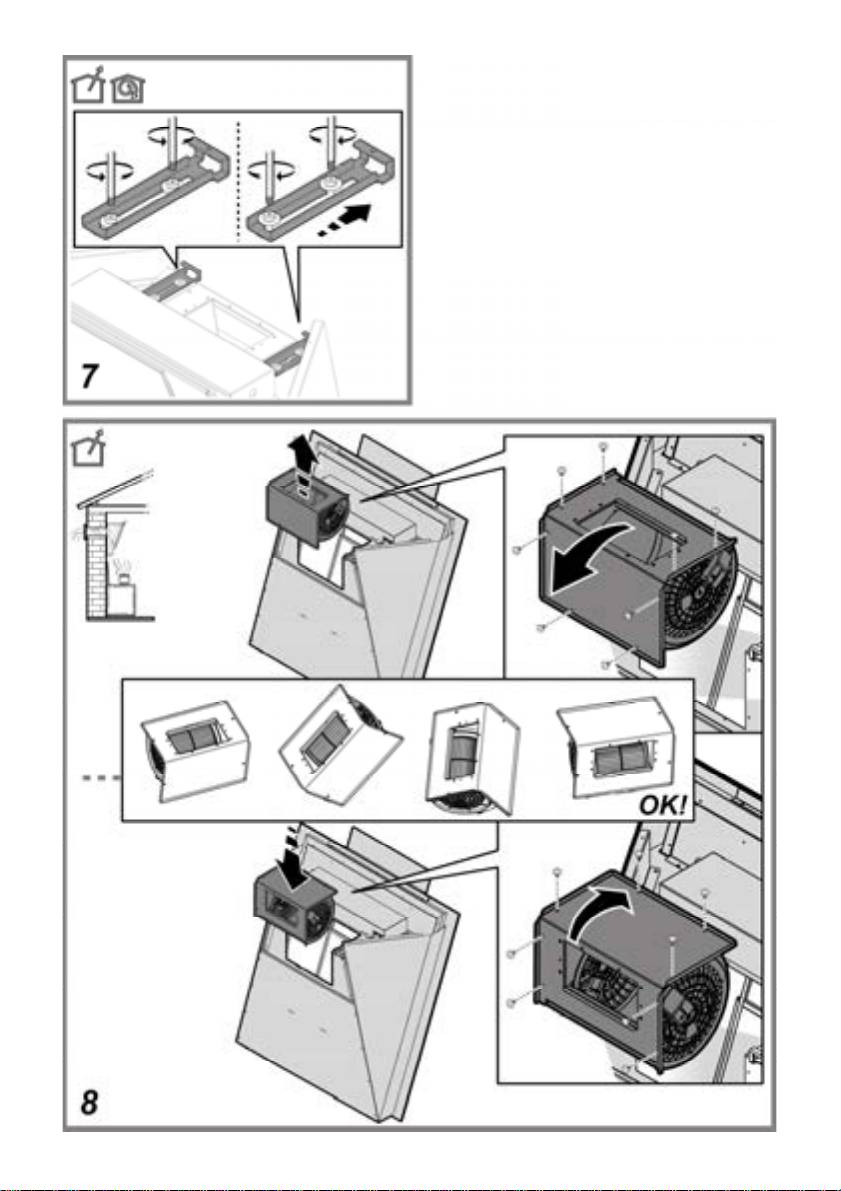
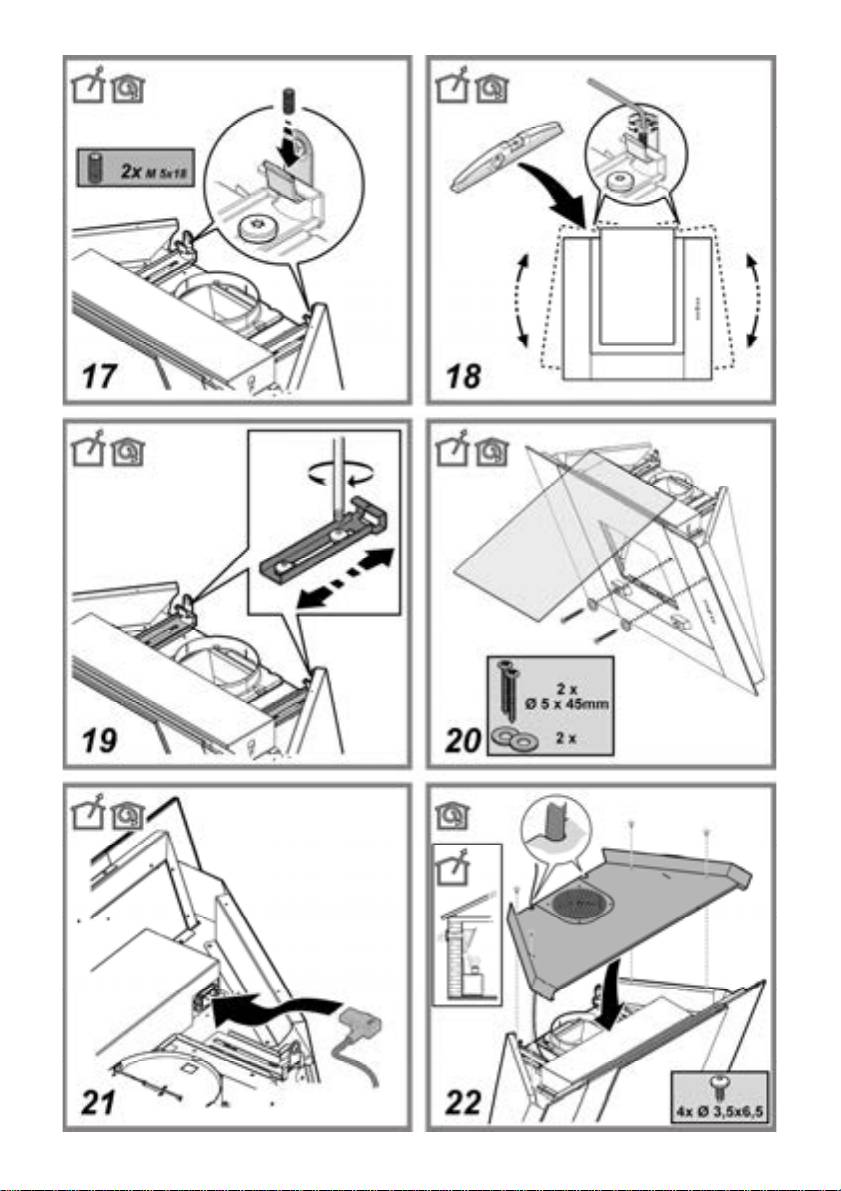
Fettfilter
Bild 13-27
Diese dienen dazu, die Fettpartikel, die beim Kochen frei
werden, zu binden.
Dieser muss einmal monatlich gewaschen werden (oder wenn
das Sättigungsanzeigesystem der Filter – sofern bei dem
jeweiligen Modell vorgesehen – dies anzeigt). Das kann mit
einem milden Waschmittel von Hand, oder in der
Spülmaschine bei niedriger Temperatur und einem
Kurzspülgang erfolgen. Der Metallfettfilter kann bei der
Reinigung in der Spülmaschine verfärben, was seine
Filtermerkmale jedoch in keiner Weise beeinträchtigt.
Den Dunstschirm öffnen.
Zwecks Demontage der Fettfilter den Aushakgriff ziehen.
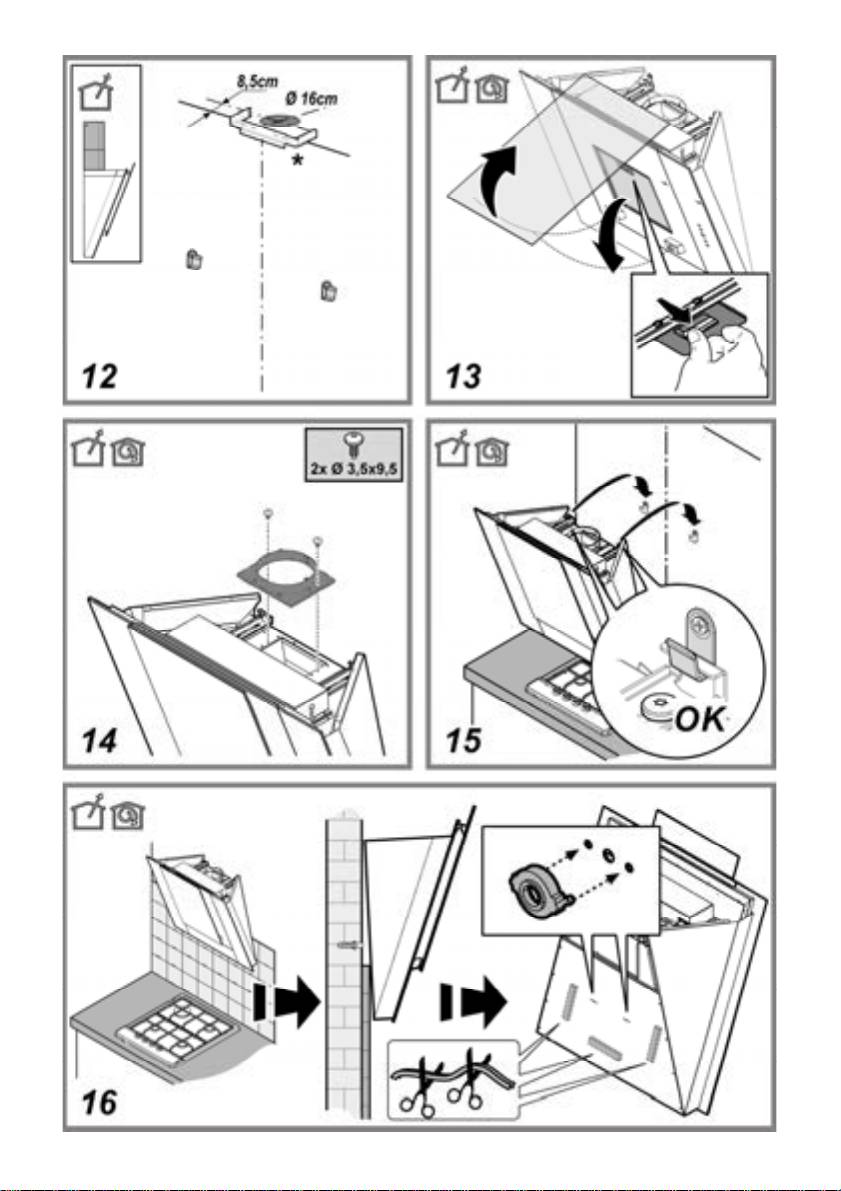
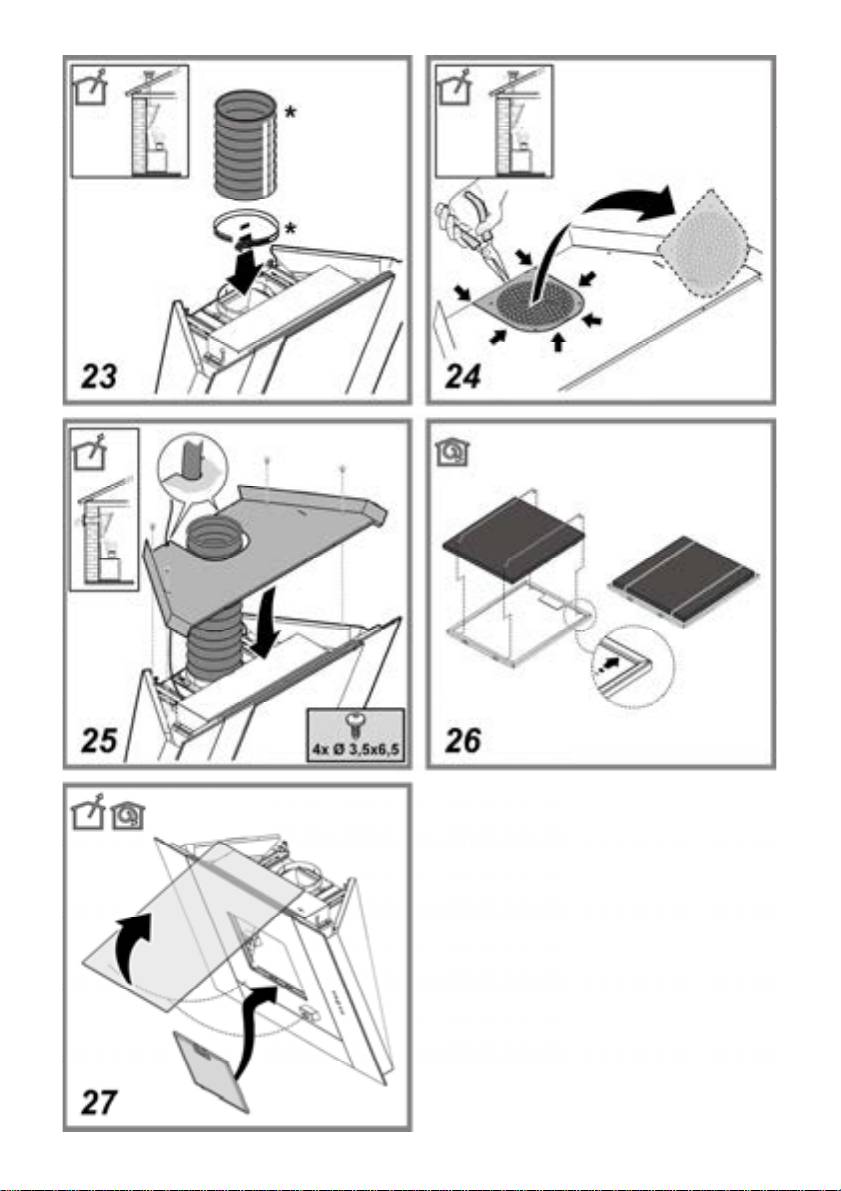
Aktivkohlefilter (nur bei der Umluftversion)
Bild 26
Dieser Filter bindet die unangenehmen Gerüche, die beim
Kochen entstehen.
Der Aktivkohlefilter wird alle zwei Monate in warmem Wasser
und geeigneten Waschmitteln oder in der Spülmaschine bei
65°C gewaschen (in diesem Fall den ollständigen Spülzyklus
– ohne zusätzliches Geschirr im Inneren der
Geschirrspülmaschine - einschalten).
Das überschüssige Wasser entfernen, ohne dabei den Filter
zu beschädigen; danach das Vlies bei 100° für 10 Minuten in
den Ofen legen, um es vollständig zu trocknen. Das Vlies
muss alle 3 Jahre ausgewechselt werden und weiterhin jedes
Mal dann, wenn es beschädigt ist.
• Montage
Den Dunstauffangschirm öffnen und den Fettfilter
herausnehmen.
Den Kohlefilter auf der Rückseite des Fettfilters
installieren und mit zwei Stäben befestigen.
Hinweis! Die Stäbe sind in der Packung des Kohlefilters
und nicht in der Haube enthalten.
• Beim Ausbauen des Filters in umgekehrter Reihenfolge
vorgehen.
Ersetzen der Lampen
Die Haube ist mit einem auf der Leuchtdiodentechnologie
basierten Beleuchtungssystem ausgestattet.
Die LEDs ermöglichen eine optimale Beleuchtung der
Kochfläche. Sie haben eine Leistungsdauer, die das
Zehnfache deren der traditionellen Lichter ist und bieten eine
Energieersparnis bis zu 90%.
Um die Leds mit neuen zu ersetzen, setzen Sie sich bitte mit
dem Kundendienst in Verbindung.
13
EN - Instruction on mounting and use
Closely follow the instructions set out in this manual. All
cooking applicance.
responsibility, for any eventual inconveniences, damages or
With regards to the technical and safety measures to be
fires caused by not complying with the instructions in this
adopted for fume discharging it is important to closely follow
manual, is declined. The extractor hood has been designed
the regulations provided by the local authorities.
exclusively for domestic use.
The hood must be regularly cleaned on both the inside and
The hood can look different to that illustrated in the
outside (AT LEAST ONCE A MONTH).
drawings in this booklet. The instructions for use,
This must be completed in accordance with the maintenance
maintenance and installation, however, remain the same.
instructions provided in this manual). Failure to follow the
! It is important to conserve this booklet for consultation at
instructions provided in this user guide regarding the cleaning
any moment. In the case of sale, cession or move, make
of the hood and filters will lead to the risk of fires.
sure it is together with the product.
Do not use or leave the hood without the lamp correctly
! Read the instructions carefully: there is important
mounted due to the possible risk of electric shocks.
information about installation, use and safety.
We will not accept any responsibility for any faults, damage or
! Do not carry out electrical or mechanical variations on the
fires caused to the appliance as a result of the non-
product or on the discharge conduits.
observance of the instructions included in this manual.
Note: the elements marked with the symbol “(*)” are optional
This appliance is marked according to the European directive
accessories supplied only with some models or elements to
2002/96/EC on Waste Electrical and Electronic Equipment
purchase, not supplied.
(WEEE). By ensuring this product is disposed of correctly, you
will help prevent potential negative consequences for the
Caution
environment and human health, which could otherwise be
WARNING! Do not connect the appliance to the mains until
caused by inappropriate waste handling of this product.
the installation is fully complete.
Before any cleaning or maintenance operation, disconnect
hood from the mains by removing the plug or disconnecting
The symbol
on the product, or on the documents
the mains electrical supply.
accompanying the product, indicates that this appliance may
Always wear work gloves for all installation and maintenance
not be treated as household waste. Instead it should be taken
operations.
to the appropriate collection point for the recycling of electrical
The appliance is not intended for use by children or persons
and electronic equipment. Disposal must be carried out in
with impaired physical, sensorial or mental faculties, or if
accordance with local environmental regulations for waste
lacking in experience or knowledge, unless they are under
disposal.
supervision or have been trained in the use of the appliance
by a person responsible for their safety.
Use
This appliance is designed to be operated by adults, children
The hood is designed to be used either for exhausting or filter
should be monitored to ensure that they do not play with the
version.
appliance.
This appliance is designed to be operated by adults. Children
should not be allowed to tamper with the controls or play with
the appliance.
Ducting version
Never use the hood without effectively mounted grating!
In this case the fumes are conveyed outside by means of a
The hood must NEVER be used as a support surface unless
special pipe connected with the connection ring located on top
specifically indicated.
of the hood.
The premises where the appliance is installed must be
Attention! The exhausting pipe is not supplied and must be
sufficiently ventilated, when the kitchen hood is used together
purchased apart.
with other gas combustion devices or other fuels.
Diameter of the exhausting pipe must be equal to that of the
The ducting system for this appliance must not be connected
connection ring.
to any existing ventilation system which is being used for any
In the horizontal runs the exhausting pipe must be slightly
other purpose such as discharging exhaust fumes from
slanted (about 10°) and directed upwards to vent the air easily
appliances burning gas or other fuels.
from the room to the outside.
The flaming of foods beneath the hood itself is severely
Attention! If the hood is supplied with active charcoal filter,
prohibited.
then it must be removed.
The use of exposed flames is detrimental to the filters and
Connect the hood and discharge holes on the walls with a
may cause a fire risk, and must therefore be avoided in all
diameter equivalent to the air outlet (connection flange).
circumstances.
Using the tubes and discharge holes on walls with smaller
Any frying must be done with care in order to make sure that
dimensions will cause a diminution of the suction performance
the oil does not overheat and ignite.
and a drastic increase in noise.
Accessible parts of the hood may became hot when used with
14
Any responsibility in the matter is therefore declined.
Only for some models
! Use a duct of the minimum indispensible length.
An aesthetic flue can be purchased as an optional accessory.
! Use a duct with as few elbows as possible (maximum
Check with the authorized dealer whether the model in your
elbow angle: 90°).
possession envisages this possibility.
! Avoid drastic changes in the duct cross-section.
We advise installing the hood after having purchased the flue
! Use a duct with an as smooth as possible inside.
to check with certainty the most suitable installation.
! The duct must be made of certified material.
Operation
Use the high suction speed in cases of concentrated kitchen
Filter version
vapours. It is recommended that the cooker hood suction is
One active charcoal filter is needed for this and can be
switched on for 5 minutes prior to cooking and to leave in
obtained from your usual retailer.
operation during cooking and for another 15 minutes
The filter removes the grease and smells from the extracted
approximately after terminating cooking.
air before sending it back into the room through the upper
outlet grid.
The models with no suction motor only operate in ducting
mode, and must be connected to an external suction device
(not supplied).
The connecting instructions are supplied with the peripheral
suction unit.
Installation
The minimum distance between the supporting surface for the
cooking equipment on the hob and the lowest part of the
range hood must be not less than 30cm from electric cookers
and 35cm from gas or mixed cookers.
If the instructions for installation for the gas hob specify a
greater distance, this must be adhered to.
Electrical connection
The mains power supply must correspond to the rating
indicated on the plate situated inside the hood. If provided with
a plug connect the hood to a socket in compliance with current
regulations and positioned in an accessible area, after
installation. If it not fitted with a plug (direct mains connection)
or if the plug is not located in an accessible area, after
installation, apply a double pole switch in accordance with
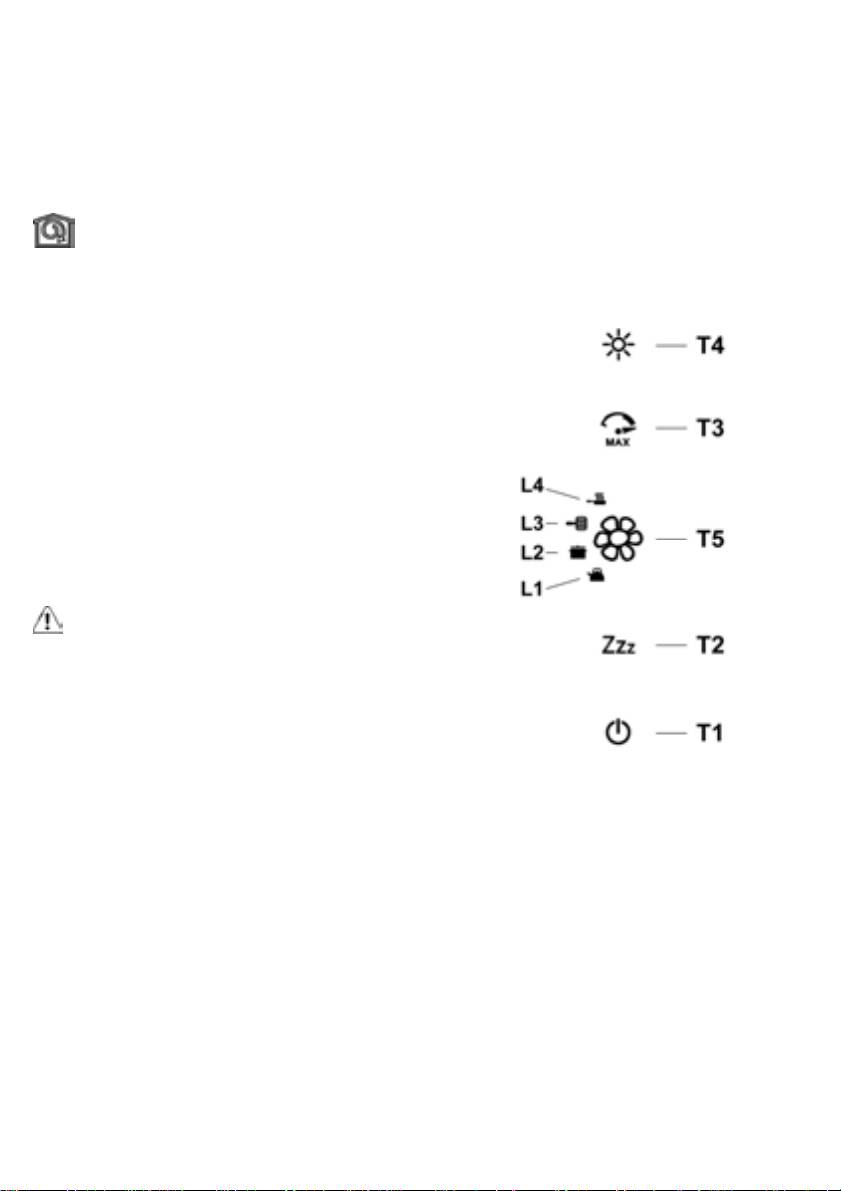
T1. Hood OFF
standards which assures the complete disconnection of the
Press the button and the hood passes from operation, in any
mains under conditions relating to over-current category III, in
suction mode, to OFF.
accordance with installation instructions.
Warning! Before re-connecting the hood circuit to the mains
T2. “Silent” mode
supply and checking the efficient function, always check that
This mode is not associated with any specific type of cooking.
the mains cable is correctly assembled.
Press the button to activate the hood in silent mode.
Press button T1 or T2 and the hood passes to OFF.
Mounting
Expansion wall plugs are provided to secure the hood to most
T3. “Boost” mode
types of walls/ceilings. However, a qualified technician must
This mode is not associated with any specific type of cooking.
verify suitability of the materials in accordance with the type of
Press the button in the case of particularly intense fumes.
wall/ceiling. The wall/ceiling must be strong enough to take
Press button T1 or T3 and the hood passes to OFF.
the weight of the hood. Do not tile, grout or silicone this
appliance to the wall. Surface mounting only.
T4. Lighting ON/OFF
Press the button to turn the lights on or off.
In the case of the presence of panels and/or walls and/or
The lighting turns on gradually without intermediate level
lateral wall units check that there is sufficient space to install
adjustments.
the hood and that access to the command panel is easy.
15

T5. Cooking mode.
Grease filter
Press the button cyclically to activate the different suction
Fig. 13-27
modes.
Traps cooking grease particles.
Each mode is associated with different types of food cooking.
This must be cleaned once a month (or when the filter
This is to obtain optimum suction according to the different
saturation indication system – if envisaged on the model in
needs.
possession – indicates this necessity) using non aggressive
A signalling LED corresponds to each suction mode.
detergents, either by hand or in the dishwasher, which must
be set to a low temperature and a short cycle.
• “Slow cooking” mode LED L1 on
When washed in a dishwasher, the grease filter may discolour
Press the button when cooking vegetables in a pan,
slightly, but this does not affect its filtering capacity.
when heating food or drinks (milk, coffee, tea).
Open the steam screen.
• “Boiling” mode LED L2 on
To remove the grease filter, pull the spring release handle.
Press the button when cooking sauces, broth, boiled
vegetables and soups, or when boiling food (e.g. pasta).
Charcoal filter (filter version only)
• “Grilling” mode LED L3 on
Fig. 26
Press the button when cooking food on grill or griddle.
It absorbs unpleasant odours caused by cooking.
The charcoal filter can be washed once every two months
• “Frying” mode LED L4 on
using hot water and a suitable detergent, or in a dishwasher at
Press the button when frying food (e.g. meat, potatoes,
65°C (if the dishwasher is used, select the full cycle function
vegetables).
and leave dishes out).
Eliminate excess water without damaging the filter, then put it
To quit the selected suction mode press the following buttons:
in the oven for 10 minutes at 100° C to dry completely.
Button T1 hood in OFF
Replace the mattress every 3 years and when the cloth is
Button T2 activation of “Silent” mode
damaged.
Button T3 activation of “Boost” mode
• Montage
Open the steam screen and remove the grease filter.
Fault alarm
Install the carbon filter on the back of the grease filter and
In case of motor fault (stall, overheating, etc.) all the functions
fix with two rods.
of the motor will be blocked (except for lighting) buttons T2,
Attention! The rods are included in the carbon filter
T3, T5 and LEDs L1, L2, L3, L4 will flash.
packing and not on the hood.
Once the alarm has gone off, the hood goes back to OFF.
• To dismantle the filter act in the reverse manner.
Press button T1 and the hood passes to OFF.
If the fault persists, the hood remains in the alarm state and all
Replacing lamps
the functions are blocked. Contact the technical service.
Maintenance
The hood is equipped with a lighting system based on LED
technology.
ATTENTION! Before performing any maintenance operation,
The LEDs guarantee an optimum lighting, a duration up to 10
isolate the hood from the electrical supply by switching off at
times as long as the traditional lamps and allow to save 90%
the connector and removing the connector fuse.
electrical energy.
Or if the appliance has been connected through a plug and
socket, then the plug must be removed from the socket.
For replacement, contact the technical service.
Cleaning
The cooker hood should be cleaned regularly (at least with the
same frequency with which you carry out maintenance of the
fat filters) internally and externally. Clean using the cloth
dampened with neutral liquid detergent. Do not use abrasive
products. DO NOT USE ALCOHOL!
WARNING: Failure to carry out the basic cleaning
recommendations of the cooker hood and replacement of the
filters may cause fire risks.
Therefore, we recommend oserving these instructions.
The manufacturer declines all responsibility for any damage to
the motor or any fire damage linked to inappropriate
maintenance or failure to observe the above safety
recommendations.
Steam screen
The steam screen must always be left closed and opened only
for maintenance (e.g. cleaning or changing filters).
16
FR - Prescriptions de montage et mode d’emploi
Suivre impérativement les instructions de cette notice. Le
que l’huile surchauffée ne prenne feu.
constructeur décline toute responsabilité pour tous les
Les pièces accessibles peuvent se réchauffer de façon
inconvénients, dommages ou incendies provoqués à l’appareil
importante quand elles sont utilisées avec des appareils pour
et dûs à la non observation des instructions de la présente
la cuisson.
notice. La hotte a été conçue exclusivement pour l’usage
En ce qui concerne les mesures techniques et de sécurité à
domestique.
adopter pour l’évacuation des fumées, s’en tenir strictement à
La hotte peut avoir des configurations esthétiques
ce qui est prévu dans les règlements des autorités locales
différentes par rapport à ce qui est illustré dans les
compétentes. La hotte doit être régulièrement nettoyée,
dessins de ce manuel, cependant les instructions pour
aussi bien à l’intérieur qu’à l’extérieur (AU MOINS UNE FOIS
l’utilisation, l’entretien et l’installation restent identiques.
PAR MOIS, respecter néanmoins les instructions relatives à
! Il est important de conserver ce livret pour pouvoir le
l’entretien fournies dans ce manuel).
consulter à tout moment. En cas de vente, de cession ou
La non observation de ces normes de nettoyage de la hotte et
de déménagement, s’assurer qu’il reste avec le produit.
du changement et nettoyage des filtres comporte des risques
! Lire attentivement les instructions: il y a d’importantes
d’incendie.
informations sur l’installation, sur l’emploi et sur la
Ne pas utiliser ou laisser la hotte sans que les ampoules
sécurité.
soient correctement placées pour éviter tout risque de choc
! Ne pas effectuer des modifications électriques ou
électrique.
mécaniques sur le produit ou sur les conduit
La société décline toute responsabilité pour d’éventuels
d’évacuation.
inconvénients, dégâts ou incendies provoqués par l’appareil et
Note: les pièces indiquées avec le symbole “(*)” sont des
dérivés de la non observation des instructions reprises dans
accessoires optionnels qui sont fournies uniquement avec
ce manuel.
certains modèles ou des pièces non fournies qui doivent être
Cet appareil porte le symbole du recyclage conformément à la
achetées.
Directive Européenne 2002/96/CE concernant les Déchets
d’Équipements Électriques et Électroniques (DEEE ou
Attention
WEEE).
Attention! Ne pas raccorder l’appareil au circuit électrique
En procédant correctement à la mise au rebut de cet appareil,
avant que le montage ne soit complètement terminé.
vous contribuerez à empêcher toute conséquence nuisible
Avant toute opération de nettoyage ou d’entretien, débrancher
pour l’environnement et la santé de l’homme.
la hotte du circuit électrique en retirant la prise ou en coupant
l’interrupteur général de l’habitation.
Munissez-vous de gants de travail avant d’effectuer toute
Le symbole
présent sur l’appareil ou sur la
opération d’installation et d’entretien.
documentation qui l’accompagne indique que ce produit ne
L’appareil n’est pas destiné à une utilisation par des enfants
peut en aucun cas être traité comme déchet ménager. Il doit
ou des personnes à capacités physiques, sensorielles ou
par conséquent être remis à un centre de collecte des déchets
mentales réduites et sans expérience et connaissance à
chargé du recyclage des équipements électriques et
moins qu’ils ne soient sous la supervision ou formés sur
électroniques.
l’utilisation de l’appareil par une personne responsable de leur
Pour la mise au rebut, respectez les normes relatives à
sécurité.
l’élimination des déchets en vigueur dans le pays
Les enfants doivent être surveillés afin qu’ils ne jouent pas
d’installation.
avec l’appareil.
Pour obtenir de plus amples détails au sujet du traitement, de
Ne jamais utiliser la hotte sans que la grille ne soit montée
la récupération et du recyclage de cet appareil, veuillez vous
correctement!
adresser au bureau compétent de votre commune, à la
La hotte ne doit JAMAIS être utilisée comme plan pour
société de collecte des déchets ou directement à votre
déposer quelque chose sauf si cela est expressément indiqué.
revendeur.
Quand la hotte est utilisée en même temps que d’autres
appareils à combustion de gaz ou d’autres combustibles, le
Utilisation
local doit disposer d’une ventilation suffisante.
La hotte est réalisée de façon qu’elle puisse être utilisée en
L’air aspiré ne doit jamais être envoyé dans un conduit utilisé
version aspirante à évacuation extérieure, ou filtrante à
pour l’évacuation des fumées produites par des appareils à
recyclage intérieur.
combustion de gaz ou d’autres combustibles.
Il est formellement interdit de faire flamber les aliments sous
la hotte.
Version évacuation extérieure
L’utilisation de flammes libres peut entraîner des dégâts aux
Les vapeurs sont évacuées vers l'extérieur à travers un
filtres et peut donner lieu à des incendies, il faut donc les
conduit d'évacuation fixé à la bride de raccord qui se trouve
éviter à tout prix.
au-dessus de la hotte.
La friture d’aliments doit être réalisée sous contrôle pour éviter
17
Attention!
de montage.
Le tuyau d’évacuation n’est pas fourni et doit être acheté à
Attention! Avant de rebrancher le circuit de la hotte à
part.
l’alimentation électrique et d’en vérifier le fonctionnement
Le diamètre du tuyau d'évacuation doit être égal à celui de la
correct, contrôlez toujours que le câble d’alimentation soit
bride de raccord.
monté correctement.
Sur la partie horizontale, le tuyau doit avoir une légère
inclinaison vers le haut (10° env.) de façon à convoyer plus
Montage
facilement l’air vers l’extérieur.
La hotte est équipée de chevilles de fixation convenant à la
Si la hotte est équipée d'un filtre à charbon, ce dernier doit
plupart des parois/plafonds. Il est cependant nécessaire de
être enlevé.
s’adresser à un technicien qualifié afin de s’assurer que le
Relier la hotte aux tubes et trous d’évacuation de la paroi d’un
matériel est approprié au type de paroi/plafond. La
diamètre équivalent à la sortie de l’air (collier de raccord).
paroi/plafond doit être suffisamment solide pour supporter le
L’utilisation de tubes et des trous d'évacuation à paroi avec un
poids de la hotte.
diamètre inférieur entraînera une diminution des
performances d’aspiration et une nette augmentation du bruit.
En présence de panneaux et/ou parois et/ou étagères
Nous déclinons toute responsabilité à cet égard.
latérales, vérifier que l’espace soit suffisant pour installer la
! Utiliser un tuyau de la longueur strictement nécessaire.
hotte et que l’accès aux commandes soit pratique.
! Les coudes du tuyau doivent être en nombre minime
(angle maxi du coude: 90°).
Uniquement pour certains modèles
! Éviter les variations excessives de section du tuyau.
Comme accessoire optionnel, on peut acheter une cheminée
! Utiliser un tuyau le plus lisse possible sur sa partie
esthétique, vérifier auprès du revendeur autorisé si le modèle
interne.
en votre possession prévoit cette possibilité.
! Le matériau du tuyau doit être aux normes.
On conseille d’installer la hotte après avoir acheté la
cheminée pour vérifier avec sécurité l’installation la plus
adéquate.
Version recyclage
Il convient d’utiliser un filtre à charbon actif, disponible auprès
Fonctionnement
de vôtre revendeur habituel.
Utiliser la puissance d’aspiration maximum en cas de
L’air aspiré sera dégraissé et désodorisé avant d’être refoulé
concentration très importante des vapeurs de cuisson. Nous
dans la pièce à travers la grille supérieure.
conseillons d’allumer la hotte 5 minutes avant de commencer
la cuisson et de la faire fonctionner encore pendant 15
Les modèles sans moteur d’aspiration fonctionnent
minutes environ après avoir terminé la cuisson.
uniquement dans la version aspirante et ils doivent être
connectés à une unité périphérique d’aspiration (non fournie).
Les instructions de raccordement sont fournies avec l’unité
périphérique d’aspiration.
Installation
La distance minimum entre la superficie de support des
récipients sur le dispositif de cuisson et la partie la plus basse
de la hotte de cuisine ne doit pas être inférieure à 30cm dans
le cas de cuisinières électriques et de 35cm dans le cas de
cuisinières à gaz ou mixtes.
Si les instructions d’installation du dispositif de cuisson au gaz
spécifient une plus grande distance, il faut en tenir compte.
Branchement électrique
La tension électrique doit correspondre à la tension reportée
sur la plaque signalétique située à l’intérieur de la hotte. Si
une prise est présente, branchez la hotte dans une prise
murale conforme aux normes en vigueur et placée dans une
zone accessible également après l’installation. Si aucune
prise n’est présente (raccordement direct au circuit
électrique), ou si la prise ne se trouve pas dans une zone
accessible également après l’installation, appliquez un
disjoncteur normalisé pour assurer de débrancher
complètement la hotte du circuit électrique en conditions de
catégorie surtension III, conformément aux règlementations
18

T1. OFF hotte
Alarmes anomalie
En appuyant sur la touche,la hotte passe du fonctionnement,
En cas d’anomalie du moteur (blocage, surchauffe, etc.),
en toute modalité d’aspiration, à l’état OFF.
toutes les fonctions du moteur seront bloquées (à l’exclusion
de l’éclairage), les touches T2, T3, T5 et les VOYANTS L1,
T2. Modalité “Silent”
L2, L3, L4 clignoteront
Cette modalité n’est associée à aucune typologie spécifique
A la fin des alarmes, la hotte retourne à l’état OFF.
de cuisson.
En appuyant sur la touche T1, la hotte passe à l’état OFF.
Appuyer sur la touche pour activer la hotte en modalité
Si l’anomalie persiste, la hotte restera à l’état d’alarmes et
silencieuse.
toutes les fonctions resteront bloquées. Contacter l’assistance
En appuyant sur la touche T1 ou T2, la hotte passera à l’état
technique.
OFF.
Entretien
T3. Modalité “Boost”
Attention! Avant toute opération de nettoyage ou
Cette modalité n’est associée à aucune typologie spécifique
d’entretien, débrancher la hotte du circuit électrique en
de cuisson.
enlevant la prise ou en coupant l’interrupteur général de
Appuyer sur la touche en cas de vapeurs et fumées
l’habitation.
particulièrement intenses.
Nettoyage
En appuyant sur la touche T1 ou T3, la hotte passera à l’état
OFF.
La hotte doit être régulièrement nettoyée à l’intérieur et à
l’extérieur (au moins à la même fréquence que pour l’entretien
T4. ON/OFF éclairage
des filtres à graisse). Pour le nettoyage, utiliser un chiffon
Appuyer sur la touche pour allumer ou éteindre l’éclairage.
humidifié avec un détergent liquide neutre. Ne pas utiliser de
L’éclairage s’allume graduellement sans réglage de niveaux
produit contenant des abrasifs.
intermédiaires.
NE PAS UTILISER D'ALCOOL!
ATTENTION: Il y a risque d’incendie si vous ne respectez pas
T5. Modalité de cuisson.
les instructions concernant le nettoyage de l’appareil et le
En appuyant de façon cyclique sur la touche, on active les
remplacement ou le nettoyage du filtre.
différentes modalités d’aspiration.
La responsabilité du constructeur ne peut en aucun cas être
Chaque modalité est associée à différentes typologies de
engagée dans le cas d’un endommagement du moteur ou
cuisson des aliments.
d’incendie liés à un entretien négligé ou au non respect des
Ceci pour obtenir une aspiration optimale sur base des
consignes de sécurité précédemment mentionnées.
différentes exigences.
Écran vapeurs
A chaque modalité d’aspiration correspondra un VOYANT de
L’écran vapeurs doit toujours rester fermé et doit être ouvert
signalement.
uniquement en cas d’entretien (par ex: nettoyage ou
remplacement des filtres).
• Modalité “Slow cooking” Voyant L1 allumé
Filtre anti-gras
Appuyer sur la touche durant la cuisson des légumes à
Fig. 13-27
la poêle, durant le réchauffement de boissons (lait, café,
Il retient les particules de graisse issues de la cuisson.
thé).
Le filtre doit être nettoyé une fois par mois (ou lorsque le
• Modalité “Boiling” Voyant L2 allumé
système d’indication de saturation des filtres – si prévu sur le
Appuyer sur la touche durant la cuisson de sauces,
modèle possédé – indique cette nécessité) avec des
bouillon, légumes bouillis et soupes ou quand on fait
détergents non agressifs, à la main ou dans le lave-vaisselle à
bouillir les aliments (ex. pâtes).
faibles températures et cycle rapide.
• Modalité “Grilling” Voyant L3 allumé
Le lavage du filtre anti-graisse métallique au lave-vaisselle
Appuyer sur la touche en cas de cuisson des légumes
peut en provoquer la décoloration. Toutefois, les
sur une grille ou sur une plaque.
caractéristiques de filtrage ne seront en aucun cas modifiées.
• Modalité “Frying” Voyant L4 allumé
Ouvrir l’écran vapeurs.
Appuyer sur la touche durant la friture d’aliments (ex.
Pour démonter le filtre anti-graisse, tirer la poignée de
viande, patates, légumes).
décrochement à ressort.
Pour sortir de la modalité d’aspiration sélectionnée, appuyer
sur les touches suivantes:
Touche T1 hotte en OFF
Touche T2 activation modalité “Silent”
Touche T3 activation modalité “Boost”
19

Filtre à charbon actif (uniquement pour version
recyclage)
Fig. 26
Retient les odeurs désagréables de cuisson.
Le filtre à charbon peut être nettoyé tous les deux mois avec
de l’eau chaude et au moyen de détergents appropriés ou
dans le lave-vaisselle à 65°C (dans le cas de lavage dans le
lave-vaisselle suivre un cycle de lavage complet sans
vaisselle à l’intérieur).
Enlever l’eau qui excède en faisant attention de ne pas
abîmer le filtre, ensuite le mettre dans le four pendant 10
minutes à 100°C pour le sécher définitivement. Remplacer le
coussinet tous les 3 ans et chaque fois que le filtre sera
abîmé.
• Montage
Ouvrir l’écran vapeurs et enlever le filtre à graisse.
Installer le filtre à charbon à l’arrière du filtre à graisse et
fixer avec deux baguettes.
Attention! Les baguettes sont incluses dans la
confection du filtre à charbon et non sur la hotte.
• Pour démonter le filtre, procéder en sens inverse.
Remplacement des lampes
La hotte est dotée d’un système d’éclairage basé sur la
technologie LED.
Les LEDS garantissent un éclairage optimal, une durée
jusqu’à 10 fois supérieures aux ampoules traditionnelles et
permettent une épargne de 90% en énergie électrique.
Pour le remplacement, s’adresser au service d’assistance
technique.
20
