Canon i-SENSYS MF8380Cdw: English
English: Canon i-SENSYS MF8380Cdw
Table of contents
- Wireless LAN Setting Guide
- English Contents Table des matières Sommario Inhalt
- English Checking Before the Setup Véri fi cation avant la con fi guration Controllo prima della con fi gurazione Überprüfen vor der Einrichtung
- English Switching the Connection Method to Wireless LAN Changement de méthode de connexion pour choisir Réseau sans fi l Cambiare il metodo di connessione in LAN wireless Umschalten der Verbindungsmethode zu Wireless LAN
- ENG ENG ENG Selecting a Method for Setting the Wireless LAN Sélectionnez une méthode de con fi guration du réseau sans fi l Selezione di un metodo di impostazione della LAN wireless Auswählen einer Methode zur Einstellung des Wireless LANs
- English Setting the Machine Using the WPS (Push Button Mode) Con fi guration de la machine avec les fonctions WPS (système à bouton poussoir) Con fi gurazione della macchina utilizzando WPS (pressione del pulsante) Einrichten des Geräts mit WPS (Tastenwahlmodus)
- English
- English English Setting the Access Point Manually and Connecting Con fi guration manuelle et connexion du point d'accès Impostazione manuale dell'Access Point e connessione Manuelles Einstellen des Access Points und Herstellen einer Verbindung
- English
- English
- English
- English
- English
- English
- English Checking the Wireless LAN Setting is Completed La véri fi cation des réglages de réseau sans fi l est terminée Veri fi care la completezza della con fi gurazione della LAN wireless Überprüfen, ob die Einstellung des Wireless LANs abgeschlossen ist
- English
- English Checking SSID or Network Key for a Wireless LAN Router/Access Point Véri fi cation du SSID ou de la clé réseau d'un routeur/point d'accès de réseau sans fi l Controllo del SSID o della chiave di rete di un router LAN wireless o Access Point Überprüfen der SSID oder des Netzwerkschlüssels für einen Router/Access Point für Wireless LAN
- English
English Français
Italiano Deutsch
11
Searching...
Recherche en cours...
English
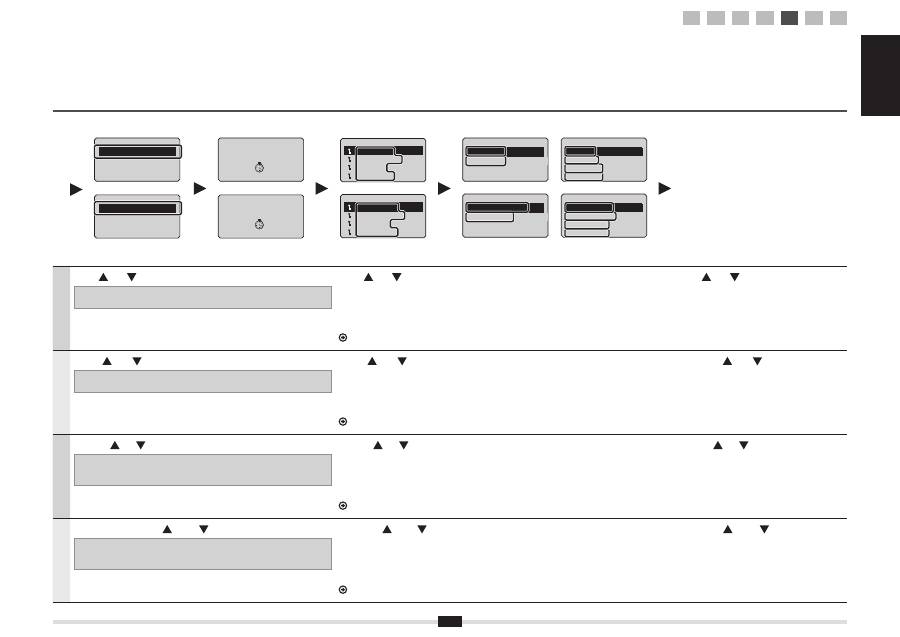
Press [
] or [
] to select, and press [OK].
If <Cannot
fi
nd access point> is displayed.
Press [OK] to close the screen and resume from two steps before.
Press [
] or [
] to select the SSID* that you wrote down, and press [OK].
* SSID is displayed in front of "WEP" "WPA" "None".
If multiple matched SSIDs are displayed, select the ID that is listed
fi
rst (the one with the
strongest signal).
If you cannot
fi
nd the SSID, refer to the section below:
Proceed to "A-2 Checking SSID or Network Key for a Wireless LAN Router/Access Point".
Press [
] or [
] to select the entry format that
matches the number of characters or digits that
you wrote down, and press [OK].
Français
Utiliser [
] ou [
] pour sélectionner l'option voulue, puis appuyer sur [OK].
Si le message <Point d'accès introuvable> s'af
fi
che.
Appuyer sur [OK] pour fermer l'écran et reprenez la procédure deux étapes plus haut.
Utiliser [
] ou [
] pour sélectionner le SSID* noté précédemment, puis appuyer sur [OK].
* Le SSID est af
fi
ché en regard de la mention "WEP", "WPA" ou "Aucun".
Si l'écran af
fi
che plusieurs SSID correspondants, sélectionnez l'ID qui apparaît en début de
liste (signal le plus puissant).
Si le SSID est introuvable, reportez-vous à la section suivante :
Passez à "A-2 Véri
fi
cation du SSID ou de la clé réseau d'un routeur/point d'accès de réseau sans
fi
l".
Appuyer sur [
] ou [
] pour sélectionner le
format de saisie correspondant au nombre de
caractères ou de chiffres que vous avez noté plus
haut, puis appuyer sur [OK].
Italiano
Utilizzare [
] e [
] per effettuare la selezione, quindi premere [OK].
Se viene visualizzato il messaggio <Punto di accesso non trovato>.
Premere [OK] per chiudere la schermata e riprendere la procedura tornando indietro di due
passaggi.
Premere [
] o [
] per selezionare il SSID* annotato e premere [OK].
* Il SSID è mostrato davanti a "WEP" "WPA" "Nessuno".
Se vengono visualizzati più SSID corrispondenti, selezionare l'ID elencato in prima posizione
(quello con il segnale più forte).
Se non si riesce a trovare il SSID, consultare la sezione seguente:
Procedere da "A-2 Controllo del SSID o della chiave di rete di un router LAN wireless o Access Point".
Utilizzare [
] e [
] per selezionare il formato
d'immissione corrispondente al numero di caratteri
o di cifre annotato, quindi premere [OK].
Deutsch
Drücken Sie zur Auswahl [
] oder [
], und drücken Sie [OK].
Wenn <Access Point kann nicht gefunden werden> angezeigt wird.
Drücken Sie [OK], um den Bildschirm zu schließen, und führen Sie die beiden vorherigen
Schritte erneut aus.
Drücken Sie [
] oder [
], um die von Ihnen notierte SSID* auszuwählen, und drücken Sie [OK].
* SSID wird vor "WEP" "WPA" "Keine" angezeigt.
Wenn mehrere entsprechende SSIDs angezeigt werden, wählen Sie die ID aus, die als erstes
aufgelistet wird (die ID mit dem stärksten Signal).
Wenn Sie die SSID nicht
fi
nden können, lesen Sie im unten aufgeführten Abschnitt nach:
Fahren Sie mit "A-2 Überprüfen der SSID oder des Netzwerkschlüssels für einen Router/Access Point für Wireless LAN" fort.
Drücken Sie [
] oder [
], um das
Eingabeformat auszuwählen, das der von
Ihnen notierten Anzahl der Zeichen oder Ziffern
entspricht, und drücken Sie [OK].
SSID Settings
Select Access Point
Manual Settings
Réglages SSID
Choisir point d'accès
Réglages manuels
Select Access Point
SampleABCD WEP 13
SampleEFGHIJ WPA-PS
SampleKL WPA2-PSK 9
SampleMNOP None 7
Choisir point d'accès
ExempleABCD WEP 13
ExempleEFGHIJ WPA-
...
ExempleKL WPA2-PSK
...
ExempleMNOP Aucun 7
Entry Format
5 Char. (40bit ASCII)
13 Char. (104bit ASC
...
10 Digits (40bit Hex)
26 Digits (104bit Hex)
Format de saisie
5 caractères (40 bits
13 caractères (104 b
...
10 chiffres (40 bits
...
26 chiffres (104 bit
...
Entry Format
8-63 Char. (ASCII)
64 Digits (Hex)
Format de saisie
8-63 caractères (AS
64 chiffres (Hex)
1
2
3
4-A 4-B A-1 A-2
