MB QUART Premium PTE 25: инструкция
Раздел: Авто, мото оборудование и транспорт
Тип: Автомобильная Колонка
Инструкция к Автомобильной Колонке MB QUART Premium PTE 25
One name – one promise
Ein Name – ein Versprechen
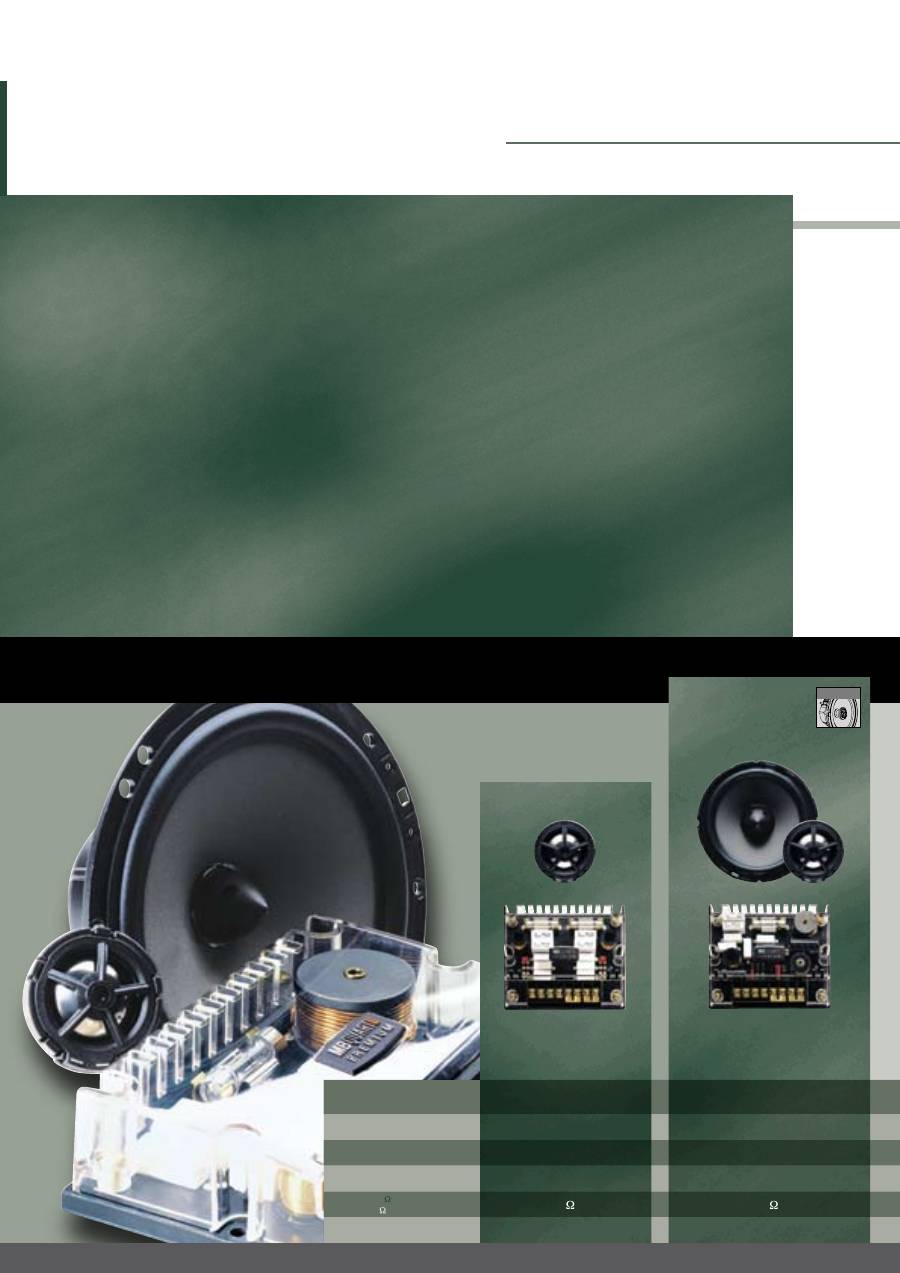
Premium
Borrowing from the Q-Line and taking the best our Reference-Line has to offer MB QUART’s
Premium-Line goes a way of its own. Experience high-quality car audio on an excellent sound
and quality level. With the Premium-Line, special focus has been put on fine details: crossovers
with high-quality, selected components; consequent implementation of MB QUART’s proprietary
Balanced Temperature Technology; high-performance tweeters with 1” titanium dome and
woofers with optimized mounting features. To put it simple — a high-performance system for
those who want a step above MB QUART’s Reference-Line.
Mit Anleihen aus der Q-Line und dem Besten, was die Reference-Line zu bieten hat, geht die
Premium-Line von MB QUART einen individuellen Weg. Klanglich und qualitätsmäßig auf einem
exzellenten Niveau erleben Sie hochwertiges Car-Hifi. Das besondere Augenmerk liegt bei der
Premium-Line auf den feinen Details: Frequenzweichen mit hochwertigen, selektierten Bauteilen,
konsequente Umsetzung der von MB QUART entwickelten Balanced Temperature Technology,
leistungsfähige Hochtöner mit 25 mm Titan-Hochtonkalotte und optimal verbaubare Tieftöner.
Kurz ein Hochleistungssystem für alle, die der Reference-Line von MB QUART noch eins
draufsatteln wollen.
P R E M I U M
9 / 10
PTE 25
PCE 210
PCE 213
PCE 216
PCE 164
PRINCIPLE
PRINZIP
Tweeter Kit
Hochtöner-Set
2-Way Component/Coaxial System
2-Wege-Komponenten/Koaxial-System
2-Way Component/Coaxial System
2-Wege-Komponenten/Koaxial-System
2-Way Component/Coaxial System
2-Wege-Komponenten/Koaxial-System
Add-A-Woofer-System
DIAMETER TWEETER / WOOFER
DURCHMESSER HOCH- / TIEFTÖNER
1“ / - ( 25 mm / - )
1“ / 4“ ( 25 mm / 10 cm )
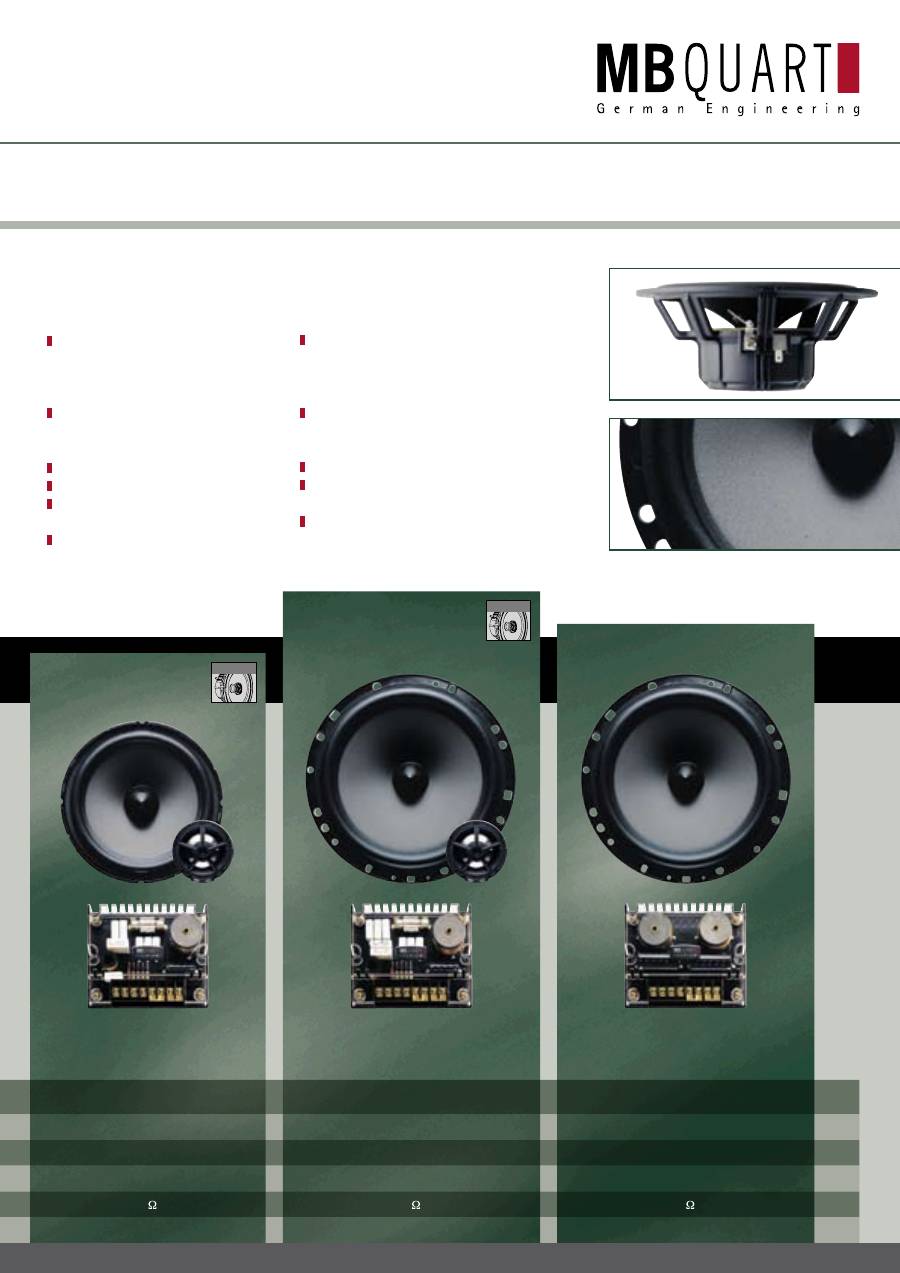
1“ / 5.25“ ( 25 mm / 13 cm )
1“ / 6.5“ ( 25 mm / 16 cm )
- / 6.5“ ( - / 16 cm )
POWER HANDLING (W)
BELASTBARKEIT (W)
120 W
30 – 80 W
40 – 100 W
60 – 130 W
60 – 130 W
FREQUENCY RESPONSE (Hz)
ÜBERTRAGUNGSBEREICH (Hz)
< 32.000 Hz
59 – 32.000 Hz
52 – 32.000 Hz
38 – 32.000 Hz
38 – 280 Hz
IMPEDANCE ( )
IMPEDANZ ( )
6
4
4
4
4
CROSSOVER FREQUENCY (Hz)
ÜBERTRAGUNGSFREQUENZ (Hz)
3.000 Hz
2.500 Hz / HP 250 Hz
2.500 Hz
2.500 Hz
250 Hz
+ COAXIAL
One name – one promise
Ein Name – ein Versprechen
P R E M I U M
9 / 10
PTE 25 PCE 210 PCE 213 PCE 216 PCE 164
PRINCIPLE
PRINZIP
Tweeter Kit
Hochtöner-Set
2-Way Component/Coaxial System
2-Wege-Komponenten/Koaxial-System
2-Way Component/Coaxial System
2-Wege-Komponenten/Koaxial-System
2-Way Component/Coaxial System
2-Wege-Komponenten/Koaxial-System
Add-A-Woofer-System
DIAMETER TWEETER / WOOFER
DURCHMESSER HOCH- / TIEFTÖNER
1“ / - ( 25 mm / - )
1“ / 4“ ( 25 mm / 10 cm )
1“ / 5.25“ ( 25 mm / 13 cm )
1“ / 6.5“ ( 25 mm / 16 cm )
- / 6.5“ ( - / 16 cm )
POWER HANDLING (W)
BELASTBARKEIT (W)
120 W
30 – 80 W
40 – 100 W
60 – 130 W
60 – 130 W
FREQUENCY RESPONSE (Hz)
ÜBERTRAGUNGSBEREICH (Hz)
< 32.000 Hz
59 – 32.000 Hz
52 – 32.000 Hz
38 – 32.000 Hz
38 – 280 Hz
IMPEDANCE ( )
IMPEDANZ ( )
6
4
4
4
4
CROSSOVER FREQUENCY (Hz)
ÜBERTRAGUNGSFREQUENZ (Hz)
3.000 Hz
2.500 Hz / HP 250 Hz
2.500 Hz
2.500 Hz
250 Hz
PREMIUM PCE
Woofers with one-piece plastic
chassis, insert injection-molded
magnet system and WPC-coated
polypropylene cone
1” tweeters with two-piece
titanium dome in metal housing
with neodymium magnet
Separate or coaxial mounting
Metal phase-plug and tweeter support
Premium crossovers with variable
four-level tweeter output
Bi-wiring and bi-amping enabled
PREMIUM PCE
Tieftöner mit einteiligem Kunststoff–
chassis, umspritztem Magnetsystem und
mit WPC beschichteten Polypropylen-
Membran
25 mm Hochtöner mit zweiteiliger
Titankalotte im Metallgehäuse und
Neodymnagnet
Separate oder koaxiale Verbaubarkeit
Premium-Frequenzweichen mit variabler
Hochtonabsenkung in vier Stufen
Bi-Wiring- und Bi-Amping-fähig
+ COAXIAL
+ COAXIAL

Einbauanleitung
Installation Manual
Directiones de installation
Instrucciones de instalación
Istruzioni di montaggio
àÌÒÚÛ͈Ëfl ÔÓ ÛÒÚ‡ÌÓ‚ÍÂ
P R E M I U M P T E 2 5
M A X X S O N I C S E U R O P E G M B H
Neckarstraße 20
74847 Obrigheim, Germany
Phone +49 (0) 62 61 - 6 38-0
FAXX +49 (0) 62 61 - 6 38-129
E-Mail info@mbquart.de
Website www.mbquart.de
M A X X S O N I C S U S A , I N C .
1290 Ensell Road
Lake Zurich, Illinois 60047 USA
Phone +1 847 - 540 - 7700
FAXX +1 847 - 540 - 9776
E-Mail info@maxxsonics.com
Website www.maxxsonics.com
Herzlichen Glückwunsch!
Mit dem Kauf eines Car-HiFi Lautsprechersets aus dem Hause
MB QUART haben Sie sich für ein technisch und qualitativ hoch–
wertiges Produkt entschieden. MB QUART wünscht Ihnen viel Spaß
mit Ihrem Premium System. Sollten Sie Fragen zu Premium oder
anderen MB QUART Produkten haben, freuen wir uns über eine
Mail an
info@mbquart.de
oder Ihren persönlichen Anruf unter
+49 6261 638-0
.
Wenn Sie den Einbau nicht durch eine Fachwerkstatt vornehmen
lassen, lesen Sie bitte nachstehende Einbauhinweise sorgfältig durch.
Congratulations!
With the purchase of a MB QUART car hi-fi loudspeaker set, you
have purchased a technically sophisticated, high-quality product.
MB QUART feels confident that you will enjoy your new Premium
system. Should you have any questions about Premium or any
other MB QUART products, please feel free to send us an email to
info@mbquart.de
or give us a call at
+49 6261 638-0
.
If you are not having the installation carried out by a specialist work-
shop, please read the following installation instructions carefully.
Félicitations!
Vous venez d’acquérir en achetant un lot de haut-parleurs hi-fi pour
voitures de la maison MB QUART un produit de grande valeur sur
le plan technique et qualitatif. MB QUART vous souhaite beaucoup
de plaisir avec votre système Premium. Envoyez-nous un mail
info@mbquart.de
ou téléphonez-nous si vous avez des questions
à propos du Premium ou de tout autre produit MB QUART
+49 6261 638-0
.
Si vous préférez vous charger vous-même du montage au lieu d’en
laisser le soin à un atelier spécialisé, veuillez lire soigneusement la
notice d’installation et de montage ci-dessous.
¡Enhorabuena!
Con la compra de un set de altavoces Car-HiFi de MB QUART, ha
adquirido usted un producto de alta calidad técnica. MB QUART
le desea que disfrute con su Premium System. Si tiene alguna
pregunta acerca de Premium u otro producto MB QUART, la con-
testaremos gustosamente por mail
info@mbquart.de
o por teléfono
+49 6261 638-0
.
Si no encarga el montaje a un taller especializado, lea atentamente
las instrucciones de montaje siguientes.
Congratulazioni!
Acquistando un’altoparlante Hi-Fi Car MB QUART, avete scelto un
prodotto di massimo livello tecnologico e qualitativo. MB QUART
Vi augura un buon ascolto con il Vostro, nuovo, sistema Premium
Qualora desideriate porgere quesiti riguardanti i modelli della
Premium od altri prodotti della MB QUART, saremo lieti di risponder-
vi per posta elettronica
info@mbquart.de
o telefonicamente
+49
6261 638-0
.
Nel caso in cui non incarichiate dell’installazione un’officina speci-
alizzata, vi preghiamo di leggere attentamente le seguenti note di
installazione.
Примите наши сердечные поздравления!
Купив комплект автомобильных громкоговорителей категории
Hi-Fi фирмы MB QUART Вы выбрали высококачественное в
техническом отношении изделие. Фирма MB QUART желает Вам
приятного времяпровождения с Вашей системой
Premium
. Если
у Вас появятся вопросы по этой системе или по другим изделиям
фирмы MB QUART, будем рады получить от Вас письмо по
электронной почте
info@mbquart.de
или услышать Вас по
телефону
+49 6261 638-0
.
Если Вы не собираетесь приглашать для выполнения монтажа
представителя специализированного предприятия, внимательно
прочитайте помещённую ниже инструкцию по сборке.
Art.-Nr. 90-7937

Beachten Sie bei Einbau und Betrieb des Lautsprechers die
Sicherheitsbestimmungen über tragende Karosserieteile, die
Bestimmungen der StVZO sowie Vorschriften der Fahrzeughersteller.
Informieren Sie sich, ob Sie evtl. fahrzeugspezifische MB QUART
Einbauadapter benötigen. Schützen Sie Ihre Lautsprecher bei Einbau
und Betrieb vor Beschädigung, Spritzwasser und Überlastung.
Klemmen Sie während der Montage die Minusklemme der
Fahrzeugbatterie ab, um mögliche Kurzschlüsse zu vermeiden.
Berühren Sie bitte nicht die empfindliche Oberfläche der Hoch- und
Tieftonmembrane. Verwenden Sie niemals die Lautsprecherchassis
als Schneid- oder Bohrvorlage.
Please observe the safety requirements relating to supporting chas-
sis members, the applicable road safety regulations and the
instructions of the vehicle manufacturer when installing and using
the loudspeakers. Find out whether you might need specific MB
QUART installation adapters for your vehicle. Always protect your
loudspeak-ers during installation and use against damage, spray
water and overloading. Disconnect the minus terminal of the vehicle
battery during installation in order to avoid possible short-circuits.
Please do not touch the delicate surface of the tweeter and woofer
membranes. Never use the loudspeaker chassis itself as a cutting or
drilling template.
Respectez lors du montage et de l’utilisation du haut-parleur les
directives de sécurité concernant les pièces de carrosserie porteuses,
les spécifications du Service des Mines ainsi que les consignes du
constructeur automobile. Renseignez-vous pour savoir si vous avez
besoin éventuellement d’adaptateurs MB QUART pour votre véhicu-
le. Protégez vos haut-parleurs lors du montage et de l’utilisation de
toute dégradation, projection d’eau et surcharge. Débranchez pen-
dant le montage la borne moins de la batterie du véhicule afin d’évi-
ter tout court-circuit éventuel. Veuillez ne pas toucher la surface
sensible de la membrane des aiguës et des graves. N’utilisez jamais
le châssis du haut-parleur pour couper ou percer dessus.
Durante el montaje y funcionamiento del altavoz tenga en cuenta
las normas de seguridad sobre las piezas de soporte de la carrocería,
las disposiciones del Código de Circulación así como las prescripcio-
nes del fabricante del vehículo. Infórmese de si necesita un adapta-
dor MB QUART para el montaje específico para el vehículo. Durante
el montaje y su funcionamiento, proteja su altavoz contra daños,
salpicaduras de agua y sobrecarga. Durante el montaje, desemborne
la borna negativa de la batería del vehículo para evitar cortocircui-
tos. No toque la superficie sensible de la membrana de agudos y gra-
ves. No utilice nunca el chasis del altavoz como plantilla para cort-
ar o taladrar.
Vogliate osservare durante l’installazione ed il funzionamento
dell’altoparlante le norme di sicurezza in merito a parti portanti
della carrozzeria, le norme del Codice di circolazione stradale e le
altre disposizione del costruttore dell’autoveicolo. Vogliate
informarVi nel caso abbiate bisogno di un adattatore di montaggio
della MB QUART specifico per il Vs. veicolo. Durante il montaggio ed
il funzionamento proteggete il Vs. altoparlante da danni, spruzzi
d’acqua e sovraccarico. Staccate durante il montaggio il morsetto
meno della batteria del veicolo, per evitare eventuali corti circuiti. Vi
preghiamo di non toccare la sensibile membrana delle basse ed alte
frequenze. Non utilizzate mai il complesso portante dell’altoparlan-
te radio come base di taglio o di foratura.
При установке и во время эксплуатации громкоговорителей
обратите особое внимание на соблюдение требований техни-
ческой безопасности, касающихся несущих деталей кузова
автомобиля, а также правила эксплуатации транспортных
средств и предписания завода-изготовителя автомобиля.
Проконсультируйтесь, не понадобятся ли Вам установочный
адаптер фирмы MB QUART, необходимый для данного типа
автомобиля. Предохраняйте Ваши громкоговорители при
установке и дальнейшей эксплуатации от повреждений, воды и
перегрузок. Во избежание короткого замыкания, отсоедините на
время монтажа минусовую клемму автомобильной батареи. Не
прикасайтесь, пожалуйста, к чувствительной поверхности мембран
высоких и низких частот. Не используйте ни в коем случае корпус
громкоговорителя в качестве шаблона для резки или сверления.
P R E M I U M P T E 2 5
Allgemeines
General
Généralités
Indicaciones generales
Informazioni generali
鷢ˠÂÍÓÏẨ‡ˆËË
Jahre
years
ans
años
anni
goda
Garantie
Warranty
Garantie
Garantía
Garanzia
Srok Garantii
3
Bitte bewahren Sie Ihren Kaufbeleg für Garantiezwecke auf.
Please keep your purchasing slip for warranty reasons.
Veuillez conserver le reçu de caisse pour la garantie.
Por favor conserve su comprobante de compra a efectos de garantía.
Conservate la ricevuta di acquisto ai fini della garanzia.
Soxranite, poøalujsta hek dlå sluhaev, trebuœwix
predostavleniå garantii.
1
2
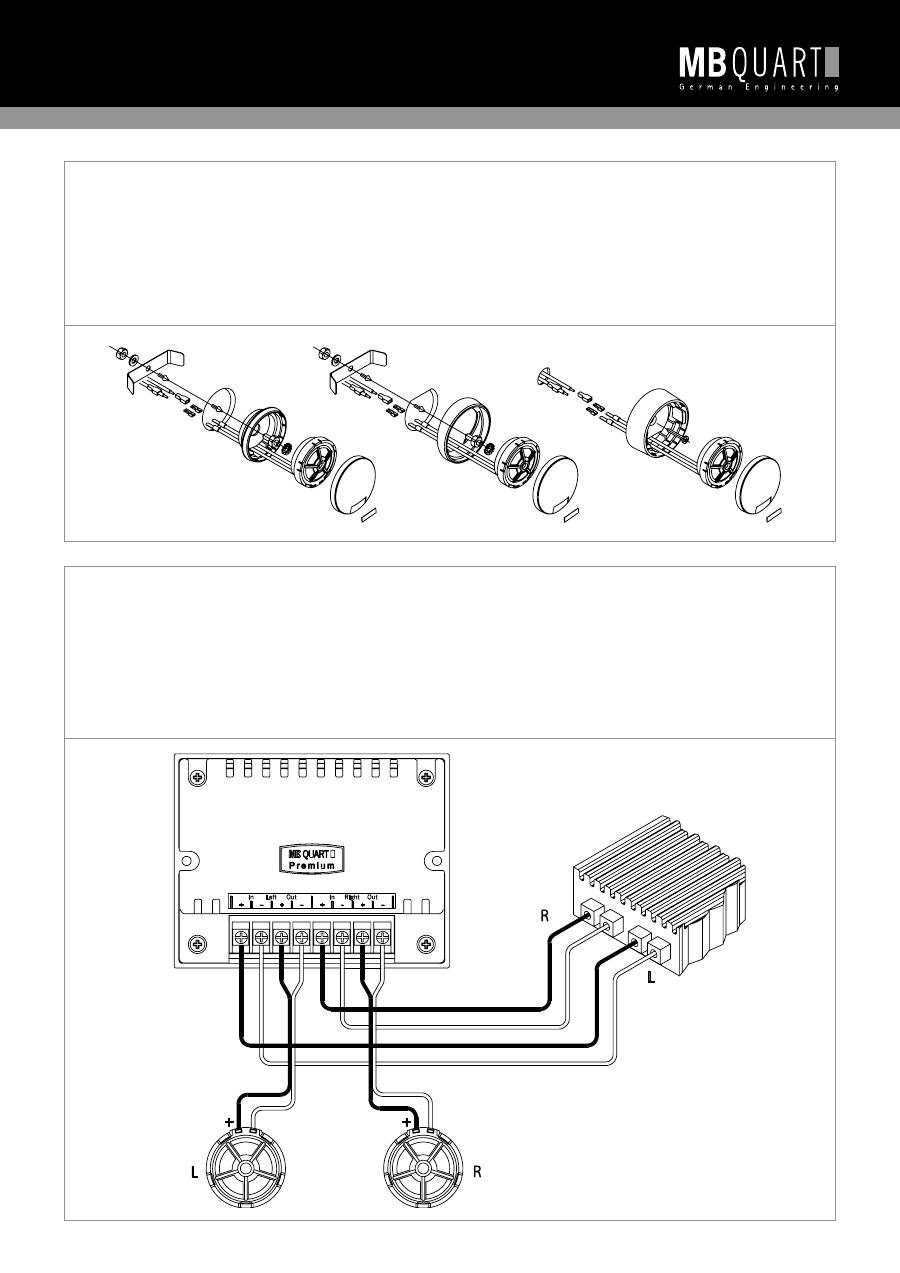
Anschlusshinweise Frequenzweiche
Connecting instructions – crossover
Consignes de branchement du filtrage de fréquence
Indicaciones de conexión del diplexor
Istruzioni di collegamento del filtro passivo
àÌÒÚÛ͈Ëfl ÔÓ ÔÓ‰Íβ˜ÂÌ˲ ˜‡ÒÚÓÚÌÓ-‡Á‰ÂÎËÚÂθÌÓ„Ó ÙËθڇ
Montagemöglichkeiten Hochtöner
Assembly options - tweeter
Possibilités de montage des aiguës
Posibilidades de montaje del altavoz de agudos
Istruzioni di montaggio di un altoparlante per alte frequenze
ëÔÓÒÓ·˚ Ò·ÓÍË ‚˚ÒÓÍÓ˜‡ÒÚÓÚÌ˚ı ÂÔÓ‰ÛÍÚÓÓ‚

P R E M I U M P T E 2 5
Achten Sie vor der Montage der Lautsprecherkomponenten dar-
auf, dass beim Einbau hinter der Auflage keine Hindernisse wie z.B.
Fenstermechanik oder Airbag vorhanden sind. Ebenso ist darauf zu
achten, dass die Frontgitter genügend Abstand zu Funktionsteilen wie
Fensterkurbel oder Türgriff haben. Verbinden Sie die Anschlüsse der
Lautsprecher mit den Elektronikkomponenten wie in den Abbildungen
aufgezeigt. Bitte achten Sie immer auf die richtige Polung.
Hochtonabsenkung: Der Hochtonpegel der Frequenzweiche ist werk-
seitig auf 0 dB – das heißt auf maximalen Pegel – eingestellt. Sie
können den Pegel in 2 dB Stufen bis zu -6 dB absenken. Zum Absenken
müssen Sie lediglich die Jumper mit der Bezeichnung Tweeter um
eine Position umstecken. Führen Sie danach eine Hörprobe durch.
Sollte der Hochtonpegel immer noch zu hoch sein, schalten Sie Ihre
Anlage wieder ab und stecken den Jumper um eine Position wei-
ter. Nach Feststellung der Funktion können Sie bei abge-schalteter
Anlage die Polung der Hochtöner probeweise ändern (Plus und Minus
vertauschen). Dies kann je nach Einbausituation zu einer besse-
ren räumlichen Abbildung führen. Eventuell die Pegel nachstellen.
Please make sure when fitting the loudspeaker components behind
fascia panelling that there are no obstacles behind it to prevent the
required installation depth, such as the window mechanism or air-
bags. Also take care to ensure that there is sufficient room between
the front grill and moving parts such as window- or door-handles.
Connect the loudspeaker with the electronics components as shown
in the diagram. Take care to ensure the correct polarity.
Tweeter adjustment: The tweeter frequency level is set during
manufacture to 0 dB, i.e. to the maximum level. You can reduce the
level in stages of 2 dB as far as -6 dB. To reduce the level, simply
move the jumper marked “Tweeter” by one position. Then carry out
a listening test. If the tweeter level is still too high, switch the
system off and move the jumper one position further. After establish-
ing that the loudspeakers work properly, you can switch the system
off and again reverse the polarity of the tweeters (by reversing the
plus and minus leads). Depending on the installation conditions, this
may provide better acoustics.
Veillez, avant de monter les composants du haut-parleur, à ce qu’il
n’y ait aucun obstacle derrière le support, comme par exemple le
mécanisme de vitre ou un airbag. Veillez également à ce que la dis-
tance entre la grille frontale et les éléments fonctionnels comme par
exemple le lève-vitre ou la poignée de portière soit suffisante. Reliez
les raccords des haut-parleurs avec les composants électroniques de
la manière indiquée sur les illustrations. Attention à ce que la pola-
rité soit correcte.
Abaissement du niveau des aiguës: Le niveau des aiguës du diviseur
de fréquence est réglé en usine sur 0 dB - ce qui équivaut au niveau
maximum. Vous pouvez réduire le niveau par étapes de 2 dB jusqu’à
-6 dB. Pour cela, il vous suffit de brancher les cavaliers marqués
Tweeter un emplacement plus loin. Procédez ensuite à un test acou-
stique. Si le niveau des aiguës est malgré tout encore trop élevé,
déconnectez à nouveau votre installation et branchez le cavalier un
emplacement plus loin. Après avoir constaté son bon fonctionne-
ment, vous pouvez modifier la polarité des aiguës (permutation du
pôle positif et du pôle négatif) à condition que l’installation soit
déconnectée. Cela peut permettre, en fonction du site de montage,
d’obtenir une meilleure projection tridimensionnelle. Ajustez éventu-
ellement le niveau.
Antes de montar el altavoz compruebe que detrás del soporte no
haya ningún obstáculo, como por ejemplo, el sistema mecánico de
la ventanilla o el airbag. También debe comprobarse que la rejilla
frontal tenga una distancia suficiente a las piezas funcionales como
la maneta de la ventanilla o la manilla de la puerta. Establezca las
conexiones del altavoz con los componentes electrónicos tal como
se muestra en las imágenes. Compruebe en todo momento que la
polaridad sea correcta.
Bajar los agudos: El nivel de agudos del diplexor viene ajustado de
fábrica a 0 dB – es decir, al nivel máximo. Puede bajar el nivel en
2 dB hasta -6 dB. Para bajarlo únicamente debe cambiar a una posi-
ción el puente de conexión con la designación tweeter. A continua-
ción realice una prueba de escucha. Si el nivel de agudos es aún
demasiado alto, desconecte de nuevo la instalación y conecte el
puente de conexión a una posición más. Después de comprobar el
funcionamiento correcto puede cambiar la polaridad de los altavo-
ces de agudos con la instalación desconectada (cambiar positivo y
negativo). Según la situación de montaje puede producir una mejor
reproducción tridimensional. Volver a ajustar el nivel en caso
necesario.
Prima di iniziare il montaggio dei componenti dell’altoparlante radio
fate attenzione che durante l’installazione dietro il supporto non ci
siano elementi d’intralcio, come p.e. parti meccaniche del finestrino.
Si prega di voler osservare anche che il retino anteriore sia suffi-
cientemente distante da parti funzionali, come maniglia alzacristal-
li o quella della portiera. Collegate gli allacciamenti dell’altoparlante
con i componenti elettronici come indicato nelle illustrazioni.
Vogliate fare attenzione alla corretta polarizzazione.
Riduzione dell’alta frequenza: Il livello dell’alta frequenza del separa-
tore di frequenze è impostato in sede di produzione su 0 dB- que-sto
significa sul livello massimo. È possibile ridurre il livello in scala di
2 dB fino a - 6dB. Per ottenere tale risultato basta spostare il jum-
per con la denominazione Tweeter di una posizione. Effettuare poi
una prova sonora e se il livello dell’alta frequenza dovesse essere
ancora troppo alto, spegnere di nuovo l’impianto e connettere il
jumper di nuovo spostandolo di una posizione. Dopo aver accertato
il funzionamento, è possibile modificare ancora una volta la pola-
ri-zzazione dell’altoparlante ad alte frequenze, sempre mantenen-
do prima spento l’impianto (scambiare più e meno). A seconda delle
situazione di montaggio può generare una migliore raffigurazione
ambientale, eventualmente correggere il livello.
Перед монтажом компонентов громкоговорителя обратите
внимание на то, чтобы при установке за основанием не было
препятствий наподобие механических деталей окон или на-
дувной подушки безопасности. Также необходимо проследить за
тем, чтобы передние решетки находились на достаточном рас-
стоянии от таких функциональных деталей как ручка стекло-
подъемника или ручка двери. Соедините гнезда для подключения
громкоговорителей с электрическими компонентами, как показано
на рисунках. Всегда следите за правильной полярностью.
Понижение высоких частот: Уровень высоких частот частотного
разделительного фильтра установлен на заводе на 0 дБ – то
есть на максимальный уровень. Вы можете понизить уровень
ступенями по 2 дБ до –6 дБ. Для этого Вам потребуется лишь
переставить на одну позицию штепсели перемычек с обо-
значением „Tweeter“ („высокочастотный громкоговоритель“).
После этого выполните пробное прослушивание. Если уровень
высоких частот все еще будет оставаться высоким, снова
выключите свою систему и переключите перемычку на одну
позицию дальше. После проверки функционирования Вы можете
при выключенной системе попробовать изменить полярность
высокочастотных громкоговорителей (менять местами „плюс“ и
„минус“). В зависимости от ситуации во время монтажа это может
дать более качественный пространственный эффект. В случае
необходимости, выполнить регулировку уровней.
Einbauhinweise
Installation Instructions
Instructions de montage
Indicaciones de instalación
Istruzioni per il montaggio
àÌÒÚÛ͈Ëfl ÔÓ Ò·ÓÍÂ
Art.-Nr. 90-7937
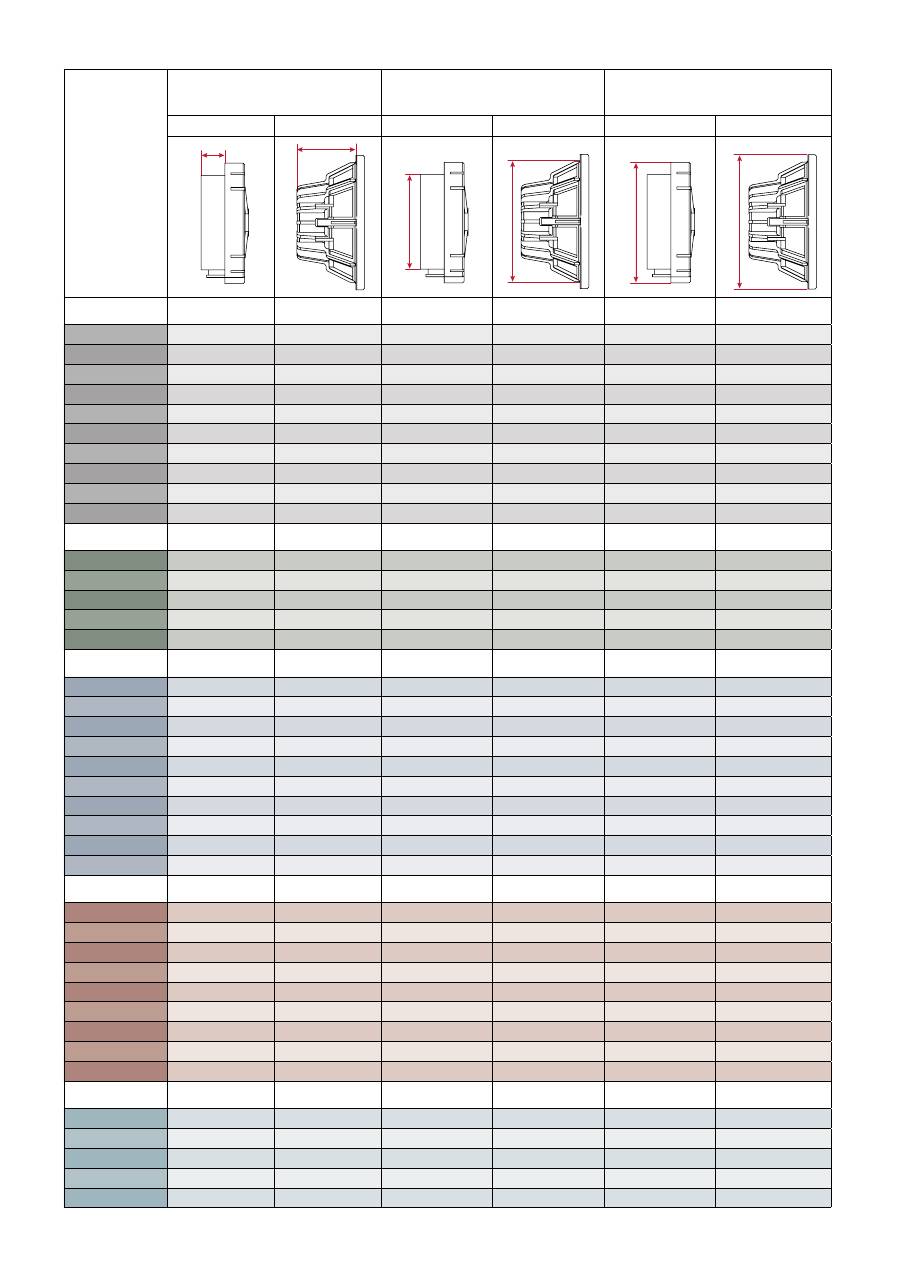
MOUNTING DEPTH
Ø
EINBAUTIEFE
Ø
INSTALLATION
Ø
AUSSCHNITT
Ø
EXTERNAL
Ø
AUSSEN
Ø
Tweeter
Hochtöner
Woofer
Tieftöner
Tweeter
Hochtöner
Woofer
Tieftöner
Tweeter
Hochtöner
Woofer
Tieftöner
Q - L I N E
inch
mm
inch
mm
inch
mm
inch
mm
inch
mm
inch
mm
Q 216
SIGNATURE
0.28
7
2.58
65,5
1.46
37
5.61
142,5
1.77
44,5
6.54
166
QTD 25
0.28
7
-
1.46
37
-
1.77
44,5
-
QSD 210
0.28
7
1.71
43,5
1.46
37
3.39
86
1.77
44,5
3.96
100,5
QSD 213
0.28
7
2.19
55,5
1.46
37
4.49
114
1.77
44,5
5.12
130
QSD 216
0.28
7
2.50
63,5
1.46
37
5.61
142,5
1.77
44,5
6.54
166
QSD 164
-
2.50
63,5
-
5.61
142,5
-
6.54
166
QSC 210
0.28
7
1.71
43,5
1.46
37
3.39
86
1.77
44,5
3.96
100,5
QSC 213
0.28
7
2.19
55,5
1.46
37
4.49
114
1.77
44,5
5.12
130
QSC 216
0.28
7
2.50
63,5
1.46
37
5.61
142,5
1.77
44,5
6.54
166
QSC 164
-
2.50
63,5
-
5.61
142,5
-
6.54
166
P R E M I U M
inch
mm
inch
mm
inch
mm
inch
mm
inch
mm
inch
mm
PTE 25
0.28
7
-
1.46
37
-
1.77
44,5
-
PCE 210
0.28
7
1.81
45,5
1.46
37
3.39
86
1.77
44,5
3.96
100,5
PCE 213
0.28
7
2.40
61
1.46
37
4.49
114
1.77
44,5
5.12
130
PCE 216
0.28
7
2.50
63,5
1.46
37
5.61
142,5
1.77
44,5
6.54
166
PCE 164
-
2.50
63,5
-
5.61
142,5
-
6.54
166
R E F E R E N C E
inch
mm
inch
mm
inch
mm
inch
mm
inch
mm
inch
mm
RTE 20
0.24
6
-
1.16
29,5
-
1.38
35
-
RVF 210
0.24
6
1.81
45,5
1.16
29,5
3.39
86
1.38
35
3.96
100,5
RVF 213
0.24
6
2.40
61
1.16
29,5
4.49
114
1.38
35
5.12
130
RVF 216
0.24
6
2.50
63,5
1.16
29,5
5.61
142,5
1.38
35
6.54
166
RVF 164
-
2.50
63,5
-
5.61
142,5
-
6.54
166
RCE 268
0.24
6
2.44
62
1.16
29,5
6“ x 8“ oval
*
1.38
35
-
RCE 269
0.24
6
3.25
83
1.16
29,5
6“ x 9“ oval
**
1.38
35
-
RUA 210
0.28
7
1.27
32,25
1.46
37
3.39
86
1.77
44,5
3.96
100,5
RUA 213
0.28
7
1.66
42,25
1.46
37
4.49
114
1.77
44,5
5.12
130
RUA 216
0.28
7
1.78
45,25
1.46
37
5.61
142,5
1.77
44,5
6.54
166
D I S C U S
inch
mm
inch
mm
inch
mm
inch
mm
inch
mm
inch
mm
DKF 113
-
2.32
59
-
4.49
114
-
5.12
130
DKF 116
-
2.42
61,5
-
5.61
142,5
-
6.54
166
DSF 213
0.31
8
2.32
59
1.22
31
4.49
114
1.59
40,5
5.12
130
DSF 216
0.31
8
2.42
61,5
1.22
31
5.61
142,5
1.59
40,5
6.54
166
DKF 168
-
2.36
60
-
6“ x 8“ oval
*
-
-
DKF 169
-
3.11
79
-
6“ x 9“ oval
**
-
-
DTF 169
-
3.11
79
-
6“ x 9“ oval
**
-
-
DWE 254
-
5.03
128
-
9.31
237
-
10.5
266
DWE 304
-
5.58
142
-
11.2
283
-
12.4
315
N A U T I C
inch
mm
inch
mm
inch
mm
inch
mm
inch
mm
inch
mm
NKA 116
-
2.99
76
-
5.16
131
-
7.07
179,5
NKD 116
-
2.50
63,5
-
5.79
147
-
6.73
171
NKA 169
-
3.25
83
-
5.9x8.7 150x220
-
6.71x9.56 170,5x243
NWD 254
-
4.61
117
-
8.94
227
-
10.71
272
NKD 254 TT
-
4.61
117
-
8.94
227
-
10.71
272
INSTALLATION DIAMETER
EINBAUMASSE
*
Only for original installation slots.
Nur für original Einbauschächte.
**
External diameter and Installation diameter only as on Installation template.
Außendurchmesser und Ausschnittsdurchmesser bitte nur nach Original-Einbauschablone.
Subject to technical changes.
Technische Änderungen vorbehalten.
