Yamaha CDX-397MK2: CONNECTIONS
CONNECTIONS: Yamaha CDX-397MK2
Table of contents
- CAUTION: READ THIS BEFORE OPERATING YOUR UNIT.
- CONTENTS
- SUPPORTED DISC TYPES FEATURES
- UNPACKING NOTES ABOUT THE REMOTE CONTROL
- CONNECTIONS
- IDENTIFICATION OF COMPONENTS Front panel Display
- Remote control
- BASIC OPERATION
- To pause playback To turn off the power To play back the desired track To stop playback To search an folder/file on an MP3 or WMA disc
- To advance or reverse playback rapidly (Manual search) To skip to the beginning of the desired track (Skip search)
- Changing display
- Changing brightness of the display Automatic spacing Adjusting the output level
- RANDOM-SEQUENCE PLAY REPEAT PLAY Repeat a selected item
- Repeat A-B
- PROGRAM PLAY
- INDEX SEARCH
- TRACK PROGRAMMING FOR RECORDING TO TAPE Automatic tape-programming (for Audio CD)
- Notes
- Manual tape-programming (for Audio CD)
- Random sequential tape-programming (for Audio CD)
- Automatic searching for the peak level on a disc (for Audio CD)
- CD SYNCHRONIZED RECORDING
- Notes about handling compact discs Discs playable with this unit NOTES ABOUT DISCS
- SYMPTOM TROUBLESHOOTING
- SPECIFICATIONS
4
En
■
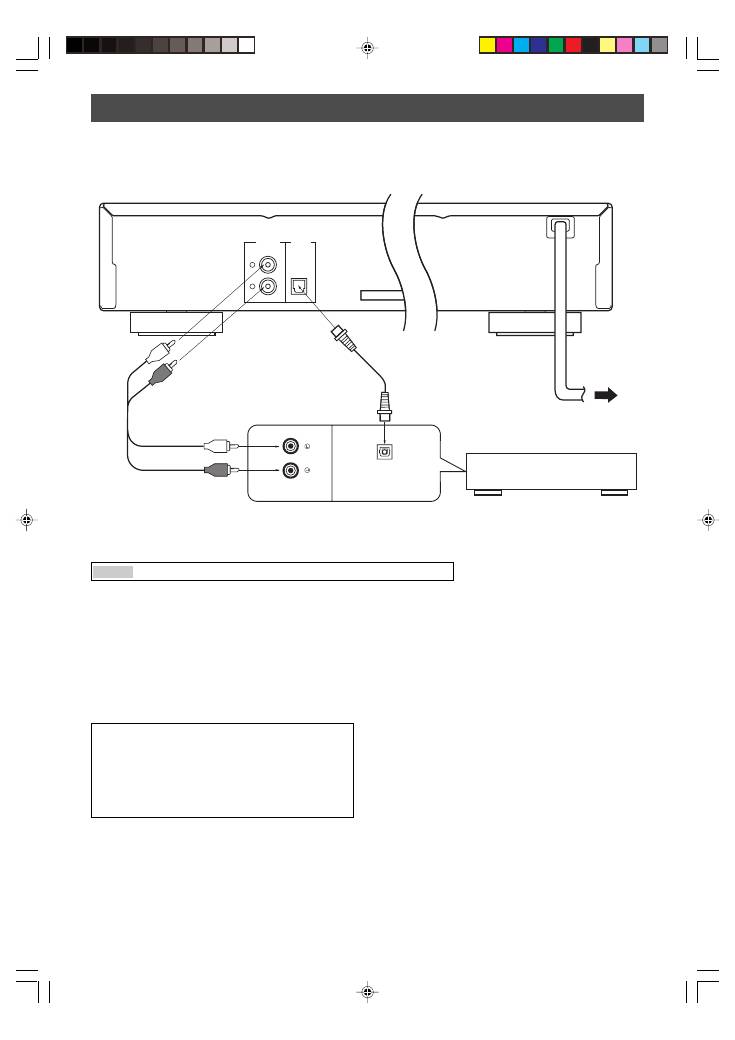
To connect this unit to your amplifier, choose one of the ways listed below.
Caution
Do not plug in this unit to a wall outlet until all connections are complete.
When the DIGITAL OUT (OPTICAL) terminal
of this unit is used (
2
)
●
Make the connection from this terminal to the optical
input terminal of an amplifier by using a commercially
available optical cable.
*
Use a reliable optical cable.
●
This terminal can also be connected to the optical input
terminal of an MD recorder etc. to record CD onto MD
directly.
●
The level of signals output from any of these terminals
into an amplifier can be adjusted by the
OUTPUT LEVEL +/–
buttons.
●
When using the DIGITAL OUT (OPTICAL) terminal, set
the level of signals output into an amplifier to max. by
using the
OUTPUT LEVEL +/–
buttons.
LINE OUT
OPTICAL
DIGITAL
OUT
L
R
MAINS
CD
DIGITAL IN
OPTICAL
CONNECTIONS
●
Before making any connection, switch OFF the power to
the unit and the amplifier or other component.
●
Connections should be made to the correct input
terminals of the amplifier or another component.
●
If the placement of this unit causes noise to another
equipment, such as a tuner, separate them from each
other.
Amplifier
To AC outlet
1
Audio pin cable
(included)
Europe and U.K models
When the LINE OUT (analog) terminals of
this unit are used (
1
)
Connect these terminals to the “CD” (or “AUX”) terminals of
the amplifier. For details concerning these connections,
refer to the operation instructions of the amplifier being
used.
*
Be sure that the left (“L”) and right (“R”) of these terminals are
connected to the corresponding (left and right) terminals of the
amplifier or another component.
2
Optical cable
(not included)
■
To connect this unit to the AC outlet
After you made all connections, connect the power cable of this unit to the AC outlet.
01En_02_BOD_CDX-397MK2_G.p65
1/23/07, 13:40
4
