Ardo PEO58: instruction
Class: Household, kitchen appliances, electronics and equipment
Type: Dishwasher
Manual for Ardo PEO58
VITROCERAMIC HOB
GB
Operating instruction book
ELEKTRO-GLASKERAMIKMULDE
D
Gebrauchs-und montageanweisung
TABLE VITROCERAMIQUE
F
Notice d'utilisation
GLASCERAMIEK PLAAT
NL
Gebruiksaanwijzingen
PLANO DE VIDRIO DE CERAMICA
E
Instrucciones de uso
PLANO VITRO-CERÂMICO
P
Intruções para de uso
PIANO VETROCERAMICA
I
Istruzioni per l'uso
KERAMISK GLASHÄLL
S
Användarhandbok
KERAMISK TOPP
N
Bruksanvisning
GLASKERAMISK KOGEPLADE
DK
Brugervejledning
ΕΠIφΑΝΕΙΑ ΥΑΛΟΚΕΡΑΜΙΚΗ
GR
Ο∆ΗΓΙΕΣ ΓΙΑ ΤΗΝ ΧΡΗΣΕΗ
ПАНЕЛЬ ИЗ СТЕКЛОКЕРАМИКИ
RUS
ИНСТРУКЦИИ ПО ЭКСПЛУАТАЦИИ
PłYTA CERAMICZNA
PL
Instrukcja obsługi
VAØIE ZE SKLOKERAMIKY
CZ
Návod k pou ití
PLACA STICLACERAMICA
RO
Instructiuni de utilizare
Cod. 94000STISPO200


Fig.1
580 - 770
B
A
30 mm
510
50
Min
560 - 750
53.5
40 mm
Min
490
50
Min
C
25
min.
Fig.2
2
2
220-240 V~ H05RR-F 2.5mm
220-240 V2~ H05RR-F 2.5mm
1
4 432
4321
4
LN
L1
L2
2
2
380-415 V2N~ H05RR-F 2.5mm
220-240 V3~ H05RR-F 2.5mm
1
32
44
21
43
4
L1
L2
N
L1
L2
L3
2
380-415 V3N~ H05RR-F 2.5mm
1
32
44
L1
L2
L3
N
Fig.3
Fig.4
- 3 -
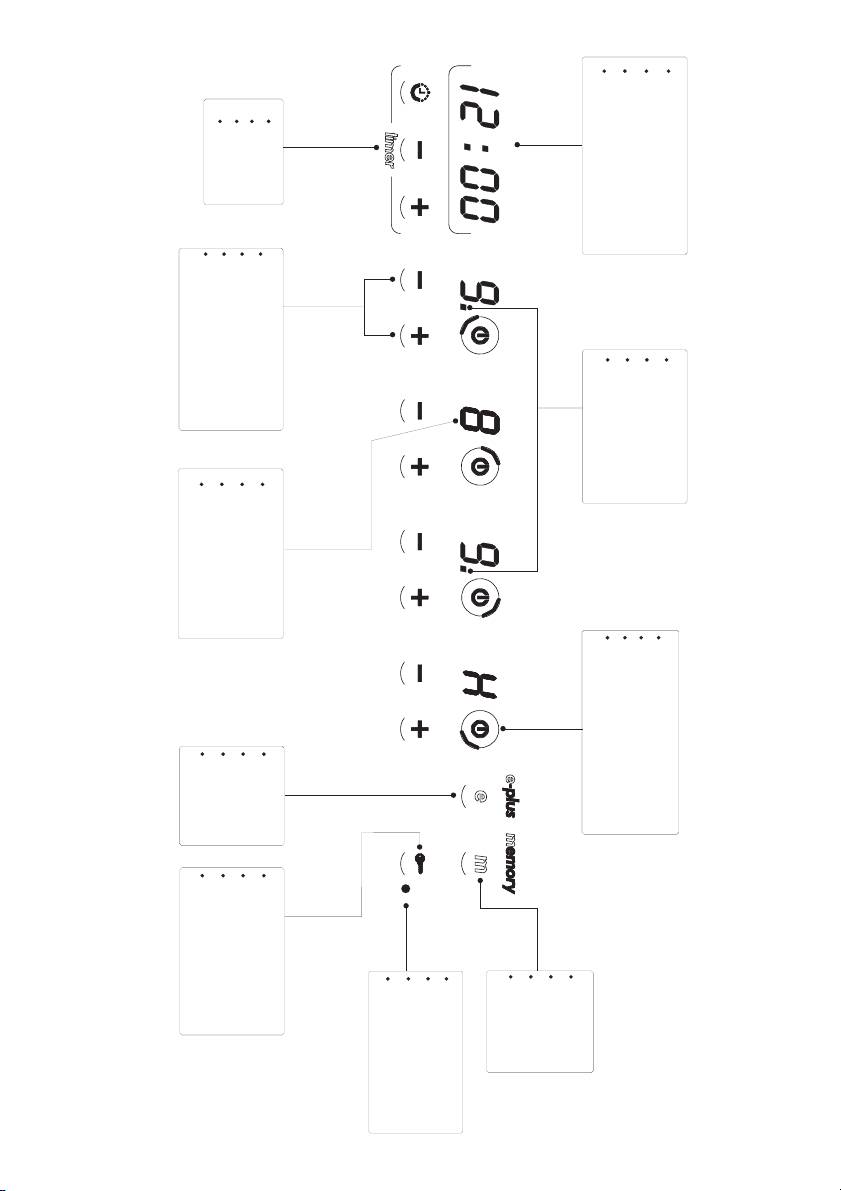
Fig.5
- 4 -
Moutre / Timer / Count-down
Uhr / Timer / Count-down
Clock / Timer / Count-down
Orologio / Timer / Count-down
Zone Timer
Timer Zone
Timer Zone
Area Timer
Touches reglage temperature
Taste Wärmeregulierung
Keys for temperature reguletion
Tasti regolazione temperatura
Voyant zone etendue
Led erweiterte Kochzone
Extended zone led
Spia zona estesa
Display zone de cuisson
Display kochzone
Cooking zone display
Display zona di cottura
on/off et indicateur zone de cuisson
on/off und kochzonen-Anzeiger
on/off and cooking zone display
on/off e indicatore zona di cottura
Touche e-plus Touche cle
Taste e-plus Sicherheits-u.Schlüsseltaste
E-plus key key lock key
Tasto e-plus Tasto chiave
Voyant on/off touche cle
Led on/off u.Schlüsseltaste
on/off led key lock
Spia on/off tasto chiave
Touche memoire
Taste Memory
Memory Key
Tasto Memory

ENGLISH
GENERAL
tween the contacts and suited to the load indicated on the plate
and conform to the regulations in force (the yellow/green ground
Carefully read the contents of this leaflet since it provides impor-
conductor must not be interrupted by the switch). When the appli-
tant instructions regarding safety of installation, use and mainte-
ance has been installed, the omnipolar switch must be easily reach-
nance.
able.
Keep the leaflet for possible future consultation. All the operations
relating to installation (electrical connections) must be carried out
USE AND MAINTENANCE
by specialised personnel in conformity with the regulations in force.
MAINTENANCE
SAFETY WARNINGS
Remove any residues of food and drops of grease from the cook-
ing surface using the special scraper supplied on request (Fig.4)
It is recommended to use flat-bottom pans with a diameter equal
Clean the heated area as thoroughly as possible using SIDOL,
to or slightly larger than that of the heated area. Do not use pans
STAHLFIX or similar products and a cloth/paper, then rinse with
with a rough base to prevent scratching the heat surface of the
water and dry with a clean cloth.
cooktop (Fig.3).
Using the special scraper (optional) immediately remove any frag-
This appliance is not suitable for use by children or persons requir-
ments of aluminium and plastic material that have unintentionally
ing supervision. Do not let children play with the appliance.
melted on the heated cooking area or residues of sugar or food
with a high sugar content (Fig.4). In this way, any damage to the
IMPORTANT
cooktop surface is prevented.
- Avoid spilling liquid, therefore to boil or heat liquids, reduce
Under no circumstances use abrasive sponges or irritating chemi-
the heat.
cal detergents such as oven sprays or stain removers.
- Do not leave the heating elements on with empty pots and
pans or without receptacles.
USE
- When you have finished cooking, switch off the relevant heat-
If your appliance is predisposed then it will be possible to optimize
ing element with the control indicated below.
energy consumption via the intelligent handling of the turning on
and off of the cooking zones (hotplates). It is possible to set the
WARNING: If the surface is cracked, switch off the appliance
maximum power absorption to 4 diverse levels: 2.4 KW - 3.4 KW
to prevent electric shock.
- 4.4 KW - Pmax. The cook top is factory set with no power
limitation (Pmax).
INSTALLATION INSTRUCTIONS
· Multi Level Power Control (MLP)
These instructions address specialised installers and serve as a
In the installation phase, based on the available power in use, it is
guide for installation, adjustment and maintenance in conformity
possible to set the desired maximum power level absorbed in the
with the laws and regulations in force.
following way:
- Unblock the cooking surface by keeping pressed down the “key
If a built-in oven or any other appliance that generates heat
button” for 3 seconds until the “indicator light key” is switched
must be fitted directly under the glass-ceramic cooktop, THIS
off.
APPLIANCE (oven) AND THE GLASS-CERAMIC COOKTOP
- Press the button “E-plus” for 3 seconds: the watch’s display will
MUST BE SUITABLY INSULATED in such a way that the heat
show the power level formulated among those available: 2.4 KW/
generated by the oven, measured on the bottom right of the
3.4 KW/4.4 KW and FULL.
cooktop, does not exceed 60°C. Failure to respect this pre-
- Press the buttons (+) or (-) to change level.
caution may determine improper functioning of the
- Confirm the choice by pressing the “E-plus” key within 10 sec-
TOUCHCONTROL system.
onds else it will return to the initial state.
POSITIONING (Fig.1)
· “E-PLUS” function
The domestic appliance is designed to be built into a worktop as
During cooking it is possible to increase the maximum absorbed
illustrated in the specific figure. Apply sealant around the entire
power level by passing from the formulated level to the immedi-
perimeter (cut-out dimensions Fig.1B). Fix the domestic appliance
ately superior one by pressing the button “E-PLUS” until the rela-
on the worktop by means of the 4 brackets provided, taking the
tive indicator light is switched on.
thickness of the worktop into account (Fig.1A). If the lower part of
When the surface is switched off it returns to the pre-formulated
the appliance, after installation, is accessible via the lower part of
level.
the cabinet then it is necessary to mount a separator panel re-
Warning: normally the “E-PLUS” function is to be utilised when
specting the distances indicated (Fig.1C). If the appliance is in-
the maximum absorbed power from the surface is inferior to the
stalled with an oven underneath then the separator is not neces-
available power in use.
sary.
· CONTROL AREA (Fig.5)
ELECTRICAL CONNECTIONS (Fig.2)
- At the first ignition the cook top will be in the safety position, that
Before making the electrical connections, check that:
is the “key button warning light on/off” will be switched on.
- the ground cable is 2 cm longer than the other cables;
- To use the cook top it will be necessary to keep the “key button”
- the system ratings meet the ratings indicated on the identifica-
depressed for 3 seconds until the “key button warning light on/
tion plate fixed on the lower part of the worktop;
off” switches off.
- the system is fitted with efficient earthing compliant to the laws
To turn on the desired heating element :
and regulations in force.
- depress the corresponding on/off key. The “led” of the “Cooking
Earthing is obligatory by law.
zone display” will be visualized flickering .
If the domestic appliance is not fitted with a cable and/or relevant
- depress the key within 10 seconds - to go to position 4 or the +
plug, use material suited to the absorption value indicated on the
key to go to position 9.
identification plate and the operating temperature. At no point must
- To regulate the temperature of the cooking zone use the + or -
the cable reach a temperature 50°C higher than room tempera-
keys.
ture.
- If the hotplate is supplied with an extensive area, to switch the
If wishing to make a direct connection to the mains, an omnipolar
second area on bring the “Display of the cooking area” to posi-
switch must be interposed with a minimum opening of 3 mm be-
tion 9 and press the button + for 2 sec: until the decimal point is
- 5 -

switched on to confirm.
ter, milk, etc.) over the controls zone.
- To switch the hotplate off press the relative on/off button.
2. The commands keyboard has an internal temperature sensor
NOTE:( During operation it will be possible to block / unblock the
that, in the case that the internal temperature reaches 90° (abnor-
control zone by depressing the key button for 3 seconds).
mal use conditions of the surface without pots) the surface will
automatically enter in an automatic system of temperature limita-
· Timer Area (Fig.5)
tion: switching itself off automatically.
The surface has the possibility to set the timer simultaneously on
every cooking area. The timer is a function that allows setting a
· RESIDUAL HEAT
time (from 1 to 99 minutes) to automatically switch off the selected
WARNING : when a cooking zone is switched off, the surface of
cooking area.
the cook top has a very high and dangerous temperature level.
- Press the “Timer” button for 2 seconds: the display shows “00” in
The danger is highlighted by the fact that the “cooking zone dis-
the centre and it will show which element is active on the right and
play” will flicker until the temperature of the surface will not de-
left side.
crease to under 50°C.
- By continuing to press the “Timer” button the hotplate is selected
amongst those active.
· WARNINGS :
- Press + or - to select the “Timer” value.
When the cook top is used with the power limitation (power level
NOTE:
2,4 / 3,4 / 4,4)) the following operation will guarantee the preset
- If the “Timer” function has been imposed for more than one
maximum power level absorbed :
cooking area, the “Timer Display” will show every 3 seconds the
remaining time for every programmed area.
A) After having switched on a number of cooking zones to their
- To cancel the “Timer” function, switch off the relative cooking
maximum power (position 9) the cook top may not accept the switch-
area.
ing on of another “Cooking zone” and will emit an acoustic sound.
Or, turn on the next cooking zone (heating element) at a diverse
· “MEMORY” function
temperature than that desired.
This function allows the programming and execution of one cook-
B) When a number of cooking zones are switched on and there is
ing cycle on every warming element.
a desire to increase the temperature value, the cook top may not
accept the increase and will emit an acoustic sound.
Note:
C) After having switched on a number of cooking zones at an in-
- One cycle at a time can be carried out in registration or in
termediate temperature value then when another element is
execution.
switched on then a few seconds delay may occur for the element
- The variations of power level for the times inferior to 15 sec. are
to light up.
not registered.
- One cooking cycle with a maximum duration of 10 hours and a
THE MANUFACTURER DECLINES ALL RESPONSIBILITY FOR
maximum of 10 variations of the power level can be memorised.
EVENTUAL DAMAGES CAUSED BY BREACHING THE ABOVE
WARNINGS.
· Memorisation of a cooking cycle
- Press the “Memory” button and then select the desired hotplate
by means of the relative “ON/OFF” button.
- Press the buttons + or - until the desired power is selected.
- To terminate the memorisation cycle press once again the button
“ON/OFF”.
· Executing a cooking cycle
- To execute a cooking cycle already memorised, it is sufficient to
press the “ON/OFF” button of the interested cooking area followed
by the “Memory” button.
· Display
The cooking surface is supplied with a display that in normal func-
tion is a “WARCH” and can also carry out the “COUNTDOWN”
function when the surface is off.
· Regulation of the Watch
In the installation phase set the clock in the following way:
- Unblock the cooking surface by keeping the “key button” pressed
down for 3 seconds until the “indicator light button” is switched
off.
- Simultaneously press the buttons + and - under the display until
it begins flashing.
- Press + or - to set the desired time.
- Press the “Timer” button to confirm the selection.
· Countdown Function
- Unblock the cooking surface by keeping the “key button” pressed
down for 3 seconds until the “indicator light button” is switched off.
- Press the “Timer” button until the writing “00” appears on the
display.
- Press + or - to select the number of the minutes.
- Press the “Timer” button to confirm the selection.
At the end of the set time, an acoustic signal will be activated.
· Safety Systems
1. In the instance where an object is placed over the controls, the
cook top will switch off and the auto-protection system will acti-
vate automatically, this occurs even in cases of liquid spills (wa-
- 6 -
