Swarovski Optik Z3 4-12x50: DEEN EN DE
DEEN EN DE: Swarovski Optik Z3 4-12x50
DEEN EN
DE
The scope has been filled with nitrogen via the sealing
For your safety!
screw located underneath the windage adjustment
turret. Please do not loosen this sealing screw!
WARNING!
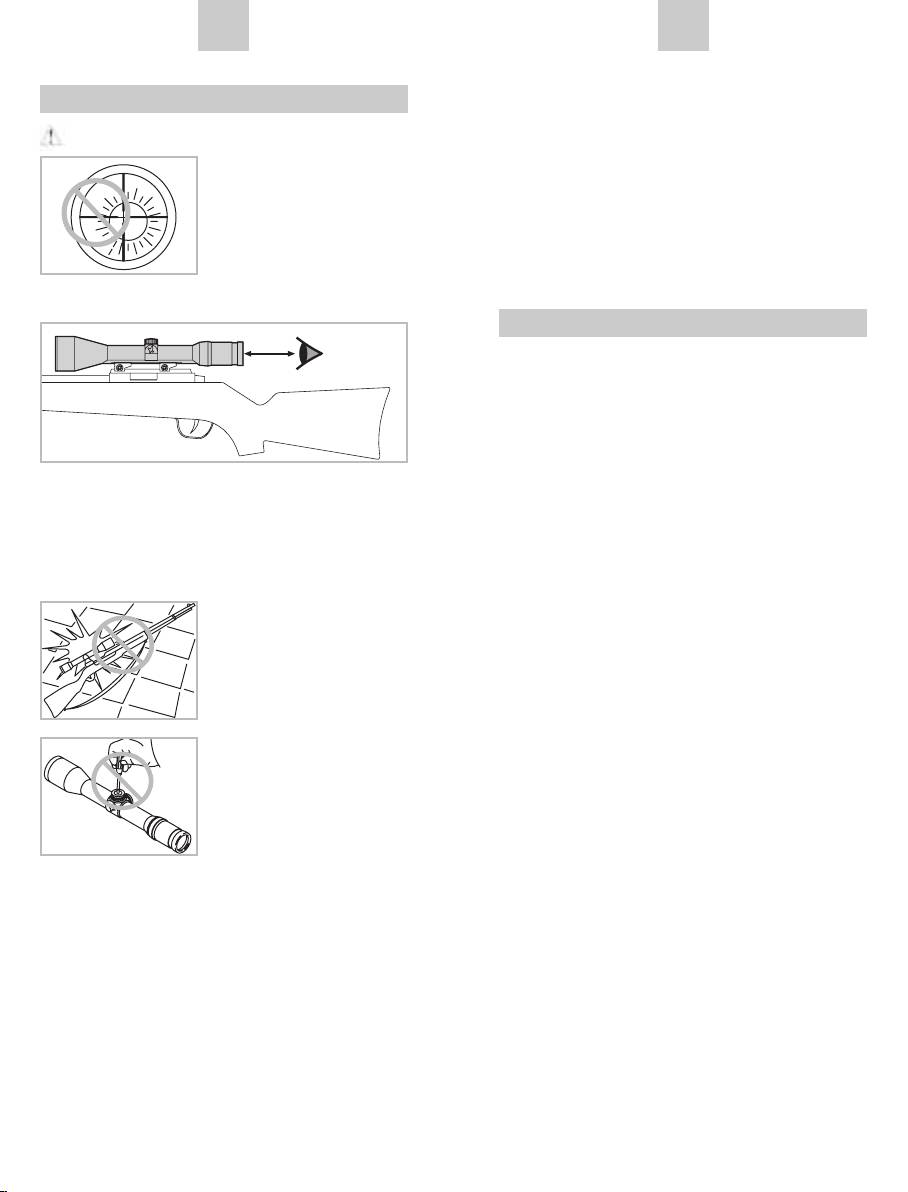
Never use the rifle scope
to look at the sun! This will
lead to damage to your eyes!
Please protect your rifle
scope from unnecessary
solar radiation.
Mounting
Basic Alignment
To ensure perfect alignment of the scope to the
rifle, please have a competent gunsmith mount the
scope.
Please note the eye relief distance specified for a
The reticle has been factory-set to the mechanical
mounted rifle scope (see Data Sheet for dimen-
middle position. Prior to mounting you can check the
sions).
correct position of the reticle. To do this, unscrew the
screw-on caps of the elevation adjustment turret and
windage adjustment turret.
General Information
Now turn the respective knurled knob of the eleva-
Please protect your rifle
tion adjustment turret and windage adjustment turret
scope against knocks.
clockwise until it reaches the stop. Then turn the
knurled knob back again counter-clockwise until it
reaches the stop and count the clicks at the same
time.
Halve the number of clicks and you will have the
exact middle position. Repeat this procedure for the
Repairs should only be
second turret.
carried out by authorized
workshops.
Alignment of the Scope to the Rifle
If the point of impact of the bullet deviates from the
aiming point, this can be easily and precisely correc-
Sealing
ted by adjusting the elevation turret and the windage
Thanks to the use of high-quality sealing elements
turret of the scope.
and controlled fabrication processes, our rifle scopes
Regardless of corrections, the middle point of the
are watertight and gas-tight to a pressure of 0.4 bar
aiming mark always stays in the middle of the field
or a depth in water of 4.4 yds/4 m. Seal integrity is
of view.
guaranteed even when the screw-on cap has been
removed. Nevertheless, careful handling is advised,
To make adjustments, simply unscrew the screw-on
especially around the turrets.
caps of the elevation and windage turrets.
12
13

DEEN EN
DE
When the shot is low
1. Pull the knurled
knob upwards.
Turn the knurled
In this position the
knob of the elevation
reticle is not adjus-
turret in the direction
ted when the knurled
of H.
knob is twisted.
When the shot is high
2. Turn the knurled knob until the zero point of
the scale is aligned with the index point on the
Turn the knurled
scope.
knob of the elevation
3. Pushing the knurled knob back down re-engages
turret in the opposite
the reticle adjustment and the knurled knob. Your
direction to H.
individual setting is now precisely adjusted as the
zero point.
When the shot is to the left
Turn the knurled
Operation
knob of the windage
turret in the direction
Adjusting the Focus
of R.
Simply turn the dioptric correction ring to achieve the
best focus for your individual setting of the reticle.
First turn the diop-
When the shot is to the right
tric correction ring all
the way to the left ➀
Turn the knurled
(counter-clockwise)
knob of the windage
and then to the right
turret in the opposite
➁, until the reticle is
direction to R.
optimally focused.
The adjustment ranges depend on the individual
The impact point correction per click can be taken
models. Please consult the technical data sheet
from the enclosed technical data sheet or the infor-
enclosed.
mation printed on the elevation or windage adjust-
ment turret of your rifle scope.
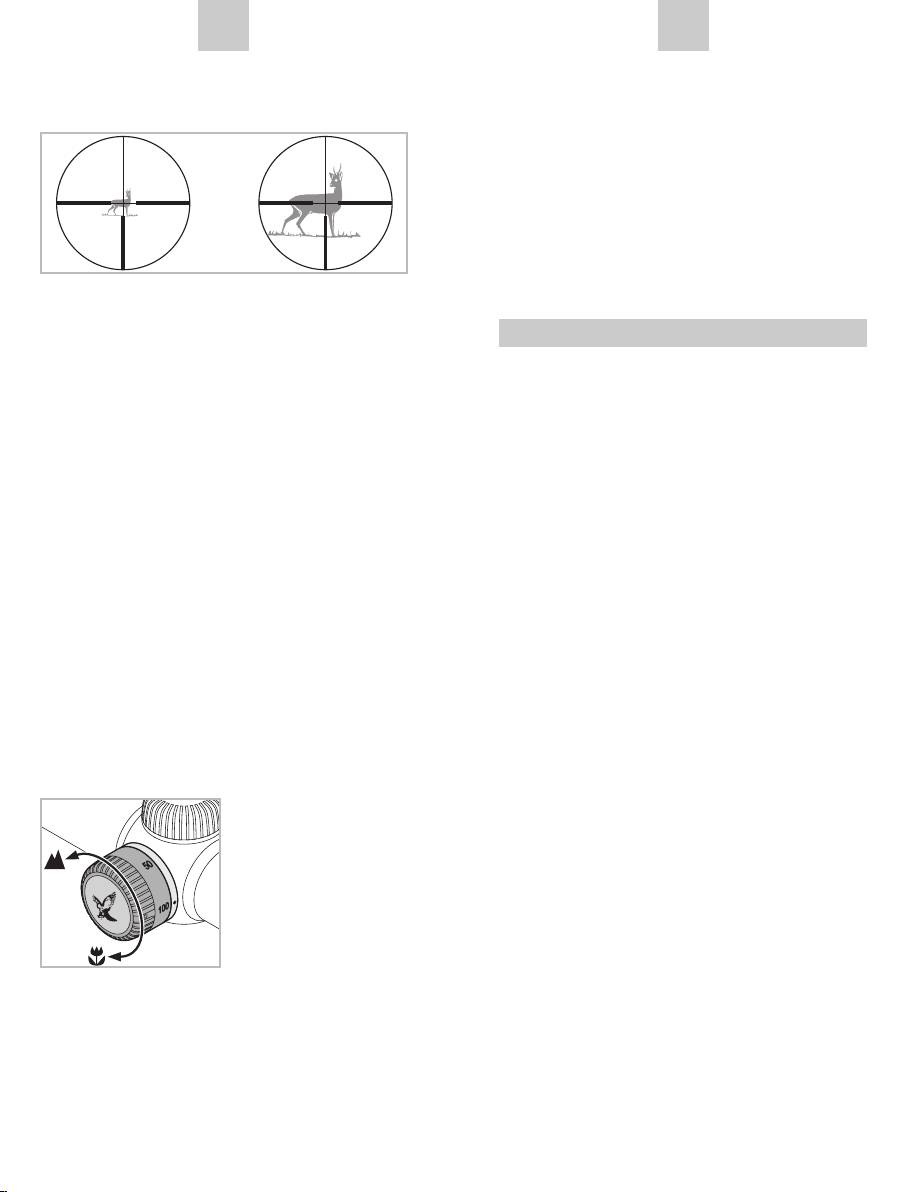
Changing the Magnification
You can set the desired
magnification by turning
the (stepless) magni-
fication adjustment ring
through 180°. The scale
on the adjustment ring
Zero Point Adjustment
allows simple and easy
Once you have aligned the scope to the rifle, you can
reading of the setting.
retain this basic setting. The scale for this is located
The soft, ribbed covering
on the respective knurled knob of the elevation/
of the adjustment ring has a nose for better orien-
windage adjustment turret.
tation.
14
15
2
1
DEEN EN
DE
nd
The Reticle in the 2
Image Plane
b) Precision adjustment
(Eyepiece Image Plane)
Set the magnification as high as possible and turn
the parallax turret until the image appears at its
sharpest. Now move the eye backwards and forwards
within the range of the exit pupil. If in the process
the reticle moves in relation to the image, correct
the distance setting until it is no longer possible to
discern any difference between the movement of the
reticle and the movement of the image.
If the magnification increases, then the reticle
remains the same size – the size of the image is
increased but not the size of the reticle. Even for
Maintenance and Care
large magnifications only a little of the target is cove-
red. The reticle can only be used for estimating the
Lens-Cleaning Cloth
distance to a limited extent.
The special microfibre cloth can be used to clean
Parallax
even the most sensitive glass surfaces. It is suitable
Your rifle scope is set to be parallax-free without
for objective lens, eyepieces and spectacles.
parallax turret at a target distance of 109 yds
Please keep the microfiber cloth clean as dirt par-
(100 m) – or in the case of the 4A-300 (not available
ticles can damage the lens surface. If the cloth is
in the USA), BRH (only available in the USA) and
dirty, it may be washed in lukewarm soapy water and
BRX reticles at a target distance of 219 yds (200 m).
allowed to dry naturally. Please use it exclusively for
This means that at a distance of 109 yards (100 m)
cleaning lens surfaces.
and 219 yards (200 m) respectively, the image of the
object aimed at and the image of the reticle are in a
Cleaning
single plane.
We have designed all elements and surfaces to
Please take into consideration:
require very little care.
With shots at distances greater or less than 109 yards
To ensure the long-lasting optical brilliance of your
(100 m) and 219 yards (200 m) respectively, take
rifle scope, you should keep the glass surfaces free
care to position the eye carefully central to the scope.
from dirt, oil and grease. When cleaning the lenses,
This will prevent shifting of the impact point due to
first remove larger particles with an optical lens
parallax errors.
brush. For subsequent thorough cleaning, breathe
Operation of the Parallax Turret
lightly on the lens and clean with the cleaning cloth.
(depending on model)
The metal parts are best cleaned with a soft, clean
Using the parallax tur-
cloth.
ret, you can adjust the
optimum focus for every
Storage
target distance thus pre-
You should keep your rifle scope in a well-ventilated,
venting aiming errors due
dry, dark place.
to parallax.
If the rifle scope is wet, it must be dried prior to
storage.
a) Rapid Adjustment
All details are typical values.
The target distances are printed on the parallax turret
from 50 to ∞. Turn the parallax turret until the index
We reserve the right to make changes regarding design and delivery.
point indicates the desired distance.
We accept no liability for printing errors. BA-696-01, 02/2012
16
17
