Partner P360S 2014: MAINTENANCE INSTRUCTIONS
MAINTENANCE INSTRUCTIONS: Partner P360S 2014

MAINTENANCE INSTRUCTIONS
All chain saw service, other than items listed
C
here in your user manual maintenance
instructions, should be performed by a
professional.
B
PREVENTIVE MAINTENANCE
D
A
A good preventive maintenance program of
regular inspection and care will increase life
Fig. 15A
Fig. 15B
and improve performance of your chain saw.
This maintenance checklist is a guide for
B
F
such a program.
F
Cleaning, adjustment, and parts replacement
E
may be required, under certain conditions, at
more frequent intervals than those indicated.
MAINTENANCE
HOURS OF
CHECKLIST
EACH
OPERATION
Fig. 15C
Fig. 15D
USE
ITEM ACTION
10 20
FUEL FILTER
Screws/Nuts/Bolts Inspect/Tighten
WARNING: Never operate your saw
Air Filter Clean or Replace
without a fuel filter. The fuel filter should be
Fuel Filter/Oil Filter Replace
replaced after each 20 hours of use. Drain
Spark Plug Clean/Adjust/Replace
fuel tank completely before changing filter.
Spark Arrester Screen Inspect
1. Remove the fuel tank cap.
Replace as Required
2. Bend a piece of soft wire to from a hook at
the end.
Fuel Hoses Inspect
3. Reach into fuel tank opening and hook fuel
Replace as Required
line. Carefully pull the fuel line toward the
Chain brake Inspect
opening until you can reach it with your
components
Replace as Required
fingers.
NOTE: Do not pull hose completely out of
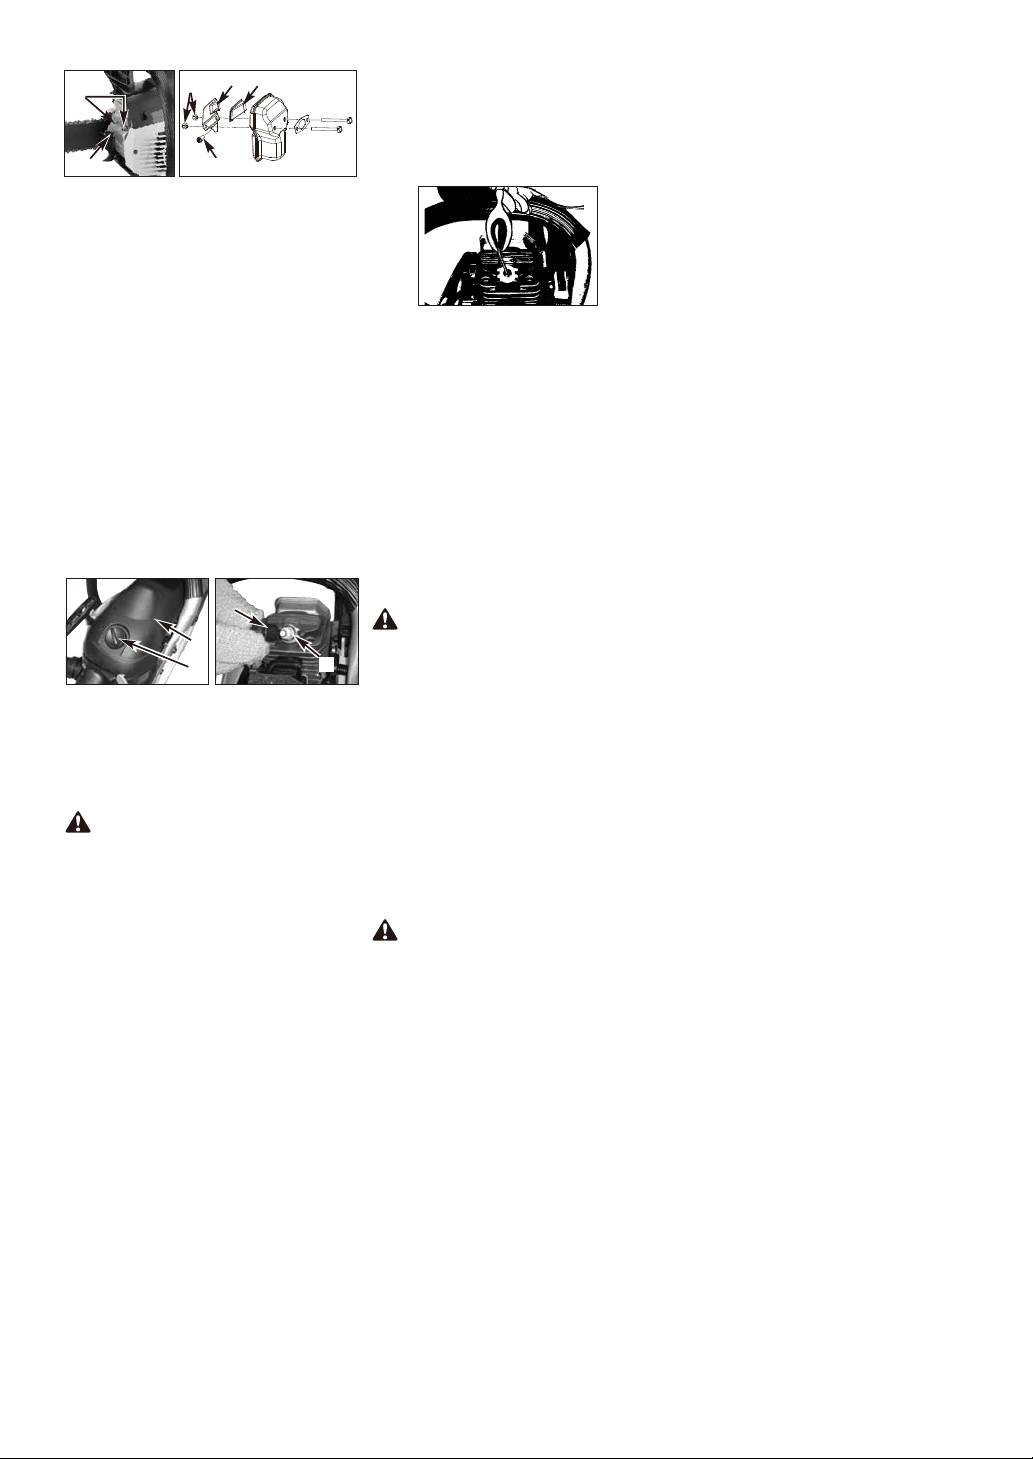
AIR FILTER
tank.
4. Lift filter (A) out of tank (Fig.16).
CAUTION: Never operate saw
5. Pull filter off with a twisting motion. Discard
without the air filter. Dust and dirt will be
filter.
drawn into engine and damage it. Keep the
6. Install new filter. Insert end of filter into
air filter clean!
tank opening. Make sure filter sits in
TO CLEAN AIR FILTER:
bottom corner of tank. Use a long
1. Remove knob (A) holding air filter cover in
screwdriver to aid in filter placement if
place, remove the top cover (B) by
necessary.
loosening the cover retaining screws.
7. Fill tank with fresh fuel / oil mixture. See
Cover will lift off. (Fig.15A)
Section FUEL AND LUBRICATION.
2. Lift the air filter (C) out of air-box (D)
Install fuel cap.
(Fig.15B).
3. Clean air filter. Wash filter in clean, warm,
A
soapy water. Rinse in clear, cool water. Air
dry completely.
NOTE: It is advisable to have a supply of
spare filters.
4. Install air filter. Install engine / air filter
Fig. 16
cover. Make sure latche (E) latch (F) and
cover fit properly. Tighten the cover
SPARK ARRESTER SCREEN
retaining knob securely. (Fig.15C &
NOTE: A clogged spark arrester screen will
Fig.15D)
dramatically reduce engine performance.
1. Remove the 2 bolts (A) and pull muffler
WARNING: Never perform mainten-
out. (Fig. 17A).
ance when the engine is hot, to avoid any
2. Remove the 2 screws that holds the cover
chance of burning hands or fingers.
(C). (Fig.17B)
3. Discard the used spark arrester screen (D)
andreplace it with a new one.
4. Reasemble the muffler components and
install the muffler to the cylinder. Tighten
securely.
-- 11 --
B
C
D
5. Pour 1 teaspoon of clean 2-cycle oil into
A
the combustion chamber. Pull starter rope
slowly several times to coat internal
components. Replace spark plug. (Fig. 19)
NOTE: Store the unit in a dry place and away
B
from possible sources of ignition such as a
B
furnace, gas hot water heater, gas dryer, etc.
Fig. 17A
Fig. 17B
SPARK PLUG
NOTE: For efficient operation of saw engine,
spark plug must be kept clean and properly
gapped.
1. Push STOP switch down.
2. Remove knob (A) holding air filter cover in
place, remove the top cover (B) by
loosening the cover retaining screws.
Fig. 19
Cover will lift off. (Fig.18A)
REMOVING A UNIT FROM STORAGE
3. Disconnect the wire connector (C) from the
1. Remove spark plug.
spark plug (D) by pulling and twisting at the
2. Pull starter rope briskly to clear excess oil
same time (Fig. 18B).
from combustion chamber.
4. Remove spark plug with spark plug socket
3. Clean and gap spark plug or install a new
wrench. DO NOT USE ANY OTHER
spark plug with proper gap.
TOOL.
4. Prepare unit for operation.
5. Check electtrode gaps with wire feeler
5. Fill fuel tank with proper fuel / oil mixture.
gauge and set gaps to .025” (.635mm) if
See FUEL AND LUBRICATION Section.
necessary.
6. Reinstall a new spark plug.
GUIDE BAR MAINTENANCE
NOTE: A resistor spark plug must be used for
Frequent lubrication of the guide bar (railed
replacement.
bar which supports and carries the saw
chain) sprocket tip is required. Proper
NOTE: This spark ignition system meets all
maintenance of the guide bar, as explained in
requirements of the Interference-Causing
this section, is essential to keep your saw in
Equipment Regulations.
good working condition.
SPROCKET TIP LUBRICATION:
C
CAUTION: The sprocket tip on your
B
new saw has been pre-lubricated at the
factory. Failure to lubricate the guide bar
A
D
sprocket tip as explained below will result in
poor performance and seizure, voiding the
Fig. 18A
Fig. 18B
manufacturer’s warranty.
CARBURETOR ADJUSTMENT
Lubrication of the sprocket tip is
The carburetor was preset at the factory for
recommended after 10 hours of use or once
optimum performance. If further adjustments
a week, which ever occurs first. Always
are necessary, please take your unit to the
thoroughly clean guide bar sprocket tip
nearest qualified service technician.
before lubrication.
STORING A CHAIN SAW
TOOLS FOR LUBRICATION:
The Lube Gun (optional) is recommended for
CAUTION: Never store a chain saw
applying grease to the guide bar sprocket tip.
for longer than 30 days without performing
The Lube Gun is equipped with a needle
the following procedures.
nose tip which is necessary for the efficient
Storing a chain saw for longer than 30 days
application of grease to the sprocket tip.
requires storage maintenance. Unless the
storage instructions are followed, fuel
TO LUBRICATE SPROCKET TIP:
remaining in the carburetor will evaporate,
leaving gum-like deposits. This could lead to
WARNING: Wear heavy duty work
difficult starting and result in costly repairs.
gloves when handling the bar and chain.
1. Remove the fuel tank cap slowly to release
1. Press the STOP switch down.
any pressure in tank. Carefully drain the
NOTE: It is not necessary to remove the saw
fuel tank.
chain to lubricate the guide bar sprocket tip.
2. Start the engine and let it run until the unit
Lubrication can be done on the job.
stops to remove fuel from carburetor.
2. Clean the guide bar sprocket tip.
3. Allow the engine to cool (approx. 5
3. Using the Lube Gun (optional), insert
minutes).
needle nose into the lubrication hole and
4. Using a spark plug wrench, remove the
inject grease until it appears at outside
spark plug.
edge of sprocket tip (Fig. 20).
-- 12 --
4. Rotate saw chain by hand. Repeat
WARNING: After 3 to 4 of your
lubrication procedure until the entire
sharpening of the cutting teeth, have the saw
sprocket tip has been greased.
chain sharpened in any authorised service.
They will sharpen the depth limiter as well,
which provides the distance.
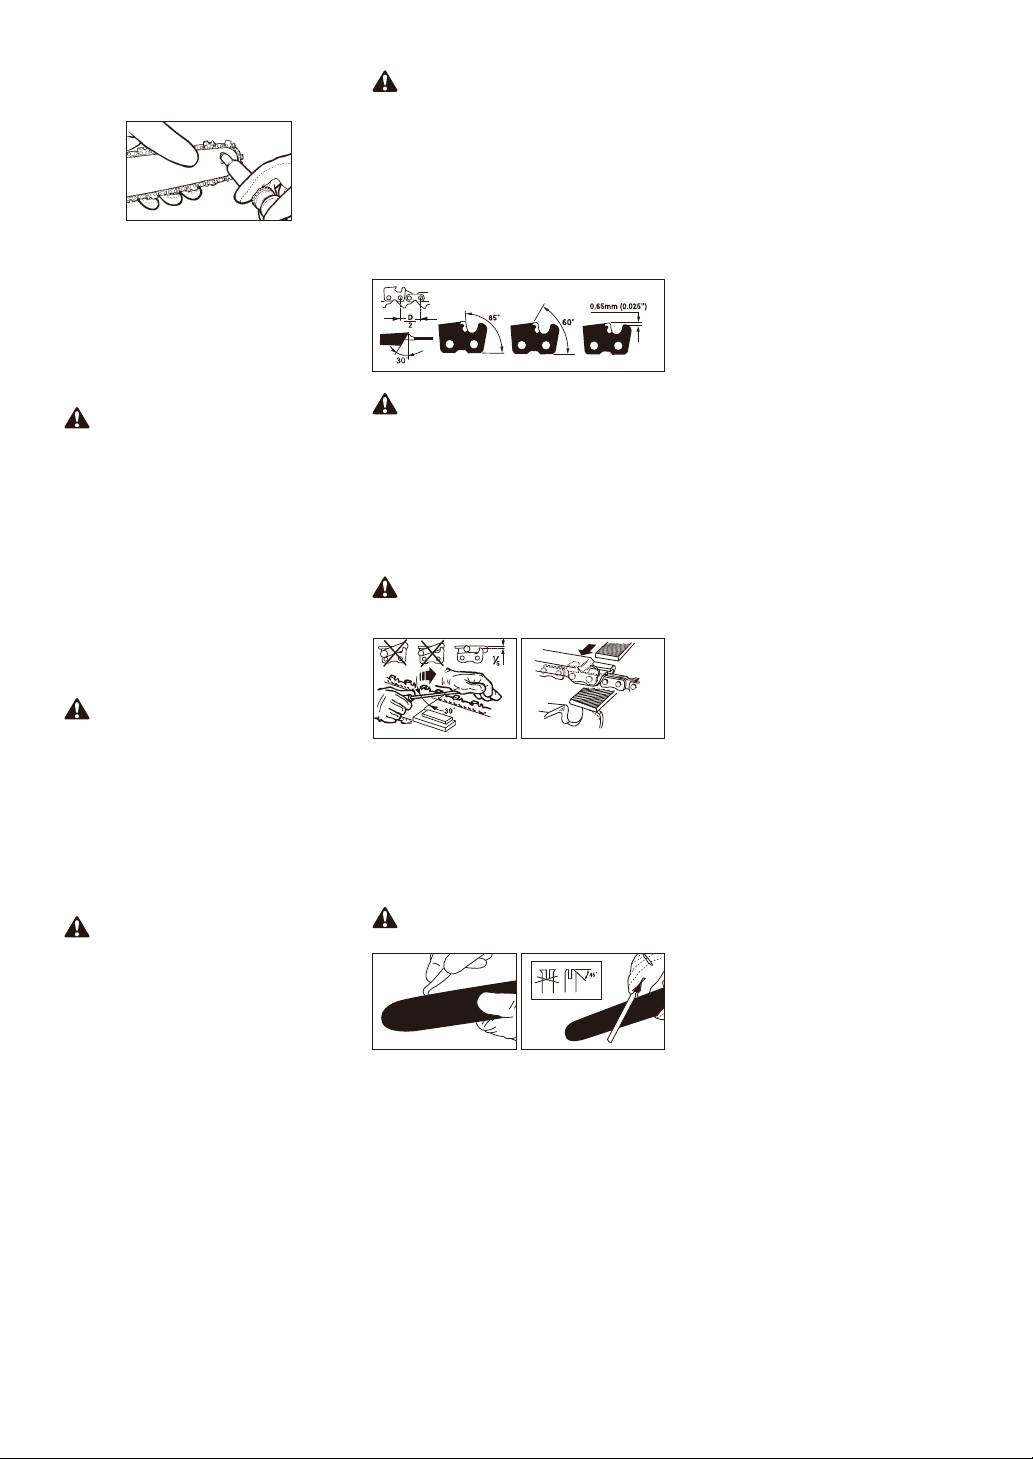
CHAIN SHARPENING - The pitch of the
chain (Fig. 21) is 3/8” LoPro x .050”.
Sharpen the chain using protective gloves
and a round file of ø5/32” (4mm).
Fig. 20
Always sharpen the cutters only with outward
strokes (Fig. 22) observing the values given
GUIDE BAR MAINTENANCE:
in Fig. 21.
Most guide bar problems can be
prevented merely by keeping the chain
saw well maintained.
Insufficient guide bar lubrication and
operating the saw with chain that is TOO
TIGHT will contribute to rapid bar wear.
To help minimize bar wear, the following
guide bar maintenance procedures are
Fig. 21
recommended.
WARNING: A sharp chain produces
WARNING: Always wear protective
welldefined chips. When your chain starts to
gloves during maintenance operations. Do
produce sawdust, it is time to sharpen.
not carry out maintenance when the engine is
After sharpening, the cutting links must all
hot.
have the same width and length.
CHAIN SHARPENING:
After every 3-4 times the cutters have been
Chain sharpening requires special tools to
sharpened you need to check the height of
ensure that cutters are sharpened at the
the depth gauges and, if necessary, lower
correct angle and depth. For the
them using the flat file and template supplied
inexperienced chain saw user, we
optional, then round off the front corner.
recommend that the saw chain be
(Fig. 23)
professionally sharpened by the nearest
professional Service Center. If you feel
WARNING: Proper adjustment of the
comfortable sharpening your own saw chain,
depth gauge is as important as proper
special tools are available from the
sharpening of the chain.
professional Service Center. For
non-experienced users of the chain saw, we
recommend to have the chain sharpened by
a specialist in any authorised service.
WARNING: When having wrong
sharpened chain, there may occur a higher
danger of kickback.
Fig. 22 Fig. 23
1. To sharpen the saw chain, use the suitable
GUIDE BAR- The bar should be reversed
sharpen-ing tools:
every 8 working hours to ensure uniform
- Round chain file ø5/32”(4mm).
wear.
- File leading
Keep the bar groove and lubrication hole
- Chain measuring calibre.
clean using a bar groove cleaner (optional).
These tools can be bought in any
(Fig. 24)
specialsed stores.
Check the bar rails frequently for wear and, if
2. To gain well shaped sawdust particles, use
necessary, remove the burs and square-up
sharp chain. If there appears wooden
the rails using a flat file. (Fig.25)
powder, you must sharpen the saw chain.
WARNING: Never mount a new
WARNING: All cutting teeth must be
chain on a worn sprocket or self-aligning ring.
similarly long. Different length of the teeth
can cause rough run of the chain or its
rupture, as well.
3. Minimum length of the teeth must be 4mm.
If they are shorter, remove the saw chain.
4. Angles, which the teeth are under, must be
followed.
5. To sharpen the chain basically, make 2 to
Fig. 24 Fig. 25
3 pulls of the file from the inside out.
-- 13 --

BAR WEAR - Turn guide bar frequently at
BREAKING IN A NEW SAW CHAIN:
regular intervals (for example, after 5
A new chain and bar will need chain
hours of use), to ensure even wear on top
readjustment after as few as 5 cuts. This is
and bottom of bar.
normal during the break-in period, and the
OIL PASSAGES - Oil passages on the bar
interval between future adjustments will
should be cleaned to ensure proper
begin to lengthen quickly.
lubrication of the bar and chain during
operation.
WARNING: Never have more than 3
NOTE: The condition of the oil passages
links removed from a loop of chain. This
can be easily checked. If the passages are
could cause damage to the sprocket.
clear, the chain will automatically give off a
CHAIN LUBRICATION:
spray of oil within seconds of starting the
Always make sure the automatic oiler
saw. Your saw is equipped with an
system is working properly. Keep the oil
automatic oiler system.
tank filled with Chain, Bar and Sprocket Oil.
CHAIN MAINTENANCE
Adequate lubrication of the bar and chain
CHAIN TENSION:
during cutting operations is essential to
Check the chain tension frequently and
minimize friction with the guide bar.
adjust as often as necessary to keep the
Never starve the bar and chain of lubricating
chain snug on the bar, but loose enough to
oil. Running the saw dry or with too little oil
be pulled around by hand.
will decrease cutting efficiency, shorten saw
chain life, cause rapid dulling of chain, and
lead to excessive wear of bar from
overheating. Too little oil is evidenced by
smoke or bar discoloration.
TROUBLESHOOTING TABLE
WARNING:
Always stop unit and disconnect spark plug before performingall of the
recommended remedies below except remedies that require operation of the unit.
PROBLEM
PROBABLE CAUSE
CORRECTIVE ACTION
Unit won’t start or starts
Incorrect starting procedures.
Follow instructions in the User Manual.
but will not run.
Incorrect carburetor mixture
Have carburetor adjusted by an Authorized
adjustment setting.
Service Center.
Fouled spark plug
Clean / gap or replace plug.
Fuel filter plugged.
Replace fuel filter.
Dirty spark arrester screen.
Replace spark arrester screen.
Unit starts, but engine
has low power.
Dirty air filter.
Remove, clean and reinstall filter.
Incorrect carburetor mixture
Have carburetor adjusted by an Authorized
adjustment setting.
Service Center.
Engine hesitates.
Incorrect carburetor mixture
Have carburetor adjusted by an Authorized
No power under load.
adjustment setting.
Service Center.
Runs erratically.
Incorrectly gapped spark plug.
Clean / gap or replace plug.
Smokes excessively.
Incorrect carburetor mixture
Have carburetor adjusted by an Authorized
adjustment setting.
Service Center.
Incorrect fuel mixture.
Use properly mixed fuel (40:1 mixture).
-- 14 --
Оглавление
- IDENTIFICATION (WHAT IS WHAT?)
- SAFETY RULES
- KICKBACK SAFETY PRECAUTIONS
- IMPORTANT SAFETY
- FUEL AND LUBRICATION
- OPERATION
- GENERAL CUTTING INSTRUCTIONS
- MAINTENANCE INSTRUCTIONS
- DECLARATION OF CONFORMITY
- TECHNICAL DATA SHEET
- ОПИСАНИЕ ДЕТАЛЕЙ ИНСТРУМЕНТА
- ПРАВИЛА ТЕХНИКИ БЕЗОПАСНОСТИ
- МЕРЫ ПРЕДОСТОРОЖНОСТИ ДЛЯ ПРЕДОТВРАЩЕНИЯ ОТСКОКА
- ВАЖНЫЕ СВЕДЕНИЯ, КАСАЮЩИЕСЯ БЕЗОПАСНОСТИ
- ТОПЛИВО И СМАЗКА
- ЭКСПЛУАТАЦИЯ
- ОБЩИЕ ИНСТРУКЦИИ ПО ПИЛЕНИЮ
- ИНСТРУКЦИИ ПО ТЕХНИЧЕСКОМУ ОБСЛУЖИВАНИЮ
- ДЕКЛАРАЦИЯ О СООТВЕТСТВИИ СТАНДАРТАМ
- ТЕХНИЧЕСКИЕ ХАРАКТЕРИСТИКИ
- IDENTIFIERING (VAD ÄR VAD?)
- SÄKERHETSREGLER
- SÄKERHETSÅTGÄRDER MOT KAST
- VIKTIG SÄKERHET
- BRÄNSLE OCH SMÖRJNING
- ANVÄNDNING
- ALLMÄNNA SÅGNINGSANVISNINGAR
- UNDERHÅLLSINSTRUKTIONER
- FÖRSÄKRAN OM ÖVERENSSTÄMMELSE
- TEKNISKT DATABLAD
- IDENTIFIKASJON (HVA ER HVA?)
- SIKKERHETSREGLER
- SIKKERHETSFORANSTALTNINGER FOR TILBAKESLAG
- VIKTIG SIKKERHET
- DRIVSTOFF OG SMØRING
- DRIFT
- GENERELLE INSTRUKSJONER FOR KUTTING
- INSTRUKSJONER FOR VEDLIKEHOLD
- SAMSVARSERKLÆRING
- TECHNICAL DATA SHEET
- IDENTIFICERING (HVAD ER HVAD?)
- SIKKERHEDSREGLER
- SIKKERHEDSFORANSTALTNINGER VEDRØRENDE TILBAGESLAG
- VIGTIGE SIKKERHEDSOPLYSNINGER
- BRÆNDSTOF OG SMØRING
- BETJENING
- GENERELLE VEJLEDNINGER TIL SAVNING
- VEDLIGEHOLDELSESANVISNINGER
- TEKNISK DATAARK
- TUNNISTUS (MIKÄ ON OLEELLISTA?)
- TURVAOHJEET
- TAKAPOTKUJEN TURVALLISUUSVAROTOIMENPITEET
- TÄRKEÄ TURVALLISUUS
- POLTTOAINE JA VOITELU
- KÄYTTÖ
- YLEISIÄ SAHAUSOHJEITA
- HUOLTO-OHJEET
- TEKNISTEN TIETOJEN LEHTI
- IDENTYFIKACJA (CO TO JEST?)
- ZASADY BEZPIECZEŃSTWA
- ŚRODKI BEZPIECZEŃSTWA DOTYCZĄCE ODBIĆ
- WAŻNE INSTRUKCJE DOTYCZĄCE BEZPIECZEŃSTWA
- PALIWO I SMAROWANIE
- OPERACJE
- OGÓLNE INSTRUKCJE CIĘCIA
- INSTRUKCJE KONSERWACJI
- DEKLARACJA ZGODNOŚCI
- ARKUSZ DANYCH TECHNICZNYCH
- IDENTIFIKACE (CO JE CO?)
- BEZPEČNOSTNÍ PRAVIDLA
- BEZPEČNOSTNÍ ZÁSADY PROTI ZPĚTNÉMU RÁZU
- DŮLEŽITÉ INFORMACE O BEZPEČNOSTI
- PALIVO A MAZÁNÍ
- POUŽITÍ
- OBECNÉ POKYNY PRO ŘEZÁNÍ
- POKYNY PRO ÚDRŽBU
- PROHLÁŠENÍ SHODY
- TECHNICKÉ ÚDAJE
