Beko CM 68201 C – страница 2
Инструкция к Плите Beko CM 68201 C
RUD
ANALOGGARENDE
FYFKJUJDSQ NFQVTHFYFKJUJDSQ NFQVTH
FYFKJUJDSQ NFQVTH
FYFKJUJDSQ NFQVTHFYFKJUJDSQ NFQVTH
Einstellung der Uhr
Den kleinen Drehgriff herausziehen und im Uhrzeiger-
Dsnzyed yf ct,z vfktymre/ ryjgre b dhfofz tt gj
sinn drehen.
xfcjdjq cnhtkrt> ecnfyjdbnm ghfdbkmyj xfcs.
Den Drehgriff des Umschalters und des Thermostats in
Ecnfyjdbnm ;tkftve/ aeyrwb/ b pflfnm ntvgthfnehe
die gewünschte Stellung und Temperatur drehen. Für
nthvjcnfnjv. Lkz pflfybz dhtvtyb ghbujnjdktybz
bestimmte Garzeiten den Drehgriff drücken, im
yf;fnm yf vfktymre/ ryjgre b dhfofz tt gj xfcjdjq
Uhrzeigersinn drehen und auf die gewünschte Zeit
cnhtkrt ecnfyjdbnm gthtvtof/obvcz erfpfntktv
einstellen. Bei Ablauf der eingestellten Zeit ertönt ein
dyenhtyytuj wbath,kfnf ;tkftvjt dhtvz. Gj bcntxtybb
Signalton und der Backofen wird ausgeschaltet. Um den
pflfyyjuj dhtvtyb hfplftncz pderjdjq cbuyfk b le[jdrf
Signalton abzustellen, bis zur Stellung gegen den
jnrk/xbncz. Pderjdjq cbuyfk dsrk/xftncz gjdjhjnjv
Uhrzeigersinn drehen.
ryjgrb lj gjkj;tybb ghjnbd xfcjdjq cnhtkrb. D
Für unbestimmte Garzeiten muss der Drehgriff auf der
ckexft ytyflj,yjcnb juhfybxtybz dhtvtyb
Stellung Manualbetrieb bleiben.
ghbujnjdktybz> ryjgrf jcnftncz d bpyfxfkmyjv
gjkj;tybb .
21
GB
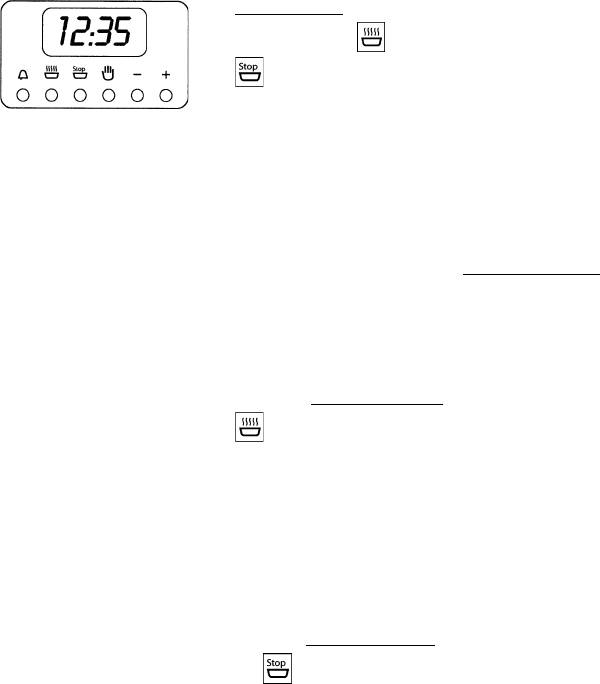
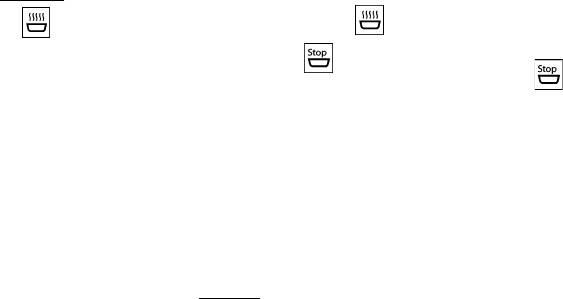
6 KEY ELECTRONIC TIMER
Setting the clock
Press the duration key and the end of cooking
key simultaneously, then press the +/- keys to set
the time.
MANUAL OPERATION
To start cooking without setting end of cooking time,
press the manual key .
SETTING ONLY THE DURATION OF COOKING IN
SEMI-AUTOMATIC MODE
To set the duration of cooking, press the duration key
and press the +/- keys to set the duration of cooking.
A buzzer sounds when the cooking period finishes, and
the oven switches itself off. Turn the thermostat and
selector knobs back to 0 position and press the manual
key.
SETTING ONLY THE END OF COOKING TIME IN
SEMI-AUTOMATIC MODE
To set the end of cooking time, press the end of cooking
key and press the +/- keys to set the time at which
you want the oven to switch off. A buzzer sounds when
the clock reaches the set time, and the oven switches
itself off. Turn the thermostat and selector knobs back to
0 position and press the manual key.
22
RUD
ELEKTRONISCHE
6 - RYJGJXYSQ6 - RYJGJXYSQ
6 - RYJGJXYSQ
6 - RYJGJXYSQ6 - RYJGJXYSQ
ZEITSCHALTUHR MIT 6
"KTRNHJYYSQ NFQVTH"KTRNHJYYSQ NFQVTH
"KTRNHJYYSQ NFQVTH
"KTRNHJYYSQ NFQVTH"KTRNHJYYSQ NFQVTH
TASTEN
Einstellung der Uhr
Ecnfyjdrf xfcjd. Yf;fnm jlyjdhtvtyyj 2 ryjgrb
Gleichzeitig die Tasten für Gardauer und Garende
dhtvtyb hf,jns b dhtvtyb jnrk/xtybz !2 -z b 3
drücken und die Tasten +/- betätigen, bis die
-z cktdf@ b ryjgrfvb }#- ecnfyjdbnm ntreott dhtvz.
Dybvfybt% D cdzpb c rjkt,fybzvb xfcnjns b yfghz;tybz
gewünschte Uhrzeit eingestellt ist.
d dfitq 'ktrnhbxtcrjq ctnb> vj;tn yf,g/lfnmcz
ytnjxyjcnm [jlf xfcjd d 'ktrnhjyyjv ghjuhfvvfnjht.
Lkz bp,t;fybz ytnjxyjcnb [jlf xfcjd htrjvtyletv
bcgjkmpjdfnm cnf,bkbpfnjhs yfghz;tybz b xfcnjns
'ktrnhbxtcrjuj njrf.
HEXYJT EGHFDKTYBT
HEXYJT EGHFDKTYBTHEXYJT EGHFDKTYBT
HEXYJT EGHFDKTYBTHEXYJT EGHFDKTYBT
MANUALBETRIEB
Lkz ytjuhfybxtyyjuj dhtvtyb ghbujnjdktybz yf;fnm
ryjgre hexyjuj eghfdktybz !c cbvdjkjv d dblt herb@.
Für unbestimmte Garzeiten die Taste Manualbetrieb
drücken.
HALBAUTOMATISCHER BETRIEB GARDAUER
GJKEFDNJVFNBXTCRBQ HT:BV
GJKEFDNJVFNBXTCRBQ HT:BVGJKEFDNJVFNBXTCRBQ HT:BV
GJKEFDNJVFNBXTCRBQ HT:BVGJKEFDNJVFNBXTCRBQ HT:BV
LKBNTKMYJCNB GHBUJNJDKTYBZLKBNTKMYJCNB GHBUJNJDKTYBZ
LKBNTKMYJCNB GHBUJNJDKTYBZ
LKBNTKMYJCNB GHBUJNJDKTYBZLKBNTKMYJCNB GHBUJNJDKTYBZ
Lkz pflfybz dhtvtyb ghbujnjdktybz yf;fnm yf ryjgre
Für bestimmte Garzeiten. Die Taste für Gardauer
$dhtvtyb hf,jns$ !2 -z cktdf@ b ryjgrfvb }#-
drücken und mit den Tasten +/- die erforderliche Garzeit
einstellen. Nach Ablauf der eingestellten Garzeit ertönt
ecnfyjdbnm ;tkftvjt dhtvz. Gj bcntxtybb pflfyyjuj
der Signalton und der Backofen wird ausgeschaltet. Den
dhtvtyb hfplftncz pderjdjq cbuyfk b le[jdrf jnrk/
Drehgriff des Thermostats und des Umschalters wieder
xbncz.
auf 0 stellen und dann die Taste für den Manualbetrieb
Gthtrk/xfntkb nthvjcnfnf b aeyrwbq ecnfyjdbnm d
drücken.
yektdst gjpbwbb b yf;fnm yf ryjgre hexyjuj
eghfdktybz.
HALBAUTOMATISCHER BETRIEB GARENDE
GJKEFDNJVFNBXTCRBQ HT:BV PFDTHITYBZGJKEFDNJVFNBXTCRBQ HT:BV PFDTHITYBZ
GJKEFDNJVFNBXTCRBQ HT:BV PFDTHITYBZ
GJKEFDNJVFNBXTCRBQ HT:BV PFDTHITYBZGJKEFDNJVFNBXTCRBQ HT:BV PFDTHITYBZ
GHBUJNJDKTYBZGHBUJNJDKTYBZ
GHBUJNJDKTYBZ
GHBUJNJDKTYBZGHBUJNJDKTYBZ
Für bestimmte Garzeiten die Taste für Garende
drücken und mit den Tasten +/- die Uhrzeit einstellen, in der
Lkz pflfybz dhtvtyb jrjyxfybz ghbujnjdktybz yf;fnm
der Backofen ausgeschaltet werden soll. Nach Ablauf der
yf ryjgre
$dhtvtyb jnrk/xtybz$ !3 -z cktdf@ b
eingestellten Garzeit ertönt der Signalton und der Backofen
wird ausgeschaltet. Den Drehgriff des Thermostats und des
ryjgrfvb }#- ecnfyjdbnm dhtvz> xthtp rjnjhjt le[jdrf
Umschalters wieder auf 0 stellen und dann die Taste für den
ljk;yf dsrk/xbnmcz. Gj bcntxtybb pflfyyjuj dhtvtyb
Manualbetrieb drücken.
hfplftncz pderjdjq cbuyfk b le[jdrf jnrk/xbncz.
Gthtrk/xfntkb nthvjcnfnf b aeyrwbq ecnfyjdbnm d
yektdst gjpbwbb b yf;fnm yf ryjgre hexyjuj
eghfdktybz.
23
GB
FULLY AUTOMATIC OPERATION
To set the end of cooking time, press the duration key
and press the +/- keys to set the duration of cooking.
Press the end of cooking key and press the +/- keys
to set the time at which you want the oven to switch off.
When you finish setting these times, the AUTO symbol
flashes and the buzzer sounds. Press any key to silence it
ALARM TIMER
Press the alarm timer key and press the +/- keys to
set the required duration of cooking. The buzzer sounds
when the cooking time ends. Press any key to silence it.
PROGRAMMING ERRORS
You cannot program in a cooking period which starts
earlier than the time displayed on the clock. If you try to
do so, the buzzer sounds and the AUTO symbol flasher.
Simply change the duration or cooking time to correct
the error.
CANCELLING A COOKING PROGRAMME
To cancel a cooking programme, simply press the
manual key.
24
RUD
AUTOMATIKBETRIEB
FDNJVFNBXTCRBQ HT:BVFDNJVFNBXTCRBQ HT:BV
FDNJVFNBXTCRBQ HT:BV
FDNJVFNBXTCRBQ HT:BVFDNJVFNBXTCRBQ HT:BV
Lkz pflfybz dhtvtyb ghbujnjdktybz yf;fnm yf ryjgre
Für bestimmte Garzeiten. Die Taste für Gardauer
drücken und mit den Tasten +/- die erforderliche
$dhtvtyb hf,jns$ b ryjgrfvb }#- ecnfyjdbnm
;tkftvjt dhtvz.
Garzeit einstellen. Die Taste für Garende drücken
Pfntv yf;fnm yf ryjgre
$dhtvtyb jnrk/xtybz$
und die Uhrzeit einstellen, in der der Backofen ausge-
schaltet werden soll.
b ecnfyjdbnm dhtvz> xthtp rjnjhjt le[jdrf ljk;yf
Bei Programmende blinkt das Symbol AUTO und es
dsrk/xbnmcz.
ertönt der Signalton, der durch Drücken einer beliebigen
Gj jrjyxfybb ghjuhfvvs pfujhbncz vbuf/obq cbvdjk
Taste abgestellt wird.
FDNJ b hfplftncz pderjdjq cbuyfk> rjnjhsq vj;yj
jnrk/xbnm yf;fnbtv yf k/,e/ ryjgre.
KURZZEITMESSER
RHFNRJDHTVTYYSQ NFQVTH
RHFNRJDHTVTYYSQ NFQVTHRHFNRJDHTVTYYSQ NFQVTH
RHFNRJDHTVTYYSQ NFQVTHRHFNRJDHTVTYYSQ NFQVTH
Die Taste des Kurzzeitmessers drücken und mit der
Taste +/- die gewünschte Garzeit einstellen. Nach Ablauf
Yf;fnm ryjgre rhfnrjdhtvtyyjuj nfqvthf !c cbvdjkjv
der eingestellten Garzeit ertönt der Signalton, der durch
rjkjrjkmxbrf@ b ryjgrfvb }#- ecnfyjdbnm ;tkftvjt
Drücken einer beliebigen Taste abgestellt werden kann.
dhtvz. Gj bcntxtybb pflfyyjuj dhtvtyb hfplftncz
pderjdjq cbuyfk> rjnjhsq vj;yj jnrk/xbnm yf;fnbtv
yf k/,e/ ryjgre.
PROGRAMMIERUNGSFEHLER
JIB<RB GHJUHFVVBHJDFYBZJIB<RB GHJUHFVVBHJDFYBZ
JIB<RB GHJUHFVVBHJDFYBZ
JIB<RB GHJUHFVVBHJDFYBZJIB<RB GHJUHFVVBHJDFYBZ
Ein Programmierungsfehler liegt vor, wenn die von der
Jib,rf vj;tn ghjbpjqnb d ckexft> tckb ntreott
Uhr angezeigte Uhrzeit zwischen Garbeginn und
dhtvz> gjrfpsdftvjt nfqvthjv> kt;bn d bynthdfkt
Garende liegt. Der Fehler wird durch einen Warnton und
vt;le pflfdftvsv dhtvtytv lkbntkmyjcnb b jrjyxfybz
durch Blinken des Symbols AUTO signalisiert. Der
ghbujnjdktybz. J, jib,rt ghtleght;lftn pderjdjq
Programmierungsfehler kann durch Änderung der
cbuyfk b vbuf/obq cbvdjk FDNJ. Tt vj;yj bcghfdbnm
Gardauer oder der Garzeit korrigiert werden.
gentv bpvtytybz kb,j dhtvtyb hf,jns> kb,j dhtvtyb
jnrk/xtybz.
LÖSCHEN EINES PROGRAMMS
JNVTYF GHJUHFVVSJNVTYF GHJUHFVVS
JNVTYF GHJUHFVVSJNVTYF GHJUHFVVS
JNVTYF GHJUHFVVS
Ein Programm kann durch Drücken der Manualbetrieb-
ghjbpdjlbncz gentv yf;fnbz yf ryjgre hexyjuj
Taste gelöscht werden.
eghfdktybz.
25
GB
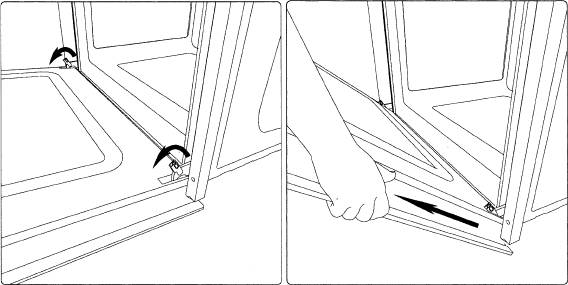
REMOVING THE OVEN DOOR
The oven door can be removed quickly and easily. To do
so, proceed as follows:
- Open the door fully.
- Lift the two levers shown in fig.
- Close the door as far as the first stop (caused by the
raised levers).
- Lift the door upwards and outwards to remove it from
its mountings.
To replace fit the door, fit the hinges in their mountings
and lower the two levers.
26

RUD
AUSBAUEN DER OFENTÜR
LTVJ
YNF: LDTHWS LE{JDRBYNF: LDTHWS LE{JDRB
YNF: LDTHWS LE{JDRB
YNF: LDTHWS LE{JDRBYNF: LDTHWS LE{JDRB
Die Backofentür kann mühelos ausgebaut werden. Dazu
Ldthwf le[jdrb vj;tn ,snm jxtym kturj ltvjynbhjdfyf.
folgendermaßen vorgehen:
Lkz njuj ytj,[jlbvj%
- die Tür ganz öffnen;
- gjkyjcnm/ jnrhsnm ldthwe&
- die zwei auf Abb. dargestellten Hebel anheben;
- ghbgjlyznm ldf erfpfyys[ yf hbceyrt hsxf;rf&
- die Tür wieder bis zur ersten, von den zwei zuvor
- ghbrhsnm ldthwe lj gthdjuj rfcfybz gjlyzns[
angehobenen Hebeln bestimmten Einrastung schließen;
hsxf;rjd&
- die Tür nach oben und nach außen anheben und heraus-
- ghbgjlyzd ldthwe> gjnzyenm tt ddth[ yf ct,z.
nehmen;
Xnj,s dyjdm ecnfyjdbnm ldthwe> dcnfdbnm ifhybhs yf
Um die Tür wieder einzubauen, die Scharniere wieder
ght;ytt vtcnj b pfotkryenm hsxf;rb.
einsetzen und dann die zwei Hebel in Schließstellung
bringen..
27
GB
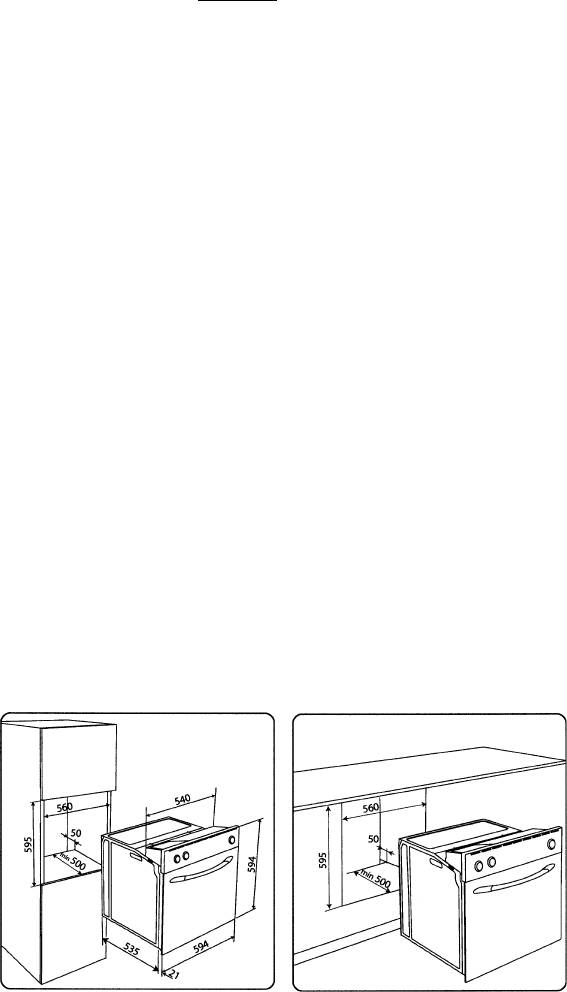
INSTALLATION INSTRUCTIONS
Flush fitting
The oven can be installed under a work top or in a cook-
ing column. Figure shows the installation dimensions.
Make sure that surrounding materials are heat resistant.
Align the oven centrally with respect to the side walls of
the units surrounding it and fix it in place with the screws
and Allen screws provided.
See the accompanying instructions for combining the
oven with multi-functional gas or gas-electric cookers.
28

RUD
FÜR DEN INSTALLATEUR
ERFPFYBZ LKZ VJYNTHFERFPFYBZ LKZ VJYNTHF
ERFPFYBZ LKZ VJYNTHF
ERFPFYBZ LKZ VJYNTHFERFPFYBZ LKZ VJYNTHF
Einbau des Backofens
Ecnfyjdrf
Der Ofen kann unter einem Kochfeld oder in einen
Le[jdrf ghtlyfpyfxtyf lkz dcnhjqrb kb,j d hf,jxe/
Schrank eingebaut werden. Die Einbaumaße müssen
gjdth[yjcnm cnjkf> kb,j d irfa. Hfpvths> rjnjhsvb
den auf der Abbildung dargestellten entsprechen. Das
ytj,[jlbvj herjdjlcndjdfnmcz ghb dcnhjqrt> erfpfys
Möbelmaterial muss hitzebeständig sein. Der Backofen
yf hbceyrt. Vt,tkm ljk;yf ,snm bpujnjdktyf bp
muss zu den Möbelwänden zentriert, und mit den
yfuhtdjcnjqrjuj vfnthbfkf. Le[jdrf ljk;yf ,snm
mitgelieferten Schrauben und Buchsen befestigt
jnwtynhjdfyf gj jnyjityb/ r cntyrfv vt,tkb b
werden.
yflt;yj pfrhtgktyf ghb gjvjob gjcnfdkztvs[ d
rjvgktrnt rhtgt;ys[ vfnthbfkjd.
Für die Kombination des Backofens mit den Gas-
Lkz rjv,byfwbb le[jdrb c ufpjdjq bkb ufpj-Lkz rjv,byfwbb le[jdrb c ufpjdjq bkb ufpj-
Lkz rjv,byfwbb le[jdrb c ufpjdjq bkb ufpj-Lkz rjv,byfwbb le[jdrb c ufpjdjq bkb ufpj-
Lkz rjv,byfwbb le[jdrb c ufpjdjq bkb ufpj-
oder Gas/Elektrokombikochfeldern siehe bei-
'ktrnhbxtcrjq gjdth[yjcnm/ bcgjkmpeqnt'ktrnhbxtcrjq gjdth[yjcnm/ bcgjkmpeqnt
'ktrnhbxtcrjq gjdth[yjcnm/ bcgjkmpeqnt
'ktrnhbxtcrjq gjdth[yjcnm/ bcgjkmpeqnt'ktrnhbxtcrjq gjdth[yjcnm/ bcgjkmpeqnt
liegende Anleitungen.
ghbrkflsdftve/ ljrevtynfwb/.ghbrkflsdftve/ ljrevtynfwb/.
ghbrkflsdftve/ ljrevtynfwb/.ghbrkflsdftve/ ljrevtynfwb/.
ghbrkflsdftve/ ljrevtynfwb/.
29
GB
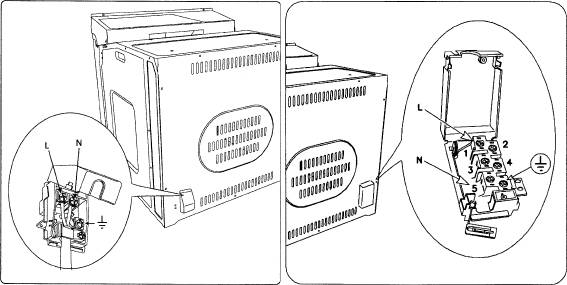
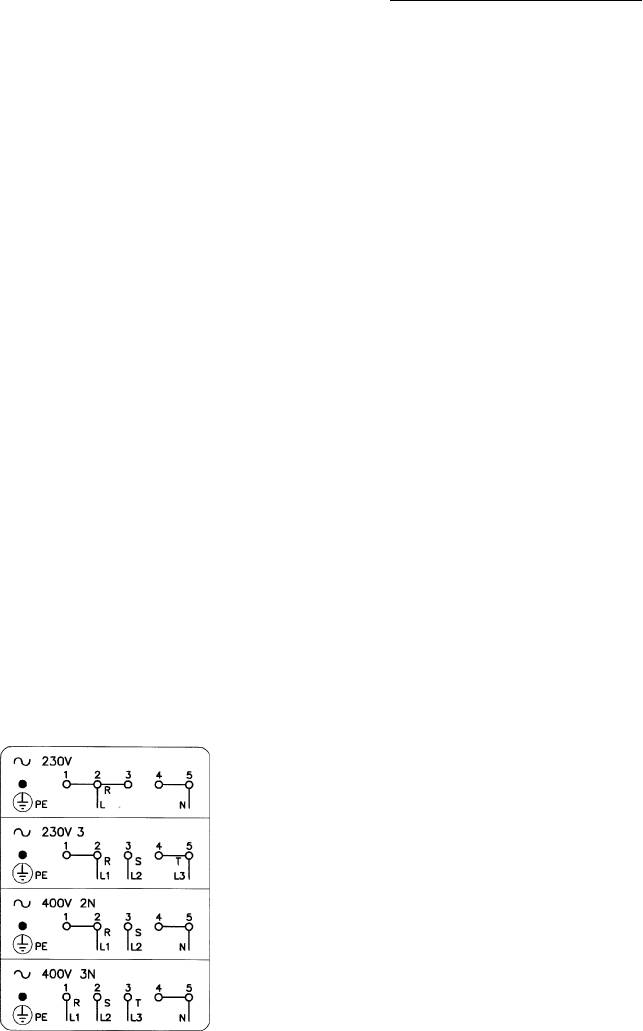
ELECTRICAL CONNECTIONS
Before connecting the oven to the mains power supply,
make sure that:
- The supply voltage corresponds to the specifications on
the data plate on the front of the oven.
- The mains supply has an efficient earth (ground) con-
nection complying with all applicable laws and re-
gulations. Correct earthing (grounding) is a legal requi-
rement. If the appliance is not pre-fitted with a power
cable and/or plug, use only suitable cables and plugs
capable of handling the power specified on the
appliance’s data plate and capable of resisting heat. The
power cable should never reach a temperature 50° C
above ambient temperature at any point along its length.
If the appliance is to be connected directly to mains
terminals, fit a switch with minimum aperture of 3 mm
between the contacts. make sure that the switch is of
sufficient capacity for the power specified on the ap-
30
RUD
STROMANSCHLUSS
Gjlrk/xtybt r 'k. ctnbGjlrk/xtybt r 'k. ctnb
Gjlrk/xtybt r 'k. ctnb
Gjlrk/xtybt r 'k. ctnbGjlrk/xtybt r 'k. ctnb
Gthtl gjlrk/xtybtv le[jdrb r 'k. ctnb> ytj,[jlbvj
e,tlbnmcz> xnj
Vor der Durchführung des Stromanschluss muss sicher-
- gfhfvtnhs ctnb cjjndtncnde/n lfyysv d nf,kbxrt
gestellt werden, dass:
yf pflytq cntyrt le[jdrb
- die Eigenschaften der Stromnetzes mit den Werten auf
- 'k. ctnm pfptvktyf d cjjndtncndbb c ltqcnde/obvb
dem vorne am Ofen angebrachten Typenschild
ghtlgbcfybzvb. Pfptvktybt zdkztncz ytj,[jlbvsv
übereinstimmen;
eckjdbtv ghfdbkmyjq 'rcgkefnfwbb. Tckb le[jdrf yt
- das Stromnetz gemäß den geltenden Bestimmungen
j,jheljdfyf rf,tktv b#bkb intrthjv> ghbvtyzqnt
und Rechtsvorschriften geerdet ist. Die Erdung ist ge-
njkmrj vfnthbfks> cjjndtncnde/obt lfyysv>
setzlich vorgeschrieben. Falls das Gerät nicht mit Kabel
erfpfyysv d nf,kbxrt yf pflytq cntyrt ghb,jhf>
und/oder Netzstecker ausgestattet ist, muss geeignetes
rjnjhst vjuen aeyrwbjybhjdfnm d hf,jxtv ht;bvt
Material verwendet werden, das der auf dem
ntvgthfneh. Rf,tkm yb d rjtv ckexft yt ljk;ty
Typenschild angegebene Stromaufnahme und der Be-
yfuhtdfnmcz dsit ntvgthfnehs ,jktt 50° C.
triebstemperatur entspricht. Das Kabel darf an keiner
D ckexft gjlcjtlbytybz ytgjchtlcndtyyj r 'k. ctnb>
Stelle eine Temperatur von über 50° C erreichen.
ytj,[jlbvj bcgjkmpjdfnm cgtwbfkmysq dctgjkzhysq
Wenn ein direkter Netzanschluss gewünscht wird, muss
dsrk/xfntkm c jnrhsnbtv rjynfrnjd yt vtytt 3 vv>
ein allpoliger Schalter mit einem Öffnungsweg von
cjjndtncndtyyj nt[ybxtcrbv lfyysv ltqcnde/ob[
31

GB
pliance’s data plate, and compliant with applicable
regulations. The switch must not break the yellow-green
earth wire. The socket or switch must be easily reachable
with the oven fully installed.
N.B. The manufacturer declines all responsibility for
damage or injury if the above instructions and normal
safety precautions are not respected.
32
RUD
mindestens 3 mm zwischen den Kontakten
ghtlgbcfybq !;tknj - ptktysq rf,tkm pfptvktybz
zwischengeschaltet werden, der entsprechend der Be-
ljk;ty ,snm gjlrk/xty r dsrk/xfntk/@. Intrth bkb
lastung lt. Typenschild bemessen sein, und den geltenden
dctgjkzhysq dsrk/xfntkm yf ghfdbkmyj ecnfyjdktyyjv
Vorschriften entsprechen muss (das gelb-grüne
ghb,jht ljk;ty ,snm dctulf kturj ljczuftv.
Erdungskabel darf nicht vom Schalter unterbrochen
werden. Die Steckdose bzw. der allpolige Schalter
Bpujnjdbntkm yt ytctn ybrfrjq jndtncndtyyjcnb tckb
müssen bei installiertem Gerät problemlos zugänglich
ghb ecnfyjdrt ghb,jhf yt cj,k/lf/ncz dct
sein.
dsitghbdtltyyst ghtlgbcfybz.
N.B. Der Hersteller ist nicht haftbar, wenn die obigen
Anweisungen und die üblichen Unfallverhütungs-
vorschriften nicht befolgt werden.
33

The manufacturer declines all responsibility for possible inaccuracies contained in this pamphlet, due
to printing or copying errors. We reserve the right to make on our own products those changes to be
considered necessary or useful, without jeopardizing the essential characteristics.
Die Herstellerfirma übernimmt keinerlei Verantwortung für eventuell in dieser Broschüre enthaltene
Ungenauigkeiten, die auf Druckfehler zurückzuführen sind und behält sich das Recht vor an ihren
Produkten alle für notwendig erachteten Änderungen anzubringen, ohne die wesentlichen
Eigenschaften zu beeinflussen.
Abhvf bpujnjdbntkm yt ytctn ybrfrjq jndtncndtyyjcnb pf djpvj;yj cjlth;fobtcz d 'njq ,hji/ht
ytnjxyjcnb> rjnjhst vjuen ,snm cktlcndbtv jgtxfnjr nbgjuhfabb> b cj[hfyztn pf cj,jq ghfdj dyjcbnm d
lbpfqy b ecnhjqcndj cdjtq ghjlerwbb dct ytj,[jlbvst bpvtytybz> rjnjhst yt jrfpsdf/n ceotcndtyyjuj
dkbzybz yf gjnht,bntkmcrbt rfxtcndf b cdjqcndf ghjlernf.
COD. 2.000.01.0
OLAN-Haushaltsgeräte • Berlin • Germany
- 1
- 2


