Bionaire BWM5075C: инструкция
Раздел: Климатическое Оборудование
Тип: Увлажнитель Воздуха
Инструкция к Увлажнителю Воздуха Bionaire BWM5075C
Holmes Products (Europe) Ltd
1 Francis Grove
London SW19 4DT
England
Fax: +44 (0)20 8947 8272
Email: info-europe@theholmesgroup.com
UK - Filter Sales Order Line - 0870 759 9000
Website address: www.theholmesgroup.com/europe
UK - Free phone Customer Service Helpline – 0800 052 3615
Holmes Products France
1015, Rue du Maréchal Juin
Z.I Vaux - Le - Pénil
77000 Melun – France
Phone: +33 1 64 10 45 80
Fax: +33 1 64 10 02 32
FRANCE - SERVICE CONSOMMATEURS
Belgium
+32 38 70 86 86
Czech Republic
+420 48 513 03 03
Denmark
+45 45 93 43 73
Finland
+358 98 70 870
Greece
+30 2 10 61 56 400
Hungary
+36 72 482 017
Netherlands
+31 793 41 77 71
Norway
+47 51 66 99 00
Poland
+48 22 847 8968
Russia
+7 095 334 82 21
Spain
+34 91 64 27 020
Sweden
+46 31 29 09 80
0 825 85 85 82
BWM5075/5075CI/IUK04M1
Warm Mist
Humidifier
BWM5075
BWM5075C
INSTRUCTION MANUAL
MANUEL D’UTILISATION
BENUTZERHANDBUCH
HANDLEIDING
KÄYTTÄJÄN OHJEKIRJA
BRUGSANVISNING
BRUKSANVISNING
MANUAL DE INSTRUCCIONES
MANUALE DI ISTRUZIONI
PYKOBOДCTBO
HASZNÁLATI UTASÍTÁS
NÁVOD K OBSLUZE
ECVEIIDIO ODGCIXM VQGRGR
INSTRUKCJA
MANUAL DE INSTRUÇÕES
BWM5075/5075CI/IUK04M1 v.qxd 3/23/04 9:42 AM Page 1
BWM5075
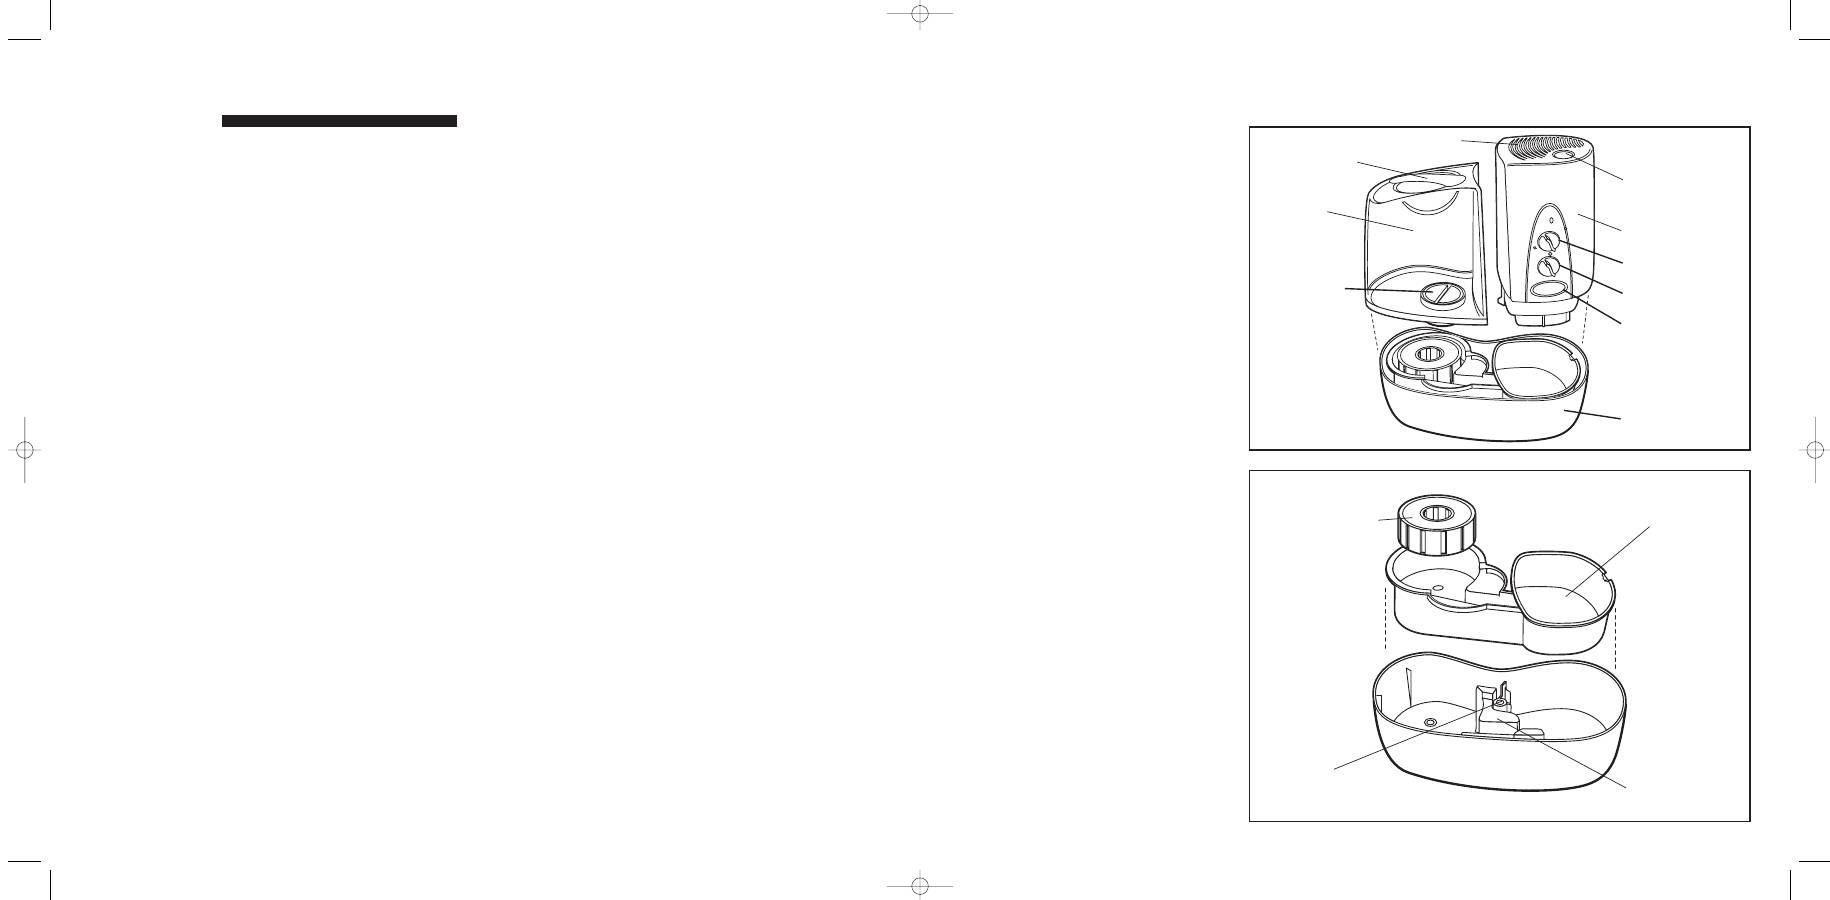
Figure 1
Figure 2
A: Mist Chamber
C: Humidifier Housing
D: Power Knob
E: Night Light Control
F: Night Light
J: Humidfier Base
B. Medicine Cup
G: Tank Handle
H: Tank
I: Tank Cap
K: Water Purification Filter
M: Safety Lock
N: Heating Element
L: Water Tray
English
2
Français/French
6
Deutsch/German
11
Nederlands/Dutch
16
Suomi/Finnish
21
Norsk/Norwegian
25
Dansk/Danish
29
Svenkas/Swedish
34
Español/Spanish
38
Italiano/Italian
42
PYCCKNÑ/Russian
47
Magyar/Hungarian
52
"esky/Czech
57
E
KK
HNIKA/Greek
61
Polski/Polish
66
BWM5075/5075CI/IUK04M1 v.qxd 3/23/04 9:42 AM Page 4

20.If the supply cord is damaged, it must be
replaced by the manufacturer or its service
agent or a similarly qualified person.
PLEASE SAVE THESE INSTRUCTIONS
Please note that this is an electrical
appliance, and requires attention when
in use.
How Your Warm Mist Humidifier Works
Your Bionaire™ Warm Mist Humidifier is designed
to allow the proper amount of water to flow out of
the tank and through the water purification filter.
The filter takes most of the minerals and sediment
out of the water before the water enters the
heating chamber where the Electronic Thermal
Control heating element warms the water. Air is
drawn in through the grill openings located in the
back of the unit and mixed with steam in the
misting chamber. The warm mist is then
dispersed out of the top of the misting chamber
through the outlet grill and into the room.
NOTE:
A humidity level below 30% can be
unhealthy and uncomfortable. The recommended
humidity level is between 45%-55%.
PRE-OPERATING INSTRUCTIONS
1. Be sure the humidifier is disconnected from
the electrical outlet and the power knob is in
the 0 - off position.
2. Select a location for your humidifier, on a flat
surface, about 10cm away from the wall. Do
not place your humidifier on furniture. A floor
location that will not be damaged by moisture
is best.
3. Remove the water tank (see Figure 1). Remove
the Water Purification Filter, and hold it under a
cold running tap for at least 1 minute to ensure
it is thoroughly wet. Then replace it in the water
tray.
4. Make sure the water tray is free of foreign
objects by removing the Mist Chamber. To
remove this stack you must move the Safety
Lock (M) that secures both parts in place.
(Replace the Mist Chamber over the heating
element and make sure that the Safety Lock
knob is in the "Lock" position).
Filling the Water Tank
NOTE:
This humidifier holds about 5.5 litres of
water in the tank and humidifier base. The
humidifier will produce up to 11.5 litres of moisture
over a 24-hour period.
1. Be sure the humidifier is disconnected from
the electrical outlet and the power knob is in
the 0 - off position. Remove the water tank.
2. Twist off the tank cap located on the bottom of
the reservoir by turning counter clockwise and
fill the water tank with cool, fresh water. Do
not fill with warm water as this may cause
leaking.
3. After filling the tank, replace the tank cap by
firmly turning clockwise and then replace the
water tank on the base. The tank will
immediately begin to empty into the base.
4. Plug the power cord into a convenient and
suitable power supply.
OPERATING INSTRUCTIONS (See Fig 2)
IMPORTANT
When using the water purification filter in the
humidifier for the first time, or after a period of
non-use (i.e. 48 hours), pre-soak the filter under a
cold running tap for 1 minute. Replace the filter in
the unit and allow 5 minutes for the water to pass.
Then, carefully lift the water tank and check if the
water tray (I) is 2/3 full of water. If not, replace the
water tank and wait a further 5 minutes until the
water reaches the desired level.
DO NOT switch on the humidifier until the water
tray is 2/3 full of water.
1. Turn the power knob to the I position. It is
normal for the humidifier to take about 2-3
minutes to warm up and begin to mist.
2. The Medicine Cup (B) is located on the top of
the Mist Chamber (A). To use, pour designated
humidifier medication into the groove.
DO NOT add medication to the water tank
DO NOT add medication to the medicine cup
when the unit is already operating.
Nightlight
1. To activate nightlight( ), move the knob to the
on (
I
) position.
2. To maximize bulb life, turn the nightlight ( )
off (
O
) during the day.
RESET PROCEDURE
NOTE: When the water tank is empty and the
water in the Heating Chamber is almost empty,
the re-fill light (red) will illuminate and the
Automatic Shut-off will activate. The unit will not
operate again until you refill the water tank and
reset the humidifier.
1. Turn the power knob anti-clockwise on to
RESET( ) .
2. Unplug the unit.
3. Remove and refill the water tank.Replace the
tank onto the base.
4. Wait 5 minutes for the Automatic Shut-Off to reset.
5. After the 5 minutes, plug in the unit and turn
3
2
Congratulations
By choosing a Bionaire™ humidifier, you have
chosen one of the finest humidifiers on the market
today
PLEASE READ AND SAVE THESE
IMPORTANT INSTRUCTIONS.
NOTE: Before reading these instructions,
please refer to the corresponding
illustrations
Descriptions (See fig 1/2)
A. Mist Chamber
B. Medicine Cup
C. Humidifier Housing
D. Power Knob
E. Night Light Control
F Night Light
G Tank Handle
H. Tank
I. Tank Cap
J. Humidifier Base
K. Water Purification Filter
L. Water Tray
M. Safety Lock
N. Heating Element
SAFETY PRECAUTIONS
When using electrical appliances, basic safety
precautions should always be followed to reduce
the risk of fire, electric shock, and injury to
persons, including the following:
1. Read all instructions before using the
appliance.
2. To avoid fire or shock hazard, plug the
appliance directly into an electrical outlet and
fully insert the plug.
3. Keep the cord out of heavy traffic areas. To
avoid fire hazard, NEVER put the cord under
rugs, or near radiator, stoves, or heaters.
4. DO NOT place humidifier near heat sources
such as stoves, radiators, and heaters. Do
locate your humidifier on an inside wall near
an electrical outlet. The humidifier should be
at least 10cm/4" away from the wall for best
results.
5.
WARNING:
This humidifier produces hot
steam and therefore should not be placed in
an area where it is accessible to children.
Never use a humidifier in a closed room. (i.e:
doors and windows closed) as it may result in
excessive humidity.
6. WARNING: Do not attempt to refill humidifier
without first unplugging the unit from it's
electrical outlet. Be sure to pull by the plug and
not the cord.
7. NEVER drop or insert any object into any
openings. DO NOT place hands, face, or body
directly over or near Moisture Outlet while unit
is in operation. DO NOT cover Moisture Outlet
or place anything over it while the unit is
operating.
8. DO NOT operate any appliance with a
damaged cord or plug, after the appliance
malfunctions, or if it has been dropped or
amaged in any manner. Return appliance to
manufacturer for examination, electrical or
mechanical adjustment, or repair.
9. Use appliance only for intended household use
as described in this manual. Any other use not
recommended by the manufacturer may cause
fire, electric shock, or injury to persons. The
use of attachments not recommended or sold
by The Holmes Group, may cause hazards.
10.DO NOT use outdoors.
11. Always place humidifier on a firm, flat, level
surface. A waterproof mat or pad is
recommended for under the humidifier.
NEVER place it on a surface that may become
damaged by exposure to water and moisture
(i.e. finished floor).
12.DO NOT allow the Moisture Outlet to directly
face the wall. Moisture could cause damage,
particularly to wallpaper.
13.Humidifier should be unplugged when not in
use.
14.NEVER tilt, move, or attempt to empty unit
while it is operating. Shut off and unplug
before removing the water tank and moving
the unit. DO NOT attempt to remove the water
tank within 15 minutes after the humidifier is
turned off and unplugged. Serious injury may
result.
15.This humidifier requires regular maintenance
to operate appropriately. Refer to cleaning and
maintenance procedures.
16.NEVER use detergents, petrol, glass cleaner,
furniture polish, paint thinner, or other
household solvents to clean any part of the
humidifier.
17.Excessive humidity in a room can cause water
condensation on windows and some furniture.
If this happens, turn the humidifier OFF
18.Do not use humidifier in an area where
humidity level is in excess of 55%.
19.DO NOT attempt to repair or adjust any
electrical or mechanical functions on this unit.
The inside of the unit contains no user
serviceable parts. All servicing should be
performed by qualified personnel only.
U.K. and IRELAND
BWM5075/5075CI/IUK04M1 v.qxd 3/23/04 9:42 AM Page 7

the Power Knob to I. In about 2-3 minutes, the
humidifier will begin to produce moisture.
6. If the refill light remains lit, unplug the
humidifier and wait a further 5 minutes.
IMPORTANT:
If you do not plan to use the humidifier for two or
more days, make sure any residual water is
drained from the water tank and base to prevent
algae or bacteria growth.
Replacing the Water Purification Filter
The water purification filter is used to retain
minerals in your water and provide a clean
moisture output. The filter life is determined by
the average daily use of your humidifier and the
water hardness in your area. Areas with hard
water will require more frequent replacement of
the filter. It is strongly recommended that the filter
be replaced at least every 2-3 months (depending
on use) or when the heating element is starting to
gather minerals on it.
To Replace the Filter:
1. Switch the humidifier to 0 - off and unplug.
Remove the tank, drain any water from the
base, lift out the used filter, and throw it away.
2. Remove the protective bag from the new filter
and pre-soak the filter under a cold running tap
for 1 minute. Place the soaked filter into the
base (see Figure 2) and replace the tank
allowing at least 5 minutes for the water to
pass before switching the unit ON (I).
Cleaning and Maintenance Instruction
The following maintenance procedures must be
routinely followed in order to ensure proper,
efficient operation of your humidifier. The unit
WILL FAIL if it is not cleaned properly.
Regular cleaning prevents scale build-up on the
heating element and tray. It also prevents micro-
organisms from growing on the tray and tank. This
ensures that maximum efficiency will be achieved.
We cannot over-emphasize how essential proper
cleaning is to the maintenance and continued use
of your unit and the avoidance of algae or bacteria
build-up.
Regular Maintenance
The frequency of maintenance will depend on the
average daily use of your humidifier and the water
hardness of your area. It is recommended that
this procedure is carried out weekly or more
regularly if necessary.
1. Before cleaning, set the control to 0 - off
position and unplug the unit from the electrical
outlet.
2. Remove the water tank then unlock the misting
chamber by rotating the safety lock. Lift mist
chamber from the unit's base. Now lift the tray
from the base.
3. Empty water and minerals from the tray and
wash it through to remove any sediment and
dirt that has accumulated in the tray.
NOTE:
It is imperative that the tray is cleaned
properly. The tray is dishwasher safe for easy
cleaning (Top rack of the dishwasher only).
4. Rinse out the tank out and refill with clean cool
water.
5. Wipe the heating element clean with a soft
cloth after it has had a chance to cool.
WARNING:
If the misting chamber is left
assembled to the humidifier, it may take up to an
hour before the heating element is sufficiently cool
to be touched.
This humidifier heats the water producing a clean
moisture. Some of the impurities from the water
are collected in the Heating Chamber. The
Electronic Thermal Control Heating element is
lined with a Teflon coating that is designed to
provide the easiest cleaning to prolong the
operating efficiency of the humidifier.
DO NOT use any metal or hard objects to clean
the Heating Element. The coating can be
scratched if cleaned improperly.
Never use detergents, gasoline, kerosene, glass
cleaner, furniture polish, paint thinner or other
household solvents to clean any part of the
humidifier.
De-scaling Maintenance
•
Scale needs to be removed as it becomes
noticeable. We recommend using Bionaire
TM
Clean Away - Humidifier cleaning solution.
•
Apply Solution with a plastic brush to scale
surfaces. Let it soak until residue is softened.
For cleaning the tank, mix 2 capsules of
solution with 2 litres of water. Let mixture stand
for several minutes, swishing every few
minutes. Drain solution and THOROUGHLY
RINSE the tank.
If not available follow these instructions:
1. Repeat steps 1-3 in the Maintenance section.
2. Clean the tray by partially filling the tray with
200ml of undiluted white vinegar. If the
element is heavily scaled, plug the humidifier
into an electrical socket and turn it ON for no
longer than 15 seconds. After this time turn the
humidifier OFF and unplug it from the electrical
outlet.
Let solution stand 20 minutes, cleaning all
interior surfaces with a soft brush. Dampen a
cloth with undiluted white vinegar and wipe out
entire tray to remove scale.
3. Rinse with clean warm water to remove scale
and the white vinegar solution before
beginning to disinfect the tank.
4. Wipe the heating element clean with a soft
cloth after it has had a chance to cool.
Disinfect tank:
1. Fill tank with 1 teaspoon of bleach and 3.5
litres of water.
2. Let the solution stand for 20 minutes, swishing
every few minutes. Wet all surfaces.
3. Empty the tank after 20 minutes, and rinse well
with water until the bleach smell is gone. Dry
with some paper towel.
4. Refill the water tank with cool water; replace
the water tank. Repeat Operating Instructions.
Storage Instructions
If your humidifier will not be in use for two days or
more, or at the end of the season follow these
instructions.
1. Clean, rinse and thoroughly dry the humidifier
as directed in the De-scaling Maintenance
section. DO NOT leave any water inside the
base or tray.
2. Remove the reservoir cap. Do not store with
the reservoir cap in place.
3. Remove and throw away the filter
4. Place the humidifier in the original carton and
store in a cool, dry place.
5. Clean the humidifier before the next season
begins.
6. Order a replacement filter to start the next
season.
SERVICE INSTRUCTIONS
1. Do NOT attempt to repair or adjust any
electrical or mechanical functions on this unit.
Doing so will void the warranty. The insides of
the unit contain no user serviceable parts. Only
qualified personnel should perform all
servicing.
2. Should the unit stop working, first check the
fuse in the plug (UK only) or fuse/circuit
breaker at the distribution board is operating,
before contacting the manufacturer or service
agent.
3. If you need to exchange the unit, please return
it in its original carton, with a sales receipt, to
the store where you purchased it.
4. Should your humidifier require service, please
contact your local dealer.
ACCESSORIES FOR MODEL BWM5075
•
WMF-50 Water Purification Filter
•
We recommend the use of a Bionaire™ /
Hygrometer/ Thermometer, model NO: BT400,
to read the indoor room temperature and
humidity level.
•
Bionaire™ Cleaning Solution
TECHNICAL SPECIFICATIONS
Input voltage:
220-240 V~ 50 Hz
Power consumption:
400 Watts (max)
The Holmes Group reserves the right to change
or modify any specifications without notice.
THIS PRODUCT IS MANUFACTURED TO
COMPLY WITH THE E.E.C. DIRECTIVES
73/23/EEC and 89/336/EEC.
For U.K. and Ireland only:
If the plug is not suitable for the socket outlets in
your home, it can be removed and replaced by
a plug of the correct type.
Please refer to "Installation of a plug" below.
Installation of a plug Applicable to
U.K. and Ireland.
WARNING - THIS APPLIANCE MUST BE
EARTHED
The wires in the mains lead are coloured as such:
GREEN AND YELLOW
- EARTH
BROWN
- LIVE
BLUE -
NEUTRAL
Please note that the colour of these mains wires
may not correspond with the colour markings
that identify the terminals in your plug.
Please proceed as follows:
The wire which is coloured GREEN AND YELLOW
must be connected to the terminal which is marked
with the letter 'E' or by the earth symbol or
coloured GREEN or GREEN AND YELLOW.
The BROWN coloured wire must be connected
to the terminal, which is marked with the letter
"L" or is coloured RED.
The BLUE coloured wire must be connected to
the terminal, which is marked with the letter "N"
or is coloured BLACK.
5
4
BWM5075/5075CI/IUK04M1 v.qxd 3/23/04 9:42 AM Page 9
