Xoro HSD 8420 – страница 3
Инструкция к DVD-проигрывателю Xoro HSD 8420
BASIC CONNECTIONS
Connecting to a TV
• Ensure that the power switch of this unit and other equipment to be connected is
turned off before commencing connection.
• Read through the instructions before connecting other equipment.
• Ensure that you observe the colour-coding when connecting audio and video cords.
• Please use only one kind of connection with TV set for the unit and choose correct
video output setting, otherwise there may be image distortion.
• To get better viewing quality, you are advised using S-video cord to connect the TV
set with S-video input meanwhile changing the TV set to S-video input format.
English
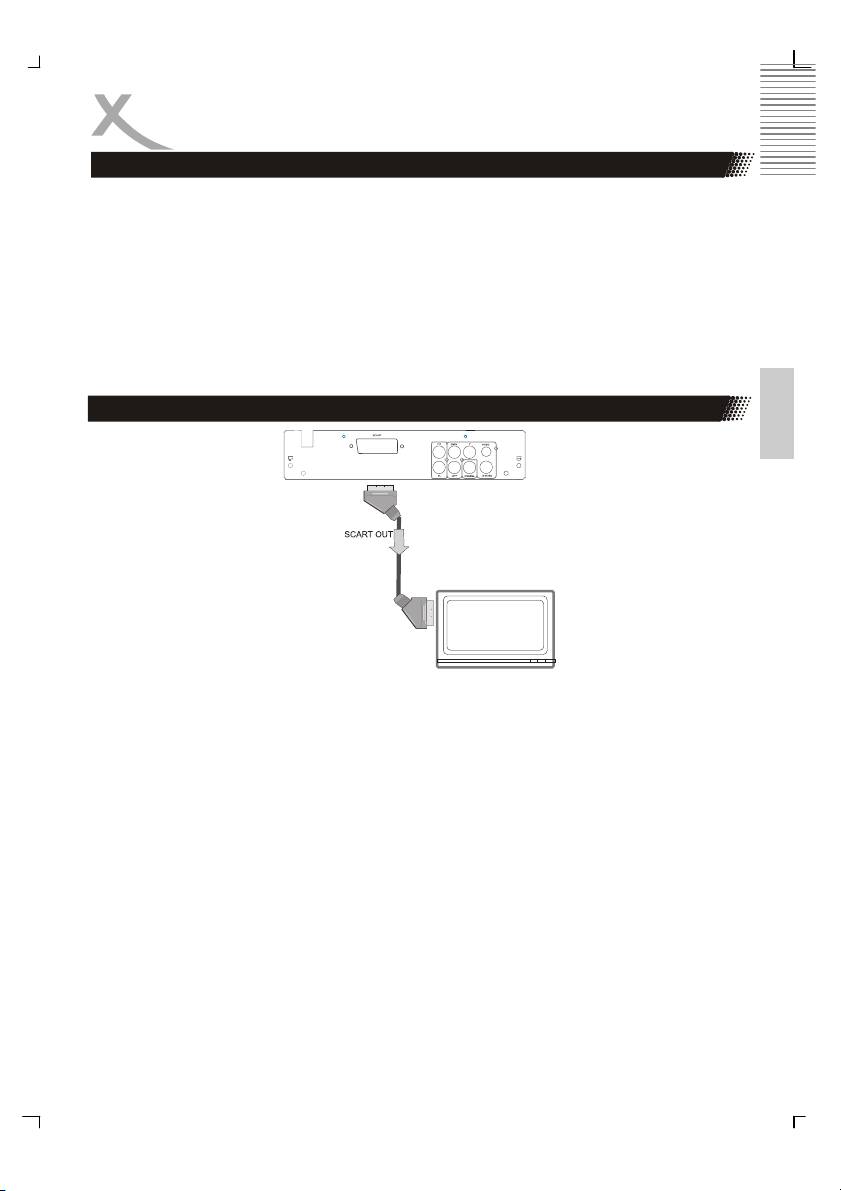
Connecting to a stereo TV set by SCART
The Scart or Euro AV cable serves as the universal connector for picture, sound and control
signals. Plug a cable onto the SCART socket at the back of the DVD player and the SCART
IN socket on the rear side of the TV set. Please also refer to your TV sets user manual.
Switch on the TV set and select the Scart input or the respective channel number. For
channel number and input selection please also refer to your TV operating instructions.
Notes:
The Scart interface of this DVD player is RGB enable. In RGB mode, the picture quality is
much better than in standard SCART mode. You can activate RGB mode on the video
settings page of your DVD recorder, You only can use this mode if it is supported by your
TV set. Otherwise, the use of RGB will result in wrong colour display. please also refer to
your TV set's user manual.
Notes:
If you find the image like non-fully zoomed picture, or brim picture or black & white picture
ect., please select PAL or NTSC by systems settings or press the N/P button on the remote
control to switch the TV system. This DVD player is capable of supporting different scales
picture, as a result, non-full zoomed picture could appear or picture be partially covered on
users TV set.
5
BASIC CONNECTIONS
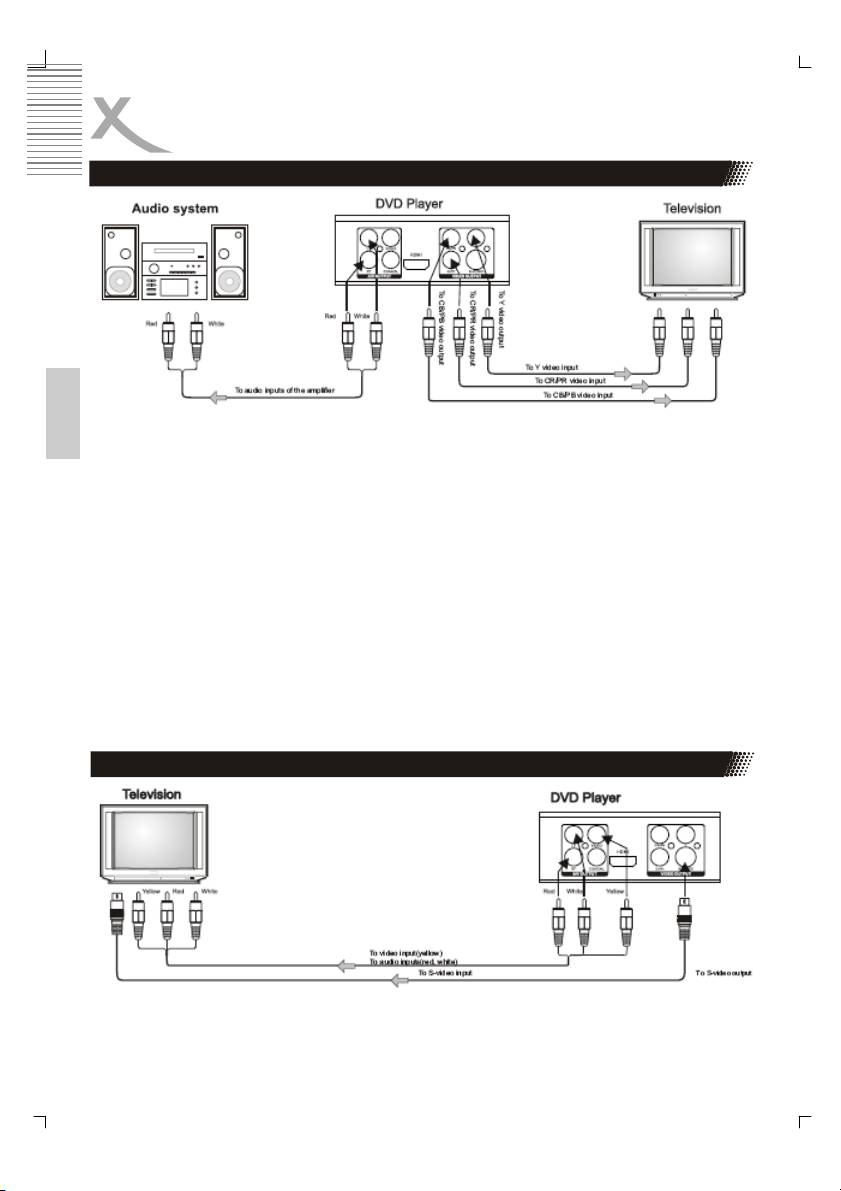
Connecting to a TV set by YUV (Component RCA)
The TV set with Y, Cb, Cr input can get more clear picture and realistic image when it
English
connects to Y, Cb, Cr output jacks of this player. The Video out setting must be set as
Compoment if you use Y, Cb, Cr output, so 480i or 576i are available.
Notes:
1. Choose below speaker setting in the Audio menu if you use the TV speaker.
• Front: Large
• Center/Rear/Subwoofer: OFF
At this setting situation which is Stereo effect, the signal from Audio output LT, RT is
the same as the FL, FR output, also the same as the audio signal from Scart jack.
You could also conntect the Stereo output (LT/RT) to an Audio system.
2. Only one kind of connection to the TV set can be made. If your TV set does not
support Y Pb Pr function, do not switch the VIDEO OUT to Y Pb Pr of the unit,
otherwise there will be no picture output.
3. If the your TV set support Progressive Scan, than you should choose in the Video
Setup the option P-Scan by the Video-Out” settings.
Connecting to a TV by S-Video or CVBS
If the TV has S-Video input, than you can connect the DVD player with an S-Video cable.
For getting sound, please connect the Red and White wire from the AV cable with the TV
set. If the TV support only Video (CVBS) in, than connect the AV cable with the TV by using
the yellow wire boor the video signals and the RE and White wire for Audio signals.
6
BASIC CONNECTIONS
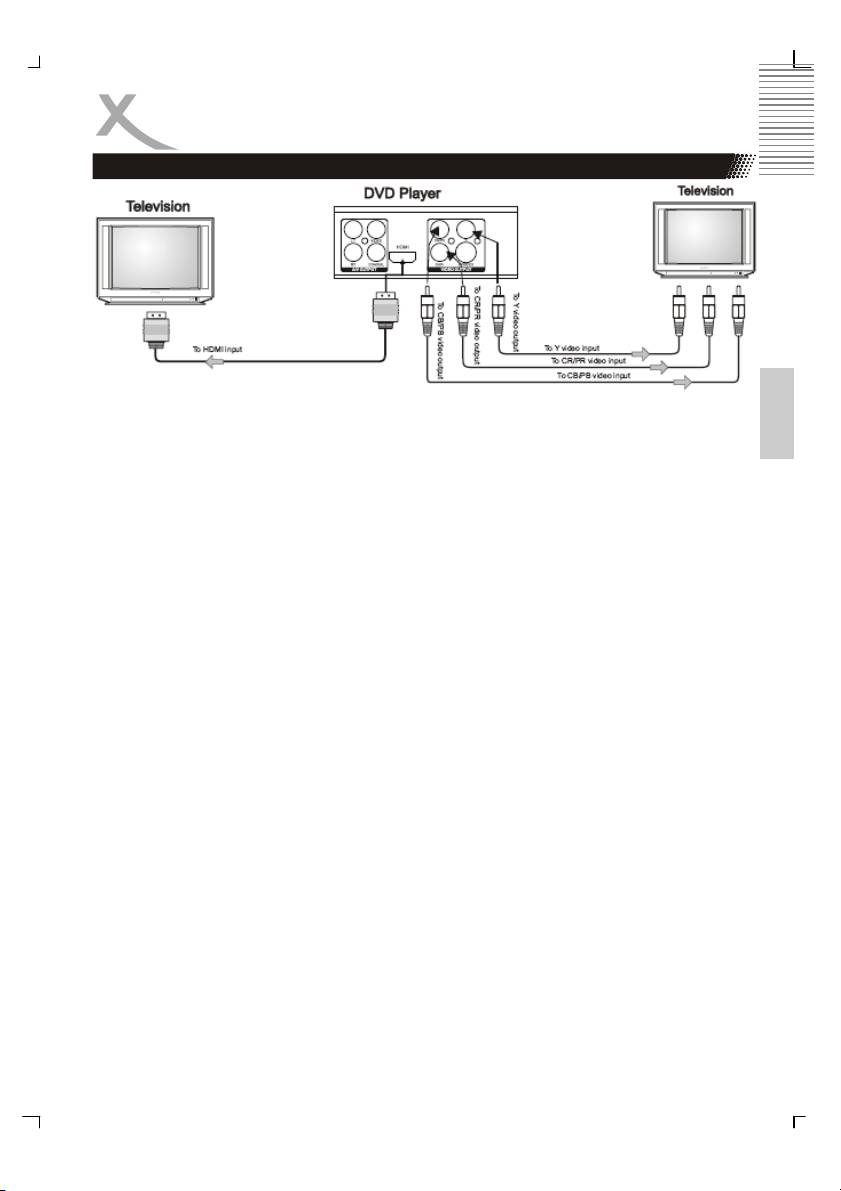
Connecting to a TV by HDMI/DVI
English
HDMI is a digital transmission technology for both audio and video. Connect the DVD player
and display with a HDMI-HDMI cable. Please note that some TV set can not support RAW
audio. In this case, please set the DVD player audio digital output to PCM.
If your TV set is not equipped with HDMI, but with DVI input, you can use a conversion
cable or an adapter to DVI. As DVI does not transmit sound, you also must add an audio
connection. Insert one end of an audio (cinch (RCA)) cable into the white/red cinch (RCA)
socket L/R AUDIO OUT at the back of the DVD player and the other end into the audio
input socket (usualy white/red) on the TV set (usually labelled "AUDIO IN" or "AV IN".
Please also refer to your TV set's user manual)
Switch on the TV set and select the HDMI or DVI input. For input selection please also refer
to your TV operating instructions.
Notes:
By pressing the HDMI button the DVD player switches to different output resolutions: 576p,
720p, 1080i, 1024x768 and 1360x768.
By pressing the V-Mode button the DVD player switches from HDMI to normal video output
(Component). If you gets no picture, please connect a SCART or AV cable to the TV set.
For displaying high definition resolutions by YUV please connect the DVD player with 3-wire
cable to the TV set. Additional please change the setup video out setting to HD and than
you can choose the resolution by HD Resolution.
7
BASIC CONNECTIONS
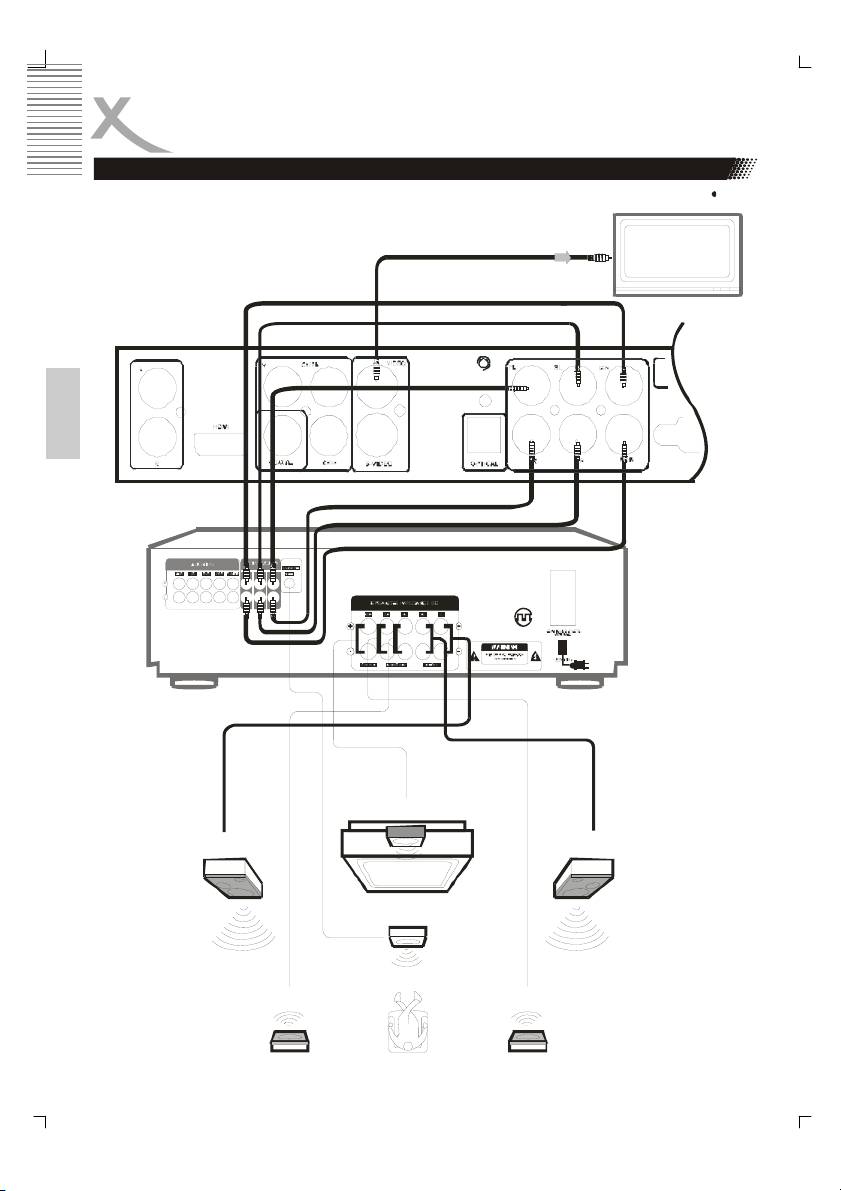
Connection to AV amplifier with 5.1 channel input connector
video out
cent er
rear (left)
front (left)
English
front (right )
rear (right )
av amplifier
subwoofer
center
front (right)front (left)
subwoofer
rear (right)rear (left)
8
BASIC CONNECTIONS
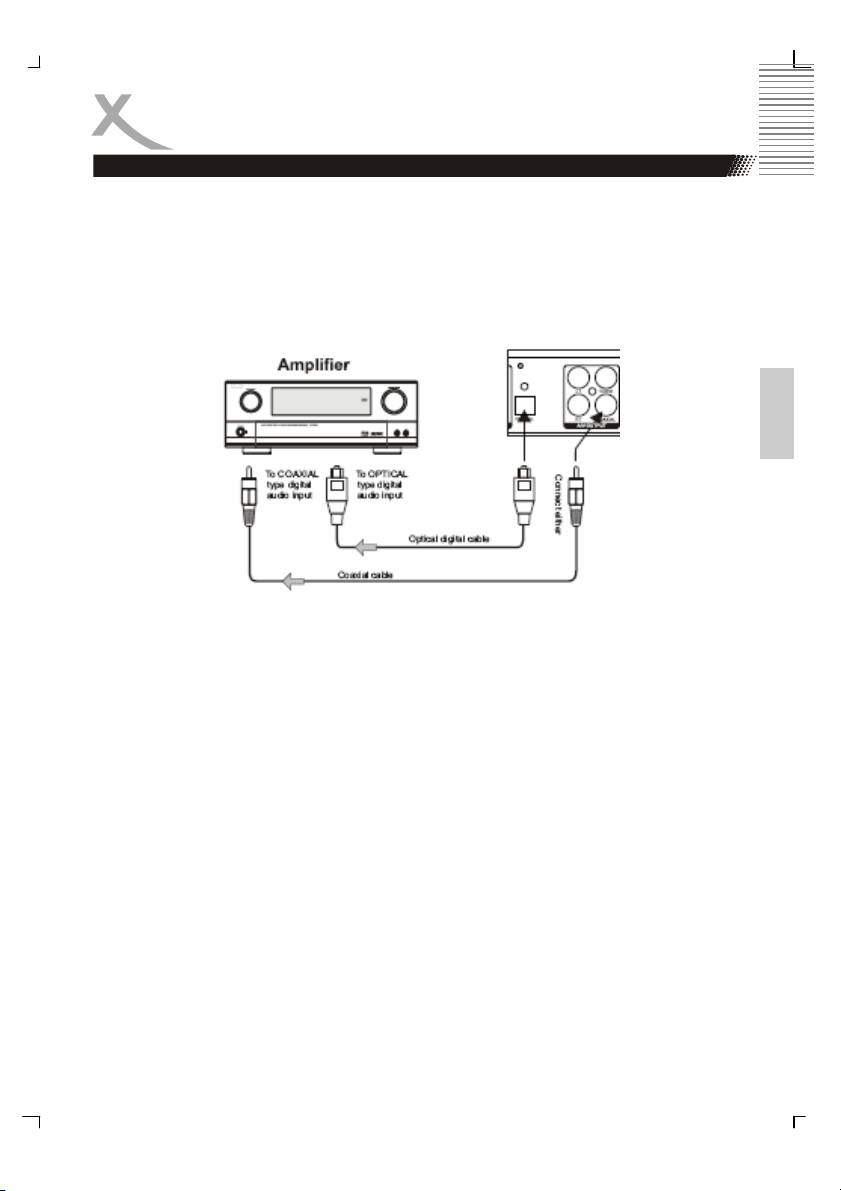
Connection to AV amplifier with 5.1 channel input connector
This player contains a Dolby Digital or MPEG2 decoder. This enables the playback of DVD
recorded in Dolby Digital, MPEG1/2 audio or linear PCM without an external decoder
supports. When the player is connected to an AV amplifier with 5.1 channel input
connectors, theater quality audio could be enjoyed at your home at the time of playing disc
recorded in Dolby digital, MPEG1/2 audio or linear PCM.
Recommendation:
Choose following speaker size setting in the setting Audio menu: Front/ Center/Rear
English
Notes:
1. Choose right audio setting for this player according to your audio system
requirement after connection is made.
2. If the type of the speaker connected does not satisfy the channels recorded in a
MPEG-2 or Linear PCM disc, the disc will not be played in all channels but only in 2
channels (i.e. even if the front speakers and the center speakers are connected, a
disc recorded in 5.1 channels will be played only in 2 channels)
When DVD discs recorded in DOLBY digital, MPEG audio or other formats are played,
corresponding bit stream is output from the player OPTICAL and COAXIAL digital audio
output connector. When the player is connected to an external decoder or a power
amplifier, you can enjoy theater-quality at your home.
Notes when connecting the optical digital cable:
Remove the protective cap from the connector, insert the plug-ins of DVD and amplifier
optical slot so that the configurations of both the cable and the connector match. Keep the
protective cap and always reattach the cap when not using the connector to protect against
dust and laser beam.
Notes:
Please set the digital output as RAW
Caution for the coaxial/optical digital audio output connector:
Do not connect an amplifier with a Coaxial or optical digital input connector) which does not
contain the Dolby digital or MPEG audio decoder otherwise it may be harmful to your ears
and damage your speakers.
9
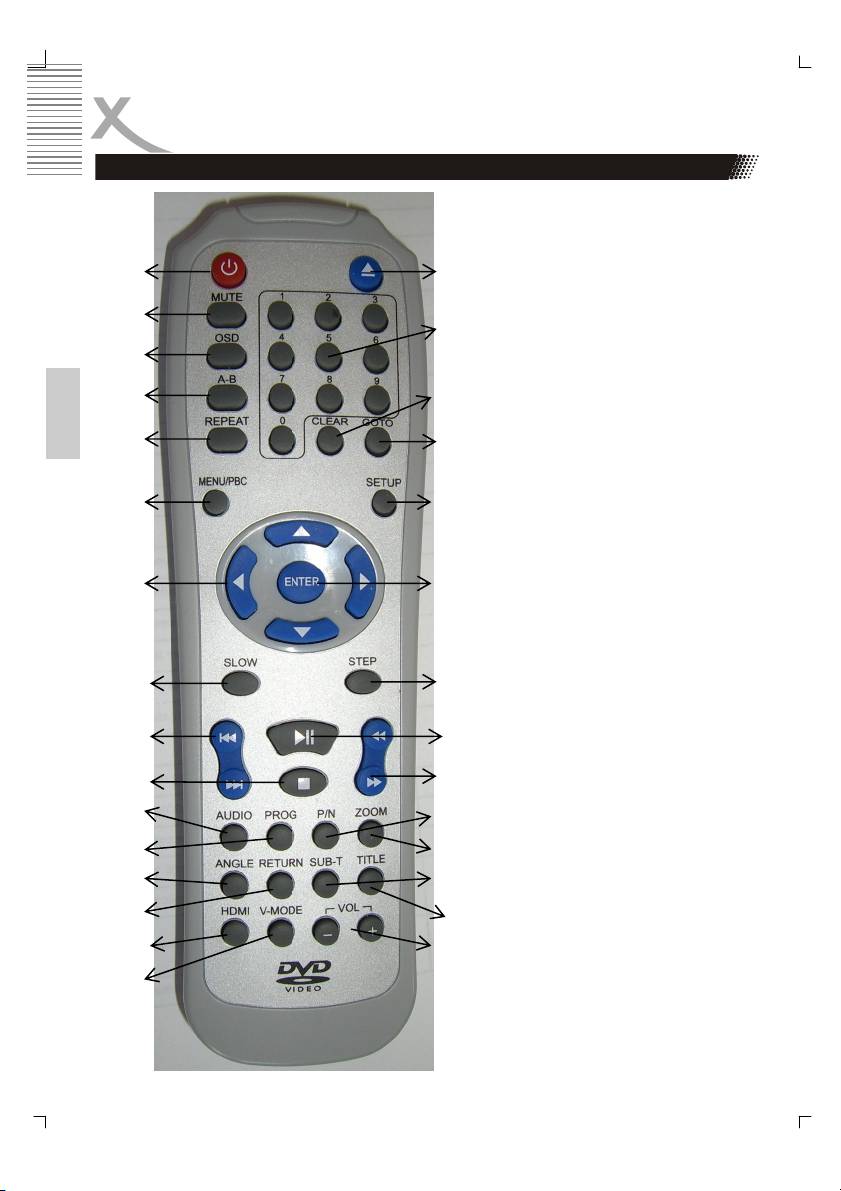
REMOTE CONTROL
Buttons on the Remote Control:
1. Power Button
2. Open / Close
2.
1.
3. Mute
4. OSD
3.
5. A—B Segment Repeat
7.
6. Repeat
4.
7. Numeric Buttons (0...9)
8. Clear
5.
9. Goto / Search
8.
10. Menu / PBC
11. Setup
English
6.
9.
12. Navigation Buttons (Up,
down, right, left)
13. Enter Button
10.
11.
14. Slow
15. Step
16. Skip + / Skip - (>>| / |<<)
17. Play / Pause
18. Stop
12.
13.
19. FBW / FFW (<< / >>)
20. Audio
21. Prog
22. PAL / NTSC (P/N)
23. Zoom
15.
14.
24. Angle
25. Return
26. Subtitle (Sub-T)
16.
17.
27. Title
28. HDMI
19.
18.
29. V-Mode
30. Volume + / -
20.
22.
21.
23.
24.
26.
25.
27.
28.
30.
29.
10

OPERATION
Preparation before playing disc
• The option of display language catalog is preset to English. Please refer to Setup
operation.
• Most of functions are operated by remote control. Either operation of remote control
and front panel is effected when their buttons indicate the same function.
• Turn the TV on and select AV as the TV input
• Switch on the stereo system power if the player has been connected to stereo
system.
Place a Disc
English
• This p layer will enter DVD working status after power on.
• Connect AC power cord to AC outlet (AC230V, 50Hz)
• Switch on the power, the displayed LOAD on the LED indicates the normal power
supply. (Note: The disc information appears after several seconds if there is a disc
after LOAD displayed otherwise appears NO DISC)
• Press OPEN/CLOSE button to open disc tray. OPEN will be indicated on the right
upper of TV screen.
• Place a disc (8cm or 12cm) ion to the tray. (For one-sided disc, position it with
printed title side facing up. For two-sided disc, position side to be playback facing
down)
• Press OPEN/CLOSE again to close disc tray.
Play Functions
Press PLAY to playback disc. You may operate according to MENU indication after MENU
shows on screen then press ENTER button to playback. Some discs can play automatically
after loaded.
Switch off the power via pushing the power button again, BYE will be displayed on VFD
before shut down.
STOP
Press STOP button to stop playing. When playback is stopped, the unit records the point
where STOP was pressed (RESUME function). Press PLAY again, and play will resume
from this point. Press STOP button twice, RESUME function will be cancelled
.
RESUME function is suitable for discs showing playing time during playback.
Note:
Some discs including MPEG4 discs have no such function.
11

OPERATION
Play
StandBy
When you press the button, the player will switch to Standby status, then the power
indicator on the front panel will be light. When pressed again, the player is returned to
normal working status.
Note:
should you not wish to use the player, please switch off the power by pressing the power
button.
PBC
Press the PBC button, under the VCD state. If you choose off, you can choose the VCD
open, if you choose on that you can not choose VCD open.
English
Skipping Tracks
Press |<< / >>| button on remote control during playback. A chapter (DVD) or a track (CD) is
skipped back or ahead correspondingly each time the button is pressed.
Press << / >> button on the remote control during playback and the unit will enter fast
forward/reverse status There are 4 speeds of fast forward (reverse) available: x2, x4, x8,
x16 and x32. To return to normal play, you can press again or press PLAY button on player
or remote control.
Notes:
1. Some discs do not have such function
2. For some MPEG4 discs, the speed levels of fast forward (reverse) will only have x2
or x4.
Press SLOW button on the remote control during playback and the unit will enter slow
forward/reverse status. There are 4 speeds available: 1/2, 1/4, 1/6 and 1/8. To return to
normal play, you can press again or press PLAY button on player or remote control again.
Note:
Some discs do not have such function
Press STEP button during play, the player will enter the still picture mode. If the button is
pressed again, the disc is advanced by one frame (step). When the button is kept pressed,
consecutive frame advance works. To return to normal play, press PLAY button.
Note:
Some discs do not have such function
NOTE:
During the playing of the introduction of a movie, STEP, >>, <<, SLOW, |<< , >>| may be
ineffective.
12

OPERATION
Select a Track
Press Number (0-9) button and enter button allows you to directly access any desired track
while a disc is playing.
Mute
Press MUTE button during play, the player shows mute picture and there is no audio output
(silence), press again to cancel MUTE. And pressing VOL+ or VOL- also can cancel
MUTE.
English
Volume control
Press VOLUME+/- button during play may change volume for audio output
Note:
• VOLUME button will lose function when using this digital output.
The volume is set to maximum.
Using OSD features
Press OSD button during play to show the discs relevant information in a popup menu on
TV screen. Press OSD button again to close the popup menu.
A-B Loop and Repaet Functions
• Press A-B button during playback at the point where repeat play is to commence (a)
then press again at the point where repeat play is to be concluded (B). Repeat
playback between point (A) and point (B) starts.
• Press A-B button once more where TV screen appears
Note:
• Some DVD discs have no such function.
• Some MPEG-4 files on card has no A-B repeat function.
REPEAT
Press REPEAT button during the playing to choose different REPEAT modes.
By playback of VCD, SVCD or CD three modes are available: Single, All or Off.
By playback of Video-DVD three modes are available: Chapter, Title or Off
RETURN
Stop playing the track or song then press this button can return to the parental menu from
the current menu when play compressed audio files, JPEG, MPEG4 discs.
13

OPERATION
Zoom in The Video Image
Press ZOOM button during play or pause to zoom into current picture. There are 3 levels of
zoom available (x1, x2, x3). Press ZOOM continuously to return to normal display.
Note:
Some discs do not have such function or have only x1or x2.
Using the GOTO Feature
When playing a DVD disc, press the GOTO button and Title / Chapter will appear on the
screen. Use the number buttons to set the time or chapter or title. Press the ENTER button
to start playing from the selected point and press CLR to cancel the wrong settings.
Note:
English
Some discs do not have search function.
Using the CLEAR button
When setting a program or searching, you need to input a number. Press CLEAR button to
clear the number when the input number is incorrect. In case you set the Video output
which is not compatible to your TV set and picture distortion or black screen appears, you
could press OPEN/CLOSE button to open the disc tray, press CLEAR button to recover the
video output to the default one: RGB.
Changing the Camera Angle
Press ANGLE continuously during playback of DVD disc to toggle the disc between
available angles recorded on the disc if the disc has multi -angle function.
Audio function
Press AUDIO button during playback to toggle between available audio languages recorded
on the disc if the disc has this multi-language function.
Note:
Press AUDIO button could toggle available audio language soundtracks in Video-DVD,
MPEG-4, VCD and SVCD disc.
Using the Title Feature
For DVD discs, press TITLE button on remote control during playback, a list of titles on the
disc (depends on discs) will be displayed on TV set. Use direction button or number button
to select your preferred title then press enter button to confirm to play as you selected.
14

OPERATION
Using the Menu Feature
Press MENU button on remote control during playback of DVD discs, a list of menu on the
disc (depends on discs) will be displayed on TV set. Use direction or number button to
select your preferred items then press enter button to confirm to display on TV set as you
selected.
Subtitle function
Press SUBTITLE button on remote control during playback. „Subtitle: [1]“ will be displayed
on TV set that means a kind of language. Press once more, „Subtitle: [2]“ appeared on TV
set means another kind of language and accordingly subtitles appear that represents how
English
many kinds of language being selected. Subtitle: [OFF]
Note:
This function is only valid for DVD discs with subtitles.
Using the Programm Feature
Press STOP button first then press PROG button, the program playback screen appears on
the TV set. tracks or chapters can be programmed. Use NUMBER button to input your
preferred track (CD) or chapter (DVD) when the blue cursor flashes on the position 1.
Note: When programming a DVD disc, you must input title number ahead of and chapter
number after it. It is invalid to input the number larger than available. Then press direction
button (UP, DOWN, LEFT, RIGHT) down to remove blue cursor to position 2 and the same
procedure to program your preferred track or chapter.
Use CLR button and enter a new number to amend false or unsatisfied program through
direction button. After you have selected all your preferred title/chapter(s) or track(s),
Remove the cursor to Play Program and press enter to start the program playback.
You can quit program setting by pressing PROG button again and PLAY again to start
normal playback.
Notes:
• Some discs do not have program function.
• The search function is not available during PROGRAM playback.
HDMI and V-Mode Button
Press the HDMI button to change the video output mode into the HDMI output. By more
than one time the HDMI button the HD resolution are changing from 576p to 720p to 1080i,
1024x768 and 1360x768.
Press V-Mode button, you can select different video output modes, SCART, CVBS, ect.
15
OPERATION
JPEG Photo CD/Audio/MPEG-4 playing
Depending on folder/files structure on CD-ROM, playback may start automatically after
inserting the CD-ROM with JPEG, compressed audio files, or MPEG4 and enter playing
control menu as below.
Menu
File list window Operation window
Normal status, all files are listed in the
Filter
area
REPEAT: Off / All / Single
MODE: Normal / Shuffle / Intro
Edit Mode / Program view / Add to program
English
Note:
Some characters of folder/file names may not be displayed normally.
All the files are displayed in the left side of the window where you can choose the desired
file to play by using c or d button.
Filter function:
You could assort and filter the files you need by FILTER engine. Move the cursor to FILTER
on the right upper window, press OK button on the remote control to popup a little menu:
Audio / Photo / Video. Choose the file type you need by pressing OK button.
For example: Move the cursor to the AUDIO, press OK button once, the Ö symbol will
disappear, all of the audio files disappear; press OK button again, all of the audio files will
be listed in the left window. You can choose one or two types of files to display in the left
main window by choosing it from the menu.
REPEAT function:
There are three repeat modes available: All, Single and Off.
MODE function:
There are three play modes available: Normal (the files are played one by one as what
they displayed), Shuffle (the files are played randomly) and Intro (10 seconds scan of
the files).
Edit Mode:
There are tow view modes available for editing here:
• Program View & Add to program
• Browser View & Clear Program
When doing this operation, use UP/DOWN direction button to move to Edit Mode, than
press OK to select (highlight) it, and press Left direction button to return to the files list,
choose the desired files, after that use Right button to enter the Edit Mode window again,
and move to Add to Program before pushing OK to add the selected items up to the
program to be edited.
16

JPEG Photo CD/Audio/MPEG-4 playing
1. Place a disc (8cm or 12cm) ion to the tray
2. Press PLAY / ENTER to playback disc.
3. Press SKIP+ button to display next picture or title
4. Press SKIP- button to play last picture or title
5. Press PAUSE/STEP button to pause, and press PLAY to
resum
Note:
Program View and Browser View can be switched by pressing ENTER button.
English
Browserview is used to display the file list and programview to display the programmed title
list.
Picture Transition Effects (JPEG file only)
You can rotate the picture to get different viewing angle by pressing efcd button. Press
continuously, the following angles can be displayed in turn: original 90 Deg, 180 Deg, 270
Degree.
Zoom (JPEG file only)
You can zoom into the pictures by pressing ZOOM button. The following zoom levels are
available: Q1, Q2 and Q3. Press PLAY button to return to normal view
Remark:
Some discs do not have such function or have only have 1 level.
Large pictures may not be displayed normally.
Title (JPEG file only)
Press TITLE button during play, 9 small pictures within current folder will be displayed in
thumbnail mode. Nine or less pictures (depends on left numbers) are displayed where you
are watching.
You can use efcd buttons to choose your favourite pictures. At the same time, you can
press SKIP-/+ button to go to previous/next page.
Note:
1. The reading time of JPEG picture CD formatted discs may vary due to the level of
content. Please allow more time for highly formatted discs.
2. Perhaps colour distortion will occur when play some kinds of JPEG picture files
such as downloading from the Internet.
17
OPERATION CARD READER
Operation for Card Reader and USB
This player will enter DVD working status after power on. Pressing Goto button on the
remote control, the screen appears „Loading Card“ for a while then it will display popup
menu. You can select the relative cards or USB once they are plugged in.
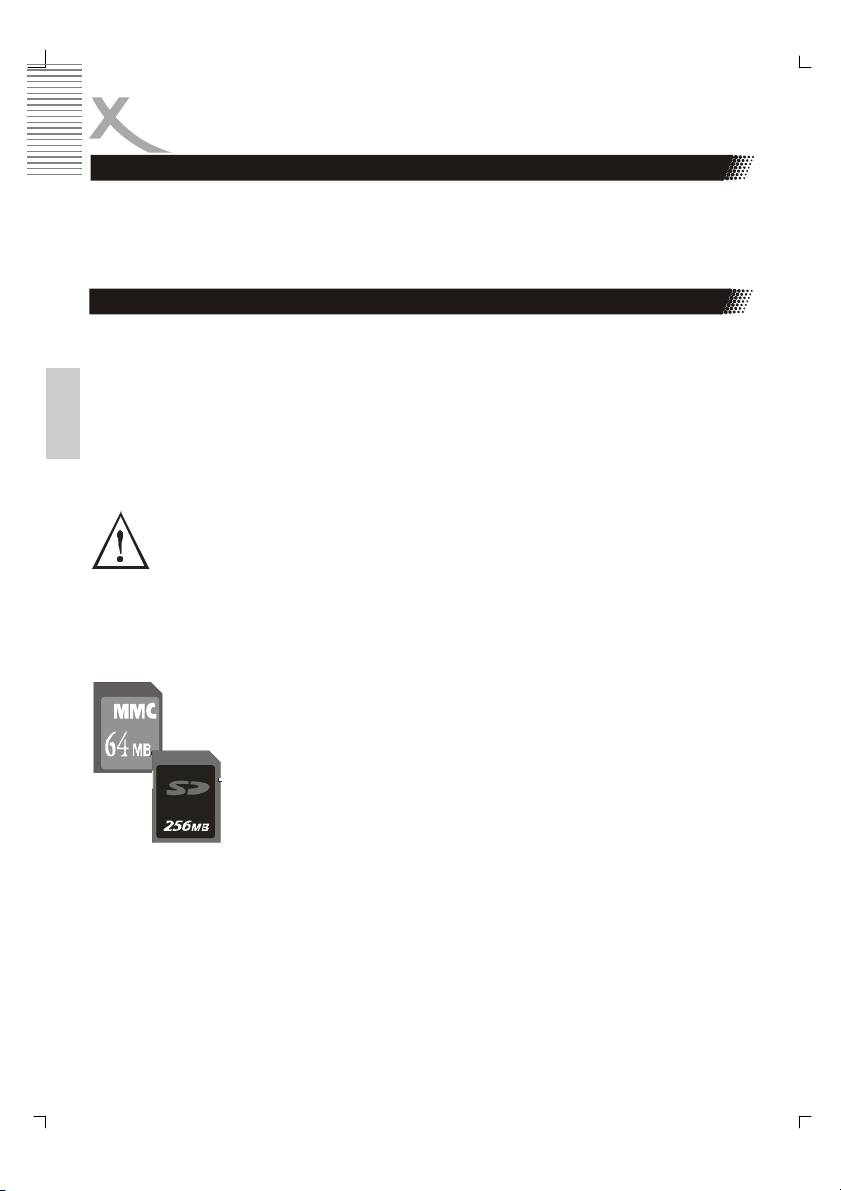
Digital Media Card Compatibility
The Secure Digital slot is compatible with most brands of Secure Digital of 8, 16, 32, 64,
128, 256 and 512 MB.
The MultiMediaCard is compatible with most brands of MultiMediaCard/PRO of 8, 16, 32,
64 and 128 MB.
CAUTION:
English
To avoid complications while attempting to use this Card Reader, we recommend reading
this entire chapter and follow below instructions to insert different cards.
Warning:
DO NOT BEND THE CARDS OR INSERT THE CARDS IN THE WRONG
DIRECTION. IF THEYRE FORCED IN, THE READER OR THE CARDS OR USB
MAY BE DAMAGED, OR DATA ON THE CARDS MAY BE LOST OR
CORRUPTED. IF EXCESSIVE FORCE IS REQUIRED OR THE CARD JUST
DOESNSEEM TO FIT, DO NOT ATTEMPT TO FORCE THE CARD IN THE READER,
INSTEAD, CONTACT TECHNICAL SUPPORT.
Inserting a MultiMedia Card, MS Card or Secure Digital Card
Position the MultiMediaCard or Secure Digital card on its side with the
medias label on top and gold contacts on the bottom. The media should
be positioned so that the gold contacts are farthest from you and
inserted into the reader first. Please refer to below image for proper
media insertion.
Insert the card into the slot gold contacts first and the recessed notch on
the right. Gently push the card in all the way until the card is fixed in
place.
IMPORTANT:
Notice the notched corner of the MultiMediaCard or Secure Digital card and be careful not
to insert the MultiMediaCard or Secure Digital card in the wrong direction. To insert
properly, be sure that the card is positioned so that the recessed notch is facing right and
the media‘s label is on the top. The media is to be inserted gold contacts first.
18

USB DEVICES
USB device
The cards and the USB device can only be removed when the card reader is at non-working
status and the cards indicator must be off, otherwise the reader or the cards may be
damaged, or data on the cards may be lost or corrupted.
To remove cards or USB devices, you should pull the card or USB device gently and
horizontally out of the slot by your hand directly.
Remark:
The supported range & capacity for the folders & files in the card
1. This card reader can support 2 levels of folders in the card.
English
2. The total folders number can be supported in the card is no more than 10. (Max 5
folders can be supported under directory)
3. Only support 100 files for each folder or support 100 files for each card with not any
folder in it.
4. A folder including different format files should not be supported.
5. Large JPEG files larger than 1 MB may not be displayed normally.
6. Do not insert different cards simultaneously.
19
INITIAL SETTINGS
Once the initial settings have been completed, the player can always be operated under the
same conditions (especially with DVD discs). The settings will be retained in the memory
even after turning off the power until the settings are changed. The initial language is set to
English/German, you may change the language to your preference.
Operation
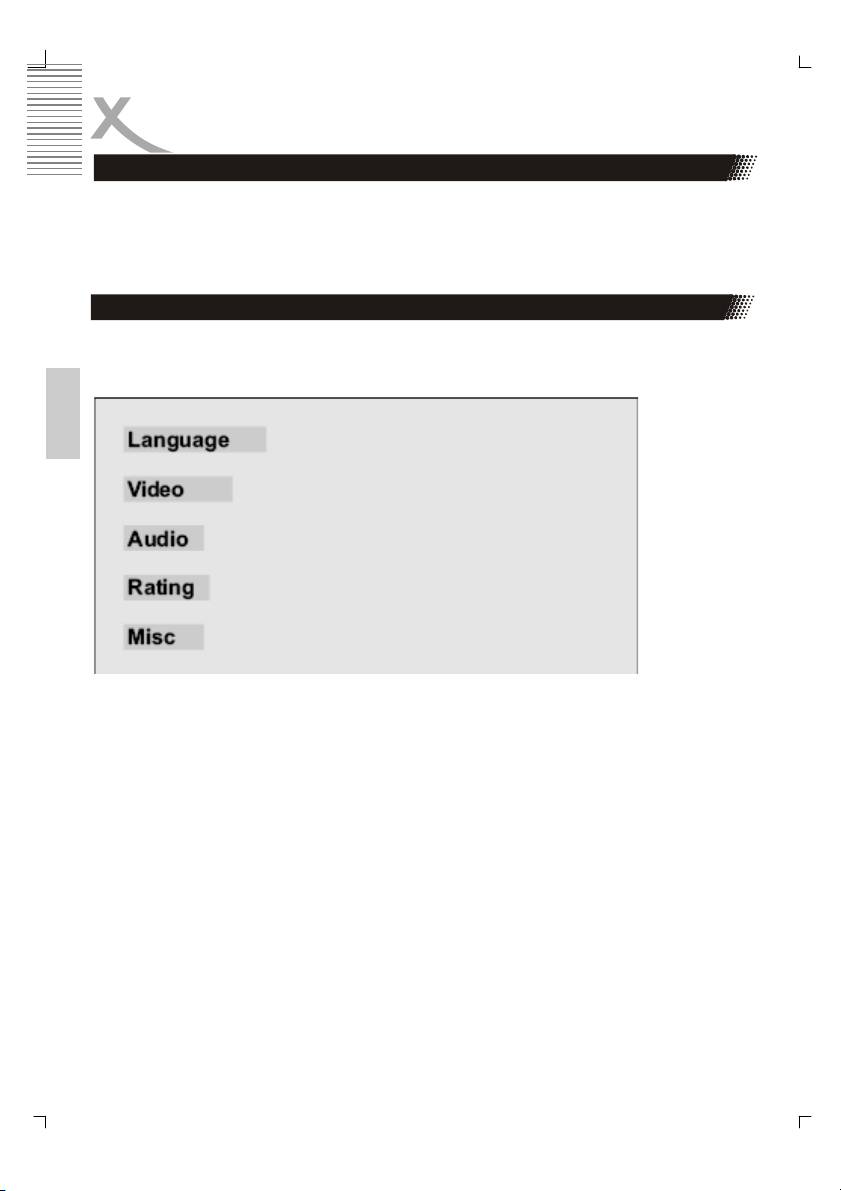
Press STOP button first then press SETUP button to enter setup interface as followed
during the stop status. You can setup Language, Video, Audio, Rating and Mics.
English
Press Navigation (Up/Down/Left/Right) button to navigate through menus. Choose
desired option and press OK button for confirmation. On the screen is appearing a
submenu with all available options. To exit from the Setup mode, please press SETUP
button once again.
20
INITIAL SETTINGS
Menu Languages
Highlight the OSD LANGUAGE option, and press the
Submenu Options
Arrow buttons to choose the OSD language you prefer.
Press OK to confirm, and it will display OSD in that
OSD
English
language; There are 6 optional OSD languages:
languages
German
English, German, French, Spanish, Italian, Russian and
French
Slovenian.
Spanish
Italian
Russian
English
Highlight the SUBTITLE LANG option, and press the
Submenu Options
Arrow buttons to choose the subtitle language you
prefer. Press OK to confirm. If the disc you are playing
Subtitle English
has that language available, it will displays subtitles in
German
that language; There are 8 optional audio languages:
French
English, German, French, Spanish, Russian, Slovenian,
Spanish
Auto, off.
Italian
Russian
Auto
OFF
Highlight the MPEG 4 Subtitle option, and press the
Submenu Options
Arrow buttons to choose the subtitle language you
prefer. Press OK to confirm. If the disc you are
MPEG-4
Unicode (UTF-8)
playing has that language available, it will displays
subtitle
Western European
subtitles in that language.
Turkish
For the languages Czech, Hungarian, Slovenian,
Central European
Polski, Slowacian and Serbian (with latin characters)
Cyrillic
please use the setting “Central European”.
Greek
For Russian language please use the setting
Hebrew
“Cyrillic”.
Arabic
For Swedish, German, French and English
Baltic
languages please use the setting “Western
European”.
Submenu Options
Highlight the Audio option, and press the Arrow buttons
to choose the audio language you prefer. Press OK to
Audio English
confirm. If the disc you are playing has that language
German
available, it will output audio in that language.
French
Spanish
Italian
Russian
Slovenian
21
INITIAL SETTINGS
Menu Languages
Highlight the DVD MENU option, and press the Arrow
Submenu Options
buttons to choose the menu language you prefer. Press
OK to confirm. If the disc you are playing has that
DVD Menu English
language available, it will displays menu in that
German
language; There are some optional menu languages:
French
English, German, French, Spanish, Italian, Russian and
Spanish
Slovenian.
Italian
Russian
Highlight the MPEG-4 Subtitle Shape option, and press
the Arrow buttons to choose the MPEG-4 subtitle
shape colour. Press OK to confirm.
English
Submenu Options
Highlight the MPEG-4 Subtitle Pos. Option, and press
the Arrow button to choose the position of the MPEG-4
MPEG-4
Bottom
subtitle. Press OK to confirm.
subt. Pos.
Middle
Top
Menu Video
Followed is the Video setup screen for your reference where you can set Aspect Ratio,
View Mode, TV System, Video-Out, Brightness, Sharpness, HD Resolution and HD JPEG
Mode.
Aspect Ratio
Submenu Options
4 : 3: Choosing this setting if your DVD player is connected to
a normal ratio TV. You can fill the movie to the entire screen of
your TV. This might mean that parts of the picture (the left and
Aspect ratio 4:3
right edges) won't be seen.
16:9
16 : 9: Choose this setting if your DVD player is connected to a
wide screen TV. If you choose this setting and you don't have a wide screen TV, the
images on the screen may appear distorted due to vertical compression.
Notes:
1. The image display ratio is related to the recorded disc format. Some disc can not
display images in the aspect ratio you choose.
2. If you play a disc recorded in 4:3 format on a wide screen TV, black bars will appear
on the left and right side of the screen.
3.
You must adjust the screen setting depending on the type of the television you have.
22
INITIAL SETTINGS
Menu Video
View mode
Submenu Options
These settings only take effect in case the resolution of MPEG4
video is less than PAL (720 x 576).
View mode Fill
Orginal
Player and TV are set to 4:3
Height Fit
Scaling of a file with the AR 1,33:1 and a resolution of 480x360
Width Fit
Original: Displays the native resolution of the video, including on
Auto Fit
all side borders.
Pan Scan
Pan Scan: Zoom to Fullscreen, crop on all sides, keep the
Aspect Ratio
English
All other settings are displaying in the same way like Pan Scan.
Scaling of a file with the AR 2,35:1 and a resolution of 640x272
Fill: Fullscreen / Crop on Right + Left side / keep the Aspect Ratio (AR)
Original: Displays the original resolution
Height Fit: Fullscreen / Crop strongly on Right + Left side / keep the AR
Width Fit: Fullscreen with black bar on Top + Bottom / Crop on Right + Left side / keep the
AR
Auto Fit: Same like Width Fit
Pan Scan: Same like Height Fit
Player and TV are set to 16:9
Scaling of a file with the AR 1,33:1 and a resolution of 480x360
Pan Scan: Fullscreen / Crop on all side / keep the AR
Auto Fit: 4:3 picture with black bar on Right + Left side / Crop on Top + Buttom side / keep
the AR
Width Fit: Same effect like Pan Scan
Height Fit: Same effect like Auto Fit
Original: 4:3 picture with a black bar on Left + Right side / complete resolution are shown /
keep the AR
Fill: Fullscreen / Crop on all side / AR is strongly distorted.
Scaling of a file with the AR 2,35:1 and a resolution of 640x272
Fill: Fullscreen / Crop on every side / AR is strongly distorted
Original: Diplays the original size
Height Fit: Fullscreen / Crop on Rifgt + Left side / keep the AR
Width Fit: Fullscreen with black bar on Top + Bottom side / smal crop on Right + Left side /
keep the AR
Auto Fit: Same effect like Width Fit
Pan & Scan: Same effect like Height Fit
23
INITIAL SETTINGS
Menu Video
TV SYSTEM
Submenu Options
According to the Color System of the TV, you can choose
the TV System.
TV Sytem NTSC
NTSC: Choose this settings if your DVD player is
PAL
connected to a NTSC TV.
Auto
PAL: Choose this settings if your DVD player is
connected to a PAL TV.
Auto: Choose this settings if your DVD player is
connected to a multi-system TV.
The default setting is NTSC.
Video Out
Submenu Options
Set normal video out on RGB. This is the SCART output.
English
Set normal video out via P-Scan. This is the YPbPr output
Video Out Component
with progressive Scan in standard definition resolution
RGB
(576p).
P-Scan
Set normal video out on Component. This is the YPbPr
HD
interlaced (576i) output.
Set normal video out via HD. This settings activated the
high definition output for YPbPr and HDMI. Combined with
the setting HD Resolution=Auto the DVD-Player set the
optimal resolution to the native resolution of the TV Set.
Brightness
Submenu Options
Use the right and Left Arrow button to move the scroll
and adjust the brightness.
Brightness 1 to 16
Sharpness
Use the right and Left Arrow button to move the scroll
Sharpness 1 to 16
and adjust the sharpness.
HD Resolution
HD Resoluti-
Auto
You can select different settings for the resolution: Auto,
on
480p/576p
480p/576p, 720p and 1080i. By 720p and 1080i the DVD-
720p
Player will upscale to this resolution.
1080i
1024x768
HD JPEG mode
1360x768
By activating this feature in HDMI or YPbPr with high
definition resolution the picture quality increases in
HD JPEG
On
sharpness and details by displaying on the TV.
mode
Off
Smart Picture
Smart Picture Standrad
By activating this feature you can choose different presets
Bright
settings by brightness and contrast.
Soft
Dynamic
24
