Benelli M3 Convertible Semi-Auto Pump Shotgun – страница 4
Инструкция к Benelli M3 Convertible Semi-Auto Pump Shotgun

60
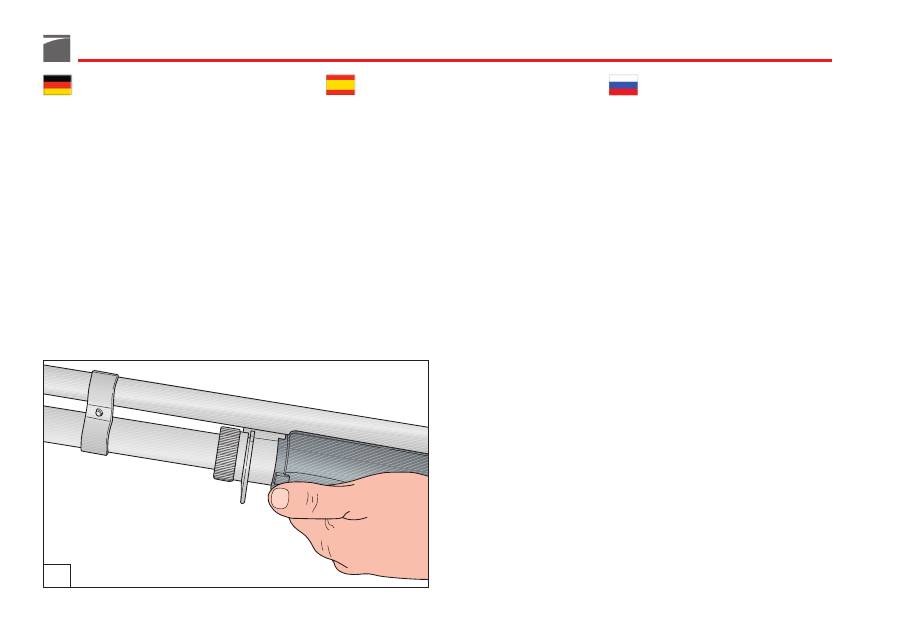
2) Mantenendo ruotato il commutatore,
spingere in avanti tutto il gruppo asta
d'armamento inserendo la parte frontale
del commutatore sull'anello guida canna
(fig. 22).
3) Lasciare libero il commutatore di ruotare
in senso antiorario fino a quando non
ritorna nella sua posizione di riposo (fig.
23).
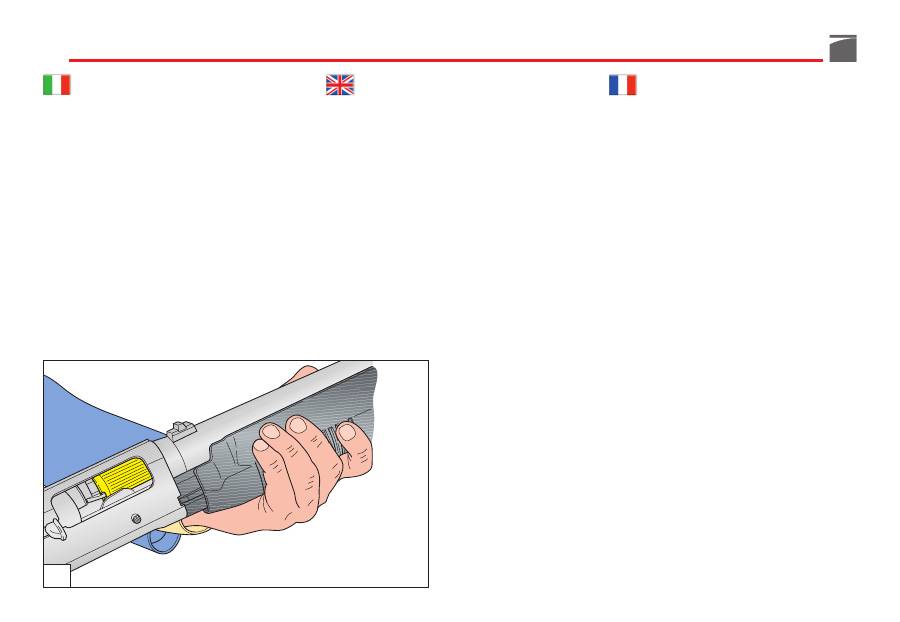
2) Keeping the selection ring in the position,
push the fore-end lever forward until the
front of the selection ring fits into the bar-
rel ring (fig. 22).
3) Release the selection ring which will
rotate counterclockwise until it reaches
its normal resting position (fig. 23).
2) En gardant le commutateur tourné, pous-
ser vers l'avant tout le groupe du levier
d'armement en insérant la partie frontale
du commutateur sur la bague de guidage
du canon (fig. 22).
3) Laisser le commutateur libre de tourner en
sens contraire des aiguilles d'une montre
jusqu'à ce qu'il ne reprenne sa position
de repos (fig. 23).
22
61
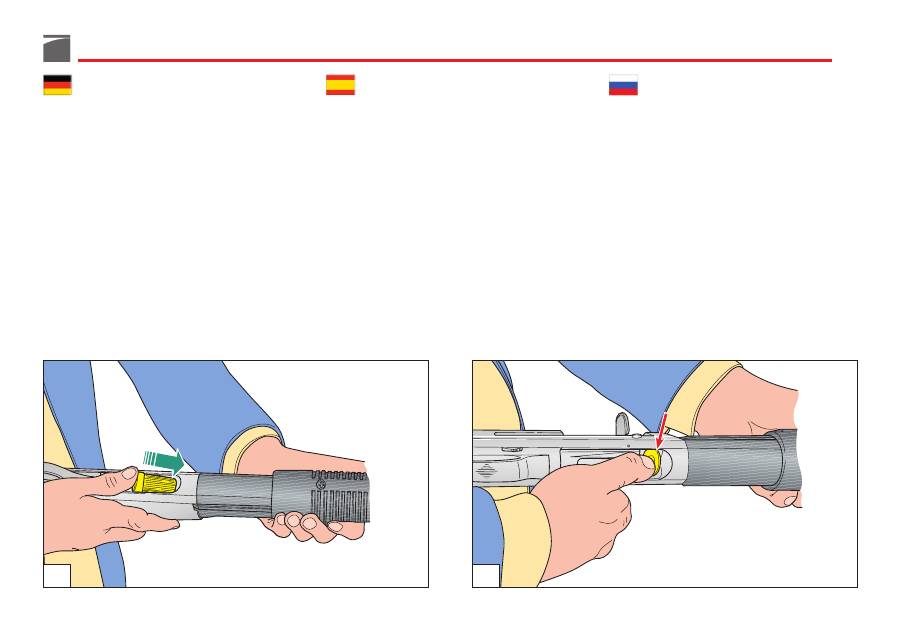
2) Halten Sie den Selektionsring in der Posi-
tion und schieben Sie den Vordergriff
nach vorne bis der Selektionsring in den
Ring des Laufes hineinpasst (Abb. 22).
3) Wird der Selektionsring gelöst, dreht er
sich entgegen der Uhrzeigerrichtung bis
er seine normale Ruhestellung erreicht
hat (Abb. 23).
2) Manteniendo girado el conmutador, em-
pujar hacia delante todo el grupo varilla
de armamento introduciendo la parte
delantera del conmutador en el anillo de
guía del cañón (fig. 22).
3) Dejar libre el conmutador para que gire
en sentido contrario a las agujas del reloj
hasta que vuelva a su posición de descan-
so (fig. 23).
2) Удерживая переключатель в повернутом
положении, протолкнуть вперед весь узел
цевья и ввести переднюю часть
переключателя на направляющее кольцо
ствола (рис. 22).
3) Отпустить переключатель и дать ему
возможность повернуться в направлении
против часовой стрелки до его
возвращения в положение покоя (рис. 23).
23

B) passage de semi-automatique en manuel
(par pompe):
1) Avec l'obturateur en position de fermeture
(fig. 18) tourner le commutateur dans le
sens des aiguilles d'une montre (du pouce
de la main qui tien l'arme) jusqu'en fin de
course (fig. 22).
2) En gardant le commutateur tourné de la
façon indiquée fig. 22, reculer le groupe
levier d'armement jusqu'à ce que le com-
mutateur se soit dégagé de la bague de
guidage du canon (fig. 21).
3) Laisser le commutateur libre de tourner en
sens contraire des aiguilles d'une montre
jusqu'à sa position de report (fig. 16).
ATTENTION:
lorsqu'on commute l'arme en
fonctionnement manuel (par pompe), il est
impératif de s'assurer que le commutateur
soit accroché à le groupe bras de commande-
obturateur. Lorsqu'on recule l'obturateur à la
main, par la manette, le groupe levier d'ar-
mement doit également reculer.
62
B) da semiautomatico in manuale
(a pompa):
1) Con otturatore in posizione di chiusura
(fig. 18) ruotare il commutatore con il
pollice della mano che impugna l'arma
in senso orario a fine corsa (fig. 22).
2) Mantenendo ruotato il commutatore co-
me in fig. 22, arretrare il gruppo asta
armamento fino a che il commutatore
non si è disimpegnato dall'anello guida
canna (fig. 21).
3) Lasciare libero il commutatore di ruotare
in senso antiorario fino alla sua posizione
di riporto (fig. 16).
ATTENZIONE:
quando si porta l'arma in fun-
zionamento manuale (a pompa) assicurarsi
sempre che il commutatore sia agganciato al
gruppo otturatore-bretelle: arretrando manual-
mente l'otturatore, tramite la manetta, anche
il gruppo asta armamento deve arretrare.
B) from semi-automatic to pump action:
1) With the bolt closed (fig. 18), turn the
selection clockwise as far as it will go
with the thumb of the hand holding the
weapon (fig. 22).
2) Keeping the selection ring in the position
shown in fig. 22, pull back the fore-end
lever until the selection ring is disconnect-
ed from barrel ring (fig. 21).
3) Release the selection ring which will
rotate counterclockwise until it reaches
its normal resting position (fig. 16).
NOTE:
when the manual (pump-action) mode
is selected, make sure that the selection ring is
securely fastened to the bolt-swivel unit. To
verify this, pull back the bolt using that bolt
handle, the forearm should also move back-
wards.

63
B) vom halbautomatischen zum Pump-
betrieb:
1) Den Selektionsring bei geschlossenem
Verschlussblock (Abb. 18) so weit wie
möglich in Uhrzeigerrichtung mit dem
Daumen der Hand drehen, die die Waffe
hält (Abb. 22).
2) Halten Sie den Selektionsring in der Posi-
tion wie in Abbildung 22 gezeigt und
ziehen Sie den Vordergriff zurück bis der
Selektionsring vom Ring des Laufes ge-
trennt wird (Abb. 21).
3) Wird der Selektionsring gelöst, dreht er
sich entgegen der Uhrzeigerrichtung bis
er seine normale Ruhestellung erreicht
hat (Abb. 16).
ACHTUNG:
Beim manuellen Betrieb (Pump-
betrieb) sicherstellen, dass der Selektionsring
fest an der Verschlussblockhalterung befestigt
wird, hierzu den Verschlussblock mit dem
Spannhebel manuell zurückziehen, wobei
sich der Vordergriff auch rückwärts bewegen
muss.
B) de semiautomático a manual
(de bomba):
1) Con el obturador en posición de cierre
(fig. 18) girar el conmutador con el pulgar
de la mano que empuña el arma en senti-
do de las agujas del reloj al final de su
carrera (fig. 22).
2) Manteniendo girado el conmutador co-
mo en la fig. 22, retroceder el grupo
varilla de armamento hasta que el con-
mutador se libere del anillo guía cañón
(fig. 21).
3) Dejar libre el conmutador para que gire
en sentido contrario a las agujas del reloj
hasta su posición de descanso (fig. 16).
ATENCIÓN:
cuando se pone el arma en fun-
cionamiento manual (de bomba) controlar
siempre que el conmutador esté enganchado
al grupo obturador-bandoleras: retrocediendo
manualmente el obturador mediante la mane-
ta, también el grupo varilla de armamento
debe retroceder.
B) из полуавтоматического режима в
ручной (помповый) режим:
1) При затворе, находящимся в закрытом
положении (рис. 18), повернуть
переключатель большим пальцем руки,
удерживающей оружие, в направлении
по часовой стрелке до конца (рис. 22).
2) Удерживая переключатель в повернутом
положении, как показано на рисунке 22,
отвести узел цевья до того момента,
пока переключатель не освободится от
направляющего кольца ствола (рис. 21).
3) Отпустить переключатель и дать ему
возможность повернуться в направлении
против часовой стрелки до его
возвращения в положение покоя (рис. 16).
ВНИМАНИЕ:
при переводе оружия в ручной
(помповый) режим необходимо обязательно
убедиться в том, что переключатель
находится в сцеплении с узлом крепления
затвора: при отводе назад вручную затвора
при помощи рукоятки должен отойти назад
узел цевья.
64
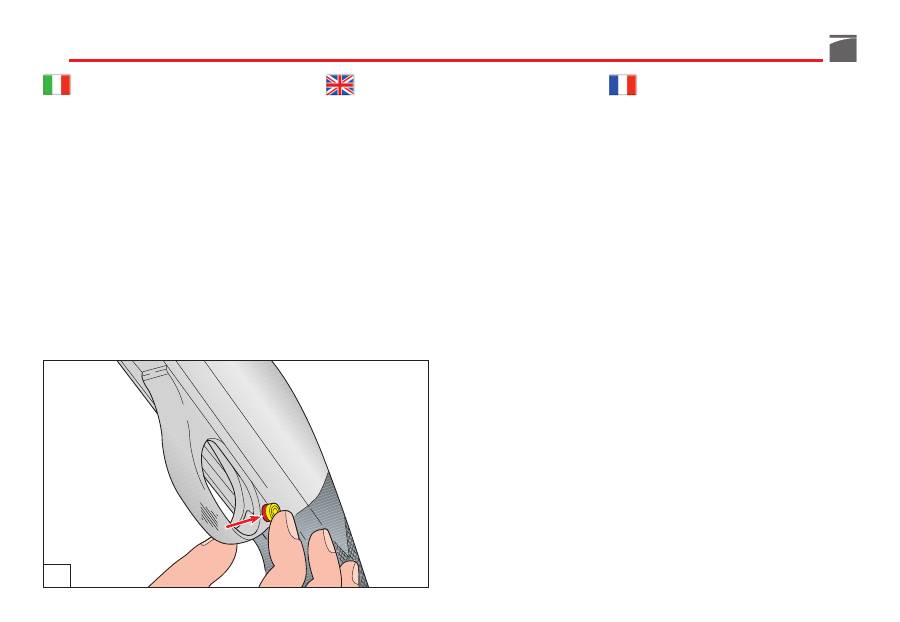
Sicura del fucile
Spingere
il bottone di sicura
a traversino
posto sulla guardia: a sicura inserita
non si
deve vedere l'anello rosso
indicante la posi-
zione di sparo (figg. 24-25).
Caricamento
Prima di effettuare qualunque tipo di inter-
vento sul fucile, accertatevi sempre che
camera di scoppio e serbatoio siano com-
pletamente vuoti!
(Leggere attentamente le
istruzioni di caricamento e scaricamento
dell’arma).
Gun safety catch
Press the
safety button
on the trigger guard
until its
red ring
, indicating firing position,
is
no longer visible
(figs. 24-25).
Loading
Before starting any operation on your shot-
gun, make sure that the chamber and the
magazine are unloaded!
(Carefully read the
instructions on gun loading and unloading).
Sûreté du fusil
Pousser
le bouton de sûreté
situé sur la sous-
garde: la sûreté étant mise la
bague rouge
indiquant la position de tir
ne devra pas être
visible
(figures 24-25).
Chargement
Avant d’effectuer n’importe quel type d’in-
tervention sur votre fusil, toujours vérifier
que la chambre d’explosion et le magasin
sont complètement vides!
(Lire attentivement
les instructions de chargement et de déchar-
gement).
24
65
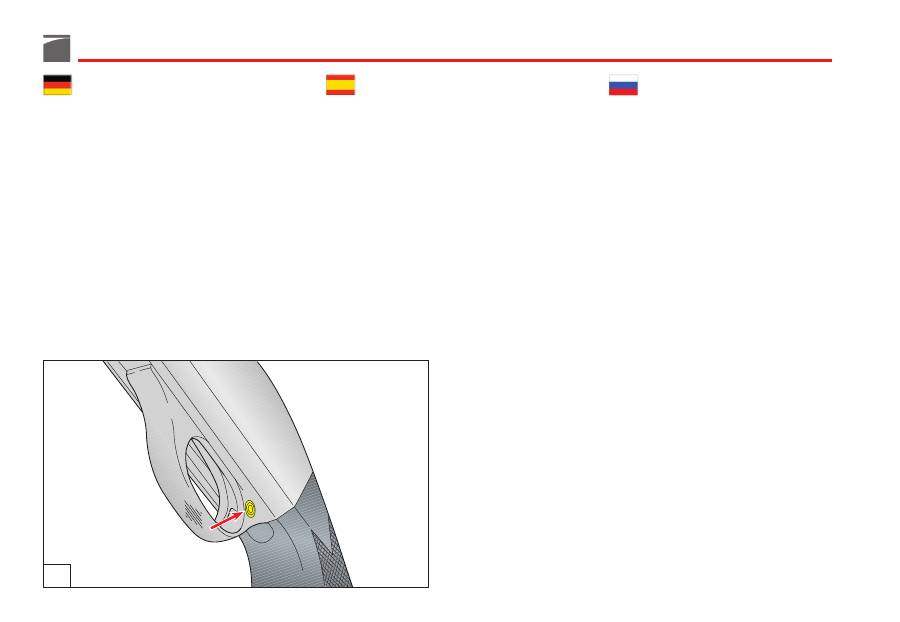
Sicherung des Gewehrs
Den stegförmigen
Sicherungsknopf
am
Abzugsbügel drücken: Bei betätigter Siche-
rung darf der
rote Ring
, der die sofortige
Feuerbereitschaft der Waffe anzeigt,
nicht
sichtbar sein (Abb. 24-25).
Laden
Vor jeder Waffenhandhabung sollten Sie
sicherstellen, dass die Patronenlager und das
Magazin ihres Gewehrs völlig leer sind!
(Bitte
lesen Sie aufmerksam die Anweisungen für
das Laden und das Entladen der Waffe).
Предохранитель ружья
Для включения сдвиньте расположенную на
скобе
кнопку предохранителя слева
направо или справа налево.
При
установленном предохранителе
не должно
быть видимо красное кольцо,
указывающее
на готовность ружья к стрельбе (рис. 24-25).
Заряжание
Перед тем, как выполнять любые операции
с Вашим ружьем, убедитесь что патронник,
механизм подачи и магазин совершенно
пустые!
(внимательно прочитайте инструкции
по заряжанию и разряжанию оружия).
25
Seguro del fusil
Empuje el
botón transversal del seguro
que
se encuentra en el guardamonte; cuando el
seguro está activado
no se debe ver el anillo
rojo
que indica la posición de disparo (figs.
24-25).
Carga
Antes de realizar cualquier tipo de opera-
ción en su fusil, compruebe siempre que la
cámara de explosión y el almacén estén
completamente vacíos.
(Lea atentamente las
instrucciones para la carga y la descarga).

66
Il serbatoio di alimentazione nella versione
con tubo lungo è predisposto per contenere
fino a un numero max di 7 cartucce a secon-
da della loro lunghezza. Tutti i fucili sono
dotati di riduttore di colpi per limitare la
capacità del tubo serbatoio a 2 cartucce (3
colpi totali con quello in canna).
Procedura di caricamento
ATTENZIONE:
l'arma deve essere
in sicura
(vedi “Sicura del fucile”) e con
cane armato
(per consentire alla leva fermo cartuccia di
bloccare le cartucce introdotte nel serbatoio).
AVVERTENZA:
per maggior sicurezza,
verifi-
care
che l'arma
sia scarica
aprendo l'ottura-
tore.
Riportare
poi l'otturatore
in chiusura.
In the long tube version, the magazine is
equipped to contain up to a maximum of 7
cartridges, according to their length. All shot-
guns are fitted with a shot plug to limit maga-
zine tube capacity to 2 cartridges (3 rounds
in total, including the one in the barrel).
Loading procedure
NOTE:
make sure that the shotgun
safety
catch
(see “Gun safety catch”) is engaged
and the
hammer cocked
(so that the carrier
latch can retain the cartridges as they are
inserted in the magazine).
WARNING:
for safety reasons,
verify
if by
opening the breech bolt the shotgun
is un-
loaded.
Then
close
the breech bolt
again.
Le magasin d’alimentation dans la version
tube long peut contenir jusqu’à 7 cartouches
maximum selon leur longueur. Tous les fusils
sont équipés d’un réducteur de coups pour
limiter la capacité du tube magasin à 2 car-
touches (3 coups au total avec celui au ca-
non).
Marche à suivre pour le chargement
ATTENTION:
l’arme doit toujours être
en
sûreté
(voir “Sûreté du fusil”) et le
chien armé
(pour consentir au levier d’arrêt de cartouche
de bloquer les cartouches introduites dans le
magasin).
ATTENTION:
pour plus de sécurité,
vérifier
que l’arme
se décharge
lorsqu’on ouvre l’ob-
turateur.
Ramener
ensuite l’obturateur en po-
sition de
fermeture.

67
Das Magazinrohr kann in der langen Version
bis zu 7 Patronen aufnehmen, abhängig von
der Hülsenlänge. Alle Gewehre haben ein
Reduzierstück in der Ausstattung, um die
Magazinkapazität auf 2 Schuss (plus eine
Patrone im Lauf, d.h. insgesamt 3 Schuss)
begrenzen zu können.
Laden
ACHTUNG!
Die Waffe muss
gesichert
(siehe
"Sicherung des Gewehrs") und das
Schlag-
stück
muss gespannt sein (damit die Maga-
zinsperrklinke die im Magazin vorhandenen
Patronen blockiert.
HINWEIS:
Zur besseren Sicherheit öffnen
Sie den Verschluss und
prüfen Sie,
ob die
Waffe entladen ist, danach
schließen
Sie den
Verschluss wieder.
El almacén de alimentación en la versión con
tubo largo está preparado para contener hasta
un número máximo de 7 cartuchos, según la
longitud de los mismos. Todos los fusiles están
dotados de reductor de disparos para limitar
la capacidad del tubo almacén de 2 cartuchos
(3 disparos totales con el del cañón).
Procedimiento de carga
ATENCIÓN:
el arma debe tener
el seguro
puesto (ver “Seguro del fusil”), y el
martillo
armado
(para permitir a la palanca de blo-
queo del cartucho bloquear los cartuchos
introducidos en el almacén).
ADVERTENCIA:
para mayor seguridad,
veri-
fique
que el arma
esté descargada
abriendo
el obturador. Después vuelva
a cerrarlo.
В версии с длинной трубкой магазин может
вмещать максимально до 7 патронов в
зависимости от их длины. Все ружья
оборудованы
соответствующими
редукторами, ограничивающими емкость
трубки магазина 2 патронами (всего 3 патрона
с учетом того, который находится в стволе).
Порядок заряжания
ВНИМАНИЕ:
оружие должно быть
на
предохранителе
(смотри “Предохранитель
ружья”) и со
взведенным курком
(чтобы
позволить рычагу держателя патрона
удерживать патроны в магазине).
ПРЕДУПРЕЖДЕНИЕ:
для
большей
безопасности
проверьте
, что оружие
разряжено,
открыв затвор. Затем
закройте
затвор.
68
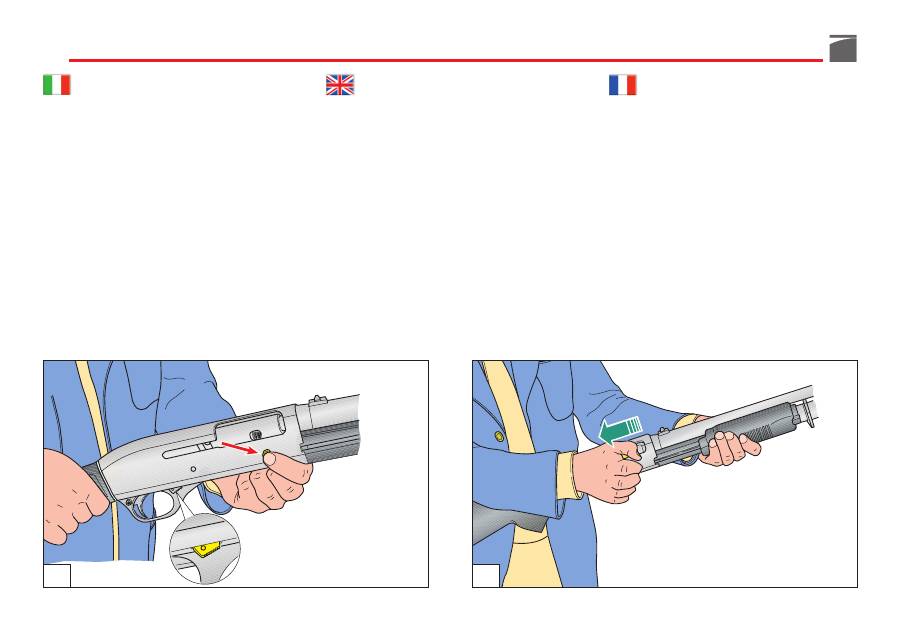
1) La leva discesa cartuccia deve avere
il
punto rosso ben visibile
(avviso
cane
armato
) (fig. 26). Se necessario, portarla
in tale posizione premendo
il bottone
comando elevatore, aprendo a mano
l'ot-
turatore
e riportandolo poi in posizione
di chiusura (fig. 27).
2) Con otturatore chiuso e cane armato,
rovesciare l'arma,
orientando la canna
verso il basso
.
3)
Infilare una cartuccia
a fondo nel serba-
toio (fig. 28): la leva di arresto deve ag-
ganciare la cartuccia automaticamente,
trattenendola (fig. 29). Ripetere l'opera-
zione sino al completo caricamento del
serbatoio.
26
27
1) The
red dot
on the cartridge drop lever
(indicating that the
hammer is cocked
)
(fig. 26) must be
clearly visible
. To bring
lever to this position, press the carrier
button
and open the
bolt
by hand, then
bring it to close position again (fig. 27).
2) With the bolt closed and the hammer
cocked, reverse the gun
pointing the bar-
rel downwards
.
3)
Insert a cartridge
into the magazine (fig.
28): push it until it is retained by the car-
rier latch which engages automatically
(fig. 29). Repeat the operation until the
magazine is fully loaded.
1)
Le point rouge
du levier de descente de la
cartouche
doit être bien visible
(avis
chien armé
) (fig. 26). Si nécessaire, l’ame-
ner dans cette position en appuyant sur
le
bouton
commande élévateur, en ouvrant
l’obturateur
à la main et en le ramenant
ensuite en position de fermeture (fig. 27).
2) L’obturateur étant fermé et le chien armé,
renverser l’arme en
orientant le canon
vers le bas.
3)
Introduire une cartouche
à fond dans le
magasin (fig. 28); le levier d’arrêt doit
accrocher automatiquement la cartouche,
en la retenant (fig. 29). Répéter l’opéra-
tion jusqu’à ce que le magasin soit com-
plètement chargé.
69
1) Красная точка на рычаге выбрасывателя
патрона говорит о
взведенном курке
(рис. 26). Для перевода рычага в
указанное положение нажмите на кнопку
фиксатора подавателя патронов,
откройте и закройте затвор (рис. 27).
2) С закрытым затвором и взведенным
курком переверните ружье и
направьте
ствол вниз.
3)
Вставьте патрон
в магазин (рис. 28) до
его фиксации стопором патронов (рис.
29). Повторите операцию до полного
заряжания магазина.
28
29
1) Der
rote Punkt
auf dem Patronenfreiga-
behebel
muss deutlich sichtbar
sein
(Hinweis, dass das
Schlagstück gespannt
ist). Um dies zu bewerkstelligen, muss
ggfs. der Verschlussfangknopf betätigt
(Abb. 26), der
Verschluss
mittels Spannhe-
bel per Hand geöffnet und wieder gesch-
lossen werden (Abb. 27).
2) Die Waffe bei geschlossenem Verschluss
und gespanntem Schlagstück umdrehen
und
den Lauf nach unten richten.
3) Eine
Patrone
tief in das Magazin
einschie-
ben
(Abb. 28); die Magazinsperrklinke
muss automatisch hinter der Patrone ein-
rasten und diese blockieren (Abb. 29).
Diesen Vorgang bis zum völligen Laden
des Magazins wiederholen.
1) La palanca de descenso del cartucho
debe tener
el punto rojo a la vista
(aviso
martillo armado
) (fig. 26). Si es necesario
llevarla a esa posición pulsando el
botón
de mando del elevador, abriendo manual-
mente el
obturador
y regresándolo
después a la posición de cierre (fig. 27).
2) Con el obturador cerrado y el martillo
armado, voltee el arma
orientando el
cañón hacia el suelo.
3)
Introduzca un cartucho
en el almacén
hasta el fondo (fig. 28): la palanca de blo-
queo debe enganchar el cartucho auto-
máticamente, deteniéndolo (fig. 29). Re-
pita la operación hasta cargar completa-
mente el almacén.

70
ATTENZIONE:
il caricamento del serbatoio
deve essere effettuato
con il cane armato
per
consentire alla leva fermo cartuccia di bloc-
care le cartucce che si introducono nel serba-
toio stesso.
A questo punto il fucile non può ancora spa-
rare se prima non si introduce
una cartuccia
in canna
, operando secondo una delle alter-
native indicate:
A) sistema di funzionamento manuale
(a pompa):
1)
Aprire
, tramite l'asta di armamento,
l'ot-
turatore
dell'arma (fig. 17); la prima car-
tuccia del serbatoio scenderà automatica-
mente sul cucchiaio elevatore.
NOTE:
the gun must be loaded with the
ham-
mer cocked
so that the carrier latch can
retain the cartridges as they are inserted in
the magazine.
Now the gun cannot be fired unless a
car
-
tridge is placed in the barrel
, as to one of the
following procedures:
A) pump action:
1)
Open
the bolt by pulling back the fore-
end lever (fig. 17). The first cartridge in
the magazine will be deposited on the
carrier.
ATTENTION:
le chargement du magasin doit
être effectué
chien armé
afin de permettre au
levier d’arrêt de cartouche de bloquer les car-
touches qui s’introdusient dans le magasin
même.
A ce point le fusil ne peut pas encore tirer si,
auparavant, vous n’avez pas introduit
une
cartouche dans le canon
. Pour ce faire, sui-
vre une des deux marches indiquées ci-après:
A) système de fonctionnement manuel
(par pompe):
1)
Amener l'obturateur
en position d'ouver-
ture (fig. 17) au moyen du levier d'arme-
ment du magasin montera automatique-
ment dans l'élévateur.

71
ACHTUNG:
Das Magazin muss mit
gespann-
tem Schlagstück
geladen werden, damit die
Magazinsperrklinke die Patronen vorschrifts-
mäßig aufnimmt, die ins Magazin geschoben
werden.
Das Gewehr ist noch nicht schussbereit, denn
vorher muss
eine Patrone in das Patronen-
lager
des Laufes geladen werden. Dafür gibt
es folgende zwei Vorgehensweisen.
A) Manuelle Funktionsweise
(Pumpbetrieb)
1)
Öffnen
Sie den Verschlussblock durch
Zurückziehen des Vordergriffes (Abb. 17).
Die erste Patrone im Magazin wird auf
dem Ladelöffel abgelegt.
ATENCIÓN:
la carga del almacén se debe
realizar con el
martillo armado
para permitir
a la palanca de bloqueo del cartucho blo-
quear los cartuchos que se introduzcan en el
almacén.
Ahora, el fusil todavía no puede disparar si
antes no se introduce un
cartucho en el
cañón
actuando según una de las dos alter-
nativas indicadas:
A) sistema de funcionamiento manual
(a bomba):
1)
Abrir
, mediante la varilla de armamento,
el obturador
del arma (fig. 17); el primer
cartucho del almacén bajará automática-
mente sobre el elevador.
ВНИМАНИЕ:
заряжание магазина должно
выполняться
со взведенным курком
,
чтобы позволить рычагу держателя патрона
удерживать патроны в магазине.
Ружье еще не готово к стрельбе, если не
дослать
патрон в патронник
, действуя в
соответствии с двумя указанными
вариантами.
A) система функционирования в ручном
(помповом) режиме:
1) При помощи цевья
открыть затвор
оружия (рис. 17). При этом первый
патрон автоматически поступает из
магазина на подаватель.
72
2)
Riportare l'otturatore in posizione di
chiusura
tramite la stessa asta di arma-
mento; l'otturatore mentre torna in chiu-
sura (fig. 30) incamera la cartuccia prece-
dentemente scesa sul cucchiaio elevatore
e si arresterà in posizione di chiusura (fig.
18).
ATTENZIONE:
durante queste operazioni -
anche se l'arma è in sicura (vedi “Sicura del
fucile”) - è opportuno
orientare la canna in
direzione di sicura prudenza
.
2)
Close the bolt
by pushing the fore-end
lever forward. The bolt will chamber the
cartridge on the carrier (fig. 30) and come
to a stop in the closed position (fig. 18).
NOTE:
during this operation, always
point
the gun in a safe direction
, even though the
safety catch is engaged (see “Gun safety
catch”).
2)
Ramener l'obturateur en position de fer-
meture
au moyen du même levier d'arme-
ment, au moment où il se referme (fig. 30)
l'obturateur incorpore la cartouche pré-
cédemment positionnée sur l'élévateur,
puis il s'arrête en position de fermeture
(fig. 18).
ATTENTION:
durant ces opérations, même si
la sûreté de l’arme est mise (voir “Sécurité
fusil”), n’oubliez pas
d’orienter le canon dans
une direction de prudence certaine
.
30

73
2)
Schließen Sie den Verschlussblock,
indem
Sie den Vordergriff nach vorne schieben
(Abb. 30). Der Verschlussblock schließt
die Patrone auf dem Ladelöffel ein und
rastet in der geschlossenen Stellung ein
(Abb. 18).
ACHTUNG:
Bei diesen Ladevorgängen muss
der Lauf immer in eine sichere Richtung
gehalten werden
, auch wenn die Waffe gesi-
chert ist (siehe “Sicherung des Gewehrs”).
2)
Volver a poner el obturador en posición
de cierre
mediante la varilla de arma-
mento, el obturador mientras vuelve al
cierre (fig. 30) encamara el cartucho que
precedentemente ha bajado en el eleva-
dor y se parará en posición de cierre (fig.
18).
ATENCIÓN:
durante estas operaciones - aun-
que el arma tenga puesto el seguro (ver
“Seguro del fusil”) - es oportuno
orientar el
cañón hacia una dirección segura.
2) При помощи цевья
вернуть затвор в
закрытое положение.
В процессе
возвращения в закрытое состояние (рис.
30) затвор подает в патронник патрон,
который предварительно вышел на
подаватель, и останавливается в
закрытом положении (рис. 18).
ВНИМАНИЕ:
во время этих операций – даже
если оружие установлено на предохранитель
(смотри “Предохранитель ружья”) - следует
направлять ствол в безопасную сторону.

74
B) sistema di funzionamento
semiautomatico:
1)
Aprire
, tramite la manetta d'armamento,
l'otturatore
dell'arma (fig. 20); la prima
cartuccia del serbatoio scenderà automa-
ticamente sul cucchiaio elevatore.
2) Lasciare libera la manetta in modo che
l'otturatore scorra in avanti incamerando
la cartuccia scesa sul cucchiaio elevatore
ed arrestandosi in posizione di chiusura
(fig. 18).
AVVERTENZA:
l'introduzione della cartuccia
in canna riduce di un colpo la quantità di
cartucce in serbatoio; è possibile l'inserimen-
to, come prima descritto, di una nuova car-
tuccia in serbatoio per averlo completamente
carico.
ATTENZIONE:
durante queste operazioni -
anche se l'arma è in sicura (vedi “Sicura del
fucile”) - è opportuno
orientare la canna in
direzione di sicura prudenza
.
A questo punto
il fucile è carico
: portando la
sicura in posizione di sparo (
anello rosso visi-
bile
), l'arma è pronta per sparare.
B) semi-automatic action:
1)
Open the bolt
with the bolt lever (fig.
20). The first cartridge in the magazine
will be deposited on the carrier.
2) Release the bolt lever so that the bolt can
slide forward, chambering the cartridge
on the carrier and coming to a stop in the
closed position (fig. 18).
WARNING:
after the first cartridge is cham-
bered, the magazine contains one less cartrid-
ge. It is possible to insert another cartridge in
the magazine, in the manner outlined above,
to keep it fully loaded.
NOTE:
during this operation, always
point
the gun in a safe direction
, even though the
safety catch is engaged (see “Gun safety
catch”).
Now the
gun is loaded
: when the safety catch
is moved to firing position
(red ring visible)
,
the gun is ready for use.
B) système de fonctionnement
semi-automatique:
1)
Amener l'obturateur
en position d'ou-
verture (fig. 20) au moyen de la manette
d'armement du magasin, la première car-
touche du magasin montera automatique-
ment dans l'élévateur.
2) Laisser libre la manette de façon à ce que
l'obturateur coulisse vers l'avant en per-
mettant l'introduction de la cartouche et
en s'arrêtant à la position de fermeture
(fig. 18).
ATTENTION:
l'introduction de la cartouche
dans le canon réduit d'un coup la quantité de
cartouches dans le magasin; comme déjà vu, il
est possible d'introduire une nouvelle cartou-
che pour remplir complètement le magasin.
ATTENTION:
durant ces opérations, même si
la sûreté de l’arme est mise (voir “Sécurité
fusil”), n’oubliez pas
d’orienter le canon dans
une direction de prudence certaine
.
A ce point
le fusil est chargé
: placer la sûreté
en position de tir (
bague rouge visible
), l’arme
est prête à tirer.

75
B) Halbautomatischer Betrieb
1)
Öffnen
Sie den Verschlussblock mit dem
Spannhebel (Abb. 20). Die erste Patrone
im Magazin wird automatisch auf dem
Ladelöffel abgelegt.
2) Lösen Sie den Spannhebel, damit der Ver-
schlussblock nach vorne gleiten und die
Patrone auf dem Ladelöffel einschließen
kann. Er rastet dann in der geschlossenen
Stellung ein (Abb. 18).
WARNUNG
:
Nachdem die erste Patrone im
Lauf ist, enthält das Magazin eine Patrone
weniger. Es ist möglich, noch eine Patrone ins
Magazin zu legen, wie es weiter oben be-
schrieben wurde, um es völlig geladen zu
halten.
ACHTUNG:
Bei diesen Ladevorgängen muss
der Lauf immer in eine sichere Richtung
gehalten werden,
auch wenn die Waffe gesi-
chert ist (siehe “Sicherung des Gewehrs”).
Nun ist die
Waffe geladen;
nach dem Entsi-
chern (
der rote Ring ist sichtbar
) ist die Waffe
schussbereit.
B) sistema de funcionamiento
semiautomático:
1)
Abrir
, mediante la maneta de armamen-
to,
el obturador
del arma (fig. 20); el pri-
mer cartucho del almacén bajará auto-
máticamente en el elevador.
2) Dejar libre la maneta de modo que el
obturador se deslice hacia delante enca-
marando el cartucho que ha bajado so-
bre el elevador deteniéndose en posición
de cierre (fig. 18).
ADVERTENCIA:
la introducción del cartucho
en el cañón reduce de un disparo la cantidad
de cartuchos en el almacén, es posible intro-
ducir, como antes detallado un nuevo cartu-
cho en el almacén para tenerlo completa-
mente cargado.
ATENCIÓN:
durante estas operaciones - aun-
que el arma tenga puesto el seguro (ver
“Seguro del fusil”) - es oportuno
orientar el
cañón hacia una dirección segura.
Ahora
el fusil está cargado
: llevando el segu-
ro a la posición de disparo (
anillo rojo a la
vista
), el arma está lista para disparar.
B) система функционирования в
полуавтоматическом режиме:
1) При помощи рукоятки
открыть затвор
оружия (рис. 20). При этом первый
патрон автоматически поступает из
магазина на подаватель.
2) Отпустить рукоятку так, чтобы затвор
мог свободно переместиться вперед. При
этом затвор вводит в патронник патрон,
поступивший
на
подаватель,
и
останавливается в закрытом положении
(рис. 18).
ПРЕДУПРЕЖДЕНИЕ:
при вводе патрона в
ствол количество патронов в магазине
уменьшается на одну единицу; имеется
возможность
путем
выполнения
вышеописанных операций ввести в магазин
новый патрон с тем, чтобы он был полностью
заряжен.
ВНИМАНИЕ:
во время этих операций – даже
если оружие установлено на предохранитель
(смотри “Предохранитель ружья”) - следует
направлять ствол в безопасную сторону.
Теперь
ружье заряжено
. Установите
предохранитель в положение выстрела;
сместив предохранитель, становится
видимым красное кольцо.

76
AVVERTENZA:
all'inizio dell'uso (fucile nuo-
vo) può essere necessario un breve periodo
di rodaggio prima che l'arma funzioni perfet-
tamente anche con cariche leggere. In pre-
senza di problemi di funzionamento, è op-
portuno sparare a titolo di rodaggio tre o
quattro scatole di cartucce
con carica stan-
dard
.
Sostituzione cartuccia
(Operazione da effettuarsi con fucile in sicu-
ra - vedi “Sicura del fucile” - e canna orien-
tata in direzione di sicura prudenza)
E' possibile sostituire la cartuccia in camera
di scoppio con una cartuccia del serbatoio o
con altra cartuccia non prelevata dal serba-
toio ma introdotta manualmente in canna.
In relazione al tipo di funzionamento dell'ar-
ma selezionato, si può procedere nel seguen-
te modo:
WARNING:
due to precision machine toler-
ances on your shotgun, some breaking-in
period may be required before your new gun
works perfectly with light target loads. If you
experience any initial functioning problems,
we recommended firing three or four boxes
of
standard hunting
loads to allow for this
break-in period.
Cartridge replacement
(This operation must be carried out with the
gun safety catch engaged - see “Gun safety
catch” and barrel pointed in a safe direction)
The round in the chamber may be manually
replaced with a different round from the
magazine or another round by following the
steps outlined below, depending on the type
of action selected.
ATTENTION:
au début de son utilisation (fusil
neuf), une courte période de rodage pourrait
se rendre nécessaire avant que votre fusil
fonctionne parfaitement même avec des char-
ges légères. En présence de problèmes de
fonctionnement, il est opportun de tirer trois
ou quatre boîtes de cartouches
à charge stan-
dard
à titre de rodage.
Remplacement cartouche
(Opération à effectuer avec le fusil en sûreté
- voir “Sûreté du fusil” - et le canon orienté
en direction de prudence certaine)
Il est possible de remplacer la cartouche dans
la chambre par une cartouche du magasin ou
par une cartouche différenté non prélevée du
magasin mais introduite à la main dans le
canon.
Suivant le type de fonctionnement de l'arme
sélectionné, on pourra procéder de la façon
ci-après:

77
HINWEIS:
Bei Neuwaffen kann eine "Ein-
schießphase" erforderlich sein, bis die Waffe
auch mit leichter Ladung einwandfrei funk-
tioniert. Bei Funktionsstörungen empfiehlt es
sich drei oder vier Patronenschachteln mit
Standardmunition
zu verschießen.
Auswechseln der Patrone
(Dieser Vorgang ist bei gesichertem Gewehr
durchzuführen - siehe "Sicherung des Ge-
wehrs" - wobei der Lauf in eine sichere Rich-
tung gehalten werden muss)
Die Patrone in der Schusskammer kann ent-
weder manuell durch eine andere Patrone aus
dem Magazin ersetzt werden oder durch eine
andere Patrone , die nicht aus dem Magazin
stammt, sondern manuell in den Lauf ein-
geführt wird.
Dafür müssen folgende Schritte je nach der
Betriebsart, die gewählt wurde, ausgeführt
werden.
ADVERTENCIA:
al inicio del uso (fusil nue-
vo), puede ser necesario un breve periodo de
rodaje antes de que el arma funcione perfec-
tamente incluso con cargas ligeras. En pre-
sencia de problemas de funcionamiento es
oportuno disparar tres o cuatro cajas de car-
tuchos con
carga estándar
como rodaje.
Sustitución del cartucho
(Esta operación se debe realizar con el segu-
ro puesto - ver “Seguro del fusil” - y cañón
orientado hacia una dirección segura)
Es posible sustituir el cartucho en recámara
con un cartucho del almacén o con otro car-
tucho no cargado del almacén sino introduci-
do manualmente en el cañón.
Respecto del tipo de funcionamiento del
arma seleccionada, se puede proceder de la
siguiente manera:
ПРЕДУПРЕЖДЕНИЕ:
в начале использования
нового ружья может быть необходим
короткий период притирки перед тем, как
оружие начнет хорошо работать даже с
легкими зарядами. При наличии проблем с
функционированием следует отстрелять для
притирки три или четыре коробки патронов
со стандартным зарядом.
Замена патрона
Операция выполняется с ружьем,
установленным на предохранитель -
смотри “Предохранитель ружья”- и со
стволом, направленным в безопасную
сторону.
Имеется возможность заменить патрон в
патроннике на патрон из магазина или на
другой патрон, не взятый из магазина, а
введенный в ствол вручную.
В зависимости от выбранного режима
функционирования
оружия
можно
действовать следующим образом:
78
A) sistema di funzionamento manuale
a pompa
(sostituzione con cartuccia nel serbatoio)
1)
Inserire la sicura dell'arma: aprire
, trami-
te arretramento dell'asta d'armamento,
l'otturatore
dell'arma (fig. 17); la cartuc-
cia in camera di scoppio viene estratta ed
espulsa dall'arma mentre la prima cartuc-
cia del serbatoio scende automaticamente
sul cucchiaio elevatore (fig. 31).
A) pump action
(replacement with a cartridge from the
magazine)
1)
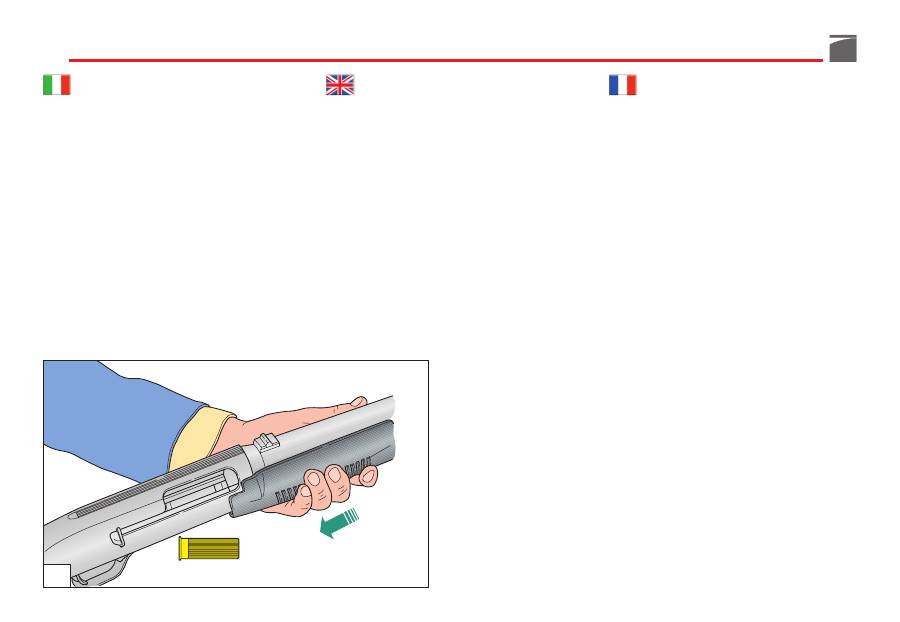
Engage the safety catch. Open the bolt
by pulling on the fore-end lever (fig. 17).
The cartridge in the chamber is ejected by
the extractor and the first cartridge in the
magazine is automatically deposited onto
the carrier (fig. 31).
A) système de fonctionnement à la main
(par pompe)
(remplacement par
une cartouche du magasin)
1)
Mettre l'arme en sûreté; ouvrir l'obtura-
teur
de l'arme (fig. 17) en reculant le le-
vier d'armement; la cartouche qui se
trouve dans la chambre est extraite et
ejecteé de l'arme tandis que la première
cartouche du magasin monte automati-
quement sur l'elevateur (fig. 31).
31

79
A) Manuelle Funktionsweise (Pumpbetrieb)
(Ersatz durch eine Patrone aus dem
Magazin)
1)
Die Sicherung betätigen.
Den Verschluss-
block durch Ziehen des Vordergriffes
öff-
nen
(Abb. 17). Die Patrone in der Schuss-
kammer wird ausgeworfen und die erste
Patrone im Magazin wird automatisch
auf dem Ladelöffel abgelegt (Abb. 31).
A) sistema de funcionamiento manual
de bomba
(sustitución con cartucho en el almacén)
1)
Introducir el seguro del arma: abrir,
mediante el retroceso de la varilla de
armamento,
el obturador
del arma (fig.
17); el cartucho en la recámara se extrae
mientras el primer cartucho del almacén
baja automáticamente en el elevador (fig.
31).
A) система ручного (помпового) режима
функционирования
(замена на патрон из магазина)
1)
Установить оружие на предохранитель:
отведя назад цевье,
открыть затвор
оружия (рис. 17). Происходит извлечение
и выброс находящегося в патроннике
патрона из оружия, а первый патрон из
магазина автоматически поступает на
подаватель (рис. 31).

