SilverStone F1 DS322: 2. System Setup
2. System Setup: SilverStone F1 DS322
2. System Setup
ENGLISH
2.2 RAID Modes
For Raid 0/1, hard drives of identical capacities are recommended.
If the capacities are different, the total amount of the space that can be used will depend on the drive with
the smallest capacity. Under Raid 0, if one drive becomes damaged, the whole array can become
corrupted.
If only one drive is defective and the RAID mode is set to RAID 1, the data can still be accessed but we
strongly recommend replacing the faulty drive immediately to assure continued proper backup and data
safety.If more than one drive at the same time fails or if the RAID mode is set to RAID 0, the data will be
lost and the system can not be accessed again until the drive(s) have been replaced.
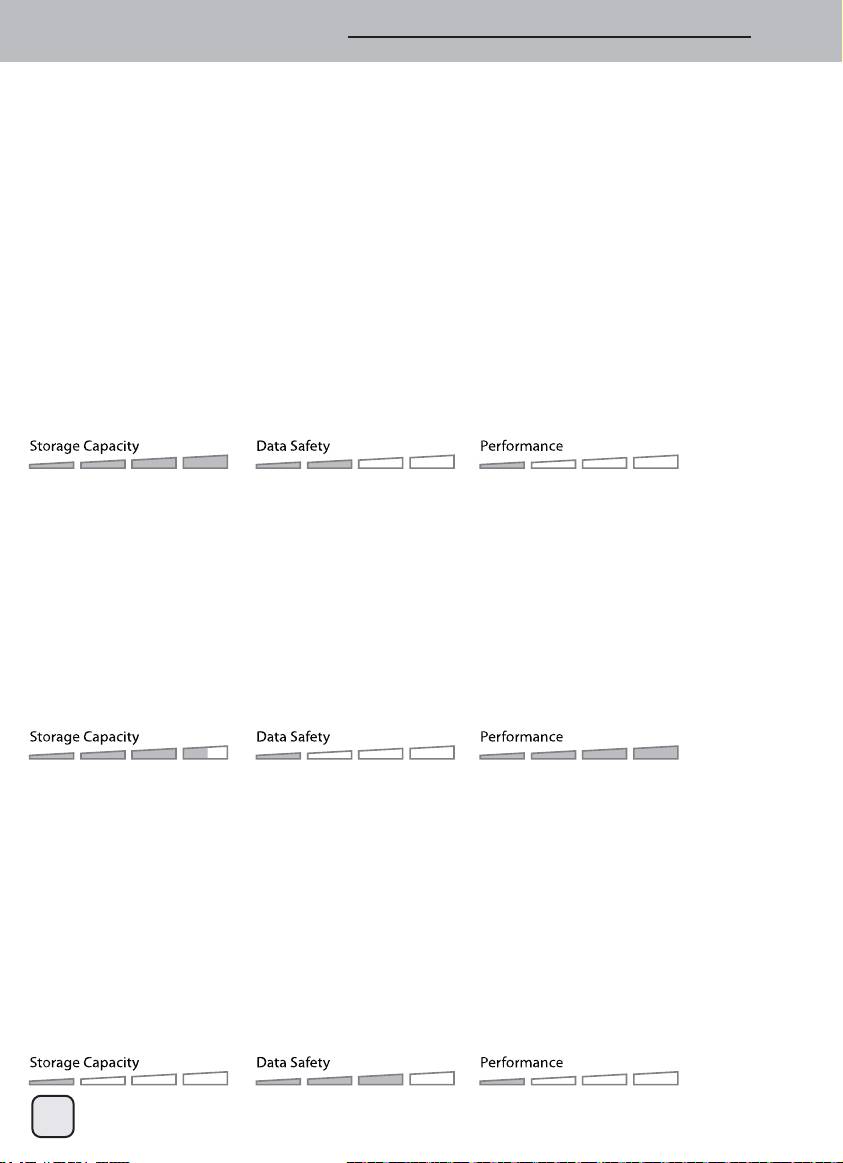
2.2.1 Non-RAID
The drives show up as independent volumes. Each drive can be formatted and accessed separately if one
drive fails, the other is not affected.
The setting does not provide any performance or redundancy benefits.
1. Installing hard drives for the first time or hard disk fails.
2. Turn off the power and install the hard drive(s) or replace the faulty drive(s).
3. Set the RAID switch to Non-Raid Mode.
4. Connect to your computer and turn the power on.
5. Installing new hard drives- for PC users, use the disk management tool or for Mac users, use the disk
utility to create a new partition and format the drives.
6. Installing used hard drives- for PC users, use the disk management tool or for Mac users, use the disk
utility to delete the old partition and format the drives.
1 or 2 drives
2.2.2 RAID 0 - Disk Striping
The drives are shown as one large single volume but the total size will depend on the drive with the
smallest capacity. This setting is used where speed is the primary objective but RAID level 0 (also called
striping) is not redundant. This form of array splits each piece of data across the drives in segments; since
data is written without any form or parity data-checking, it allows for the fastest data transfer of all other
modes. On the downside, if one drive becomes damaged, the whole array can become corrupted.
1. Installing the hard drive or the hard drive fails.
2. Turn off the power and install the hard drive(s) or replace the faulty drive(s).
3. Set the RAID switch to Raid 0 Mode.
4. Connect to your computer and turn the power on.
5. Installing new hard drives- for PC users, use the disk management tool or for Mac users, use the disk
utility to create a new partition and format the drives.
6. Installing used hard drives- for PC users, use the disk management tool or for Mac users, use the disk
utility to delete the old partition and format the drives.
2 drives
2.2.3 RAID 1 - Disk Mirroring
Two drives show up as one volume but only 50% of the total capacity, depending on the drive with the
smallest capacity, can be used. RAID 1 creates an exact copy (or mirror) of a set of data on the second
drive. This is useful when reliability and backup take precedence over storage capacity. Should one hard
drive fail, it can be replaced and the data rebuilt automatically.
1. Installing the hard drive or the hard drive fails.
2. Turn off the power and install the hard drive(s) or replace the faulty drive(s).
3. Set the RAID switch to Raid 1 Mode.
4. Connect to your computer and turn the power on.
5. Installing new hard drives- for PC users, use the disk management tool or for Mac users, use the disk
utility to create a new partition and format the drives.
6. Installing used hard drives- for PC users, use the disk management tool or for Mac users, use the disk
utility to delete the old partition and format the drives.
7. The LEDs (HDD1 and HDD2) will flash rapidly when rebuilding the RAID array.
8. Rebuilding the RAID array will take several hours, depending on the drive capacity. When the data has
been restored, the LEDs will turn steady.
2 drives
5

2. System Setup
ENGLISH
2.2.3.1 Replace failed drive in RAID1 mode
How to replace failed drive and rebuild RAID1 array if the drive in B slot failed.
1. Turn off the power of DS322, and then remove failed drive in B slot.
2. Make sure the USB cable is plugged in and connected to your computer.
Make sure DS322 is in RAID1 mode.
3. Turn on the power, and wait for about 30 seconds for the system to start up.
4. Make sure you can access data of drive A correctly.
5. Install new drive in B slot.
6. The LED of the source drive will start to blink rapidly and the LED of the destination drive will start to
blink slowly. This indicates that it is now rebuilding the RAID array.
7. Rebuilding the RAID array will take several hours, depending on the drive capacity.
When the data has been restored, the LEDs will turn a steady blue.
2.2.4 Changing the RAID Mode
The RAID mode should be set after installing and before formatting the drives.
1. Install the hard drives.
2. Set the RAID switch and select your preferred RAID mode.
3. Connect and switch on your device.
4. For PC users, use the disk management tool or for Mac users, use the disk utility to create/delete the
partition and format the drives.
5. Done.
Note
Changing the RAID mode requires formatting the drives. Make sure to backup all existing data first!
2.3 Connection to computer
A few precautions and notes when using your external storage:
• Do not expose the product to ware or humid conditions.
• Do not cover the enclosure’s ventilation holes.
• Before connecting the device, install the hard drives and set your preferred RAID mode.
• For the safe removal of your drive and to assure that no data is lost, always follow the correct unplug
procedure for external hardware (e.g. Eject the drive before removal).
• When the computer goes into stand-by mode, the hard drives in the external enclosure will
spin down as well.
2.4 Precautions
2.4.1 Power on/off precautions
• It is highly recommended to switch the unit off when not in use.
• When re-locating the device or when not in use for an extended period of time, we strongly recommend
unplugging the unit.
2.4.2 Location and placing precautions
Avoid positioning your device in the following places:
• Location with direct sunlight, next to radiators, other sources of heat.
• Locations with very high temperatures (more than 38°C) or humidity (more than 90%).
• Very dusty or sandy locations.
• Locations subject to vibration, shock, or with a sloping base.
2.4.3 Electricity and power plug
Careful attention must be paid to the following points in order to prevent damage, fire, and/or injury:
• When removing the power cable from the socket, pull on the plug fixture
and never on the cord.
• Do not connect and remove the power cable with wet hands.
• Keep the power cable away from heaters.
• Never try to repair the power cable yourself or to modify it in any way.
• If the unit is dropped or becomes damaged in any other way, unplug the power cable.
6
2. System Setup
ENGLISH
2.4.4 Cables
Use only the cables supplied or recommended by your vendor in order to avoid
the risk of malfunction, electric shock, and/or possible interference to the device.
2.5 About Data Backup
To protect your files and help prevent the loss of your data, we strongly recommend that you keep two
copies of your data, one copy on your DS322 and a second copy either on your internal drive or another
storage media such as CD, DVD, Tape or an additional external drive.
Any loss or corruption of data while using the DS322 is the sole responsibility of the user, and under no
circumstances will the manufacturer be held liable for compensation or the recovery of this data.
3.1 Specifications
Application
• One or two 3.5” SATA I or SATA II hard drive
• 1.5Gb/s or 3.0Gb/s
Interface/Ports
• USB 3.0 SuperSpeed
Data Transfer
• USB 3.0 up to 5Gbps (625MB/s)
• USB 2.0 up to 480Mbps (60MB/s)
System Requirements
• PC: Windows XP or above
• Mac: Mac OS 10.4 or above
• Relevant ports required
(i.e. USB 3.0, USB 2.0)
Operating Environment
• Temperature: 5°C ~ 40°C
• Humidity: 20%RH ~ 80%RH
Storage Environment
• Temperature: -20°C ~ 70°C
• Humidity: 10%RH ~ 90%RH
Power Supply
• Input: AC 100-240V
• Output: DC +12V/3A
Product Size
• 179.5mm x 120mm x 81.1mm
3.2 FAQ
Q: Can I connect this device to a USB 2.0 host?
A: Yes, this device is backwards compatible with USB 2.0.
Q: What file system should I choose to format my drive?
A: This will depend on how you want to use the drive but in general, we recommend:
• Windows Vista/7 NTFS
• Mac OS X HFS+ (Mac OS Extended)
• To use it on both PC and Mac FAT32 (single file size is limited to 4GB)
Q: How many drives can fail before I lose my data?
A: For RAID 0, any drive failure will result in the data being lost. For RAID 1, more than one drive
failure at the same time will mean the data can not be recovered anymore. For Non-RAID, only the
data on the defective drive will be lost.
7
Оглавление
- 1. Introduction
- 2. System Setup
- 1. Einleitung
- 2. Systemeinrichtung
- 1. Introduction
- 2. Réglage du système
- 1. Introducción
- 2. Configuración del sistema
- 1. Introduzione
- 2. Setup del Sistema
- 1. Введение
- 1. Введение
- 1. Введение
- 2. Подготовка системы к работе
- 2. Подготовка системы к работе
- 2. Подготовка системы к работе
- 1. 紹介
- 1. 紹介
- 1. 紹介
- 2. システムのセットアップ
- 2. システムのセットアップ
- 2. システムのセットアップ
- 1. 簡介
- 1. 簡介
- 1. 簡介
- 2. 系統架設
- 2. 系統架設
- 2. 系統架設
- 1. 简介
- 1. 简介
- 1. 简介
- 2. 系统架设
- 2. 系统架设
- 2. 系统架设
- 1. 소개
- 1. 소개
- 1. 소개
- 2. 시스템 설정
- 2. 시스템 설정
- 2. 시스템 설정
- Warranty Information
