Promise Technology SmartStor NS2300N: инструкция
Раздел: Профоборудование
Тип: Аппарат
Инструкция к Аппарату Promise Technology SmartStor NS2300N

SMARTSTOR
NS2300N
Quick Start Guide
Kurzanleitung
Guide de démarrage rapide
Guida Introduttiva
Guía de inicio rápido
Руководство по быстрому началу
работы
クイックスタートガイド
快速安裝手冊
快速安装手册
빠른 시작 안내서
Version 1.0
© 2008 Promise Technology, Inc. All Rights Reserved.

SmartStor NS2300N Quick Start Guide
Contents
English . . . . . . . . . . . . . . . . . . . . . . . . . . . . . . . . . . . . . . . . . . . . . . . 3
Deutsch . . . . . . . . . . . . . . . . . . . . . . . . . . . . . . . . . . . . . . . . . . . . .22
Français . . . . . . . . . . . . . . . . . . . . . . . . . . . . . . . . . . . . . . . . . . . . . 41
Italiano . . . . . . . . . . . . . . . . . . . . . . . . . . . . . . . . . . . . . . . . . . . . . .60
Español . . . . . . . . . . . . . . . . . . . . . . . . . . . . . . . . . . . . . . . . . . . . . .79
Pусский язык . . . . . . . . . . . . . . . . . . . . . . . . . . . . . . . . . . . . . . . . .98
日本語 . . . . . . . . . . . . . . . . . . . . . . . . . . . . . . . . . . . . . . . . . . . . . . 117
繁體中文 . . . . . . . . . . . . . . . . . . . . . . . . . . . . . . . . . . . . . . . . . . . .136
简体中文 . . . . . . . . . . . . . . . . . . . . . . . . . . . . . . . . . . . . . . . . . . . .155
한국어 . . . . . . . . . . . . . . . . . . . . . . . . . . . . . . . . . . . . . . . . . . . . . . 173
2

Step 1: Unpacking the SmartStor NS2300N
SmartStor Task List
• Step 1: Unpacking the SmartStor NS2300N (page 3)
• Step 2: Installing Disk Drives (page 5)
• Step 3: Connecting to the Network (page 5)
• Step 4: Connecting the Power (page 6)
• Step 5: Installing the Software (page 6)
• Step 6: Setting up the SmartStor (page 7)
• Step 7: Connecting to PASM (page 11)
• Step 8: Setting up Network Drives on other PCs (page 14)
• Step 9: Setting up a USB Printer (page 18)
For complete information about your SmartStor NS2300N, see the
SmartStor
NS2300N Product Manual
on the CD.
Step 1: Unpacking the SmartStor NS2300N
The SmartStor NS2300N box contains the following items:
• SmartStor NS2300N Unit
•Power cord
• Quick Start Guide
• 12V DC Power Adapter
• Screws for disk drives
• CD with SmartNAVI software,
(1 package)
Product Manual
and
Quick Start
Guide
• Ethernet cable
Warning
The electronic components within the SmartStor are sensitive to
damage from Electro-Static Discharge (ESD). Observe
appropriate precautions at all times when handling the SmartStor
or its subassemblies.
Important
To configure the SmartStor, you must install the software onto a
PC running Windows Vista, 2003 Server, XP Professional, or
2000.
3
SmartStor NS2300N Quick Start Guide
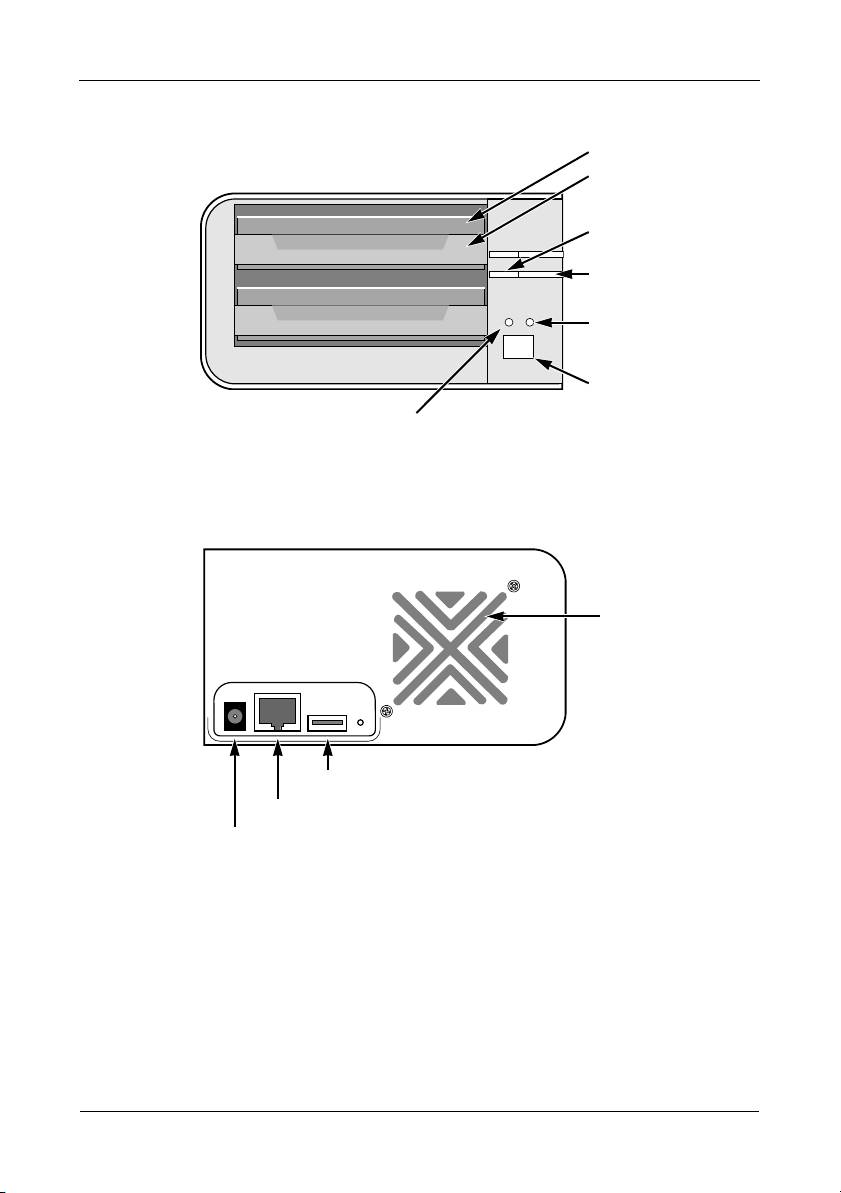
Figure 1. SmartStor NS2300N Front View
Disk Drive
Drive Carrier
Drive Status
LED
Drive Activity
LED
Ethernet
Activity LED
Power Button
System Status LED
Note: This SmartStor is shown without the front door.
Figure 2. SmartStor NS2300N Rear View
Cooling Fan
USB Connection
RJ45 Network Connection
Power Connection
4

Step 2: Installing Disk Drives
Step 2: Installing Disk Drives
You can populate the SmartStor NS2300N with SATA 1.5 Gb/s or 3.0 Gb/s disk
drives. For optimal performance, install disk drives of the same model and
capacity. Your disk drives will become a RAID Volume on the SmartStor.
To install disk drives:
1. Open the door on the front of the SmartStor enclosure.
2. Pull a disk drive carrier from the enclosure. See Figure 1.
3. Carefully lay the disk drive into the drive carrier, so that the screw holes on
the sides of the carrier align with the screw holes in the drive.
4. Insert the screws through the holes in the drive carrier and into the sides of
the disk drive.
• Install only the counter-sink screws supplied with the SmartStor.
• Install four screws per disk drive.
• Snug each screw. Be careful not to over-tighten.
5. Reinstall the drive carrier into the SmartStor enclosure.
Repeat steps 2 through 5 for the other disk drive.
6. Close the door on the front of the SmartStor.
Step 3: Connecting to the Network
To connect the SmartStor to your network:
1. Attach one end of the network cable to the RJ45 network connection.
See Figure 2.
2. Attach the other end of the network cable to your Ethernet hub or switch.
Important
If there are multiple networks at your facility, note the network to
which you connect the SmartStor. You will need this information
during the setup process.
5

SmartStor NS2300N Quick Start Guide
Step 4: Connecting the Power
To power the SmartStor:
1. Attach the power cord from the power source to the power adapter.
2. Connect the power adapter to the back of the SmartStor enclosure. See
Figure 2.
3. On the front of the SmartStor, press the power button. See Figure 1.
It takes about a minute to boot the SmartStor. When fully booted:
• The System Status LED turns green. See Figure 1.
• The buzzer beeps one time.
Step 5: Installing the Software
The SmartNAVI software connects your PC to the SmartStor, sets up the
SmartStor, sets up network drives on your PC, and performs backups.
To install the software:
1. Insert the CD into your CDROM.
2. Double-click the SmartNAVI installer icon.
3. Click the Next button to begin installation.
The License Agreement screen appears.
4. Click the “I accept the terms...” option, then click the Next button.
The Choose Destination Location screen appears.
5. Optional. Click the Browse... button to choose a new install location for the
software.
Click the Next button.
The Ready to Install screen appears.
6. Click the Install button to proceed with installation.
When the installation is finished, the final installation screen appears.
7. Click to Finish button to close the installer.
With the Online Registration box checked, your browser will open and go
directly to the Promise product registration website. Thank you for taking the
time to register.
The installer adds a SmartNAVI icon to the:
• Start menu
• Application tray
SmartNAVI loads automatically every time your Windows OS starts.
6
Step 6: Setting up the SmartStor
Step 6: Setting up the SmartStor
The SmartNAVI performs the setup procedures on your SmartStor. After the
procedure is done, you will have a default folder on the SmartStor, set up as a
network drive on your PC.
You can change the network settings, create RAID volumes, add and mount
folders on your SmartStor after initial setup using SmartNAVI. You can also made
more advanced settings using the PASM software. See “Step 7: Connecting to
PASM” on page 11.
To set up your SmartStor:
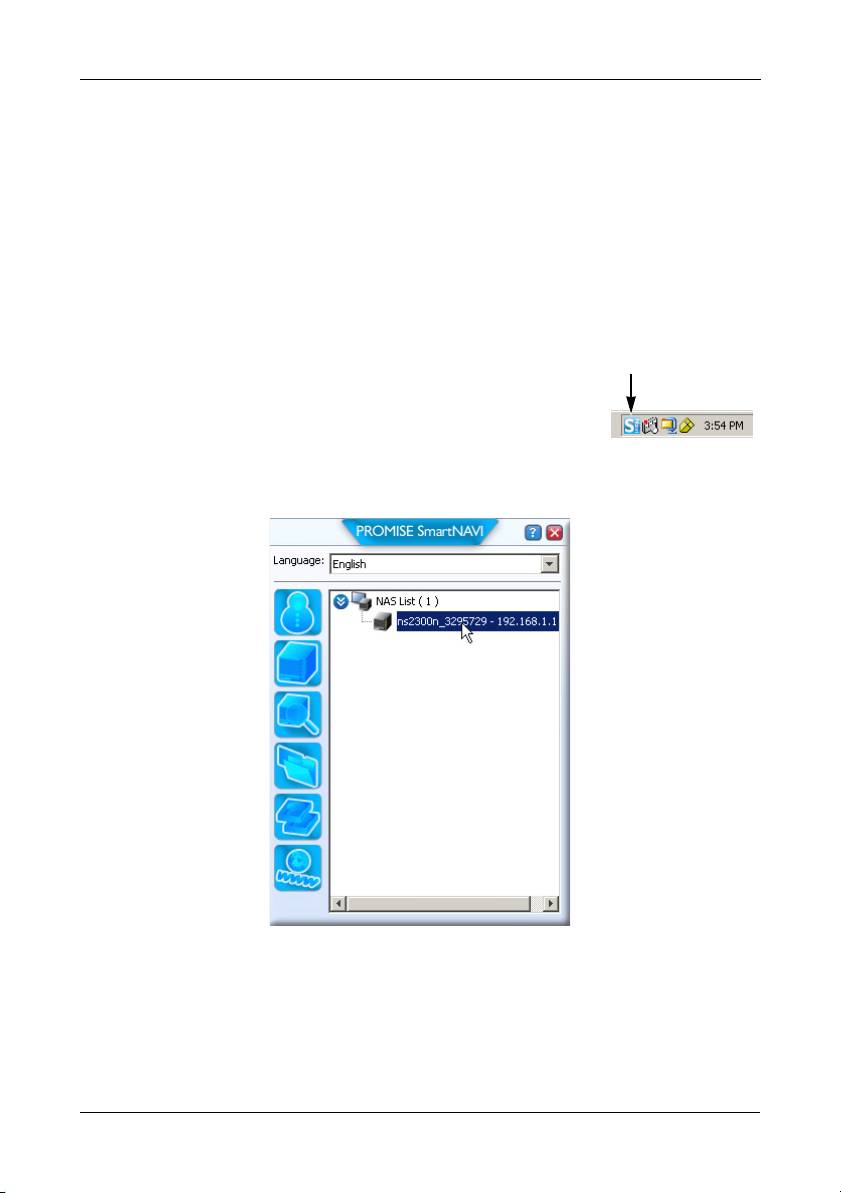
1. Right-click the SmartNAVI icon in the Windows
SmartNAVI icon
application tray (lower right corner of the screen).
2. Choose Open SmartNAVI from the popup menu.
The MSN Window opens.
3. Optional. From Language dropdown menu, choose the language you prefer.
4. Double-click the NS2300N in the NAS list.
The login window opens.
7
SmartStor NS2300N Quick Start Guide
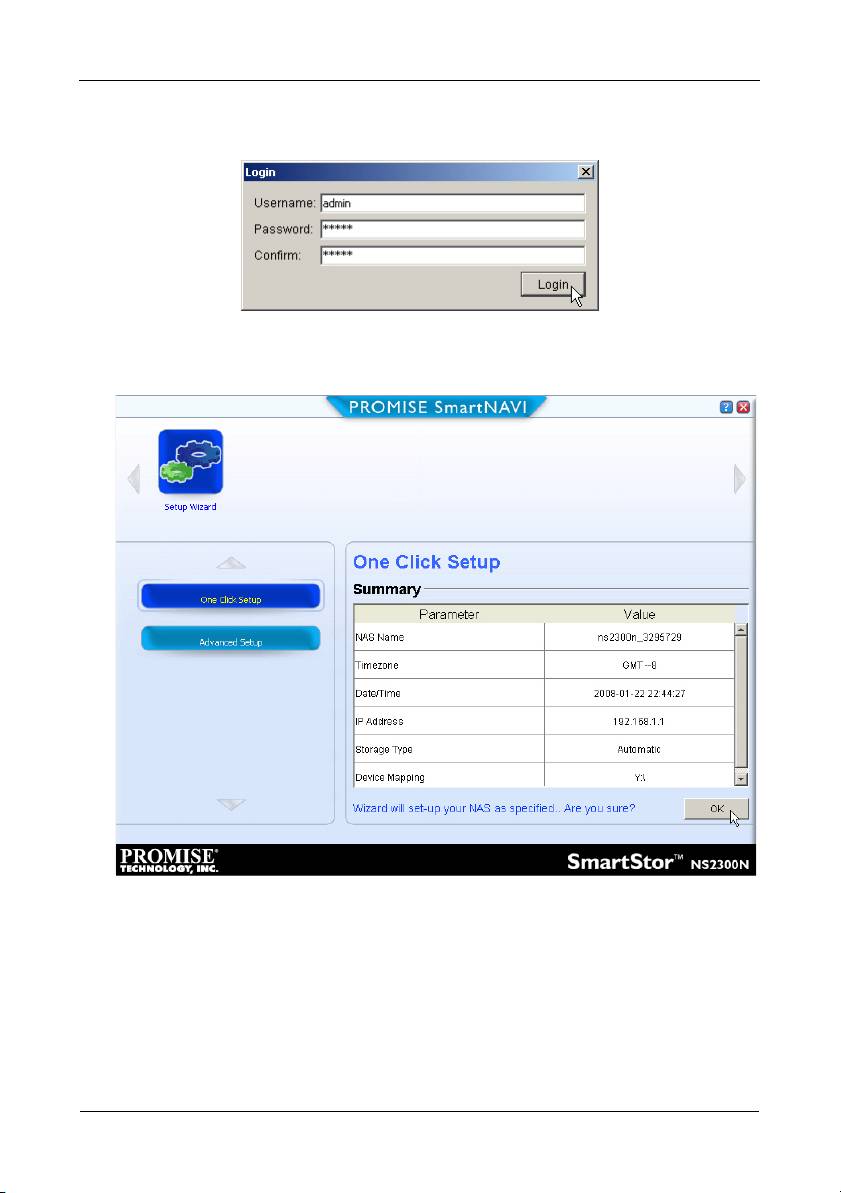
5. Type admin in the Username, Password, and Confirm fields, then click the
Login button.
This action creates a default user and logs the default user into SmartNAVI.
The Main Window opens.
6. Choose a Setup Mode and click the button:
• One Click Setup – Loads a collection of default settings.
Recommended for most users.
• Advanced Setup – Enables you to make your own settings.
Recommended for advanced users.
7. Click the OK button to continue.
If you chose One Click Setup, the Wizard creates a RAID Volume and a
default folder called
Public
. You are finished with the setup.
8

Step 6: Setting up the SmartStor
If you chose Advanced Setup, go to the next step.
8. Choose Automatic (DHCP) or Manual network settings.
If you chose Manual settings, type entries for each of the following
parameters in the fields provided:
• Computer (NAS system) Name
• IP Address
• Subnet Mask
• Gateway
• Primary and Secondary DNS – optional
9. Click the Next button to continue.
10. Choose the following values from their respective dropdown menus:
• Timezone
•Year
• Month
•Day
• Time in Hours, Minutes, and Seconds
11. Click the Next button to continue.
12. Choose Automatic or Manual RAID Volume creation.
If you chose Manual, choose the type of RAID Volume you want:
• Maximum Capacity – RAID 0, using both disk drives
• Data Protection – RAID 1, using both disk drives
13. Click the Next button to continue.
14. Choose a network drive letter from the dropdown menu.
This drive will be mapped as a network drive on your PC.
The list begins with Z and goes in reverse alphabetical order.
15. Click the Next button to continue.
16. Review your parameters.
To make changes, click the Previous button.
To accept the parameters and configure your NAS system, click the OK
button.
17. Click the Yes button in the confirmation box.
The Wizard creates a RAID Volume and a default folder called
Public
.
The Public folder on the SmartStor appears under My Computer as a
network drive.
9
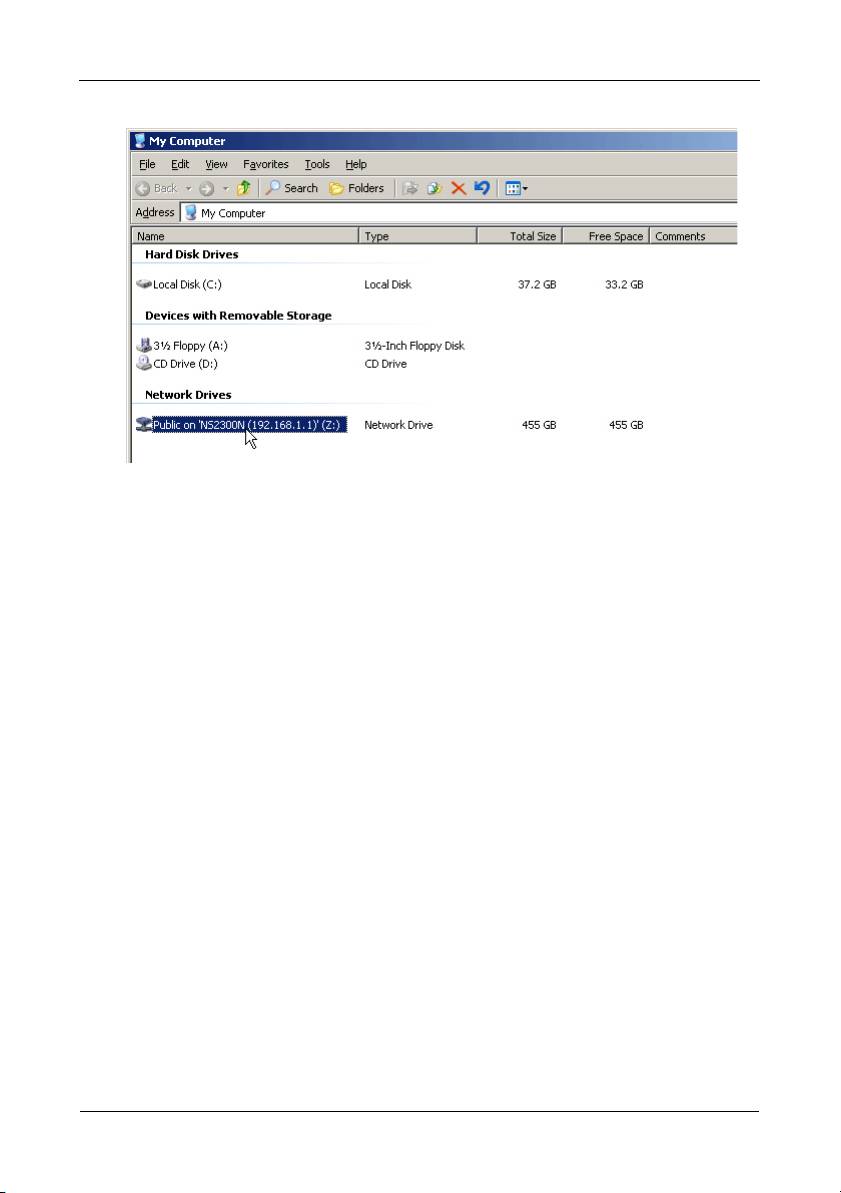
SmartStor NS2300N Quick Start Guide
You can now copy files to and from the folder on the SmartStor.
To access this folder from other PCs, see “Step 8: Setting up Network Drives
on other PCs” on page 14.
To create additional RAID Volumes and folders, see Chapter 5 of the
SmartStor NS2300N User Manual
on the CD.
10
Step 7: Connecting to PASM
Step 7: Connecting to PASM
The Promise Advanced Storage Manager (PASM) software is factory-installed on
the SmartStor system. PASM runs in the browser on your PC. You can access
PASM:
• Directly in your browser (page 12)
• Through SmartNAVI (page 13)
Browser Support
Choose one of the following browsers to use with PASM:
• Internet Explorer
• Netscape Navigator
• Mozilla
• Safari (Mac OS X)
• Firefox
Finding the SmartStor’s IP Address
To access the SmartStor in your browser, you must know the SmartStor’s IP
address. Use SmartNAVI for this purpose.
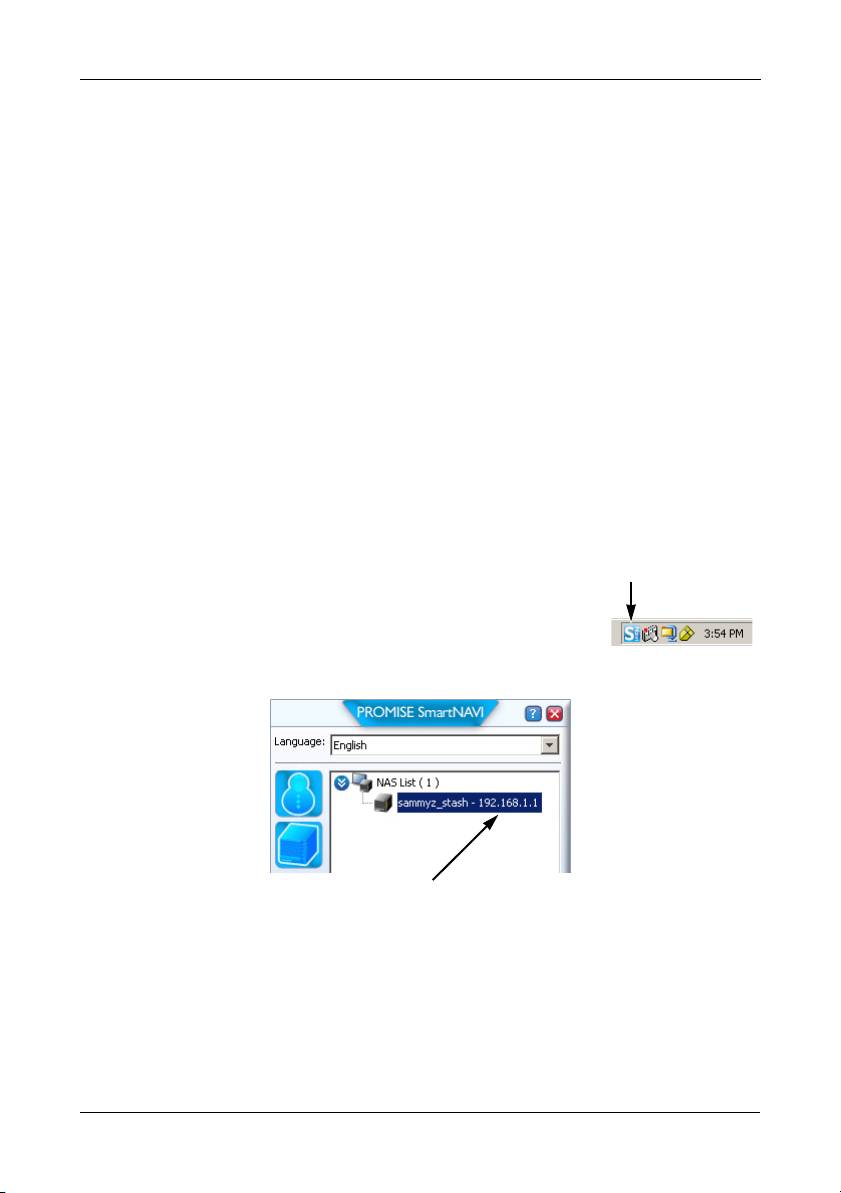
1. Right-click the SmartNAVI icon in the Windows
SmartNAVI icon
application tray (lower right corner of the screen).
2. Choose Open SmartNAVI from the popup menu.
The SmartNAVI MSN window appears with the NAS
List displayed. The IP address of the SmartStor shown in the NAS List.
IP address of the SmartStor
detected on the network
For more information about SmartNAVI, see Chapter 4 of the
SmartStor
NS2300N User Manual
on the CD.
11
SmartStor NS2300N Quick Start Guide
PASM in your Browser
To log into PASM in your browser:
1. Start your Browser.
2. In the Browser address field, type in the IP address of the SmartStor.
See “Finding the SmartStor’s IP Address” on page 11.
Note that the IP address shown below is only an example. The IP address
you type into your browser might be different.
• PASM uses an HTTP connection . . . . . . . . . . . . . . . . . . . . . . .http://
• Enter the SmartStor’s IP address . . . . . . . . . . . . . . . . . 192.168.1.1
Together, your entry looks like this: http://192.168.1.1
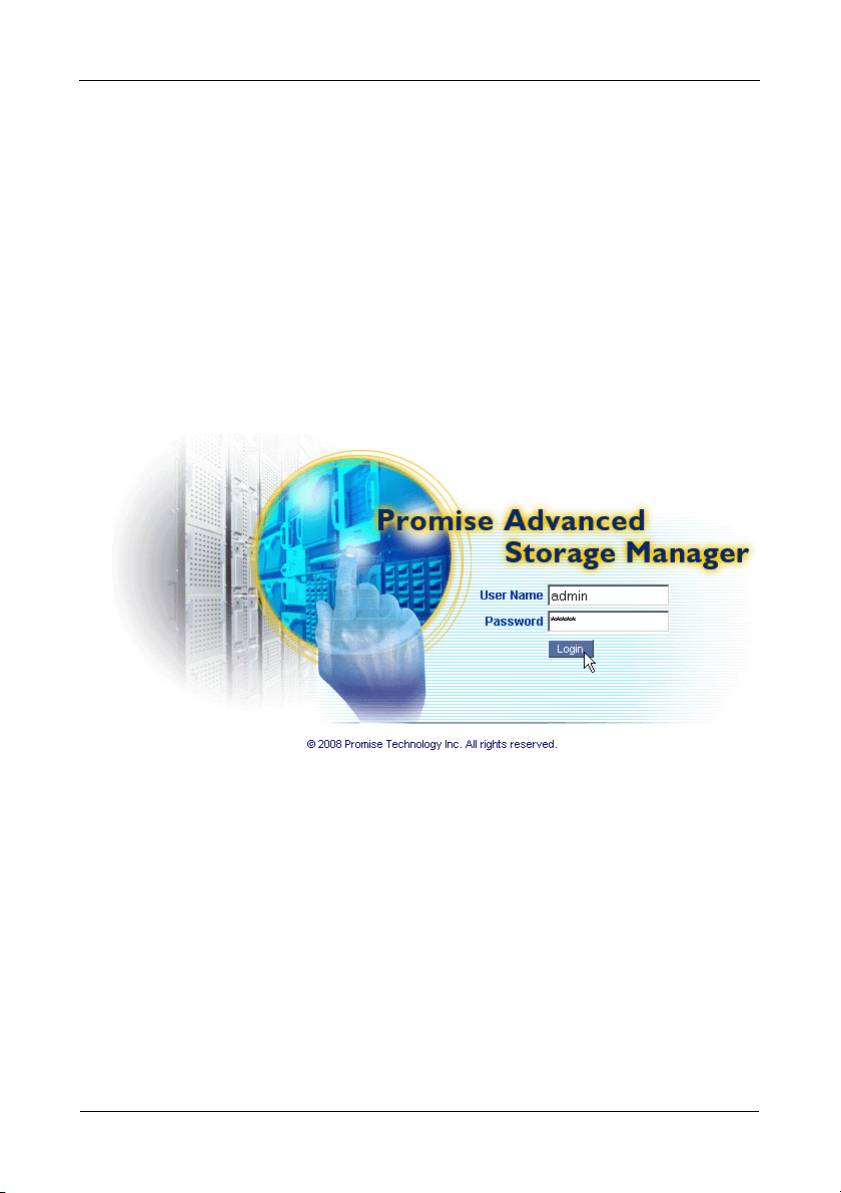
The PASM login screen displays.
3. Type admin in both the User Name and Password fields, then click the
Login button.
The user name and password are case sensitive.
For more information about PASM, see Chapter 5 of the
SmartStor
NS2300N User Manual
on the CD.
12
Step 7: Connecting to PASM
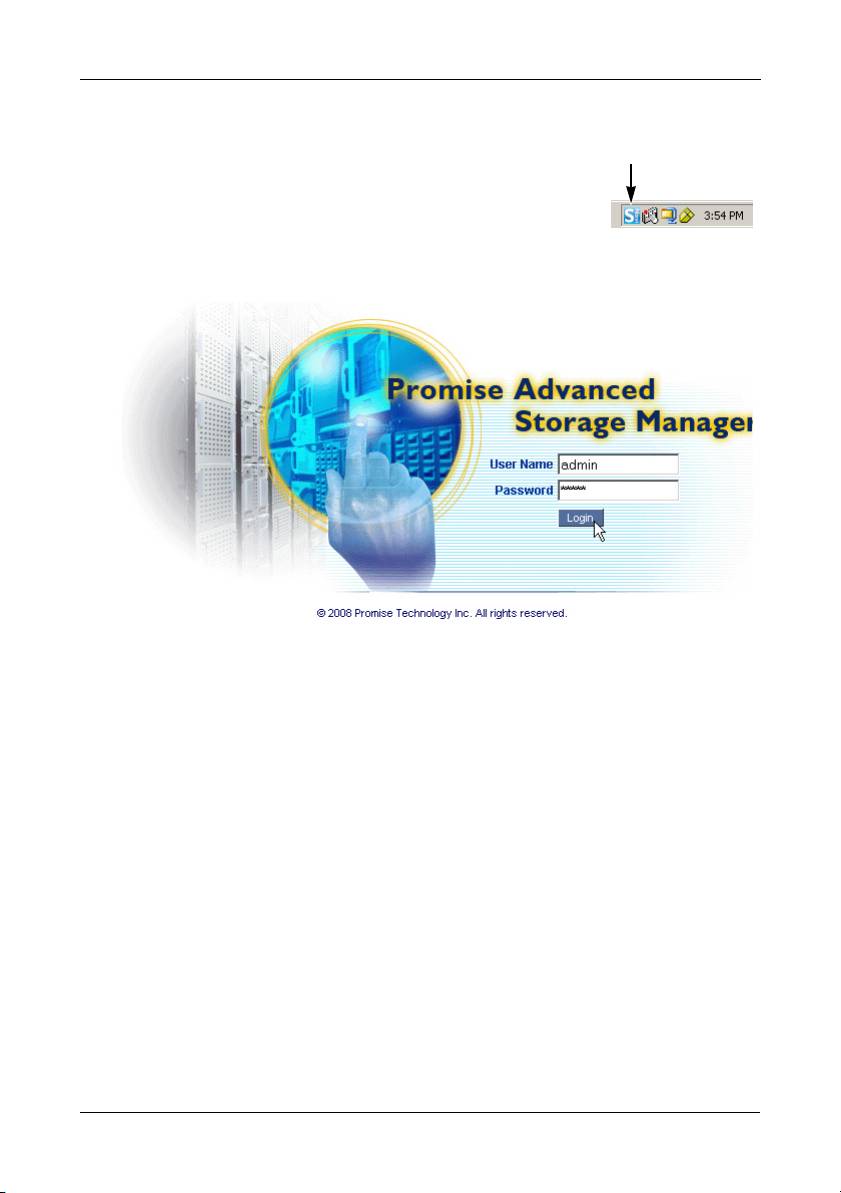
PASM in SmartNAVI
To log into PASM through SmartNAVI:
SmartNAVI icon
1. On the Windows desktop, right-click the SmartNAVI
icon (right).
2. Choose Open Advanced Management from the
popup menu.
Your default browser starts and the PASM login screen displays.
3. Type admin in both the User Name and Password fields, then click the
Login button.
The user name and password are case sensitive.
For more information about PASM, see Chapter 5 of the
SmartStor
NS2300N User Manual
on the CD.
13

SmartStor NS2300N Quick Start Guide
Step 8: Setting up Network Drives on other PCs
In Step 6, the SmartNAVI Setup Wizard created a default folder on the SmartStor
and made it a network drive on your PC.
To setup network drives on other PCs, where you have not installed the
SmartNAVI software, you must use the PCs’ Operating Systems for this purpose:
• Setting up a Network Drive on a Windows PC (page 14)
• Setting up a Network Drive on a UNIX or Linux PC (page 14)
• Setting up a Network Drive on a Macintosh PC (page 16)
Setting up a Network Drive on a Windows PC
To setup a Network Drive with My Network Places:
1. On the Windows desktop, double-click the My Network Places icon.
2. Click the Search button in the toolbar.
If the Search button is not shown, from the View menu, choose Toolbars,
then Standard Buttons.
3. In the Computer name field, type the IP address of the SmartStor and click
the Search button.
See “Finding the SmartStor’s IP Address” on page 11.
The SmartStor appears in the search results list.
4. Double-click the SmartStor to show the Public folder.
5. Right-click the Public folder and choose Map Network Drive from the
dropdown menu.
The Map Network Drive dialog box appears.
6. In the Map Network Drive dialog box, choose a drive letter and click the
Finish button.
7. Double-click the My Computer icon on your Windows desktop.
The Public folder on the SmartStor appears under My Computer as a
network drive. You can now copy files to and from the folder on the
SmartStor.
Setting up a Network Drive on a UNIX or Linux PC
Before you can access the SmartStor from a UNIX or Linux PC, you must use
PASM to configure the SmartStor to communicate with UNIX and Linux.
On the Windows PC
1. Start PASM.
See “PASM in your Browser” on page 12 or “PASM in SmartNAVI” on
page 13.
14

Step 8: Setting up Network Drives on other PCs
2. In the Tree, on the left side of the PASM screen, click the + beside the File &
Print icon to expand the Tree.
3. Click the Protocol Control icon, then click the UNIX/Linux tab.
4. Next to Service, click the Enable option, then click the OK button.
The UNIX/Linux protocol enables UNIX and Linux PCs to connect to
SmartStor.
5. Click the File Sharing icon in the tree.
6. Click the Modify tab.
7. Check the Unix/Linux box, then click the OK button.
The UNIX/Linux file sharing enables UNIX and Linux PCs to access folders
on the SmartStor. In this case, access is given for the PUBLIC folder.
8. Click the Sharing Setup icon in the tree.
9. Click the UNIX/Linux Sharing tab.
10. In the New IP Address field, type the IP address of the UNIX/Linux PC from
which you want to access the SmartStor.
11. Click the Add button.
On the UNIX or Linux PC with Command Line Interface
1. Open a terminal window.
2. Create a new folder for the SmartStor. Type mkdir SmartStor and press
Enter.
3. Mount the SmartStor. Type mount 192.168.1.1:/VOLUME1/PUBLIC /
SmartStor and press Enter.
Note that the IP address shown here is only an example. The IP address you
type in your terminal window might be different.
See “Finding the SmartStor’s IP Address” on page 11.
Volume1 and Public refer to the default RAID Volume and folder created
during setup. See page 9.
4. Change to the SmartStor directory. Type cd /SmartStor and press Enter.
You can now copy files to and from the folder on the SmartStor.
5. When you are done with the SmartStor, type cd; umount /SmartStor and
press Enter.
15

SmartStor NS2300N Quick Start Guide
On the Linux PC with Graphic Desktop
This procedure is for a RedHat Enterprise Linux 4 configuration. If you run a
different version of Linux, you might have to adapt the procedure. See your OS
documentation.
1. From the Applications menu, choose Network Servers.
2. In the Network window, double-click Windows Network.
3. Double-click the SmartStor (NS2300) on the network.
4. Double-click the PUBLIC folder.
If this is the first time you accessed this folder, an Authentication dialog box
opens.
5. Type admin in the Username and Password fields, then click the OK button.
Leave the Domain field blank.
The folder opens. You can now copy files to and from the folder on the
SmartStor.
Setting up a Network Drive on a Macintosh PC
Before you can access the SmartStor from a Macintosh, you must use PASM to
configure the SmartStor to communicate with MacOS X.
On the Windows PC
1. Start PASM.
See “PASM in your Browser” on page 12 or “PASM in SmartNAVI” on
page 13.
2. In the Tree, on the left side of the PASM screen, click the + beside the File &
Print icon to expand the Tree.
3. Click the Protocol Control icon, then click the Macintosh tab.
4. Next to Service, click the Enable option, then click the OK button.
The Macintosh protocol enables Macintosh PCs to connect to SmartStor.
5. Click the File Sharing icon in the tree.
6. Click the Modify tab.
7. Check the Macintosh box, then click the OK button.
The Macintosh file sharing enables Macintosh PCs to access folders on the
SmartStor. In this case, access is given for the PUBLIC folder.
16

Step 8: Setting up Network Drives on other PCs
On the Macintosh PC
1. From the Go menu, choose Connect to Server.
2. In the Connect to Server dialog box, type afp://192.168.1.1 and click the
Connect button.
Note: The IP address shown here is only an example. The IP address you
enter might be different.
See “Finding the SmartStor’s IP Address” on page 11.
Click the + button to add this IP address to the Favorite Servers list.
3. Type admin in both the user name and password fields, then click the
Connect button.
4. In the Select the Volumes dialog box, click the PUBLIC folder, then click the
OK button.
5. In the Welcome screen, click the OK button.
A window opens on the Macintosh desktop to access the PUBLIC folder on
the SmartStor. You can now copy files to and from the folder on the
SmartStor.
17

SmartStor NS2300N Quick Start Guide
Step 9: Setting up a USB Printer
You can use the SmartStor as a print server. You must connect the USB printer,
enable SmartStor’s print server, and set up printing on your PC.
• Connecting a USB Printer to SmartStor (page 18)
• Setting up the Print Server on SmartStor (page 18)
• Setting up Windows Printing (page 18)
• Setting up Linux Printing (page 19)
• Setting up Macintosh Printing (page 20)
Connecting a USB Printer to SmartStor
To connect a USB printer:
1. Set up your printer according to the printer’s
Setup Guide
or
User Manual
.
2. Install the printer drivers onto your PC as described in the printer’s
Setup
Guide
or
User Manual
.
3. Attach the USB cable from your printer to one of the USB connections on the
back of the SmartStor. See Figure 2.
Setting up the Print Server on SmartStor
You must use PASM to configure the SmartStor for printing.
To set up the SmartStor’s print server:
1. Start PASM.
See “PASM in your Browser” on page 12 or “PASM in SmartNAVI” on
page 13.
2. In the Tree, on the left side of the PASM screen, click the + beside the File &
Print icon to expand the Tree.
3. Click the Protocol Control icon, then click the Printer Server tab.
4. Click the Enable option button beside Printer Server.
5. Click the OK button to save your settings.
Setting up Windows Printing
To set up printing on a Windows PC:
1. On the Windows desktop, double-click the My Network Places icon.
2. Click the Search button in the toolbar.
If the Search button is not shown, go to View > Toolbars and choose
Standard Buttons.
18

Step 9: Setting up a USB Printer
3. In the Computer name field, type the IP address of the SmartStor and click
the Search button.
See “Finding the SmartStor’s IP Address” on page 11.
The SmartStor appears in the search results list.
4. In the computer list, double-click the SmartStor to open it.
If the Connect to dialog box appears, type admin in the both the user name
and password fields, then click the OK button.
5. Right-click the usbptr1 icon and choose Connect... from the dropdown
menu.
6. When the warning message about printer drivers appears, click OK to
continue.
7. In the Add Printer Wizard, click the Manufacturer and model name of your
USB printer, then click OK.
8. In the Add Printer Wizard, click the OK button.
9. To verify printer installation, in the Windows Start menu, choose Settings,
then Printers and Faxes.
The Printers and Faxes screen appears. The usbptr1 is the USB printer on
the SmartStor.
Setting up Linux Printing
This procedure is for a RedHat Enterprise Linux 4 configuration. If you run a
different version of Linux, you might have to adapt the procedure. See your OS
documentation.
1. From the Applications menu, choose System Settings, then Printing.
Printer configuration window opens.
2. Click the New button.
Add a new print queue dialog box opens.
3. Click the Forward button.
4. In the Name field, type a name for the printer, such as
NAS_printer
, a
description, and click the Forward button.
5. From the Select a queue type dropdown menu, choose Network Windows
(SMB).
6. Scroll the list and click the triangle icon beside NS2300.
USBPTR01 appears below NS2300. USBPTR01 represents the USB printer
connected to the SmartStor.
7. Highlight USBPTR01 and click the Forward button.
The Authentication dialog box opens.
19

SmartStor NS2300N Quick Start Guide
8. In the User name and Password fields, type admin, then click the OK
button.
The Printer Model dialog box opens.
9. From the dropdown menu, choose the manufacturer of your printer.
From the model list, highlight the model of your computer.
Then click the Forward button.
10. Click the Finish button.
USBPTR01 is added to your printer list.
Setting up Macintosh Printing
To set up printing on a Macintosh PC:
1. From the Apple Menu, choose System Preferences.
2. Double-click the Print & Fax icon.
3. Click the Setup Printers button.
4. In the Printer List, click the Add icon.
The Printer List displays a new panel.
5. In the new panel, from the popup menus, choose:
• Windows Printing
• Workgroup
6. From the list, highlight the SmartStor, then click the Choose button.
A user name and password dialog box appears.
7. Type admin into the User Name and Password fields, then click OK.
The printer list displays a new panel.
8. Highlight the USBPTR01 in the list.
USBPRT01 represents the USB printer connected to the SmartStor.
9. In the Printer Model popup menu, choose the make of your printer.
10. In the Model Name list, choose the model of your printer.
11. Click the Add button.
USBPTR01 is added to your printer list.
20
