One For All HC-8300: инструкция
Раздел: Бытовая, кухонная техника, электроника и оборудование
Тип: Пульт Управления
Инструкция к Пульту Управления One For All HC-8300
light Control_17_TALEN_2007:light Control 19-03-2007 14:27 Pagina b
HC-8300
HC-8010
HC-8000
................
4
.............
40
.............
76
English
Nederlands
Русский
.............
10
.............
46
e
e
.............
82
Deutsch
Dansk
T
T
ü
ü
r
r
k
k
ç
ç
.............
16
.............
52
.............
88
P
P
o
o
l
l
s
s
k
k
i
i
Français
Norsk
.............
22
.............
58
k
k
y
y
.............
94
Español
Sverige
Č
Č
e
e
s
s
.............
28
.............
64
a
a
r
r
...........
100
M
g
g
y
y
Português
Suomi
M
a
a
.............
34
¿¿
.............
70
Italiano
EE
ÏÏ
ÏÏ
ËË
ÓÓ
ÈÈ
ÎÎ
light Control_17_TALEN_2007:light Control 19-03-2007 14:27 Pagina c
h
Instruction Manual
. . . . . . . . . . . . . . . . . . . . . . . . . . . . . . . . . . . . . . . . . . . . . . . . . . . . . . . . .
4
E
nglis
c
h
Bedienungsanleitung
. . . . . . . . . . . . . . . . . . . . . . . . . . . . . . . . . . . . . . . . . . . . . . . . . .
10
De
uts
a
is
Mode d'emploi
. . . . . . . . . . . . . . . . . . . . . . . . . . . . . . . . . . . . . . . . . . . . . . . . . . . . . . . . . . . .
16
F
r
a
nç
l
Guía del usario
. . . . . . . . . . . . . . . . . . . . . . . . . . . . . . . . . . . . . . . . . . . . . . . . . . . . . . . . . . . .
22
E
s
pa
ño
.............
76
s
Manual de instruções
. . . . . . . . . . . . . . . . . . . . . . . . . . . . . . . . . . . . . . . . . . . . . . . . . .
28
Po
r
tuguê
.............
82
no
Istruzioni per l'uso
. . . . . . . . . . . . . . . . . . . . . . . . . . . . . . . . . . . . . . . . . . . . . . . . . . . . . .
34
Ita
lia
.............
88
Gebruiksaanwijzing
. . . . . . . . . . . . . . . . . . . . . . . . . . . . . . . . . . . . . . . . . . . . . . . . . . . . .
40
rl
ands
Ne
de
.............
94
Brugsanvisning
. . . . . . . . . . . . . . . . . . . . . . . . . . . . . . . . . . . . . . . . . . . . . . . . . . . . . . . . . . .
46
...........
100
Da
ns
k
k
Bruksanvisning
. . . . . . . . . . . . . . . . . . . . . . . . . . . . . . . . . . . . . . . . . . . . . . . . . . . . . . . . . . .
52
N
ors
Bruksanvisning
. . . . . . . . . . . . . . . . . . . . . . . . . . . . . . . . . . . . . . . . . . . . . . . . . . . . . . . . . . .
58
Sv
erige
Käyttöohje
. . . . . . . . . . . . . . . . . . . . . . . . . . . . . . . . . . . . . . . . . . . . . . . . . . . . . . . . . . . . . . . . . . .
64
Suomi
√
√
‰
‰
Ë
Ë
Á
Á
›
›
Â
Â
˜
˜
¯
¯
Ú
Ú
‹
‹
Û
Û
Â
Â
ˆ
ˆ
˜
˜
. . . . . . . . . . . . . . . . . . . . . . . . . . . . . . . . . . . . . . . . . . . . . . . . . . . . . . . . . . . . .
70
E
E
Ï
Ï
Ï
Ï
Ë
Ë
Ó
Ó
È
È
Î
Î
¿
¿
Инструкция пользователя
. . . . . . . . . . . . . . . . . . . . . . . . . . . . . . . . . . . . . . . . . . . . . .
ий
76
Р
ус
ск
r
r
k
k
ç
ç
e
e
Kullanım kılavuzu
. . . . . . . . . . . . . . . . . . . . . . . . . . . . . . . . . . . . . . . . . . . . . . . . . . . . . . . .
82
T
T
ü
ü
Instrukcja obsługi
s
s
k
k
i
i
. . . . . . . . . . . . . . . . . . . . . . . . . . . . . . . . . . . . . . . . . . . . . . . . . . . . . . . .
88
P
P
o
o
l
l
Návod k použití
. . . . . . . . . . . . . . . . . . . . . . . . . . . . . . . . . . . . . . . . . . . . . . . . . . . . . . . . . . .
Č
Č
e
e
s
s
k
k
y
y
94
r
r
Használati útmutató
. . . . . . . . . . . . . . . . . . . . . . . . . . . . . . . . . . . . . . . . . . . . . . . . .
100
a
a
g
g
y
y
a
a
M
M
WWW.ONEFORALL.COM 2
light Control_17_TALEN_2007:light Control 19-03-2007 14:27 Pagina d
1
ON
2
3
ON
ON
WWW.ONEFORALL.COM 3

light Control_17_TALEN_2007:light Control 19-03-2007 14:27 Pagina e
English
Table of Contents
Safety precautions
. . . . . . . . . . . . . . . . . . . . . . . . . . . . . . . . . . . . . . . . . . . . . . . . . . . . 5
How does it work?
. . . . . . . . . . . . . . . . . . . . . . . . . . . . . . . . . . . . . . . . . . . . . . . . . 5
Set up the HC Receiver . . . . . . . . . . . . . . . . . . . . . . . . . . . . . . . . . . 6
Controlling your lights . . . . . . . . . . . . . . . . . . . . . . . . . . . . . . . . . . 7
Zone Control . . . . . . . . . . . . . . . . . . . . . . . . . . . . . . . . . . . . . . . . . . . . . . . . . . . . . . . . . 8
Macros
. . . . . . . . . . . . . . . . . . . . . . . . . . . . . . . . . . . . . . . . . . . . . . . . . . . . . . . . . . . . . . . 8
Specification HC Receiver
. . . . . . . . . . . . . . . . . . . . . . . . . . . . . . . . . . . . . . . . . . . . . 9
Customer Service
. . . . . . . . . . . . . . . . . . . . . . . . . . . . . . . . . . . . . . . . . . . . . . . . . . . . . 9
Helpful Hints
. . . . . . . . . . . . . . . . . . . . . . . . . . . . . . . . . . . . . . . . . . . . . . . . . . . . . . . . . 9
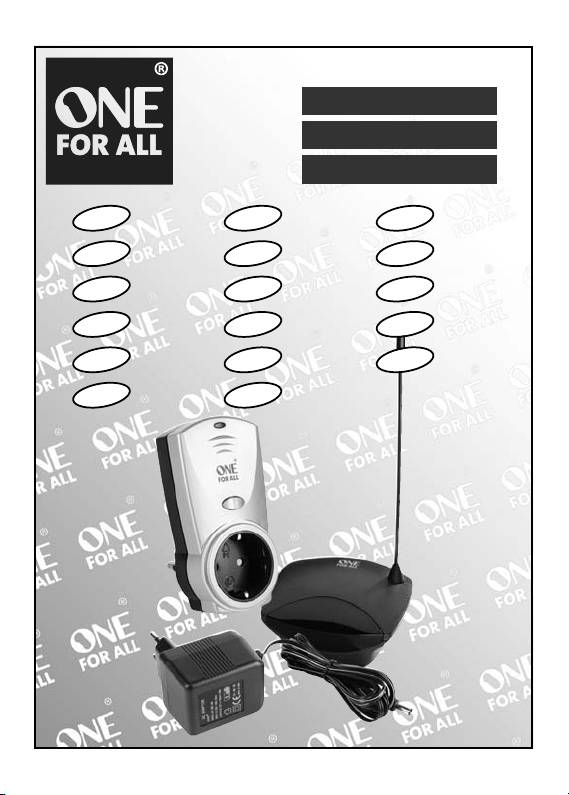
Introduction
Thank you for purchasing the ONE FOR ALL Light Control product. This
manual will explain how to install and operate any of the following
products:
HC-8300 – Starters Kit*
HC-8000 – Extension Kit On/Off
HC-8010 – Extension Kit Dimmer
In order to control your lights by remote, you need the following
components:
• Home Control Receiver (Power Plug)
• Home Control Command Centre (RF Transmitter + AC/DC Adaptor)
To begin installation, see overleaf.
* The Starters Kit is necessary to begin using the ONE FOR ALL Light
Control feature and therefore should be purchased before either of
the extension kits.
WWW.ONEFORALL.COM 4
light Control_17_TALEN_2007:light Control 19-03-2007 14:27 Pagina 5
Safety precautions
- This product should not be exposed to high temperatures.
- This product should not be used in damp places or close to
water.
- The HC-8300 should only be connected to a power supply of
220-240 VAC / 50Hz.
- The maximum load that can be connected to this HC-8000 and
HC-8300 is 1000 Watt: please check the load before usage.
- The maximum load that can be connected to this HC-8010 is 300
Watt: please check the load before usage.
- This product should not be covered.
- This product is to be used only in conjunction with ONE FOR
ALL Light Control compatible remotes. Compatible remotes
all feature the logo shown here..........
How does it work?
The HC Receiver plugs into the wall socket, in between your lamp and the
power outlet. It can be switched ON and OFF either manually by the switch
on the front or by remote control using a ONE FOR ALL Universal Remote
Control.
The HC-8010 unit also allows you to dim or brighten your lights.
The HC Receiver is controlled by Radio Frequency (RF), which enables it be
controlled even if it is not directly in sight. In order to change the Infra Red
(IR) signal of your remote control into RF, the Command Centre is required.
To control your light(s), simply point to the Command Centre and press the
function you want.
WWW.ONEFORALL.COM 5

light Control_17_TALEN_2007:light Control 19-03-2007 14:27 Pagina 6
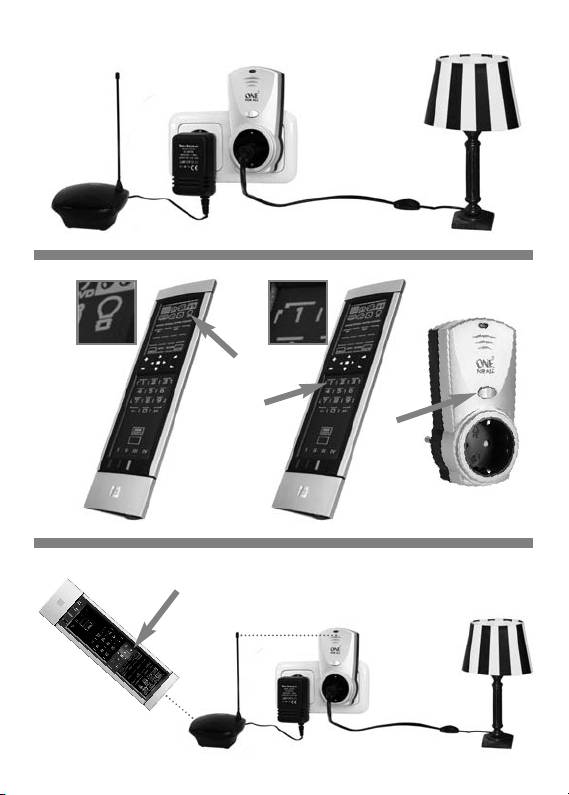
Set up the HC Receiver
To set up your HC Receiver to work with your remote, you will need to
assign a number to it. This is a one-time process that will allow you to
control individual lights separately if you purchase additional HC Receivers
in the future. To assign a number to the plug, follow these steps:
• Plug the lamp into the HC Receiver, and plug the HC
1
Receiver into the wall outlet. If your lamp has a power
switch it should be in the “ON” position.
• Plug the Command Centre in as close as possible to the HC
Receiver, so that they are only 10-20 cm apart (the
Command Centre can be moved after the initial setup).
• Press the Light Device key on your remote control so that
2
it is in Light Mode.
• Press the number you wish to assign to the HC Receiver. If
this is your first Plug, number 1 is recommended, number
2 for the second etc. The IR Indicator at the top of the
remote should blink twice.
• Press and hold the button on the HC Receiver until the red
light begins to blink.
• Point your remote control towards the Command Centre
3
and press the Channel Up (+) key. The red light should
stop flashing.
The remote should now operate the HC Receiver. To test it, check if the
Channel Up (+) and Channel Down (-) keys work to turn
your light on and off respectively, or if you have the HC8010 Dimmer unit,
see if the Volume up ( ) key begins to brighten or darken the light
(press again to stop).
6 WWW.ONEFORALL.COM

light Control_17_TALEN_2007:light Control 19-03-2007 14:27 Pagina 7
Controlling your lights
Once the HC Receiver has been assigned a number, it is ready to be used.
Remember that you need to point your remote towards the Command
Centre to control your lights, but once the HC Receiver has been set up,
the Command Centre can be placed anywhere in sight of the remote
(for example on top of you TV).
To use the remote to control your lights, select the Light Mode on the
remote by pressing the Light Device Key. Once in Light Mode you can select
which HC Receiver you want to control by pressing the number of that plug
and the IR indicator will blink twice to indicate that a number has been
selected. To operate that plug, use the following keys:
Light ON – Press Channel Up (
+)
Light OFF – Press Channel Down (
-
)
Light Brighter/Dimmer* – Press Volume Up ( )
The light will cycle between dim and bright. To stop at the required
brightness, press Volume up ( ) again.
*(requires HC8010 Dimmer Unit)
The remote will remember the last light you controlled, so if you don’t
want to change between lights, it is not necessary to press a number
before pressing one of the above keys.
WWW.ONEFORALL.COM 7

light Control_17_TALEN_2007:light Control 19-03-2007 14:27 Pagina 8
Zone Control
The HC Receiver units can be assigned more than one number at a time.
This feature allows you to create “zones”, or groups of lights that can be
controlled simultaneously. For example, imagine that you have 3 lights
around your Home Theatre area, to which you have assigned numbers 1, 2
and 3. If you perform the setup process again, and this time assign the
number 0 to each HC Receiver, the 3 Plugs will remember this number and
their original number. So in order to control each individual light, simply
press 1, 2 or 3 followed by the +, -, “vol +” or “vol –“ keys. However if you
press the 0 key followed by + or -, you will be able to turn all 3 lights ON or
OFF at the same time.
Should you wish to reset any of your HC Receivers, see Helpful Hints.
Macros
Once set up, your remote treats your lights simply as another remote-
controlled device. Therefore you can incorporate your lights into a Macro,
a series of commands sent on the press of a single key.
Imagine pressing a single key to turn off all of your Home Theatre and turn
your lights ON at the same time! Or start a DVD playing and turn the lights
near your TV off!
For more details on how to program Macros, see the Macro section of the
instruction manual of your ONE FOR ALL Universal remote.
8 WWW.ONEFORALL.COM

light Control_17_TALEN_2007:light Control 19-03-2007 14:27 Pagina 9
Specification HC Receiver
- Voltage and Load: 230V~
- Degree of Protection: IP 20
- Radio Frequency: 433.92MHz
- RF Range: Typically 30m in open area.
Customer Service
- ofahelp@uebv.com (just send a blank message – you will receive an
auto reply)
- www.oneforall.com
Helpful Hints
• If you require more than 10 lights to control, you can also use the Red,
Green, Yellow and Blue keys on your remote to control lights 11-14.
Simply assign these keys to the HC Receivers as you would do a
number.
• If you experience interference, it is possible to change the code of the
Light Mode on your remote to avoid this. The default code is 1000, but
it is possible to change the code to 1001, 1002 etc up to 1015
To change the code, set the Light Mode up as you would do a normal
device, using codes 1000-1015. See the manual of your ONE FOR ALL
Universal Remote Control for details on how to set up a device.
• If you wish to control more than 14 Lights, you can assign another
mode on your remote to be a second Light Mode using a different
code (between 1000 and 1015) and you will have 14 more possibilities.
For more details see the Mode Reassignment section of your manual.
• If you should wish to reset your HC Receivers to factory defaults so you
can assign it a new number, hold down the button on the HC Receiver
until the red light starts to blink, release the button and then hold it
down again until the red light goes out.
WWW.ONEFORALL.COM 9

light Control_17_TALEN_2007:light Control 19-03-2007 14:27 Pagina 10
Deutsch
Inhaltsverzeichnis
Sicherheitsmassnahmen
. . . . . . . . . . . . . . . . . . . . . . . . . . . . . . . . . . . . . . . . . . . . . . 11
Wie funktioniert es?
. . . . . . . . . . . . . . . . . . . . . . . . . . . . . . . . . . . . . . . . . . . . . . 11
Einstellung des HC Receivers . . . . . . . . . . . . . . . . . . . . . . . 12
Kontrolle ihres Lichts . . . . . . . . . . . . . . . . . . . . . . . . . . . . . . . . . . 13
Zone Control . . . . . . . . . . . . . . . . . . . . . . . . . . . . . . . . . . . . . . . . . . . . . . . . . . . . . . . . 14
Makros
. . . . . . . . . . . . . . . . . . . . . . . . . . . . . . . . . . . . . . . . . . . . . . . . . . . . . . . . . . . . . . 14
Technische Daten HC Receiver
. . . . . . . . . . . . . . . . . . . . . . . . . . . . . . . . . . . . . . . . 15
Kundenservice
. . . . . . . . . . . . . . . . . . . . . . . . . . . . . . . . . . . . . . . . . . . . . . . . . . . . . . . 15
Hilfreiche Hinweise
. . . . . . . . . . . . . . . . . . . . . . . . . . . . . . . . . . . . . . . . . . . . . . . . . . 15
Einleitung
Vielen Dank für den Kauf des ONE FOR ALL Light Control Produktes.
Diese Bedienungsanleitung erklärt, wie folgende Produkte installiert und
bedient werden:
HC-8300 – Start Paket*
HC-8000 – Erweiterungs-Paket Ein/Aus
HC-8010 – Erweiterungs-Paket Dimmer
Um Ihr Licht per Fernbedienung steuern zu können, benötigen sie die
folgenden Komponenten:
• Home Control Receiver (Stromstecker)
• Home Control Command Centre (RF Sender + AC/DC Stromadapter)
Beginn der Installation, siehe wie umseitig beschrieben.
* Das Start-Paket ist erforderlich, um die Nutzung der ONE FOR ALL
Light Control Features zu beginnen, daher sollte es vor der
Anschaffung eines Erweiterungs-Paketes erworben werden.
10 WWW.ONEFORALL.COM
light Control_17_TALEN_2007:light Control 19-03-2007 14:27 Pagina 11
Sicherheitsmassnahmen
- Dieses Produkt sollte nicht zu hohen Temperaturen ausgesetzt
werden.
- Dieses Produkt sollte nicht bei zu hoher Luftfeuchtigkeit oder
in der Nähe von Wasser benutzt werden .
- Der HC-8300 sollte nur mit einem Netzteil von 220-240 VAC /
50Hz angeschlossen werden.
- Die maximale Auslastung mit dem der HC-8000 und der HC-
8300 angeschlossen werden sollte, beträgt 1000 Watt: Bitte vor
Gebrauch prüfen
- Die maximale Auslastung mit dem der HC-8010 angeschlossen
werden sollte , beträgt 300 Watt: Bitte vor Gebrauch die elektri-
sche Ladung prüfen
- Dieses Produkt sollte nicht abgedeckt werden.
- Dieses Produkt sollte nur in Verbindung mit ONE FOR ALL Light
Control kompatiblen Fernbedienungen benutzt werden.
Kompatible Fernbedienungen haben folgendes Logo..........
Wie funktioniert es?
Der HC Receiver befindet sich in der Wandsteckdose, zwischen ihrer Lampe
und der Steckdose.Er kann Ein-und Aus geschaltet werden, entweder
manuell durch den Schalter an der Vorderseite oder per Fernbedienung,
wenn Sie eine ONE FOR ALL Fernbedienung benutzen. Das HC-8010
Element kann zusätzlich ihr Licht dimmen oder die Helligkeit steuern.
Der HC Receiver sendet Radiofrequenzen, ( RF) daher kann dieses Gerät auch
bedient werden, wenn es sich nicht in unmittelbarer Sichtweite befindet. Für
den Fall , das das Infrarot-Signal (IR) Ihrer Fernbedienung in ein RF-Signal
umgewandelt werden soll, benötigen Sie das Command Centre. Um ihr Licht
bedienen zu können, halten sie die Fernbedienung einfach in Richtung des
Command Centres und drücken Sie die Funktion, die sie wünschen.
WWW.ONEFORALL.COM 11

light Control_17_TALEN_2007:light Control 19-03-2007 14:27 Pagina 12
Einstellung des HC Receivers
Um Ihren HC-Receiver mit ihrer Fernbedienung bedienen zu können,
müssen sie hierfür eine Nummer zuweisen. Das ist ein einmaliger Prozess, der
es ihnen ermöglicht, individuell separate Lichtsysteme zu kontrollieren, falls
sie in der Zukunft noch einen weiteren HC Receiver anschaffen möchten.
• Verbinden Sie die Lampe mit dem HC Receiver und verbin-
1
den sie dann den HC Receiver mit der Wandsteckdose. Hat
ihre Lampe einen Netzschalter dann schalten sie diesen
bitte EIN.
• Schliessen sie das Command Centre so dicht wie eben
möglich in der Nähe des HC Receivers an , sodass beide ca.
10-20 cm auseinander stehen (Das Command Centre kann
nach der Einstellung woanders platziert werden)
• Drücken sie bitte auf ihrer Fernbedienung, die Geräte-
2
Taste LICHT, sodass diese sich im “Licht Modus” befindet
• Drücken sie nun bitte die Nummer , die sie für ihren HC
Receiver eingeben möchten. Ist es ihre erste Einstellung,
so wäre die Nummer 1 zu empfehlen, Nummer 2 für den
Zweiten etc. Der IR Indikator oben auf der Fernbedienung
sollte zweimal aufleuchten.
• Drücken sie die Taste auf dem HC Receiver solange (und
halten diese gedrückt ) bis das rote Licht anfängt zu
blinken
• Halten sie nun die Fernbedienung in Richtung des
3
Command Centers und drücken sie die Programm + Taste.
Das rote Licht sollte aufhören zu blinken.
Die Fernbedienung sollte nun den HC Receiver bedienen. Um das zu testen,
prüfen sie ob die Programm + und Programm – Tasten entsprechend
funktionieren, um ihr Licht ein und auszuschalten, oder falls sie die HC
8010 Dimmer Einheit benutzen, probieren sie bitte, ob die Lautstärke Plus
Taste ihr Licht verdunkelt oder erhellt (um zu beenden, nochmals drücken).
12 WWW.ONEFORALL.COM
light Control_17_TALEN_2007:light Control 19-03-2007 14:27 Pagina 13
Kontrolle ihres Lichts
Sobald der HC Receicer eine Nummer bekommen hat, ist er betriebsbereit.
Berücksichtigen sie bitte , das sie die Fernbedienung in Richtung des
Command Centres halten müssen, um ihr Licht zu bedienen. Ist der HC
Receiver erst einmal installiert, können sie das Command Centre überall in
der Sichtweite ihrer Fernbedienung platzieren, z.B. auf ihrem TV.
Um mit der Fernbedienung ihr Licht zu kontrollieren, selektieren sie den
Light Modus auf der Fernbedienung, indem sie die Licht-Geräte-Taste
drücken.Innerhalb des Light Modus können sie den jeweiligen HC Receiver,
der gesteuert werden soll, selektieren, indem sie die Nummer des
Anschlusses drücken und der IR Indikator wird zweimal aufleuchten um
anzuzeigen, das eine Nummer angewählt wurde.Um diesen Anschluss zu
steuern, benutzen sie bitte folgende Tasten:
Licht EIN – Drücken Sie Programm plus (
+)
Licht AUS – Drücken sie Programm minus (
-
)
Licht Helligkeit/Dimmer* – Drücken sie Lautstärke Plus ( )
Das Licht wird im Takt zwischen Dimmen und Helligkeit wechseln. Um
dieses bei der gewünschten Helligkeit zu stoppen, drücken sie bitte
Lautstärke Plus ( ) noch einmal.
* (benötigt HC8010 Dimmer Einheit)
Die Fernbedienung speichert die letzte Lichteinstellung, falls sie zwischen
den Lichtsystemen wechseln wollen, ist es nicht erforderlich eine Nummer
einzugeben bevor sie eine der oben genannten Tasten drücken.
WWW.ONEFORALL.COM 13

light Control_17_TALEN_2007:light Control 19-03-2007 14:27 Pagina 14
Zone Control
Den HC Receivern kann mehr als eine Nummer zur selben Zeit zugewiesen
werden. Dieses Feature ermöglich “Zonen” zu erschaffen, oder Gruppen
von Lichtsystemen können gleichzeitig bedient werden. Stellen sie sich zum
Beispiel vor, sie haben in ihrem Home Theatre Bereich 3 Lichtsysteme die sie
den Nummern 1, 2 und 3 zugeordnet haben. Sie wiederholen den
Einstellungsvorgang und dieses Mal ordnen sie jedem HC Receiver die
Nummer 0 zu, dann werden sich alle drei Anschlüsse sowohl an diese
Nummer, als auch an die Originalnummern erinnern. Wenn sie also jedes
Lichtsystem individuell einzeln bedienen wollen, dann drücken sie die 1, 2,
oder 3 und danach die +, -, “Lautstärke +” oder “Lautstärke –“ Tasten.
Drücken sie aber die 0 und danach die + oder – Taste, werden sie alle drei
Lichtsysteme gleichzeitig EIN oder AUS schalten können.
Falls sie diese Einstellungen wieder löschen möchten – siehe Hilfreiche
Hinweise
Makros
Einmal eingestellt , wird ihre Fernbedienung ihre Lichtsysteme einfacher
steuern als jedes andere fernbedienbare Gerät . Daher können sie ihre
Lichtsysteme in ein Makro mit einbeziehen, eine Serie von Befehlen kann
durch einen einzigen Tastendruck ausgesendet werden.
Stellen sie sich vor, durch einen einzigen Tastendruck schalten sie ihre
Home Theatre aus und schalten gleichzeitig ihr Licht EIN! Oder sie starten
eine DVD und schalten gleichzeitig das Licht neben ihrem TV aus!
Weitere Details, wie sie solche Makros programmieren können, finden sie
in dem entsprechenden Absatz der Bedienungsanleitung der ONE FOR ALL
Universal Fernbedienung.
14 WWW.ONEFORALL.COM

light Control_17_TALEN_2007:light Control 19-03-2007 14:27 Pagina 15
Technische Daten HC Receiver
- Betriebsspannung und elektrische Ladung 230V~
- Schutzgrad: IP 20
- Radio Frequenz: 433.92MHz
- RF Reichweite: Normalerweise 30m in offenen Bereichen.
Kundenservice
- ofahelp@uebv.com (Bitte senden sie uns einfache eine leere Mail,
sie erhalten dann ein Auto Replay Formular)
- www.oneforall.de
Hilfreiche Hinweise
• Möchten sie mehr als 10 Lichtsysteme steuern, können sie ebenfalls die
Rote, Grüne, Gelbe und Blaue Taste auf ihrer Fernbedienung nutzen,
um die Lichtsysteme 11 –14 zu steuern. Fügen sie einfach diese Tasten
für den HC Receiver zu als ob sie eine Nummerntaste benutzen.
• Falls sie Empfangsstörungen bemerken,ist es möglich, den Code des
Light Modus auf der Fernbedienung zu ändern, um dieses zu umge-
hen. Der Standard Code lautet 1000, aber es ist möglich , diesen Code
in 1001,1002 etc. bis 1015 abzuändern. Um diesen Code zu ändern,
nehmen sie die Einstellung des Light Modus wie bei einem normalen
Gerät vor, benutzen sie dann aber bitte die Codes 1000-1015. Lesen sie
in der Bedienungsanleitung der ONE FOR ALL Fernbedienung nach,
wie die Geräteeinstellung vorgenommen wird.
• Wollen sie mehr als 14 Lichtsysteme bedienen, können sie eine andere
Mode als einen zweiten Light Modus ( mit einem anderen Code
zwischen 1000 und 1015) auf ihrer Fernbedienung hinzufügen und sie
haben 14 weitere Möglichkeiten. Weitere Details finden sie unter
„Mode-Neuzuordnung“ in ihrer Bedienungsanleitung.
• Möchten sie ihren HC Receiver in die“Fabrikeinstellung“ zurücksetzen,
damit sie dem Receiver eine neue Nummer zuordnen können, halten
sie bitte die Taste am Receiver gedrückt bis die rote Lampe beginnt zu
blinken, lassen sie diese wieder los und halten die Taste dann wieder
erneut gedrückt bis die rote Lampe ausgeht.
WWW.ONEFORALL.COM 15
light Control_17_TALEN_2007:light Control 19-03-2007 14:27 Pagina 16
Français
Table des matières
Précautions d’emploi
. . . . . . . . . . . . . . . . . . . . . . . . . . . . . . . . . . . . . . . . . . . . . . . .
17
Comment cela fonctionne?
. . . . . . . . . . . . . . . . . . . . . . . . . . . . . . . . . . . . . . . 17
Installation du Récepteur HC . . . . . . . . . . . . . . . . . . . . . . . 18
Contrôle des luminaires . . . . . . . . . . . . . . . . . . . . . . . . . . . . . . 19
Contrôle par zones . . . . . . . . . . . . . . . . . . . . . . . . . . . . . . . . . . . . . . . . . . . . . . . . . . 20
Macros
. . . . . . . . . . . . . . . . . . . . . . . . . . . . . . . . . . . . . . . . . . . . . . . . . . . . . . . . . . . . . . 20
Spécifications du Récepteur HC
. . . . . . . . . . . . . . . . . . . . . . . . . . . . . . . . . . . . . . 21
Service Clientèle
. . . . . . . . . . . . . . . . . . . . . . . . . . . . . . . . . . . . . . . . . . . . . . . . . . . . . 21
Conseils utiles
. . . . . . . . . . . . . . . . . . . . . . . . . . . . . . . . . . . . . . . . . . . . . . . . . . . . . . . 21
Introduction
Merci pour l’achat de votre produit de Contrôle des Luminaires ONE FOR
ALL. Ce mode d’emploi vous explique comment installer et utiliser
les produits suivants:
HC-8300 – Kit de base*
HC-8000 – Kit Marche/Arrêt additionnel
HC-8010 – Kit variateur additionnel
Afin de contrôler vos luminaires par télécommande, vous avez besoin
des éléments suivants:
• Récepteur Home Control (prise)
• Centre de Commande Home Control (Émetteur RF + Transformateur
AC/DC)
Pour l’installation, voir au verso.
* Le Kit de base est indispensable à l’utilisation du matériel de Contrôle
des Luminaires ONE FOR ALL, il est donc nécessaire d’un faire
l’acquisition avant de se procurer les kits additionnels.
16 WWW.ONEFORALL.COM
light Control_17_TALEN_2007:light Control 19-03-2007 14:27 Pagina 17
Précautions d’emploi
- Ce produit ne doit pas être exposé à de hautes températures.
- Ce produit ne doit pas être utilisé dans les endroits humides ou
proches d’un point d’eau.
- Le HC-8300 ne doit être branché que sur du 220-240 VAC / 50Hz.
- La puissance électrique maximale pouvant être branchée sur le
HC-8000 et sur le HC-8300 est de 1000 watt: veuillez vérifier la
puissance avant l’utilisation.
- La puissance électrique maximale pouvant être branchée sur
HC-8010 est de 300 Watt: veuillez vérifier la puissance avant
l’utilisation.
- Ce produit ne doit pas être recouvert.
- Ce produit doit exclusivement être utilisé avec les télécomman-
des ONE FOR ALL compatibles avec le Contrôle des Luminaires.
Les télécommandes compatibles sont reconnaissables au logo
suivant:..........
Attention – Italy/France/Denmark only
Attention: ce produit doit être utilisé seulement avec des prises qui ne
sont pas de terre.
Comment cela fonctionne?
Le Récepteur HC se branche sur la prise de courant murale, entre votre
lampe et la prise de courant. Il peut être allumé (ON) ou éteint (OFF) à la
main ou par télécommande grâce à une télécommande universelle ONE FOR
ALL. Le HC-8010 vous permet également de varier l’intensité de la lumière.
Le Récepteur HC se commande par Radio Fréquence (RF), ce qui permet de le
contrôler sans pour autant être en face. Le Centre de Commande est nécessai-
re afin de changer le signal Infra Rouge (IR) de votre télécommande en signal
RF. Pour télécommander vos luminaires, pointez simplement votre télécom-
mande en direction du Centre de Commande et appuyez sur le bouton désiré.
WWW.ONEFORALL.COM 17

light Control_17_TALEN_2007:light Control 19-03-2007 14:27 Pagina 18
Installation du Récepteur HC
Afin de rendre votre Récepteur télécommandable, vous devez lui assigner
un numéro. Il s’agit d’une opération unique qui vous permettra de contrô-
ler les lampes séparément dans le cas où vous vous procuriez ultérieure-
ment d’autres Récepteurs HC. Afin d’assigner un numéro à la prise, veuillez
suivre les étapes suivants:
• Branchez la lampe sur le Récepteur HC, puis branchez
1
le Récepteur HC sur la prise murale. S’il y a un interrup-
teur sur la lampe, celui-ci devrait être allumé.
• Branchez le Centre de Commande le plus près possible
du Récepteur HC, à une distance de 10 à 20 cm (le Centre
de Commande pourra être déplacé après l’installation
initiale)
• Appuyez sur la touche Luminaire de la télécommande
2
pour la mettre en Mode Luminaire.
• Appuyez sur le numéro que vous souhaitez assigner au
Récepteur HC. Il est recommandé d’utiliser le chiffre 1
pour la première prise, 2 pour la deuxième etc.
L’indicateur IR situé en haut de la télécommande
s’allumera deux fois.
• Maintenez appuyé le bouton situé sur le Récepteur HC
jusqu’à ce que la lumière rouge se mette à clignoter.
• Pointez votre télécommande vers le Centre de Commande
3
et appuyez sur la touche Chaîne Plus (+). La lumière rouge
devrait cesser de clignoter.
La télécommande devrait maintenant contrôler le Récepteur HC. Afin de
vous en rendre compte, vous pouvez vérifier si les touches Chaîne Plus (+)
et chaîne Moins (-) vous permettent, respectivement, d’allumer et d’étein-
dre votre lampe ou, si vous avez le variateur HC8010, vérifiez si la touche
Volume Plus ( ) vous permet de varier l’intensité de la lumière (appuy-
ez de nouveau sur la touche pour stopper).
18 WWW.ONEFORALL.COM
light Control_17_TALEN_2007:light Control 19-03-2007 14:27 Pagina 19
Contrôle des luminaires
Une fois qu’un numéro a été assigné au Récepteur HC, celui-ci est prêt à
l’emploi. Pour contrôler vos luminaires, n’oubliez pas qu’il faut pointer
votre télécommande vers le Centre de Commande. Une fois le Récepteur
HC installé, vous pourrez placer le Centre de Commande partout où vous
pourrez encore le viser avec la télécommande (par ex. au dessus de votre
TV). Afin d’uiliser la télécommande pour le contrôle de vos luminaires,
mettez-la en mode Luminaire en appuyant sur la touche Luminaire. Une
fois en mode Luminaire, vous pouvez sélectionner le Récepteur HC que
vous désirez contrôler en appuyant sur le numéro correspondant à la prise,
l’indicateur IR situé en haut de la télécommande s’allumera deux fois pour
indiquer que le numéro a été sélectionné. Pour utiliser cette prise, vous
devez utiliser les touches comme suit:
Allumage – appuyez sur Chaîne PLus (
+)
Extinction – appuyez sur Chaîne Moins (
-)
Variateur de Lumière* - appuyez sur Volume Plus ( )
L’intensité de la lumière variera. Dès que l’intensité désirée est atteinte,
appuyez de nouveau sur Volume Plus ( )
* (nécessite le Variateur HC8010)
La télécommande garde en mémoire la lampe contrôlée en dernier ainsi,
dans le cas où vous contrôlez toujours la même lumière, il ne sera pas
nécessaire d’appuyer sur un numéro avant d’appuyer sur les touches
ci-dessus.
WWW.ONEFORALL.COM 19

light Control_17_TALEN_2007:light Control 19-03-2007 14:27 Pagina 20
Contrôle par zones
Il est possible d’assigner plus d’un numéro à la fois au même Récepteur HC.
Cette fonction vous permet de créer des “zones” , ou groupes de luminai-
res pouvant être contrôlés simultanément. Par exemple, imaginez qu’ il y a
trois lampes dans votre coin TV auxquelles vous avez assigné les numéros 1,
2 et 3. Si vous procédez de nouveau à l’installation mais cette fois en assig-
nant le numéro 0 à chaque Récepteur, les trois prises mémoriseront ce
numéro en plus du premier numéro assigné. Ainsi, afin de contrôler chaque
lampe séparément, vous devrez simplement appuyer sur 1, 2 ou 3 suivi des
touches +, -, “vol +” ou “vol –“. Alors que si vous appuyez sur 0 suivi des
touches +, -, vous pourrez allumer ou éteindre les trois lampes simultané-
ment.
Si vous désirez réinitialiser un ou plusieurs Récepteurs HC, veuillez consulter
la section “conseils utiles”.
Macros
Une fois programmée, votre télécommande prend en compte vos luminai-
res comme tout autre appareil télécommandable. Ainsi, il vous est possible
d’intégrer vos luminaires dans une macro, une séquence de commandes
envoyée en appuyant sur une seule touche.
Imaginez appuyer sur une seule touche qui vous permette d’ allumer tous
vos appareils en même temps que les lumières! Ou encore, mettre en route
un DVD tout en éteignant les lumières autour de la télévision!
Pour plus d’information sur la programmation des macros, veuillez consul-
ter la section correspondante du mode d’emploi de votre télécommande
universelle ONE FOR ALL
20 WWW.ONEFORALL.COM
