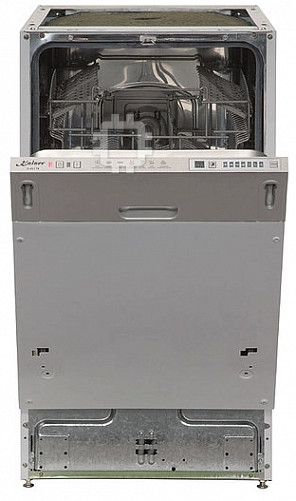
Kaiser S 45 I 60 XL: инструкция
Раздел: Бытовая, кухонная техника, электроника и оборудование
Тип: Стиральная Машина С Сушкой
Характеристики, спецификации
Инструкция к Стиральной Машиной С Сушкой Kaiser S 45 I 60 XL
S 45 I 84 XL, S 60 I 84 XL
S 45 I 83 XL, S 60 I 83 XL
S 45 I 60 XL, S 60 I 60 XL
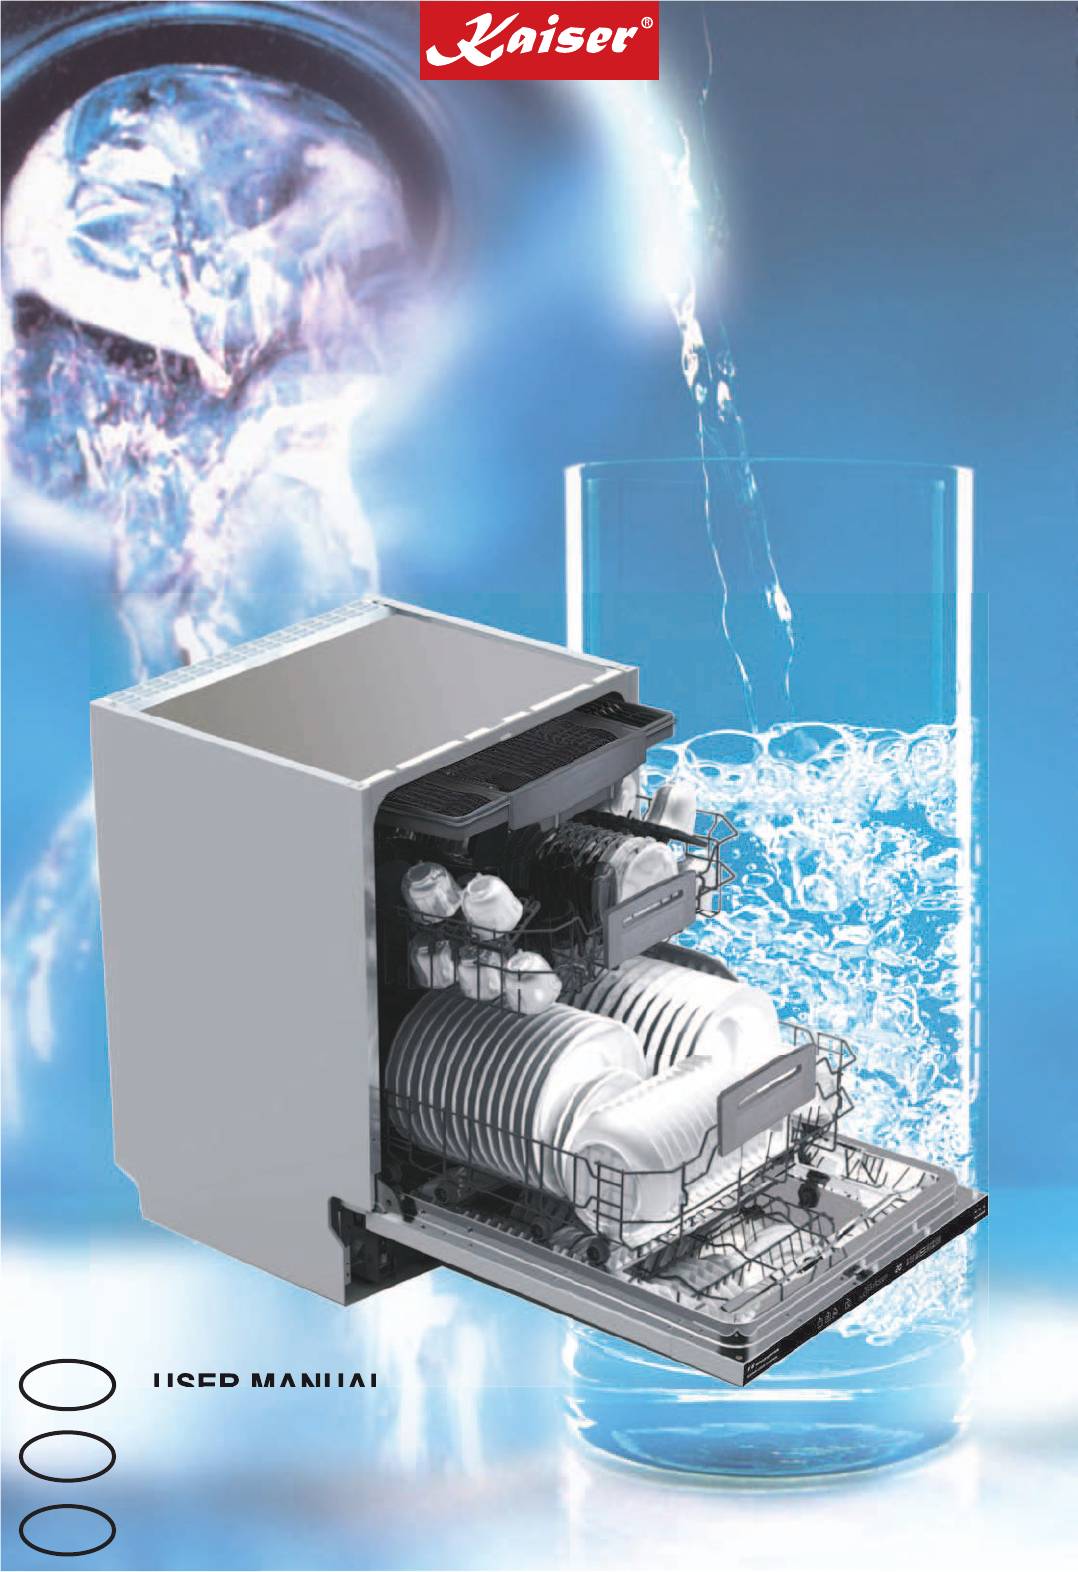
DISHWASHER
GESCHIRRSPÜLER
ПОСУДОМОЕЧНАЯ МАШИНА
EN
USER MANUAL
DE
GEBRAUCHSANWEISUNG
RU
ИНСТРУКЦИЯ ПО ОБСЛУЖИВАНИЮ И ЭКСПЛУАТАЦИИ

2
EN
DEAR CUSTOMERS,
thank you for purchasing this Kaiser product.
We are convinced that you have made a right choice.
You have purchased a dishwasher which satisfies the
high quality demands and corresponds to comprehensive
international standards.
Please read these instructions carefully before starting
operation to be sure to obtain optimum performance.
The following recommendations are aimed to protect
you from possible inconveniences which can occur as a
result of the wrong operation and, at th
e same time,
reduce the consumption of electric energy and water.
Proper operation and maintenance provide a longer
service life of the unit.
The Kaiser dishwashers fulfil the main norms of safety,
hygiene and environment protection in correspondence
with the EU directives and are certified according to EU
norms and standards (DIN ISO 9001, ISO 1400),
standards of Russia (Gosstandart) and the CIS.
The company’s policy is aimed at constant improvement
of product quality. Modifications made to the design and
equipment result in exclusively positive changes in
operating qualities of the appliances. The right for
changes in the products is reserved by the manufacturer.
We wish you an effective use of the Kaiser product.
Yours faithfully
OLAN-Haushaltsgeräte
Berlin Germany
The appliances under present operating instructions are designed for
domestic and not industrial use.

3
DE
RU
LIEBE KUNDIN, LIEBER KUNDE,
wir danken Ihnen für den Erwerb unserer Technik.
Wir sind überzeugt, dass S
ie eine richtige Wahl
getroffen haben. Wir übergeben Ihnen zum Gebrauch
den Geschirrspüler, der die hohen Forderungen
befriedigt und den weltumfassenden Standards
entspricht.
Bitte lesen Sie die Bedienungsanleitung vor Gebrauch
aufmerksam durch. Die Beach
tung von Empfehlungen
schützt Sie von eventuellen Unannehmlichkeiten, die als
Folge der falschen Nutzung des Geschirrspülers
auftreten können sowie ermöglicht Ihnen den Strom-
und Wasserverbrauch zu reduzieren. Der
Geschirrspüler bringt Ihnen viel Vergnügen auf lange
Zeit, wenn der Gebrauch der vorliegenden
Bedienungsanleitung entsprechen wird.
Unsere Geschirrspüler entsprechen den
Hauptforderungen der Sicherheit, der Hygiene und des
Umweltschutzes, laut den Direktiven der EU, was mit
Zertifikaten DIN ISO 9001, ISO 1400, entsprechend den
im Rahmen der EU geltenden Normen, bestätigt ist, und
genauso auch den Anforderungen von Gosstandart in
Russland und Standards anderer GUS Ländern, was
durch die Identifikationszertifikate bestätigt ist.
Mit den Geda
nken der ständigen Verbesserung der
Qualität unserer Geschirrspüler sind Änderungen bei
Design und Einrichtung, die nur zu positiven
Veränderungen der technischen Eigenschaften führen,
vom Hersteller vorbehalten.
Wir wünschen Ihnen die effektive Nutzung unseres
Produkts.
Hochachtungsvoll
OLAN-Haushaltsgeräte
Berlin Germany
Wir Informieren Sie, dass unsere Geschirrspüler, die der
Gegenstand der vorliegenden Bedienungsanleitung sind, sind
ausschließlich für den häuslichen Gebrauch vorbestimmt.
УВАЖАЕМЫЙ ПОКУПАТЕЛЬ,
благодарим Вас за приобретение нашей техники.
Мы уверены, что Вы сделали правильный выбор.
Передаём Вам в пользование посудомоечную
машину, удовлетворяющую самым высоким
требованиям и отвечающую мировым стандартам.
Просим Вас внимательно прочитать инструкцию
по обслуживанию и эксплуатации до пуска
устройства. Соблюдение содержащихся в ней
рекомендаций защитит Вас от возможных
неприятностей при неправильной эксплуатации
посудомоечной машины, а также позволит Вам
уменьшить расход электроэнергии и воды. Если
эксплуатация посудомоечной машины будет
соответствовать настоящей инструкции, наша
посудомоечная машина будет радовать Вас долгое
время.
Наши посудомоечные машины полностью
соответствует основным требованиям
безопасности, гигиены и защиты окружающей
среды, согласно директивам Европейского Союза,
что подтверждено сертификатами DIN ISO 9001,
ISO 1400, в соответствии с настоящими нормами,
действующими на территории Европейского
сообщества, a также полностью отвечают всем
требованиям Госстандарта России и стандартов
других стран СНГ, что подтверждается
сертификатами соответствия.
С мыслью о дальнейшем повышении технических и
эксплуатационных характеристик наших
посудомоечных машин мы оставляем за собой право
на внесение изменений в дизайн и устройство,
влияющих только положительно на
потребительские качества и свойства продукта.
Желаем Вам эффективного пользования продуктом
нашей фирмы.
Уважающий Вас
OLAN-Haushaltsgeräte
Berlin Germany
Информируем, что наши посудомоечные машины, являющиеся
предметом настоящей Инструкции, предназначены
исключительно для домашнего пользования.

4
EN
CONTENTS
INSTALLATION INSTRUCTIONS 6
Electrical connection 6
Connection to water supply
and sewerage network 8
Installation 12
Safety conditions 20
BRIEF DESCRIPTION 24
Location drawing 24
Control panels 28
EQUIPMENT 32
Loading the dishwasher baskets 32
Detergent dispenser 36
Rinse aid dispenser 38
Water softener 42
Filtering system 46
OPERATING THE DISHWASHER 48
Programmable control for models
with LCD display 50
Programmable control for models
with LED display 58
Wash cycle table 76
CARE AND ATTENDANCE 78
RESPECT FOR THE ENVIRONMENT 94

5
DE
RU
INHALTSVERZEICHNIS
BEDIENUNGSANLEITUNG FÜR MONTAGE 7
Stromanschluss 7
Anschluss ans Wassernetz 9
Aufstellen des Geräts 13
Sicherheitsbedingungen 21
KURZBESCHREIBUNG 25
Gesamtansicht 25
Bedienblenden 29
AUSSTATUNG 33
Geschirr einordnen 33
Spülmittelspender 37
Klarspülerspender 39
Wasserenthärter 43
Filtersystem 47
GEBRAUCH VOM GESCHIRRSPÜLER 49
Elektronische Programmierung für Modellen
Mit LCD Display 51
Elektronische Programmierung für Modellen
Mit LED Display 59
Waschzyklentabelle 77
PFLEGE UND WARTUNG 79
UMWELTVERTRÄGLICHKEIT 95
ОГЛАВЛЕНИЕ
ИНСТРУКЦИЯ ПО МОНТАЖУ 7
Подключение к электросети 7
Подключение к сети водоснабжения и
канализации 9
Установка 13
Условия безопасности 21
КРАТКОЕ ОПИСАНИЕ 25
Внешний вид 25
Панели управления 29
ОБОРУДОВАНИЕ 33
Размещение посуды в машине 33
Емкость для моющего средства 37
Емкость для ополаскивателя 39
Устройство для снижения жесткости
воды 43
Система фильтров 47
ИСПОЛЬЗОВАНИЕ ПОСУДОМОЕЧНОЙ
МАШИНЫ 49
Электронное программирующее
Устройство для моделей c LCD дисплеем 51
Электронное программирующее
Устройство для моделей c LED дисплеем 59
Таблица циклов мойки 77
ОБСЛУЖИВАНИЕ И УХОД 79
ОХРАНА ОКРУЖАЮЩЕЙ СРЕДЫ 95

6
EN
INSTALLATION INSTRUCTIONS
ELECTRICAL CONNECTION
Before connecting the stove to the mains power
supply, make sure that:
•
the supply voltage corresponds to the
specifications on the data plate on the
behind of the dishwasher,
•
the mains supply has an efficient ground
connection complying with all applicable
laws and regulations.
After
making sure that the voltage and the
frequency values for the current in the home
correspond to those on the rating plate and that
the electrical system is sized for the maximum
voltage on the rating plate, insert the plug into an
electrical socket which is earthed properly
This dishwasher is intended for AC power ~220 -
240V, 50Hz. Use safety copper wire fuse 12 A
only. Preferable is a time delay fuse or circuit
breaker with a 3 mm contact spacing which
constitutes a separate circuit for the appliance.
The outlet should be placed in the adjacent
cabinet. After the dishwasher has been mounted,
make sure that the plug is accessible.
Before using the appliance for the first time, check
up if the due grounding is provided.
For personal safety:
Do not use an extension cord or an adapter plug
with this appliance.
Caution! Connection of hoses and cords
as well as placing the appliance into
operati
on must be made by a qualified
expert only.

7
DE
RU
BEDIENUNGSANLEITUNG FÜR
MONTAGE
STROMANSCHLUSS
Vor der Durchführung des Stromanschlusses muss
sichergestellt werden, dass:
• die Eigenschaften des Stromnetzes mit den
Werten auf dem angebrachten Typenschild
auf der Rückwand des Geschirrspülers
übereinstimmen,
•
das Stromnetz gemäß den geltenden
Bestimmungen und Rechtsvorschriften
geerdet ist.
Nachdem Sie sich vergewissert haben, dass
Spannungs- und Frequenzwerte des Stroms im
Stromnetz den Angaben auf dem Geräteschild
entsprechen, stecken Sie den Stecker in eine
ordnungsgemäß geerdete Wandsteckdose.
Diese Geschirrspülmaschine ist für das Netz ~220
- 240V, 50Hz ausgelegt. Zur Anwendung sind nur
Kupferdrahtsicherungen verwen
dbar, die für die
Stromstärke von 12 A geeignet sind. Von Vorteil
wäre es jedoch für dieses Gerät einen selbsttätig
gesteuerten Schalter mit 3 mm-Kontaktentfernung
zu benutzen, welcher für dieses Gerät einen
abgesonderten Stromkreis bildet.
Befestigen Si
e die Steckdose im benachbarten
Schrank. Prüfen Sie nach der Installation der
Geschirrspülmaschine, ob der Zugang zum
Stecker des Gerätes frei ist.
Stellen Sie vor dem ersten Benutzen sicher, dass
eine ordentliche Erdung vorhanden ist.
Zu Ihrer persönlichen Sicherheit:
Benutzen Sie für dieses Gerät kein
Verlängerungskabel bzw. keinen Adapterstecker.
ИНСТРУКЦИЯ ПО МОНТАЖУ
ПОДКЛЮЧЕНИЕ К ЭЛЕКТРОСЕТИ
Перед подключением к эл. сети, необходимо
убедиться, что:
• параметры сети соответствуют данным в
табличке на задней стенке
посудомоечной машины,
• эл. сеть заземлена в соответствии с
действующими предписаниями.
После того, как Вы удостоверились, что
значения напряжения и частоты тока в
электросети соответствуют данным, указанным
на заводской табличке устройства, вставьте
сетевую вилку в надлежащим образом
заземленную настенную розетку.
Эта посудомоечная машина разработана для
работы в сети ~220 - 240В, 50Гц. К применению
пригодны плавкие предохранители с медной
проволокой, рассчитанные на силу тока 12 A.
Однако рекомендуется применение
собственной электроцепи, питающей только это
устройство с автоматическим выключателем с
расстоянием между контактами 3 мм.
Электрическая розетка должна быть помещена
в смежной нише и сетевая вилка доступна
после инсталляции посудомоечной машины.
Перед первым использованием удостоверьтесь
в наличии должного заземления.
Для Вашей личной безопасности:
Не используйте удлинители или любого вида
адаптеры для подключения этого устройства.
Внимание! Монтаж и подключение
шлангов и сетевого кабеля
посудомоечной машины должны
производиться только
квалифицированным специалистом.
Achtung! Die Montage von Schläuchen
und elektrischem Netzanschluss soll nur
von einem qualifizierten Fachmann
durchgeführt werden.
8
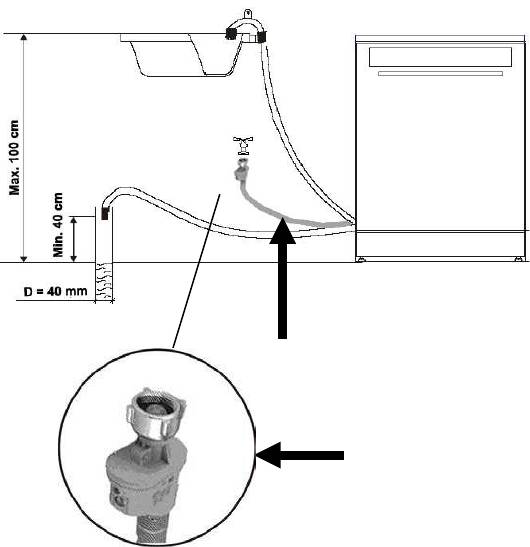
EN
CONNECTING TO WATER SUPPLY AND
SEWERAGE NETWORK
Connecting the Aqua-Stop inlet hose
The inlet hose equipped with Aqua-Stop System 1
is provided with double walls.
The Aqua-Stop System ensures blocking of water
supply in case the inlet hose has broken as well as
if the air gap between the hose itself and its
corrugated shell is filled with water.
Connect the appliance to the water mains with new
hose sets only. Never reuse old hose sets.
Water pressure must amount to 0.
04 MPa (min.)
and 1 MPa (max.). In case the pressure is below
the minimum value, consult the Service Centre.
•
Pull the inlet hose completely out from
storage compartment located at the back of
the dishwasher.
•
While adjusting to the faucet, tighten the
screw 2 of the safety inlet hose (3/4-inch
thread).
• Before starting the dishwasher, turn on the
faucet against the stop.
2
1
9
DE
RU
ANSCHLUSS ANS WASSERNETZ
Anschluss des Wasserzulauf-
Schlauchs mit
Aqua-Stop-System
Der Wasserzulauf-Schlauch mit Aqua-Stop-System
1 ist doppelwandig.
Das Aqua-Stop-
System sperrt den Wasserzufuhr
falls der Wasserzu
laufschlauchs beschädigt bzw.
der Luftraum zwischen dem Schlauch und seiner
geriffelten Außenhülle mit Wasser gefüllt ist.
Bei dem Anschluss des Gerätes an die
Wasserleitung verwenden Sie nur einen neuen
Wasserzulaufschlauch. Die gebrauchten
Schläuche dürfen nicht wieder verwendet werden.
Der Wasserdruck soll Minimum 0,04 MPa und
Maximum 1 MPa betragen. Wenden Sie sich an
das Servicezentrum, wenn der Wasserdruck
niedriger als Minimum ist.
•
Nehmen Sie den Wasserzulaufschlauch
aus der speziellen Nische
auf der
Rückwand des Geschirrspülers heraus.
• Drehen Sie die Mutter 2 des Wasserzulauf-
Schlauches auf dem Hahn der
Wasserleitung mit dem 3/4- Zoll-Gewinde
zu.
• Drehen Sie den Wasserzulaufhahn vor dem
Start des Geschirrspülers vollständig auf.
ПОДКЛЮЧЕНИЕ К СЕТИ
ВОДОСНАБЖЕНИЯ И КАНАЛИЗАЦИИ
Подключение подающего шланга c системой
Aqua-Stop
Подающий шланг
c системой Aqua-Stop 1 имеет
двойные стенки.
Система Aqua-Stop блокирует поток воды в
случае разрыва подающего шланга, а также в
случае, если воздушное пространство между
самим шлангом и его внешней рифленой
оболочкой заполнено водой.
При подключении машины к водопроводу
используйте всегда только новый подающий
шланг, никогда не используйте подающие
шланги, бывшие ранее в эксплуатации.
Давление воды должно составлять минимум
0,04 MPa (0,4 бар) и максимум 1 MPa (10 бар).
При давлении ниже минимума обратитесь в
сервисный центр.
• Достаньте подающий шланг из
специальной ниши на задней стенке
машины.
• Закрутите гайку 2 подающего шланга на
кране водопровода с резьбой 3/4 дюйма.
• Перед запуском машины полностью
откройте кран подачи воды.

10
EN
1
Connecting cold water
•
Connect the cold water inlet hose to the
threaded 3/4-inch connector. Make sure it
is fastened tightly.
If the water pipes are new or have not been used
for an extended period of time, let the water run to
make sure that the water is clear and free of
impurities.
If this precaution is not taken, there is a risk that
the water inlet
can get blocked and damage the
appliance.
Connecting hot water
The inlet hose of the appliance can be also
connected to the hot water supply provided the
temperature doesn’t exceed 60° C.
In this case, both the wash cycle time
and the
power consumption are reduced.
For hot water connection follow the same
procedure as that for cold water.
Connecting drain hose
• Connect the drain hose to the drain pipe 1
(diameter: 40 mm min.), or let it run directly
into the sink 2.
Use the special plastic hose support
which is
delivered with the appliance.
The free end of the hose must be at a height of 40
to 100 cm and must not be immersed. Make sure
that the hose is free from being bent or flattened.
1
2
11
DE
RU
Kaltwasseranschluss
• Schließen Sie den Kaltwasserschlauch an
den Anschluss mit 3/4-Zoll-Gewinde an und
vergewissern Sie sich, dass er fest und
dicht sitzt.
Wenn die Wasserröhre neu sind, oder eine längere
Zeit nicht benutzt worden sind, lassen Sie zuerst
Wasser fließen, um sicherzugehen,
dass das
Wasser klar und frei von Unreinheiten ist.
Wird diese Vorsichtsmaßnahme nicht eingehalten,
besteht das Risiko, dass der Wasserzufluss
blockiert und das Gerät dadurch beschädigt wird.
Heißwasseranschluss
Der Wasserzulaufschlauch des Geräts kann auch
an die Heißwasserleitung angeschlossen werden,
solange die Wassertemperatur darin 60°C nicht
überschreitet.
Bei der Verwendung heißen Wassers verkürzt sich
die Zeit des Spülzyklus und der Stromverbrauch
sinkt.
Der Anschluss an die Heißwasserleitun
g erfolgt
nach den gleichen Vorgangsweisen wie beim
Anschluss an die Kaltwasserleitung.
Anschluss des Abflussschlauchs
• Schließen Sie den Abflussschlauch an ein
Abflussrohr 1
von mindestens 40 mm
Durchmesser an. Oder lassen Sie das
Wasser direkt in die Spüle abfließen 2.
Verwenden Sie die Spezialplastikhalterung, die mit
dem Gerät geliefert wird.
Vergewissern Sie sich, dass der Schlauch nicht
geknickt oder gequetscht wird. Das freie Ende des
Schlauchs muss sich auf einer Höhe zwischen 40
und 100 cm befinden
und darf nicht in Wasser
getaucht werden.
Подключение к холодной воде
• Подключите шланг к месту соединения с
резьбой 3/4 дюйма и убедитесь, что он
плотно сидит на месте.
Если водопроводные трубы новые или долгое
время не использовались, дайте воде стечь,
чтобы удостовериться, что вода чистая.
При несоблюдении этой меры
предосторожности остается риск того, что
поступление воды может быть заблокировано и
вследствие этого машина выйдет из строя.
Подключение к горячей воде
Подающий шланг машины может быть также
подключен и к системе горячего
водоснабжения, но в этом случае температура
воды не должна превышать 60°C.
При этом время цикла мойки сокращается и
сокращается расход электроэнергии.
Подсоединение к линии горячего
водоснабжения производится таким же
способом как и при подключении к холодной
воде.
Подсоединение сливного шланга
• Подсоединените сливной шланг
непосредственно или через тройник в
сточную трубу 1 диаметром минимум 40
мм. Вода может стекать и
непосредственно в мойку 2.
Используйте специальное пластиковое
крепление для шланга, которое поставляется
вместе с машиной.
Удостоверьтесь, что шланг не перегнут или
сдавлен. Свободный конец шланга должен
быть на высоте между 40 и 100 см и не должен
быть погружен в воду.
12
EN
Disconnecting from water supply and
sewerage
To disconnect the Aqua-
Stop inlet hose, cut off
water supply by turning off the faucet, screw out
the nut of the safety inlet hose which adjusts it to
the faucet.
Put the hose into the special storage compartment
at the back of the dishwasher.
In case the free end of the hose is put directly into
the sink, pay attention to the following:
If the sink is mounted at the height of 100 cm from
the floor, the excess water cannot be drained
directly into the sink.
To drain the excess water from the hose in this
case, you need a pail or any other suitable
container which should be put below the sink at
the side of it.
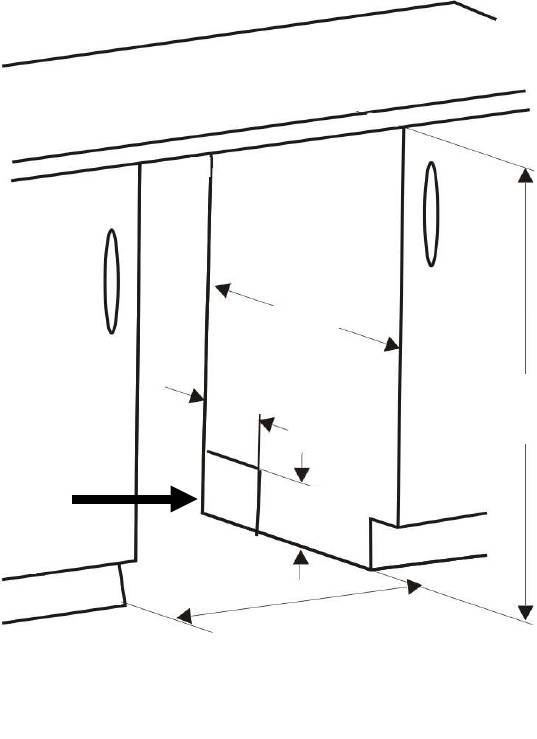
INSTALLING THE DISHWASHER (MODELS
S 45I70 XL, S 60I70 XL, S 45I80 XL, S 60I80
XL, S 45I83 XL, S 60I83 XL)
Before installing the dishwasher, carry out the
following preparatory steps:
Make sure you have enough space to install the
appliance and to connect the water inlet and drain
hoses as well as the electrical cord 1.
The installation space measurements are given in
mm.
* – S 45I70 XL, S 45I80 XL
* * – S 60I70 XL, S 60I80 XL
825
600
80
100
450*
600**
1

13
DE
RU
Abmontieren vom Wassernetz
Um den Wasserzulaufschlauch mit Aqua-Stop-
System abzumontieren soll die Wasserzufuhr
abgestellt und die Mutter des
Wasserzulaufschlauchs mit Aqua-Stop-System am
Wasserhahn abgeschraubt werden.
Danach kann man den Schlauch in die spezielle
Nische, die sich auf der Rückwand des
Geschirrspülers befindet, platzieren.
Wenn das Wasser unmittelbar in die Spüle abfließt
beachten Sie Folgendes:
Wenn sich die Spüle auf der Höhe mehr als 100
cm vom Fußboden befindet, ist es nicht möglich,
dass ganze Wasser direkt in die Spüle abfließt.
In solchem Fall muss man das Wasser aus dem
Schlauch in den Eimer bzw. ein anderes
geeignetes Gefäß abfließen lassen. Es soll sich
außerhalb
der Spüle und tiefer, als die Spüle
befinden.
EINBAU DES GESCHIRRSPÜLERS
IN DEN UMBAUSCHRANK
(MODELLE S 45I70 XL, S 60I70 XL, S 45I80
XL, S 60I80 XL, S 45I83 XL, S 60I83 XL)
Bevor das Gerät auf den richtigen Ort gestellt wird,
sollen alle Vorbereitungen durchgeführt werden.
Bereiten Sie die Nische des Umbauschrankes für
Einbau des Gerätes sowie die Öffnungen 1 für den
Anschluss an Stromnetz, Wasserzulauf- und
Wasserabflussschläuche vor.
Maßen der Nische für das Einbauen sind in mm
angegeben.
Отсоединение от системы водоснабжения и
канализации
Чтобы отсоединить подающий шланг c
системой Aqua-Stop перекройте подачу воды и
открутите гайку шланга c системой Aqua-Stop на
кране водопровода.
После этого можно шланг убрать в
специальную нишу на задней стенке.
Если вода стекает непосредственно в мойку
обратите внимание на следующее:
Если мойка находится на высоте более 100 см
от уровня пола, вся вода не сможет сливаться
непосредственно в мойку.
В таком случае необходимо сливать воду из
шланга в ведро или другой подходящий сосуд,
который находится ниже мойки и в стороне от
нее.
УСТАНОВКА ПОСУДОМОЕЧНОЙ
МАШИНЫ В НИШУ ШКАФА
(МОДЕЛИ S 45I60 XL, S 60I60 XL, S 45I83
XL, S 60I83 XL, S 45I84 XL, S 60I84 XL)
Все приготовления должны быть сделаны
перед перемещением машины к месту
установки.
Подготовьте нишу для установки прибора и
проемы 1 для подключения подающего и
сливного шланга и сетевого электрокабеля.
Размеры ниши для встраивания даны в мм.
14
EN
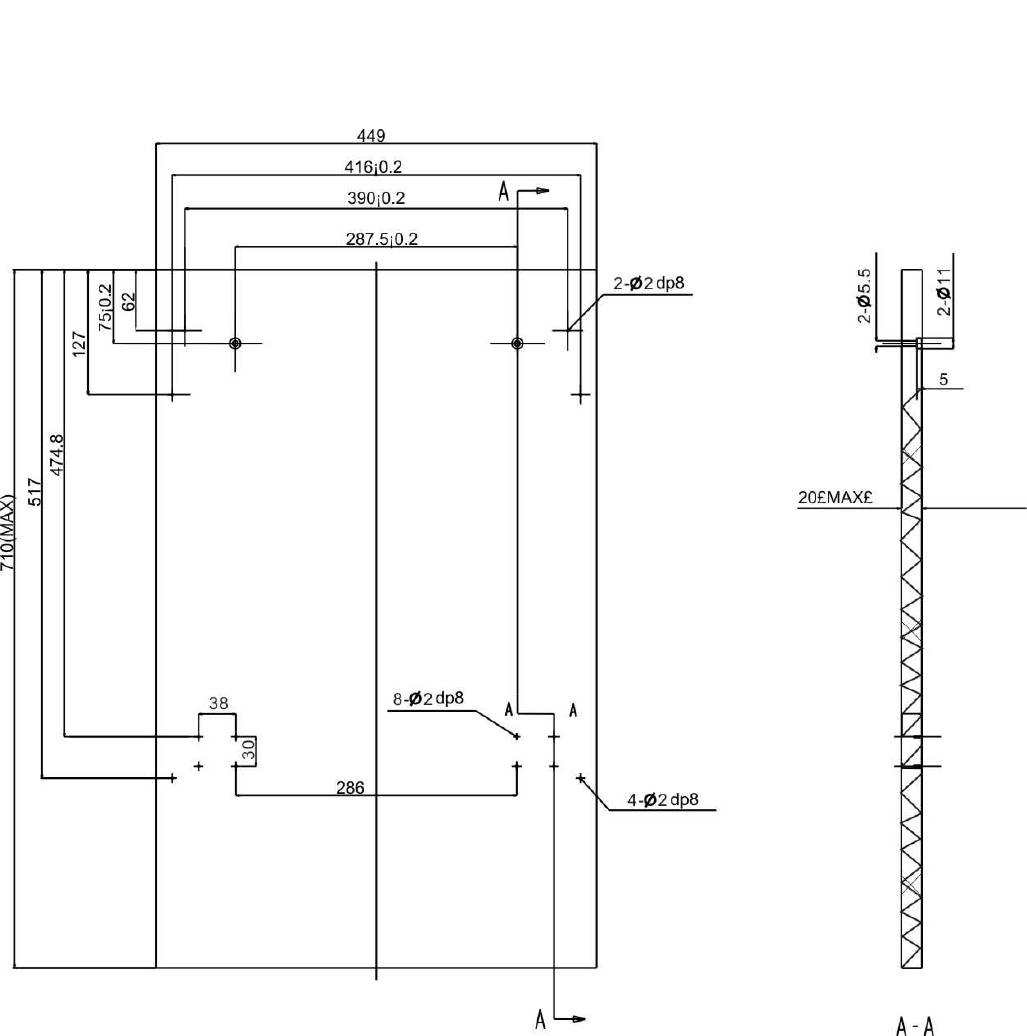
Furniture door's installation
• The aesthetic panel should be processed in
accordance with the illustrated dimensions.
The
dimensions are given in mm.
S 45 I …
15
DE
RU
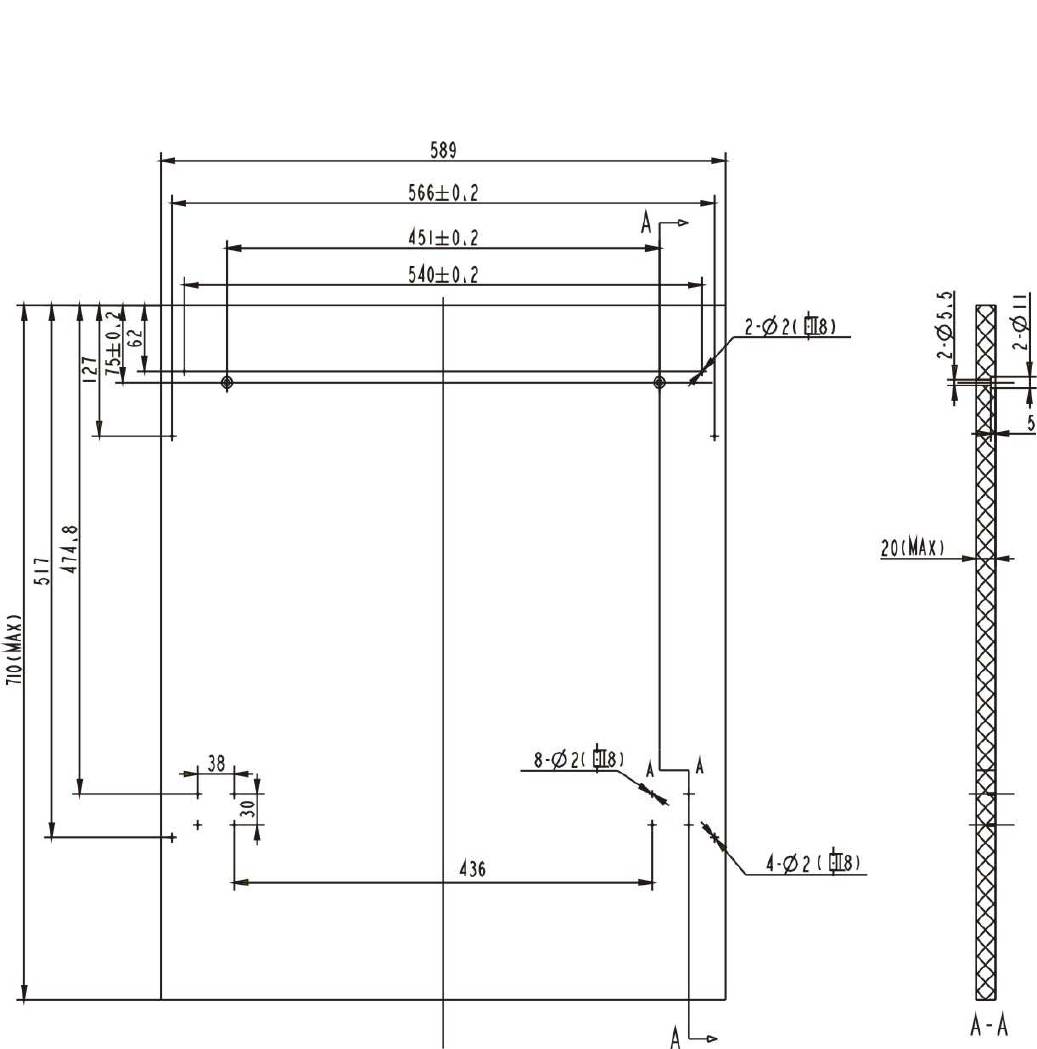
Montage der dekorativen Abdeckplatte
• Bereiten Sie die Abdeckplatte gemäß der
angegebenen Maßen.
Die Maßen sind in mm angegeben.
Установка декоративной панели
• Подготовте декоративную панель в
соответствии с указанными размерами.
Размеры даны в мм.
S 60 I …
16
EN
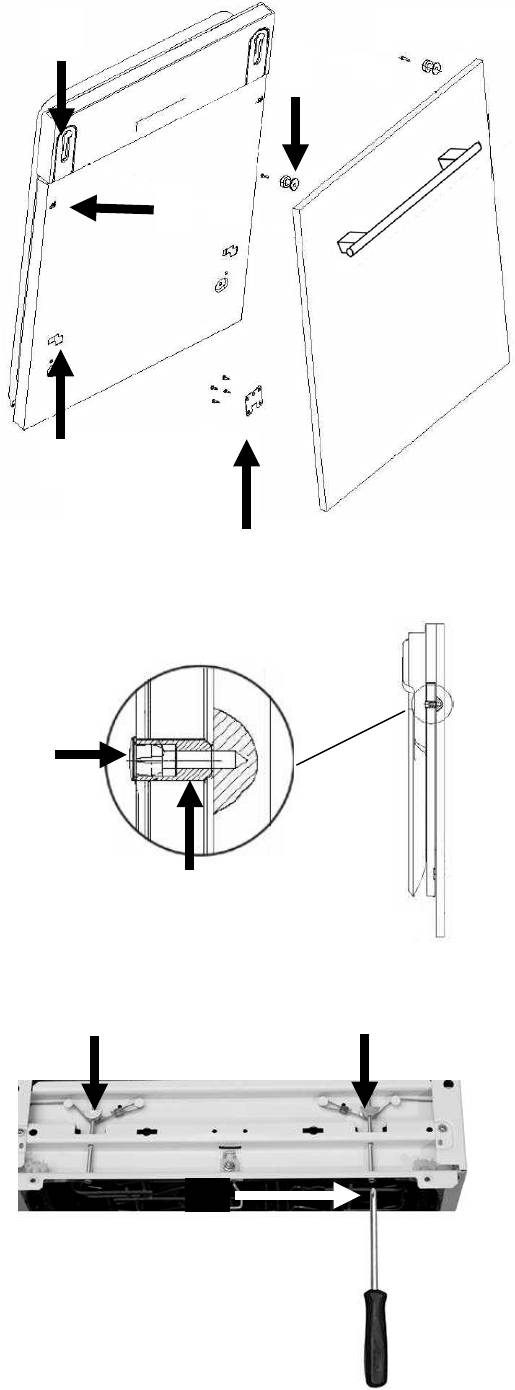
• Install the
bottom and top hooks from the
interior of the furniture door by countersunk
head screws 1.
• Put the hook into the slot 2 of the outer
door of dishwasher and hang the furniture
door.
After that it is necessary to fix the panel on a door
of a dishwasher by screws
from the inside of the
door through corresponding holes 3.
For this purpose:
• Take away the cover 4,
• Pin up the screw 5,
• Get back the cover.
The door springs are set at the factory to the
proper tension for the outer door. If aesthetic
wooden panel are installed, you will have to adjust
the door spring tension. Rotate the adjusting screw
6 to drive the adjustor 7 to strain or relax the steel
cable.
Door spring tension is correct when the door
remains horizontal in the fully opened position, yet
rises to a close with the slight lift of a finger
4
5
6
7
7
1
1
2
2
3
17
DE
RU
•
Befestigen Sie die unteren und oberen
Befestigungen
mit Hilfe von
Senkkopfschrauben an der Innenseite der
Abdeckplatte 1.
•
Stecken Sie diese Befestigungen in die
entsprechenden Öffnungen auf der Tür des
Geschirrspülers 2 und hängen Sie die
dekorative Abdeckplatte auf.
Danach muss die Abdeckplatte mit Schrauben
durch die Öffnungen an der Innenseite der Tür
befestigt werden 3.
Gehen Sie wie folgt vor:
• Entfernen Sie die Verschlussklappe 4,
• Drehen Sie die Schraube zu 5,
• Setzen
Sie die Verschlussklappe wieder
ein.
Nach der Montage der Abdeckplatte muss die
Spannkraft der Türfedern reguliert werden.
Beim Drehen der Regulierschraube 6 der
Korrektor 7 spannt bzw. schwächt das Stahlkabel.
Die Spannkraft der Türfedern ist korrekt, wenn die
vollständig geöffnete Tür in horizontaler Lage
bleibt, und doch bei leichter Bemühung nach oben
geht.
• Закрепите с помощью винтов с потайной
головкой нижние и верхние крепления с
внутренней стороны панели 1.
• Вставьте крепления в соответствующие
гнезда 2 на двери посудомоечной
машины и навесьте декоративную
панель.
После этого следует закрепить панель на двери
посудомоечной машины винтами с внутренней
стороны двери через соответствующие
отверстия 3.
Для этого:
• Снимите заглушку 4,
• Закрутите винт 5,
• Установите заглушку.
Установив декоративную панель, нужно
отрегулировать натяжение пружин двери.
При вращении регулировочного винта 6
корректор 7 натягивает или ослабляет
стальной трос.
Натяжение пружин двери правильно, если
дверь остается горизонтальной в полностью
открытом положении, однако поднимается при
незначительном усилии.
18
EN
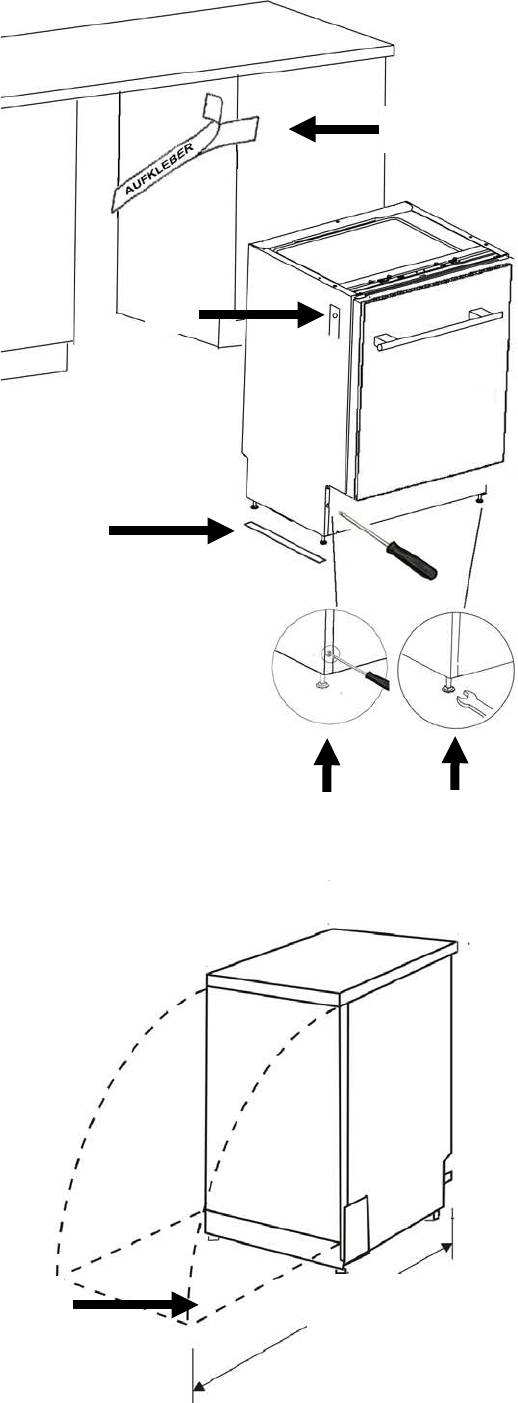
Once the appliance is positioned, level the
dishwasher by adjusting the feet 1 and 2 (screw in
or out). The inclination angle must not exceed
more than 2°.
Ensure that the space between the contact
surfaces at the top of the appliance is not more
than 5 mm. Align the appliance door with the edge
of the kitchen furniture unit.
• Connect the inlet and drain hoses
as well
as the power cord.
• Stick the safety adhesive covering 3 to the
inner side of the working surface in the unit
where the dishwasher is to be installed. To
do that, first remove the stripe of paper to
set the adhesive
side free. The safety
covering is intended to protect the furniture
surface from the steam which comes out of
the dishwasher
in small quantities every
time you open the door of the appliance.
• Putting the dishwasher on slide-rails 4.
• Push the dishwasher into the unit.
• Fix the dishwasher in the unit with two
countersunk head screws 5.
While installing the dishwasher
, leave some free
space for the appliance door 6 to open.
1155 mm
6
1
2
3
4
5
19
DE
RU
Die richtige Höhe und waagrechte Lage des
Geschirrspülers können Sie mit den regulierbaren
Füßen 1 und 2 (durch Hinein-
, oder
Herausschrauben) justieren. Das Gerät sollte in
jedem Fall keine stärkere Neigung als 2°
aufweisen.
Der Abstand zwischen dem Deckel des
Geschirrspülers und der Arbeitsplat
te soll
Maximum 5 mm betragen; die Außentür soll auf
den
Rand des Umbauschrankes ausgerichtet
werden.
• Schließen Sie die Wasserzufuhr-,
Abflussschläuche und Netzstromkabel an.
• Befestigen Sie den Schutzaufkleber 3 auf
die untere Seite der Arbeitsplatte in dem
Umbauschrank
, wo der Geschirrspüler
installiert werden soll. Dafür soll erst der
Papierstreifen von der Kleberseite entfernt
werden. Der Aufkleber schützt die
Arbeitsplatte von den kleinen
Dampfmengen, die bei geöffneter Tür aus
der Spülmaschine rauskommen.
• Spülmaschine auf Gleitens-Schienen
stellen 4.
•
Schieben Sie den Geschirrspüler in die
Schranknische rein.
•
Befestigen Sie den Geschirrspüler in der
Nische mit zwei Senkkopfschrauben 5.
Bei dem Aufstellen des Geschirrspülers in die
Schranknische, ist es notwendig, genügend Platz
für das Türöffnen zu lassen 6.
Регулируя передние и заднии ножки
1
и
2
(вкручивая их или выкручивая) Вы можете
отрегулировать высоту посудомоечной машины
и ее горизонтальное положение. В любом
случае она не должна быть наклонена более
чем на 2°.
Расстояние между верхом машины и
столешницей должно быть не более 5 мм;
дверца должна быть выровнена по краю ниши.
• Подсоедините подающий и сливной
шланги и сетевой электрокабель.
• Прикрепите защитную наклейку 3 с
нижней стороны рабочего стола в месте
установки машины, предварительно
удалив бумагу с клеющейся стороны.
Это защитит стол от небольшого
количества пара, выходящего из
машины при открывании двери.
• Поместите посудомоечную машину на
задвижные полозья 4.
• Задвиньте посудомоечную машину в
нишу шкафа.
• Закрепите машину в нише шкафа двумя
винтами с потайными головками 5.
При установке посудомоечной машины в нишу
шкафа, следует обеспечить пространство для
открывания дверцы 6.
20
EN
SAFETY CONDITIONS
• Service and repair of the appliance should
be carried out only by the representative of
an authorized service centre.
• During installation, the power cord must not
be excessively or dangerously bent or
flattened.
• Do not operate the
dishwasher unless all
enclosure panels are properly mounted. In
case the dishwasher is being operated,
open the door carefully: water can flow out.
• The dishwasher is intended for house
utensils only. I
n case of unauthorized
operation or wrong service the
manufacturer does not bear any
responsibility for possible damages.
•
Use only detergent and rinse additives
intended for an
automatic dishwasher.
Never use soap, laundry detergent, or hand
washing detergent in the dishwasher. Keep
these products out of reach for children.
•
Don’t forget to close the appliance door
after having loaded or unloaded the
dishwasher. The open door can
lead to a
trouble.
• Do not wash plastic items
in the
dishwasher
unless they are marked
dishwasher safe or the equivalent.
• Keep children aw
ay from detergent and
rinse aid as well as from the open door of
the dishwasher: there could be still some
detergent left inside.
• Do not tamper with controls.
• Little
children should be supervised to
ensure that they do no
t play with the
appliance.


