Kaiser S 45 E 70 XLR: инструкция
Раздел: Бытовая, кухонная техника, электроника и оборудование
Тип: Посудомоечная Машина
Характеристики, спецификации
Инструкция к Посудомоечной Машиной Kaiser S 45 E 70 XLR
USER MANUAL
GEBRAUCHSANWEISUNG
ИНСТРУКЦИЯ ПО ОБСЛУЖИВАНИЮ И ЭКСПЛУАТАЦИИ
EN
DE
DE
RU
RU
S 45 70 XL ...
S 45 E 70 XL ...
DISHWASHER
GESCHIRRSPÜLER
ПОСУДОМОЕЧНАЯ МАШИНА

EN
DEAR CUSTOMERS,
thank you for purchasing this Kaiser product.
We are convinced that you have made a right choice.
You have purchased a dishwasher which satisfies the
high quality demands and corresponds to comprehensive
international standards.
Please read these instructions carefully before starting
operation to be sure to obtain optimum performance.
The following recommendations are aimed to protect
you from possible inconveniences which can occur as a
result of the wrong operation and, at the same time,
reduce the consumption of electric energy and water.
Proper operation and maintenance provide a longer
service life of the unit.
The Kaiser dishwashers fulfil the main norms of safety,
hygiene and environment protection in correspondence
with the EU directives and are certified according to EU
norms and standards (DIN ISO 9001, ISO 1400),
standards of Russia (Gosstandart) and the CIS.
The company’s policy is aimed at constant improvement
of product quality. Modifications made to the design and
equipment result in exclusively positive changes in
operating qualities of the appliances. The right for
changes in the products is reserved by the manufacturer.
We wish you an effective use of the Kaiser product.
Yours faithfully
OLAN-Haushaltsgeräte
Berlin Germany
The appliances under present operating instructions are designed for
domestic and not industrial use.
2

DE RU
LIEBE KUNDIN, LIEBER KUNDE,
,
wir danken Ihnen für den Erwerb unserer Technik.
.
Wir sind überzeugt, dass Sie eine richtige Wahl
, .
getroffen haben. Wir übergeben Ihnen zum Gebrauch
den Geschirrspüler, der die hohen Forderungen
, !
befriedigt und den weltumfassenden Standards
! .
entspricht.
Bitte lesen Sie die Bedienungsanleitung vor Gebrauch
"
aufmerksam durch. Die Beachtung von Empfehlungen
# $"
schützt Sie von eventuellen Unannehmlichkeiten, die als
. % #!
Folge der falschen Nutzung des Geschirrspülers
" ! #
auftreten können sowie ermöglicht Ihnen den Strom-
$"
und Wasserverbrauch zu reduzieren. Der
, #
Geschirrspüler bringt Ihnen viel Vergnügen auf lange
$$ . &
Zeit, wenn der Gebrauch der vorliegenden
$"
Bedienungsanleitung entsprechen wird.
! ",
.
Unsere Geschirrspüler entsprechen den
'
Hauptforderungen der Sicherheit, der Hygiene und des
Umweltschutzes, laut den Direktiven der EU, was mit
, ! #!
Zertifikaten DIN ISO 9001, ISO 1400, entsprechend den
, & %,
im Rahmen der EU geltenden Normen, bestätigt ist, und
# * DIN ISO 9001,
genauso auch den Anforderungen von Gosstandart in
ISO 1400, ! ,
Russland und Standards anderer GUS Ländern, was
! &
durch die Identifikationszertifikate bestätigt ist.
!, a #
+ /
%'+, #
* .
Mit den Gedanken der ständigen Verbesserung der
%
Qualität unserer Geschirrspüler sind Änderungen bei
$"
Design und Einrichtung, die nur zu positiven
Veränderungen der technischen Eigenschaften führen,
,
vom Hersteller vorbehalten.
! #
.
Wir wünschen Ihnen die effektive Nutzung unseres
2 $**
Produkts.
*.
Hochachtungsvoll
3#!
OLAN-Haushaltsgeräte
OLAN-Haushaltsgeräte
Berlin Germany
Berlin Germany
Wir Informieren Sie, dass unsere Geschirrspüler, die der
5*, , !
Gegenstand der vorliegenden Bedienungsanleitung sind, sind
! 5",
ausschließlich für den häuslichen Gebrauch vorbestimmt.
.
3

EN
CONTENTS
INSTALLATION INSTRUCTIONS 6
Electrical connection 6
Connection to water supply
and sewerage network 8
Installation 12
Safety conditions 20
BRIEF DESCRIPTION 24
Location drawing 24
Control panel and display 28
EQUIPMENT 32
Loading the dishwasher racks 32
Detergent dispenser 36
Rinse aid dispense 38
Water softener 42
Filtering system 46
OPERATING THE DISHWASHER 46
Programmable control 48
Wash cycle table 56
CARE AND ATTENDANCE 58
ENVIROMENTAL COMPATIBILITY 74
4

DE RU
INHALTSVERZEICHNIS
BEDIENUNGSANLEITUNG FÜR MONTAGE 7
7
Stromanschluss 7
7
Anschluss ans Wassernetz
9
9
Aufstellen des Geräts 13
13
Sicherheitsbedingungen 21
21
KURZBESCHREIBUNG 25
25
Gesamtansicht 25
25
Bedienblende und Display 29
29
AUSSTATUNG 33
33
Geschirr einordnen 33
33
Spülmittelspender 37
37
Klarspülerspender 39
39
Wasserenthärter
43
43
Filtersystem 47
47
GEBRAUCH VOM GESCHIRRSPÜLER 47
47
Elektronische Programmierung 49
49
Waschzyklentabelle 57
57
PFLEGE UND WARTUNG 59
59
UMWELTVERTRÄGLICHKEIT 75
75
5

EN
INSTALLATION INSTRUCTIONS
ELECTRICAL CONNECTION
Before connecting the stove to the mains power
supply, make sure that:
the supply voltage corresponds to the
specifications on the data plate on the
behind of the dishwasher,
the mains supply has an efficient ground
connection complying with all applicable
laws and regulations.
After making sure that the voltage and the
frequency values for the current in the home
correspond to those on the rating plate and that
the electrical system is sized for the maximum
voltage on the rating plate, insert the plug into an
electrical socket which is earthed properly
This dishwasher is intended for AC power ~220 -
240V, 50Hz. Use safety copper wire fuse 12 A
only. Preferable is a time delay fuse or circuit
breaker with a 3 mm contact spacing which
constitutes a separate circuit for the appliance.
The outlet should be placed in the adjacent
cabinet. After the dishwasher has been mounted,
make sure that the plug is accessible.
Before using the appliance for the first time, check
up if the due grounding is provided.
For personal safety:
Do not use an extension cord or an adapter plug
with this appliance.
Caution! Connection of hoses and cords
as well as placing the appliance into
operation must be made by a qualified
expert only.
6

DE RU
BEDIENUNGSANLEITUNG FÜR
MONTAGE
STROMANSCHLUSS
Vor der Durchführung des Stromanschlusses muss
. ,
sichergestellt werden, dass:
, :
die Eigenschaften des Stromnetzes mit den
Werten auf dem angebrachten Typenschild
auf der Rückwand des Geschirrspülers
,
übereinstimmen,
das Stromnetz gemäß den geltenden
.
Bestimmungen und Rechtsvorschriften
.
geerdet ist.
Nachdem Sie sich vergewissert haben, dass
, ,
Spannungs- und Frequenzwerte des Stroms im
Stromnetz den Angaben auf dem Geräteschild
,
entsprechen, stecken Sie den Stecker in eine
,
ordnungsgemäß geerdete Wandsteckdose.
.
Diese Geschirrspülmaschine ist für das Netz ~220
- 240V, 50Hz ausgelegt. Zur Anwendung sind nur
~220 - 240, 50.
Kupferdrahtsicherungen verwendbar, die für die
Stromstärke von 12 A geeignet sind. Von Vorteil
, 12 A.
wäre es jedoch für dieses Gerät einen selbsttätig
gesteuerten Schalter mit 3 mm-Kontaktentfernung
,
zu benutzen, welcher für dieses Gerät einen
abgesonderten Stromkreis bildet.
3 .
Befestigen Sie die Steckdose im benachbarten
Schrank. Prüfen Sie nach der Installation der
Geschirrspülmaschine, ob der Zugang zum
.
Stecker des Gerätes frei ist.
Stellen Sie vor dem ersten Benutzen sicher, dass
eine ordentliche Erdung vorhanden ist.
.
Zu Ihrer persönlichen Sicherheit:
:
Benutzen Sie für dieses Gerät kein
Verlängerungskabel bzw. keinen Adapterstecker.
.
Achtung! Die Montage von Schläuchen
!
und elektrischem Netzanschluss soll nur
von einem qualifizierten Fachmann
durchgeführt werden.
.
7
EN
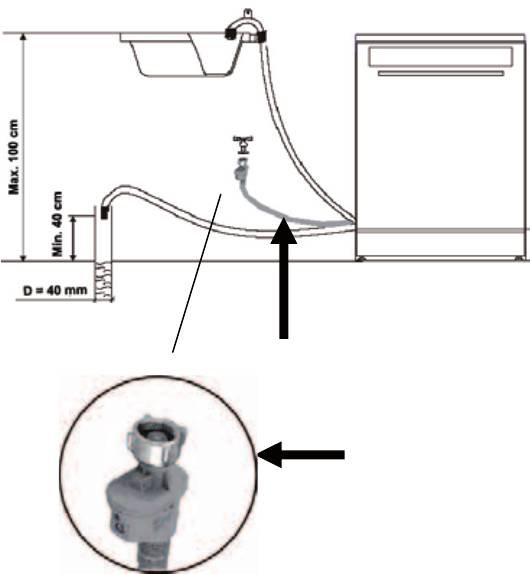
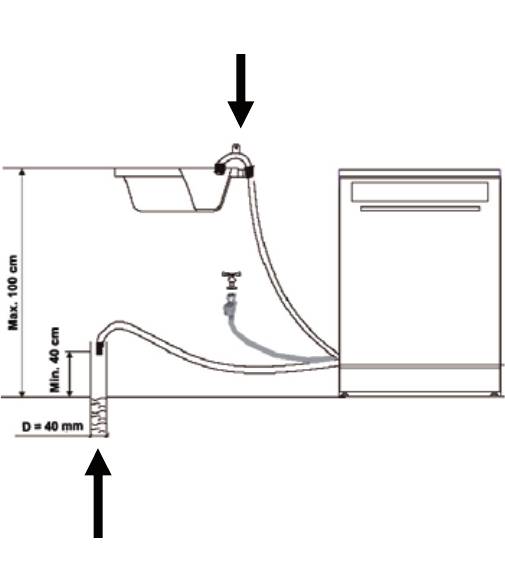
CONNECTING TO WATER SUPPLY AND
SEWERAGE NETWORK
Connecting the Aqua-Stop inlet hose
The inlet hose
equipped with Aqua-Stop System 1
is provided with double walls.
The Aqua-Stop System ensures blocking of water
supply in case the inlet hose has broken as well as
if the air gap between the hose itself and its
corrugated shell is filled with water.
Connect the appliance to the water mains with new
hose sets only. Never reuse old hose sets.
1
Water pressure must amount to 0,04 MPa (min.)
and 1 MPa (max.). In case the pressure is below
the minimum value, consult the Service Centre.
2
Pull the inlet hose completely out from
storage compartment located at the back of
the dishwasher.
While adjusting to the faucet, tighten the
screw 2 of the safety inlet hose (3/4-inch
thread).
Before starting the dishwasher, turn on the
faucet against the stop.
Connecting cold water
Connect the cold water inlet hose to the
threaded 3/4-inch connector. Make sure it
is fastened tightly.
If the water pipes are new or have not been used
for an extended period of time, let the water run to
make sure that the water is clear and free of
impurities.
If this precaution is not taken, there is a risk that
the water inlet can get blocked and damage the
appliance.
8
DE
RU
ANSCHLUSS ANS WASSERNETZ
Anschluss des Wasserzulauf-Schlauchs mit
c
Aqua-Stop-System
Aqua-Stop
Der Wasserzulauf-Schlauch mit Aqua-Stop-System
c Aqua-Stop 1
1 ist doppelwandig.
.
Das Aqua-Stop-System sperrt den Wasserzufuhr
Aqua-Stop
falls der Wasserzulaufschlauchs beschädigt bzw.
,
der Luftraum zwischen dem Schlauch und seiner
,
geriffelten Außenhülle mit Wasser gefüllt ist.
.
Bei dem Anschluss des Gerätes an die
Wasserleitung verwenden Sie nur einen neuen
Wasserzulaufschlauch. Die gebrauchten
,
Schläuche dürfen nicht wieder verwendet werden.
,
.
Der Wasserdruck soll Minimum 0,04 MPa und
Maximum 1 MPa betragen. Wenden Sie sich an
0,04 MPa (0,4 ) 1 MPa (10 ).
das Servicezentrum, wenn der Wasserdruck
niedriger als Minimum ist.
.
Nehmen Sie den Wasserzulaufschlauch
aus der speziellen Nische auf der
Rückwand des Geschirrspülers heraus.
.
Drehen Sie die Mutter 2 des Wasserzulauf-
2
Schlauches auf dem Hahn der
3/4
Wasserleitung mit dem 3/4- Zoll-Gewinde
.
zu.
Drehen Sie den Wasserzulaufhahn vor dem
Start des Geschirrspülers vollständig auf.
.
Kaltwasseranschluss
Schließen Sie den Kaltwasserschlauch an
den Anschluss mit 3/4-Zoll-Gewinde an und
3/4 ,
vergewissern Sie sich, dass er fest und
.
dicht sitzt.
Wenn die Wasserröhre neu sind, oder eine längere
Zeit nicht benutzt worden sind, lassen Sie zuerst
, ,
Wasser fließen, um sicherzugehen, dass das
, .
Wasser klar und frei von Unreinheiten ist.
Wird diese Vorsichtsmaßnahme nicht eingehalten,
besteht das Risiko, dass der Wasserzufluss
,
blockiert und das Gerät dadurch beschädigt wird.
.
9
EN
Connecting hot water
The inlet hose of the appliance can be also
connected to the hot water supply provided the
temperature doesn’t exceed 60°C.
In this case, both the wash cycle time and the
power consumption are reduced.
For hot water connection follow the same
procedure as that for cold water.
Connecting drain hose
2
Connect the drain hose to the drain pipe 1,
diameter: 40 mm min., or let it run directly
into the sink 2.
Use the special plastic hose support which is
delivered with the appliance.
The free end of the hose must be at a height of 40
to 100 cm and must not be immersed. Make sure
that the hose is free from being bent or flattened.
1
Disconnecting from water supply and
sewerage
To disconnect the Aqua-Stop inlet hose, cut off
1
water supply by turning off the faucet, screw out
the nut of the safety inlet hose which adjusts it to
the faucet.
Put the hose into the special storage compartment
at the back of the dishwasher.
In case the free end of the hose is put directly into
the sink, pay attention to the following:
If the sink is mounted at the height of 100 cm from
the floor, the excess water cannot be drained
directly into the sink.
To drain the excess water from the hose in this
case, you need a pail or any other suitable
container which should be put below the sink at
the side of it.
10

DE
RU
Heißwasseranschluss
Der Wasserzulaufschlauch des Geräts kann auch
an die Heißwasserleitung angeschlossen werden,
solange die Wassertemperatur darin 60°C nicht
,
überschreitet.
60°C.
Bei der Verwendung heißen Wassers verkürzt sich
die Zeit des Spülzyklus und der Stromverbrauch
.
sinkt.
Der Anschluss an die Heißwasserleitung erfolgt
nach den gleichen Vorgangsweisen wie beim
Anschluss an die Kaltwasserleitung.
.
Anschluss des Abflussschlauchs
Schließen Sie den Abflussschlauch an ein
Abflussrohr 1 von mindestens 40 mm
Durchmesser an. Oder lassen Sie das
1 40
Wasser direkt in die Spüle abfließen 2.
.
2.
Verwenden Sie die Spezialplastikhalterung, die mit
dem Gerät geliefert wird.
,
.
Vergewissern Sie sich, dass der Schlauch nicht
,
geknickt oder gequetscht wird. Das freie Ende des
.
Schlauchs muss sich auf einer Höhe zwischen 40
40
100
und 100 cm befinden und darf nicht in Wasser
.
getaucht werden.
Abmontieren vom Wassernetz
Um den Wasserzulaufschlauch mit Aqua-Stop-
c
System abzumontieren soll die Wasserzufuhr
Aqua-Stop
abgestellt und die Mutter des
c Aqua-Stop
Wasserzulaufschlauchs mit Aqua-Stop-System am
.
Wasserhahn abgeschraubt werden.
Danach kann man den Schlauch in die spezielle
Nische, die sich auf der Rückwand des
.
Geschirrspülers befindet, platzieren.
Wenn das Wasser unmittelbar in die Spüle abfließt
beachten Sie Folgendes:
:
Wenn sich die Spüle auf der Höhe mehr als 100
100
cm vom Fußboden befindet, ist es nicht möglich,
,
dass ganze Wasser direkt in die Spüle abfließt.
.
In solchem Fall muss man das Wasser aus dem
Schlauch in den Eimer bzw. ein anderes
,
geeignetes Gefäß abfließen lassen. Es soll sich
außerhalb der Spüle und tiefer, als die Spüle
.
befinden.
11
EN
INSTALLING THE FREE STANDING
DISHWASHER (MODEL S 4570 XL)
Place the dishwasher close to the water supply
and sewerage inlets as well as to the electrical
outlet.
Once the appliance is positioned, level the
dishwasher by adjusting the feet 1 (screw in or
out). The inclination angle must not exceed more
than 2°.
The dishwasher is equipped with water inlet and
1
1
drain hoses which can be fixed on the right or on
the left to enable proper installation.
INSTALLING THE DISHWASHER
(MODEL S 45E70 XL)
Before installing the dishwasher, carry out the
following preparatory steps:
Make sure you have enough space to install the
820
80
appliance and to connect the water inlet and drain
hoses as well as the electrical cord 2.
2
The installation space measurements are given in
mm.
100
450*
12
DE
RU
AUFSTELLEN DES FREISTEHENDEN
GESCHIRRSPÜLERS
(MODELL S 4570 XL)
( S 4570 XL)
Die Stelle für die Installation des Geschirrspülers
soll in der greifbarer Nähe zu einer
Wasserversorgungsquelle, einem Wasserabfluss
,
und einer stromversorgten Steckdose gewählt
.
werden.
Nivellieren Sie den Geschirrspüler bezüglich des
Schrankes mit Hilfe von vier regulierbaren Füßen 1
( )
(durch Hinein-, bzw. Herausschrauben). Das Gerät
1.
sollte in jedem Fall keine stärkere Neigung als 2°
aufweisen.
2°.
Der Geschirrspüler ist mit Wasserzufuhr- und
Abflussschläuchen ausgestattet, die rechts oder
,
links vom Gerät geführt werden können, um ein
,
ordnungsgemäßes Installieren zu erleichtern.
.
EINBAU DES GESCHIRRSPÜLERS
IN DEN UMBAUSCHRANK
(MODELL S 45E70 XL)
( S 45E70 XL)
Bevor das Gerät auf den richtigen Ort gestellt wird,
sollen alle Vorbereitungen durchgeführt werden.
.
Bereiten Sie die Nische des Umbauschrankes für
Einbau des Gerätes sowie die Öffnungen 2 für den
2
Anschluss an Stromnetz, Wasserzulauf- und
.
Wasserabflussschläuche vor. Maßen der Nische
.
für das Einbauen sind in mm angegeben.
13
EN
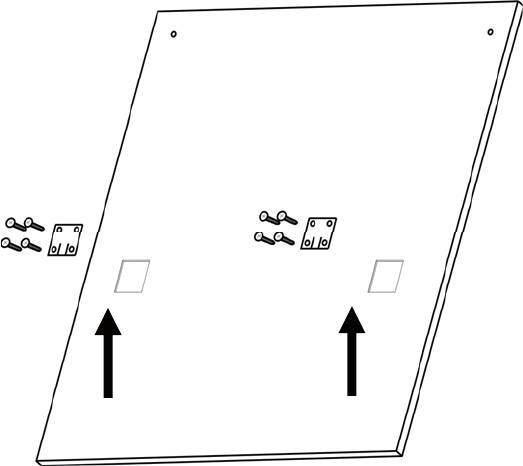
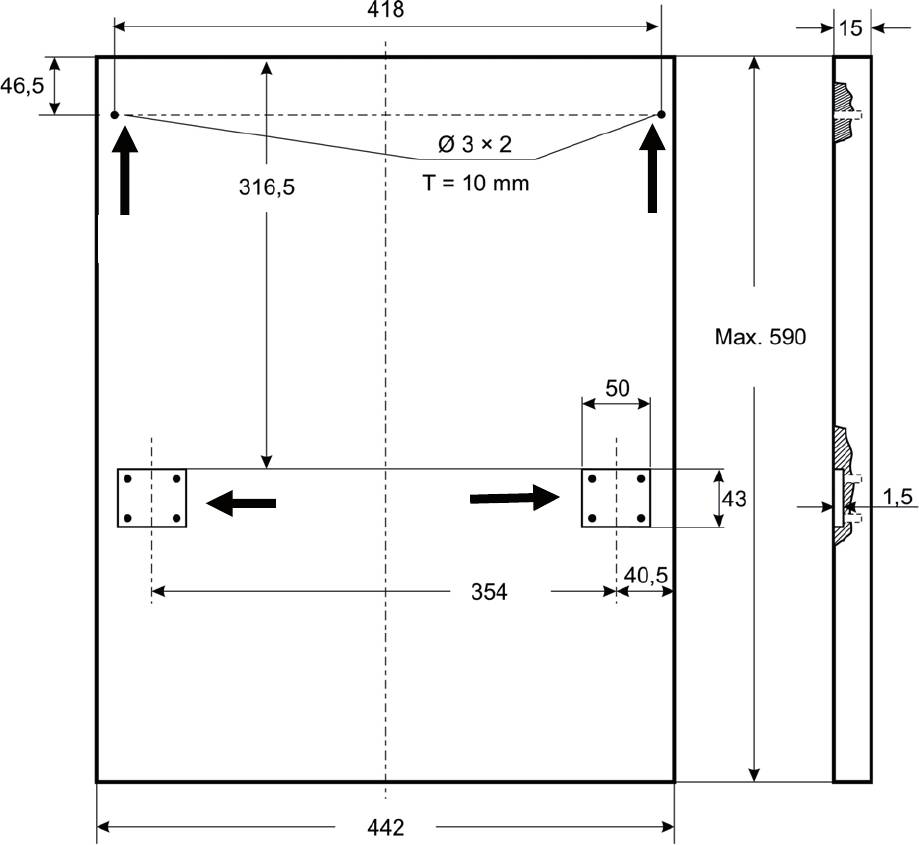
Furniture door's installation
Prepare the hole deeps 1 and 2 for
fastenings the aesthetic panel according to
the specified dimensions.
The
dimensions are given in mm.
Install the
bottom hooks from the interior of
the furniture door by countersunk head
screws 3.
3
3
14
DE
RU
Montage der dekorativen Abdeckplatte
Bereiten Sie die Vertiefungen 1 und 2 für
1 2
Fixierung der dekorativen Abdeckplatte
entsprechend der genannten Maßen vor.
.
Maßen sind in mm angegeben.
.
1
1
2
2
Fixieren Sie die Befestigungen mit Hilfe der
Senkkopfschrauben an der Innenseite der
Abdeckplatte 3.
3.
15
EN
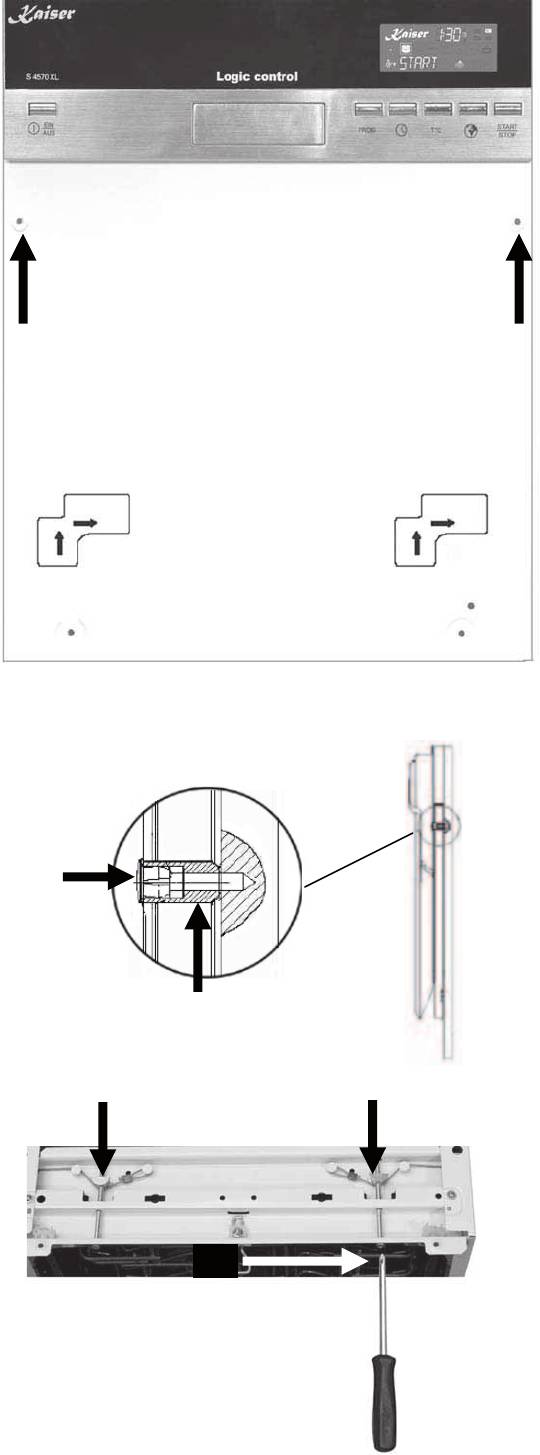
The hook is lifted from position 1 to the
appropriate place, and then pushed right to
the position 2, making the panel and the
outer door align.
3
3
2
2
1
1
After that it is necessary to fix the panel on a door
of a dishwasher by screws
from the inside of the
door through corresponding holes 3.
For this purpose:
Take away the cover 4,
4
Pin up the screw 5,
Get back the cover.
5
7
7
The door springs are set at the factory to the
proper tension for the outer door. If aesthetic
wooden panel are installed, you will have to adjust
the door spring tension. Rotate the adjusting screw
6 to drive the adjustor 7 to strain or relax the steel
6
cable.
Door spring tension is correct when the door
remains horizontal in the fully opened position, yet
rises to a close with the slight lift of a finger
16
DE
RU
Nachdem die Befestigungen in die
entsprechende Spalten an der Tür des
Geschirrspülers in die Position 1
1,
positioniert sind, schieben Sie sie nach
2,
rechts in die Position 2, gleichen Sie dabei
die Abdeckplatte und die Außentür aus.
.
Danach muss die Abdeckplatte mit Schrauben
durch die Öffnungen an der Innenseite der Tür
befestigt werden 3.
3.
Gehen Sie wie folgt vor:
:
Entfernen Sie die Verschlussklappe 4,
4,
Drehen Sie die Schraube zu 5,
5,
Setzen Sie die Verschlussklappe wieder
.
ein.
Nach der Montage der Abdeckplatte muss die
,
Spannkraft der Türfedern reguliert werden.
.
Beim Drehen der Regulierschraube 6 der
6
Korrektor 7 spannt bzw. schwächt das Stahlkabel.
7
.
Die Spannkraft der Türfedern ist korrekt, wenn die
,
vollständig geöffnete Tür in horizontaler Lage
bleibt, und doch bei leichter Bemühung nach oben
,
geht.
.
17
EN
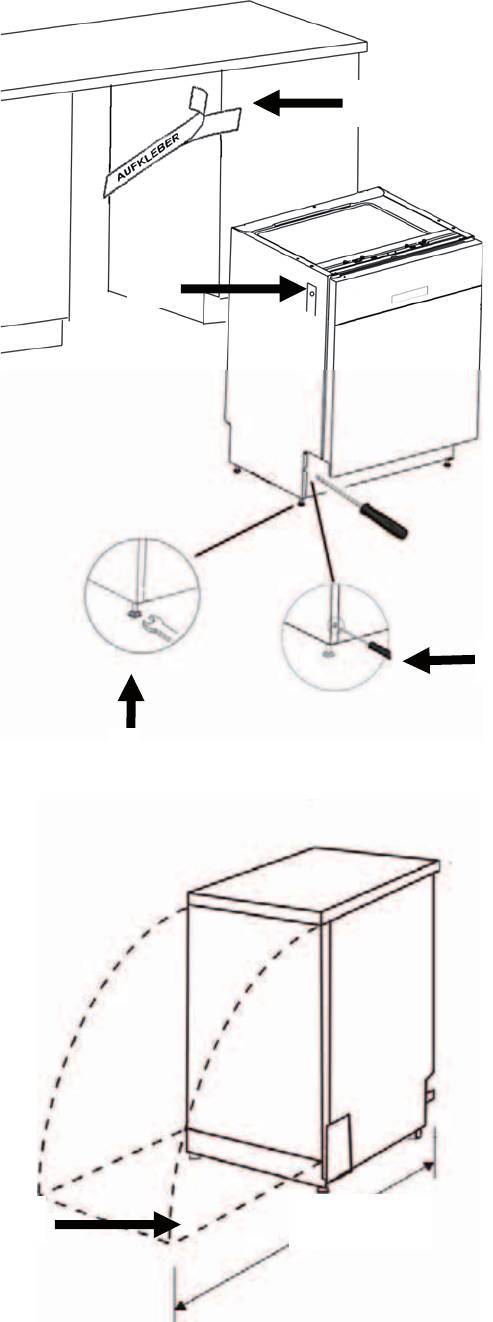
Once the appliance is positioned, level the
dishwasher by adjusting the feet 1 and 2 (screw in
or out). The inclination angle must not exceed
more than 2°.
Ensure that the space between the contact
surfaces at the top of the appliance is not more
than 5 mm. Align the appliance door with the edge
of the kitchen furniture unit.
Connect the inlet and drain hoses as well
as the power cord.
Stick the safety adhesive covering 3 to the
inner side of the working surface in the unit
where the dishwasher is to be installed. To
do that, first remove the stripe of paper to
set the adhesive side free. The safety
covering is intended to protect the furniture
surface from the steam which comes out of
the dishwasher in small quantities every
time you open the door of the appliance.
1
Push the dishwasher into the unit.
Fix the dishwasher in the unit with two
countersunk head screws 4.
While installing the dishwasher, leave some free
space for the appliance door 5 to open.
1155 mm
5
18
2
3
4
DE
RU
Die richtige Höhe und waagrechte Lage des
1 2
Geschirrspülers können Sie mit den regulierbaren
( )
Füßen 1 und 2 (durch Hinein-, oder
Herausschrauben) justieren. Das Gerät sollte in
.
jedem Fall keine stärkere Neigung als 2°
aufweisen.
2°.
Der Abstand zwischen dem Deckel des
Geschirrspülers und der Arbeitsplatte soll
5 ;
Maximum 5 mm betragen; die Außentür soll auf
.
den Rand des Umbauschrankes ausgerichtet
werden.
Schließen Sie die Wasserzufuhr-,
Abflussschläuche und Netzstromkabel an.
.
Befestigen Sie den Schutzaufkleber 3 auf
3
die untere Seite der Arbeitsplatte in dem
Umbauschrank, wo der Geschirrspüler
,
installiert werden soll. Dafür soll erst der
.
Papierstreifen von der Kleberseite entfernt
werden. Der Aufkleber schützt die
,
Arbeitsplatte von den kleinen
.
Dampfmengen, die bei geöffneter Tür aus
der Spülmaschine rauskommen.
Schieben Sie den Geschirrspüler in die
Schranknische rein.
.
Befestigen Sie den Geschirrspüler in der
Nische mit zwei Senkkopfschrauben 4.
4.
Bei dem Aufstellen des Geschirrspülers in die
Schranknische, ist es notwendig, genügend Platz
,
für das Türöffnen zu lassen 5.
5.
19
EN
SAFETY CONDITIONS
Service and repair of the appliance should
be carried out only by the representative of
an authorized service centre.
During installation, the power cord must not
be excessively or dangerously bent or
flattened.
Do not operate the dishwasher unless all
enclosure panels are properly mounted. In
case the dishwasher is being operated,
open the door carefully: water can flow out.
The dishwasher is intended for house
utensils only. In case of unauthorized
operation or wrong service the
manufacturer does not bear any
responsibility for possible damages.
Use only detergent and rinse additives
intended for an automatic dishwasher.
Never use soap, laundry detergent, or hand
washing detergent in the dishwasher. Keep
these products out of reach for children.
Don’t forget to close the appliance door
after having loaded or unloaded the
dishwasher. The open door can lead to a
trouble.
Do not wash plastic items in the
dishwasher unless they are marked
dishwasher safe or the equivalent.
Keep children away from detergent and
rinse aid as well as from the open door of
the dishwasher: there could be still some
detergent left inside.
Do not tamper with controls.
Little children should be supervised to
ensure that they do not play with the
appliance.
20


