Kaiser EH 6964: инструкция
Раздел: Кухонная техника
Тип: Электрическая Духовка
Характеристики, спецификации
Инструкция к Электрической Духовке Kaiser EH 6964
EH ..., EHK ...
BUILT IN OVEN
EINBAUBACKOFEN
ВСТРАИВАЕМЫЙ ДУХОВОЙ ШКАФ
EN
USER MANUAL
DE
GEBRAUCHSANWEISUNG
RU
ИНСТРУКЦИЯ ПО ОБСЛУЖИВАНИЮ И ЭКСПЛУАТАЦИИ

EN
DEAR CUSTOMERS,
we thank to you for the acquisition of our technology.
We are convinced that you have made a right choice.
This product which satisfies the high quality demands
and corresponds to world comprehensive standards
realizes your cookeries, and his modern appearance
which has been developed by the best European
designers will decorate your kitchen splendidly.
We ask you to read the operating instructions before
usage thoroughly. The consideration of
recommendations protects you from possible
inconveniences which can appear as a result of the
wrong use of the oven, and allows you to reduce the
consumption of electric energy. If the use corresponds to
the present operating instructions, the oven will bring
you a lot of pleasure for a long time.
Our ovens correspond to the main demands of the
security, hygiene and environment protection, according
to the directives of the EU which is confirmed with
certificates DIN ISO 9001, ISO 1400, according to the
norms counting within the frames of the EU, they also
correspond to the Gosstandart of Russia, standards of
the CIS, which is confirmed with the corresponding
certificates.
With the thoughts of a constant improvement of the
quality of our ovens the changes in design and
equipment which lead only to positive changes of the
technical qualities are reserved by the manufacturer.
We wish you an effective use of our oven.
Yours faithfully
OLAN-Haushaltsgeräte
Berlin Germany
We Inform you that our devices which are the object of the present
operating instructions are precertain exclusively for the domestic
use.
2

DE RU
LIEBE KUNDIN, LIEBER KUNDE,
ɍȼȺɀȺȿɆɕɃ ɉɈɄɍɉȺɌȿɅɖ,
wir danken Ihnen für den Erwerb unserer Technik.
ɛɥɚɝɨɞɚɪɢɦ ȼɚɫ ɡɚ ɩɪɢɨɛɪɟɬɟɧɢɟ ɧɚɲɟɣ ɬɟɯɧɢɤɢ.
Wir sind überzeug, dass Sie eine richtige Wahl getroffen
Ɇɵ ɭɜɟɪɟɧɵ, ɱɬɨ ȼɵ ɫɞɟɥɚɥɢ ɩɪɚɜɢɥɶɧɵɣ ɜɵɛɨɪ.
haben. Dieses Produkt, das die hohen Forderungen zur
Ⱦɚɧɧɵɣ ɩɪɨɞɭɤɬ, ɭɞɨɜɥɟɬɜɨɪɹɸɳɢɣ ɫɚɦɵɦ ɜɵɫɨɤɢɦ
Qualität befriedigt und weltumfassenden Standards
ɬɪɟɛɨɜɚɧɢɹɦ ɢ ɨɬɜɟɱɚɸɳɢɣ ɦɢɪɨɜɵɦ ɫɬɚɧɞɚɪɬɚɦ,
entspricht, verwirklicht Ihre Kochkünste, und sein
ɩɨɡɜɨɥɢɬ ȼɚɦ ɥɟɝɤɨ ɜɨɩɥɨɬɢɬɶ ɜɫɟ ȼɚɲɢ
modernes Aussehen, das von besten europäischen
ɤɭɥɢɧɚɪɧɵɟ ɫɩɨɫɨɛɧɨɫɬɢ, ɚ ɟɝɨ ɫɨɜɪɟɦɟɧɧɵɣ ɜɢɞ,
Designer entwickelt worden ist, wird Ihre Küche
ɪɚɡɪɚɛɨɬɚɧɧɵɣ ɥɭɱɲɢɦɢ ɟɜɪɨɩɟɣɫɤɢɦɢ ɞɢɡɚɧɟɪɚɦɢ,
prächtig schmücken.
ɜɟɥɢɤɨɥɟɩɧɨ ɭɤɪɚɫɢɬ ȼɚɲɭ ɤɭɯɧɸ.
Wir bitten Sie die Bedienungsanleitung vor der Nutzung
ɉɪɨɫɢɦ ȼɚɫ ɜɧɢɦɚɬɟɥɶɧɨ ɩɪɨɱɢɬɚɬɶ ɢɧɫɬɪɭɤɰɢɸ
aufmerksam zu lesen. Die Beachtung von Empfehlungen
ɩɨ ɨɛɫɥɭɠɢɜɚɧɢɸ ɢ ɷɤɫɩɥɭɚɬɚɰɢɢ ɞɨ ɩɭɫɤɚ
schützt Sie von eventuellen Unannehmlichkeiten, die als
ɭɫɬɪɨɣɫɬɜ
ɚ. ɋɨɛɥɸɞɟɧɢɟ ɫɨɞɟɪɠɚɳɢɯɫɹ ɜ ɧɟɣ
Folge der falschen Nutzung des Backofens auftreten
ɪɟɤɨɦɟɧɞɚɰɢɣ ɡɚɳɢɬɢɬ ȼɚɫ ɨɬ ɜɨɡɦɨɠɧɵɯ
können, und ermöglicht Ihnen den Verbrauch von
ɧɟɩɪɢɹɬɧɨɫɬɟɣ ɩɪɢ ɧɟɩɪɚɜɢɥɶɧɨɣ ɷɤɫɩɥɭɚɬɚɰɢɢ
Elektroenergie zu reduzieren. Der Backofen bringt
ɞɭɯɨɜɨɝɨ ɲɤɚɮɚ, ɚ ɬɚɤɠɟ ɩɨɡɜɨɥɢɬ ȼɚɦ ɭɦɟɧɶɲɢɬɶ
Ihnen viel Vergnügen auf lange Zeit, wenn der
ɪɚɫɯɨɞ ɷɥɟɤɬɪɨɷɧɟɪɝɢɢ. ȿɫɥɢ ɷɤɫɩɥɭɚɬɚɰɢɹ ɞɭɯɨɜɨɝɨ
Gebrauch der vorliegenden Bedienungsanleitung
ɲɤɚɮɚ ɛɭɞɟɬ ɫɨɨɬɜɟɬɫɬɜɨɜɚɬɶ ɧɚɫɬɨɹɳɟɣ
entsprechen wird.
ɢɧɫɬɪɭɤɰɢɢ, ɧɚɲ ɞɭɯɨɜɨɣ ɲɤɚɮ ɛɭɞɟɬ ɪɚɞɨɜɚɬɶ ȼɚɫ
ɞɨɥɝɨɟ ɜɪɟɦɹ.
Unsere Backöfen entsprechen den Hauptforderungen
ɇɚɲɢ ɞɭɯɨɜɵɟ ɲɤɚɮɵ ɩɨɥɧɨɫɬɶɸ ɫɨɨɬɜɟɬɫɬɜɭɟɬ
der Sicherheit, der Hygiene und des Umweltschutzes,
ɨɫɧɨɜɧɵɦ ɬɪɟɛɨɜɚɧɢɹɦ ɛɟɡɨɩɚɫɧɨɫɬɢ, ɝɢɝɢɟ
ɧɵ ɢ
laut den Direktiven der EU, was mit Zertifikaten DIN
ɡɚɳɢɬɵ ɨɤɪɭɠɚɸɳɟɣ ɫɪɟɞɵ, ɫɨɝɥɚɫɧɨ ɞɢɪɟɤɬɢɜɚɦ
ISO 9001, ISO 1400, entsprechend den im Rahmen der
ȿɜɪɨɩɟɣɫɤɨɝɨ ɋɨɸɡɚ, ɱɬɨ ɩɨɞɬɜɟɪɠɞɟɧɨ
EU geltenden Normen, bestätigt ist, und genauso auch
ɫɟɪɬɢɮɢɤɚɬɚɦɢ DIN ISO 9001, ISO 1400, ɜ
den Anforderungen von Gosstandart in Russland und
ɫɨɨɬɜɟɬɫɬɜɢɢ ɫ ɧɚɫɬɨɹɳɢɦɢ ɧɨɪɦɚɦɢ,
Standards anderer GUS Länder, was durch die
ɞɟɣɫɬɜɭɸɳɢɦɢ ɧɚ ɬɟɪɪɢɬɨɪɢɢ ȿɜɪɨɩɟɣɫɤɨɝɨ
Identifikationszertifikate bestätigt ist.
ɫɨɨɛɳɟɫɬɜɚ, a ɬɚɤɠɟ ɩɨɥɧɨɫɬɶɸ ɨɬɜɟɱɚɸɬ ɜɫɟɦ
ɬɪɟɛɨɜɚɧɢɹɦ Ƚɨɫɫɬɚɧɞɚɪɬɚ Ɋɨɫɫɢɢ ɢ ɫɬɚɧɞɚɪɬɨɜ
ɞɪɭɝɢɯ ɫɬɪɚɧ ɋɇȽ, ɱɬɨ ɩɨɞɬɜɟɪɠɞɚɟɬɫɹ
ɫɟɪɬɢɮɢɤɚɬɚɦɢ ɫɨɨɬɜɟɬɫɬɜɢɹ.
Mit den Gedanken der ständigen Verbesserung der
ɋ ɦɵɫɥɶɸ ɨ ɞɚɥɶɧɟɣɲɟɦ ɩɨɜɵɲɟɧɢɢ ɬɟɯɧɢɱɟɫɤɢɯ ɢ
Qualität unserer Backöfen sind Änderungen bei Design
ɷɤɫɩɥɭɚɬɚɰɢɨɧɧɵɯ ɯɚɪɚɤɬɟɪɢɫɬɢɤ ɧɚɲɢɯ ɛɵɬɨɜɵɯ
und Einrichtung, die nur zu positiven Veränderungen
ɩɪɢɛɨɪɨɜ ɦɵ ɨɫɬɚɜ
ɥɹɟɦ ɡɚ ɫɨɛɨɣ ɩɪɚɜɨ ɧɚ ɜɧɟɫɟɧɢɟ
der technischen Eigenschaften führen, vom Hersteller
ɢɡɦɟɧɟɧɢɣ ɜ ɞɢɡɚɣɧ ɢ ɭɫɬɪɨɣɫɬɜɨ, ɜɥɢɹɸɳɢɯ ɬɨɥɶɤɨ
vorbehalten.
ɩɨɥɨɠɢɬɟɥɶɧɨ ɧɚ ɩɨɬɪɟɛɢɬɟɥɶɫɤɢɟ ɤɚɱɟɫɬɜɚ ɢ
ɫɜɨɣɫɬɜɚ ɩɪɨɞɭɤɬɚ.
Wir wünschen Ihnen die effektive Nutzung unseres
ɀɟɥɚɟɦ ȼɚɦ ɷɮɮɟɤɬɢɜɧɨɝɨ ɩɨɥɶɡɨɜɚɧɢɹ ɞɭɯɨɜɵɦ
Backofens.
ɲɤɚɮɨɦ ɧɚɲɟɣ ɮɢɪɦɵ.
Hochachtungsvoll
ɍɜɚɠɚɸɳɢɣ ȼɚɫ
OLAN-Haushaltsgeräte
OLAN-Haushaltsgeräte
Berlin Germany
Berlin Germany
Wir Informieren Sie, dass unsere Geräte, die der Gegenstand der
ɂɧɮɨɪɦɢɪɭɟɦ, ɱɬɨ ɧɚɲɢ ɩɪɢɛɨɪɵ, ɹɜɥɹɸɳɢɟɫɹ ɩɪɟɞɦɟɬɨɦ
vorliegenden Bedienungsanleitung sind, sind ausschließlich für den
ɧɚɫɬɨɹɳɟɣ ɂɧɫɬɪɭɤɰɢɢ, ɩɪɟɞɧɚɡɧɚɱɟɧɵ ɢɫɤɥɸɱɢɬɟɥɶɧɨ ɞɥɹ
häuslichen Gebrauch vorbestimmt.
ɞɨɦɚɲɧɟɝɨ ɩɨɥɶɡɨɜɚɧɢɹ.
3

EN
CONTENTS
INSTALLATION INSTRUCTIONS 6
Electrical connection 6
Installation of the oven 8
Preparation 8
BRIEF DESCRIPTION 10
Location drawing 10
Control panel 12
EQUIPMENT 16
Cooking zones control 16
Multifunction oven control 18
Operation functions of the oven 20
USAGE 24
Mechanical timer 26
Digital clock timer of the oven Prestige 30
Digital clock timer with sensor of
the oven Touch control 42
Specialities of the oven Logic control 56
Digital clock timer of the oven
Logic control 58
Digital clock timer of the oven Logic control
F12 BITURBO with full sensor control 74
Digital clock timer of the oven Logic control
F14 BITURBO with full sensor control 92
PRACTICAL ADVICES 116
CARE AND ATTENDANCE 124
ENVIROMENTAL COMPATIBILITY 136
4
DE RU
INHALTSVERZEICHNIS
ɈȽɅȺȼɅȿɇɂȿ
FÜR DEN INSTALLATEUR 7
ɂɇɋɌɊɍɄɐɂə ɉɈ ɆɈɇɌȺɀɍ 7
Stromanschluss 7
ɉɨɞɤɥɸɱɟɧɢɟ ɤ ɷɥɟɤɬɪɨɫɟɬɢ 7
Einbau des Backofen 9
ɍɫɬɚɧɨɜɤɚ 9
Vorbereitung 9
ɉɨɞɝɨɬɨɜɤɚ 9
KURZBESCHREIBUNG 11
ɄɊȺɌɄɈȿ ɈɉɂɋȺɇɂȿ 11
Gesamtansicht 11
ȼɧɟɲɧɢɣ ɜɢɞ 11
Bedienblende 13
ɉɚɧɟɥɶ ɭɩɪɚɜɥɟɧɢɹ 13
AUSSTATUNG 17
ɈȻɈɊɍȾɈȼȺɇɂȿ 17
Kochfeldersteuerung 17
ɍɩɪɚɜɥɟɧɢɟ ɪɚɛɨɬɨɣ ɧɚɝɪɟɜɚɬɟɥɶɧɵɯ ɩɨɥɟɣ 17
ɍɩɪɚɜɥɟɧɢɟ ɪɚɛɨɬɨɣ ɦɧɨɝɨɮɭɧɤɰɢɨɧɚɥɶɧɨɝɨ
Steuerung von Multifunktionsbackofen 19
ɞɭɯɨɜɨɝɨ ɲɤɚɮɚ 19
Betriebsfunktion des Backofens 21
Ɋɚɛɨɱɢɟ ɮɭɧɤɰɢɢ ɞɭɯɨɜɨɝɨ ɲɤɚɮɚ 21
BENUTZUNG 25
ɂɋɉɈɅɖɁɈȼȺɇɂȿ 25
Mechanische Zeitschaltuhr 27
Ɇɟɯɚɧɢɱɟɫɤɢɣ Ɍɚɣɦɟɪ 27
Elektronische Zeitschaltuhr von
ɗɥɟɤɬɪɨɧɧɨɟ ɩɪɨɝɪɚɦɦɢɪɭɸɳɟɟ ɭɫɬɪɨɣɫɬɜɨ
Backofen Prestige 31
ɞɭɯɨɜɨɤ Prestige 31
Elektronische Zeitschaltuhr mit Sensor
ɋɟɧɫɨɪɧɨɟ ɷɥɟɤɬɪɨɧɧɨɟ ɩɪɨɝɪɚɦɦɢɪɭɸɳɟɟ
von Backofen Touch control 43
ɭɫɬɪɨɣɫɬɜɨ ɞɭɯɨɜɨɤ Touch control 43
Besonderheiten des Backofen Logic control 57
Ɉɫɨɛɟɧɧɨɫɬɢ ɞɭɯɨɜɨɤ Logic control 57
Elektronische Zeitschaltuhr von
ɗɥɟɤɬɪɨɧɧɨɟ ɩɪɨɝɪɚɦɦɢɪɭɸɳɟɟ ɭ
ɫɬɪɨɣɫɬɜɨ
Backofen Logic control 59
ɞɭɯɨɜɨɤ Logic control 59
Elektronische Zeitschaltuhr von Backöfen
ɗɥɟɤɬɪɨɧɧɨɟ ɩɪɨɝɪɚɦɦɢɪɭɸɳɟɟ ɭɫɬɪɨɣɫɬɜɨ
Logic control
F12 BITURBO mit
ɞɭɯɨɜɨɤ Logic control
F12 BITURBO
Vullsensorbedienung 75
ɫ ɩɨɥɧɵɦ ɫɟɧɫɨɪɧɵɦ ɭɩɪɚɜɥɟɧɢɟɦ 75
Elektronische Zeitschaltuhr von Backöfen
ɗɥɟɤɬɪɨɧɧɨɟ ɩɪɨɝɪɚɦɦɢɪɭɸɳɟɟ ɭɫɬɪɨɣɫɬɜɨ
Logic control
F14 BITURBO mit
ɞɭɯɨɜɨɤ Logic control
F14 BITURBO
Vullsensorbedienung 93
ɫ ɩɨɥɧɵɦ ɫɟɧɫɨɪɧɵɦ ɭɩɪɚɜɥɟɧɢɟɦ 93
PRAKTISCHE EMPFEHLUNGEN 117
ɉɊȺɄɌɂɑȿɋɄɂȿ ɋɈȼȿɌɕ 117
PFLEGE UND WARTUNG 123
ɈȻɋɅɍɀɂȼȺɇɂȿ ɂ ɍɏɈȾ 125
UMWELTVERTRÄGLICHKEIT 137
ɈɏɊȺɇȺ ɈɄɊɍɀȺɘɓȿɃ ɋɊȿȾɕ 137
5
EN
INSTALLATION INSTRUCTIONS
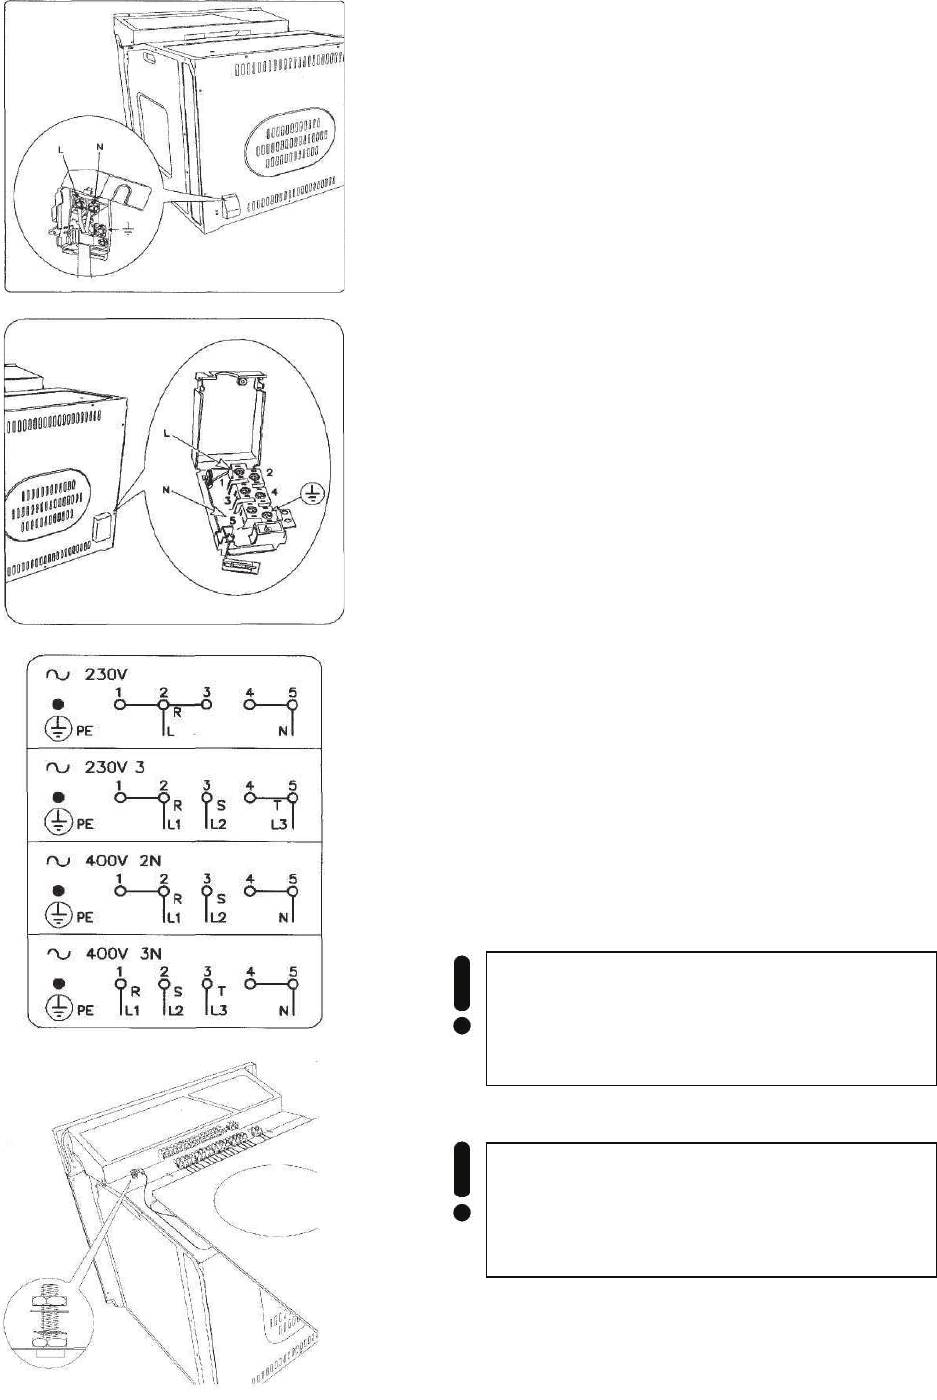
ELECTRICAL CONNECTION
Before connecting the oven to the mains power
supply, make sure that:
x The supply voltage corresponds to the
specifications on the data plate on the front
of the oven.
x The mains supply has an efficient ground
connection complying with all applicable
laws and regulations.
Correct grounding is a legal requirement. If the
appliance is not pre-fitted with a power cable
and/or plug, use only suitable cables and plugs
capable of handling the power specified on the
appliance's data plate and capable of resisting
heat. The power cable should never reach a
temperature 50 °C above ambient temperature at
any point along its length.
If the appliance is to be connected directly to
mains terminals, fit a switch with minimum
aperture of 3 mm between the contacts. Make sure
that the switch is of sufficient capacity for the
power specified on the appliance's data plate, and
compliant with applicable regulations. The switch
must not break the yellow-green earth wire. The
socket or switch must be easily reachable with the
oven fully installed.
Attention! Installation and electrical
connection must be made by a qualified
expert only.
Attention! The manufacturer declines all
responsibility for damage or injury if the
above instructions and normal safety
precautions are not respected.
6
DE RU
FÜR DEN INSTALLATEUR
ɂɇɋɌɊɍɄɐɂə ɉɈ ɆɈɇɌȺɀɍ
STROMANSCHLUSS
ɉɈȾɄɅɘɑȿɇɂȿ Ʉ ɗɅȿɄɌɊɈɋȿɌɂ
Vor der Durchführung des Stromanschlusses muss
ɉɟɪɟɞ ɩɨɞɤɥɸɱɟɧɢɟɦ ɞɭɯɨɜɤɢ ɤ ɷɥ. ɫɟɬɢ,
sichergestellt werden, dass:
ɧɟɨɛɯɨɞɢɦɨ ɭɛɟɞɢɬɶɫɹ, ɱɬɨ
x die Eigenschaften des Stromnetzes mit den
x ɩɚɪɚɦɟɬɪɵ ɫɟɬɢ ɫɨɨɬɜɟɬɫɬɜɭɸɬ ɞɚɧɧɵɦ ɜ
Werten auf dem angebrachten Typenschild
ɬɚɛɥɢɱɤɟ ɧɚ ɡɚɞɧɟɣ ɫɬɟɧɤɟ ɞɭɯɨɜɤɢ,
auf der hinteren Wand des Backofens
übereinstimmen;
x das Stromnetz gemäß den geltenden
x ɷɥ. ɫɟɬɶ ɡɚɡɟɦɥɟɧɚ ɜ ɫɨɨɬɜɟɬɫɬɜɢɢ ɫ
Bestimmungen und Rechtsvorschriften
ɞɟɣɫɬɜɭɸɳɢɦɢ ɩɪɟɞɩɢɫɚɧɢɹɦɢ.
geerdet ist.
Die Erdung ist eine notwendige Voraussetzung der
Ɂɚɡɟɦɥɟɧɢɟ ɹɜɥɹɟɬɫɹ ɧɟɨɛɯɨɞɢɦɵɦ ɭɫɥɨɜɢɟɦ
Nutzung des Gerätes. Falls der Backofen nicht mit
ɩɪɚɜɢɥɶɧɨɣ ɷɤɫɩɥɭɚɬɚɰɢɢ. ȿɫɥɢ ɞɭɯɨɜɤɚ ɧɟ
Kabel und\ oder Netzstecker ausgestattet ist, muss
ɨɛɨɪɭɞɨɜɚɧɚ ɤɚɛɟɥɟɦ ɢ/ɢɥɢ ɲɬɟɤɟɪɨɦ,
geeignetes Material verwendet werden, das der auf
ɩɪɢɦɟɧɹɣɬɟ ɬɨɥɶɤɨ ɦɚɬɟɪɢɚɥɵ,
dem Typenschild auf der hinteren Wand des
ɫɨɨɬɜɟɬɫɬɜɭɸɳɢɟ ɞɚɧɧɵɦ, ɭɤɚɡɚɧɧɵɦ ɜ
Gerätes angegebene Stromaufnahme und der
ɬɚɛɥɢɱɤɟ ɧɚ ɡɚɞɧɟɣ ɫɬɟɧɤɟ ɩɪɢɛ
ɨɪɚ, ɤɨɬɨɪɵɟ
Betriebstemperatur entspricht. Das Kabel darf an
ɦɨɝɭɬ ɮɭɧɤɰɢɨɧɢɪɨɜɚɬɶ ɜ ɪɚɛɨɱɟɦ ɪɟɠɢɦɟ
keiner Stelle keinesfalls eine Temperatur von über
ɬɟɦɩɟɪɚɬɭɪ. Ʉɚɛɟɥɶ ɧɢ ɜ ɤɨɟɦ ɫɥɭɱɚɟ ɧɟ
50 °C erreichen.
ɞɨɥɠɟɧ ɧɚɝɪɟɜɚɬɶɫɹ ɜɵɲɟ ɬɟɦɩɟɪɚɬɭɪɵ ɛɨɥɟɟ
50 °ɋ.
Wenn ein direkter Netzanschluss gewünscht wird,
ȼ ɫɥɭɱɚɟ ɩɨɞɫɨɟɞɢɧɟɧɢɹ ɧɟɩɨɫɪɟɞɫɬɜɟɧɧɨ ɤ ɷɥ.
muss ein allpoliger Schalter mit Kontaktöffnung von
ɫɟɬɢ, ɧɟɨɛɯɨɞɢɦɨ ɢɫɩɨɥɶɡɨɜɚɬɶ ɫɩɟɰɢɚɥɶɧɵɣ
min. 3mm vorgesehen werden, der erlaubt das
ɚɜɬɨɦɚɬɢɱɟɫɤɢɣ ɜɵɤɥɸɱɚɬɟɥɶ ɫ ɡɚɡɨɪɨɦ ɦɟɠɞɭ
Gerät vom Netz zu trennen, der den technischen
ɤɨɧɬɚɤɬɚɦɢ ɧɟ ɦɟɧɟɟ 3 ɦɦ, ɩɨɡɜɨɥɹɸɳɢɣ
Daten der geltenden Vorschriften entsprechen
ɨɬɫɨɟɞɢɧɹɬɶ ɩɪɢɛɨɪ ɨɬ ɫɟɬɢ, ɫɨɨɬɜɟɬɫɬɜɟɧɧɨ
muss (das gelb-grüne Erdungskabel darf nicht vom
ɬɟɯɧɢɱɟɫɤɢɦ ɞɚɧɧɵɦ ɞɟɣɫɬɜɭɸɳɢ
ɯ
genannten Schalter unterbrochen werden). Der
ɩɪɟɞɩɢɫɚɧɢɣ (ɠɟɥɬɨ-ɡɟɥɟɧɵɣ ɤɚɛɟɥɶ
Stecker bzw. der allpolige Schalter müssen bei
ɡɚɡɟɦɥɟɧɢɹ ɧɟ ɞɨɥɠɟɧ ɩɪɟɪɵɜɚɬɶɫɹ ɞɚɧɧɵɦ
installiertem Gerät problemlos zugänglich sein.
ɜɵɤɥɸɱɚɬɟɥɟɦ). ɒɬɟɤɟɪ ɢɥɢ ɚɜɬɨɦɚɬɢɱɟɫɤɢɣ
ɜɵɤɥɸɱɚɬɟɥɶ ɧɚ ɩɪɚɜɢɥɶɧɨ ɭɫɬɚɧɨɜɥɟɧɧɨɦ
ɩɪɢɛɨɪɟ ɞɨɥɠɟɧ ɛɵɬɶ ɜɫɟɝɞɚ ɥɟɝɤɨ ɞɨɫɹɝɚɟɦ.
Achtung! Die Montage und
ȼɧɢɦɚɧɢɟ! Ɇɨɧɬɚɠ ɢ ɩɨɞɤɥɸɱɟɧɢɟ
Stromnetzanschluss soll nur von einem
ɞɭɯɨɜɨɝɨ ɲɤɚɮɚ ɞɨɥɠɧɵ ɩɪɨɜɨɞɢɬɶɫɹ
qualifizierten Fachmann durchgeführt
ɬɨɥɶɤɨ ɤɜɚɥɢɮɢɰɢɪɨɜɚɧɧɵɦ
werden.
ɫɩɟɰɢɚɥɢɫɬɨɦ.
Achtung! Der Hersteller ist nicht haftbar,
ȼɧɢɦɚɧɢɟ! ɂɡɝɨɬɨɜɢɬɟɥɶ ɧɟ ɧɟɫɟɬ
wenn bei der Installation des Gerätes alle
ɧɢɤɚɤɨɣ ɨɬɜɟɬɫɬɜɟɧɧɨɫɬɢ, ɟɫɥɢ ɩɪɢ
obenangeführten Anweisungen nicht
ɭɫɬɚɧɨɜɤɟ ɩɪɢɛɨɪɚ ɧɟ ɫɨɛɥɸɞɚɸɬɫɹ ɜɫɟ
befolgt werden.
ɜɵɲɟɩɪɢɜɟɞɟɧɧɵɟ ɩɪɟɞɩɢɫɚɧɢɹ.
7
EN
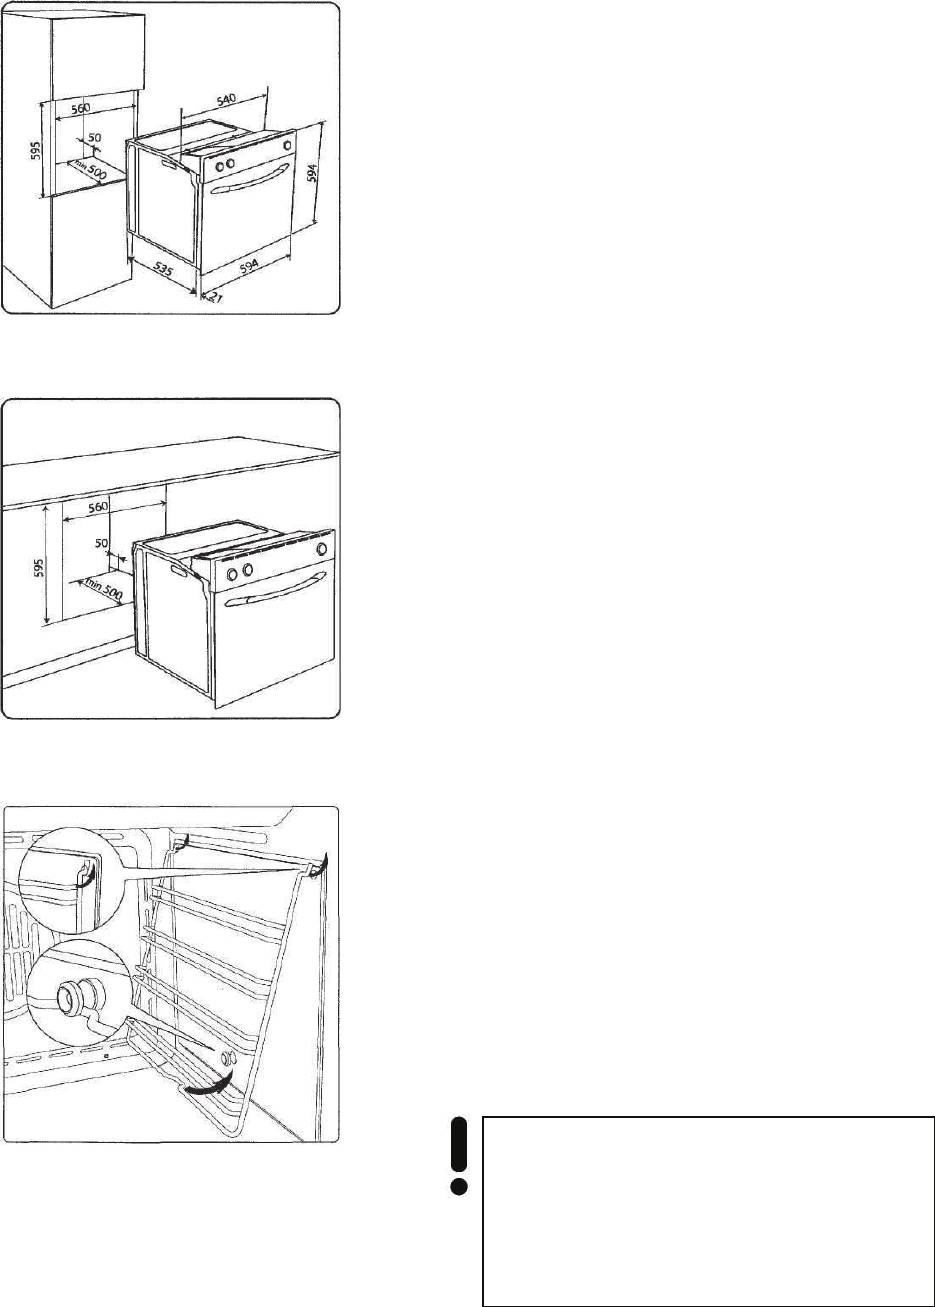
INSTALLATION OF THE OVEN
The oven can be installed under a work top or in a
cooking column. Figure shows the installation
dimensions. Make sure that surrounding materials
are heat resistant. Align the oven centrally with
respect to the side walls of the units surrounding it
and fix it in place with the screws and Allen screws
provided.
See the accompanying instructions for combining
the oven with multi-functional gas or gas-electric
cookers.
PREPARATION
Clean the oven thoroughly with soapy water and
rinse well. To remove the lateral frames from
smooth-walled ovens, proceed as shown in the
figure.
Operate the oven for about 30 minutes at
maximum temperature to burn off all traces of
grease which might otherwise create unpleasant
smells when cooking.
Important!!!
As a safety precaution, before cleaning the oven,
always disconnect the plug from the power socket
or the power cable from the oven. Do not use acid
or alkaline substances to clean the oven (lemon
juice, vinegar, salt, tomatoes etc.). Do not use
chlorine based products, acids or abrasive
products to clean the painted surfaces of the oven.
Attention! You must set the time on the
clock before you can use the oven.
(See chapter “Digital clock timer“).
If the time is not set, the oven will not work!
8
DE RU
EINBAU DES BACKOFENS
ɍɋɌȺɇɈȼɄȺ
Der Backofen kann unter einer Arbeitsplatte oder in
Ⱦɭɯɨɜɤɚ ɩɪɟɞɧɚɡɧɚɱɟɧɚ ɞɥɹ ɜɫɬɪɨɣɤɢ ɥɢɛɨ ɩɨɞ
einen Schrank eingebaut werden. Die Einbaumaße
ɪɚɛɨɱɭɸ ɩɨɜɟɪɯɧɨɫɬɶ ɫɬɨɥɚ, ɥɢɛɨ ɜ ɲɤɚɮ.
müssen den auf der Abbildung dargestellten
Ɋɚɡɦɟɪɵ, ɤɨɬɨɪɵɦɢ ɧɟɨɛɯɨɞɢɦɨ
Massen entsprechen. Das Möbelmaterial muss
ɪɭɤɨɜɨɞɫɬɜɨɜɚɬɶɫɹ ɩɪɢ ɜɫɬɪɨɣɤɟ, ɭɤɚɡɚɧɵ ɧɚ
hitzebeständig sein. Der Backofen muss zu den
ɪɢɫɭɧɤɟ. Ɇɟɛɟɥɶ ɞɨɥɠɧɚ ɛɵɬɶ ɢɡɝɨɬɨɜɥɟɧɚ ɢɡ
Möbelwänden zentriert, und mit den mitgelieferten
ɧɚɝɪɟɜɨɫɬɨɣɤɨɝɨ ɦɚɬɟɪɢɚɥɚ. Ⱦɭɯɨɜɤɚ ɞɨɥɠɧɚ
Schrauben und Buchsen befestigt werden.
ɛɵɬɶ ɨɬɰɟɧɬɪɨɜɚɧɚ ɩɨ ɨɬɧɨɲɟɧɢɸ ɤ ɫɬɟɧɤɚɦ
ɦɟɛɟɥɢ ɢ ɧɚɞɟɠɧɨ ɡɚɤɪɟɩɥɟɧɚ ɩɪɢ ɩɨɦɨɳɢ
ɩɨɫɬɚɜɥɹɟɦɵɯ ɜ ɤɨɦɩɥɟɤɬɟ ɤɪɟɩɟɠɧɵɯ
ɦɚɬɟɪɢɚɥɨɜ.
Für die Kombination des Backofens mit den Gas-
Ⱦɥɹ ɤɨɦɛɢɧɚɰɢɢ ɞɭɯ
ɨɜɤɢ ɫ ɝɚɡɨɜɨɣ ɢɥɢ ɝɚɡɨ-
oder Gas-Elektrokombikochfeldern siehe
ɷɥɟɤɬɪɢɱɟɫɤɨɣ ɩɨɜɟɪɯɧɨɫɬɶɸ ɢɫɩɨɥɶɡɭɣɬɟ
beiliegende Anleitungen.
ɩɪɢɤɥɚɞɵɜɚɟɦɭɸ ɞɨɤɭɦɟɧɬɚɰɢɸ.
VORBEREITUNG
ɉɈȾȽɈɌɈȼɄȺ
Vor dem ersten Gebrauch muss der Backofen
ɉɟɪɟɞ ɩɟɪɜɵɦ ɩɨɥɶɡɨɜɚɧɢɟɦ ɬɳɚɬɟɥɶɧɨ
gründlich mit Seifenwasser gesäubert und
ɨɱɢɫɬɢɬɶ ɞɭɯɨɜɤɭ ɦɵɥɶɧɵɦ ɪɚɫɬɜɨɪɨɦ ɢ ɯɨɪɨɲɨ
anschließend mit klarem Wasser abgewaschen
ɩɪɨɦɵɬɶ ɞɨɫɬɚɬɨɱɧɵɦ ɤɨɥɢɱɟɫɬɜɨɦ ɜɨɞɵ.
werden. Die mitgelieferten Einhängegitter auf die
ɇɚɜɟɫɢɬɶ ɧɚ ɛɨɤɨɜɵɟ ɫɬɟɧɤɢ ɩɨɫɬɚɜɥɹɟɦɵɟ ɜ
Seitenwände einbauen und die Gitter und Bleche
ɤɨɦɩɥɟɤɬɟ ɥɟɫɬɧɢɱɤɢ ɢ ɭɫɬɚɧɨɜɢɬɶ ɧɚ ɧɢɯ
aufstellen. Den Backofen für etwa 30 Minuten auf
ɪɟɲɟɬɤɢ ɢ ɩɪɨɬɢɜɧɢ. ȼ ɬɟɱɟɧɢɟ ɩɪɢɦɟɪɧɨ 30
Höchsttemperatur aufheizen, auf diese Weise
ɦɢɧɭɬ ɩɪɨɝɪɟɬɶ ɞɭɯɨɜɤɭ ɞɨ ɦɚɤɫɢɦɚɥɶɧɨɣ
werden alle fetthaltigen Bearbeitungsrückstände
ɬɟɦɩɟɪɚɬɭɪɵ, ɩɪɢ ɷɬɨɦ ɧɟɣɬɪɚɥɢɡɭɸɬɫɹ ɜɫɟ
eliminiert, die beim Backen unangenehme Gerüche
ɠɢɪɨɫɨɞɟɪɠɚɳɢɟ ɜɟɳɟɫɬɜɚ, ɢɫɩɨɥɶɡɭɟɦɵɟ ɩɪɢ
verursachen könnten.
ɩɪɨɢɡɜɨɞɫɬɜɟɧɧɨɣ ɨɛɪɚɛɨɬɤɟ ɢɡɞɟɥɢɹ, ɤɨɬɨɪɵɟ
ɦɨɝɭɬ ɨɛɭɫɥɨɜɢɬɶ ɩɨɹɜɥɟɧɢɟ ɧɟɩɪɢɹɬɧɵɯ
ɡɚɩɚɯɨɜ ɩɪɢ ɩɟɪɜɨɦ ɩɪɢɝɨɬɨɜɥɟɧɢɢ ɛɥɸɞ.
Wichtig!!!
ȼɚɠɧɨ!!!
Als Sicherheitsvorkehrung muss vor jeder
ȼ ɤɚɱɟɫɬɜɟ ɦɟɪɵ ɩɪɟɞɨɫɬɨɪɨɠɧɨɫɬɢ
Reinigung des Backofens immer das Stromnetz
ɧɟɨɛɯɨɞɢɦɨ ɩɟɪɟɞ ɤɚɠɞɨɣ ɱɢɫɬɤɨɣ ɞɭɯɨɜɤɢ
abgeschaltet werden. Zum Reinigen dürfen keine
ɨɬɤɥɸɱɚɬɶ ɟɟ ɨɬ ɫɟɬɢ. ɇɟ ɩɪɢɦɟɧɹɣɬɟ ɞɥɹ
sauren oder alkalischen Substanzen verwendet
ɱɢɫɬɤɢ ɤɢɫɥɨɬɨ- ɢɥɢ ɳɟɥɨɱɟɫɨɞɟɪɠɚɳɢɯ
werden (Zitronensaft, Essig, Salz, usw.).
ɜɟɳɟɫɬɜ (ɭɤɫɭɫ, ɫɨɤ ɥɢɦɨɧɚ, ɫɨɥɶ ɢ ɬ.ɞ.). ɇɢ ɜ
Chlorhaltige Produkte (Bleichmittel u. s. w.) sind
ɤɨɟɦ ɫɥɭɱɚɟ ɧɟ ɩɪɢɦɟɧɹɣɬɟ ɬɚɤɠɟ
ebenfalls zu vermeiden, dies gilt vor allem für die
ɯɥɨɪɨɫɨɞɟɪɠɚɲɢɟ ɫɪɟɞɫɬɜɚ (ɨɬɛɟɥɢɜɚɸɳɢɟ ɢ
Reinigung der emaillierten Oberflächen
ɬ.ɞ.). Ɉɫɨɛɟɧɧɨ ɷɬɨ ɧɭɠɧɨ ɢɦɟɬɶ ɜ ɜɢɞɭ ɩɪɢ
ɱɢɫɬɤɟ ɷɦɚɥɢɪɨɜɚɧɧɵɯ ɩɨɜɟɪ
ɯɧɨɫɬɟɣ ɞɭɯɨɜɨɤ.
ȼɧɢɦɚɧɢɟ! ɉɟɪɟɞ ɩɟɪɜɵɦ
ɢɫɩɨɥɶɡɨɜɚɧɢɟɦ ɞɭɯɨɜɤɢ ɧɟɨɛɯɨɞɢɦɨ
ɜɵɫɬɚɜɢɬɶ ɬɟɤɭɳɟɟ ɜɪɟɦɹ ɧɚ
ɱɚɫɚɯ (ɫɦ. ɪɚɡɞɟɥ „ɗɥɟɤɬɪɨɧɧɨɟ
ɩɪɨɝɪɚɦɦɢɪɭɸɳɟɟ ɭɫɬɪɨɣɫɬɜɨ“).
ȼɩɪoɬɢɜɧɨɦ ɫɥɭɱɚɟ ɞɭɯɨɜɤɚ ɧɟ ɛɭɞɟɬ
9
ɪ
Achtung! Vor dem ersten Gebrauch des
Backofens muss die aktuelle Tageszeit
eingestellt werden. (siehe Kapitel
„Elektronische Zeitschaltuhr.“).
Ohne eingestellte Uhr funktioniert der
Backofen nicht!
ɚɛɨɬɚɬɶ!
EN
BRIEF DESCRIPTION
LOCATION DRAWING
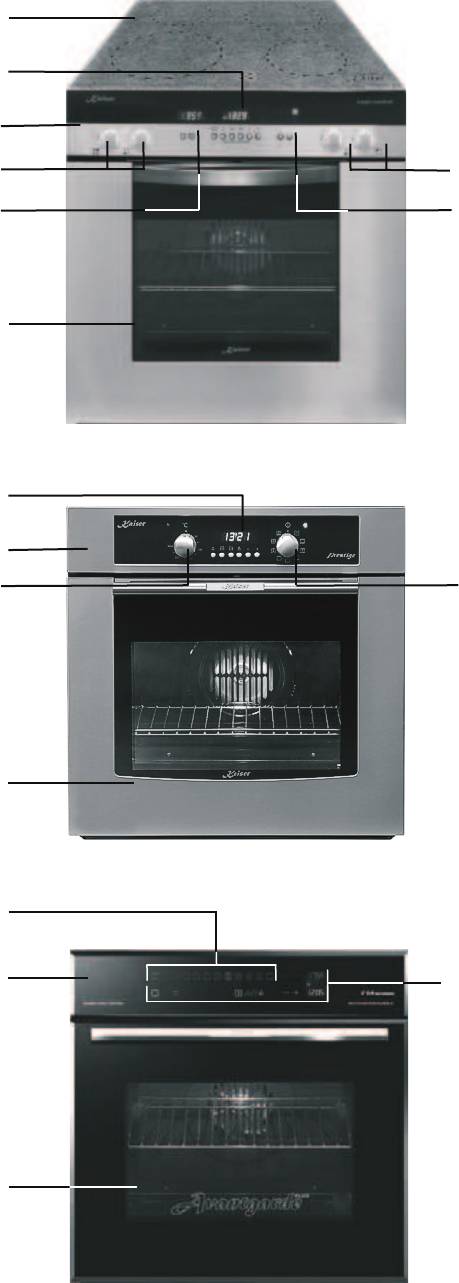
Arrangement of functional assemblies
10
1. Vitroceramic cooking hob
2. Rotary handles of the cooking zones
regulator
3. Rotary handles / keys of the oven
temperature regulator
4. Rotary handles / keys of the oven operating
functions
5. Control panel
6. Oven door
7. Digital clock timer
8. Funɫtions set area
Different control panels are put on different models
according to their technical equipment on which
the operating elements are arranged sensibly.
1
2
2
6
5
3 4
6
7
5
4
3
8
7
7
5
6
DE RU
KURZBESCHREIBUNG
GESAMTANSICHT
Anordnung von Funktionsbaugruppen
11
ɄɊȺɌɄɈȿ ɈɉɂɋȺɇɂȿ
ȼɇȿɒɇɂɃ ȼɂȾ
ɉɪɢɦɟɪɧɨɟ ɪɚɡɦɟɳɟɧɢɟ ɮɭɧɤɰɢɨɧɚɥɶɧɵɯ
ɭɡɥɨɜ
1. Ʉɟɪɚɦɢɱɟɫɤɚɹ ɩɨɜɟɪɯɧɨɫɬɶ ɫ
1. Glaskeramik-Kochfeld mit Kochzonen
ɧɚɝɪɟɜɚɬɟɥɶɧɵɦɢ ɩɨɥɹɦɢ
2. Ɋɭɱɤɢ / ɤɧɨɩɤɢ ɭɩɪɚɜɥɟɧɢɹ
2. Drehknebel der Kochzonenregler
ɧɚɝɪɟɜɚɬɟɥɶɧɵɯ ɩɨɥɟɣ
3. Ɋɭɱɤɢ / ɤɧɨɩɤɢ ɬɟɪɦɨɪɟɝɭɥɹɬɨɪɚ ɞɭɯɨɜɤɢ
3. Drehknebel / Tasten des
Backofentemperaturreglers
4. Ɋɭɱɤɢ / ɤɧɨɩɤɢ ɪɟɠɢɦɚ ɪɚɛɨɬɵ ɞɭɯɨɜɤɢ
4. Drehknebel / Tasten der
Backofenbetriebsfunktionen
5. ɉaɧeɥɶ ɭɩɪɚɜɥɟɧɢɹ
5. Bedienblende
6. Ⱦɜɟɪɶ ɞɭɯɨɜɨɝɨ ɲɤɚɮɚ
6. Backofentür
7. ɗɥɟɤɬɪɨɧɧɨɟ ɩɪɨɝɪɚɦɦɢɪɭɸɳɟɟ
7. Elektronische Zeitschaltuhr
ɭɫɬɪɨɣɫɬɜɨ
8. Ɉɛɥɚɫɬɶ ɭɫɬɚɧɨɜɤɢ ɮɭɧɤɰɢɣ
8. Bereich für Funktioneneinstellungen
Verschiedene Modelle, je nach ihrer technischen
Ɉɬɞɟɥɶɧɵɟ ɦɨɞɟɥɢ, ɜ ɡɚɜɢɫɢɦɨɫɬɢ ɨɬ ɢɯ
Ausrüstung, sind mit verschiedenen Bedienblenden
ɬɟɯɧɢɱɟɫɤɨɝɨ ɨɛɨɪɭɞɨɜɚɧɢɹ, ɢɦɟɸ
ɬ ɪɚɡɥɢɱɧɵɟ
versehen, an denen die Bedienelemente sinnvoll
ɩɚɧɟɥɢ ɭɩɪɚɜɥɟɧɢɹ ɫ ɫɨ
ɨɬɜɟɬɫɬɜɟɧɧɨ
angeordnet sind.
ɪɚɡɦɟɳɟɧɧɵɦɢ ɧɚ ɧɢɯ ɷɥɟɦɟɧɬɚɦɢ ɭɩɪɚɜɥɟɧɢɹ.
EN
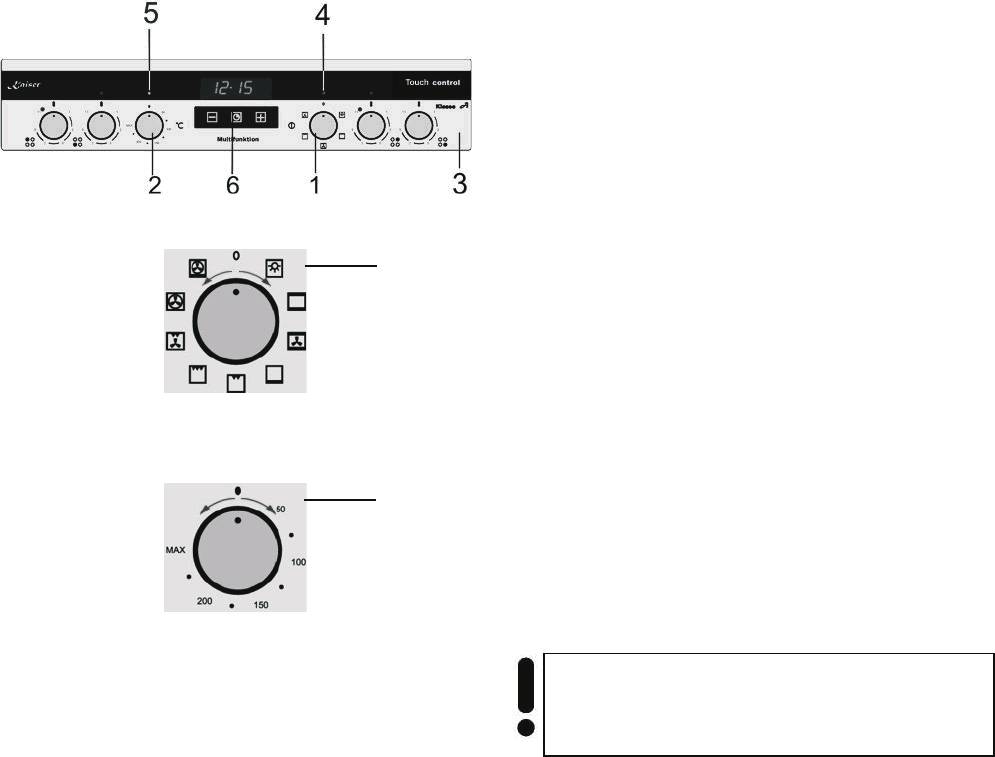
CONTROL PANEL
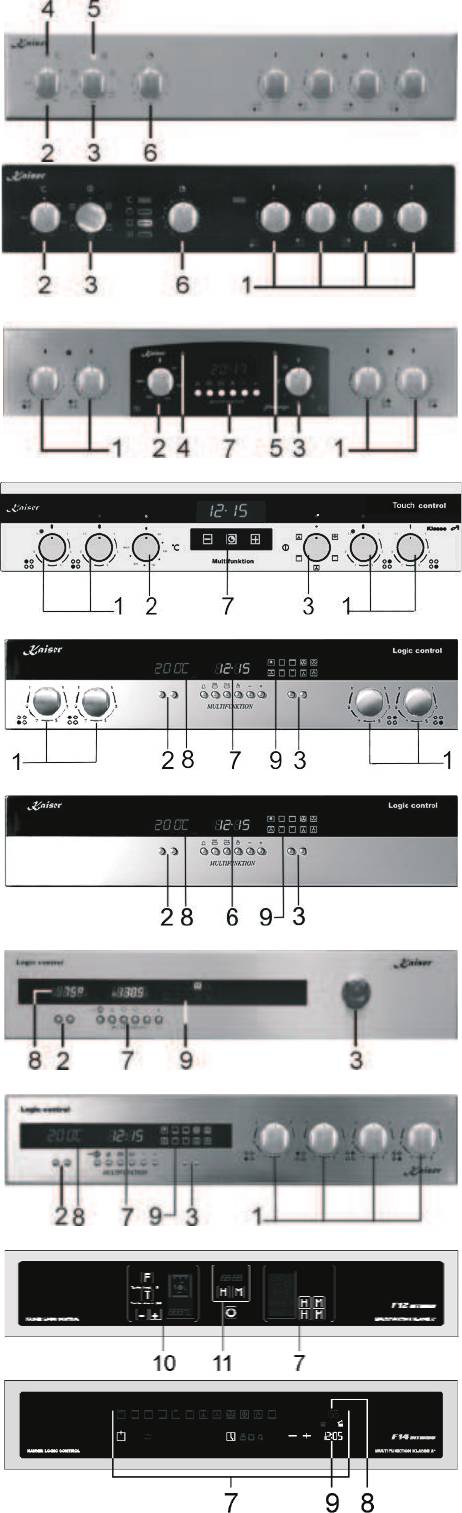
Control Panels of the models Prestige*
12
*
with Timer
Control panels of the models Prestige*
*
with clock timer
Control panels of the models Touch control*
*
with clock timer with sensor
Control panels of the models Logic control*
*
with Digital clock timer
1. Rotary handles of cooking zones
2. Rotary handles / keys of the oven
temperature regulator
3. Rotary handles / keys of the oven oven
operating functions
4. Controlling light ON/OFF (yellow)
5. Oven operation - Controlling light (red)
6. Rotary clutch of the timer
7. Digital time switch clock
8. Temperature indicator
9. Oven function indicator
10. Funktion/ temperature set area
11. Clock setting/ ON-OFF area
Control panels of the models
Logic control* with full sensor control
*
– electronic time switch clock can be executed differently
according to the model. See a precise description in the
suitable chapter.
DE RU
BEDIENBLENDE
Bedienblende von Modellen Prestige*
13
*
mit Kurzzeitwecker
Bedienblende von Modellen Prestige*
mit elektronischer Zeitschaltuhr
Bedienblende von Modellen Touch control *
mit elektronischer Zeitschaltuhr mit
Sensorbedienung
Bedienblende von Modellen Logic control*
ɉȺɇȿɅɖ ɍɉɊȺȼɅȿɇɂə
ɉɚɧɟɥɢ ɭɩɪɚɜɥɟɧɢɹ ɦɨɞɟɥɟɣ Prestige*
mit elektronischer Zeitschaltuhr
1. Drehknebel der Kochzonenregler
2. Drehknebel / Tasten des
Backofentemperaturreglers
3. Drehknebel / Tasten der
Backofenbetriebsfunktionen
4. Kontrollleuchte ON/OFF (gelb)
5. Backofenbetrieb - Kontrollleuchte (rot)
6. Drehknebel des Kurzzeitweckers
7. Elektronische Zeitschaltuhr
8. Temperaturanzeige
9. Backofenfunktionsanzeige
10. Bereich für Temperutur-/
Funktioneneinstellungen
11. Bereich für Uhreinstellung, Ein-/ Auschalten
vom Backofen
Bedienblende von Modellen Logic control*
mit mit Vollsensorbedienung
*
– elektronische Zeitschaltuhr kann je nach Modell
unterschiedlich ausgeführt werden. Genaue Beschreibung
siehe im entsprechenden Kapitel.
*
ɫ ɦɢɧɭɬɧɢɤɨɦ
ɉɚɧɟɥɢ ɭɩɪɚɜɥɟɧɢɹ ɦɨɞɟɥɟɣ Prestige*
*
ɫ ɷɥɟɤɬɪɨɧɧɵɦ ɩɪɨɝɪɚɦɦɢɪɭɸɳɢɦ
ɭɫɬɪɨɣɫɬɜɨɦ
ɉɚɧɟɥɢ ɭɩɪɚɜɥɟɧɢɹ ɦɨɞɟɥɟɣ
Touch control *
*
ɫ ɫɟɧɫɨɪɧɵɦ ɷɥɟɤɬɪɨɧɧɵɦ
ɩɪɨɝɪɚɦɦɢɪɭɸɳɢɦ ɭɫɬɪɨɣɫɬɜɨɦ
ɉɚɧɟɥɢ ɭɩɪɚɜɥɟɧɢɹ ɦɨɞɟɥɟɣ Logic control*
*
ɫ ɷɥɟɤɬɪɨɧɧɵɦ ɩɪɨɝɪɚɦɦɢɪɭɸɳɢɦ
ɭɫɬɪɨɣɫɬɜɨɦ
1. Ɋɭɱɤɢ ɭɩɪɚɜɥɟɧɢɹ ɧɚɝɪɟɜɚɬɟɥɶɧɵɯ ɩɨɥɟɣ
2. Ɋɭɱɤɢ / ɤɧɨɩɤɢ ɬɟɪɦɨɪɟɝɭɥɹɬɨɪɚ ɞɭɯɨɜɤɢ
3. Ɋɭɱɤɢ / ɤɧɨɩɤɢ ɪɟɠɢɦɚ ɪɚɛɨɬɵ ɞɭɯɨɜɤɢ
4. Ʉɨɧɬɪɨɥɶɧɚ
ɹ ɥɚɦɩɚ ȼɤɥ/ȼɵɤɥ (ɠɟɥɬ.)
5. Ʉɨɧɬɪɨɥɶɧɚɹ ɥɚɦɩɚ ɪɚɛɨɬɵ
ɞɭɯɨɜɤɢ(ɤɪɚɫɧ.)
6. Ɋɭɱɤɚ ɦɢɧɭɬɧɢɤɚ
7. ɗɥɟɤɬɪɨɧɧɨɟ ɩɪɨɝɪɚɦɦɢɪɭɸɳɟɟ
ɭɫɬɪɨɣɫɬɜɨ
8. Ⱦɢɫɩɥɟɣ ɡɧɚɱɟɧɢɹ ɬɟɦɩɟɪɚɬɭɪɵ
9. Ⱦɢɫɩɥɟɣ ɮɭɧɤɰɢɣ ɞɭɯɨɜɤɢ
10. Ɉɛɥɚɫɬɶ ɭɫɬɚɧɨɜɤɢ ɬɟɦɩɟɪɚɬɭɪ/ ɮɭɧɤɰɢɣ
11. Ɉɛɥɚɫɬɶ ɭɫɬɚɧɨɜɤɢ ɱɚɫɨɜ, ȼɤɥɸɱɟɧɢɟ/
Ɉɬɤɥɸɱɟɧɢɟ ɞɭɯɨɜɨɝɨ ɲɤɚɮɚ
ɉɚɧɟɥɶ ɭɩɪɚɜɥɟɧɢɹ ɦɨɞɟɥɟɣ Logic control*
c ɩɨɥɧɵɦ ɫɟɧɫɨɪɧɵɦ ɭɩɪɚɜɥɟɧɢɟɦ
*
– ɷɥɟɤɬɪɨɧɧɨɟ ɩɪɨɝɪɚɦɦɢɪɭɸɳɟɟ ɭɫɬɪɨɣɫɬɜɨ, ɜ
ɡɚɜɢɫɢɦɨɫɬɢ ɨɬ ɦɨɞɟɥɢ, ɦɨɠɟɬ ɛɵɬɶ ɪɚɡɥɢɱɧɵɦ.
Ɍɨɱɧɨɟ ɨɩɢɫɚɧɢɟ ɫɦɨɬɪɢɬɟ ɜ ɫɨɨɬɜɟɬɫɬɜɭɸɳɟɦ ɪɚɡɞɟɥɟ.

EN
Control Panels of the models Prestige*
14
*
with Timer
Control Panels of the models Belle Epoque
with mechanical timer
Control panels of the models Prestige*
*
with clock timer
Control panels of the models Logic control*
*
with Digital clock timer
1. Rotary handles of cooking zones
2. Rotary handles / keys of the oven
temperature regulator
3. Rotary handles / keys of the oven oven
operating functions
4. Controlling light ON/OFF (yellow)
5. Oven operation - Controlling light (red)
6. Rotary clutch of the timer
7. Digital time switch clock
8. Temperature indicator
9. Oven function indicator
*
– electronic time switch clock can be executed differently
according to the model. See a precise description in the
suitable chapter.
DE RU
Bedienblende von Modellen Prestige*
15
*
ɉɚɧɟɥɢ ɭɩɪɚɜɥɟɧɢɹ ɦɨɞɟɥɟɣ Prestige*
mit Kurzzeitwecker
Bedienblende von Modellen Belle Epoque
mit mechaniche Zeitschaltuhr
Bedienblende von Modellen Prestige*
mit elektronischer Zeitschaltuhr
Bedienblende von Modellen Logic control*
mit elektronischer Zeitschaltuhr
1. Drehknebel der Kochzonenregler
2. Drehknebel / Tasten des
Backofentemperaturreglers
3. Drehknebel / Tasten der
Backofenbetriebsfunktionen
4. Kontrollleuchte ON/OFF (gelb)
5. Backofenbetrieb - Kontrollleuchte (rot)
6. Drehknebel des Kurzzeitweckers
7. Elektronische Zeitschaltuhr
8. Temperaturanzeige
9. Backofenfunktionsanzeige
*
– elektronische Zeitschaltuhr kann je nach Modell
unterschiedlich ausgeführt werden. Genaue Beschreibung
siehe im entsprechenden Kapitel.
*
ɫ ɦɢɧɭɬɧɢɤɨɦ
ɉɚɧɟɥɢ ɭɩɪɚɜɥɟɧɢɹ ɦɨɞɟɥɟɣ Belle Epoque
ɫ ɦɟɯɚɧɢɱɟɫɤɢɦ ɬɚɣɦɟɪɨɦ
ɉɚɧɟɥɢ ɭɩɪɚɜɥɟɧɢɹ ɦɨɞɟɥɟɣ Prestige*
*
ɫ ɷɥɟɤɬɪɨɧɧɵɦ ɩɪɨɝɪɚɦɦɢɪɭɸɳɢɦ
ɭɫɬɪɨɣɫɬɜɨɦ
ɉɚɧɟɥɢ ɭɩɪɚɜɥɟɧɢɹ ɦɨɞɟɥɟɣ Logic control*
*
ɫ ɷɥɟɤɬɪɨɧɧɵɦ ɩɪɨɝɪɚɦɦɢɪɭɸɳɢɦ
ɭɫɬɪɨɣɫɬɜɨɦ
1. Ɋɭɱɤɢ ɭɩɪɚɜɥɟɧɢɹ ɧɚɝɪɟɜɚɬɟɥɶɧɵɯ ɩɨɥɟɣ
2. Ɋɭɱɤɢ / ɤɧɨɩɤɢ ɬɟɪɦɨɪɟɝɭɥɹɬɨɪɚ ɞɭɯɨɜɤɢ
3. Ɋɭɱɤɢ / ɤɧɨ
ɩɤɢ ɪɟɠɢɦɚ ɪɚɛɨɬɵ ɞɭɯɨɜɤɢ
4. Ʉɨɧɬɪɨɥɶɧɚɹ ɥɚɦɩɚ ȼɤɥ/ȼɵɤɥ (ɠɟɥɬ.)
5. Ʉɨɧɬɪɨɥɶɧɚɹ ɥɚɦɩɚ ɪɚɛɨɬɵ
ɞɭɯɨɜɤɢ(ɤɪɚɫɧ.)
6. Ɋɭɱɤɚ ɦɢɧɭɬɧɢɤɚ
7. ɗɥɟɤɬɪɨɧɧɨɟ ɩɪɨɝɪɚɦɦɢɪɭɸɳɟɟ
ɭɫɬɪɨɣɫɬɜɨ
8. Ⱦɢɫɩɥɟɣ ɡɧɚɱɟɧɢɹ ɬɟɦɩɟɪɚɬɭɪɵ
9. Ⱦɢɫɩɥɟɣ ɮɭɧɤɰɢɣ ɞɭɯɨɜɤɢ
*
– ɷɥɟɤɬɪɨɧɧɨɟ ɩɪɨɝɪɚɦɦɢɪɭɸɳɟɟ ɭɫɬɪɨɣɫɬɜɨ, ɜ
ɡɚɜɢɫɢɦɨɫɬɢ ɨɬ ɦɨɞɟɥɢ, ɦɨɠɟɬ ɛɵɬɶ ɪɚɡɥɢɱɧɵɦ.
Ɍɨɱɧɨɟ ɨɩɢɫɚɧɢɟ ɫɦɨɬɪɢɬɟ ɜ ɫɨɨɬɜɟɬɫɬɜɭɸɳɟɦ ɪɚɡɞɟɥɟ.
EN
EQUIPMENT
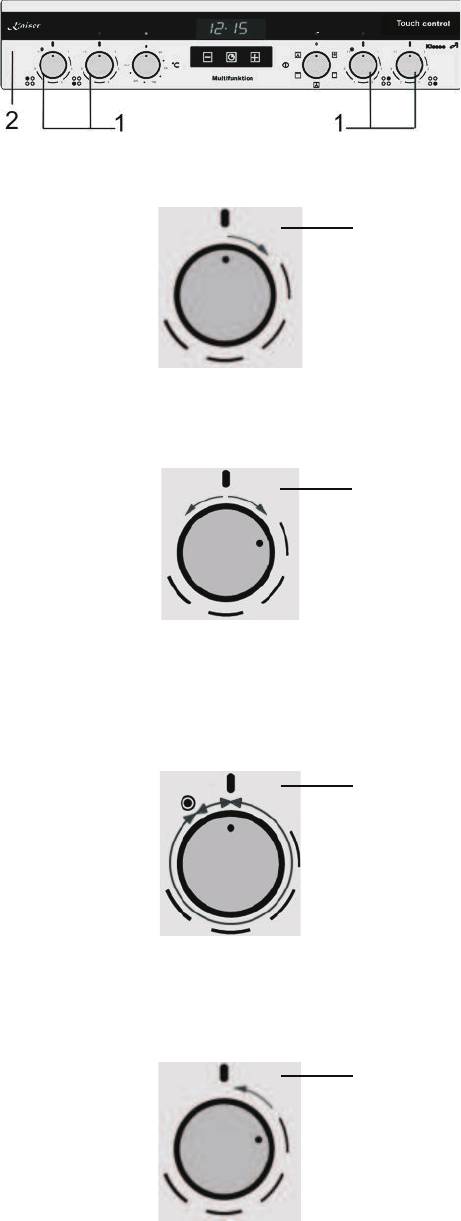
COOKNG ZONES CONTROL
The cooking zones regulation ensues with the
help of rotary handles 1 which are set up on the
control panel 2 of the oven.
3
The graphic symbols which are beside the rotary
handles of the cooking zones shows which
cooking zone the chosen rotary clutch manages.
To turn on or regulate a cooking zone do the
following:
x Turn the rotary handle clockwise 3
x Bring the rotary handle to the chosen
position 4.
4
You can regulate the amount of the heat supply to
the dishes fluently within the rotary area.
The double field heating elements are steered by
the energy regulators with the integrated switch of
the outer field.
You can regulate the amount of the heat supply to
the dishes fluently within the rotary area up to
5
symbol 5 only for the inner cooking zone. To turn
off the outer field:
x Turn rotary handle clockwise as far as it
will go and let go.
By this moment you can regulate the amount of
the heat supply to the dishes fluently for both
cooking zones (inner and outer).
To turn off the cooking zones 6 bring the rotary
handle to position «0»
6
If the control panel of your oven is equipped with
rotary handles Push (sunk rotary handles), for
the control with these rotary handles is necessary:
x Push the rotary handle carefully and let it
go
The rotary handle will come out of the control
panel
To countersink the rotary handle:
x Push the rotary handle as far as it will go
and let go
16
DE RU
AUSSTATUNG
ɈȻɈɊɍȾɈȼȺɇɂȿ
KOCHFELDERSTEUERUNG
ɍɉɊȺȼɅȿɇɂȿ ɊȺȻɈɌɈɃ
ɇȺȽɊȿȼȺɌȿɅɖɇɕɏ ɉɈɅȿɃ
Die Kochzonensteuerung erfolgt mit Hilfe von
ɍɩɪɚɜɥɟɧɢɟ ɪɟɠɢɦɨɦ ɪɚɛɨɬɵ ɧɚɝɪɟɜɚɬɟɥɶɧɵɯ
Drehknebel 1, die auf der Bedienblende des
ɩɨɥɟɣ ɨɫɭɳɟɫɬɜɥɹɟɬɫɹ ɩɨɜɨɪɨɬɨɦ ɪɭɱɟɤ
Backofens 2 eingerichtet sind.
Die graphischen Symbole, die sich neben den
Drehknebel der Kochzonen befinden, zeigen, über
welche Kochzone der gewählten Drehknebel
verwaltet.
Zum Einschalten oder zur Regulierung einer
Kochzone müssen sie wie folgt vorgehen:
x Drehknebel im Uhrzeigersinn drehen 3
x den Drehknebel in ausgewählte Position
bringen 4
In dem Drehbereich kann man fließend die Menge
der Wärmezufuhr zum Geschirr regulieren.
Die Heizelemente mit dem doppelten Feld werden
durch den Energieregler, mit dem eingebauten
Schalter des Außenfeldes gesteuert.
In dem Drehbereich bis zum Symbol 5 kann man
fließend die Menge der Wärmezufuhr zum Geschirr
nur von innerem Kochfeld regulieren. Zum
Einschalten des Außenfeldes:
x Drehknebel bis zum Anschlag im
Uhrzeigersinn umdrehen und loslassen.
Von diesem Moment kann man fließend die Menge
der Wärmezufuhr zum Geschirr von beiden
Kochfeldern (inneres und äußeres) regulieren
Zum Abschalten beider Kochfeldern 6 den
Drehknebel in die Position «0» bringen.
Wenn die Bedienblende Ihres Backofens mit
Drehknebeln Push (versenkbare Drehknebel)
ausgestattet ist, ist zur Steuerung mit diesen
Drehknebeln nötig:
x den Drehknebel vorsichtig drücken und
loslassen.
Drehknebel wird aus der Bedienblende
herauskommen.
Um den Drehknebel wieder zu versenken,:
x den Drehknebel vorsichtig bis zum
Anschlag drücken und loslasse
17
1
,
ɭɫɬɚɧɨɜɥɟɧɧɵɯ ɧɚ ɩɚɧɟɥɢ ɭɩɪɚɜɥɟɧɢɹ ɞɭɯɨɜɨɝɨ
ɲɤɚɮɚ
2
.
Ƚɪɚɮɢɱɟɫɤɢɟ ɨɛɨɡɧɚɱɟɧɢɹ, ɭɫɬɚɧɨɜɥɟɧɧɵɟ
ɪɹɞɨɦ ɫ ɪɭɱɤɚɦɢ ɭɩɪɚɜɥɟɧɢɹ ɧɚɝɪɟɜɚɬɟɥɶɧɵɦɢ
ɩɨɥɹɦɢ ɩɨɤɚɡɵɜɚɸɬ, ɤɚɤɢɦ ɧɚɝɪɟɜɚɬɟɥɶɧɵɦ
ɩɨɥɟɦ ɭɩɪɚɜɥɹɟɬ ɜɵɛɪɚɧɧɚɹ ɪɭɱɤɚ.
Ⱦɥɹ ɜɤɥɸɱɟɧɢɹ ɧɚɝɪɟɜɚɬɟɥɶɧɨɝɨ ɩɨɥɹ ɢɥɢ
ɪɟɝɭɥɢɪɨɜɤɢ ɦɨɳɧɨɫɬɢ ɧɚɝɪɟɜɚɬɟɥɶɧɨɝɨ ɩɨɥɹ
ɫɥɟɞɭɟɬ:
x ɩɨɜɟɪɧɭɬɶ ɪɭɱɤɭ ɩɨ ɱɚɫɨɜɨɣ ɫɬɪɟɥɤɟ 3 .
x ɭɫɬɚɧɨɜɢɬɶ ɪɭɱɤɭ ɜ ɢɡɛɪɚɧɧɨɟ
ɩɨɥɨɠɟɧɢɟ 4
ȼ ɩɪɟɞɟɥɚɯ ɪɟɝɭɥɹɬɨɪɚ ɜɨɡɦɨɠɧɚ ɩɥɚɜɧɚɹ
ɪɟɝɭɥɢɪɨɜɤɚ ɤɨɥɢɱɟɫɬɜɚ ɬɟɩɥɚ ɧɚɝɪɟɜɚɬɟɥɶɧɨɝɨ
ɩɨɥɹ.
ɇɚɝɪɟɜɚɬɟɥɶɧɵɟ ɷɥɟɦɟɧɬɵ ɫ ɞɜɨɣɧɵɦ ɩɨɥɟɦ
ɭɩɪɚɜɥɹɸɬɫɹ ɩɪɢ ɩɨɦɨɳɢ ɪɟɝɭɥɹɬɨɪɚ ɫɨ
ɜɫɬɪɨɟɧɧɵɦ ɜɵɤɥɸɱɚɬɟɥɟɦ ɜɧɟɲɧɟɝɨ ɩɨɥɹ.
ȼ ɩɪɟɞɟɥɚɯ ɪɟɝɭɥɹɬɨɪɚ ɞɨ ɡɧɚɤɚ 5, ɜɨɡɦɨɠɧɚ
ɩɥɚɜɧɚɹ ɪɟɝɭɥɢɪɨɜɤɚ ɤɨɥɢɱɟɫɬɜɚ ɬɟɩɥɚ ɬɨɥɶɤɨ
ɜɧɭɬɪɟɧɧɟɝɨ ɩɨɥɹ. Ⱦɥɹ ɜɤɥɸɱɟɧɢɹ ɜɧɟɲɧɟɝɨ
ɧɚɝɪɟɜɚɬɟɥɶɧɨɝɨ ɩɨɥɹ:
x ɪɭɱɤɭ ɩɨɜɟɪɧɭɬɶ ɞɨ ɭɩɨɪɚ ɩɨ ɱɚɫɨɜɨɣ
ɫɬɪɟɥɤɟ ɢ ɨɬɩɭɫɬɢɬɶ.
ɋ ɷɬɨɝɨ ɦɨɦɟɧɬɚ, ɜɨɡɦɨɠɧɚ ɩɥɚɜɧɚɹ
ɪɟɝɭɥɢɪɨɜɤɚ ɨɛɨɢɯ ɧɚɝɪɟɜɚɬɟɥɶɧɵɯ ɩɨɥɟɣ
(ɜɧɭɬɪɟɧɧɟɝɨ ɢ ɜɧɟɲɧɟɝɨ).
Ⱦɥɹ ɨɬɤɥɸɱɟɧɢɹ ɨɛɨɢɯ ɩɨɥɟɣ 6 ɭɫɬɚɧɨɜɢɬɶ
ɪɭɱɤɭ ɜ ɩɨɥɨɠɟɧɢɢ «0».
ȿɫɥɢ ȼɚɲɚ ɞɭɯɨ
ɜɤɚ ɨɛɨɪɭɞɨɜɚɧɚ ɪɭɱɤɚɦɢ Push
(ɭɬɨɩɥɟɧɵɦɢ ɜ ɩɚɧɟɥɢ), ɬɨ ɞɥɹ ɭɩɪɚɜɥɟɧɢɹ
ɷɬɢɦɢ ɪɭɱɤɚɦɢ ɧɟɨɛɯɨɞɢɦɨ:
x ɨɫɬɨɪɨɠɧɨ ɧɚɠɚɬɶ ɧɚ ɪɭɱɤɭ ɢ ɨɬɩɭɫɬɢɬɶ
ɟɟ.
Ɋɭɱɤɚ ɜɵɣɞɟɬ ɢɡ ɩɚɧɟɥɢ.
Ⱦɥɹ ɬɨɝɨ ɱɬɨɛɵ ɜɧɨɜɶ ɭɬɨɩɢɬɶ ɪɭɱɤɭ:
x ɨɫɬɨɪɨɠɧɨ ɧɚɠɚɬɶ ɧɚ ɪɭɱɤɭ ɞɨ ɭɩɨɪɚ ɢ
ɨɬɩɭɫɬɢɬɶ.
EN
MULTIFUNCTION OVEN CONTROL
Oven operation functions are steered through
turning of the rotary handle mode of operation
1 and rotary handle temperature regulator 2
on the control panel 3.
1
The graphic symbols next to the rotary handles
show the chosen operation modes.
To turn off the oven bring the rotary handle
operating mode 1 and the rotary handle
temperature regulator 2 to position «0».
2
For more comfort you can use the digital clock
timer 6. It enables you to run the oven in an
automatical, half automatical or manuel cycle.
Important! The activation of the oven is
signalizes by the flashing up of controlling
lights in yellow 4 and red 5.
If the red controlling light lapses it signalizes that
the set oven temperature has been reached.
If a cooking recipe advices you to put the meal in
a preheated oven, o this after the lapse of the red
controlling light.
The red controlling light can also glow when the
rotary handle is in the oven inner allumination
position, but in this rotary handle position the
heating element is always off.
If the control panel of your oven is equipped with
rotary handles Push (sunk rotary handles), for
the control with these rotary handles is necessary:
x Push the rotary handle carefully and let it
go
The rotary handle will come out of the control
panel
To countersink the rotary handle:
x Push the rotary handle as far as it will go
and let go
*
for models with digital time switch clock
18

DE RU
STEUERUNG VON MULTIFUNKTIONS-
ɍɉɊȺȼɅȿɇɂȿ ɊȺȻɈɌɈɃ
BACKOFEN
ɆɇɈȽɈɎɍɇɄɐɂɈɇȺɅɖɇɈȽɈ ȾɍɏɈȼɈȽɈ
ɒɄȺɎȺ
Backofenbetriebsfunktionen werden durch Drehen
ɍɩɪɚɜɥɟɧɢɟ ɪɟɠɢɦɨɦ ɪɚɛɨɬɵ ɞɭɯɨɜɨɝɨ ɲɤɚɮɚ
von Drehknebel Betriebsart 1 und Drehknebel
ɨɫɭɳɟɫɬɜɥɹɟɬɫɹ ɩɨɜɨɪɨɬɨɦ ɪɭɱɟɤ ɜɵɛɨɪɚ
1 ɢ 2
Temperaturregler 2 auf der Bedienblende 3
ɞɭɯɨɜɤɢ, ɭɫɬɚɧɨɜɥɟɧɧɵɯ ɧɚ ɩɚɧɟɥɢ ɭɩɪɚɜɥɟɧɢɹ
gesteuert.
ɞɭɯɨɜɨɝɨ ɲɤɚɮɚ 3.
Die graphischen Symbole neben den Drehknebeln
Ƚɪɚɮɢɱɟɫɤɢɟ ɨɛɨɡɧɚɱɟɧɢɹ ɭɫɬɚɧɨɜɥɟɧɧɵɟ
zeigen die gewählten Backofenbetriebarten.
ɪɹɞɨɦ ɫ ɪɭɱɤɚɦɢ ɭɩɪɚɜɥɟɧɢɹ ɩɨɤɚɡɵɜɚɸɬ
ɜɵɛɪɚɧɧɵɟ ɩɚɪɚɦɟɬɪɵ ɪɚɛɨɬɵ ɞɭɯɨɜɤɢ.
Zum Abschalten des Backofens Drehknebel
Ⱦɥɹ ɨɬɤɥɸɱɟɧɢɹ ɞɭɯɨɜɤɢ ɭɫɬɚɧɨɜɢɬɶ ɪɭɱɤɢ
Betriebsart 1 und Drehknebel
1 ɢ
Temperaturregler 2 in die Position «0»
2 ɜ ɩɨɥɨɠɟɧɢɢ «0».
bringen.
Für mehr Komfort können Sie die Elektronische
Ⱦɥɹ ɛɨɥɶɲɟɝɨ ɤɨɦɮɨɪɬɚ ȼɵ ɬɚɤɠɟ ɦɨɠɟɬɟ
ɢɫɩɨɥɶɡɨɜɚɬɶ
Zeitschaltuhr* 6 benutzen, die ermöglicht den
Backofen im automatischen, halbautomatischen
*
und manuellen Zyklus zu betreiben.
Wenn die rote Kontrollleuchte erlischt, signalisiert
es, dass die voreingestellte Backofentemperatur
erreicht worden ist.
Wenn ein Kochrezept empfiehlt, die Speise in den
vorgewärmten Backofen hineinzulegen, so ist es
nach dem Erlöschen der roten Kontrollleuchte zu
tun
Die rote Kontrollleuchte kann auch bei der
Einstellung des Drehknebels in der Position
Innenbeleuchtung des Backofens leuchten,
jedoch sind die Heizkörper bei dieser
Drehknebelposition immer ausgeschaltet.
Wenn die Bedienblende Ihres Backofens mit
Drehknebeln Push (versenkbare Drehknebel)
ausgestattet ist, ist zur Steuerung mit diesen
Drehknebeln nötig:
x den Drehknebel vorsichtig drücken und
loslassen.
Drehknebel wird aus der Bedienblende
herauskommen.
Um den Drehknebel wieder zu versenken,:
x den Drehknebel vorsichtig bis zum
Anschlag drücken und loslassen.
*
für Modelle mit elektronischer Zeitschaltuhr
19
*
6,
ɞɚɸɳɟɟ ɜɨɡɦɨɠɧɨɫɬɶ ɭɩɪɚɜɥɹɬɶ ɪɚɛɨɬɨɣ
ɞɭɯɨɜɤɢ ɜ ɚɜɬɨɦɚɬɢɱɟɫɤɨɦ, ɩɨɥɭɚɜɬɨɦɚɬɢɱɟɫɤɨɦ
ɢ ɪɭɱɧɨɦ ɪɟɠɢɦɚɯ.
Wichtig! Die Einschaltung vom Backofen
ȼɚɠɧɨ! ȼɤɥɸɱɟɧɢɟ ɞɭɯɨɜɤɢ
wird durch Aufleuchten von Kontrolllampen
ɫɢɝɧɚɥɢɡɢɪɭɟɬɫɹ ɜɤɥɸɱɟɧɢɟɦ ɤɨɧɬɪɨɥɶɧɵɯ
gelben 4 und roten 5 Farben signalisiert.
ɥɚɦɩ ɠɟɥɬɨɝɨ 4 ɢ ɤɪɚɫɧɨɝɨ 5 ɰɜɟɬɨɜ
ɉɨɫɥɟ ɬɨɝ
ɨ ɤɚɤ ȼɚɲɚ ɞɭɯɨɜɤɚ ɞɨɫɬɢɝɧɟɬ
ɭɫɬɚɧɨɜɥɟɧɧɨɣ ɬɟɦɩɟɪɚɬɭɪɵ ɤɪɚɫɧɚɹ ɥɚɦɩɚ
ɩɨɝɚɫɧɟɬ.
ȿɫɥɢ ɤɭɥɢɧɚɪɧɵɟ ɪɟɰɟɩɬɵ ɪɟɤɨɦɟɧɞɭɸɬ ɫɬɚɜɢɬɶ
ɛɥɸɞɨ ɜ ɩɪɨɝɪɟɬɭɸ ɞɭɯɨɜɤɭ, ɞɟɥɚɣɬɟ ɷɬɨ ɩɨɫɥɟ
ɜɵɤɥɸɱɟɧɢɹ ɤɪɚɫɧɨɣ ɤɨɧɬɪɨɥɶɧɨɣ ɥɚɦɩɵ.
Ʉɨɧɬɪɨɥɶɧɚɹ ɥɚɦɩɚ ɦɨɠɟɬ ɬɚɤɠɟ ɫɜɟɬɢɬɶɫɹ ɜ
ɩɨɥɨɠɟɧɢɢ ɪɭɱɤɢ
, ɧɨ ɜ ɷɬɨɦ ɩɨɥɨɠɟɧɢɢ ɧɚɝɪɟɜɚɬɟɥɶɧɵɟ
ɷɥɟɦɟɧɬɵ ɜɫɟɝɞɚ ɜɵɤɥɸɱɟɧɵ.
ȿɫɥɢ ȼɚɲɚ ɞɭɯɨɜɤɚ ɨɛɨɪɭɞɨɜɚɧɚ ɪɭɱɤɚɦɢ Push
(ɭɬɨɩɥɟɧɵɦɢ ɜ ɩɚɧɟɥɢ), ɬɨ ɞɥɹ ɭɩɪɚɜɥɟɧɢɹ
ɷɬɢɦɢ ɪɭɱɤɚɦɢ ɧɟɨɛɯɨɞɢɦɨ:
x ɨɫɬɨɪɨɠɧɨ ɧɚɠɚɬɶ ɧɚ ɪɭɱɤɭ ɢ ɨɬɩɭɫɬɢɬɶ
ɟɟ.
Ɋɭɱɤɚ ɜɵɣɞɟɬ ɢɡ ɩɚɧɟɥɢ.
Ⱦɥɹ ɬɨɝɨ ɱɬɨɛɵ ɜɧɨɜɶ ɭɬɨɩɢɬɶ ɪɭɱɤɭ:
x ɨɫɬɨɪɨɠɧɨ ɧɚɠɚɬɶ ɧɚ ɪɭɱɤɭ ɞɨ ɭɩɨɪɚ ɢ
ɨɬɩɭɫɬɢɬɶ.
*
ɞɥɹ ɦɨɞɟɥɟɣ ɫ ɷɥɟɤɬɪɨɧɧɵɦ ɩɪɨɝɪɚɦɦɚɬɨɪɨɦ
EN
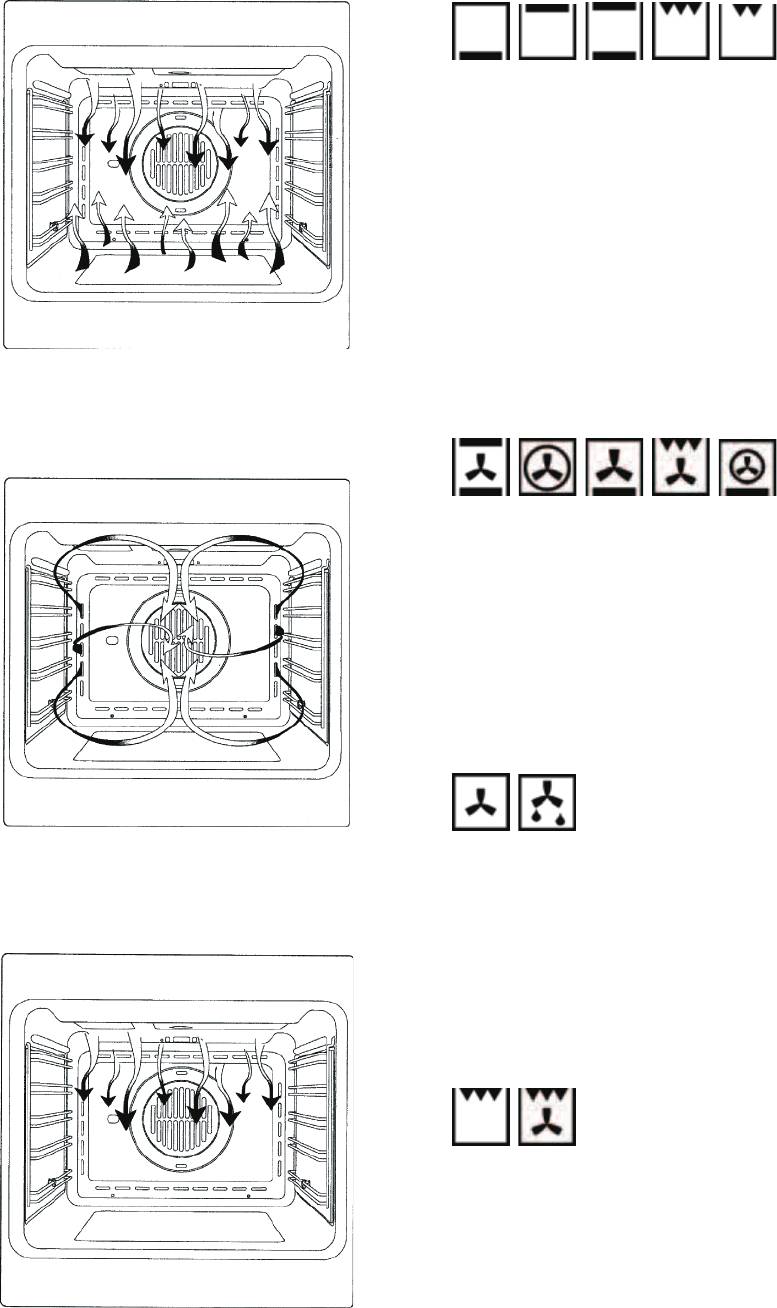
OPERATION FUNCTIONS OF THE OVEN
CONVENTIONAL COOKING
A classical system in which top and bottom heat
are used to cook a single dish.
Place the food in the oven only once cooking
temperature has been reached, i.e. when the
heating indicator goes out.
If you want to increase top or bottom temperature
towards the end of the cooking cycle, set the
temperature control to the right position. It is
advisable to open the oven door as little as
possible during cooking.
FAN COOKING
For this type of cooking a fan positioned at the
back allows the circulation of hot air inside the
oven, creating uniform heat. In this way cooking is
more rapid than conventional cooking. It is a
suitable method for cooking dishes on more than
one shelf, especially when the food is of different
types (fish, meat etc.)
DEFROSTING
By selecting one of the fan cooking functions and
setting the temperature regulator to zero, the
fan allows cold air to circulate inside the oven. In
this way frozen food can be rapidly defrosted.
It is not essential to pre-heat the oven, but you are
adviced to do so when cooking pastries.
GRILL COOKING
This function is used to grill or brown foods.
Place the shelf with the food to be cooked in the
1st or 2nd position from the top.
Pre-heat the oven for 5 minutes. Set the
temperature regulator to a temperature
between 50 °C and 200 °C.
20


