Graff WALL-MOUNT BATHTUB AND SHOWER TAPS: инструкция
Раздел: Бытовая, кухонная техника, электроника и оборудование
Тип: Кулер для воды
Инструкция к Кулеру для воды Graff WALL-MOUNT BATHTUB AND SHOWER TAPS
150±20
~262
MIN. 80 - MAX. 95
115
55
G1/2
~124
G1/2
40
MIN. 203 - MAX. 218
80
40
40
195
G1/2
G1/2
80
150±20
~262
MIN. 80 - MAX. 95
55
40
~ MIN. 80 -
~ MAX. 95
40
195
SHOWER TAP • DUSCHBATTERIE • BATTERIE DE DOUCHE •
•
• BATTERIA DA DOCCIA
СМЕСИТЕЛЬ ДЛЯ ДУША GRIFERÍA DUCHA
For care, use soft towel with soap and water only! Under no circumstances should
use any chemicals.
you
ATTENTION!
Загрязнения следует удалять водой с мылом и мягкой тряпочкой! Ни в коем
случае нельзя применять химические средства.
ВНИМАНИЕ!
Verunreinigungen bitten wir mittels Wasser mit Seife und mit weichem Lappen
beseitigen! In keinem Falle chemische Mittel verwenden.
ACHTUNG!
Para el cuidado, utilice solamente una toalla suave con
í
jabón y aqua! Bajo ninguna
circunstancia no use productos qu micos.
ATENCIÓN!
Pour le nettoyage utiliser seulement une serviette douce, du savon et de l'eau!
En aucun cas n'utiliser les produits chimiques quelconques!
ATTENTION!
Attenzione! Si prega di pulire usando acqua e sapone ed un panno morbido! In nessun
caso usare detergenti chimici.
ATTENZIONE!
Dear Customer
Sehr geehrte Damen und Herren
Muy Se ores Míos
Thank you for choosing our pro
duct. We hope the item you have
purchased can fulfill all your expec
tations our products are techno
logically advanced and designed
on the basis of our many years of
experience in the production of
sanitary fittings.
Wir bedanken uns für die Wahl
unseres Produktes. Wir hoffen,
dass wir mit unserem technolo
gisch fortgeschrittenen Produkt,
dass auf Basis mehrjährigen
Erfahrungen bei der Produktion
von Sanitärarmaturen entwickelt
wurde, Ihre Erwartungen erfüllt
haben.
satisfaire
pleinement à vos attentes grâce
à notre riche offre de produits d'un
niveau technologique avancé qui
résulte de notre
.
,
,
,
.
Les agradecemos por elegir
nuestro producto. Esperamos que
cumplamos Sus deseos entre
gándoles un producto de una
tecnología avanzada, diseńado
a base de la experiencia de
muchos ańos en la producción de
accesorios sanitarios
-
-
-
-
Nous vous remercions pour savoir
choisi notre produit. Nous som-
mes certains de pouvoir
longue expérien-
ce en fabrication de la robinetterie
et des accessoires des salles de
bains.
-
-
-
-
-
.
Vi ringraziamo per aver scelto il
nostro prodotto. Speriamo, di aver
soddisfatto completamente le
Vostre aspettative, offrendo Vi un
prodotto tecnologicamente avan-
zato, progettato in base ad una
esperienza di molti anni nell'ambito
di produzione degli accessori
sanitari.
Cher Client
Cari Clienti
Уважаемые господа
Благодарим за выбор нашего
продукта Надеемся что пол
ностью удовлетворим Ваши
ожидания вводя в эксплуата
цию технологически усовершен
ствованное изделие запроек
тированное на базе много
летнего опыта в области
производства санитарной
арматуры
ń
GB
D
F
RUS
E
IT
WALL-MOUNT BATHTUB AND SHOWER TAPS
AS DE PARED BAÑERA Y DUCHA
WAND-, WANNEN- UND DUSCHMISCHBATTERIEN
BATTERIE MURALE DE BAIGNOIRE ET DE DOUCHE
E
GRIFERÍ
BATTERIE A MURO DA VASCA E PER DOCCIA
СМЕСИТЕЛИ ДЛЯ ВАНН И ДУША НАСТЕННЫЕ
Instructions for assembly and use • Montage- und Gebrauchsanweisung •
•
c
• Instrucción de Montaje y Servicio • Manuale di Montaggio e Uso
Notice technique montage et utilisation Ин трукция по монтажу и обслуживанию
IOG 2
.
360 00
Rev
20
. 1 March
11
1
GB
D
F
RUS
E
IT
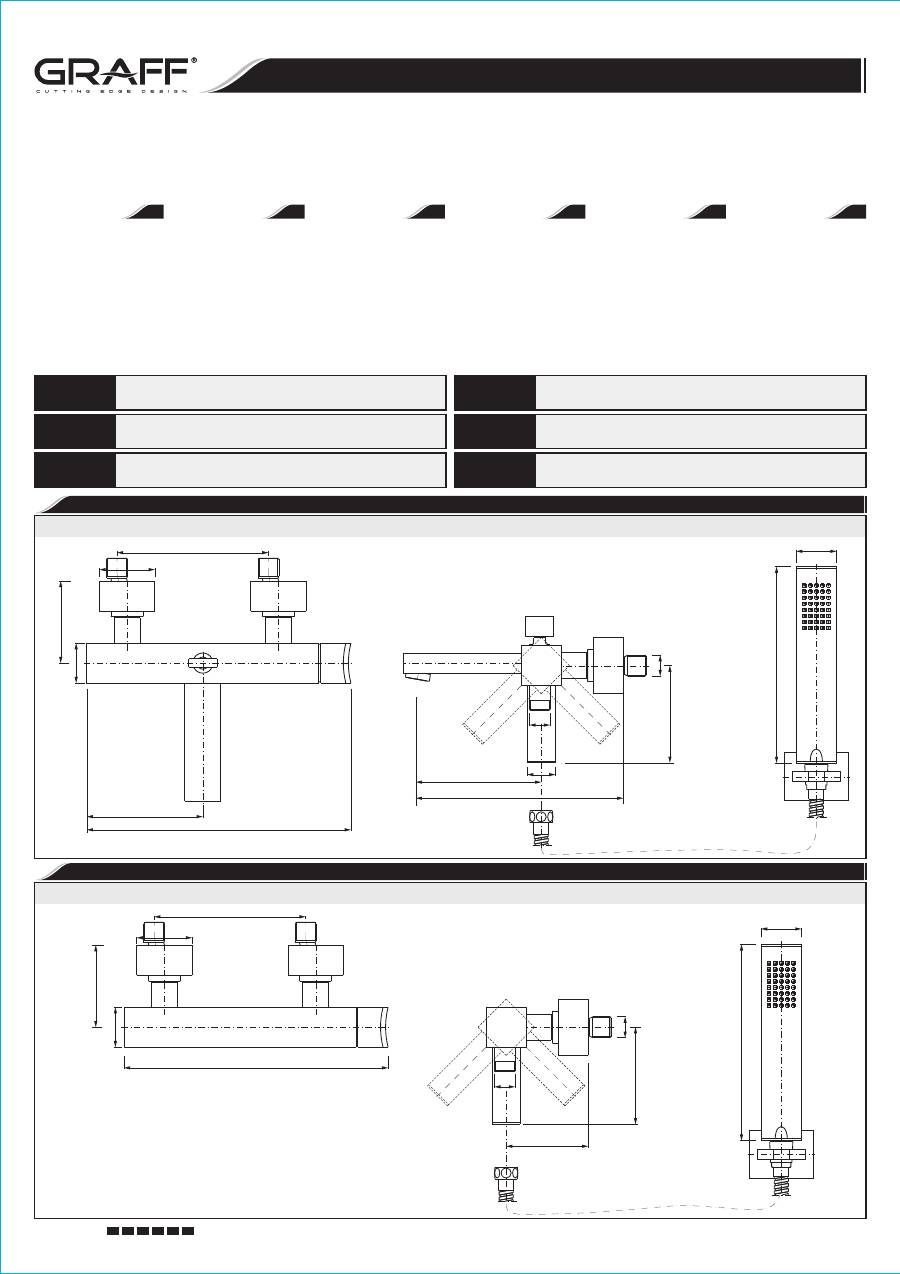
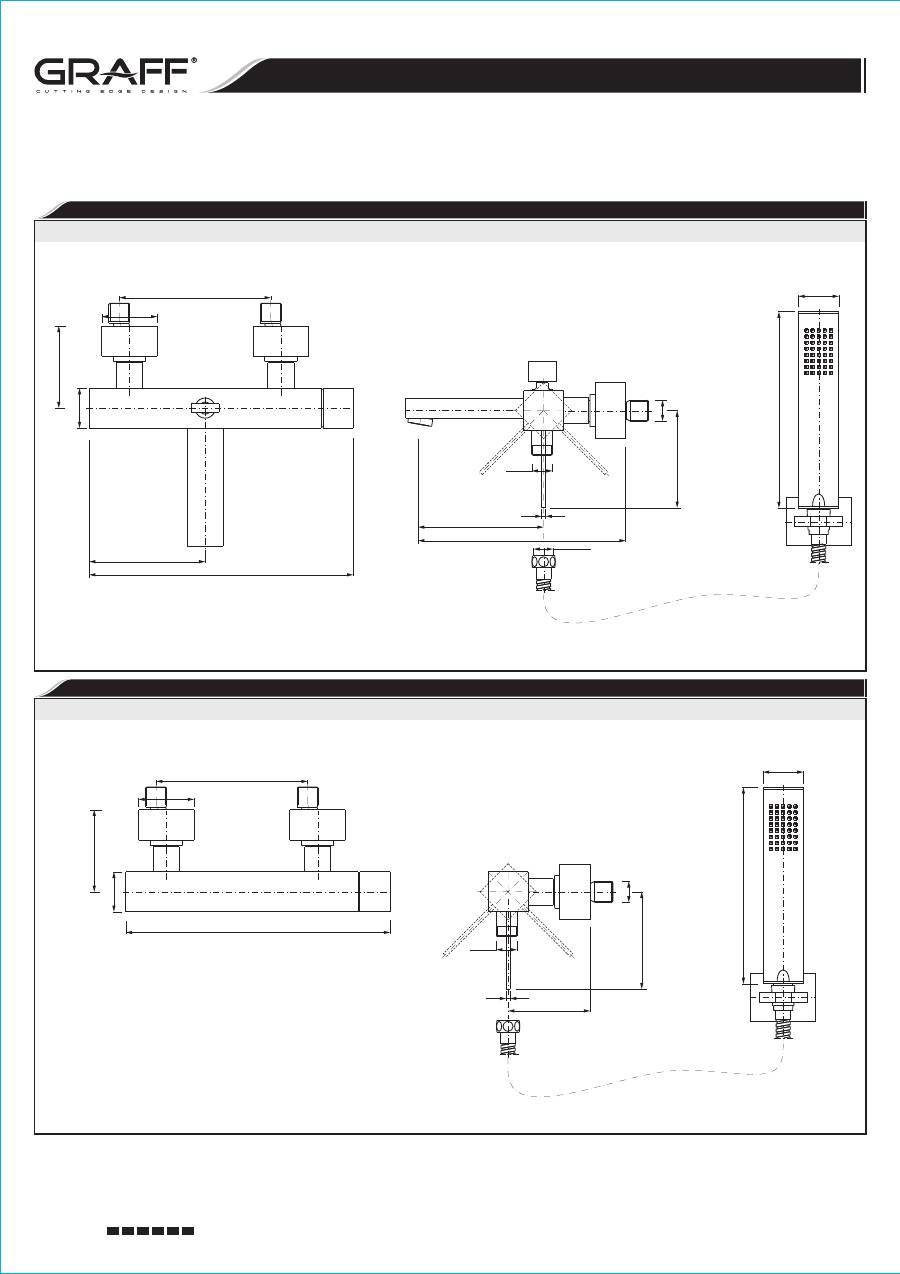
BATHTUB TAP • WANNENBATTERIE • BATTERIE DE BAIGNOIRE •
•
• BATTERIA DA VASCA
СМЕСИТЕЛЬ ДЛЯ ВАННЫ GRIFERÍA BAÑERA
SADE, TARGA
SADE, TARGA
G1/2
G1/2
80
150±20
~262
MIN. 80 - MAX. 95
55
40
~ MIN. 80 -
~ MAX. 95
40
195
150±20
~262
MIN. 80 - MAX. 95
115
55
G1/2
~124
G1/2
40
MIN. 203 - MAX. 218
80
40
40
195
WALL-MOUNT BATHTUB AND SHOWER TAPS AS DE PARED BAÑERA Y DUCHA WAND-, WANNEN- UND DUSCHMISCHBATTERIEN BATTERIE MURALE DE BAIGNOIRE ET DE DOUCHE E GRIFERÍ BATTERIE A MURO DA VASCA E PER DOCCIA СМЕСИТЕЛИ ДЛЯ ВАНН И ДУША НАСТЕННЫЕ
Instructions for assembly and use • Montage- und Gebrauchsanweisung •
•
c
• Instrucción de Montaje y Servicio • Manuale di Montaggio e Uso
Notice technique montage et utilisation Ин трукция по монтажу и обслуживанию
IOG 2
.
360 00
Rev
20
. 1 March
11
2
GB
D
F
RUS
E
IT
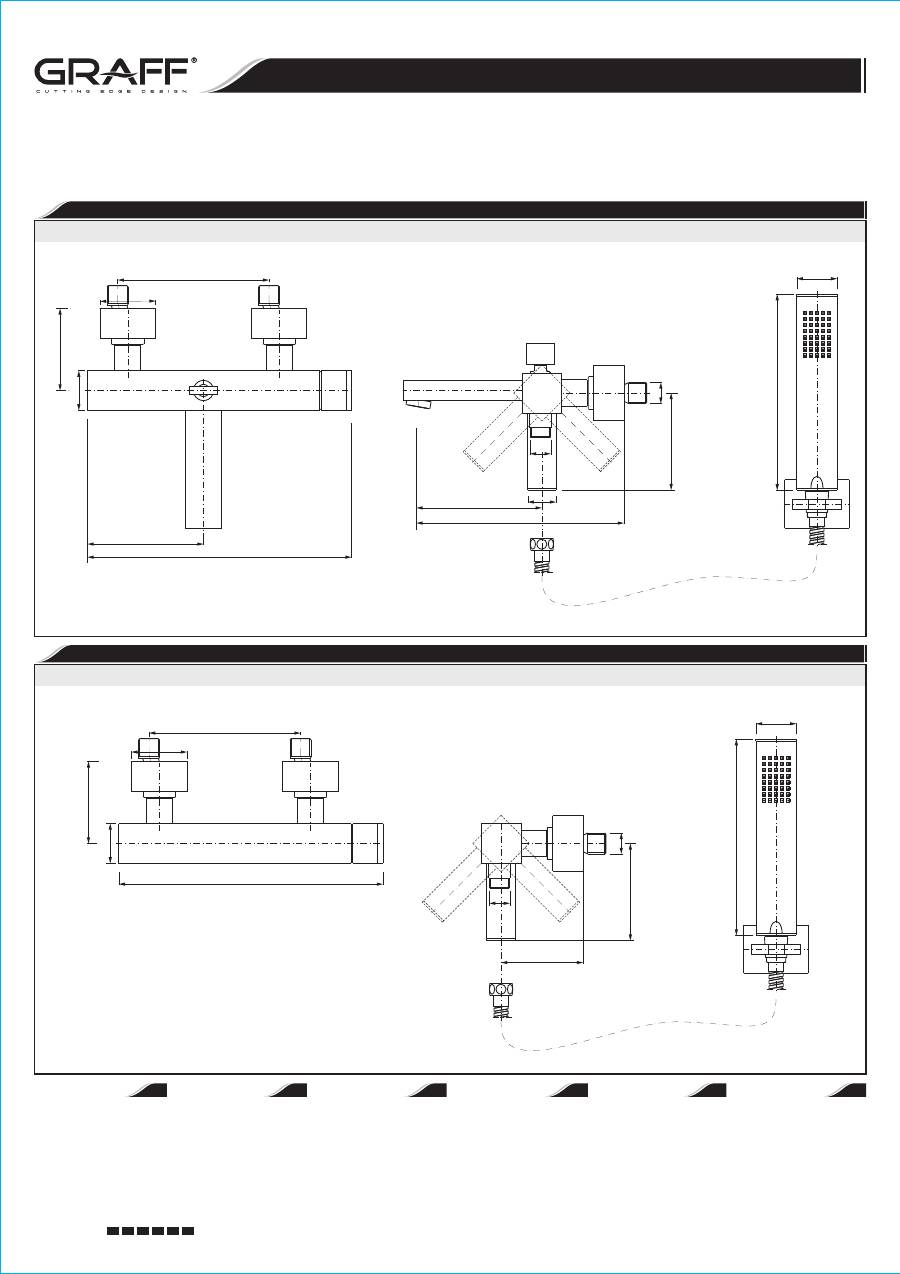
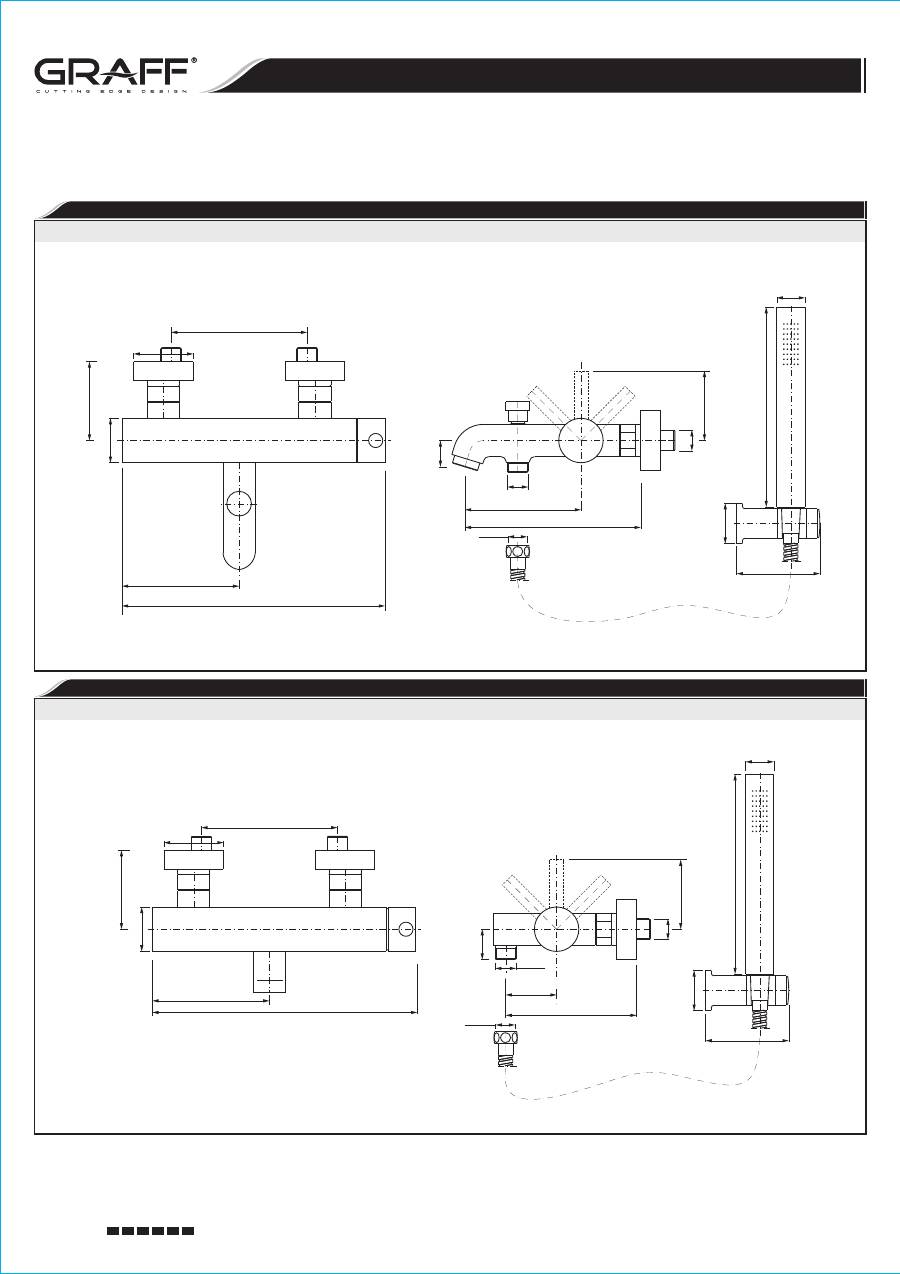
SHOWER TAP • DUSCHBATTERIE • BATTERIE DE DOUCHE •
•
• BATTERIA DA DOCCIA
СМЕСИТЕЛЬ ДЛЯ ДУША GRIFERÍA DUCHA
BATHTUB TAP • WANNENBATTERIE • BATTERIE DE BAIGNOIRE •
•
• BATTERIA DA VASCA
СМЕСИТЕЛЬ ДЛЯ ВАННЫ GRIFERÍA BAÑERA
SOLAR SOLAR
#
#
#
#
#
#
For assembly you will need:
Bei der Montagewerden
benötigt:
:
Para el montaje se
necesitan:
an adjustable spanner,
pliers,
silicon or other sealant.
verstellbarer Schlüssel,
Kombizange,
Teflonband,
Silikon oder anderes
Dichtungsmittel.
,
,
,
.
llave ajustable,
alicates universales,
cinta de teflón,
silicona u otro tipo de
material de estancar.
La pince universelle,
La bande Téflon,
Le silicone ou une autre
garniture d'étanchéité.
chiave registrabile,
tenaglia piana,
nastro di teflon,
silicone o altro tipo di
guarnizione.
Les outils nécessaires pour
le montage:
Per il montaggio sono
necessari i seguenti utensili:
Для монтажа необходимы
разводной ключ
плоскогубцы
тефлоновая лента
силикон или другой
уплотнитель
?
?
?
?
?
?
?
?
?
?
?
?
?
?
?
?
?
?
?
?
?
?
?
?
teflon tape,
La clef à ouverture variable,
GB
D
F
RUS
E
IT
G1/2
G1/2
150±20
~262
MIN. 80 - MAX. 95
55
40
~ MIN. 80 -
~ MAX. 95
40
195
150±20
~262
MIN. 80 - MAX. 95
115
55
G1/2
~123
G1/2
40
MIN. 203 - MAX. 218
40
195
WALL-MOUNT BATHTUB AND SHOWER TAPS AS DE PARED BAÑERA Y DUCHA WAND-, WANNEN- UND DUSCHMISCHBATTERIEN BATTERIE MURALE DE BAIGNOIRE ET DE DOUCHE E GRIFERÍ BATTERIE A MURO DA VASCA E PER DOCCIA СМЕСИТЕЛИ ДЛЯ ВАНН И ДУША НАСТЕННЫЕ
Instructions for assembly and use • Montage- und Gebrauchsanweisung •
•
c
• Instrucción de Montaje y Servicio • Manuale di Montaggio e Uso
Notice technique montage et utilisation Ин трукция по монтажу и обслуживанию
IOG 2
.
360 00
Rev
20
. 1 March
11
3
GB
D
F
RUS
E
IT
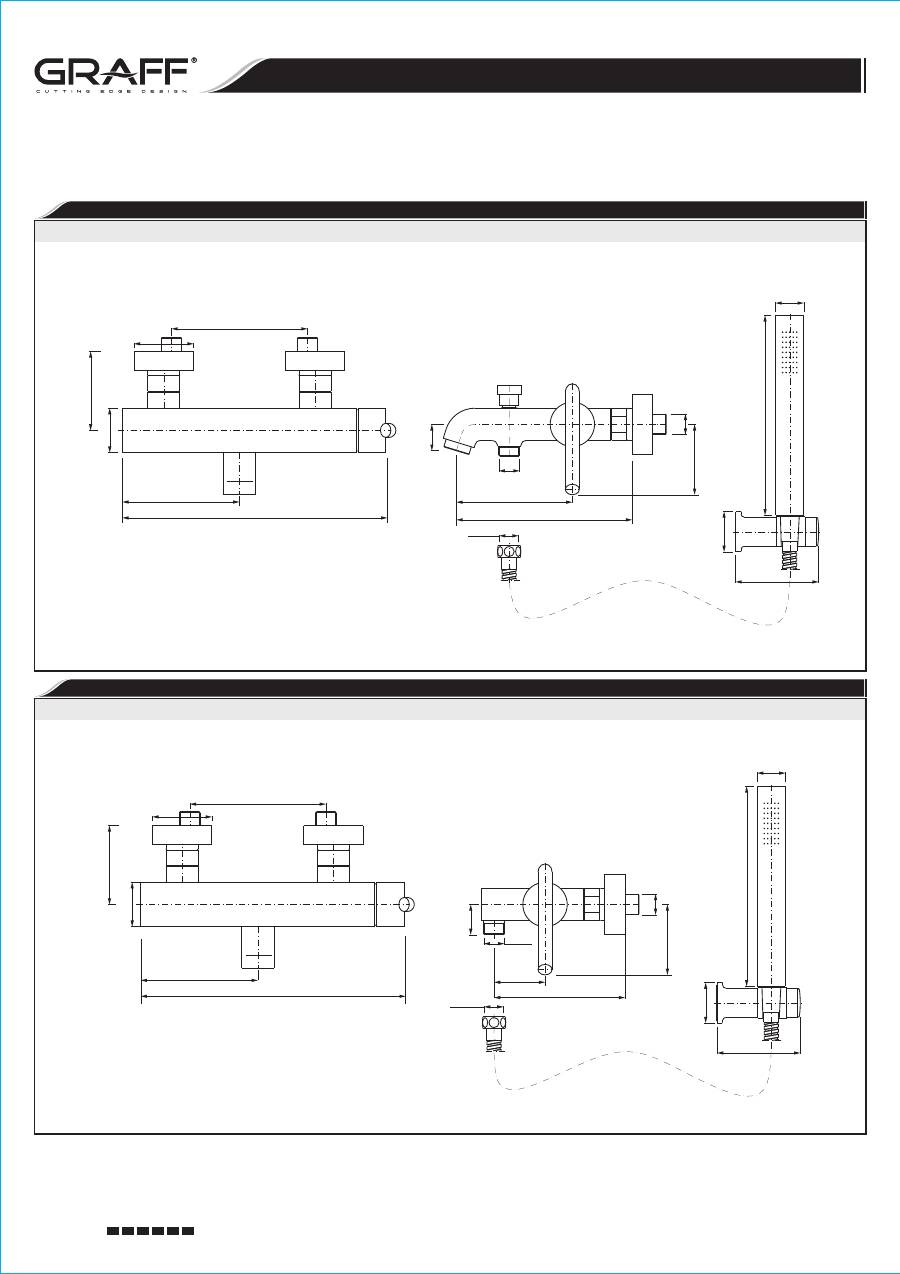
SHOWER TAP • DUSCHBATTERIE • BATTERIE DE DOUCHE •
•
• BATTERIA DA DOCCIA
СМЕСИТЕЛЬ ДЛЯ ДУША GRIFERÍA DUCHA
BATHTUB TAP • WANNENBATTERIE • BATTERIE DE BAIGNOIRE •
•
• BATTERIA DA VASCA
СМЕСИТЕЛЬ ДЛЯ ВАННЫ GRIFERÍA BAÑERA
FONTAINE FONTAINE

G1/2
G1/2
150±20
~262
MIN. 80 - MAX. 95
55
40
~ MIN. 80 -
~ MAX. 95
40
195
150±20
~262
MIN. 80 - MAX. 95
115
55
G1/2
~123
G1/2
40
MIN. 203 - MAX. 218
40
195
WALL-MOUNT BATHTUB AND SHOWER TAPS AS DE PARED BAÑERA Y DUCHA WAND-, WANNEN- UND DUSCHMISCHBATTERIEN BATTERIE MURALE DE BAIGNOIRE ET DE DOUCHE E GRIFERÍ BATTERIE A MURO DA VASCA E PER DOCCIA СМЕСИТЕЛИ ДЛЯ ВАНН И ДУША НАСТЕННЫЕ
Instructions for assembly and use • Montage- und Gebrauchsanweisung •
•
c
• Instrucción de Montaje y Servicio • Manuale di Montaggio e Uso
Notice technique montage et utilisation Ин трукция по монтажу и обслуживанию
IOG 2
.
360 00
Rev
20
. 1 March
11
4
GB
D
F
RUS
E
IT
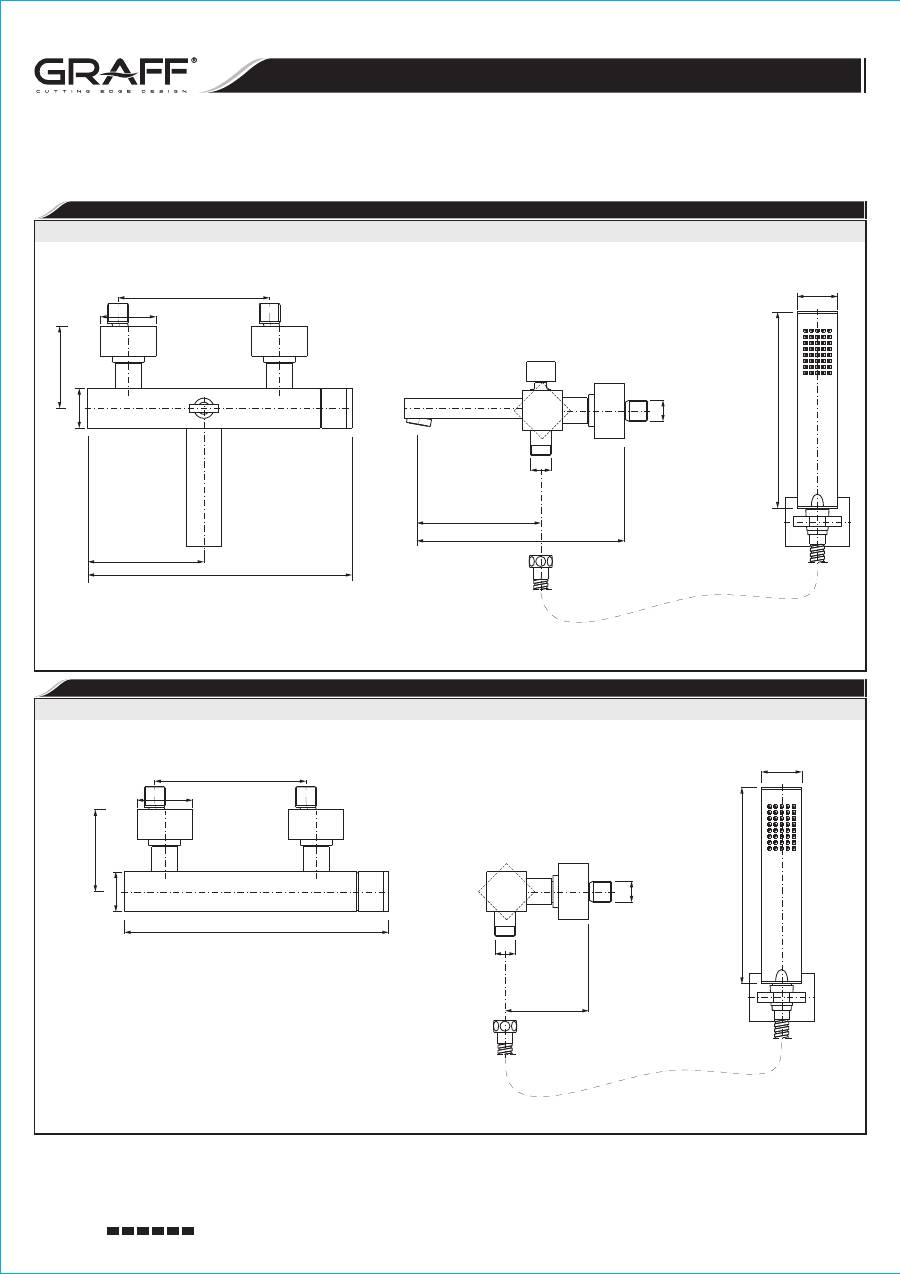
SHOWER TAP • DUSCHBATTERIE • BATTERIE DE DOUCHE •
•
• BATTERIA DA DOCCIA
СМЕСИТЕЛЬ ДЛЯ ДУША GRIFERÍA DUCHA
BATHTUB TAP • WANNENBATTERIE • BATTERIE DE BAIGNOIRE •
•
• BATTERIA DA VASCA
СМЕСИТЕЛЬ ДЛЯ ВАННЫ GRIFERÍA BAÑERA
STRUCTURE STRUCTURE
G1/2
G1/2
96
150±20
~262
MIN. 80 - MAX. 95
55
40
~ MIN. 80 -
~ MAX. 95
40
195
150±20
~262
MIN. 80 - MAX. 95
115
55
G1/2
~123
G1/2
40
MIN. 203 - MAX. 218
96
40
40
195
G 1/2"
WALL-MOUNT BATHTUB AND SHOWER TAPS AS DE PARED BAÑERA Y DUCHA WAND-, WANNEN- UND DUSCHMISCHBATTERIEN BATTERIE MURALE DE BAIGNOIRE ET DE DOUCHE E GRIFERÍ BATTERIE A MURO DA VASCA E PER DOCCIA СМЕСИТЕЛИ ДЛЯ ВАНН И ДУША НАСТЕННЫЕ
Instructions for assembly and use • Montage- und Gebrauchsanweisung •
•
c
• Instrucción de Montaje y Servicio • Manuale di Montaggio e Uso
Notice technique montage et utilisation Ин трукция по монтажу и обслуживанию
IOG 2
.
360 00
Rev
20
. 1 March
11
5
GB
D
F
RUS
E
IT
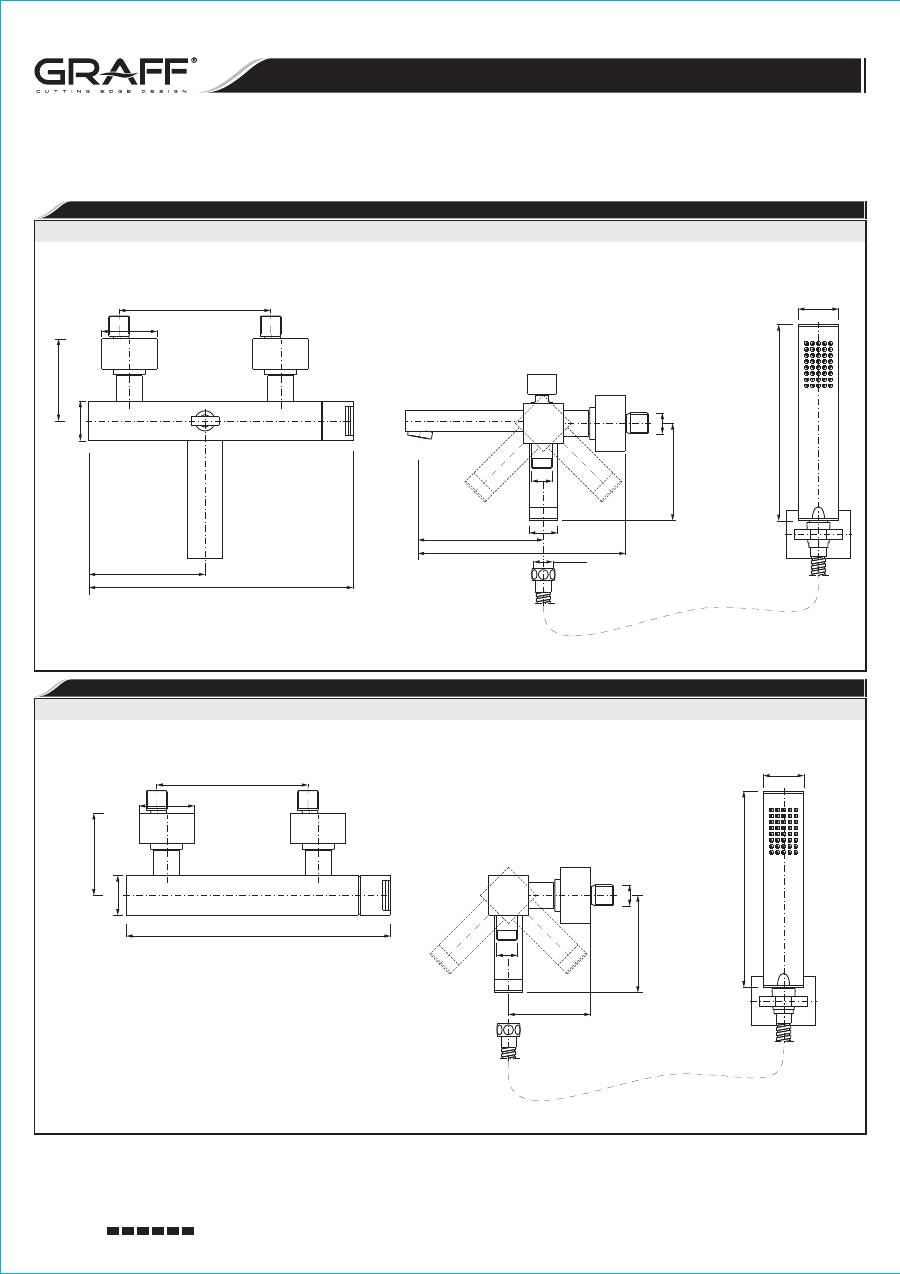
SHOWER TAP • DUSCHBATTERIE • BATTERIE DE DOUCHE •
•
• BATTERIA DA DOCCIA
СМЕСИТЕЛЬ ДЛЯ ДУША GRIFERÍA DUCHA
BATHTUB TAP • WANNENBATTERIE • BATTERIE DE BAIGNOIRE •
•
• BATTERIA DA VASCA
СМЕСИТЕЛЬ ДЛЯ ВАННЫ GRIFERÍA BAÑERA
QUBIC QUBIC
4
150±20
~262
MIN. 80 - MAX. 95
115
55
G1/2
121
G1/2
40
MIN. 203 - MAX. 218
94
40
195
G 1/2"
4
G1/2
G1/2
94
150±20
~262
MIN. 80 - MAX. 95
55
40
~ MIN. 80 -
~ MAX. 95
40
195
WALL-MOUNT BATHTUB AND SHOWER TAPS AS DE PARED BAÑERA Y DUCHA WAND-, WANNEN- UND DUSCHMISCHBATTERIEN BATTERIE MURALE DE BAIGNOIRE ET DE DOUCHE E GRIFERÍ BATTERIE A MURO DA VASCA E PER DOCCIA СМЕСИТЕЛИ ДЛЯ ВАНН И ДУША НАСТЕННЫЕ
Instructions for assembly and use • Montage- und Gebrauchsanweisung •
•
c
• Instrucción de Montaje y Servicio • Manuale di Montaggio e Uso
Notice technique montage et utilisation Ин трукция по монтажу и обслуживанию
IOG 2
.
360 00
Rev
20
. 1 March
11
6
GB
D
F
RUS
E
IT
SHOWER TAP • DUSCHBATTERIE • BATTERIE DE DOUCHE •
•
• BATTERIA DA DOCCIA
СМЕСИТЕЛЬ ДЛЯ ДУША GRIFERÍA DUCHA
BATHTUB TAP • WANNENBATTERIE • BATTERIE DE BAIGNOIRE •
•
• BATTERIA DA VASCA
СМЕСИТЕЛЬ ДЛЯ ВАННЫ GRIFERÍA BAÑERA
QUBIC TRE QUBIC TRE
G1/2
~115
~26
MIN. 189 - MAX. 198
MIN. 74-MAX. 83
44
150±10
~116
~263
G1/2
59
~198
28
G 1/2"
82
40
69
~50
~30
G1/2
G1/2
MIN. 74-MAX. 83
44
150±10
~116
~263
59
MIN. 124 - MAX. 133
~198
28
G 1/2"
82
40
69
WALL-MOUNT BATHTUB AND SHOWER TAPS AS DE PARED BAÑERA Y DUCHA WAND-, WANNEN- UND DUSCHMISCHBATTERIEN BATTERIE MURALE DE BAIGNOIRE ET DE DOUCHE E GRIFERÍ BATTERIE A MURO DA VASCA E PER DOCCIA СМЕСИТЕЛИ ДЛЯ ВАНН И ДУША НАСТЕННЫЕ
Instructions for assembly and use • Montage- und Gebrauchsanweisung •
•
c
• Instrucción de Montaje y Servicio • Manuale di Montaggio e Uso
Notice technique montage et utilisation Ин трукция по монтажу и обслуживанию
IOG 2
.
360 00
Rev
20
. 1 March
11
7
GB
D
F
RUS
E
IT
SHOWER TAP • DUSCHBATTERIE • BATTERIE DE DOUCHE •
•
• BATTERIA DA DOCCIA
СМЕСИТЕЛЬ ДЛЯ ДУША GRIFERÍA DUCHA
BATHTUB TAP • WANNENBATTERIE • BATTERIE DE BAIGNOIRE •
•
• BATTERIA DA VASCA
СМЕСИТЕЛЬ ДЛЯ ВАННЫ GRIFERÍA BAÑERA
ME25, ME ME25 / ME
MIN. 74-MAX. 83
44
150±10
~116
~263
59
G1/2
~115
~26
MIN. 189 - MAX. 198
G1/2
~69
~198
28
G 1/2"
82
40
~69
~50
~30
G1/2
G1/2
MIN. 74-MAX. 83
44
150±10
~116
~263
59
MIN. 124 - MAX. 133
~198
28
G1/2"
82
40
WALL-MOUNT BATHTUB AND SHOWER TAPS AS DE PARED BAÑERA Y DUCHA WAND-, WANNEN- UND DUSCHMISCHBATTERIEN BATTERIE MURALE DE BAIGNOIRE ET DE DOUCHE E GRIFERÍ BATTERIE A MURO DA VASCA E PER DOCCIA СМЕСИТЕЛИ ДЛЯ ВАНН И ДУША НАСТЕННЫЕ
Instructions for assembly and use • Montage- und Gebrauchsanweisung •
•
c
• Instrucción de Montaje y Servicio • Manuale di Montaggio e Uso
Notice technique montage et utilisation Ин трукция по монтажу и обслуживанию
IOG 2
.
360 00
Rev
20
. 1 March
11
8
GB
D
F
RUS
E
IT
SHOWER TAP • DUSCHBATTERIE • BATTERIE DE DOUCHE •
•
• BATTERIA DA DOCCIA
СМЕСИТЕЛЬ ДЛЯ ДУША GRIFERÍA DUCHA
BATHTUB TAP • WANNENBATTERIE • BATTERIE DE BAIGNOIRE •
•
• BATTERIA DA VASCA
СМЕСИТЕЛЬ ДЛЯ ВАННЫ GRIFERÍA BAÑERA
TRANQUILITY TRANQUILITY
WALL-MOUNT BATHTUB AND SHOWER TAPS AS DE PARED BAÑERA Y DUCHA WAND-, WANNEN- UND DUSCHMISCHBATTERIEN BATTERIE MURALE DE BAIGNOIRE ET DE DOUCHE E GRIFERÍ BATTERIE A MURO DA VASCA E PER DOCCIA СМЕСИТЕЛИ ДЛЯ ВАНН И ДУША НАСТЕННЫЕ
Instructions for assembly and use • Montage- und Gebrauchsanweisung •
•
c
• Instrucción de Montaje y Servicio • Manuale di Montaggio e Uso
Notice technique montage et utilisation Ин трукция по монтажу и обслуживанию
IOG 2
.
360 00
Rev
20
. 1 March
11
9
GB
D
F
RUS
E
IT
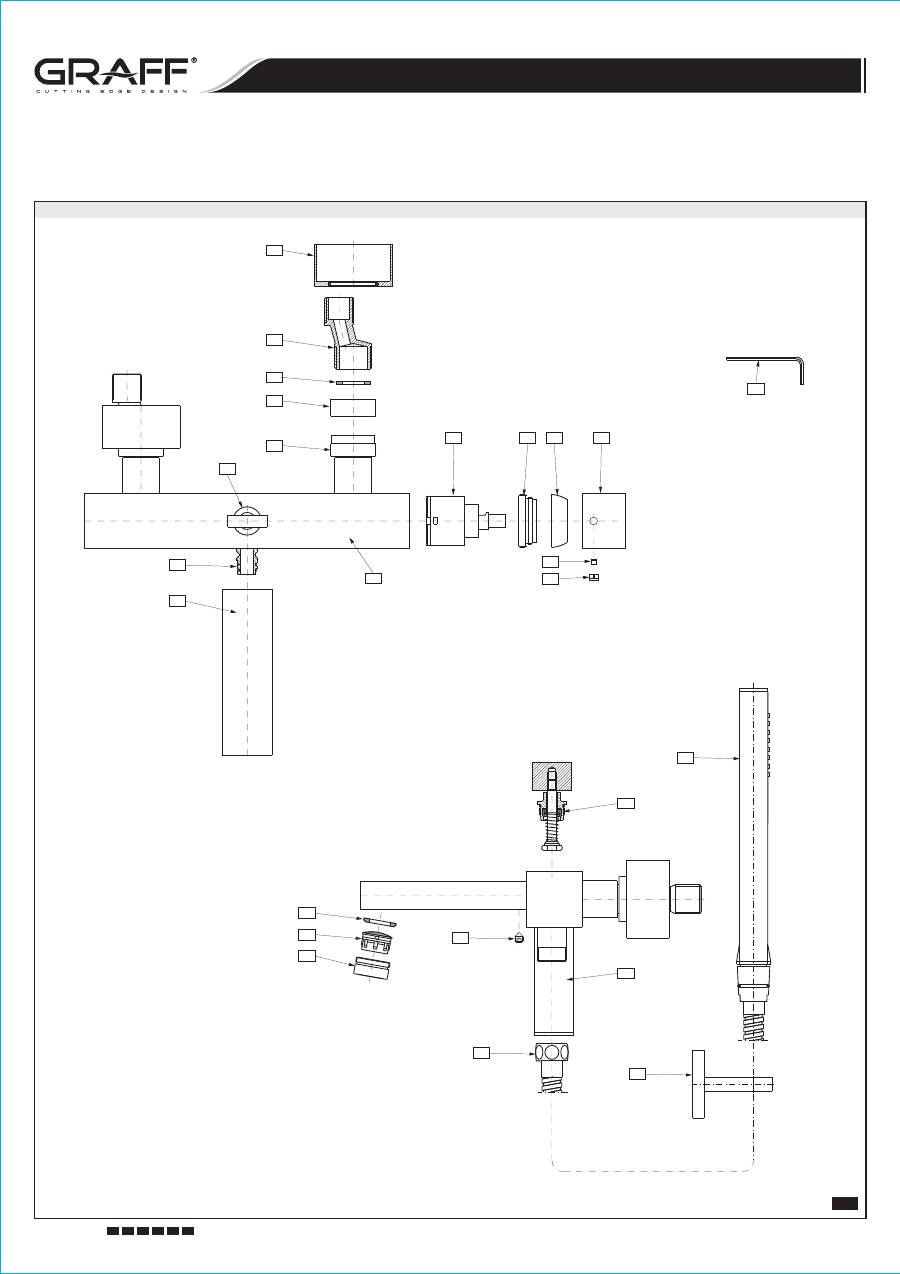
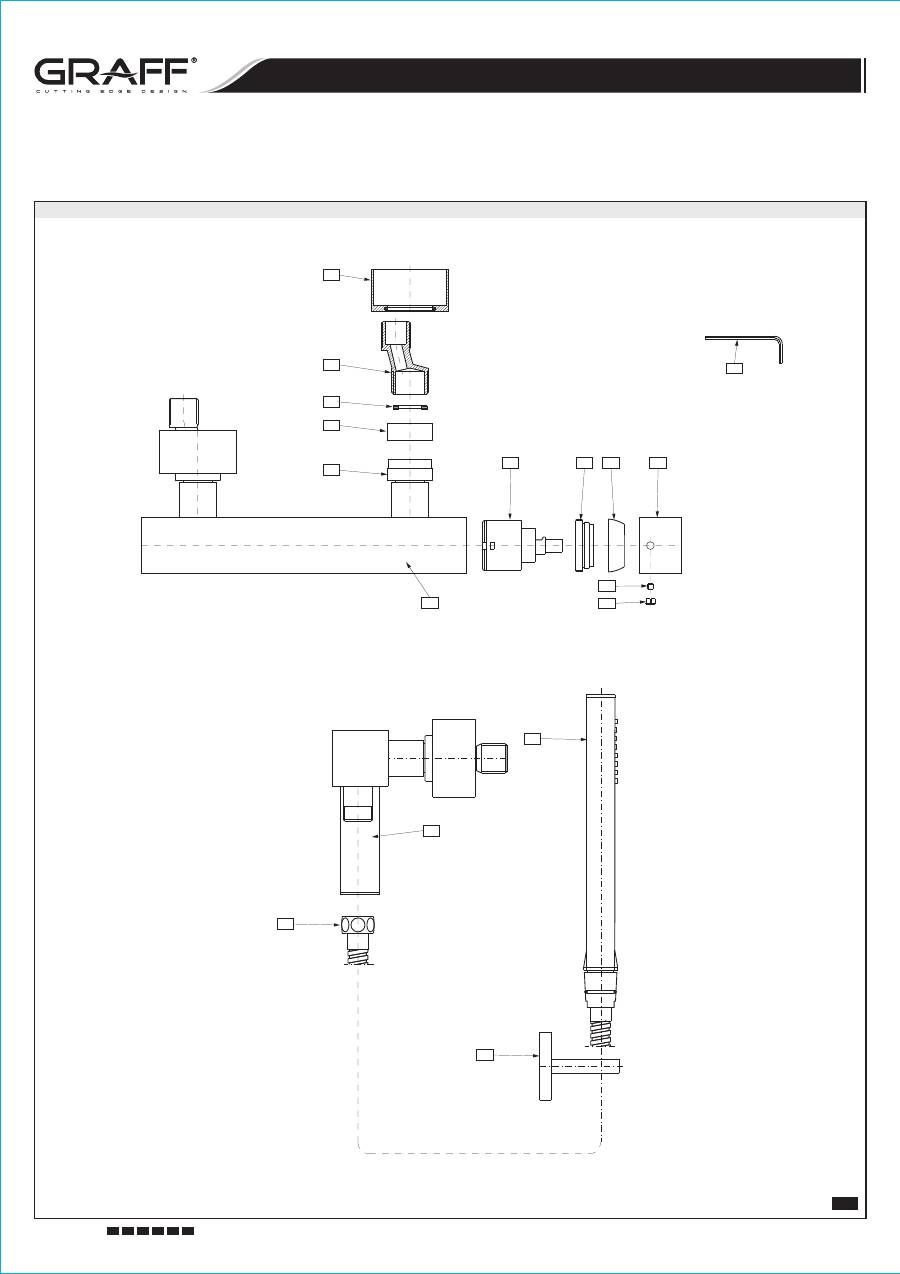
QUBIC
1.1
BATHTUB TAP • WANNENBATTERIE • BATTERIE DE BAIGNOIRE
•
• BATTERIA DA VASCA
СМЕСИТЕЛЬ ДЛЯ ВАННЫ GRIFERÍA BAÑERA
K
5
4
20
21
22
6
7
8
12
19
18
17
16
15
8
1
2
3
9
10
11
12
13
14
19
18
17
16
15
1
9
10
11
12
13
14
WALL-MOUNT BATHTUB AND SHOWER TAPS AS DE PARED BAÑERA Y DUCHA WAND-, WANNEN- UND DUSCHMISCHBATTERIEN BATTERIE MURALE DE BAIGNOIRE ET DE DOUCHE E GRIFERÍ BATTERIE A MURO DA VASCA E PER DOCCIA СМЕСИТЕЛИ ДЛЯ ВАНН И ДУША НАСТЕННЫЕ
Instructions for assembly and use • Montage- und Gebrauchsanweisung •
•
c
• Instrucción de Montaje y Servicio • Manuale di Montaggio e Uso
Notice technique montage et utilisation Ин трукция по монтажу и обслуживанию
IOG 2
.
360 00
Rev
20
. 1 March
11
10
GB
D
F
RUS
E
IT
QUBIC
1.2
SHOWER TAP • DUSCHBATTERIE • BATTERIE DE DOUCHE
•
• BATTERIA DA DOCCIA
СМЕСИТЕЛЬ ДЛЯ ДУША GRIFERÍA DUCHA
K
12
20
21
22
WALL-MOUNT BATHTUB AND SHOWER TAPS AS DE PARED BAÑERA Y DUCHA WAND-, WANNEN- UND DUSCHMISCHBATTERIEN BATTERIE MURALE DE BAIGNOIRE ET DE DOUCHE E GRIFERÍ BATTERIE A MURO DA VASCA E PER DOCCIA СМЕСИТЕЛИ ДЛЯ ВАНН И ДУША НАСТЕННЫЕ
Instructions for assembly and use • Montage- und Gebrauchsanweisung •
•
c
• Instrucción de Montaje y Servicio • Manuale di Montaggio e Uso
Notice technique montage et utilisation Ин трукция по монтажу и обслуживанию
IOG 2
.
360 00
Rev
20
. 1 March
11
11
GB
D
F
RUS
E
IT
GB
D
F
RUS
E
IT
1
2
3
4
5
6
7
8
9
10
11
12
13
14
15
16
17
18
19
20
21
22
A
K
Mixer-tap body
Connector
Bathtub spout
(in bathtub tap)
Shower connector pipe
(in shower tap)
Bolt
Flat gasket
Tap aerator insert
Aerator body
Diverter set
Mixer
Nut
Decorative cap
Lever body
Lever bar
Bolt
Body nut (2 pcs.)
Decorative nut (2 pcs.)
Flat gasket (2 pcs.)
Eccentric connectors (2 pcs.)
Rosette with O-ring (2 pcs.)
Special key for the tap
aerator
Hex key
Shower hose
Hand shower holder
Hand shower
Mischbatteriekörper
Verbindungsstück
Auslaufgarnitur
(in der Wannenmischbatterie)
Anschlussstutzen
(in der Duschbatterie)
Blechschraube
Flachdichtung
Luftsprudlereinsatz
Luftsprudlerkörper
Umschalter, kpl.
Mischer
Mutter
Zierkappe
Handhebelkörper
Zugstange für Handhebel
Blechschraube
Körpermutter (2 Stk.)
Ziermutter (2 Stk.)
Flachdichtung (2 Stck.)
Exzenter (2 Stck.)
Rosette mit O-Ring (2 Stck.)
A Spezialschlüssel für Luftsprudler
Innensechskantschlüssel
Duschschlauch
Duschkopfgriff
Duschkopf
Corps de la batterie
Raccord
Mélangeur
(pour batteries de baignoire)
Tubulure de raccordement
(pour batteries de douche)
Vis
Joint plat
Insert de l'aérateur
Corps de l'aérateur
Ensemble du commutateur
Mitigeur
Ecrou
Capuchon décoratif
Corps du levier
Tige du levier
Vis
Ecrou du corps (x 2)
Ecrou décoratif (x 2)
Joint plat (x 2)
Excentrique (x 2)
Rosace avec joint o-ring (x 2)
Clef spéciale pour aérateur
Clef Allen
Flexible de douche
Support de pommeau de douche
Pommeau de douche
Корпус смесителя
Соединитель
Излив
в смесителе для ванны
Подсоеднительный патрубок
в смесителе для душа
Винт
Плоская прокладка
Вкладыш перлатора
Корпус перлатора
Переключатель компл
Смеситель
Гайка
Декоративный колпачок (2 шт
Корпус рукоятки
Стержень рукоятки
Винт
Гайка корпуса (2 шт
Декоративная гайка (2 шт
Плоская прокладка (2 шт
Эксцентрик (2 шт
Декоративный элемент с
уплотнением
o
-r
in
g (2 шт
Специальный ключ для
перлатора
Шестигранный ключ
(
)
(
)
.
.)
.)
.)
.)
.)
.)
Душевой шланг
Держатель душа
Душевая трубка
Cuerpo de la grifería
Conjuntor
(
)
Racor de conexión
(en la batería de ducha)
Tornillo
Junta plana
Inserto del atomizator
Cuerpo del atomizator
Conmutador juego
Mezclador
Tuerca
Caperuza decorativo
Cuerpo de la palanca
Barra de la palanca
Tornillo
Tuerca del cuerpo (2 unidades)
Tuerca decorativa (2 unidades)
Junta plana (2 unidades)
Excéntrica (2 unidades)
Roseta con junta tórica
(2 unidades)
Llave especial para el atomizador
Llave allén
Caño
en la grifería de bañera
Manguera de la ducha
Asa de la regadera
Regadera
Corpo della batteria
Connettore
Bocca
(nella batteria da vasca)
Tubo di giunzione
(nella batteria per doccia)
Vite
Guarnizione piatta
Cartuccia dell'aeratore
Corpo dell'aeratore
Deviatore completo
Miscelatore
Dado
Cappuccio decorativo
Corpo della leva
Asta della leva
Vite
Dado del corpo (2 pezzi)
Dado decorativo (2 pezzi)
Guarnizione piatta (2 pezzi)
Eccentrico (2 pezzi)
Rosone con o-ring (2 pezzi)
Chiave speciale dell'aeratore
Chiave a brugola
Flessibile doccia
Attacco della doccetta
Doccetta
See fig. 1.1, 1.2
Siehe Abb. 1.1, 1.2
Voir sch ma
é
1.1, 1.2
C . p c.
м и 1.1, 1.2
Ver dis. 1.1, 1.2
Vedi fig. 1.1, 1.2
GB
D
F
RUS
E
IT
1
2
3
4
5
6
7
8
9
10
11
12
13
14
15
16
17
18
19
K
20
21
22
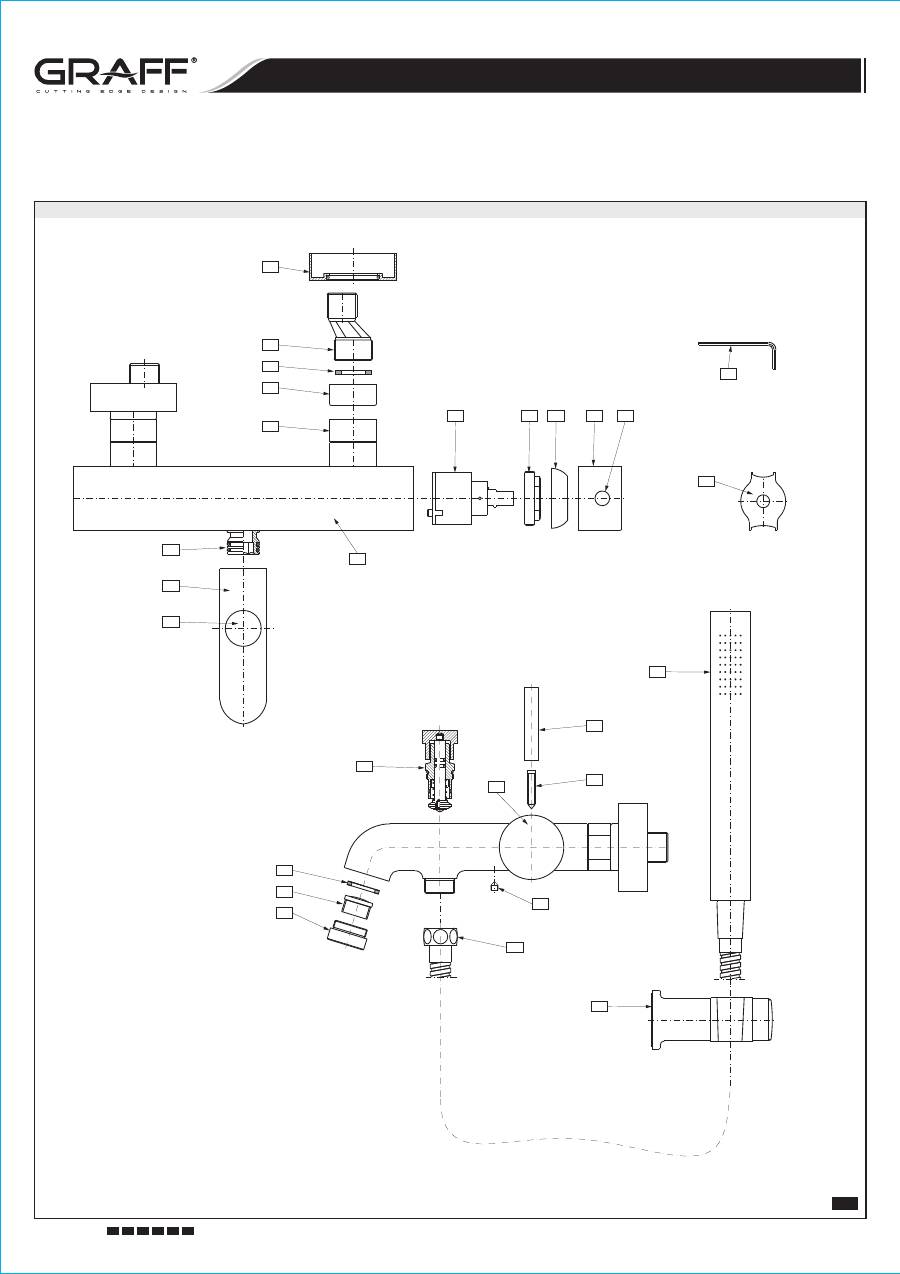
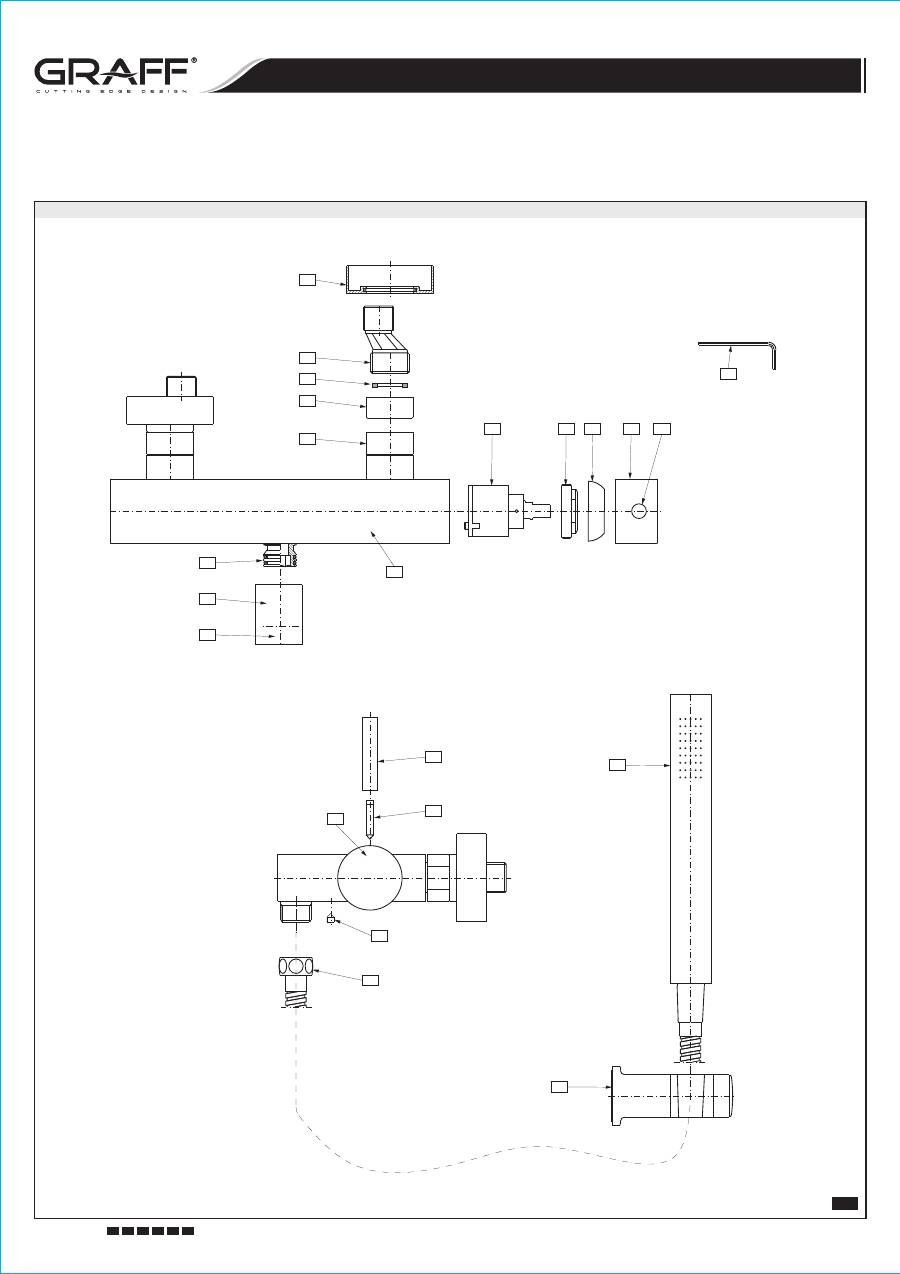
Mixer-tap body
Connector
Spout
Bolt (2 pcs.)
Flat gasket
Tap aerator insert
Aerator body
Diverter set
Mixer
Nut
Decorative cap
Lever
Bolt
Hole plug
Body nut (2 pcs.)
Decorative nut (2 pcs.)
Flat gasket (2 pcs.)
Eccentric connectors (2 pcs.)
Rosette with O-ring (2 pcs.)
Hex key
Shower hose
Hand shower holder
Hand shower
Mischbatteriekörper
Verbindungsstück
Auslaufgarnitur
Blechschraube (2 Stk.)
Flachdichtung
Luftsprudlereinsatz
Luftsprudlerkörper
Umschalter, kpl.
Mischer
Mutter
Zierkappe
Handhebel
Blechschraube
Blindplatte
Körpermutter (2 Stk.)
Ziermutter (2 Stk.)
Flachdichtung (2 Stck.)
Exzenter (2 Stck.)
Rosette mit O-Ring (2 Stck.)
Innensechskantschlüssel
Duschschlauch
Duschkopfgriff
Duschkopf
Corps de la batterie
Raccord
Mélangeur
Vis (x 2)
Joint plat
Insert de l'aérateur
Corps de l'aérateur
Ensemble du commutateur
Mitigeur
Ecrou
Capuchon décoratif
Levier
Vis
Obturateur
Ecrou du corps (x 2)
Ecrou décoratif (x 2)
Joint plat (x 2)
Excentrique (x 2)
Rosace avec joint o-ring (x 2)
Clef Allen
Flexible de douche
Support de pommeau de douche
Pommeau de douche
Корпус смесителя
Соединитель
Излив
Винт (2 шт
Плоская прокладка
Вкладыш перлатора
Корпус перлатора
Переключатель компл
Смеситель
Гайка
Декоративный колпачок
Рукоятка
Винт
Заглушка
Гайка корпуса (2 шт
Декоративная гайка (2 шт
Плоская прокладка (2 шт
Эксцентрик (2 шт
Декоративный элемент с
уплотнением
o
-r
in
g (2 шт
Шестигранный ключ
.)
.
.)
.)
.)
.)
.)
Душевой шланг
Держатель душа
Душевая трубка
Cu
e
rp
o
d
e
l
a
gr
i
f
e
r
a
C
on
ju
n
t
o
r
C
a o
T
o
r
ni
ll
o
(2 u
ni
d
a
d
e
s)
Ju
n
t
a
pl
ana
I
n
s
e
rt
o
d
e
l
a
t
o
m
i
z
a
t
o
r
Cu
e
rp
o
d
e
l
a
t
o
m
i
z
a
t
o
r
C
on
mut
a
d
o
r ju
e
g
o
M
e
zcl
a
d
o
r
Tu
e
rc
a
C
a
p
e
ruz
a
d
e
c
o
r
a
t
i
v
o
P
a
l
an
c
a
T
o
r
ni
ll
o
Obtur
a
d
o
r
Tu
e
rc
a
d
e
l cu
e
rp
o
(2 u
ni
d
a
d
e
s)
Tu
e
rc
a
d
e
c
o
r
a
t
i
v
a
(2 u
ni
d
a
d
e
s)
Ju
n
t
a
pl
ana
(2 u
ni
d
a
d
e
s)
Exc
n
tr
i
c
a
(2 u
ni
d
a
d
e
s)
R
o
s
e
t
a
c
on
ju
n
t
a
t r
i
c
a
(2 u
ni
d
a
d
e
s)
Llave allén
Manguera de la ducha
Asa de la regadera
Regadera
Corpo della batteria
Connettore
Bocca
Vite (2 pezzi)
Guarnizione piatta
Cartuccia dell'aeratore
Corpo dell'aeratore
Deviatore completo
Miscelatore
Dado
Cappuccio decorativo
Leva
Vite
Tappo
Dado del corpo (2 pezzi)
Dado decorativo (2 pezzi)
Guarnizione piatta (2 pezzi)
Eccentrico (2 pezzi)
Rosone con o-ring (2 pezzi)
Chiave a brugola
Flessibile doccia
Attacco della doccetta
Doccetta
See fig. 2.1, 2.2
Siehe Abb. 2.1, 2.2
Voir sch ma
é
2.1, 2.2
C . p c.
м и 2.1, 2.2
Ver dis. 2.1, 2.2
Vedi fig. 2.1, 2.2
A
WALL-MOUNT BATHTUB AND SHOWER TAPS AS DE PARED BAÑERA Y DUCHA WAND-, WANNEN- UND DUSCHMISCHBATTERIEN BATTERIE MURALE DE BAIGNOIRE ET DE DOUCHE E GRIFERÍ BATTERIE A MURO DA VASCA E PER DOCCIA СМЕСИТЕЛИ ДЛЯ ВАНН И ДУША НАСТЕННЫЕ
Instructions for assembly and use • Montage- und Gebrauchsanweisung •
•
c
• Instrucción de Montaje y Servicio • Manuale di Montaggio e Uso
Notice technique montage et utilisation Ин трукция по монтажу и обслуживанию
IOG 2
.
360 00
Rev
20
. 1 March
11
12
GB
D
F
RUS
E
IT
2.1
BATHTUB TAP • WANNENBATTERIE • BATTERIE DE BAIGNOIRE
•
• BATTERIA DA VASCA
СМЕСИТЕЛЬ ДЛЯ ВАННЫ GRIFERÍA BAÑERA
K
ME
19
18
17
16
15
2
1
3
8
9
10
11
12
13
8
5
6
7
13
14
4
12
21
22
20
WALL-MOUNT BATHTUB AND SHOWER TAPS AS DE PARED BAÑERA Y DUCHA WAND-, WANNEN- UND DUSCHMISCHBATTERIEN BATTERIE MURALE DE BAIGNOIRE ET DE DOUCHE E GRIFERÍ BATTERIE A MURO DA VASCA E PER DOCCIA СМЕСИТЕЛИ ДЛЯ ВАНН И ДУША НАСТЕННЫЕ
Instructions for assembly and use • Montage- und Gebrauchsanweisung •
•
c
• Instrucción de Montaje y Servicio • Manuale di Montaggio e Uso
Notice technique montage et utilisation Ин трукция по монтажу и обслуживанию
IOG 2
.
360 00
Rev
20
. 1 March
11
13
GB
D
F
RUS
E
IT
2.2
SHOWER TAP • DUSCHBATTERIE • BATTERIE DE DOUCHE
•
• BATTERIA DA DOCCIA
СМЕСИТЕЛЬ ДЛЯ ДУША GRIFERÍA DUCHA
K
ME
19
18
17
16
15
2
1
3
8
9
10
11
12
13
13
14
4
12
21
22
20
GB
D
WALL-MOUNT BATHTUB AND SHOWER TAPS AS DE PARED BAÑERA Y DUCHA WAND-, WANNEN- UND DUSCHMISCHBATTERIEN BATTERIE MURALE DE BAIGNOIRE ET DE DOUCHE E GRIFERÍ BATTERIE A MURO DA VASCA E PER DOCCIA СМЕСИТЕЛИ ДЛЯ ВАНН И ДУША НАСТЕННЫЕ
Instructions for assembly and use • Montage- und Gebrauchsanweisung •
•
c
• Instrucción de Montaje y Servicio • Manuale di Montaggio e Uso
Notice technique montage et utilisation Ин трукция по монтажу и обслуживанию
IOG 2
.
360 00
Rev
20
. 1 March
11
14
GB
D
F
RUS
E
IT
F
RUS
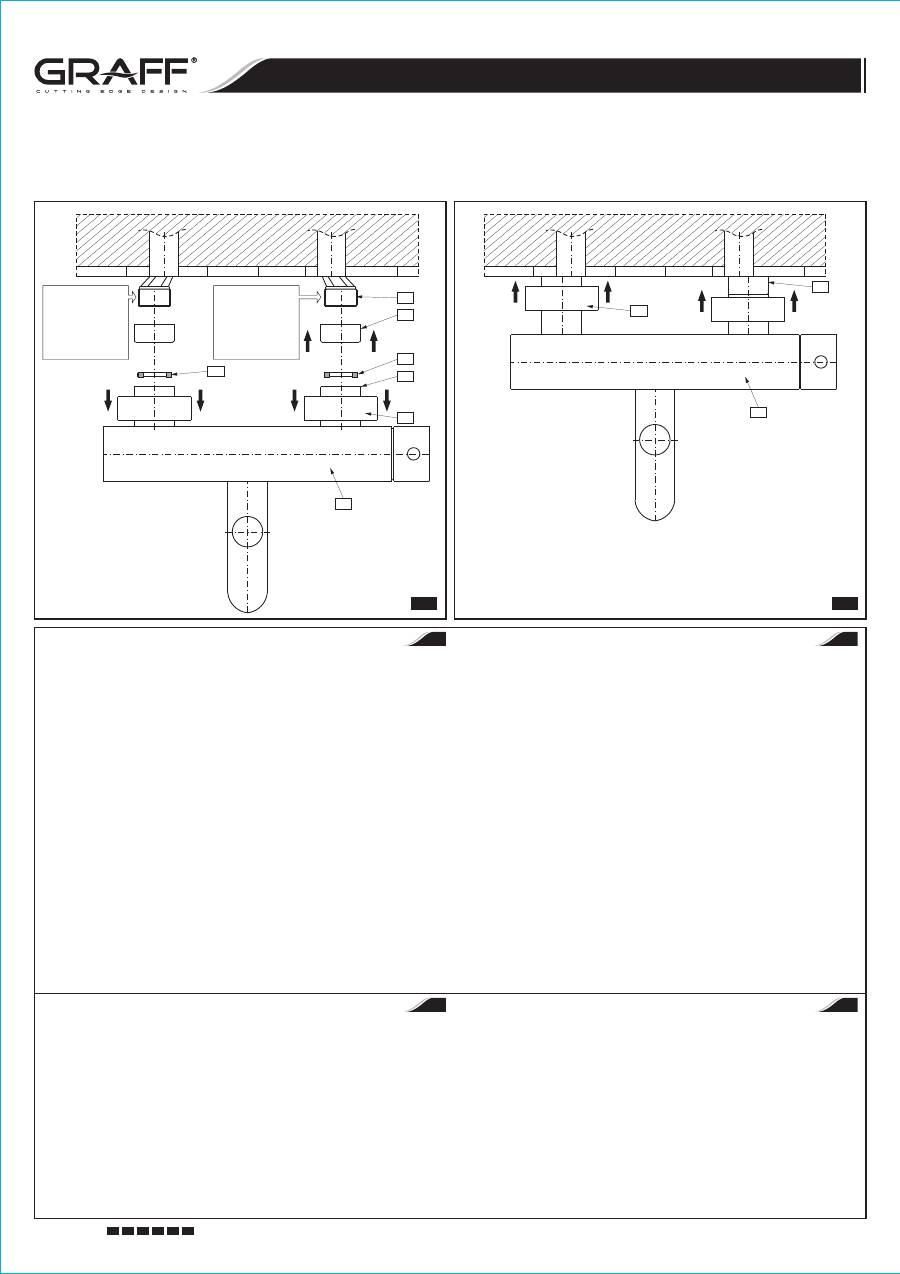
3.1
3.2
TAP INSTALLATION
(18)
(18)
(15)
(1A)
(16)
(18)
(19)
(15)
(17)
(15)
(18)
(15)
(19)
(see fig. 3.1, 3.2)
1.
Supply hot and cold water to the place where tap will be installed according to the recommendations:
–
hot water connection should be on the left-hand side, cold water connection should be on the right-
hand side,
–
spacing between connections must be between: 150±10mm (for
models),
150±20mm (for
models).
2.
Screw eccentric connectors
into installation segments terminated with internal G1/2” thread and
seal the connection with tape (or other leak stopper) – remember that eccentric connector
hole axes
at the G3/4” thread side need to be at the same height, end faces need to be at the same distance from
the wall, and the space between the holes needs to be equal to the distance of connection nut axes
of the tap body
.
3.
Screw decorative sleeves
onto eccentric connectors
until you feel strong resistance.
4.
Slide rosettes
with O-rings over connection nuts
and move them further onto the tap body
connector pipes – according to fig. 3.1.
5.
Insert gaskets
into connection nuts
and screw them onto eccentric connectors
using an
open end adjustable wrench. In order not to scratch the decorative surface of nuts
, put plastic
washers under the wrench.
6.
Slide the rosettes
down carefully and push them to the finishing wall - see fig. 3.2.
7.
Carry out performance test of connected tap. If you notice any leaks, remedy by tightening the
connections.
For models with accessories, go to page 8 or 10 (depending on mixer tap type) – installation of spot hand grip
and hand-held shower spray.
For models without accessories – installation of spot hand grip and hand-held shower spray can be found in
instruction provided with separately purchased product.
ME, TRANQUILITY,
QUBIC
MONTAGE DE LA BATTERIE
(18)
(18)
(15)
(1A)
(16)
(18)
(19)
(15)
(voir schéma 3.1, 3.2)
nt
les instructions suivantes :
–
–
±
±
.
Pour les tronçons de l'installation terminés par un filetage interne G1/2” vous visserez les raccords
excentriques
, en assurant l'étanchéité par la pose d'une bande (ou de tout autre produit assurant
l'étanchéité) – assurez-vous que les axes des orifices excentriques
du
corps de la batterie
.
Vissez les tubulures décoratives
sur les raccords excentriques
nt une résistance perceptible.
Glissez les rosaces
avec leurs joints o-ring sur les écrous de raccordement
et enfoncez-les
plus avant sur les tubulures du corps de la batterie- en vous conformant au schéma n 3.1.
1. Installez l'arrivée d'eau chaude et d'eau froide à l'emplacement de montage de la batterie, en respecta
le raccordement d'eau chaude doit être situé du côté gauche, celui d'eau froide du côté droit,
l'écart entre les raccords doit être compris entre: 150 10mm (pour les modèles
), 150 20 mm (pour les modèles
)
2.
placés du côté du filetage G3/4”
se trouvent à la même hauteur, que les surfaces frontale soient à une distance identique du mur, et que
l'écart entre les orifices soit identique à la distance entre les axes des écrous de raccordement
3.
puis vissez ces tubulures
jusqu'à ce qu'elles présente
4.
ME
QUBIC
,
TRANQUILITY
o
MISCHBATTERIE INSTALLIEREN
(18)
(18)
(15)
(1A)
(18)
(16)
(19)
(15)
(15)
(17)
(15)
(19)
(sieheAbb. 3.1, 3.2)
1.
Installieren Sie die Warm- und Kaltwasseranlage an der für die Mischbatterie-montage vorgesehenen
Stelle gemäß den unten genannten Hinweisen:
der Warmwasseranschluss ist links und der Kaltwasseranschluss rechts anzubringen,
der Abstand der Anschlüsse sollte im Bereich: 150±10mm (für die
- Modelle),
150±20mm (für die
-Modelle) gehalten werden.
2.
In die mit dem Innengewinde G1/2” abgeschlossenen Teilstücke sind die Exzenterverbindungsstücke
einzudrehen und die Verbindungen mit einem Band (oder mit einem anderen Dichtmittel) abzudichten – zu
beachten ist, dass die Öffnungsachsen der Exzenter
von der Gewindeseite G3/4” auf derselben Höhe
liegen, die Stirnflächen im gleichem Abstand von der Wand liegen, und der Öffnungsabstand dem Abstand
derAchsen derAnschlussmutter
des Mischbatteriekörpers
entspricht.
3.
Auf die Exzenterverbindungsstücke
die Zierhülsen
bis zum spürbaren Widerstand aufschrauben.
4.
Die Rosetten
mit den O-Ringen auf die Anschlussmuttern
aufschieben und weiter auf die
Stutzen des Mischbatteriekörpers gemäß derAbbildung 3.1 verschieben.
5.
In die Anschlussmuttern
Dichtungen
einlegen und sie auf die Exzenterverbindungsstücke (18)
mit einem verstellbaren Mutterschlüssel aufschrauben. Um Risse auf der Dekoroberfläche der Muttern
zu vermeiden, sind unter den Flachschlüssel die Kunststoffscheiben unterzulegen.
6.
Die Rosetten
vorsichtig abziehen und sie an die Oberfläche der Ausbauwand heran schieben -
7.
Danach ist eine Funktionsprobe der an die Versorgung angeschlossenen Mischbatterie durchzuführen.
Bei Feststellung irgendwelcher Leckagen sind diese durch Festziehen der vorher durchgeführten
Verbindung zu beseitigen.
Für Modelle mit Zubehör – geh zur Seite 8 oder 10 (abhängig von der Art der Batterie) – Montage der
Punkthalterung und des Duschkopfes.
Für Modelle ohne Zubehör - Montage der Punkthalterung und des Duschkopfes gemäss separate
Produktanleitung.
‒
‒
ME, TRANQUILITY
QUBIC
sieheAbb. 3.2.
МОНТАЖ СМЕСИТЕЛЯ
(18)
(18)
(15)
(1A)
(18)
(16)
(19)
(15)
(c . p c. 3.1, 3.2)
1.
–
,
–
: 150±10
), 150±20
).
2.
G1/2”
,
G3/4”
.
3.
4.
o-ring
3.1.
м и
Подвести шланги для горячей и холодной воды к месту монтажа смесителя в соответствии с
указаниями:
подсоединение горячей воды должно быть с левой стороны, подсоединение холодной воды
– с правой стороны
расстояние между подсоединениями должно быть в пределе
мм (для модели
мм (для модели
На концы с внутренней резьбой
ввинтите эксцентриковые соединители
уплотняя
соединение тефлоновой лентой (или другим уплотняющим материалом) - обращайте внимание
на то, чтобы оси отверстий эксцентриков
со стороны резьбы
раполагались на одной
высоте, торцевые поверхности на одинаковом расстоянии от стены, а расстояние между
отверстиями равнялось расстоянию между осями гаек
в корпусе смесителя
Наденьте на эксцентриковые соединители
декоративные гайки
и надвиньте их до упора.
Надвиньте декоративные элементы
с уплотнениями
на гайки корпуса
и
предвиньте далее на патрубки корпуса смесителя – в соответствии с рис.
ME,
TRANQUILITY
QUBIC
16
19
1A
18
16
17
17
15
19
1A
Cold water supply
KW-Versorgung
Alimentation d'eau froide
Alimentación agua fría
Alimentazione con
acqua fredda
Подвод холодной воды
Hot water supply
WW-Versorgung
Alimentation d'eau chaud
e
Alimentación agua caliente
Alimentazione con
acqua calda
Подвод теплой воды
2290610 2319350
4.1
4.2
WALL-MOUNT BATHTUB AND SHOWER TAPS AS DE PARED BAÑERA Y DUCHA WAND-, WANNEN- UND DUSCHMISCHBATTERIEN BATTERIE MURALE DE BAIGNOIRE ET DE DOUCHE E GRIFERÍ BATTERIE A MURO DA VASCA E PER DOCCIA СМЕСИТЕЛИ ДЛЯ ВАНН И ДУША НАСТЕННЫЕ
Instructions for assembly and use • Montage- und Gebrauchsanweisung •
•
c
• Instrucción de Montaje y Servicio • Manuale di Montaggio e Uso
Notice technique montage et utilisation Ин трукция по монтажу и обслуживанию
IOG 2
.
360 00
Rev
20
. 1 March
11
15
GB
D
F
RUS
E
IT
5.
te à ouverture variable. Pour éviter de rayer la surface décorative des
écrous
6.
et poussez-les jusqu'à
7.
nt de la batterie, une fois celle-ci raccordée à l'arrivée d'eau. En cas de
fuites, éliminez ces dernières en resserrant les jonc
Pour les modèles avec accessoires, passer à la page 8 ou 10 (en fonction du genre de la batterie) - montage
de support ponctuel et de douchette de la douche.
Pour les modèles sans accessoires le montage de support ponctuel et da la douchette, sur notice jointe au
produit acheté à part.
Placez les joints
dans les écrous de raccordement
et vissez-les sur les raccords excentriques
en vous servant d'une clef pla
placez des rondelles en plastique entre la clef et les écrous.
Placez les rosaces
la surface du mur de finition - voir schéma n 3.2.
Faites un essai de fonctionneme
tions précédemment effectuées.
–
(17)
(15)
(18)
(15)
(19)
o
5.
(15),
6.
- c . p c. 3.2
7.
) –
.
–
,
.
Вложите в гайки
уплотнительные прокладки
и с помощью плоского разводного ключа
навинтите их на эксцентриковые соединители
Чтобы не поцарапать декоративную
отделочную поверхность гаек
подложите под плоский ключ пластиковые подкладки.
Осторожно наденьте декоративные элементы
до момента, пока они не упрутся в
поверхность стены
м и
.
Проверьте работу смесителя, подсоединенного к системе водоснабжения. В случае
обнаружения какой-либо течи необходимо проверить выполненные ранее подсоединения и в
случае надобности довинтить.
Для модели с аксессуарами перейдите на страницу 8 или 10 (в зависимости от вида смесителя
монтаж точечного держателя и лейки душа
Для модели без аксессуаров монтаж точечного держателя и лейки на инструкции прилагающейся
к отдельно закупленному продукту
(15)
(17)
(18).
(19)
E
IT
INSTALCIÓN DE LA GRIFERÍA
(18)
(18)
(15)
(1A)
(18)
(16)
(19)
(15)
(15)
(17)
(18)
(15)
(19)
(ver dis. 3.1, 3.2)
1.
Conecte la instalación del agua fría y caliente en el lugar instalar la grifería siguiendo las indicaciones:
–
realice la conexión del agua caliente por el lado izquiero y la conexión del agua fría por el derecho,
–
el espaciamiento entre las conexioines no puede sueperar: 150±10mm (para los modelos
), 150±20mm (para los modelos
).
2.
En las secciones de la instalación acabados con la rosca interna R1/2” enrosque el vástago de la
excéntrica
, estanqueando los empalmes con cinta (u otro tipo de obturador) – fíjese en que los ejes
de los huecos de las excéntricas
por el lado de la rosca R3/4” se encuentren en la misma altura, las
superficies de contacto en la distancia igual de la pared, y el espaciamiento entre los huecos sea igual
que la distancia entre el eje de las tuercas de conexión
y el cuerpo de la grifería
.
3.
En los vástagos de la excéntrica
enrosque los casquillos decorativos
hasta el momento de
sentir resistencia.
4.
Meta las rosetas
con juntas tóricas en las tuercas de conexión
y desplácelos en los racores del
cuerpo de la grifería – ver la imagen 3.1.
5.
En tuercas de conexión
meta las juntas
y enrósquelas en los vástagos de la excéntrica
usando para el fin la llave plana ajustable. Para evitar roscar la superficie decorativa de acabado de las
tuercas
, ponga debajo de la llave unas arandelas de plástico.
6.
Meta las rosetas
con cuidado y apriételas a la superficie de la pared de acabado - ver la imagen 3.2.
7.
Realice una prueba de funcionamiento de la grifería conectada a la alimentación. En caso de observar
fugas, elimínelas apretando las conexiones realizadas antes.
Para los modelos con accesorios, ir a la página 8 o 10 (dependiendo del tipo de grifería) - montaje del
conjunto soporte y del teléfono de ducha.
Para los modelos sin accesorios - el montaje del conjunto soporte y del teléfono de ducha está descrito en
las instrucciones adjuntas al producto adquirido por separado.
ME,
TRANQUILITY
QUBIC
MONTAGGIO DELLA BATTERIA
(18)
(18)
(15)
(1A)
(18)
(16)
(19)
(15)
(15)
(17)
(18)
(15)
(19)
(vedi fig. 3.1, 3.2)
1.
Conduci l'impianto dell'acqua calda e fredda fino al posto di montaggio della batteria, conformemente
alle raccomandazioni:
–
collegamento dell'acqua calda viene eseguito dalla parte sinistra, collegamento dell'acqua fredda
dalla destra,
–
la distanza dei collegamenti deve essere compresa nell'ambito: 150±10mm (per modelli
), 150±20mm (per modelli
).
2.
Agli elementi dell'impianto che terminano con il filetto interno G1/2” avvita i connettori eccentrici
,
metti sui collegamenti il nastro per guarnizioni (o altro tipo di guarnizione) – fa attenzione, che gli assi dei
fori eccentrici
dalla parte del filetto G3/4” siano alla stessa altezza, le superfici frontali a uguale
distanza dalla parete, e la distanza dei fori sia uguale alla distanza degli assi dei dadi di connessione
del corpo della batteria
.
3.
Avvita sul connettore eccentrico
le canne decorative
fino a sentire un'evidente resistenza.
4.
Infila i rosoni
con gli o-ring sui dadi di connessione
e spostale sui tubi di giunzione del corpo
della batteria – conformemente alla fig. 3.1.
5.
Metti nei dadi di connessione
le guarnizioni
e avvitali sui connettori eccentrici
usando la
chiave registrabile piatta. Per evitare di graffiare la superficie decorativa della finitura dei dadi
metti
sotto la chiave piatta le rondelle di plastica.
6.
Leva attentamente i rosoni
e accostali alla superficie della parete di finitura - vedi fig. 3.2.
7.
Esegui una prova di funzionamento della batteria collegata all'alimentazione. In caso di mancanze di
tenuta, eliminale serrando i collegamenti eseguiti anteriormente.
Per i modelli con accessori andare alla pagina 8 o 10 (a seconda del tipo di rubinetto) - installazione del
supporto a parete e del soffione doccia.
Per i modelli senza accessori - installazione del supporto a parete e del soffione doccia nelle istruzioni
allegate al prodotto acquistato a parte.
ME,
TRANQUILITY
QUBIC
3
2
1
4
D
A
B
A
4
2
3
B
1
Finished wall
Ausbauwand
Paroi de finition
Pared de acabado
Parete di finitura
Отделочная стенка
GB
GB
D
D
F
F
RUS
RUS
E
E
IT
IT
1
2
3
4
A
B
1
2
3
4
A
B
Hand grip body
Wall cover of hand grip
Fastening plate
M4x10 socket head screw
Dowel
Screw
Hole plug
Hand grip body
Holder of hand-held shower
spray
Rubber washer
Dowel
Screw
Körper des Griffes
Rosette des Griffes
Befestigungsplatte
Schraube M4x10 mit Sechskant-
Sitz
Dübel
Schraube
Blende
Körper des Griffes
Griff des Duschköpfes
Gummiunterlage
Dübel
Schraube
Corps de support
Rosace de support
Lamelle de fixation
Cheville
Vis
Vis M4x10 à trous six pans
Obtur
a
t
e
ur
C
o
rps d
e
supp
o
rt
Supp
o
rt p
o
ur d
o
uch
e
tt
e
R
on
d
e
ll
e
en
c
ao
utch
o
uc
Ch
e
v
i
ll
e
V
i
s
Корпус держателя
Розетка держателя
Крепежная пластинка
Винт М4x10 с гн 6кт
Шпилька
Винт
Заглушка
Корпус держателя
Рукоятка лейки
Резиновая прокладка
Шпилька
Винт
Cu
e
rp
o
d
e
l s
o
p
o
rt
e
R
o
s
e
t
a
d
e
l s
o
p
o
rt
e
L m
ina
d
e
f
i
j
a
c
i n
T
o
r
ni
ll
o
M4x10 c
on
c
a
b
e
z
a
6kt
T
a
rug
o
T
o
r
ni
ll
o
Tapón ciego
Cuerpo del soporte
Soporte de teléfono
Arandela de goma
Tarugo
Tornillo
Corpo del supporto
Rosone del supporto
Piastrina di fissaggio
Vite M4x10 con sede esagonale
Tassello
Vite
Tappo
Corpo del supporto
Braccio del soffione
Rondella di gomma
Tassello
Vite
GB
GB
D
D
F
RUS
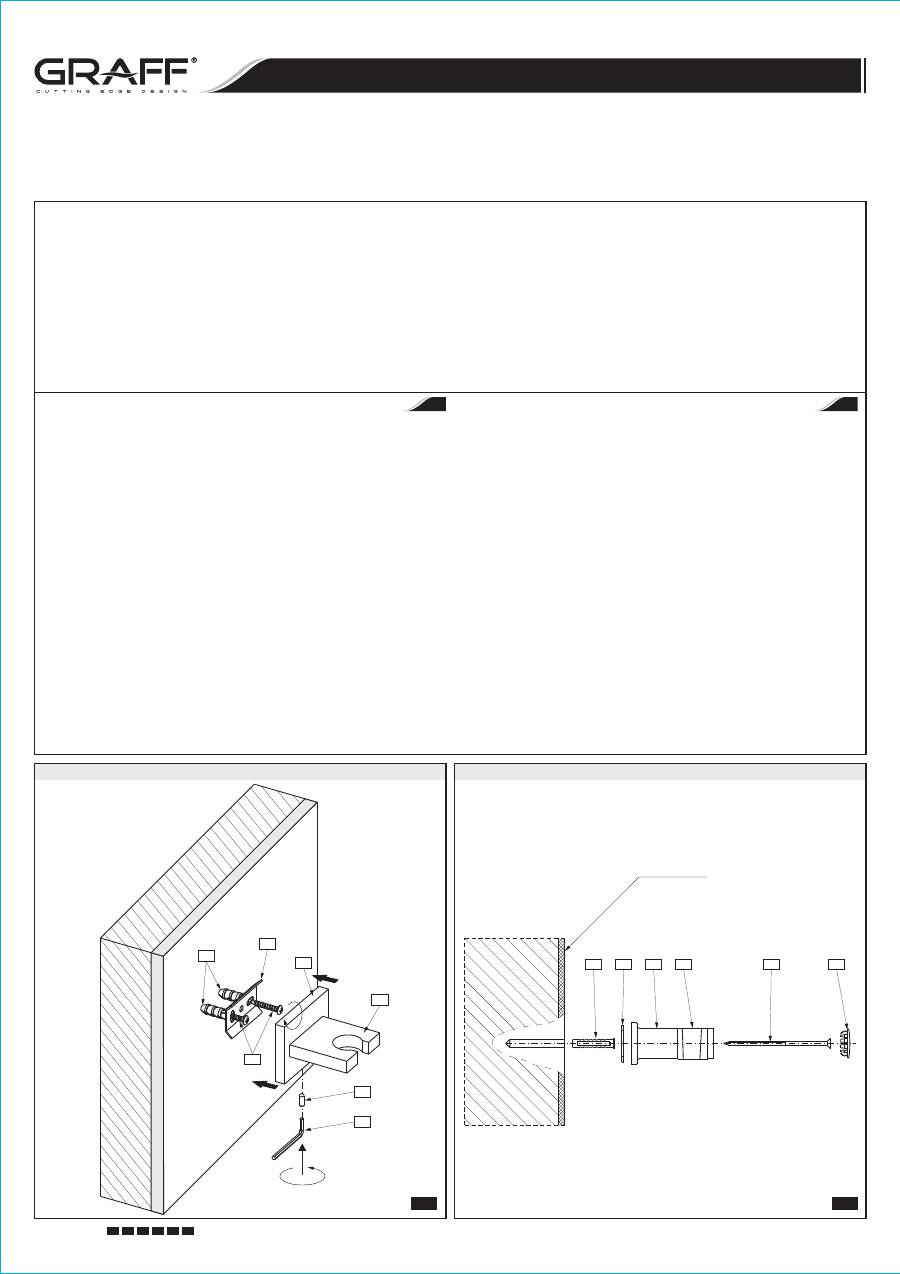
Installation of 2290610 spot hand grip
Applies to the following mixer taps:
(with accessories)
Installation on ceramic tiles
(A)
(3)
(B)
(4)
(see fig. 4.1)
1.
Choose adequate place on a wall for hand grip, while taking into account requirements of users.
Consider as well extreme positions of hand-held shower sprayer holder, as well as connection place of
shower hose to water supply.
3.
:
4.
Insert dowels
into drilled holes. Place the fastening plate
over holes in the wall, then insert and
screw in the screws
.
5.
Place the hand grip on the fastening plate and screw in the screw
.
SADE, TARGA, SOLAR, FONTAINE, STRUCTURE, QUBIC,
QUBIC TRE
2.
First, mark places for holes, then drill 2 holes Ø 8 mm.
drill hole Ø 8 mm in joint grout (if possible) and put a dowel into the hole.
Installation of 2319350 spot hand grip
Applies to the following mixer taps:
(with accessories)
Installation on ceramic tiles
(A)
(4)
(1)
(B)
(1)
(see fig. 4.2)
1.
Choose adequate place on a wall for hand grip, while taking into account requirements of users.
Consider as well extreme positions of hand-held shower sprayer holder, as well as connection place of
shower hose to water supply.
2.
First, mark places for hole, then drill a hole 8 mm.
3.
:
4.
Insert dowel
into drilled hole. Place rubber washer
together with mounting holder body
over
the hole in a wall, then insert and screw in the screw
.
5.
Install hole plug
.
ME25, ME, ME25/ME, TRANQUILITY
drill hole Ø 8 mm in joint grout (if possible) and put a dowel into the hole.
Montage de support ponctuel 2290610
Concerne les batteries :
(avec
accessoires)
Montage sur carreaux céramiques
(A)
(3)
(B)
(4)
(voir schéma 4.1)
1. Choisir sur le mur la place appropriée pour le support mural, en tenant compte des exigences des
usagers.
support pour douchette et
l'endroit de branchement du flexible d'alimentation de la douche.
2. Marquer tout d'abord les endroits pour les orifices , et ensuite forer 2 orifices
3.
:
oint (si cela est possible) et
placer une cheville expansible.
4. Placer les chevilles expansibles
dans les orifices forés. Placer la platine de fixation
au-dessus
des orifices dans le mur, et ensuite introduire et visser les vis
.
5. Installer le support sur la platine de fixation et visser le vis
.
SADE, TARGA, SOLAR, FONTAINE, STRUCTURE, QUBIC, QUBIC TRE
Prendre en compte simultanément les positions extrêmes du
Ø 8 mm.
percer un orifice Ø 8mm dans le j
Montage der Punkthalterung 2290610
Betrifft Batterien:
(mit
Zubehör)
Montage in Keramikfliesen:
(A)
(3)
(B)
(4)
(sieheAbb. 4.1)
1.
Für die Halterung entsprechende Stelle an der Wand wählen, indem Erfordernisse berücksichtigt
werden. Die Randlage des Griffes für den Duschkopf und die Anschlussstelle des Duschschlauches an
die Versorgung berücksichtigen.
2.
Zuerst Stellen für Bohrungen wählen und dann zwei 8 mm-Bohrungen machen.
3.
Falls möglich, 8 mm-Bohrung in der Fuge und darin Spreizdübel stecken.
4.
In die Bohrungen Spreizdübel
stecken. Über die Wandbohrungen Befestigungsplatte anordnen
und dann Schrauben stecken und drehen
.
5.
Griff auf Befestigungsplatte anlegen und Schraube drehen
.
SADE, TARGA, SOLAR, FONTAINE, STRUCTURE, QUBIC, QUBIC TRE
Montage der Punkthalterung 2319350
Betrifft Batterien:
(mit Zubehör)
Montage in Keramikfliesen
(A)
(4)
(1)
(B)
(1)
(sieheAbb. 4.2)
1.
Für die Halterung entsprechende Stelle an der Wand wählen, indem Erfordernisse berücksichtigt
werden. Die Randlage des Griffes für den Duschkopf und die Anschlussstelle des Duschschlauches an
die Versorgung berücksichtigen.
2.
Zuerst Stelle für Bohrung wählen und dann 8mm-Bohrung machen.
3.
: Falls möglich, 8 mm-Bohrung in der Fuge und darin Spreizdübel stecken.
4.
In die Bohrung Spreizdübel
stecken. Über die Wandbohrung Gummiunterlage
mit Körper des
Montagegriffes
anordnen und dann Schraube stecken und drehen
.
5.
Blende anordnen
.
ME25, ME, ME25/ME, TRANQUILITY
Монтаж точечного держателя 2290610
Касается смесителей:
(с
аксессуарами)
Монтаж на керамической плитке
(A)
(3)
(B)
(4)
(c . p c. 4.1)
1. Выберите соответствующее место на стене под настенный держатель, принимая во внимание
требования пользователей. Учтите при этом крайние положения рукоятки лейки, а также место
подсоединения душевого шланга к сети водоснабжения.
2. Обозначьте сначала места под отверстия, а затем просверлите 2 отверстия
мм.
3.
: просверлите отверстие
мм в шве (если это возможно) и
вставьте дюбель.
4. Вставьте дюбели
в просверленные отверстия. Поместите крепежную пластинку
над
отверстиями в стене, а затем вставьте и прикрутите винты
.
5. Вставьте держатель на крепежную пластинку и вкрутите винт
.
м и
SADE, TARGA, SOLAR, FONTAINE, STRUCTURE, QUBIC, QUBIC TRE
Ø8
Ø8
WALL-MOUNT BATHTUB AND SHOWER TAPS AS DE PARED BAÑERA Y DUCHA WAND-, WANNEN- UND DUSCHMISCHBATTERIEN BATTERIE MURALE DE BAIGNOIRE ET DE DOUCHE E GRIFERÍ BATTERIE A MURO DA VASCA E PER DOCCIA СМЕСИТЕЛИ ДЛЯ ВАНН И ДУША НАСТЕННЫЕ
Instructions for assembly and use • Montage- und Gebrauchsanweisung •
•
c
• Instrucción de Montaje y Servicio • Manuale di Montaggio e Uso
Notice technique montage et utilisation Ин трукция по монтажу и обслуживанию
IOG 2
.
360 00
Rev
20
. 1 March
11
16
GB
D
F
RUS
E
IT
E
IT
Montaje de conjunto soporte 2290610
Para la siguiente grifería:
(con
accesorios)
Montaje en baldosas cerámicas
(A)
(3)
(B)
(4)
(ver dis. 4.1)
1.
Seleccione una ubicación en la pared para el soporte de pared, teniendo en cuenta las necesidades de
los usuarios. Considere la posición extrema del soporte de teléfono y el punto de conexión de la
manguera de ducha a la red.
3.
e introduzca el tarugo.
4.
Introduzca los tarugos
en los agujeros taladrados. Coloque la lámina de fijación
sobre los
agujeros en la pared, a continuación introduzca y apriete los tornillos
.
5.
Coloque el soporte en la lámina de fijación y apriete el tornillo
.
SADE, TARGA, SOLAR, FONTAINE, STRUCTURE, QUBIC, QUBIC TRE
2.
En primer lugar, marque los puntos para agujeros, a continuación perfore 2 agujeros de Ø8mm.
: taladre el agujero de Ø8mm en la junta (si es posible)
Installazione del supporto a parete 2290610
Per rubinetti:
(con accessori)
Installazione sulle piastrelle in ceramica
(vedi fig. 4.1)
1.
Scegliere un posto sulla parete adeguato per montare il supporto a parete, prendendo in
considerazione le esigenze degli utilizzatori. Tener conto delle posizioni estreme del braccio del soffione
e del punto di collegamento del tubo flessibile doccia all'alimentazione.
2.
Prima segnare i punti per i fori, poi eseguire 2 fori 8mm.
3.
: eseguire un foro 8mm nel giunto (se possibile) ed inserirvi
un tassello ad espansione.
4.
Inserire i tasselli ad espansione (A) nei fori preparati. Collocare la piastrina di fissaggio (3) sopra i fori
nella parete, quindi inserire ed avvitare le viti (8).
5.
Posizionare il supporto sulla piastrina di fissaggio ed avvitare la vite (4).
SADE, TARGA, SOLAR, FONTAINE, STRUCTURE, QUBIC, QUBIC TRE
Ø
Ø
F
RUS
5
Montage de support ponctuel 2319350
Concerne les batteries :
(avec accessoires)
Montage sur carreaux céramiques
(A)
(4)
(1)
(B)
(1)
(voir schéma 4.2)
1. Choisir sur le mur la place appropriée pour le support mural, en tenant compte des exigences des
usagers.
ent du flexible d'alimentation de la douche.
2.
'
'
3.
:
expansible.
4. Introduire une cheville expansible
dans l'orifice foré. Installer la rondelle en caoutchouc
avec le
corps du support de montage
sur l'orifice dans le mur et ensuite, placer et visser le vis
.
5. Installer l'obturateur
.
ME25, ME, ME25/ME, TRANQUILITY
Prendre en compte simultanément les positions extrêmes du support pour douchette et
l'endroit de branchem
Marquer tout d'abord l endroit pour l orifices , et ensuite forer un orifices de Ø8 mm.
percer un orifice Ø8 mm dans le joint (si cela est possible) et
placer une cheville
Монтаж точечного держателя 2319350
Касается смесителей:
(с аксессуарами)
(A)
(4)
(1)
(B)
(1)
(c . p c. 4.2)
1. Выберите соответствующее место на стене под настенный держатель, принимая во внимание
требования пользователей. Учтите при этом крайние положения рукоятки лейки, а также место
подсоединения душевого шланга к сети водоснабжения.
3.
4.
Вставьте дюбель
в просверленное отверстие. Поместите резиновую прокладку
вместе с
корпусом монтажного держателя
над отверстием в стене, а затем вставьте и прикрутите винт
.
5.
.
м и
2. Обозначьте сначала место под отверстие, а затем просверлите отверстие
мм.
: просверлите отверстие
мм в шве (если это возможно) и
вставьте дюбель.
Вставьте заглушку
ME25, ME, ME25/ME, TRANQUILITY
Ø8
Ø8
Монтаж на керамической плитке
WALL-MOUNT BATHTUB AND SHOWER TAPS AS DE PARED BAÑERA Y DUCHA WAND-, WANNEN- UND DUSCHMISCHBATTERIEN BATTERIE MURALE DE BAIGNOIRE ET DE DOUCHE E GRIFERÍ BATTERIE A MURO DA VASCA E PER DOCCIA СМЕСИТЕЛИ ДЛЯ ВАНН И ДУША НАСТЕННЫЕ
Instructions for assembly and use • Montage- und Gebrauchsanweisung •
•
c
• Instrucción de Montaje y Servicio • Manuale di Montaggio e Uso
Notice technique montage et utilisation Ин трукция по монтажу и обслуживанию
IOG 2
.
360 00
Rev
20
. 1 March
11
17
GB
D
F
RUS
E
IT
E
IT
Montaje de conjunto soporte 2319350
Para la siguiente grifería:
(con accesorios)
Montaje en baldosas cerámicas
(A)
(4)
(1)
(B)
(1)
(ver dis. 4.2)
1. Seleccione una ubicación en la pared para el soporte de pared, teniendo en cuenta las necesidades de
los usuarios. Considere la posición extrema del soporte de teléfono y el punto de conexión de la
manguera de ducha a la red.
2. En primer lugar, marque los puntos para el agujero, a continuación perfore un agujero de 8mm.
3.
4.
Introduzca el tarugo
en el agujero taladrado. Coloque la arandela de goma
junto con el cuerpo del
soporte de montaje
sobre el agujero en la pared, a continuación introduzca y apriete el tornillo
.
5. Coloque el tapón ciego
.
ME25, ME, ME25/ME, TRANQUILITY
: taladre el agujero de Ø8mm en la junta (si es posible) e introduzca el
tarugo.
Montaje de conjunto soporte 2319350
Para la siguiente grifería:
(con accesorios)
Montaje en baldosas cerámicas
(A)
(4)
(1)
(B)
(1)
(vedi fig. 4.2)
1.
Seleccione una ubicación en la pared para el soporte de pared, teniendo en cuenta las necesidades de
los usuarios. Considere la posición extrema del soporte de teléfono y el punto de conexión de la
manguera de ducha a la red.
3.
4.
Introduzca el tarugo
en el agujero taladrado. Coloque la arandela de goma
junto con el cuerpo del
soporte de montaje
sobre el agujero en la pared, a continuación introduzca y apriete el tornillo
.
5.
Coloque el tapón ciego
.
ME25, ME, ME25/ME, TRANQUILITY
2.
En primer lugar, marque los puntos para el agujero, a continuación perfore un agujero de Ø8mm.
: taladre el agujero de Ø8mm en la junta (si es posible)
e introduzca el tarugo.
7
8
2
3
4
5
6
1
Finished wall
Ausbauwand
Paroi de finition
Pared de acabado
Parete di finitura
Отделочная стенка
G1/2”
G1/2”
G1/2”
G1/2”
WALL-MOUNT BATHTUB AND SHOWER TAPS AS DE PARED BAÑERA Y DUCHA WAND-, WANNEN- UND DUSCHMISCHBATTERIEN BATTERIE MURALE DE BAIGNOIRE ET DE DOUCHE E GRIFERÍ BATTERIE A MURO DA VASCA E PER DOCCIA СМЕСИТЕЛИ ДЛЯ ВАНН И ДУША НАСТЕННЫЕ
Instructions for assembly and use • Montage- und Gebrauchsanweisung •
•
c
• Instrucción de Montaje y Servicio • Manuale di Montaggio e Uso
Notice technique montage et utilisation Ин трукция по монтажу и обслуживанию
IOG 2
.
360 00
Rev
20
. 1 March
11
18
GB
D
F
RUS
E
IT
GB
D
F
RUS
E
IT
1
2
3
4
5
6
7
Hose nut G1/2”
Rubber gasket
Shower hose
Hose conical nut
Rubber gasket
Hand shower
Hand shower holder
Schlauchmutter G1/2”
Gummidichtung
Duschschlauch
Schlauchkegeldichtung
Gummidichtung
Duschkopf
Duschkopfgriff
Ecrou G1/2” du flexible
Joint caoutchouc
Flexible de douche
Ecrou conique du flexible
Joint caoutchouc
Pommeau de douche
Support de pommeau de douche
Гайка G1/2” шланга
Резиновая прокладка
Душевой шланг
Конусная гайка шланга
Резиновая прокладка
Душевая трубка
Держатель душа
Tuerca R1/2 de la manguera
Junta de goma
Manguera de la ducha
Tuerca cónica de la manguera
Junta de goma
Regadera
Asa de la regadera
”
Dado G1/2” del flessibile
Guarnizione di gomma
Flessibile doccia
Dado conico del flessibile
Guarnizione di gomma
Doccetta
Attacco della doccetta
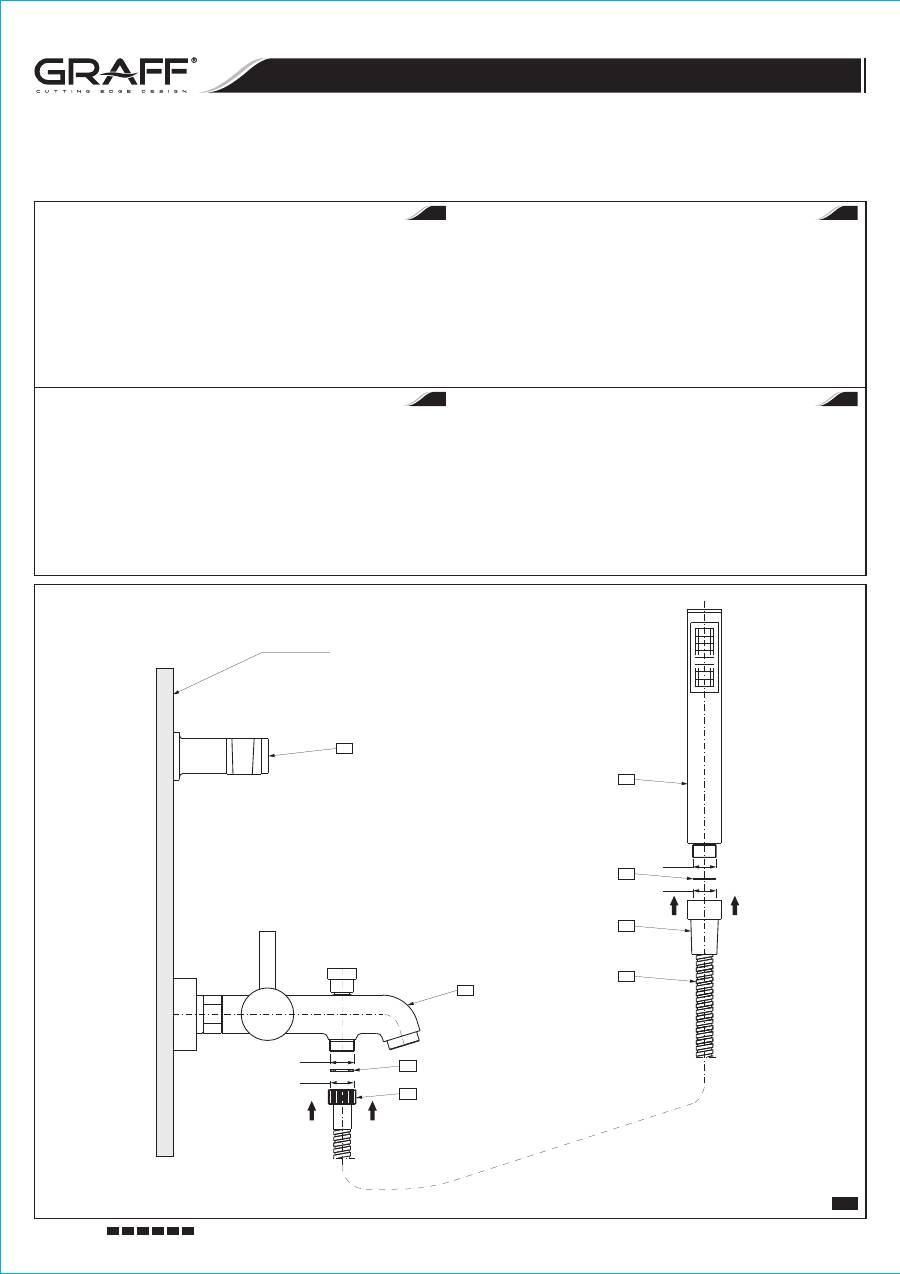
INSTALLATION OF HAND SHOWER
(2)
(1)
(1)
(3)
(5)
(4)
(4)
(6)
(6)
(7)
(1)
(8)
(see fig. 5)
1.
Place the gasket
in the hose nut
. Carefully fit the hose nut
on the threaded connector of the
angle joint
. Tighten the nut by hand.
2.
Place the gasket
in the conical hose nut
. Carefully fit the hose end
on the threaded connector
of the hand shower
. Tighten the nut by hand. Place the hand shower
in the wall
holder
.
3.
Carefully screw the rotary G1/2 hose nut
onto threaded nozzle G1/2 in lower part of the mixer tap
.
DUSCHKOPFMONTAGE
(2)
(1)
(1)
(3)
(5)
(4)
(4)
(6)
(6)
(7)
(1)
(8)
(sieheAbb. 5)
1.
Platzieren Sie die Dichtung
in der Schlauchmutter
. Die Schlauchmutter
vorsichtig auf den
Gewindestutzen des Eckverbinders
aufdrehen. Die Mutter per Hand anziehen.
2.
Platzieren Sie die Dichtung
in der Kegelschlauchmutter
. Anschließend drehen Sie die
Schlauchmutter
vorsichtig auf den Gewindestutzen am Duschkopf
auf. Die Mutter per Hand
anziehen.Als nächstes setzen Sie den Duschkopf
im Wandhalter
ein.
3.
Drehschraube des Schlauches G1/2
auf Gewindestutzen G1/2 im unteren Teil der Batterie
vorsichtig aufschrauben.
GB
D
IT
E
INSTALACIÓN DE LA REGADERA
(2)
(1)
(1)
(3)
(5)
(4)
(4)
(6)
(6)
(7)
(1)
(8)
(ver dis. 5)
1.
Coloque la junta
en la tuerca de la manguera
. Con cuidado enrosque la tuerca de la manguera
en el racor roscado del empalme angular
.Apriete la tuerca a mano.
2.
Coloque la junta
en la tuerca cónica de la manguera
. Con cuidado enrosque el extremo de la
manguera
en el racor roscado de la regadera
. Apriete la tuerca a mano. Luego coloque la
regadera de la ducha
en el asa de pared
.
3.
Apriete con cuidado la tuerca giratoria de la manguera G1/2
en el codo roscado G1/2 en la parte
inferior de la grifería
.
MONTAGGIO DELLA CORNETTA
(2)
(1)
(1)
(3)
(5)
(4)
(4)
(6)
(6)
(7)
(1)
(8)
(vedi fig. 5)
1.
Disponi la guarnizione
nel dado del flessibile
. Facendo attenzione avvita il dado del flessibile
sul tubo di giunzione filettato della giunzione angolare
. Serra manualmente il dado.
2.
Disponi la guarnizione
nel dado conico del flessibile
.
all'
. Serra manualmente il dado. Di seguito disponi la
doccetta
sull'attacco alla parete
.
3.
Avvitare con attenzione il dado girevole del tubo flessibile G1/2
sull'attacco filettato G1/2 nella parte
inferiore del rubinetto
.
Facendo attenzione avvita l'estremità del
flessibile
estremità filettata della doccetta
МОНТАЖ ДУШЕВОЙ ТРУБКИ
(2)
(1)
(1)
(3)
(5)
(4)
(4)
(6)
(6)
(7)
(8)
(c . p c. 5)
1.
.
.
2.
.
.
.
3.
.
м и
Установи прокладку
в гайке шланга
Осторожно навинти гайку шланга
на резьбовый
патрубок углового соединения
Вручную затяни гайку.
Установи прокладку
в конусной гайке шланга
Осторожно навинти гайку шланга
на
резьбовый патрубок душевой трубки
Вручную затяни гайку. Затем вложи душевую трубку
в держатель на стене
Осторожно прикрутите поворотную гайку шланга G1/2
на патрубок с резьбой G1/2 в нижней
части смесителя
(1)
INSTALLATION DU POMMEAU DE DOUCHE
(2)
(1)
(1)
(3)
(5)
(4)
(4)
(6)
(6)
(7)
(1)
(8)
(voir schéma 5)
1.
Insérez le joint
dans l'écrou du flexible
.Vissez avec précaution l'écrou du flexible
sur l'embout
fileté du raccord d'angle
.
.
2.
Placez le joint
dans l'écrou conique du flexible
.Vissez avec précaution l'extrémité du flexible
sur l'embout fileté du pommeau de douche
.
. Ensuite, placez le pommeau de
douche
dans le support mural
.
3.
Visser avec précaution l'écrou tournant du flexible G1/2
sur le manchon fileté G1/2 dans la partie
inférieure de la batterie
.
Serrez l'écrou à la main
Serrez l'écrou à la main
F
RUS
GB
D
OPERATION
Opening water outflow and steady regulation of water discharge are achieved by pushing tap handle
down (by max. 25°). Lifting the handle stops water discharge.
Water temperature increases when the handle is turned left (in the user direction),
and decreases when the handle is turned right. When the handle is in the extreme left position only hot
water flows, and in the extreme right position only cold water flows.
Water
temperature increases when the handle is turned right, and decreases when the handle is turned left (in
the user direction). When the handle is in the extreme right position only hot water flows, and in the
extreme left position only cold water flows.
The diverter valve (only in bathtub taps) is designed to select the operating mode: Pulling the knob up
and turning it 90° to the right (in order to block the setting) causes water to flow out of the shower head.
Turning the knob 90° to the left causes automatic switch-over of the valve to the position where water
flows out of the spout.
ME25/ME,
:
?
?
?
ME25
QUBIC, TRANQUILITY, SADE, TARGA, SOLAR FONTAINE, STRUCTURE, QUBIC TRE:
BEDIENUNGSABLAUF
Das Öffnen des Wasserauslaufs und die stufenlose Einstellung des auslaufenden Wassers erfolgen
mittels Stellung des Griffes nach oben (um max. 25 ). Das Hochschieben des Griffes schließt die
Wasserzufuhr.
Durch Drehen des Griffs nach links (Bedienerseite) wird die Wassertemperatur erhöht;
durch Drehen des Griffs nach rechts wird die Wassertemperatur gesenkt. Die linke Endstellung des Griffs
verursacht den Austritt von ausschließlich heißem Wasser, die rechte Endstellung von ausschließlich
kaltem Wasser.
Durch Drehen
des Griffs nach rechts wird die Wassertemperatur erhöht; durch Drehen des Griffs nach links (Bedienerseite)
wird die Wassertemperatur gesenkt. Die rechte Endstellung des Griffs verursacht den Austritt von
ausschließlich heißem Wasser, die linke Endstellung von ausschließlich kaltem Wasser.
Der Brauseumschalter (ausschließlich in Wannen-Mischbatterien) dient zur Auswahl der Arbeitsmodi: das
Ziehen des Drehknopfes und Drehen um 90 nach rechts (zwecks Sperren der Einstellung) bewirkt den
Wasseraustritt durch den Duschknopf, Drehen des Drehknopfes um 90 nach links bewirkt die selbsttätige
Umschaltung des Ventils in die Position, in welcher das Wasser aus demAuslaufgarnitur austreten wird.
°
°
°
?
?
?
ME25/ME, ME25:
QUBIC, TRANQUILITY, SADE, TARGA, SOLAR FONTAINE, STRUCTURE, QUBIC TRE:
F
RUS
MODE D'EMPLOI
L'ouvreture du débit d'eau et le réglage de son débit se font en abaissant le levier de la batterie (sous un
angle maximum de 25°). La levée du levier provoque la coupure de l'arrivée d'eau.
L'augmentation de la température de l'eau se fait en faisant tourner le levier vers la
gauche (dans le sens de l'usager);
droite
L'augmentation de la température de l'eau se fait en faisant tourner le levier vers la droite; pour diminuer
la température, vous tournerez le levier vers la gauche (dans le sens de l'usager)
droite seule l'eau chaude s'écoulera
gauche seule l'eau froide
arrivera au robinet.
La vanne de commutation (seulement pour le
°
°
commute
automatiquement l'arrivée d'eau vers le mélangeur de la baignoire.
pour diminuer la température, vous tournerez le levier vers la droite.
En position extrême gauche seule l'eau chaude s'écoulera du robinet, alors qu'en position extrême
seule l'eau froide arrivera au robinet.
. En position extrême
du robinet, alors qu'en position extrême
s batteries de baignoire) sert à sélectionner le mode de
fonctionnement: le bouton tourné vers le haut et à 90 à droite (position de blocage de la sélection) fait
s'écouler l'eau de la pomme de douche, alors que la rotation du bouton à 90 vers la gauche
?
?
?
ME25/ME, ME25:
QUBIC, TRANQUILITY, SADE, TARGA, SOLAR FONTAINE, STRUCTURE, QUBIC TRE:
OБСЛУЖИВАНИЕ
25 ).
,
,
-
(
).
,
-
.
90
90
Подача воды и плавное регулирование интенсивности струи осуществляется путем отклонения
рукоятки крана вниз (макс. на
Поднимая рукоятку вверх, закрываем подачу воды.
Температуру воды увеличиваем, поворачивая рукоятку крана влево (в
направлении пользователя), а уменьшаем - поворачивая вправо. В крайнем левом положении
течет только горячая вода, в крайнем правом - только холодная.
Температуру воды увеличиваем поворачивая рукоятку крана вправо а уменьшаем
поворачивая влево в направлении пользователя В крайнем правом положении течет только
горячая вода в крайнем левом только холодная
Переключающий клапан (только в смесителях для ванны) предназначен для выбора режима
работы: поднимая рукоятку вверх и поворачивая ее на
вправо (для заблокирования
положения), направляем струю воды в душевую головку, а при повороте рукоятки на
влево
клапан автоматически переключается в положение, в котором струя воды направляется в излив.
°
°
°
?
?
?
ME25/ME, ME25:
QUBIC, TRANQUILITY, SADE, TARGA, SOLAR FONTAINE, STRUCTURE, QUBIC TRE:
WALL-MOUNT BATHTUB AND SHOWER TAPS AS DE PARED BAÑERA Y DUCHA WAND-, WANNEN- UND DUSCHMISCHBATTERIEN BATTERIE MURALE DE BAIGNOIRE ET DE DOUCHE E GRIFERÍ BATTERIE A MURO DA VASCA E PER DOCCIA СМЕСИТЕЛИ ДЛЯ ВАНН И ДУША НАСТЕННЫЕ
Instructions for assembly and use • Montage- und Gebrauchsanweisung •
•
c
• Instrucción de Montaje y Servicio • Manuale di Montaggio e Uso
Notice technique montage et utilisation Ин трукция по монтажу и обслуживанию
IOG 2
.
360 00
Rev
20
. 1 March
11
19
GB
D
F
RUS
E
IT
E
IT
MANIPULACIÓN
Abrir el agua fría y el ajuste de su flujo se realiza al tirar el mango hacia abajo (por el ángulo máximo de
25°). Levantar el mango cierra el flujo del agua.
Aumentar la temperatura del agua se realiza girando el mango hacia izquierda (en
dirección del usuario), y disminuir girando el mango a la derecha. La posición extrema izquierda
suministra agua sólo caliente, la posición extrema derecha – sólo fría.
Aumentar
la temperatura del agua se realiza girando el mango hacia derecha, y disminuir girando el mango a la
izquierda (en dirección del usuario). La posición extrema derecha suministra agua sólo caliente, la
posición extrema izquierda – sólo fría.
La válvula de conmutación (
) sire para seleccionar el modo de trabajo:
tirar la bola hacia arriba y girarla por el ángulo de 90° a la derecha (para bloquear el ajuste) deja salir el
agua por el auricular de ducha, girar la bola por el ángulo de 90°
sólo en las griferías de bañera
a la izquierda conmuta
automáticamente la válvula para la posición de dejar salir el agua sólo por el caño.
?
?
?
ME25/ME, ME25:
QUBIC, TRANQUILITY, SADE, TARGA, SOLAR FONTAINE, STRUCTURE, QUBIC TRE:
FUNZIONAMENTO
Apertura dell'uscita dell'acqua e la regolazione scorrevole della sua erogazione avviene tramite il
posizionamento della maniglia in basso (di max. angolo 25 ). L'alzata della maniglia provoca la
chiusura dell'uscita dell'acqua.
L'aumento della temperatura avviene in seguito alla rotazione della maniglia a
sinistra (in direzione dell'utente), e l'abbassamento tramite la rotazione a destra. La posizione della
maniglia estremamente a sinistra provoca soltanto l'uscita dell'acqua calda, estremamente a destra –
soltanto l'uscita dell'acqua fredda.
L'aumento
della temperatura avviene in seguito alla rotazione della maniglia a destra, e l'abbassamento tramite la
rotazione a sinistra (in direzione dell'utente). La posizione della maniglia estremamente a destra
provoca soltanto l'uscita dell'acqua calda, estremamente a sinistra - soltanto l'uscita dell'acqua fredda.
La valvola deviatore (solo in batterie da vasca)
a per la scelta del modo di lavoro: tramite il
tiro del pomolo in alto e la sua rotazione di un angolo di 90 a destra (allo scopo di bloccare la posizione)
l'uscita dell'acqua avviene tramite la doccetta, la rotazione del pomolo di un angolo di 90 a sinistra
provoca l'automatica deviazione della valvola in posizione, nella quale l'uscita dell'acqua avviene
tramite la bocca.
°
°
°
è predispost
?
?
?
ME25/ME, ME25:
QUBIC, TRANQUILITY, SADE, TARGA, SOLAR FONTAINE, STRUCTURE, QUBIC TRE:
MAINTENANCE
?
?
?
?
?
?
Clean water guarantees that a mixer equipped with ceramic flow regulators will work correctly, i.e. th
water should not contain any impurities such as sand, boiler scale etc. Because of this, the pipe system
should be equipped with sieve filters or, if there is no such possibility, with individual cut-off valves with
filters designed for such units.
In the event of increased steering resistance, greater pressure should not be exerted on the handle, as
this may cause damage to the flow regulator. In such a situation, the regulator should be removed and
cleaned of the dirt and impurities which have accumulated on it.
The seals should be maintained with vaseline or silicon oil.
dirt or stains on the external surfaces of the mixer resulting from scale deposits should be removed by
washing the unit with soapy water only. Scale deposits should be dissolved with vinegar then the surface
rinsed with clean water and rubbed dry with a soft cloth,
under no circumstances should the surface of the mixer be cleaned with coarse cloths or cleaning
agents containing abrasive materials or acids,
plastic or lacquered parts must not be cleaned with chemicals containing alcohol, disinfectants or
solvents.
Cleaning the outer coating:
WARTUNG
?
?
?
?
?
?
Eine Garantie für richtige Funktion von Batterien mit keramischen Durchflussregler ist sauberes
Wasser, dass heißt Wasser ohne solche Verunreinigungen, wie: Sand, Kesselstein, usw. Deswegen
wird die Ausrüstung der Wasserleitungsanlage mit Gitterfilter gefordert, und wenn solche Filter nicht
vorhanden sind, soll es möglich sein, die für Batterien bestimmteAbsperrventile mit Filter zu montieren.
Bei vergrößertem Einstellungswiderstand soll man auf den Heben keinen größeren Druck ausüben, da
es eine Beschädigung des Durchflussreglers verursachen kann. Wenn es so ist, soll man den Regler
ausmontieren und die auf dem Regler gesammelten Verunreinigungen entfernen.
Die Dichtungen sollen mit Vaselin oder Silikonöl gewartet werden.
en Schmutz oder die Flecke, entstanden infolge von Steinablagerungen auf den äußeren
Batterieoberflächen, durch Abspülen mit Seifewasser entfernen, den Stein mit Essig lösen, danach die
Oberfläche mit sauberem Wasser abspülen und mit weichem Lappen trocknen.
Auf keinem Fall die Batterieoberfläche mit rauen Lappen oder mit scheuermittel- oder säurehaltigen
Reinigungsmitteln reinigen
Für die Reinigung der Kunststoffteile oder lackierten Teile kann man keine alkoholhaltige Mitteln,
Desinfektions- oder Lösungsmitteln verwenden.
Reinigung der äußeren Oberflächen:
D
GB
D
КОНСЕРВИРОВАНИЕ
?
?
?
?
?
?
Гарантией правильной работы смесителей, оснащенных керамическими регуляторами
протекания, является чистая вода, т.е. которая не содержит таких загрязнений, как : песок,
накипь, и т.п. В связи с вышесказанным, требуется оснащение водопроводной системы
сетчатыми фильтрами, а если это невозможно, индивидуальными запорными клапанами
с фильтром, предназначенными для смесителей.
В случае повышенного сопротивления при регулировании запрещается увеличивать силу
нажима на рычаг т.к. это может привести к повреждению регулятора протекания. В этой
ситуации необходимо демонтировать регулятор и очистить его от загрязнений.
Уплотнения консервировать вазелином или силиконовым маслом.
загрязнение или пятна, возникшие в результате оседания камня на внешних поверхностях
смесителя, смывать исключительно водой с мылом, для растворения камня применять уксус,
затем промыть поверхность чистой водой и досуха вытереть мягкой тряпочкой,
ни в каком случае нельзя чистить поверхность смесителя шероховатыми тряпочками или
чистящими средствами с содержанием абразивных компонентов и кислот,
для чистки элементов, выполненных из пластмассы или лакированных, запрещается
использовать средства, содержащие алкоголь, дезинфицирующие средства или растворители.
Очистка наружных поверхностей:
ENTRETIEN
?
?
?
?
?
?
La garantie du fonctionnement correct de la robinetterie équipée en régulateurs de flux céramiques est
l'eau propre, c'est-à-dire une eau qui ne contient pas de polluants tels que : sable, tartre, etc. Pour cette
raison, il est exigé d'équiper les installations d'eau en crépines et, en cas d'absence d'une telle
possibilité, en vannes d'arrêt individuelles avec un filtre destiné à la robinetterie.
En cas de résistance accrue de la commande, il est interdit d'exercer un plus grand appui sur le levier
car cela peut provoquer l'endommagement du régulateur de flux. Dans ce cas, il faut démonter le
régulateur et enlever les polluants qui s'y sont rassemblés.
Entretenir les joints d'étanchéité avec de la vaseline ou de l'huile de moteur.
éliminer les salissures ou les taches apparues suite au dépôt du tartre sur les surfaces externes de la
robinetterie en la lavant uniquement avec de l'eau et du savon ; pour dissoudre le tartre, utiliser du
vinaigre, rincer ensuite la surface avec de l'eau propre et essuyer avec un chiffon sec et doux,
en aucun cas, il ne faut nettoyer la surface de la robinetterie avec des chiffons rugueux ou des produits
de nettoyage contenant des matériaux abrasifs et des acides,
il est interdit d'utiliser, pour le nettoyage des parties réalisées en matière plastique et vernies, des
produits contenant de l'alcool, des substances de désinfection ou des dissolvants.
Nettoyage des couches externes:
F
RUS
MANUTENZIONE
Pulizia di rivestimenti esterni
è l'acqua pulita
In relazione a
quanto suddetto si è tenuti a equipaggiare
non è ammesso
in quanto si può danneggiare il regolatore del
le impurità
Non è ammessa in alcun caso la pulizia della superficie della batteria con
non è ammesso l'uso di detergenti
La garanzia per un funzionamento corretto delle batterie equipaggiati in regolatori ceramici di
portata
, ossia priva di tali elementi, come: sabbia, incrostazione ecc.
l'impianto idrico in filtri a rete, nel caso in cui fosse
impossibile, in individuali valvole di arresto con un filtro predisposto per la batteria.
Nel caso in cui la resistenza di commando aumenti,
di esercitare una pressione
maggiore sulla leva,
la portata. In tal caso bisogna
smontare il regolatore ed eliminare
in esso accumulate.
Per la manutenzione delle guarnizioni usare vaselina od olio di silicone.
Eliminare lo sporco o le macchie, formatesi in conseguenza alla sedimentazione del calcare sulle
superfici esterne della batteria, lavando la batteria esclusivamente con acqua e sapone, per lo
scioglimento del calcare usare l'aceto, in seguito sciacquare la superficie con acqua pulita ed
asciugare perfettamente con un panno morbido ed asciutto.
panni scabrosi o
detergenti di pulizia che contengono sostanze abrasive e acidi.
Per la pulizia delle parti eseguite di materie plastiche e verniciate
,
che contengono alcol, sostanze disinfettanti o solventi.
:
?
?
?
?
?
?
CONSERVACIÓN
el flujo es necesaria
el agua limpia, que quiere decir el agua sin tales basuras como la arena, la piedra de caldera etc. Por
eso es imprescindible equipar la instalación de cañerías en filtros de tela metálica, y en caso de la falta
de tales posibilidades
Para el buen funcionamiento de las baterías equipadas en reguladores cerámicos d
, en válvulas particulares cortadoras con el filtro adecuadas para la batería.
En caso de una resistencia aumentada del mando no se puede ejercer una presión mayor en la palanca
porque esto puede provocar una avería del regulador de flujo. En este caso hay que desmontar el
regulador y quitar toda la basura agrupada.
Conservar las empaquetaduras con la vaselina o el aceite de silicona.
la suciedad o las manchas que se produjeron a causa de depositar el sarro en las superficies exteriores
de la batería hay que quitarlas lavando la batería sólo con el agua y el jabón, para diluir el sarro use
vinagre, después enjuague la superficie con el agua limpia y séquela con un trapo suave,
en cualquier caso no se puede limpiar la superficie de la batería con trapos ásperos o medios de
limpieza que contienen abrasivos y ácidos,
para limpiar las partes hechas de materias plásticas y barnizadas no se puede usar medios que
contienen alcohol, sustancias desinfectante o disolventes.
Limpieza de las superficies exteriores:
?
?
?
?
?
?
E
IT
WALL-MOUNT BATHTUB AND SHOWER TAPS AS DE PARED BAÑERA Y DUCHA WAND-, WANNEN- UND DUSCHMISCHBATTERIEN BATTERIE MURALE DE BAIGNOIRE ET DE DOUCHE E GRIFERÍ BATTERIE A MURO DA VASCA E PER DOCCIA СМЕСИТЕЛИ ДЛЯ ВАНН И ДУША НАСТЕННЫЕ
Instructions for assembly and use • Montage- und Gebrauchsanweisung •
•
c
• Instrucción de Montaje y Servicio • Manuale di Montaggio e Uso
Notice technique montage et utilisation Ин трукция по монтажу и обслуживанию
IOG 2
.
360 00
Rev
20
. 1 March
11
20
GB
D
F
RUS
E
IT
#
#
GUARANTEE
IN THE EVENT OF A PROBLEM:
:
The guarantee conditions are contained on a separate sheet.
e-mail: graff@graff-mixers.com
#
#
GARANTIE
EN CAS DE PROBLEME:
:
e-mail: graff@graff-mixers.
Les conditions de garantie se trouvent dans une feuille séparée.
com
#
#
GARANTÍA:
EN CASO DE PROBLEMAS:
com
Las condiciones de la garantía se encuentran en otra hoja
e-mail: graff@graff-mixers.
#
#
GARANTIE:
SOLLTEN PROBLEME AUFTRETEN wenden Sie sich an uns
Die Gewährleistungsbedingungen sind auf dem separaten Blatt.
e-mail: graff@graff-mixers.com
#
#
GARANZIA
NEL CASO IN CUI SI VERIFICHINO PROBLEMI:
:
Le condizioni di garanzia sono indicate sul foglio separato.
e-mail: graff@graff-mixers.com
#
#
ГАРАНТИЯ
ЕСЛИ ВОЗНИКНЕТ ПРОБЛЕМА:
:
Гарантийные условия на отдельном листе.
e-mail: graff@graff-mixers.com
GB
D
F
RUS
E
IT
