Eizo FORIS FX2431: Connecting Cables
Connecting Cables: Eizo FORIS FX2431

English
7
TroubleshootingSetting/AdjustmentPrior to use Installation
Connecting Cables
Connect each device.
1
• Connect a PC ............................................See below
• Connect a USB device .................................Page 10
• Connect an AV device .................................. Page 11
• Connect an audio device .............................Page 12
●
Connect a PC
Attention
• When replacing the current monitor with an FX2431 monitor, be sure to change the PC settings for
resolution and vertical frequency to those which are available for the FX2431 monitor referring to the
resolution table (see page 3) before connecting the PC.
1. Connect the monitor to the PC with a signal cable that matches the connectors.
After connecting the cable connectors, tighten the screws of the connectors to secure the coupling.
• When connecting to PC1 input (digital signal connection)
Connectors on the
Connectors on the
PC
monitor
DVI connector
Signal cable FD-C39 (supplied)
DVI-D connector
1
Audio cable
*
Audio output
Audio input
connector
(stereo mini jack to stereo mini jack)
connector
USB
USB
Upstream
Downstream
2
USB cable MD-C93 (supplied)
*
1
*
Please purchase the cable.
2
*
When connecting two PCs to the monitor,
please purchase another cable.
English
8
TroubleshootingSetting/AdjustmentPrior to use Installation
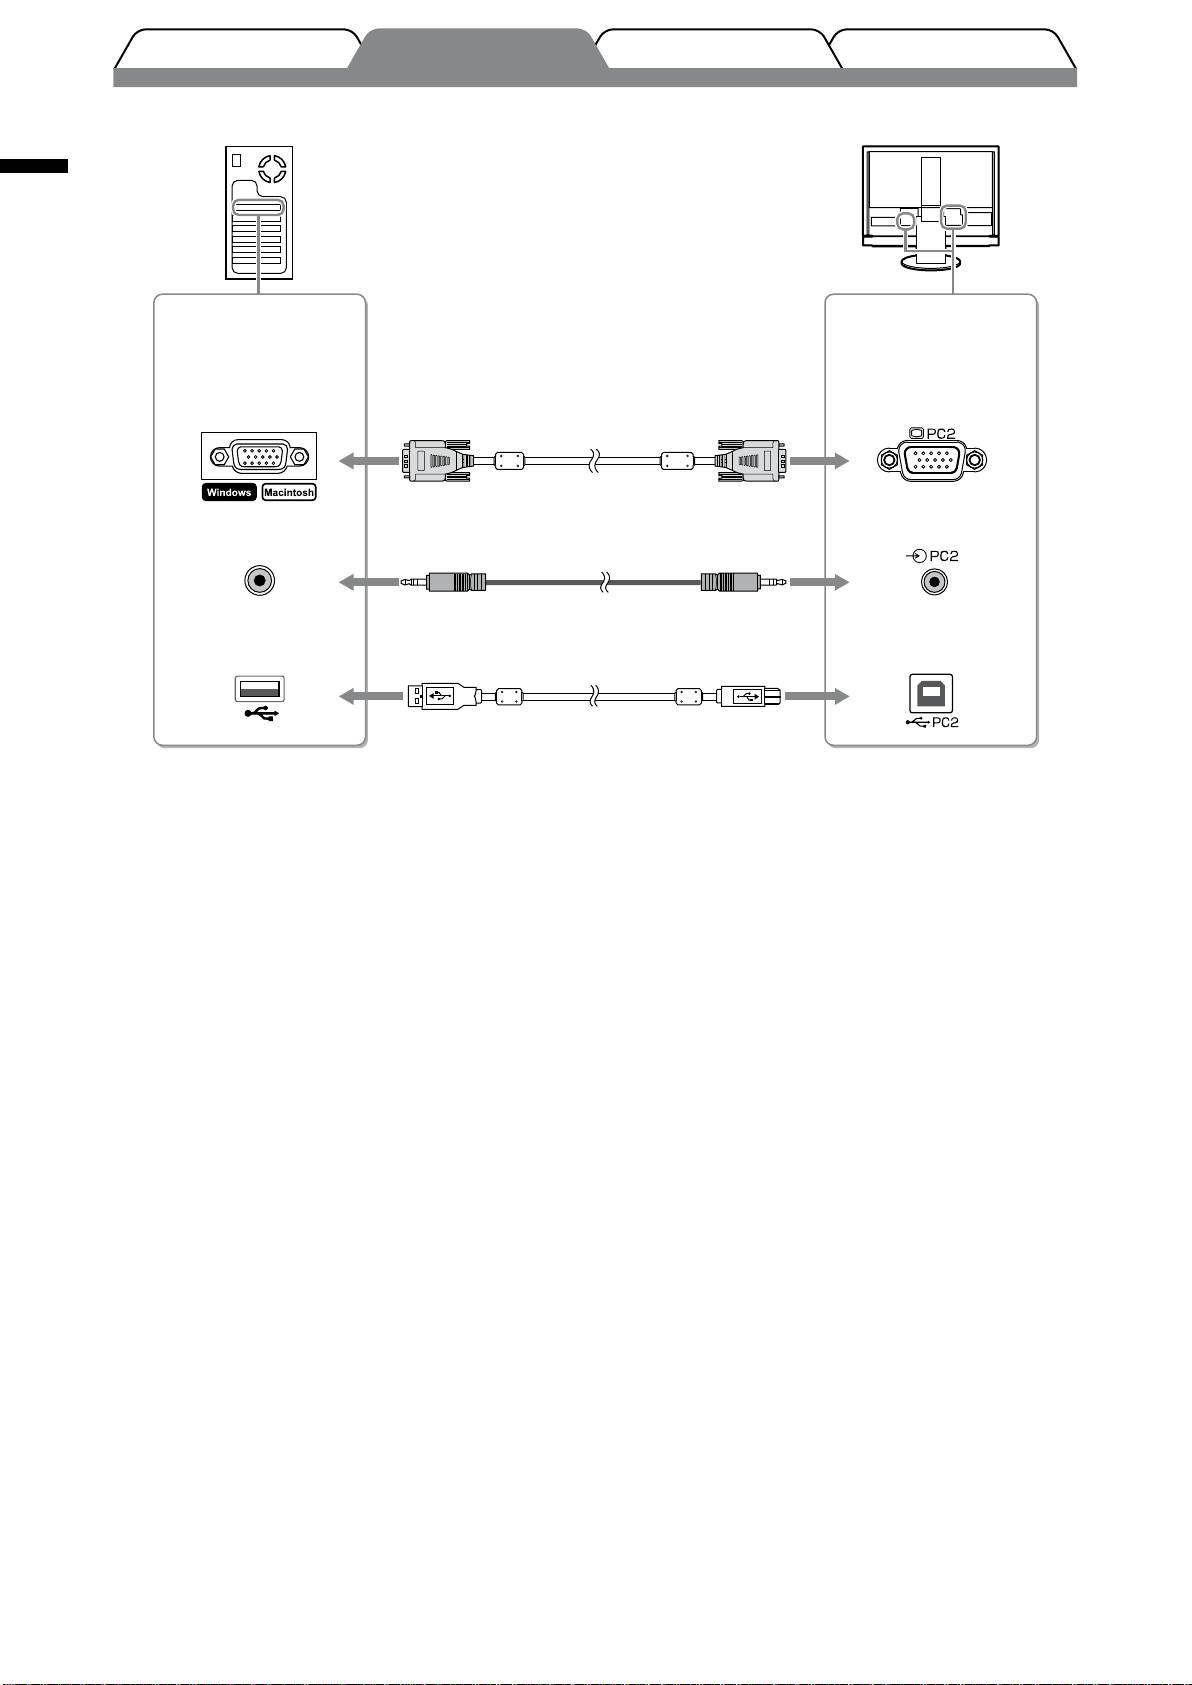
• When connecting to PC2 input (analog signal connection)
Connectors on the
Connectors on the
PC
monitor
D-Sub mini 15-pin
D-Sub mini 15-pin
connector
connector
Signal cable MD-C87 (supplied)
Audio input
1
Audio output
Audio cable
*
connector
connector
(stereo mini jack to stereo mini jack)
USB
USB
Downstream
2
Upstream
USB cable MD-C93 (supplied)
*
1
*
Please purchase the cable.
2
*
When connecting two PCs to the monitor,
please purchase another cable.
English
9
TroubleshootingSetting/AdjustmentPrior to use Installation
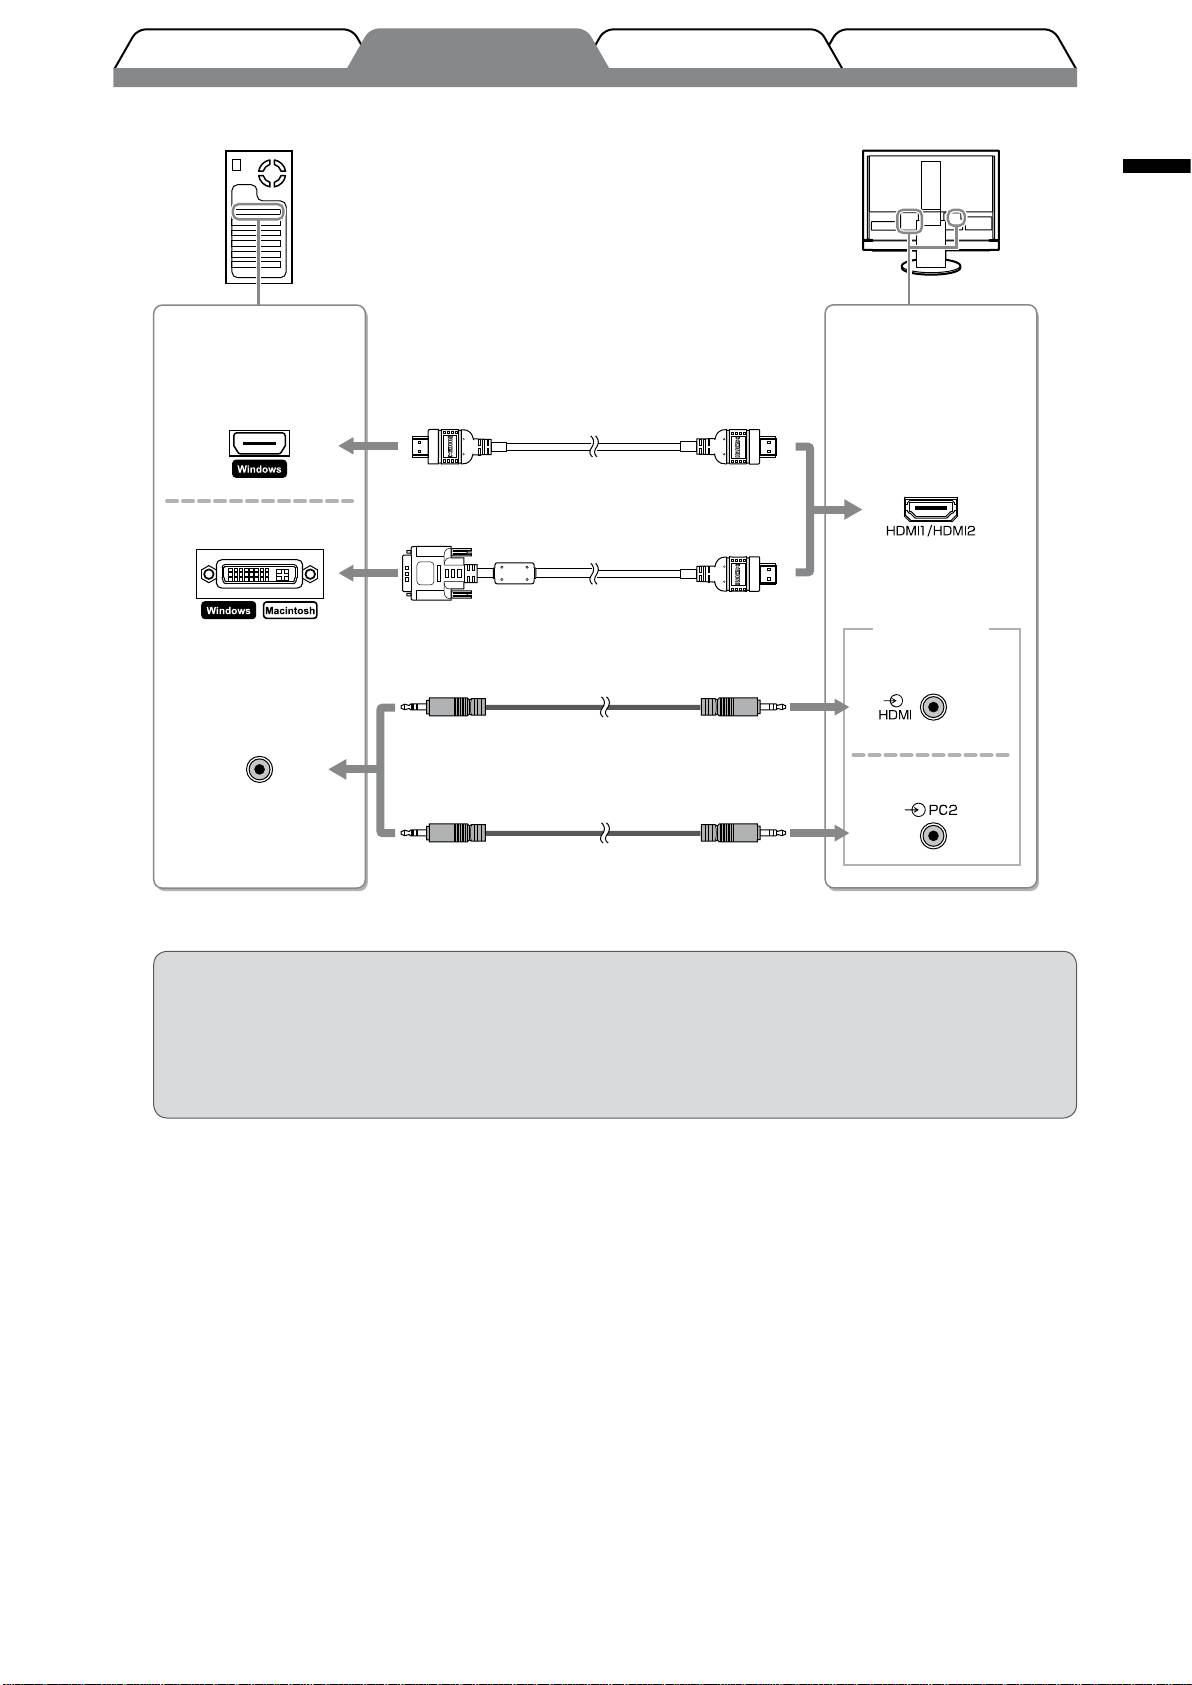
• When connecting HDMI1 input / HDMI2 input (digital signal connection)
Connectors on the
Connectors on the
PC
monitor
HDMI connector
1
HDMI cable
*
HDMI connector
1
DVI connector
DVI-HDMI converter cable
*
Audio input
connector
1
Audio cable
*
(“Analog Sound”)
(stereo mini jack to stereo mini jack)
Audio output
connector
1
Audio cable
*
(“PC2 Sound”)
(stereo mini jack to stereo mini jack)
1
*
Please purchase the cable.
Attention
• Please note the following when connecting the PC to HDMI input.
- After setting “PC” to [Input Format] of the Setting menu, start the PC.
- Set the connector (“Analog Sound” or “PC2 Sound”) from which the sound of the PC is input in [Sound Input
Jack] of the Setting menu.
For details, refer to the User’s Manual on the “EIZO LCD Utility Disk” (CD-ROM).

●
Connect a USB device
1. Connect USB devices (keyboard, mouse, etc.) to the USB port (downstream) on the monitor.
English
Connectors on the
monitor
USB
Downstream
Keyboard
Mouse
Attention
• After connecting the USB devices and turning on the monitor, the USB function is set up
automatically.
• This monitor may not work properly depending on the PC, OS or USB devices used. (For USB
compliance of the respective devices, consult their manufacturers.)
• USB device does not work when the main power switch of the monitor is off.
NOTE
• The PC (PC1 or PC2) on which the USB devices work switches automatically in conjunction with input signal
switching. The PC on which the USB devices work can also be specied. For details, refer to the User’s Manual
on the “EIZO LCD Utility Disk” (CD-ROM).
10
TroubleshootingSetting/AdjustmentPrior to use Installation
●
Connect an AV device
1. Connect the monitor to the AV device with a signal cable that matches the connectors.
English
Connectors on the
Connectors on the
AV device
monitor
1
2
S-Video cable
*
*
or
1
2
Video cable
*
*
1
Audio cable
*
VideoS-Video
R L
(pin jack to pin jack)
Component video
1
Component video cable
*
1
Audio cable
*
Component video
R L
(pin jack to pin jack)
1
3
HDMI connector
HDMI cable
*
*
HDMI connector
1
*
Please purchase the cable.
2
*
Use either cable to connect the monitor and the AV
device.
3
*
TM
Please use the cable on which “High Speed HDMI
Cable” is written.
Attention
• When controlling the AV device connected to HDMI input of the monitor using the HDMI CEC
function, [HDMI CEC Setting] of the Setting menu is required to be set (see page 16).
11
TroubleshootingSetting/AdjustmentPrior to use Installation
Оглавление
- FORIS FX2431
- Compatible Resolutions/Signal Format
- Controls and Functions
- Connecting Cables
- Adjusting the Screen Height and Angle
- Displaying the Screen
- Selecting Display Mode
- Adjusting Brightness
- Setting HDMI CEC (When controlling external devices from the monitor)
- No-Picture Problem
- FORIS FX2431
- Kompatible Auösungen/Signalformate
- Bedienelemente und Funktionen
- Kabel anschließen
- Höhe und Neigung des Bildschirms einstellen
- Bild wiedergeben
- Anzeigemodus auswählen
- Bildschirmhelligkeit einstellen
- Festlegen von HDMI-CEC
- Problem: Kein Bild
- FORIS FX2431
- Résolutions/Format de signal compatibles
- Commandes et fonctions
- Connexion des câbles
- Ajustage de la hauteur et de l’angle de l’écran
- Afchage de l’écran
- Ajustage de la luminosité
- Réglage HDMI CEC
- Problème de non-afchage d’images
- FORIS FX2431
- Resoluciones/formato de señal compatibles
- Controles y funciones
- Conexión de los cables
- Ajuste de la altura y el ángulo de la pantalla
- Visualización de la pantalla
- Selección del modo de pantalla
- Ajuste del brillo
- Ajuste HDMI CEC (Si controla dispositivos externos desde el monitor)
- Si no se muestra ninguna imagen
- FORIS FX2431
- Risoluzioni/Formato del segnale compatibili
- Comandi e funzioni
- Collegamento dei cavi
- Regolazione dell’altezza e dell’angolo dello schermo
- Visualizzazione dello schermo
- Selezione della modalità schermo
- Regolazione della luminosità
- Impostazione di HDMI CEC
- FORIS FX2431
- Kompatibla upplösningar/signalformat
- Reglage och funktioner
- Att ansluta kablarna
- Justera skärmhöjd och vinkel
- Visa skärmen
- Välja skärmläge
- Ställa in skärmens ljusstyrka
- Ställa in HDMI CEC (När du styr externa enheter från skärmen)
- Ingen bild visas
- FORIS FX2431
- Συμβατές αναλύσεις/Μορφότυπο σήματος
- Χειριστήρια και λειτουργίες
- Σύνδεση καλωδίων
- Ρύθμιση του ύψους και της γωνίας κλίσης
- Εμφάνιση της οθόνης
- Επιλογή λειτουργίας οθόνης
- Εκτέλεση ρυθμίσεων για προχωρημένους/Ρύθμιση
- Ρύθμιση HDMI CEC (Όταν ελέγχετε εξωτερικές συσκευές από την οθόνη)
- Πρόβλημα “Καθόλου εικόνα”
- FORIS FX2431
- Совместимое разрешение/формат сигнала
- Средства управления и их назначение
- Подключение кабелей
- Регулировка высоты и угла наклона экрана
- Отображение экрана
- Выбор рабочего режима экрана
- Настройка яркости экрана
- Настройка HDMI CEC (при управлении внешними устройствами с монитора)
- Отсутствует изображение на экране
- FORIS FX2431
- 适用的分辨率/信号格式
- 控制和功能
- 连接电缆
- 调整屏幕高度和角度
- 显示屏幕
- 选择显示模式
- 调整亮度
- 设定HDMICEC(从显示器控制外接设备时)
- 无图片的问题
