Eizo FlexScan SX3031W: инструкция
Раздел: Компьютерная техника, комплектующие, аксессуары
Тип: Монитор
Инструкция к Монитору Eizo FlexScan SX3031W

English Deutsch Français Español Italiano Svenska Greece Russia
Setup Manual
Important: Please read PRECAUTIONS, this Setup Manual and the User’s Manual
stored on the CD-ROM carefully to familiarize yourself with safe and effective
usage. Please retain this manual for future reference.
Installationshandbuch
Wichtig: Lesen Sie die VORSICHTSMASSNAHMEN, dieses Handbuch zur
Einrichtung und das Benutzerhandbuch (auf der CD-ROM) aufmerksam
durch, um sich mit der sicheren und effizienten Bedienung vertraut zu
machen. Bewahren Sie dieses Handbuch zum späteren Nachschlagen auf.
Manuel d’installation
Important : Veuillez lire attentivement les PRECAUTIONS, ce Manuel d’installation ainsi
que le Manuel d’utilisation inclus sur le CD-ROM, afin de vous familiariser
avec ce produit et de l’utiliser efficacement et en toute sécurité. Veuillez
conserver ce manuel pour référence ultérieure.
Manual de instalación
Importante: Lea detenidamente el apartado PRECAUCIONES, el Manual de instalación y
el Manual del usuario que encontrará en el CD-ROM para familiarizarse con
las normas de seguridad y los procedimientos de uso. Conserve este manual
para consultas posteriores.
Manuale di installazione
Importante:
leggere attentamente la sezione PRECAUZIONI, il presente Manuale di
installazione e il Manuale dell’utente memorizzati sul CD-ROM per utilizzare il
prodotto in modo efficace e sicuro. Conservare il manuale per consultazioni future.
Installationshandboken
Viktigt:
Läs försiktighetsåtgärderna, den här installationshandboken och
användarhandboken som finns på CD-skivan noggrant så att du känner dig säker
och får ett effektivt användande av produkten. Behåll manualen för framtida behov.
Εγχειρίδιο εγκατάστασης
Σημαντικό: Διαβάστε προσεκτικά τις ΠΡΟΦΥΛΑΞΕΙΣ, το Εγχειρίδιο εγκατάστασης και το
Εγχειρίδιο χρήστη που θα βρείτε στο CD-ROM προκειμένου να εξοικειωθείτε
με την ασφαλή και αποτελεσματική χρήση της συσκευής. Διατηρήστε αυτό το
εγχειρίδιο για μελλοντική χρήση.
Руководство по установке
Важно! Внимательно прочитайте МЕРЫ ПРЕДОСТОРОЖНОСТИ, настоящее
Руководство по установке и Руководство пользователя на CD-ROM для
получения сведений о безопасной и эффективной эксплуатации.
Сохраните это руководство для справки.
设定手册
重要事项: 请仔细阅读储存在光盘上的用户手册、本设定手册和预防措施、掌握如何安
全、有效地使用本产品。请保留本手册、以便今后参考。
中文
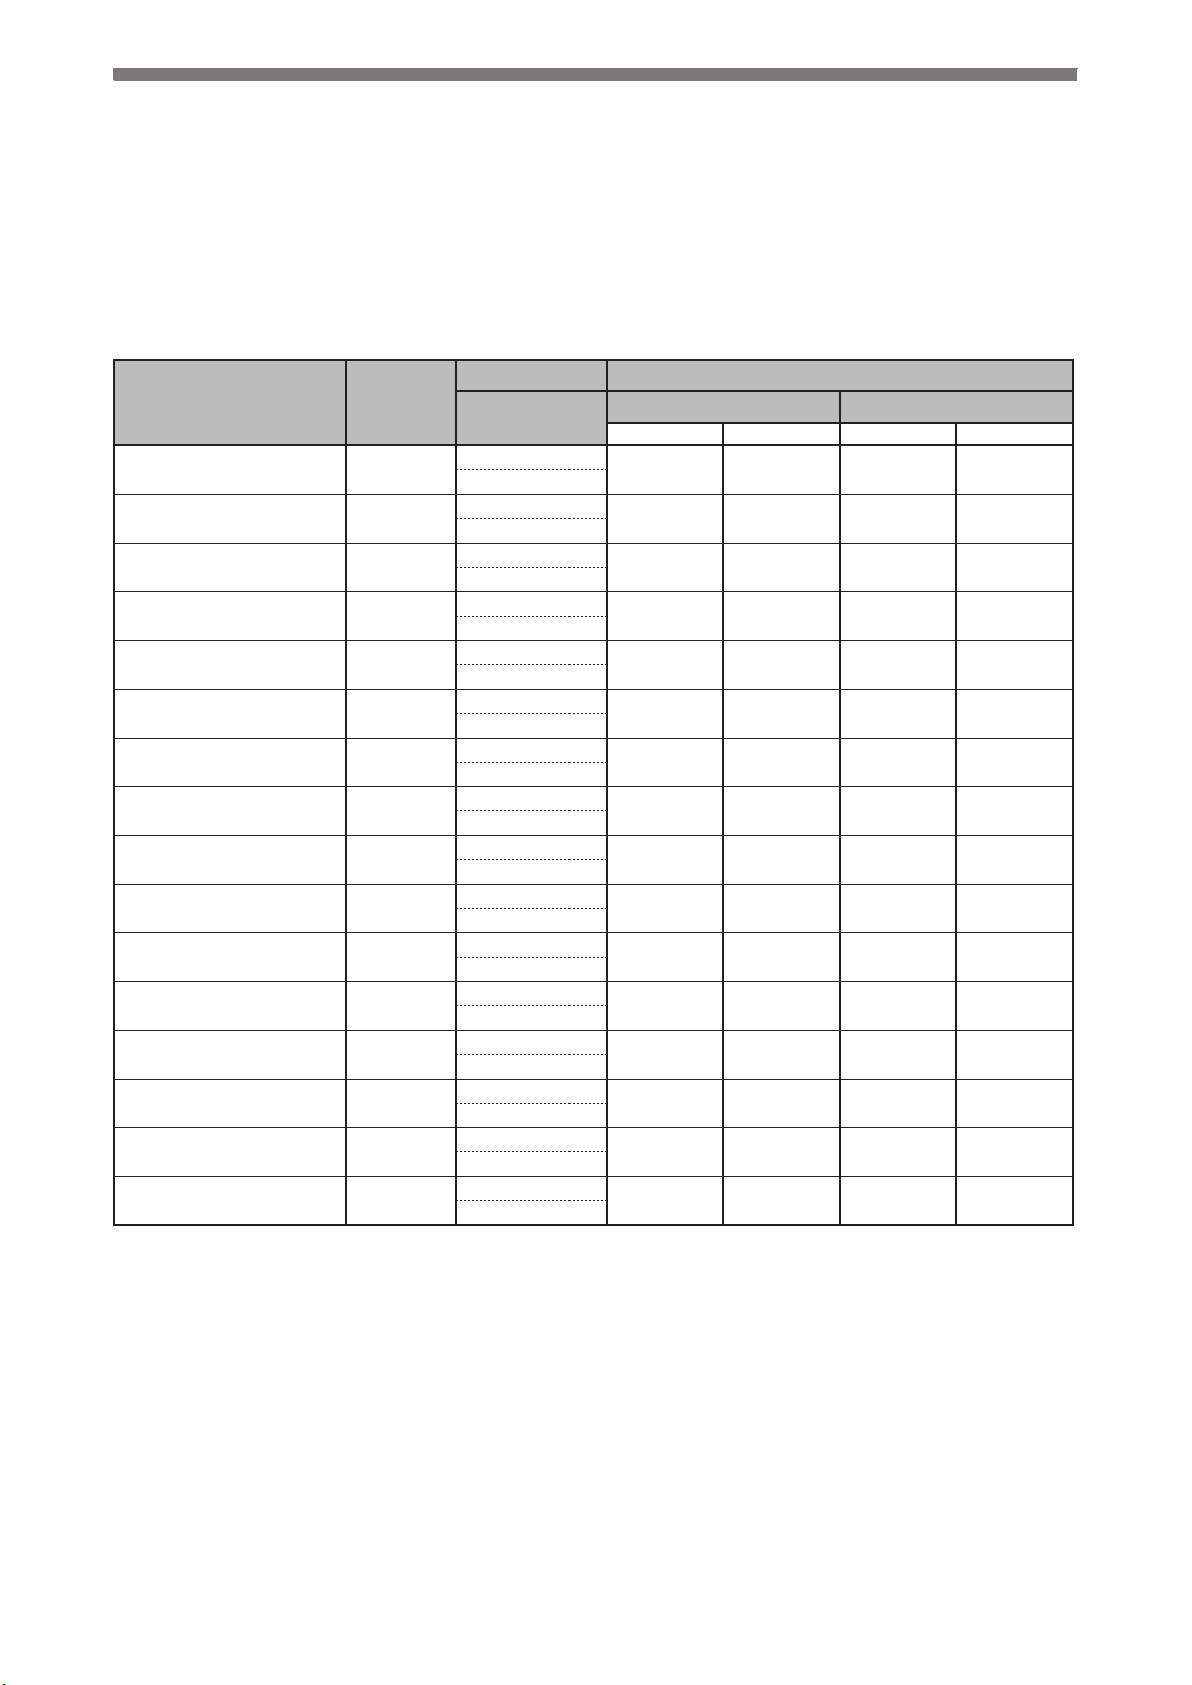
Compatible Resolutions/Freguencies Kompatibla upplösningar/frekvenser
Kompatible Auflösungen/Bildwiederholfrequenzen
Συμβατές αναλύσεις/Συχνότητες
Résolutions/Fréquences compatibles
Поддерживаемые разрешения/частоты
Frecuencias y resoluciones compatibles
兼容的分辨率/频率
Risoluzioni/Frequenze compatibili:
The monitor supports the following resolutions. Skärmen stöder följande upplösningar.
Der Monitor unterstützt die nachfolgend aufgeführten Auflösungen
.
Η οθόνη υποστηρίζει τις παρακάτω αναλύσεις.
Le moniteur est compatible avec les résolutions suivantes. Монитор поддерживает следующие разрешения.
El monitor admite las siguientes resoluciones.
本显示器支持下列分辨率。
Il monitor supporta le seguenti risoluzioni.
Frequency Display Setup
Resolution
Dot clock
Horizontal (kHz)/
Single Display Dual Display
Vertical (Hz)
SIGNAL1 SIGNAL2
SIGNAL1 SIGNAL2
31.47
VGA 640 × 480@60Hz 25.2 MHz
√ √ √ √
59.94
VGA TEXT
31.47
28.3 MHz
√ √ √ √
720 × 400@70Hz
70.09
37.88
VGA 800 × 600@60Hz
40.0 MHz
√ √ √ √
60.32
48.36
VESA 1024 × 768@60Hz
65.0 MHz
√ √ √ √
60.00
60.00
VESA 1280 × 960@60Hz
108.0 MHz
√ √ √ √
60.00
VESA
63.98
108.0 MHz
√ √ √ √
1280 × 1024@60Hz
60.02
VESA CVT RB
98.61
1280 × 1600@60Hz
*
1
142.0 MHz
− −
√ √
59.91
VESA
75.00
162.0 MHz
√ √
− −
1600 × 1200@60Hz
60.00
99.42
1200 × 1600@60Hz
*
1
162.3MHz
− −
√ √
59.96
VESA CVT
65.29
1680 × 1050@60Hz
*
5
146.3MHz
√ √
− −
59.95
VESA CVT RB
64.67
1680 × 1050@60Hz
*
5
119.0MHz
√ √
− −
59.88
VESA CVT RB
74.04
2
5
154.0MHz
−
√
− −
1920 × 1200@60Hz
*
*
59.95
DUAL LINK
74.56
*
3
*
5
193.3MHz
√
− − −
1920 × 1200@60Hz
59.89
QXGA VESA CVT
95.45
3
267.3MHz
√
− − −
2048 × 1536@60Hz
*
59.95
DUAL LINK
94.77
2048 × 1536@60Hz
*
3
209.3MHz
√
− − −
59.98
DUAL LINK
98.71
*
3
268.5MHz
√
− − −
2560 × 1600@60Hz
*
4
5
*
59.97
1
2
3
4
*
For Dual display
*
For Single display (SIGNAL 2)
*
For Single display (SIGNAL 1)
*
Recommended resolution (Set this resolution)
1
2
3
4
*
Für Dualanzeige
*
Für einfache Anzeige (SIGNAL 2)
*
Für einfache Anzeige (SIGNAL 1)
*
Empfohlene Auflösung (diese Auflösung festlegen)
1
2
3
4
*
Pour l’affichage double
*
Pour l’affichage simple (SIGNAL 2)
*
Pour l’affichage simple (SIGNAL 1)
*
Résolution recommandée (Réglez votre appareil sur cette résolution)
1
2
3
4
*
Para visualización dual
*
Para visualización simple (SIGNAL 2)
*
Para visualización simple (SIGNAL 1)
*
Resolución recomendada (ajuste esta resolución)
1
2
3
4
*
Per visualizzazione doppia
*
Per visualizzazione singola (SIGNAL 2)
*
Per visualizzazione singola (SIGNAL 1)
*
Risoluzione consigliata (impostare questo valore di risoluzione)
1
2
3
4
*
För dubbel visning
*
För enkel visning (SIGNAL 2)
*
För enkel visning (SIGNAL 1)
*
Rekommenderad upplösning (Ställ in den här upplösningen)
1
2
3
4
*
Για διπλή οθόνη
*
Για μονή οθόνη (SIGNAL 2)
*
Για μονή οθόνη (SIGNAL 1)
*
Προτεινόμενη ανάλυση (Επιλέξτε αυτή την ανάλυση)
1
2
3
4
*
Для двойного дисплея
*
Для одного дисплея (SIGNAL 2)
*
Для одного дисплея (SIGNAL 1)
*
Рекомендованное разрешение (Установите данное разрешение)
1
2
3
4
*
用于双画面显示
*
用于单画面显示 (SIGNAL 2)
*
用于单画面显示 (SIGNAL 1)
*
推荐的分辨率 (设定此分辨率)
*
5
When displaying the wide format input signal, a graphics board in conformance with VESA CVT standard is required.
*
5
Zur Anzeige des Eingangssignals für das Breitbild ist eine Grafikkarte erforderlich, die die Anforderungen des Standards VESA CVT erfüllt.
*
5
Lors de l’affichage du signal d’entrée format large, une carte vidéo conforme à la norme VESA CVT est requise.
*
5
Se necesita una tarjeta gráfica compatible con el estándar VESA CVT para visualizar la señal de entrada con formato panorámico.
*
5
Per visualizzare il segnale di ingresso in formato ampio, è necessaria una scheda grafica conforme allo standard VESA CVT.
*
5
Vid visning med ingångssignalen för bredbildsformat, krävs ett grafikkort som uppfyller VESA CVT-standard.
*
5
Όταν εμφανίζεται το σήμα εισόδου οθόνης μεγάλου μεγέθους, απαιτείται κάρτα γραφικών συμβατή με το πρότυπο VESA CVT.
*
5
Для отображения широкоформатного входного сигнала графическая карта должна соответствовать стандарту VESA CVT.
*
5
当显示宽荧幕格式输入信号时,需要符合VESA CVT标准的显卡。
Color LCD Monitor
English
1
TroubleshootingSetting/AdjustmentInstallationPrior to use
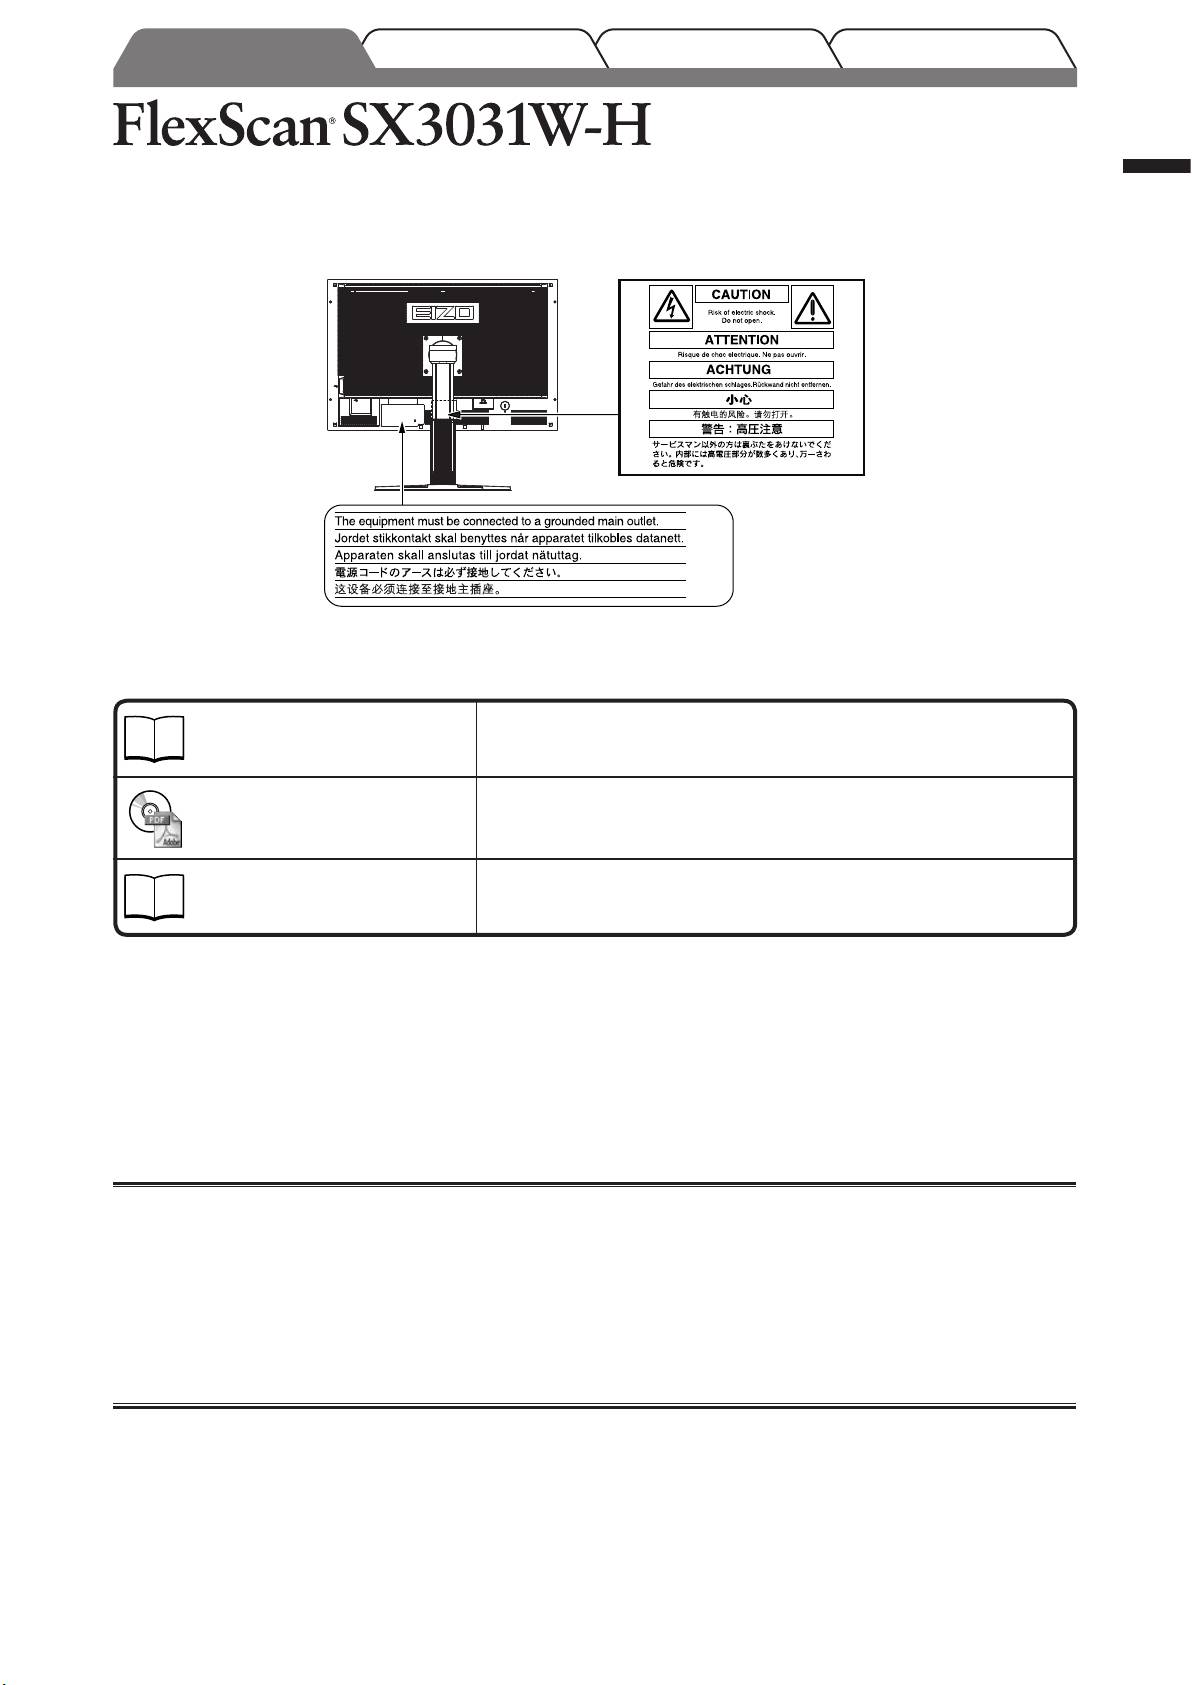
[Location of Caution Statement]
About Setup Manual and User’s Manual
Setup Manual
Describes basic information ranging from connection of the monitor to a
(this manual)
PC to using the monitor.
User’s Manual
Describes application information such as screen adjustments, settings,
and specifications.
(PDF file on the CD-ROM*)
PRECAUTIONS
Describes how to use the monitor safely.
* Installation of Adobe Reader is required.
• Product specifications vary with sales areas. Confirm that the manual is written in the language of the area of purchase.
Copyright© 2007-2008 EIZO NANAO CORPORATION All rights reserved.
No part of this manual may be reproduced, stored in a retrieval system, or transmitted, in any form or by any means,
electronic, mechanical, or otherwise, without the prior written permission of EIZO NANAO CORPORATION.
EIZO NANAO CORPORATION is under no obligation to hold any submitted material or information confidential
unless prior arrangements are made pursuant to EIZO NANAO CORPORATION’s receipt of said information.
Although every effort has been made to ensure that this manual provides up-to-date information, please note that EIZO
monitor specifications are subject to change without notice.
ENERGY STAR is a U.S. registered mark.
Apple and Macintosh are registered trademarks of Apple Inc.
VGA is a registered trademark of International Business Machines Corporation.
DPMS is a trademark and VESA is a registered trademark of Video Electronics Standards Association.
Windows is a registered trademark of Microsoft Corporation.
PowerManager is a trademark of EIZO NANAO CORPORATION.
FlexScan, ScreenManager, i•Sound
and EIZO are registered trademarks of EIZO NANAO CORPORATION in Japan and other countries.
English
2
TroubleshootingSetting/AdjustmentInstallationPrior to use
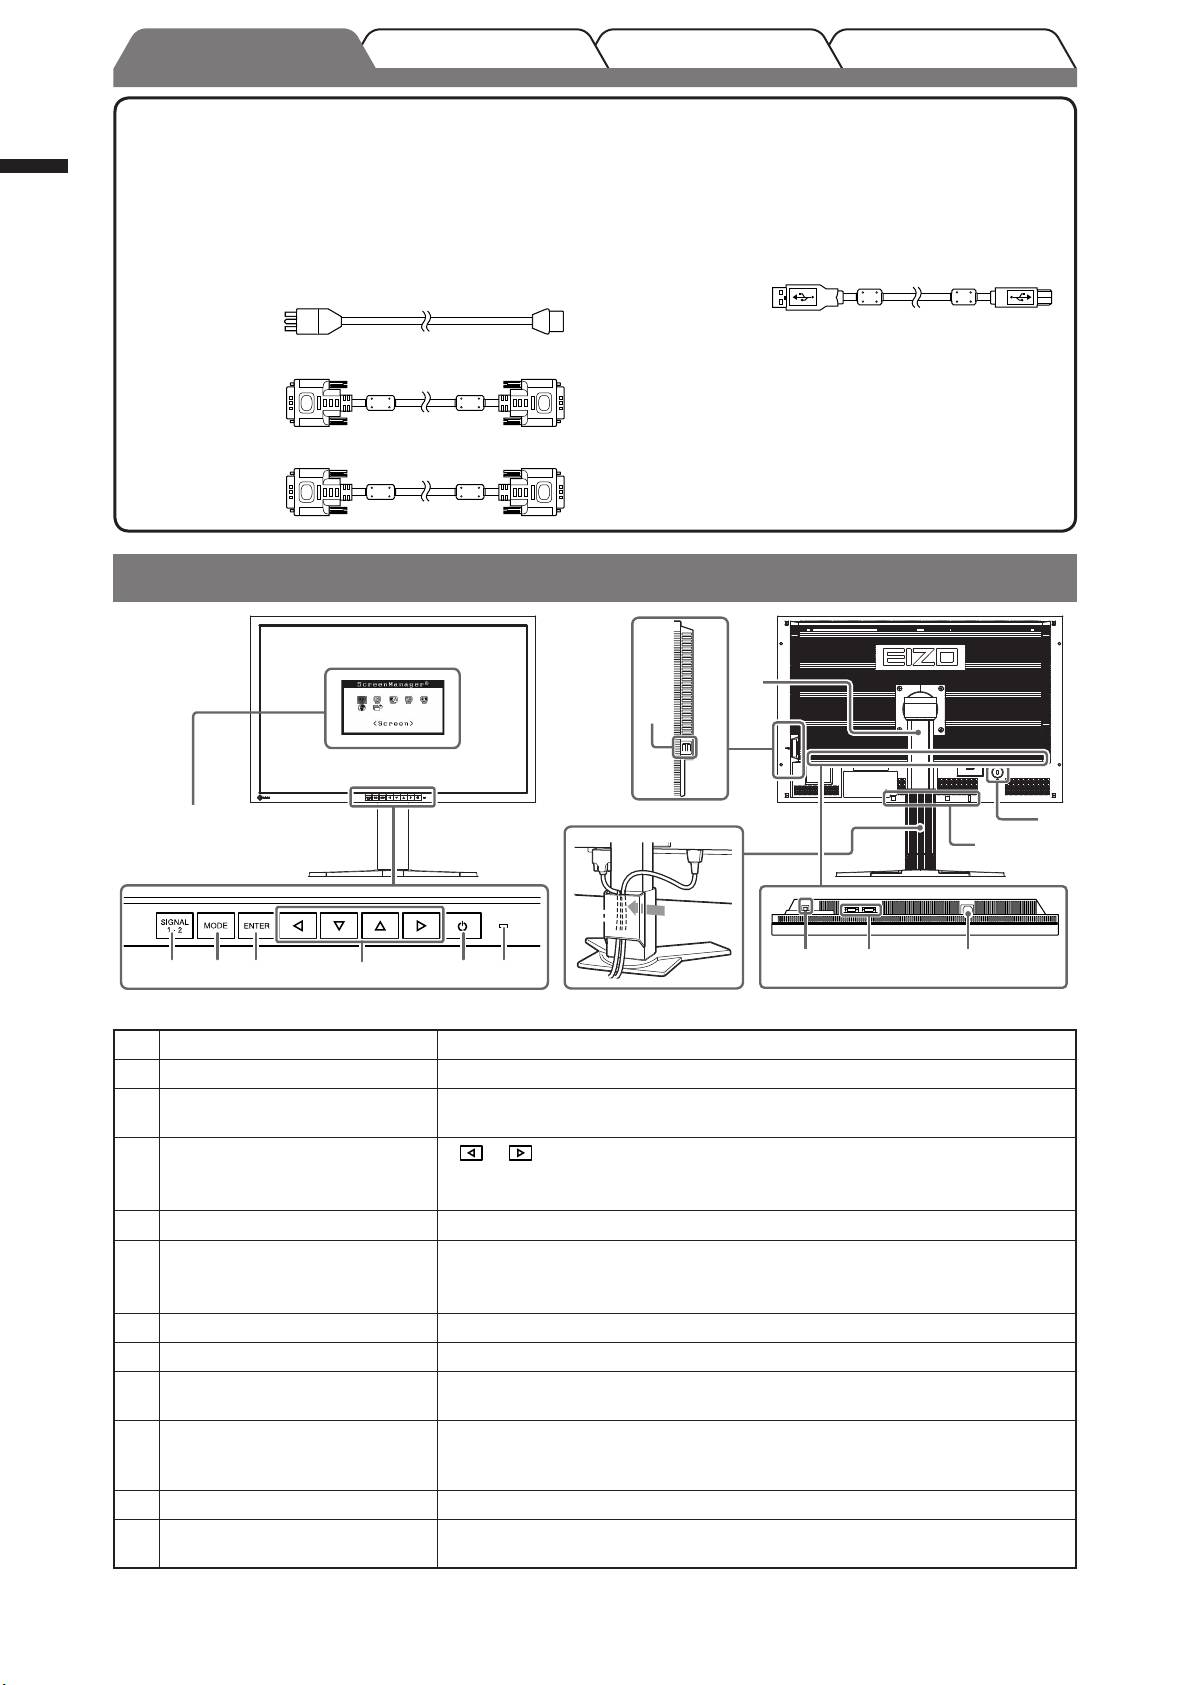
Package Contents
Check that all the following items are included in the packaging box. If any items are missing or damaged, contact your local
dealer.
NOTE
• Please keep the packaging box and materials for future movement or transport of the monitor.
□ Monitor
□ EIZO USB Cable: MD-C93
□ Power Cord
□ EIZO LCD Utility Disk (CD-ROM)
□ Signal Cable (Dual Link): DD200DL-BK
• User’s Manual
□ Setup Manual (this manual)
□ PRECAUTIONS
□ Limited Warranty
□ Signal Cable: FD-C39
□ Recycling Information
□ Mounting Screws (M4 x 12, 4 pcs.)
Controls and Functions
1 Input Signal Selection button Switches input signals for display images.
2 Mode button Displays the FineContrast menu (page 5).
3 Enter button Displays the Adjustment menu, determines an item on the menu screen, and
saves values adjusted.
4 Control buttons (Left, Down,
• or button: Displays the brightness adjustment window (page 5).
Up, Right)
• Chooses an adjustment item or increases/decreases adjusted values for
advanced adjustments using the Adjustment menu (page 5).
5 Power button Turns the power on or off.
6 Power indicator Indicates monitor’s operation status.
Blue : Operating
Off : Power off
Orange : Power saving
7 Tilt adjustable stand Used to adjust the angle of the monitor screen.
8 Security lock slot Complies with Kensington’s MicroSaver security system.
9 Input signal connectors Left: DVI-D connector (SIGNAL1 DUAL LINK)/Right: DVI-D connector
(SIGNAL2)
10 USB port (Up) Connects the USB cable to use the ScreenManager Pro for LCD software
(for Windows).
For how to use it, refer to the User’s Manual on the CD-ROM.
11
USB port (Down) Connects a peripheral USB device.
12
Option speaker (i·Sound L3)
Used to attach the option speaker (i·Sound L3).
mounting holes
®
* ScreenManager
is an EIZO’s nickname of the Adjustment menu. (For how to use ScreenManager, refer to the User’s Manual on
the CD-ROM.)
7
11
8
12
10 9
1 2 3 4 5 6
Adjustment menu
®
(*ScreenManager
)
Power connector
Push the cable into the cable holder.
English
3
TroubleshootingSetting/AdjustmentPrior to use Installation
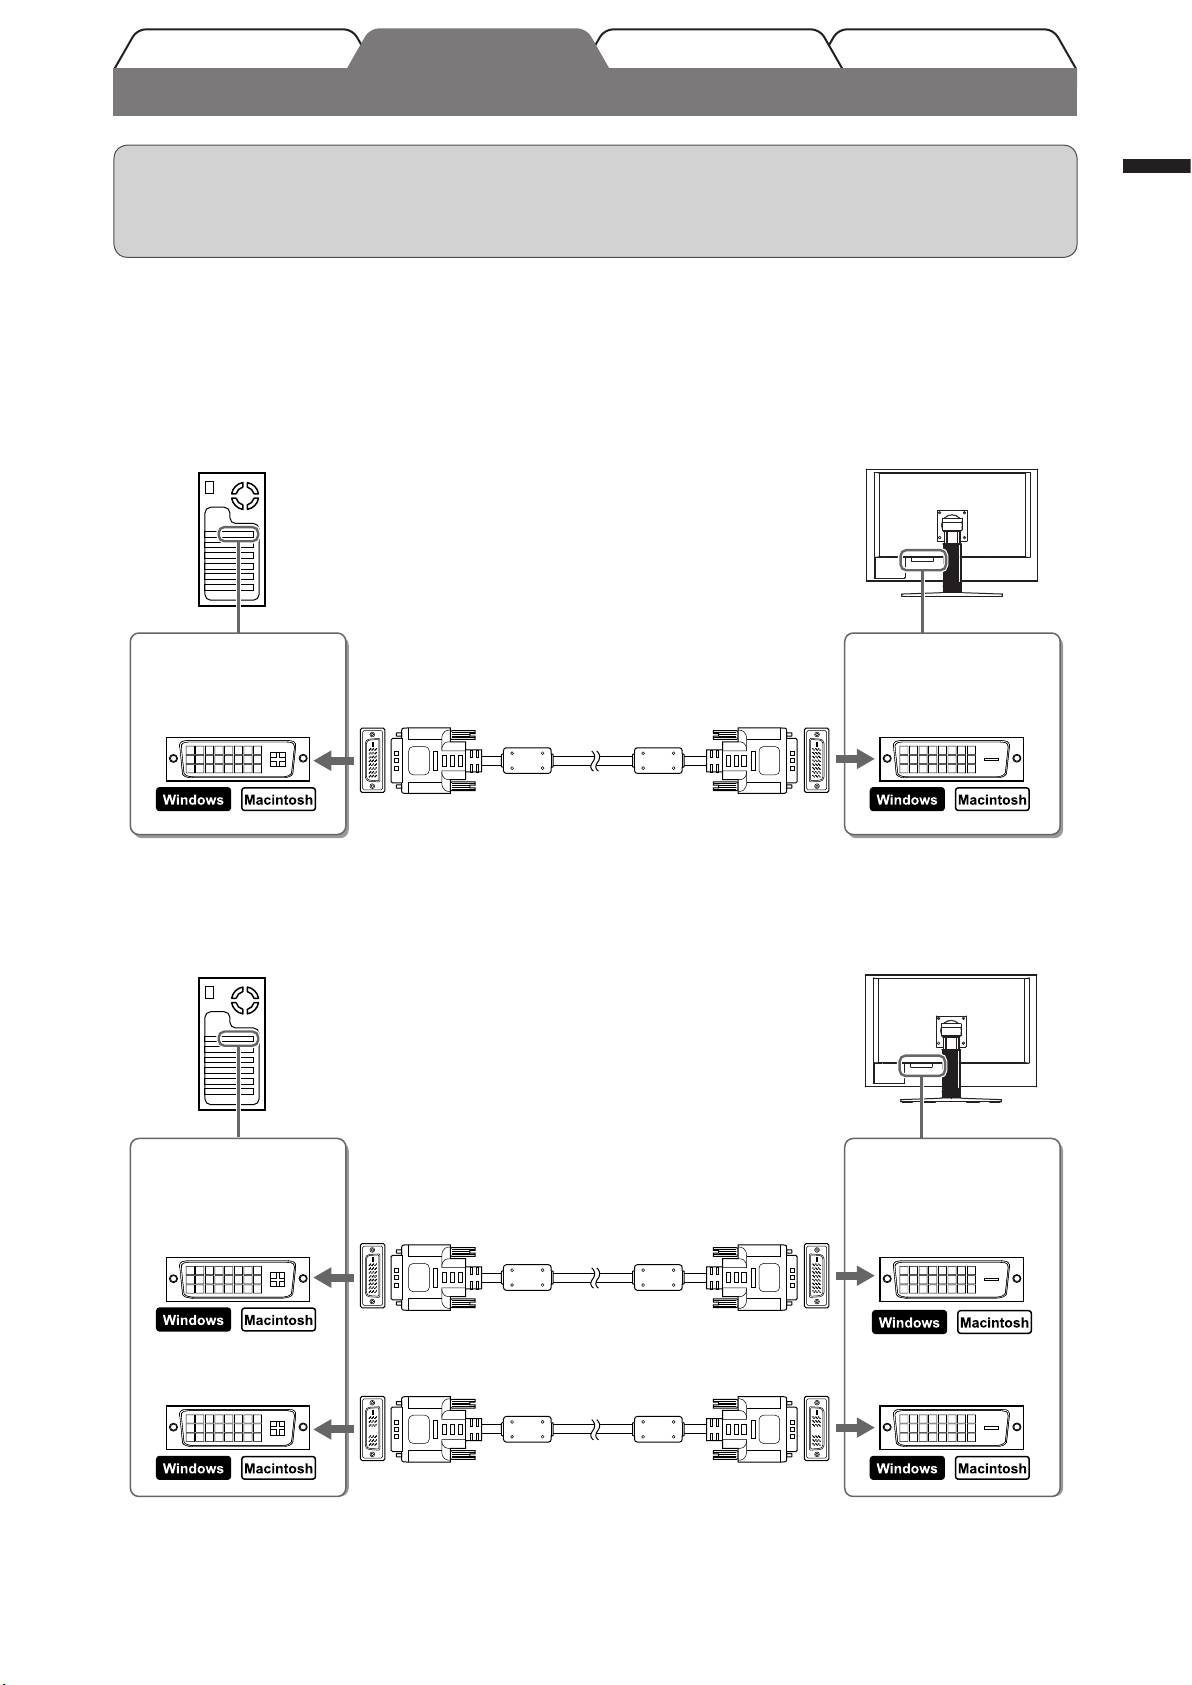
Connecting Cables
Attention
• When replacing the current monitor with a SX3031W-H monitor, be sure to change the PC settings for
resolution and vertical frequency to those which are available for the SX3031W-H monitor referring to the
resolution table (back of cover page) before connecting the PC.
Check that the monitor and the PC are powered off.
1
Connect the monitor to the PC with a signal cable that matches the connectors.
2
After connecting the cable connectors, tighten the screws of the connectors to secure the coupling.
• When the resolution of the graphics board on your PC is applicable to 2560 × 1600 (Single display);
Connectors on the
Connectors on the
PC
monitor
Signal cable DD200DL-BK (supplied)
DVI connector
SIGNAL1
• When the resolution of the graphics board on your PC is not applicable to 2560 × 1600 (Dual display);
Dual display (simultaneous left and right sides display) is available by using a dual DVI-D system graphics
board or any two graphics boards.
Dual display with 1280 × 1600 resolution is the maximum display size.
Connectors on the
Connectors on the
PC
monitor
Signal cable DD200DL-BK (supplied)
DVI connector SIGNAL1
Signal cable FD-C39 (supplied)
DVI connector SIGNAL2
Plug the power cord into a power outlet and the Power connector on the monitor.
3
Оглавление
- Controls and Functions
- Connecting Cables
- Adjusting the Screen Height and Angle
- Selecting Display Mode
- No-Picture Problem
- Bedienelemente und Funktionen
- Kabel anschließen
- Höhe und Neigung des Bildschirms einstellen
- Anzeigemodus auswählen
- Problem: Kein Bild
- Commandes et fonctions
- Connexion des câbles
- Ajustage de la hauteur et de l’angle de l’écran
- Sélection du mode d’écran
- Problème de non-affichage d’images
- Controles y funciones
- Conexión de los cables
- Ajuste de la altura y el ángulo de la pantalla
- Selección del modo de pantalla
- Si no se muestra ninguna imagen
- Comandi e funzioni
- Collegamento dei cavi
- Regolazione dell’altezza e dell’angolo dello schermo
- Selezione della modalità schermo
- Problema Nessuna immagine
- Reglage och funktioner
- Att ansluta kablarna
- Justera skärmhöjd och vinkel
- Välja skärmläge
- Ingen bild visas
- Χειριστήρια και λειτουργίες
- Σύνδεση καλωδίων
- Ρύθμιση του ύψους και της γωνίας κλίσης
- Επιλογή λειτουργίας οθόνης
- Πρόβλημα "Καθόλου εικόνα"
- Средства управления и их назначение
- Подключение кабелей
- Регулировка высоты и угла наклона экрана
- Выбор рабочего режима экрана
- Отсутствует изображение на экране
- 控制和功能
- 连接电缆
- 调整屏幕高度和角度
- 选择显示模式
- 无图片的问题
- MEMO
