Boneco Air-O-Swiss AOS W2055A: E
E: Boneco Air-O-Swiss AOS W2055A
Filling the tank
Water quality maintenance (ISS)
®
Do not operate the appliance when the water
The Ionic Silver Stick
(ISS) utilizes the antimicrobial pro-
tank is empty!
perty of silver and provides one season of optimum water
qualitymaintenanceinallAIR-O-SWISSandBONECOhu-
• Removethewatertank(21).
midifiers. The ISS begins working as soon as it comes into
• Ensurethattherearenoforeignobjectsinthewater
contact with water – even if the unit is switched off. The
tank.
ISS is intended exclusively for use in humidifiers. Look at
en
• Removethewatertankcapfromthetank(22).Fillthe
picture27forthepositionoftheISSintheappliance.
tankwithfresh,coldtapwater(23).Fullyclosethe
bayonet seal to prevent the water tank from leaking
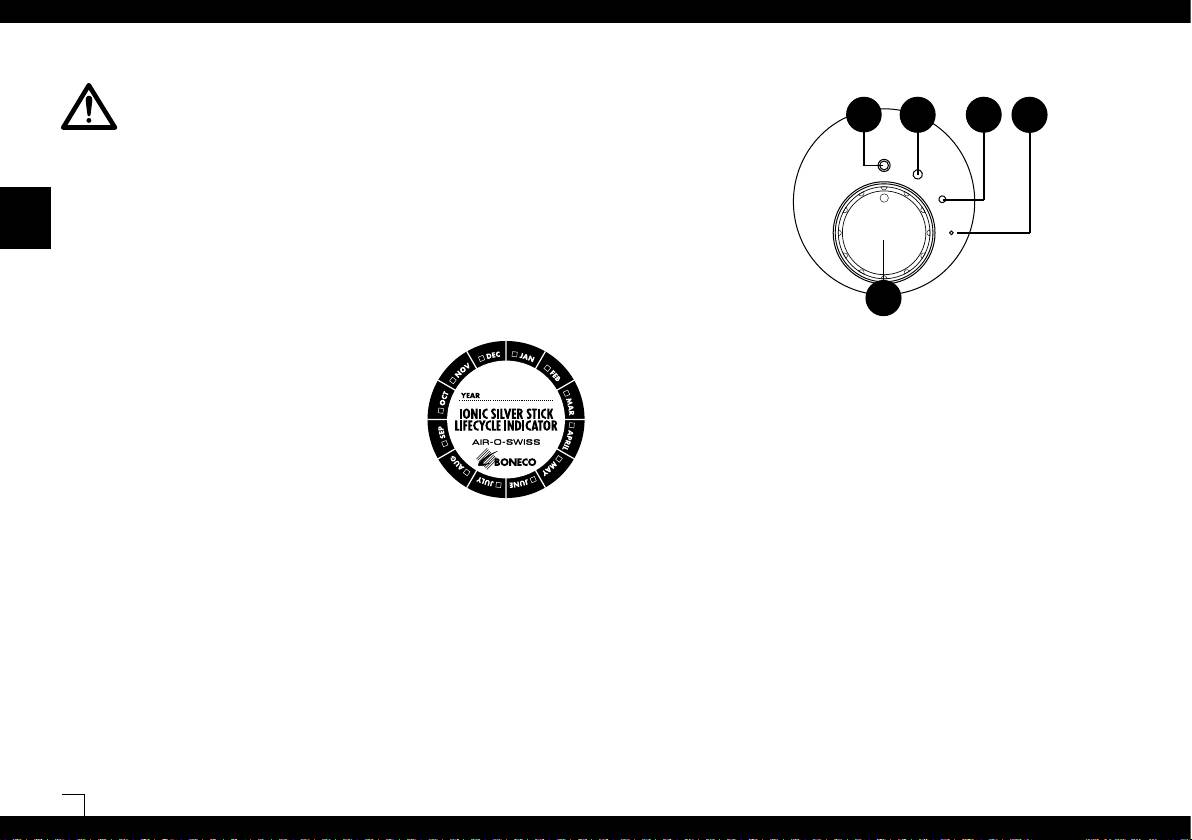
Lifecycle indicator
(24).Placethewatertankonthewaterbase(25).Do
Your appliance comes with a standard lifecycle indicator
not add any additives to the water!
on the back of the upper part for changing the Ionic Silver
®
• Donotpressurisethewatertank,e.g.byfillingitwith
Stick
. To remind yourself of when you put the ISS into
carbonated mineral water.
operation,pleasecrossthecurrentmonthontheindicator
• Connectthemainscabletothemainsandswitchthe
and write the current year on the line provided.
appliance on.
The appliances are fitted with an automatic cut-off switch.
Assoonasthewaterbaseisempty,theunitswitchesoff
automatically. The empty indicator illuminates (also see
section«Operation»).
Use of fragrances
The base contains a special fragrance container (26). Wad-
ding soaked with fragrance can be placed in this container.
Placefragrancesonlyinthecontainerprovided!Waterad-
ditives(e.g.essentialoils,fragrances,waterconditioners)
mustNOTbeusedinthetankoranywhereelseintheappli-
ance!Evenasmallamountcandamagetheplasticorcause
cracks. The material is not suitable for the use of additives.
Onedropisenoughtodamagethewatertankandtherefore
render the unit unusable. Appliances that are damaged by
additives are excluded from the warranty. The fragrance
container is also used as a tool for opening the rotary locks
of the humidifying disks. To learn more about removing the
disks,refertosection«Cleaningthehumidifyingdisks».
20
B
C
D
E
A
Operating W2055A
A) Rotary switch
Connect the appliance to the mains and turn rotary switch
AtopositionCorDasrequired.Toswitchtheapplianceoff,
turntherotaryswitchtopositionB.
B) Switching on/off
IftherotaryswitchisinpositionB,theapplianceisswit-
ched off.
C) Normal mode
IfyouselectpositionC,thennormalmodeisset,andthe
appliance reaches maximum humidity output.
D) Night mode
IfyouturntherotaryswitchtopositionD,theappliance
works in night mode and is especially quiet.
E) Operating light
Thegreenlight(LED)(F)illuminateswhentheappliance
isswitchedon.Whenthewaterlevelislow,theappliance
automaticallyswitchesoff.TheLEDdisplaychangesfrom
green to red. The appliance automatically continues opera-
ting when filled with water. (Also see 2nd paragraph of point
F in operation 2055D).

en
21
C
D
E
F
H
G
A
B
Operating 2055D
toshowthecurrentvalue(CURRENT)(E).Uponreaching
F) Automatic switch-off
thedesiredrelativehumidity,theunitautomaticallyswit-
«Tank empty»
chesoff(displayshowsDESIREDandCURRENT)(E).Ifthe
The water quantity is easy to see thanks to the transparent
desiredrelativehumidityfalls,theapplianceautomatically
water tank. The display on the appliance also shows when
switches on again.
the unit should be refilled with water. If the water level falls
belowtheminimumquantity,theapplianceautomatically
Quick display of current relative humidity
switches off. A red blinking symbol (F) appears on the
Whentheunitisswitchedoff(mainscableisconnected,
display.Whenwaterisadded,symbolFgoesoutandthe
rotaryswitchtoOFFsetting),thecurrentrelativehumidity
appliance continues operating.
can be shown in the display by briefly pressing one of the
Bbuttons.Thisdisplayautomaticallygoesoutafterafew
Warning:Whenliftingtheupperpartoffthebase,theap-
seconds.
pliancealsoswitchesoff.Inthiscase,theredblinkingF
symbolwillalsoappearonthedisplay.Onlywhentheupper
®
C) Change Ionic Silver Stick
partisreplacedonthebasedoestheLEDchangefromred
The letter C in the display indicates that the Ionic Silver
to green and the appliance continues operating.
®
A) Switching on/off
Stick
(ISS) must be changed. The symbol remains visible
Turn rotary switch A from the OFF position to position
untilbothBbuttonsarepressedandhelddownforapprox.
H or G as required.Position H is especially quiet (night
5 seconds.
mode).PositionG(normalmode)achievesmaximumhu-
midity output.Assoon as the appliance is switched on,
D) Cleaning the appliance
the display shows the current relative air humidity. The
The letter D in the display indicates that the appliance must
measurement is accurate to +/- 5%.
becleaned.TheletterremainsvisibleuntilbothBbuttons
are pressed and held down for approx. 5 seconds.
B) Setting the humidity output
The appliance is fitted with a hygrostat. This measures the
E) Current/Desired Display
relative air humidity and automatically switches the appli-
IfDESIREDappearsonthedisplay,thevaluein%nexttoit
ance off when the desired value is reached. When switching
signifiesthedesiredrelativehumidity,i.e.thedesiredvalue
theunitonusingtherotaryswitch(A),thedesiredvalueis
isshown.IfthedisplayshowsCURRENT,thenthecurrent
preset to 55%.
relative humidity is shown.
The desired value can be adjusted in steps of 5% by pres-
sing button B. While selecting the humidity output, the
desiredvalueisblinking.ThewordDESIREDappearson
thedisplay(E).Thesettingfortherelativehumidityranges
fromaminimumof30%toamaximumof70%.Arela-
tive humidity of between 40 and 60% is recommended.
After a few seconds, the display automatically changes

Cleaning/maintenance
Cleaning the water tank and base
Switch the appliance off and remove the power
(every 2 weeks)
plug from the mains socket before you clean the
• Liftthewatertankoutoftheunit,openthewatertank
appliance(28).
capandcleanthetank(36–38).
• Lifttheupperpartoftheunitoffthebaseandremove
• Regularcleaningisapreconditionforhygienic,trouble-
the Ionic Silver Stick (39).
free operation.
• Fillthebasewithwater,pourinacommercialdecalcifi-
en
• Theappliancecanbedisassembledforcleaningina
cation agent and allow to work;
few moves.
Rotatethediskassemblyafewtimesbyhand(40).
• Neversubmersetheentireunitinwater(30).
• Emptythewaterbase(41),removethediskassembly
• Theunitmustbecompletelyemptiedandcleaned,if
(42) and rinse (43).
it has been filled with water for longer than a week
• Removedepositsfromthebaseusingaplasticor
without being used.
woodenbrushandadiluted,commercialwashing-up
detergent (44).
Recommended cleaning intervals
The recommended cleaning intervals depend on the air and
Cleaning the humidifying disks
waterquality,aswellasoperatingtimes.Athinfilmoflime
(every 4 weeks)
scale on the disks actually increases the humidity output!
A thin film of lime scale on the disks actually increases
• oncetotwiceayear:upperpartofhousingandfan
thehumidityoutput!Toclean,unscrewtheindividualhumi-
• every2weeks:watertankandbase
difyingdisksfromeachother.Rotarylocks(toothedwheels)
• every4weeks:humidifyingdisks
can be easily removed using the multifunctional fragrance
container (45).
Cleaning the upper part of the housing
Removetheupperpartoftheunit(32)andwipeouttho-
Next,thediskscanbewashedindividually(46-47).
roughly once to twice a year with a damp cleaning cloth
(33).
• Thetoothedwheelcanonlybeassembledinone
position.
Cleaning the fan
The cover can be removed from the upper part of the unit
Aftercleaning,reassembletheapplianceinthereversese-
(34).Underthiscoveristhefan(35),whichcanbecleaned
quence.Note:rotarylockshavetworestpositions.Warning:
with a damp cleaning cloth as required.
Do not overtighten!
22
Storing the appliance when not in use for
be carried out by specialists.Through improper repairs,
Technical specifications
an extended period
considerable danger for the operator can result and war-
Cleantheapplianceasdescribed,allowtodrycompletely
ranty claims lapse.
Mains voltage 230 V / 50 Hz
andstoreitinadryplace,preferablyintheoriginalpacka-
TheapplianceisCEcertifiedandcomplieswiththeLow
PowerconsumptionW2055A/2055D 24W/27W
gingandawayfromexcessiveheat.Removethebayonet
Voltage Directive 73/23/EEC, and the Electromagnetic
Humidity output 300 g/h
seal from the water tank and store separately to protect
CompatibilityDirectives89/336/EECand92/31/EEC.
2
3
the seal.
Suitable for rooms up to 50 m
/ 125 m
Spare parts
Water capacity (Water tank) 4.5 Liter
en
Disposal
The spare parts depicted in the «Description of the ap-
Water capacity (Water base) 2.5 Liter
Give your decommissioned air humidifier to your
pliance» section can be obtained from your specialist
dealer for proper disposal. For other disposal op-
dealerandinstalled intheunit byyourself.Onlyoriginal
Dimensions 360 x 360 x 360 mm
tions,pleaserefertoyourlocalauthority.
manufacturer’s parts may be used. All other repairs must
Weight (empty) 5.9 kg
be carried out by a specialist or customer service. This also
Operatingnoiselevel <25dB(A)
Warranty
applies to a defective mains cable.
The warranty conditions are defined by our representative
Accessories IonicSilverStick(ISS)A7017
inthecountryofsale.Pleasecontactyourdealerif,despite
CalcOffA7417
strictqualitycontrol,yourappliancebecomesdefective.You
must present your original receipt when making a claim
Subject to technical change
underthewarranty.Repairstoelectricappliancescanonly
Troubleshooting
Problem Possible cause What to do
Appliancedoesnotwork Powerplugnotinserted Connectpowerplugtothemainssocket
Turn rotary switch to position 1 or 2
Nowaterinthewatertank Fillwithwater
Brushingnoise Diskassemblyisnotcorrectlyinserted Insertthediskassemblycorrectly
in the water base.
Diskswarped Replacedisks
Nohumidity Nowaterinthewaterbase Fillthewatertank
23

en
24

Instructions d’utilisation
fr
25

Avant-propos
Consignes de sécurité
Principe de fonctionnement
Félicitations
! Vous avez choisi le Air Washer W2055A /
• Lisezlemoded’emploidanssonintégralitéavantla
Votre appareil
2055D
!
mise en service et conservez-le afin de pouvoir le
• laveethumidifiel’airsansfiltresànattes,
consulter ultérieurement.
• fonctionnedemanièresilencieuseavecdeuxmodesde
Utilisation conforme à la destination :
• N’utilisezl’humidificateurd’airquedanslespièces
fonctionnement,
L‘appareil sert exclusivement à l‘humidification et à la puri-
à vivre et dans le respect des données techniques
• estfabriquéavecdescomposantsdehautequalité
fication de l‘air ambiant dans des espaces intérieurs.
indiquées. Une utilisation non conforme à la destination
ayantunelongueduréedevie,
peut nuire à la santé et à la vie.
• disposed’unegrandepuissanced’épurationgrâceàla
Saviez-vous qu’un air ambiant trop sec
• Lesenfantspeuventnepasidentifierlesdangersque
préionisation.Lesdifférentesparticulesdepoussière
• assèchelesmembranesmuqueusesetentraînedes
représente l’utilisation d’appareils électriques. Il faut
sont ionisées (chargées) et restent donc accrochées
gerçuresauniveaudeslèvresetuneirritationdes
donctoujourslessurveillerlorsqu’ilssetrouventà
aux disques de l’humidificateur.
fr
yeux
?
proximité de l’humidificateur d’air (image 1).
• favoriselesinfectionsetmaladiesdesvoies
• Lespersonnesquinesontpasfamiliariséesavecle
Al’intérieurdel’appareil,desdisquesd’humidificationspé-
respiratoires
?
moded’emploi,ainsiquelesenfantsetlesperso-
ciaux tournent dans un bain d’eau. L’air circulant est ainsi
• entraînel’épuisement,lafatigueetunepertede
nnessousl’influencedemédicaments,d’alcooletde
nettoyédesimpuretésdemanièrenaturelle,commel’air
concentration
?
drogues ne doivent pas utiliser l’appareil ou doivent
est purifié par la pluie dans la nature.
• nuitauxanimauxdomestiquesetauxplantes
l’utiliser uniquement sous surveillance.
L’humidification de l’air s’effectue via un principe auto-
d’intérieur
?
• Nemettezpasl’appareilenservicesiuncâbleouune
régulant d’évaporation à froid. L’appareil produit ainsi une
• favoriseledéveloppementdespoussièresetaugmente
priseestendommagé(2),encasdemauvaisfonction-
humidité d’air optimale sans que des appareils de com-
la charge électrostatique des textiles en fibres
nement de l’appareil ou si ce dernier est tombé (3) ou a
mande supplémentaires ne soient nécessaires.
synthétiques,tapisetsolssynthétiques
?
étéendommagéd’uneautremanière.
• endommagelesobjetsdécoratifsenboisetcertains
• Pourparfumerl’air,utilisezlerécipientpourparfum
Désemballage
parquets
?
prévu à cet effet (reportez-vous également à la section
• Retirezdélicatementl’appareildel’emballage.Atten-
• désaccordelesinstrumentsdemusique
?
«Utilisationdeparfums»).Nemettezaucunadditif,
tion : la partie supérieure est simplement posée sur le
telquedeshuilesessentielles,directementdansle
bac d’eau (10 – 12).
Remarques générales
réservoir d’eau ou dans le bac d’eau. Ces additifs en-
• Retirezl’appareildesonsacplastique(13).
Enrèglegénérale,leclimatambiantestagréablequand
dommagent l’appareil ! Les appareils endommagés par
• Retireztoutes les bandes de carton de la rangée de
l’humidité relative se situe entre 40 et 60 %. L’humidification
des additifs sont exclus de la garantie.
disques (14).
del’airestparticulièrementimportanteenhivermaisne
• Utilisezexclusivement CalcOffpour le détartrage.Les
• Vérifiezlesinformationsrelativesàl’alimentationélec-
remplacepasuneaérationrégulièredespiècesàvivre.
dommages occasionnés par l‘utilisation d‘autres produ-
trique mentionnées sur la plaquette signalétique (15).
its anticalcaires sont exclus de la garantie.
• Sivousn’utilisezpasl’appareiltoutel’année,rangez-le
dans l’emballage d’origine.
26
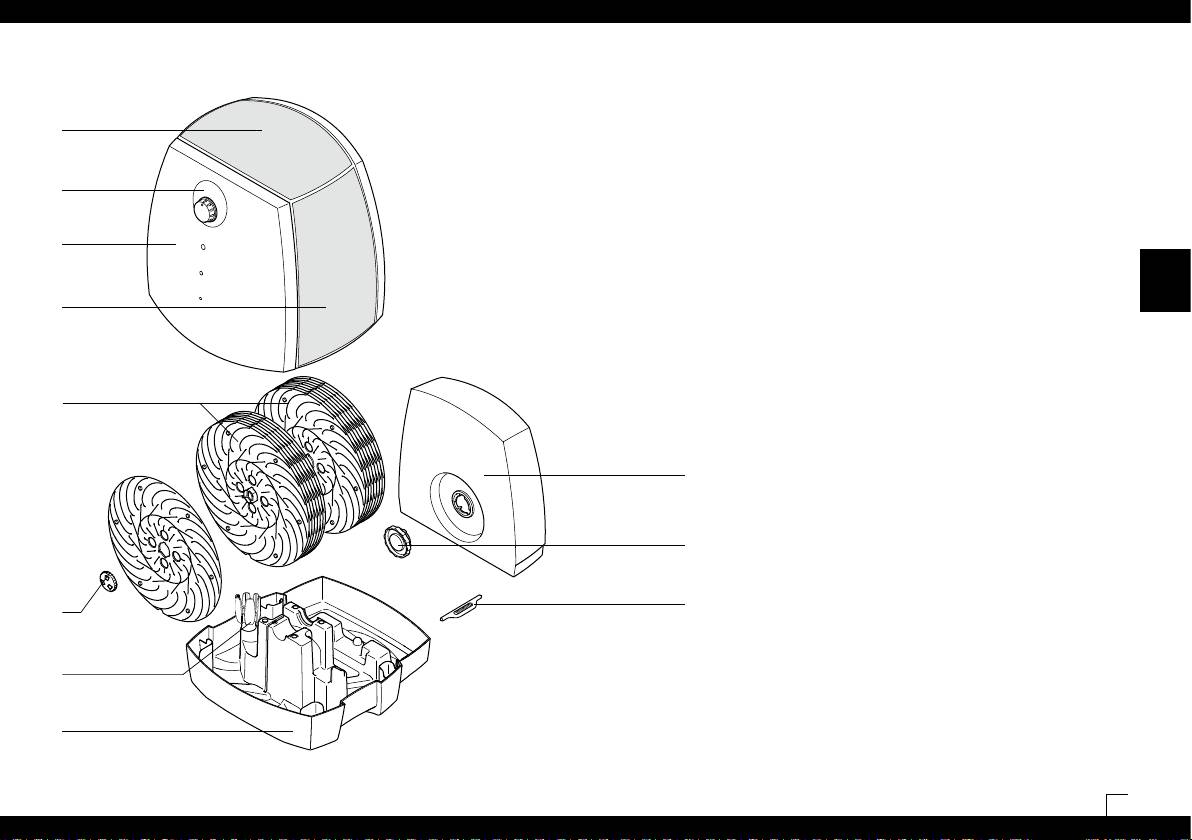
Description de l’appareil
Réglage de la longueur de câble
Mise en marche
Lalongueurtotaleducâbles’élèveàenv.2
Le meilleur emplacement pour votre appareil est le
mètresetestréglabledemanièreindividuelle.
suivant
:
• Eteignezl’appareiletdébranchezlaprisede
• Placezl’appareildanslapièce,surlesolousurune
Couvercle
courantdelaprisesecteur.Netirezpassur
surfaceplaneetsèche.
lecâble(16).
• Veillezàunebonneaccessibilitéetàunespacesuffi-
• Ouvrezlecouvercle(17et18)
sant pour la maintenance et le nettoyage de l’appareil.
Tableau de
1. Insérez le tournevis dans le trou
• Pourunplusgranddébitd’évaporationdansles
contrôle
prévu à cet effet.
grandespièces,placezl’appareilàproximitéd’un
2. Tirez vers l’extérieur.
radiateur (attention
: il ne faut pas dépasser une tem-
Partie
3. Poussezverslehaut.
pérature de 50°C).
fr
supérieure
• Tirezlecâbledesonlogement(19).
• Lisezleparagraphe«
Remplissageduréservoir
» pour
• Réglezlecâbleentirant/poussant.
remplir le réservoir d’eau (21 – 24).
• Insérezlecâblerestantdanslelogement.
• Placezleréservoird’eausurlapartieinférieure(25).
Sortie d’air
• Refermezlecouvercle(20).
• Raccordezlecâbled’alimentationauréseauetallumez
l’appareil à l’aide de l’interrupteur marche/arrêt.
• Dixàquinzeminutesaprèsl’enclenchementde
l’appareil,ilatteintsapleinepuissance.
• Assurez-vousquelecâbleréseaun’estpascoincé(9).
Un ensemble de
N’allumezpasl’appareilsilecâbleréseauestdéfec-
disques avec 16 disques
tueux (2).
d’humidification
Réservoird’eau
Bouchon du réservoir d’eau
Ionic Silver Stick
®
(ISS)
Bouchon à vis
Récipientpourparfum
et ouvre-bouchon pour
disque d’humidification
Bac à eau
27
