Boneco Air-O-Swiss E2441A: инструкция
Раздел: Аксессуары для дома
Тип:
Инструкция к Boneco Air-O-Swiss E2441A

AIR-O-SWISS is a registered trademark of PLASTON AG, Espenstrasse 85, 9443 Widnau, Switzerland
Version: 2
Edition: 06/10
36661-00
E2441A
Verdunster
Evaporator
Gebrauchsanweisung Deutsch
3
Instructions for use English
8
Mode d'emploi Français
13
Istruzioni per l´uso Italiano
18
Instrucciones de uso Español
23
Gebruiksaanwijzing Nederlands
28
Brugsanvisning Dansk
33
Bruksanvisning Norsk
38
Bruksanvisning Svenska
43
Käyttöohje Suomi
48
使用说明书 中文
53
Инструкция по эксплуатации Pусский
57
Instrukcja obsługi w języku Polskim
62
Návod k použití Česky
68
Navodila za uporabo Slovenska
73
Návod na používanie Slovenský
78
Upute za uporabu Hrvatski
83
Használati utasítás Magyar
88
Lietošanas instrukcija Latviski
93
Naudojimo instrukcija Lietuvių kalba
98
Kasutusjuhend Saksa
103
A 2
A 3
A 4
A 7
A 10
A 5
A 8
A 11
A 12
A 9
A 6
A 1
A
A 13
30cm
120cm
A 14
B
B 8
B 9
B 7
B 14
B 3
B 13
B 1
B 2
B 3
B 5
B 6
B 7
B 10
B 11
B 12
B 13
B 14
B 14
B 22
B 19
B 18
B 17
B 16
B 15
B 21
B 20
B 4
C
C 1
C 2
C 3
C 4
C 5
C 6
C 7
S T O P
!
D E
S T O
P
!
D 1
D 2
D 3
E 1
E 2
E 3
E 4
F H
F 2
F 3
F 5
F 4
F 6
G
H 3
F 1
H 4
H 2
H 1
G 3
G 2
G 1

Besten Dank, dass Sie sich für einen AIR-O-SWISS
Verdunster entschieden haben!
Weiterführende Informationen zu diesem Produkt finden Sie auf
www.airoswiss.ch
Thank you for choosing an AIR-O-SWISS Evaporator!
Additional information about this product can be found at
www.airoswiss.ch
Nous vous remercions d‘avoir choisi un évaporateur
AIR-O-SWISS!
Vous trouverez des informations complémentaires à propos de
ce produit sur www.airoswiss.ch
Grazie di aver deciso a favore di un evaporatore
AIR-O-SWISS!
Per ulteriori informazioni sul prodotto visitare il sito
www.airoswiss.ch
¡Muchísimas gracias por haber elegido un evaporador
AIR-O-SWISS!
Encontrará más información sobre este producto en
www.airoswiss.ch
Hartelijk dank dat u hebt gekozen voor een
AIR-O-SWISS verdamper!
Meer informatie over dit product vindt u op www.airoswiss.ch
Mange tak, fordi du besluttede dig for at købe en
AIR-O-SWISS fordamper!
Yderligere oplysninger om dette produkt finder du på
www.airoswiss.ch
Mange takk for at du valgte en AIR-O-SWISS-fordamper!
Mer informasjon om dette produktet finner du på
www.airoswiss.ch
Tack för att du har valt en AIR-O-SWISS-avdunstare!
Ytterligare information om denna produkt finns på
www.airoswiss.ch
Kiitämme sinua ostettuasi AIR-O-SWISS-haihduttimen!
Lisätietoja tuotteesta löydät sivulta www.airoswiss.ch
感谢您选择 AIR-O-SWISS 产品!
更多产品信息,请访问网站 www.airoswiss.cn
Благодарим вас за покупку испарителя
AIR-O-SWISS!
С дополнительной информацией по этому изделию можно
ознакомиться на сайте www.airoswiss.net
Dziękujemy bardzo, że zdecydowali się Państwo na zakup
urządzenia ewaporacyjnego AIR-O-SWISS!
Więcej informacji o tym produkcie znajdą Państwo na stronie
www.airoswiss.net
Děkujeme, že jste se rozhodli pro zvlhčovač vzduchu
AIR-O-SWISS!
Podrobné informace o tomto výrobku najdete na
www.airoswiss.net
Zahvaljujemo se vam, da ste se odločili za vlažilnik
AIR-O-SWISS!
Dodatne informacije o tem izdelku najdete na spletnem mestu
www.airoswiss.net.
Ďakujeme, že ste sa rozhodli pre zvlhčovač AIR-O-SWISS!
Rozsiahlejšie informácie k tomuto výrobku nájdete na
www.airoswiss.net
Najljepša hvala što ste se odlučili za AIR-O-SWISS
ovlaživač zraka!
Daljnje informacije o ovom proizvodu naći ćete na stranici
www.airoswiss.net
Köszönjük, hogy az AIR-O-SWISS párologtatót választotta!
A termékkel kapcsolatosan további információkat a
www.airoswiss.net oldalon talál.
Liels paldies, ka Jūs esat izvēlējies/-usies AIR-O-SWISS
gaisa mitrinātāju!
Papildu informāciju par šo izstrādājumu atradīsiet
www.airoswiss.net
Dėkojame, kad Jūs nusprendėte įsigyti AIR-O-SWISS
garintuvą!
Kitą informaciją apie šį produktą rasite internetiniame
puslapyje www. airoswiss.net
Täname Teid, et otsustasite AIR-O-SWISS aurusti kasuks!
Edasist informatsiooni leiate käesoleva toote kohta aadressilt
www.airoswiss.net
3
3
Zu diesem Dokument
3
Sicherheitshinweise
4
Technische Daten
4
Beschreibung des Geräts
4
Funktionsprinzip
4
Gerät auspacken
4
Gerät in Betrieb nehmen
5
Gerät ein-/ausschalten
5
Gerät reinigen und warten
6
Gerät transportieren
6
Gerät lagern
6
Gerät entsorgen
6
Ersatzteile und Zubehör
6
Häufige Fragen
7
Allgemeine Informationen zur
Luftbefeuchtung
7
Störungen beheben
Zu diesem Dokument
Diese Gebrauchsanweisung ist Teil des Pro-
dukts und beschreibt dessen sichere Bedienung.
Die Gebrauchsanweisung ist ausschliesslich für das
hier beschriebene Produkt gültig.
• Gebrauchsanweisung vor der Inbetriebnahme
vollständig durchlesen.
• Gebrauchsanweisung während der Lebensdauer
des Produkts aufbewahren.
• Gebrauchsanweisung an jeden folgenden Be-
sitzer, Nachbesitzer und Benutzer des Produkts
weitergeben und vom Hersteller erhaltene Ergän-
zungen beifügen.
• Für Schäden, die durch Nichtbeachten dieser
Gebrauchsanweisung entstehen, lehnt der Her-
steller jegliche Haftung ab.
Bestimmungsgemässe Verwendung
Das Gerät dient ausschliesslich dazu, die Luft in
Wohnräumen bis 40 m
2
zu befeuchten. In grösseren
Räumen kann die optimale Luftfeuchtigkeit (50 %
relative Luftfeuchtigkeit) evtl. nicht erreicht werden.
Das Gerät darf nicht zu anderen Zwecken verwen-
det werden. Es dürfen keine Fremdgegenstände in
das Gerät gesteckt werden. Das Gerät ist nur für
die in dieser Gebrauchsanweisung beschriebenen
Zwecke zu benutzen.
Garantie
Die Garantiebestimmungen sind von unserer Lan-
desvertretung festgelegt. Wenden Sie sich an Ihren
Fachhändler, wenn am Gerät ein Mangel auftritt. Für
eine Garantieleistung ist die Vorlage des Kaufbelegs
unbedingt erforderlich.
CE-Konformität und geltende Richtlinien
Das Gerät ist CE-konform und entspricht den fol-
genden Richtlinien:
• 2006/95/EG für elektrische Sicherheit
• 2004/108/EG für elektromagnetische Verträg-
lichkeit
• 2002/95/EG zur Beschränkung der Verwendung
bestimmter gefährlicher Stoffe in Elektro- und
Elektronikgeräten
• 2002/96/EG über Elektro- und Elektronik-Altge-
räte
Hinweise und Auszeichnungen in diesem
Dokument
In diesem Dokument werden Warnhinweise verwen-
det, um Verletzungen oder Sachschäden zu vermei-
den. Sie sind wie folgt aufgebaut:
WARNSTuFE
ursache und Folge der Gefahr
▶
Massnahme zur Vermeidung der Gefahr
Es gibt folgende Warnstufen:
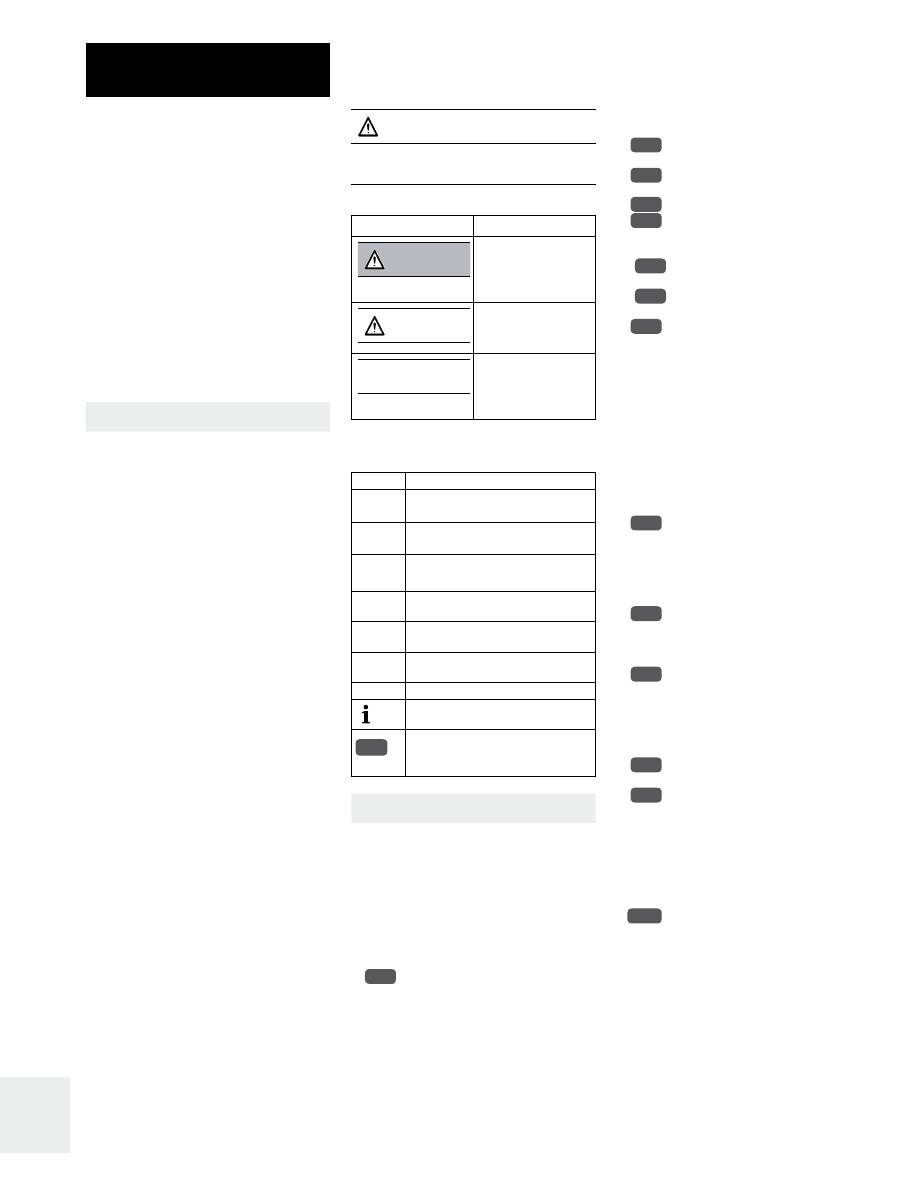
Warnstufe
Beschreibung
WARNuNG
Möglicherweise dro-
hende Gefahr.
Bei Nichtbeachtung
drohen Tod oder
schwerste Verlet-
zungen.
VORSICHT
Gefährliche Situation.
Bei Nichtbeachtung
können geringfügige
Verletzungen folgen.
VORSICHT
Kritische Situation.
Bei Nichtbeachtung
können Sachschäden
folgen.
In diesem Dokument werden folgende Symbole ver-
wendet, um einen schnellen Zugriff auf die Informa-
tionen zu ermöglichen:
Symbol
Beschreibung
✔
Voraussetzung, die vor Beginn einer
Handlung erfüllt sein muss.
▶
Handlung mit einem Schritt oder mit
mehreren Schritten, deren Reihenfol-
ge nicht relevant ist.
1.
2.
Handlung mit mehreren Schritten,
deren Reihenfolge relevant ist.
•
Aufzählung erster Ebene
-
Aufzählung zweiter Ebene
➥
Ergebnis einer oder mehrerer Hand-
lungen
(siehe...) Verweis auf ein Kapitel oder ein Bild
wichtige Informationen
Verweis auf eine Positionsnummer
im Bild z. B. Positionsnummer 1 in
Grafik A
Sicherheitshinweise
• Vor Benutzung des Geräts diese Gebrauchsan-
weisung lesen und an sicherem Ort aufbewah-
ren.
• Personen, die mit der Gebrauchsanweisung nicht
vertraut sind, sowie Kinder und Personen unter
Medikamenten-, Alkohol- oder Drogeneinfluss,
dürfen das Gerät nicht bedienen.
A 1
• Das Gerät nur gemäss der bestimmungsgemäs-
sen Verwendung und innerhalb der spezifizierten
technischen Daten verwenden. Ein nicht bestim-
mungsgemässer Gebrauch kann Gesundheit und
Leben gefährden.
•
Kinder können die Gefahren beim Um-
gang mit Elektrogeräten nicht erkennen. Deshalb
Kinder immer beaufsichtigen, wenn sie sich in
der Umgebung des Gerätes aufhalten.
• Das Gerät nicht in Räumen betreiben, in denen
sich feuergefährliche Güter, Gase oder Dämpfe
befinden.
• Das Gerät nicht verändern und keine Fremdge-
genstände in das Gerät stecken.
Beim Umgang mit Elektrizität besteht Lebensgefahr
durch Stromschlag. Die folgenden Hinweise zur Ver-
meidung beachten:
• Das Gerät nicht in den Regen stellen.
• Das Gerät nicht in Räumen mit relativer Luft-
feuchtigkeit > 70 % verwenden.
• Bei Nichtgebrauch Netzstecker ausstecken.
•
Niemals den Netzstecker am Kabel aus
der Steckdose ziehen.
•
Niemals den Netzstecker mit nassen Hän-
den aus der Steckdose ziehen oder in die Steck-
dose stecken.
•
Das Gerät nur an Wechselstrom anschlies-
sen.
•
Gerät nur betreiben mit Spannung ge-
mäss dem Typenschild am Gerät.
• Das Gerät
nicht
in Betrieb nehmen:
-
wenn Kabel oder Stecker beschädigt
sind.
- nach Fehlfunktion.
-
wenn es heruntergefallen ist oder auf
eine andere Art beschädigt wurde.
•
Reparaturen an Elektrogeräten dür-
fen nur von Fachkräften durchgeführt werden.
Ein defektes Netzkabel darf nur von einer Fach-
kraft repariert/gewechselt werden.
• Den Netzstecker in folgenden Fällen aus der
Steckdose ziehen:
- vor jedem Entleeren des Gerätes,
- vor jeder Reinigung,
- vor jedem Wechsel der Verdunstermatte oder
des Ionic Silver Sticks
®
,
- vor jeder Montage/Demontage einzelner Teile,
- vor jedem Abheben des Oberteils,
- vor jeder Umplatzierung.
•
Unterteil mit Elektrik und Ventilator nie in
Wasser oder andere Flüssigkeiten tauchen bzw.
mit Wasser oder anderen Flüssigkeiten abspü-
len.
Die folgenden Hinweise zur Vermeidung von Verlet-
zungen beachten:
•
Gerät so platzieren, dass Sie nicht über
das Kabel stolpern.
• Das Gerät so platzieren, dass es nicht umgestos-
sen werden kann.
•
Das Kabel nicht in der Türe oder mit ande-
ren Gegenständen einklemmen.
• Das Kabel nicht bedecken.
Die folgenden Hinweise zur Vermeidung von Sach-
schäden beachten:
•
Sich nicht auf das Gerät setzen und keine
Gegenstände darauf platzieren.
•
Das Gerät nur auf eine ebene, trockene
Fläche stellen.
• Lufteintritt und Luftaustritt des Geräts unbedingt
freihalten.
A 1
A 2
A 3
A 4
B 14
A 5
A 6
A 7
A 8
A 9
A 10
A 11
A 12
Gebrauchsanweisung
Deutsch
Seite Kapitel
4
Betriebsarten
Am Schiebeschalter lassen sich folgende Betriebs-
arten einstellen:
Position
Funktion
0
das Gerät ist ausgeschaltet
I
das Gerät arbeitet im Nachtbetrieb
(geräuscharm)
die Betriebsanzeige leuchtet grün
II
das Gerät arbeitet im Normalbetrieb
(maximale Befeuchtungsleistung)
die Betriebsanzeige leuchtet grün
Betriebsanzeige
Die Betriebsanzeige leuchtet grün, sobald das Gerät
mit Wasser befüllt und eingeschaltet ist. Wird die
Wasserwanne vom Unterteil abgehoben, wechselt
die grüne LED auf rot und der Gerätebetrieb wird
unterbrochen, das Gerät ist aber nicht stromlos.
Erst beim Wiederaufsetzen der Wasserwanne auf
das Unterteil wechselt die rote LED wieder auf grün
und das Gerät setzt den Betrieb fort.
Bei Unterschreiten des minimalen Wasserstandes
schaltet das Gerät automatisch aus und die grü-
ne LED wechselt auf rot. Wird Wasser nachgefüllt,
wechselt die rote LED wieder auf grün und das Ge-
rät setzt den Betrieb fort.
Leistungsschild
Auf dem Leistungsschild werden folgende
Informationen angezeigt:
• Produktname
• Netzspannung
• Leistungsaufnahme
• Schutzklasse
• Produktionsnummer
• Produktionsdatum
• Konformitätszeichen
Die Angaben auf dem Leistungsschild in den
Illustrationen sind nur beispielhaft. Bitte prüfen
Sie die Angaben auf dem Leistungsschild Ihres
Geräts.
Funktionsprinzip
Beim Füllen des Geräts wird das Schwimmerpaket
mit dem Wasserpegel angehoben. Wenn der Was-
serpegel die Befüllgrenze erreicht, verschliesst die
Schwimmerspitze die Einfüllöffnung des Geräts. Die
Verdunstermatte saugt sich mit Wasser voll. Der
Ventilator drückt die trockene Raumluft durch die
feuchte Matte und gibt sie als ausreichend befeuch-
tete Luft wieder ab. Durch die gezielte Führung des
Luftstromes ist eine annähernd konstante Befeuch-
tung bei jedem Wasserstand möglich. Das Gerät
erzeugt daher eine optimale Luftfeuchtigkeit, ohne
dass zusätzliche Steuergeräte erforderlich sind.
Bei Unterschreiten des minimalen Wasserstandes
schaltet das Gerät automatisch aus.
Ionic Silver Stick
®
Der Ionic Silver Stick
®
nutzt die antimikro-
bielle Wirkung von Silber und sorgt ein Jahr für
optimale Wasserreinhaltung in allen AIR-O-SIWSS
und BONECO Luftbefeuchtern.
B 14
B 4
Der ISS wirkt, sobald er mit Wasser in Berührung
kommt - auch bei ausgeschaltetem Gerät. Der ISS
ist ausschliesslich für den Einsatz in Luftbefeuch-
tern bestimmt.
Erinnerungsmarke
Das Gerät ist standardmässig mit einer
Erinnerungsmarke für die Auswechslung des Ionic
Silver Stick
®
ausgerüstet. Damit Sie später noch
wissen, wann Sie den Ionic Silver Stick
®
in Betrieb
genommen haben, kreuzen Sie bitte auf der Marke
den aktuellen Monat an und schreiben Sie das ak-
tuelle Jahr auf die dafür vorgesehene Linie.
Gerät auspacken
Das Gerät ist bei Lieferung komplett zusammen-
gestellt und bereits mit einer Verdunstermatte
ausgestattet.
Der Schwimmerkörper ist Teil des Schwimmer-
pakets und gehört nicht zur Verpackung.
VORSICHT
Verletzungsgefahr durch fallende Teile!
▶
Das Gerät zum Auspacken und Anheben immer
am Unterteil anfassen.
VORSICHT
Schäden am Gerät durch Entfernen des
Schwimmerkörpers!
▶
Schwimmkörper beim Auspacken des Geräts
nicht entfernen.
1. Verpackung öffnen.
2.
Oberen Teil der Styroporverpackung ab-
nehmen.
3.
In die Einfüllöffnung des Geräts greifen
und das obere Ende des Plastikbeutels fest fas-
sen.
4.
Vorsichtig den Plastikbeutel mit dem
Gerät aus der Verpackung ziehen. Dabei den
Plastiksack fest greifen und beim Entnehmen aus
der Verpackung nicht loslassen.
5.
Den Plastikbeutel mit dem Gerät am
Boden abstellen und den Plastikbeutel am Gerät
nach unten schieben.
6.
Das Gerät am Unterteil fassen und nach
oben aus dem Plastikbeutel heben.
➥
Alle Verpackungsbestandteile sowie der Plastik-
beutel sind vom Gerät entfernt.
7.
Angaben zum Netzanschluss auf dem
Leistungsschild überprüfen.
8.
Prüfen, ob alle Teile des Geräts vorhanden
sind.
Gerät in Betrieb nehmen
Gerät platzieren
VORSICHT
Schäden am Kunststoff durch hohe Tempera-
turen!
▶
Gerät nicht Temperaturen > 50 °C aussetzen.
B 9
C 1
C 2
C 3
C 5
C 6
B 14
B
• Für das Befüllen des Gerätes ausschliesslich
saubere Gefässe verwenden.
• Sicherstellen, dass die Giesskanne nicht mit
Düngemittel oder ähnlichen Substanzen gefüllt
wird.
• Keine Zusätze direkt in die Wasserwanne füllen.
•
Wasserzusätze (z. B. ätherische Öle, Duft-
stoffe) nur mit dem Duftstoffbehälter verwenden.
• Das Gerät nur in komplett zusammengebautem
und einwandfreiem Zustand in Betrieb nehmen.
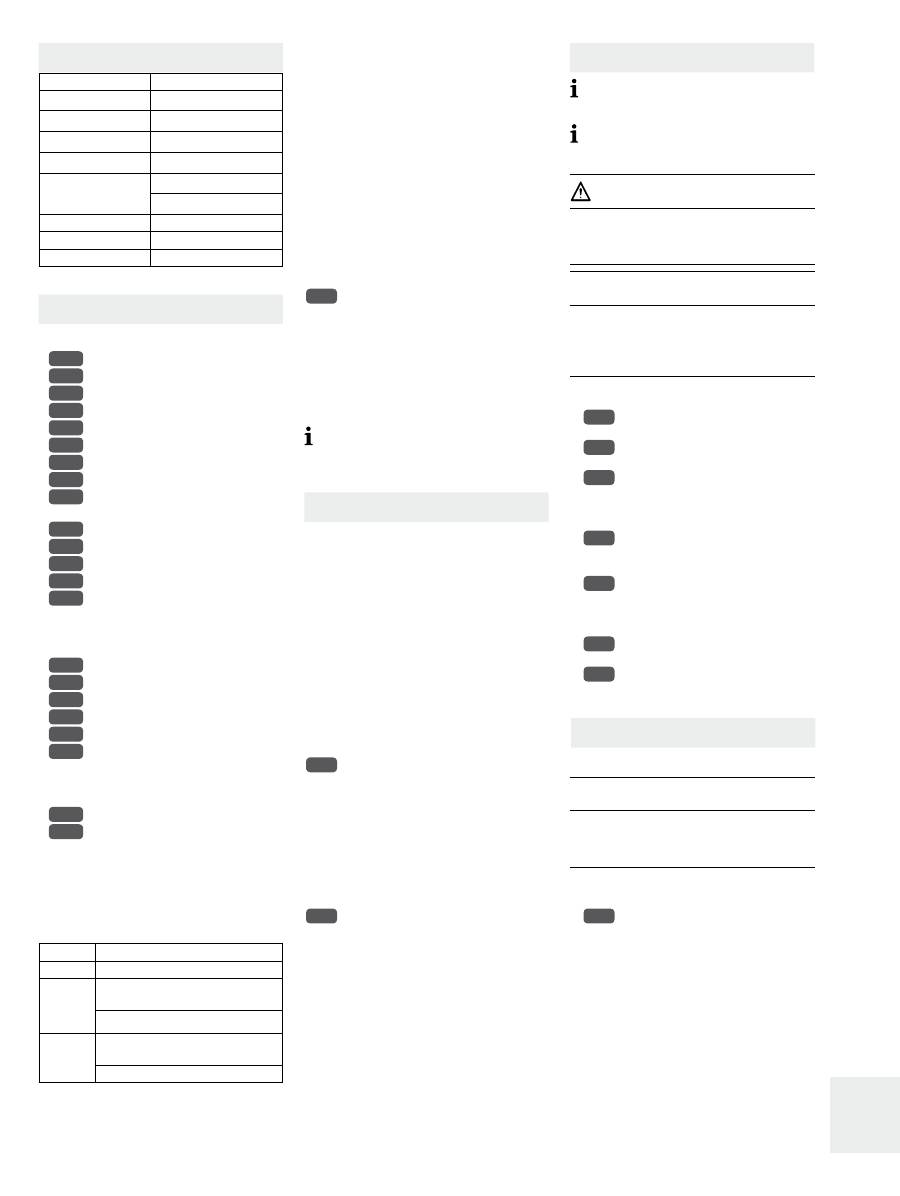
Technische Daten
Wert
Netzspannung
230 V / 50 Hz
Leistungsaufnahme
20 W
Befeuchtungsleis-
tung
bis zu 220 g/h
Geeignet für Raum-
grössen
bis zu 40 m²
Fassungsvermögen
max. 3,8 l
min. 0,2 l
Abmessungen LxBxH
320 x 320 x 400 mm
Leergewicht
3,8 kg
Betriebslautstärke
< 25 dB(A)
Beschreibung des Geräts
Das Gerät besteht aus folgenden Teilen:
•
Einfüllöffnung
•
Oberteil mit Einfüllöffnung
•
Schwimmerpaket (B 16–19)
•
Ionic Silver Stick
®
(ISS)
•
Wasserwanne (B 5–7)
•
Befüllgrenze
•
Wannengriffe
•
Ausguss
•
Erinnerungsmarke für Ionic Silver Stick
®
(ISS)
•
Netzkabel/-stecker
•
Unterteil (B 11–14)
•
Ventilator
•
Schiebeschalter (B 21–22)
•
Leistungsschild (an der Unterseite des
Geräts)
Das Schwimmerpaket besteht aus folgenden Tei-
len:
•
Schwimmerspitze
•
Füllstandsring (Maximal 3,8 l)
•
Verdunstermatte A7018
•
Schwimmerkorb
•
Schwimmerkörper
•
Duftstoffbehälter
Der Schiebeschalter besteht aus folgenden Teilen:
•
Schiebeschalter
•
Betriebsanzeige / Leerstandsanzeige
B 20
B 1
B 2
B 3
B 4
B 5
B 6
B 7
B 8
B 9
B 10
B 11
B 12
B 13
B 14
B 15
B 16
B 17
B 18
B 19
B 20
B 21
B 22
5
Folgende Hinweise beim Aufstellen des Geräts be-
achten:
•
Auf gute Zugänglichkeit und ausrei-
chenden Platz zum Warten und Reinigen des Ge-
rätes achten.
• Das Gerät nur befüllt in Betrieb nehmen!
1. Das Gerät auf den Boden oder eine ebene, tro-
ckene Fläche im Raum stellen.
2. Das Gerät befüllen (siehe Kapitel „Gerät befüllen“).
Gerät befüllen
Es gibt folgende Möglichkeiten, das Gerät mit Was-
ser zu befüllen:
• über die Einfüllöffnung des Oberteils oder
• direkt in die entnommene Wasserwanne an
einem Wasserhahn.
✔
Im Gerät befinden sich keine fremden Gegen-
stände
✔
Das Gerät ist ordnungsgemäss zusam-
mengestellt.
Das Gerät sollte nach längerem Stillstand ent-
leert und gereinigt werden. Vor der Wiederinbe-
triebnahme muss das Gerät mit frischem Wasser
befüllt werden. Andernfalls kann es zu Geruchs-
belästigungen kommen.
VORSICHT
Schäden und Risse im Kunststoff durch Zusätze
im Wasser!
▶
Keine Zusätze (z. B. ätherische Öle oder ande-
re Duftstoffe) ins Wasser geben. Ätherische Öle
oder andere Duftstoffe direkt in den Duftstoffbe-
hälter füllen.
▶
Sicherstellen, dass sich vor dem Befüllen mit einem
Gefäss keine wasserlöslichen Zusätze (z. B. Pflan-
zendünger) in diesem Gefäss befinden.
VORSICHT
Wasserschäden durch Überfüllung!
▶
Beim Befüllen die von der Füllstands-Linie ange-
zeigte maximale Füllmenge von 3,8 l nicht über-
schreiten.
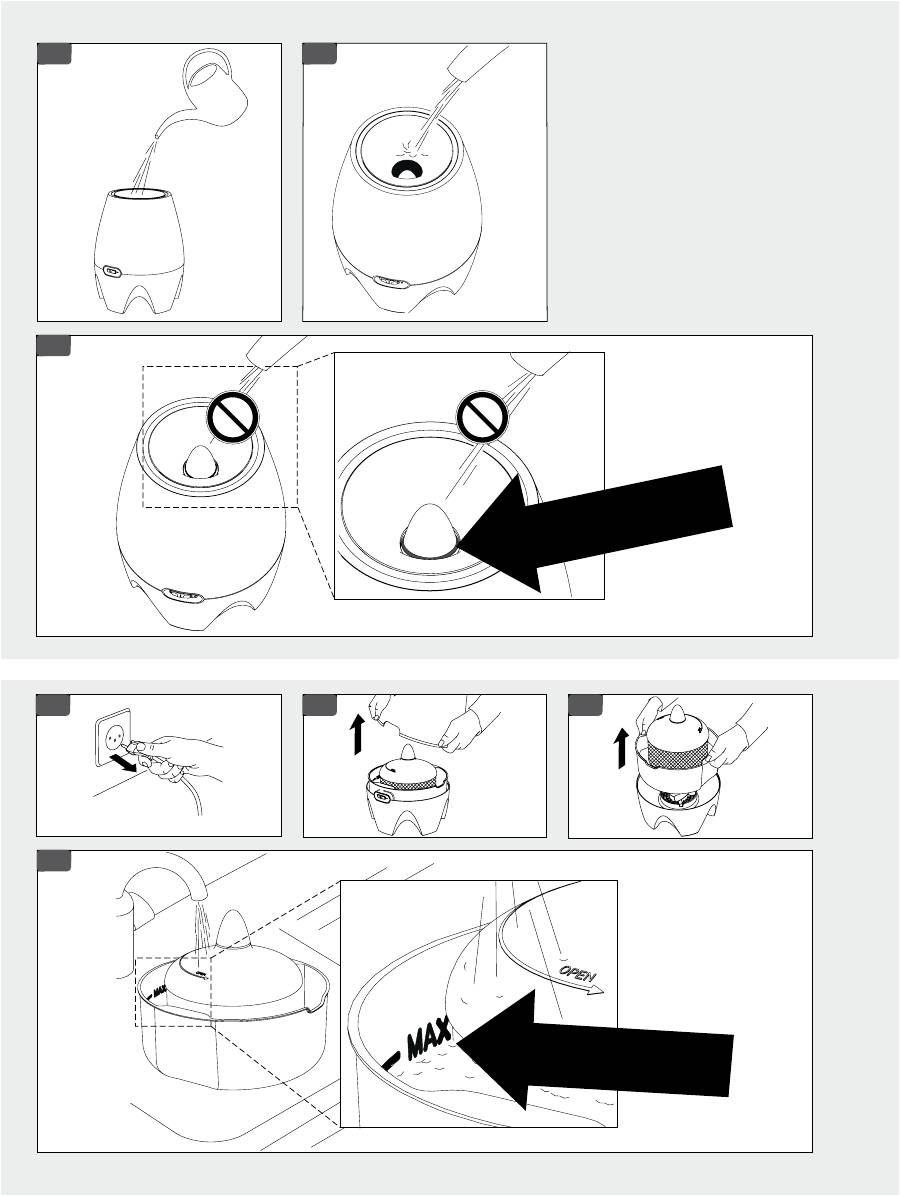
Gerät über Einfüllöffnung befüllen:
1.
Mit einem sauberen Behälter (z. B. einem
Krug) das Gerät befüllen.
2.
Mit einem sauberen Behälter frisches, kaltes
Wasser in die Einfüllöffnung des Oberteils giessen.
3.
Das Befüllen des Geräts stoppen, sobald
der Füllstandsring des Schwimmers in der Ein-
füllöffnung erscheint.
➥
Das Gerät ist mit Wasser gefüllt und kann einge-
schaltet werden.
Gerät über die Wasserwanne befüllen:
✔
(
Das Gerät ist ausgeschaltet und der Netz-
stecker gezogen (siehe Kapitel „Gerät ein-/ aus-
schalten“).
1.
Das Oberteil vom Unterteil abheben.
2.
Die Wasserwanne samt Schwimmerpa-
ket an den Wannengriffen abheben.
3.
Frisches, kaltes Wasser direkt in die Was-
serwanne füllen.
4.
Höchstens so lange Wasser eingiessen,
bis die maximale Befüllgrenze an der Innenseite
der Wasserwanne erreicht ist.
A 14
B
D 1
D 2
D 3
E 1
E 2
E 3
E 4
E 4
5. Die befüllte Wasserwanne samt Schwimmerpa-
ket auf das Unterteil setzen.
6. Das Oberteil auf das Unterteil setzen.
➥
Das Gerät ist mit Wasser gefüllt und kann einge-
schaltet werden.
Gerät ein-/ausschalten
✔
Das Gerät ist mit Wasser gefüllt.
1. Den Netzstecker in die Steckdose stecken.
2. Den Schiebeschalter je nach Bedarf auf Position
I oder Position II stellen (siehe Kapitel „Betriebs-
arten“).
➥
Das Gerät ist eingeschaltet.
1. Den Schiebeschalter auf Position 0 stellen.
WARNuNG
Lebensgefahr durch Stromschlag!
▶
Den Stecker nicht mit feuchten Händen aus der
Steckdose ziehen.
2.
Den Netzstecker ziehen.
➥
Das Gerät ist ausgeschaltet und stromlos.
Gerät reinigen und warten
Mit zunehmender Betriebsdauer nehmen die Saug-
und die Verdunsterleistung der Verdunstermatte ab.
Die regelmässige Wartung und Reinigung des Ge-
räts ist deshalb Voraussetzung für einen reibungs-
losen und störungsfreien Betrieb.
VORSICHT
Beschädigung des Kunststoffs durch ungeeig-
nete Reinigungsmittel!
▶
Keine säurehaltigen Reinigungsmittel verwen-
den.
▶
Gerät mit einem feuchten Tuch abwischen.
Reinigungs- und Wartungsintervalle
Die empfohlenen Reinigungs- und Wartungsin-
tervalle sind von der Luft- und Wasserqualität
sowie der tatsächlichen Betriebsdauer abhängig.
Intervall
Tätigkeit
1-mal pro Tag
Wasserstand kontrollieren,
ggf. Wasser nachfüllen (siehe
Kapitel „Gerät befüllen“)
ab 1 Woche
ohne Betrieb
Gerät entleeren und reinigen
(siehe Kapitel „Gerät zerlegen
und entleeren“)
alle 2 Wochen
Wasserwanne reinigen
(siehe Kapitel „Wasserwanne
reinigen“)
alle 10–12
Wochen (oder
bei Bedarf)
Verdunstermatte ersetzen
(siehe Kapitel „Verdunstermat-
te wechseln“)
1–2-mal pro
Jahr
Ventilator reinigen (siehe Kapi-
tel „Ventilator reinigen“)
1-mal pro Jahr Ionic Silver Stick
®
ersetzen
(siehe Kapitel „Ionic Silver
Stick
®
wechseln“)
E 1
Gerät zerlegen und entleeren
Das Gerät lässt sich zum Reinigen mit wenigen
Handgriffen zerlegen.
WARNuNG
Lebensgefahr durch Stromschlag!
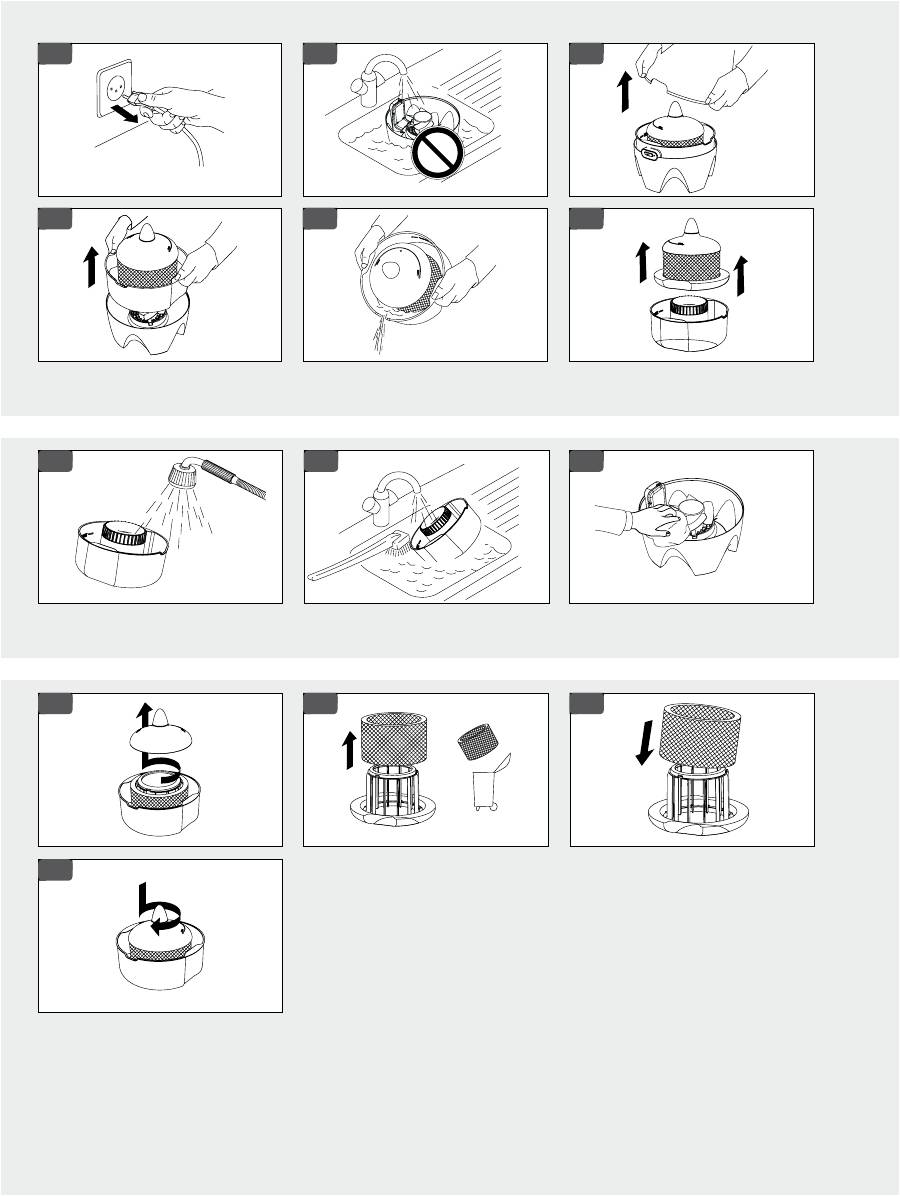
▶
Den Stecker nicht mit feuchten Händen aus der
Steckdose ziehen.
✔
Das Gerät ist ausgeschaltet und der Netz-
stecker gezogen
1.
Das Oberteil vom Unterteil abheben.
2.
Wasserwanne samt Schwimmerpaket
an den dafür vorgesehenen Wannengriffen ent-
nehmen.
3.
Das restliche Wasser aus der Wasserwan-
ne über den Ausguss entleeren.
4.
Das Schwimmerpaket aus der leeren
Wasserwanne entnehmen.
WARNuNG
Lebensgefahr durch Stromschlag!
▶
Wasser nicht über die Elektronik ausleeren.
5. Falls Wasser im Unterteil ist: Unterteil entleeren
und trocknen.
➥
Das Gerät ist zerlegt und entleert.
Wasserwanne reinigen
✔
Gerät ist zerlegt und entleert
WARNuNG
Lebensgefahr durch Stromschlag!
▶
Vor dem Reinigen Netzstecker ziehen.
▶
Nie das Unterteil samt Elektronik und Ventilator
unter Wasser tauchen.
1.
Die Wasserwanne mit lauwarmen Wasser
auswaschen.
2.
Für eine gründlichere Reinigung die Was-
serwanne mit einer handelsüblichen Abwasch-
bürste reinigen.
3. Zum Entkalken der Wasserwanne das dazu emp-
fohlene Entkalkungsmittel verwenden (siehe Ka-
pitel „Ersatzteile und Zubehör“).
4. Die Teile nach der Reinigung trocknen.
5. Das Schwimmerpaket passend in die leere Was-
serwanne einsetzen.
6. Das Gerät zusammensetzen (siehe Kapitel „Gerät
zusammensetzen“).
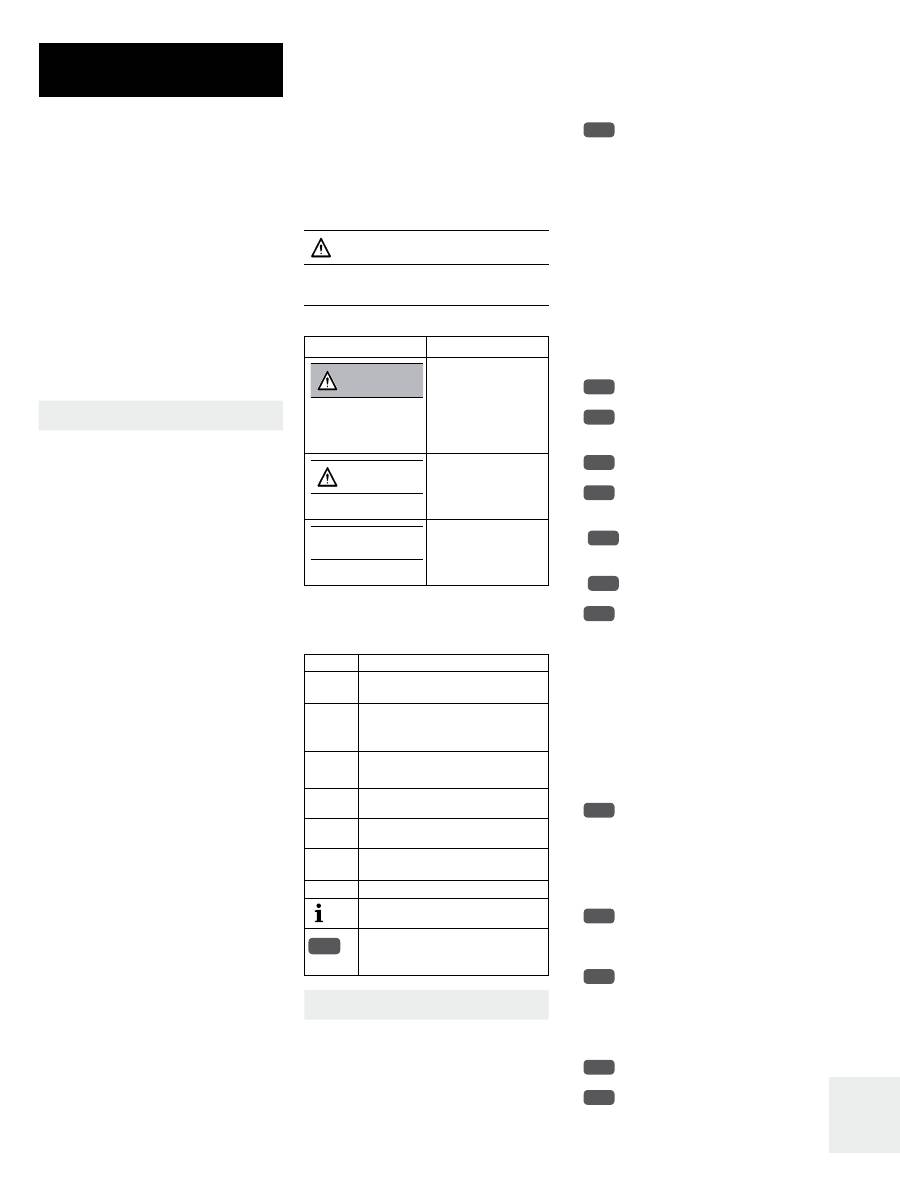
Ventilator reinigen
✔
Gerät ist zerlegt und entleert.
1.
Den Ventilator mit einem leicht ange-
feuchteten Tuch oder Putzlappen abwischen.
2. Die Teile nach der Reinigung trocknen.
3. Das Gerät zusammensetzen (siehe Kapitel „Gerät
zusammensetzen“).
F1
F 3
F 4
F 5
F 6
G 1
G 2
G 3

6
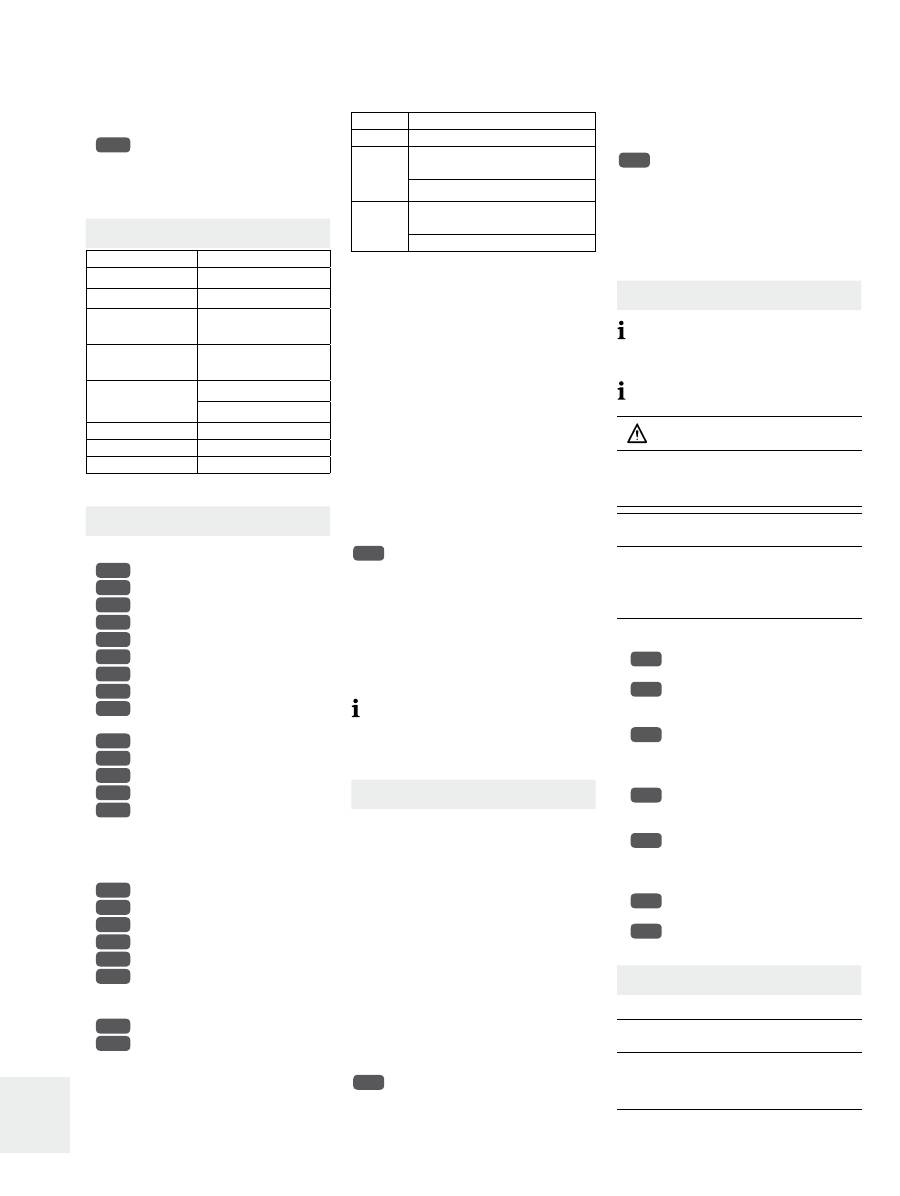
Verdunstermatte wechseln
Bei starker Verschmutzung, Verkalkung, Geruchs-
bildung, reduzierter Saugleistung usw. soll die
Verdunstermatte ersetzt werden. Verdunstermatten
erhalten Sie bei dem Fachhändler, bei dem Sie das
Gerät erworben haben.
✔
Gerät ist zerlegt und entleert.
Nur Original-Verdunstermatten des Herstellers
verwenden (siehe Kapitel „Ersatzteile und Zu-
behör“).
VORSICHT
Beschädigung der feuchten Verdunstermatte
durch Auswaschen oder Auswringen!
▶
Verdunstermatte nicht auswaschen und auswrin-
gen.
1.
Zum Öffnen des Schwimmerpakets die
Schwimmerspitze entgegen dem Uhrzeigersinn
(Pfeil OPEN) drehen und nach oben abheben.
2.
Die verbrauchte Verdunstermatte nach
oben vom Schwimmerkorb abziehen und entsor-
gen.
VORSICHT
Schäden am Gerät durch Entfernen des
Schwimmerkörpers!
▶
Schwimmkörper beim Auspacken des Geräts
nicht entfernen.
3.
Neue Verdunstermatte auf den Schwim-
merkorb aufsetzen.
4.
Zum Schliessen des Schwimmerpakets
die Schwimmerspitze auf den Schwimmer-
korb und die Verdunstermatte aufsetzen, nach
unten drücken und im Uhrzeigersinn (Pfeil
CLOSE) zudrehen.
5. Zum Überprüfen Schwimmerspitze leicht nach
oben ziehen. Dabei darf sie sich nicht vom
Schwimmerkorb abheben lassen.
6. Ggf. Schwimmerspitze nochmals drehen und
prüfen.
7. Das Schwimmerpaket passend in die leere Was-
serwanne einsetzen.
8. Das Gerät zusammensetzen (siehe Kapitel „Gerät
zusammensetzen“).
Ionic Silver Stick
®
wechseln
✔
Gerät ist zerlegt und entleert.
1. Den Ionic Silver Stick
®
vom Boden der Wasser-
wanne entnehmen und entsorgen.
2. Neuen Ionic Silver Stick
®
in die Halterung am Bo-
den der Wasserwanne stecken.
3. Das Schwimmerpaket passend in die leere Was-
serwanne einsetzen.
4. Das Gerät zusammensetzen (siehe Kapitel „Gerät
zusammensetzen“).
H 1
H 2
H 3
H 4
Gerät zusammensetzen
✔
Gerät ist zerlegt und entleert.
1. Schwimmerpaket passend in Wasserwanne ein-
setzen.
2.
Wasserwanne samt Schwimmerpaket
an den Wannengriffen in das Unterteil einsetzen.
3. Oberteil auf das Unterteil setzen.
4.
Sicherstellen, dass das Gerät korrekt zu-
sammengesetzt ist.
5. Sicherstellen, dass sich keine fremden Gegen-
stände im Gerät befinden.
➥
Das Gerät ist zusammengesetzt.
Gerät transportieren
VORSICHT
Verletzungsgefahr durch fallende Teile!
▶
Das Gerät zum Auspacken und Anheben immer
am Unterteil anfassen.
VORSICHT
Wasserschäden durch überschwappendes
Wasser!
▶
Gerät vor dem Transport entleeren.
1. Gerät entleeren (siehe Kapitel „Gerät zerlegen
und entleeren“).
2. Gerät trocknen.
3. Gerät am Unterteil anheben und zum gewünsch-
ten Ort tragen.
Gerät lagern
1. Gerät reinigen (siehe Kapitel „Gerät reinigen und
warten“).
2. Gerät trocknen.
3. Gerät vorzugsweise in die Originalverpackung
packen.
4. Gerät an einem trockenen, kühlen Ort aufbewah-
ren.
Gerät entsorgen
Das ausgediente Gerät einem Fachhändler zur fach-
gerechten Entsorgung übergeben. Bei der Entsor-
gung die geltenden nationalen Vorschriften beach-
ten. Weitere Entsorgungsmöglichkeiten erfahren Sie
von Ihrer Gemeinde oder Stadtverwaltung.
Ersatzteile und Zubehör
Ersatzteile und Zubehör können Sie über Ihren
Fachhändler beziehen und selbst am Gerät austau-
schen. Es dürfen nur Originalteile des Herstellers
verwendet werden. Reparaturen dürfen nur Fach-
kräfte durchführen. Dies gilt auch für ein defektes
Netzkabel.
Zubehör
Bezeichnung
Verdunstermatte
A7018
Ionic Silver Stick
®
A7017
Entkalkungsmittel
A7417
B 5
B
Häufige Fragen
F. Warum ist die Luftfeuchtigkeit in meinem
Zimmer zu niedrig?
A. Wie oft benutzen Sie das Gerät? Wenn das Ge-
rät nur nachts in Betrieb ist, nimmt tagsüber die
Luftfeuchtigkeit ab, da der Luft nicht konstant
Feuchtigkeit zugeführt wird.
Holz, Leder, Teppiche, Vorhänge und andere
Materialien nehmen viel Feuchtigkeit auf, wo-
durch die Luftfeuchtigkeit im Raum abnimmt.
Wenn das Fenster geöffnet ist, kann die Feuch-
tigkeit aus dem Zimmer entweichen.
Eine häufige Ursache ist, dass das Gerät neben
ein Heizgerät gestellt wird, um die Feuchtigkeit
mit der heissen Luft schnell im Raum zu ver-
teilen. Das funktioniert jedoch nicht. Die aus-
tretende heisse Luft nimmt den Grossteil der
Feuchtigkeit auf, bevor sie die Raumluft über-
haupt erreicht.
F. Soll ich meine Tür geöffnet oder geschlossen
lassen, während das Gerät in Betrieb ist?
A. Bei geöffneter Tür verlässt die Feuchtigkeit den
Raum und verteilt sich auch in andere Bereiche
des Hauses. Wenn Sie die Luftfeuchtigkeit
in einem bestimmten Raum erhöhen wollen,
sollten Sie darauf achten, dass die Tür zu die-
sem Raum geschlossen bleibt, während das
Gerät in Betrieb ist.
F. Wie hoch sollte die Luftfeuchtigkeit in
meinem Zimmer sein?
A. Es wird eine Luftfeuchtigkeit von 40–60 %
empfohlen.
F. Was sind die Folgen bei zu geringer oder zu
hoher Luftfeuchtigkeit?
A. Trockene Luft kann zu trockener Haut, elektro-
statischen Aufladungen, zu verstimmten Musik-
instrumenten, zu vermehrter Staubbildung, zu
Schäden an Gegenständen aus Holz (Austrock-
nung und Risse), zu Unwohlsein, zu Krankheit
führen und die Nasenschleimhaut austrocknen.
Zu hohe Luftfeuchtigkeit kann zu Schimmelbil-
dung und zum Ablösen von Tapeten führen.
F. Warum benötige ich einen Verdunster, wenn
ich auch einfach das Fenster öffnen kann?
A. Die Luftfeuchtigkeit der Aussenluft ist nicht
hoch genug, um einen Raum zu befeuchten.
F. Wo sollte ich meinen Verdunster aufstellen?
A. Das Gerät soll frei und nicht an einer Wand,
einem Fenster, einer Tür oder einer Wärmebrü-
cke stehen, damit die Luft um das Gerät frei
zirkulieren kann.
F. Kann ich die Wasserwanne in der Spülma-
schine reinigen?
A. Nein, Sie können die Wasserwanne nicht in der
Spülmaschine reinigen, da sie sonst schmilzt.
7
Störungen beheben
Reparaturen an Elektrogeräten dürfen nur Fach-
kräfte durchführen. Durch unsachgemässe Re-
paraturen können erhebliche Gefahren für den
Benutzer entstehen und der Garantieanspruch
erlischt.
WARNuNG
Lebensgefahr durch Stromschlag!
▶
Keine Reparaturen an Elektroteilen durchführen.
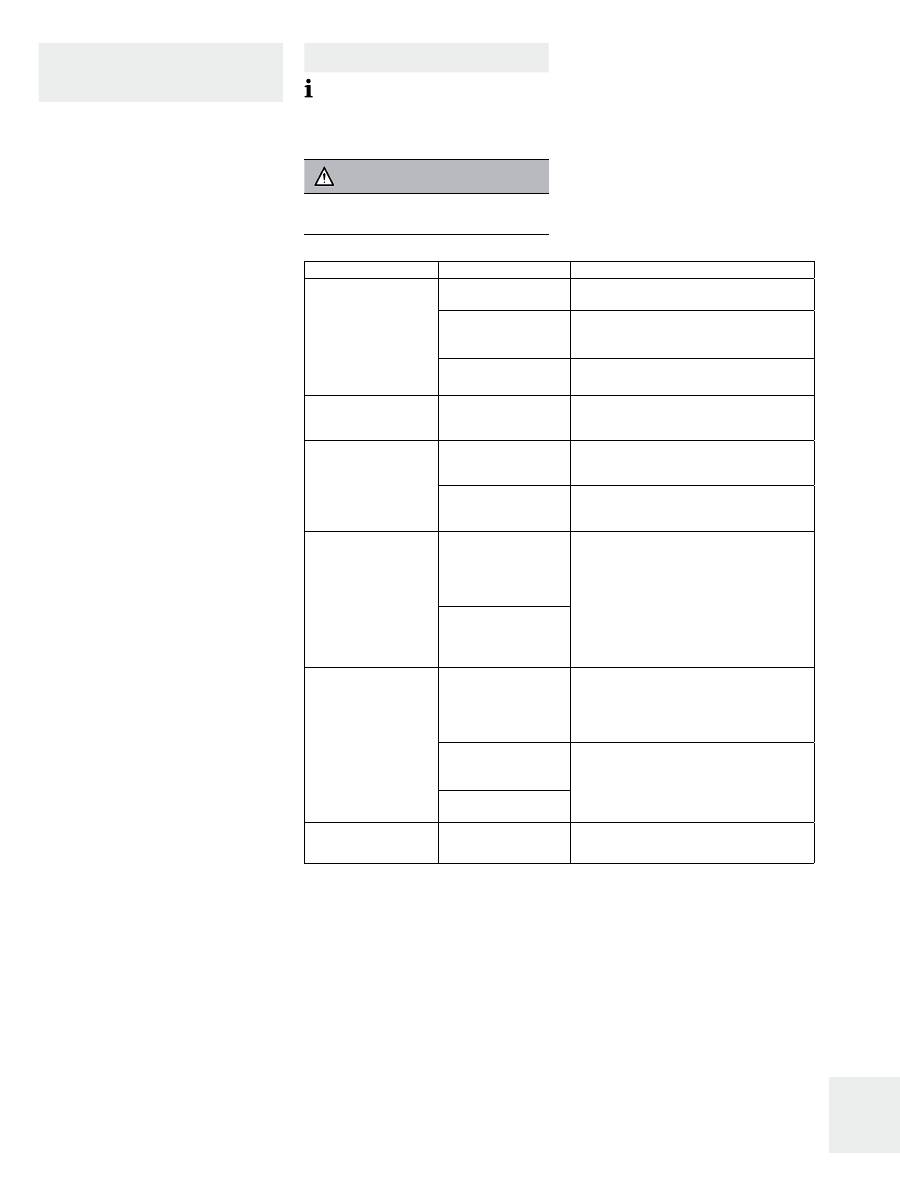
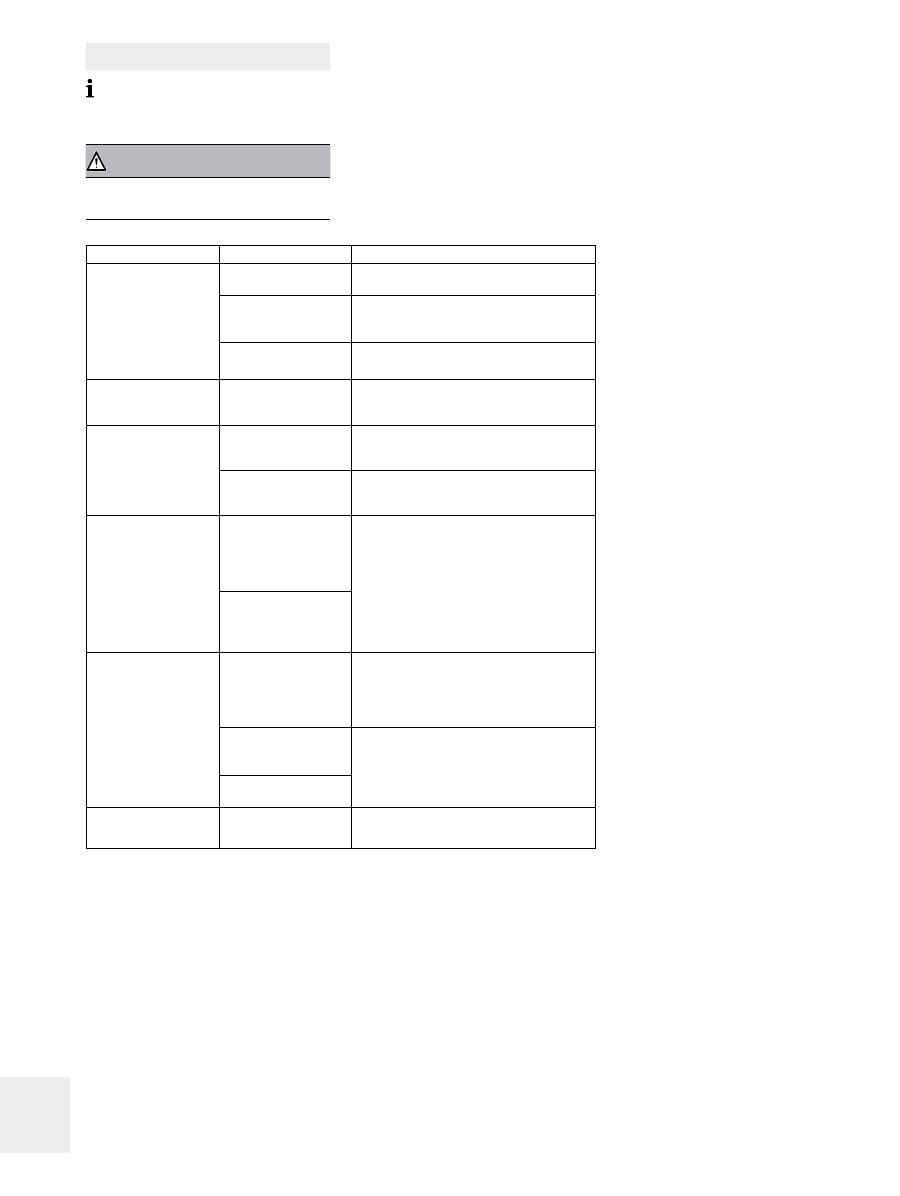
Störung
ursache
Lösung
Das Gerät funktioniert
nicht.
Netzstecker ist nicht
eingesteckt.
▶
Netzstecker einstecken und Gerät einschalten.
Wasserwanne wurde
beim Zusammensetzen
nicht eingesetzt.
▶
Wasserwanne einsetzen (siehe Kapitel „Gerät
zusammensetzen“).
Kein Wasser in der Was-
serwanne.
▶
Wasserwanne füllen (siehe Kapitel „Gerät be-
füllen“).
Streifgeräusche
Wasserwanne nicht
richtig eingesetzt.
▶
Wasserwanne richtig einsetzen (siehe Kapitel
„Gerät zusammensetzen“).
Keine Befeuchtung der
Luft
Kein Wasser in der Was-
serwanne.
▶
Wasserwanne füllen (siehe Kapitel „Gerät be-
füllen“).
Verdunstermatte ist
verkalkt.
▶
Verdunstermatte wechseln (siehe Kapitel „Ver-
dunstermatte wechseln“).
Schwimmerspitze mit
Füllstandsring wird beim
Befüllen nicht sichtbar.
Beim Zusammensetzen
wurde ein Geräteteil
vergessen.
▶
Netzstecker ziehen.
▶
Prüfen, ob das Gerät richtig zusammengesetzt
ist (Bild B).
Gerät ist falsch zusam-
mengesetzt.
Gerät verliert Wasser.
Gerät wurde überfüllt.
▶
Wasser entleeren (siehe Kapitel „Gerät zerle-
gen“).
▶
Gerät trocknen. Dabei ausgetretenes Wasser
aufwischen.
Beim Zusammenset-
zen wurde Geräteteil
vergessen.
▶
Netzstecker ziehen.
▶
Prüfen, ob das Gerät richtig zusammengesetzt
ist (Bild B).
Gerät ist falsch zusam-
mengesetzt.
Gerät verursacht schlech-
ten Geruch.
Verdunstermatte ist
verschmutzt.
▶
Verdunstermatte wechseln (siehe Kapitel „Ver-
dunstermatte wechseln“).
Allgemeine Informationen zur
Luftbefeuchtung
Wussten Sie, dass zu trockene Raumluft
• Schleimhäute austrocknet sowie spröde Lippen
und Augenbrennen verursacht?
• Infektionen und Erkrankungen der Atemwege
begünstigt?
• zu Abgespanntheit, Müdigkeit und Konzentrati-
onsschwäche führt?
• Haustiere und Zimmerpflanzen belastet?
• Staubentwicklung fördert und die elektrosta-
tische Aufladung von Textilien aus Kunststofffa-
sern, Teppichen und Kunststoffböden erhöht?
• Einrichtungsgegenstände aus Holz und speziell
Parkettböden beschädigt?
• Musikinstrumente verstimmt?
Das körperliche Wohlbefinden von Mensch und Tier
hängt von vielen Einflüssen ab. Einer davon ist die
richtig befeuchtete Raumluft. Während der Heizperi-
ode wird die kalte Aussenluft, die durch die Fenster
in die Wohnräume einströmt, erwärmt. Dies hat ein
massives Absinken der relativen Luftfeuchtigkeit
zur Folge. Für Pflanzen und Tiere ein ungünstiges
Klima, Holzgegenstände und Möbel trocknen aus
und die Menschen fühlen sich unwohl und werden
in verstärktem Masse anfällig für Erkältungskrank-
heiten. Angenehm ist das Raumklima in der Regel
dann, wenn die relative Feuchtigkeit zwischen 40
und 60 % beträgt. Luftbefeuchtung ist besonders in
der Winterzeit sinnvoll.
8
About this document
These instructions for use is a component
of the product and describe its safe use.
The instructions for use apply exclusively to the
product described within.
• Read through the instructions thoroughly prior to
putting the unit into operation.
• Save the instructions for use throughout the
lifespan of the product.
• Pass the instructions for use on to each succes-
sive owner or operator of the product and include
any supplements received from the manufac-
turer.
• The manufacturer disclaims all liability for dam-
age resulting from the non-compliance with
these instructions for use.
Intended use
The unit is only intended to humidify the air in liv-
ing areas up to 40 m
2
. In larger rooms, optimum air
moisture (50 % relative air moisture) may not be
able to be reached. The unit may not be used for
other purposes. No foreign objects may be put into
the unit. The unit may only be used for the purposes
described in these instructions for use.
Warranty
Warranty stipulations are determined by our nation-
al representation. Contact the dealer the unit was
purchased from if there is a problem with the unit. It
is absolutely necessary to present proof of purchase
for warranty validation.
CE conformity and applicable guidelines
The unit is CE compliant and adheres to the follow-
ing guidelines:
• 2006/95/EG for electric safety
• 2004/108/EG for electromagnetic compatibility
• 2002/95/EG for the restriction of the use of cer-
tain hazardous substances in electrical and elec-
tronic equipment
• 2002/96/EG concerning waste electrical and
electronic equipment
Warnings and symbols in this document
In this document, warnings are used to prevent inju-
ries and material damage. They are set up follows:
WARNING LEVEL
Cause and result of the danger
▶
Precautions to prevent danger
There are the following warning levels:
Warning level
Description
WARNING
Possible danger.
Non-observance could
result in death or seri-
ous injury.
CAuTION
Dangerous situation.
Non-observance could
result in slight injury.
CAuTION
Critical situation.
Non-observance could
result in material
damage.
In this document, the following symbols are used to
facilitate fast access to information:
Symbol
Description
✔
Condition which must be met before
beginning an action.
▶
Action with one or more step(s)
whose order is not relevant.
1.
2.
Action with several steps whose order
is relevant.
•
Listing of first level
-
Listing of second level
➥
Result of one or more actions
(see...)
Reference to a chapter or a drawing
Important information
Reference to an item number in a
drawing e.g. item number 1 in draw-
ing A
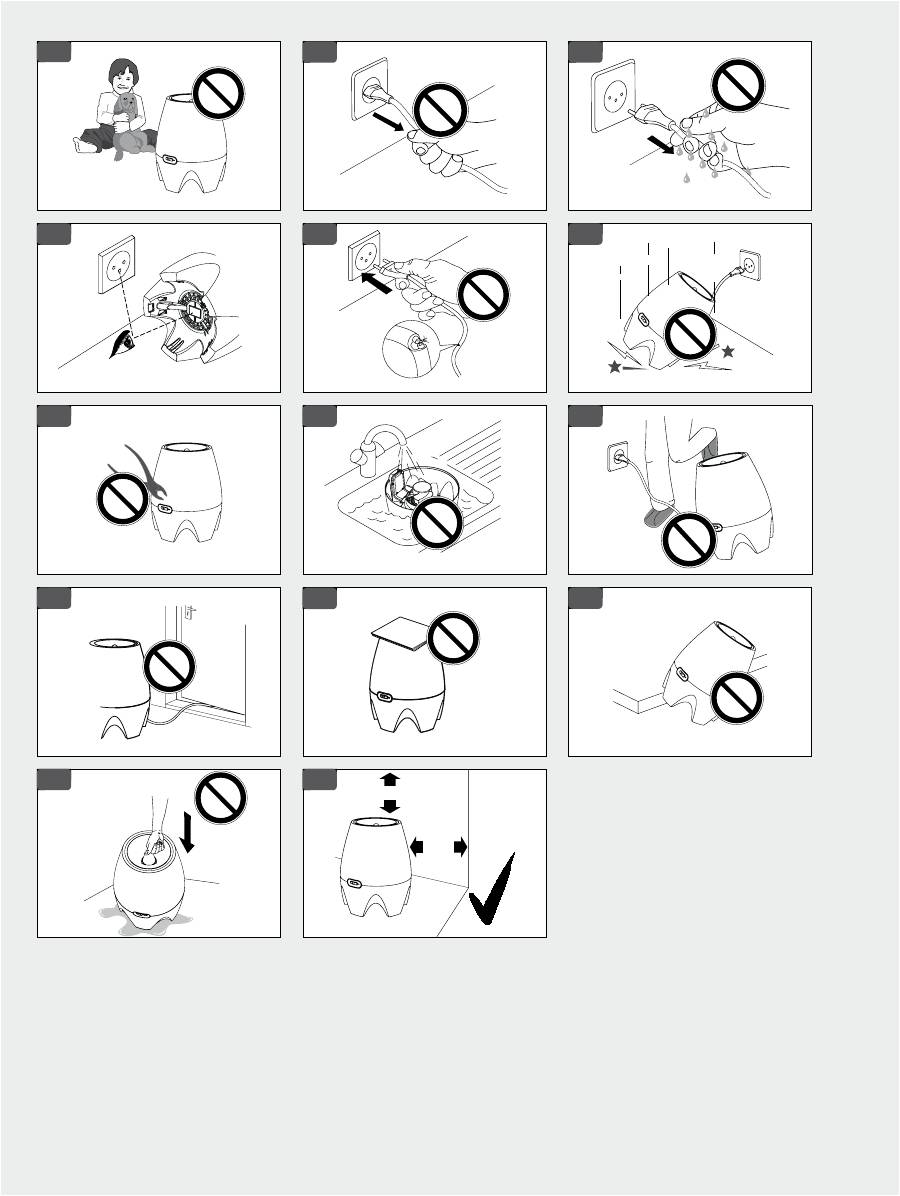
Safety instructions
• Read these instructions for use thoroughly prior
to using the unit and store them in a safe place.
• Those unfamiliar with the instructions for use as
well as children and people under the influence
of medicine, alcohol or drugs may not operate
the unit.
• The unit may only be operated for its intended
use and within the specified technical data. Unin-
tended use can be a danger to health or life.
•
Children cannot recognize the danger in
handling electric appliances. Therefore always
supervise children who are near the unit.
• Do not use the unit in rooms in which there are
flammable goods, gases or vapors.
• Do not alter the unit or put foreign objects into
the unit.
A 1
A 1
When using electricity, electrical shock poses a
danger to life. Observe the following precautions:
• Do not place the unit in the rain.
• Do not use the unit in rooms with relative air
moisture of more than 70 %.
• Unplug the power plug when not in use.
•
Never pull the power plug out of the elec-
trical socket by the cord.
•
Never pull the power plug out of or plug it
into the electrical socket with wet hands.
•
Only plug the unit into an AC supply.
•
Operate the unit only at the voltage ac-
cording to the rating plate on the unit.
• Do
not
operate the unit:
-
if cord or plug are damaged.
- following a malfunction.
-
if it has fallen down or has been other-
wise damaged.
•
Repairs to electric appliances can only
be carried out by specialists. A faulty power cord
may only be repaired/replaced by a specialist.
• Unplug the power plug from the electrical socket
in the following cases:
- each time before emptying the unit,
- before each cleaning,
- before each replacement of the evaporator wick
or the Ionic Silver Stick
®
,
- before installing/uninstalling individual compo-
nents,
- before taking off the upper part,
- before each move of the unit.
•
Never submerge the lower part with the
electrical part and fan in water or other liquids or
rinse it off with water or other liquids.
Observe the following precautions to prevent in-
jury:
•
Place the unit in such a way that you do
not trip over the cord.
• Place the unit in such a way that it cannot be
knocked over.
•
Do not get the cord stuck in the door or
clamp it with other objects.
• Do not cover the cord.
Observe the following precautions to prevent mate-
rial damage:
•
Do not sit on the unit or place any objects
on it.
•
Only place the unit on a flat, dry surface.
• The unit's air inlet and air outlet must be kept
clear.
• Only use clean containers for filling the unit.
• Ensure that the watering can has not been filled
with fertilizer or similar substances.
• Do not fill any additives directly into the water
base.
•
Use water additives (e.g. essential oils,
fragrances) only with the fragrance container.
• Operate the unit only when fully assembled and
completely operational.
A 2
A 3
A 4
B 14
A 5
A 6
A 7
A 8
A 9
A 10
A 11
A 12
B 20
Page Chapter
Instructions for use
English
8
About this document
8
Safety instructions
9
Technical data
9
Description of the unit
9
Functional principle
9
Unpacking the unit
9
Putting the unit into operation
10
Switching the unit on and off
10
Cleaning and servicing the unit
11
Transporting the unit
11
Storing the unit
11
Disposing of the unit
11
Spare parts and accessories
11
Frequently asked questions
11
General information about air
humidification
12
Troubleshooting
9
Operating light
The operating light lights up green as soon as the
unit is filled with water and switched on. If the wa-
ter base is taken off the base, the green LED chang-
es to red and unit operation is interrupted, but the
unit is not currentless. Only when the water base is
returned to the base does the red LED turn green
again and the unit resumes operation. If the water
level falls below the minimum limit, the unit switch-
es off automatically and the green LED turns red.
When water is refilled, the LED turns green again
and the unit resumes operation.
Power rating plate
The following information is displayed on
the power rating plate:
• Product name
• Electrical voltage
• Power consumption
• Protection class
• Production number
• Production date
• The data on the power rating plate in the illustra-
tions is only exemplary. Please check the data on
the power rating plate of your unit.
Functional principle
When filling the unit, the float assembly is lifted with
the water gauge. When the water gauge reaches the
water capacity fill line, the float tip closes the fill-
ing opening of the unit. The evaporator wick soaks
up water. The fan pushes the dry room air through
the moist mat and emits it as sufficiently moistur-
ized air. Through the directed guiding of the airflow,
nearly constant humidification is possible at every
water level. Therefore the unit creates optimum
air moisture, without additional control units being
necessary. The unit switches off automatically if the
water level falls below the minimum limit.
Ionic Silver Stick
®
The Ionic Silver Stick
®
utilizes the antimicro-
bial property of silver and provides a year of opti-
mum water quality maintenance in all AIR-O-SWISS
and BONECO humidifiers. The ISS begins working
as soon as it comes into contact with water - even
if the unit is switched off. The ISS is exclusively for
use in humidifiers.
Lifecycle indicator
The unit is equipped with a lifecycle indica-
tor for the Ionic Silver Stick
®
. Please cross off the
current month on the label and write the current
year on the line provided.
B 14
B 4
B 9
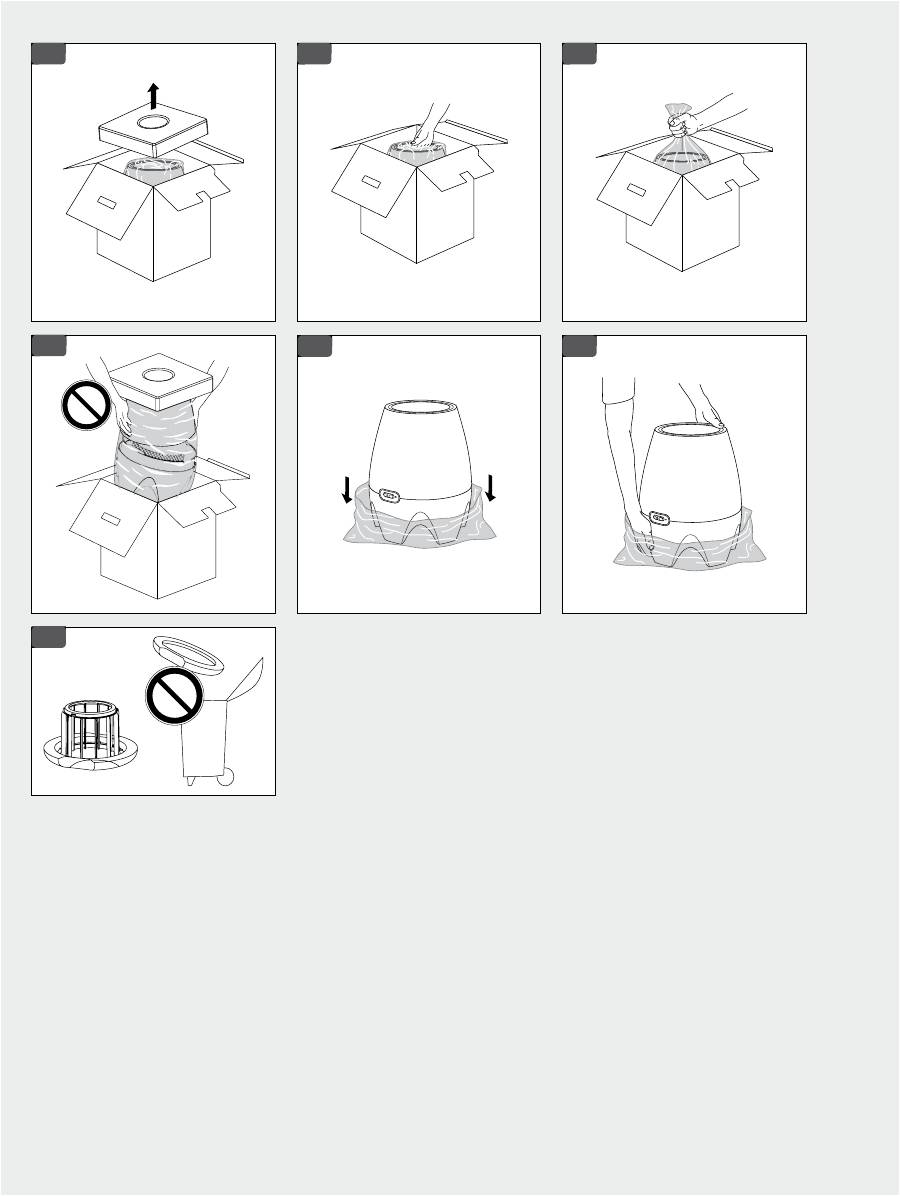
Unpacking the unit
At delivery the unit is completely assembled and
already equipped with an evaporator wick.
The float body (styrofoam) is a component of
the float assembly and does not belong to the
packaging.
CAuTION
Risk of injury by falling parts!
▶
Always handle the unit by the base when un-
packing and lifting.
CAuTION
Damage to the unit due to removal of the float
body (styrofoam)!
▶
Do not remove the float body (styrofoam) when
unpacking the unit.
1. Open the packaging.
2.
Remove the upper part of the styrofoam
packaging.
3.
Reach into the filling opening and grasp
the upper end of the plastic bag securely.
4.
Carefully pull the plastic bag with the unit
out of the packaging. When doing so, grasp the
plastic bag securely and do not let go of the plas-
tic bag when removing.
5.
Place the plastic bag with the unit on the
floor and push the plastic bag down along the
unit.
6.
Hold the unit by the base and lift up out of
the plastic bag.
➥
All packaging components as well as the plastic
bag are removed from the unit.
7.
Check data regarding the power supply
on the power rating plate.
8.
Check that all components of the unit are
included.
Putting the unit into operation
Positioning the unit
CAuTION
Damage to the plastic due to high tempera-
tures!
▶
Do not expose the unit to temperatures > 50 °C.
Observe the following pointers when positioning the
unit:
•
Remember to ensure easy accessibility
and sufficient room for servicing and cleaning
the unit.
• Only operate the unit when it is filled!
1. Place the unit on the floor or on a flat, dry surface
in the room.
2. Fill the unit (see chapter "Filling the unit").
Filling the unit
There are the following possibilities for filling the
unit with water:
• using the filling opening on the upper part or
• directly into the removed water base from a fau-
cet.
C 1
C 2
C 3
C 5
C 6
B 14
B
A 14
Technical data
Value
Electrical voltage
230 V / 50 Hz
Power consumption
20 W
Humidity output
up to 220 g/h
Suitable for rooms
up to 40 m²
Water capacity
max. 3.8 l
min. 0.2 l
Dimensions LxWxH
320 x 320 x 400 mm
Weight (empty)
3.8 kg
Operation noise level
< 25 dB(A)
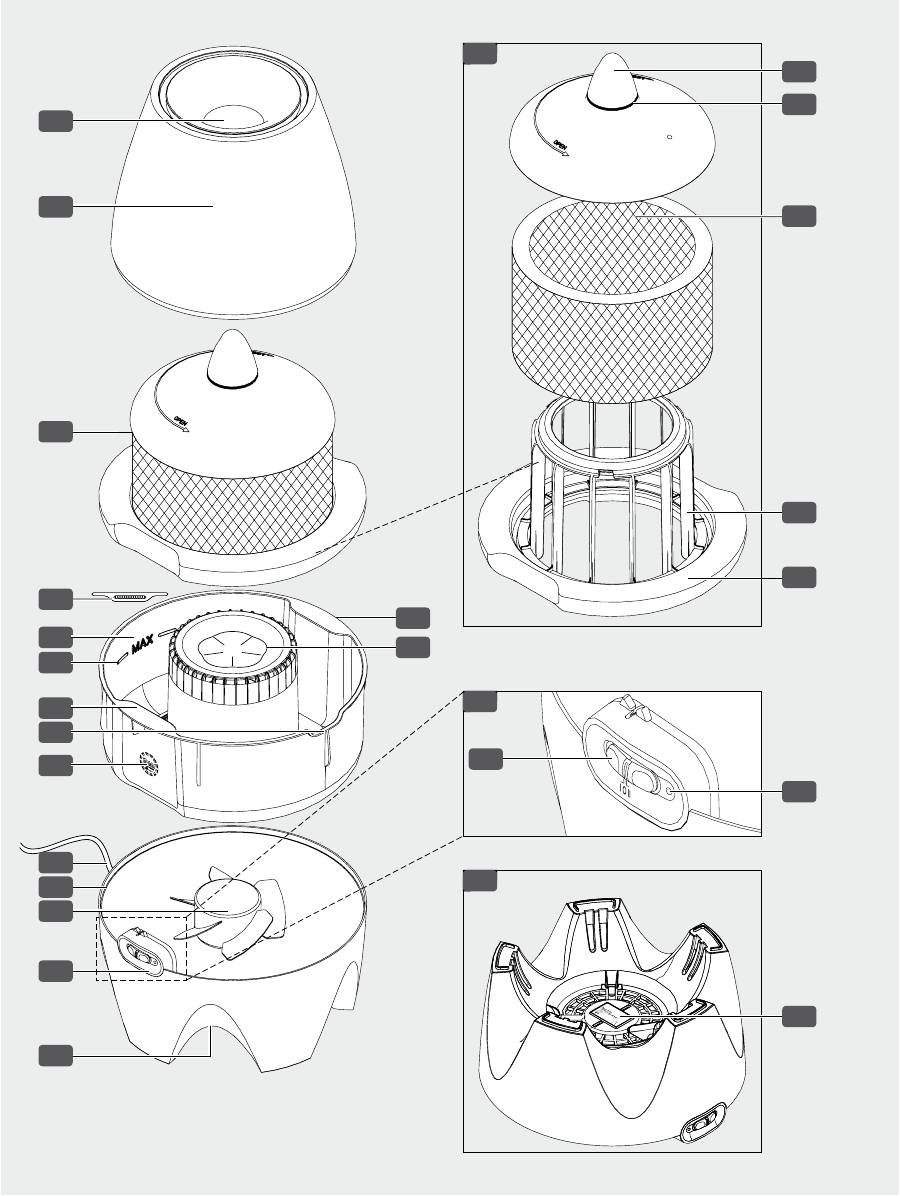
Description of the unit
The unit consists of the following components:
•
Filling opening
•
Top assembly
•
Float assembly (B 16–19)
•
Ionic Silver Stick
®
(ISS)
•
Water base (B 5–7)
•
Water capacity fill line
•
Base handles
•
Spout
•
Lifecycle indicator for the Ionic Silver
Stick
®
(ISS)
•
Power cord/plug
•
Base (B 11–14)
•
Fan
•
Slide switch (B 21–22)
•
Power rating plate (on the underside of
the unit)
The float assembly consists of the following parts:
•
Float tip
•
Water level indicator ring (max. 3.8 l)
•
Evaporator wick A7018
•
Float basket
•
Float body (styrofoam)
•
Fragrance container
The slide switch consists of the following parts:
•
Slide switch
•
Operating light / Empty indicator light
Operating modes
The following operating modes can be set on the
slide switch:
Position
Function
0
The unit is switched off
I
The unit is operating in night mode
(low noise level)
The operating light lights up green
II
The unit is operating in normal mode
(maximum humidity output)
The operating light turns green
B 1
B 2
B 3
B 4
B 5
B 6
B 7
B 8
B 9
B 10
B 11
B 12
B 13
B 14
B 15
B 16
B 17
B 18
B 19
B 20
B 21
B 22
10
✔
There are no foreign objects in the unit.
✔
The unit is assembled properly.
After an extended period of disuse, the unit
should be emptied and cleaned. Before recom-
missioning, ensure that the unit is clean. Other-
wise an unpleasant odor can result.
CAuTION
Damage to and cracks in the plastic caused by
additives in the water!
▶
Do not put any additives (e.g. essential oils or
other fragrances) into the water. Fill essential oils
or other fragrances directly into the fragrance
container.
▶
Ensure that there are no water-soluble additives
(e.g. plant fertilizer) in a container before using
it to fill the unit.
CAuTION
Water damage due to overfilling!
▶
When filling, do not exceed the maximum filling
capacity of 3.8 l, indicated by the filling level
line.
Filling the unit at the filling opening:
1.
Fill the unit with a clean container (e.g. a
jar or a watering can).
2.
Pour fresh, cold water into the filling
opening of the upper part with a clean container.
3.
Stop filling the unit as soon as the water
level indicator ring of the float appears in the fill-
ing opening.
➥
The unit is filled with water and can be switched
on.
Filling the unit at the water base:
✔
((
The unit is switched off and the power
plug is unplugged (see chapter "Switching the
unit on and off").
1.
Lift the upper part from the base.
2.
Lift the water base including the float as-
sembly by the base handles.
3.
Fill fresh, cold water directly into the wa-
ter base.
4.
Only pour water in until the maximum wa-
ter capacity fill line on the inner side of the water
base is reached.
5. Place the filled water base including the float as-
sembly onto the base.
6. Place the upper part on the base.
➥
The unit is filled with water and can be switched
on.
Switching the unit on and off
✔
The unit is filled with water.
1. Plug the power plug into the electrical socket.
2. Set the slide switch to position I or position II
according to your needs (see chapter "Operating
modes").
➥
The unit is switched on.
B
D 1
D 2
D 3
E 1
E 2
E 3
E 4
E 4
1. Set the slide switch to position 0.
WARNING
Danger to life through electrical shock!
▶
Do not unplug the unit from the electrical socket
with wet hands.
2.
Unplug the power plug.
➥
The unit is switched off and currentless.
Cleaning and servicing the unit
With increasing operating time, the air through-
put and evaporator performance of the evaporator
wick decrease. Therefore, regular maintenance and
cleaning of the unit is a requirement for smooth and
trouble-free operation.
CAuTION
Damage to the plastic due to unsuitable clean-
ing agents!
▶
Do not use acidic cleaning agents.
▶
Wipe the unit with a damp cloth.
Cleaning and servicing intervals
Recommended cleaning and servicing intervals
depend on air and water quality as well as actual
operating time.
Interval
Activity
once a day
Check water level,
if necessary, refill water (see
chapter "Filling the unit")
1 week or
more without
operation
Empty and clean the unit (see
chapter "Taking apart and
emptying the unit")
every 2 weeks
Clean water base (see chapter
"Cleaning the water base")
every 10–12
weeks (or as
needed)
Replace the evaporator wick
(see chapter "Replacing the
evaporator wick")
1–2 times a
year
Clean the fan (see chapter
"Cleaning the fan")
once a year
Replace Ionic Silver Stick
®
(see chapter "Replacing the
Ionic Silver Stick
®
")
Taking apart and emptying the unit
The unit can easily be taken apart for cleaning.
WARNING
Danger to life through electrical shock!
▶
Do not unplug the unit from the electrical socket
with wet hands.
✔
The unit is switched off and the power plug is
unplugged
1.
Lift the upper part from the base.
2.
Remove the water base including float as-
sembly using the provided base handles.
E 1
F 1
F 3
F 4
3.
Empty the residual water from the water
base using the spout.
4.
Remove the float assembly from the emp-
ty water base.
WARNING
Danger to life through electrical shock!
▶
Do not empty water over the electronic part.
5. If water is in the base: Empty and dry the base.
➥
The unit is taken apart and emptied from water.
Cleaning the water base
✔
Unit is taken apart and emptied from water
WARNING
Danger to life through electrical shock!
▶
Unplug the power plug prior to cleaning.
▶
Never submerge the base with the electronic part
and the fan in water.
1.
Rinse out the water base with lukewarm
water.
2.
For more thorough cleaning, clean the
water base with a commercial dish brush.
3. To decalcify the water base, use the recommend-
ed decalcification agent (see chapter "Spare
parts and accessories").
4. Dry the parts after cleaning.
5. Insert the float assembly into the empty water
base.
6. Put the unit together (see chapter "Putting the
unit together").
Cleaning the fan
✔
Unit is taken apart and emptied from water.
1.
Wipe off the fan with a slightly damp
cloth or cleaning rag.
2. Dry the parts after cleaning.
3. Put the unit together (see chapter "Putting the
unit together").
Replacing the evaporator wick
The evaporator wick should be replaced in the case
of heavy pollution, calcification, unpleasant odor,
reduced air throughput, etc. Evaporator wicks are
available from the specialty retailer where you pur-
chased the unit.
✔
Unit is taken apart and emptied from water.
Only use the manufacturer's original evaporator
wicks (see chapter "Spare parts and accesso-
ries").
CAuTION
Damage to the damp evaporator wick due to
rinsing or wringing!
▶
Do not rinse or wring out the evaporator wick.
1.
To open the float assembly, turn the float
tip counter-clockwise (OPEN arrow) and pull up.
2.
Pull the used evaporator wick up and out
of the float basket and discard it.
F 5
F 6
G 1
G 2
G 3
H 1
H 2
11
CAuTION
Damage to the unit due to removal of the float
body (styrofoam)!
▶
Do not remove the float body (styrofoam) when
unpacking the unit.
3.
Push the new evaporator wick onto the
float basket.
4.
To close the float assembly, place the
float tip on the float basket and the evapo-
rator wick, push down and turn clockwise
(CLOSE arrow).
5. To check, gently pull the float tip upwards. In do-
ing so, it should not lift off the float basket.
6. If necessary, turn the float tip again and re-
check.
7. Insert the float assembly into the empty water
base.
8. Put the unit together (see chapter "Putting the
unit together").
Replacing the Ionic Silver Stick
®
✔
Unit is taken apart and emptied from water.
1. Remove the Ionic Silver Stick
®
from the bottom
of the water base and discard it.
2. Place the new Ionic Silver Stick
®
in the holder at
the bottom of the water base.
3. Insert the float assembly into the empty water
base.
4. Put the unit together (see chapter "Putting the
unit together").
Putting the unit together
✔
Unit is taken apart and emptied from water.
1. Insert the float assembly into the water base.
2.
Place the water base including the float
assembly on the base handles into the base.
3. Place the upper part onto the base.
4.
Ensure that the unit is put together cor-
rectly.
5. Ensure that there are no foreign objects in the
unit.
➥
The unit is put together.
Transporting the unit
CAuTION
Risk of injury by falling parts!
▶
Always handle the unit by the base when un-
packing and lifting.
CAuTION
Water damage due to water spilling over!
▶
Empty the unit before transporting.
1. Empty the unit (see chapter "Taking apart and
emptying the unit").
2. Dry the unit.
3. Pick the unit up by the base and carry it to the
desired location.
H 3
H 4
B 5
B
Storing the unit
1. Clean the unit (see chapter "Cleaning and servic-
ing the unit").
2. Dry the unit.
3. Pack the unit, preferably in the original packag-
ing.
4. Store the unit in a dry, cool place.
Disposing of the unit
Pass the outdated unit onto a specialized retailer
for professional disposal. Observe the applicable
national specifications when disposing of the unit.
You can find out about further disposal possibilities
from your municipality.
Spare parts and accessories
You can purchase spare parts and accessories from
specialized retailers and replace them on the unit
yourself. Only original parts from the manufacturer
can be used. Repairs can only be carried out by pro-
fessionals. This also applies to a faulty power cord.
Accessories
Designation
Evaporator wick
A7018
Ionic Silver Stick
®
A7017
Decalcification agent
A7417
Frequently asked questions
Q. Why is the air moisture too low in my room?
A. How often do you use the unit? If the unit is only
in operation at night, the air moisture decreases
during the day as moisture is not being added to
the air constantly.
Wood, leather, carpeting, curtains and other
materials absorb a lot of moisture, resulting in
a decrease in air moisture.
If the window is open, moisture can escape
from the room.
A common reason is that the unit is placed next
to a heater in order to disperse the moisture
quickly throughout the room with the hot air.
However, this does not work. The escaping hot
air absorbs the majority of the moisture before
reaching the room air at all.
Q. Should I leave my door open or closed while
the unit is in operation?
A. With an open door, the moisture escapes the
room and disperses itself in other areas of the
house. If you want to increase the air moisture
in a certain room, you should make sure that
the door to that room remains closed while the
unit is in operation.
Q. How high should the air moisture be in my
room?
A. Air moisture of 40–60 % is recommended.
Q. What are the consequences of too low or too
high air moisture?
A. Dry air can lead to dry skin, electrostatic charg-
es, out of tune musical instruments, increased
dust development, damage to wooden items
(drying out and cracking), illness, disease and
drying out the nasal mucous membranes. Too
high air moisture can result in mold develop-
ment and wall paper falling off.
Q. Why do I need an Evaporator if I could also
simply open the window?
A. The air moisture in the outside air is not high
enough to moisturize a room.
Q. Where should I place my Evaporator?
A. The unit should be placed in the middle of the
room and not at a wall, a window, a door or
a thermal bridge so that the air can circulate
freely around the unit.
Q. Can I clean the water base in the dishwash-
er?
A. No, you cannot clean the water base in the
dishwasher as it would otherwise melt.
General information about air
humidification
Did you know that air that is too dry
• dries out mucous membranes and additionally
causes chapped lips and stinging eyes?
• promotes infections and sicknesses of the respi-
ratory passages?
• leads to a lack of energy, exhaustion and concen-
tration weakness?
• burdens pets and room plants?
• encourages dust development and the electro-
static charge of synthetic textiles, carpets and
synthetic flooring?
• damages wooden fixtures, especially hardwood
floors?
• puts musical instruments out of tune?
The physical comfort of man and animal is depen-
dent on many influences. One of those is correctly
humidified air. During the heating period, the cold
outside area which streams into living spaces
through the windows is warmed. This results in a
plummet in the relative air moisture. An adverse
climate for plants and animals, wooden objects and
furniture dry out and people feel uncomfortable and
are susceptible to colds in higher numbers. As a
rule, room climate is comfortable when the relative
moisture is between 40 % and 60 %. Air humidifica-
tion is especially useful in the winter.
12
Troubleshooting
Repairs to electric appliances can only be car-
ried out by specialists. Through improper repairs,
considerable danger for the operator can result
and warranty claims lapse.
WARNING
Danger to life through electrical shock!
▶
Do not carry out any repairs on electrical parts.
Fault
Cause
Solution
The unit is not working.
Power plug is not plugged
in.
▶
Plug in the power plug and switch the unit on.
Water base was not
inserted when putting the
unit together.
▶
Insert the water base (see chapter "Putting the
unit together").
No water in the water
base.
▶
Fill the water base (see chapter „Filling the
unit“).
Grinding noises
Water base not inserted
correctly.
▶
Insert the water base correctly (see chapter
"Putting the unit together").
No air humidification
No water in the water
base.
▶
Fill the water base (see chapter "Filling the
unit").
Calcified evaporator wick.
▶
Replace the evaporator wick (see chapter "Re-
placing the evaporator wick").
Water level indicator ring
with fill level ring not vis-
ible when filling.
Unit component forgot-
ten when putting unit
together.
▶
Unplug the power plug.
▶
Check if the unit is put together correctly
(drawing B).
Unit put together incor-
rectly.
Unit is losing water.
Unit was overfilled.
▶
Empty the water (see chapter "Taking apart the
unit").
▶
Dry the unit. In doing so, wipe up water that
has leaked.
A unit component was
forgotten when putting it
together.
▶
Unplug the power plug.
▶
Check if the unit is put together correctly
(drawing B).
Unit put together incor-
rectly.
Unit emits a bad odor.
Evaporator wick is dirty.
▶
Replace the evaporator wick (see chapter "Re-
placing the evaporator wick").

13
A propos de ce document
Ce mode d'emploi fait partie du produit et décrit sa
manipulation sûre. Le mode d'emploi est exclusive-
ment valable pour le produit décrit ici.
• Lire entièrement le mode d'emploi avant la mise
en service.
• Conserver le mode d'emploi pendant la durée de
vie du produit.
• Transmettre le mode d'emploi à tout propriétaire
ou utilisateur suivant du produit et y joindre les
compléments fournis par le fabricant.
• Le fabricant décline toute responsabilité pour
les dommages découlant du non-respect de ce
mode d'emploi.
utilisation conforme
L'appareil sert exclusivement à humidifier l'air dans
des locaux d'habitation jusqu'à 40 m
2
. Dans les lo-
caux de grand volume, l'humidité de l'air optimale
(50 % d'humidité de l'air relative) peut éventuelle-
ment ne pas être atteinte. L'appareil ne peut pas
être employé dans d'autres buts. On ne peut pas
insérer d'objets étrangers dans l'appareil. L'appa-
reil doit uniquement être utilisé pour les buts décrits
dans ce mode d'emploi.
Garantie
Les conditions de garantie sont fixées par notre re-
présentation nationale. Veuillez vous adresser à vo-
tre revendeur en cas de manquement de l'appareil.
Pour une prestation de garantie, la présentation de
la preuve d'achat est absolument nécessaire.
Conformité CE et directives en vigueur
L'appareil est conforme aux stipulations CE et aux
directives suivantes:
• 2006/95/CE pour la sécurité électrique
• 2004/108/CE pour la compatibilité électroma-
gnétique
• 2002/95/CE pour la limitation de l'utilisation de
certaines substances dangereuses dans les ap-
pareils électriques et électroniques
• 2002/96/CE pour les appareils électriques et
électroniques mis au rebut
Indications et mises en évidence dans ce
document
Dans ce document, on utilise des indications d'aver-
tissement pour la prévention des blessures ou dom-
mages matériels. Ils sont structurés comme suit:
NIVEAu D'AVERTISSEMENT
Cause et conséquence du danger
▶
Mesure à prendre pour éviter le danger
Les niveaux d'avertissement suivants existent:
Niveau d'avertissement
Description
AVERTISSEMENT
Danger éventuel.
En cas de non-
respect, danger
de mort ou de
blessures graves.
ATTENTION
Situation dange-
reuse.
En cas de non-
respect, risque
de blessures
légères.
ATTENTION
Situation critique.
En cas de non-
respect, risque
de dommages
matériels.
Dans ce document, on utilise les symboles suivants
afin de permettre un accès rapide aux informa-
tions:
Symbole
Description
✔
Condition qui doit être remplie avant
le début d'une action.
▶
Action en une étape ou en plusieurs
étapes dont l'ordre est sans impor-
tance.
1.
2.
Action en plusieurs étapes dont
l'ordre est important.
•
Enumération de premier niveau
-
Enumération de deuxième niveau
➥
Résultat d'une ou plusieurs actions
(voir...)
Renvoi à un chapitre ou une illus-
tration
Informations importantes
Renvoi à un numéro de référence
dans l'illustration, p. ex. numéro de
référence 1 dans le graphique A
Consignes de sécurité
• Avant d'utiliser l'appareil, lire ce mode d'emploi
et le conserver en un endroit sûr.
• Les personnes non familières avec le mode d'em-
ploi, ainsi que les enfants et les personnes sous
l'influence de médicaments, de l'alcool ou de
drogues, ne peuvent pas manipuler l'appareil.
A 1
• Utiliser l'appareil uniquement conformément à
l'utilisation conforme et dans le cadre des ca-
ractéristiques techniques spécifiées. Une utilisa-
tion non conforme à la destination peut mettre la
santé et la vie en danger.
•
Les enfants ne peuvent pas reconnaître
les dangers de la manipulation d'appareils élec-
triques. Pour cette raison, toujours surveiller les
enfants lorsqu'ils se trouvent à proximité de l'ap-
pareil.
• Ne pas exploiter l'appareil dans des locaux dans
lesquels se trouvent des marchandises, gaz ou
vapeurs inflammables.
• Ne pas modifier l'appareil et ne pas insérer de
corps étrangers dans l'appareil.
Lors de la manipulation de l'électricité, il y a danger
de mort par électrocution. Tenir compte des indica-
tions suivantes afin d'éviter ces dangers:
• Ne pas exposer l'appareil à la pluie.
• Ne pas utiliser l'appareil dans des locaux où l'hu-
midité relative de l'air est > 70 %.
• En cas de non-utilisation, tirer la fiche de la
prise.
•
Ne jamais tirer la fiche de la prise à l'aide
du câble.
•
Ne jamais tirer la fiche de la prise ni la
brancher dans la prise avec des mains humides.
•
Raccorder l'appareil uniquement au cou-
rant alternatif.
•
Exploiter l'appareil uniquement avec une
tension conforme à la plaque signalétique de
l'appareil.
• Ne pas
mettre l'appareil en service:
-
si le câble ou la fiche sont endomma-
gés.
- après un dysfonctionnement.
-
s'il est tombé par terre ou a été autre-
ment endommagé.
•
Les travaux de réparation d'appareils
électriques peuvent uniquement être effectués
par des spécialistes. Un cordon d'alimentation
défectueux peut uniquement être réparé/rem-
placé par un spécialiste.
• Tirer la fiche de la prise dans les cas suivants:
- avant chaque vidange de l'appareil,
- avant chaque nettoyage,
- avant chaque remplacement de la natte d'éva-
poration ou des Ionic Silver Sticks
®
,
- avant tout montage/démontage de composants
individuels,
- avant toute dépose de la partie supérieure,
- avant tout changement d'emplacement.
•
Ne jamais plonger la partie inférieure
avec les composants électriques et le ventilateur
dans l'eau ni dans d'autres liquides, ni les rincer
avec de l'eau ou d'autres liquides.
Tenir compte des indications suivantes afin d'éviter
des blessures:
•
Placer l'appareil de façon à ne pas trébu-
cher sur le câble.
• Placer l'appareil de façon à ce qu'il ne puisse pas
être renversé.
•
Ne pas coincer le câble dans une porte ni
dans d'autres objets.
• Ne pas recouvrir le câble.
Tenir compte des indications suivantes afin d'éviter
des dommages matériels:
•
Ne pas se placer sur l'appareil et ne pas y
déposer de petits objets.
A 1
A 2
A 3
A 4
B 14
A 5
A 6
A 7
A 8
A 9
A 10
A 11
Mode d'emploi
Français
Page Chapitre
13
A propos de ce document
13
Consignes de sécurité
14
Caractéristiques techniques
14
Description de l'appareil
14
Principe de fonctionnement
14
Déballer l'appareil
15
Mettre l'appareil en service
15
Mettre l'appareil en service/hors
service
15
Nettoyer et entretenir l'appareil
16
Transporter l'appareil
16
Stocker l'appareil
16
Mise au rebut de l'appareil
16
Pièces de rechange et
accessoires
16
Questions fréquentes
17
Informations générales sur
l'humidification d'air
17
Dépannage
14
L'interrupteur coulissant est constitué des éléments
suivants:
•
Interrupteur coulissant
•
Affichage de fonctionnement / Affichage
de bas niveau
Modes de fonctionnement
L'interrupteur coulissant permet de régler les mo-
des de fonctionnement suivants:
Position
Fonction
0
L'appareil est hors service
I
L'appareil fonctionne en fonctionne-
ment nocturne (silencieux)
L’affichage de fonctionnement est
allumé en vert
II
L'appareil fonctionne en fonctionne-
ment normal (puissance d'humidifi-
cation maximale)
L'affichage de fonctionnement est
allumé en vert
Affichage de fonctionnement
L’affichage de fonctionnement est allumé en vert
dès que l’appareil est rempli d’eau et enclenché.
Lorsqu’on soulève le réservoir d’eau de la partie in-
férieure, la LED verte passe au rouge et le fonction-
nement de l’appareil est interrompu, l’appareil n’est
cependant pas hors tension. Ce n’est que lorsqu’on
replace le réservoir d’eau sur la partie inférieure
que la LED rouge redevient verte et que l’appareil
se remet en service. Si le niveau d’eau descend
en dessous du niveau d’eau minimum, l’appareil
se met automatiquement hors service et la LED
verte devient rouge. Lorsqu’on ajoute de l’eau, la
LED rouge repasse au vert et l’appareil se remet en
fonctionnement.
Plaque signalétique
La plaque signalétique comporte les infor-
mations suivantes:
• Nom du produit
• Tension de réseau
• Puissance absorbée
• Classe de protection
• Numéro de production
• Date de production
• Marque de conformité
Les indications sur la plaque signalétique dans
les illustrations sont uniquement données à titre
d'exemple. Veuillez contrôler les indications sur
la plaque signalétique de votre appareil.
Principe de fonctionnement
Lors du remplissage de l’appareil, l’ensemble du
flotteur est soulevé par le niveau d’eau. Lorsque
le niveau d'eau atteint la limite de remplissage, la
pointe du flotteur ferme l'ouverture de remplissage
de l'appareil. La natte d'évaporation se sature en
eau. Le ventilateur presse l'air ambiant sec à tra-
vers la natte humide et le restitue sous la forme
d'air humidifié. Le guidage ciblé du flux d'air per-
met une humidification pratiquement constante
quel que soit le niveau d'eau. L'appareil génère dès
lors une humidité de l'air optimale sans que des
appareils de commande supplémentaires ne soient
B 21
B 22
B 14
nécessaires. Lorsque le niveau d’eau descend en
dessous du niveau d’eau minimum, l’appareil se
met automatiquement hors service.
Ionic Silver Stick
®
L’Ionic Silver Stick
®
utilise l’action antimi-
crobienne de l’argent et assure pendant un an une
épuration optimale de l’eau dans tous les humidi-
ficateurs AIR-O-SIWSS et BONECO. L’ISS agit dès
qu’il entre en contact avec l’eau - même lorsque
l’appareil est désactivé. L’ISS est exclusivement
destiné à l’utilisation dans des humidificateurs.
Marque de rappel
L'appareil est équipé en standard d'une
marque de rappel pour le remplacement de l'Ionic
Silver Stick
®
. Afin que vous sachiez encore plus tard
quand vous avez mis l'Ionic Silver Stick
®
en service,
cochez sur la marque le mois en cours et écrivez
l'année sur la ligne prévue à cet effet.
Déballer l'appareil
L'appareil est livré complètement assemblé et
déjà équipé d'une natte d'évaporation.
Le corps de flotteur fait partie de l'ensemble de
flotteur et ne fait pas partie de l'emballage.
ATTENTION
Danger de blessure par chute de pièces!
▶
Toujours saisir l'appareil par la partie inférieure
pour le déballer et le soulever.
ATTENTION
Dommage à l'appareil si on enlève le corps de
flotteur!
▶
Ne pas enlever le corps de flotteur lors du débal-
lage de l'appareil.
1.
Enlever la partie supérieure de l'embal-
lage en polystyrène.
2.
Introduire la main dans l'ouverture de
remplissage de l'appareil et saisir fermement
l'extrémité supérieure du sac en plastique.
3.
Sortir avec précaution de l'emballage le
sac en plastique avec l'appareil. Ce faisant, saisir
fermement le sac en plastique et ne pas le lâcher
en le sortant de l'emballage.
4.
Déposer sur le sol le sac en plastique
avec l'appareil et repousser le sac en plastique
vers le bas autour de l'appareil.
5.
Saisir l'appareil à la partie inférieure et le
soulever hors du sac en plastique.
➥
Tous les éléments d'emballage ainsi que le sac
en plastique ont été enlevés de l'appareil.
7.
Vérifier les indications de raccordement
électrique sur la plaque signalétique.
8.
Vérifier si tous les éléments de l'appa-
reil sont présents.
B 4
B 9
C 1
C 2
C 3
C 5
C 6
B 14
B
•
Installer l'appareil uniquement sur une
surface plane et sèche.
• Absolument maintenir libres l'entrée d'air et la
sortie de l'air de l'appareil.
• Utiliser exclusivement des récipients propres
pour le remplissage de l'appareil.
• S'assurer que l'arrosoir ne contient pas d'engrais
ni de substances similaires.
• Ne pas verser d’additifs directement dans le ré-
servoir d’eau.
•
Utiliser des additifs pour l’eau (p. ex.
huiles essentielles, substances odorantes) uni-
quement avec le récipient pour substance odo-
rante.
• Mettre l'appareil en service uniquement lorsqu'il
est complètement assemblé et en état impecca-
ble.
Caractéristiques techniques
Valeur
Tension de réseau
230 V / 50 Hz
Puissance absorbée
20 W
Capacité d'humidi-
fication
jusqu'à 220 g/h
Convient pour des
locaux de taille
jusqu'à 40 m²
Capacité
max. 3,8 l
min. 0,2 l
Dimensions LxlxH
320 x 320 x 400 mm
Poids à vide
3,8 kg
Niveau sonore de
fonctionnement
< 25 dB(A)
Description de l'appareil
L'appareil est constitué des éléments suivants:
•
Ouverture de remplissage
•
Partie supérieure avec ouverture de
remplissage
•
Ensemble de flotteur (B 16–19)
•
Ionic Silver Stick
®
(ISS)
•
Réservoir d'eau (B 5–7)
•
Limite de remplissage
•
Poignées du réservoir
•
Système verseur
•
Marque de rappel pour Ionic Silver Stick
®
(ISS)
•
Câble/fiche secteur
•
Partie inférieure (B 11–14)
•
Ventilateur
•
Interrupteur coulissant (B 21–22)
•
Plaque signalétique (à la face inférieure
de l'appareil)
L'ensemble de flotteur est constitué des éléments
suivants:
•
Pointe de flotteur
•
Anneau de remplissage (maximum 3,8 l)
•
Natte d'évaporation A7018
•
Panier de flotteur
•
Corps de flotteur
•
Récipient pour substance odorante
A 12
B 20
B 1
B 2
B 3
B 4
B 5
B 6
B 7
B 8
B 9
B 10
B 11
B 12
B 13
B 14
B 15
B 16
B 17
B 18
B 19
B 20
