Asus P5WDG2 WS Professional – page 2
Manual for Asus P5WDG2 WS Professional
Table of contents
- Index 1. English .................................................................................1
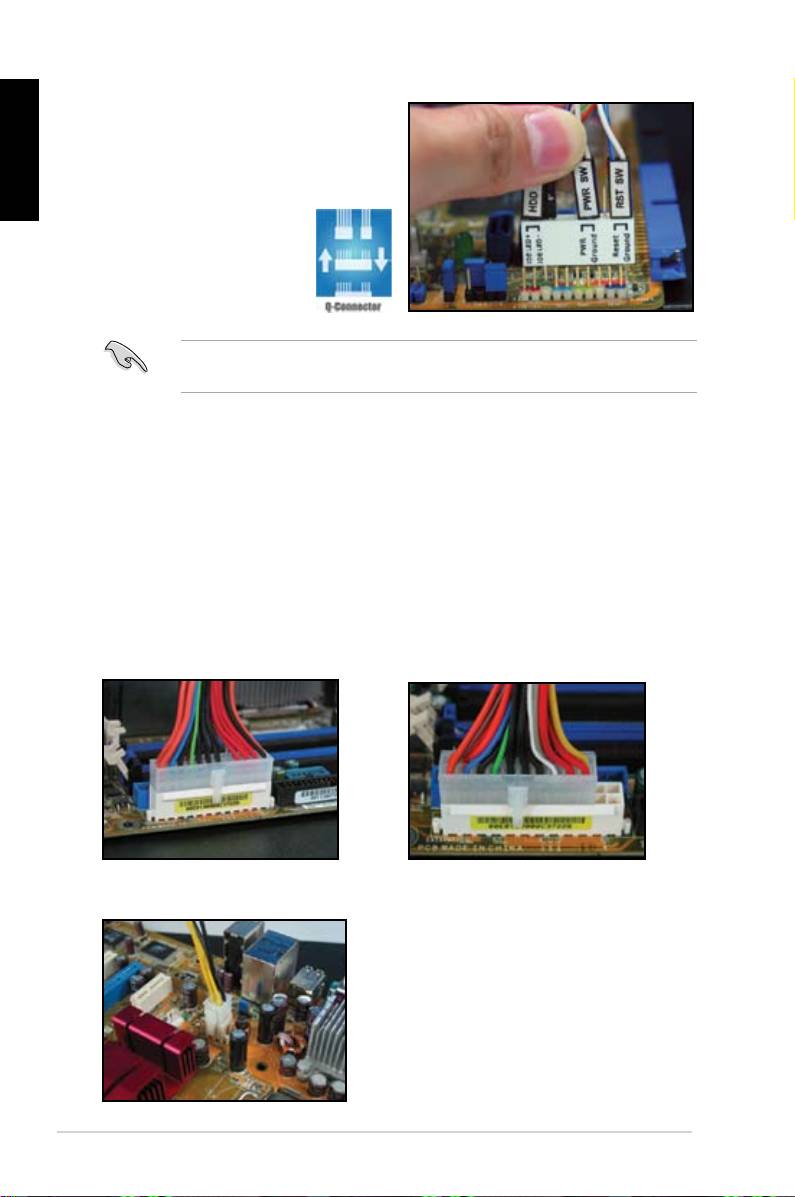
ASUS Q-Connector
English
ASUSQ-Connector’sonestepinstallation
savesyourtimefromstrugglingwiththe
messyfrontpanelcables.Refertothe
user guide for details.
TheQ-connectorisavailabletoselectedmodels.Refertotheuserguidefor
details.
1.9 Connecting the ATX power
TheATXpowerconnectorscantinonlyoneorientation.Usethesidecliptohook
theconnectorstothemotherboard.DONOTforcethemalepowerconnectorsinto
thefemalecounterpartsonthemotherboard.Usuallytherewillbetwoconnectors
on the motherboard, 24‑pin and 4‑pin power connectors. Some older power
supplyunitmayonlyhas20-pinpowerconnectorwhichalsotsthe24-pinpower
connector on the motherboard.
20-pin power connector
24-pin power connector
(on the 24-pin female counterpart)
4-pin power connector
20
Chapter1: QuickStart

• DONOTattachtheexternalACpowerwhenconnectingthepower
connectors to the motherboard.
• Makesurethepowerconnectorsarermlysecuredtothemotherboard.
English
• Ifyourpowersupplysupports20-pin+4-pin,youareabletocombinethese
two connectors and install to the 24‑pin connectors on the motherboard.
Power connectors
20+4 (24) pin ATX connector
4-pin ATX connector
peripheral power connector (left)
oppy power connector (right)
ASUS Motherboard installation guide
21
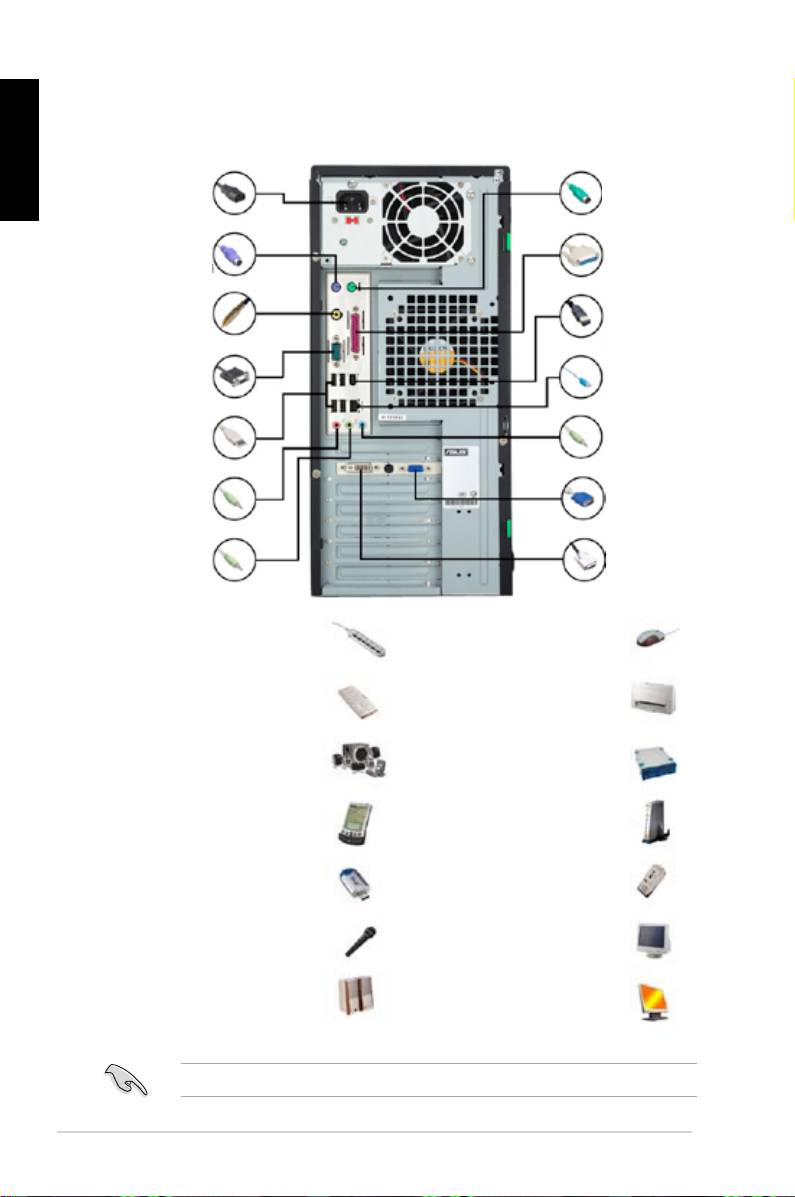
1.10 Peripheral devices and accessories
English
Refertothegurebelowtoconnectingtheperipheraldevicesandaccessories.
1. AC power plug
8. PS/2
mouse port
2. PS/2 keyboard
9. Parallel port
port
3. S/PDIF out port
10. IEEE1394 port
4. Serial port
11. LAN (RJ45) port
5. USB port
12. Line in port
13. Video graphics
6. Microphone port
adapter port
7. Line out port 14. DVI port
1. ACPowerplug+power
8. PS/2mouseport+
extension cord
mouse
2. PS/2keyboardport+
9. Parallelport+printer
keyboard
3. S/PDIFoutport+digital
10. IEEE1394port+external
5.1speakersystem
hard disk drive
4. Serialport+PDAdock
11. LAN(RJ45)port+modem
5. USBport+USBdevices
12. Lineinport+recorder
6. Microphoneport+
13. VGAport+CRTmonitor
microphone
7. Lineoutport+speaker
14. DVIport+LCDmonitor
Therearpanelconnectorsvarywithmodels.Refertotheuserguidefordetails.
22
Chapter1: QuickStart

1.11 Startingupforthersttime
Thesystemthenrunsthepower-onselftestsorPOST.Whilethetestsarerunning,
the BIOS beeps (see BIOS beep codes table below)
English
BIOS Beep Description
Onecontinuousbeepfollowedbythree
NoVGAdetected
short beeps
Onecontinuousbeepfollowedbytwo
Nomemorydetected
short beeps then a pause (repeated)
Onecontinuousbeepfollowedbyfour
Hardwarecomponentfailure
short beeps
(AMI BIOS)
Four short beeps Hardwarecomponentfailure
(AWARDBIOS)
Troubleshooting
Trouble Action
• Can't turn on the computer
Makesurethepowercordisconnectedcorrectly.
•PowerLEDisnotlit.
•Powersupplyfanisnot
working.
The computer is on but the
•MakesurethemonitorpowerisonandtheVGAcableis
monitor is black.
connectedcorrectly.
•Adjustthemonitorbrightnessandcontrast.
• Shut down the computer and remove the power cord.
CheckwhethertheVGAcardisinstalledrmly.
Nomemorydetected •Makesurethememorymoduleiscorrect.
•MakesuretheDIMMSarermlyseatedontheDIMM
socket.
•Makesurethememorymoduleisfromthequaliedvedor
list.RefertotheuserguidefortheQVL.
FloppyError
•ChecktheBIOScongurationaboutoppydiskdrive.
(Theindicatorisalwayslitor
•Makesurethecablesfortheoppydiskdriveisplugged
a warning message pops on
correctly.
the screen.)
Hard/opticaldiskdriveerror
•Makesurethejumpersettingiscorrect.(Master/Slave)
(notrecognizedordetected)
•ChecktheBIOScongurationabouthard/opticaldisk
drive.
•Makesurethedevicecablesarermlyattached.
• Make sure the device drivers are installed.
ASUS Motherboard installation guide
23

English
Chapter 2: Manage/update BIOS
2.1 AFUDOS utility
TheAFUDOSutilityallowsyoutoupdatetheBIOSleinDOSenvironmentusing
abootableoppydiskwiththeupdatedBIOSle.Thisutilityalsoallowsyouto
copythecurrentBIOSlethatyoucanuseasbackupwhentheBIOSfailsorgets
corrupted during the updating process.
Copying the current BIOS
TocopythecurrentBIOSleusingtheAFUDOSutility:
• Makesurethattheoppydiskisnotwrite-protectedandhasatleast
1024KBfreespacetosavethele.
• ThesucceedingBIOSscreensareforreferenceonly.TheactualBIOS
screendisplaysmaynotbesameasshown.
1. CopytheAFUDOSutility(afudos.exe)fromthemotherboardsupportDVDto
thebootableoppydiskyoucreatedearlier.
2. BootthesysteminDOSmode,thenattheprompttype:
afudos /o[lename]
wherethe[lename]isanyuser-assignedlenamenotmorethaneight
alphanumericcharactersforthemainlenameandthreealphanumeric
characters for the extension name.
A:\>afudos /oOLDBIOS1.rom
Main lename Extension name
3. Press<Enter>.TheutilitycopiesthecurrentBIOSletotheoppydisk.
A:\>afudos /oOLDBIOS1.rom
AMI Firmware Update Utility - Version 1.19(ASUS V2.07(03.11.24BB))
Copyright (C) 2002 American Megatrends, Inc. All rights reserved.
Reading ash ..... done
Write to le...... ok
A:\>
TheutilityreturnstotheDOSpromptaftercopyingthecurrentBIOSle.
Updating the BIOS le
ToupdatetheBIOSleusingtheAFUDOSutility:
1. VisittheASUSwebsite(www.asus.com)anddownloadthelatestBIOSlefor
themotherboard.SavetheBIOSletoabootableoppydisk.
24
Chapter2: Manage/update BIOS

WritetheBIOSlenameonapieceofpaper.YouneedtotypetheexactBIOS
lenameattheDOSprompt.
2. CopytheAFUDOSutility(afudos.exe)fromthemotherboardsupportDVDto
English
thebootableoppydiskyoucreatedearlier.
3. BootthesysteminDOSmode,thenattheprompttype:
afudos /i[lename]
where[lename]isthelatestortheoriginalBIOSleonthebootableoppy
disk.
A:\>afudos /iP5K3D.ROM
4. TheutilityveriestheleandstartsupdatingtheBIOS.
A:\>afudos /iP5K3D.ROM
AMI Firmware Update Utility - Version 1.19(ASUS V2.07(03.11.24BB))
Copyright (C) 2002 American Megatrends, Inc. All rights reserved.
WARNING!! Do not turn off power during ash BIOS
Reading le ....... done
Reading ash ...... done
Advance Check ......
Erasing ash ...... done
Writing ash ...... 0x0008CC00 (9%)
DONOTshutdownorresetthesystemwhileupdatingtheBIOStoprevent
systembootfailure!
5. TheutilityreturnstotheDOSpromptaftertheBIOSupdateprocessis
completed.Rebootthesystemfromtheharddiskdrive.
A:\>afudos /iP5K3D.ROM
AMI Firmware Update Utility - Version 1.19(ASUS V2.07(03.11.24BB))
Copyright (C) 2002 American Megatrends, Inc. All rights reserved.
WARNING!! Do not turn off power during ash BIOS
Reading le ....... done
Reading ash ...... done
Advance Check ......
Erasing ash ...... done
Writing ash ...... done
Verifying ash .... done
Please restart your computer
A:\>
ASUS Motherboard installation guide
25

2.2 Award BIOS Flash Utility
English
Updating the BIOS
TheBasicInput/OutputSystem(BIOS)canbeupdatedusingtheAwardBIOS
FlashUtility.FollowtheseinstructionstoupdatetheBIOSusingthisutility.
1. DownloadthelatestBIOSlefromtheASUSwebsite.Renametheleto
M2N32SLI.BINandsaveittoaoppydisk,CDROMoraUSBashdiskin
FAT 16/12 format
.
SaveonlytheupdatedBIOSleinthedisktoavoidloadingthewrongBIOSle.
2. CopytheAwardBIOSFlashUtility(awdash.exe)fromtheSoftwarefolderof
thesupportCDtotheoppydisk,CDROMoraUSBashdiskwiththelatest
BIOSle.
3. BootthesysteminDOSmodeusingthebootableoppydisk,CDROMora
USBashdiskyoucreatedearlier.
4. UndertheDOSmode,
AwardBIOS Flash Utility for ASUS V1.14
use<X:>(Xstandsfor
(C) Phoenix Technologies Ltd. All Rights Reserved
the name of the disk
For NF590-SLI-M2N32-SLI-DELUXE DATE:03/30/2006
Flash Type - PMC Pm49FL004T LPC/FWH
assignment) to switch to
thefolderofoppydisk,
File Name to Program:
CDROMorUSBash
diskyousavedtheBIOS
leandAwardBIOSFlash
Utility.
5. Attheprompt,type
Message: Please input File Name!
awdashthenpress
<Enter>. The Award BIOS
FlashUtilityscreenappears.
26
Chapter2: Manage/update BIOS

6. TypetheBIOSlenamein
AwardBIOS Flash Utility for ASUS V1.14
the File Name to Program
(C) Phoenix Technologies Ltd. All Rights Reserved
eld,thenpress<Enter>.
For NF590-SLI-M2N32-SLI-DELUXE DATE:03/30/2006
Flash Type - PMC Pm49FL004T LPC/FWH
English
File Name to Program: M2N32SLI.bin
Message: Do You Want To Save Bios (Y/N)
7. Press<N>whentheutilitypromptsyoutosavethecurrentBIOSle.The
following screen appears.
8. TheutilityveriestheBIOS
AwardBIOS Flash Utility for ASUS V1.14
leintheoppydisk,CD
(C) Phoenix Technologies Ltd. All Rights Reserved
ROMoraUSBashdisk
For NF590-SLI-M2N32-SLI-DELUXE DATE:03/30/2006
Flash Type - PMC Pm49FL004T LPC/FWH
andstartsashingtheBIOS
le.
File Name to Program: M2N32SLI.bin
Programming Flash Memory - OFE00 OK
Write OK No Update Write Fail
Warning: Don’t Turn Off Power Or Reset System!
DONOTturnofforresetthesystemduringtheashingprocess!
9. Theutilitydisplaysa
AwardBIOS Flash Utility for ASUS V1.14
Flashing Complete
(C) Phoenix Technologies Ltd. All Rights Reserved
message indicating that
For NF590-SLI-M2N32-SLI-DELUXE DATE:03/30/2006
Flash Type - PMC Pm49FL004T LPC/FWH
youhavesuccessfully
ashedtheBIOSle.
File Name to Program: M2N32SLI.bin
Flashing Complete
Remove the disk then
Press <F1> to Continue
press <F1> to restart the
system.
Write OK No Update Write Fail
F1
Reset
ASUS Motherboard installation guide
27
Saving the current BIOS le
English
YoucanusetheAwardBIOSFlashUtilitytosavethecurrentBIOSle.Youcan
loadthecurrentBIOSlewhentheBIOSlegetscorruptedduringtheashing
process.
Makesurethattheoppydisk,CDROMoraUSBashdiskhasenoughdisk
spacetosavethele.
TosavethecurrentBIOSleusingtheAwardBIOSFlashUtility:
1. Follow steps 1 to 6 of the
AwardBIOS Flash Utility for ASUS V1.14
(C) Phoenix Technologies Ltd. All Rights Reserved
previous section.
For NF590-SLI-M2N32-SLI-DELUXE DATE:03/30/2006
2. Press<Y>whentheutility
Flash Type - PMC Pm49FL004T LPC/FWH
promptsyoutosavethe
File Name to Program: 0112.bin
currentBIOSle.The
following screen appears.
Save current BIOS as:
Message:
3. Typealenameforthe
AwardBIOS Flash Utility for ASUS V1.14
(C) Phoenix Technologies Ltd. All Rights Reserved
currentBIOSleinthe
SavecurrentBIOSaseld,
For NF590-SLI-M2N32-SLI-DELUXE DATE:03/30/2006
Flash Type - PMC Pm49FL004T LPC/FWH
then press <Enter>.
File Name to Program: 0112.bin
Checksum: 810DH
Save current BIOS as: 0113.bin
Message: Please Wait!
4. Theutilitysavesthe
AwardBIOS Flash Utility for ASUS V1.14
currentBIOSletothe
(C) Phoenix Technologies Ltd. All Rights Reserved
disk, then returns to the
For NF590-SLI-M2N32-SLI-DELUXE DATE:03/30/2006
Flash Type - PMC Pm49FL004T LPC/FWH
BIOSashingprocess.
File Name to Program: 0113.bin
Now Backup System BIOS to
File!
Message: Please Wait!
28
Chapter2: Manage/update BIOS

2.3 ASUS Update utility
TheASUSUpdateisautilitythatallowsyoutomanage,save,andupdatethe
®
motherboardBIOSinWindows
environment.TheASUSUpdateutilityallowsyou
English
to:
• SavethecurrentBIOSle
• DownloadthelatestBIOSlefromtheInternet
• UpdatetheBIOSfromanupdatedBIOSle
• UpdatetheBIOSdirectlyfromtheInternet,and
• ViewtheBIOSversioninformation.
ThisutilityisavailableinthesupportDVDthatcomeswiththemotherboard
package.
ASUS Update requires an Internet connection either through a network or an
Internet Service Provider (ISP).
Installing ASUS Update
ToinstallASUSUpdate:
1. PlacethesupportDVDintheopticaldrive.TheDriversmenuappears.
2. ClicktheUtilitiestab,thenclickInstallASUSUpdateVX.XX.XX.
3. TheASUSUpdateutilityiscopiedtoyoursystem.
ASUS Motherboard installation guide
29
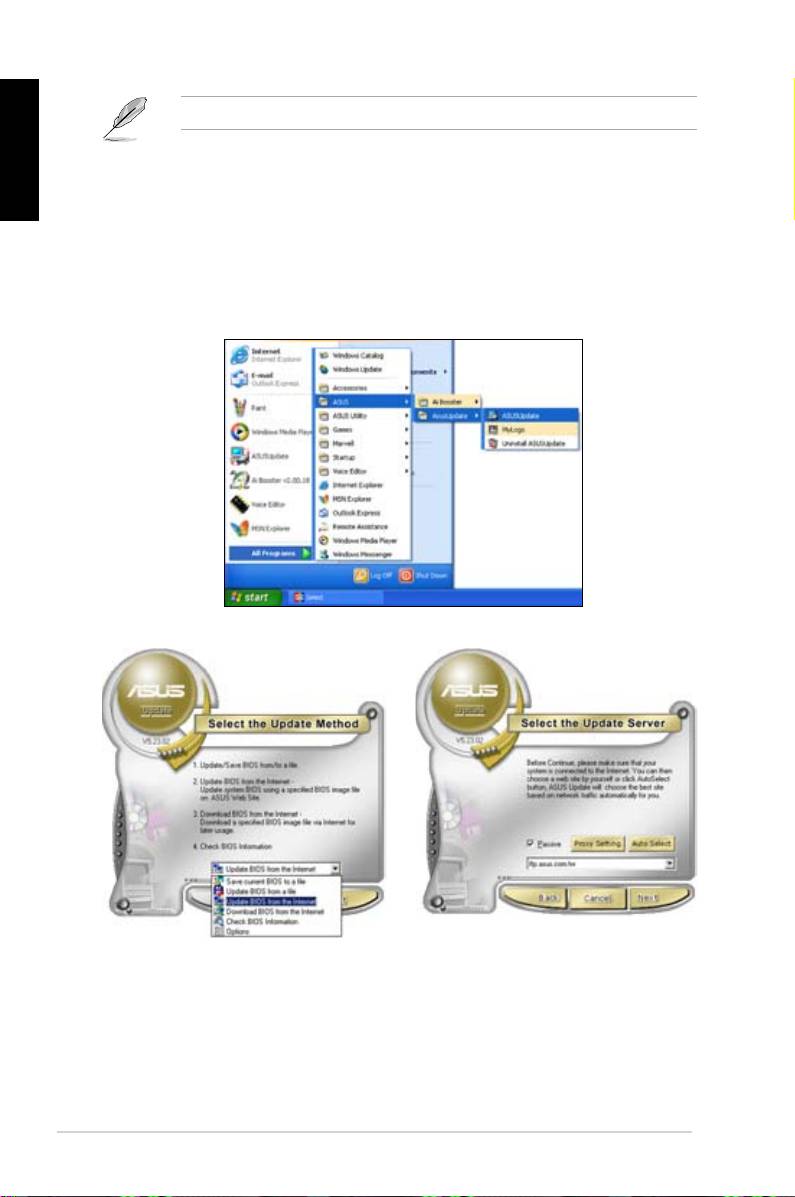
®
English
QuitallWindows
applicationsbeforeyouupdatetheBIOSusingthisutility.
Updating the BIOS through the Internet
ToupdatetheBIOSthroughtheInternet:
®
1. LaunchtheASUSUpdateutilityfromtheWindows
desktopbyclickingStart
> Programs > ASUS > ASUSUpdate > ASUSUpdate. The ASUS Update
main window appears.
2. Select Update BIOS from the
3. Select the ASUS FTP site nearest
Internet option from the drop‑down
youtoavoidnetworktrafc,or
menu, then click Next.
click Auto Select. Click Next.
30
Chapter2: Manage/update BIOS
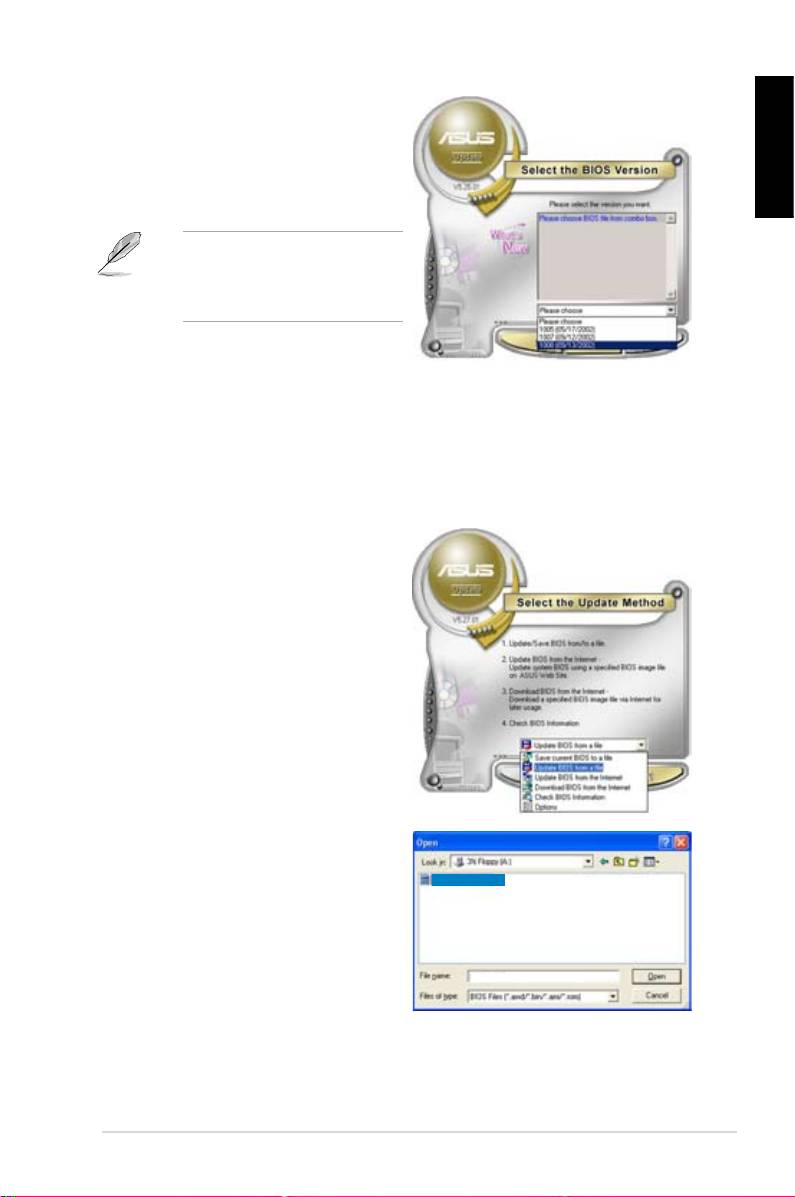
4. From the FTP site, select the BIOS
versionthatyouwishtodownload.
Click Next.
5. Follow the screen instructions to
English
complete the update process.
TheASUSUpdateutilityis
capable of updating itself through
theInternet.Alwaysupdatethe
utilitytoavailallitsfeatures.
Updating the BIOS through a BIOS le
ToupdatetheBIOSthroughaBIOSle:
®
1. LaunchtheASUSUpdateutilityfromtheWindows
desktopbyclickingStart
> Programs > ASUS > ASUSUpdate > ASUSUpdate. The ASUS Update
main window appears.
2. Select
Update BIOSfromale
option from the drop‑down menu,
then click Next.
3. LocatetheBIOSlefromtheOpen
window, then click Open.
P5K3 Deluxe
4. Follow the screen instructions to
complete the update process.
P5K3 Deluxe
ASUS Motherboard installation guide
31

English
Chapter 3: Troubleshooting
3.1 Troubleshooting for Motherboard DIY
Afterassemblingyourowncomputer,youmightencountertroublesforstarting
itup.ThischapterprovidesanswerstosomecommonquestionsaboutyourPC
beforeenteringtheoperatingsystem.Readthischapterforbasictroubleshooting.
ItsavestimeandhasslesforyouoncontactingASUStechnicalsupportteamor
returningtheproductforwarrantyservice.
3.1.1 Basic troubleshooting
A. Bad connection
1. Make sure there is no contaminants
on the gold contact or the pins.
2. Use a cotton bud or an eraser
andgentlyrubthegoldcontact.
Remembertobushawaytheeraser
crumbs.
VGA card gold contact
DIMM gold contact
LGA775 processor gold contact points
HandlethecardortheCPUbyitsedgesandDONOTtouchthegoldcontact.
Staticelectricitywillseriouslydamagethedevice.
32
Chapter3: Troubleshooting
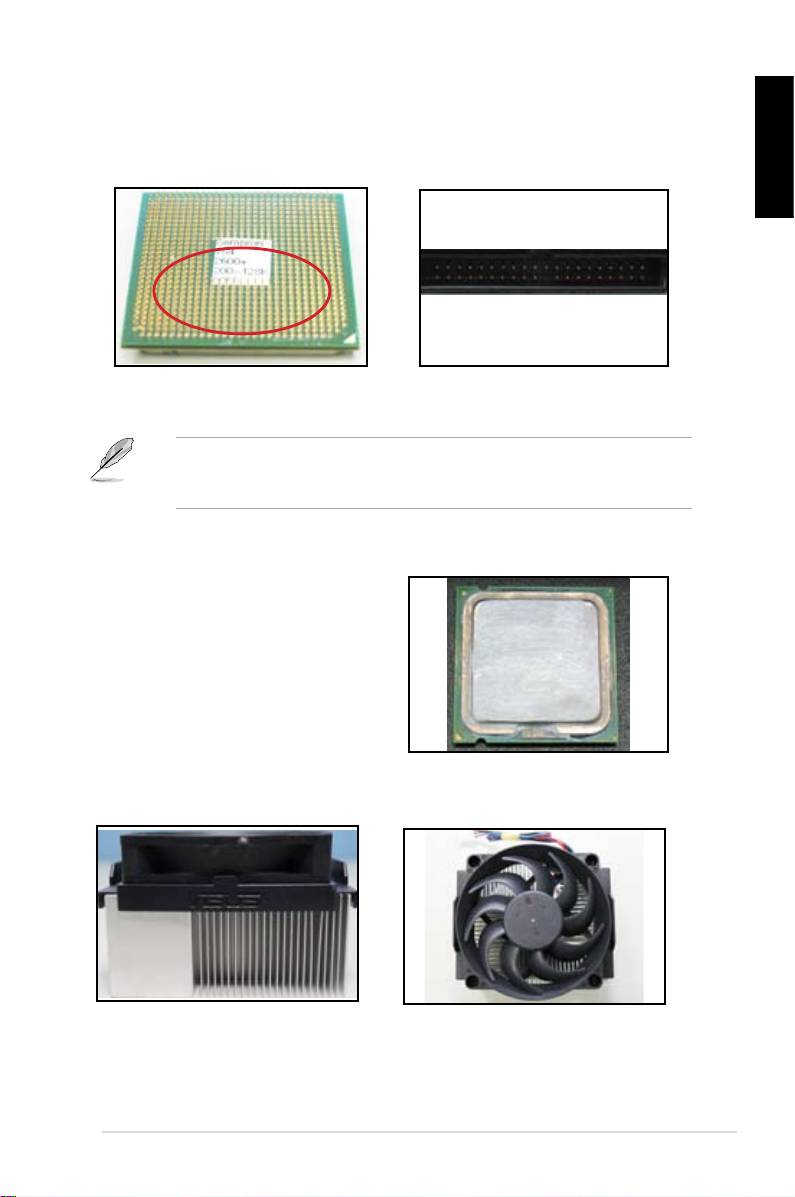
3. Makesurethereisnobrokenorbendedpinsonyourconnectorpinsor
CPU pins. A broken and bended pin will cause the component malfunction.
Contactyourretailerforfurthersupport.
English
AMD CPU gold pins
Connector pins
Ifthebrokenorbendedpinsarecausedafterthepurchase,yourretailer
mayaskforreparingcharge.SometimesthebrokenorbendedpinsareNOT
REPAIRABLE.
B. CPU overheated
1. WipecleantheCPUsurfacewiththe
cleancloth.Applyseveraldropsof
thermal paste to the exposed area
of the CPU that the heatsink will be
in contact with. Make sure that it is
spreadinaneventhinlayer.
CPU surface
2. Make sure there is no contaminants on the heatsink and fan.
Side view of heatsink and fan
Top view of heatsink and fan
3. Follow the instructions of heatsink and fan manufacturers to clean the
contaminants that will slow down the fan rotation.
ASUS Motherboard installation guide
33
3.2 Other common troubles
English
• Whenremovingdevicesfromthesystem,ensureallthepowercablesare
unplugged.
• AlltheerrormessageswillbedisplayedonscreenduringthePower-OnSelf-
Test (POST).
• If there are BIOS beeps, refer to section 1.11 for details.
• Gooverthechecklisttablebelowforfurthercheck.
Check Items
Power
Screen
Heatsink
BIOS
Error
Reference
LED
display
and fan
beeps
messages
page
No power Off No Stop No N/A 3‑4
No
On No Stop No N/A 3‑5
screen
On No Running No N/A 3‑5
display
On No Running Yes N//A 3‑5
Failure to
On Yes Running Yes Yes 3‑5
enter OS
On Yes Running No Yes 3‑5
On Yes Running No No 3‑5
Iftheproblemhasbeenxedbutanewproblememerges,gooverthechecklist
again.Iftheproblempersists,contactyourretailerorASUStechnicalsupport
team for further help.
34
Chapter3: Troubleshooting
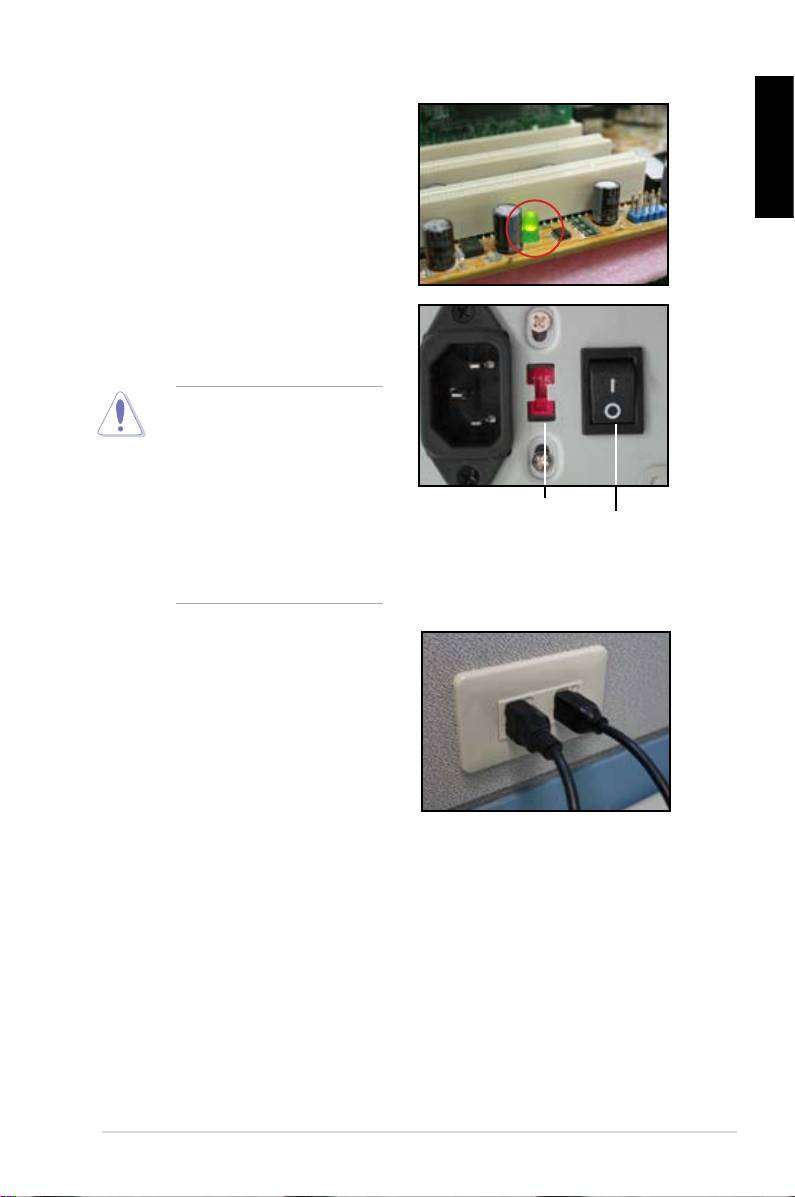
3.2.1 No power
ASUSmotherboardscomewithastandby
powerLED.TheLEDlightsuptoindicate
English
thatthesystemisON.IftheLEDstays
unlit,followtheinstructionsbelowtox
the problem.
1. Makesuretoadjustyourpower
supplytothecorrectACinput
voltageinyourarea,andthepower
supplyisturnedon.
• BeforeadjustingtheAC
input volage, ensure to
disconnect the power
plug. Failure to do so will
seriouslydamagethe
powersupplyunit.
AC input voltage switch
Power switch
• Failuretoadjustthepower
“—”: On; “O”: Off
supplytothecorrectAC
inputvolagewillseriously
damagethesystem.
2. Makesureyouhaveattachedthe
power cord to the wall outlet.
• Connect the power plug
directlytothewalloutlet.DO
NOT connect it to the power
extension, uninterruptible
powersupply(UPS)orother
devices.
• Exchange the the power plugs
ofthesystemandthemonitor
to check whether the wall outlet
isworkingnormally.
3. Iftheproblempersists,youmayneedtocontactyourretailerforanew
powersupplyunit.Ifthepowersupplyunitfunctions,contactyourASUS
motherboardretailerformotherboardwarrantyservice.
ASUS Motherboard installation guide
35

3.2.2 Failure to boot-up; No screen display
English
Mostboot-upfailureandnoscreendisplayresultfromdevicedefectionorincorrect
installation.Followtheinstructionsbelowtoxtheproblem.
1. Makesuretheallthepowercablesareattached,includingthesystemand
the monitor.
2. Make sure if the problem comes from expansion devices.
• Removealltheexpansioncardanddevices.Useonlymotherboard,
monitor,VGAcard,memeorymodules,powersupplyunit,heatsinkand
fan,keyboard,andmousetorebootthesystem.
• Ifthesystemisworkingnormally,itisoneoftheexpansiondevicesthat
causestheproblem.Reinstalltheexpansiondevicesyouremovedback
tothesystemonebyoneandndoutthedefectivedevice.
3. Makesureiftheproblemcomesfromthebasicsystemdevices.
• Ifyouhavesomesparedevices,youcanreplacethedevicesinturn
tondoutthedefectivedeviceintheorderof“memorymodule,CPU,
motherboard,hard/opticaldiskdrive,keyboard/mouse.”
Whenyoundoutthedefectivedevice,contactyourdeviceretailerforservice.
3.2.3 Failure to enter the operating system
1. Iftheproblememergesafteryouaddahardware.Removethenewadded
hardwareandrebootthesystem.Ifthesystemisworkingnormallywithout
thehardware,thedevicemaybedefectiveorincompatibletothesystem.
Contact the device retailer for help.
2. Iftheproblememergesafteryouinstallasoftwareordriver.Followthe
instructionsbelowtoxtheproblem.
a. Entertheoperatingsysteminsafemodeandremovethesoftwareor
driver.
b. Contacttheoperatingsystemcompanyforfurthersupport.
c. Ifthepreviousinstructionsfailtoxtheproblem,youmayneedtoformat
yourharddiskdriveandreinstallanewoperatingsystem.
3. IftheproblememergesafteryouchangetheBIOSsettings,rebootandenter
the BIOS to load the setup defaults. Refer the motherboard user guide for
details.
36
Chapter3: Troubleshooting

4. Iftheproblemcomesfromcomputervirusinfectionorlescorruption,follow
theinstructionsbelowtoxtheproblem.
a. Entertheoperatingsysteminsafemodeanddoafullsystemvirusscan
using an anti‑virus application.
English
b. Contacttheoperatingsystemcompanyforfurthersupport.
c. Ifthepreviousinstructionsfailtoxtheproblem,youmayneedtoformat
yourharddiskdriveandreinstallanewoperatingsystem.
3.2.4 FAQs
Q1: ThememoryreportedinPOSTisdifferentfromthememoryinstalled.
A1: Thememoryreporteddifferencemayresultfromdefectivememorymodules
orincorrectDIMMinstallation.MakesuretheDIMMsareingoodcondition
andtheDIMMsareinstalledcorrectly.Refertothemotherboarduserguide
fordetails.Ifyouinstall4.0GBmemoryanditreports3.XGB,itisnormal.
Q2. Thesystemcannotdetecttheoppydiskdrive,buttheoopydiskstayslit.
A2: Theoopydiskcablesaremis-isntalled.Makesurethetheredstripeonthe
cable(pin1end)andshouldmatchpin1ontheoppydiskdrive.
Q3: FailtoentertheoperatingsystemaftertheUSBashdiskorexternalhard
dsik drives.
A3: WhenthesystemdetectsUSBashdiskorUSBinterfaceharddisks,itmay
changethebootingdevicepriority.RemovetheUSBdevicesandrestartthe
system.
Q4: WheninstallingWindowsXP,itfailstolocatetheharddiskdrivesinstalledto
theRAIDcontroller.
A4: WindowsXPdoesnotincludetheRAIDcontrollerdriversotheharddisk
drivesarenotdetected.CopytheRAIDcontrollerdrivertoaoppydiskand
whenbootthesystemwiththeWindowsXPdisk,press<F6>toreadthe
driverfromtheoppydisk.Refertothemotherboarduserguidefordetails.
ASUS Motherboard installation guide
37

English
Chapter 4: Computer care tips
4.1 Proper care of your PC
Yourpersonalcomputerislikeotherhomeappliances.Keepyourcomputeraway
fromhumidity,directsunandstaticelectricitysource.Youshouldnotmovethe
computer when the it is turned on in case of damage. Internal dust will affect
the disk drive operating and contribute to overheating problem which will cause
computer crash or damage the components.
4.2 Basic knowledge
1. Encaseyourcomputerwithdustcoverwhennotinuse.
2. Whenusingyourcomputer,donotputanythingontheCRTmonitortoblock
the ventilation holes. Excessive heat will cause the monitor malfunction.
3. Donotplacethecomputerclosetothewallandleavesomespaceforheat
dissipation.Overheatingwillcausethesystemcrash.
4. Place the computer on a stable surface.
5. Keepthecomputerawayfromareasofextremetemperature.5°Cto30°Cis
the best surroundings temperature. Use an air conditioner or a electric fan to
gain a better heat dissipation.
6. Arrangetheribboncablesneatlytoavoidinsufcientairow.
4.3 Usage knowledge
1. Turnonandshutdownyourcomputerregularly.Ifyourcomputerneedsto
beonforalongtime,useabettersystem/CPUfanandhighvoltagepower
supplyunit.
2. Asuddenpowerfailurewilldamagetheharddiskdrive.Whenthepower
supplyisunstable,addanuninterruptiblepowersupplytoyourcomputeris
recommended.
3. Rearrangethedatales,dothevirusscanningandviruscodesrenewaland
defrgmentdiskregularly.
4. De-dustandcleanyourcomputerregularly.(Unpluggedallthepowercords
before cleaning)
• Uninstall the motherboad and hard/optical disk drives, then clean them
with canned air or a soft brush.
• Removethedustandhairdebrisonthepowersupplyunitwithananti-
static vacuum.
4.4 Tips
1. Ifyourcomputerwillnotbeusedforalongtime,putsomedesiccantmoisture
absorbersinthechassistopreventhumiditydamage.
2. Insomehotandhumidclimaticareas,you’dbetterturnonyourcomputer
everyotherweek.Thisalsohelpspreventhumiditydamage.
38
Chapter4: Computer care tip

Anakart
kurulum kılavuzu
