Thrustmaster T300 Ferrari GTE – страница 17
Инструкция к Устройству ввода Thrustmaster T300 Ferrari GTE
14/16
레이싱 핸들 및 페달 세트 자동 보정
레이싱 핸들을 전원 콘센트에 연결하고 레이싱 핸들의 USB 커넥터를 콘솔에 연결하면 핸들은
자동으로 자가보정됩니다.
이 과정에서 레이싱 핸들은 왼쪽에서 오른쪽으로 신속하게 회전하여 900 도 각도를 커버한 후
중앙에서 멈춥니다.
경고:
자가보정 하는 동안 절대 레이싱 핸들을 건드리지 마십시오!
(
이
경우
부정확한
보정
및
/
또는
부상이
발생할
수
있습니다
) .
페달 세트 자동 보정
페달 세트가 콘솔에 연결되어 있는 경우 또는 게임 중인 경우에는 페달 세트를 절대로 레이싱 핸들
베이스에 연결하지 (또는 페달 세트를 베이스에서 분리하지) 마십시오 (이로 인해 보정이 잘못될 수
있습니다) .
레이싱 핸들을 콘솔에 연결하기 전에 반드시 페달 세트를 연결하십시오.
레이싱 핸들의 보정이 완료되고 게임이 시작된 후, 페달을 몇 번 누르면 자동으로 페달이 보정됩니다.
경고:
레이싱 핸들이 자가보정 중이거나 게임을 로딩하는 중에는 절대로 페달을 누르지 마십시오!
(
이로
인해
보정이
잘못될
수
있습니다
)
레이싱 핸들 및/또는 페달 세트가 올바로 작동하지 않거나 보정이 잘못된 것으로 생각되는 경우:
콘솔의 전원을 완전히 끄고 레이싱 핸들의 연결을 해제합니다. 그 다음에 모든 케이블 (전원 공급
케이블 및 페달 세트 포함) 을 다시 연결한 후 콘솔과 게임을 다시 시작합니다.
내부 온도 센서
핸들의 냉각 시스템은 열 흡수부와 팬으로 구성되어 있습니다.
• 온도 조정 장치가 핸들의 내부 온도를 감시합니다.
• 게임에서 핸들을 사용하는 경우:
- 핸들이 특정 온도에 도달하면 (게임 시작 몇 분 후, 사용된 포스 피드백 효과의 강도에 따라
달라짐) 냉각 팬이 작동을 시작합니다.
- 핸들이 매우 높은 온도에 도달하는 즉시 (모터 보호를 위해) 포스 피드백 효과의 파워가
자동으로 감소합니다. 이들 효과의 파워는 온도가 약간 내려가는 즉시 자동으로 증가합니다.
• 게임을 마쳤을 때: 모터의 열 관성으로 인해, 온도가 냉각 팬 시동 당시 수준으로 내려갈 때까지
냉각 팬이 계속 작동합니다. 핸들은 냉각이 용이하게 하고 모터를 보호하기 위해 이러한 방식으로
설계되었습니다 (게임에서 핸들을 사용하는 동안 도달한 온도에 따라 이 작업은 5 ~ 45 분 정도가
소요됩니다) .
15/16
MODE 버튼 및 표시등 (6)
페달 세트 MODE (모드) 버튼
T300 RS에 포함된 페달 세트에는 2개의 페달이 있습니다.
이 페달 세트를 이용하는 경우에는 표시등이 빨강색으로 점등되어 있어야 하며, 그렇지 않은 경우
가속 페달이 올바로 작동하지 않습니다.
T300 RS는 3개의 페달로 구성된 Thrustmaster (트러스트마스터) 페달 세트 (
별도
판매
) 와도 호환되며,
이들 페달을 이용해서 액셀 페달과 클러치 페달을 전자적으로 교대할 수 있습니다.
전자적으로 교대하려면 MODE (모드) 버튼 (6) 을 2 초 동안 누르기만 하면 됩니다.
레이싱 핸들의 내부 메모리에는 페달이 교대되었는지 여부가 저장됩니다.
가속
페달
및
클러치
페달
MODE
표시등
(6)
색상
정상
적색
교대
시
녹색
MODE 버튼에 대한 다른 도움말
MODE 버튼 및 표시등에 대한 더 자세한 내용은 http://ts.thrustmaster.com 에서 확인할 수 있습니다.
Updates and Downloads (업데이트 및 다운로드) 부분에서 PlayStation/Wheels/T300 RS
(PlayStation/핸들/T300 RS) 을 클릭한 후 Manual/Help (사용설명서/도움말) 파일을 선택하십시오.
THRUSTMASTER 제품군과의 호환성
T300 RS 의 베이스와 호환되는 제품.
• 다음과 같은 착탈식 Thrustmaster 핸들: “Ferrari F1 Wheel Add-on* (페라리 F1 핸들 애드온) ”,
“Ferrari GTE Wheel Add-on* (페라리 GTE 핸들 애드온) ”, “T300 RS PS Wheel (T300 RS PS 핸들) ”,
“T500 RS GT Wheel* (T300 RS PS 핸들) ”.
• “Base Fixed Paddle Shifters* (베이스 고정 패들 시프터) ” 키트, 이 제품으로 베이스에 고정 패드
시프터를 설치할 수 있습니다.
• 다음과 같은 Thrustmaster 페달 세트: “T3PA*” (Thrustmaster 3 페달 애드온) 및 T500RS 레이싱
핸들의 페달 세트.
• 다음과 같은 Thrustmaster 시프터 (변속기) : “TH8A*” 및 “TH8RS*”.
*
별도
판매
(
자세한
내용은
http://www.thrustmaster.com/products/t300rs
에서
확인하십시오
) .
도움말 파일 및 자주 묻는 질문 (이 설명서에는 포함되지 않음)
웹사이트 http://ts.thrustmaster.com 으로 이동하십시오. Updates and Downloads (업데이트 및
다운로드) 에서 PlayStation/Wheels/T300 RS (PlayStation/핸들/T300 RS) 을 클릭한 후
Manual/Help (사용설명서/도움말 파일을 선택하십시오.
16/16
COPYRIGHT
®
© 2014 Guillemot Corporation S.A. 모든 권리 보유. Thrustmaster
는 Guillemot Corporation S.A.의
등록상표입니다. “ ”, “PlayStation”, “ ”, “ ”은 Sony Computer Entertainment,
Inc 의 등록상표입니다. “ ”는 Sony Computer Entertainment, Inc 의 상표입니다. 다른 모든
상표는 해당 소유자의 자산입니다. 도면은 법적 구속력이 없습니다. 설명서의 내용, 설계 및
사양은 예고 없이 변경될 수 있으며, 나라마다 서로 다를 수 있습니다. 제조국: 중국
®
TouchSense
Technology 는 Immersion Corporation 의 인가를 받았습니다. 웹사이트
www.immersion.com/patent-marking.html 에서 확인할 수 있는 한 개 이상의 미국 특허와 출원 중인
다른 특허에 의해 보호됩니다.
1/16
FOR P
LAYSTATION®3 – PLAYSTATION®4
User Manual
WARNING:
To ensure that your T300 RS racing wheel functions correctly
with games for PlayStation®3 or PlayStation®4,
you may be required to install the games’ automatic updates
(available when your console is connected to the Internet).

2/16
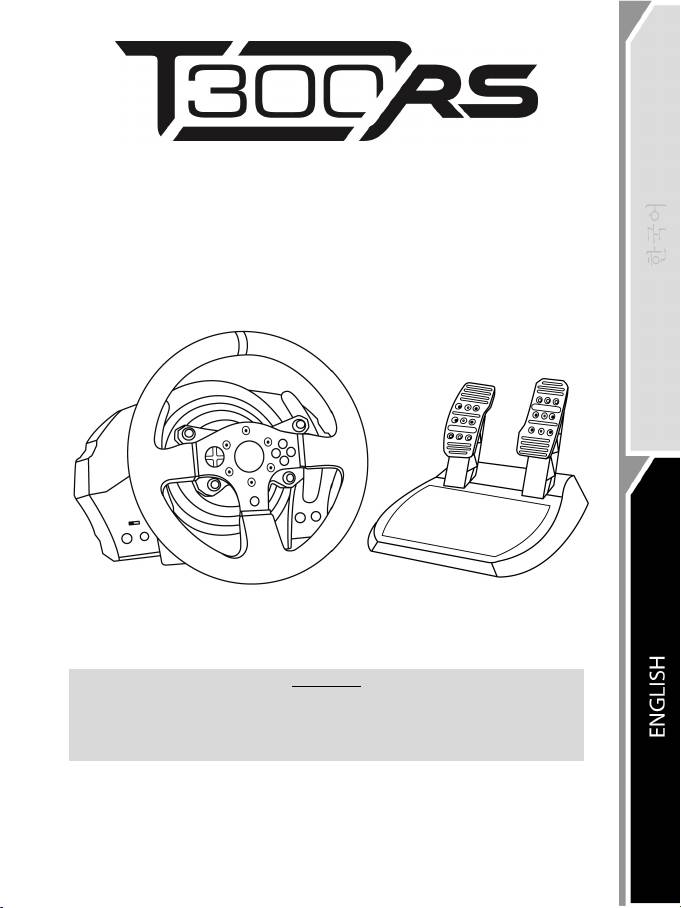
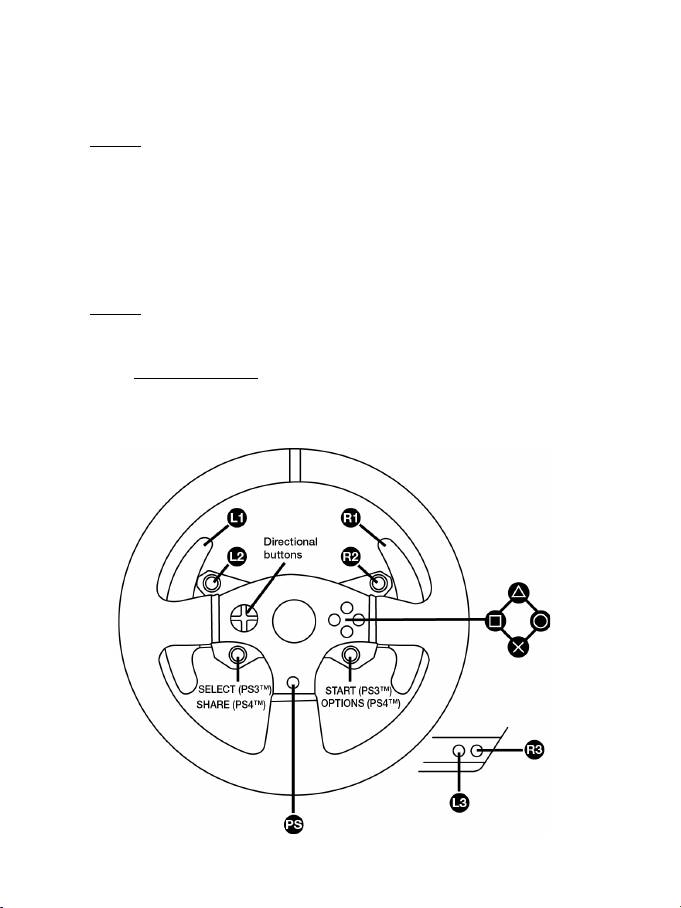
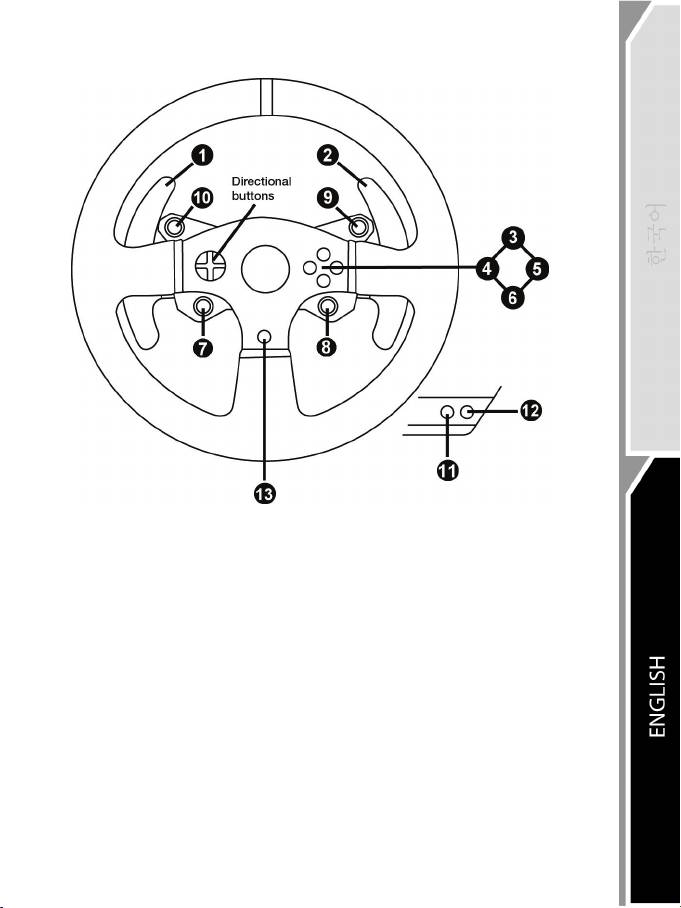
TECHNICAL FEATURES
1 T300 RS base
2 PS wheel
3 2 sequential paddle shifters (Up & Down)
4 Directional buttons
5 PS4™ or PS3™ USB sliding switch
6 MODE button + red/green indicator light
7 SELECT/START buttons on PS3™ and
SHARE/OPTIONS on PS4™
8 PS button
9 Large threaded hole (for attachment system
and fastening screw)
10 Attachment system
11 Metal fastening screw
12 Thrustmaster Quick Release
13 L3/R3 buttons
14 Power supply connector (type A or B)
(varies from one country to another)
15 Racing wheel USB cable and connector
16 Shifter (gearbox) connector
(sold separately)
17 Pedal set connector
3/16
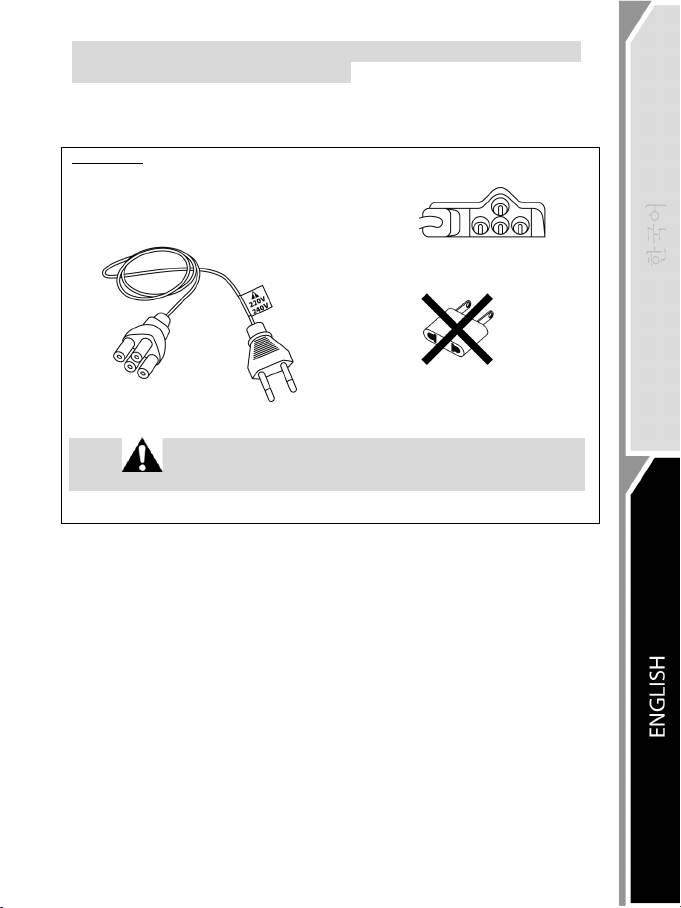
PLUGGING THE RACING WHEEL INTO AN ELECTRICAL OUTLET:
PLEASE READ BEFORE PROCEEDING!
Your racing wheel’s power supply varies according to the country where you purchased your device.
In Korea, the power supply is:
Internal, with:
* a power supply unit located directly inside the racing wheel’s base, with a type C
connector.
* a 220-240 V power supply cable.
= compatible only with 220-240 V electrical power.
Never connect the 220-240 V cable to a 100-130 V electrical outlet!!!
Never connect this cable to a power adapter!!!
4/16
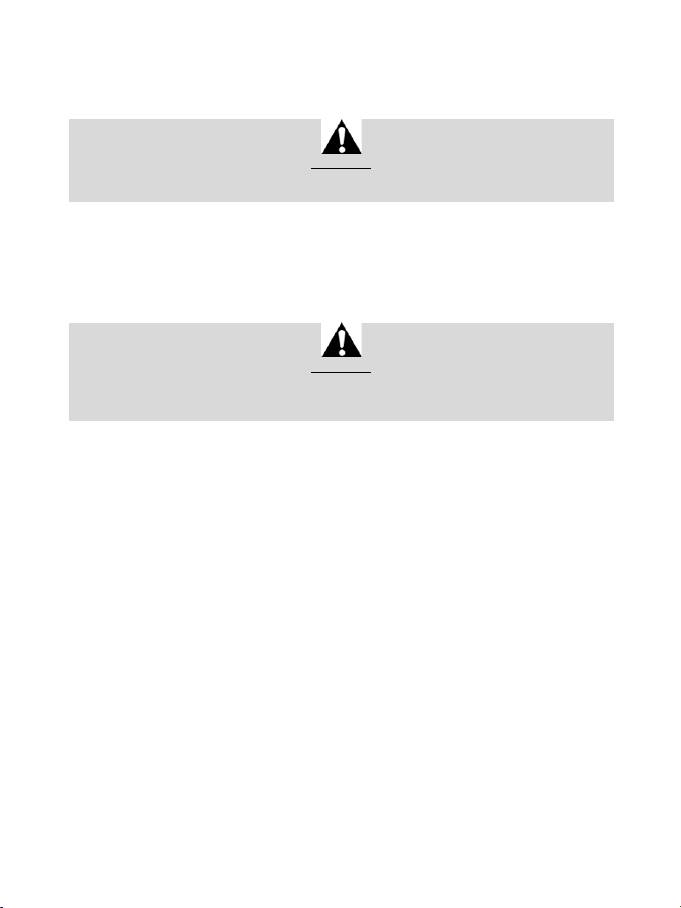
WARNINGS
Before using this product, please read this manual carefully and save it for later reference.
Warning – Electrical shock
* Keep the product in a dry location and do not expose it to dust or sunlight.
* Do not twist or pull on the connectors and cables.
* Do not spill any liquid on the product or its connectors.
* Do not short-circuit the product.
* Never dismantle the product; do not throw it onto a fire and do not expose it to high temperatures.
* Do not use a power supply cable other than the one provided with your racing wheel.
* Do not use the power supply cable if the cable or its connectors are damaged, split or broken.
* Make sure that the power supply cable is properly plugged into an electrical outlet, and properly
connected to the connector at the rear of the racing wheel’s base.
* Do not open up the racing wheel: there are no user-serviceable parts inside. Any repairs must be
carried out by the manufacturer, its authorized representative or a qualified technician.
* Only use attachment systems/accessories specified by the manufacturer.
* If the racing wheel is operating abnormally (if it is emitting any abnormal sounds, heat or odors), stop
using it immediately, unplug the power supply cable from the electrical outlet and disconnect the other
cables.
* If you will not be using the racing wheel for an extended period of time, unplug its power supply cable
from the electrical outlet.
Air vents
Make sure not to block any of the air vents on the racing wheel’s base. For optimal ventilation, make sure
to do the following:
* Position the wheel’s base at least 10 cm away from any wall surfaces.
* Do not place the base in any tight spaces.
* Do not cover the base.
* Do not let any dust build up on the air vents.
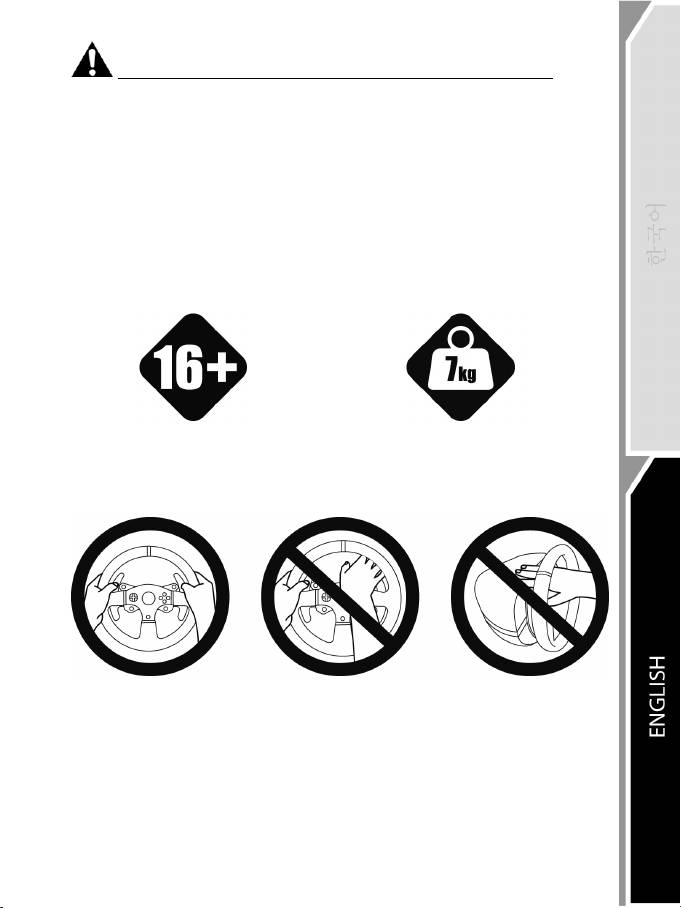
For safety reasons, never use the pedal set with bare feet
or while wearing only socks on your feet.
®
THRUSTMASTER
DISCLAIMS ALL RESPONSIBILITY IN THE EVENT OF
INJURY RESULTING FROM USE OF THE PEDAL SET WITHOUT SHOES.
Warning – Injuries due to Force Feedback and repeated movements
Playing with a Force Feedback racing wheel may cause muscle or joint pain. To avoid any problems:
* Avoid lengthy gaming periods.
* Take 10 to 15 minute breaks after each hour of play.
* If you feel any fatigue or pain in your hands, wrists, arms, feet or legs, stop playing and rest for a few
hours before you start playing again.
5/16
Warning – Injuries due to Force Feedback and repeated movements (continued)
* If the symptoms or pain indicated above persist when you start playing again, stop playing and
consult your doctor.
* Keep out of children’s reach.
* During gameplay, always leave both hands correctly positioned on the wheel without letting it go
completely.
* During gameplay, never place your hands or your fingers under the pedals or anywhere near the
pedal set.
* During calibration and gameplay, never place your hand or your arm through the openings in the
racing wheel.
* Make sure that the racing wheel’s base is properly secured, as per this manual’s instructions.
Product to be handled only by users
16 years of age or older
HEAVY PRODUCT
Be careful not to drop the product on
yourself or on anyone else!
ALWAYS NEVER NEVER
6/16
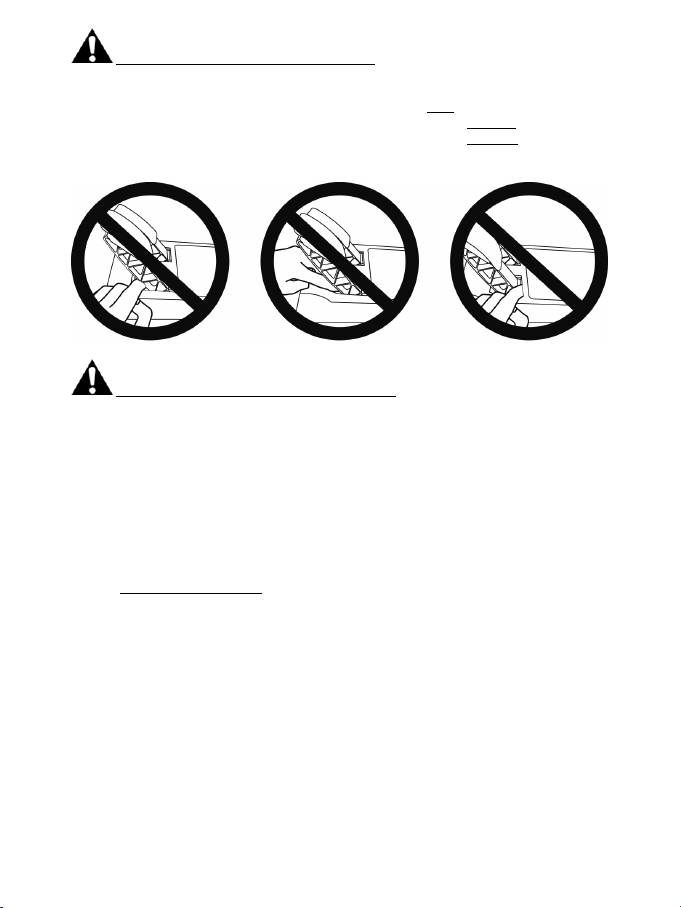
Warning – Pedal set pinch hazard when playing
* Keep the pedal set out of children’s reach.
* During gameplay, never place your fingers on or anywhere near the sides of the pedals.
* During gameplay, never place your fingers on or anywhere near the pedals’ rear base.
* During gameplay, never place your fingers on or anywhere near the pedals’ front base.
NEVER NEVER NEVER
Warning – Pedal set pinch hazard when not playing
* Store the pedal set in a safe place, and keep it out of children’s reach.
UPDATING YOUR RACING WHEEL’S FIRMWARE
The firmware included in your racing wheel’s base can be updated to a more recent version featuring
product enhancements.
To display the firmware version that your racing wheel is currently using and update it if required: on
PC, visit http://ts.thrustmaster.com. In the Updates and Downloads section, click PlayStation
/
Wheels / T300 RS, then select Driver/Firmware and follow the instructions describing the download
and installation procedure.
7/16
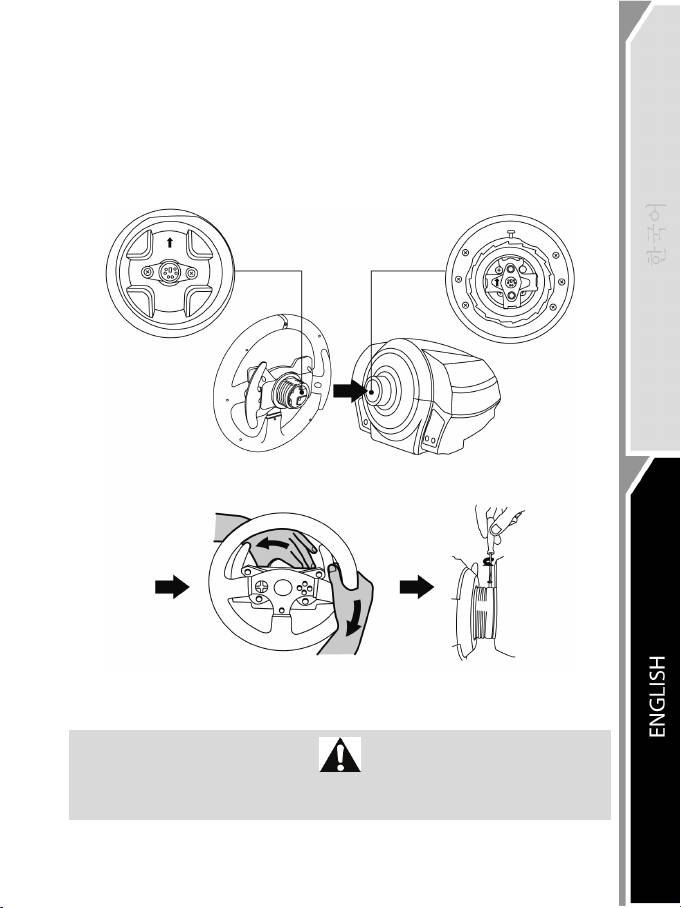
INSTALLING THE RACING WHEEL ON ITS BASE
Align the connector positions using the arrows:
Base (1) connector: Arrow pointing upwards
Racing wheel (2) connector: Arrow pointing upwards
Once the connectors are correctly positioned, simply rotate the Thrustmaster Quick Release (12) device’s
ring counterclockwise, while holding the racing wheel (2) in position.
Then, tighten the ring as much as you can: to do so, hold the ring in position and rotate the racing wheel
clockwise.
Once you have installed the racing wheel, rotate it 180° (when facing the wheel, the PlayStation® logo
should be upside down) to access the small attachment screw located on the ring of the Thrustmaster
Quick Release (12) device. Use a large Phillips screwdriver to tighten the small attachment screw (do not
use excessive force), turning it clockwise.
Do not use excessive force when tightening the small attachment screw
(using a Phillips screwdriver)!
Stop turning the screw as soon as you feel some resistance.
8/16
ADJUSTING THE PEDALS’ HEIGHT AND SPACING
Using a Phillips screwdriver (not included), remove the 2 attachment screws holding the pedal heads to
the pedal arms.
Next, adjust the pedal heads’ height and spacing to suit your preferred driving style:
- 6 different positions are available for the gas pedal.
- 6 different positions are available for the brake pedal.
Once you are happy with the height and spacing, replace and re-tighten the 2 attachment screws
holding the pedal heads to the pedal arms.
ATTACHING THE RACING WHEEL
Attaching the racing wheel to a table or a desktop
1. Place the racing wheel on a table or any other horizontal, flat and stable surface.
2. Insert the fastening screw (11) in the attachment system (10), then tighten the device by turning
the screw counterclockwise, so that it feeds into the large threaded hole (9) located beneath the
racing wheel, until the wheel is perfectly stable.
ALWAYS NEVER
WARNING: Never tighten the screw alone, without the attachment system in place!
(This could damage the racing wheel.)
9/16
ATTACHMENT /
REMOVAL
DIRECTION
To tighten:
Turn the screw
counterclockwise
To release:
Turn the screw
clockwise
10/16
Attaching the racing wheel’s base to a cockpit
1. Place the racing wheel’s base on the cockpit shelf.
2. Drive two M6 screws (not included) through the cockpit shelf, then feed them into the two small
screw threads located on the underside of the racing wheel.
Important: The length of the two M6 screws must not exceed the thickness of the shelf + 12 mm;
longer screws could cause damage to internal components located in the racing wheel’s base.
3. If required, tighten the standard attachment system by inserting the fastening screw in the large
threaded hole.
Attaching the pedal set to a cockpit
1. Attach the pedal set using the small screw threads located on its underside.
2. Drive two M6 screws (not included) through the cockpit shelf, then feed them into the two small
screw threads located on the underside of the pedal set.
Important: The length of the two M6 screws must not exceed the thickness of the shelf + 10 mm;
longer screws could cause damage to internal components located in the pedal set.
Layout diagrams for cockpits (for positioning the racing wheel’s base and/or the pedal set) are
available at http://ts.thrustmaster.com: in the Updates and Downloads section, click PlayStation
/
Wheels / T300 RS, then select Manual/Help file.
PLAYSTATION®3 AND PLAYSTATION®4 MAPPING
11/16
SETTING UP THE RACING WHEEL FOR PLAYSTATION®3 OR
P
LAYSTATION®4
1. Connect the pedal set to the connector (17) located at the back of the racing wheel's base.
2. Connect the power supply cable to the connector (14) located at the back of the racing wheel's
base.
3. Plug the power supply cable into an electrical outlet with the same voltage specifications.
For more information about this, please refer to the PLUGGING THE RACING
WHEEL INTO AN ELECTRICAL OUTLET section, on page 3 in this manual.
4. Set the USB sliding switch (5) on the racing wheel’s base to either the PS3™ or PS4™ position,
depending on the console or the game you are using.
5. Connect the racing wheel’s USB connector (15) to one of the console’s USB ports.
6. Once your console is powered on, your racing wheel will calibrate itself automatically.
7. On PlayStation
®4 (when the USB sliding switch is set to the PS4™ position): press the racing
wheel’s PS button (8) and sign in to your Sony Entertainment Network account, in order to be able
to use the wheel.
You are now ready to play!
Important notes:
- The USB sliding switch (5) on the racing wheel’s base must always be set to the proper
position (PS3™ or PS4™) before connecting the wheel’s USB cable to the console. To change
the sliding switch’s position, disconnect the USB cable from the console and then change the
position of the switch before reconnecting the USB cable to the console.
- On PlayStation®3, the USB sliding switch (5) must always be set to the PS3™ position:
* The wheel is recognized in most games as a T500RS wheel.
* The wheel is functional in compatible games and in console menus.
* The “PS” function is functional on the wheel.
- On PlayStation®4, with the USB sliding switch (5) in the PS3™ position:
* The wheel is recognized in most games as a T500RS wheel.
* The wheel is functional in compatible games, but not in console menus.
* The “SHARE” and “PS” functions are not functional on the wheel.
- On PlayStation®4, with the USB sliding switch (5) in the PS4™ position:
* Don't forget to press the racing wheel’s PS button (8) in order to be able to use the wheel.
* The wheel is recognized in most games as a T300 RS wheel.
* The wheel is functional in compatible games and in console menus.
* The “SHARE” and “PS” functions are functional on the wheel.
- The list of PlayStation®3 and PlayStation®4 games compatible with the T300 RS (along with
the required position for the USB sliding switch (5) according to the game being played) is
available at:
http://ts.thrustmaster.com
(in the Updates and Downloads section, click PlayStation
/ Wheels / T300 RS).
This list is updated regularly.

12/16
SETTING UP THE RACING WHEEL FOR PC
Important note:
On PC, the USB sliding switch (5) on the racing wheel’s base must always be set to the PS3™
position.
1. Go to http://ts.thrustmaster.com to download the drivers and the Force Feedback software for PC. In
the Updates and Downloads section, click PC / Wheels / T300 RS, then select Drivers.
2. Once the download is complete, launch the installation, and follow the on-screen instructions to
connect the wheel’s USB plug to your computer and complete the installation.
3. Once the installation is complete, click Finish and restart your computer.
4. Select Start / All Programs / Thrustmaster / FFB Racing Wheel / Control Panel to open the Game
Controllers window.
The Game Controllers window displays the racing wheel’s name T300 RS Racing Wheel with the status
OK.
5. Click Properties to configure your wheel in the T300 RS control panel:
• Test Input tab: allows to test and view the action buttons, directional buttons, wheel and pedals axes,
and to adjust the wheel’s rotation angle in your PC games.
• Test Forces tab: allows to test 12 force feedback effects.
• Gain Settings tab: allows to adjust the power of the force feedback effects in your PC games.
You are now ready to play!
General notes:
- On PC, click OK to close the Game Controllers window before launching the game.
- On PC, the adjustments made in the Game Controllers window will only be saved on your computer
(hence they will have no effect on PlayStation®3 or PlayStation®4).
- Your wheel’s firmware version is displayed in the upper right-hand corner of the T300 RS control panel
tabs.
13/16
PC MAPPING
14/16
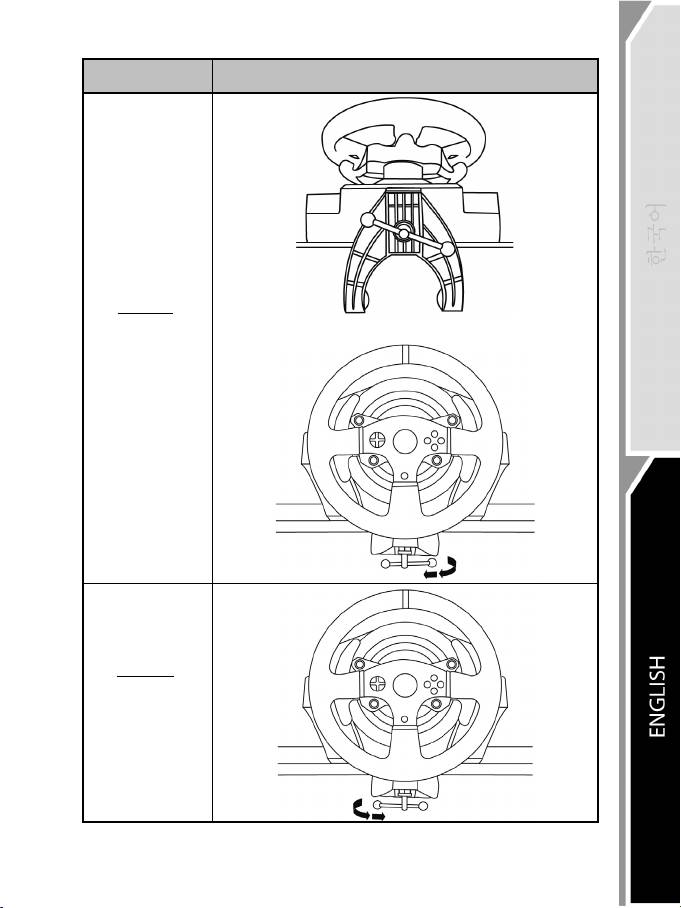
AUTOMATIC RACING WHEEL AND PEDAL SET CALIBRATION
The wheel automatically self-calibrates when you plug the racing wheel into an electrical outlet and
connect the racing wheel’s USB connector to the console.
During this phase, the racing wheel will rotate quickly towards the left and the right, covering a 900
degree angle, before stopping at the centre.
WARNING:
Never touch the racing wheel during the self-calibration phase!
(This could result in improper calibration and/or personal injuries.)
AUTOMATIC CALIBRATION OF THE PEDAL SET
Never connect the pedal set to the racing wheel’s base (or disconnect it from the base) when it is
connected to the console or during gameplay (this could result in improper calibration).
Always connect the pedal set before connecting the racing wheel to the console.
Once the racing wheel’s calibration is complete and the game has been started, the pedals are
automatically calibrated after a few presses.
WARNING:
Never press the pedals during the racing wheel's
self-calibration phase or while a game is loading!
(This could result in improper calibration.)
If your racing wheel and/or pedal set do not function correctly, or if they seem to be improperly
calibrated:
Power off your console and completely disconnect the racing wheel. Then reconnect all cables
(including the power supply cable and the pedal set), and restart your console and your game.
INTERNAL TEMPERATURE SENSOR
The wheel’s cooling system is composed of a heat sink and a fan.
• A thermostat monitors the wheel’s internal temperature.
• When you are using the wheel in a game:
- The cooling fan starts up when the wheel has reached a certain temperature (after a few minutes
of gameplay, depending on the strength of the Force Feedback effects used).
- The power of the Force Feedback effects automatically decreases as soon as the wheel reaches
a much higher temperature level (to protect the motor). The power of these effects automatically
increases as soon as the temperature slightly decreases.
• When you’re done playing: due to the motor’s thermal inertia, the cooling fan continues to operate
until the temperature drops below the fan’s startup level. Your wheel has been designed in this way
in order to facilitate cooling, and to protect the motor (this may take from 5 to 45 minutes, depending
on the temperature reached while using the wheel in a game).
15/16
MODE BUTTON AND INDICATOR LIGHT (6)
MODE button for the pedal set
The pedal set included with the T300 RS features 2 pedals.
When using this pedal set, make sure that the indicator light remains red, or else the gas pedal will not
function properly.
The T300 RS is also compatible with Thrustmaster pedal sets featuring 3 pedals (sold separately);
these allow you to electronically swap the accelerator and clutch pedals.
To do so, simply press the MODE button (6) for 2 seconds.
The racing wheel’s internal memory stores whether the pedals have been swapped around or not.
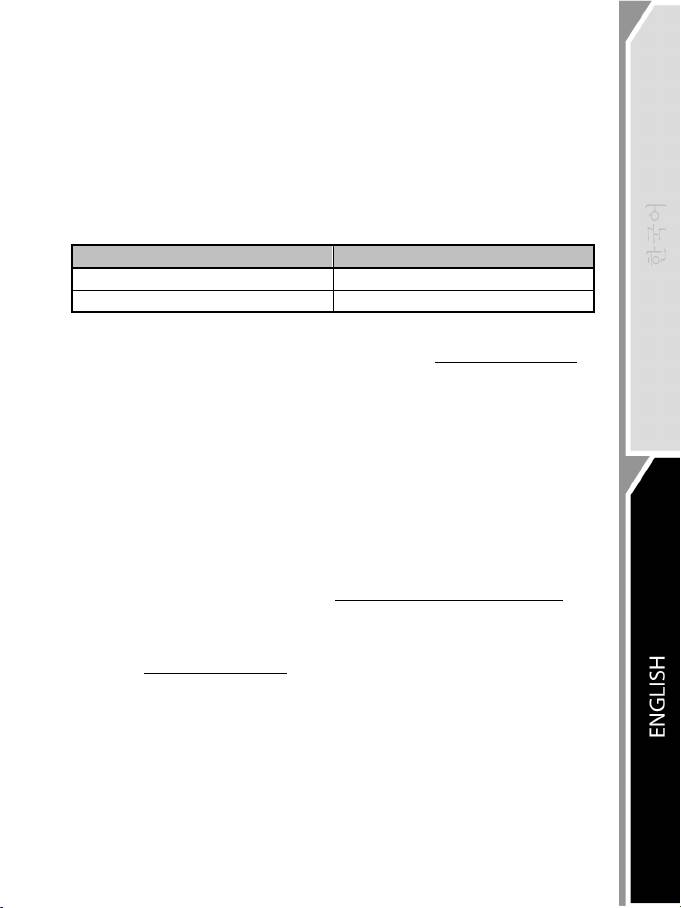
GAS AND CLUTCH PEDALS
Color of the MODE indicator light (6)
NORMAL
RED
SWAPPED AROUND
GREEN
Other hints regarding the MODE button
To learn more about the MODE button and indicator light, please visit http://ts.thrustmaster.com. In
the Updates and Downloads section, click PlayStation / Wheels / T300 RS, then select
Manual/Help file.
COMPATIBILITY WITH THE THRUSTMASTER PRODUCT ECOSYSTEM
The base of the T300 RS is compatible with:
• The following detachable Thrustmaster wheels: “Ferrari F1 Wheel Add-on*”, “Ferrari GTE Wheel
Add-on*”, “T300 RS PS Wheel”, “T500 RS GT Wheel*”.
• The “Base Fixed Paddle Shifters*” kit, which allows you to install fixed paddle shifters on the base.
• The following Thrustmaster pedal sets: “T3PA*” (Thrustmaster 3 Pedals Add-on) and the pedal set
of the T500RS racing wheel.
• The following Thrustmaster shifters (gearboxes): “TH8A*” and “TH8RS*”.
* Sold separately (for more information, please visit http://www.thrustmaster.com/products/t300rs).
HELP FILES AND FAQS (NOT INCLUDED IN THIS MANUAL)
Please visit http://ts.thrustmaster.com, and in the Updates and Downloads section, click
PlayStation / Wheels / T300 RS, then select Manual/Help file.
16/16
COPYRIGHT
© 2014 Guillemot Corporation S.A. All rights reserved. Thrustmaster® is a registered trademark of
Guillemot Corporation S.A. “
”, “PlayStation”, “ ” and “ ” are registered
trademarks of Sony Computer Entertainment, Inc. “
” is a trademark of the same
company. All other trademarks are the property of their respective owners. Illustrations not binding.
Contents, designs and specifications are subject to change without notice and may vary from one
country to another. Made in China.
TouchSense® technology licensed from Immersion Corporation. Protected by one or more of the
U.S. Patents found at the following address: www.immersion.com/patent-marking.html, and other
patents pending.
1/18
P
LAYSTATION®3 – PLAYSTATION®4
使用者說明書
警告:
為了確保遊玩 PlayStation®3 或 PlayStation®4 的遊戲時,您的 T300 RS
賽車方向盤機能正常運作,請安裝遊戲的自動更新程式
(主機與網際網路連線即可下載程式)。
