Phottix Odin for Nikon: инструкция
Раздел: Аксессуары для фото- и видеотехники
Тип:
Инструкция к Phottix Odin for Nikon
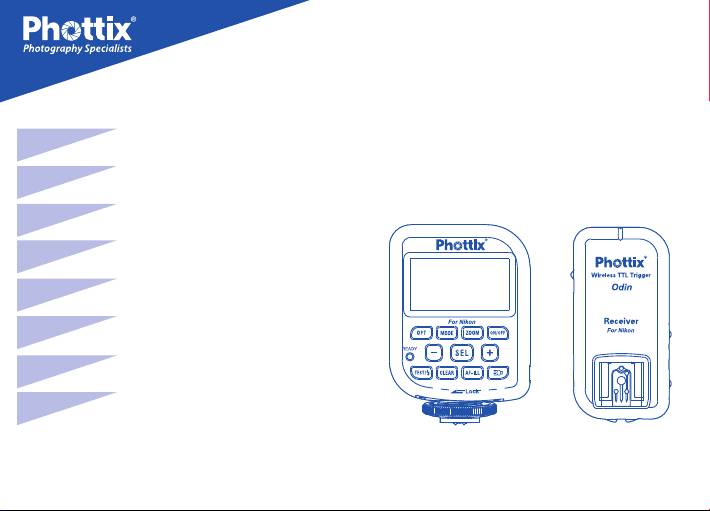
Phottix Odin TTL Flash Trigger
for Nikon
En
INSTRUCTION MANUAL
2
De
BENUTZERHANDBUCH
17
Fr
MANUEL D’UTILISATION
32
Es
MANUAL DE INSTRUCCIONES
48
Pl
INSTRUKCJA OBSŁUGI
63
Ru
РУКОВОДСТВО ПОЛЬЗОВАТЕЛЯ
78
Simp
Cn
说明书
95
Trad
Cn
說明書
108
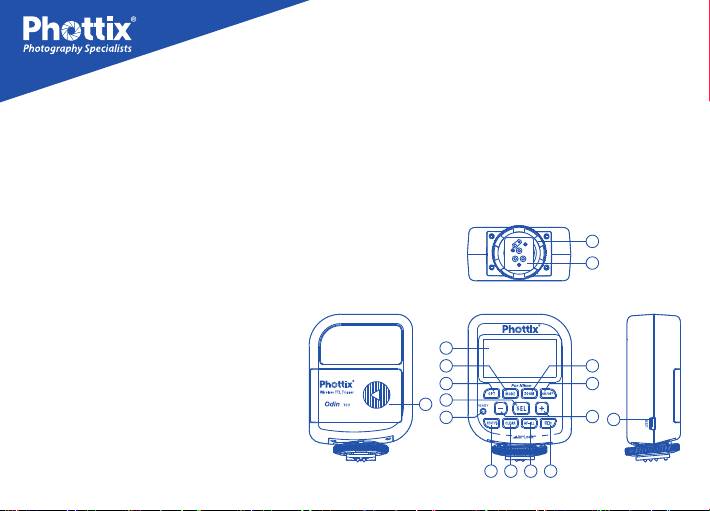
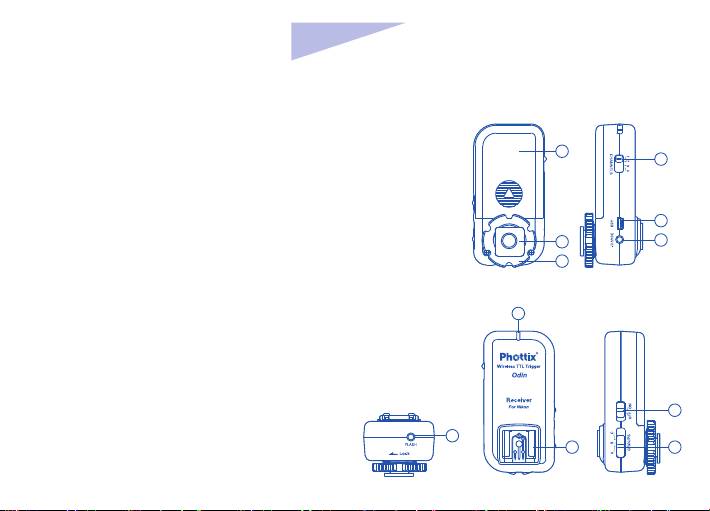
Parts
Transmitter Control Unit (TCU)
1. LCD Screen
10. Autofocus Assist Illuminator
2. Options Button
(AF-ILL) Function Button
3. Mode Button
11. Modeling Light Button
14
4. Zoom Button
12. Test Button
15
5. Power Button
13. Battery Compartment
6. LED
14. Locking Ring
7. + / - Buttons
15. Hot Shoe
8. Selection Buttons
16. USB port
9. Clear Button
1
3
4
2
5
8
13
6
7
16
12 9 10
11
2
En
INSTRUCTION MANUAL
Receiver
11
1. Power Switch
6
2. Group Selection Switch
3. 3.5mm Output Port
4. USB Port
4
5. 5V DC Power Port
10
5
6. Channel Selection Switch
9
7. LED
8. Hot Shoe Mount
9. Locking Ring
7
10. Cold Shoe / ¼” Tripod Lug
11. Battery Compartment
1
3
8
2
3

Please Note
Tips: Turn o all devices – ashes/strobes,
After turning on the Phottix Odin TCU and
cameras, and the Phottix Odin TCU and
receivers, slave mode does not need to be set
receivers - when connecting and disconnect-
on ashes on Phottix Odin receivers, but ashes
ing devices.
need to be set in TTL mode, Flash Zoom needs
to be set to Auto and AF ILL to ON (see your
Upgrading rmware by USB
ash manual for details).
The rmware of the TCU and receivers can be
upgraded using the included USB cable. Any
Ensure there is a good hot shoe connection
upgrades and full instructions will be
between the TCU and camera, and ashes and
announced on the Phottix Blog
receivers for best performance.
(journal.phottix.com).
Many TTL ashes have been tested but the
manufacturer cannot guarantee that all third
party TTL ashes will function properly with the
Phottix Odin. It has been designed and
optimized for original Nikon ashes using the
i-TTL system. Issues with third party ashes will
not be supported.
4

En
INSTRUCTION MANUAL
Compatibility with Phottix Strato
3.
The Strato II Multi receivers set to the same
Series Flash Triggers
channel and compatible group as the Odin TCU
will be triggered. The Odin TCU will not trigger
The Phottix Odin TCU oers compatibility with
Strato II Multi receivers on Group D. Other Odin
Phottix Strato and Phottix Strato II Multi
TCU functions (TTL, Power control) will not
receivers. The Odin TCU will trigger Strato
aect Strato II Multi receivers.
receivers but will not transmit TTL or power
control data. Strato series receivers will work as
4. The Odin TCU set to Channel 1, 2, 3 or 4 in
they previously did: With ashes set in Manual
TTL/Mixed mode (Group A, B and C) and in
Mode.
Ratio mode (Group A and B) can be compatible
with Phottix Strato II Multi receivers on Channel
1. The Odin TCU set on Channel 1, 2, 3 or 4 and
1, 2, 3 or 4 and Group A, B or C.
in any group will trigger Phottix Strato
receivers set on Channel 1, 2, 3 or 4. Other Odin
5. Press the Test button and ashes on Strato II
TCU functions will not aect Strato receivers.
Multi Receivers will test re in sequence: Group
A, followed by Group B and C.
2. When the Phottix Odin TCU is set to Group A,
press the Test button, the Strato receivers and
6. If a group is disabled on the Odin TCU in
the ashes on receivers will test re.
TTL/Mixed mode, it will not trigger ashes on
Strato II Multi receivers.
5

7. Strato and Strato II Multi transmitters will not
Using the Modeling Light Button
trigger Odin receivers.
Pressing the Modeling Light Button on the TCU
will cause all ashes attached to Odin receivers
8. Phottix Odin for Nikon TCUs will not trigger
to ash for one second. This is useful as a
Odin for Canon Receivers.
preview of lighting set-ups or for assist-focus.
9.
Using the Odin TCU in HSS mode may cause
issues with ash sync when using Strato and
Inserting batteries
Strato II Multi receivers.
1. Press the battery cover in while pushing it
away from the Phottix Odin TCU or receiver.
LED functions
The battery cover will slide open.
The LED on the TCU and receiver units will
2. Remove the battery cover.
turn green when the camera is focusing and
red when a photo is being taken.
3. Insert AA batteries as shown.
4. Replace the battery cover and push back into
Using the LCD Backlight
the locked position.
Pressing any button on the TCU will turn on the
LCD Backlight for approximately 10 seconds. If
5. When the battery power icon on the TCU
no further buttons on the TCU are pressed the
shows low battery levels please change the
light will go o.
batteries.
6

En
INSTRUCTION MANUAL
6. When the battery power on receivers is very
Groups and Channels
low, the LED will ash red light every 2 seconds.
1. The Phottix Odin System has 3 groups: A, B,
Please change the batteries.
and C, and 4 transmission channels: 1, 2, 3, 4.
2. Receivers can be assigned both group and
Turning the TCU and receiver on/o
channel designations.
1. To turn on the Phottix Odin TCU: Press and
3. The TCU will allow EV, Power Level and Zoom
hold the Power Button until an image appears
setting adjustments to be set for each group of
on the LCD screen.
receivers set to same channel (if the group is
To turn o: Press and hold the Power Button
not disabled on the TCU)
until the LCD screen goes blank.
2. To turn on the Phottix Odin receiver: Move
the power switch to the “ON” position.
The TCU
Connecting to the camera hot shoe
To turn o the receiver by moving the power
switch to the “OFF” position.
1. Turn o the camera.
2. Slide the Odin TCU into the camera’s hot
shoe mount.
7

3. Turn the TCU locking ring until tight.
To change function screens
Press the Option button on the TCU. The
4. Turn on the Odin TCU.
Option Button will switch between TTL/Mixed
5. Turn on the camera.
screen and Ratio screen.
Functions
TTL/Mixed Functions Screen
The TCU has two main function screens:
The Selection Button allows you to cycle
TTL/Mixed Function Screen and Ratio.
through groups A, B, and C, and Channel
TTL/Mixed allows groups A, B and C to be set to
selections. Active selections will ash on the
TTL, Manual or OFF individually with
LCD.
adjustments to Zoom, EV level or power level.
1. The - / + buttons will change the EV
adjustments or Power Level while groups A, B
Ratio allows groups A and B can be set from 8:1
or C are selected.
to 1:8. EV levels can also be adjusted from -3 to
2. The - / + buttons will change the transmis-
+3 (similar to the Nikon iTTL system available
sion channel (1, 2, 3 or 4) when Channel is
on some ashes).
selected. This will change the channel the TCU
uses to transmit.
8

En
INSTRUCTION MANUAL
TTL / M / O Ratio Functions Screen
While groups A, B or C are selected, pressing
The Selection Button allows you to cycle
the Mode button will change from TTL, (M)
through A:B ratio adjustments, EV adjustments
Manual, or O functions.
and Channel selections.
TTL: Will re ashes using TTL metering. The
Press the Selection button to access Ratio
EV level of each group can be adjusted up or
adjustments. Press the + / - button until the
down (see above).
desired A:B ratio is achieved.
M: Flashes are set in Manual mode and power
Pressing the Selection button again will move
levels adjusted up or down (see above).
the active selection to the EV adjustment
section. Press the + / - button until the desired
O: Selecting O (signied by three
EV level is achieved.
underscores _ _ _) will turn o the selected
group and not re any remote ashes in that
The Selection Button can also be used to
group.
navigate to the Channel icon. The - / + buttons
will change the transmission channel (1, 2, 3 or
Fast Exit
4) when Channel is selected. This will change
Pressing the TCU Power Button after making
the channel the TCU uses to transmit.
changes to settings will exit edit mode. The
TCU will save the current settings.
9

Fast Exit
2. Pressing the Selection button will cycle
Pressing the TCU Power Button after making
through groups A, B and C, and Transmission
changes to settings will exit edit mode. The
channel.
TCU will save the current settings.
3. With groups A, B or C active: Press the Mode
Button to change from TTL to Manual mode. In
Adjusting ash zoom
Manual Zoom, press the - / + buttons to adjust
The Phottix Odin allows the zoom level of
the ash zoom. No adjustments can be made in
ashes to be set wirelessly. Zoom can be set as
TTL mode.
TTL or Manual.
Note: Pressing the Selection button after the
TTL Zoom: Flash zoom setting will change
CH selection will return to the TTL/Mixed or
dynamically as a camera zoom ring is adjusted.
Ratios Function Screen.
Manual Zoom: Flash zoom can be set to a xed
value on the TCU. Any changes made to
Fast Exit
camera zoom will not aect this setting.
Pressing the TCU Power Button after making
changes to settings will exit edit mode. The
Using the Zoom Function
TCU will save the current settings.
1. Press the Zoom Button to enter the Zoom
screen – this functions the same in TTL/Mixed
or Ratio Modes.
10

En
En
INSTRUCTION MANUAL
INSTRUCTION MANUAL
2. Press and hold the Clear button for 2 seconds
Using the AF Assist Illuminator
to remove TTL/M/O, Ratio, Zoom and EV
(AF-ILL) Function
settings currently in the TCU.
Pressing the AF Assist Illuminator Function
button turns on/o ashes AF Assist functions.
3. The Clear button will not change or reset the
transmission channel (1, 2, 3 or 4) set on the
1. When turned on: AF Assist Illuminator Func-
TCU.
tion will cause a ash’ s AF assist lamp to
illuminate when the camera shutter button is
Using the Test Button
half-pressed.
The test button will re all ashes connected to
2. When turned o: AF Assist Illuminator Func-
Phottix Odin receivers that are on the same
tion will be disabled and will not illuminate
channel as the TCU.
when the shutter button is half-pressed.
1. Press the Test button.
Note: AF-ILL Functions need to be enabled
2. Flashes will re in sequence: Group A,
in ashes custom function menus. See ash
followed by Group B and C.
instruction manuals for details.
FP High Speed Sync
Using the Clear Button
1. The Clear Button will erase any settings
High Speed Sync functions, with a maximum
currently in the TCU.
shutter speed up to 1/8000 sec., are support by
11

the Phottix Odin when used with cameras and
specic menu settings.
ashes oering this function.
Continuous High Speed
1. FP High Speed Sync cannot be set on the
Using the Phottix Odin will result in slower
Odin TCU.
continuous high speed shooting than can be
2. Auto FP needs to be set on the camera –
achieved when using a ash directly on the
consult your camera manual for specic menu
camera. There are dierences in metering
settings.
between the Phottix Odin system related to
groups and pre-ashes than Nikon’s native
Second Curtain Sync
system.
(Rear Curtain Sync)
1. Continuous High Speed functions cannot be
Second Curtain Sync will re the ash at the end
set on the Odin TCU.
of an exposure, not at the beginning. This can
be combined with longer exposures for creative
2. Continuous High Speed functions needs to
eects.
be set on the camera – consult your camera
manual for specic menu settings.
1. Second Curtain Sync cannot be set on the
Odin TCU.
For reference:
2. Second Curtain Sync needs to be set on the
Camera: Nikon D800; Flash: SB910; Phottix
camera – consult your camera manual for
Odin; Time of continuous high speed: 2 sec.
12

En
INSTRUCTION MANUAL
1. SB910 (in TTL mode) mounted on Nikon
or 4 to select a channel.
D800: 8 photos can be taken in 2 sec.
3. Ensure the Phottix Odin TCU and receivers
2. SB910 (in TTL mode) with Phottix Odin for
are set to the same channel.
Nikon Receiver and Nikon D800 using the
Phottix Odin TCU: 6 photos can be taken in 2
Connecting a ash to the Odin
sec.
receiver hot shoe
1. Turn o the ash and the Phottix Odin
The Phottix Odin Receiver
Receiver.
Setting Groups on the receiver
2. Slide the ash into the receiver’s hot shoe
1. The Phottix Odin receiver has three group
mount.
settings.
3. Lock the ash with the ash’s locking
2. Move the Group Selection Switch to A, B or C
mechanism.
to select a group for each receiver.
4. Turn on the ash and the Phottix Odin
receiver.
Setting Channels on the receiver
1. The Phottix Odin receiver has 4 channels.
2. Move the Channel Selection Switch to 1, 2, 3,
13

Connecting a ash to the Odin
receiver to studio lights or ashes
by cable
1. Turn o the ash/strobe and the Phottix Odin
receiver.
2. Connect a cable to the receiver’s 3.5 mm
Output Port.
3. Connect the opposite end of the cable to a
ash or studio strobe (A 6.3 mm adapter is
included for studio strobes).
4. Turn on the ash/strobe and the Phottix Odin
receiver.
5. Set the ash to Manual mode – no TTL
functions can be used when a compatible ash
is triggered by cable.
14

En
INSTRUCTION MANUAL
Technical Specications
Frequency: 2.4 GHz
Distance: 100m+
Channels: 4 channels
Groups: 3 groups – A, B, C
Batteries: 2 x AA batteries (TCU and Receiver), 5V DC on receiver (external power port)
Max sync speed: 1/8000 sec*
Output: Hot shoe, 3.5 mm port (receiver)
Input: USB port (transmitter and receiver)
Attachment: 1/4 tripod lug, cold shoe (Receiver)
Input voltage: 2.4-3.2V
Flash port voltage handling: 6V (transmitter) ≤300V(receiver)
Body dimensions: 94(L) x 66(W) x 35(H) mm, (transmitter), 90(L) x 45(W) x 40(H) mm (receiver)
Antenna: built-in PCB antenna
Weight: 105g (transmitter), 66g (receiver) – without batteries
Operating temperature: -15—65℃
Storage temperature: -30—85℃
* On compatible cameras / ashes
15

Warnings
- This product is a precise electronic instru-
ment. Do not expose to damp environments
or dust.
- Do not drop or crush.
- Do not use harsh chemical(s) or solvents to
clean the body. Use a soft cloth or lens paper.
- Interference: The Phottix Odin transmits and
receives radio signals at 2.4 GHz. Its perfor-
mance can be aected by electrical current,
magnetic elds, radio signals, wireless routers,
cellular phones, and other electronic devices.
Environmental objects, such as large buildings
or walls, trees, fences, or cars can also aect
performance. If your Phottix Odin receiver will
not trigger, move its location slightly.
16
