Phottix Mitros for Canon: инструкция
Раздел: Аксессуары для фото- и видеотехники
Тип:
Инструкция к Phottix Mitros for Canon
Phottix Mitros TTL Flash
for Canon
En
INSTRUCTION MANUAL
De
BENUTZERHANDBUCH
Fr
MANUEL D’UTILISATION
Es
MANUAL DE INSTRUCCIONES
It
ISTRUZIONI D’USO
Pl
INSTRUKCJA OBSŁUGI
Ru
РУКОВОДСТВО ПОЛЬЗОВАТЕЛЯ
Simp
Cn
说明书
Trad
Cn
說明書
1

En
INSTRUCTION MANUAL
Phottix Mitros TTL Flash
for Canon
Note: To start immediately using this ash please refer to the quick-start guide.
Parts
For advanced features please read this manual and be familiar with your camera
manual and operations.
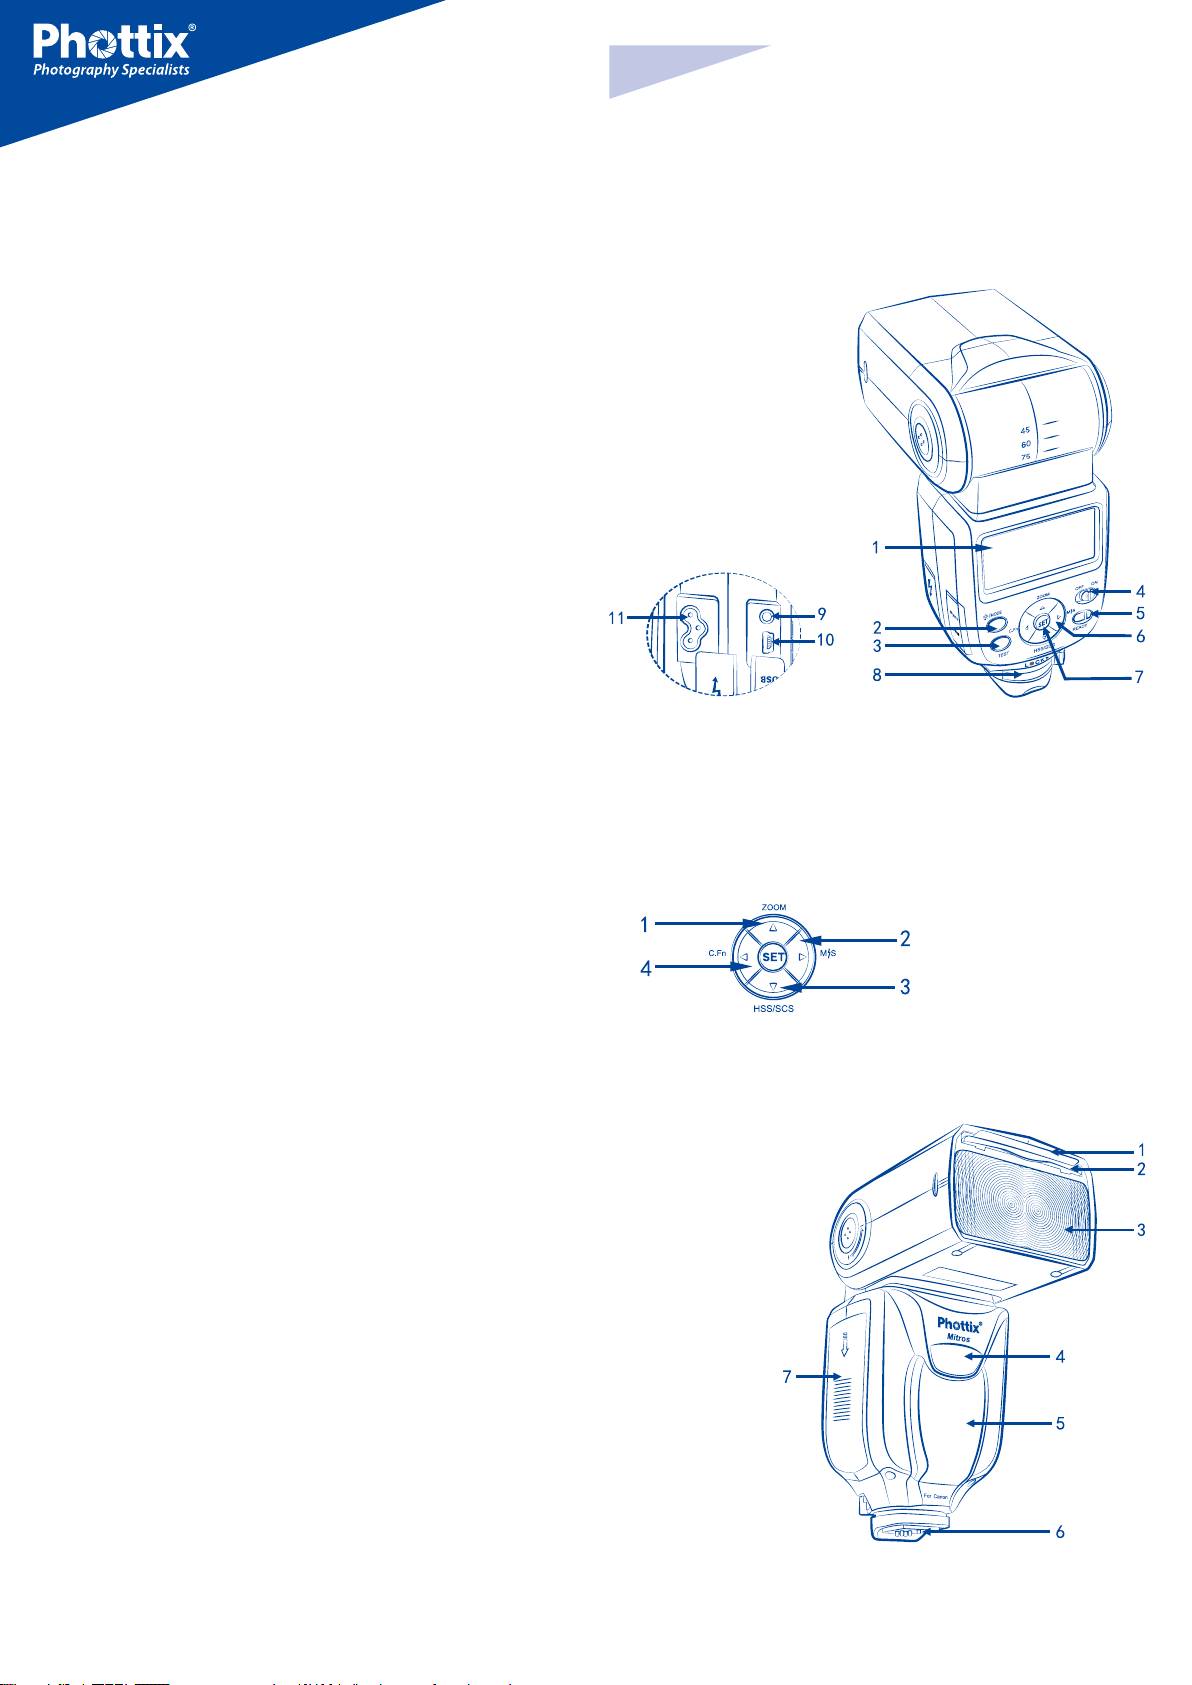
Back / Left Side
The Phottix Mitros TTL Flash for Canon is designed to work with Canon DSLR
1. LCD Display
cameras and features ETTL I/II, Manual, Multi modes as well as Wireless Master/
2. Mode Button
Slave triggering.
3. Test Button
4. Power Switch
5. Ready Light
Warnings
6. Arrow Adjustment
Buttons (see below)
1. Use your ash safely. Do not re the ash into the eyes of people or animals at
7. Set Button
short distances – damage and/or blindness can occur.
8. Locking Lever
2. Be careful using the ash in or around cars, buses, motorcycles or other mov-
9. 3.5mm Sync Port
ing vehicles as accidents can result.
10. USB Port
11. External Power Port
3. Never use the ash near combustible gases (gasoline, solvents, etc.).
4. Do not expose the ash or batteries to dripping/splashing water, or high hu-
midity.
5. Do not leave the ash or batteries in a hot location (direct sunlight, in a closed
car, etc.).
6. Remove batteries from the ash when not being used for an extended period
of time.
7. Change the batteries when required. Use undamaged batteries in good con-
dition. Do not mix battery types or new and used batteries.
Arrow Adjustment Buttons
8. Do not put opaque objects in front of the ash lens when ring the ash. The
1. Up Arrow / Zoom Adjustment Mode Button
energy emitted by the ash may cause objects to burn, or cause damage to the
2. Right Arrow / Wireless Flash Mode Button
ash tube or fresnel lens.
3. Down Arrow / HSS / SCS Button
4. Left Button / Custom Functions Button
9. Use caution in touching the ash head after use. It may be hot and can cause
burns.
10. The ash contains high voltage electronic parts. Do not disassemble or at-
tempt to repair the ash. Never touch the ash’s internal components.
11. Do not touch the External Power Port contacts with any metal objects – this
can cause electric shock and serious injury.
Front / Right Side
Table of Contents
1. Bounce Card
2. Wide Angle Diuser
Parts and Functions …...................................................…... 2
3. Flash Head
Modes …….............................................................................7
4. Wireless Signal Receiver Area
Wireless Triggering……........................................................ 9
5. AF Assist Light
Custom Functions…….........................................................11
6. Hot Shoe
Technical Specs…….............................................................12
7. Battery Compartment
2

En
INSTRUCTION MANUAL
Please note:
Raising and Rotating the Flash Head
These instruction assume:
1. The ash head will elevate from -7 to 90 degrees with stops at -7, 0, 45, 60, 75
and 90 degrees. Gently raise or lower the ash head into the required position.
1. Both the ash and camera are switched on.
2. The ash head will rotate 180 degrees in either direction with stops at 60, 75,
2. The ash and camera are set to the same settings as this manual.
90, 120, 150 and 180 degrees. Gently rotate the ash head into the required
3. Camera menu and ash custom functions menu are set to default values.
position.
4. The ash is being used with a compatible Canon DSLR.
3. When the ash head is raised or rotated from the 0 degree standard forward
position the ash zoom will set itself to 50mm. “- -” will be displayed on the
LCD. Flash zoom when the head is raised or rotated can be changed in MZoom
mode (see below).
Installing batteries
4. At -7 degrees the ash zoom will act the same as 0 degree – it will not change
1. Press the battery cover in while pushing it towards the bottom of the ash.
any settings.
The battery cover will open and raise.
2. Insert AA batteries as shown by the diagram inside the battery compartment.
3. Lower the battery cover and push back towards the top of the ash, locking
Using the Bounce Card or Wide Angle Diuser
it in place.
The Phottix Mitros Flash comes equipped with a white bounce card and wide
angle diuser panel in the ash head.
Please note:
1. The wide angle diuser panel will cause the ash to spread light to a 14mm
- Please use four standard high-quality batteries of the same brand. Make
equivalent.
sure all batteries are at similar powers levels.
2. The white bounce card can be used when the ash head is in a raised position
- Batteries can get hot when the ash is being used. Use caution when chang-
to bounce light forward to assist with catch lights in a subject’s eyes.
ing batteries.
To use:
- If you do not use the ash for an extended period of time, store with bat-
teries removed.
1. Gently pull the diuser panel and bounce card from the ash head using
the ridge on the bottom of the diuser panel.
2. If using the diuser panel it will drop into position over the ash head. Gen-
Attaching the ash to a camera
tly push the bounce card back into the ash head if not needed.
Turn o both the camera and ash
3. If using the bounce card only gently push the diuser panel back into the
ash head.
1. Align the ash hot shoe with the camera hot shoe.
2. Slide the ash into the camera hot shoe until fully inserted.
3. Lock the ash in position by pushing the locking lever to the right until the
Using the Flash Head Diuser
lock engages with a click.
The Phottix Mitros TTL Flash comes with an attachable diuser that can be add-
4. To Unlock, press the locking release button on the locking lever and slide to
ed to the front of the ash head when needed. It is good for softening light,
the left.
reducing hot spots and shadows and better coverage for macro photography.
To use:
Turning the Flash On / O
1. Align the diuser with the ash head, with the “UP” mark on the diuser
1. To power on the ash move the power switch to the on position.
facing up.
2. To power o the ash move the power switch to the o position.
2. Snap one side of the diuser mount into the corresponding ash head
mount.
3. Repeat step 2 on the other side of the diuser.
Battery Level Indicator
The Battery Level Indicator on the LCD (see below) will display an approximate
indication of how much power remains in the batteries in the ash. Use this as
a rough guide as to when a battery change is needed. If ash recycling time has
become very long (30 seconds) change the batteries.
3

En
INSTRUCTION MANUAL
Overheating Protection
The Phottix Mitros contains an overheating protection circuit that will slow ash
recycle time to avoid overheating-related damage. Approximately 20 full-power
ashes in a short amount of time will trigger this protection. A [ Hot! ] Icon will
appear when the overheating protection circuit is in operation.
To avoid further overheating or possible damage the ash will increase the re-
cycling time to assist in lowering the ash temperature. Wait 10 minutes before
using the ash.
If the ash continues to be used after the [ Hot! ] Icon appears and the ash does
not cool down a [ Stop ] icon will appear on the LCD. Cease using the ash and
wait 10 minutes for it to cool down.
Sync and USB Ports
1. The 3.5mm Sync Port can be used with a 3.5mm sync cable to trigger the
ash – from a ash trigger or camera. This port is input only – ash signals are
not output from this port.
2. The USB port is used for rmware upgrades. Firmware announcements and
instructions will be made available on Phottix websites.
Status LED
Left LED: Flash-ready indicator. In Quick Flash Mode, the LED will ash green
when the ash has the minimum recycle charge. It will ash red when fully
charged.
Right LED: Flash exposure conrmation lamp. If a standard ash exposure is ob-
tained, the ash exposure conrmation lamp will light blue for approximately 3
seconds. If the ash exposure conrmation lamp doesn’t light, move closer to
the subject or increase the camera ISO setting.
External Battery Port
The External Battery Port is a proprietary Phottix design for use with Phottix
ash cables. The external port is compatible with the Canon CP-E4 compact bat-
tery pack or compatible models when the included adapter is used.
Please note:
- Batteries must be used in the ash even when an external battery pack is
used.
- Never use non Canon-compatible battery packs.
4

En
INSTRUCTION MANUAL
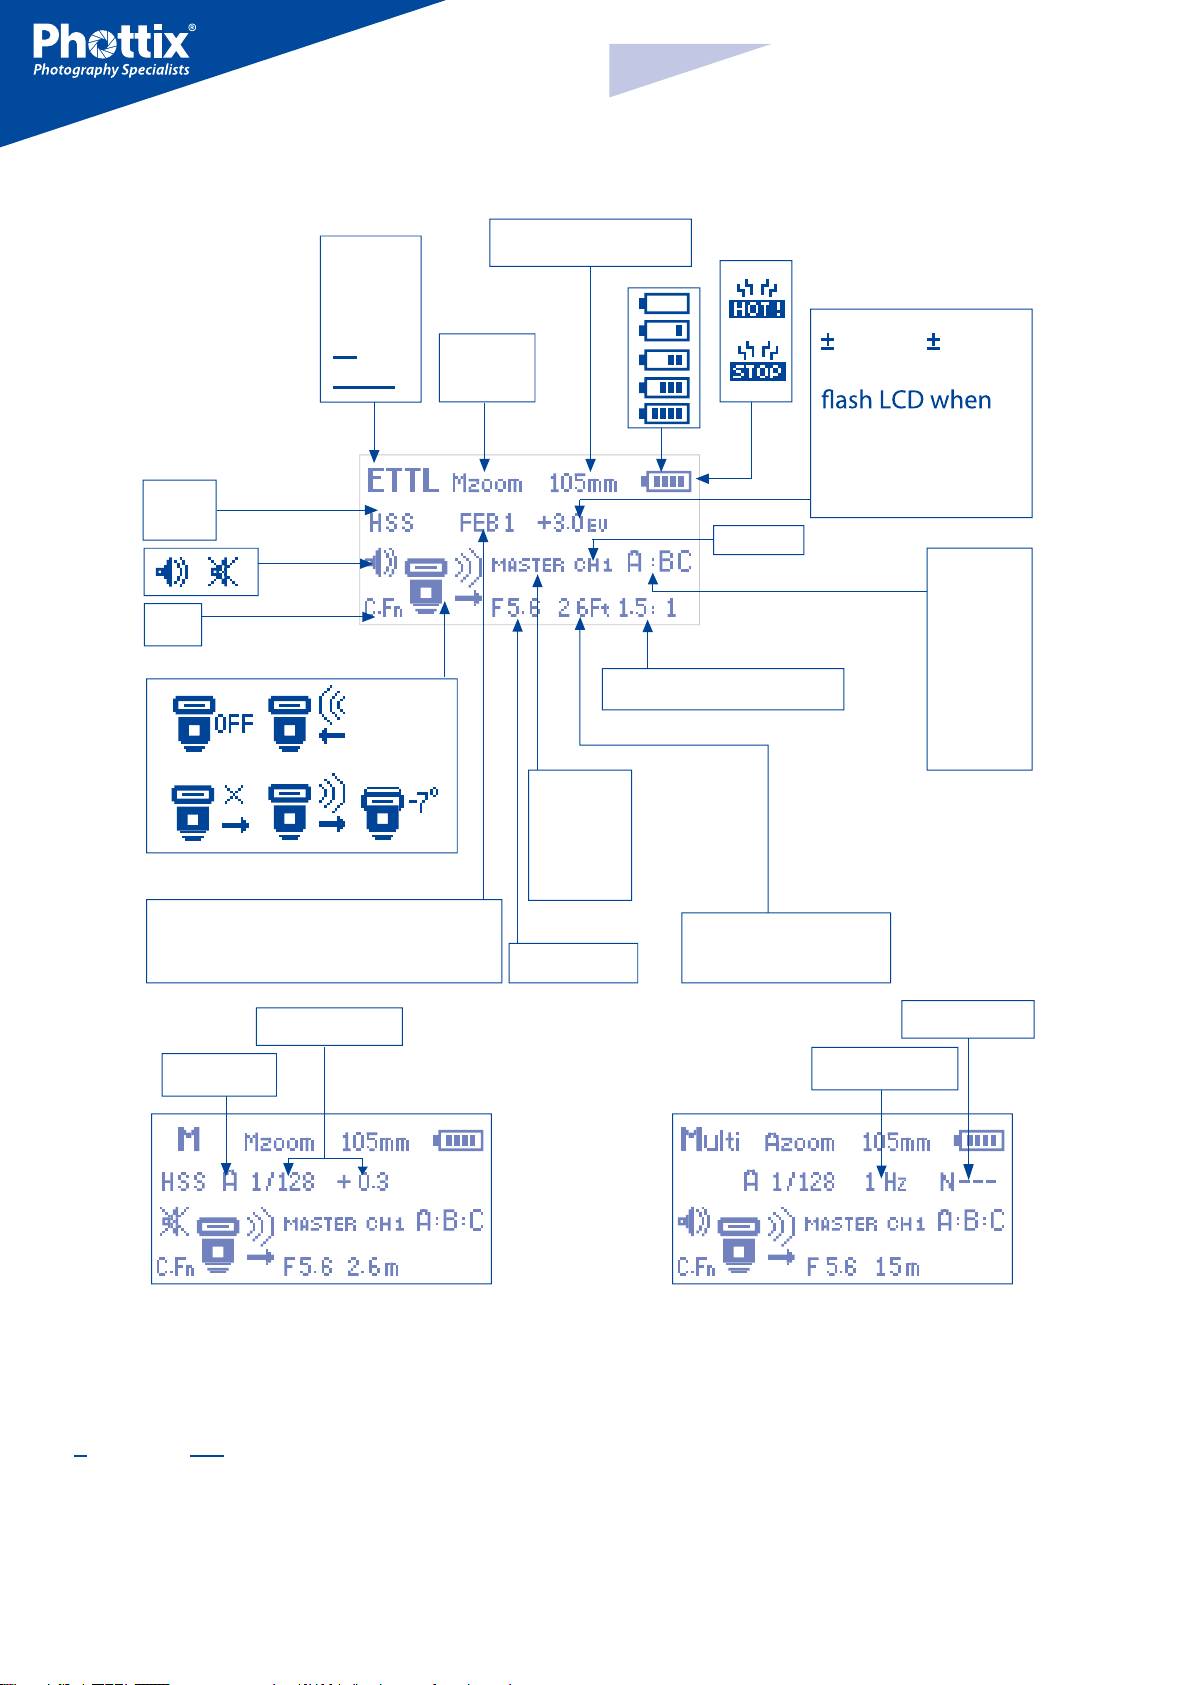
The LCD Display
14mm – 105mm
ETTL
M
Multi
M
3.0EV (" C " will
Azoom
Multi
be displayed on
Mzoom
camera’ s EV
setting is
preferred.)
SCS
HSS
CH1 – 4
A
B
C.Fn
C
A : B : C
8 : 1 – 1 : 1 – 1 : 8
A+B+C
A : BC
A : B
SLAVE
MASTER
OFF
OS
FEB Information
Flash range
(Shots taken / FEB amount)
Aperture
(in meters/feet)
N(1 – 100)
1/1 – 1/128
(1 – 199) Hz
A B C
The LCD display on the Phottix Mitros ash contains important information re-
In ETTL mode: HSS/SCS, FEB, EV
garding ash settings and functions.
In M mode: HSS/SCS, Group, Power Level
Top Line:
In Multi mode: Group, Power Level, Frequency, Flash Count
1. Flash Mode: Indicates the set mode of the ash - ETTL, Manual, Multi, M (slave
Third Line:
mode), Multi (slave mode)
Beep Signal Icon, “-7°” icon, Master / Slave Triggering Area – displays channel,
2. Zoom: Indicates auto or manual ash head zoom and distance
master/slave mode, group information
3. Battery Level Indicator, Hot!, Stop
Fourth Line:
Second Line:
Flash and Exposure information: C.Fn icon, Aperture (f stop), ash range and
High Speed Sync (HSS) / Second Curtain Sync (SCS) icon
ash ratio
FEB, Group, Power Level, EV, Multi Mode indicators (Frequency and Flash Count)
5

En
INSTRUCTION MANUAL
Auto-Save Functions
Auto-Idle Functions
The Phottix Mitros will remember ash settings. Mode, power levels, etc. will be
To save battery power the Phottix Mitros TTL Flash is equipped with Idle and
retained in the ash if it is turned o and then back on.
Auto O modes.
1. In Non-Wireless Slave Modes: The ash will go into Auto Idle mode after 90
sec. if no buttons have been pressed or it has not been red. The ash LCD will
Setting Flash Zoom
go blank. Half-pressing the camera shutter button or pressing the test button
on the ash will wake up the Phottix Mitros.
The Phottix Mitros Flash has two ash head zoom modes – Auto (Azoom) and
Manual (Mzoom). Auto zoom will dynamically change ash head zoom as a
2. In Wireless Slave Mode, the ash will go to Slave Idle Mode after 60 minutes if
camera’s zoom lens is changed to provide optimum lighting. Manual zoom al-
no buttons have been pressed or it has not been red, “IDLE” will be displayed
low the user to set the zoom of the ash head.
on the ash LCD. Full-pressing the camera shutter button or pressing the Mas-
ter ash test button will wake up ashes in idle mode. Slave Idle Timer can be
To set:
changed from 60 minutes to 10 minutes (see C.Fn-10 below). The ash will go
into Slave Auto O Mode after 8 hours if no buttons have been pressed or it has
1. Press the button.
not been red after “IDLE” is displayed on the ash LCD. Pressing the test button
2. The Zoom area on the LCD will be highlighted and ash.
on the ash will wake it up. Slave Auto O can be changed from after 8 hours to
after 1 hour (see C.Fn-11 below).
3. Press the or buttons to set the ash head zoom to Azoom
or the desired Mzoom manual level.
4. Press the button when the zoom is properly set.
Modeling Flash
Please Note:
1. Pressing the camera depth-of-eld preview button (if available) will re the
1. When in Azoom and the ash head is raised or rotated from the 0 degree
ash continuously for 1 second. This Modeling Flash is useful in seeing lighting
standard forward position - the ash zoom will set itself to 50mm. “- -” will be
eects and balance on the subject.
displayed on the LCD. The ash zoom will not change if the head is lowered
2. Modeling Flash is available in all modes, ETTL, Multi and Manual.
to -7 degrees.
3. Modeling Flash can be used in both normal and wireless shooting and can be
2. Azoom will work ONLY when the ash head is set to either 0 or -7 degrees.
set (see C.Fn-02 below).
3. When in Mzoom and the ash head is raised or rotated from the 0 degree
standard forward position - the ash zoom will not be changed from the pre-
Please note:
vious setting.
1. Overheating and damage can result from excessive use of the Modeling
4. Flash Zoom can be adjusted when the head is raised or rotated by switch-
Flash. Do not use more than 20 times in succession.
ing to Mzoom mode and making desired adjustments.
2. When overheating the ash will automatically increase charging time until
the ash temperature has decreased.
Setting High Speed Sync or Second Curtain Sync
Autofocus (AF) Assist Light
The Phottix Mitros ash has both High Speed Sync and Second Curtain Sync
functions. See further details under High Speed Sync and Second Curtain Sync later
1. In low light/contrast situations the Phottix Mitros’ built-in Auto Focus Assist
in this manual.
Light will illuminate to assist with AF. The AF Assist Light on the front of the ash
will project a focusing target on the subject.
To set:
2. AF Assist Light functions can be set to on or o (see C.Fn-08 below).
1. Press the button.
2. The button will cycle between HSS, SCS and turning both o.
Adjustments
Please note:
-HSS and SCS are available in ETTL and Manual modes, but not in Multi mode.
The Phottix Mitros will adjust levels in 1/3 stop increments. Some cameras have
custom functions to change stop adjustments from 1/3 to 1/2 stop increments
for FEB and FEC. If camera custom functions are changed the Phottix Mitros will
automatically adjust levels in 1/2 stops.
Test Button
Pressing the test button will trigger the ash. This can be used for metering (in
manual mode only). In Wireless Master Mode pressing the test button will re
slave ashes on the same channel being controlled by the Master ash. Test but-
ton output levels can be congured (see C.Fn-07 below).
6

En
INSTRUCTION MANUAL
Flash Modes
Please note:
- By default: FEB will be cancelled after three photos are taken. FEB can be set
The Phottix Mitros has three ash modes: ETTL, Manual (M) and Multi (Strobo-
in the Custom Functions screen (see C.Fn-03 below).
scopic).
- FEB shooting sequence can be changed (see C.Fn-04 below).
To change modes:
- FEB can be used with FEC and FEL (see below).
1. Press the button.
- For best results set the camera drive mode to “single” and ensure the ash is
2. The ash modes will cycle through ETTL, Manual (M) and Multi modes.
fully recharged before taking the second and third photos.
3. The current mode will be displayed in the top left corner of the LCD.
- Some cameras have custom functions to change stop adjustments from
1/3 to 1/2 stop increments for FEB and FEC. If camera custom functions are
ETTL Mode
changed the Phottix Mitros will adjust levels in 1/2 stop increments.
Flash Exposure Lock - FEL
Flash Exposure Lock (FEL) can be used to lock the ash exposure before a photo
is taken. This is useful when manual spot metering is being used in a scene with
dierent lighting conditions.
While in ETTL mode, press the camera’s FEL button (the “
” button) to use this
function. See your camera user manual for more information on FEL functions
In ETTL Mode the ash and camera will work together to calculate the correct
and usage.
exposure for recorded images. When the shutter button is fully pressed the ash
Pressing the FEL Button will cause the ash to re a pre-ash that will be used
will re a pre-ash that the camera will use to calculate exposure and ash pow-
to calculate ash power during the exposure. This will be retained in the camera
er the instant before the photo is taken.
memory. The FEL icon will be displayed in the camera viewnder.
Flash Exposure Compensation - FEC
Each time the FEL button is pressed a pre-ash will re and a new exposure cal-
culated. When the shutter button is fully pressed the ash will re at the locked
The Phottix Mitros Flash oers Flash Exposure Compensation (FEC) functions
rd
exposure.
and adjustements from -3 to +3 in 1/3
stops. This is useful in situations where
ne-tuning of the TTL system is needed based on the environment.
Please note:
To set FEC:
- If the subject is too far away underexposure will result, the “FEL” icon will
1. Press the button to enter FEC Adjustment Mode.
blink for approximately 0.5 sec. in the camera viewnder.
2. Press the or buttons to adjust FEC up or down.
- If the subject is too small in the viewnder, FEL may not be eective.
3. Press the button to exit FEC Adjustment Mode.
High Speed Sync – HSS
In HSS mode, the camera/ash maximum sync speed can reach the camera’s
Please note:
maximum shutter speed. This is useful when using aperture priority mode or
- Some cameras have custom functions to change stop adjustments from
to limit ambient light. HSS may vary with dierent camera models - see your
1/3 to 1/2 stop increments for FEB and FEC. If camera custom functions are
camera user manual for details.
changed the Phottix Mitros will adjust levels in 1/2 stop increments.
To use HSS mode:
Flash Exposure Bracketing - FEB
1. Press the button.
Flash Exposure Bracketing (FEB) can be used to automatically change ash pow-
er over a series of photos. The camera will record three images with dierent
2. The HSS icon will be displayed on the ash LCD.
exposures – one exposed as per camera calculations, one over-exposed and
3. Set shutter speeds higher than the camera’s ash sync speed and take
another under-exposed. Over and under exposure levels can be set by the user.
photos.
FEB is useful in run-and-gun situations as well as when shooting scenes with
dierent lighting conditions to help ensure a properly exposed photo. It can
To exit HSS mode:
also be used for HDR photography.
1. Press the button twice.
Some cameras have ash exposure storage function, see your camera user man-
ual for more details.
2. It will cycle from HSS to SCS and back to regular FCS mode.
To Set FEB:
Please note:
1. Press the button.
- Check that the HSS icon is displayed in the viewnder.
2.
Press the button. “FEB 0” will be displayed and highlighted on the LCD.
- HSS drastically reduces ash power, battery power and range.
3. Press the and buttons to adjust the exposure bracketing
amount.
4. Press the button to conrm the setting.
7
En
INSTRUCTION MANUAL
Second Curtain Sync – SCS
The Phottix Mitros Second Curtain Sync function makes the ash re at the end
5. Press the button to exit the adjustment screen.
of an exposure, not the beginning. This can be useful with slow shutter speeds
for capturing special eect.
Please note:
1. Overheating and damage can result from excessive use of the Multi Strobo-
To use:
scopic Mode. Do not use more than 20 times in succession.
1. Press the button twice. This will cycle from FCS to HSS and then
2. When overheated the ash will automatically increase charging time until
the SCS mode.
the ash temperature has decreased.
2. To cancel: Press the button once. This will return to standard FCS
mode.
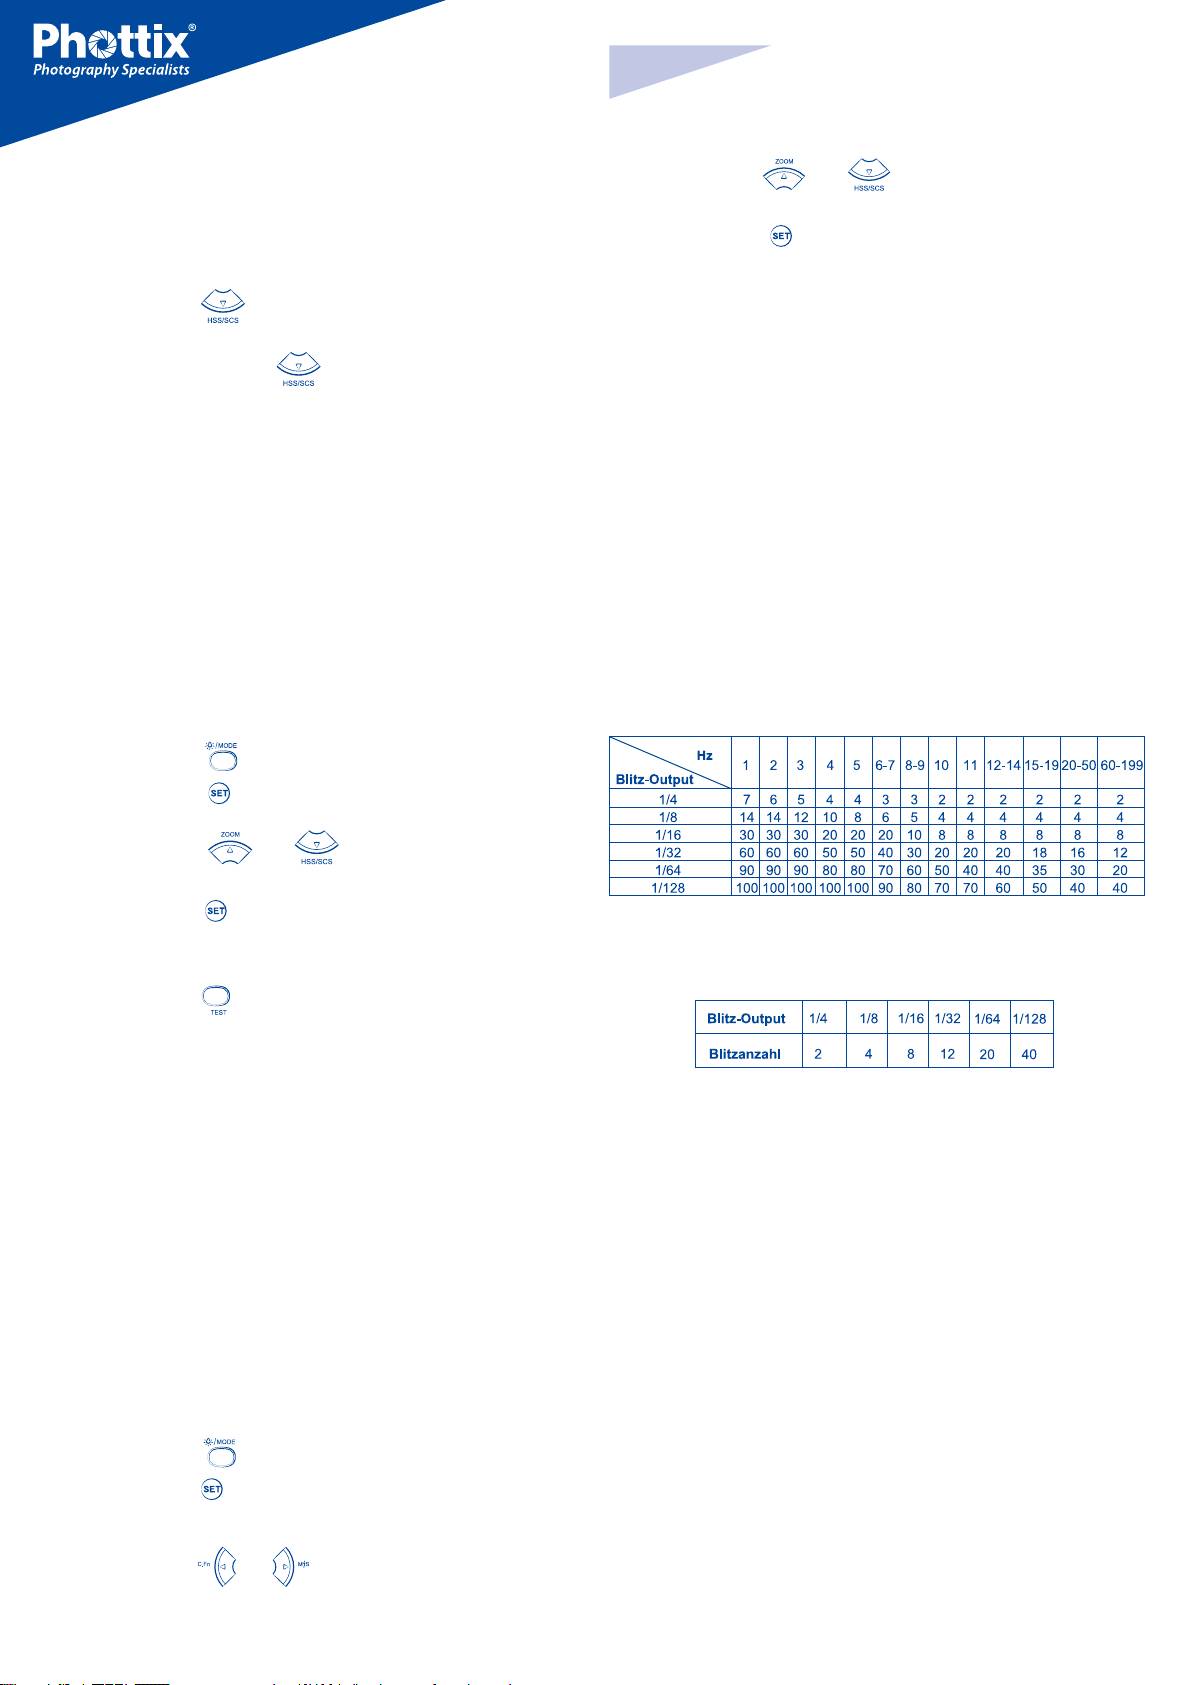
Stroboscopic Mode and Shutter Speeds
To determine the proper camera shutter speed to be used with various Strobo-
Please note:
scopic Mode variables, use the following formula:
SCS functions will not work in Wireless or Multi modes.
Number of ashes / Frequency = Shutter Speed
Example: 5x (number of ashes) / 10 Hz (Frequency) = .5 second shutter speed.
Manual (M) Mode
This is a rough guideline: You may need to increase or decrease the shutter
In Manual Mode the ash will re at the power level you set. The Phottix Mitros
speed to get the desired result.
TTL Flash can be adjusted from 1/1 (full power) to 1/128 – 8 stops of adjustments
in 1/3rd stop increments. Aperture, shutter speed and ISO on the camera needs
Multi Stroboscopic Mode Output Chart
to be manually adjusted. For best results use M-Manual mode on the camera.
To use:
1. Press the button until M is displayed on the ash LCD.
2. Press the button to enter the power adjustment screen. The power
level will ash and be highlighted.
3. Press the or buttons to adjust the ash power.
4. Press the button to exit the power adjustment screen.
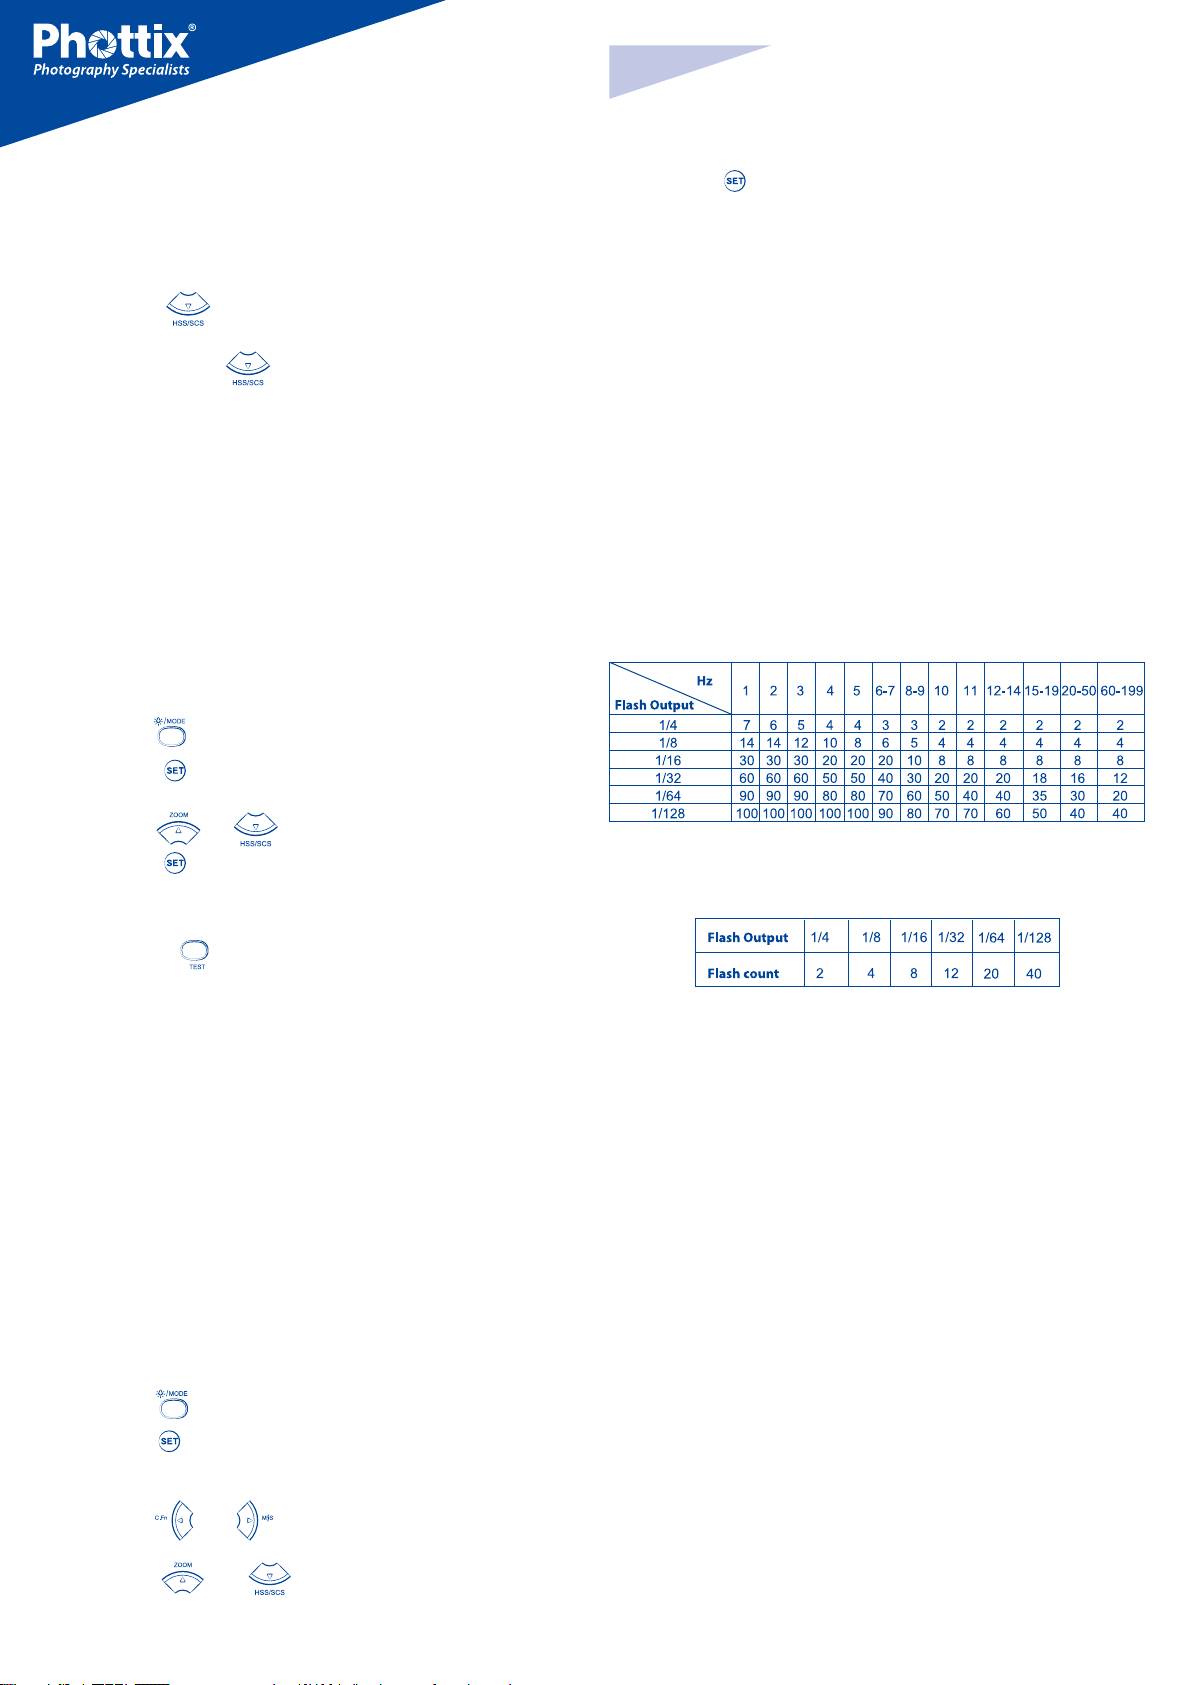
If the number of ashes is displayed as “N---”, the maximum number of ashes
will be as shown by the table below regardless of the ring frequency.
5. When the ash ready light is illuminated red the ash is fully charged and
ready to re.
6. Pressing the button will re the ash at the manual power level you
set. This is useful when taking meter readings.
Please note:
- Half pressing the shutter button will display the eective manual ash pow-
er range on the Flash LCD.
Multi: Stroboscopic Mode
With Multi Stroboscopic mode a series of rapid ashes will be red. The ash
count, frequency and power of these ashes can be programmed on the Phottix
Mitros. Multi mode is useful for capturing multiple images of a moving subject
in the same photo and other special eects.
The frequency of the eect (in Hz. - number of ashes per second), the total
number of ashes and output levels can be set.
To use:
1. Press the button until Multi is displayed on the ash LCD.
2. Press the button to adjust Multi settings. Displayed (from left to right
on the LCD) Power, Frequency (HZ) and Flash Count. Power is highlighted and
ashing upon entering the adjustment screen.
3. Press the and buttons to change between Power, Frequency
(HZ) and Flash count.
4. Press the and buttons while the setting is highlighted to
adjust Power, Frequency (HZ) and Flash count to the desired levels.
8

En
INSTRUCTION MANUAL
5. Select the transmission channel.
Wireless Triggering Mode
6. Select the Ratio mode (see below).
The Phottix Mitros TTL Flash is equipped with wireless triggering. Using pulses
7. Press the button to conrm and exit the screen.
of light, a ash on the camera adjusts and res remote ashes.
Master with Flash mode: The Master ash on the camera will re when a
The Phottix Mitros can also be triggered as an Optical Slave (OS). In OS mode
photo is taken.
other nearby red ashes will trigger the Mitros in manual mode only.
Master without Flash mode: The Master ash on the camera will not re
A ash set in Master mode must be attached to the camera (or the camera pop-
when a photo is taken. The ash will emit a short burst of light to communi-
up ash used, if compatible). Remote ashes must be set to slave mode.
cate with slave ashes but this light will not be part of the exposure.
Wireless triggering is achieved by pulses of light red by the Master ash. All
ashes must be in line of sight. The Wireless Signal Receiver Area must be able to
To set Slave Mode:
“see” signals from the Master ash. This system may not perform well outdoors
or in brightly lit areas.
1. Press and hold the button for 2 seconds to enter wireless mode.
For increased performance and power control consider using the Phottix Odin
2. Pressing the and buttons will cycle between Master with
TTL Flash Trigger with your Phottix Mitros ash. The Phottix Odin controls and
Flash, Master without Flash, Slave, OS and O modes.
res TTL ashes via radio signals, not pulses of light, and is less limited in all
3. Select Slave.
environments.
4. Pressing the button to change the highlighted selection from Slave
to Channel and Group.
Optical Slave (OS) Mode
5. Select the Transmission Channel.
In Optical Slave (OS) Mode the Phottix Mitros will re when it optically “sees”
another nearby ash re. The Mitros will re in manual mode at the power levels
6. Select the group: A, B or C.
it was set to.
7. Press the button to conrm and exit the screen.
To Set OS Mode:
8. When Slave ashes are ready to shoot the AF Assist light on the front of the
ash will blink once every 1 second.
1. Press and hold the button for 2 seconds to enter wireless mode.
9. To set Multi or M modes for the Slave – press and hold the button
2. Press button to cycle to OS mode.
for approximately 2 sec.
3. Press the button to conrm and exit the screen.
10. Set Power Levels or Multi Strobe Frequency / Flash Count using the arrow
4. The ash will change to Manual-M mode.
buttons.
5. Set the desired power level.
Please note:
Please note:
- Make sure the Master and Slave ashes are set to the same transmission
channel (1-4).
- Do not place any obstacles between the master unit and slave unit(s). Obsta-
cles can block signal transmissions.
- Do not place any obstacles between the master unit and slave unit(s). Obsta-
cles can block signal transmissions.
- Ensure the slave ash’s Wireless Signal Receiver Area faces toward the trig-
gering ash.
- When using wireless bounce ash, please ensure the slave ash Wireless Sig-
nal Receiver Area faces toward the Master ash.
- TTL pre-ashes will set o a ash set to OS mode. The ash will re before
the exposure. Do not mix OS mode with other ashes using TTL.
- When using only one ash set Wireless Mode to “O”.
- Unlike other Wireless Mode, Optical Slave (OS) does not use channels. A ash
set in OS mode will re when it sees any ash trigger.
Transmission channels
The Phottix Mitros Wireless system has four transmission channels: 1, 2, 3 and 4.
Signals from the Master ash are sent to Slave ashes on these channels. If Mas-
Wireless Settings
ter and Slave ashes are set to dierent channels the Slave ashes will not re.
Flashes must be set to Master or Slave mode. A Master ash is needed on the
camera to control remote (slave) ashes. The same transmission channel needs
to be set on both Master and Slave ashes. Groups need to be set for Slave ash-
Using Wireless Triggering
es, Group Ratio functions needs to be set for Master ashes.
With a ash in Master mode on the camera and remote ashes in Slave mode,
pressing the shutter button will re the Master ash (if set to Master with ash)
To set Master Mode:
and ashes set to Slave mode within the range of the Master ash. The camera
and ash will meter the scene and re ashes in TTL mode to properly expose
1. Press and hold the button for 2 seconds to enter wireless mode.
the scene.
2. Pressing the and buttons will cycle between Master with
ash, Master without ash, Slave, OS and O modes.
Ratio Modes
3. Select Master with ash or Master without ash.
Slave ashes can be controlled by the master ash in dierent ratio modes.
Available modes are:
4. Pressing button will change the highlighted selection from Master
to Channel and Ratio.
9
En
INSTRUCTION MANUAL
ETTL Modes
3. Pressing the and buttons will cycle between Master with
ash, Master without ash, Slave, OS and O modes.
A+B+C All three groups re at an average of the total calculated output.
4. Select Master with ash or Master without ash.
A:BC Groups A and B can be set by Flash Ratio (see below). Group C is inde-
pendent with its ash output level assigned by the camera.
5. Pressing button will change the highlighted selection from Master
to Channel and Ratio.
The EV compensation of Groups A and B can be adjusted.
6. Select the transmission channel.
1. Press the button after exiting the Flash Ratio Setting Screen.
7. Select the Ratio mode. Pressing the and buttons will cycle
2. Press the or buttons to adjust up or down EV for Groups
between A+B+C, A:B and A:B:C modes.
A and B.
8. Press the button to conrm and exit the screen.
3. The EV compensation for Group C can also be adjusted.
9. Press the button to adjust power levels.
4. Pressing the button after setting the ash ratio will move the high-
lighted selection to EV adjustment for Group C.
10. Pressing the or buttons will change the Flash Power Level
(1/1 to 1/128 in 1/3rd stops).
5. Press the or buttons to adjust the EV for Group C.
11. Pressing the button will change the Groups from A to B to C,
A:B Groups A and B can be set by Flash Ratio (see below). Group C is not
the button from C to B to A (if applicable).
adjustable and does not re.
12. Press the button to exit power level adjustment mode.
The EV compensation of Groups A and B can be adjusted.
1. Press the button after exiting the Flash Ratio Setting Screen.
Multi Mode
2. Press the or buttons to adjust up or down EV for Groups
A+B+C All three groups re in Multi Mode at the same power level, frequen-
A and B.
cy and ash count.
A:B:C The output level of each group is adjusted individually by the user (see
Setting and Adjusting Ratio Modes
below). The frequency and ash count of the multi strobe of each group are
same and can only be adjusted on Group A.
ETTL Modes
1. Press and hold the button for 2 seconds to enter wireless mode.
A:B Groups A and B can be set by power level individually by the user (see
below). The frequency and ash count of the multi strobe of Groups A and
2. Pressing the and buttons will cycle between Master with
B are same and can only be adjusted on Group A. Group C is not adjustable
ash, Master without ash, Slave, OS and O modes.
and does not re.
3. Select Master with ash or Master without ash.
Setting and Adjusting Multi Mode
4. Pressing button will change the highlighted selection from Master
to Channel and Ratio.
1. Press the button to change the ash into Multi Mode.
5. Select the transmission channel.
2. Press and hold the button for 2 seconds to enter wireless mode.
6. Select the Ratio mode. Pressing the and buttons will cycle
3. Pressing the and buttons will cycle between Master with
between A+B+C, A:B and A:BC modes.
ash, Master without ash, Slave, OS and O modes.
7. When A:B or A:BC are highlighted pressing the button will highlight
4. Select Master with ash or Master without ash.
the ratio adjustment selection below the ratio.
5. Pressing button will change the highlighted selection from Master
8. Pressing the button will change the ratio from 1:1 to 1:8 in steps of
to Channel and Ratio.
1:1.5, 1:2, 1:3, 1:4, 1:6, 1:8.
6. Select the transmission channel.
9. Pressing the button will change the ratio from 1:1 to 1.5:1, 2:1, 3:1,
7. Select the Ratio mode. Pressing the and buttons will cycle
4:1, 6:1, 8:1.
between A+B+C, A:B and A:B:C modes.
10. Press the button to conrm and exit the screen.
8. Press the button to conrm and exit the screen.
9. Press the button to adjust power levels.
Manual Modes
10. Pressing the or buttons will change the Flash Power Level
A+B+C In manual mode all three groups re at the same output level. This
(1/1 to 1/128 in 1/3rd stops).
power level can be set.
11. Pressing the buttons will change the Groups from A to B to C,
A:B:C The output level of each group is individually adjusted by the user (see
the button from C to B to A (if applicable), and allow power level to
below). Each group is independent, one not aecting the other.
be changed on these groups.
A:B Groups A and B power level can be set individually by the user (see be-
12. Pressing the button after cycling through the groups will move to
low). Group C is not adjustable and does not re.
the frequency and ash count selections.
13. Pressing the or buttons will allow changes to be made to
Setting and Adjusting Manual Modes
frequency and ash count. These setting can only be changed on Group A
1. Press the button to change the ash into Manual (M) Mode.
and will be applied to Group B or C (if applicable).
2. Press and hold the button for 2 seconds to enter wireless mode.
14. Press the button to exit power level adjustment mode.
10

En
INSTRUCTION MANUAL
Custom Functions
The Phottix Mitros TTL Flash comes with a number of programmable custom
3. Press the or buttons to change the function within the menu.
functions. To edit these functions (below):
4. Press the button to exit the C.Fn menu.
1. Press the button for 2 seconds to enter the C.Fn Menu Screen.
2. Press the or buttons to cycle through the menu items – C.Fn
0 to 15.
Custom Functions Chart
11

En
INSTRUCTION MANUAL
Quick Flash Function
Technical Specication
The Quick Flash function allows the ash to re at 1/6 to 1/2 of the full output.
Modes: E-TTL and E-TTL II, Manual, and Multi Stroboscopic
Quick Flash recycle times are faster. It helps for snap photography for near sub-
jects.
Guide No.: 58/190 (at 105mm focal length, ISO 100 in meters/feet)
Quick ash can be used for continuous drive modes, quick ash for continuous
Flash coverage: 24-105mm (14mm with wide angle diuser panel)
shot function can be enabled or disabled (see C.Fn-06 above).
Auto zoom (Flash coverage automatically adjusts to match the lens focal
Please note:
length)
The Quick Flash Function makes ash ring a priority. Under-exposure could
Manual zoom (Zoom can be adjusted by changing setting on the ash/cam-
result if the subject is located to far from the camera.
era)
Rotation: 360 degrees, Up-Down: -7 to 90 degrees.
FEC (Flash exposure compensation): Manual
Auto Backlight
FEB (Flash exposure bracketing): ±3 stops in 1/3 stop increments (Manual
The backlight will light up for 8 seconds and then go o if no buttons are
ash exposure compensation and FEB can be combined)
pressed. When the auto backlight function is enabled, pressing any button will
light it up after it goes o. When the auto backlight function is set to “disable”,
Sync modes: First Curtain Sync, Second Curtain Sync, and High Speed Sync
pressing the mode button will light it up.
Stroboscopic ash: 1-199Hz
Flash exposure conrmation: Blue LED lamp lights up in E-TTL mode
TTL Pref
Flash Recycling (with size-AA alkaline batteries)
TTL may vary slightly when using the ash on dierent cameras. TTL Pref (C.Fn-
Recycling time/Flash-ready indicator:
15) setting allows users to adjust EV from +3 to -3 in 1/3rd stops to compensate
Normal ash: Approx.0.1-5 sec./Red LED indicator lamp lights up.
for these slight variations. This adjustment is a personal preference based on
Quick ash: Approx.0.1-2.5 sec./Green LED indicator lamp lights up.
camera standard TTL and will be stored in memory. When this EV level prefer-
ence is set, this compensation will be used for images taken in TTL mode. This EV
Internal power: Four size-AA alkaline batteries or size-AA Ni-MH batteries
compensation will not be displayed on the LCD during regular use.
External battery: Compatible with Phottix Battery Pack and Canon compact
battery pack CP-E4 through specic adapter
Resetting to Factory Defaults
Power saving: Non-wireless slave modes: 90 seconds, Wireless slave mode: 60
minutes
The Phottix Mitros Flash can reset to factory defaults.
Wireless ash
To reset the ash:
Transmission method: Optical pulse
1. Press and hold the and buttons for 3 seconds.
Channels: 4
2. The ash will reset to factory default settings.
Wireless options: OFF, Master, Slave and Optical Slave
3. All custom functions will be reset to factory defaults.
Transmission range (Approx.): Indoors:12-16m/39.36-52.48 ft., Outdoors:
7-9m/22.96-29.52 ft., Reception angle: ±40°(horizontal), ±30°(vertical)
Controlled slave groups: 3 (A, B, and C)
Flash Information Display
For technical support or rmware upgrade checking the Phottix Mitros infor-
Flash ratio control: 1:8-1:1-8:1
mation may be need. To display the hardware, software, icon library and serial
Standby current: ≤100uA in sleep mode
number display:
Dimensions: (L x W x H): 202.8×77.5×58.3 mm
1. Press the button as the ash is turned on.
Weight: 427g (ash only, excluding batteries)
2. Press any button to cancel this display and enter the LCD screen.
Changes to the ash capacitor:
If the ash is not used for some time physical changes will take place within the
ash’s capacitor. Make sure to turn on the ash a minimum of 10 minutes every
three months to prevent any physical changes.
www.phottix.com
12
De
BENUTZERHANDBUCH
Phottix Mitros TTL
Elektronenblitz für Canon
Hinweis: Um das Blitzgerät sofort in Betrieb zu nehmen, lesen Sie die Anleitung
Teilebezeichnungen
zum Schnelleinstieg.Für eine komplette Übersicht über alle Funktionen lesen
Sie bitte diese Anleitung und machen Sie sich mit dem Handbuch Ihrer Kamera
Hintere Seite / Linke Seite
vertraut.
1. LC-Display
Der Phottix Mitros TTL Elektronenblitz für Canon ist für den Betrieb an Canon
2. Modus-Button
DSLR-Kameras und den ausgelegt und unterstützt folgende Funktionen: ETTL I/
3. Test-Button
II, Manuell, Multi sowiedie kabellose Master/Slave Steuerung.
4. Power-Schalter
5. Bereitschaftslicht
6. Pfeiltasten (siehe Folgende)
Warnhinweise
7. Set-Button
8. Verriegelungshebel
1. Feuern Sie den Blitz nicht direkt auf Gegenstände, Personen oder Tiere ab.
9. 3.5mm Sync-Port
Blicken Sie nicht direkt in den Blitz – Augenschäden können die Folge sein.
10. USB-Port
2. Gehen Sie mit dem Blitzgerät in oder in der Nähe von Fahrzeugen vorsichtig
11. Extern-Power-Port
um. Es besteht Unfallgefahr!
3. Verwenden Sie das Blitzgerät nicht in der Nähe brennbarer oder explosive
Gase.
4. Vermeiden Sie den Kontakt des Blitzgerätes mit Wasser oder hoher Luft-
feuchtigkeit.
5. Setzen Sieden Blitzoder die Batterien keiner großen Hitze aus(direktes Son-
nenlicht,in einem geschlossenen Auto, etc.).
6. Entfernen Sie die Batterien ausdem Blitz, wenndieser über einen längeren-
Zeitraum nicht benutztwird.
Pfeiltasten
7. Wechseln Sie die Batterien, wenn erforderlich. Verwenden Sieunbeschädigte
1. Pfeil rauf / Zoom Button
Batterien ingutem Zustand. Vermischen Sie niemals verschiedene Batterietype-
2. Pfeil rechts / FernauslösemodiButton
noder neue und gebrauchteBatterien.
3. Pfeil abwärts / HSS- / SCS-Button
8. Decken Sie das Blitzgerät bei der Auslösung nicht mit undurchsichtigen Ge-
4. Pfeil links / Individualfunktions-Button
genständen ab.Die abgegebene EnergiekannGegenstände, die Blitzröhre oder-
Fresnel-Linse beschädigen.
9. Berühren Sie die Blitzäche direkt nach Gebrauch nicht. Diese könnte heiß
sein und Verbrennungen verursachen.
10. Önen Sie das Blitzgerät nicht! Innenliegende Bauteile können auch ohne
eingelegte Batterien unter Hochspannung stehen! Es besteht Lebensgefahr!
11. Schließen Sie die Externen-Power Kontakte des Blitzgerätes nicht kurz. Dies
Vordere Seite / Rechte Seite
könnte einen Kurzschluss verursachen und das Blitzgerät beschädigen.
1. Weißkarte
2. Weitwinkelscheibe
3. Blitzäche
Inhalt
4. Empfänger für Fernauslösung
5. AF-Hilfslicht
Teile und Funktionen…....................................................…..13
6. Hot Shoe
Modi ……...............................................................................18
7. Batteriefach
Fernauslösung……................................................................20
Individualfunktionen…….....................................................22
Technische Daten……...........................................................23
13

De
BENUTZERHANDBUCH
Hinweise:
Kippen und Drehen des Blitzkopfes
Diese Anleitung setzt voraus:
1. Der Blitzkopf kann zwischen -7° und 90°, mit Raststufen bei -7°, 0°, 45°, 60°
und 90° gekippt werden. Ziehen oder drücken Sie den Kopf in die gewünschte
1. Kamera und Blitzgerät sind eingeschaltet.
Rastposition.
2. Kamera und Blitzgerät sind wie angegeben eingestellt.
2. Der Blitzkopf lässt sich um 180° in jede Richtung drehen. Raststufen bei: 60°,
3. Kamera und Blitzgerät benden sich in den Standardeinstellungen.
75°, 90°, 120°, 150° und 180°. Drehen Sie den Kopf in die gewünschte Rastposi-
tion.
4. Der Blitz wird auf einer kompatiblen Kamera verwendet.
3. Wird das Gerät in einer größeren Stellung als 0° betrieben fährt der Zoom auf
50mm und“- -” wird im LC-Display angezeigt. Diese Einstellung kann im Modus
“MZoom” (siehe unten) verändert werden.
Einlegen der Batterien
4. In der Position -7° verhält sich das Blitzgerät wie in der Position 0°.
1. Drücken Sie leicht auf den Deckel des Batteriefaches und schieben Sie es
nach unten auf. Lassen Sie den Deckel los, damit dieser sich von alleine önet.
2. Legen Sie Batterien/Akkus des Typs AA/Mignon ein, wie auf der Zeichnung im
Benutzen der Weißkarte und der
Batteriefach angegeben.
Weitwinkelscheibe
3. Klappen Sie das Batteriefach zu und schieben Sie den Deckel zurück in seine
ursprüngliche Position.
Der Phottix Mitros Blitz ist mit einer Weißkarte und einer Weitwinkel-Diusor-
scheibe ausgestattet, welche im Blitzkopf versenkt sind.
Hinweise:
1. Mit der Diusorscheibe wird eine 14mm äquivalente Zoomstellung erreicht.
- Verwenden Sie nur Qualitätsbatterien. Stellen Sie sicher, dass die Batterien
den gleichen Ladestand aufweisen.
2. Die Weißkarte kann bei gekipptem Blitzkopf verwendet werden, um einen
Teil des Lichts zu reektieren, um z.B. Spitzlichter in Augen zu erzeugen.
-Batterien können während des Gebrauchs erhitzen. Wechseln Sie diese vor-
sichtig, wenn der Blitz direkt zuvor verwendet wurde.
Verwendung:
-Wenn das Gerät längere Zeit nicht verwendet wird, entnehmen Sie die Bat-
1. Ziehen Sie vorsichtig die Weißkarte und Weitwinkelscheibe aus den Blitz-
terien aus dem Blitz.
kopf, benutzen Sie dazu die Rielung an der Unterseite der Scheibe.
2. Wenn Sie die Scheibe ganz herausziehen, wird sie sich umklappen und vor
dem Blitzkopf positionieren. Die Weißkarte können Sie einfach wieder hinein-
Den Blitz an einer Kamera anbringen
schieben, wenn Sie diese nicht benötigen.
Schalten Sie die Kamera und das Blitzgerät aus.
3. Wenn Sie nur die Weißkarte benutzen wollen, schieben Sie die Diusor-
1. Achten Sie auf die korrekte Einschubrichtung beim Anbringen.
scheibe einfach wieder zurück.
2. Schieben Sie den Fuß des Blitzgerätes komplett in die Aufnahme an der Kam-
era.
Benutzen des Blitzkopfdiusors
3. Schieben Sie den Sperrhebel am Blitzgerätefuß nach rechts bis dieser ein-
rastet.
Der Phottix Mitros TTL Blitzhat einen aufsteckbaren Diusor, der bei Bedarf
auf den Kopf gesteckt werden kann. Der Diusor softet das Licht ab, reduzi-
4. Zum Entsperren des Hebels drücken Sie die Entriegelungstaste am Hebel und
ert Spitzenlichter und Schlagschatten und verbessert die Lichtverhältnisse bei
ziehen Sie den Hebel nach links zurück.
Makroaufnahmen.
Verwendung:
Gerät ein- und ausschalten
1. Stecken Sie den Diusor so auf den Kopf, dass die Markierung UP nach
oben zeigt.
1. Um das Gerät einzuschalten, schieben Sie den Power-Schalter in die Position
“ON”.
2. Lassen Sie den Diusor in die Kerben am Blitzgerät einrasten.
2. Um das Gerät auszuschalten, schieben Sie den Power-Schalter in die Position
3. Wiederholen Sie Schritt 2 für die andere Seite des Diusors.
“OFF”.
Batterieanzeige
Die Batterieanzeige auf dem LC-Display (siehe unten) zeigt an, wieviel Resten-
ergie ungefähr in den Batterien verbleibt.Sobald sich die Ladezeit des Gerätes
verlängert, wechseln Sie die Batterien.
14

De
BENUTZERHANDBUCH
Überhitzungsschutz
Der Phottix Mitros ist mit einem Überhitzungsschutz ausgestattet durch
welchem die Blitzfolgezeit reduziert wird, um eine Überhitzung zu vermeiden.
Nach 20 Voll-Power Auslösungen wird der Schutz aktiviert. Im Display erscheint
das [Hot!] Symbol wenn der Schutz aktiv ist.
Zur Vermeidung weiterer Überhitzungen oder möglichen Beschädigungen wird
der Blitz die Ladezeit so anpassen, dass die Temperatur gesenkt wird. Warten Sie
besser ca. 10 Minuten, bis sich der Blitz wieder temperiert hat.
Wenn der Blitz weiter benutzt wird obwohl das [Hot!] Symbol leuchtet, wird sich
der Blitz nicht abkühlen, dann erscheint das [Stop] Symbol im Display. Beenden
Sie die Benutzung des Gerätes und lassen Sie es für ca. 10 Minuten abkühlen.
Synchron-und USB-Port
1. Der 3,5mm Sync-Port kann mit einem 3,5mm Sync-Kabelbenutzt werden,
um den Blitz mit einem Blitzauslöser oder einer Kamera auszulösen. Dieser An-
schluss ist nur dafür da ein Signal zu empfangen – nicht um eines zu senden.
2. Der USB Port wird für Firmware-Upgrades benutzt. Firmware-Ankündigungen
und Instruktionen erhalten Sie auf der Phottix-Website.
Status LED
LED links: Blitzbereitschaftsanzeige. Im Quick Flash Modus leuchtet die LED
grün wenn der Blitz minimal aufgeladen ist. Die LED leuchtet rot wenn der Blitz
voll aufgeladen ist.
LED rechts: Blitz Belichtungs-Kontrollanzeige. Wenn eine Standard-Blitzbelich-
tung erreicht ist, wird die LED für 3 Sekunden blau leuchten. Wenn die blaue
LED nicht leuchtet, verringern Sie den Abstand zum Motiv oder erhöhen Sie den
ISO-Wert der Kamera.
Externer Batterie Port
Der externe Batterie Port ist ein speziell für Phottix Blitzkabel entwickelt. Mit
dem beiliegenden Adapter können auch das Canon CP-E4 oder kompatible
Batterie-Packs benutzt werden.
Bitte beachten:
- Die Batterien des Blitzgerätes müssen auch dann eingelegt sein wenn ein
externes Batterie-Pack benutzt wird.
- Niemals inkompatible Batterie-Packs benutzen.
15
De
BENUTZERHANDBUCH
DasDisplay (LCD)
14mm – 105mm
ETTL
M
Multi
M
3.0EV (" C " will
Azoom
Multi
be displayed on
Mzoom
camera’ s EV
setting is
preferred.)
SCS
HSS
CH1 – 4
A
B
C.Fn
C
A : B : C
8 : 1 – 1 : 1 – 1 : 8
A+B+C
A : BC
A : B
SLAVE
MASTER
OFF
OS
FEB Information
Flash range
(Shots taken / FEB amount)
Aperture
(in meters/feet)
N(1 – 100)
1/1 – 1/128
(1 – 199) Hz
A B C
Das Display des Phottix Mitros informiert über die Blitzeinstellungen und Blitz-
Im ETTL Modus: HSS/SCS, FEB, EV
funktionen.
Im M Modus: HSS/SCS, Group, Power Level
Erste Reihe:
Im Multi Modus: Group, Power Level, Frequenz, Blitzzähler
1. Blitzmodus: Zeigt den eingestellten Modus des Blitzesan - ETTL, Manual, Mul-
Dritte Reihe:
ti, M (Slave Modus), Multi (Slave Modus)
Signalton Ikon, “-7°” Ikon,Master / Slave Auslösebereich – Kanäle, Master/Slave
2. Zoom: Zeigt Auto oder manuellen Blitzkopf-Zoom und den Abstand an
Modus, Gruppen Information
3. Batterieanzeige, Hot!, Stop
Vierte Reihe:
Zweite Reihe:
Blitz- und Belichtungsinformationen: C.Fn Ikon, Blende (f stop), Reichweiteund
High-Speed-Sync (HSS) / Zweiter Vorhang Verschluss(SCS)
Blitzverhältnis
FEB, Gruppe, Power Level, EV, Multi ModusAnzeige (Frequenz und Blitzzähler)
16

De
BENUTZERHANDBUCH
ausgelöst, die sich im selben Kanal benden wie der Master und von diesem
Auto-Save Funktion
gesteuert werden. Der Test-Buttonkann individuell konguriert werden (siehe
Der Phottix Mitros speichert die Blitzeinstellungen. Modus, Levels usw. werden
C.Fn-07).
gespeichert und sind nach dem erneuten Einschalten wieder verfügbar.
Auto-OFF und Ruhefunktion
Blitz Zoom Einstellung
Um Batterieenergie zu sparen, ist der Phottix Mitros miteinem Ruhe-und Au-
Der Phottix Mitros hat zwei Blitzkopf-Zoommodi – Auto (Azoom) und Manuell
to-O-Modus ausgestattet.
(Mzoom). Auto ändert sich dynamisch, wenn der Zoom am Kameraobjektiv
1. Im Slavemodus (nicht kabellos): Wenn 90s lang kein Button gedrückt oder
verändert wird. Manuell Zoom erlaubt dem Benutzer die manuelle Einstellung
der Blitz ausgelöst wird, geht der Blitz in die Ruhestellung. Das Display erlischt.
des Zooms.
Der Blitz wird durch Halbdrücken des Kameraauslösers oder des Test-Buttons
aufgeweckt.
Einstellen:
2. Im Slavemodus (kabellos): Wenn 60min lang kein Button gedrückt oder der
1. Drücken Sieden Button.
Blitz ausgelöst wird, geht der Blitz in den Slave-Ruhemodus. Im Display er-
2. Der Zoom-Bereich wird im Display markiert und blinkt.
scheint “IDLE”. Durch Volldrücken des Kameraauslösers oder des Test-Buttons
am Masterblitzes werden Blitzgerät im Slave-Ruhemodus aufgeweckt. Der
3. Drücken Sie den oder Button, um den Zoom auf Azoom
Slave-Ruhemodus Timer kann von 60-10min eingestellt werden (siehe C.Fn-10).
oderMzoom einzustellen.
3. Wenn 8h lang kein Button gedrückt oder der Blitz ausgelöst wird oder na-
4. Drücken Sie den Button,um die Einstellung zu setzen.
chdem “IDLE” im Display stand, geht der Blitz in den Slave-Auto-OFF-Modus.
Drücken Sie den TestButton, um den Blitz wieder aufzuwecken. Slave-Auto-OFF
Bitte beachten:
kann von 8-1h eingestellt werden (siehe C.Fn-11).
1. Wenn im Azoom der Blitzkopf von der 0°-Position aus angehoben oder
gedreht wird, wird sich der Blitz selbst auf 50mm einstellen, “--” wird im Dis-
play angezeigt. Der Zoom lässt sich nicht einstellen, wenn der Kopf unter -7°
Einstellblitz
geneigt ist.
1. Drücken Sie die Abblendtaste (wenn verfügbar), dadurchwird 1s lang eine
2. Azoom funktioniert NUR, wenn der Blitzkopf entweder auf 0° oder auf
Reihe von Blitzen ausgelöst. DieserEinstellblitzist hilfreich, um die Lichtverhält-
-7° eingestellt ist.
nisse und Schatteneekte im Motiv zu überprüfen.
3. Wenn im Azoom der Blitzkopf von der 0°-Position aus angehoben oder
2. Der Einstellblitzist für jeden Modus verfügbar, ETTL, Multi und Manual.
gedreht wird, wird sich die Zoomeinstellung nicht ändern.
3. Der Einstellblitzkann für normal und kabelloses Auslösen eingestellt werden
4. Wenn der Kopf angehoben oder gedreht wird, kann der Zoom durch
(C.Fn-02).
Wechseln in den Mzoom Modus eingestellt werden.
Bitte beachten:
1. Überhitzungen und Beschädigung könnendurch exzessives Benutzen des
Einstellungen für High-Speed-Synchronisation
Einstellblitzes vorkommen. Lösen Sie niemals mehr als 20x in Folge den ein-
stellblitz aus.
oderZweiten Verschlussvorhang
2. Wenn der Blitz überhitzt ist, wird automatisch die Ladezeit erhöht, bis die
Der Phottix Mitros verfügt über High-Speed-Synchronisation oder Zweiten
Temperatur wieder gesunken ist.
Verschlussvorhang. Siehe weiter Details unter High-Speed-Synchronisation oder
Zweiten Verschlussvorhangweiter unten in diesem Handbuch.
Einstellen:
AF-Hilfslicht
1. Drücken Sie den Button.
1. Bei schwacher Licht-/Kontrast-Situation kann die Kamera unter Umständen
2. Der Buttonermöglichst das wechseln zwischen HSS, SCS und HSS/
nicht automatisch scharf stellen. Dafür verfügt der Phottix Mitros über ein
SCS OFF.
AF-Hilfslicht an der Front des Blitzes. Das AF-Hilfslichtsendet ein Fokuslicht auf
das Motiv, sodass die Kamera automatisch scharf stellen kann.
Bitte beachten:
2. Die AF-Hilfslicht Funktion kann ein- oder ausgeschaltet werden(siehe C.Fn-
-HSS und SCS sind verfügbar im ETTL und Manuell-Modus, aber nicht im Mul-
08).
ti-Modus.
Anpassungen
Test-Button
Der Phottix Mitrosarbeitet mit 1/3 Blendestufen. Einige Kameras sind umstellbar
Durch drücken des Test-Buttonwird der Blitz ausgelöst. Dies kann zum einstel-
von 1/3 auf 1/2 Blendestufen für FEB und FEC. Wenn die Kamera auf 1/2 Blend-
len der Blitzleistung benutzt werden (nur im manuellen Modus).Im kabellosen
enstufen eingestellt ist, übernimmt der Mitros dies automatisch.
Mastermodus werden beim Drücken des Test-Buttons alle Slave-Blitzgeräte
17

De
BENUTZERHANDBUCH
Blitzmodi
Bitte beachten:
-Standard: FEB wird nach 3 Aufnahmen abgebrochen.FEBkann eingestellt
Der Phottix Mitrosverfügt über 3 Blitzmodi: ETTL, Manual (M) und Multi (Stro-
umgestellt (siehe C.Fn-03).
boskop).
- FEB Aufnahmesequenz kann geändert werden (siehe C.Fn-04).
Modus wechseln:
- FEB kann mit FEC und FEL benutzt werden (siehe weiter unten).
1. Drücken Sie den Button.
- Für bessere Ergebnisse stellen Sie die Kamera in den Singlemodus, um
2. Der Blitzmodus ist nun wählbar, ETTL, Manual (M) und Multi Modus.
sicherzustellen, dass der Blitz für die weiteren Aufnahmen bereit ist.
3. Der aktuelle Modus wird in der linken, oberen Ecke des Displays angezeigt.
- Einige Kameras sind umstellbar von 1/3 auf 1/2 Blendestufen für FEB und
FEC. Wenn die Kamera auf 1/2 Blendenstufen eingestellt ist, übernimmt der
ETTL Modus
Mitros dies automatisch.
Belichtungsspeicherung - FEL
Belichtungsspeicherung (FEL) kann zum sperren der Blitzbelichtung verwendet
werden, bevor ein Foto aufgenommen wird. Dies ist hilfreich, wenn die ma-
nuelle Spotmessung bei unterschiedlichen Lichtverhältnissen benutzt wird.
Im ETTL Modus drücken Sie die FEL-Taste (die
Taste) der Kamera, um dieses
Funktion zu benutzen. Schauen Sie für mehr Informationen über FEL bitte im
Im ETTL Modus arbeiten Kamera und Blitzgerät perfekt aufeinander abgestim-
Handbuch der Kamera nach.
mt. Beim Drücken des Kameraauslösers wird ein Vorblitz ausgelöst durch dem
Beim Drücken des FEL-Button wird ein Vorblitz ausgelöst durch dem die Kamera
die Kamera die korrekte Belichtung und Blitzleistung errechnet und an den Mi-
die korrekte Belichtung und Blitzleistung errechnet und an den Mitros sendet.
tros sendet.
Diese Einstellung wird im Kameraspeicher gehalten. Das FEL-Symbol wird im
Sucher der Kamera angezeigt.
Blitzbelichtungskorrektur - FEC
Jedes Mal wenn Sie den FEL-Button drücken wird ein Vorblitz ausgelöst und eine
Der Phottix Mitrosermöglichtdie Blitzsbelichtungskorrektur (FEC) von -3 bis +3
es wird eine neue Belichtung berechnet. Wenn der Auslöser ganz durchgedrückt
in 1/3 Stufen.Dies ist nützlich, wenn die Feinabstimmung des TTL-Systems ba-
wird, wird der Blitz mit der gespeicherten Belichtung auslösen.
sierend auf die Umgebung eingestellt werden muss.
FEC einstellen:
Bitte beachten:
1. Drücken Sie den Button,um den FEC Modus zu starten.
- Wenn das Motiv zu weit entfernt ist, wird es zur Unterbelichtung kommen.
Das FEL-Ikon wird für 0,5s im Sucher der Kamera blinken.
2. Drücken Sie den oder Button,um FEC einzustellen.
- Wenn das Motiv im Sucher zu klein ist,hat FEL keine Wirkung.
3. Drücken Sie den Button,um den FEC Modus zu beenden.
High-Speed-Synchronisation – HSS
Bitte beachten:
Im HSS-Modus erreicht der Blitz die maximale Synchronzeit.Das ist hilfreich
- Der Phottix Mitrosarbeitet mit 1/3 Blendestufen. Einige Kameras sind um-
wenn Sie den Zeitautomatik-Modus mutzen oder, um das Umgebungslicht zu
stellbar von 1/3 auf 1/2 Blendestufen für FEB und FEC. Wenn die Kamera auf
begrenzen. Schauen Sie für weitere Informationen im Handbuch Ihrer Kamera
1/2 Blendenstufen eingestellt ist, übernimmt der Mitros dies automatisch.
nach.
Belichtungsreihe - FEB
HSS Modus benutzen:
Belichtungsreihe (FEB) können benutzt werden, um automatisch 3 Fotos hin-
1. Drücken Sie den Button.
tereinander mit unterschiedlicher Belichtung zu erstellen. Über- und Unterbe-
lichtung kann vom Benutzer eingestellt werden. FEB ist besonders hilfreich,
2. Das HSS-Ikon erscheint im Display.
wenn Sie unterschiedliche Lichtverhältnisse im Motiv haben und für HDR-Auf-
3. Stellen Sie die Verschlusszeit höher als die Blitzsynchronzeit ein und
nahmen.
machen Sie ein Foto.
Einige Kameras verfügen über Belichtungsspeicher. Schauen Sie dafür bitte im
Handbuch Ihrer Kamera nach.
HSS Modus beenden:
1. Drücken Sie den Button doppelt.
FEB einstellen:
2. Sie wechseln nun von HSS zu SCS und zurück zum FCS-Modus.
1. Drücken Sie den Button.
2. Drücken Sie den Button. “FEB 0”erscheint hervorgehoben im Display.
Bitte beachten:
3. Drücken Sie den und Buttons, um die Belichtungsreihen-
- Überprüfen Sie, dass das HSS-Symbol im Sucher angezeigt wird.
menge einzustellen.
- Der HSS-Modus reduziert drastisch die Blitzleistung, Batteriekapazität und
4. Drücken Sie den Button, um die Einstellung zu übernehmen.
die Reichweite.
18
De
BENUTZERHANDBUCH
Zweiter Vorhang Synchronisation – SCS
Die Phottix MitrosZweiter Vorhang bewirkt, dass der Blitz am Ende der Belich-
4. Drücken Sie die und während die Einstellung markiert ist,
tung ausgelöst wird, nicht am Anfang. Dies ist hilfreich bei langen Verschlussze-
um Power, Frequenz (Hz)und Blitzanzahleinzustellen.
iten.
5. Drücken Sie den Button, um das Einstellungsmenü zu verlassen.
Benutzung:
Bitte beachten:
1. Drücken Sie den Buttondoppelt. Sie wechseln nun von FCS zu HSS
1. Überhitzungen und Beschädigung könnendurch exzessives Benutzen der
und dann zum SCS-Modus.
Stroboskop-Funktion vorkommen. Lösen Sie niemals mehr als 20x in Folge
2. Beenden: Drücken Sie den Buttoneinmal. Dadurch gelangen Sie
die Stroboskop-Funktion aus.
zum FCS-Modus.
2. Wenn der Blitz überhitzt ist, wird automatisch die Ladezeit erhöht, bis die
Temperatur wieder gesunken ist.
Bitte beachten:
SCS funktioniert nicht im Drahtlosen- oder im Multi-Modus.
Stroboskop-Modus und Verschlusszeit
Um die richtige Kamera Verschlusszeit mit verschiedenen Stroboskop-Modi zu
ermitteln, benutzen Sie die folgende Formel:
Manuell-Modus (M)
Blitzanzahl / Frequenz = Verschlusszeit
Im Manuell-Modus löst der Blitz mit der Leistung aus, die Sie einstellen. Der
Phottix Mitros TTL Blitz kann von 1/1 (volle Leistung) bis 1/128 eingestellt
Beispiel: 5x (Blitzanzahl) / 10 Hz (Frequenz) = 0,5s Verschlusszeit
werden, 8 Schritte in 1/3 Blendenstufen. Blende, Verschlusszeit und ISO müssen
Dies ist nur eine grobe Richtlinie: Sie müssen die Verschlusszeit erhöhen oder
an der Kamera manuell eingestellt werden. Für beste Ergebnisse verwenden Sie
verringern, um das gewünschte Ergebnis zu erhalten.
den Manuellen-Modus der Kamera.
Multi Stroboskop-Modus Output-Diagramm
Benutzung:
1. Drücken Sie den Button bis M im Display erscheint.
2. Drücken Sie den Button, um in das Leistungeinstellungsmenü zu gel-
angen.Die Leistungsstufen blinken und sind markiert.
3. Drücken Sie den oder Button, um zur Leistungsanpassung
zu gelangen. Die Blitzleistung wirdmarkiert und blinkt.
4. Drücken Sie den Button, um die Leistungsanpassung zu beenden.
Wenn die Blitzanzahl als “N ---“ dargestellt wird, wird die max. Blitzanzahl wie in
5. Wenn die Blitzbereitschafts-LED rot leuchtet ist der Blitz voll geladen und
der Tabelle unabhängig von der Frequenz angezeigt.
auslöse bereit.
6. Drücken Sie den Button, um den Blitz mit der von Ihnen eingestellten
Leistung auszulösen.
Bitte beachten:
- Beim Halbdrücken des Auslösers wird die eektive manuelle Blitzleistung
im Display angezeigt.
Multi: Stroboskop-Modus
Bei der Benutzung der Stroboskop Funktion, wird eine schnelle Folge von
Blitzen ausgelöst. Die Anzahl, Frequenz und Leistung kann im Phottix Mitros
programmiert werden. Multi-Modus ist hilfreich für die Aufnahme eines sich be-
wegenden Objektes und andere Spezialeekte.
Die Frequenz des Eektes (Hz - Blitze/s), die Gesamtzahl der Blitze und die Aus-
gangsleistung kann eingestellt werden.
Benutzung:
1. Drücken Sie den Button bis Multi im Display erscheint.
2. Drücken Sie den Button, um Einstellungen vorzunehmen. Anzeige von
links nach rechts:Leistung, Frequenz (Hz) und Blitzanzahl. Die Leistungsan-
zeige ist markiert und blinkt beim Eintritt in das Einstellungsmenü.
3. Drücken Sie die und Button, um zwischen Leistung, Frequenz
(Hz) und Blitzanzahlzu wechseln.
19

De
BENUTZERHANDBUCH
Master-Modus einstellen:
Drahtlose Auslösung
1. Drücken und halten Sie den Button für 2s, um in den drahtlosen
Der Phottix Mitros TTL kann auch kabellos ausgelöst werden. Ein Blitz auf der
Modus zu gelangen.
Kamera kann über einen Lichtimpuls den Mitros auslösen.
2. Drücken Sie den und Button, um zwischen Master mit
Der Phottix Mitroskann auch als Optical Slave (OS) ausgelöst werden. Im OS-Mo-
Blitz, Master ohneBlitz, Slave, OS und OFF-Modus zu wählen.
dus lösen andere ausgelöste Blitzgeräte den Phottix Mitros aus (nur im Manuel-
len-Modus).
3. Wählen Sie Master mit Blitz oder Master ohne Blitz.
Das Blitzgerät, welches sich auf der Kamera bendet muss im Master-Modus
4. Drücken Sie den Button, um von Master zu Kanal und Ratio zu
sein. Blitze die fernausgelöst werden sollen müssen sich im Slave-Modus be-
wechseln.
nden.
5. Wählen Sie den Kanal.
Die drahtlose Auslösung erfolgt durch den Lichtimpuls des Master Blitzes. Alle
6. Wählen Sie den Ratio-Modus (siehe weiter unten).
Blitze die ausgelöst werden sollen, müssen sich im Sichtbereich des Masters
7. Drücken Sie den Button, um zu bestätigen und das Menü zu verlassen.
benden. Die optische Auslösung kann im Freien und in hell Beleuchteten Räu-
men nicht durchgeführt werden.
Master mit Blitz Modus: Der Masterblitz auf der Kamera wird mit blitzen,
wenn die Kamera ausgelöst wird.
Für eine perfekte Fernauslösung und Kontrolle, sollten Sie den Phottix Mitros
zusammen mit dem Phottix Odin TTL Blitzauslöser benutzen. Der Phottix Odin
Master ohne BlitzModus: Der Masterblitz auf der Kamera wird nicht mit
löst Blitzgeräte mittels Funk aus, dadurch ist die Auslösung in nahezu jeder
blitzen, wenn die Kamera ausgelöst wird. Der Masterblitz gibt ein kurzes Li-
Umgebung gewährleistet.
chtsignal an den Slaveblitz zur Kommunikation, welches aber nicht die Beli-
chtung beeinussen wird.
Optical Slave (OS) Modus
Im Optical Slave Modus wird der Phottix Mitros ausgelöst, wenn in seinem Sicht-
Slave-Modus einstellen:
bereich ein anderer Blitz ausgelöst wird. Im Manuellen-Modus wird der Mitros
1. Drücken und halten Sie den Button für 2s, um in den drahtlosen
mit der Einstellung ausgelöst mit der er eingestellt ist.
Modus zu gelangen.
2. Drücken Sie den und Button, um zwischen Master mit
OS-Modus einstellen:
Blitz, Master ohneBlitz, Slave, OS und OFF-Modus zu wählen.
1. Drücken und halten Sie den Button für 2s, um in den drahtlosen
3. Wählen Sie Slave.
Modus zu gelangen.
4. Drücken Sie den Button, um von Slave zu Kanal und Gruppen zu
2. Drücken Sie den Button, um zum OS-Modus gelangen.
wechseln.
3. Drücken Sie den Button, um zu bestätigen und das Menü zu verlassen.
5. Wählen Sie den Kanal.
4. Der Blitz wechselt nun in den Manuellen-Modus.
6. Wählen Sie eine Gruppe: A, B oder C.
5. Stellen Sie die gewünschte Leistung ein.
7. Drücken Sie den Button, um zu bestätigen und das Menü zu verlassen.
Bitte beachten:
8. Wenn der Slaveblitzbereit zum Auslösen ist, wird das AF-Hilfslicht se-
kündlich blinken.
- Stellen Sie kein Hindernis zwischen den Master- und den Slave-Blitz, Hin-
dernisse können das Signal stören.
9. Um für den Slaveblitz den Multi oder M-Modus zu wählen – drücken und
halten Sie den Buttonfür 2s.
- Stellen Sie sicher, dass der Slave-Blitz in Richtung des Master-Blitzes aus-
gerichtet ist.
10. Stellen Sie die Leistungsstufen, Multi Frequenz oder die Blitzanzahl mit
den Pfeiltasten ein.
- Der TTL-Vorblitz ist ausgeschaltet, wenn sich der Blitz im OS-Modus ben-
det. Der Blitz wird vor der Belichtung ausgelöst. Mischen Sie keine Blitze im
Bitte beachten:
OS-Modus mit Blitzen, die sich im TTL-Modus benden.
- Vergewissern Sie sich, dass sich Master- und der Slaveblitz im selben Kanal
- Im Gegensatz zu anderen drahtlosen Modi benötigt und benutzt Optical
benden (1-4).
Slave (OS) keine Kanäle. Ein Blitz im OS-Modus wird ausgelöst, wenn andere
Blitze in Sichtweite ausgelöst werden.
- Stellen Sie kein Hindernis zwischen den Master- und den Slave-Blitz, Hin-
dernisse können das Signal stören.
- Stellen Sie sicher, dass der Slave-Blitz in Richtung des Master-Blitzes aus-
Einstellung drahtlos Auslösung
gerichtet ist.
Blitzgeräte müssen auf Master- oder Slave-Modus eingestellt sein. Ein Master-
- Wenn Sie nur einen Blitz benutzen, schalten Sie den drahtlosen Modus aus.
blitz auf der Kamera wird benötigt, um Slaveblitze auszulösen. Master- und
Slaveblitz müssen sich im selben Übertragungskanal benden. Die Slaveblitze
Übertragungskanäle
können in Gruppen eingeteilt werden, die jeweilige Gruppe muss dann am Mas-
terblitz eingestellt werden.
Das Phottix Mitros Funksystem verfügt über vier Übertragungskanäle: 1, 2, 3
und 4. Signale eines Masterblitzes werden auf diesen Kanälen an die Slave-
blitze gesendet. Wenn Master- und Slaveblitz auf unterschiedlichen Kanälen
eingestellt sind, dann können die Slaveblitze nicht ausgelöst werden.
20
De
BENUTZERHANDBUCH
4:1 / 6:1 / 8:1 einzustellen.
Drahtlos Auslösung benutzen
Sie benötigen einen Blitz im Master-Modus auf der Kamera und einen Slaveblitz.
10. Drücken Sie den Button, um zu bestätigen und das Menü zu verlassen.
Wenn Sie die Kamera auslösen, wird der Masterblitz ausgelöst (wenn Master mit
Blitz eingestellt ist) und die Slaveblitze im Sichtbereich auch. Die Kamera und
Manueller-Modus
der Blitz messen die korrekte Belichtung und die Blitze werden im TTL-Modus
A+B+C Alle drei Gruppen werden im manuellen Modus mit der gleichen Leis-
ausgelöst.
tung ausgelöst. Die Leistung kann eingestellt werden.
A:B:C Die Leistung jeder Gruppe kann separat eingestellt werden (siehe unt-
Blitzverhältnis-Modus (Ratio)
en). Jede Gruppe ist unabhängig von den anderen einstellbar.
Slaveblitze können in durch das Masterblitzgerät in unterschiedlichen Verhält-
A:B Gruppen A und B können eingestellt werden (siehe unten). Gruppe C ist
nissen gesteuert werden. Verfügbare Modi sind folgende:
nicht einstellbar und wird nicht ausgelöst.
ETTL-Modus
Manuellen-Modus einstellen und anpassen
A+B+C Alle Gruppen werden ausgelöst und die Leistung so berechnet, das
1. Drücken Sie den Button, um in den Multi-Modus zu wechseln.
alle Blitzgeräte ihre nötige Leistung zugewiesen bekommen.
2. Drücken und halten Sie den Button für 2s, um in den drahtlosen
A:BC Das Verhältnis für die Gruppen A und B kann eingestellt werden (siehe
Modus zu wechseln.
unten). Die Leistung der Gruppe C wird von der Kamera festgelegt.
3. Drücken Sie den und Button zum Wechseln zwischen-
The EV compensation of Groups A and B can be adjusted.
Master mit Blitz, Master ohne Blitz, Slave, OS- und OFF-Modus.
1. Drücken Sie den Buttonnach dem Verlassen des Blitzverhältnis-Menüs
4. Wählen Sie Master mit Blitz oder Master ohne Blitz.
(Ratio).
5. Drücken Sie den Button, um die Auswahl von Master auf Kanal und
2. Drücken Sie den oder Button, um EV für die Gruppen A und
Ratio zu wechseln.
B hoch oder runter zu setzen.
6. Wählen Sie den gewünschten Übertragungskanal.
3. Die EV-Kompensation für die Gruppe C kann ebenfalls eingestellt werden.
7. Wählen Sie das Blitzverhältnis (Ratio) aus. Drücken Sie den ,
4. Drücken Sie den Button, um nach der Einstellungdes Verhältnisses
und Button, um zwischen A+B+C, A:B und A:BC Modus zu wechseln.
die EV-Einstellung für die Gruppe C vornehmen zu können.
8. Drücken Sie den Button, um zu bestätigen und das Menü zu verlassen.
5. Drücken Sie den oder Button, um EV für die Gruppe C ein-
zustellen.
9. Drücken Sie den Button, um die Leistung einstellen zu können.
A:B Das Verhältnis für die Gruppen A und B kann eingestellt werden (siehe
10. Drücken Sie den oder Button, um die Leistungsstufe
unten). Gruppe C ist nicht einstellbar und wird nicht ausgelöst.
auszuwählen (1/1 zu 1/128 in 1/3Schritten).
Die EV-Kompensation der Gruppen A und B können eingestellt werden.
11. Drücken Sie den Button, um von A zu B zu C zu wechseln, den
, Button um von C zu B zu A zu wechseln.
1. Drücken Sie den Buttonnach dem Verlassen des Blitzverhältnis-Menüs
(Ratio).
12. Drücken Sie den Button, um die Leistungseinstellung zu verlassen.
2. Drücken Sie den oder um EV für die Gruppen A und B hoch
Multi-Modus
oder runter zu setzen.
A+B+C Alle drei Gruppen werden mit gleicher Leistung, Frequenz und
Blitzverhältnis-Modus (Ratio) einstellen und anpassen
Blitzanzahl ausgelöst.
A:B:C Der Leistung jeder Gruppe kann einzeln durch den Benutzer eingestellt
ETTL-Modus
werden (siehe unten). Frequenz und Blitzanzahl aller Gruppen sind die
1. Drücken und halten Sieden Button für 2s, um in dendrahtlosen
gleichen und werden in Gruppe A eingestellt.
Modus zu gelangen.
A:B Der Leistungen der Gruppen A und B können einzeln durch den Benutzer
2. Drücken Sie den und Button zum Wechseln zwischen-
eingestellt werden (siehe unten). Frequenz und Blitzanzahl der Gruppen A
Master mit Blitz, Master ohne Blitz, Slave, OS- und OFF-Modus.
und B sind die gleichen und werden in Gruppe A eingestellt. Gruppe C ist
nicht einstellbar und wird nicht ausgelöst.
3. Wählen Sie Master mit Blitz oder Master ohne Blitz.
4. Drücken Sie den Button, um die Auswahl von Master auf Kanal und
Multi-Modus einstellen und anpassen
Ratio zu wechseln.
1. Drücken Sie den Button, um in den Manuellen-Modus (M) zu wechseln.
5. Wählen Sie den gewünschten Übertragungskanal.
2. Drücken und halten Sie den Button für 2s, um in den drahtlosen
6. Wählen Sie das Blitzverhältnis (Ratio) aus. Drücken Sie den ,
Modus zu wechseln.
und Button, um zwischen A+B+C, A:B und A:BC Modus zu wechseln.
3. Drücken Sie den und Button zum Wechseln zwischenMaster
7. Wenn A:B oder A:BC markiert sinddrücken Sie den Button, um die
mit Blitz, Master ohne Blitz, Slave, OS- und OFF-Modus.
Ratio-Einstellung zu aktivieren.
4. Wählen Sie Master mit Blitz oder Master ohne Blitz.
8. Drücken Sie den Button, um das Ratio von1:1 zu 1:8 in folgenden
5. Drücken Sie den Button, um die Auswahl von Master auf Kanal und
Schritten einzustellen: 1:1,5/ 1:2 / 1:3 / 1:4 / 1:6 / 1:8.
Ratio zu wechseln.
9. Drücken Sie den Button, um das Ratio von1:1 zu 1,5:1 / 2:1 / 3:1 /
6. Wählen Sie den gewünschten Übertragungskanal.
21
1. There is no
translation for this
sentence.
De
BENUTZERHANDBUCH
7. Wählen Sie das Blitzverhältnis (Ratio) aus. Drücken Sie den und
, Button um von C zu B zu A zu wechseln und die Leistungseinstellung
, Button, um zwischen A+B+C, A:B und A:BC Modus zu wechseln.
zu ermöglichen.
8. Drücken Sie den Button, um zu bestätigen und das Menü zu verlassen.
12. Drücken Sie den Button, nach den Gruppen folgen Frequenz und
Blitzanzahl.
9. Drücken Sie den Button, um die Leistung einstellen zu können.
13. Drücken Sie den oder Button, um die Frequenz und Blitzan-
10. Drücken Sie den oder Button, um die Leistungsstufe auszu-
zahl einzustellen. Diese Einstellungen können nur für Gruppe A eingestellt
wählen (1/1 zu 1/128 in 1/3Schritten).
werden und wird für die Gruppen B und C übernommen (falls zutreend).
11. Drücken Sie den Button, um von A zu B zu C zu wechseln, den
14. Drücken Sie den Button, um den Leistungsstufen-Modus zu verlassen.
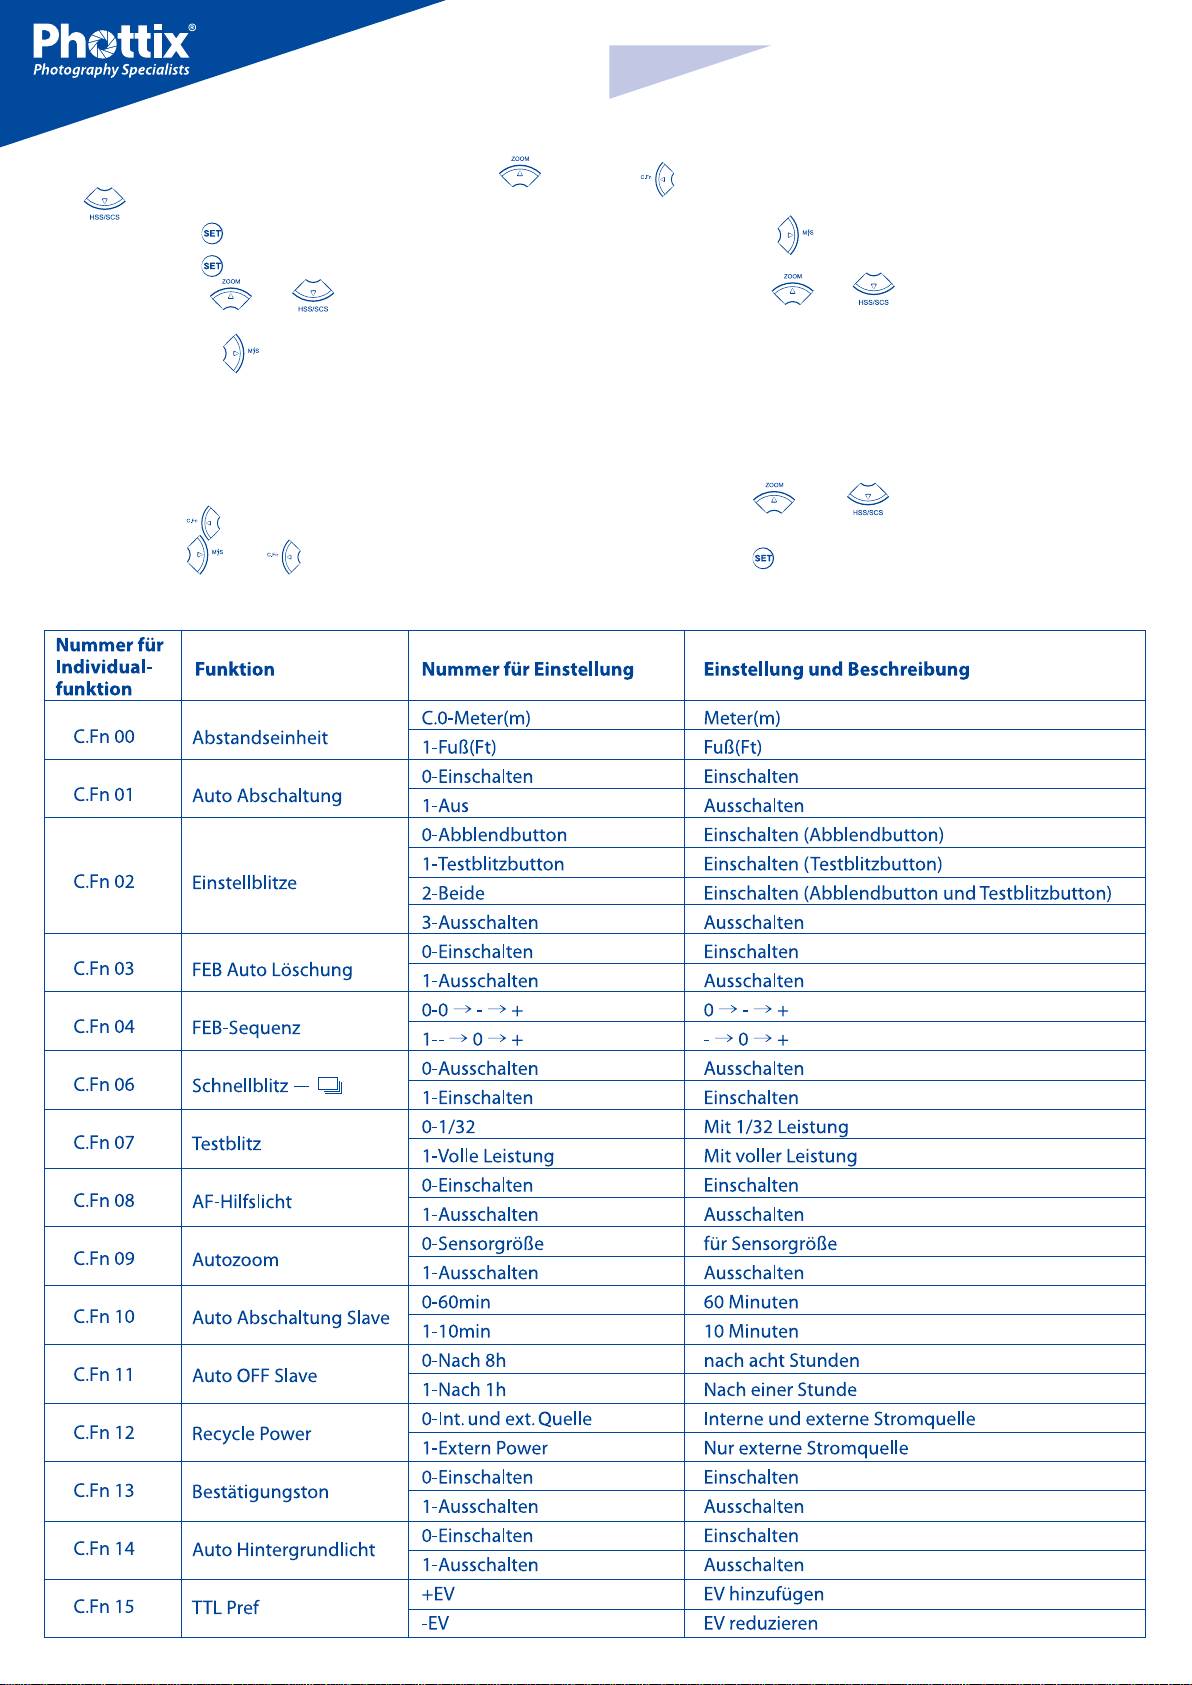
Individualfunktionen (CF)
Der Phottix Mitros TTL Blitzverfügt über eine Vielzahl an einstellbaren Individual-
zu wählen – C.Fn 0 bis 15.
funktionen. Wie diese Funktionen eingestellt werden:
3. Drücken Sie den oder Button, um die Einstellung/Funktion
1. Drücken Sie den Button für 2s, um das C.Fn Menüaufzurufen.
vorzunehmen.
2. Drücken Sie den oder Button, um zwischen den Menüpunkten
4. Drücken Sie den Button, um das C.Fn Menü zu beenden.
Individualfunktion Tabelle
22
