Planet POE-152S: 5. Hardware Installation
5. Hardware Installation: Planet POE-152S
5. Hardware Installation
In questa sezione sono descritte le funzionalità del PoE Splitter. Prima
di connettere un dispositivo al PoE Splitter, leggere attantamente
questo capitolo.
5.1 Prima dell’installazione
Il PoE Splitter della PLANET fornisce due tipi di alimentazione in uscita
selezionabili con il selettore di alimentazione, come illustrato di seguito:
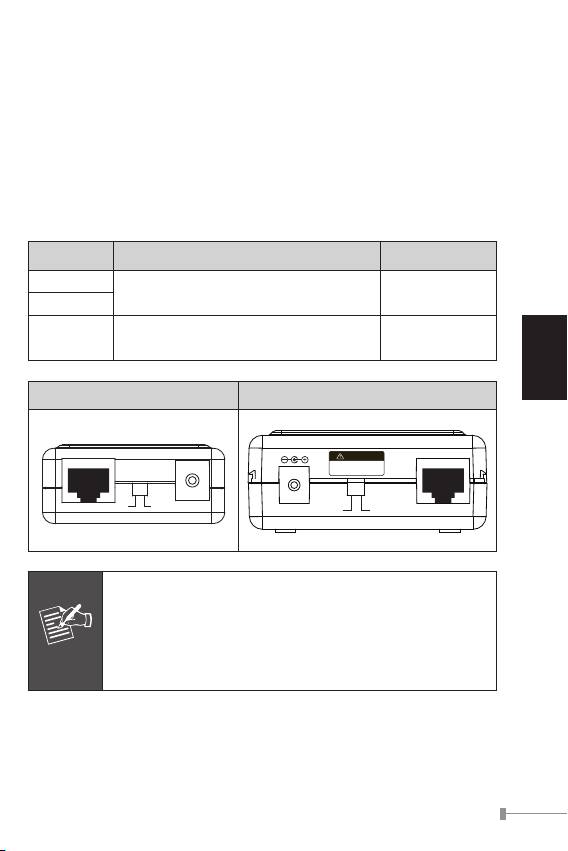
Modello Selezionatore di alimentazione in uscita Valore impostato
POE-151S
5V DC / 2A
5V DC
POE-152S
12V DC / 1A
Italiano
12V DC / 2A
POE-162S
12V DC
24V DC / 1A
POE-151S / POE-152S POE-162S
4-3
Ethernet+DC
Power in-use
Ready
PoE
PoE-IEEE 802.3af
IEEE 802.3af
Power over Ethernet Splitter
Ethernet
5V 12V
DC OUT
PoE In
before change 12/24V
Disconnect "PoE In" cable
Note
IEEE 802.3at High Power PoE Splitter
PoE In
CAUTION
Incorrect voltage might
cause device damage
DC Out Ethernet
24V 12V
Nota
Il PoE Splitter ed il PoE Injector della PLANET (es.
POE-151, POE-152 e POE-161) ) possono essere utiliz-
zati in coppia. Per poter utilizzare dispositivi di terze
parti, devono rispettare gli standard IEEE 802.3at o
IEEE 802.3af.
5.2 Installazione del PoE splitter
Il PoE Splitter PLANET è l’alternativa che rende possibile la
connessione di dispositivi non predisposti allo standard PoE IEEE
802.3af / 802.3at, come illustrato di seguito:
Italiano
4-4
100 meters
PoE-IEEE 802.3af
PoE
Ready
Power in-use
802.3af in-line power Switch
Ethernet+DC
Ethernet
5V 12V
DC OUT
Data
Power
Data
PoE
DC
Power
Wireless AP
POE-151S
POE-152S
100Base-TX UTP
DC
Power Line (DC)
PoE
100Base-TX UTP with PoE
Figura 3: Connessione ad un dispositivo IEEE 802.3af
100 meters
802.3at in-line power Switch
PoE In
DC Out Ethernet
24V 12V
Data
Data
Power
PoE
DC
Power
POE-162S
PTZ Speed
Dome
1000Base-T UTP
PoE
1000Base-T UTP with PoE
DC
Power Line (DC)
Figura 3: Connessione ad un dispositivo IEEE 802.3at
Italiano
4-5
Nota
Standard IEEE 802.3af / 802.3at; il PoE Splitter della
PLANET può anche interagire con uno Switch End-Span
IEEE 802.3af / 802.3at che fornisca alimentazione sui
pin 1, 2 e 3, 6.
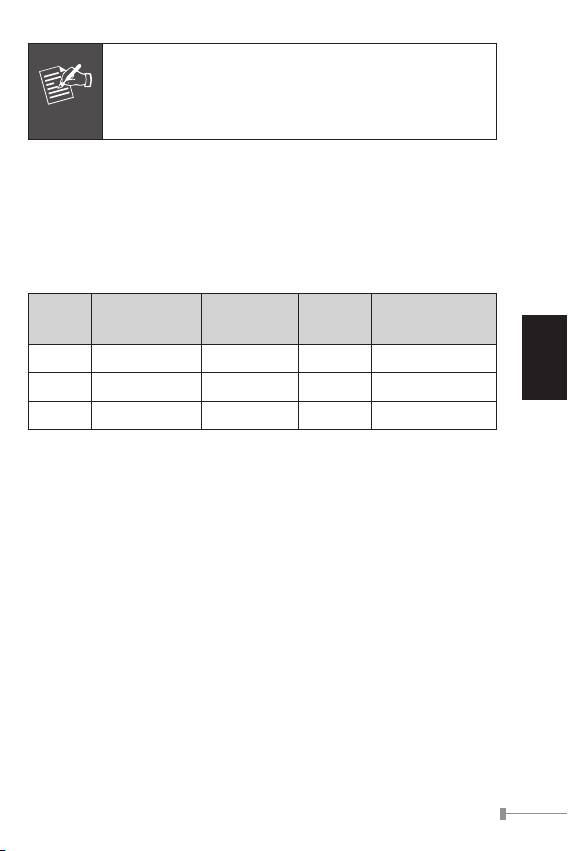
5.3 Installazione PoE Injector e PoE Splitter
Se il dispositivo remoto non è compatibile POE oppure non è installato
in una rete LAN, il PoE Injector ed il PoE Splitter possono lavorare
in coppia per fornire l’alimentazione necessaria, nella tabella che segue
vengono illustrati i modelli di PoE Injectors disponibili della PLANET:
Alimentazione
Potenza in
Velocità di
Modello Standard PoE
PoE di uscita
ingresso
trasferimento dati
POE-151 IEEE 802.3af 15.4 Watts 48V DC 10/100Mbps
POE-152 IEEE 802.3af 15.4 Watts 48V DC 10/100/1000Mbps
POE-161 IEEE 802.3at / af 30 Watts 56V DC 10/100/1000Mbps
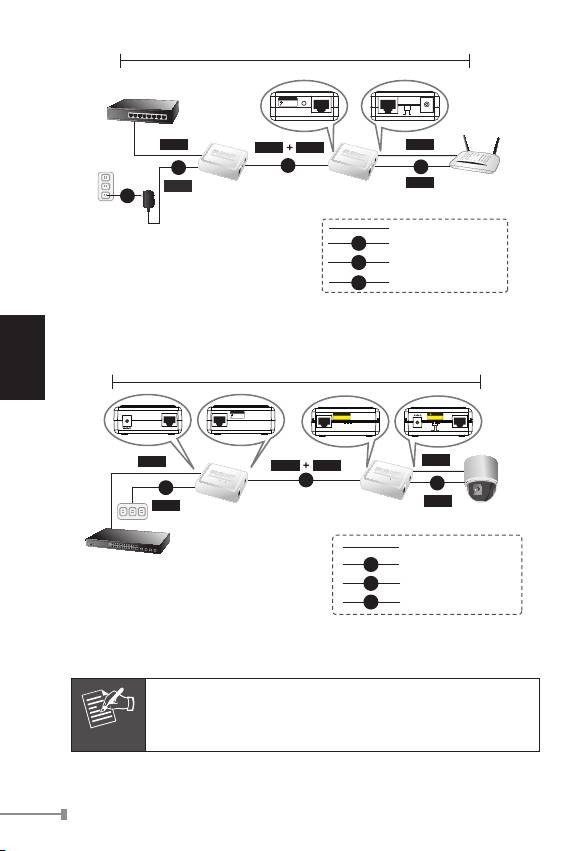
Passi:
1. [Switch & PoE Injector] Connettere con un cavo LAN standard
UTP da uno Switch/workstation alla porta to “Ethernet” del PoE
Injector ed il PoE Injector all’alimentatore di rete.
2. [PoE Injector & PoE Splitter]
Connettere un cavo UTP tra la porta “Ethernet+DC” del PoE
Injector alla porta “Ethernet+DC” (o “PoE IN”) del PoE
Splitter.
I PoE LEDs di entrambi gli apparati, Injector e Splitter, si accend-
eranno.
3. [PoE Splitter]
Connettere il cavo UTP fornito nella confezione dalla porta
“Ethernet” del PoE splitter alla porta RJ-45 del dispositivo
remoto.
Impostare la corretta alimentazione di uscita e connettere alla
porta “DC OUT”, del PoE Splitter, al dispositivo remoto.
Italiano
4-6
100 meters
Ethernet Switch
PoE-IEEE 802.3af
PoE
Ready
Power in-use
Ethernet+DC
Ethernet
5V 12V
DC OUT
Data
Data
Data
Power
DC
PoE
DC
Power
Wireless AP
Power
POE-151/152
POE-151S
AC
PoE Injector
PoE Splitter
100Base-TX UTP
DC
Power Line (DC)
AC
Power Line (AC)
PoE
100Base-TX UTP with PoE
Figura 5: Connection Architecture via 802.3af PoE Injector and PoE Splitter
100 meters
56V DC
Ethernet
Ethernet+DC
PoE In
DC Out Ethernet
24V 12V
Data
Data
Data
Power
PoE
DC
AC
Power
Power
POE-162S
POE-161
PTZ Camera
1000Base-T UTP
Switch
PoE
1000Base-T UTP with PoE
AC
Power Line (AC)
DC
Power Line (DC)
Figura 6: Connection Architecture via 802.3at PoE Injector and PoE Splitter
Nota
Assicurarsi che il voltaggio di uscita dello Splitter POE
sia corretto prima di collegare il dispositivo remoto, altri-
menti potrebbe danneggiarsi.
Оглавление
- Table of Contents
- 1. Overview
- 3. Product Outlook
- 5. Hardware Installation
- 6. Product Specication
- 1. Vue d’ensemble
- 3. Détail du produit
- 5. Installation du matériel
- 6. Caractéristiques du produit
- 1. Überblick
- 3. Produkt Ansicht
- 5. Hardware Installation
- 6. Produkt Spezikation
- 1. Informazioni generali
- 3. Vista del Prodotto
- 5. Hardware Installation
- 6. Speciche del Prodotto
- 1. Apresentação
- 3. Apresentação do Produto
- 5. Instalação do Equipamento
- 6. Especicação do Produto
- 1. Обзор
- 3. Внешний вид продукта
- 4. Светодиодная индикация
- 6. Характеристики продукта
- 1. Información general
- 3. Vista general del Producto
- 5. Instalación del hardware
- 6. Especicación de Producto
