Planet WNRT-617: инструкция
Раздел: Сети, связь, телекоммуникации, интернет, безопасность
Тип: Роутер
Инструкция к Роутеру Planet WNRT-617

802.11n Wireless Broadband Router
Routeur large bande sans l 802.11n
802.11n-WLAN-Breitband-Router
802.11n Беспроводной широкополосный маршрутизатор
Roteador de Banda Larga Sem Fio 802.11n
Router inalámbrico de banda ancha 802.11n
Manuale rapido d’installazione
WNRT-617
Quick Installation Guide

Table of Contents
English
1. Package Contents ..................................................................................... 1-1
2. Physical Introduction ................................................................................. 1-1
3. Hardware Installation ................................................................................ 1-2
4. Smart Setup! Installation........................................................................... 1-3
5. Manual Installation – Network Setup .......................................................... 1-4
6. Manual Installation – Web Management ...................................................... 1-4
7. Wireless Network Connection ..................................................................... 1-6
Further Information ...................................................................................... 1-6
Française
1. Contenu Du Coffret ................................................................................... 2-1
2. Présentation Physique ............................................................................... 2-1
3. Installation Du Matériel ............................................................................. 2-2
4. Installation Du Smart Setup! ..................................................................... 2-3
5. Installation Manuelle - Conguration Du Réseau .......................................... 2-4
6. Installation Manuelle - Web Management .................................................... 2-4
7. Connexion Au Réseau Sans Fil ................................................................... 2-6
Informations Supplémentaires ........................................................................ 2-6
Deutsch
1. Lieferumfang ............................................................................................ 3-1
2. Übersicht ................................................................................................. 3-1
3. Hardwareinstallation .................................................................................. 3-2
4. Smart Setup! installieren ........................................................................... 3-3
5. Manuelle Installation – Netzwerkeinrichtung ................................................ 3-4
6. Manuelle Installation – Webverwaltung ....................................................... 3-4
7. WLAN-Verbindung ..................................................................................... 3-6
Weitere Informationen ................................................................................... 3-6

Português
1. Conteúdo Da Embalagem .......................................................................... 4-1
2. Apresentação Física ................................................................................... 4-1
3. Instalação Do Equipamento ....................................................................... 4-2
4. Smart Setup! Instalação ............................................................................ 4-3
5. Instalação Manual – Conguração De Rede ................................................. 4-4
6. Instalação Manual – Gerenciamento Da Web ............................................... 4-4
7. Conexão Da Rede Sem Fio ........................................................................ 4-6
Mais Informações .......................................................................................... 4-6
Pусский
1. Комплект Поставки .................................................................................. 5-1
2. Внешний Вид ........................................................................................... 5-1
3. Установка Аппаратной Части .................................................................... 5-2
4. Интеллектуальная Настройка! Установка .................................................. 5-3
5. Установка Вручную - Настройка Сети ....................................................... 5-4
6. Установка Вручную - Сетевое Управление ................................................ 5-4
7. Беспроводное Сетевое Подключение ........................................................ 5-6
Дополнительная Информация ...................................................................... 5-6
Español
1. Contenido Del Paquete .............................................................................. 6-1
2. Introducción Física .................................................................................... 6-1
3. Instalación Del Hardware ........................................................................... 6-2
4. Instalación De Smart Setup! ...................................................................... 6-3
5. Instalación Manual – Conguración De Red ................................................. 6-4
6. Instalación Manual – Administración Web .................................................... 6-4
7. Conexión De Red Inalámbrica .................................................................... 6-6
Información Adicional .................................................................................... 6-6

Italiano
1. Contenuto Della Confezione ....................................................................... 7-1
2. Descrizione Del Prodotto ............................................................................ 7-1
3. Installazione ............................................................................................. 7-2
4. Installazione Rapida .................................................................................. 7-3
5. Installatione Manuale – Congurazione Lan ................................................. 7-4
6. Installazione Manuale – Gestione Con Interfaccia Web ...........................................7-4
7. Connessione Alla Rete Wireless .................................................................. 7-6
Ulteriori Imformazioni .................................................................................... 7-6

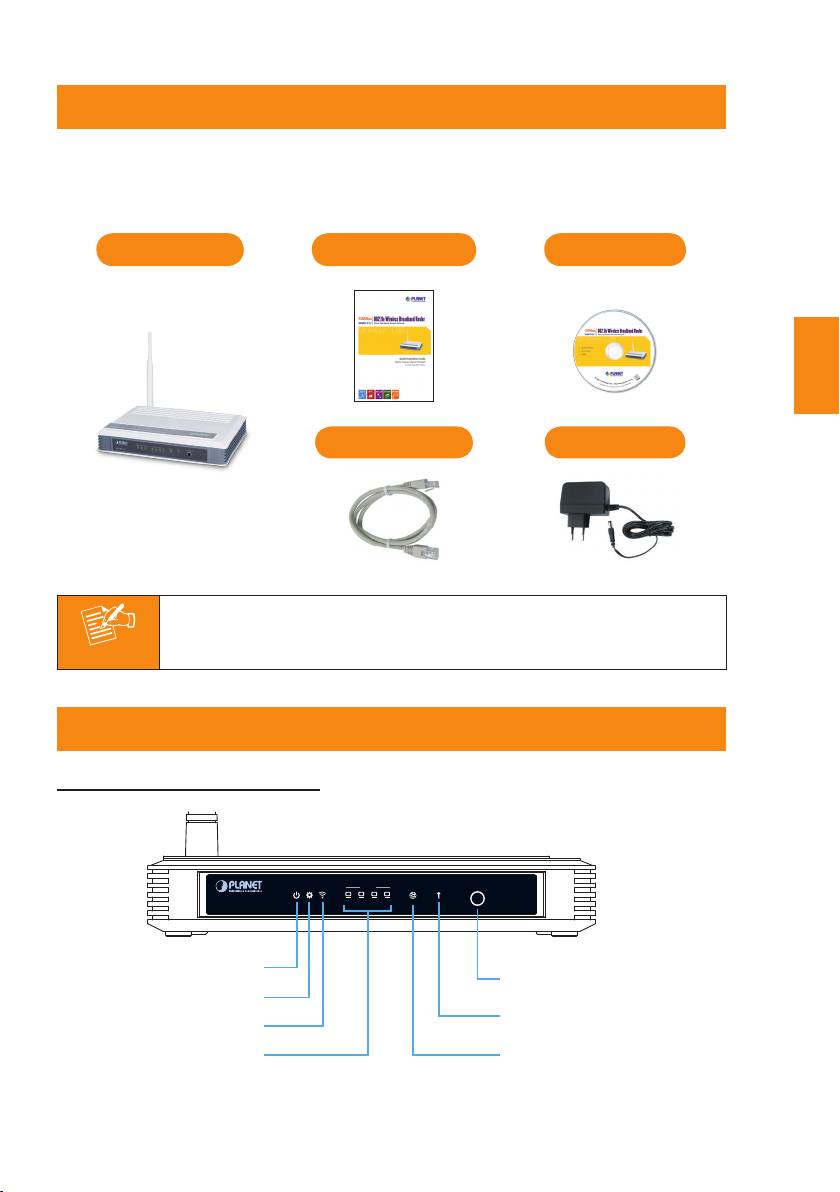
1. Package Contents
English
Thank you for choosing PLANET WNRT-617 – Wireless Broadband Router. Before
installing the router, please verify if the items below and the router are contained
in the package.
WNRT-617
Quick Guide
CD-ROM
Ethernet Cable
Power Adapter
1-1
Note
If there is any item missed or damaged, please contact the seller
immediately.
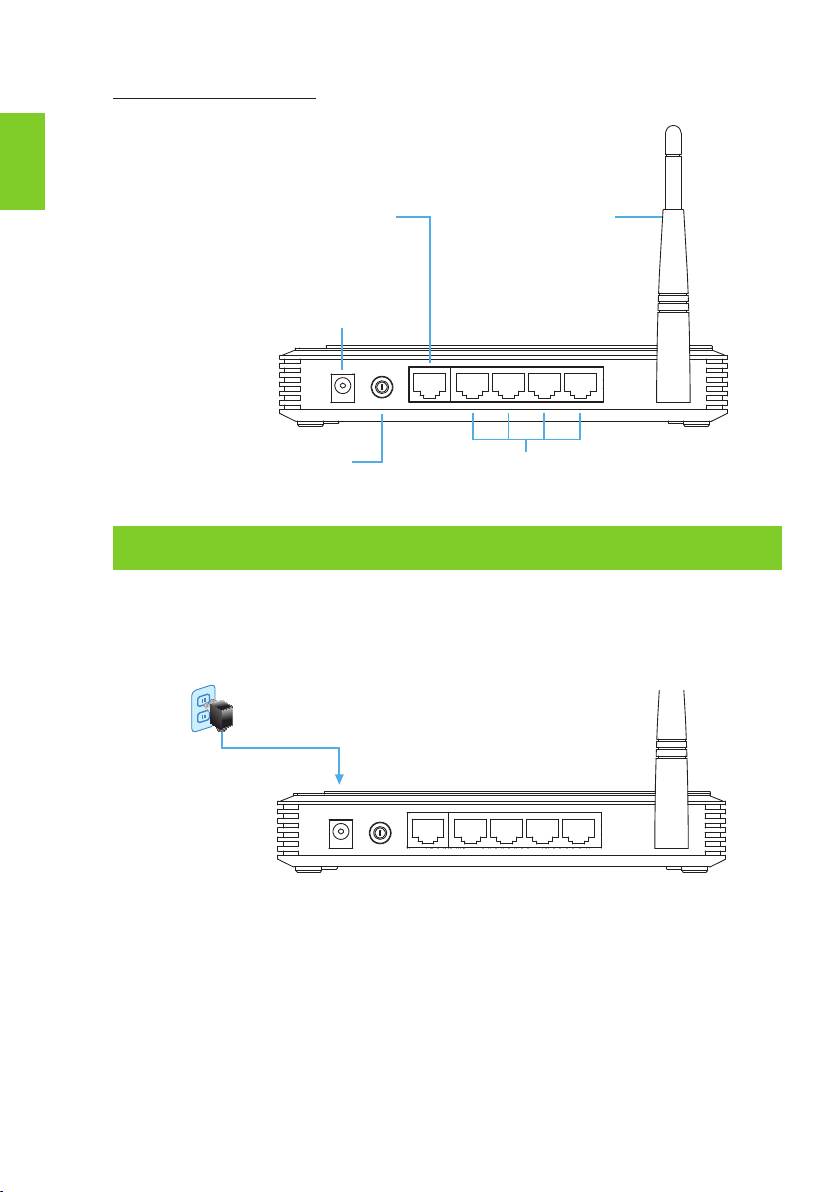
2. Physical Introduction
Front Panel Description
WLAN LANSYSPWR
WAN WPS
WPS/Reset
1 32 4
WNRT-617
Power LED
WPS/Reset Button
System LED
WPS Funtion LED
Wireless LED
LAN1~LAN4 LED
WAN Port Status LED
English
1-2
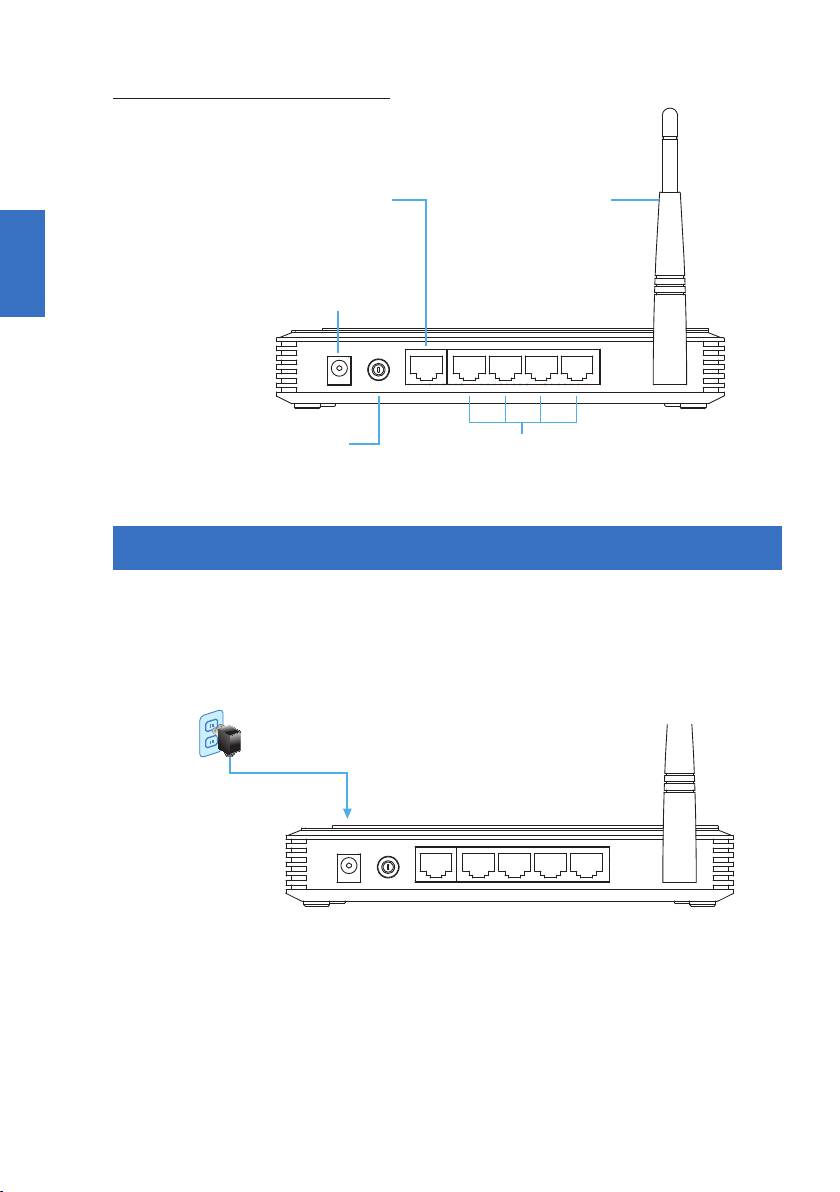
Rear Panel Description
WAN Port
5dBi Antenna
(Connect to DSL/Cable Modem)
Power Connector 9V DC Input
POWER
ON/OFF
WAN 4 3 2 1
Power ON/OFF Button
4 x 10/100Mbps LAN Port
Connect to user’s PC or network devices
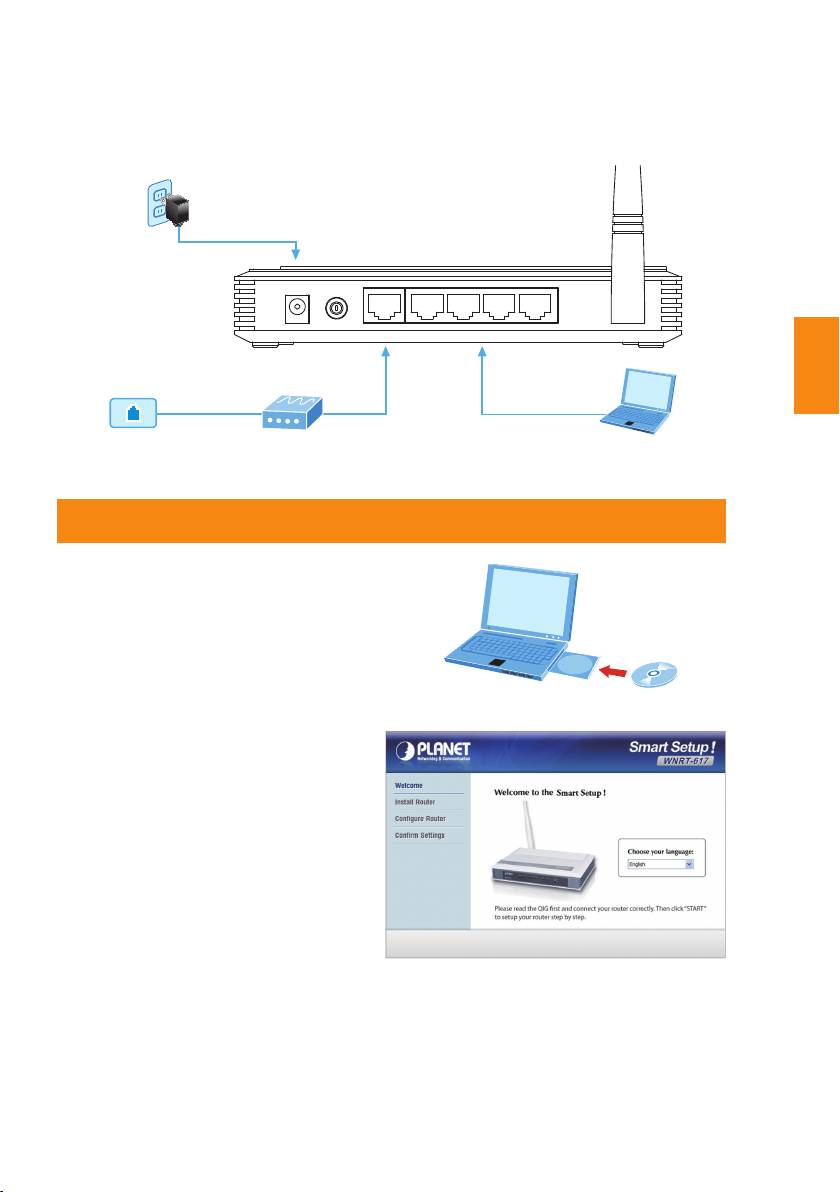
3. Hardware Installation
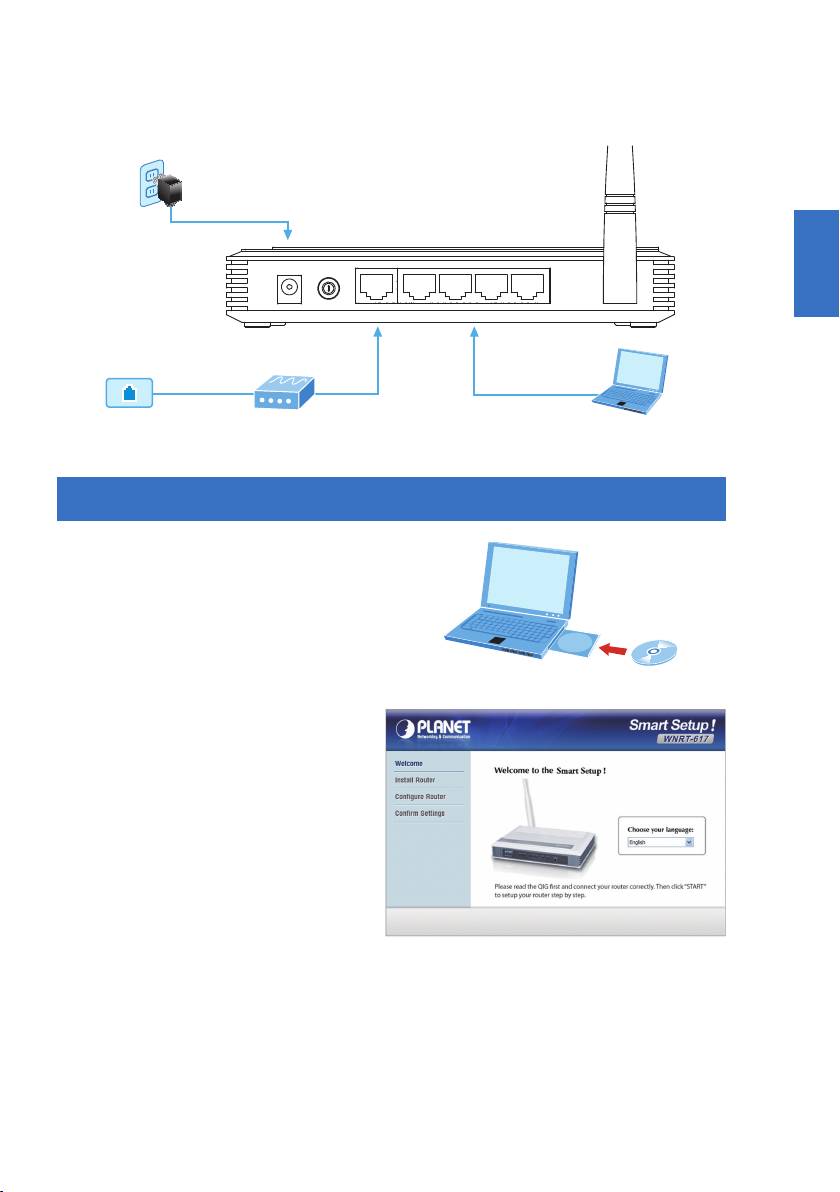
STEP 1: Connect the Power Adapter to the Wireless Router and press the button
to turn it on. The PWR LED on the front panel shall turn on accordingly.
Power
Power Adapter
POWER
ON/OFF
WAN 4 3 2 1
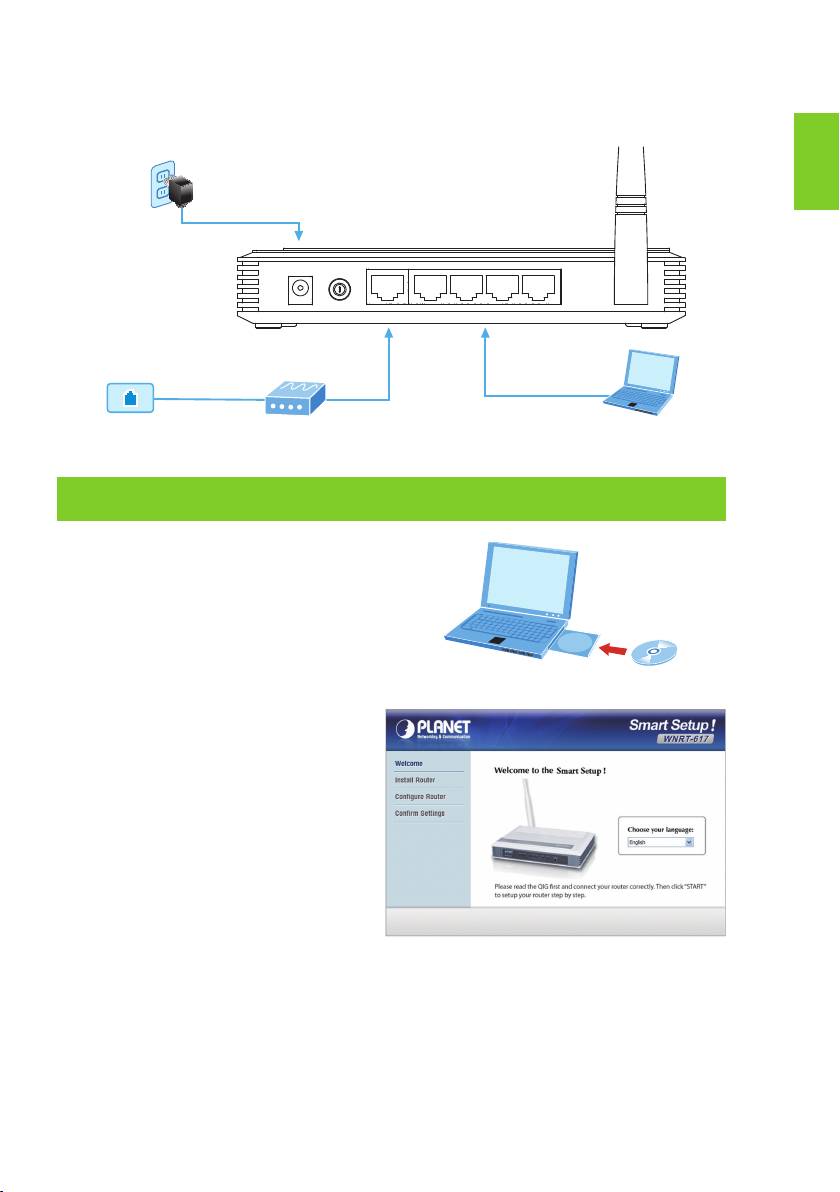
English
1-3
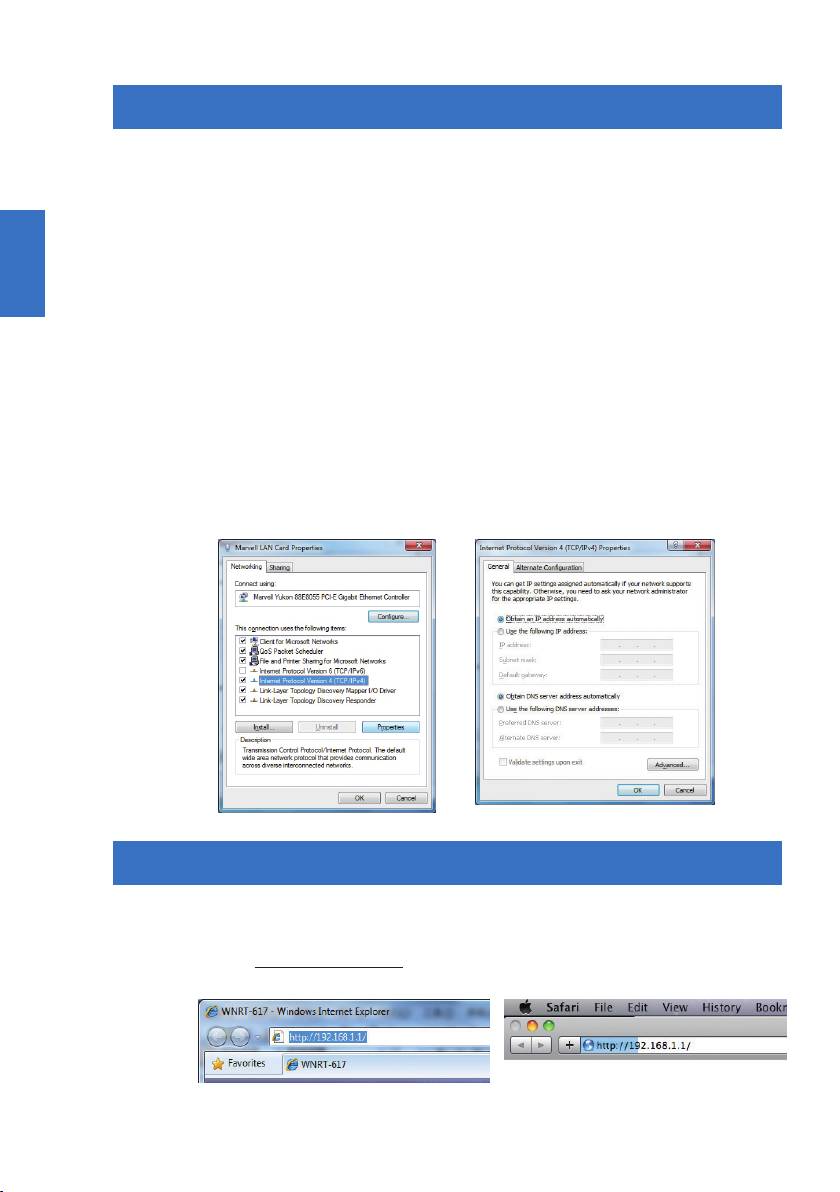
STEP 2: Follow the gure below to connect network devices.
Power
Power Adapter
POWER
ON/OFF
WAN 4 3 2 1
RJ-11
001101010
RJ-45
RJ-45
Phone Jack
DSL/Cable Modem
PC/Laptop
4. Smart Setup! Installation
STEP 1: You can congure the router by
running the SMART SETUP!
in the CD-ROM provided in the
package.
CD in the package
STEP 2: Please follow the indications
on the screen to quickly
setup for the Internet
connection.
When “Finish” is displayed, the setup is completed.
If you prefer the traditional web setup, please follow the procedures below to
congure the router.
English
1-4
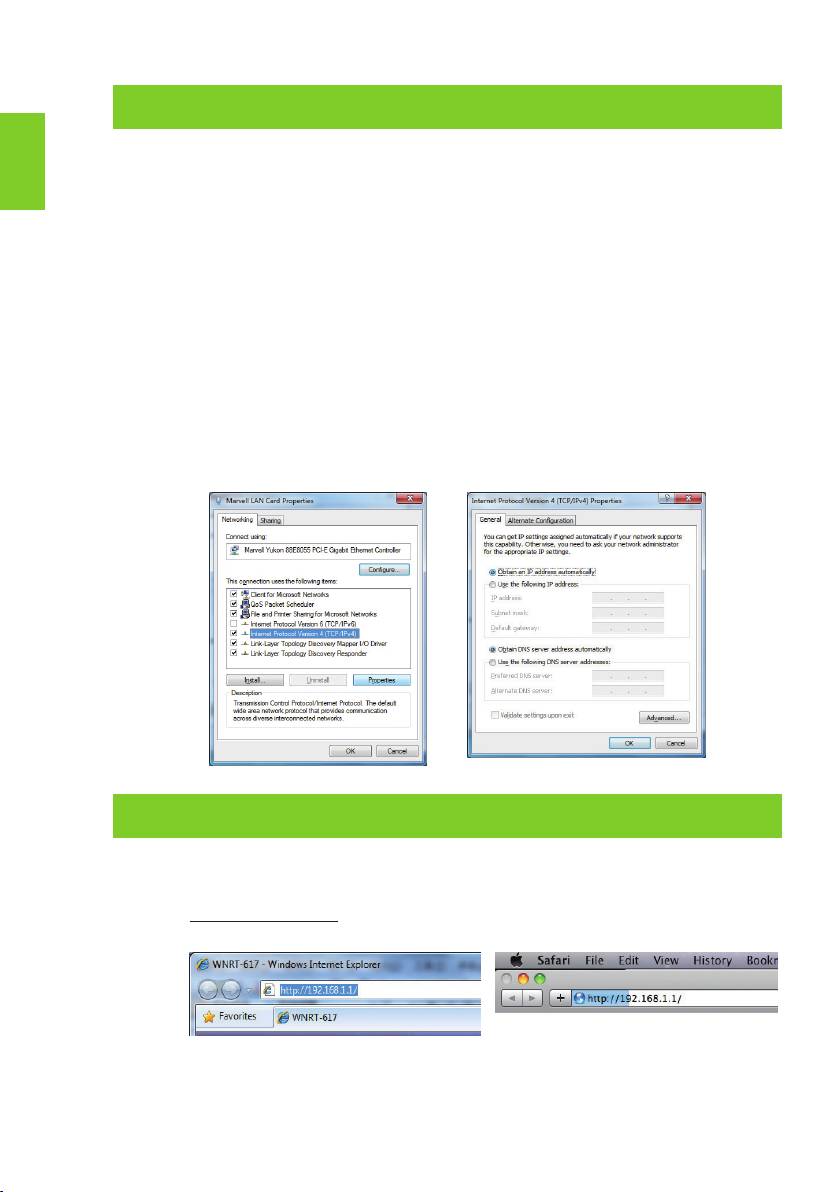
5. Manual Installation – Network Setup
A computer with the UTP cable connected to the Wireless Router is required for the
rst-time conguration.
STEP : Set your computer to get an IP address from the Wireless Router (Based
on Windows 7):
1. Click “Start” button located at lower-left corner of you computer.
2. Click “Control Panel”.
3. Double click “Network and Sharing Center” icon.
4. Click “Change adapter settings”.
5. Double click “Local Area Connection”.
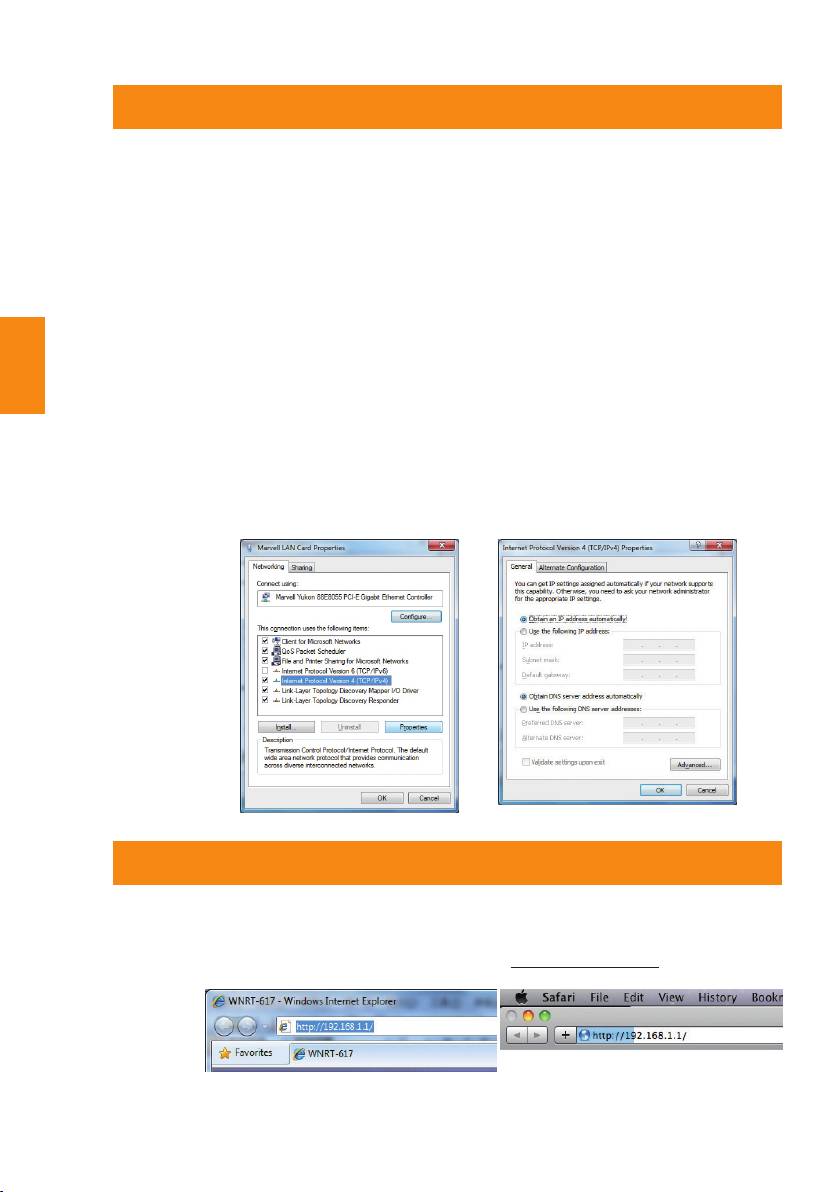
6. Select “Internal Protocol Version 4 (TCP/IPv4)” and click “Prop-
erties”.
7. Select “Obtain an IP address automatically” and “Obtain DNS
server address automatically”, then click “OK”.
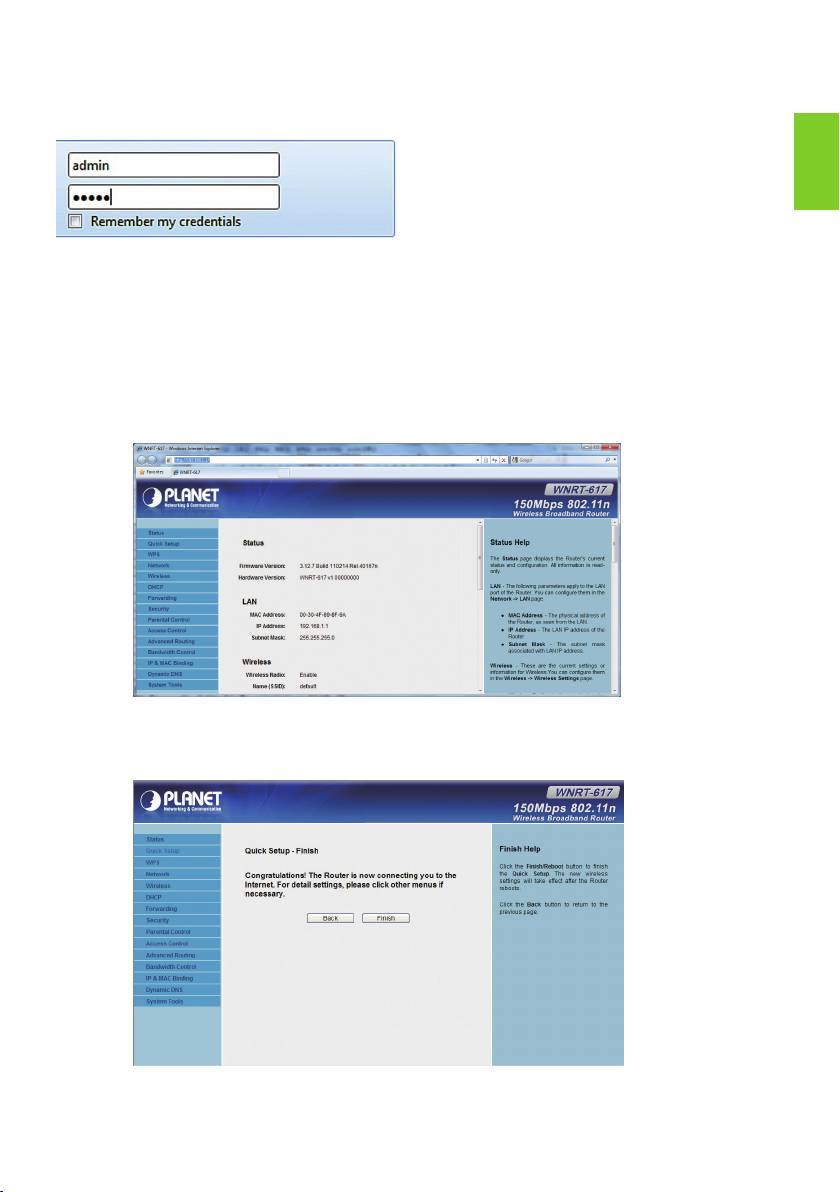
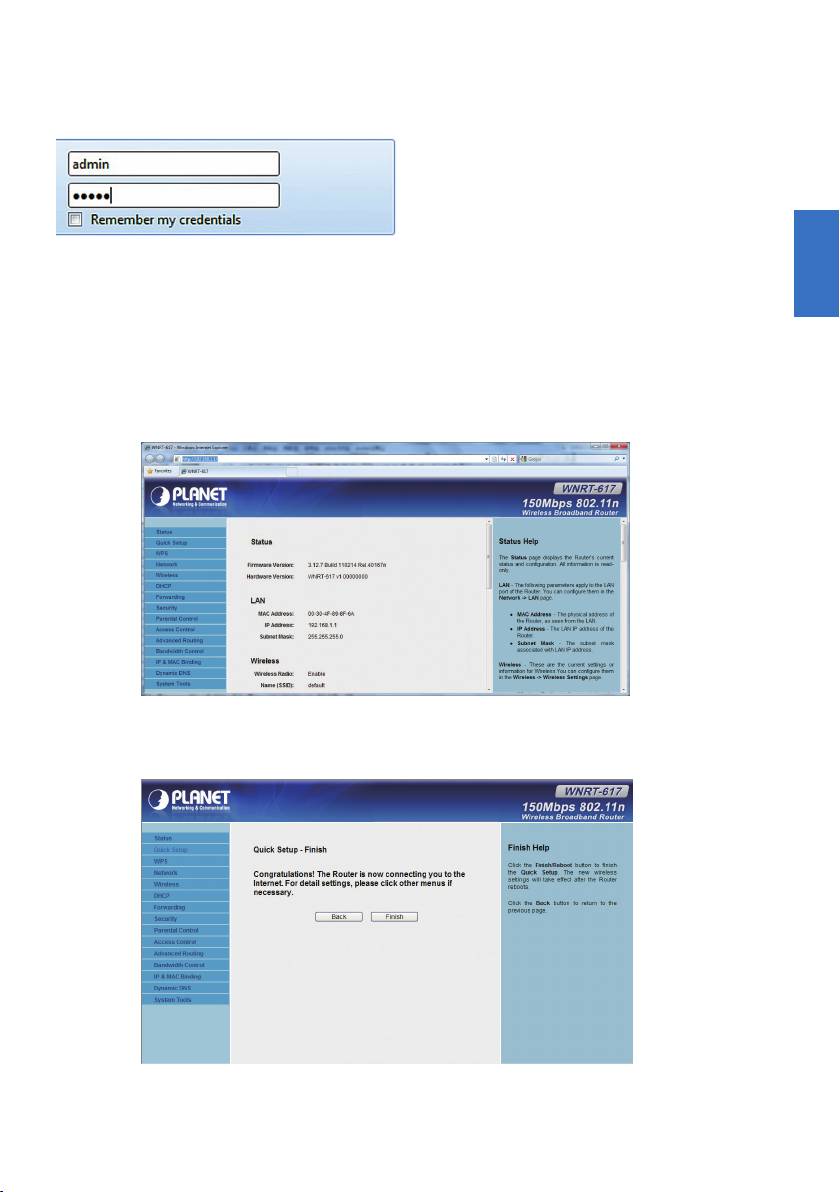
6. Manual Installation – Web Management
STEP 1: The Web Management allows you to access and manage the Wireless
Router easily. Launch the Web browser and enter the default IP address
http://192.168.1.1.
English
1-5
The default User name and Password are both “admin”.
Then click OK button to continue.
Default IP Address: 192.168.1.1
Default Username: admin
Default Password: admin
Default SSID: default
STEP 2: When you enter into the Web User Interface, click Quick Setup at the
left hand side of the screen.
STEP 3: Once the basic conguration of the router is done. Click Reboot button
to make the change take effect.
7. Wireless Network Connection
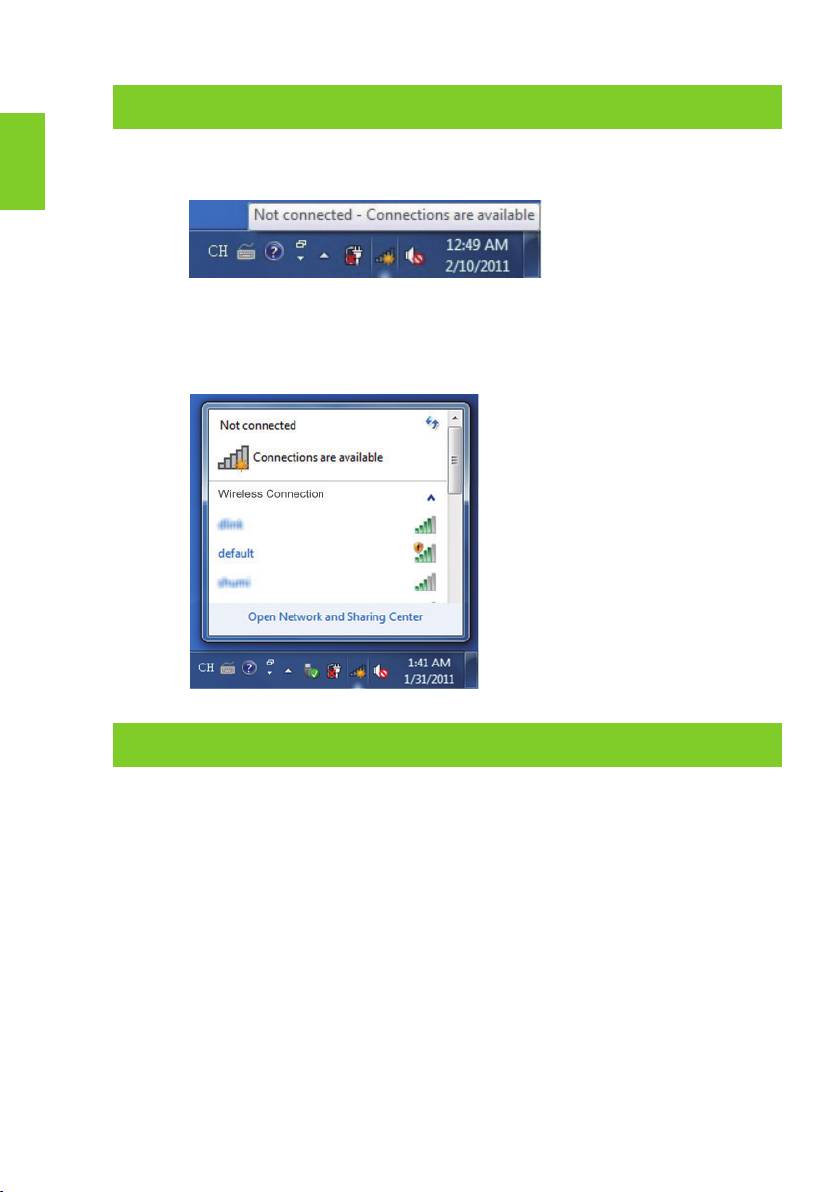
STEP 1: Right-click on the network icon displayed in the system tray.
English
STEP 2: Highlight the wireless network (SSID) to connect and click [Connect].
STEP 3: Enter the encryption key of the Wireless Router.
Further Information
The above steps introduce the simple installations and congurations for WNRT-
617. For further congurations of WAN, LAN, Wireless, Firewall, Virtual Server,
Security, Routing, DMZ, and DDNS etc, please refer to the user’s manual in the
CD. If you have further questions, please contact the local dealer or distributor
where you purchased this product.
1-6

1. Contenu Du Coffret
Merci d'avoir choisi le Routeur large bande sans l PLANET WNRT-617. Avant
d'installer le routeur, veuillez vérier si les éléments ci-dessous et le routeur se
trouvent dans l'emballage.
Fr ançaise
WNRT-617
Guide de démarrage rapide
CD-ROM
Câble Ethernet Adaptateur secteur
2-1
Remarque
Si l’un des éléments manque ou est endommagé, veuillez contacter
immédiatement le revendeur.
2. Présentation Physique
Description du panneau avant
WLAN LANSYSPWR
WAN WPS
WPS/Reset
1 32 4
WNRT-617
Voyant DEL d'alimentation
Bouton WPS/Réinitialisation
Voyant DEL du système
Voyant DEL de la
Voyant DEL de la
fonction WPS
connexion sans fil
Voyant DEL du statut du
Voyant DEL des
port WAN
réseaux LAN1~LAN4
Fr ançaise
2-2
Description du panneau arrière
Port WAN
Antenne 5dBi
(Branchement DSL/Modem Câble)
Connecteur d'alimentation
POWER
ON/OFF
WAN 4 3 2 1
Bouton MARCHE/ARRÊT
4 Ports LAN 10/100Mbps pour se
brancher sur les appareils réseau ou sur
le PC de l'utilisateur
3. Installation Du Matériel
ÉTAPE 1: Branchez l'adaptateur secteur sur le routeur sans l et enfoncez le
bouton pour le mettre sous tension. Le voyant DEL PWR (alimentation)
du panneau avant devrait alors s'allumer.
Alimentation
Adaptateur secteur
POWER
ON/OFF
WAN 4 3 2 1
Fr ançaise
2-3
ÉTAPE 2: Suivez le schéma ci-dessous pour brancher les appareils en réseau.
Alimentation
Adaptateur
secteur
POWER
ON/OFF
WAN 4 3 2 1
001101010
RJ-45RJ-11
RJ-45
Prise téléphone
Modem DSL/Câble
PC/Ordinateur portable
4. Installation Du Smart Setup!
ÉTAPE 1: Il est possible de congurer le
routeur en exécutant SMART
SETUP! disponible sur le CD-ROM
fourni dans l'emballage.
CD de l'emballage
ÉTAPE 2: Veuillez suivre les
indications à l'écran pour
congurer rapidement la
connexion Internet.
Lorsque "Finish" (Terminer) s'afche à l'écran, l'installation est terminée.
Si vous préférez l'installation traditionnelle sur Internet, veuillez suivre les
procédures ci-dessous pour congurer le routeur.
Fr ançaise
2-4
5. Installation Manuelle - Conguration Du Réseau
Pour la première conguration, il est nécessaire de connecter un ordinateur au
routeur sans l via un câble UTP.
ÉTAPE : Paramétrez votre ordinateur de façon à obtenir l'adresse IP du routeur
sans l (sur Windows 7):
1. Cliquez sur le bouton “Démarrer”, en bas à gauche de votre ordina-
teur.
2. Cliquez sur “Panneau de conguration”.
3. Double-cliquez sur l’icône “Centre Réseau et partage”.
4. Cliquez sur “Modier les paramètres de la carte”.
5. Double-cliquez sur “Connexion au réseau local”.
6. Sélectionnez “Protocole Internet Version 4 (TCP/IPv4)” puis
cliquez sur “Propriétés”.
7. Sélectionnez “Obtenir automatiquement une adresse IP” et
“Obtenir les adresses des serveurs DNS automatiquement”.
Cliquez ensuite sur “OK”.
6. Installation Manuelle - Web Management
ÉTAPE 1: Web Management vous permet d'accéder et de gérer facilement le
routeur sans l. Lancez le navigateur Web et accédez à l'adresse IP par
défaut http://192.168.1.1.
Fr ançaise
2-5
Le nom utilisateur et le mot de passe par défaut sont “admin”.
Cliquez ensuite sur le bouton OK pour poursuivre.
Adresse IP par défaut: 192.168.1.1
Nom d’utilisateur par défaut: admin
Mot de passe par défaut: admin
SSID par défaut: default
ÉTAPE 2: Lorsque vous entrez dans l'interface utilisateur sur le Web, cliquez sur
Quick Setup (Conguration rapide), à gauche de l'écran.
ÉTAPE 3: Une fois la conguration de base du routeur effectuée : Cliquez sur le
bouton Reboot (Redémarrer) pour appliquer les modications.

7. Connexion Au Réseau Sans Fil
ÉTAPE 1: Cliquez avec le bouton droit sur l'icône réseau afchée dans la barre
d'état du système.
Fr ançaise
ÉTAPE 2: Sélectionnez le réseau sans l (SSID) choisi pour votre connexion, et
cliquez sur [Connect] (Connecter).
ÉTAPE 3: Saisissez la clé de cryptage du routeur sans l.
Informations Supplémentaires
Les étapes précédentes ne concernent que les installations et congurations simples
des modèles WNRT-617. Pour des congurations plus complexes du WAN, LAN,
Sans l, Pare-feu, Serveur virtuel, Sécurité, Routage, DMZ et DDNS, etc., veuillez
consultez le mode d'emploi sur le CD. Si vous avez d'autres questions, veuillez
contacter votre fournisseur ou votre distributeur local chez qui vous avez acheté ce
produit.
2-6
1. Lieferumfang
Danke, dass Sie sich für den WLAN-Breitband-Router WNRT-617 von PLANET
entschieden haben. Bitte prüfen Sie vor der Installation des Routers, ob die
nachstehenden Artikel sowie der Router selbst im Paket enthalten sind.
WNRT-617
Schnellanleitung CD-ROM
Deutsch
Ethernet-Kabel Netzteil
3-1
Hinweis
Falls etwas fehlen oder beschädigt sein sollte, wenden Sie sich bitte
umgehend an Ihren Händler.
2. Übersicht
Beschreibung der Vorderseite
WLAN LANSYSPWR
WAN WPS
WPS/Reset
1 32 4
WNRT-617
Betriebs-LED
WPS/Reset-Taste
System-LED
WPS-Funktions-LED
WLAN-LED
LEDs: LAN1 – LAN4
WAN-Port-Status-LED
Deutsch
3-2
Beschreibung der Rückseite
WAN-Port
5-dBi-Antenne
(mit DSL/Kabelmodem verbinden)
Netzanschluss
POWER
ON/OFF
WAN 4 3 2 1
Ein-/Austaste
Vier LAN-Ports (10/100 Mbit/s),
mit PCs oder Netzwerkgeräten verbinden
3. Hardwareinstallation
SCHRITT 1: Schließen Sie das Netzteil an den WLAN-Router an und drücken
zum Einschalten die Ein-/Austaste. Die Betriebs-LED (PWR) an der
Vorderseite sollte jetzt leuchten.
Steckdose
Netzteil
POWER
ON/OFF
WAN 4 3 2 1
Deutsch
3-3
SCHRITT 2: Beachten Sie zum Anschließen von Netzwerkgeräten die nachstehende
Abbildung.
Steckdose
Netzteil
POWER
ON/OFF
WAN 4 3 2 1
001101010
RJ-45RJ-11
RJ-45
Telefondose
DSL/Kabelmodem
PC/Notebook
4. Smart Setup! installieren
SCHRITT 1: Sie können den Router
kongurieren, indem Sie
SMART SETUP! auf der
mitgelieferten CD-ROM
ausführen.
Mitgelieferte CD
SCHRITT 2: Bitte folgen Sie zur
schnellen Einrichtung
der Internetverbindung
den Anweisungen auf
dem Bildschirm.
Sobald "Finish" (Fertig) angezeigt wird, ist die Einrichtung abgeschlossen.
Wenn Sie die herkömmliche Einrichtung einer Internetverbindung bevorzugen,
folgen Sie zur Konguration des Routers bitte den nachstehenden Anweisungen.
Deutsch
3-4
5. Manuelle Installation – Netzwerkeinrichtung
Für die erstmalige Konguration müssen Sie einen Computer per UTP-Kabel mit
dem WLAN-Router verbinden.
SCHRITT : Paramétrez votre ordinateur de façon à obtenir l'adresse IP du routeur
sans l (sur Windows 7):
1. Klicken Sie unten links auf Ihrem Computerbildschirm auf “Start”.
2. Klicken Sie auf “Systemsteuerung”.
3. Doppelklicken Sie auf das “Netzwerk- und Freigabecenter”-
Symbol.
4. Klicken Sie auf “Adaptereinstellungen ändern”.
5. Doppelklicken Sie auf “LAN-Verbindung”.
6. Wählen Sie “Internetprotokoll Version 4 (TCP/IPv4)” und
klicken auf “Eigenschaften”.
7. Wählen Sie “IP-Adresse automatisch beziehen” und “DNS-
Serveradresse automatisch beziehen” und klicken Sie auf
“OK”.
6. Manuelle Installation – Webverwaltung
SCHRITT 1: Über die Webverwaltung können Sie mühelos auf Ihren WLAN-Router
zugreifen und diesen verwalten. Öffnen Sie den Webbrowser und
geben die Standard-IP-Adresse ein: http://192.168.1.1.
