Linksys RE2000: User Guide
User Guide: Linksys RE2000
RE1000
RE2000
User Guide
Wireless-N Range Extender
Linksys
1
Introduction
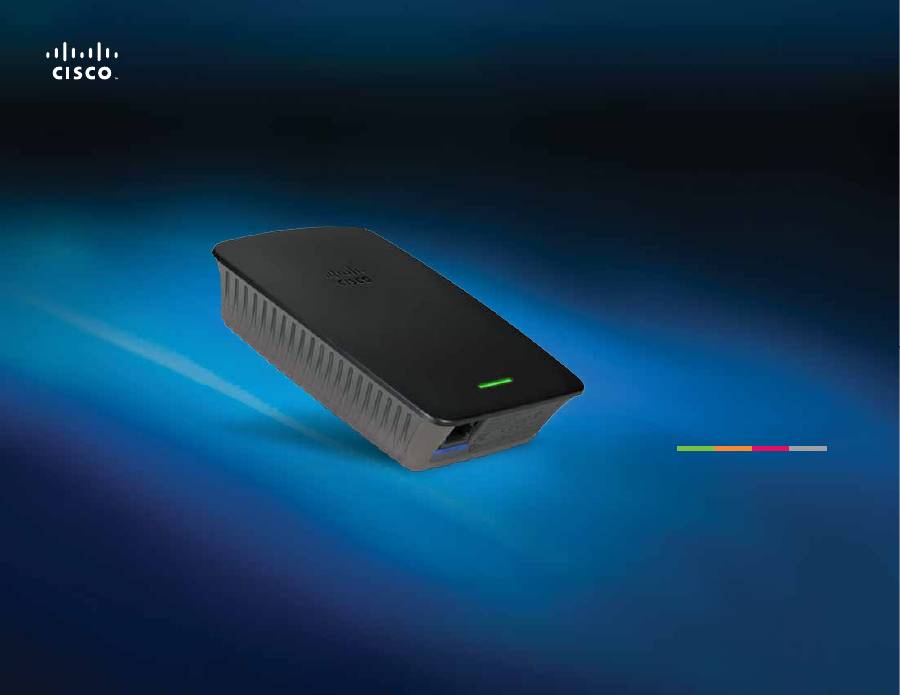
Linksys Wireless-N Range Extender
Introduction
This
Getting Started
guide can help you connect the extender to your network
and solve common setup issues. You can find more help from our award-
winning, 24/7 customer support at
Linksys.com/support
.
Contents
Overview . . . . . . . . . . . . . . . . . . . . . . . . . . . . . . . . . . . . . . . . 1
How to install the range extender . . . . . . . . . . . . . . . . 2
How to access the browser-based utility . . . . . . . . . . 5
Using Wi-Fi Protected Setup . . . . . . . . . . . . . . . . . . . . . 7
How to use Site Survey . . . . . . . . . . . . . . . . . . . . . . . . . . 9
Troubleshooting . . . . . . . . . . . . . . . . . . . . . . . . . . . . . . . . 10
Specifications . . . . . . . . . . . . . . . . . . . . . . . . . . . . . . . . . . 13
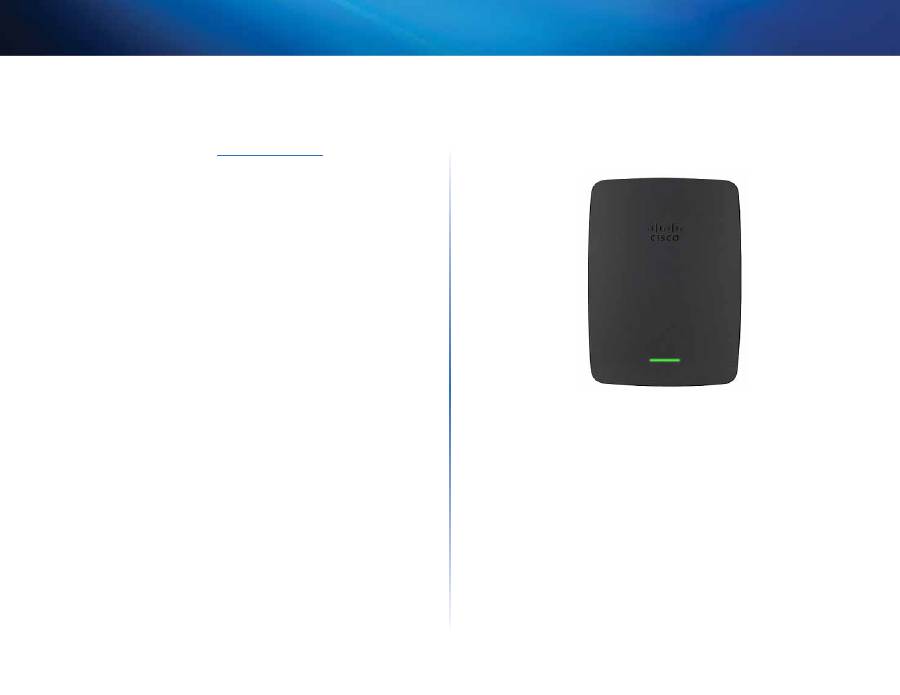
Overview
Front
This light indicates the power and the Wi-Fi Protected Setup status. After
initial setup, if you have client devices, such as wireless printers, that
support Wi-Fi Protected Setup, then you can use Wi-Fi Protected Setup to
automatically configure wireless security for your wireless network.
Power
When the extender is powered on, resets to factory
defaults, or upgrades its firmware, the light flashes slowly
(about every three seconds). When the extender is ready for use,
the light is continuously lit. If there is an error, the light flashes
quickly (about every second); disconnect the extender from the
wall mount socket, wait two seconds, and then reconnect it.
Wi-Fi Protected Setup
When the Wi-Fi Protected Setup process
is active, the light flashes slowly (about every two seconds) for
two minutes. When the Wi-Fi Protected Setup is successful,
the light is continuously lit. If there is an error, the light flashes
quickly (about every second) for two minutes; please wait and
try again.
2
Contents
Linksys Wireless-N Range Extender
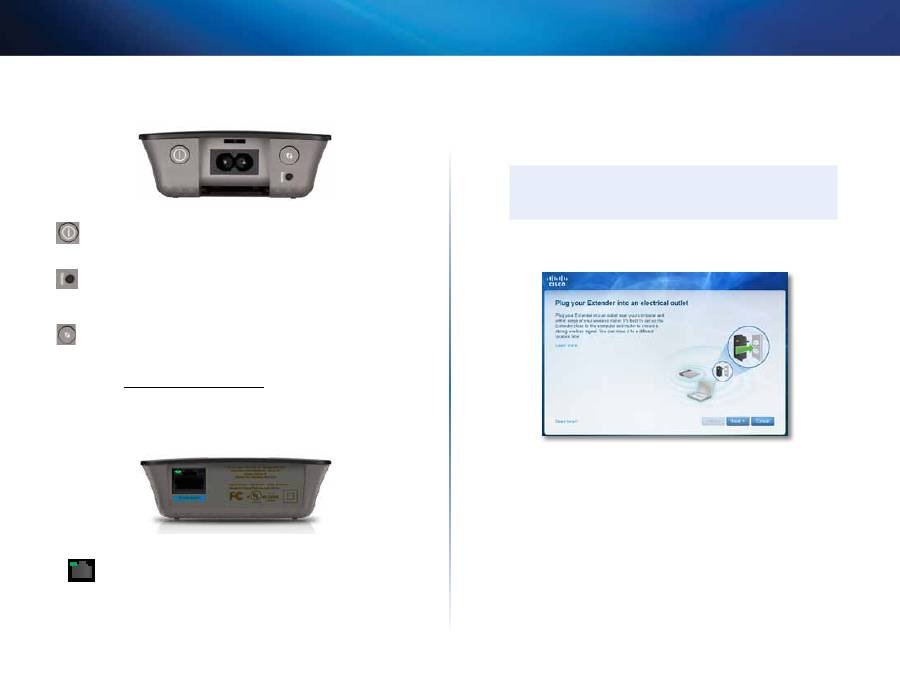
Top
Power Switch
Featured only in the European versions of the extender.
Reset
Press and hold this button for about five seconds to reset the
extender to its factory defaults. You can also restore the defaults from
the
Administration > Factory Defaults
screen in the extender’s browser-
based utility.
Wi-Fi Protected Setup Button
After initial setup, if you have client
devices, such as wireless printers, that support Wi-Fi Protected Setup,
then you can use Wi-Fi Protected Setup to automatically configure
wireless security for your wireless network. To use Wi-Fi Protected Setup,
refer to “
Using Wi-Fi Protected Setup
” on page 7.
Bottom
Ethernet
(green) Using Ethernet cables (also called network
cables), this Ethernet port connects Ethernet network devices
to your wireless network.
The green light turns on when an Ethernet device is connected
and active on this port. The light flashes when the extender is
sending or receiving data over the Ethernet port.
How to install the range extender
1.
Insert the
Setup CD
into a computer that is connected to the network
router. You will need to be near the router or access point and have
access to a networked computer.
IMPORTANT
Set up the extender close to the computer and router to ensure a
strong wireless signal. You can move it to a different location later.
2.
When the
Setup
utility starts, read the license terms, then click
Next
. You
are prompted to plug your extender into an electrical outlet.
3.
Connect your extender to an AC power outlet. Your extender searches for
wireless networks. The list of networks is displayed.
3
Contents
Linksys Wireless-N Range Extender
4.
Select the network to use, then click
Next
.
5.
Type your network’s password, then click
OK
.
- OR -
If your network is hidden (your router does not broadcast its name), click
My network is hidden
, enter your network’s information, then click
OK
.
6.
Click
Next
. Your extender is set up, and you are prompted to move the
extender to its final location.
TIP
For best performance, position the extender where the wireless
signal of your router or access point is reliably strong (at least 60%
strength).
4
Contents
Linksys Wireless-N Range Extender
7.
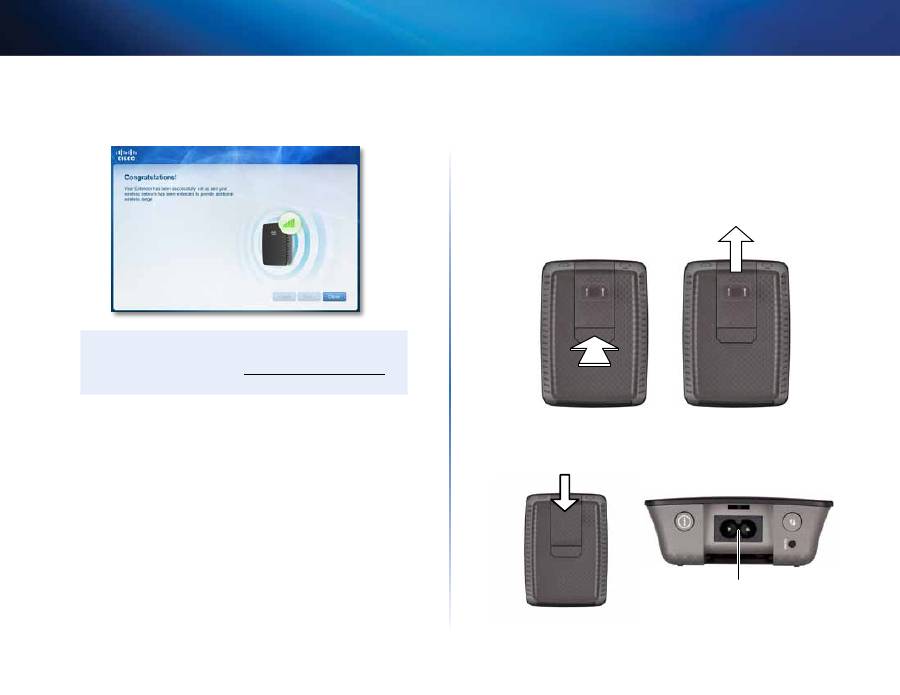
Move the extender to its primary location, then click
Next
. Your router
tests the wireless connection to your relocated extender and prompts
you if it needs further adjustment.
TIP
You can also connect the range extender by using Wi-Fi Protected
Setup. For more information, see “
Using Wi-Fi Protected Setup
” on
page 7.
How to change the power plug configuration
You can connect the extender’s built-in power plug directly to a wall power
outlet. For a desktop or table-top setup, you can also remove the built-in plug
and use an AC cable instead.
To attach the AC power plug:
1.
Press the plug release latch, then slide the AC plug off the extender.
2.
Slide the clip cover into the slot that held the AC plug, then connect the
AC cable to the power connector.
Power connector
(European version of extender shown)
5
Contents
Linksys Wireless-N Range Extender
How to access the browser-based utility
After setting up the extender with the setup software (located on the CD), the
extender will be ready for use. If you would like to change its advanced settings,
use the extender’s browser-based utility.
If the extender has not been set up yet
Using a wired computer:
1.
Use the included Ethernet (network) cable to connect your extender to
your computer.
2.
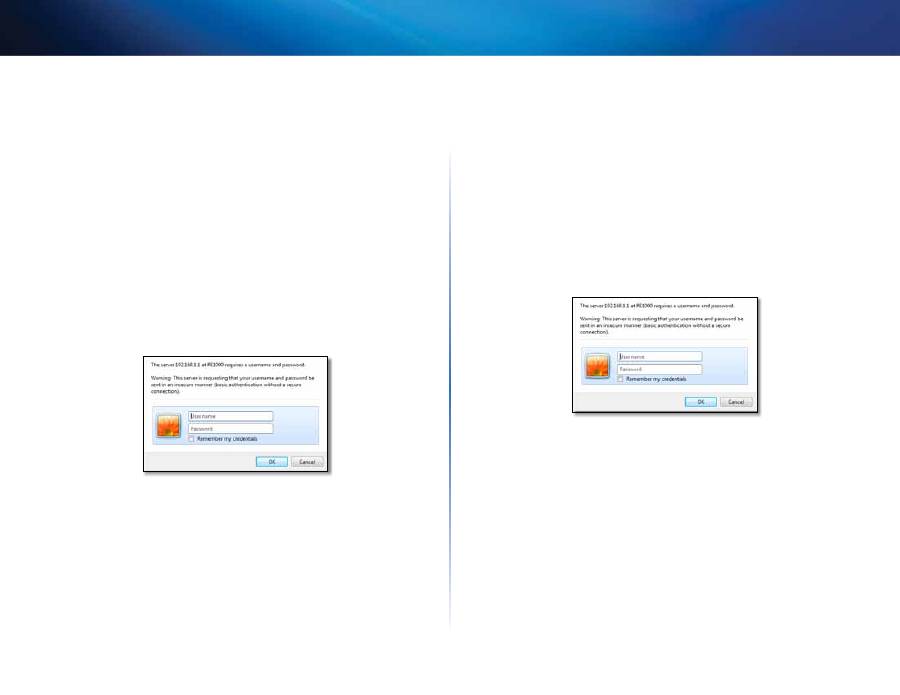
Open a web browser. If you have defined a default startup page in your
browser, the extender’s
User Name and Password
dialog box automatically
opens. If your browser’s home or default page is blank, enter any valid
web address and the extender’s
User Name and Password
dialog box
opens.
3.
Leave the
User Name
blank, then enter the default password
admin
.
4.
Click
OK
. You are logged in to your extender’s browser-based utility.
Using a wireless computer:
1.
Locate the extender’s wireless network name (SSID). The extender comes
with a pre-configured SSID showing as
LinksysExtenderxxxxx
in the
wireless site survey of your computer, with
xxxxx
being the last five digits
of your extender’s serial number.
2.
Connect your computer to the extender’s wireless network. Refer to
your computer’s operating system documentation or online help for
instructions.
3.
Open a web browser. If you have defined a default startup page in your
browser, the extender’s
User Name and Password
dialog box automatically
opens. If your browser’s home or default page is blank, enter any valid
web address and the extender’s
User Name and Password
dialog box
opens.
4.
Leave the
User Name
blank, then enter the default password
admin
.
5.
Click
OK
. You are logged into your extender’s browser-based utility.
6
Contents
Linksys Wireless-N Range Extender
If the extender has already been set up
On a Microsoft Windows XP computer:
TIP
To follow these instructions, UPnP needs to be enabled in
Windows XP.
To enable UPnP:
1.
Click
Start
,
Control Panel
,
Add or Remove Program
, then click
Add/Remove Windows Components
.
2.
Select
Network Services
, then click
Details
.
3.
Select
UPnP User Interface
, then click
OK
.
1.
Open Windows Explorer, then click
My Network Places
on the left panel.
The
RE1000/RE2000
icon appears on the right panel. (You might be
required to change the firewall settings to allow the display of networked
computers. Refer to your operating system’s help for instructions.)
2.
Double-click the
RE1000/RE2000
icon. Your web browser opens and
you are prompted for your
User Name
and
Password
.
3.
Leave the
User Name
field blank, then enter the password you created
during Setup.
4.
Click
OK
.
On a Microsoft Windows 8, Windows 7, or Vista computer:
1.
Open Windows Explorer (File Explorer in Windows 8), then click
Network
.
The
RE1000/RE2000
icon appears on the right panel. (You might be
required to change the firewall settings to allow the display of networked
computers. Refer to your operating system’s help for instructions.)
2.
Right-click the
RE1000/RE2000
icon, then click
Properties
. Click on the
address link in
Device webpage
. Your web browser opens, and you are
asked for a
User Name
and
Password
.
3.
Leave the
User Name
blank, and enter the password you have created.
4.
Click
OK
.
On a Mac OS X computer:
Every Mac computer has Bonjour networking technology, which a Mac
uses to communicate with basic devices such as cell phones and iPods.
1.
Open
Safari
, click the book icon, then click
Bonjour
on the left panel.
The
RE1000/RE2000
icon appears on the bottom right panel.
2.
Double-click the
RE1000/RE2000
icon. You are asked for a
User Name
and
Password
.
3.
Leave the
User Name
blank, and enter the password you have created.
4.
Click
OK
.
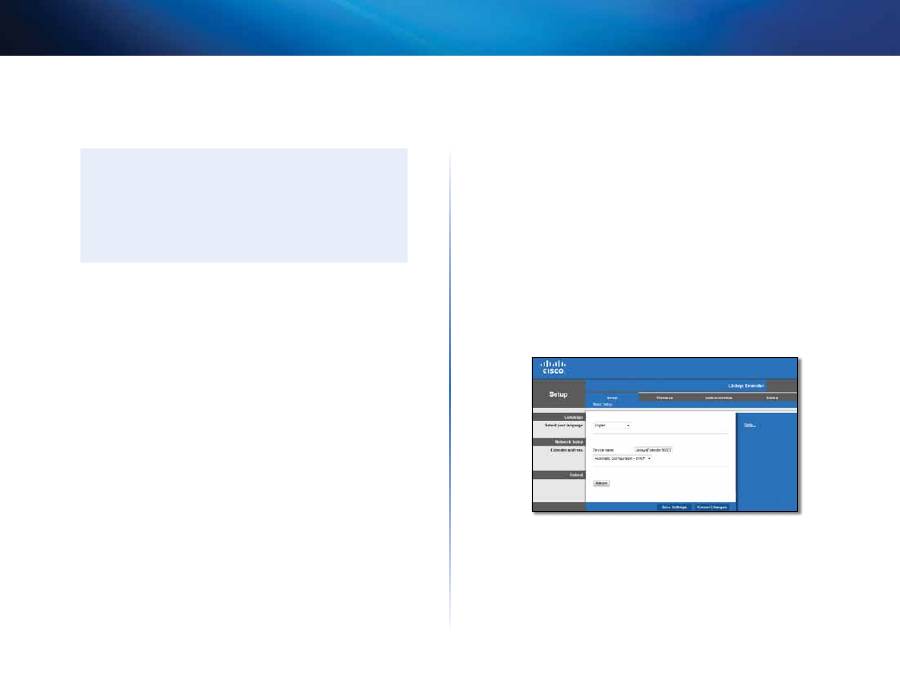
How to use the browser-based utility
If you change any settings on a screen, you must click
Save Settings
to apply
your changes, or click
Cancel Changes
to clear your changes. These controls
are located at the bottom of each screen. Click
Help
on the right side of the
screen for additional information on the screen’s options.
7
Contents
Linksys Wireless-N Range Extender
Using Wi-Fi Protected Setup
Wi-Fi Protected Setup™ makes it easy to connect your extender to your network,
then connect other devices to your network through the extender.
Wi-Fi Protected Setup light activity
•
When the Wi-Fi Protected Setup process is active, the light flashes slowly.
When the Wi-Fi Protected Setup is successful, the light is continuously lit.
•
If there is an error, the light flashes quickly for two minutes; please wait
and try again.
•
Wait until the light is continuously lit before starting the next Wi-Fi
Protected Setup session.
Connecting the extender to an existing access point
If your access point or router supports it, you can use Wi-Fi Protected Setup
to connect the range extender to the access point or router. Choose from the
setup methods below to connect the extender.
NOTE
If you have an access point or a router that do not support Wi-Fi
Protected Setup, note the wireless settings, and then manually
configure the extender.
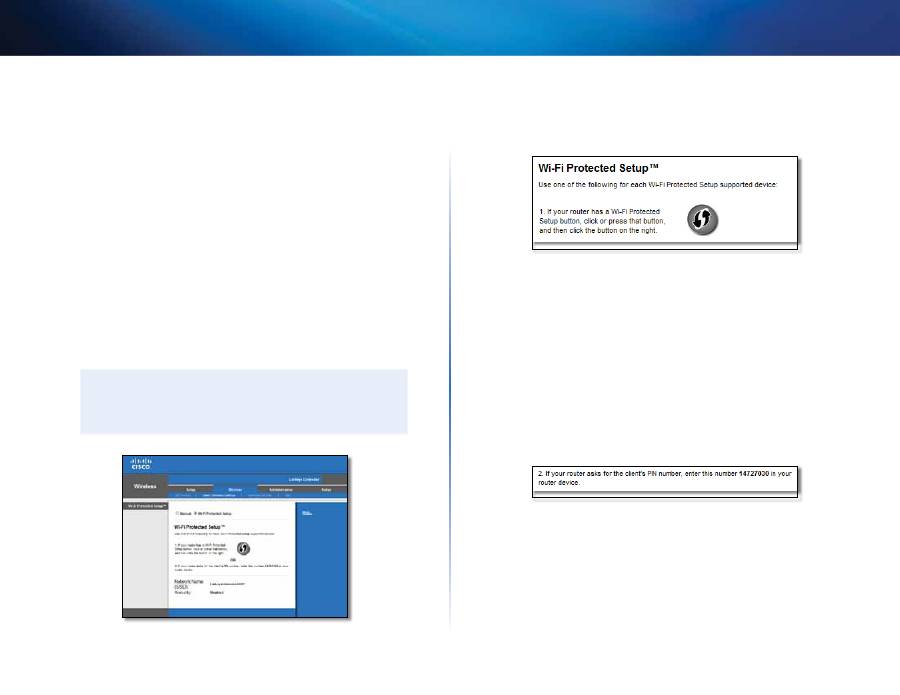
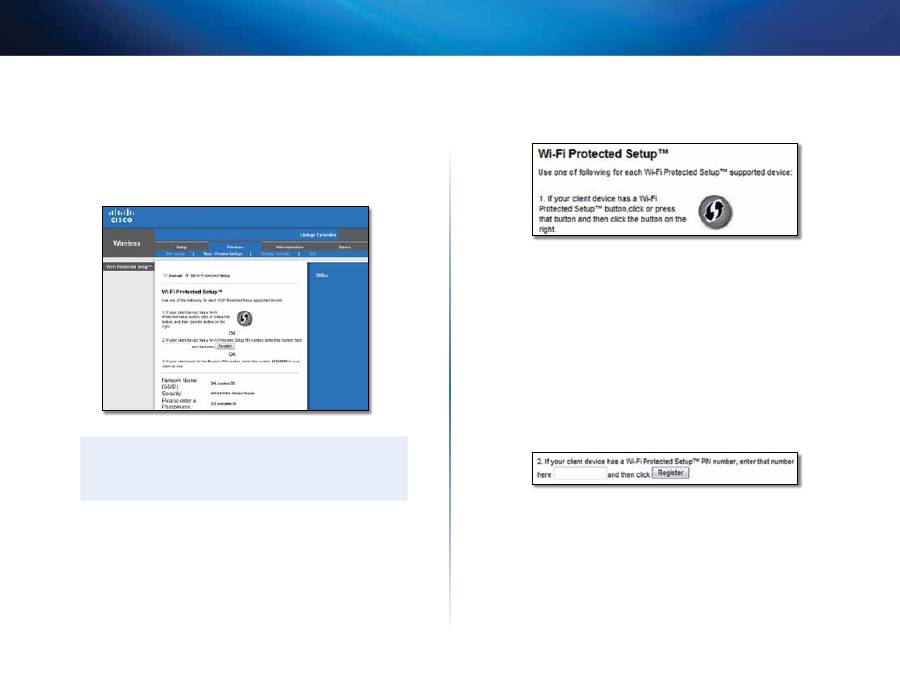
Connecting with the Wi-Fi Protected Setup Button
Use this method if your router or access point has a Wi-Fi Protected Setup
button.
1.
Click or press the
Wi-Fi Protected Setup
button on the extender.
2.
Click the
Wi-Fi Protected Setup
button on the router’s
Wi-Fi Protected
Setup
screen (if available), OR press and hold the Wi-Fi Protected Setup
button on the router for one second. When the connection is complete,
the Wi-Fi Protected Setup light on the extender is continuously lit.
3.
If you used the extender’s
Wi-Fi Protected Setup
screen, click
OK
in that
screen within two minutes.
Connecting with the range extender’s PIN
The Wi-Fi Protected Setup PIN (Personal Identification Number) can be found
on the product label of the extender. You can use this method only if your
router’s administration utility has a Wi-Fi Protected Setup menu.
1.
Enter the extender’s PIN into the appropriate field on the router’s
Wi-
Fi Protected Setup
screen, then click
Register.
When the connection is
complete, the Wi-Fi Protected Setup light on the extender is continuously
lit.
2.
Click
OK.
8
Contents
Linksys Wireless-N Range Extender
Connecting devices to your network through the
extender
If you have network devices, such as wireless printers, that support Wi-Fi
Protected Setup, then you can use Wi-Fi Protected Setup to connect them to
your wireless network. Choose from the methods below to connect the device
to your network.
NOTE
Wi-Fi Protected Setup configures only one client device at a time.
Repeat the instructions for each client device that supports Wi-Fi
Protected Setup.
Connecting with the Wi-Fi Protected Setup Button
Use this method if your client device has a Wi-Fi Protected Setup button.
1.
Click or press the
Wi-Fi Protected Setup
button on the client device.
2.
Click the
Wi-Fi Protected Setup
button on the extender’s
Wi-Fi Protected
Setup
screen, OR press and hold the Wi-Fi Protected Setup button on
the top panel of the extender for one second. When the connection is
complete, the Wi-Fi Protected Setup light on the extender is continuously
lit.
3.
Click
OK
on the
extender’s
Wi-Fi Protected Setup
screen within two
minutes.
Connecting with the client device’s PIN
Use this method if your client device has a Wi-Fi Protected Setup PIN (Personal
Identification Number).
1.
Enter the PIN from the client device in the
field on the extender’s
Wi-Fi
Protected Setup
screen.
2.
Click
Register
on the
extender’s
Wi-Fi Protected Setup
screen. When the
connection is complete, the Wi-Fi Protected Setup light on the extender
is continuously lit.
3.
Click
OK
on the extender’s
Wi-Fi Protected Setup
screen within two
minutes.
9
Contents
Linksys Wireless-N Range Extender
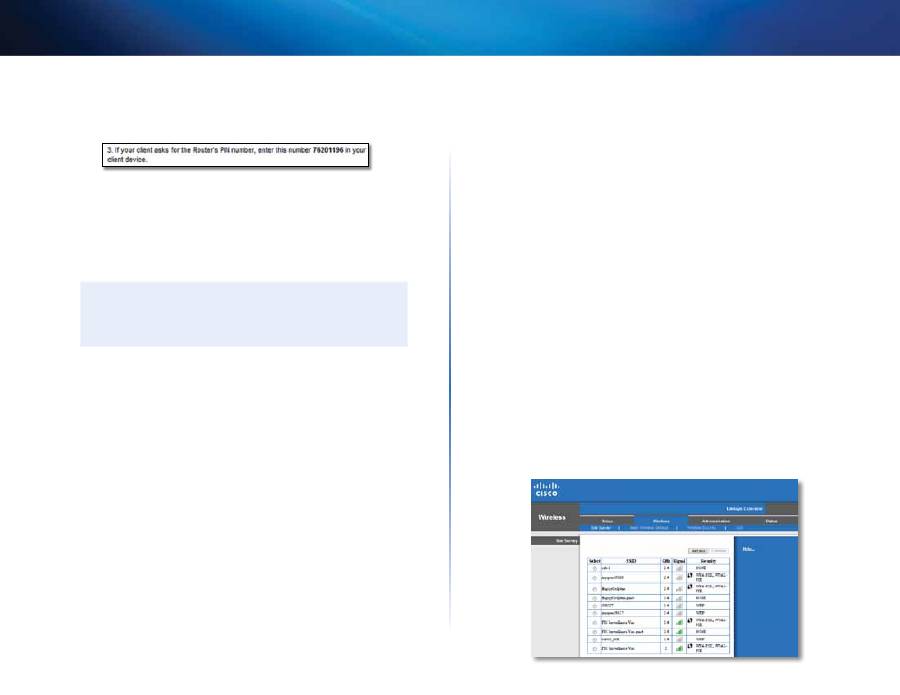
Connecting with the extender’s PIN
Use this method if your client device asks for the extender’s PIN.
1.
On the client device, enter the PIN listed on the extender’s
Wi-Fi Protected
Setup
screen. (It is also listed on the bottom of the extender.) When the
connection is complete, the Wi-Fi Protected Setup light on the extender
is continuously lit.
2.
Click
OK
on the extender’s
Wi-Fi Protected Setup
screen within two
minutes.
TIP
If you have client devices that do not support Wi-Fi Protected
Setup, note the wireless settings, and then manually configure
those client devices.
How to use Site Survey
The Site Survey gives a snapshot of all neighboring access points and
wireless routers within range of the extender.
To open the Site Survey page:
1.
Log into the browser-based utility (see “How to access the browser-based
utility” on page 5).
2.
Click the
Wireless
tab, then click the
Site Survey
page.
Select
—To connect to a wireless network, click the button next to the
wireless network name (SSID) in the
Select
column, then click
Connect
.
SSID
—Displays the name of neighboring wireless networks.
GHz
—Displays the radio band (in GHz) of the neighboring wireless
networks. (This column is available only with the RE2000.)
Signal Strength
—Displays the relative position of the neighboring
APs by indicating the power of the wireless signal received: 1 bar= 20%,
2 bars=40%, 3 bars=60%, 4 bars=80%, 5 bars=100%. If no bar is displayed,
the extender is located too far away from the upstream AP. Try to keep
the signal strength between 60% and 100% for optimum performance.
A careful site survey will help in keeping this value within acceptable
range to benefit from optimum performance.
Security
—Displays the mode of security in use by the neighboring APs.
If a network supports Wi-Fi Protected Setup, the Wi-Fi Protected Setup
icon is also displayed.
10
Contents
Linksys Wireless-N Range Extender
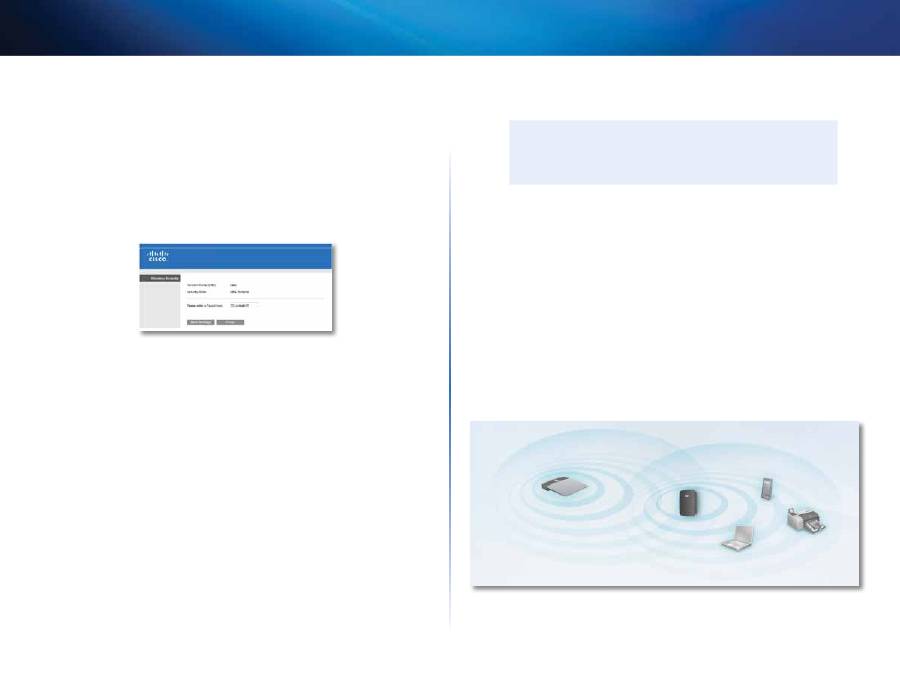
To associate your extender with your known access point or router:
1.
Make a note of the SSID and the security passphrase that your access
point or wireless router is actually configured with. This information will
be useful to carry on setup after the site survey is done.
2.
Select the network name (SSID) that you want to repeat with your
extender by clicking the corresponding button in the
Select
column.
3.
Click
Connect
. You are prompted for the passphrase used to secure your
wireless network. The type of security information required in this screen
needs to match your access point or router’s wireless security settings.
4.
Enter the passphrase, then click
Save Settings
. Your extender wireless
parameters should be configured. The wireless interface restarts, and the
extender associates with the access point or router you have chosen.
Troubleshooting
NOTE
Your RE1000 works only on the 2.4 GHz network and cannot be
used on a 5 GHz network. Your RE2000 works on either a 2.4 GHz or
5 GHz network.
You cannot get your extender connected
Check the position of your router and extender
•
For first-time setup, you may need to place the extender closer to the
router. After you’ve set up your extender, you can unplug it and move it
to the final location.
•
To reduce signal obstructions, you can try alternate locations for the
router and extender.
•
Avoid placing the router and extender near metal objects, masonry walls,
and reflective surfaces such as glass or mirrors.
•
Avoid placing the router and extender near other electronics that may be
causing signal interference.
If you’re using Wi-Fi Protected Setup to connect
•
Wait until the Wi-Fi Protected Setup indicator stops blinking before
trying to make the connection again.
11
Contents
Linksys Wireless-N Range Extender
You cannot access your range extender
To access your range extender, you must be connected to your own network. If
you currently have wireless Internet access, the problem may be that you have
accidentally connected to a different wireless network.
For Mac instructions, see “
To fix the problem on Mac computers:
” on page 12.
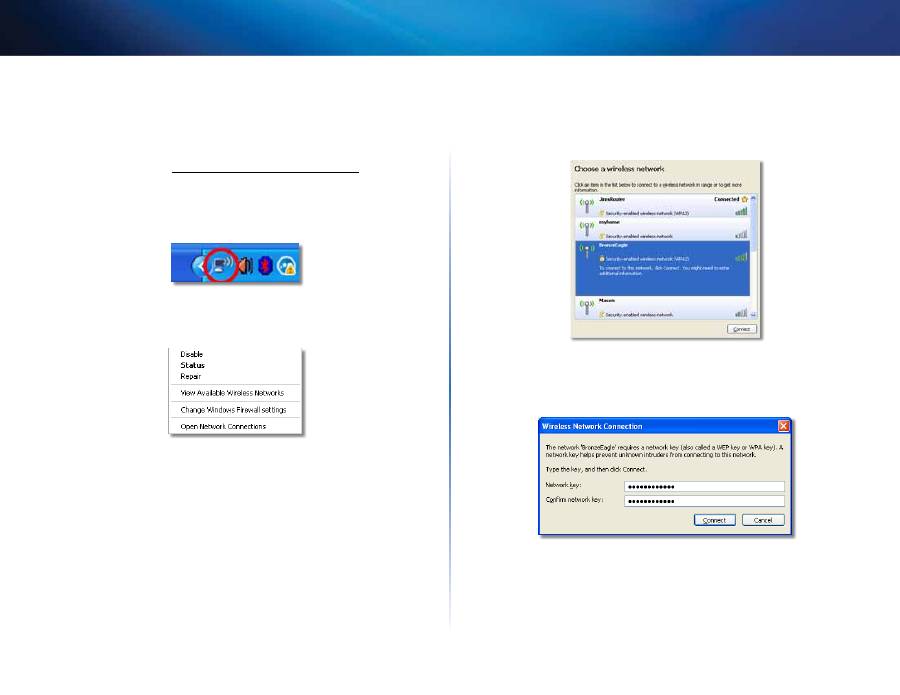
To fix the problem on Windows computers:
1.
On your Windows desktop, right-click the wireless icon in the system tray.
2.
Click
View Available Wireless Networks
. A list of available networks
appears.
3.
Click your own network name, then click
Connect
. In the example
below, the computer was connected to another wireless network named
JimsRouter
. The name of the correct network,
BronzeEagle
in this example
,
is shown selected.
4.
If you are prompted to enter a network key, type your password (Security
Key) into the
Network key
and
Confirm network key
fields, then click
Connect
.
Your computer connects to the network, and you should now be able to
access the range extender’s browser-based utility.
12
Contents
Linksys Wireless-N Range Extender
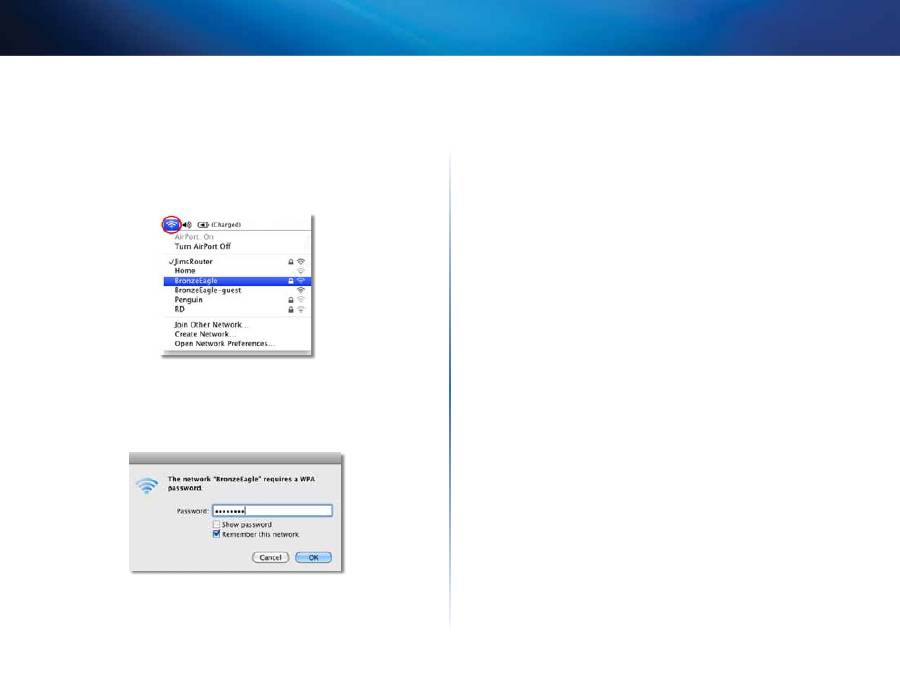
To fix the problem on Mac computers:
1.
In the menu bar across the top of the screen, click the
AirPort
icon. A list
of wireless networks appears. Cisco Connect has automatically assigned
your network a name.
In the example below, the computer was connected to another wireless
network named
JimsRouter
. The name of the Linksys E-Series network,
BronzeEagle
in this example
,
is shown selected.
2.
Click the wireless network name of the router your range extender is
connected to.
3.
Type your wireless network password (Security Key) into the
Password
field, then click
OK
.
Your computer connects to the network, and you should now be able to
access the range extender’s browser-based utility.
You have intermittent connection problems
When you position your range extender, place it in a location where the signal
strength can be kept between 60% and 100% for optimum performance.

13
Contents
Linksys Wireless-N Range Extender
Specifications
RE1000
Model Name
Linksys RE1000
Model Description
Wireless-N Range Extender
Model Number
RE1000
Standards
IEEE 802.11n, 802.11g, 802.11b, 802.3u
Ports
Fast Ethernet, C7 connector for localized
AC cable or clip
Buttons
Reset, Wi-Fi Protected Setup™,
Power (European model only)
LEDs
Power/Wi-Fi Protected Setup,
Ethernet (link, activity)
Cabling Type
CAT 5e
Antennas
2 (internal)
Detachable (y/n)
No
Wireless Security
Wi-Fi Protected Access™ 2 (WPA2),
Wi-Fi Protected Access™ (WPA), WEP
Security Key Bits
Up to 128-bit encryption
Environmental
Dimensions
4.92” x 3.62” x 1.29” (125 x 92 x 33 mm)
Weight
5.5 oz (155 g)
Power
Internal AC/DC power supply
100-240V, 50/60Hz, 0.5A
Certification
FCC, UL/cUL, ICES-003, RSS210, CE,
Wi-Fi (IEEE 802.11b/g/n), WPA2™, WMM®,
Wi-Fi Protected Setup™
Operating Temperature
32 to 104°F (0 to 40°C)
Storage Temperature
-4 to 140°F (-20 to 60°C)
Operating Humidity
10 to 80% noncondensing
Storage Humidity
5 to 90% noncondensing
Specifications are subject to change without notice.

14
Contents
Linksys Wireless-N Range Extender
RE2000
Model Name
Linksys RE2000
Model Description
Dual-band Wireless-N Range Extender
Model Number
RE2000
Standards
IEEE 802.11a, 802.11n, 802.11g, 802.11b, 802.3u
Ports
Fast Ethernet, C7 connector for localized
AC cable or clip
Buttons
Reset, Wi-Fi Protected Setup™,
Power (European model only)
LEDs
Power/Wi-Fi Protected Setup,
Ethernet (link, activity)
Cabling Type
CAT 5e
Antennas
2 (internal)
Detachable (y/n)
No
Wireless Security
Wi-Fi Protected Access™ 2 (WPA2),
Wi-Fi Protected Access™ (WPA), WEP
Security Key Bits
Up to 128-bit encryption
Environmental
Dimensions
4.92” x 3.62” x 1.29” (125 x 92 x 33 mm)
Weight
5.4 oz (152 g)
Power
Internal AC/DC power supply
100-240V, 50/60Hz, 0.5A
Certification
FCC, UL/cUL, ICES-003, RSS210, CE,
Wi-Fi (IEEE 802.11a/b/g/n), WPA2™, WMM®,
Wi-Fi Protected Setup™
Operating Temperature
32 to 104°F (0 to 40°C)
Storage Temperature
-4 to 140°F (-20 to 60°C)
Operating Humidity
10 to 80% noncondensing
Storage Humidity
5 to 90% noncondensing
Specifications are subject to change without notice.
130
214
MS
Cisco, the Cisco logo, and Linksys are trademarks or registered trademarks of Cisco and/or its affiliates in the United States and other countries.
A listing of Cisco’s trademarks can be found at www.cisco.com/go/trademarks. All other trademarks mentioned in this document are the property of their respective owners.
© 2013 Cisco and/or its affiliates. All rights reserved.
Visit
linksys.com/support
for award-winning 24/7 technical support
3425-01650
B
Оглавление
- Ръководство за потребителя
- Uživatelská příručka
- Brugervejledning
- Benutzerhandbuch
- Οδηγός χρήσης
- User Guide
- Guía del usuario
- Käyttöopas
- Felhasználói kézikönyv
- Panduan Pengguna
- Guida per l’utente
- Gebruikershandleiding
- Brukerhåndbok
- Manual do utilizador
- Guia de introdução
- Ghid de utilizare
- Руководство пользователя
- Navodila za uporabo
- Användarhandbok
- คู่มือผู้ใช้
- kullanım kılavuzu
- Керівництво користувача
- Hướng dẫn sử dụng
