Yamaha CDX-497: CONNECTIONS
CONNECTIONS: Yamaha CDX-497
Table of contents
- CAUTION: Read this before operating your unit.
- CONTENTS
- SUPPORTED DISC TYPES FEATURES
- UNPACKING NOTES ABOUT THE REMOTE CONTROL
- CONNECTIONS
- IDENTIFICATION OF COMPONENTS Front panel Display
- Remote control
- BASIC OPERATION
- To pause playback To turn off the power To play back the desired track To stop playback To search an folder/file on an MP3 or WMA disc (CDX-497 only)
- To advance or reverse playback rapidly (Manual search) To skip to the beginning of the desired track (Skip search)
- Changing display
- Adjusting the output level (CDX-497 only) Changing brightness of the display Automatic spacing
- RANDOM-SEQUENCE PLAY REPEAT PLAY Repeat a selected item
- Repeat A-B
- PROGRAM PLAY
- INDEX SEARCH
- TRACK PROGRAMMING FOR RECORDING TO TAPE Automatic tape-programming (for Audio CD)
- Notes
- Manual tape-programming (for Audio CD)
- Random sequential tape-programming (for Audio CD)
- Automatic searching for the peak level on a disc (for Audio CD)
- CD SYNCHRONIZED RECORDING
- Notes about handling compact discs Discs playable with this unit NOTES ABOUT DISCS
- TROUBLESHOOTING
- SPECIFICATIONS
4
En
■
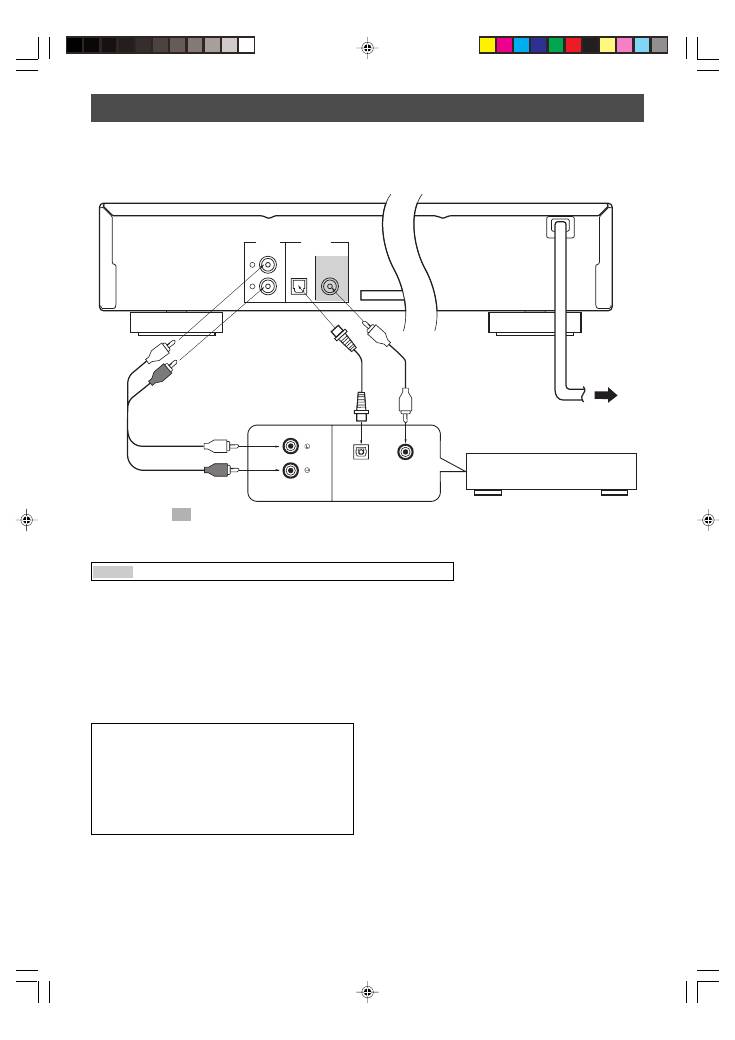
To connect this unit to your amplifier, choose one of the ways listed below.
Caution
Do not plug in this unit to a wall outlet until all connections are complete.
When the DIGITAL OUT (OPTICAL) terminal
of this unit is used (
2
)
●
Make the connection from this terminal to the optical
input terminal of an amplifier by using a commercially
available optical cable.
*
Use a reliable optical cable.
●
This terminal can also be connected to the optical input
terminal of an MD recorder etc. to record CD onto MD
directly.
When the DIGITAL OUT (COAXIAL) terminal
of this unit is used (
3
)
(CDX-497 only)
Make the connection from this terminal to the digital input
terminal of an amplifier by using a coaxial cable.
(CDX-497 only)
●
The level of signals output from any of these terminals
into an amplifier can be adjusted by the
OUTPUT LEVEL +/–
buttons.
●
When using the DIGITAL OUT (OPTICAL or COAXIAL)
terminal, set the level of signals output into an amplifier
to max. by using the
OUTPUT LEVEL +/–
buttons.
LINE OUT
OPTICAL
COAXIAL
DIGITAL OUT
L
R
CD
DIGITAL IN
OPTICAL
COAXIAL
CONNECTIONS
●
Before making any connection, switch OFF the power to
the unit and the amplifier or other component.
●
Connections should be made to the correct input
terminals of the amplifier or another component.
●
If the placement of this unit causes noise to another
equipment, such as a tuner, separate them from each
other.
Amplifier
To AC outlet
The shaded part ( ) is provided for CDX-497 only.
1
Audio pin cable
(included)
Europe and U.K models
When the LINE OUT (analog) terminals of
this unit are used (
1
)
Connect these terminals to the “CD” (or “AUX”) terminals of
the amplifier. For details concerning these connections,
refer to the operation instructions of the amplifier being
used.
*
Be sure that the left (“L”) and right (“R”) of these terminals are
connected to the corresponding (left and right) terminals of the
amplifier or another component.
2
Optical cable
(not included)
3
Coaxial cable
(not included)
■
To connect this unit to the AC outlet
After you made all connections, connect the power cable of this unit to the AC outlet.
01_En_02_BOD_CDX-397_497_G.pm
4/27/06, 3:06 PM
4
