ABUS TVIP52502 Operating instructions – page 6
Manual for ABUS TVIP52502 Operating instructions
Table of contents
- User manual
101
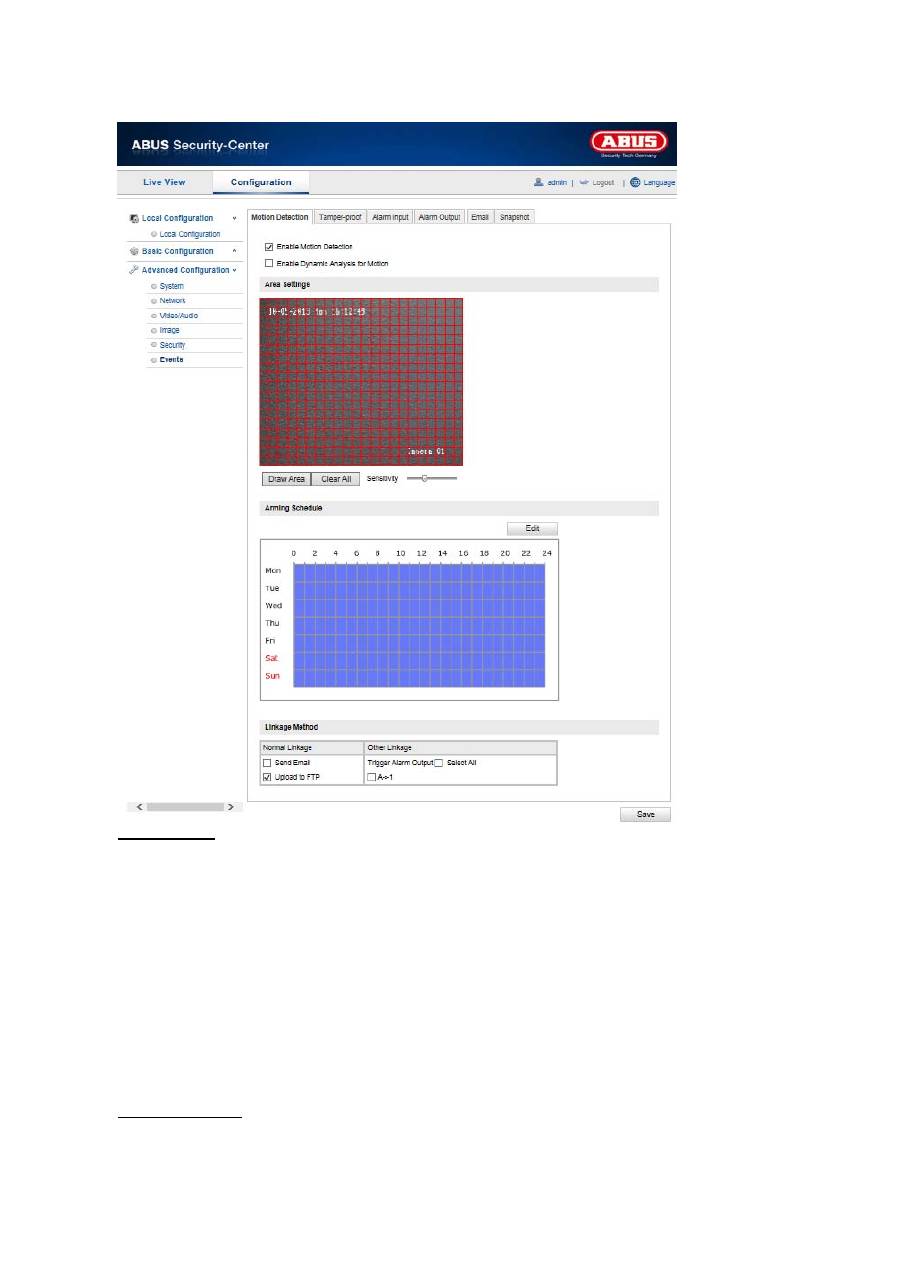
10.3.7.1 Motion Detection
Area Settings
Activate motion detection by clicking the “Enable Motion Detection” checkbox.
By clicking on “Enable Dynamic Motion Analysis”, movements are recorded in the preview image and the
live view (dynamic recording according to motion).
To select an area, click on the “Draw Area” button. The entire area is selected by default. To discard this
selection, click on “Clear All”.
Drag the mouse pointer over the desired area. Set the sensitivity using the regulation control bar. To apply
the setting for the area, click on “Stop Drawing”.
Right: high sensitivity level
Left: low sensitivity level
Arming Schedule
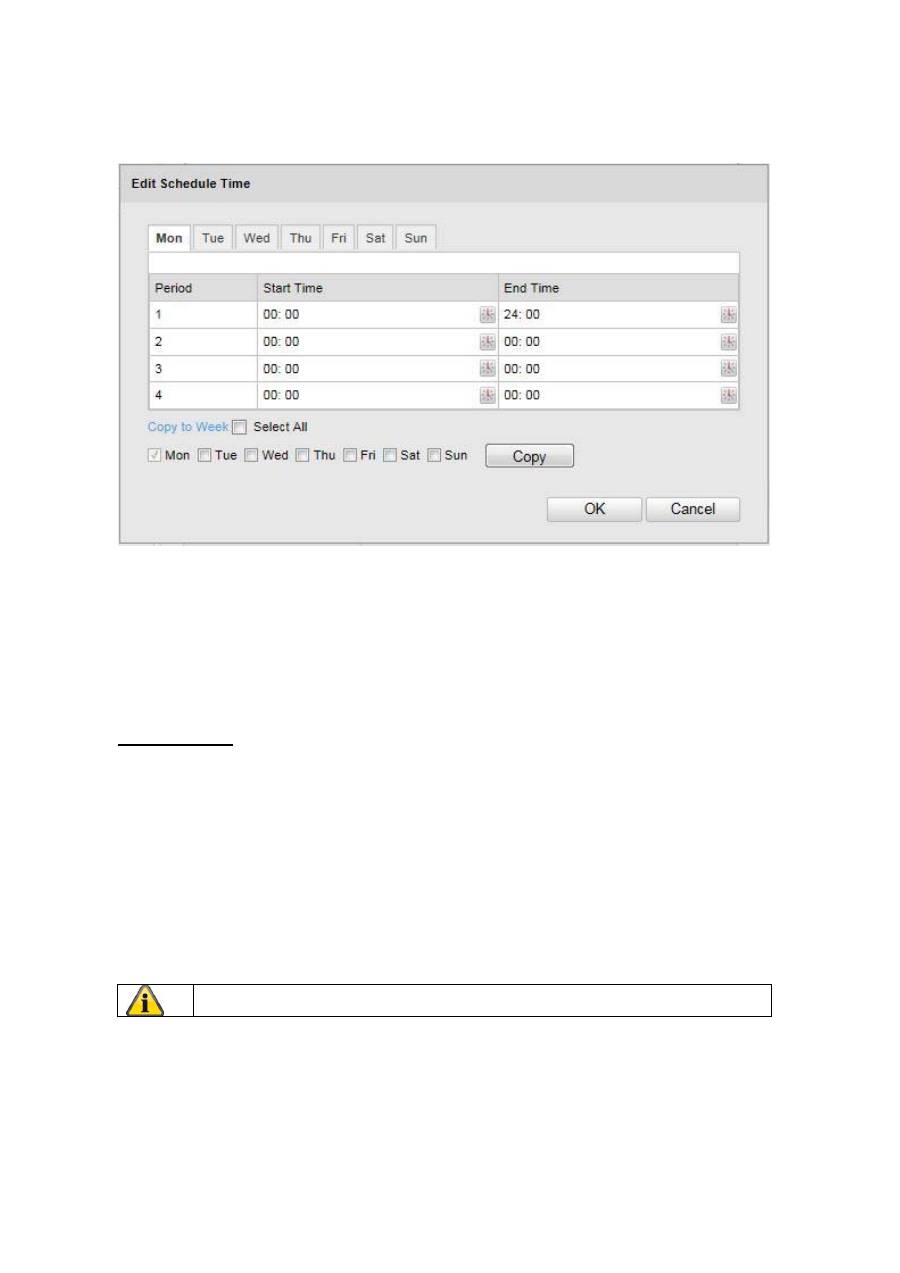
To save a schedule for motion-controlled recording, click on “Edit”.
102
A new window appears. Specify here on which days of the week and at which times motion-controlled
recording should take place.
Now select a week day for motion controlled recording. To store particular time periods, enter a start and
end time. To set up all-day motion-detection, select 00:00 as the start time and 24:00 as the end time.
To apply motion detection for all week days, click the “Select All” checkbox. To copy motion detection to
other week days, select the week day and click on “Copy”.
To apply the changes, click “OK” and to discard them click on “Cancel”.
Apply the settings made with “Save”.
Linkage Method
Make the setting here for which action motion detection should be performed.
Normal Linkage
Send Email:
You receive an e-mail as notification, activate the checkbox for this to be performed.
Upload to FTP: Activate the checkbox to upload the motion-controlled recording to an FTP server.
Other Linkage
You can switch on the alarm output for when motion is detected.
To switch on alarm output 1, select “A->1”.
Apply the settings made with “Save”.
103
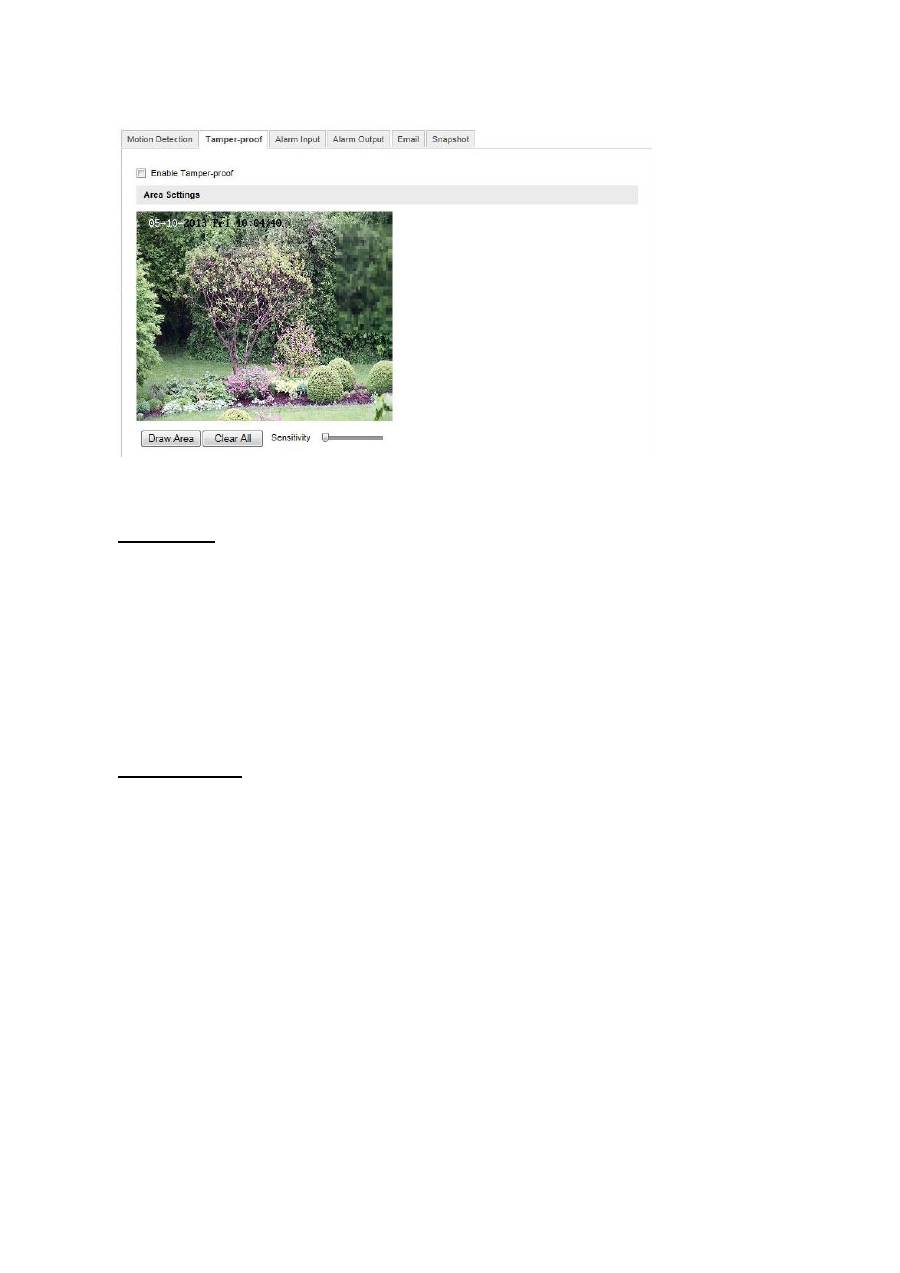
10.3.7.2 Tamper-proof
With this menu item you can configure the Speed Dome so that a sabotage alarm is triggered as soon as
the lens is covered.
Area Settings
Activate the sabotage alarm by clicking the “Enable Tamper-proof” checkbox.
To select an area, click on the “Draw Area” button. The entire area is selected by default. To discard this
selection, click on “Clear All”.
Drag the mouse pointer over the desired area. Set the sensitivity using the regulation control bar. To apply
the setting for the area, click on “Stop Drawing”.
Right: high sensitivity level
Left: low sensitivity level
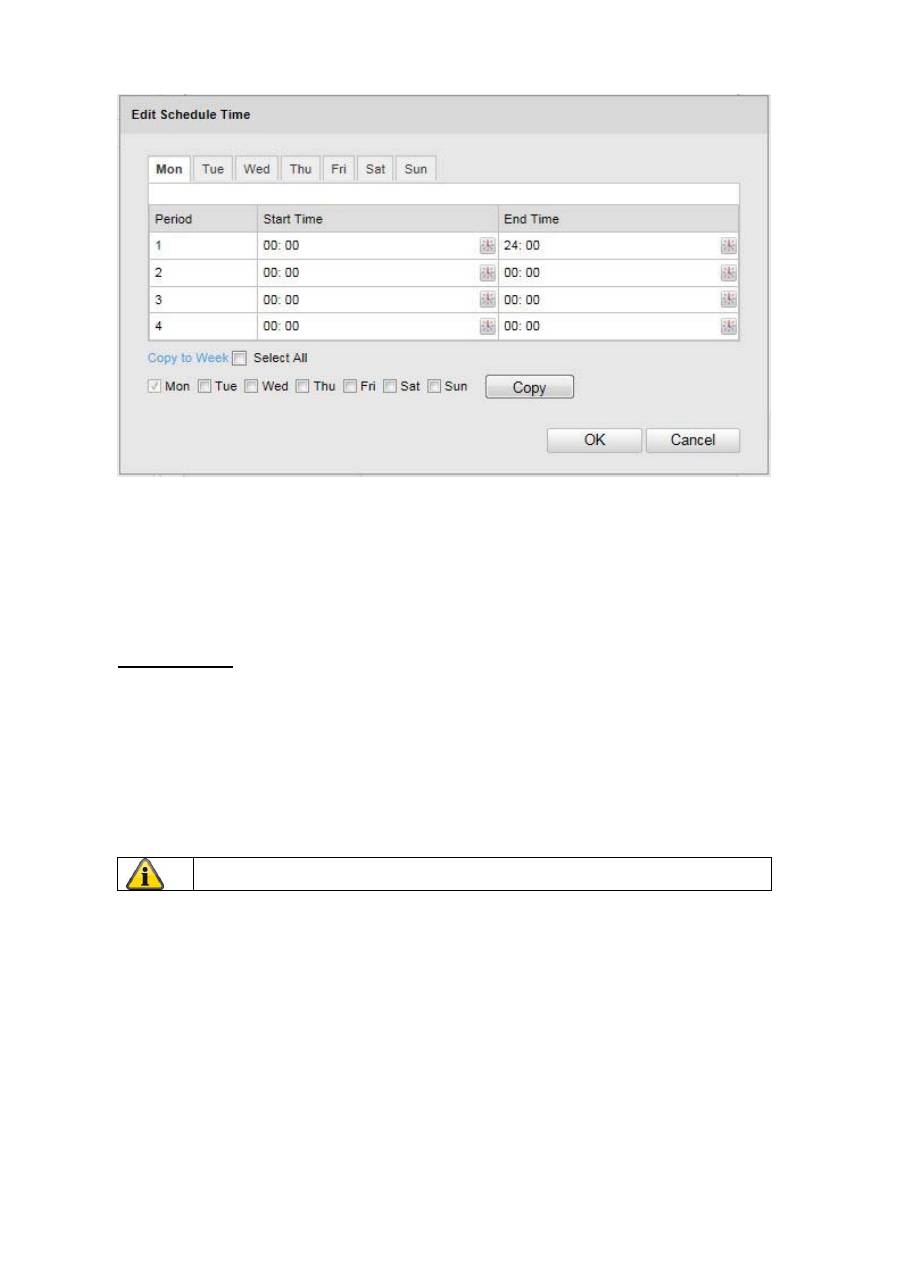
Arming Schedule
To save a schedule for the sabotage alarm, click on “Edit”.
A new window appears. Specify here on which days of the week and at which times the sabotage alarm
should be active.
104
Now select a week day for the sabotage alarm. To store particular time periods, enter a start and end time.
To set up an all-day sabotage alarm, select 00:00 as the start time and 24:00 as the end time.
To activate the sabotage alarm for all week days, click the “Select All” checkbox. To copy the sabotage
alarm to other week days, select the week day and click on “Copy”.
To apply the changes, click “OK” and to discard them click on “Cancel”.
Linkage Method
Make the setting here for which action the sabotage alarm should be performed.
Normal Linkage
Send Email:
You receive an e-mail as notification, activate the checkbox for this to be performed.
Other Linkage
You can switch on the alarm output for when tampering is detected.
To switch on alarm output 1, select “A->1”.
Apply the settings made with “Save”.
105
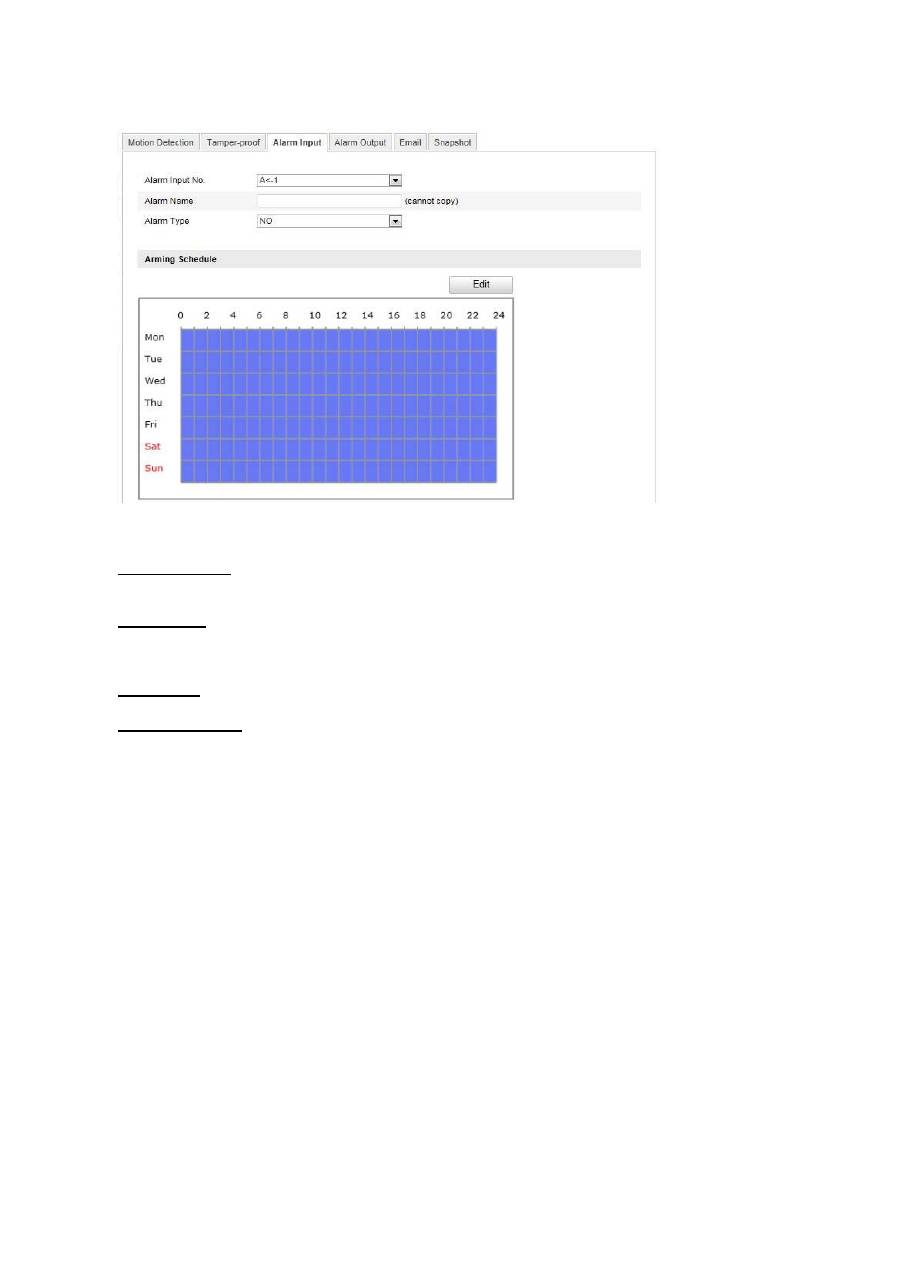
10.3.7.3 Alarm Input
You can configure the alarm inputs of the Speed Dome with this menu item.
Alarm Input No.
Select the alarm input here that you wish to configure.
Alarm Name
You can specify a device name for the alarm input here. Please do not use the alarm input number or any
special characters.
Alarm Type
Select the alarm type here. You can choose between “NO” (normally open) or “NC” (normally closed).
Arming Schedule
To save a schedule for the alarm input, click on “Edit”.
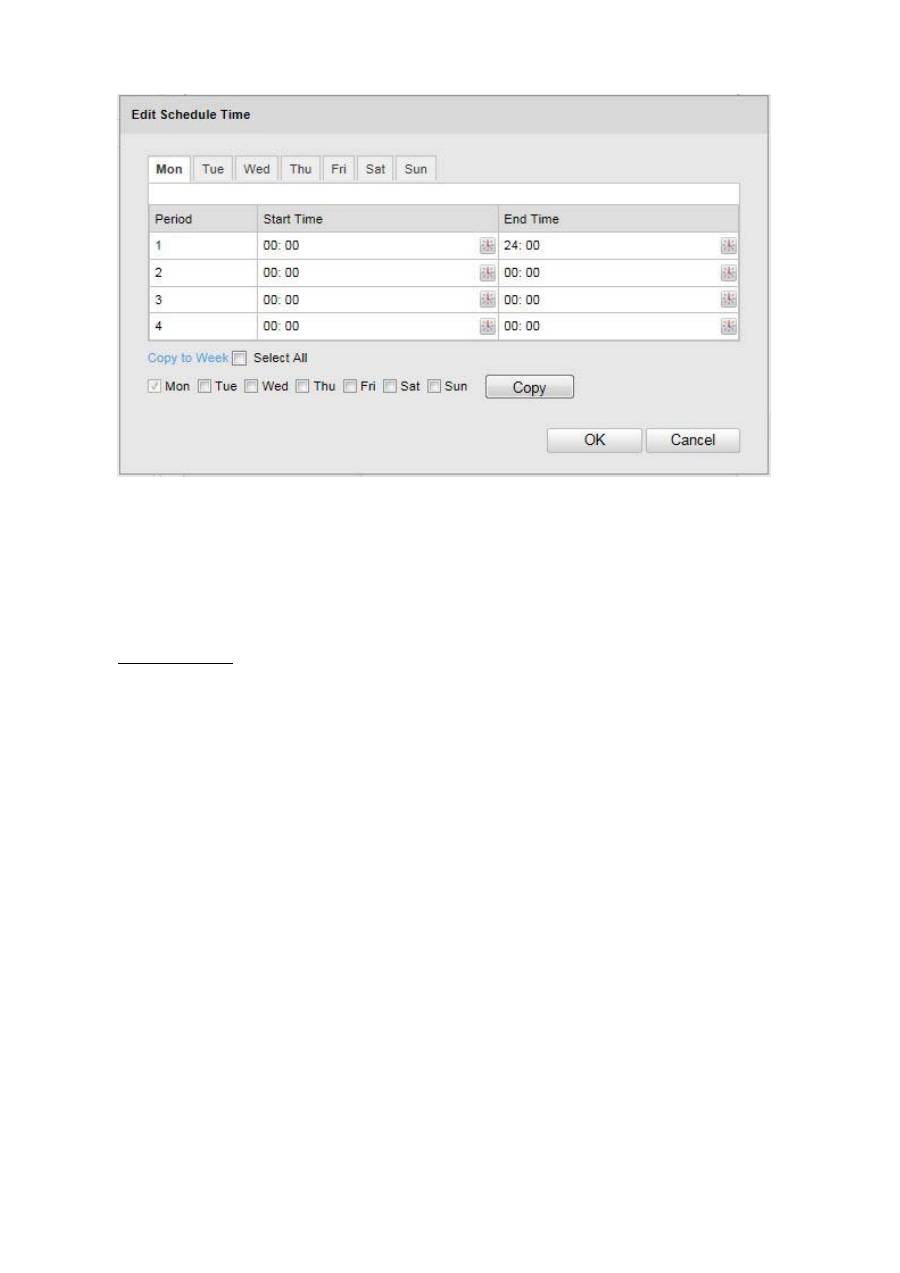
A new window appears. Specify here on which days of the week and at which times the alarm input should
be active.
106
Now select a week day for the alarm input. To store particular time periods, enter a start and end time. To
activate the alarm input all day, select 00:00 as the start time and 24:00 as the end time.
To apply the settings for all week days, click the “Select All” checkbox. To copy the settings to certain other
week days, select the week day and click on “Copy”.
To apply the changes, click “OK” and to discard them click on “Cancel”.
Linkage Method
Make the setting here for which action motion detection should be performed.
Normal Linkage
Send Email:
You receive an e-mail as notification, activate the checkbox for this to be performed.
Upload to FTP: Activate the checkbox to upload the alarm input to an FTP server.
Other Linkage
You can switch on the alarm output for when an alarm is detected.
To switch on alarm output 1, select “A->1”.
107
Copy to Alarm
This function allows you to copy the settings of one alarm input to other alarm inputs.
To apply the settings for all alarm inputs, click the “Select All” checkbox. To copy the settings to single
alarm inputs, select the alarm input and click on “Copy”.
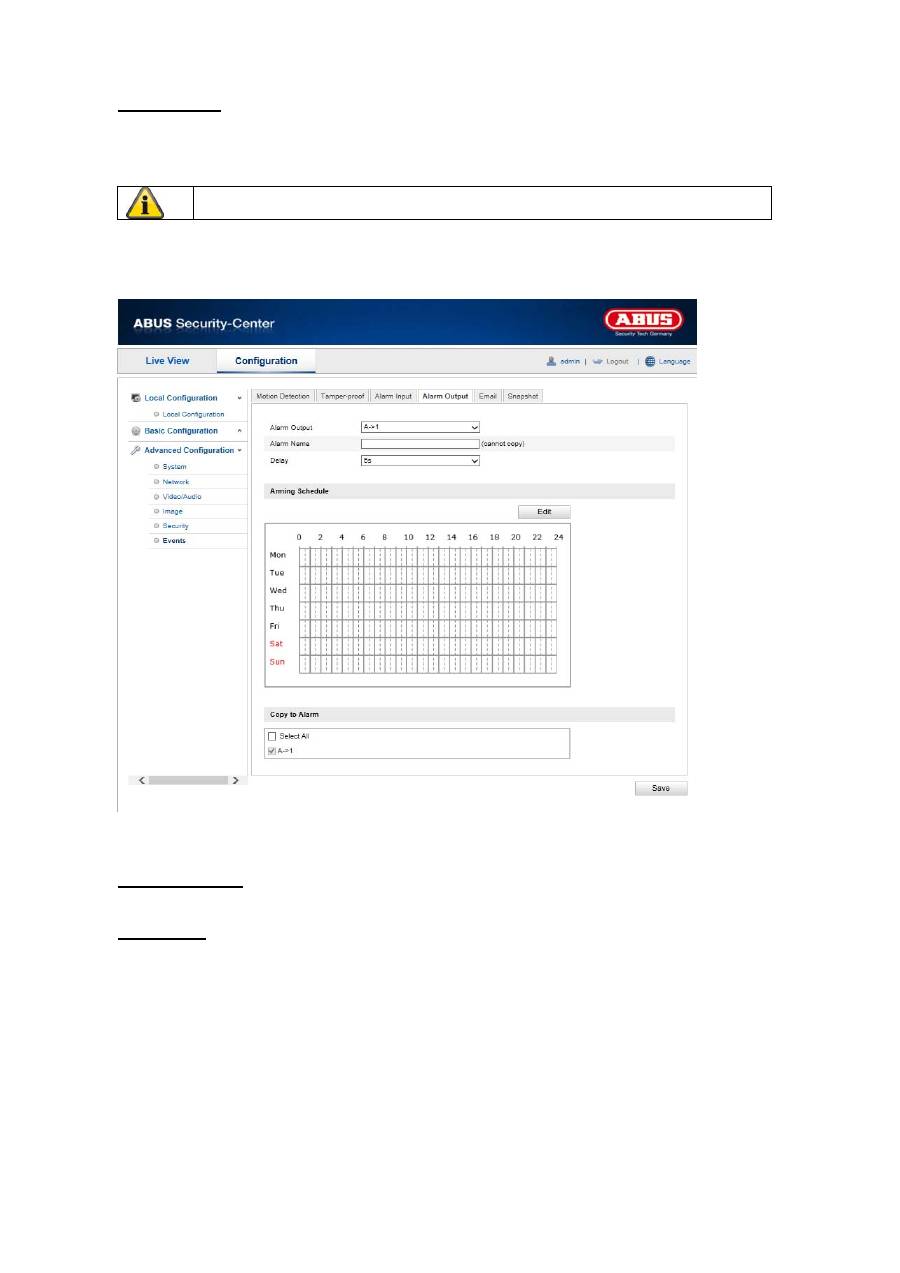
10.3.7.4 Alarm Output
You can configure the two alarm outputs here.
Alarm Output No.
Select the alarm output here that you wish to configure.
Alarm Name
You can specify a device name for the alarm output here. Please do not use the alarm output number or
any special characters.
Apply the settings made with “Save”.
108
Arming Schedule
To save a schedule for the alarm output, click on “Edit”.
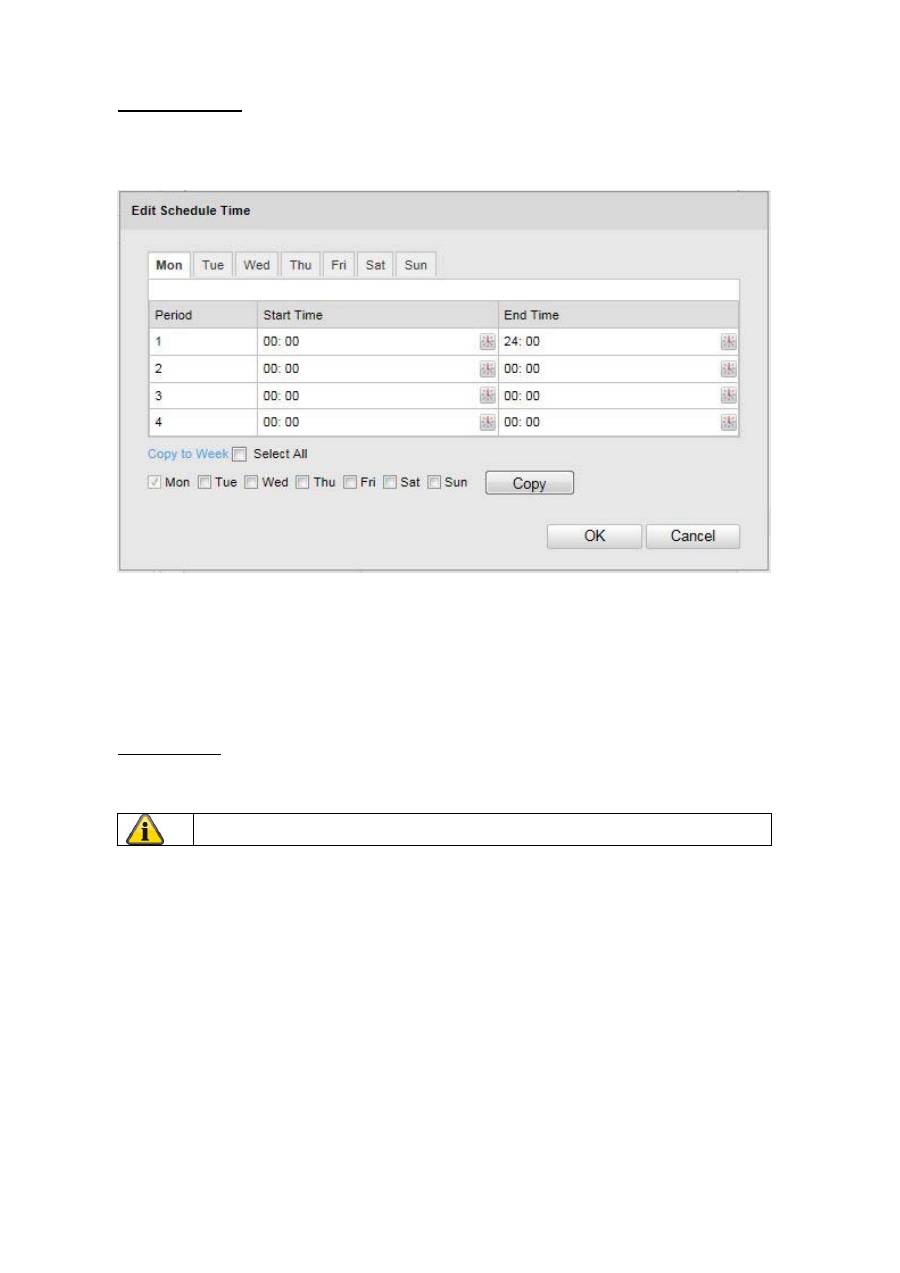
A new window appears. Specify here on which days of the week and at which times the alarm output
should be active.
Now select a week day for the alarm output. To store particular time periods, enter a start and end time. To
activate the alarm input all day, select 00:00 as the start time and 24:00 as the end time.
To apply the settings for all week days, click the “Select All” checkbox. To copy the settings to certain other
week days, select the week day and click on “Copy”.
To apply the changes, click “OK” and to discard them click on “Cancel”.
Copy to Alarm
This function allows you to copy the settings of one alarm output to other alarm outputs.
To apply the settings for all alarm outputs, click the “Select All” checkbox.
Apply the settings made with “Save”.
109
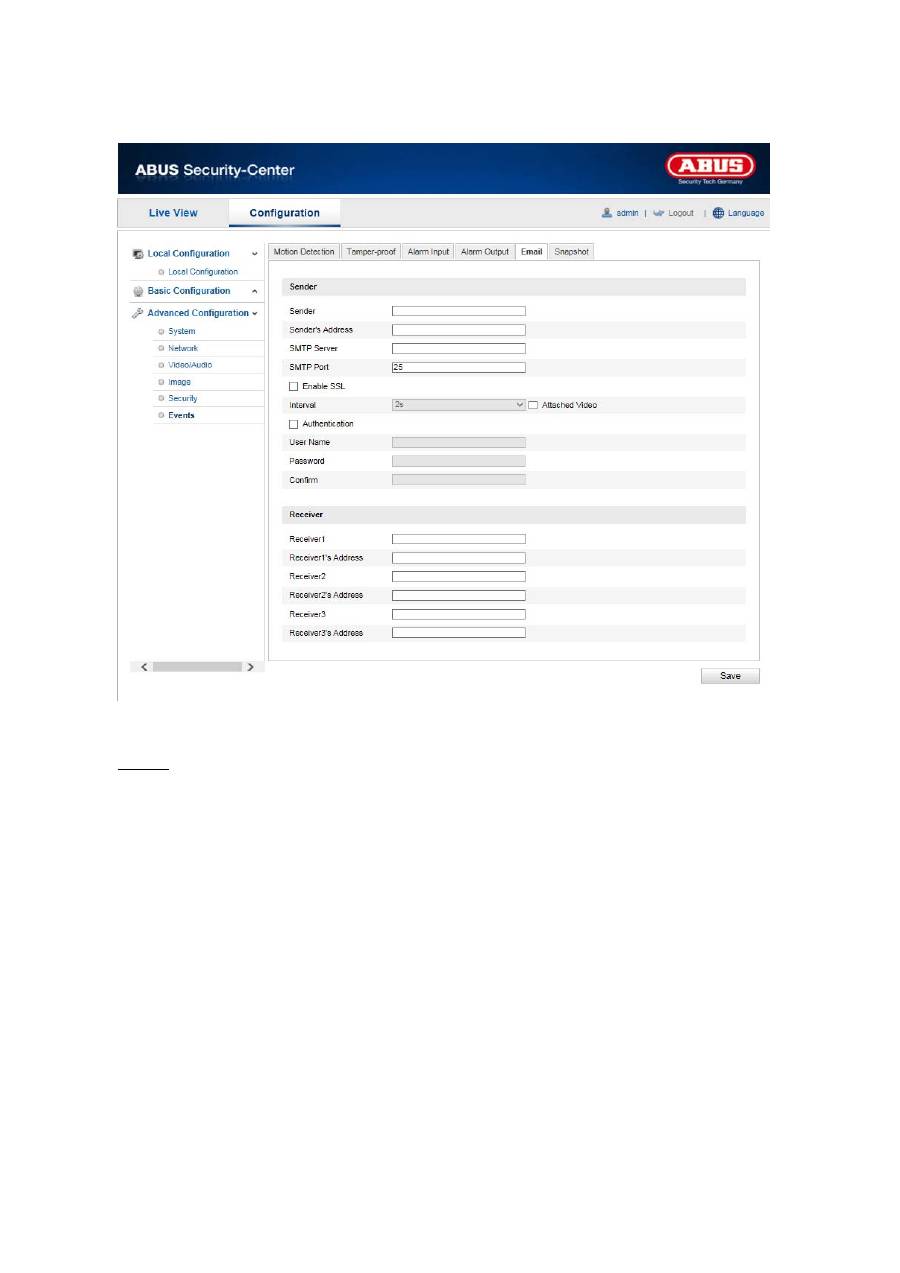
10.3.7.5 Email
You can make the settings for sending e-mails here.
Sender
Sender
Enter a name here that should be displayed as the sender.
Sender's Address
Enter the e-mail address of the sender here.
SMTP Server
Enter the IP address or host name of the SMTP server here. (For example: smtp.googlemail.com)
SMTP Port
Enter the SMTP port here. This is configured as 25 by default.
Enable SSL
Select the SSL function if the SMTP server requires this.
Interval
Set the interval between sending e-mails with picture attachments here.
Attached Image
Enable this function if images are to be attached to the e-mail in the event of an alarm.
110
Authentication
If the e-mail server in use requires authentication, enable this function to be able to log onto the server with
authentication.
User names and passwords can only be entered once this function has been activated.
User Name
Enter the user name of the e-mail account here. This is the part before the @ character.
Password
Enter the password of the e-mail account here.
Confirm
Confirm the password by entering it again.
Receiver
Receiver1 /Receiver2
Enter the user name of the receiver here.
Receiver1's Address / Receiver2's Address
Enter the e-mail address of the person to be informed here.
Apply the settings made with “Save”.
111
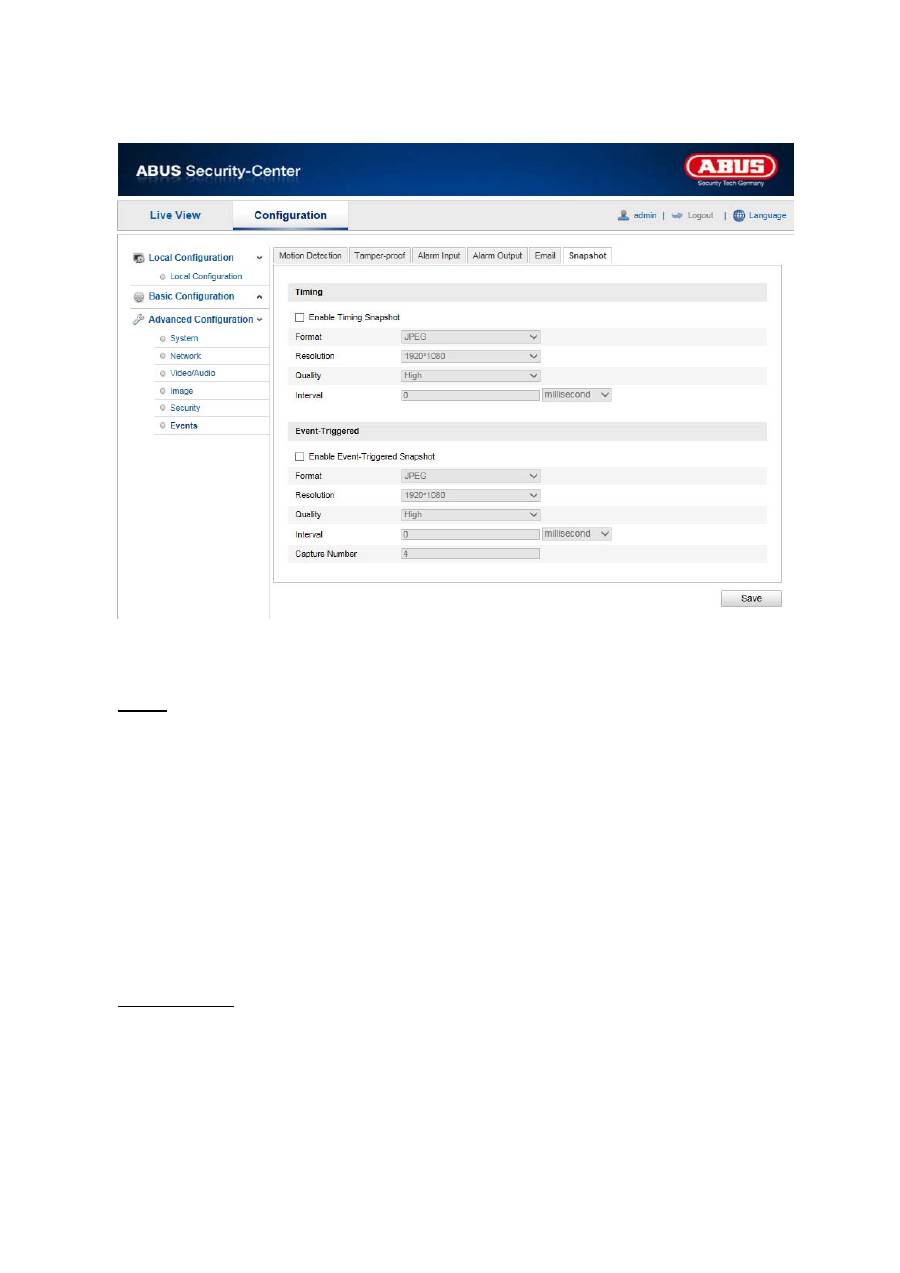
10.3.7.6 Snapshot
You can make the configuration for time and event-controlled snapshots here to be able to upload them to
an FTP server.
Timing
Enable Timing Snapshot
Enable this function to save pictures at certain intervals.
Format
The format for the pictures is preconfigured as JPEG.
Resolution
Set the resolution of the picture here.
Quality
Select the quality for the saved pictures here.
Interval
Set the interval between saving two pictures here.
Event-Triggered
Enable Event-Triggered Snapshot
Enable this function to enable event-triggered pictures.
Format
The format for the pictures is preconfigured as JPEG.
Resolution
Set the resolution of the picture here.
112
Quality
Select the quality for the saved pictures here.
Interval
Set the interval between saving two pictures here.
11. Maintenance and cleaning
11.1 Maintenance
Regularly check the product's physical state, e.g. check for damage of the housing.
If you suspect that safe operation cannot be guaranteed anymore, disconnect the product and ensure
that it cannot be used by mistake. Remove the batteries.
You can assume that safe operation is not possible anymore when
the device shows visible damage,
the device does not function anymore
Please note:
The product is absolutely maintenance-free for you. There are no components on the
inside of the product to be checked or services by you, never open it.
11.2 Cleaning
Wipe the product with a clean, dry cloth. If the device is very dirty, you can moisten the cloth with
lukewarm water.
Ensure that no liquids can get into the device.
Do not use any chemical cleaners, since they could damage the housing surface or the
screen (discolorations).

113
12. Disposal
Important: The EU Directive 2002/96/EC regulates the proper return, treatment and
recycling of used electronic devices. This symbol means that in the interest of
environmental protection the device must be disposed of separately from household or
industrial waste at the end of its service life in accordance with applicable local legal
guidelines. Disposing of used devices can be done at official recycling centers in your
country. Obey local regulations when disposing of material. Further details on returns
(also for non-European countries) can be obtained at your local authority. Separate
collection and recycling saves natural resources and ensures that all the provisions for
protecting health and environment are observed when recycling the product.
13. Technical
Data
Model number
TVIP52502
Image sensor
1/3" progressive scan CMOS sensor
Camera type
Day/night
Resolution
1920 x 1080, 1280 x 960, 1280 x 720, 704 x 576, 352 x 288, 176
x 144
Pixels (total)
1920 x 1080
Pixels (effective)
1920 x 1080
Day/night switching
Electromechanical IR-cut filter
Minimum illumination (colour)
0.05 lux
Image compression
H.264, MPEG-4, MJPEG
Frame Rate
H.264: 25 fps @ 1920 x 1080
MPEG-4: 25 fps @ 1920 x 1080
MJPEG: 15 fps @ 1920 x 1080
Number of parallel streams
2
Electronic shutter control
1 ~ 1/100,000 sec.
White balance
Yes
Backlight compensation
BLC, WDR
Noise reduction
3D DNR
Motion detection
Yes
Image overlay
Date, camera name, private zone
Alarm input (NO/NC)
1
Alarm output
1
Alarm notification
E-mail/FTP/alarm output
Supported browsers
Mozilla Firefox, Safari or Internet Explorer 6.x and higher
Supported software
ABUS VMS
Network access
RJ-45 Ethernet 10/100 Base-T
Network protocols
IPv4/IPv6, HTTP, FTP, SMTP, UPnP, DNS, DDNS,
NTP, RTSP ,RTP ,TCP ,UDP, DHCP, PPPoE
Power over Ethernet
IEEE803.af
Power supply
12 V DC
Current consumption
Max. 500 mA
Operating temperature
-10 °C – 50 °C
Dimensions (W x H x D)
72 x 65 x 141 mm
Certifications
CE, RoHS, REACH

114
14. GPL license information
Here we wish to inform you that the network surveillance camera TVIP52502 contain Open Source
Software, which is licensed exclusively under the GNU General Public License (GPL). To ensure that your
use of the programs conforms with GPL, please refer to the GPL license conditions.

TVIP52502
Manuel utilisateur
Version
10/2013
Original du manuel en allemand. Conserver pour suivant usage!

116
Introduction
Chère cliente, cher client,
Nous vous remercions de l’achat de ce produit.
Cet appareil est conforme aux exigences des directives européennes en vigueur. La déclaration de
conformité est disponible auprès de:
ABUS Security-Center GmbH & Co. KG
Linker Kreuthweg 5
86444 Affing
ALLEMAGNE
Afin de maintenir cet état et d’assurer une exploitation sans danger, vous devez absolument respecter ce
manuel de commande!
Lisez avant la mise en service du produit le manuel de commande complet, respectez toutes les instructions
de commande et de sécurité!
Tous les noms de firme et désignations de produit sont des marques du propriétaire respectif. Tous
droits réservés.
En cas de questions, consultez votre installateur ou partenaire spécialiste!
Non-responsabilité
Ce mode d’emploi a été établi avec la plus grande diligence. Si vous constatez encore des omissions ou
inexactitudes, veuillez-nous informer sous l’adresse mentionnée au verso du manuel.
ABUS Security-Center GmbH n’est pas responsable d’erreurs techniques et typographiques et se réserve
du droit d’effectuer à tout moment sans annonciation préalable des modifications au produit et aux manuels
de commande.
ABUS Security-Center n’est pas responsable de dommages directs et indirects, liés à l’équipement, la
performance et l’usage de ce produit. Aucune garantie n’est accordée pour le contenu de ce document.

117
Ikon forklaring
Explication des symboles
Un éclair dans le triangle signifie qu’il y a un danger pour la santé, par exemple, une
décharge électrique.
Un point d’exclamation dans le triangle renvoie à une remarque importante dans ce
manuel à laquelle il faut penser.
Vous trouvez ce symbole lorsque des conseils et des informations concernant le
fonctionnement sont fournis.
Conseils de sécurité importants
La garantie ne couvre pas les dommages causés par le non-respect de ce mode
d’emploi. ABUS n’est pas tenu de vous indemniser de vos pertes indirectes !
ABUS décline toute responsabilité pour les dommages causés à des biens ou pour les
préjudices individuels causés par de fausses manipulations ou le non-respect des
instructions de sécurité.
La garantie ne couvre pas de tels cas.
Chère cliente, cher client, les consignes de sécurité et mises en garde suivantes sont destinées à la
protection de votre santé ainsi qu'à la protection de l'appareil. Veuillez lire les indications suivantes
avec attention :
Aucune pièce interne du produit ne nécessite un entretien. Par ailleurs, tout démontage du produit
entraînera automatiquement une annulation de la certification (CE) et de la garantie.
En cas de chute, même de faible hauteur, le produit risque d'être endommagé.
Installez le produit de manière à ce que le capteur d'images de l'appareil ne soit pas directement
exposé aux rayons du soleil. Veuillez respecter les instructions d'installation fournies dans la notice
d'utilisation, voir chapitre correspondant.
Cet appareil est uniquement prévu pour une utilisation en intérieur ou à l’intérieur d’un boîtier de
protection contre les intempéries.
Évitez d'utiliser le produit dans les conditions ambiantes suivantes :
Emplacement humide ou humidité élevée de l'air
Froid ou chaleur extrême
exposition directe aux rayons du soleil
En présence de poussières et de gaz, de vapeurs ou de solvants inflammables
Fortes
vibrations
Champs magnétiques puissants, comme à proximité de machines ou de haut-parleurs
Toute installation de la caméra sur des surfaces instables est interdite.
Consignes de sécurité générales :
Ne laissez pas traîner le matériel d'emballage. Dans les mains d'un enfant, les films et sacs en
plastique, les éléments en polystyrène, etc. peuvent devenir des jouets dangereux.
Pour des raisons de sécurité, la caméra de vidéosurveillance doit être tenue hors de portée des
enfants en raison des petites pièces qu'ils pourraient avaler.
Veuillez ne jamais introduire d'objets à l'intérieur de l'appareil à travers ses orifices.
Utilisez uniquement les auxiliaires et accessoires préconisés par le fabricant. Ne raccordez aucun
produit non compatible.
Veuillez respecter les consignes de sécurité et les manuels utilisateur des autres appareils raccordés.
Avant de mettre l'appareil en service, veuillez vérifier s'il est endommagé. Si c'est le cas, ne mettez
pas l'appareil en service !
118
Respectez les limites de tension de fonctionnement indiquées dans les caractéristiques techniques.
Toute tension supérieure est susceptible de détruire l'appareil et de compromettre votre sécurité
(danger d'électrocution).
Consignes de sécurité
1. Alimentation électrique : bloc d'alimentation 100-240 V CA, 50/60 Hz
/
24 V CA, 3 A (compris à la
livraison)
N'utilisez cet appareil qu'avec une source de courant qui fournit la tension secteur indiquée sur la plaque
signalétique. Si vous ne savez pas exactement de quelle alimentation électrique vous disposez, veuillez
vous adresser à votre fournisseur d'électricité. Coupez l'alimentation électrique de l'appareil avant de
procéder à toute opération d'installation ou de maintenance.
2. Surcharge
Évitez toute surcharge des prises secteur, des câbles de rallonge et des adaptateurs, ceci pouvant
entraîner un risque d'électrocution ou d'incendie.
3. Nettoyage
Nettoyez l'appareil uniquement avec un chiffon humide et n'utilisez pas de produits de nettoyage
agressifs.
Veuillez pour cela couper l'alimentation électrique de l'appareil.
Avertissements
Avant la première mise en service, toutes les consignes de sécurité et d'utilisation doivent être lues et
respectées !
1. Veuillez respecter les consignes suivantes afin d'éviter que le câble et la prise secteur ne soient
endommagés :
Ne modifiez pas et ne manipulez pas le câble ni la prise secteur.
Ne pliez pas et ne tordez pas le câble secteur.
Pour débrancher l'appareil, saisissez la prise secteur et ne tirez pas sur le câble secteur.
Veillez à ce que le câble secteur se trouve le plus loin possible de tout appareil de chauffage afin
que la gaine plastique du câble ne puisse pas fondre.
2. Suivez attentivement ces instructions. Leur non-respect pourrait conduire à une électrocution :
N'ouvrez jamais le boîtier ou le bloc d'alimentation.
N'introduisez aucun objet métallique ou inflammable à l'intérieur de l'appareil.
Afin d'éviter tout dommage dû à des surtensions (en cas de foudre par exemple), veuillez utiliser
une protection contre les surtensions.
3. Lorsqu'un appareil tombe en panne, débranchez-le immédiatement du réseau et signalez la panne à
votre distributeur.
Assurez-vous que tous les appareils sont déconnectés du circuit de basse tension et de tension
d’alimentation pendant l’installation dans un système de vidéosurveillance existant.
Dans le doute, faites monter, installer et câbler votre appareil par un électricien professionnel.
Tout branchement incorrect sur le secteur constitue une menace, non seulement pour vous mais
aussi pour d’autres personnes.
Câblez l’ensemble du système en faisant en sorte que le secteur et le circuit de basse tension
restent séparés et qu’ils ne puissent entrer en contact lors d’une utilisation normale ou suite à
une défaillance.
Déballage
Lorsque vous sortez le dispositif de l’emballage, traitez-le avec grand soin.
En cas d’un dommage eventuel de l’emballage original, testez d’abord le dispositif. Si le dispositif
démontre des dommages, renvoyez-le avec l’emballage et informez-vous auprès du service de
livraison.

119
Contenu
1. Usage
approprié
................................................................................................................... 121
2. Livraison
............................................................................................................................... 121
3. Caractéristiques et fonctions ................................................................................................ 121
4. Description
de
l'appareil
........................................................................................................ 121
5. Description
des
connecteurs
................................................................................................ 122
6. Initial
start-up
........................................................................................................................ 123
7. Premier accès à la caméra réseau ....................................................................................... 124
8. Saisie du mot de passe ........................................................................................................ 125
9. Fonctions
utilisateur
.............................................................................................................. 126
9.1 Barre de menu ........................................................................................................................ 126
9.2 Affichage en direct de l'image ................................................................................................. 127
9.3 Commande audio / vidéo ........................................................................................................ 127
10. Configuration ........................................................................................................................ 128
10.1. Configuration locale ............................................................................................................. 128
10.2 Configuration de base .......................................................................................................... 130
10.3 Configuration avancée .......................................................................................................... 130
10.3.1 Système ............................................................................................................................. 130
10.3.1.1 Informations sur le matériel ............................................................................................ 131
10.3.1.2 Réglage de l'heure .......................................................................................................... 132
10.3.1.3 Maintenance ................................................................................................................... 133
10.3.1.4 Heure d'été ..................................................................................................................... 134
10.3.2 Réseau .............................................................................................................................. 135
10.3.2.1 TCP/IP ............................................................................................................................ 136
10.3.2.2 Port ................................................................................................................................. 137
10.3.2.4 FTP ................................................................................................................................. 141
10.3.2.5 UPnP™ ........................................................................................................................... 142
10.3.3 Vidéo / audio ...................................................................................................................... 143
10.3.3.1 Vidéo .............................................................................................................................. 144
10.3.3.2 Audio .............................................................................................................................. 145
10.3.4 Image ................................................................................................................................. 146
10.3.4.1 Réglages de l'affichage .................................................................................................. 147
10.3.4.2 Réglages OSD ................................................................................................................ 150
10.3.4.3 Superposition de texte .................................................................................................... 151
10.3.4.4 Masque de confidentialité ............................................................................................... 151
10.3.6 Sécurité ............................................................................................................................. 151
10.3.6.1 Sécurité .......................................................................................................................... 152

120
10.3.6.2 Authentification RTSP..................................................................................................... 153
10.3.6.3 Filtre d’adresse IP ........................................................................................................... 153
10.3.7 Événements ....................................................................................................................... 154
10.3.7.1 Détection de mouvements .............................................................................................. 154
10.3.7.2 Alarme antisabotage ....................................................................................................... 156
10.3.7.3 Entrée d'alarme .............................................................................................................. 158
10.3.7.4 Sortie d'alarme ................................................................................................................ 160
10.3.7.5 E-mail ............................................................................................................................. 162
10.3.7.6 Instantané ....................................................................................................................... 164
11. Entretien et nettoyage ........................................................................................................... 165
11.1 Entretien ............................................................................................................................... 165
11.2 Nettoyage ............................................................................................................................. 165
12. Recyclage
............................................................................................................................. 165
13. Donnèes techniques
............................................................................................................. 166
