Grandstream GXV3672_HD Quick Installation Guide: инструкция
Раздел: Устройства видеонаблюдения
Тип:
Инструкция к Grandstream GXV3672_HD Quick Installation Guide
GXV3672_HD/FHD
v2 Series
Outdoor Day/Night HD IP CAMERA
Grandstream Networks, Inc.
126 Brookline Ave, 3rd Floor
Boston, MA 02215. USA
Tel : +1 (617) 566 - 9300
Fax: +1 (617) 249 - 1987
www.grandstream.com
Quick Installation Guide
For Warranty and RMA information, please visit
www.grandstream.com

Content
English......................................................1
Español...................................................9
Français..................................................17
简体中文................................................25
Deutsch................................................33
Italiano................................................41
Русскй................................................49
Português............................................... 57
Polski.......................................................65
EN
PRECAUTIONS
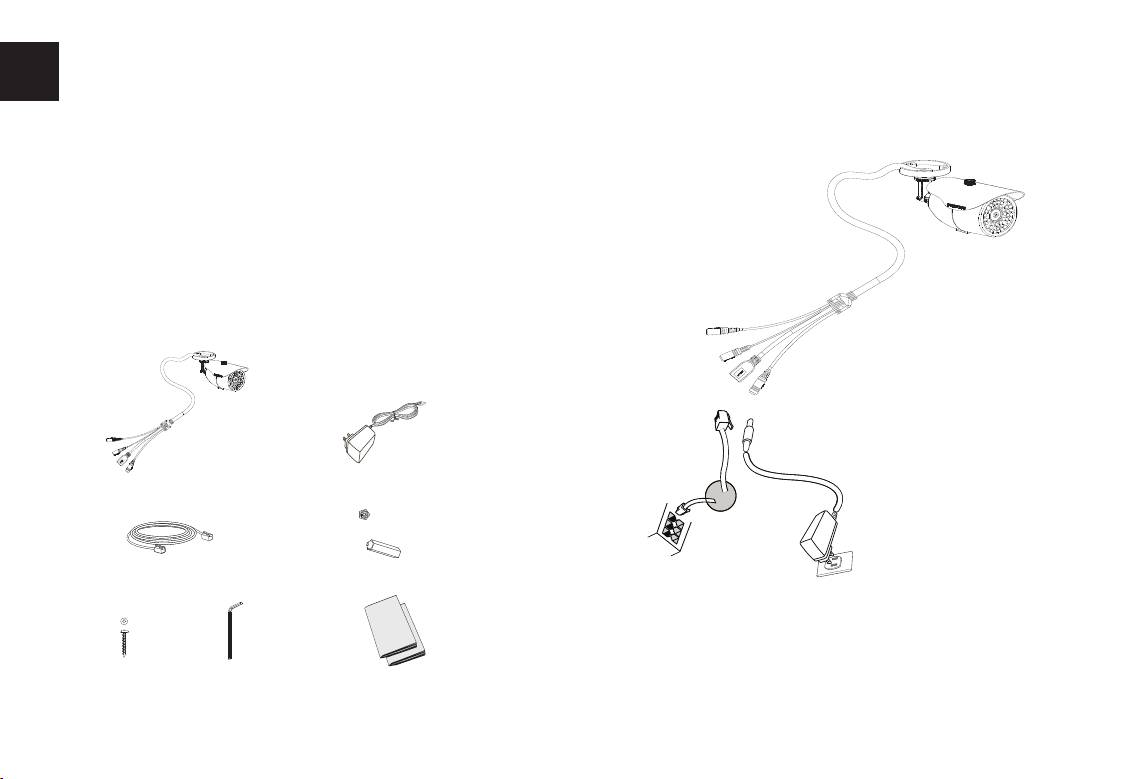
CONNECTING GXV3672_HD/FHD
• Do not attempt to open, disassemble, or modify the
Refer to the illustration below when following the
device
instructions on the next page.
• Do not use a third party power adapter
• Do not expose this device to temperatures outside
the range of -20 °C to 45 °C for operating or -30 °C
to 60 °C for storage
• Do not expose this device to environments outside
of the following humidity range: 10-90% RH
(non-condensing)
• Please install camera properly for correct function
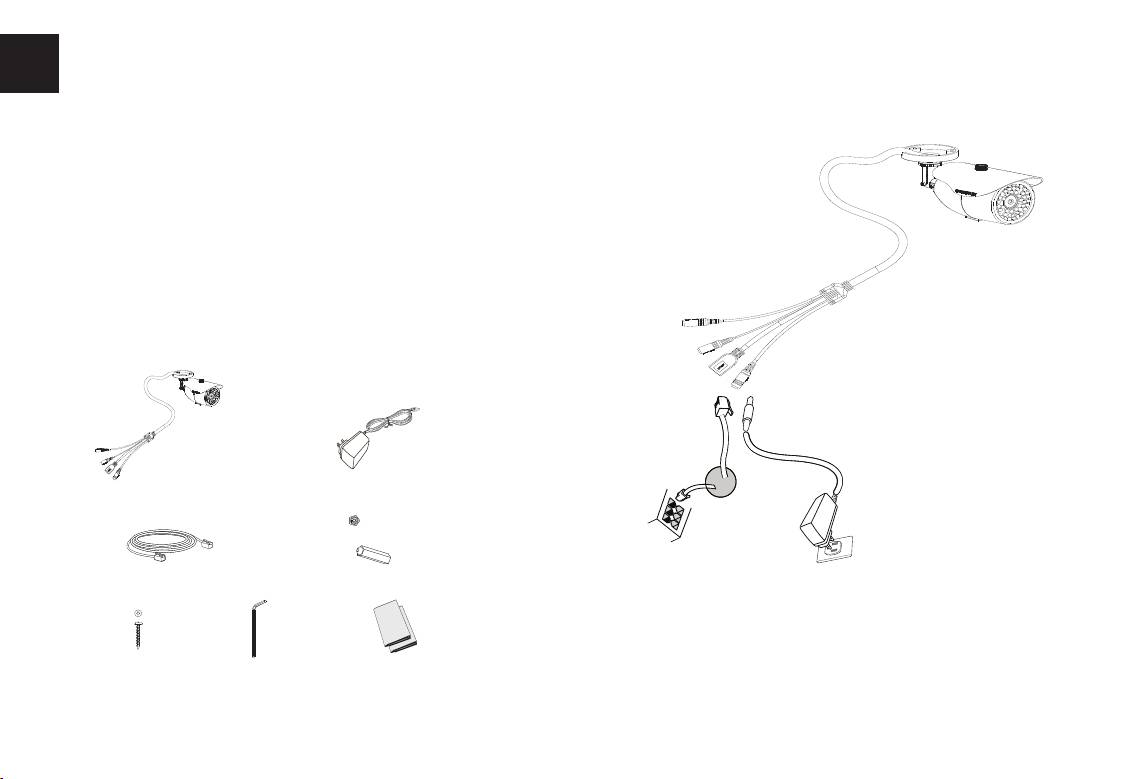
Audio In/Out
Ports
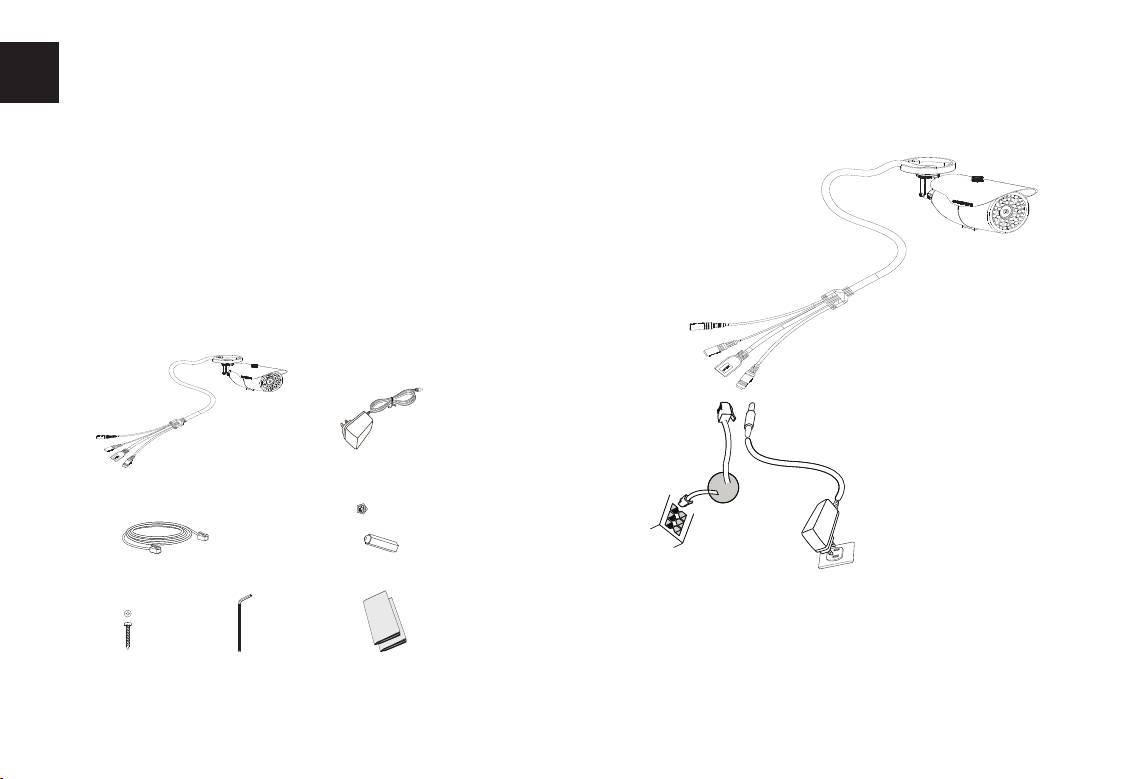
PACKAGE CONTENTS
Network
Power Port
Port
12V
Option A:
1 x GXV3672_HD/FHD
1 x 12V Power Supply
Power Adapter To AC
Outlet
12V
1 x Ethernet Cable
3 x Wall Anchors
Option B:
RJ45 Ethernet Cable
to Power over Ethernet
(PoE) Switch
NOTE: Choose Option A if using the power supply; or choose
3 x Screw 1 x Hex Key
1 x Quick Start Guide
Option B if using a Power over Ethernet (PoE) switch.
1 x GPL License
~1~ ~2~
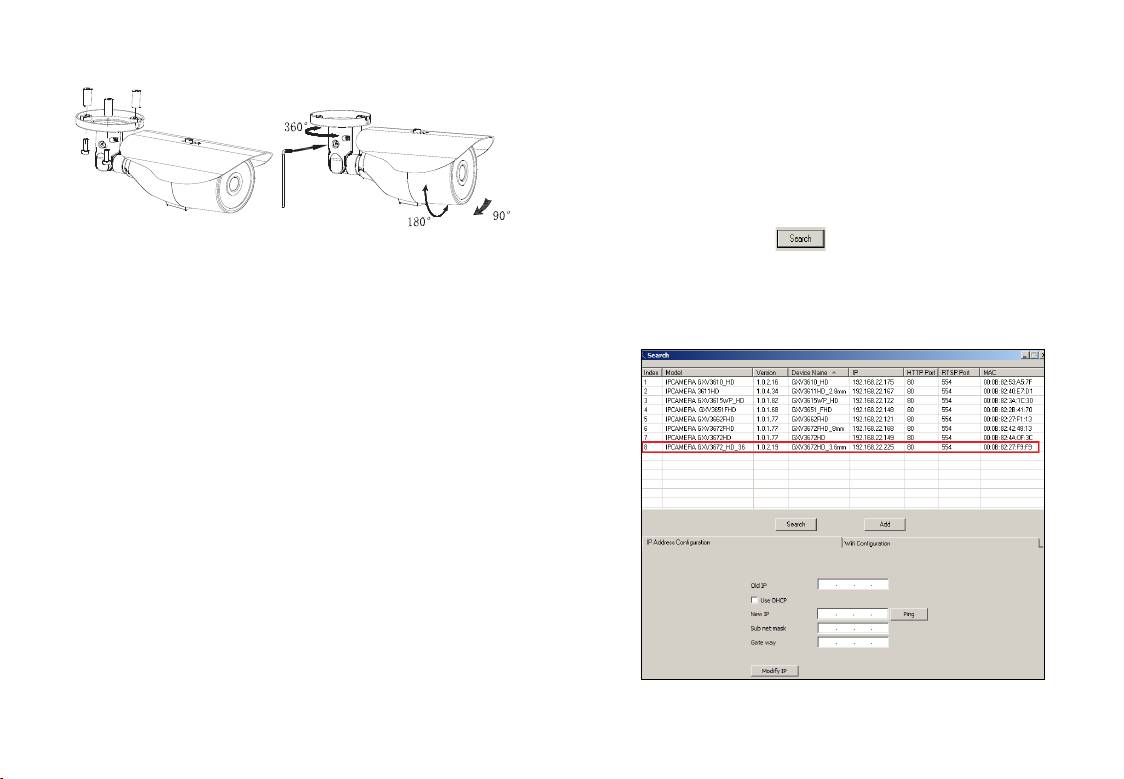
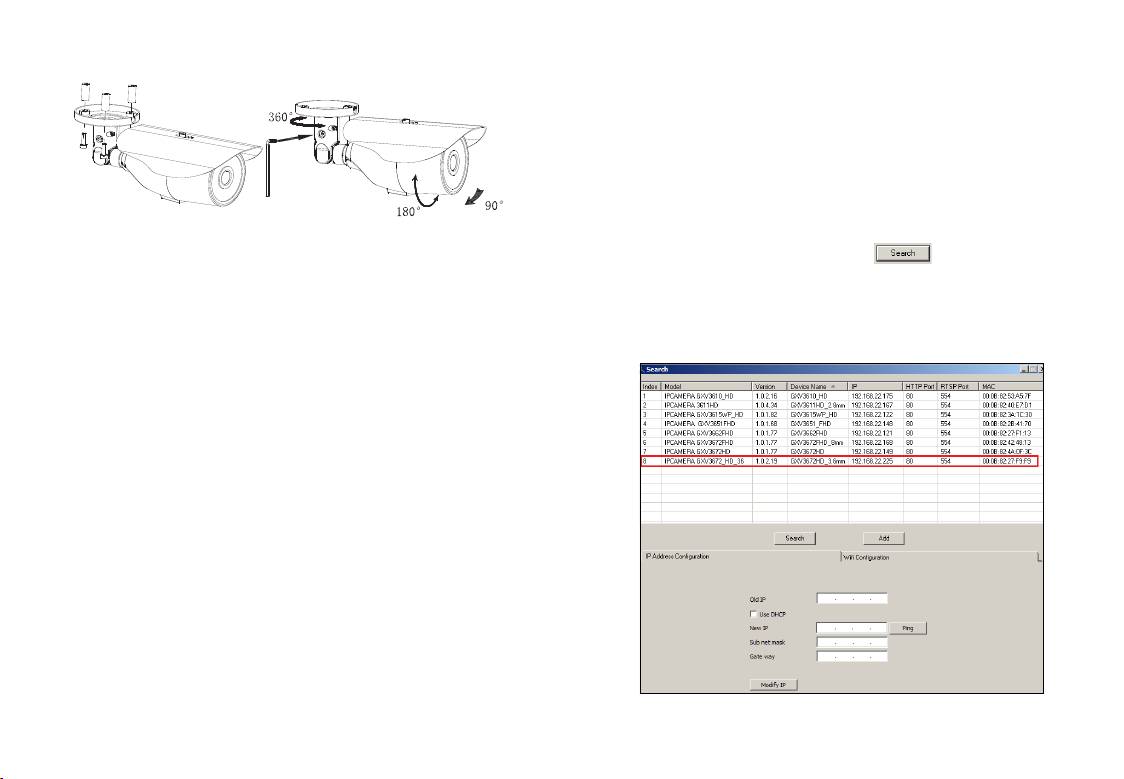
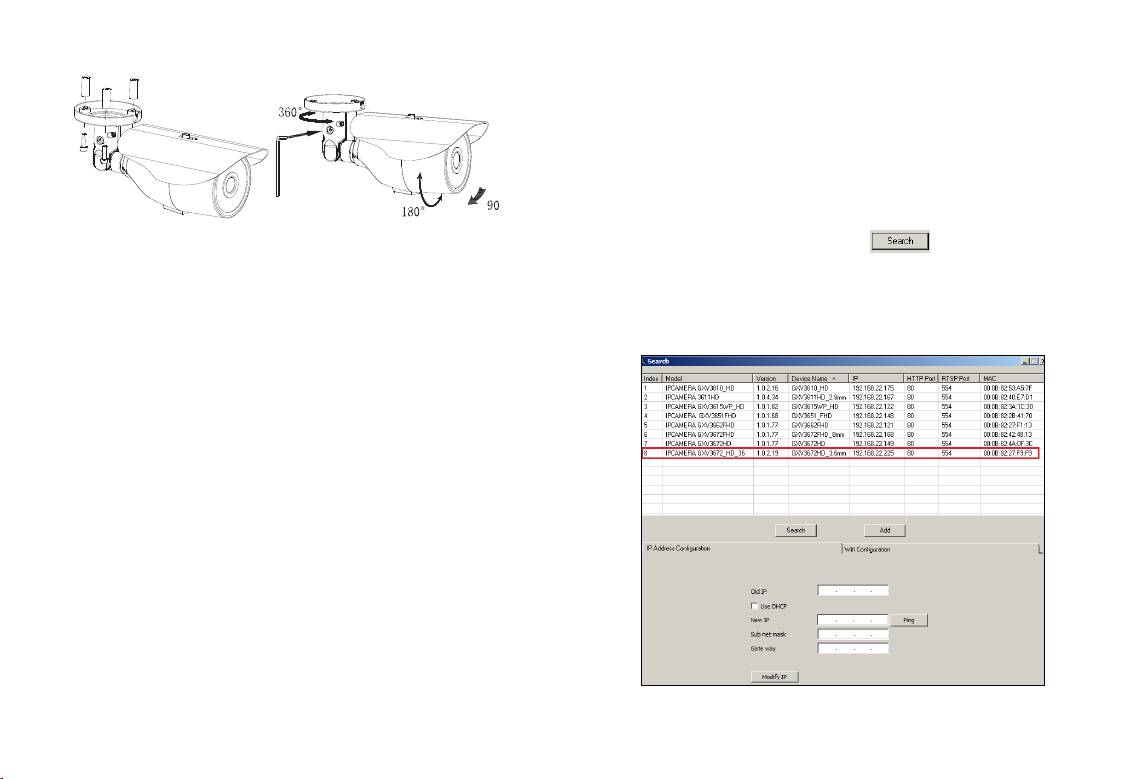
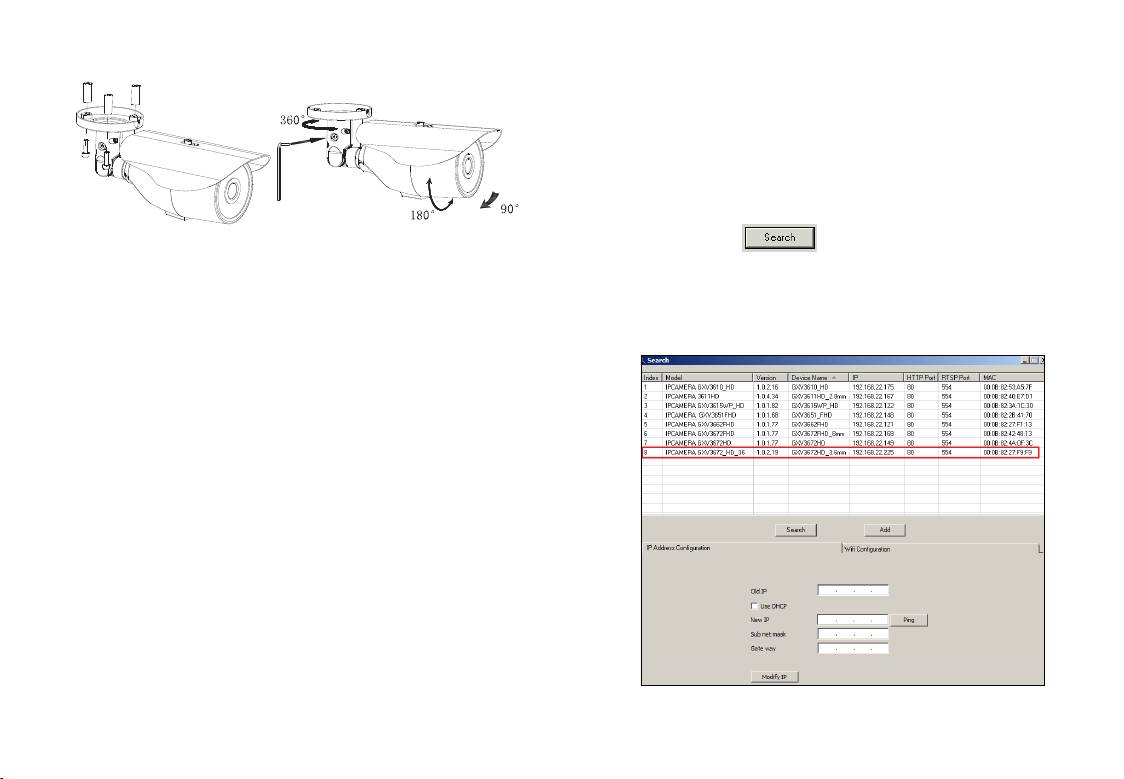
Step 1: Download and install GS_Search tool:
http://www.grandstream.com/products/
tools/surveillance/GS_Search.zip
Step 2: Run the Grandstream GS_Search tool.
Step 3: Click on button to start device
Option A
detection.
Step 1: Insert the power adapter into the 12V DC
socket of the tail cable in GXV3672_HD/FHD.
Step 4: The detected devices will appear in the
Plug the other end of the adapter into an AC
output eld as below.
power outlet.
Step 2: Plug an RJ45 Ethernet cable into the network
socket of the tail cable in GXV3672_HD/FHD.
Plug the other end into a switch/hub or router.
Option B
Step 1: Plug an RJ45 Ethernet cable into the network
socket of the tail cable in GXV3672_HD/FHD.
Plug the other end into a Power over
Ethernet (PoE) switch.
GXV3672_HD/FHD CONFIGURATION
Conguring the GXV3672_HD/FHD using Firefox,
Chrome or Microsoft Internet Explorer (with related
plug-in installed)
Connect the GXV3672_HD/FHD to a DHCP
Server Enabled Network
~3~ ~4~
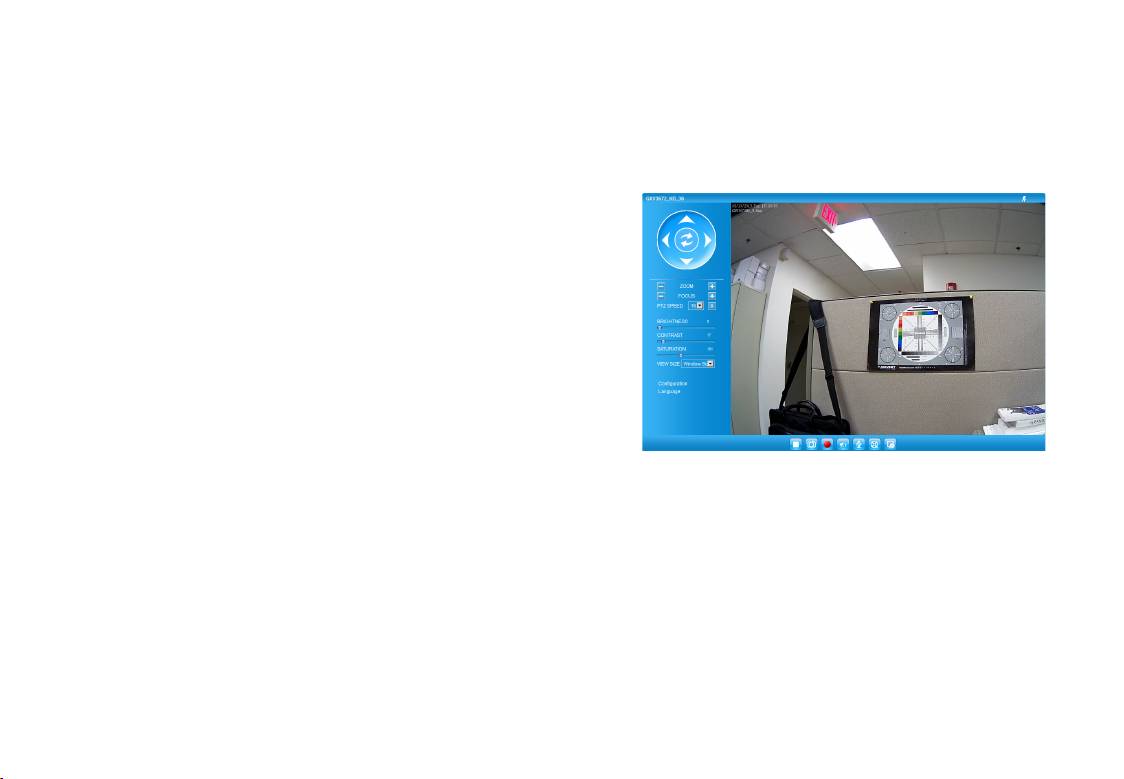
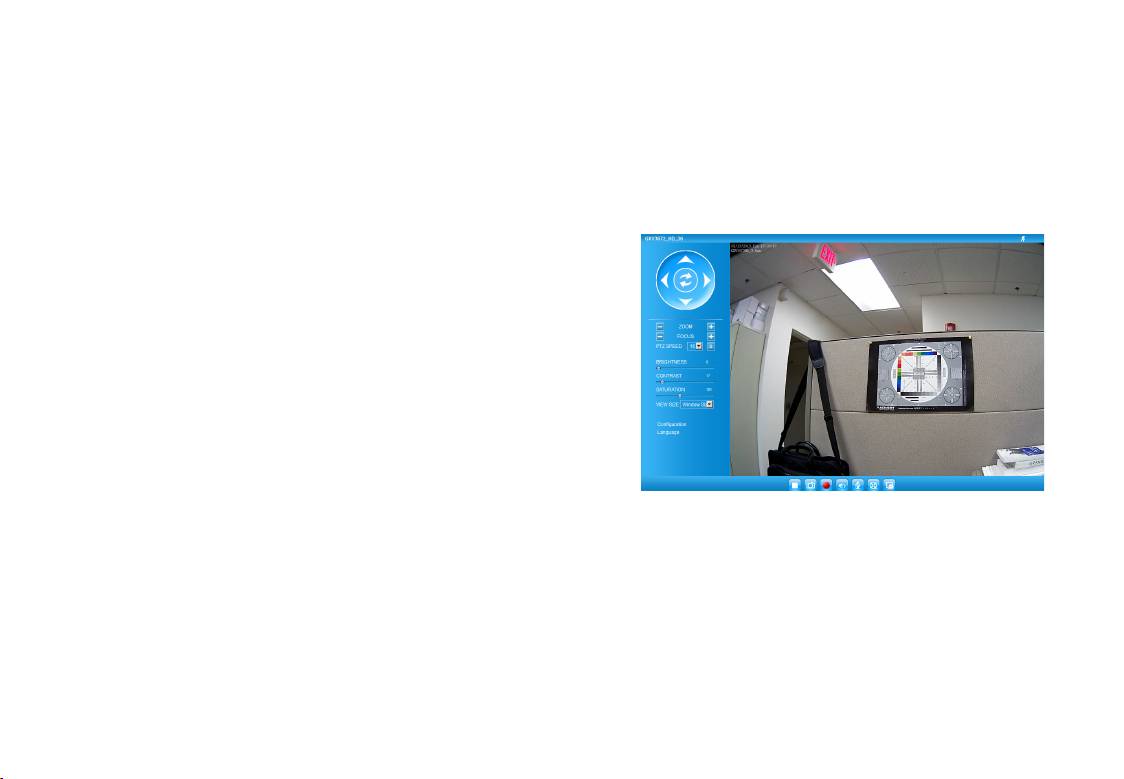
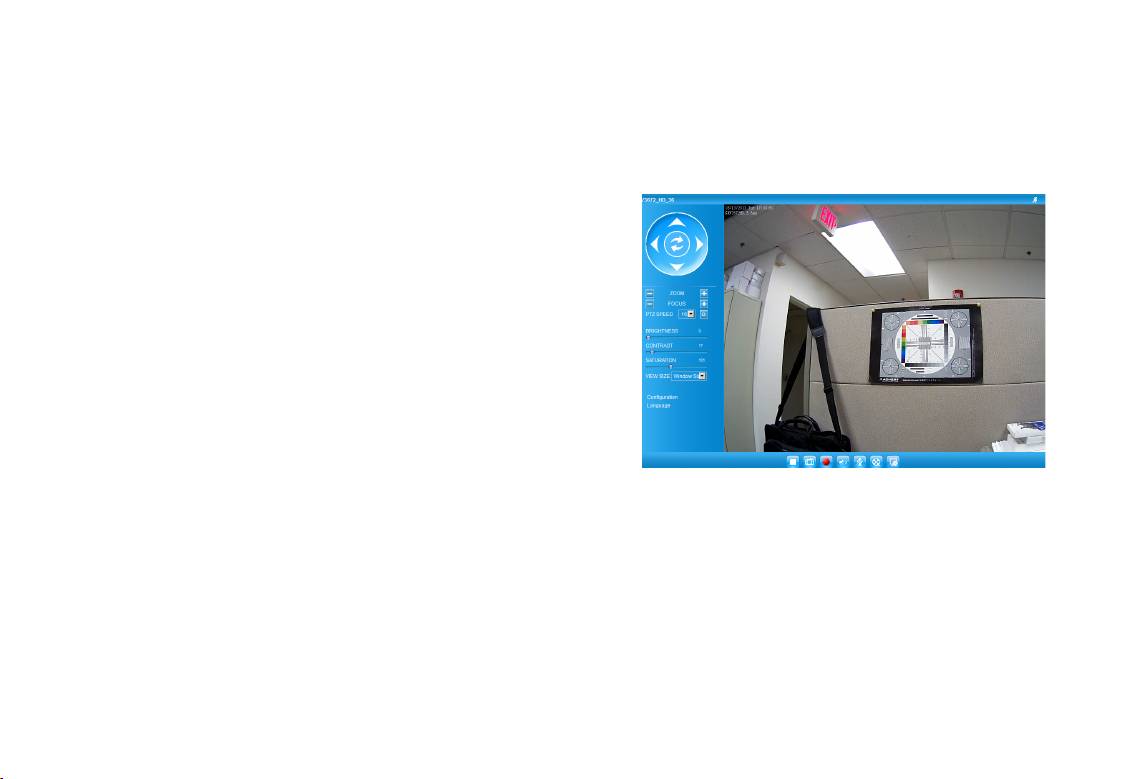
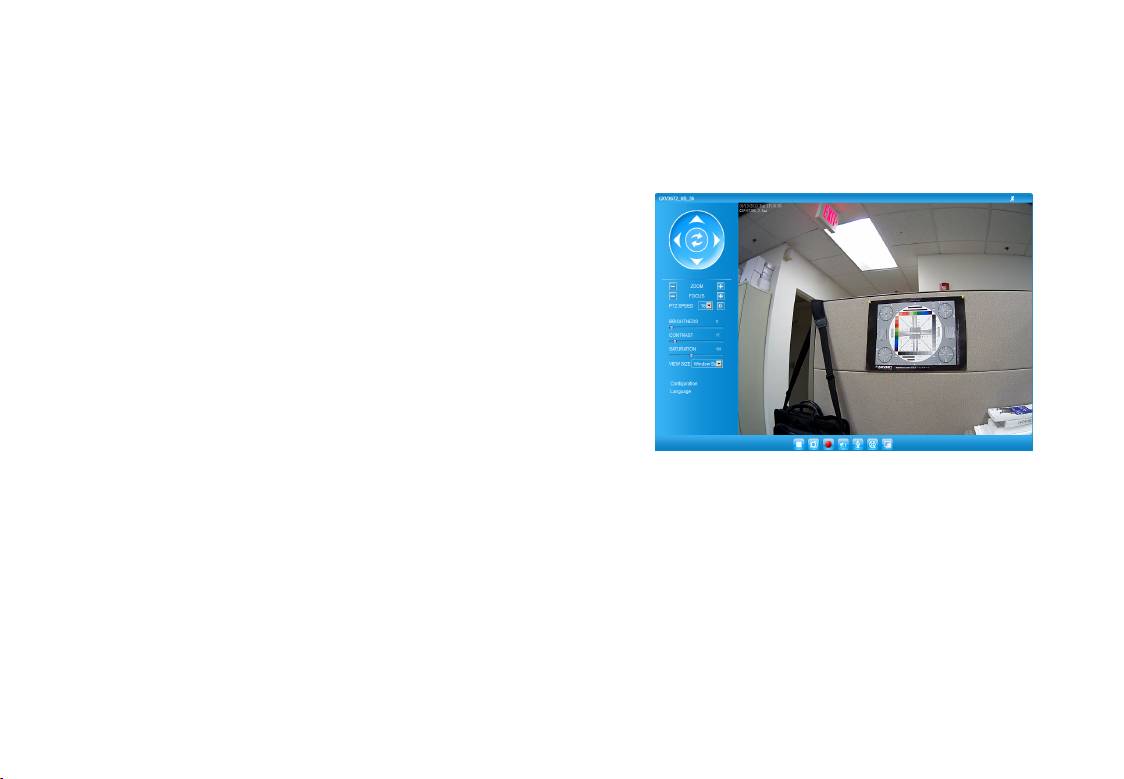
Step 5: Double click on the detected device. The
Step 9: Here is a sample screenshot with successful
default browser(MS IE in this example) will
Active-X or Plug-in installation. Click on the
open displaying the camera’s webGUI.
play button to view the video feed.
Step 6: A pop-up window will prompt for user name
& password. The default administrator user
name and password are both set to
“admin” as to after the factory reset.
Step 7: Once you log into the webGUI, the device
will indicate that an Active-X or video plug-
in is required. Follow the displayed instruc-
tion to download and install the plug-in.
Step 8: If downloading or installing is unsuccessful
due to browser setting or slow Internet con
nection, please download the les from the
link below. Save and install the program
then restart the browser. The video will now
appear embedded inside the camera’s
web interface.
Step 10: Click through the menu on the left hand
side of the web interface for more
• Plug-in:
advanced conguration parameters.
http://www.grandstream.com/products/tools/
surveillance/webcontrl_plugin.zip
~5~ ~6~

Connect GXV3672_HD/FHD using Static IP
If the camera does not get response from the DHCP
server or the network without DHCP server, after 3
minutes, it can be accessed by the default IP address
192.168.1.168.
Please download the User Manual, refer to online
documents and FAQ for more detailed information:
http://www.grandstream.com/index.php/products/
ip-video-surveillance/gxv3672
http://www.grandstream.com/support
http://www.grandstream.com/support/tools
~7~ ~8~
Step 1: Use RJ-45 Ethernet cable to connect your
computer network port directly to the
Ethernet socket of GXV3672_HD/FHD.
S
tep 2:
Run the GS_Search tool as above. It will show
the original IP of the GXV3672_HD/FHD
(default IP address 192.168.1.168).
S
tep 3: Input the NEW IP Address, Subnet Mask and
Default Gateway, according to your network
conguration. Please check with local system
administrator for the necessary information.
S
tep 4: Click on “Modify IP”. The desired IP address
will be applied to GXV3672_HD/FHD.
GXV3672_HD/FHD v2 SPECIFICATIONS
Image Sensor
Day & night mode
Sensitivity
Shutter: 1/10000 - 1/30 second
Focal Length 3.6mm: GXV3672_HD/FHD_36
8.0mm: GXV3672_HD/FHD
Aperture F1.8
Field Angle (FOV) 3.6mm:
100.2°(D) x 77°(H) x 54°(V)
8.0mm:
46°(D) x 36°(H) x 26.5°(V)
IR Cut Filter Yes. Mechanical
Day & Night Mode Color & B/W mode
3.6mm:
IR LED covering up to 10 meter
8.0mm:
IR LED covering up to 30 meter
Minimum
0.05 Lux
Illumination
0 Lux with IR LED on
Responsivity HD: 5.48V/Lux-sec (550nm)
FHD: 1.9V/Lux-sec (550nm)
Maximum Video
HD: 1280 x 960 (25fps)
Resolution
1280 x 720 (30fps)
and Frame Rate
FHD: 2048 x 1536 (15fps)
1920 x 1080 (30fps)
Panning Range 0º - 180º (Manual)
Tilting Range 0º - 180º (Manual)
ES
PRECAUCIONES
CONENXION DE LA GXV3672_HD/FHD
• No abrir, desarmar o intentar modicar este equipo
Consulte la siguiente ilustración y siga las instruccio-
• No use adaptadores de corriente distintos al sumi-
nes de la siguiente pagina.
nistrado
• No exponga este dispositivo a temperaturas fuera
del rango de -20 °C a 45 °C en funcionamiento y
-30 °C a 60 °C en almacenadas
• No exponga este dispositivo ambientes fuera del
siguiente rango de humedad: 10-90% RH
Puertos de en-
(Sin condensación)
trada/salida de
• Por favor, instale la cámara adecuadamente para
audio
un funcionamiento correcto
CONTENIDO DEL PAQUETE
Puerto de
Puerto de
Red
Alimentación
12V
1 x Adaptador de
1 x GXV3672_HD/FHD
Opción A:
corriente de 12 VDC
Adaptador de corriente
a la toma de CA
12V
Opción B:
1 x Cable Ethernet 3 x Anclaje de pared
Cable de Red RJ45 a
un switch PoE (Power
over Ethernet)
Nota: Seleccione la opción A si usa la fuente de pod-
3 x Tornillos
1 x Llave
1 x Guía de Instalación
er o seleccione la Opción B si usa switch PoE
exagonal
rápida, 1 x Licencia GPL
(Power over ethernet).
~9~ ~10~
Paso 1: Descargue e instale la herramienta GS_Search
http://www.grandstream.com/products/tools/
surveillance/GS_Search.zip
Paso 2: Ejecute la herramienta de Grandstream
GS_Search.
Opción A:
Paso 3: Haga Click en botón para iniciar
Paso 1: Conecte el adaptador de corriente en el
la detección de dispositivos en la red.
conector de 12 VDC que esta en la parte
post erior de la GXV3672_HD/FHD y conecte
Paso 4: Los dispositivos detectados se mostraran en
el otro extremo del adaptador a una toma
el campo de salida como se muestra abajo.
de corriente AC.
Paso 2: Conecte un cable Ethernet RJ45 en el puerto
de red que esta en la parte posterior de la
GXV3672_HD/FHD y conecte el otro
extremo a un switch/hub o router.
Opción B:
Paso 1: Conecte el cable de red Ethernet RJ45 al
conector que esta en la parte posterior de la
GXV3672_HD/FHD y conecte el otro extremo
al switch PoE (Power over Ethernet).
CONFIGURACION DE LA GXV3672_HD/FHD
Conguración de la GXV3672_HD/FHD usando
Firefox, Chrome o con Microsoft Internet Explorer
Conecte la GXV3672_HD/FHD a una red con un
servidor DHCP activo
~11~ ~12~
Paso 5: Haga Doble click en el dispositivo detectado.
El navegador por defecto (MS IE por
ejemplo) se abrirá mostrando la interfaz web
Paso 9: Aquí esta una captura de pantalla con un
de la cámara.
ejemplo de una instalación exitosa del
Active-X o del Plug-in. Haga clic en el botón
Paso 6: Una ventana emergente le pedirá el
play para reproducir el vídeo.
nombre de usuario y contraseña. El
nombre de usuario y la contraseña por
defecto es “admin” para la conguración
predeterminada de fábrica.
Paso 7: Una vez que inicie sesión en la interfaz
webGUI, el dispositivo indicará que un
Active-X o el plug-in de vídeo es necesario.
Siga las instrucciones que aparecen para
la descargar e instalación del plug-in.
Paso 8: Si la descarga/instalación no es correcta
debido a la conguración de su navegador
o debido a una conexión lenta a Internet,
descargue los archivos desde el siguiente
enlace. Descargue e instale el programa y
reinicie el navegador. El vídeo se mostrara
Paso 10: Haga clic en el menú de la parte izquierda
ahora dentro de la interfaz web de la cámara.
de la interfaz web para mas parámetros
de conguración avanzados.
• Plug-in:
http://www.grandstream.com/products/tools/
surveillance/webcontrl_plugin.zip
~13~ ~14~

Conecte la GXV3672_HD/FHD
ESPECIFICACIONES DE LA GXV3672_HD/FHD v2
usando IP estática
Sensibilidad del
Modo día y noche
sensor de imagen
Obturador:
Si la cámara no recibe una respuesta desde el servdor
1/10000 – 1/30 segundos
DHCP o la red no tiene un servidor DHCP, después de
Longitud Focal 3.6mm: GXV3672_HD/FHD_36
3 minutos, se puede acceder por la dirección IP pre-
8.0mm: GXV3672_HD/FHD
determinada 192.168.1.168.
Paso 1: Use el cable de red Ethernet RJ45 para
Apertura F1.8
conectar el puerto de red de su
Ángulo de campo
3.6mm:
computadora directamente al conector
(FOV)
100.2°(D) x 77°(H) x 54°(V)
Rj45 de la GXV3672_HD/FHD.
8.0mm:
Paso 2: Ejecute la herramienta GS_Search como se
46°(D) x 36°(H) x 26.5°(V)
indica anteriormente, se mostrara la IP de la
Filtro de corte IR Si. Mecánico
GXV3672_HD/FHD(La dirección IP por
defecto es 192.168.1.168).
Modo día y noche Modo a color y blanco y negro
3.6mm: cobertura del LED IR de
Paso 3: Ingrese la nueva dirección IP, mascara
hasta 10m
de red, y puerta de enlace predeterminada
8.0mm: cobertura del LED IR de
de acuerdo a la conguración de su red,
hasta 30m
por favor contacte al administrador de
Iluminación mínima 0.05 Lux
su red para la información necesaria.
0 Lux con el LED IR
Paso 4: Haga Click en “Modicar IP”. La dirección IP
deseada se aplicara en la GXV3672_HD/FHD.
Responsividad HD: 5.48V/Lux-sec (550nm)
FHD: 1.9V/Lux-sec (550nm)
Resolución máxima de
HD: 1280 x 960 (25fps)
Por favor, descargue el Manual del usuario, consulte
vídeo y velocidad de
1280 x 720 (30fps)
la documentación en línea y preguntas frecuentes
cuadro
FHD: 2048 x 1536 (15fps)
para obtener información más detallada.
1920 x 1080 (30fps)
Rango panorámico 0º - 180º (Manual)
http://www.grandstream.com/index.php/products/
ip-video-surveillance/gxv3672
Rango de inclinación 0º - 180º (Manual)
http://www.grandstream.com/support
http://www.grandstream.com/support/tools
~15~ ~16~
FR
PRECAUTIONS
CONNEXION DU GXV3672_HD/FHD
• Ne pas tenter d’ouvrir, de désassembler, ou de
Reportez-vous à l’illustration ci-dessous en suivant les
modier le dispositif
instructions sur la page suivante.
• Ne pas utiliser un adaptateur d’alimentation tiers
• Ne pas exposer cet appareil à des températures
hors de la plage de -20 °C à 45 °C en opération
ou -30 °C à 60 °C en stockage
• Ne pas exposer cet appareil à un environnement
avec humidité hors de la plage de 10-90% RH
Audio In/Out
(sans condensation)
Ports
• Veuillez installer la caméra proprement pour un
fonctionnement correcte
CONTENU DU PACK
Port
Port d’alimentation
Réseau
12V
Option A:
Adaptateur d’alimentation
à une prise électrique
1 x 12V Adaptateur
1 x GXV3672_HD/FHD
d’alimentation
12V
Option B:
1 x Câble Ethernet
3 x Attaches murales
Câble Ethernet RJ45 à un switch avec
port Ethernet pré-alimenté (PoE)
NOTE: Choisissez l’option A si vous utilisez l’alimentation,
ou choisissez l’option B si vous utilisez un switch
3 x Vis 1 x Clé Hexagonale
1 x Guide d’Installation
à port Ethernet pré-alimenté (PoE).
Rapide, 1 x Licence GPL
~17~ ~18~
Etape 1: Téléchargez et installez l’outil GS_Search:
http://www.grandstream.com/products/tools/
surveillance/GS_Search.zip
Etape 2: Exécutez l’outil Grandstream GS_Search.
Etape 3: Cliquez sur le bouton pour lancer la
détection des appareils.
Etape 4: Les appareils détectés s’afcheront dans le
champ de sortie comme ci-dessous.
~19~ ~20~
Option A
Etape 1:
Insérez l’adaptateur d’alimentation dans le
port 12V DC du GXV3672_HD/FHD.
Branchez l’ autre extrémité à une prise
électrique.
Etape 2:
Branchez un câble Ethernet RJ45 au port
réseau. Branchez l’autre extremité à un
switch ou routeur.
Option B
Etape 1:
Branchez un câble Ethernet RJ45 sur le port
réseau du GXV3672_HD/FHD.
Branchez l’autre extrémité à un switch
avec port Ethernet préalimenté (PoE).
CONFIGURATION DU GXV3672_HD/FHD
Congurer le GXV3672_HD/FHD en utilisant le
navigateur Firefox, Chrome ou Microsoft Internet
Explorer (avec plugin installé)
Connecter le GXV3672_HD/FHD à un serveur DHCP
Etape 5: Double cliquez sur l’appareil détecté. Le
navigateur par défaut (MS IE dans cet
exemple) s’exécutera en afchant l’interface
Etape 9: Voici une capture d’écran montrant une
web de la caméra.
installation réussie de l’Active-X ou Plugin.
Etape 6: Une fenêtre pop-up invitant à entrer un nom
d’utilisateur et un mot de passe apparaîtra.
Le nom d’utilisateur et le mot de passe
administrateur sont congurés initialement
à “admin”.
Etape 7: Une fois connecté sur l’interface WebGUI
l’appareil indiquera qu’un Active-X ou
plugin vidéo est requis. Suivez les
instructions afchées pour télécharger et
installer le plugin vidéo.
Etape 8: Si le téléchargement/installation échoue à
cause des paramètres du navigateur ou
de lenteur de connexion Internet, veuillez
télécharger les chiers à partir du lien
suivant. Enregistrez et installez le programme
puis redémarrer le navigateur. La vidéo
Etape 10: Pour les paramètres de conguration
sera maintenant afchée.
avancés cliquez sur le menu dans la
partie gauche de l’interface web.
• Plug-in:
http://www.grandstream.com/products/tools/
surveillance/webcontrl_plugin.zip
~21~ ~22~

Connecter le GXV3672_HD/FHD en utilisant
SPECIFICATIONS DU GXV3672_HD/FHD v2
une adresse IP Statique
Sensibilité Capteur
Mode Jour & Nuit.
d'Images
Obturateur:
Si la caméra ne reçoit pas de réponse du serveur DHCP
1/10000 - 1/30 seconde
ou qu’il n’y pas de serveur DHCP sur le réseau, au bout
Distance Focale 3.6mm: GXV3672_HD/FHD_36
de 3 minutes, vous pouvez y accéder par l’adresse IP
8.0mm: GXV3672_HD/FHD
par défaut 192.168.1.168.
Etape 1: Utilisez un câble Ethernet RJ-45 pour connec-
Ouverture F1.8
ter le port réseau de votre PC directement
Angles de vue (FOV) 3.6mm:
au port réseau du GXV3672_HD/FHD.
100.2°(D) x 77°(H) x 54°(V)
Etape 2: Exécutez l’outil GS_Search comme ci-dessus.
8.0mm:
Il afchera l’adresse IP originale du
46°(D) x 36°(H) x 26.5°(V)
GXV3672_HD/FHD (adresse IP par
Filtre IR Cut Oui. Mécanique.
défaut 192.168.1.168).
Mode Jour & Nuit Couleur & mode N/B.
Etape 3: Saisissez la NOUVELLE adresse IP, Masque du
3.6mm: LED IR couverant
Sous-Réseau et la passerelle par défaut,
jusqu’à 10m
suivant la conguration de votre réseau.
8.0mm: LED IR couverant
Veuillez consulter votre administrateur
jusqu’à 30m
système pour les informations nécessaires.
Illumination
0.05 Lux
Etape 4: Cliquez sur “Modify IP”. L’adresse IP
Minimum
0 Lux avec LED IR allumé
souhaitée sera appliquée sur le
Sensibilité HD: 5.48V/Lux-sec (550nm)
GXV3672_HD/FHD.
FHD: 1.9V/Lux-sec (550nm)
Veuillez télécharger le Manuel d’Utilisateur, consulter
Résolution Vidéo Maxi-
HD: 1280 x 960 (25fps)
les documents en ligne et FAQ pour des informations
mum et Taux de Trames
1280 x 720 (30fps)
plus détaillées.
FHD: 2048 x 1536 (15fps)
1920 x 1080 (30fps)
http://www.grandstream.com/index.php/products/
Champ de Rotation (H) 0º - 180º (Manuel)
ip-video-surveillance/gxv3672
Champ de Rotation (V) 0º - 180º (Manuel)
http://www.grandstream.com/support
http://www.grandstream.com/support/tools
~23~ ~24~

ZH
注意事项
GXV3672_HD/FHD连接方法
•请不要打开、拆卸或修改该设备
请参照下图以及下一页的操作说明。
•请不要使用第三方的电源适配器
•请不要在超出-20至45摄氏度环境下使用此设备;
请不要在超出-30至60摄氏度环境下保存此设备
•请不要将GXV3672_HD/FHD暴露在超出相对湿
度10-90%范围外的环境下
音频输入/输出接口
•请准确安装以保证GXV3672_HD/FHD正常工作
(仅限GXV3672_HD/
FHD_36)
包装内容
网络接口 电源接口
12V
方案A:
GXV3672_HD/FHD一个
12V DC 电源一个
使用12V DC 电源
适配器供电
12V
网线一根
墙体固定零件三个
方案B:
使用RJ45以太网
接口通过PoE供电
快速入门指南一本,
注意: 选择A方案使用电源适配器给设备供电或选择
螺丝三个
六角扳手一个
GPL许可证一份
B方案使用PoE给设备供电。
~25~ ~26~
步骤 1: 通过浏览器访问地址下载并安装 GS_Search
http://www.grandstream.com/products/tools/sur-
veillance/GS_Search.zip
步骤 2: 运行下载的 GS_Search 工具 ;
步骤 3: 点击 按键,搜索该网段下的设备IP
地址 ;
方案A
步骤 4: 搜索到的设备IP地址及HTTP端口将显示在以
下界面 ;
步骤 1: 将电源适配器与GXV3672_HD/FHD连线上的
12V DC 端口相连;
步骤 2: 将RJ45网线一端与 GXV3672_HD/FHD连线上
的网络接口相连,另一端与集线器、交换机或
路由器相连。
方案B
步骤 1: 将RJ45网线一端与GXV3672_HD/FHD连线上
的网络接口相连,另一端与以太网供电 (PoE) 交
换机相连。
GXV3672_HD/FHD配置
通过Firefox, Chrome 或Microsoft Internet Explor-
er 浏览器配置GXV3672_HD/FHD (需安装插件)
连接GXV3672_HD/FHD到DHCP服务器环境下,
GXV3672_HD/FHD默认通过DHCP获取IP地址
~27~ ~28~
步骤 5: 双击界面上检测到的设备,默认浏览器
步骤 9: 插件安装成功后,用户可以看到如下图所示
(如IE浏览器)将会打开并显示 GXV3672_
的 Web 界面。点击播放按钮观看视频 ;
HD/FHD的Web界面
步骤 6: 界面将会跳出输入用户名及密码的验证框出
厂时默认的用户名和密码均为 admin
步骤 7: 登陆到GXV3672_HD/FHD网络界面后 ,
浏览器将提示您安装插件。参照提示下载插
件Active-X 或Video Plug-in
步骤 8: 如果由于浏览器设置或网速慢等原因无法下
载安装插件,请使用以下链接下载插件文件。
保存并安装插件,重启浏览器。此时浏览器将
显示GXV3672_HD/FHD Web界面中的视频
• 插件:
步骤 10: 点击Web界面左侧的菜单进行更多的高级
配置。
http://www.grandstream.com/products/tools/
surveillance/webcontrl_plugin.zip
~29~ ~30~

通过默认的静态IP地址访问
GXV3672_HD/FHD v2 参数
如果将GXV3672_HD/FHD置于非DHCP环境下或三
图像传感器
白天和夜晚模式
灵敏度
快门: 1/10000 - 1/30 秒
分钟后未从DHCP服务器得到响应,它将使用默认
的静态IP地址 192.168.1.168。
焦距
3.6mm: GXV3672_HD/FHD_36
8.0mm: GXV3672_HD/FHD
步骤 1: 将您的PC与GXV3672_HD/FHD通过
通光孔径
F1.8
RJ-45网线相连
视场角 (FOV)
3.6mm:
步骤 2: 在PC上运行GS_Search工具
100.2°(D) x 77°(H) x 54°(V)
8.0mm:
GXV3672_HD/FHD的初始IP地址将会
46°(D) x 36°(H) x 26.5°(V)
显示:192.168.1.168(默认初始IP地址)
光圈 是,机械
步骤 3: 请根据您的网络配置为GXV3672_HD/FHD
白天/夜晚模式 彩色和黑白模式
输入新IP地址,子网掩码以及默认网关地
3.6mm: IR LED 覆盖范围至10m
址。如有需要,请联系您的网络系统管理员
8.0mm: IR LED 覆盖范围至30m
获取必要信息
最低限度照明
0.05 Lux
0 Lux 当 IR LED开启时
步骤 4: 请点击Modify IP,新的IP地址将会应用在
响应
HD: 5.48V/Lux-sec (550nm)
GXV3672_HD/FHD上
FHD: 1.9V/Lux-sec (550nm)
最高视频分辨率
HD: 1280 x 960 (25fps)
请下载用户手册,网站文档以及常见问题解答,取
及帧速率
1280 x 720 (30fps)
得更详细的配置说明。下载地址:
FHD: 2048 x 1536 (15fps)
1920 x 1080 (30fps)
http://www.grandstream.com/index.php/products/
水平旋转范围 0º - 180º (手动)
ip-video-surveillance/gxv3672
http://www.grandstream.com/support
倾斜范围 0º - 180º (手动)
http://www.grandstream.com/support/tools
~31~ ~32~
DE
WICHTIGE HINWEISE
ANSCHLIESSEN DES GXV3672_HD/FHD
• Versuchen Sie nicht, das Gerät zu öffnen, zu
Orientieren Sie sich bei den Anweisungen auf der
zerlegen oder zu modizieren.
nächsten Seite an der folgenden Abbildung.
• Verwenden Sie keine Netzteile von anderen
Herstellern.
• Das Gerät darf nicht bei Temperaturen jenseits
von -20 °C bis 45 °C betrieben oder gelagert werden
von -30 °C bis 60 °C.
• Die Luftfeuchtigkeit muss innerhalb des folgenden
Bereichs liegen: 10–90% rel. Luftfeuchtigkeit
(nicht-kondensierend)
• Die Kamera muss ordnungsgemäß montiert werden,
damit sie einwandfrei funktioniert.
LIEFERUMFANG
Stromanschluss
Netzwer-
kanschluss
12V
Option A:
Netzteil an Netzsteckdose
1 GXV3672_HD/FHD
1 12-V-Netzteil
12V
Option B:
1 Ethernet-Kabel
3 Wandhalterungen
RJ45-Ethernet-Kabel
an PoE-Switch (Power
over Ethernet)
HINWEIS: Wählen Sie bei Verwendung einer Steckdose
3 Schrauben
1 Sechskant-
Option A und bei Verwendung eines PoE-
schlüssel
Switches (Power over Ethernet) Option B.
~33~ ~34~
Puertos de
entrada/sali-
da de audio
(GXV3672_HD/
FHD_36 Sólo)
Puertos de
entrada/sali-
da de audio
(GXV3672_HD/
FHD_36 Sólo)
1 Schnellstarth-andbuch,
1 GPL-Lizenz
Schritt 1: Laden Sie das Tool GS_Search herunter,
und installieren Sie es.
http://www.grandstream.com/products/tools/
surveillance/GS_Search.zip
Schritt 2: Starten Sie das Tool GS_Search.
Schritt 3: Klicken Sie auf die Taste „ “(Suche),
um die Geräteerkennung zu starten..
Schritt 4: Die erkannten Geräte werden im
Ausgabefeld wie folgt angezeigt.
KONFIGURATION DES GXV3672_HD/FHD
Konguration der GXV3672_HD/FHD über
Firefox, Chrome oder Microsoft Internet Explorer
(mit installiertem Plug-In)
GXV3672_HD/FHD an Netzwerk mit aktiviertem
DHCP-Server anschließen
~35~ ~36~
Option A
Schritt 1: Stecken Sie das Netzteil in die 12-V-DC-Buch-
se des rückwärtigen Kabels in der
GXV3672_HD/FHD . Stecken Sie das andere
Endedes Netzteils in die Steckdose.
Schritt 2:
Stecken Sie ein RJ45-Ethernet-Kabel in die
Netzwerkbuchse des rückwärtigen Kabels
in der GXV3672_HD/FHD . Stecken Sie das
andere Ende in einen Switch oder Router.
Option B
Schritt 1:
Stecken Sie ein RJ45-Ethernet-Kabel in die
Netzwerkbuchse des rückwärtigen Kabels in
der GXV3672_HD/FHD . Stecken Sie das an
dere Ende in einen PoE-Switch.
- 1
- 2
