Bell'o 7612: инструкция
Раздел: Аксессуары для телевизоров
Тип:
Инструкция к Bell'o 7612
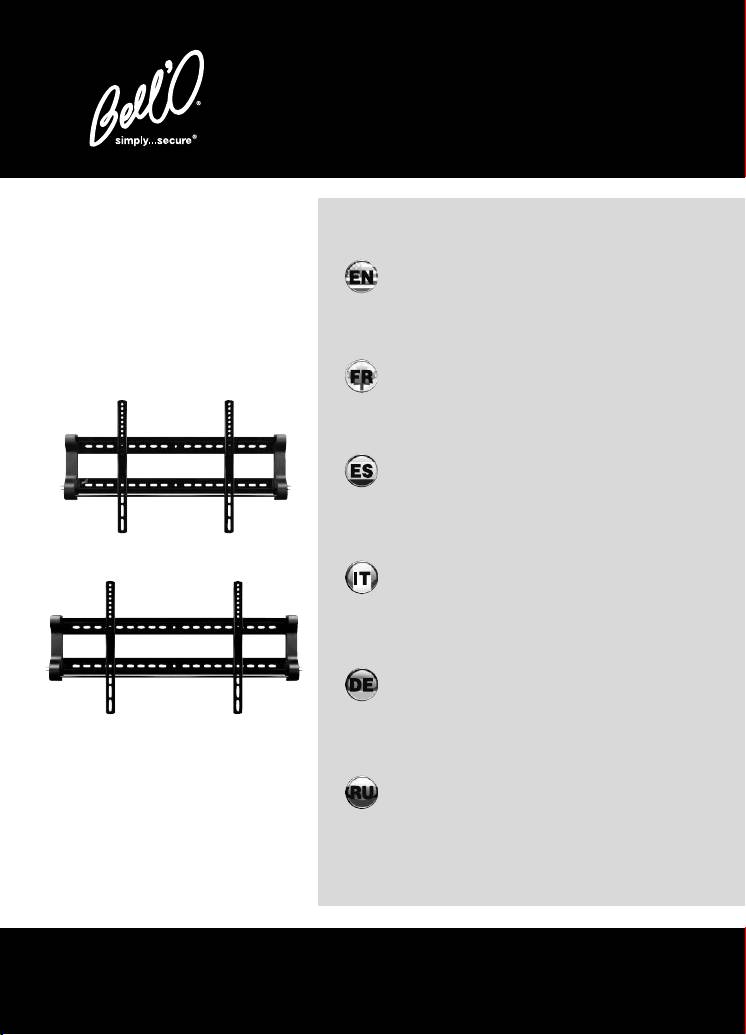
7610
7612
FLAT PANEL TV
WALL MOUNT
INSTRUCTION MANUAL
SUPPORT MURAL
D'ÉCRAN PLAT
MANUEL D'INSTRUCTIONS
SOPORTE DE PARED PARA
TV DE PANTALLA PLANA
MANUAL DE INSTRUCCIONES
SUPPORTO A PARETE
PER TELEVISORE A
SCHERMO PIATTO
MANUALE DI ISTRUZIONI
WANDBEFESTIGUNG FÜR
FLACHBDILDSCHIRMTV
ANLEITUNGSHANDBUCH
НАСТЕННЫЙ КРОНШТЕЙН
ДЛЯ ПЛОСКОПАНЕЛЬНОГО
ТЕЛЕВИЗОРА
ИНСТРУКЦИЯ


PRECAUTIONS
If at any time you are unclear about the directions and believe you need further assistance,
®
contact Bell’O
at: 1-888-235-7646 (US/Canada) or +1-732-972-1333 (International) from
9am – 5pm EST.
•
NEVER EXCEED THE MAXIMUM LOAD CAPACITY OF 200 LBS (91 KG),
• This mounting bracket was designed to be installed and utilized ONLY as specified in this
manual. Bell’O International Corporation will not be responsible for failure to assemble as
directed or for the improper assembly, use, or handling of this product.
• Improper installation of this product may cause damage or serious injury. Bell'O
International Corporation cannot be liable for direct or indirect damage or injury caused
by incorrect mounting, incorrect use, or incorrect assembly.
• If the mounting bracket will be attached to any structure other than specified in this
manual, only a licensed professional contractor/installer should perform this installation.
The supporting structure must support, at minimum, four times the combined weight of
the mounting bracket and TV. It is the responsibility and liability of the installer to ensure
the suitability of the supporting structure.
• This mount with the included hardware is not UL listed for installation into metal studs. For the
availability of UL listed metal stud mounting hardware, monitor weight limit and installation
instructions please check www.bello.com, your retailer, or an installation professional.
• Check carefully to ensure that there are no missing or damaged parts. Never use defective
parts. To receive replacement or missing part(s) under this Warranty, visit our website at
www.bello.com or call our Customer Service Department at 1-888-779-7781. Please have
the model number, date code, part number(s) and your sales receipt or other proof of
purchase available for reference. Bell’O will ship you any necessary replacement parts in
the United States or Canada at our expense.
• Specifications are subject to change without notice.
• The maximum weight of your television cannot exceed the maximum weight rating of your
®
mount or any attached Bell'O
UL listed adapters sold separately, whichever is lower.
3

AVERTISSEMENTS
Pour toutes questions concernant les instructions ou pour tout besoin d'assistance, veuillez
®
communiquer avec Bell’O
au : 1-888-235-7646 (USA/Canada) ou +1-732-972-1333
(International) de 9h00 à 17h00 (heure de l'Est).
•
NE JAMAIS DÉPASSER LA CAPACITÉ DE CHARGE MAXIMALE DE 91 KG (200 LBS).
• Ce support de fixation est conçu pour être posé et utilisé UNIQUEMENT comme indiqué dans
ce manuel. Bell’O International Corporation décline toute responsabilité en cas de pose non
conforme aux instructions ou d'assemblage, utilisation ou manipulation incorrects de ce
produit.
• Une pose incorrecte de ce produit peut entraîner des dommages matériels ou des
blessures graves. Bell'O International Corporation ne saurait être tenu responsable de
dommages matériels ou corporels directs ou indirects résultant d'une pose incorrecte,
d'une utilisation incorrecte ou d'un assemblage incorrect.
• Si le support de fixation doit être attaché à un structure autre que celles indiquées dans
ce manuel, la pose doit impérativement être confiée à un entrepreneur/installateur
professionnel agréé. La structure porteuse doit être capable de soutenir, au minimum,
quatre fois le poids combiné du support de fixation et du téléviseur. L'installateur a pour
charge et responsabilité de s'assurer que la structure porteuse convient.
• Ce support utilisé avec la visserie fournie n'est pas homologué UL pour la pose sur des
montants métalliques. Pour connaître la visserie de fixation sur montants métalliques
homologuée UL disponible, la limite de poids d'écran et les instructions de pose, veuillez
consulter www.bello.com, le revendeur ou un installateur professionnel.
• Contrôler avec soin qu'il n'y a aucune pièce manquante ou endommagée. Ne jamais utiliser
de pièces défectueuses. Pour obtenir des pièces de rechange ou manquantes dans le cadre
de cette garantie, veuillez visiter notre site Web à www.bello.com ou appeler notre Service
après-vente au 1-888-779-7781. Veillez à avoir le numéro de modèle, le code de date, les
références des pièces et le reçu de la vente ou autre justificatif d’achat à disposition. Bell’O
expédiera toutes les pièces de rechange nécessaires à ses propres frais aux États-Unis et
au Canada.
• Les caractéristiques sont sujettes à modification sans préavis.
• Le poids maximum du téléviseur ne doit pas dépasser la capacité de charge maximale
®
du support ni celle de tout adaptateur homologué UL Bell'O
vendu séparément
éventuellement fixé au téléviseur.
4

ADVERTENCIAS
Si en algún momento tiene dudas sobre las instrucciones y necesita asesoramiento
®
adicional, comuníquese con Bell’O
: 1-888-235-7646 (EE. UU. y Canadá) o
+1-732-972-1333 (desde otros lugares del mundo) de 9 a 17 hora del este.
•
NUNCA EXCEDA LA CAPACIDAD MÁXIMA DE CARGA DE 200 LBS (91 KG).
• Este soporte fue diseñado para ser instalado y utilizado ÚNICAMENTE como se indica en
el presente manual. Bell’O International Corporation no se hará responsable si el
producto no se ensambla tal como se indica ni de su ensamblaje, uso o manejo
incorrectos.
• La instalación incorrecta de este producto puede causar daños o lesiones graves. Bell'O
International Corporation no puede ser responsabilizada por los daños o lesiones directos
o indirectos causados por el montaje, uso o ensamblaje incorrectos.
• Si desea fijar el soporte a una estructura que no está especificada en este manual, la
instalación deberá realizarla un contratista o instalador profesional autorizado. La
estructura de soporte debe soportar, como mínimo, cuatro veces el peso combinado del
soporte y el TV. Es responsabilidad y obligación del instalador garantizar la idoneidad de
la estructura de soporte.
• Este soporte con los elementos incluidos no están en la lista del UL para la instalación en
montantes metálicos. Para verificar la disponibilidad de los elementos para el montaje
en montantes metálicos en la lista del UL, el límite de peso y las instrucciones de
instalación, ingrese a www.bello.com o consulte con su proveedor o instalador
profesional.
• Revise cuidadosamente el sistema para asegurarse de que no haya piezas faltantes o
dañadas. Nunca utilice piezas defectuosas. Para recibir el reemplazo o la(s) parte(s) o
pieza(s) faltante(s) cubiertas por la presente garantía, ingrese a nuestro sitio web
www.bello.com o llame a nuestro Departamento de atención al cliente al 1-888-779-7781.
Tenga a mano el número de modelo, código de fecha, número(s) de la parte o pieza y su
recibo de venta u otro comprobante de compra disponible como referencia. Bell’O le
enviará cualquier parte o pieza de reemplazo sin cargo en los Estados Unidos o Canadá.
• Las especificaciones están sujetas a cambios sin previo aviso.
• El peso máximo de su televisor no puede exceder la clasificación de peso máximo de su
®
soporte o cualquier adaptador Bell’O
adjunto y enumerado en la lista del UL que se
venda por separado, el que sea inferior.
5

PRECAUZIONI
Nel caso che, in qualsiasi momento, le istruzioni non dovessero risultare chiare o si
®
necessitasse di ulteriore assistenza, contattare Bell’O
al numero verde: 1-888-235-7646
(da USA/Canada) oppure al +1-732-972-1333 (da altri Paesi) dalle 9.00 - 17.00 (ora costa
orientale USA).
•
NON SUPERARE MAI LA MASSIMA CAPACITÀ DI CARICO, PARI A 91 KG.
• Questo supporto è stato progettato UNICAMENTE per essere installato e utilizzato come
specificato in questo manuale. Bell’O International Corporation non sarà responsabile nel
caso di incapacità a completare l'assemblaggio secondo le istruzioni fornite, o di
assemblaggio, uso o trasporto scorretto del prodotto.
• L'erronea installazione di questo prodotto può causare danni o seri incidenti. Bell'O
International Corporation non sarà responsabile di danni o incidenti diretti o indiretti
causati da un montaggio scorretto, utilizzo scorretto o assemblaggio scorretto.
• Se il supporto viene affrancato a una struttura diversa da quella specificata in questo manuale,
l'installazione deve essere effettuata esclusivamente da un tecnico/installatore professionista
autorizzato. La struttura di supporto deve essere in grado di sostenere almeno quattro volte il
peso combinato del supporto e del televisore. È responsabilità dell'installatore assicurare
l'idoneità della struttura di sostegno.
• Nel caso di installazione su montanti in metallo, questo supporto e la ferramenta relativa
non sono conformi agli standard UL. Per verificare la disponibilità di ferramenta, il peso
limite dello schermo e le istruzioni di installazione del supporto su montanti in metallo
conformi agli standard UL, consultare il sito www.bello.com, il rivenditore o
l'installatore.
• Verificare con attenzione che non vi siano pezzi mancanti o danneggiati. Non utilizzare mai
pezzi danneggiati. Per ottenere i pezzi mancanti o di sostituzione coperti da questa Garanzia,
visitare il nostro sito Web www.bello.com o chiamare il centro di assistenza clienti al numero
1-888-779-7781 (numero verde valido solo in Nord America). Si prega di avere a portata di
mano il numero del modello, il codice della data, i numeri dei pezzi in questione e la ricevuta
o altra prova d'acquisto. Bell’O invierà i pezzi di ricambio necessari, a proprie spese, negli
Stati Uniti o in Canada.
• Le specifiche sono soggette a modifiche senza preavviso.
• Il peso massimo del televisore non deve essere superiore alla classe di peso indicata
®
per il supporto o per qualunque adattatore per Bell'O
conforme agli standard UL venduto
separatamente, qualsiasi sia minore.
6

VORSICHTSMASSNAHMEN
Sollten Sie sich nicht ganz klar über die Anleitungen und der Ansicht sein, dass Sie
®
Unterstützung brauchen, setzen Sie sich bitte mit Bell’O
unter Telefonnummer
1-888-235-7646 (US/Kanada) oder + 1-732-972-1333 (International) zwischen 9 Uhr und
17 Uhr (Ostzeit) in Verbindung.
• BITTE NIE DIE HÖCHSTBELASTBARKEIT VON 91 KG (200 PFD) ÜBERSCHREITEN.
• Diese Konsole darf NUR so wie in diesen Anleitungen beschrieben installiert und
verwendet werden. Bell’O International Corporation ist nicht verantwortlich für Ihr
Versäumnis, dieses Produkt ordnungsgemäß entsprechend den Anleitungen zu montieren,
unsachgemäße Montagen. Verwendungen oder einen unsachgemäßen Umgang.
• Die unsachgemäße Installation dieses Produkts kann zu Schäden oder ernsten Verletzungen
führen. Bell'O International Corporation kann nicht für unmittelbare oder mittelbare Schäden
oder Verletzungen verantwortlich sein, die durch den unsachgemäßen Einsatz oder ein
unsachgemäße Montage bewirkt wurden.
• Falls die Konsole an Strukturen angebracht wird, die nicht denen in diesen Anleitungen
aufgeführten Konsolen entsprechen, darf nur ein qualifizierter Fachmann bzw. Installateur diese
Installation vornehmen. Die Tragkonstruktion muss mindestens viermal das Gesamtgewicht des
Fernsehers und der Konsole tragen können. Der Installateur trägt die Verantwortung und ist
haftpflichtig in Bezug auf die Sicherstellung, dass die Tragkonstruktion angemessen ist.
• Diese Halterung samt Eisenteilen ist nicht UL verzeichnet zur Installation in Metallbolzen.
Bitte sehen Sie bei www.bello.com nach, oder fragen Ihren Einzelhändler oder
Installateur für UL verzeichnete Eisenteile für Montagen, Gewichtsbegrenzungen und
Installationsanleitungen.
• Prüfen Sie sorgfältig, um sicherzustellen, dass keine Teile fehlen oder beschädigt sind. Bitte
nie beschädigte Teile einsetzen. Um Ersatzteile oder fehlende Teile gemäß dieser Garantie zu
erhalten, besuchen Sie bitte unsere Website www.bello.com oder rufen Sie unsere
Kundendienstabteilung unter 1-888-779-7781 an. Bitte haben Sie Ihre Modell-Nummer,
Datumscode, Teilenummer(n) und Ihre Verkaufsquittung oder sonstigen Kaufbeleg griffbereit
zum Verweis. Bell'O sendet Ihnen dann alle erforderlichen Ersatzteile in den Vereinigten
Staaten bzw. Kanada auf unsere Kosten zu.
• Die Spezifikationen unterliegen Änderungen ohne vorheriger Ankündigung.
• Das Höchstgewicht Ihres TVs darf nicht das Höchstgewichtsklasse Ihrer Halterung oder
®
allen daran befestigten Bell'O
UL verzeichneten, getrennt erhältlichen Adaptern
übersteigen, wobei das niedrigerere Gewicht maßgeblich ist.
7

ПРЕДУПРЕЖДЕНИЕ
Если вам понадобится помощь или что–то непонятно в инструкции, обратитесь в
®
фирму Bell’O
по телефону 1-888-235-7646 (США/Канада) или +1-732-972-1333 (для
международных звонков) с 9 утра до 5 вечера (время — восточное стандартное).
•
НИ ПРИ КАКИХ ОБСТОЯТЕЛЬСТВАХ НЕ ПРЕВЫШАТЬ МАКСИМАЛЬНУЮ НАГРУЗКУ В 200
ФУНТОВ (91 КГ).
•
Этот настенный кронштейн был сконструирован для установки и использования ТОЛЬКО в
соответствии со спецификациями, приведенными в этом документе. Фирма Bell’O International
Corporation не будет нести ответственности за невыполнение инструкций по сборке или за
неправильную сборку, использование или эксплуатацию этого продукта.
•
Неправильная установка этого продукта может явиться причиной ущерба или серьезной
травмы . Фирма Bell'O International Corporation не может нести ответственность за прямой или
косвенный ущерб или травму из–за неправильной установки, эксплуатации или сборки.
•
Если настенный кронштейн будет крепиться к любой структуре, которая не специфицирована
в этом документе, то его должен устанавливать только лицензированный подрядчик,
специалист по таким установкам. Опорная структура должна выдерживать нагрузку, как
минимум в четыре раза превышающую суммарный вес кронштейна и телевизора. Установщик
несет юридическую и материальную ответственность за обеспечение соответствия опорной
структуры таким требованиям.
•
Этот кронштейн и прилагаемые детали не внесены в списки UL для установки на
металлические стойки. Для того чтобы выяснить, как можно приобрести внесенные в списки
UL детали для установки на металлические стойки, получить сведения об ограничениях на
вес монитора и инструкции по установке, обратитесь на сайт www.bello.com, к своему
поставщику или к профессиональному установщику.
•
Тщательно проверьте, что все нужные детали имеются в наличии и что они не
повреждены. Никогда не используйте дефектные детали. Чтобы заменить поврежденные
детали или получить недостающие детали в соответствии с этой Гарантией, обратитесь на
наш сайт www.bello.com или позвоните в наш отдел обслуживания по телефону
1-888-779–7781. Для этого нужно знать номер модели, код даты, номер детали (деталей) и
иметь квитанцию или другое доказательство покупки для ссылок. Фирма Bell’O за свой
счет вышлет вам все необходимые для замены детали в пределах Соединенных Штатов
или Канады.
•
Спецификации могут быть изменены без предварительного уведомления.
•
Максимальный вес вашего телевизора не должен превышать наименьший вес из следующих
двух: максимальный вес, на который рассчитан ваш кронштейн, или максимальный вес, на
который рассчитаны любые крепящиеся продающиеся отдельно внесенные в списки UL
®
адаптеры Bell'O
.
8

INCLUDED PARTS PIÈCES INCLUSES
PARTES INCLUIDAS
PARTI INCLUSE
IM LIEFERUMFANG
ПОСТАВЛЯЕМЫЙ
ENTHALTENE TEILE
КОМПЛЕКТ
(WP)
Wall Plate, 1
Plaque murale, 1
Placa de pared, 1
Supporto a parete, 1
Wandplatte, 1
Настенная плата, 1
(MA)
Monitor Arms, 2
Bras de moniteur, 2
Brazos de la pantalla, 2
Snodi dello schermo, 2
Monitorarme, 2
Крепежные узлы
(IT)
монитора, 2
Installation Template, 1
Gabarit de pose, 1
Plantilla de instalación, 1
Schema di installazione, 1
Schablone für Installation, 1
Шаблон для установки, 1
(EC)
(TA)
End Covers, 2
5° Tilt Adapters (7612 Only), 4
Capuchons, 2
Adaptateurs d'inclinaison de 5° (7612 seulement), 4
Cubiertas de extremos, 2
Adaptadores de inclinación de 5° (7612 solamente), 4
Paraspigoli, 2
Adattatori di inclinazione - 5° (solo modello 7612), 4
Endabdeckungen, 2
5° Kipparme (Nur 7612), 4
Концевые крышки, 2
Адаптер наклона 5° (только для модели 7612), 4
9

INCLUDED PARTS PIÈCES INCLUSES
PARTES INCLUIDAS
PARTI INCLUSE
IM LIEFERUMFANG
ПОСТАВЛЯЕМЫЙ
ENTHALTENE TEILE
КОМПЛЕКТ
(A) M4 x 12mm, 4
(AB)
M4 x
10mm, 2
(AE)
(B) M4 x 22mm, 4
M6 (7612 Only), 4
M6 (7612 seulement), 4
M6 (7612 solamente), 4
M6 (solo modello 7612), 4
(C) M4 x 30mm, 4
M6 (Nur 7612), 4
M6 (только для модели 7612), 4
(G) M5 x 12mm, 4
(AC)
M6 (7612 Only), 4
(H) M5 x 22mm, 4
Boulon à tête bombée (7612 seulement), 4
Pernos de cabeza redonda con cuello cuadrado (7612 solamente), 4
Bullone a testa tonda (solo modello 7612), 4
Schlittenbolzen (Nur 7612), 4
M6 (только для модели 7612), 4
(I) M5 x 30mm,4
(J) M6 x 14mm, 4
(M) M8 x 20mm, 4
(K) M6 x 25mm, 4
(N) M8 x 30mm, 4
(L) M6 x 35mm, 4
(O) M8 x 40mm, 4
10

INCLUDED PARTS PIÈCES INCLUSES
PARTES INCLUIDAS
PARTI INCLUSE
IM LIEFERUMFANG
ПОСТАВЛЯЕМЫЙ
ENTHALTENE TEILE
КОМПЛЕКТ
(D) M4/M5, 4 (E) M4/M5, 4
(Q) M6/M8, 4
(P) M6/M8, 4
(R) M4/M5, 4
(S) M6/M8, 4
®
(U) TOGGLER
brand AF8
®
(T) #14 x 65mm, 4
ALLIGATOR
Anchor, 4
®
®
TOGGLER
brand ALLIGATOR
SOLID-WALL ANCHORS are patented under one or more of US Patent numbers 5,161,296 and 5,938,385; and foreign
counterparts thereof and of 4,752,170. Other patents pending. TOGGLER and ALLIGATOR are worldwide registered trademarks of Mechanical Plastics Corp.
11

NECESSARY TOOLS
OUTILLAGE NÉCESSAIRE
HERRAMIENTAS NECESARIAS
ATTREZZI NECESSARI
ERFORDERLICHE WERKZEUGE
НЕОБХОДИМЫЕ ИНСТРУМЕНТЫ
Phillips-head Screwdriver
Ratchet Set
Tournevis à tête Phillips
Clé à cliquet à douilles
Destornillador philips (cruz)
Equipo de trinquete
Cacciavite Phillips
Strumento Del Cricco
Kreuzschlitzschraubenzieher
Schaltklinke Hilfsmittel
Крестообразная отвертка
Набор инструментов с храповиком
Masking Tape
Stud Finder
Pencil
Ruban de masquage
Détecteur de montant
Crayon
Cinta de enmascarar
Localizador de montantes
Lápiz
Nastro adesivo
Rilevatore di montanti
Matita
Abdeckband
Bolzenfinder
Bleistift
Маскировочная лента
Искатель стойки
Карандаш
Drill Bit: Wood:
5/32" (4mm), Masonry: 5/16" (8mm)
Drill
Foret Bois : 5/32 po (4 mm), Maçonnerie : 5/16 po (8 mm)
Perceuse
Broca para madera: 5/32" (4 mm), para mampostería: 5/16" (8 mm)
Taladro
Punte trapano da legno: 4 mm; da muro: 8 mm
Trapano
Bohrerspitze, Holz: 4 mm; Mauerwerk: 8 mm
Bohrer
Сверло – дерево: 5/32" (4 мм), каменная кладка: 5/16" (8 мм)
Дрель
Tape Measure
Ruban à mesurer
Cinta métrica
Metro
Level
Livella
Messband
Niveau
Nivellierinstrument
Рулетка
Nivel
Уровень
12

ATTACHING THE MONITOR ARMS (MA)
FIXER LES BRAS DE MONITEUR (MA)
CÓMO FIJAR LOS BRAZOS DE LA PANTALLA (MA)
FISSAGGIO DEGLI SNODI DELLO SCHERMO (MA)
BEFESTIGUNG DER MONITORARME (MA)
ПРИКРЕПЛЕНИЕ КРЕПЕЖНЫХ УЗЛОВ МОНИТОРА (МА)
SELECT THE CORRECT SCREW
Before beginning, test several of the screws in your hardware kit to find the correct size and length for
your television.
SÉLECTIONNER LA VIS CORRECTE
Avant de commencer, essayer différentes vis du nécessaire de visserie pour trouver la section et la
longueur correctes pour le téléviseur.
ELIJA EL TORNILLO CORRECTO
Antes de comenzar, pruebe varios tornillos de su kit de accesorios para encontrar el de tamaño y
longitud indicados para su televisor.
SELEZIONARE LE VITI CORRETTE
Prima di iniziare, cercare tra le varie viti nel kit di ferramenta quelle di dimensione e lunghezza
corrette per il vostro televisore.
DIE RICHTIGE SCHRAUBE AUSWÄHLEN
Bevor Sie mit der Installation beginnen, sind mehrere der in Ihrem Eisenteil-Satz enthaltenen
Schrauben auszuprobieren, um die richtige Größe und Länge für Ihr TV zu ermitteln.
ВЫБЕРИТЕ НУЖНЫЙ ВИНТ
Перед тем как начать, проверьте несколько винтов из крепежного комплекта, чтобы выбрать
винт соответствующего размера и длины для вашего телевизора.
WASHER
SPACER
RONDELLE
DOUILLE D'ESPACEMENT
ARANDELA
ESPACIADOR
MONITOR ARM (MA)
RONDELLE
DISTANZIALI
BRAS DE MONITEUR (MA)
DISTANZSCHEIBE
ABSTANDSHALTER
BRAZO DE LA PANTALLA (MA)
ПРОМЕЖУТОЧНОЕ
ШАЙБА
SNODO DELLO SCHERMO (MA)
КОЛЬЦО
MONITORARM (MA)
КРЕПЕЖНЫЙ УЗЕЛ МОНИТОРА (МА)
(MA)
(MA)
(MA)
TELEVISION TÉLÉVISEUR TELEVISOR TELEVISORE FERNSEHER
ТЕЛЕВИЗОР
13

USING THE 5° TILT ADAPTER (7612 ONLY)
If you will be mounting your TV above eye level, and would prefer your mounted TV with a slight
tilt, insert two Carriage Bolts (AC) into each Monitor Arm (MA) as shown. Secure them with M6
Nuts (AE). Repeat for other arm. Make sure the finished head of the Carriage Bolt will be on the
outside of the Monitor Arm so the M6 Nuts will not be seen once the TV is installed.
UTILISER L'ADAPTATEUR D'INCLINAISON DE 5° (7612 SEULEMENT)
Si le téléviseur doit être posé au-dessus du niveau des yeux et qu'une légère inclinaison est souhaité,
introduire deux boulons à tête bombée (AC) dans un bras de moniteur (MA) comme sur
l'illustration. Les fixer avec des écrous M6 (AE). Répéter l'opération sur l'autre bras. Veiller à
placer la tête bombée du boulon sur l'extérieur du bras de moniteur, afin que les écrous M6 ne
soient pas visibles une fois que le téléviseur est posé.
USO DEL ADAPTADOR DE INCLINACIÓN DE 5° (7612 SOLAMENTE)
Si va a instalar el TV por encima del nivel de la vista y prefiere que esté levemente inclinado, inserte
dos pernos de cabeza redonda con cuello cuadrado (AC) en cada brazo de la pantalla (MA) tal como
se muestra. Asegúrelos con tuercas M6 (AE). Repita el procedimiento para el otro brazo. Asegúrese
de que la punta de terminación del perno de cabeza redonda con cuello cuadrado está en la parte
exterior del brazo de la pantalla para que no se vean las tuercas M6 una vez instalado el TV.
UTILIZZO DELL'ADATTATORE DI INCLINAZIONE 5° (solo modello 7612)
Per montare il televisore al di sopra del livello degli occhi e inclinare leggermente lo schermo,
inserire i due bulloni a testa tonda (AC) in ognuno degli snodi dello schermo (MA), come illustrato.
Assicurare le viti con i dadi M6 (AE). Ripetere l'operazione per il secondo snodo. Verificare che la
testa dei bulloni a testa tonda si trovi all'esterno dello snodo dello schermo, in modo che - una
volta installato il televisore - i dadi M6 non siano visibili.
UNTER EINSATZ DES 5° KIPPADAPTERS (NUR 7612)
Wenn Sie Ihr TV höher als die Augenhöhe anbringen möchten, und es leicht gekippt sein soll,
fügen Sie zwei Schlittenbolzen (AC) in jeden Monitorarm (MA) wie abgebildet ein. Befestigen
Sie sie mit den M6-Muttern (AE). Wiederholen Sie dies für den anderen Arm. Achten Sie
darauf, dass der fertig bearbeitete Kopf des Schlittenbolzens außen auf dem Monitorarm
angebracht ist, sodass die M6-Muttern nach der Installation des TVs nicht sichtbar sind.
ИСПОЛЬЗОВАНИЕ
АДАПТЕРА НАКЛОНА 5°
TA
(ТОЛЬКО ДЛЯ МОДЕЛИ 7612)
Если вы будете устанавливать телевизор
выше уровня глаз и предпочитаете, чтобы
телевизор был установлен с небольшим
наклоном, вставьте два каретных болта
(АС) в крепежный узел монитора (МА),
как показано на рисунке. Закрепите их
гайками М6 (АЕ). Сделайте то же самое
AC
для второго крепежного узла монитора.
Убедитесь, что головка каретного
болта находится снаружи крепежного
AE
узла монитора, чтобы гайки М6 не были
видны после того как телевизор
установлен.
14

ATTACHING THE MONITOR ARMS (MA)
Attach each Monitor Arm (MA) to the back of your television as shown. Make sure that each
Washer (R for M4 or M5 screws, or S for M6 or M8 screws) is placed between the Screw and the
Monitor Arm. Don’t place the Washers between the Arms and the television.
FIXER LES BRAS DE MONITEUR (MA)
Fixer les deux bras de moniteur (MA) au dos du téléviseur comme sur l'illustration. Veiller à bien
placer une rondelle (R pour les vis M4 ou M5, S pour les vis M6 ou M8) entre chaque vis et le bras
de moniteur. Ne pas placer de rondelle entre les bras et le téléviseur.
CÓMO FIJAR LOS BRAZOS DE LA PANTALLA (MA)
Conecte cada brazo de la pantalla (MA) a la parte trasera de su televisor tal como se muestra.
Asegúrese de que cada arandela (R para tornillos M4 o M5 o S para tornillos M6 o M8) esté colocada
entre el tornillo y el brazo de la pantalla. No coloque las arandelas entre los brazos y el televisor.
FISSAGGIO DEGLI SNODI DELLO SCHERMO (MA)
Fissare ognuno dei due snodi dello schermo (MA) al retro del televisore, come illustrato. Verificare
che ogni rondella (R per le viti M4 o M5, oppure S per le viti M6 o M8) sia posta tra la vite e lo
snodo dello schermo. Non posizionare le rondelle tra lo snodo e il televisore.
BEFESTIGUNG DER MONITORARME (MA)
Befestigen Sie jeden Monitorarm (MA) an der Rückseite Ihres Fernsehers wie abgebildet. Achten
Sie dabei darauf, dass jede Unterlegscheibe (R für M4- oder M5-Schrauben oder S für M6- oder
M8-Schrauben) zwischen der Schraube und dem Monitorarm liegt. Legen Sie die Unterlegscheiben
nicht zwischen die Arme und den Fernseher.
ПРИКРЕПЛЕНИЕ КРЕПЕЖНЫХ УЗЛОВ МОНИТОРА (МА)
Прикрепите каждый крепежный узел монитора к задней стенке телевизора как показано.
Убедитесь, что каждая шайба (R для винтов M4 или M5, или S для винтов M6 или M8)
установлена между винтом и крепежным узлом монитора. Не устанавливайте шайбы
между крепежными узлами и телевизором.
15

U
se spacers if Monitor Arms (MA) do not fit firmly against the back of the television, such as
when the back of the television is curved, contains larger recessed mounting holes, or some other
obstruction is in the way. Spacers also provide extra room for cables. The Arms must rest securely
on the spacers, and should not be loose.
Utiliser les douilles d'espacement si les bras de moniteur (MA) n'appuient pas fermement contre
le dos du téléviseur, comme lorsque le dos du téléviseur est incurvé, qu'il contient de grands trous
de fixation en retrait ou qu'il y a d'autres obstacles. Les douilles d'espacement offrent également
plus d'espace pour les câbles. Les bras doivent appuyer fermement sur les douilles d'espacement et
ne pas avoir de jeu.
Use los espaciadores si los brazos de la pantalla (MA) no encajan con firmeza contra la parte
trasera del televisor, como sucede cuando esta parte es curva, contiene orificios de montaje
embutidos más grandes o presenta alguna otra obstrucción. Los espaciadores también ofrecen
espacio adicional para cables. Los brazos deben apoyarse con firmeza sobre los espaciadores y no
deben quedar flojos.
Utilizzare i distanziali quando gli snodi dello schermo (MA) non appoggiano perfettamente al
retro del televisore, ad esempio quando la parte posteriore del televisore è ricurva, oppure è dotata
di fori di montaggio infossati e di dimensioni maggiori, o quando è presente qualche tipo di
intralcio. I distanziali offrono anche spazio addizionale per l'alloggiamento dei cavi. Gli snodi
devono aderire fermamente ai distanziali, e non devono risultare allentati.
Verwenden Sie Abstandshalter, wenn die Monitorarme (MA) nicht fest gegen die Rückseite des
TVs ansitzen, beispielsweise, wenn die Rückseite des Fernsehers gerundet ist, größere ausgesparte
Befestigungslöcher hat oder falls irgend eine andere Blockierung vorhanden sein sollte. Die
Abstandshalter bieten Ihnen auch zusätzlichen Platz für die Kabel. Die Arme müssen sicher auf
den Abtandshaltern liegen, und dürfen nicht locker sein.
Используйте промежуточные кольца, если крепежные узлы монитора (МА) не прилегают
плотно к задней стенке телевизора, например, когда когда задняя панель телевизора не
плоская, с довольно большими глухими отверстиями для установки, или имеются другие
помехи. Промежуточные кольца также обеспечивают дополнительное место для кабелей.
Крепежные узлы монитора должны плотно прилегать к промежуточным кольцам и не
двигаться.
16

INSTALLING THE WALL MOUNT IN WOOD
POSER LE SUPPORT MURAL SUR DU BOIS
CÓMO INSTALAR EL SOPORTE DE PARED EN MADERA
INSTALLAZIONE DEL SUPPORTO A PARETE SU LEGNO
INSTALLATION DER WANDBEFESTIGUNG IN HOLZ
КРЕПЛЕНИЕ НАСТЕННОГО КРОНШТЕЙНА К ДЕРЕВУ
FIND THE WOOD STUDS
Using a stud finder, find the exact location of the studs
to which you want to attach the wall mount. Mark the
right and left side to determine the center of each stud.
TROUVER LES MONTANTS EN BOIS
À l'aide d'un détecteur de montant, trouver
l'emplacement exact des montants sur lesquels doit être
attaché le support mural. Marquer les bords gauche et
droit pour déterminer le centre de chaque montant.
CÓMO ENCONTRAR LOS
MONTANTES DE MADERA
Utilizando un localizador de montantes, determine
la ubicación exacta de los montantes sobre los que
desea fijar el soporte de pared. Marque los lados
derecho e izquierdo para determinar el centro de
cada montante.
INDIVIDUARE I MONTANTI
DI LEGNO
Con l'ausilio di un rilevatore, individuare la
posizione esatta dei montanti ai quali si intende
fissare il supporto a parete. Contrassegnare gli estremi
sinistro e destro dei montanti per determinarne il
punto centrale.
FINDEN SIE DIE HOLZBOLZEN
Mit einem Bolzenfinder finden Sie jetzt den genauen Ort des Bolzens, an den Sie die
Wandbefestigung befestigen wollen. Markieren Sie die rechte sowie auch linke Seite, um die Mitte
des Bolzens bestimmen zu können.
НАЙДИТЕ ДЕРЕВЯННЫЕ СТОЙКИ
С помощью искателя стойки найдите точное местоположение стоек, к которым вы хотите
прикрепить кронштейн. Отметьте правую и левую стороны, чтобы определить центр каждой
стойки.
17

DETERMINE HEIGHT LOCATION OF TELEVISION
Measure the distance from the bracket holes to the top and bottom of the TV to determine
the center mounting position. Measure from the floor up, and make small marks on the wall to
help you determine the desired TV height. Using a level, line up the Installation Template
(IT) with your pencil markings and tape it into place.
DÉTERMINER L'EMPLACEMENT EN HAUTEUR
DU TÉLÉVISEUR
Mesurer la distance des mesurer la distance entre les trous du support et le haut et le bas du
téléviseur pour déterminer la position de pose centrale. Mesurer la hauteur depuis le sol et
tracer de petits repères sur le mur pour marquer la hauteur souhaitée pour le téléviseur. À l'aide
d'un niveau, aligner le gabarit de pose (IT) sur les marquages et l'attacher avec du ruban
adhésif.
DETERMINE LA ALTURA EN LA QUE COLOCARÁ
EL TELEVISOR
Para determinar el centro de la posición de montaje mida la distancia desde los orificios del
soporte hasta las partes superior y trasera del televisor. Mida desde el piso y haga pequeñas
marcas sobre la pared para ayudarse a determinar la altura deseada para el TV. Use un nivel
para alinear la plantilla de instalación (IT) con las marcas del lápiz y sujete con cinta adhesiva
en el lugar.
DETERMINARE LA POSIZIONE IN ALTEZZA
DEL TELEVISORE
Per determinare la posizione centrale di montaggio, misurare la distanza dai fori dei sostegni
alla parte superiore e quella inferiore del televisore. Misurare partendo dal pavimento, e fare un
segno sul muro per indicare l'altezza desiderata. Con l'ausilio di una livella, allineare lo schema
di installazione (IT) al segno sul muro e fissarlo con nastro adesivo.
BESTIMMEN SIE DIE STELLE DER HÖHE
DES FERNSEHERS
Messen Sie den Abstand von den Trägerlöchern zum oberen und unteren Teil des TVs, um die
Mitte festzulegen. Messen Sie vom Fußboden nach oben, und markieren Sie die Wand mit
kleinen Bleistiftmarkierungen, um die gewünschte Höhe des Fernsehers bestimmen zu können.
Mit einem Nivellierinstrument wird die Installationsschablone (IT) mit Ihren
Bleistiftmarkierungen ausgerichtet und mit dem Abdeckband an der richtigen Stelle befestigt.
ОПРЕДЕЛИТЕ ПОЛОЖЕНИЕ ТЕЛЕВИЗОРА ПО ВЫСОТЕ
Измерьте расстояние от отверстий кронштейна до верха и низа телевизора, чтобы
определить центр установочного положения. Измерьте расстояние от пола вверх и
сделайте карандашом пометки на стене, что поможет вам определить желаемую
высоту положения телевизора. Используя уровень, совместите шаблон для
установки (IT) с пометками на стене и закрепите шаблон маскировочной лентой.
18

IT
• Height to bottom of TV
• Hauteur jusqu'au bas du téléviseur
• Altura hasta la parte inferior del TV
• Altezza alla parte inferiore del televisore
• Höhe zum unteren Teil des TVs
•
Высота до низа телевизора
19

INSTALL THE SECURITY SCREWS (AB)
Before you attach the Wall Plate (WP) to the wall, insert the M4 x 10mm Security
Screws (AB) into the locking mechanism on each end of the bracket. Insert them
only half way, so that the locking arm can still be easily rotated.
POSER LES VIS DE SÉCURITÉ (AB)
Avant de fixer la plaque murale (WP) au mur, introduire les vis de sécurité M4 x 10
mm (AB) dans le mécanisme de verrouillage à chaque extrémité de la plaque. Ne les
visser qu'à moitié, pour permettre au bras de verrouillage de tourner aisément.
CÓMO INSTALAR LOS TORNILLOS DE SEGURIDAD (AB)
Antes de fijar la placa de pared (WP) a la pared, necesitará insertar los tornillos de
seguridad M4 x 10mm (AB) dentro del mecanismo de cierre en cada extremo del
soporte. Insértelos solamente hasta la mitad para que el brazo de cierre todavía pueda
rotarse fácilmente.
INSTALLAZIONE DELLE VITI DI SICUREZZA (AB)
Prima di fissare il supporto (WP) al muro, inserire le viti di sicurezza M4 x 10 mm
(AB) nel meccanismo di blocco, ad entrambe le estremità della piastra-supporto.
Inserire le viti solo a metà, in modo che lo snodo possa ancora essere ruotato con
facilità.
INSTALLATION SIE DIE SICHERHEITSSCHRAUBEN (AB)
Bevor Sie die Wandplatte (WP) an der Wand befestigen, fügen Sie die M4 x 10 mm
Sicherheitsschrauben (AB) in den Verriegelungsmechanismus an jedem Ende des
Trägers ein. Führen Sie sie nur zur Hälfte ein, damit der Verriegelungsarm immer
noch leicht gedreht werden kann.
УСТАНОВИТЕ КРЕПЕЖНЫЕ ВИНТЫ (AB)
Перед тем как прикрепить настенную плату (WP) к стене, вставьте крепежные
винты(AB) M4 x 10 мм в фиксирующий механизм на каждом конце кронштейна.
Вставьте их не до конца, чтобы фиксирующий элемент можно было легко
поворачивать.
20