Bell'o WAVS99163-Nov13: инструкция
Раздел: Мебель
Тип:
Инструкция к Bell'o WAVS99163-Nov13
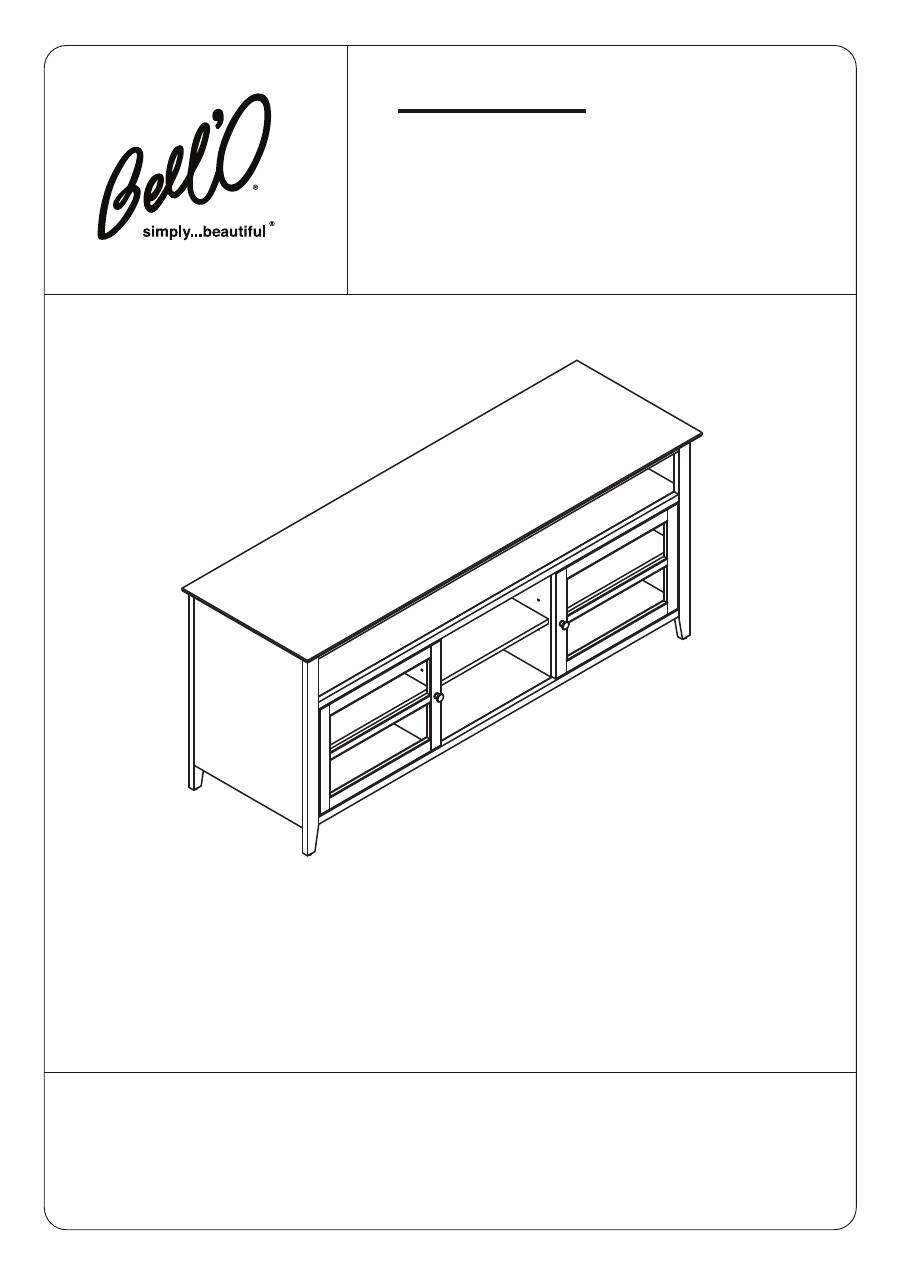
WAVs99163
WooD AuDIo/vIDeo CABIneT
ArMoIre AuDIo-vIDéo en BoIs
MesA De MADerA PArA AuDIo y vIDeo
ТУМБА ПОД АУДИО/ВИДЕО АППАРАТУРУ
Patent pending / Brevet en instance / Patent pendiente / Заявлено на патент
Made in China / Fabriqué en Chine / Hecho en China / Сделано в Китае
Italian designed / De design italien / De diseño italiano/ Разработано в Италии
Do not discard these instructions / Ne pas jeter ces instructions
Conserve estas instrucciones / Не выбрасывайте эту инструкцию
Assembly InstructIons
InstructIons D’AssemblAGe
InstruccIones De ensAmblAJe
ИНСТРУКЦИЯ ПО СБОРКЕ
J-3D_110813v1T
Bell’O International Corp. will not be responsible for failure to assemble as directed or for the improper assembly, use or handling of this stand.
Bell'O International Corps décline toute responsabilité en cas d'assemblage non conforme aux instructions ou pour l'assemblage,
l'utilisation ou la manutention incorrects de ce meuble.
Bell’O International Corp. no se hará responsable en caso de que no se instale la base según las instrucciones,
ni de la instalación, uso o manejo incorrectos de esta base.
fOR yOUR SAfETy, PLEASE fOLLOw ThESE PRECAUTIONS:
! Do not plAce Items on the shelVes WhIch exceeD the mAxImum WeIGht lImIts of 150 lbs. for
top shelf, AnD 35 lbs. for eAch InterIor shelf.
!
ALWAys reMove THe Tv AnD oTHer eQuIPMenT FroM THe FurnITure PrIor To MovInG THe
AsseMBLeD unIT.
!
Be CAreFuL WHen MovInG THe AsseMBLeD FurnITure AFTer THe sHeLves AnD Doors HAve Been
InsTALLeD, As THIs MAy CAuse THe sHeLves AnD oTHer ITeMs To BeCoMe unseCureD AnD FALL.
!
WHen In use, THIs FurnITure MusT Be PLACeD on A FLAT, soLID AnD LeveL surFACe.
!
Do noT LeAn on THe Tv WHen IT Is on THe Tv sTAnD.
!
Do noT CLIMB or sTeP on THe sTAnD.
!
Do noT BAnG InTo or PLACe your oWn WeIGHT on THe sHeLves.
VEILLER À RESPECTER CES MESURES DE PRÉCAUTION !
! ne pAs poser sur le meuble Des obJets DépAssAnt les lImItes De poIDs De 68 kG pour le plAteAu
supérIeur, et De 15,9 kG pour chAque plAteAu De IntérIeur.
!
TouJours enLever Le TéLévIseur eT AuTre éQuIPeMenT AvAnT De DéPLACer Le MeuBLe AsseMBLé.
!
DéPLACer Le MeuBLe AveC PréCAuTIon une FoIs Que Les PLATeAuX eT Les PorTes onT éTé Posés CAr
CeCI PeuT CAuser Le DéCroCHeMenT eT LA CHuTe Des PLATeAuX eT AuTres éLéMenTs.
!
DurAnT L’uTILIsATIon, Le MeuBLe DoIT ÊTre Posé sur une surFACe PLATe, soLIDe eT HorIZonTALe.
!
ne PAs s’APPuyer ConTre Le TéLévIseur LorsQu’IL esT Posé sur Le MeuBLe.
!
ne PAs GrIMPer nI MArCHer sur Le MeuBLe.
!
ne PAs TAPer nI s’APPuyer sur Les PLATeAuX.
POR SU SEGURIDAD TENGA LAS SIGUIENTES PRECAUCIONES:
! no coloque sobre los estAntes obJetos que exceDAn los límItes De peso máxImo De 150 lbs
(68 kG) pArA el estAnte superIor, y 35 lbs (15,9 kG) pArA cADA estAnte InterIor.
!
sIeMPre QuITe eL TeLevIsor y CuALQuIer oTro eQuIPo DeL MueBLe AnTes De Mover LA unIDAD ArMADA.
!
TenGA CuIDADo AL Mover eL MueBLe ensAMBLADo unA veZ Que Los esTAnTes y LAs PuerTAs HAyAn sIDo
InsTALADos yA Que esTo PoDrÍA DesesTABILIZAr y HACer CAer Los esTAnTes y oTros eLeMenTos.
!
eL MueBLe DeBe esTAr uBICADo en unA suPerFICIe PLAnA, sÓLIDA y nIveLADA CuAnDo se Lo esTé uTILIZAnDo.
!
no InCLIne eL TeLevIsor CuAnDo esTé en eL soPorTe PArA Tv.
!
no se suBA nI se PAre soBre eL soPorTe.
!
no GoLPee Los esTAnTes nI se APoye Con su Peso soBre eL MIsMo.
Международная корпорация Bell’O Bell’O International Corp. не несет ответственность за неспособность выполнить сборку в соответствии
с предоставленными инструкциями, за неправильную сборку и за неправильное использование или обращение с подставкой.
ДЛЯ ВАШЕЙ БЕЗОПАСНОСТИ ВЫПОЛНЯЙТЕ СЛЕДУЮЩИЕ МЕРЫ ПРЕДОСТОРОЖНОСТИ:
! НЕ ПОМЕЩАЙТЕ НА ПОЛКАХ ПРЕДМЕТЫ, ВЕС КОТОРЫХ ПРЕВЫШАЕТ МАКСИМАЛЬНЫЙ ПРЕДЕЛ
150 ФУНТОВ (68 КГ) НА ВЕРХНЕЙ ПОЛКЕ И 35 ФУНТОВ (16 КГ) НА КАЖДОЙ ИЗ ВНУТРЕННИХ ПОЛОК.
!
ПРЕЖДЕ ЧЕМ ПЕРЕМЕЩАТЬ СОБРАННУЮ ПОДСТАВКУ, ОБЯЗАТЕЛЬНО УБЕРИТЕ С НЕЕ ТЕЛЕВИЗОР И ДРУГОЕ
ОБОРУДОВАНИЕ.
!
БУДЬТЕ ОСТОРОЖНЫ ПРИ ПЕРЕМЕЩЕНИИ СОБРАННОЙ ПОДСТАВКИ ПОСЛЕ ТОГО, КАК УСТАНОВЛЕНЫ ПОЛКИ И
ДВЕРЦЫ, ТАК КАК ЭТО МОЖЕТ ПРИВЕСТИ К ПАДЕНИЮ ПОЛОК И ДРУГИХ ПРЕДМЕТОВ.
!
ПРИ ЭКСПЛУАТАЦИИ ПОДСТАВКА ДОЛЖНА СТОЯТЬ НА ПЛОСКОЙ, ТВЕРДОЙ, ГОРИЗОНТАЛЬНОЙ ПОВЕРХНОСТИ.
!
НЕ ОПИРАЙТЕСЬ НА ЭКРАН ТЕЛЕВИЗОРА, КОГДА ОН СТОИТ НА ТЕЛЕВИЗИОННОЙ ПОДСТАВКЕ.
!
НЕ ЗАБИРАЙТЕСЬ И НЕ ВСТАВАЙТЕ НА ПОДСТАВКУ.
!
НЕ СТУЧИТЕ И НЕ ОПИРАЙТЕСЬ СВОИМ СОБСТВЕННЫМ ВЕСОМ НА ПОЛКИ.
2
#
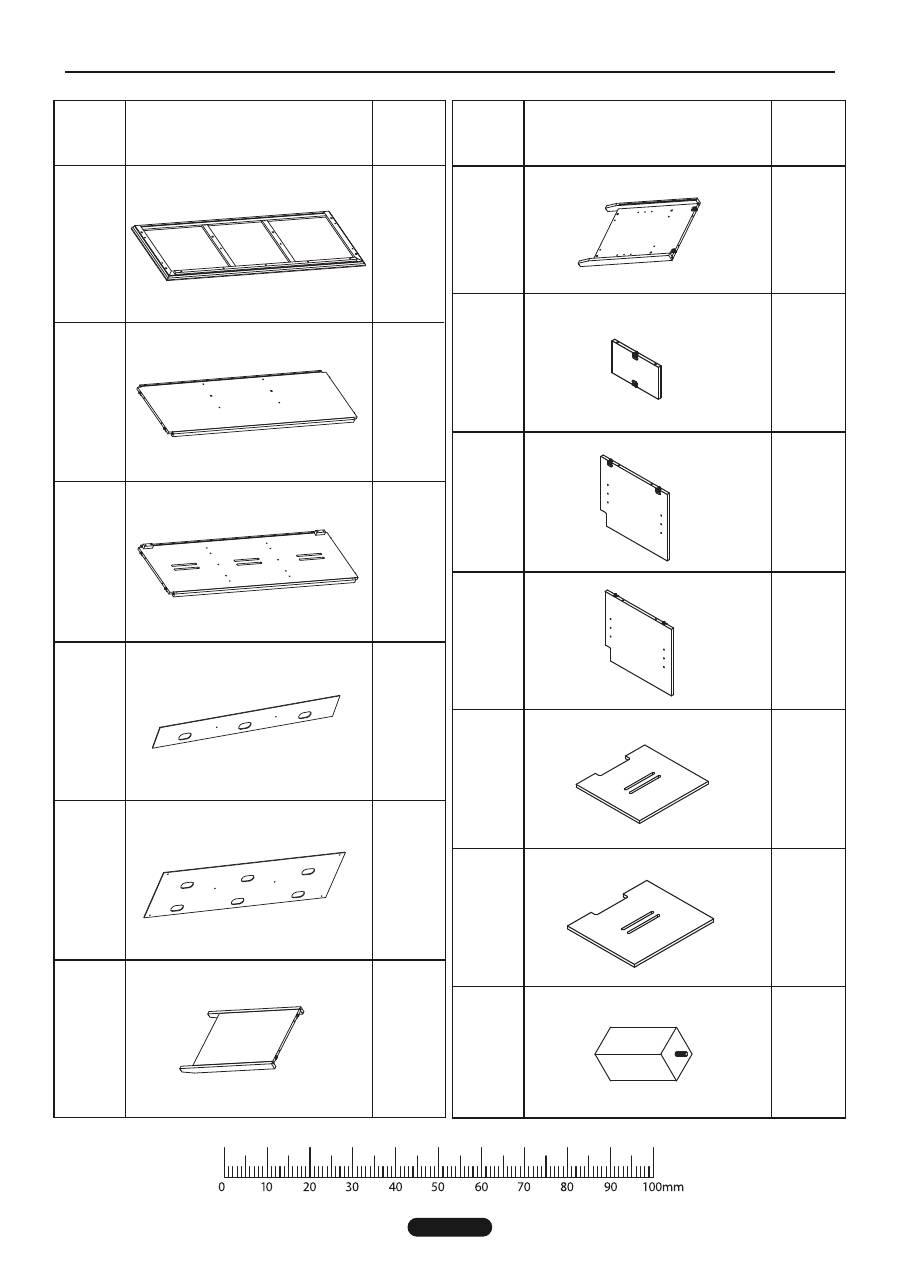
JD1
JD2
JD3
JD4
JD5
JD6
1
1
1
1
1
1
quantity
quantité
cantidad
Количество
part / pièce / pieza / Деталь
pArts lIst / nomenclAture Des pIÈces / lIstA De pIeZAs / ПЕРЕЧЕНЬ ДЕТАЛЕЙ
#
JD7
JD8
JD9
JD10
JD11
JD12
JD13
2
1
2
1
2
1
1
quantity
quantité
cantidad
Количество
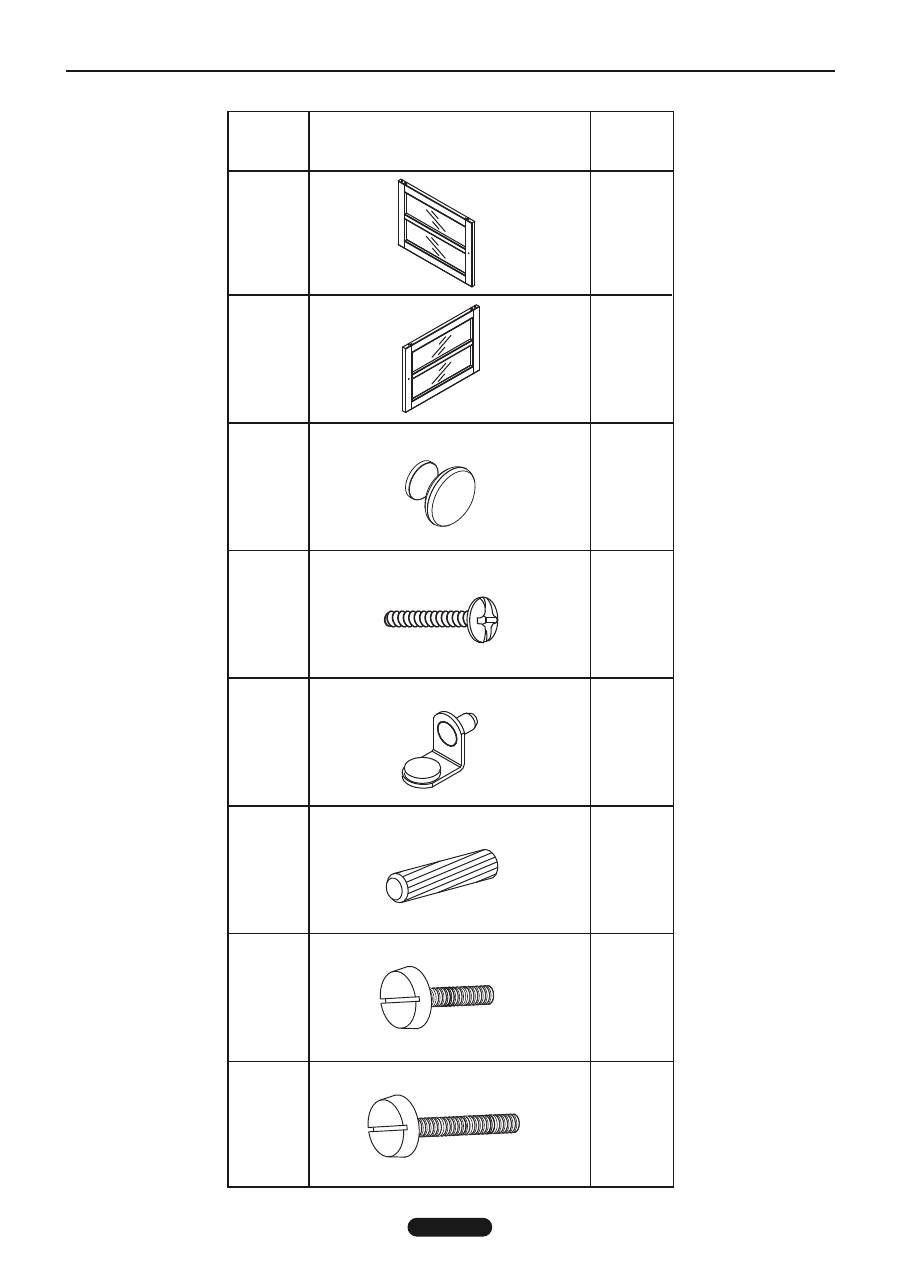
part / pièce / pieza / Деталь
3
#
JD14
JD15
JD16
JD17
JD18
JD19
JD20
JD21
8
4
28
2
2
1
12
1
quantity
quantité
cantidad
Количество
part / pièce / pieza / Деталь
pArts lIst / nomenclAture Des pIÈces / lIstA De pIeZAs / ПЕРЕЧЕНЬ ДЕТАЛЕЙ
30 mm
4
21 mm
Assembly InstructIons / InstructIons D'AssemblAGe InstruccIones De ensAmblAJe / ИНСТРУКЦИЯ ПО СБОРКЕ
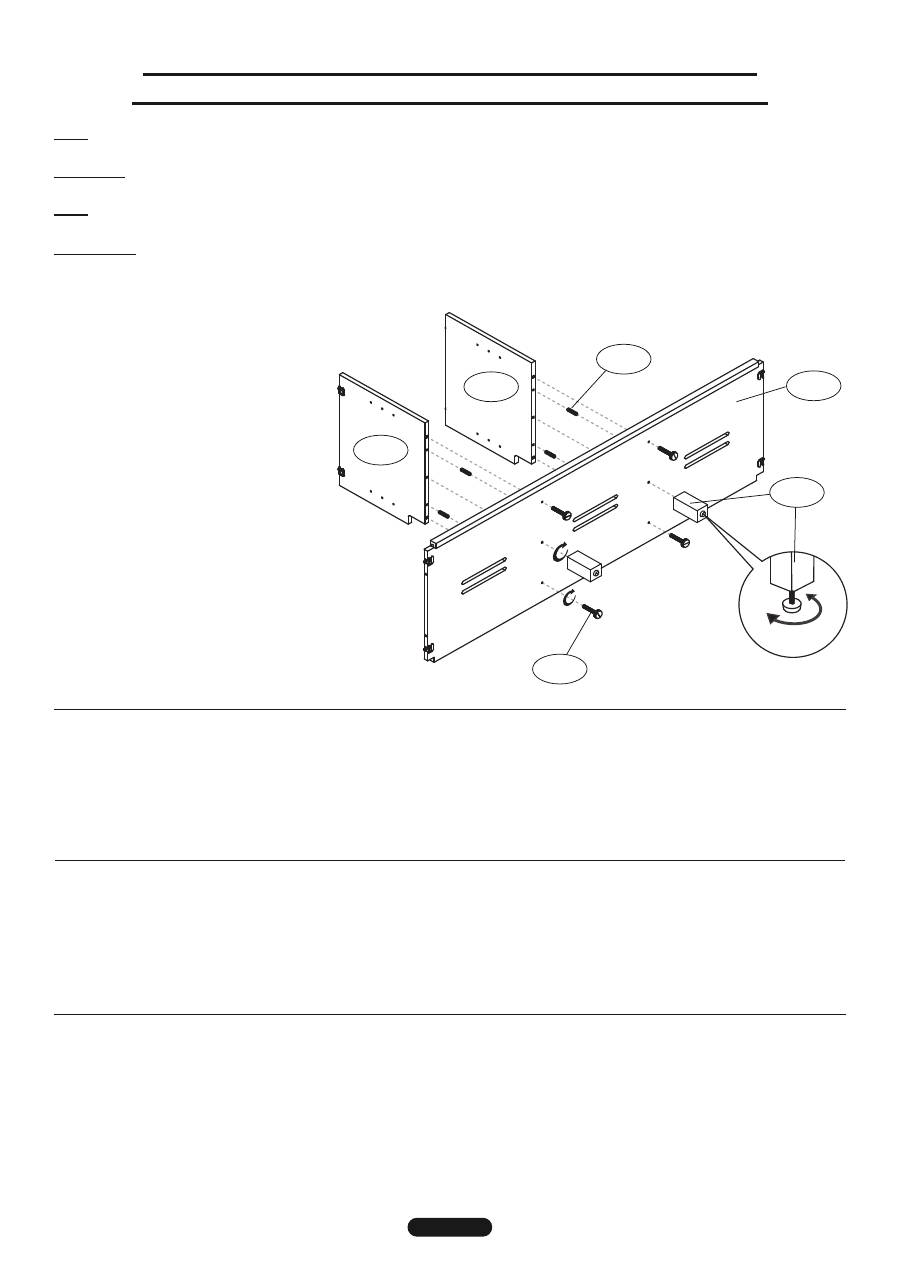
fig. 1
JD9
JD10
JD3
JD19
JD13
JD21
1. on a soft, flat surface,
AttAch
two Center Divider Panels (JD9,
JD10) to the Bottom Panel (JD3)
using four Wood Dowels (JD19) as
shown above.
secure
the Divider
Panels to the Bottom Panel using
four Long Thumbscrews (JD21).
tIGhten
Thumbscrews fully.
2.
screW
two Center support Posts
(JD13) into the pre-threaded holes
in the bottom of the Bottom Panel
(JD3).
tIGhten
fully by hand, but
be careful not to overtighten.
NOTE (!): The Center Support
Posts have Adjustable Leveling
feet to ensure the center of the
cabinet is properly supported
once assembled and in use.
TURN the Leveling feet to
adjust.
note:
2 PeoPLe Are reCoMMenDeD To AsseMBLe THIs FurnITure. To AvoID DAMAGe DurInG AsseMBLy, IT sHouLD Be AsseMBLeD on A
soFT surFACe.
remArque :
IL esT ConseILLé D’ÊTre À DeuX Pour AsseMBLer Ce MeuBLe. Pour évITer Les DoMMAGes, eFFeCTuer L'AsseMBLAGe sur
une surFACe DouCe.
notA:
es reCoMenDABLe ensAMBLAr esTe MueBLe enTre Dos PersonAs. PArA evITAr DAÑos DurAnTe eL ensAMBLAJe, ésTe DeBerÁ
reALIZArse soBre unA suPerFICIe suAve.
ПРИМЕЧАНИЕ:
РЕКОМЕНДУЕТСЯ, ЧТОБЫ СБОРКУ ВЫПОЛНЯЛИ 2 ЧЕЛОВЕКА. ОСУЩЕСТВЛЯТЬ СБОРКУ СЛЕДУЕТ НА МЯГКОЙ ПОВЕРХНОСТИ,
ЧТОБЫ ИЗБЕЖАТЬ ПОВРЕЖДЕНИЙ ВО ВРЕМЯ СБОРКИ.
1. sur une surface plate et douce,
AttAcher
deux cloisons centrales (JD9, JD10) au panneau inférieur (JD3) à l’aide de quatre chevilles en bois (JD19)
comme sur l’illustration ci-dessus.
fIxer
les cloisons au panneau inférieur à l’aide de quatre longues vis à main (JD21).
serrer
complètement les vis
à main.
2.
VIsser
les deux pieds centraux (JD13) dans les trous pré-taraudés sur le dessous du panneau inférieur (JD3).
serrer
complètement à la
main, mais sans forcer.
REMARQUE (!) : Les pieds centraux comportent un tampon de niveau réglable pour assurer que le centre du
meuble est correctement soutenu une fois qu’il est assemblé et utilisé. TOURNER les tampons de niveau pour les ajuster.
1. sobre una superficie suave y plana,
fIJe
los dos paneles divisores centrales (JD9, JD10) al panel inferior (JD3) utilizando cuatro clavijas de
madera (JD19), tal como se muestra arriba.
AseGure
los paneles divisores al panel inferior con cuatro tornillos de mano largos (JD21).
AprIete
los tornillos de mano por completo.
2.
AtornIlle
los dos soportes centrales (JD13) en los orificios pretaladrados en la parte central inferior del panel inferior (JD3).
AprIete
por
completo a mano, pero tenga cuidado de no apretarlos demasiado.
NOTA (¡!): Los soportes centrales tienen patas niveladoras ajustables
para asegurar que el centro del gabinete esté soportado correctamente una vez que esté ensamblado y en uso. GÍRELAS para ajustar.
1.
ПРИКРЕПИТЕ
две центральные разделительные панели (JD9, JD10) к нижней панели (JD3), используя четыре деревянных шипа (JD19),
как показано на рисунке выше; сборку нужно делать на мягкой горизонтальной поверхности.
ЗАКРЕПИТЕ
разделительные панели на
нижней панели, используя четыре длинных винта с головкой для закручивания вручную (JD21). Полностью
ЗАТЯНИТЕ
эти винты.
2.
ВВИНТИТЕ
две центральные опорные стойки (JD13) в готовые резьбовые отверстия в нижней части нижней панели (JD3).
Полностью
ЗАТЯНИТЕ
вручную; будьте осторожны, не затягивайте слишком сильно.
ПРИМЕЧАНИЕ (!). У центральных опорных
стоек имеются регулировочные винты для выравнивания, с помощью которых центр тумбочки будет надежно
поддерживаться после сборки и при эксплуатации. ПОВЕРНИТЕ эти винты для выравнивания, чтобы отрегулировать
положение тумбочки
.
!
5
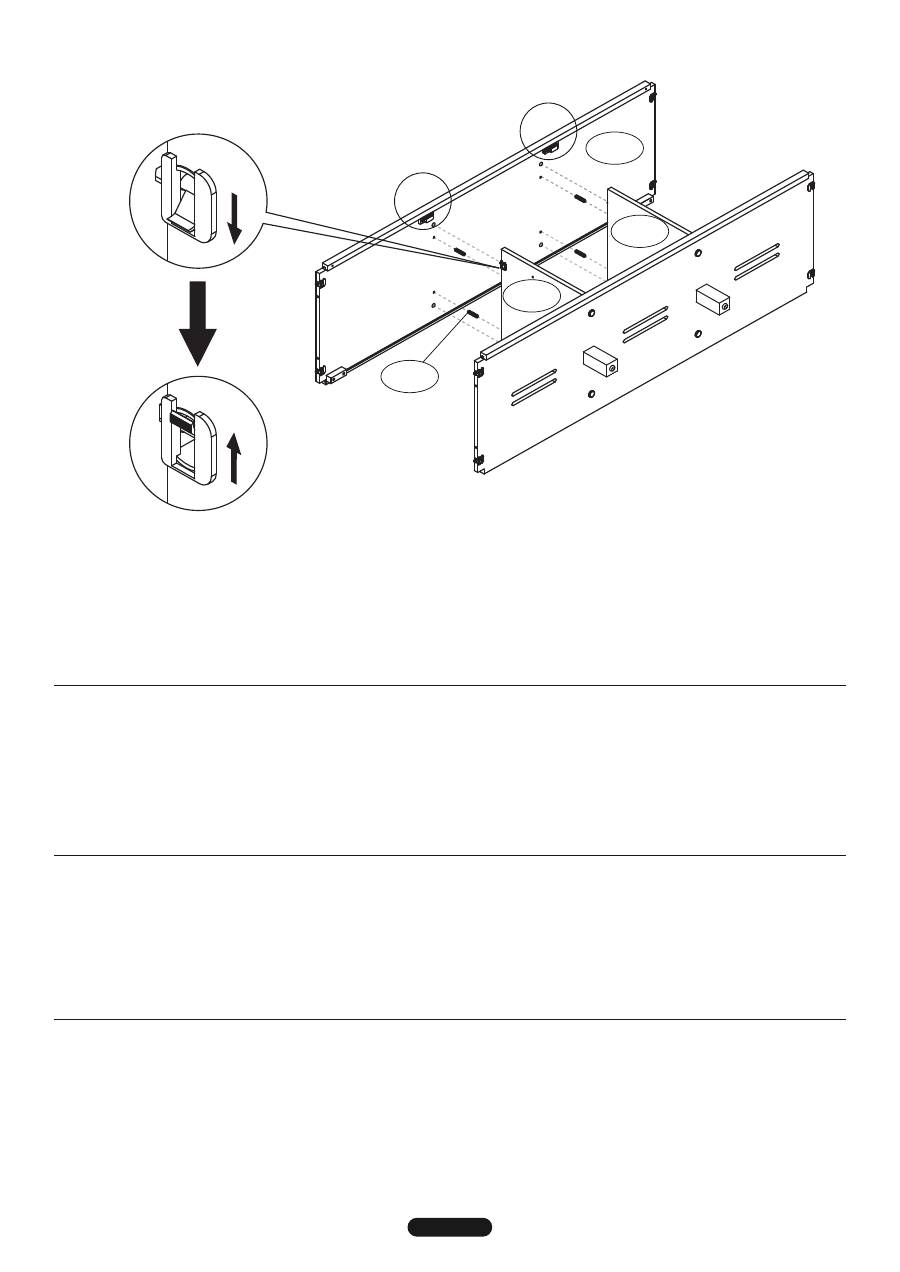
fig. 2
fig. 2A
fig. 2b
JD2
JD9
JD10
JD19
3.
AttAch
the Middle Interior shelf (JD2) to the Center Divider Panels (JD9, JD10) using four Wood Dowels (JD19) as shown
above.
secure
the Middle Interior shelf to the Divider Panels by flipping the four Locking Mechanisms in the Divider Panels as
shown in Figs 2A and 2B.
NOTE (!) : you MAy need to flip the Locking Mechanisms first to correctly position the Locking
Posts in order to get the Interior Shelf to fit properly onto the Divider Panels.
NOTE (!): Note the position of the magnets on the Middle Interior Shelf (JD2) - make sure the Interior Shelf is positioned as
shown above.
!
3.
AttAcher
le plateau intérieur du milieu (JD2) aux cloisons centrales (JD9, JD10) à l’aide de quatre chevilles en bois (JD19)
comme sur l’illustration ci-dessus.
fIxer
le plateau intérieur du milieu aux cloisons en basculant les quatre mécanismes de
verrouillage des cloisons comme sur les Fig. 2A et 2B.
REMARQUE (!) : Il PEUT être nécessaire de basculer les
mécanismes de verrouillage une première fois pour mettre les taquets de verrouillage en position correcte afin de
pouvoir engager le plateau intérieur comme il se doit sur les cloisons centrales.
REMARQUE (!) : Noter la position des aimants sur le plateau intérieur du milieu (JD2) - s’assurer que le plateau intérieur
est placé comme sur l’illustration ci-dessus.
3.
fIJe
el estante interior central (JD2) a los paneles divisores centrales (JD9, JD10) utilizando cuatro clavijas de madera (JD19),
tal como se muestra arriba.
AseGure
el estante interior central a los paneles divisores girando los cuatro mecanismos de
bloqueo en los paneles divisores, tal como se muestra en las figuras 2A y 2B.
NOTA (¡!): ES POSIBLE que tenga que girar los
mecanismos de bloqueo primero para ubicar correctamente los soportes de bloqueo y lograr que el estante interior
calce correctamente en los paneles divisores.
NOTA (¡!): Tenga en cuenta la posición de los imanes del estante interior central (JD2) y asegúrese de que el estante
interior esté ubicado tal como se muestra arriba.
3.
ПРИКРЕПИТЕ
среднюю внутреннюю полку (JD2) к центральным разделительным панелям (JD9, JD10), используя
четыре деревянных шипа (JD19), как показано на рисунке выше.
ЗАКРЕПИТЕ
среднюю внутреннюю полку на
разделительных панелях, защелкнув четыре фиксирующих механизма на разделительных панелях, как показано на
Рис. 2А и 2В.
ПРИМЕЧАНИЕ (!). МОЖЕТ СЛУЧИТЬСЯ, что вам понадобится сначала «перевернуть»
фиксирующие механизмы для правильной установки фиксирующих держателей, чтобы внутренняя полка
надлежащим образом вошла в разделительные панели.
ПРИМЕЧАНИЕ (!). Обратите внимание на положение магнитов на средней внутренней полке (JD2) –
проверьте, чтобы внутренняя полка была установлена в точности как показано на рисунке выше.
! ! !
6
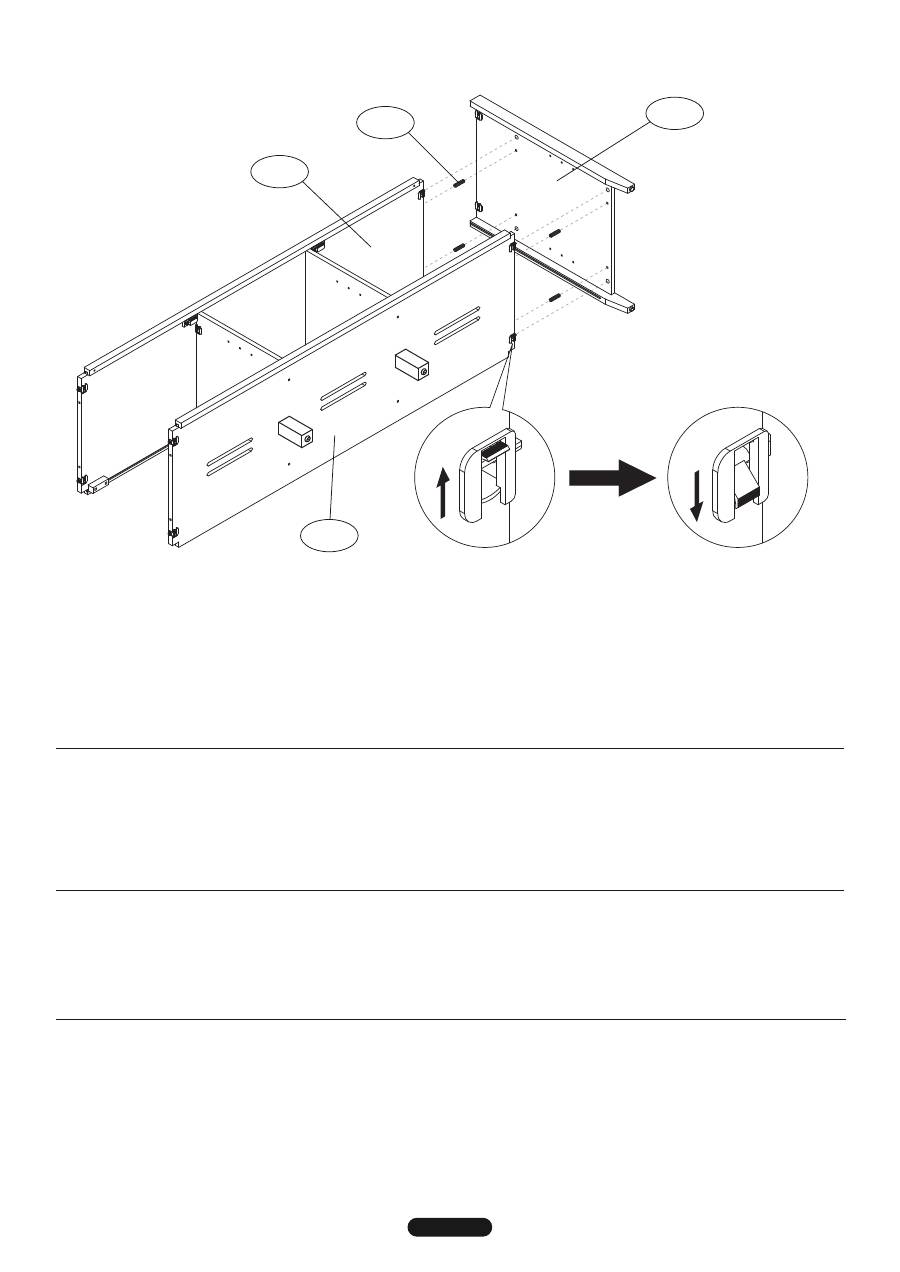
fig. 3
fig. 3A
fig. 3b
JD19
JD7
JD3
JD2
4.
AttAch
the right side Panel (JD7) as shown above. use four Wood Dowels (JD19) as shown.
5.
secure
the side Panel (JD7) by flipping the Locking Mechanisms on the underside of the Bottom shelf (JD3), and the Locking
Mechanisms on the underside of the Middle Interior shelf (JD2) as shown in Figs 3A and 3B.
4.
AttAcher
le panneau latéral droit (JD7) comme sur l’illustration ci-dessus. utiliser quatre chevilles en bois (JD19) comme sur
l’illustration ci-dessus.
5.
fIxer
le panneau latéral (JD7) en basculant les mécanismes de verrouillage sur le dessous du panneau inférieur (JD3) et les
mécanismes de verrouillage sur le dessous du plateau intérieur du milieu (JD2) comme sur les Fig. 3A et 3B.
4.
fIJe
el panel lateral derecho (JD7) tal como se muestra arriba. utilice cuatro clavijas de madera (JD19), tal como se muestra,.
5.
AseGure
el panel lateral (JD7) girando los mecanismos de bloqueo del lado de abajo del estante inferior (JD3) y los
mecanismos de bloqueo del lado de abajo del estante interior central (JD2), tal como se muestra en las figuras 3A y 3B.
4.
ПРИКРЕПИТЕ
панель правильной позиции (JD7), как показано на рисунке выше. Используйте четыре
деревянных шипа (JD19), как показано на рисунке.
5.
ЗАКРЕПИТЕ
панель правильной позиции (JD7), защелкнув фиксирующих механизма на нижней поверхности нижней
полки (JD3), а также фиксирующих механизма на нижней поверхности средней внутренней полки (JD2), как
показано на Рис. 3А и 3В.
7
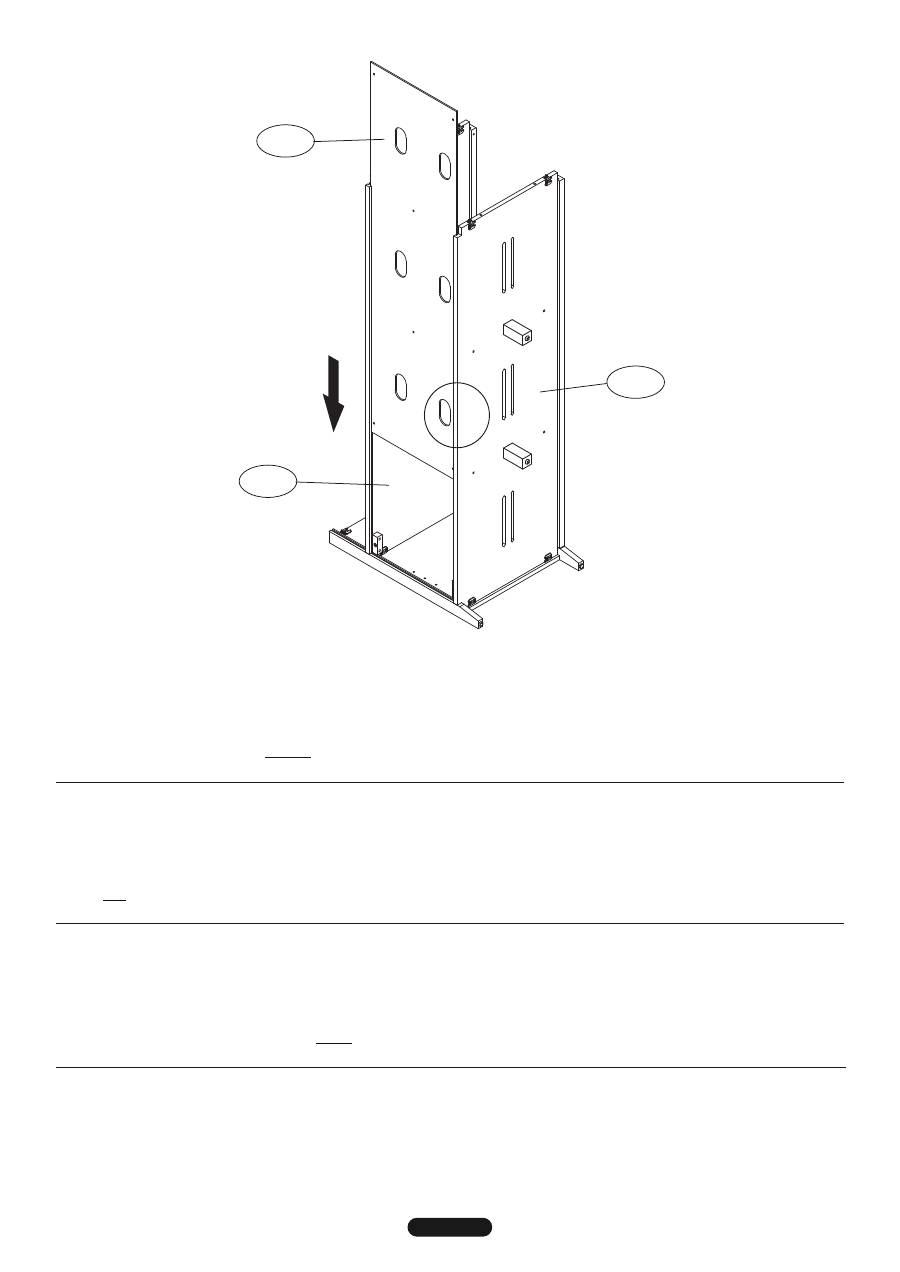
fig. 4
JD2
JD3
JD5
6.
turn
the cabinet upright with the help of an assistant. Carefully
slIDe
the Lower Back Panel (JD5) into the grooves in the
Bottom Panel (JD3) and the Middle Interior shelf (JD2).
Make sure the Lower Back Panel is completely and properly in
place before continuing.
NOTE (!): Note the position of the Cable Management holes in the Lower Back Panel (JD5) - make sure they are
positioned toward the bottom of the cabinet.
6.
tourner
le meuble à l’endroit avec l’aide d’une autre personne.
enfIler
avec précaution le panneau arrière inférieur (JD5)
dans les rainures du panneau inférieur (JD3) et du plateau intérieur du milieu (JD2).
S’assurer que le panneau arrière
inférieur est correctement et complètement en place avant de poursuivre.
REMARQUE (!) : Noter la position des trous passe-fil dans le panneau arrière inférieur (JD5) - s’assurer qu’il sont placés
vers le bas.
6.
Con la ayuda de otra persona,
GIre
el armario a su posición vertical.
DeslIce
con cuidado el panel trasero inferior (JD5) en
las ranuras del panel inferior (JD3) y del estante interior central (JD2).
Asegúrese de que el panel trasero inferior esté
insertado por completo y correctamente antes de seguir.
NOTA (¡!): Tenga en cuenta la posición de los orificios para la administración de cables en el panel trasero inferior (JD5) y
asegúrese de que estén ubicados hacia abajo.
6.
ПЕРЕВЕРНИТЕ
тумбу и поставьте ее на ножки с помощью помощника.
ВДВИНЬТЕ
нижнюю заднюю панель (JD5) в
канавки на нижней панели (JD3) и на средней внутренней полке (JD2).
Прежде чем продолжать, убедитесь, что
нижняя задняя панель установлена надлежащим образом.
ПРИМЕЧАНИЕ (!). Обратите внимание на положение отверстий системы укладки кабелей на нижней задней
панели (JD5) – убедитесь, что они «смотрят вниз».
!
8
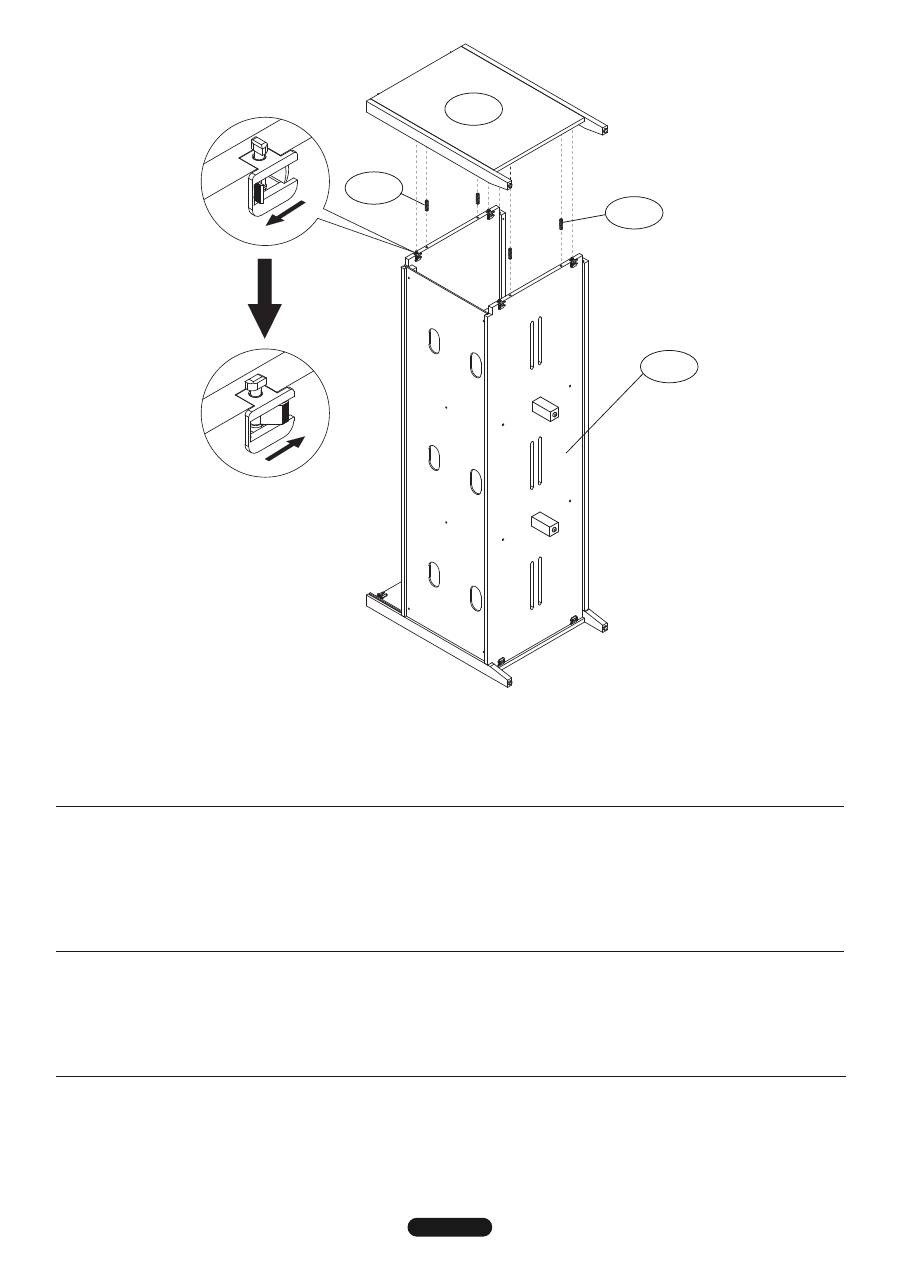
fig. 5
fig. 5A
fig. 5b
JD6
JD19
JD19
JD3
7.
AttAch
the Left side Panel (JD6) as shown above. use four Wood Dowels (JD19) as shown.
8.
secure
the side Panel (JD6) by flipping the two Locking Mechanisms on the underside of the Bottom shelf (JD3),
and the two Locking Mechanisms on the underside of the Middle Interior shelf (JD2) as shown in Figs 5A and 5B.
7.
AttAcher
le panneau latéral gauche (JD6) comme sur l’illustration ci-dessus. utiliser quatre chevilles en bois (JD19) comme
sur l’illustration.
8.
fIxer
le panneau latéral (JD6) en basculant les deux mécanismes de verrouillage sur le dessous du panneau inférieur (JD3) et
les deux mécanismes de verrouillage sur le dessous du plateau intérieur du milieu (JD2) comme sur les
Fig. 5A et 5B.
7.
fIJe
el panel lateral izquierdo (JD6) tal como se muestra arriba. utilice cuatro clavijas de madera (JD19), tal como se
muestra.
8.
AseGure
el panel lateral (JD6) girando los dos mecanismos de bloqueo del lado de abajo del estante inferior (JD3) y los dos
mecanismos de bloqueo del lado de abajo del estante interior central (JD2), tal como se muestra en las figuras 5A y 5B.
7.
ПРИКРЕПИТЕ
левая бортовая панель (JD6), как показано на рисунке выше. Используйте четыре деревянных шипа
(JD19), как показано на рисунке.
8.
ЗАКРЕПИТЕ
левая бортовая панель (JD6), защелкнув два фиксирующих механизма на нижней поверхности
нижней полки (JD3), а также два фиксирующих механизма на нижней поверхности средней внутренней полки (JD2), как
показано на Рис. 5А и 5В.
9
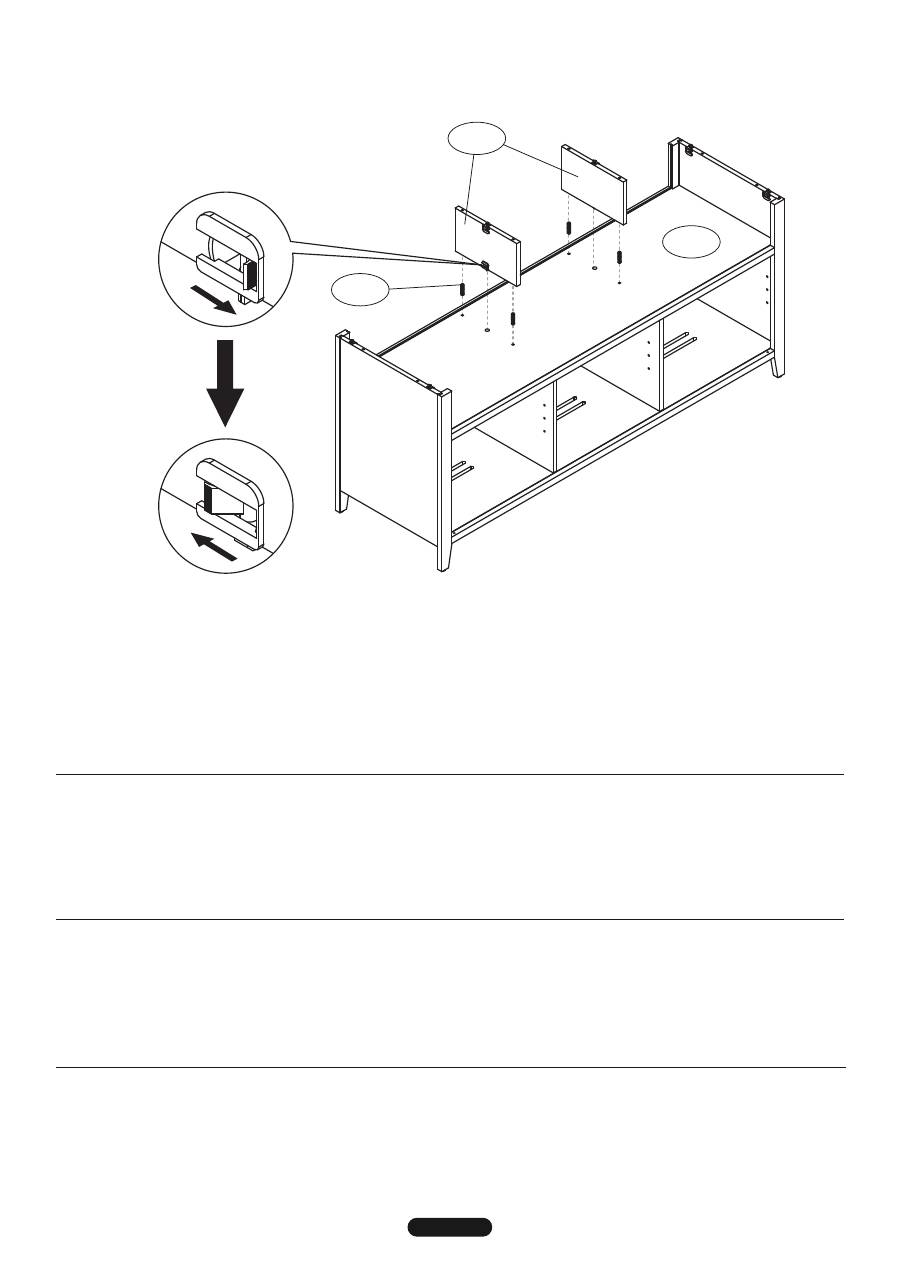
fig. 6
fig. 6A
fig. 6b
JD8
JD19
JD2
9.
AttAch
two Top shelf support Dividers (JD8) to the Middle Interior shelf (JD2) using four Wood Dowels (JD19) as shown.
secure
the support Dividers to the Interior shelf by flipping the two Locking Mechanisms as shown in Figs 6A and 6B.
9.
AttAcher
les deux cloisons de support de plateau supérieur (JD8) au plateau intérieur du milieu (JD2) à l’aide de quatre
chevilles en bois (JD19) comme sur l’illustration.
fIxer
les cloisons de support au plateau intérieur en basculant les
mécanismes de verrouillage comme sur les Fig. 6A et 6B.
9.
fIJe
los dos divisores de soporte del estante superior (JD8) al estante interior central (JD2) utilizando cuatro clavijas de madera
(JD19), tal como se muestra.
AseGure
los divisores de soporte al estante interior girando los dos mecanismos de bloqueo,
tal como se muestra en las figuras 6A y 6B.
9.
ПРИКРЕПИТЕ
два поддерживающих верхнюю полку разделителя (JD8) к средней внутренней полке (JD2), используя
четыре деревянных шипа (JD19), как показано на рисунке.
ЗАКРЕПИТЕ
поддерживающие разделители на внутренней
полке, защелкнув два фиксирующих механизма, как показано на Рис. 6А и 6В.
10
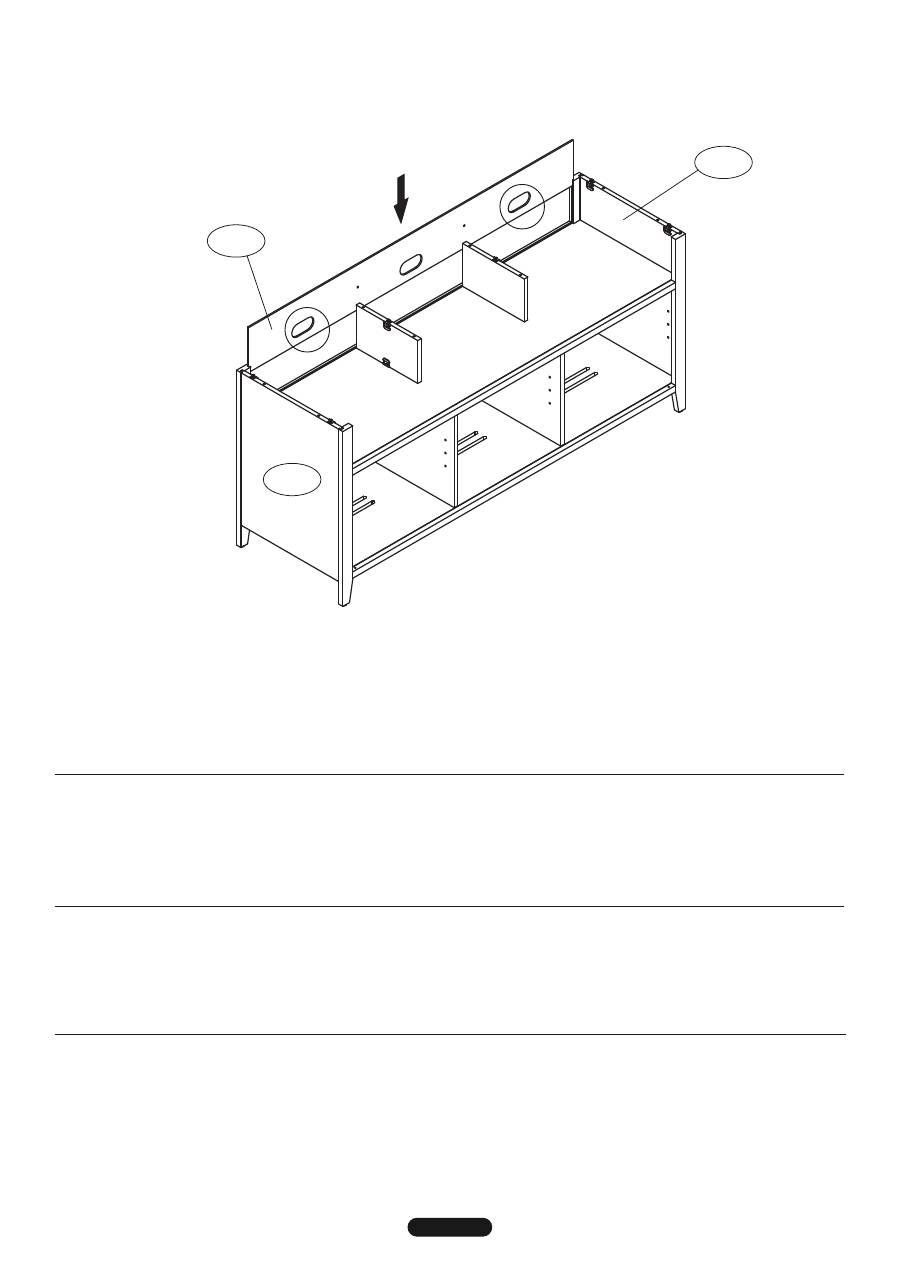
fig. 7
JD6
JD7
JD4
10.
slIDe
the upper Back Panel (JD4) down into the grooves in the Left and right side Panels (JD6, JD7) as shown.
NOTE (!): Make sure you position the Upper Back Panel with the Cable Management holes DOwN.
!
!
10.
enfIler
le panneau arrière supérieur (JD4) vers le bas dans les rainures des panneaux latéraux gauche et droit
(JD6, JD7) comme sur l’illustration.
REMARQUE (!) : Veiller à bien placer le panneau arrière supérieur avec les trous
passe-fil en BAS.
10.
DeslIce
el panel trasero superior (JD4) en las ranuras de los paneles laterales izquierdo y derecho (JD6, JD7), tal como se
muestra.
NOTA (¡!): Asegúrese de ubicar el panel trasero superior con los orificios de administración de cables hACIA
ABAJO.
10. Верхнюю заднюю панель (JD4)
ВДВИНЬТЕ
вниз в канавки на левой и правой боковых панелях (JD6, JD7), как
показано на рисунке.
ПРИМЕЧАНИЕ (!). Убедитесь, что вы установили верхнюю заднюю панель так, чтобы
отверстия системы укладки кабелей находились ВНИЗУ.
11

fig. 8
fig. 8A
fig. 8b
JD1
JD19
JD8
JD6
JD7
JD19
11. With the help of an assistant, carefully
plAce
the Top shelf (JD1) onto the cabinet assembly.
Insert
four Wood Dowels (JD19) into the
pre-drilled holes in the top edges of the Left and right side Panels (JD6, JD7), and four more Wood Dowels into the Top shelf support Dividers
(JD8) as shown.
NOTE (!) : you MAy need to flip the Locking Mechanisms first to correctly position the Locking Posts in order to get the
Top Shelf to fit properly onto the cabinet.
12. Make sure the Top shelf (JD1) is properly in position, and then
secure
the Top shelf by flipping the four Locking Mechanisms in the Left and
right side Panels (JD6, JD7), and also the two Locking Mechanisms in the Top shelf support Dividers (JD8) as shown in Figs 8A and 8B.
! !
11. Avec l’aide d’une autre personne,
poser
le plateau supérieur (JD1) avec précaution sur le meuble assemblé.
IntroDuIre
quatre chevilles
en bois (JD19) dans les trous prépercés du bord supérieur des panneaux latéraux gauche et droit (JD6, JD7) et deux chevilles en bois
supplémentaires dans la cloison de support de plateau supérieur (JD8) comme sur l’illustration.
REMARQUE (!) : Il PEUT être nécessaire de
basculer les mécanismes de verrouillage une première fois pour mettre les taquets de verrouillage en position correcte afin de
pouvoir engager le plateau supérieur comme il se doit sur le meuble.
12. s’assurer que le plateau supérieur (JD1) est en position correcte puis
fIxer
le plateau supérieur (JD1) en basculant les quatre
mécanismes de verrouillage des panneaux latéraux gauche et droit (JD6, JD7), ainsi que les deux mécanismes de verrouillage des cloisons
de support de plateau supérieur (JD8) comme sur les Fig. 8A et 8B.
11. Con la ayuda de un asistente,
coloque
con cuidado el estante superior (JD1) sobre el gabinete ensamblado.
Inserte
cuatro clavijas de
madera (JD19) en los orificios pretaladrados de los bordes superiores de los paneles laterales izquierdo y derecho (JD6, JD7) y cuatro
clavijas de madera más en los divisores de soporte del estante superior (JD8), tal como se muestra.
NOTA (¡!): ES POSIBLE que tenga que
girar los mecanismos de bloqueo primero para ubicar correctamente los soportes de bloqueo y lograr que el estante superior calce
correctamente en el gabinete.
12. Asegúrese de que el estante superior (JD1) esté colocado correctamente y luego
AseGÚrelo
girando los cuatro mecanismos de bloqueo de
los paneles laterales izquierdo y derecho (JD6, JD7) y también los dos mecanismos de bloqueo de los divisores de soporte del estante
superior (JD8), tal como se muestra en las figuras 8A y 8B.
11. Вместе с помощником осторожно
ПОМЕСТИТЕ
верхнюю полку (JD1) на собранную тумбочку.
ВСТАВЬТЕ
четыре деревянных шипа
(JD19) в уже просверленные отверстия в верхних кромках левой и правой боковых панелей (JD6, JD7) и еще четыре деревянных шипа
в поддерживающие верхнюю полку разделители (JD8), как показано на рисунке.
ПРИМЕЧАНИЕ (!). МОЖЕТ СЛУЧИТЬСЯ, что вам
понадобится сначала «перевернуть» фиксирующие механизмы для правильной установки фиксирующих держателей,
чтобы верхняя полка была надлежащим образом установлена на тумбочке.
12. Убедитесь, что верхняя полка (JD1) установлена правильно, а затем
ЗАКРЕПИТЕ
верхнюю полку (JD1), защелкнув четыре
фиксирующих механизма на левой и правой боковых панелях (JD6, JD7), а также два фиксирующих механизма на поддерживающих
верхнюю полку разделителях (JD8), как показано на Рис. 8А и 8В.
12
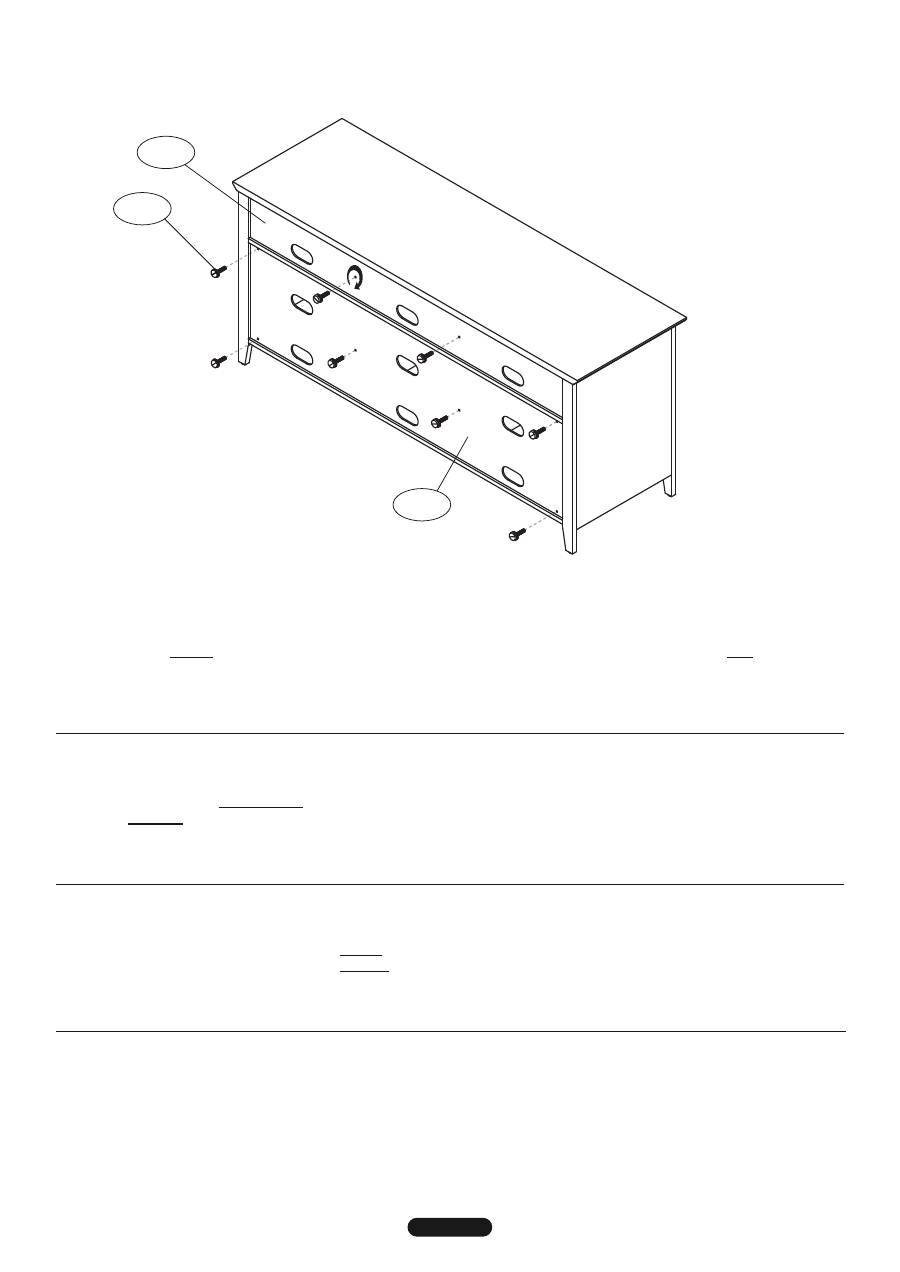
fig. 9
JD20
JD4
JD5
13.
secure
the upper and Lower Back Panels (JD4, JD5) to the cabinet assembly using eight short Thumbscrews (JD20) as
shown above.
NOTE: To ensure that all the Thumbscrews are properly aligned with each hole, insert ALL the
Thumbscrews only half way before attempting to fully tighten.
once all are in place,
tIGhten
each Thumbscrew
completely by hand (be careful not to overtighten!).
13.
fIxer
les panneaux arrière supérieur et inférieur (JD4, JD5) au meuble à l’aide de huit vis à main courtes (JD20) comme sur
l’illustration ci-dessus.
REMARQUE: Pour vous assurer que toutes les vis à main sont bien alignés avec chaque trou,
insérer TOUTES les vis seulement à mi-chemin avant d'essayer de serrer.
serrer
chaque vis à main complètement à la
main (sans forcer!)
.
13.
AseGure
los paneles traseros superior e inferior (JD4, JD5) al gabinete ensamblado utilizando ocho tornillos de mano
cortos (JD20), tal como se muestra arriba.
NOTA: Para asegurarse de que todos los tornillos de mano estén alineados
correctamente con cada
orificio
, inserte TODOS los tornillos sólo hasta la mitad antes de intentar apretar.
AprIete
cada tornillo por completo con la mano (tenga cuidado de no apretarlos demasiado)
.
13.
ЗАКРЕПИТЕ
верхнюю и нижнюю задние панели (JD4, JD5) на собранной тумбочке, используя восемь коротких
винтов с головкой для закручивания вручную (JD20), как показано на рисунке выше.
ПРИМЕЧАНИЕ: Для того,
чтобы все с накатанной головкой должным образом согласованы с каждого отверстия, вставить все с
накатанной головкой только половина пути, прежде чем пытаться полностью затяните. После того как
все на месте, затяните каждый винт с накатанной головкой полностью вручную (будьте осторожны,
чтобы не перетянуть!).
13
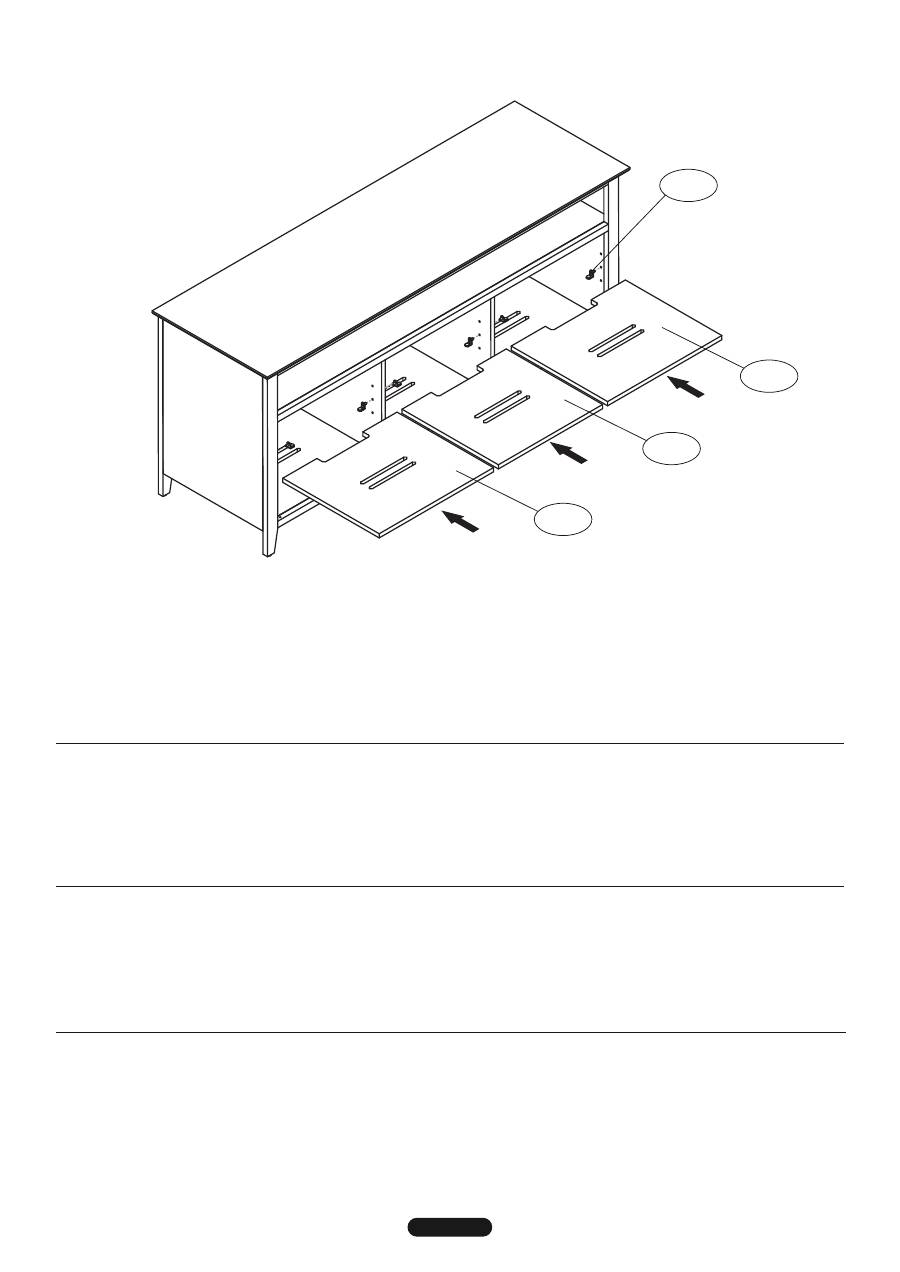
fig. 10
JD11
JD18
JD12
JD11
14.
Insert
twelve shelf support Pins (JD18) into the holes inside the cabinet interior.
Make sure you insert the Shelf Support
Pins into the SAME height position holes so each shelf is LEVEL once in place.
15. Carefully
Insert
each Wood shelf (JD11, JD12) into position as shown.
Make sure each shelf is properly supported on all
four Support Pins (JD18) and level before placing any components on them.
14.
IntroDuIre
douze broches d’appui de plateau (JD18) dans les trous à l’intérieur du meuble.
Veiller à bien placer les
broches d’appui de plateau dans des trous à la MÊME hauteur afin que chaque plateau soit DE NIVEAU une fois en
place.
15. Avec précaution,
mettre
chaque plateau en bois (
JD11, JD12
) en place comme sur l’illustration.
Vérifier que chaque
plateau repose correctement sur les quatre broches d’appuie (JD18) et est de niveau avant d’y poser des appareils.
14.
Inserte
doce pasadores de soporte del estante (JD18) en los orificios ubicados dentro del interior del gabinete.
Asegúrese
de insertarlos en los orificios de posición de la MISMA altura, de modo que cada estante quede NIVELADO.
15. Con cuidado
Inserte
cada estante de Madera (
JD11, JD12
) en su posición, tal como se muestra.
Asegúrese de que cada
estante esté correctamente apoyado sobre los cuatro pasadores de soporte (JD18) y nivelado antes de colocar
componentes encima.
14.
ВСТАВЬТЕ
двенадцать поддерживающих полки штырей (JD18) в отверстия внутри тумбочки.
Убедитесь, что
поддерживающие полки штыри вставлены в отверстия на ОДИНАКОВОЙ высоте, чтобы каждая
установленная полка была в ГОРИЗОНТАЛЬНОМ положении.
15. Осторожно
ВСТАВЬТЕ
каждую деревянную полку (JD11, JD12) на место, как показано на рисунке выше.
Убедитесь,
что каждая полка надежно поддерживается всеми четырьмя поддерживающими штырями (JD18) и что она
находится в горизонтальном положении перед тем, как класть на нее что бы то ни было.
14
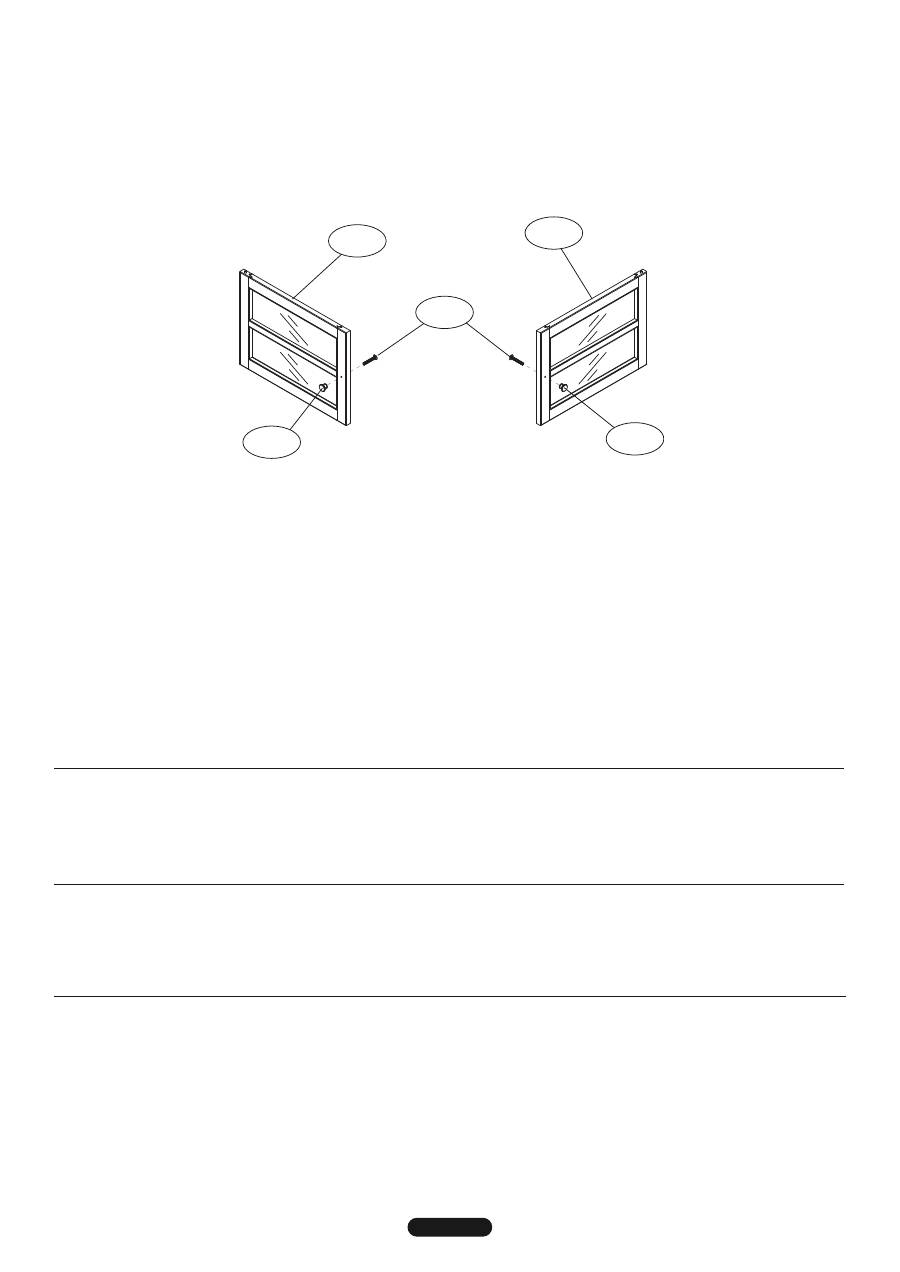
fig. 11
JD14
JD15
JD16
JD16
JD17
16.
AttAch
the Door Knobs (JD16) to the Left and right Doors (JD14, JD15) using 21 mm screws (JD17) as shown.
16.
AttAcher
les boutons de porte (JD16) aux portes gauche et droite (JD14, JD15) à l’aide des vis de 21 mm (JD17) comme
sur l’illustration.
16.
fIJe
las perillas (JD16) a las puertas izquierda y derecha (JD14, JD15) utilizando los tornillos de 21 mm (JD17), tal como se
muestra.
16.
ПРИКРЕПИТЕ
дверные ручки (JD16) к левой и правой дверцам (JD14, JD15), используя 21-мм шурупы (JD17), как
показано на рисунке.
15
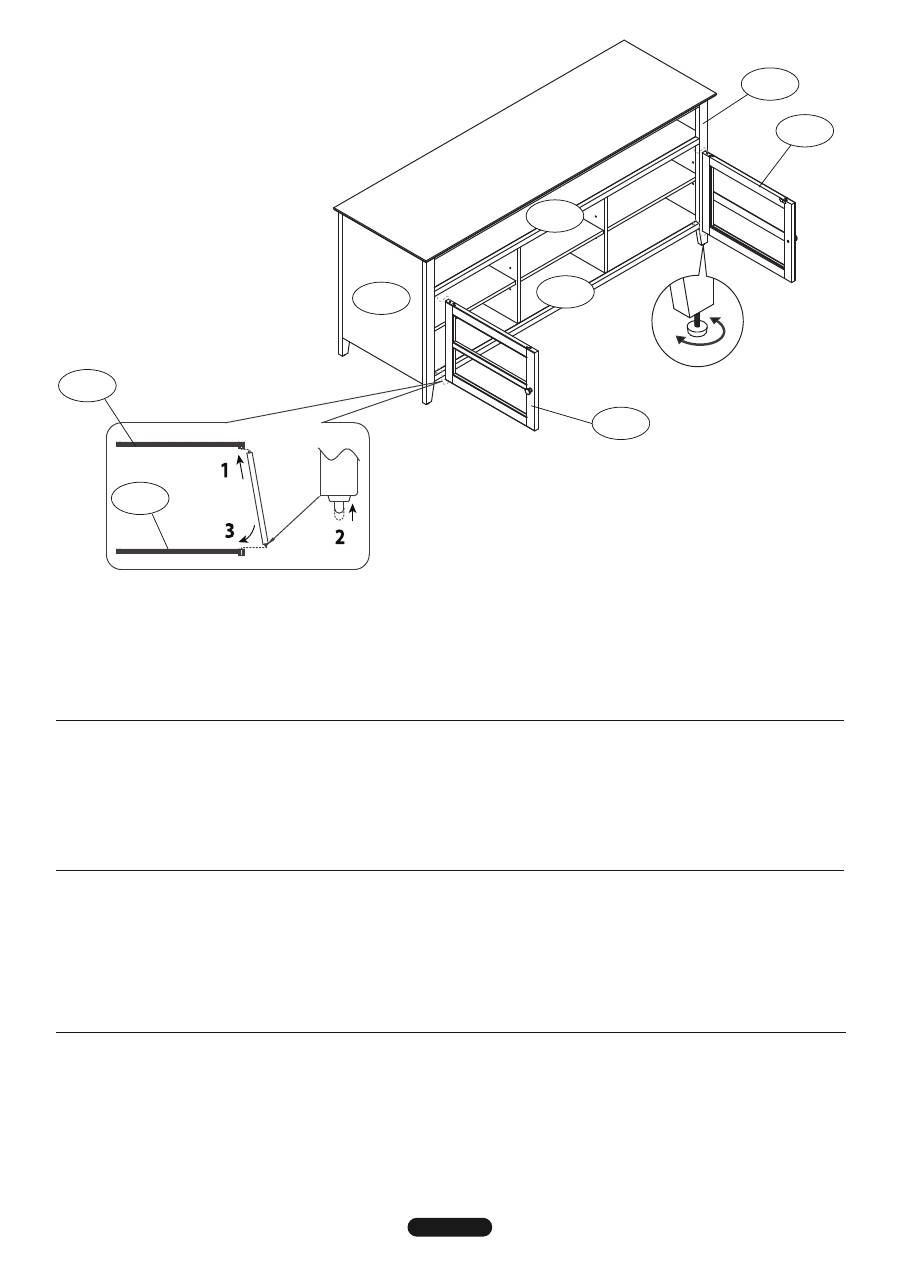
fig. 12
fig. 12A
JD14
JD3
JD15
JD2
JD6
JD7
JD3
17.
InstAll
each Door (JD14, JD15) to the cabinet assembly. First,
Insert
the ToP Pin of the Door into the hole in the underside of the Middle
Interior shelf (JD2), then
push
the BoTToM Pin upward and
sWInG
the bottom portion of the Door into place as shown in Fig 12A. As you
releAse
the Bottom Pin, you should hear it click into place in the hole in the Bottom shelf (JD3). Make sure each Door opens and closes
properly without moving out of place.
NOTE (!): There are Adjustable Leveling feet located under the Legs of the Left and Right Side Panels (JD6, JD7). TURN to adjust the
Leveling feet. A properly leveled cabinet will also level the Doors (JD14, JD15). Make sure cabinet and shelves are all level
before placing any components on them.
JD2
!
17.
monter
les deux portes (JD14, JD15) sur le meuble assemblé. D’abord,
IntroDuIre
la broche suPérIeure de la porte dans le trou sur
le dessous du plateau intérieur du milieu (JD2), puis
enfoncer
la broche InFérIeure vers le haut et
bAsculer
la partie inférieure de la
porte pour la mettre en place comme sur la Fig. 12A.
relÂcher
la broche inférieure; un déclic doit être audible lorsqu’elle s’enclenche dans
le trou du plateau inférieur (JD3). vérifier que chaque porte s’ouvre et se ferme correctement sans se décrocher.
REMARQUE (!) : Il y a des tampons de niveau réglables sous les pieds des panneaux latéraux gauche et droit (JD6, JD7).
TOURNER les tampons de niveau pour les ajuster. Si le meuble est bien de niveau, les portes seront également de niveau (JD14, JD15).
Vérifier que le meuble et les plateaux sont de niveau avant d’y poser des appareils.
17.
InstAle
cada puerta (JD14, JD15) en el conjunto del gabinete. Primero,
Inserte
el pasador suPerIor de la puerta en el orificio ubicado
en el lado inferior del estante interior central (JD2), luego
empuJe
el pasador InFerIor hacia arriba y
hAGA GIrAr
la parte inferior de la
puerta hasta que quede en su lugar, tal como se muestra en la figura 12A. A medida que
lIberA
el pasador inferior, debería escuchar un clic
cuando encaja en su lugar en el orificio del estante inferior (JD3). Asegúrese de que cada puerta abre y cierra correctamente, sin salirse de su
lugar.
NOTA (¡!): Debajo de las patas de los paneles laterales izquierdo y derecho (JD6, JD7) hay patas niveladoras ajustables.
GÍRELAS para ajustarlas. Un gabinete bien nivelado también nivelará las puertas (JD14, JD15). Asegúrese de que el gabinete y todos los
estantes estén nivelados antes de colocar cualquier componente encima.
17.
ПРИКРЕПИТЕ
каждую дверцу (JD14, JD15) к собранной тумбочке. Сначала
ВСТАВЬТЕ ВЕРХНЮЮ
шпильку двери в отверстие на
нижней поверхности средней внутренней полки (JD2), а затем
ТОЛКНИТЕ НИЖНЮЮ
шпильку вверх и
ПОВЕРНИТЕ
нижнюю часть
дверцы так, чтобы она встала на место, как показано на Рис. 12А. Когда вы
ОТПУСТИТЕ
нижнюю шпильку, вы должны услышать
щелчок, который означает, что шпилька встала на место в отверстие на нижней полке (JD3). Убедитесь, что каждая дверца
открывается и закрывается надлежащим образом, не смещаясь.
ПРИМЕЧАНИЕ (!). Под ножками левой и правой боковых панелей (JD6, JD7) имеются регулировочные винты для
выравнивания. ПОВЕРНИТЕ эти винты, если нужно. У находящейся в горизонтальном положении тумбочки дверцы
(JD14, JD15) тоже будут в правильном положении. Убедитесь, что тумбочка и все полки находятся в горизонтальном
положении перед тем, как класть на них что бы то ни было.
16

WARRANTY
One (1) Year Limited Warranty
All Bell’O International furniture products are warranted, with the exception of glass, to the original purchaser at the
time of purchase and for a period of one (1) year thereafter. Glass is warranted to the original purchaser at the time of
purchase and for a period of thirty (30) days thereafter. This warranty is expressly limited to new products purchased
in factory sealed cartons. Warranty is valid in the United States of America and Canada.
In order to provide you with timely assistance, please thoroughly inspect your furniture for missing or defective parts
immediately after opening the carton. To receive replacement or missing part(s) under this warranty, go to our
website at www.bello.com or call our
Customer Service Department at 1-888-235-7646
. Please have the model
number and part number(s) for reference. You will also need your sales receipt or other proof of purchase.
Replacement part(s) will be shipped to you at no charge with Bell’O International assuming all shipping and handling
expense.
We warrant to you, the original purchaser, that our furniture and all of its parts and components are free of defects in
material or workmanship. "Defects", as used in this warranty, is defined as any imperfections that impair the use of
the furniture or product.
Our warranty is expressly limited to the replacement of furniture parts and components. For one (1) year after the
date of purchase, Bell’O International will replace any part described on the enclosed furniture parts list that is
defective in material or workmanship.
This warranty applies under conditions of normal use. Our furniture products are not intended for outdoor use. The
warranty does not cover: 1) defects caused by improper assembly or disassembly; 2) defects caused by shipping,
claims for damage during transit to you should be placed immediately by you to the transportation company;
3) defects occurring after purchase due to product modification, intentional damage, accident, misuse, abuse,
negligence or exposure to the elements; 4) cosmetic damage and 5) labor or assembly costs.
There are no warranties, express or implied, including without limitation merchantability or fitness for particular use,
except as (I) contained herein or (II) required by applicable law in the state whose law governs (which shall be New
Jersey absent controlling law imposing the law of another state in lieu thereof as governing law). All warranties of
whatsoever derivation shall be limited to the term set forth above, unless otherwise required by applicable law.
Bell’O employees’ or representatives’ oral or other written statements do not constitute warranties, shall not be relied
upon by Buyer, and are not a part of the contract for sale or this limited warranty.
Except as provided herein, Bell’O International shall have no liability or responsibility to the purchaser or any other
person or entity with respect to any liability, loss or damage caused directly or indirectly by use of the product,
including, but not limited to, any incidental or consequential damages. Some states do not allow limitation on how
long an implied warranty can last or the exclusion of limitation of incidental or consequential damages, so the above
limitation and exclusion may not apply to you.
This warranty gives you specific legal rights. You may also have other rights, which vary from state to state.
BELL'O INTERNATIONAL CORPORATION, 711 Ginesi Drive, Morganville, NJ 07751-1235
Phone: (732) 972-1333 Fax: (732) 536-6482 Web: www.bello.com E-mail: sales@bello.com
17

GARANTIE
Garantie limitée un (1) an
Ce produit de meubles Bell'O International Corporation est garanti, à l’exception du verre, à l’acheteur initial au moment
de l’achat et pour une durée d’un (1) an à compter de cette date. Le verre est garanti à l’acheteur initial au moment de
l’achat et pour une durée de trente (30) jours à compter de cette date. Cette garantie se limite expressément aux
produits neufs achetés dans des cartons scellés à l'usine. Cette garantie est valable uniquement aux États-Unis
d’Amérique et au Canada.
Pour nous permettre d’offrir une assistance dans les meilleurs délais, veiller à vérifier avec soin si toutes les pièces du
meuble TV sont présentes et en bon état dès l’ouverture de l’emballage. Pour obtenir des pièces de rechange ou
manquantes dans le cadre de cette garantie, appeler
le Service après-vente au 1-888-235-7646
. Veiller à avoir le
numéro de modèle et les références des pièces à disposition. Le reçu de la vente ou autre justificatif d’achat est
également requis. Les pièces de rechange sont expédiées sans frais pour le destinataire.
Nous garantissons à l’acheteur initial que notre meuble TV et l’ensemble de ses pièces et composants sont exempts
de défauts de matériau et de fabrication. Le terme « défaut », au sens de cette garantie, fait référence à toute
imperfection qui entrave l’utilisation du meuble ou du produit.
Cette garantie se limite expressément au remplacement de pièces et composants du meuble TV. Pendant une durée
d’un (1) an à compter de la date d’achat, Bell'O International Corporation remplacera toute pièce figurant dans la
nomenclature jointe qui présente un défaut de matériau ou de fabrication.
Cette garantie s’applique dans des conditions d’utilisation normale. Notre meuble TV n’est pas destiné à une utilisation
en plein air. Cette garantie ne couvre pas : 1) les défauts causés par un assemblage ou un démontage incorrect ;
2) les défauts causés par le transport, les réclamations en cas de dommages dans le transport devant être soumises par
l'acheteur directement à la société de transport ; 3) les défauts se produisant après l’achat suite à une modification du
produit, des dommages intentionnels, un emploi abusif ou détourné, une négligence ou l’exposition aux intempéries ;
4) les dommages cosmétiques et 5) les coûts de main-d’oeuvre ou d’assemblage.
Il n’est offert aucune garantie, expresse ou implicite, notamment de qualité marchande ou d’adaptation à un emploi
particulier, à l’exception de (I) celle contenue dans les présentes ou (II) ce qui est prévu par la réglementation en vigueur
dans l’état ou la province dont les lois s’appliquent (l’état du New Jersey en l’absence d’une réglementation imposant
l’application des lois d’un autre état ou province). Toutes les garanties éventuellement dérivées sont limitées aux termes
ci-dessus, sauf dispositions contraires de la réglementation en vigueur.
Les déclarations orales ou écrites autres de la part d’employés ou représentants du fabricant ne constituent pas des
garanties, ne peuvent pas être invoquées par l’acheteur et ne font pas partie du contrat de vente ni de la présente
garantie.
Sous réserve des présentes dispositions, Bell'O International Corporation décline toute obligation ou responsabilité
envers l’acheteur ou toute autre personne ou entité concernant de quelconques obligations, pertes ou dommages causés
directement ou indirectement par l’utilisation du produit, notamment, mais sans s’y limiter, de quelconques dommages
accessoires ou consécutifs. Certains états ou provinces n’autorisant pas la limitation de la durée d'une garantie implicite
ou l’exclusion ou la limitation des dommages accessoires ou consécutifs, il est possible que les limites ou exclusions
ci-dessus ne s'appliquent pas au présent cas particulier.
Cette garantie confère à l’acheteur des droits juridiques particuliers. Il est possible qu’il ait d'autres droits, susceptible de
varier d’une juridiction à l’autre.
BELL'O INTERNATIONAL CORPORATION, 711 Ginesi Drive, Morganville, NJ 07751-1235
Phone: (732) 972-1333 Fax: (732) 536-6482 Web: www.bello.com E-mail: sales@bello.com
18

GARANTÍA
Garantía limitada de un (1) año
Se le garantiza al comprador original este producto de mueble Bell'O International Corporation, con excepción del vidrio,
durante un período de un (1) año a partir de la fecha de la compra. Se le garantiza al comprador original el vidrio durante
un período de treinta (30) días a partir de la fecha de la compra. Esta garantía se limita expresamente a los productos
nuevos comprados en cajas cerradas en fábrica. La garantía sólo es válida en los Estados Unidos de América y Canadá.
Inmediatamente después de abrir la caja de cartón, inspeccione detalladamente el soporte para TV y determine si faltan
piezas o algunas están defectuosas de manera que podamos asistirlo adecuadamente. Para recibir piezas de repuesto o
piezas faltantes con esta garantía, llame al
Departamento de atención al cliente al 1-888-235-7646
con el número de
modelo y los números de las piezas para usar de referencia. También necesitará el recibo de venta u otro comprobante de
compra. Se le enviarán las piezas de repuesto sin cargo.
Le garantizamos a usted, el comprador original, que nuestro soporte para TV y todas sus piezas y componentes no tienen
defectos en el material ni en la fabricación. “Defectos”, como aparece en esta garantía, se define como cualquier
imperfección que imposibilita el uso del mueble o del producto.
Nuestra garantía está expresamente limitada a la reposición de piezas y componentes del soporte para TV. Durante un (1)
año a partir de la fecha de la compra, Bell'O International Corporation repondrá cualquier pieza defectuosa en material o
fabricación de las que están enumeradas en la lista de piezas adjunta.
Esta garantía se aplica en condiciones normales de uso. El soporte para TV no está diseñado para uso en exteriores.
La garantía no cubre: 1) defectos causados por armado o desarmado incorrectos; 2) defectos causados por el envío, usted
debe realizar inmediatamente los reclamos por daños durante el transporte a la empresa de transportes; 3) defectos que
ocurran después de la compra debido a modificaciones en el producto, daño intencional, accidentes, mal uso, abuso,
negligencia o exposición de los elementos; 4) daños superficiales y 5) gastos de mano de obra y armado.
No existen garantías, expresas ni implícitas, que incluyen, entre otras, las de comerciabilidad o adecuación aun fin
concreto excepto (i) las aquí incluidas o (ii) las exigidas por la ley vigente en el estado en que rige la ley se impondrá la ley
de Nueva Jersey como ley vigente en estados donde no haya una ley de regulación). Todas las garantías de cualquier
derivación estarán limitadas a los términos establecidos anteriormente, a menos que la ley vigente exija lo contrario.
Las declaraciones verbales o por escrito de los empleados o representantes del fabricante no constituyen garantías, el
comprador no debe confiar en ellas y no forman parte del contrato para la venta ni de esta garantía limitada.
Excepto lo aquí establecido, Bell'O International Corporation no tendrá obligaciones ni será responsable ante el
comprador o cualquier otra persona o entidad con respecto a algún inconveniente, pérdida o daño causados directa o
indirectamente por el uso del producto, los que incluyen, entre otros, cualquier daño accidental o consecuente. Algunos
estados no permiten limitaciones sobre el tiempo de duración de una garantía implícita ni la exclusión de limitación de
daños accidentales o consecuentes, por lo tanto la limitación y exclusión mencionadas anteriormente pueden no tener
validez para usted.
Esta garantía le proporciona derechos legales específicos. Usted también puede tener otros derechos, los cuales varían
según el estado.
BELL'O INTERNATIONAL CORPORATION, 711 Ginesi Drive, Morganville, NJ 07751-1235
Phone: (732) 972-1333 Fax: (732) 536-6482 Web: www.bello.com E-mail: sales@bello.com
19

ГГааррааннттиияя
Ограниченная гарантия на один (1) год
За исключением стекла вся продукция корпорации Bell’O International имеет гарантию, предоставляемую
первоначальному покупателю в момент покупки сроком на 1 (один) год с момента покупки. Гарантия на стекло
предоставляется первоначальному покупателю в момент покупки сроком на тридцать (30) дней с момента покупки.
Данная гарантия распространяется только на новую продукцию, купленную в запечатанной упаковке производителя.
Гарантия действительна в Соединенных Штатах Америки и Канаде.
Для того чтобы вам могла быть предоставлена своевременная помощь, пожалуйста, тщательно осмотрите купленную
мебель сразу после открытия упаковки для выявления отсутствующих или поврежденных деталей. Для получения
замены или отсутствующей детали/деталей по данной гарантии зайдите на наш веб-сайт: www.bello.com или
позвоните в отдел обслуживания клиентов нашей компании по телефону: 1-888-235-7646. Пожалуйста, приготовьтесь
назвать номер модели и номер/номера деталей. Вам также понадобится чек или другой документ, подтверждающий
покупку. Деталь/детали для замены будут отправлены вам бесплатно. Все расходы по доставке берет на себя
корпорация Bell’O International.
Мы гарантируем вам, первоначальному покупателю, что наша мебель и все ее детали и компоненты не содержат
дефектов материала или качества изготовления. Под «дефектами» в данной гарантии понимаются любые недостатки,
которые препятствуют использованию мебели или продукции.
Наша гарантия ограничивается исключительно заменой деталей и компонентов мебели. В течение одного (1) года со
дня покупки корпорация Bell’O International заменит любую деталь из перечня деталей, вложенного в упаковку, в
которой будет обнаружен дефект материала или качества изготовления.
Данная гарантия применима только при соблюдении условий нормальной эксплуатации. Наша мебельная продукция
не предназначена для использования в уличных условиях. Гарантия не распространяется на: 1) дефекты, вызванные
неправильной сборкой или разборкой; 2) дефекты, полученные во время доставки (иски о возмещении ущерба,
нанесенного во время транспортировки, вам необходимо сразу же предъявлять транспортной компании); 3) дефекты,
возникшие после покупки продукции в результате модификации, умышленного повреждения, аварии, неправильного
использования, небрежности или воздействия погодных условий; 4) косметические повреждения и 5) затраты на
рабочую силу или сборку.
Не существует никаких гарантий, явных или подразумеваемых, включая, без ограничения, товарной пригодности или
соответствия конкретному практическому применению, за исключением (I) случаев, указанных в настоящем
документе, и (II) случаев, предусмотренных применимыми законами в штате, законодательством которого
регулируется настоящая гарантия
(в данном случае законами штата Нью-Джерси при отсутствии превалирующего закона, устанавливающего законы
другого штата в качестве регулирующего закона вместо них). Все гарантии, к чему бы они ни относились,
ограничиваются сроком, указанным выше, если иное не предусмотрено действующим законодательством.
Устные или иные письменные заявления сотрудников или представителей производителя не устанавливают гарантий
и не должны служить основанием для покупателя полагаться на них, и не являются частью договора купли-продажи
или этой ограниченной гарантии.
За исключением случаев, предусмотренных в настоящем документе, корпорация Bell’O International не несет никакой
ответственности или обязательств перед покупателем или любым другим физическим или юридическим лицом в
отношении какого-либо платежного обязательства, убытков или ущерба, причиненных прямо или косвенно в
результате использования продукции, включая, без ограничения, любые побочные или косвенные убытки. В некоторых
штатах не допускается ограничение срока действия подразумеваемой гарантии или исключают ограничение
ответственности за побочные или косвенные убытки, поэтому указанные выше ограничения и исключения могут не
относиться к вам.
Данная гарантия дает вам определенные юридические права. Вы также можете иметь другие права, которые
различаются в разных штатах.
КОРПОРАЦИЯ BELL’O INTERNATIONAL, 711 Ginesi Drive, Morganville, NJ 07751-1235
Телефон: (732) 972-1333 Факс: (732) 536-6482 Веб-сайт: www.bello.com E-mail: sales@bello.com
20
