Yamaha CDX-397: Manual tape-programming (for Audio CD)
Manual tape-programming (for Audio CD): Yamaha CDX-397
Table of contents
- CAUTION: Read this before operating your unit.
- CONTENTS
- SUPPORTED DISC TYPES FEATURES
- UNPACKING NOTES ABOUT THE REMOTE CONTROL
- CONNECTIONS
- IDENTIFICATION OF COMPONENTS Front panel Display
- Remote control
- BASIC OPERATION
- To pause playback To turn off the power To play back the desired track To stop playback To search an folder/file on an MP3 or WMA disc (CDX-497 only)
- To advance or reverse playback rapidly (Manual search) To skip to the beginning of the desired track (Skip search)
- Changing display
- Adjusting the output level (CDX-497 only) Changing brightness of the display Automatic spacing
- RANDOM-SEQUENCE PLAY REPEAT PLAY Repeat a selected item
- Repeat A-B
- PROGRAM PLAY
- INDEX SEARCH
- TRACK PROGRAMMING FOR RECORDING TO TAPE Automatic tape-programming (for Audio CD)
- Notes
- Manual tape-programming (for Audio CD)
- Random sequential tape-programming (for Audio CD)
- Automatic searching for the peak level on a disc (for Audio CD)
- CD SYNCHRONIZED RECORDING
- Notes about handling compact discs Discs playable with this unit NOTES ABOUT DISCS
- SYMPTOM
- SPECIFICATIONS
18
En
5
Use numeric buttons to select the track numbers (to
be recorded on the side B) in any order.
6
Press
PROGRAM
.
7
Start recording on the tape deck, and then press
on the remote control of this unit.
8
This unit automatically pauses at the end of the side
A. Turn the tape over to the side B, resume
recording on the tape deck, and then press
or
on the remote control of this unit to start
playback.
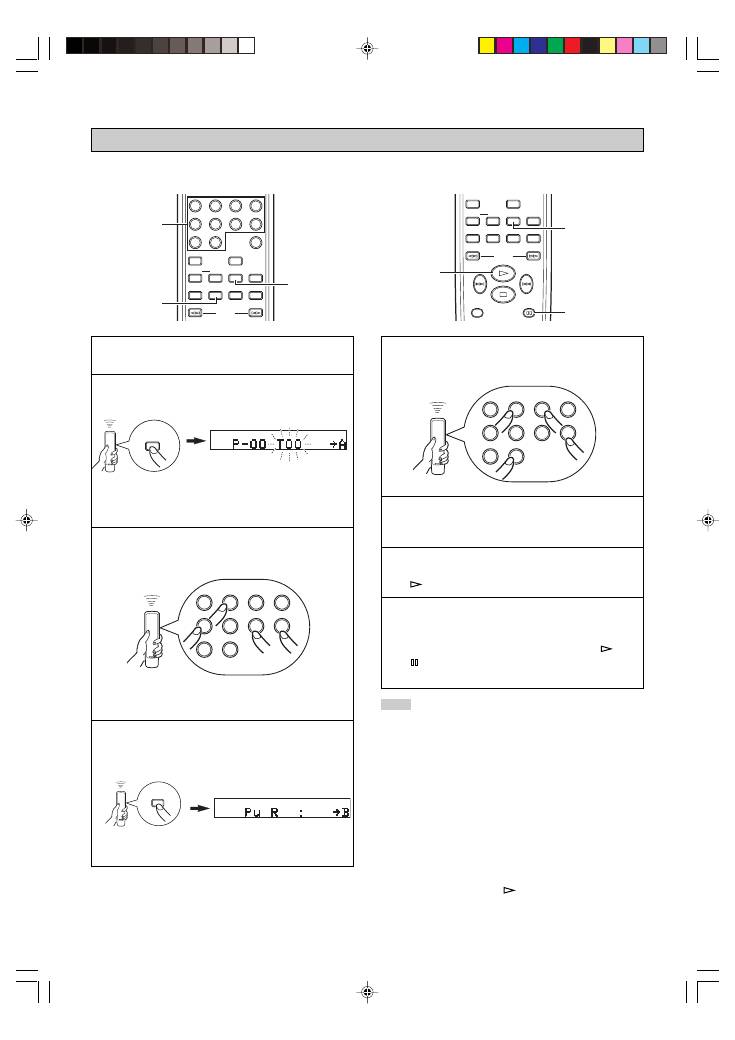
Manual tape-programming (for Audio CD)
1
Follow steps 1 – 3 on page 16.
2
Press
PROGRAM
.
3
Use numeric buttons to select desired tracks (to be
recorded on the side A) in any order.
*
Programmed track numbers light up on the display.
4
When track selection for side A is finished, press
TAPE
.
A pause is inserted.
SEARCH
SYNCHRO
TAPE
PEAK
SPACE
REPEAT
DIMMER
RANDOM
INDEX
0
9
6
5
8
7
2
1
4
3
A–B
PROGRAM
CLEAR
4
3, 5
2
SEARCH
TIME/INFO
FOLDER
SYNCHRO
TAPE
PEAK
SPACE
REPEAT
DIMMER
RANDOM
A–B
PROGRAM
CLEAR
7, 8
8
6
PROGRAM
0
9
6
5
8
7
2
1
4
3
0
9
6
5
8
7
2
1
4
3
PROG.
TAPE
PROG.
This is for recording desired tracks in any order onto a tape.
Notes
●
If, in step 3 or 5, “Err” appears on the display, the track number
just selected cannot be programmed because there is not
enough time remaining on the tape.
●
In step 3 or 5, each time a selection is made, the track number
and the remaining time of the tape is displayed, and then the
display changes to indicate the next program number.
●
You can check, cancel or correct program data. (For details,
refer to page 15.)
*
When checking program data, note that “Pu” appears
between track numbers for side A and side B.
●
Up to 40 tracks can be programmed. If, however, a pause is
inserted, it is counted as one track.
●
CD synchronized recording function can be used if your tape
deck is compatible with it. If so, in step 7 and 8, press
SYNCHRO
and then press
on the remote control of this
unit. Recording automatically starts. (For details, refer to page
21.)
Blinks.
01_En_02_BOD_CDX-397_497_G.pm
6/1/06, 8:37 PM
18
