Sharp LC-60UHD80R: instruction
Class: Household, kitchen appliances, electronics and equipment
Type:

Manual for Sharp LC-60UHD80R
Table of contents

TINS-G202WJZZ
LCD COLOUR TELEVISION
Initial setup guide
• Please read “Important safety precautions” before
setting up the TV.
Setup-Handbuch
Instrukcja wstępnej konfi guracji
• Bitte lesen Sie den Abschnitt „Wichtige Sicherheitshinweise“, bevor
• Przed skonfigurowaniem telewizora należy przeczytać
Sie mit der Aufstellung und Inbetriebnahme des TVs beginnen.
„Ważne uwagi dotyczące bezpieczeństwa”.
Guide d’installation initiale
Kezdeti beállítási útmutató
• Veuillez lire les « Précautions de sécurité
• A TV-készülék beállítása előtt olvassa el a „Fontos
importantes » avant d’installer le téléviseur.
biztonsági előírások” című részt.
Guida impostazione iniziale
Průvodce základním nastavením
• Si prega di leggere “Importanti precauzioni di
• Před instalací televizoru si přečtěte „Důležité
sicurezza” prima d’impostare il televisore.
bezpečnostní pokyny“.
Gids voor ingebruikname
Sprievodca úvodným nastavením
• Lees de “Belangrijke veiligheidsmaatregelen”
• Pred nastavením televízora si prečítajte „Dôležité
voordat u de TV in gebruik neemt.
bezpečnostné predpisy”.
Guía para la confi guración inicial
Algseadistuse juhend
• Por favor, lea “Precauciones importantes de
• Palun lugege enne teleri seadistamist läbi „Olulised
seguridad” antes de hacer los ajustes en el televisor.
ettevaatusabinõud“.
Guia de confi guração inicial
Norādījumi par sākotnējo iestatīšanu
• Antes de começar a configurar o televisor, leia as
• Pirms televizora iestatīšanas, lūdzu, izlasiet sadaļu
“Importantes Precauções de Segurança”.
„Svarīgi drošības pasākumi“.
Başlangıç kurulum kılavuzu
Pradinės sąrankos vadovas
• Televizyonun kurulumunu yapmadan önce lütfen
• Prašome perskaityti „Svarbios atsargumo
“Önemli güvenlik tedbirleri”ni okuyun.
priemonės“ prieš nustatant televizorių.
Посібник з початкової установки
Οδηγός αρχικής εγκατάστασης
• Прочитайте «Важливі запобіжні засоби по
• Διαβάστε τις «Σημαντικές προφυλάξεις ασφαλείας»
безпеці» перед встановленням телевізора.
πριν εγκαταστήσετε την τηλεόραση.
Руководство по начальной установке
Priročnik za začetne nastavitve
• Перед началом настройки телевизора прочтите раздел
• Pred namestitvijo televizorja preberite »Pomembni
«Важные меры предосторожности по безопасности».
varnostni ukrepi«.
Grundläggande inställningsguide
Ghid de confi gurare iniţială
• Läs ”Viktiga säkerhetsföreskrifter” innan TV:n
• Vă rugăm să citiţi „Măsuri de precauţie” înainte de
installeras.
instalarea televizorului.
Alkusäätöjen opas
Vodič za početno postavljanje
• Lue ”Tärkeitä turvallisuutta koskevia huomautuksia”
• Prije postavljanja televizora pročitajte “Važne mjere
ennen kuin teet TV:n asetukset.
opreza”.
Indledende opsætningsvejledning
%*
Бързо меню
• Læs ”Vigtige sikkerhedsforskrifter” før opsætning af
• Прочетете внимателно “Важни предупреждения”
fjernsynet.
преди да използвате продукта.
Veiledning for første gangs innstillinger
65
Брзи Водич
• Les ”Viktige sikkerhetsregler” før du setter opp
• Молимо прочитајте “Важне мере опреза” пажљиво
TV-apparatet.
пре него што будете користили овај производ.
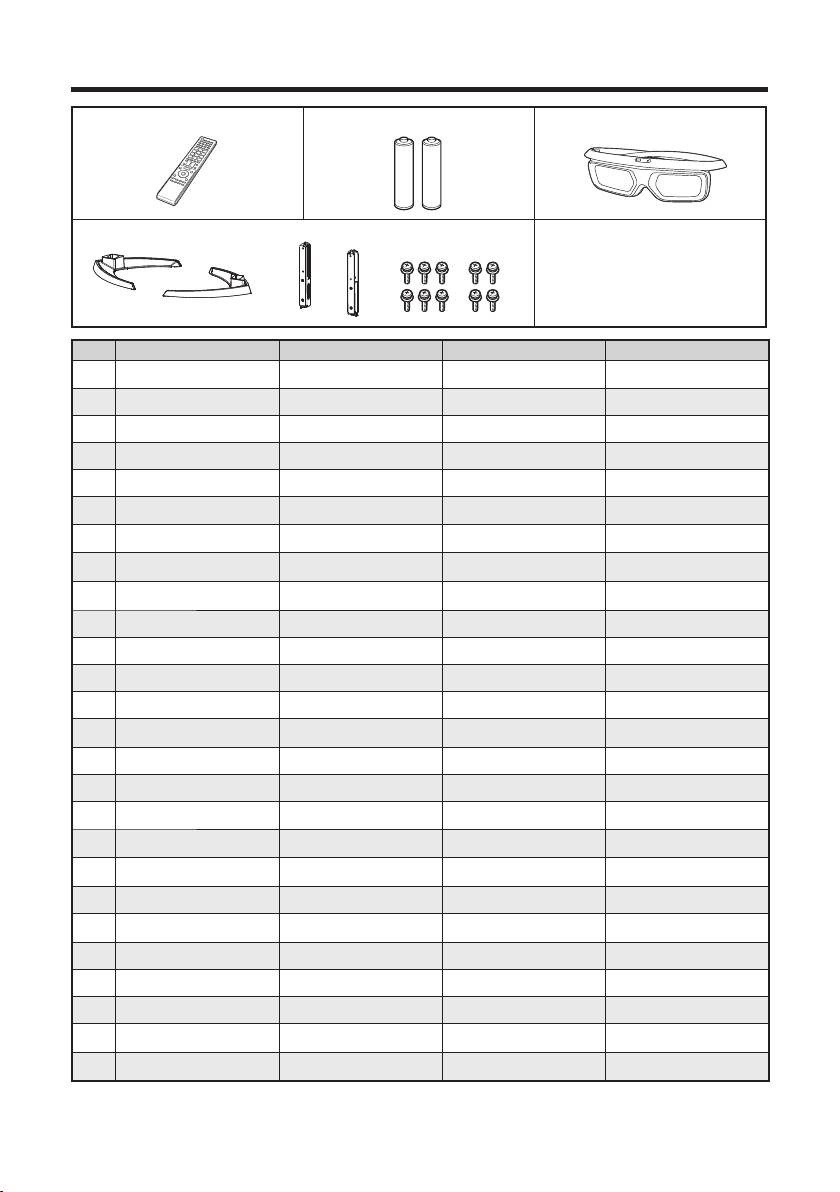
A. Supplied accessories
1 Remote control unit ( x 1) 2 “AAA” size battery 3 3D Glasses (x 2)
4 Stand unit ( x 1)
5 Initial setup guide
6 Important safety precautions
A
123
DE Mitgeliefertes Zubehör Fernbedienung ( x 1)
Microbatterie („AAA“) ( x 2)
3D-Brille (x 2)
FR Accessoires fournis Télécommande ( x 1) Pile de format « AAA » ( x 2)
Lunettes 3D
(x 2)
IT Accessori forniti Telecomando ( x 1) Batteria “AAA” ( x 2) Occhiali 3D (x 2)
NL Bijgeleverde accessoires Afstandsbediening ( x 1) “AAA” formaat batterij ( x 2) 3D bril (x 2)
ES Accesorios suministrados Mando a distancia ( x 1) Pila tamaño “AAA” ( x 2)
Gafas 3D
(x 2)
PT Acessórios fornecidos Controlo remoto ( x 1) Pilha de tamanho “AAA” (x 2) Óculos 3D (x 2)
Ürünle birlikte verilen
Uzaktan kumanda ünitesi
TR
“AAA” pil ( x 2) 3D gözlükler (x 2)
aksesuarlar
( x 1)
Аксесуари, що входять до
Пульт дистанційного
Батарея розміру «AAA»
UK
3D-окулярів (x 2)
комплекту поставки
управління ( x 1)
( x 2)
Прилагаемые
Пульт дистанционного
Батарея размера «AAA»
RU
3D очки (x 2)
принадлежности
управления ( x 1)
( x 2)
SV Medföljande tillbehör Fjärrkontroll ( x 1) Batteri av storlek ”AAA” ( x 2) 3D-glasögon (x 2)
SU Vakiovarusteet Kauko-ohjain ( x 1) ”AAA”-koon paristo ( x 2) 3D-lasit (x 2)
DA Medfølgende tilbehør Fjernbetjening ( x 1) Batteri i størrelse ”AAA” ( x 2) 3D-briller (x 2)
NO Medfølgende tilbehør Fjernkontroll ( x 1) ”AAA” batteri ( x 2) 3D-briller (x 2)
Pilot zdalnego sterowania
PL Dostarczone wyposażenie
Bateria typu „AAA” ( x 2) Okulary 3D (x 2)
( x 1)
HU Mellékelt tartozékok Távvezérlő ( x 1) „AAA” méretű elem ( x 2) 3D szemüveg (x 2)
CS Dodávané příslušenství Dálkový ovladač ( x 1) Baterie velikosti „AAA“ ( x 2) 3D brýle (x 2)
SK Dodávané príslušenstvo Diaľkový ovládač ( x 1) Veľkosť batérie „AAA“ ( x 2) 3D okuliare (x 2)
Tarnekomplekti kuuluvad
ET
Kaugjuhtimispult ( x 1) „AAA“-suuruses patarei ( x 2) 3D prillid (x 2)
tarvikud
Piegādes komplektā
LV
Tālvadības pults ( x 1) „AAA“ izmēra baterija ( x 2) 3D brilles (x 2)
ietilpstošie piederumi
LT Kartu pateikti priedai
Nuotolinio valdymo pultas ( x 1)
„AAA“ dydžio baterija ( x 2) 3D akiniai (x 2)
Μπαταρία μεγέθους «AAA»
EL Παρεχόμενα παρελκόμενα Τηλεχειριστήριο ( x 1)
Γυαλιά 3D (x 2)
( x 2)
SL Priložena dodatna oprema Daljinski upravljalnik ( x 1) Baterija velikosti »AAA« ( x 2) 3D-očala (x 2)
RO Accesorii furnizate
Telecomandă ( x 1)
Baterie tip „AAA” ( x 2) Ochelari 3D (x 2)
HR Isporučeni pribor Daljinski upravljač ( x 1) Baterija “AAA” veličine ( x 2) 3D naočale (x 2)
Дистанционно управление
BG Приложени аксесоари
Батерии размер “AAA” (x2) 3D очила (x 2)
(x1)
Уређај за даљинску
батерије “AAA” величине
SR Добијени прибор
3D наочаре
(x 2)
контролу (x1)
(x2)
2
A. Supplied accessories
45 6
DE Ständer ( x 1) Setup-Handbuch Wichtige Sicherheitshinweise
FR Ensemble du socle ( x 1) Guide d’installation initiale Précautions de sécurité importantes
IT Stand ( x 1) Guida impostazione iniziale Importanti precauzioni di sicurezza
NL Standaard ( x 1) Gids voor ingebruikname Belangrijke veiligheidsmaatregelen
ES Soporte ( x 1) Guía para la configuración inicial Precauciones importantes de seguridad
PT Pedestal ( x 1) Guia de configuração inicial Importantes Precauções de Segurança
TR Stant ünitesi ( x 1) Başlangıç kurulum kılavuzu Önemli güvenlik tedbirleri
UK Підставка ( x 1) Посібник з початкової установки Важливі запобіжні засоби по безпеці
RU Подставка ( x 1) Руководство по начальной установке
Важные меры предосторожности по безопасности
SV Ställ ( x 1)
Grundläggande inställningsguide
Viktiga säkerhetsföreskrifter
SU Jalusta ( x 1) Alkusäätöjen opas Tärkeitä turvallisuutta koskevia huomautuksia
DA Stativ (x 1) Indledende opsætningsvejledning Vigtige sikkerhedsforskrifter
NO Stativ ( x 1)
Veiledning for første gangs innstillinger
Viktige sikkerhetsregler
PL Podstawka ( x 1) Instrukcja wstępnej konfiguracji Ważne uwagi dotyczące bezpieczeństwa
HU Állvány ( x 1) Kezdeti beállítási útmutató Fontos biztonsági előírások
CS Podstavec ( x 1)
Průvodce základním nastavením
Důležité bezpečnostní pokyny
SK Podstavec ( x 1)
Sprievodca úvodným nastavením
Dôležité bezpečnostné predpisy
ET Alus ( x 1) Algseadistuse juhend Olulised ettevaatusabinõud
LV Statīvs ( x 1) Norādījumi par sākotnējo iestatīšanu Svarīgi drošības pasākumi
LT Stovas ( x 1) Pradinės sąrankos vadovas
Svarbios atsargumo priemonės
EL
Μονάδα βάσης στήριξης ( x 1)
Οδηγός αρχικής εγκατάστασης
Σημαντικές προφυλάξεις ασφάλειας
SL Stojalo ( x 1) Priročnik za začetne nastavitve Pomembni varnostni ukrepi
RO Suport ( x 1) Ghid de configurare iniţială
Măsuri de precauţie importante
HR Postolje ( x 1) Vodič za početno postavljanje Važne mjere opreza
BG Стойка (x1) Бързо меню Важни мерки за безопасност
SR Сталак (x1) Брзи Водич Важне мере опреза
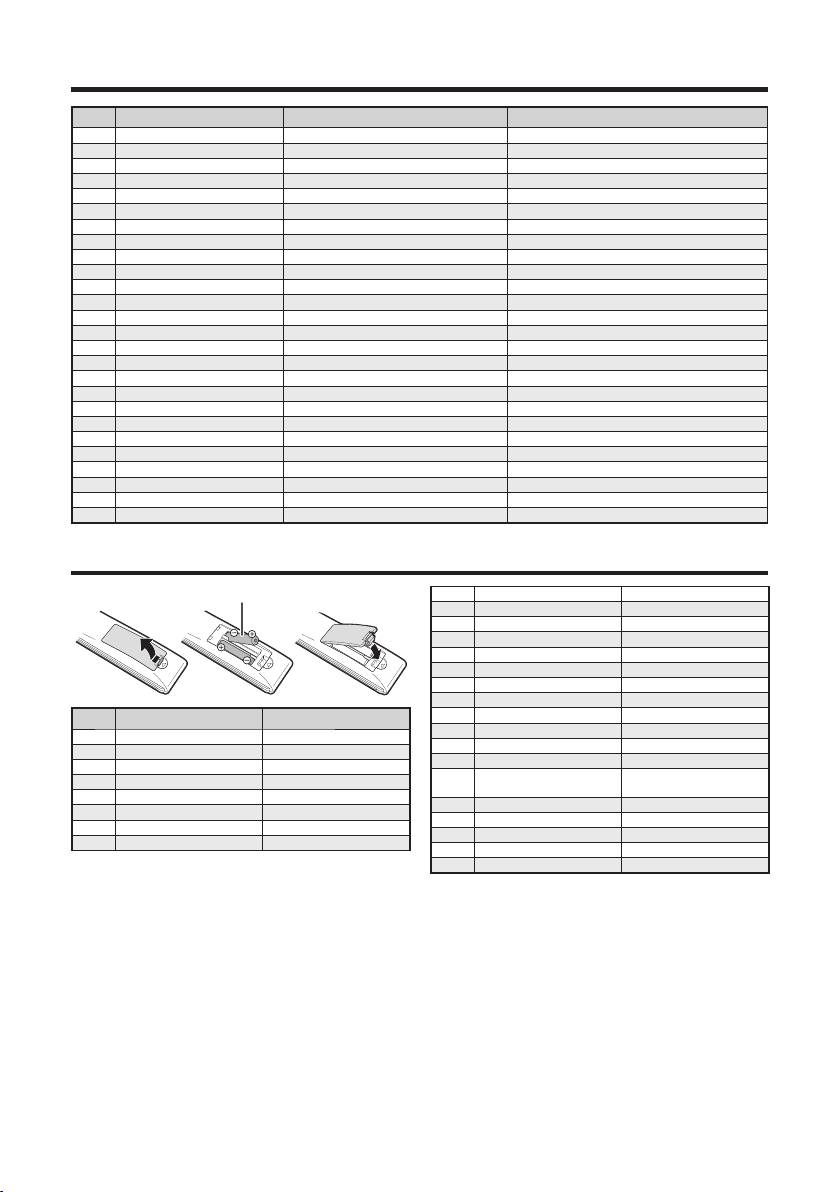
B. Inserting the batteries
1 “AAA” size battery
RU Установка батарей Батарея размера «AAA»
SV Isättning av batterier Batteri av storlek ”AAA”
SU Paristojen asettaminen ”AAA”-koon paristo
DA Isætning af batterierne Batteri i størrelse ”AAA”
NO Sette inn batteriene ”AAA” batteri
PL Wkładanie baterii Bateria typu „AAA”
HU Az elemek behelyezése „AAA” méretű elem
CS Vložení baterií Baterie velikosti „AAA“
B
SK Vloženie batérií Veľkosť batérie „AAA“
1
ET Patareide sissepanemine „AAA“-suuruses patarei
DE Einlegen der Batterien
Microbatterie („AAA“)
LV Bateriju ievietošana „AAA“ izmēra baterija
FR Insertion des piles Pile de format « AAA »
LT Baterijų dėjimas „AAA“ dydžio baterija
IT Inserimento delle batterie Batteria “AAA”
Τοποθέτηση των
Μπαταρία μεγέθους
NL Plaatsen van de batterijen “AAA” formaat batterij
EL
μπαταριών
«AAA»
ES Colocación de las pilas Pila tamaño “AAA”
SL Vstavljanje baterij Baterija velikosti »AAA«
PT Colocar as pilhas Pilha de tamanho “AAA”
RO Introducerea bateriilor Baterie tip „AAA”
TR Pillerin takılması “AAA” pil
HR Umetanje baterija Baterija “AAA” veličine
UK Вставлення батарей Батарея розміру «AAA»
BG Поставяне на батериите Батерии размер “AAA”
SR Уметање батерија батерије “AAA” величине
3
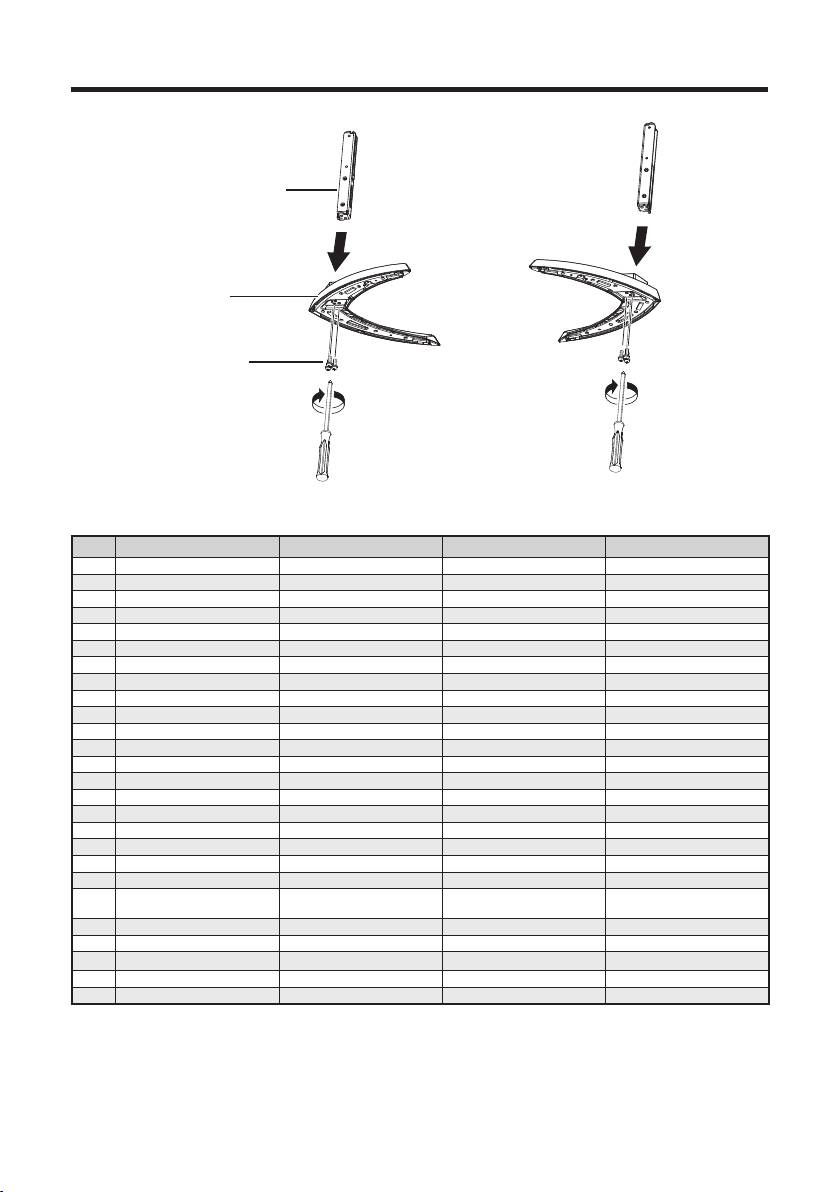
C. Attaching the stand unit
1
1 Supporting post
2 Stand base
3 M5 screws
C
123
DE Anbringen des Ständers Stütze Standfuss M5 Schrauben
FR Pose de l’ensemble du socle Pied de soutien Base du socle M5 vis
IT Fissare lo stand Montante di sostegno Base di supporto M5 viti
NL Bevestigen van de standaard Steun Standaardvoetstuk M5 schroeven
ES Acoplamiento del soporte Poste de apoyo Base del soporte Tornillos M5
PT Colocar o pedestal Elemento de suporte Base do pedestal Parafusos M5
TR Stant ünitesinin takılması Destek Stant kaidesi M5 vidalar
UK Прикріплення підставки Підпорка для підставк Основа підставки M5 Гвинти
RU Крепление подставки Подпорка для подставки Основание подставки M5 винты
SV Montering av stället Stödbalk Ställets bas M5 skruvar
SU Jalustan kiinnittäminen Jalustan tukipaikka Jalustan alusta M5 ruuvit
DA Montering af stativet Støttestang Stativbase M5 skruer
NO Feste stativet Støttestolpe Stativsokkel M5 skruer
PL Montaż podstawki Wspornik podstawki Podłoże podstawki M5 śruby
HU Az állvány csatlakoztatása Tartóláb Állvány alja M5 csavarok
CS Připojení podstavce Nosný sloupek Podstavec M5 šrouby
SK Pripojenie podstavca Podperný stojan Podstavec stojana M5 skrutky
ET Aluse kinnitamine Tugipost Alus M5 kruvid
LV Statīva piestiprināšana Statīva balsts Statīva pamatne M5 skrūves
LT Stovo pritvirtinimas Atraminė kojelė Stovo pagrindas M5 varžtai
Προσάρτηση της μονάδας
EL
Ορθοστάτης Βάση στήριξης Μ5 βίδες
της βάσης
στήριξης
SL Pritrditev stojala Podporni steber Podstavek stojala M5 vijaki
RO Ataşarea suportului Stâlp de susţinere Bază suport M5 şuruburi
HR Pričvršćivanje postolja Podupirač Postolje M5 vijci
BG Инсталиране на стойката Подкрепа пост Щанд база M5 винтове
SR Монтирање сталка Потпорни пост Станд базу M5 Сраф
4
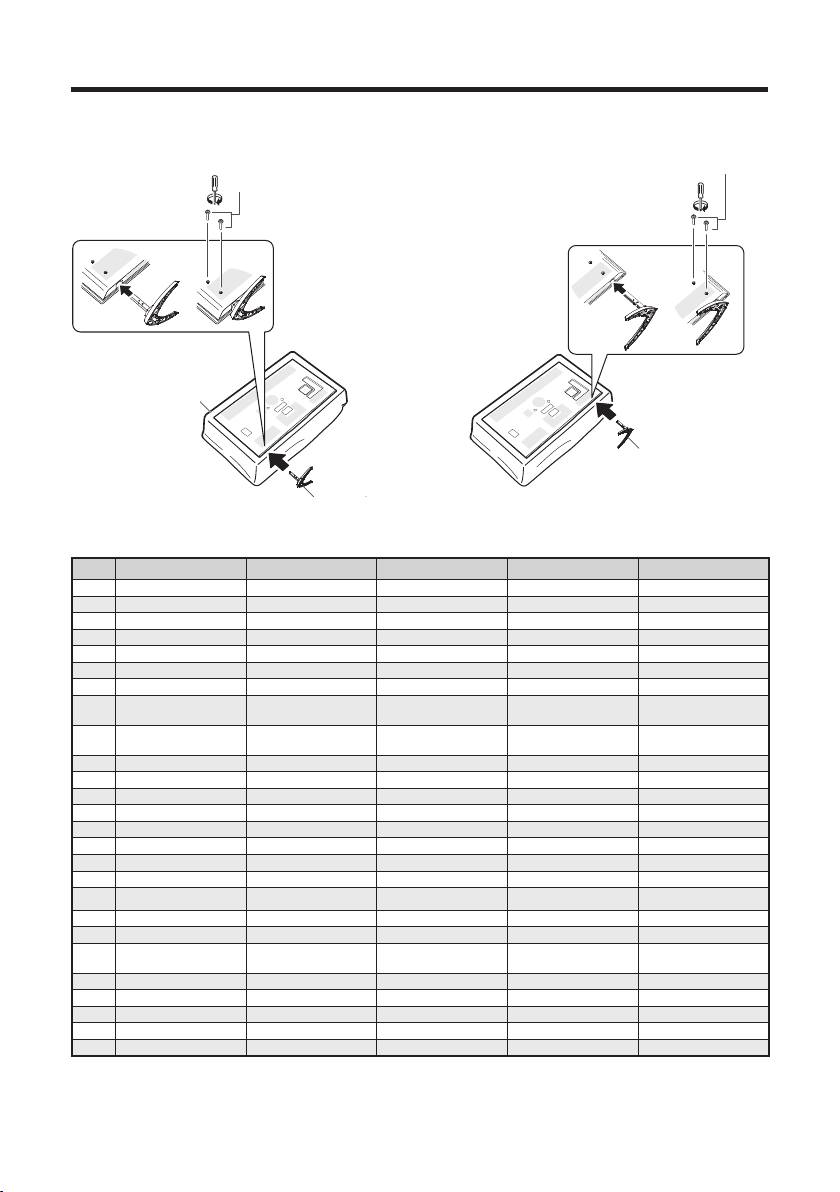
C. Attaching the stand unit
2
3
8 M5 screws
6 M5 screws
Long screws (M5)
6
4 Soft cushion
4
Soft cushion
7Stand unit (L)
Stand unit (R)
5
5 Stand unit (R)
45678
DE Weiches Polster Ständer (R) M5 Schrauben Ständer (L) M5 Schrauben
FR Coussin moelleux Ensemble du socle (R) M5 vis Ensemble du socle (L) M5 vis
IT Assorbi impatto Stand (R) M5 viti Stand (L) M5 viti
NL Zacht kussen Standaard (R) M5 schroeven Standaard (L) M5 schroeven
ES Superficie blanda Soporte (R) Tornillos M5 Soporte (L) Tornillos M5
PT Almofada macia Pedestal (R) Parafusos M5 Pedestal (L) Parafusos M5
TR Yumuşak yastık Stant ünitesi (R) M5 vidalar Stant ünitesi (L) M5 vidalar
М’який амортизуючий
UK
Підставка (R) M5 Гвинти Підставка (L) M5 Гвинти
матеріал
Мягкий амортизирующий
RU
Подставка (R) M5 винты Подставка (L) M5 винты
материал
SV Mjuk kudde Ställ (R) M5 skruvar Ställ (L) M5 skruvar
SU Pehmike Jalusta (R) M5 ruuvit Jalusta (L) M5 ruuvit
DA Blød pude Stativ (R) M5 skruer Stativ (L) M5 skruer
NO Myk pute Stativ (R) M5 skruer Stativ (L) M5 skruer
PL Miękka osłona Podstawka (R) M5 śruby Podstawka (L) M5 śruby
HU Puha alátét Állvány (R) M5 csavarok Állvány (L) M5 csavarok
CS Měkká podložka Podstavec (R) M5 šrouby Podstavec (L) M5 šrouby
SK Mäkká podložka Podstavec (R) M5 skrutky Podstavec (L) M5 skrutky
ET Pehme polsterdus Alus (R) M5 kruvid Alus (L) M5 kruvid
LV Mīkstais polsterējums Statīvs (R) M5 skrūves Statīvs (L) M5 skrūves
LT Minkštas paklotas Stovas (R) M5 varžtai Stovas (L) M5 varžtai
Μαλακή προστατευτική
Μονάδα βάσης
Μονάδα βάσης
EL
Μ5 βίδες
Μ5 βίδες
επένδυση
στήριξης (R)
στήριξης (L)
SL Mehka blazina Enota stojala (R) M5 vijaki Enota stojala (L) M5 vijaki
RO Pernă moale Unitate suport (R) M5 şuruburi Unitate suport (L) M5 şuruburi
HR Mekani jastuk Postolje (R) M5 vijci Postolje (L) M5 vijci
BG Мека възглавничка Щанд
(R) M5 винтове Щанд (L) M5 винтове
SR Meka podloga Станд
(R) M5 Сраф Станд (L) M5 Сраф
5

Initial installation
Follow the steps below one by one when using the TV for the first time. Some steps may not be necessary
depending on your TV installation and connection.
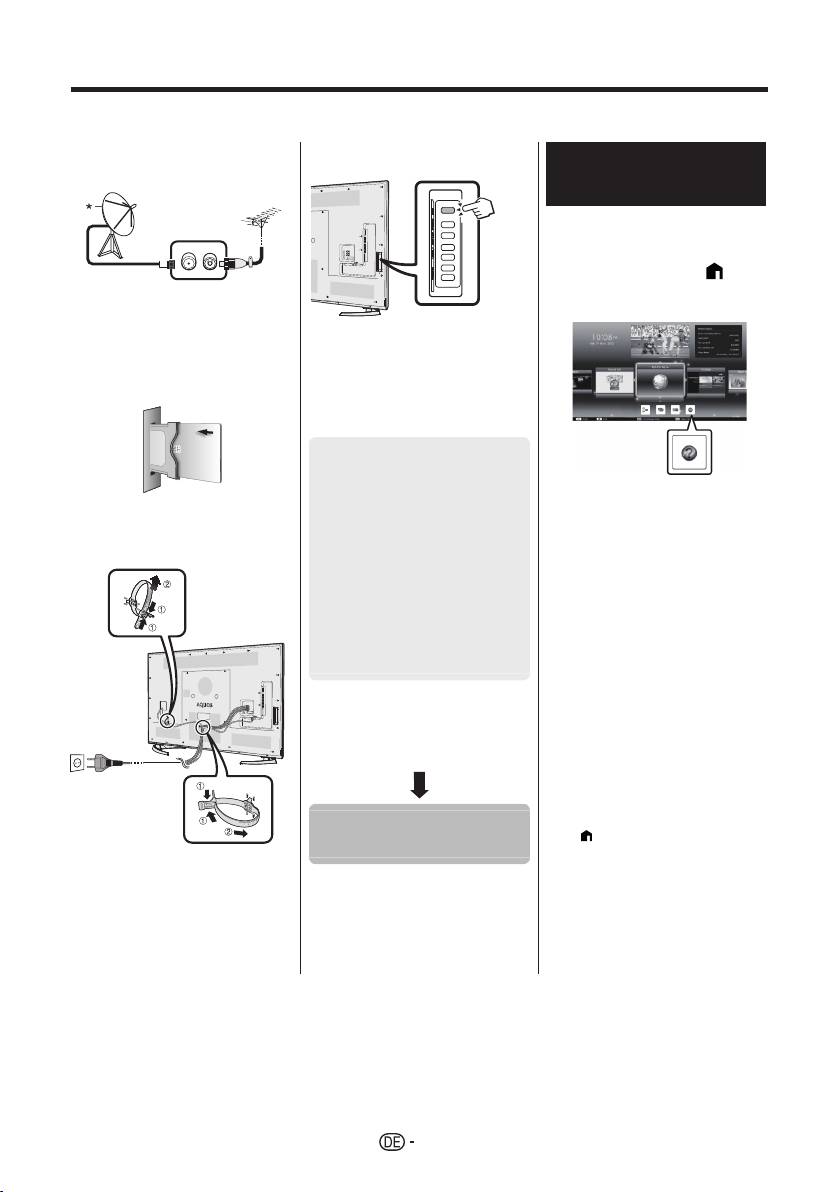
n Connect an antenna cable to the
q Press a on the TV.
Viewing the operation
antenna terminal.
manual stored in the TV
• Refer to the operation manual
(JPEG) stored in the TV for
details.
1 Press (HOME) and the
“HOME” screen will be
* Only connect a satellite antenna
displayed.
to models capable of receiving
satellite broadcasts
o If necessary, insert a CA card into
the CI slot to watch scrambled
r Run the initial auto installation.
broadcasts.
• Follow the guide on the TV screen
to set the following settings.
■ Language setting
■ Home/Store setting
1
■ Country setting*
2 Press a/b/c/d to select
■ PIN setting
p Plug the AC cord into the AC
“Manual”, and then press
outlet.
■ Channel search setting
;.
• Digital search
3 Select the folder/file you wish
− Terrestrial
to view.
2
− Cable*
NOTE
• Analogue search
1
• To change the language of the
• Satellite search*
operation manual, please select the
folder of the language to which you
I Some models do not have this setting.
would like to change.
J Refer to the operation manual stored
The language of the operation manual
in the TV for details on the settings for
will not change even if the OSD
cable broadcasts.
language in the language settings from
the TV main menu is changed.
• If you open the operation manual during
USB-recording, a caution screen will be
displayed that confirms your consent to
Start searching
stop recording.
channels
• When the operation manual is
displayed, returning to the “HOME”
screen is not possible by pressing 6
(Return). Press
(HOME) on the
remote control to return to the “HOME”
screen.
• Place the TV close to the AC
outlet, and keep the power plug
within reach.
• Product shape varies in some
countries.
6

Operation manual content stored in the TV
Introduction
Connecting a PC
Dear SHARP customer ................................GB01
Connecting a PC ..........................................GB57
Contents ......................................................GB01
Displaying a PC image on the TV ................GB57
Important safety precautions .......................GB02
PC control of the TV ....................................GB60
Preparation
Network setup
Using the remote control unit .......................GB04
Connecting to the network ...........................GB62
GB
Part names and functions
Net TV
TV (front/side view) ......................................GB05
What is Net TV? ...........................................GB64
TV (rear view) ..............................................GB05
NETFLIX ......................................................GB64
Remote control unit ......................................GB06
Operations in Net TV ...................................GB64
Quick guide
Enjoying 3D image viewing
Operation overview ......................................GB07
Before using the 3D glasses ........................GB65
Inserting the CA card into the CI module .....GB09
Preparing for the 3D glasses .......................GB66
Recording CAM PIN setting .........................GB09
Using the 3D glasses ...................................GB67
CI plus 1.3 Standard ....................................GB09
Cautions for 3D image viewing ....................GB69
Using the HOME screen ..............................GB10
Display format for 3D and 2D images ..........GB70
Using the Menu screen ................................ GB11
Viewing 3D images ......................................GB71
Using Software keyboard ............................. GB11
Configuring the TV settings to enhance
Initial auto installation
3D image viewing .....................................GB72
Initial auto installation ..................................GB12
Specifications — 3D glasses ......................GB74
Watching TV
Troubleshooting — 3D Images ....................GB74
Daily operation .............................................GB16
Appendix
Favourite Channel Information ....................GB18
Troubleshooting ...........................................GB75
Operator profile ............................................GB18
Updating your TV via DVB-T/T2/C/S/S2 ......GB77
EPG .............................................................GB19
Getting update information ..........................GB77
Teletext ........................................................GB22
Information on the software licence for this
Connecting external devices
product ...................................................... GB78
Introduction to connections ..........................GB24
Deactivating Netflix function ........................GB78
Video connections .......................................GB25
Updating your TV via USB/network .............GB78
Audio connections .......................................GB27
Trademarks ..................................................GB79
AQUOS LINK
Software licences for Net TV .......................GB80
Controlling HDMI devices using
Disclaimers for services using the Internet ..GB80
AQUOS LINK .............................................GB28
Specifications ...............................................GB81
AQUOS LINK connection ............................GB29
Specifications (Wireless LAN) .....................GB82
®
AQUOS LINK setup .....................................GB30
Specifications (Bluetooth
) ..........................GB82
Operating an AQUOS LINK device ..............GB30
Environmental specifications .......................GB83
Using a Smartphone with the TV .................GB32
Mounting the TV on a wall ...........................GB83
Basic adjustment
Dimensional drawings ..................................GB85
Picture settings ............................................GB33
EU Energy Label for Televisions ..................GB86
Audio settings ..............................................GB36
Power save settings .....................................GB37
View settings ................................................GB38
Individual setting — PIN ..............................GB41
Individual setting — Clock ...........................GB41
Individual setting — Language ....................GB42
Useful viewing functions
Optional features settings ............................GB43
Additional features .......................................GB46
Miracast (Mirroring) ......................................GB48
Other useful features
USB-recording .............................................GB49
How to operate USB-recording ....................GB50
SD/USB media/Home network ....................GB53
Selecting the picture size for photo mode ....GB54
USB device compatibility .............................GB56
Home network server compatibility ..............GB56
Selecting the picture size for video mode ....GB56
NOTE
®
• The Bluetooth
word mark and logos are registered
trademarks owned by Bluetooth SIG, Inc. and any
use of such marks by SHARP Corporation is under
license. Other trademarks and trade names are
those of their respective owners.
7
Anfängliche Installation
Führen Sie bei der Inbetriebnahme des TV zunächst der Reihe nach die folgenden Schritte durch. Je nach TV-
Installation und Anschlüssen sind einige der Schritte eventuell nicht erforderlich.
n
Schließen Sie das Antennenkabel
q Drücken Sie a am TV.
Anzeigen der auf dem
an die Antennenbuchse an.
TV gespeicherten
Bedienungsanleitung
• Weitere Informationen finden Sie
in der auf dem TV gespeicherten
Bedienungsanleitung (JPEG).
1 Durch Drücken von
* Schließen Sie eine Satellitenantenne
(HOME) wird der „HOME“-
nur an Modelle an, die für den
Bildschirm angezeigt.
Empfang von Satellitenprogrammen
geeignet sind.
r Führen Sie die anfängliche
o Erforderlichenfalls die CA-Karte
Autoinstallation durch.
für verschlüsselte Programme in
• Befolgen Sie bei den
den CI-Steckplatz einsetzen.
nachfolgenden Einstellungen
die auf dem TV-Bildschirm
erscheinenden Anleitungen.
■ Sprache-Einstellung
■ Daheim/Geschäft-
Einstellung
2 Wählen Sie mit a/b/c/d
p Schließen Sie das Netzkabel an
*1
„Manual“ und drücken Sie
■ Landeinstellung
die Netzsteckdose an.
dann ;.
■ Geheimnummer
3 Wählen Sie den Ordner bzw.
-Einstellung
die Datei, die Sie ansehen
■ Kanalsuche-Einstellung
möchten.
• Digitalsuche
ZUR BEACHTUNG
− Terrestrisch
• Zum Ändern der Sprache der
2
− Kabel*
Bedienungsanleitung wählen Sie bitte den
• Analogsuche
Ordner der gewünschten Sprache.
1
• Satellitensuche*
Die Sprache der Bedienungsanleitung
wird nicht geändert, selbst wenn die OSD-
I Bei einigen Modellen ist diese
Anzeigesprache im Hauptmenü des TV
Einstellung nicht vorhanden.
geändert wird.
J Weitere Informationen zu den
• Wenn Sie die Bedienungsanleitung
Einstellungen für Kabelprogramme
während der USB-Aufnahme öffnen, wird
finden Sie in der auf dem TV
eine Bildschirm mit einem Warnhinweis
gespeicherten Bedienungsanleitung.
angezeigt, in dem Sie bestätigen müssen,
dass die Aufnahme beendet werden soll.
• Während die Bedienungsanleitung
angezeigt wird, kann durch Drücken von
6 (Zurück) nicht wieder zum „HOME“-
Starten Sie die
Bildschirm gewechselt werden. Drücken
Sie
(HOME) auf der Fernbedienung,
Kanalsuche
um wieder zum „HOME“-Bildschirm zu
• Stellen Sie den TV nahe an einer
wechseln.
Netzsteckdose auf und sorgen Sie
dafür, dass der Netzstecker gut
zugänglich ist.
• Das Produkt kann je nach Lieferland
Unterschiede aufweisen.
8

Auf dem TV gespeicherter Bedienungsanleitungsinhalt
Einleitung
Anschließen eines PC
Verehrter SHARP-Kunde .............................DE01
Anschließen eines PC .................................DE57
Inhaltsverzeichnis ........................................DE01
Anzeigen eines PC-Bilds auf dem TV .......... DE57
Wichtige Sicherheitshinweise ......................DE02
PC-Steuerung des TV .................................. DE60
Netzwerk-Einstellungen
Vorbereitung
Anschließen an das Netzwerk .....................DE62
Benutzung der Fernbedienung ....................DE04
Net TV
Bezeichnungen und Funktionen
Was ist Net TV? ...........................................DE64
TV (Vorderseite/Seitenansicht) ....................DE05
NETFLIX ...................................................... DE64
TV (Rückseite) .............................................DE05
Bedienung von Net TV ................................. DE64
Fernbedienung ............................................. DE06
Betrachten von 3D-Bildern
Kurzanleitung
Vor der Benutzung der 3D-Brille ..................DE65
DE
Übersicht über die Bedienung .....................DE07
Vorbereiten der 3D-Brille .............................DE66
Einsetzen der CA-Karte in das CI-Modul ..... DE09
Benutzen der 3D-Brille ................................. DE67
Aufzeichnen von CAM PIN-Einstellungen ...DE09
Vorsichtsmaßregeln zum Betrachten von
CI Plus 1.3-Standard ...................................DE09
3D-Bildern ................................................. DE69
Verwenden des HOME-Bildschirms ............. DE10
Anzeigeformat für 3D- und 2D-Bilder ........... DE70
Verwenden des Menüs ................................ DE11
Betrachten von 3D-Bildern ........................... DE71
Verwenden der Softwaretastatur ................. DE11
Anpassen der TV-Einstellungen für
Anfängliche Autoinstallation
verbesserte 3D-Bildbetrachtung ............... DE72
Anfängliche Autoinstallation .........................DE12
Technische Daten — 3D-Brille ..................... DE74
Fernsehen
Fehlersuche — 3D-Bilder ............................DE74
Täglicher Betrieb .......................................... DE16
Anhang
Information bevorzugter Kanal ..................... DE18
Fehlersuche ................................................. DE75
Operatorprofil ...............................................DE18
Updaten des TV über DVB-T/T2/C/S/S2 .....DE77
EPG .............................................................DE19
Abrufen von Update-Informationen .............. DE77
Teletext ........................................................DE22
Informationen zur Software-Lizenz für dieses
Anschließen von externen Geräten
Produkt .....................................................DE78
Einführung zu den Anschlüssen ..................DE24
Deaktivierung von Netflix Funktion ..............DE78
Videoanschlüsse ..........................................DE25
Updaten des TV per USB/Netzwerk ............DE78
Audioverbindungen ......................................DE27
Warenzeichen .............................................. DE79
AQUOS LINK
Software-Lizenzen für Net TV ...................... DE80
Steuern von HDMI-Geräten über
Haftungsausschluss für Internetdienste ....... DE80
AQUOS LINK ............................................DE28
Technische Daten ........................................DE81
AQUOS LINK-Anschluss .............................DE29
Technische Daten (Wireless LAN) ...............DE82
®
AQUOS LINK-Einstellungen ........................DE30
Technische Daten (Bluetooth
) ....................DE82
Bedienen eines AQUOS LINK-Geräts .........DE30
Umweltrelevante technische Daten .............DE83
Verwenden eines Smartphones zusammen mit
Befestigen des TV an einer Wand ...............DE83
dem TV .....................................................DE32
Maßzeichnungen .........................................DE85
Grundeinstellung
EU-Energieeffizienzzeichen für
Bildeinstellungen .......................................... DE33
Fernsehgeräte ..........................................DE86
Toneinstellungen ..........................................DE36
Stromspareinstellungen ............................... DE37
Bildeinstellungen .......................................... DE38
Individuelle Einstellung — Geheimnr. ..........DE41
Individuelle Einstellung — Uhrzeit ...............DE41
Individuelle Einstellung — Sprache .............DE42
Praktische Betrachtungsfunktionen
Einstellungen für optionale Funktionen ........ DE43
Zusätzliche Funktionen ................................ DE46
Miracast (Spiegelung) .................................. DE48
Weitere praktische Funktionen
USB-Aufnahme ............................................DE49
Betriebsweise der USB-Aufnahme ..............DE50
SD/USB-Medien/Heimnetzwerk ................... DE53
Ändern Sie die Fotogröße ............................ DE54
USB-Gerätekompatibilität ............................DE56
Kompatibilität mit Heimnetzwerkserver ........ DE56
Wählen der Bildgröße für den
ZUR BEACHTUNG
Videomodus .............................................. DE56
• Die Marke und Logos von Bluetooth® sind
registrierte Handelsmarken von Bluetooth SIG,
Inc., weshalb jede Benutzung dieser Marken
durch SHARP Corporation unter Lizenz erfolgt.
Andere Handelsmarken und -namen gehören ihren
jeweiligen Eigentümern.
9
Installation initiale
Suivez une par une les étapes ci-dessous lorsque vous utilisez le téléviseur pour la première fois. Il se peut que
certaines étapes ne soient pas nécessaires en fonction de l’installation et des raccordements de votre téléviseur.
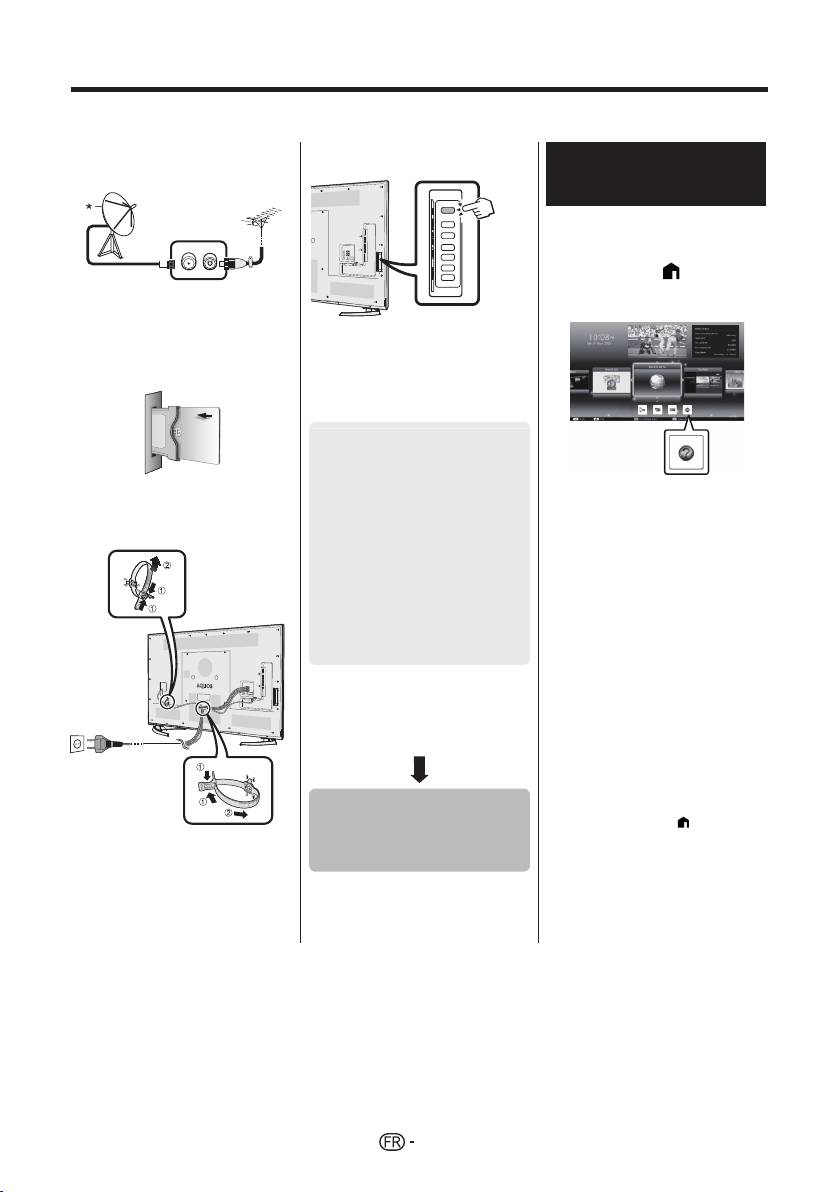
n Branchez le câble d’antenne à la
q Appuyez sur a du téléviseur.
Visionnement du mode
prise d’antenne.
d’emploi conservé dans le
téléviseur
• Reportez-vous au mode d’emploi
(JPEG) conservé dans le
téléviseur pour en savoir plus.
1 Appuyez sur (HOME)
* Ne branchez une antenne satellite
pour afficher l’écran « HOME
que sur les modèles capables de
».
recevoir des chaînes satellites
o Au besoin, insérez la carte CA
r Exécutez l’auto installation
dans la fente CI pour voir les
initiale.
émissions cryptées.
• Suivez le guide sur l’écran du
téléviseur pour procéder aux
réglages suivants.
■ Réglage de la langue
■ Réglage Domicile/
Magasin
p Branchez le cordon secteur dans
1
2 Appuyez sur a/b/c/d pour
■ Réglage pays*
la prise électrique.
sélectionner « Manual », et
■ Réglage du code secret
appuyez ensuite sur ;.
■ Réglage de la recherche
3 Sélectionnez le dossier ou
de canaux
fichier que vous souhaitez
• Recherche numérique
consulter.
− Hertzienne
REMARQUE
2
− Câble*
• Pour modifier la langue du mode
• Recherche analogique
d’emploi, sélectionnez le dossier de la
1
• Recherche de satellites*
langue que vous souhaitez utiliser.
La langue du mode d’emploi ne
I Certains modèles ne possèdent pas
changera pas même si la langue de
ce réglage.
l’OSD dans les réglages de langue
J Reportez-vous au mode d’emploi
dans le menu principal du téléviseur est
conservé dans le téléviseur pour
modifiée.
en savoir plus sur les réglages des
• Si vous ouvrez le mode d’emploi
émissions par câble.
pendant l’enregistrement USB, un écran
d’avertissement s’affiche pour confirmer
votre accord d’arrêter l’enregistrement.
• Lorsque le mode d’emploi est affiché,
il est impossible de revenir à l’écran
Lancer la
« HOME » en appuyant sur 6
(Retour). Appuyez sur
(HOME) de
recherche des
la télécommande pour revenir à l’écran
• Placez le téléviseur près de la prise
« HOME ».
électrique et gardez la fiche du
canaux
cordon d’alimentation à proximité.
• La forme de la prise peut être
différente dans certains pays.
10

Contenu du mode d’emploi conservé dans le téléviseur
Introduction
Branchement d’un ordinateur
Cher client SHARP ...................................... FR01
Branchement d’un ordinateur ...................... FR57
Table des matières ....................................... FR01
Affichage de l’image d’un ordinateur sur
Précautions de sécurité importantes ........... FR02
le téléviseur ............................................... FR57
Préparation
Commande du téléviseur par ordinateur ..... FR60
Utilisation de la télécommande .................... FR04
Configuration réseau
Nomenclature et fonctions
Connexion au réseau ................................... FR62
Téléviseur (vue de face/de côté) ................. FR05
Net TV
Téléviseur (vue de dos) ............................... FR05
Qu’est-ce que Net TV ? ............................... FR64
Télécommande ............................................ FR06
NETFLIX ...................................................... FR64
Guide rapide
Fonctionnement de Net TV .......................... FR64
Aperçu du fonctionnement ........................... FR07
Visionnement d’images 3D
Insertion de la carte CA dans le
Avant d’utiliser les lunettes 3D ..................... FR65
module CI ................................................. FR09
Préparation des lunettes 3D ........................ FR66
Enregistrement du réglage du code
Utilisation des lunettes 3D ........................... FR67
secret CAM .................................................. FR09
Précautions relatives au visionnement
FR
Norme CI Plus 1.3 ....................................... FR09
d’images 3D
.............................................. FR69
Utilisation de l’écran HOME ......................... FR10
Format d’affichage pour les
Utilisation de l’écran du Menu ...................... FR11
images 3D et 2D ....................................... FR70
Utilisation du clavier virtuel .......................... FR11
Visionnement d’images 3D .......................... FR71
Auto installation initiale
Configuration des réglages du téléviseur pour
Auto installation initiale ................................ FR12
améliorer le visionnement d’images 3D .... FR72
Regarder la télévision
Spécifications — lunettes 3D ....................... FR74
Opérations quotidiennes .............................. FR16
Que faire en cas d’anomalie ? —
Informations Concernant les
Images 3D ................................................ FR74
Canaux Favoris ......................................... FR18
Annexe
Profil d’opérateur ......................................... FR18
Que faire en cas d’anomalie ? ..................... FR75
EPG ............................................................. FR19
Mise à jour de votre téléviseur via
Télétexte ...................................................... FR22
DVB-T/T2/C/S/S2 ..................................... FR77
Raccordement d’appareils externes
Obtenir des informations sur la mise à jour . FR77
Présentation des branchements .................. FR24
Informations sur la licence d’utilisation du
Connexions vidéo ........................................ FR25
logiciel pour ce produit .............................. FR78
Connexions audio ........................................ FR27
Désactivation de la fonction Netflix .............. FR78
AQUOS LINK
Mise à jour du téléviseur via USB/réseau .... FR78
Commande d’appareils HDMI à l’aide
Marques ....................................................... FR79
d’AQUOS LINK ......................................... FR28
Licences logicielles pour Net TV .................. FR80
Connexion AQUOS LINK ............................. FR29
Avis de non-responsabilité pour les services
Réglage AQUOS LINK ................................. FR30
utilisant Internet ........................................ FR80
Commande d’un appareil AQUOS LINK ...... FR30
Fiche technique ........................................... FR81
Utilisation d’un smartphone avec
Spécifications (LAN sans fil)
........................ FR82
®
le téléviseur ............................................... FR32
Spécifications (Bluetooth
)
........................... FR82
Réglage de base
Spécifications environnementales ............... FR83
Réglages de l’image .................................... FR33
Installation du téléviseur sur un mur ............ FR83
Réglages audio ............................................ FR36
Schémas dimensionnels .............................. FR85
Réglages de l’économie d’énergie ............... FR37
Étiquette énergie européenne pour
Voir les réglages .......................................... FR38
les télévisions ........................................... FR86
Réglage individuel — Code secret .............. FR41
Réglage individuel — Horloge ..................... FR41
Réglage individuel — Langue ...................... FR42
Fonctions de visualisation pratiques
Réglages des fonctions optionnelles ........... FR43
Fonctionnalités supplémentaires ................. FR46
Miracast (Mode miroir) ................................. FR48
Autres fonctions pratiques
Enregistrement USB .................................... FR49
Comment utiliser l’enregistrement USB ....... FR50
Support SD/USB/Réseau local .................... FR53
Sélection de la taille d’image pour
le mode photo ........................................... FR54
REMARQUE
Compatibilité des périphériques USB .......... FR56
• La marque et les logos Bluetooth® sont des marques
Compatibilité du serveur Réseau local ........ FR56
commerciales déposées de Bluetooth SIG, Inc. et toute
Sélection de la taille d’image pour
utilisation de ces marques par SHARP Corporation
le mode vidéo ........................................... FR56
fait l’objet d’une licence. Les autres marques et noms
commerciaux appartiennent à leurs propriétaires
respectifs.
11

Installazione iniziale
Quando si utilizza il televisore per la prima volta seguire le seguenti fasi. Alcune fasi possono non essere necessarie
a seconda dell’installazione e del collegamento del televisore.
n Collegare il cavo dell’antenna al
q Premere a sul televisore.
Visualizzazione del manuale
terminale dell’antenna.
di istruzioni memorizzato
nel televisore
• Per i dettagli fare riferimento al
manuale di istruzioni (formato
JPEG) memorizzato nel televisore.
1 Premere (HOME) per
* Collegare l’antenna satellitare
visualizzare la schermata
solo ai modelli in grado di ricevere
“HOME”.
trasmissioni satellitari.
o Se necessario inserire la scheda
r Eseguire l’autoinstallazione
CA nella slot CI per vedere
iniziale.
trasmissioni criptate.
• Seguire la guida sullo schermo
del televisore per effettuare le
seguenti impostazioni.
■ Impostazione lingua
■ Impostazione Casa/
Grande Magazzino
p Inserire il cavo CA nella presa CA.
2 Premere a/b/c/d per
1
■ Impostazione paese*
selezionare “Manual” e poi
■ Impostazione codice
premere ;.
segreto
3 Selezionare la cartella/il file
■ Impostazione ricerca
che si desidera visionare.
canale
NOTA
• Per modificare la lingua del manuale di
• Ricerca digitale
istruzioni, selezionare la cartella della
− Terrestre
2
lingua che si desidera consultare.
− Cavo*
La lingua del manuale di istruzioni
• Ricerca analogica
non viene modificata anche se
1
• Ricerca satellite*
viene cambiata la lingua OSD nelle
impostazioni della lingua del menu
I Alcuni modelli non hanno questa
principale del televisore.
impostazione.
• Se il manuale di istruzioni viene aperto
J Fare riferimento al manuale di istruzioni
durante la registrazione con USB,
memorizzato nel televisore per
appare sullo schermo un messaggio di
dettagli relativi alle impostazioni per le
avvertimento che richiede la conferma
trasmissioni via cavo.
dell’interruzione della registrazione.
• Quando viene visualizzato il manuale
di istruzioni, non è possibile ritornare
alla schermata “HOME” premendo
6 (Indietro). Premere
(HOME) sul
• Posizionare il televisore vicino alla
Avviare la ricerca
telecomando per tornare alla schermata
presa CA di corrente e mantenere
“HOME”.
dei canali
la spina a poca distanza.
• La forma dell’apparecchio varia a
seconda del paese.
12

Contenuti del manuale di istruzioni memorizzato nel televisore
Introduzione
Collegamento di un PC
Gentile cliente SHARP ...................................IT01
Collegamento di un PC ..................................IT57
Contenuto ......................................................IT01
Visualizzazione di un’immagine PC
Importanti precauzioni di sicurezza ...............IT02
sul televisore ...............................................IT57
Preparativi
Controllo del televisore tramite PC ................IT60
Uso del telecomando .....................................IT04
Impostazione rete
Nomi delle parti e funzioni
Connessione alla rete ....................................IT62
Televisore (vista frontale/laterale) ..................IT05
Net TV
Televisore (vista posteriore) ...........................IT05
Che cosa è la Net TV? ...................................IT64
Telecomando .................................................IT06
NETFLIX ........................................................IT64
Guida rapida
Funzionamento della Net TV .........................IT64
Panoramica funzionamento ...........................IT07
Fruire della visione d’immagini 3D
Inserimento della scheda CA nel modulo CI
...IT09
Prima dell’utilizzo degli occhiali 3D ................IT65
Registrazione impostazione CAM PIN ...........IT09
Preparazione all’uso degli occhiali 3D ...........IT66
CI plus Standard 1.3 ......................................IT09
Utilizzo degli occhiali 3D ................................IT67
Utilizzo della schermata HOME .....................IT10
Precauzioni per la visione di immagini 3D .....IT69
Utilizzo della schermata Menu ....................... IT11
Visualizzazione del formato per
Utilizzo della tastiera Software ....................... IT11
immagini 3D e 2D .......................................IT70
Autoinstallazione iniziale
Visione d’immagini 3D ...................................IT71
Autoinstallazione iniziale ................................IT12
Configurazione delle impostazioni del televisore
IT
Guardare la TV
per migliorare la visione d’immagini 3D ......IT72
Funzionamento giornaliero ............................IT16
Dati tecnici — occhiali 3D
..............................IT74
Informazioni sul canale preferito ....................IT18
Risoluzione degli errori — immagini 3D .........IT74
Profilo operatore ............................................IT18
Appendice
EPG ...............................................................IT19
Risoluzione degli errori ..................................IT75
Televideo ........................................................IT22
Aggiornamento del televisore via
Collegamento di dispositivi esterni
DVB-T/T2/C/S/S2 .......................................IT77
Introduzione ai collegamenti ..........................IT24
Ottenimento d’informazioni aggiornate ..........IT77
Collegamenti video ........................................IT25
Informazioni sulla licenzia software per questo
Collegamenti audio ........................................IT27
prodotto ....................................................... IT78
AQUOS LINK
Disattivare la funzione Netflix ........................IT78
Controllo di dispositivi HDMI utilizzando
Aggiornamento del televisore via USB/rete ...IT78
AQUOS LINK ..............................................IT28
Marchi ............................................................IT79
Collegamento AQUOS LINK ..........................IT29
Licenze software per la Net TV ......................IT80
Impostazione AQUOS LINK ...........................IT30
Disclaimer per i servizi che utilizzano
Funzionamento del dispositivo
internet ........................................................ IT80
AQUOS LINK ..............................................IT30
Dati tecnici .....................................................IT81
Utilizzo di uno Smartphone con il televisore
... IT32
Dati tecnici (LAN wireless) .............................IT82
®
Regolazione base
Dati tecnici (Bluetooth
) ................................. IT82
Impostazioni immagine ..................................IT33
Caratteristiche tecniche legate all’ambiente
... IT83
Impostazioni audio .........................................IT36
Installazione del televisore su una parete ......IT83
Impostazioni risparmio energetico .................IT37
Disegni dimensionali ......................................IT85
Impostazioni visione ......................................IT38
Etichetta energetica EU per i televisori ..........IT86
Impostazione individuale — Codice segreto
...IT41
Impostazione individuale — Orologio ............IT41
Impostazione individuale — Lingua ...............IT42
Utili funzioni per la visione
Impostazioni caratteristiche opzionali ............IT43
Caratteristiche aggiuntive ..............................IT46
Miracast (Mirroring) ........................................IT48
Altre caratteristiche utili
Registrazione con USB ..................................IT49
Funzionamento della registrazione
con USB ......................................................IT50
SD/USB media/Rete casa .............................IT53
Selezione della dimensione dell’immagine
per la modalità foto .....................................IT54
Compatibilità dispositivo USB ........................IT56
Compatibilità del server Rete casa ................IT56
Selezione della dimensione dell’immagine
NOTA
per la modalità video ...................................IT56
• La parola e il logo Bluetooth® sono marchi registrati
di proprietà di Bluetooth SIG, Inc. e il loro utilizzo da
parte di SHARP Corporation è coperto da licenza.
Tutti gli altri marchi di fabbrica e nomi commerciali
sono dei rispettivi proprietari.
13

Installatie bij eerste gebruik
Voer de onderstaande stappen een voor een uit wanneer u de TV de eerste maal gebruikt. Sommige stappen zijn
mogelijk niet nodig afhankelijk van de installatie en aansluiting van de TV.
q Druk op a van de TV.
n Sluit de antennekabel op de
Kijken in de
antenneaansluiting aan.
gebruiksaanwijzing die in de
TV is opgeslagen
• Zie de gebruiksaanwijzing (JPEG)
die in de TV is opgeslagen voor
verdere informatie.
1 Druk op (HOME) om het
* Sluit een satellietantenne
“HOME” scherm weer te
alleen aan op modellen die
geven.
satellietuitzendingen kunnen
ontvangen.
r Voer de automatische installatie
bij eerste gebruik uit.
o Steek indien nodig een CA-
• Volg de gids op het TV-scherm
kaart in de CI-sleuf om naar
om de volgende instellingen te
gescramblede zenders te kijken.
maken.
■ Instelling van de taal
■ Thuis/Winkel-instelling
1
■ Landinstelling*
■ Instelling van de PIN
2 Druk op a/b/c/d om
p Steek de stekker van het
“Manual” te selecteren en
■ Instelling voor zoeken
netsnoer in het stopcontact.
druk dan op ;.
van kanalen
3 Selecteer de map/bestand
• Digitaal zoeken
die u wilt bekijken.
− Terrestrisch
2
− Kabel*
OPMERKING
• Analoog zoeken
• Om de taal van de gebruiksaanwijzing
1
• Satelliet zoeken*
te veranderen, selecteert u de map van
de taal waarnaar u wilt veranderen.
I Sommige modellen hebben deze
De taal van de gebruiksaanwijzing
instelling niet.
verandert niet wanneer de OSD-taal in
J Raadpleeg de gebruiksaanwijzing
de taalinstellingen van het hoofdmenu
opgeslagen in de TV voor verdere
van de TV wordt veranderd.
informatie over de instellingen voor de
• Als u de gebruiksaanwijzing tijdens
kabeluitzendingen.
een USB-opname opent, verschijnt
een waarschuwingsscherm waarin u
gevraagd wordt of u toestemming geeft
om de opname te stoppen.
• Wanneer de gebruiksaanwijzing wordt
Start het zoeken
weergegeven, kan er niet naar het
“HOME” scherm worden teruggekeerd
van kanalen
door op 6 (Terug) te drukken. Druk op
(HOME) van de afstandsbediening
om terug te keren naar het “HOME”
scherm.
• Plaats de TV in de buurt van het
stopcontact en zorg dat de netstekker
gemakkelijk bereikbaar is.
• De uitvoering van het netsnoer
verschilt afhankelijk van het land van
bestemming.
14

Inhoud van de gebruiksaanwijzing opgeslagen in de TV
Inleiding
Aansluiten van een PC
Beste SHARP klant ...................................... NL01
Aansluiten van een PC ................................ NL57
Inhoudsopgave ............................................ NL01
Weergeven van een PC-beeld op de TV ..... NL57
Belangrijke veiligheidsmaatregelen ............. NL02
PC-besturing van de TV .............................. NL60
Voorbereidingen
Netwerkinstellingen
Gebruik van de afstandsbediening .............. NL04
Verbinden met het netwerk .......................... NL62
Benaming en functies van de onderdelen
Net TV
TV (voorkant/zijkant) .................................... NL05
Wat is Net TV? ............................................. NL64
TV (achterkant) ............................................ NL05
NETFLIX ...................................................... NL64
Afstandsbediening ....................................... NL06
Gebruik van Net TV ..................................... NL64
Snelstartgids
Genieten van 3D beeldweergave
Overzicht van de bediening ......................... NL07
Voorafgaande aan het gebruik
Plaatsen van de CA-kaart in de CI-module
.. NL09
van de 3D bril
............................................ NL65
Opname CAM PIN instelling ........................ NL09
Voorbereidingen voor de 3D bril .................. NL66
CI plus 1.3 Standaard .................................. NL09
De 3D bril gebruiken .................................... NL67
Gebruik van het HOME scherm ................... NL10
Cautions voor 3D image viewing ................. NL69
Gebruik van het Menu scherm ......................NL11
Weergaveformaat voor 2D en 3D beelden
.... NL70
Gebruik van het softwaretoetsenbord ...........NL11
Kijken naar 3D beelden ............................... NL71
Automatische installatie bij eerste gebruik4
Wijzigen van de TV-instellingen voor het
Automatische installatie bij eerste gebruik ... NL12
verbeteren van de 3D beeldweergave ...... NL72
TV kijken
Technische gegevens — 3D bril .................. NL74
Basisbediening ............................................ NL16
Problemen oplossen — 3D beelden ............ NL74
Favoriete Kanaalinformatie .......................... NL18
Aanhangsel
Operator profiel ............................................ NL18
Problemen oplossen .................................... NL75
NL
EPG ............................................................. NL19
Updaten van de TV via DVB-T/T2/C/S/S2 ... NL77
Teletekst ....................................................... NL22
Ophalen van update-informatie ................... NL77
Aansluiten van externe apparaten
Informatie over de softwarelicentie
Inleiding tot de aansluitingen ....................... NL24
voor dit product
.......................................... NL78
Video-aansluitingen ..................................... NL25
Het deactiveren van de Netflix Functie ........ NL78
Audio-aansluitingen ..................................... NL27
Updaten van de TV via USB/netwerk .......... NL78
AQUOS LINK
Handelsmerken ............................................ NL79
Bedienen van HDMI-apparaten met
Softwarelicenties voor Net TV ..................... NL80
AQUOS LINK ............................................ NL28
Disclaimers voor services die
AQUOS LINK verbinding ............................. NL29
internet gebruiken ..................................... NL80
AQUOS LINK instelling ................................ NL30
Technische gegevens .................................. NL81
Bedienen van een AQUOS LINK apparaat
... NL30
Technische gegevens (draadloze LAN) ....... NL82
®
Een Smartphone met de TV gebruiken ....... NL32
Technische gegevens (Bluetooth
) .............. NL82
Basisinstelling
Energiespecificaties ..................................... NL83
Beeldinstellingen .......................................... NL33
Bevestigen van de TV aan de muur ............ NL83
Audio-instellingen ........................................ NL36
Maattekeningen ........................................... NL85
Stroombesparingsinstellingen ...................... NL37
EU-energielabel voor televisies ................... NL86
Weergave-instellingen ................................. NL38
Overige — PIN ............................................. NL41
Overige — Klok ............................................ NL41
Overige — Taal ............................................ NL42
Handige weergavefuncties
Instellingen voor de optionele functies ......... NL43
Extra voorzieningen ..................................... NL46
Miracast (Mirroring) ...................................... NL48
Andere handige functies
USB-opname ............................................... NL49
Hoe u de USB-opname kunt bedienen ........ NL50
SD/USB-media/thuisnetwerk ....................... NL53
Selecteren van de beeldgrootte voor de
videomodus .............................................. NL54
Compatibiliteit met USB-apparaten ............. NL56
Compatibiliteit met thuisnetwerkservers ...... NL56
Selecteren van de beeldgrootte voor de
videomodus .............................................. NL56
OPMERKING
®
• Het Bluetooth
woord, merk en logo’s zijn
gedeponeerde handelsmerken in het eigendom van
Bluetooth SIG, Inc. en het gebruik door SHARP
Corporation van deze merken gebeurt onder licentie.
Andere handelsmerken en handelsnamen zijn van
hun respectievelijke eigenaars.
15

Instalación inicial
Al utilizar el televisor por primera vez siga estos pasos uno a uno. Dependiendo de la instalación y conexión de su
televisor puede que algunos pasos no sean necesarios.
n Conecte el cable de la antena al
q Pulse a en el televisor.
Para ver el manual del
terminal de la antena.
usuario guardado en el
televisor
• Consulte el manual del usuario
(JPEG) guardado en el televisor
para conocer detalles.
1 Pulse (HOME) y se
* Solo conecte una antena para
visualizará la pantalla
satélite a modelos capaces de
“HOME”.
recibir emisiones por satélite
o De ser necesario, inserte la
r Ejecute la instalación automática
tarjeta CA en la ranura CI para
inicial.
ver emisiones codificadas.
• Siga la guía en la pantalla del
televisor para hacer los siguientes
ajustes.
■ Ajuste del idioma
■ Ajuste Hogar/Tienda
1
■ Ajuste de país*
p Enchufe el cable de CA en la
2 Pulse a/b/c/d para
toma de CA.
■ Ajuste código secreto
seleccionar “Manual”, y luego
pulse ;.
■ Ajuste de búsqueda de
canal
3 Seleccione la carpeta/el
• Búsqueda digital
archivo que desea ver.
− Terrestre
NOTA
2
− Cable*
• Para cambiar el idioma del manual
• Búsqueda analógica
del usuario, seleccione la carpeta del
1
• Búsqueda satélite*
idioma al cual quiere cambiar.
El idioma del manual del usuario no
I Algunos modelos no tienen este ajuste.
cambiará aunque se cambie el idioma
J Consulte el manual del usuario
de la OSD en los ajustes de idioma en
guardado en el televisor para conocer
el menú principal del televisor.
detalles sobre los ajustes para las
• Si abre el manual del usuario durante
transmisiones por cable.
la grabación USB, se visualizará una
pantalla de precaución que confirma
su consentimiento para detener la
grabación.
• Cuando se visualiza el manual del
Iniciar búsqueda
usuario, no es posible regresar a
la pantalla “HOME” pulsando 6
de canales
(Retornar). Pulse
(HOME) en el
mando a distancia para retornar a la
pantalla “HOME”.
• Coloque el televisor cerca de
la toma de CA, y mantenga el
enchufe al alcance de la mano.
• La forma del producto varía en
algunos países.
16

Contenido del manual del usuario guardado en el televisor
Introducción
Conexión de un PC
Estimado cliente de SHARP ........................ ES01
Conexión de un PC ...................................... ES57
Contenido .................................................... ES01
Visualización de una imagen de PC
Precauciones importantes de seguridad ..... ES02
en el televisor ............................................ ES57
Preparación
Control del televisor mediante PC ............... ES60
Utilización del mando a distancia ................ ES04
Configuración de la red
Nombres y funciones de las partes
Conexión a la red ......................................... ES62
Televisor (vista frontal/lateral) ...................... ES05
Net TV
Televisor (vista trasera) ................................ ES05
¿Qué es Net TV? ......................................... ES64
Mando a distancia ........................................ ES06
NETFLIX ...................................................... ES64
Guía rápida
Operaciones en Net TV ............................... ES64
Resumen del funcionamiento ...................... ES07
Disfrutando de visionado de imágenes en 3D
Inserción de la tarjeta CA en el módulo CI .. ES09
Antes de utilizar las gafas 3D ...................... ES65
C. grabación CAM PIN ................................ ES09
Preparación para las gafas 3D .................... ES66
CI plus 1.3 estándar ..................................... ES09
Uso de las gafas 3D .................................... ES67
Uso de la pantalla HOME ............................ ES10
Precauciones para el visionado
Uso de la Pantalla Menú .............................. ES11
de imágenes 3D ........................................ ES69
Uso del teclado del software ........................ ES11
Formato de visionado para imágenes
Instalación automática inicial
en 3D y en 2D
............................................ ES70
Instalación automática inicial ....................... ES12
Visionado de imágenes en 3D ..................... ES71
Viendo televisión
Configurando los ajustes del televisor para
Operación diaria .......................................... ES16
mejorar el visionado en 3D ....................... ES72
Información del canal favorito ...................... ES18
Especificaciones — gafas para 3D .............. ES74
Perfil del operador ....................................... ES18
Búsqueda de errores — Imágenes en 3D ... ES74
EPG ............................................................. ES19
Apéndice
Teletexto ...................................................... ES22
Búsqueda de errores ................................... ES75
Conexión de dispositivos externos
Actualización de su televisor vía
Introducción a las conexiones ..................... ES24
DVB-T/T2/C/S/S2
....................................... ES77
ES
Conexiones de vídeo ................................... ES25
Obtención de información sobre
Conexiones de audio ................................... ES27
actualización ............................................. ES77
AQUOS LINK
Información sobre la licencia de software
Control de equipos HDMI utilizando
para este producto .................................... ES78
AQUOS LINK ............................................ ES28
Desactivar la función Netflix ........................ ES78
Conexión de AQUOS LINK .......................... ES29
Actualización de su televisor vía USB/red ... ES78
Configuración de AQUOS LINK ................... ES30
Protección medioambiental ......................... ES79
Operación de un dispositivo AQUOS LINK .. ES30
Marcas comerciales ..................................... ES79
El uso de un Smartphone con la TV ............ ES32
Licencias de software para Net TV .............. ES80
Ajuste básico
Renuncias de responsabilidad respecto a
Ajustes de imagen ....................................... ES33
servicios que usan Internet ....................... ES80
Ajustes del audio ......................................... ES36
Especificaciones .......................................... ES81
Ajustes de ahorro de energía ...................... ES37
Especificaciones (LAN inalámbrica) ............ ES82
®
Ajustes del visionado ................................... ES38
Especificaciones (Bluetooth
) ...................... ES82
Ajuste individual — Código secreto ............. ES41
Especificaciones medioambientales ............ ES83
Ajuste individual — Reloj ............................. ES41
Montaje del televisor en una pared .............. ES83
Ajuste individual — Idioma .......................... ES42
Proyecciones dimensionales ....................... ES85
Funciones de visualización útiles
Etiqueta energética de la UE
Ajustes de funciones opcionales ................. ES43
para televisores ........................................ ES86
Funciones adicionales ................................. ES46
Miracast (Reflejo) ......................................... ES48
Otras funciones útiles
Grabación USB ............................................ ES49
Cómo operar la grabación USB ................... ES50
Medio USB/Red Hogar ................................ ES53
Selección del tamaño de imagen
para modo foto
.......................................... ES54
Compatibilidad de equipo USB .................... ES56
Compatibilidad de servidor para la
red Hogar .................................................. ES56
Selección del tamaño de imagen
NOTA
para modo vídeo
....................................... ES56
• La marca Bluetooth ® y sus logotipos son marcas
comerciales registradas propiedad de Bluetooth SIG,
Inc. y cualquier uso de dichas marcas por SHARP
Corporation se realiza bajo licencia. Otras marcas y
nombres comerciales pertenecen a sus respectivos
propietarios.
17
Instalação inicial
Siga as etapas abaixo, uma a uma, ao utilizar o televisor pela primeira vez. Algumas etapas podem não ser
necessárias, consoante a instalação e ligação do seu televisor.
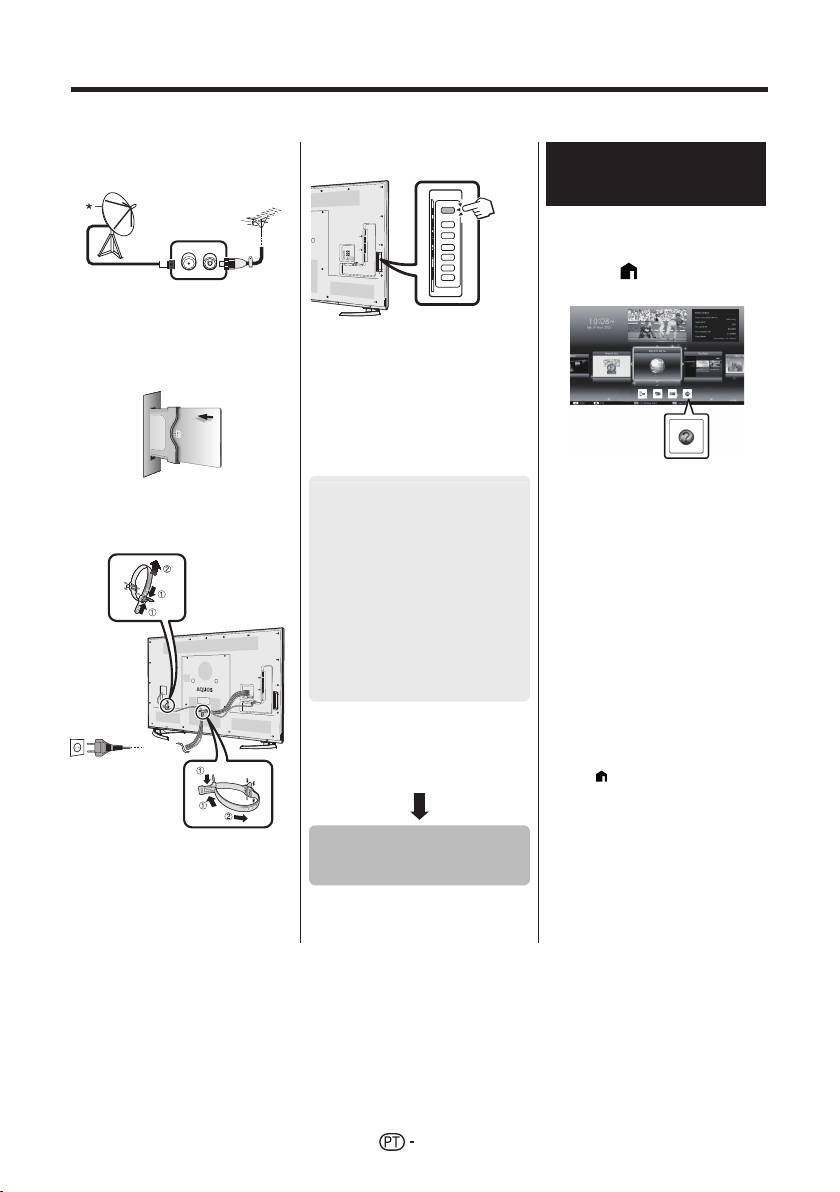
n Ligue o cabo de antena ao
q Prima a no televisor.
Visualização do manual
terminal de antena.
de utilização guardado no
televisor
• Consulte o manual de utilização
guardado (JPEG) no televisor
para mais informações.
1 Prima (HOME) e o ecrã
* Ligue uma antena de satélite
“HOME” será exibido.
apenas a modelos que consigam
receber transmissões por satélite.
o Se necessário, introduza o cartão
CA na ranhura CI para visualizar
transmissões codificadas.
r Execute a auto-instalação inicial.
• Siga o guia no ecrã do televisor
para definir as seguintes definições:
2 Prima a/b/c/d para
p Ligue o cabo de alimentação CA
■ Definição de idioma
seleccionar “Manual” e
à tomada CA.
■ Definição Início/Loja
depois prima ;.
1
■ Definição de país*
3 Seleccione a pasta/ficheiro
que quer ver.
■ Definição de senha
NOTA
■ Definição de busca de
• Para alterar o idioma do manual de
canais
utilização, seleccione a pasta do idioma
pretendido.
• Busca digital
O idioma do manual de utilização não
− Terrestre
será alterado mesmo que se altere
2
− Cabo*
o idioma do OSD nas definições de
• Busca analógico
idioma do menu principal do televisor.
1
• Busca satélite*
• Se abrir o manual de utilização durante
gravação por USB, surgirá um ecrã de
I Alguns modelos não possuem esta
aviso a confirmar a sua autorização
definição.
para parar a gravação.
J Consulte o manual de utilização
• Quando o manual de utilização estiver
guardado no televisor para informações
a ser exibido, não será possível voltar
sobre as definições para transmissões
ao ecrã “HOME” premindo 6 (Voltar).
por cabo.
Prima
(HOME) no controlo remoto
para voltar ao ecrã “HOME”.
• Coloque o televisor perto da
Iniciar a busca de
tomada CA e mantenha a ficha
canais
acessível.
• O formato do produto pode ser
diferente consoante o país.
18

Conteúdo do manual de utilização guardado no televisor
Introdução
Ligar um computador
Caro Cliente SHARP ................................... PT01
Ligar um computador ................................... PT57
Índice ........................................................... PT01
Exibir uma imagem de PC no televisor ........ PT57
Importantes Precauções de Segurança ...... PT02
Controlo do televisor via PC ........................ PT60
Preparativos
Configuração da rede
Utilizar o controlo remoto ............................. PT04
Ligação à rede ............................................. PT62
Nomes dos componentes e respectivas funções
Net TV
Televisor (vista dianteira/lateral) .................. PT05
O que é Net TV? .......................................... PT64
Televisor (vista traseira) ............................... PT05
NETFLIX ...................................................... PT64
Controlo remoto ........................................... PT06
Operações em Net TV ................................. PT64
Guia rápido
Desfrutar da visualização de imagens 3D
Descrição geral das operações ................... PT07
Antes de usar óculos 3D .............................. PT65
Inserir o cartão CA no módulo CI ................. PT09
Preparação para os óculos 3D .................... PT66
Def. gravar CAM PIN ................................... PT09
Utilizando os óculos 3D ............................... PT67
CI plus 1.3 Padrão ....................................... PT09
Precauções para visualização de
Utilização do ecrã HOME ............................ PT10
imagens 3D ............................................... PT69
Utilizar o ecrã do menu .................................PT11
Formato de apresentação para imagens
Utilização do teclado digital ..........................PT11
3D e 2D ..................................................... PT70
Auto-instalação inicial
Visualização de imagens 3D ....................... PT71
Auto-instalação inicial .................................. PT12
Configuração das definições do televisor para
Ver televisão
melhorar a visualização de imagens 3D ... PT72
Utilização diária ........................................... PT16
Especificações — Óculos 3D ...................... PT74
Informação de canal preferido ..................... PT18
Resolução de problemas — Imagens 3D .... PT74
Perfil de operador ........................................ PT18
Apêndice
EPG ............................................................. PT19
Resolução de problemas ............................. PT75
Teletexto ...................................................... PT22
Actualizar o seu televisor via DVB-T/
Ligar dispositivos externos
T2/C/S/S2 ................................................. PT77
Introdução às ligações ................................. PT24
Obter informação sobre a actualização ....... PT77
Ligações vídeo ............................................. PT25
Informações sobre a licença de software
Ligações áudio ............................................. PT27
deste produto ............................................ PT78
AQUOS LINK
Desactivar a função Netflix .......................... PT78
Controlar aparelhos HDMI através de
Actualizar o televisor através de USB/rede
... PT78
PT
AQUOS LINK ............................................ PT28
Marcas comerciais ....................................... PT79
Ligação do AQUOS LINK ............................ PT29
Licenças de software para Net TV ............... PT80
Configuração de AQUOS LINK .................... PT30
Exclusões de responsabilidade relativas a
Utilizar um aparelho AQUOS LINK .............. PT30
serviços que utilizem a Internet ................ PT80
Utilizar um Smartphone com o televisor ...... PT32
Especificações ............................................. PT81
Definição básica
Especificações (Wireles LAN) ..................... PT82
®
Definições da imagem ................................. PT33
Especificações (Bluetooth
) ........................ PT82
Definições áudio .......................................... PT36
Especificações ambientais .......................... PT83
Definições de poupança de energia ............ PT37
Montar o televisor na parede ....................... PT83
Definições da visualização .......................... PT38
Medidas ....................................................... PT85
Definição individual — Senha ...................... PT41
Rótulo energético da UE para os
Definição individual — Relógio .................... PT41
televisores ................................................. PT86
Definição individual — Idiomas .................... PT42
Funções de visualização úteis .......................... PT43
Definições de funções opcionais ................. PT43
Funções adicionais ...................................... PT46
Miracast (Espelhamento) ............................. PT48
Outras funções úteis
Gravação USB ............................................. PT49
Como operar gravações USB ...................... PT50
Suporte SD/USB/Rede doméstica ............... PT53
Seleccionar o tamanho da imagem para o
modo de FOTO ......................................... PT54
Compatibilidade do dispositivo USB ............ PT56
Compatibilidade do servidor de rede
doméstica ................................................. PT56
Seleccionar o tamanho da imagem para o
NOTE
modo de vídeo... ....................................... PT56
®
• A palavra, a marca e os logótipos Bluetooth
são marcas comerciais registadas propriedade
da Bluetooth SIG, Inc. Todas as utilizações das
mesmas pela SHARP estão licenciadas. As outras
marcas e nomes comerciais são propriedade dos
respectivos titulares.
19
Başlangıç kurulumu
TV’yi ilk kez kullanırken aşağıdaki adımları izleyin. TV montajınıza veya bağlantınıza bağlı olarak bazı adımlar gerekli
olmayabilir.
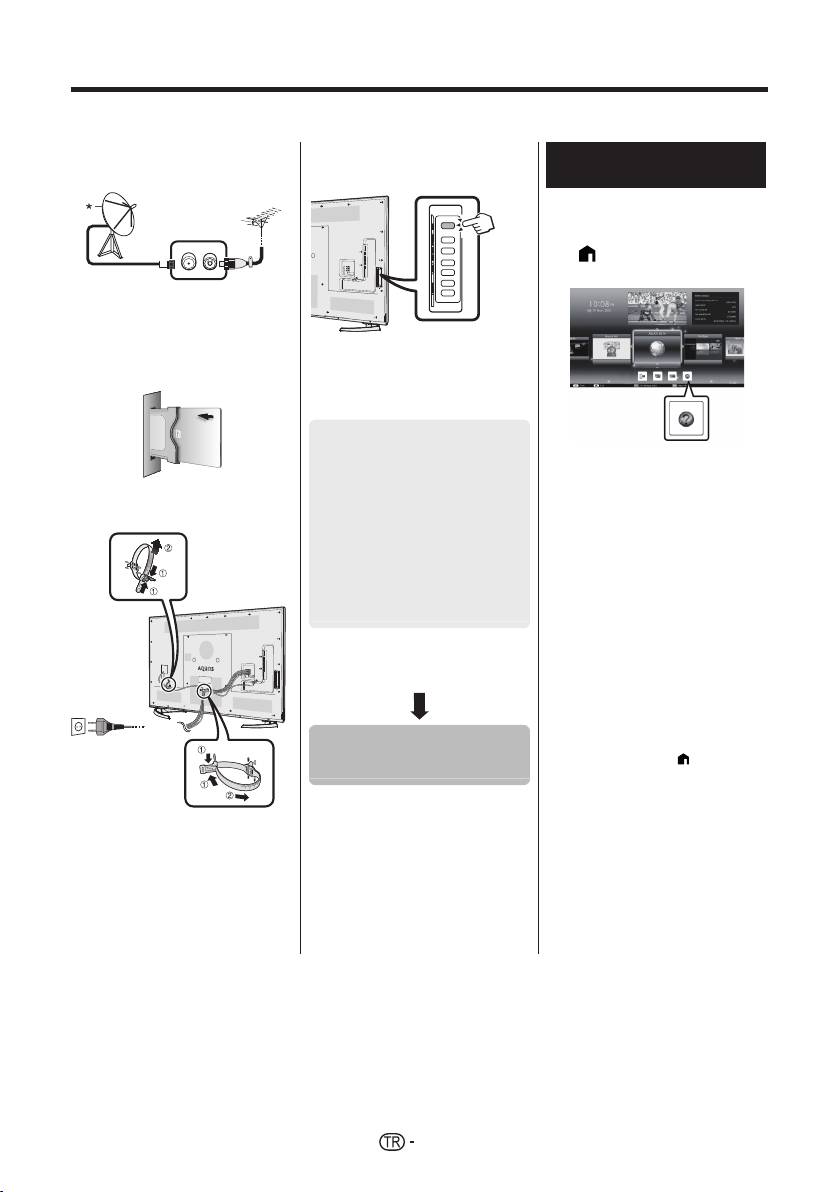
n Anten terminaline bir anten
q TV’nin üzerindeki a düğmesine
TV’de kayıtlı olan kullanım
kablosu takın.
basın.
kılavuzunu görüntüleme
• Ayrıntılar için TV’de kayıtlı olan
kullanım kılavuzuna (JPEG)
bakınız.
1 ’ye (HOME) bastığınızda
“HOME” ekranı çıkar.
* Uydu anteni, yalnızca uydu
yayınlarını alabilen modellere
bağlanabilir.
o Gerekirse, karışmış yayınları
izlemek için CI yuvasına bir CA
kartı takın.
r Otomatik ön kurulumu çalıştırın.
• Aşağıdaki ayarları yapmak için TV
ekranındaki talimatları uygulayın.
■ Lisan ayarı
■ Ev/Mağaza ayarı
2 “Manual”yı seçmek için a/b/
1
■ Ülke ayarı*
c/d düğmelerine, ardından
p AC kablosunu AC çıkışına takın.
; düğmesine basın.
■ PIN ayarı
3 Görmek istediğiniz klasörü/
■ Kanal arama ayarı
dosyayı seçin.
• Dijital arama
NOT
− Karasal
• Kullanım kılavuzunun dilini değiştirmek
2
− Kablo*
için değiştirmek istediğiniz dilin
• Analog arama
klasörünü seçin.
1
• Uydu arama*
OSD dili TV’nin ana menüsündeki dil
ayarlarından değiştirilse de, kullanım
I Bazı modellerde bu ayar yoktur.
kılavuzunun dili değişmez.
J Kablolu yayın ayarlarıyla ilgili ayrıntılar
• USB kaydı sırasında kullanım
için TV’de kayıtlı olan kullanım
kılavuzunun açılması durumunda
kılavuzuna başvurun.
kaydın durdurulması için onay vermenizi
isteyen bir uyarı ekranı çıkar.
• Ekranda kullanım kılavuzu çıktığında
6’ya (Geri Dön) basarak “HOME”
ekranına dönmek mümkün değildir.
Kanalları aramaya
“HOME” ekranına geri dönmek için
uzaktan kumandadaki
’ye (HOME)
başlayın
basın.
• TV’yi AC çıkışına yakın bir yere
yerleştirin ve elektrik prizini
ulaşılabilecek bir mesafede tutun.
• Ürün boyutu bazı ülkelerde
değişmektedir.
20


