Sharp CV-P10PR: instruction
Class: Home Accessories
Type:
Manual for Sharp CV-P10PR
Table of contents
- A. Information on Disposal for Users (private households) B. Information on Disposal for Business Users.
- CONTENTS
- SAFETY PRECAUTIONS WARNINGS CAUTIONS
- LOCATION INCLUDED
- PART NAMES FRONT VIEW REAR VIEW
- REMOTE CONTROL
- INSTALLATION AND REMOVAL OF EXHAUST HOSE Installation of the exhaust hose 1 2 3
- 4 5 Removal of the exhaust hose
- USING THE REMOTE CONTROL LOADING BATTERIES HOW TO USE THE REMOTE CONTROL
- NOTE ON OPERATION NOTES ON OPERATION OPERATING CONDITIONS ENERGY EFFICIENCY TIPS
- USE FOR AIR CONDITIONER COOL MODE DRY MODE
- FAN MODE VENTILATION MODE
- USE FOR AIR CONDITIONER TO CHANGE AIR FLOW DIRECTION UP / DOWN AIR FLOW DIRECTION LEFT / RIGHT AIR FLOW DIRECTION
- TURBO COOL OPERATION TO CANCEL SLEEP OPERATION TO CANCEL
- TIMER ON TO CANCEL USE FOR AIR CONDITIONER TIMER OPERATION TIMER OFF
- USE FOR ION GENERATOR ION GENERATOR MODE
- USE FOR ION GENERATOR TO CHANGE AIR FLOW DIRECTION MAX DENSITY OPERATION
- REFRESH OPERATION TIMER OFF OPERATION
- MAIN UNIT OPERATION DRAINAGE
- MAINTENANCE CLEANING THE FILTER AIR INLET FILTER CLEANING THE UNIT AND THE REMOTE CONTROL WHEN STORING FOR A LONG PERIOD (NOT IN USE)
- BEFORE CALLING FOR SERVICE
LOCAL AIR CONDITONER
ENGLISH ITALIANO
INSTALLATION AND OPERATION
MANUAL
CONDIZIONATORE D’ARIA
LOCALE
MANUALE DI INSTALLAZIONE
E FUNZIONAMENTO
CLIMATISEUR LOCAL
FRANÇAIS
MANUEL D’INSTALLATION
ET D’UTILISATION
LOKALES KLIMAGERÄT
DEUTSCH ESPAÑOL
INSTALLATIONS-
UND BEDIENUNGSANLEITUNG
ACONDICIONADOR DE AIRE
LOCAL
MANUAL DE FUNCIONAMIENTO
E INSTALACCIÓN
PORTUGUÊS
AR CONDICIONADO LOCAL
MANUAL DE INSTALAÇÃO
E OPERAÇÃO
KLIMATYZATOR LOKALNY
POLSKI
INSTRUKCJA OBSŁUGI
I INSTALACJI
NEDERLANDS
LOKALE AIRCONDITIONER
INSTALLATIE
EN GEBRUIKERSHANDLEIDING
ЛОКАЛЬНЫЙ КОНДИЦИОНЕР
РУССКИЙ
ВОЗДУХА
CV-P10PR
РУКОВОДСТВО ПО МОНТАЖУ
И ЭКСПЛУАТАЦИИ
"Plasmacluster" and "Device of a cluster
of grapes" are registered trademarks or
trademarks of Sharp Corporation.
CV-P10PR_OM_9_lang.indb 1CV-P10PR_OM_9_lang.indb 1 2013-03-20 22:42:022013-03-20 22:42:02
A. Information on Disposal for Users (private households)
1. In the European Union
Attention: If you want to dispose of this equipment, please do not use the
ordinary dust bin!
Used electrical and electronic equipment must be treated separately and
in accordance with legislation that requires proper treatment, recovery and
recycling of used electrical and electronic equipment.
Following the implementation by member states, private households within
the EU states may return their used electrical and electronic equipment
to designated collection facilities free of charge*. In some countries* your
Attention: Your product is
local retailer may also take back your old product free of charge if you
marked with this symbol. It
purchase a similar new one.
means that used electrical and
electronic products should
*) Please contact your local authority for further details.
not be mixed with general
If your used electrical or electronic equipment has batteries or
household waste. There is a
accumulators, please dispose of these separately beforehand according to
separate collection system for
local requirements.
these products.
By disposing of this product correctly you will help ensure that the waste
undergoes the necessary treatment, recovery and recycling and thus
prevent potential negative effects on the environment and human health
which could otherwise arise due to inappropriate waste handling.
2. In other Countries outside the EU
If you wish to discard this product, please contact your local authorities and
ask for the correct method of disposal.
For Switzerland: Used electrical or electronic equipment can be returned
free of charge to the dealer, even if you don’t purchase a new product.
Further collection facilities are listed on the homepage of www.swico.ch or
www.sens.ch.
B. Information on Disposal for Business Users.
1. In the European Union
If the product is used for business purposes and you want to discard it:
Please contact your SHARP dealer who will inform you about the take-back
of the product. You might be charged for the costs arising from take-back
and recycling. Small products (and small amounts) might be taken back by
your local collection facilities.
For Spain: Please contact the established collection system or your local
authority for take-back of your used products.
2. In other Countries outside the EU
If you wish to discard of this product, please contact your local authorities
and ask for the correct method of disposal.
The battery supplied with this product contains traces of Lead.
For EU: The crossed-out wheeled bin implies that used batteries should
not be put to the general household waste! There is a separate collection
system for used batteries, to allow proper treatment and recycling in
accordance with legislation. Please contact your local authority for details
on the collection and recycling schemes.
For Switzerland: The used battery is to be returned to the selling point.
For other non-EU countries: Please contact your local authority for correct
method of disposal of the used battery.
Contains uorinated greenhouse gases covered by the Kyoto Protocol
R410A (Global warming potential 1975)
GB
Pb
01_CV-P10PR_OM_EN.indd 2 14/08/29 16:42

ENGLISH
Please read this manual carefully before using the product. This manual should be kept in
a safe place for handy reference.
ENGLISH
Visit http://sharp-world.com/ for electronic version of the operation manual.
CONTENTS
• SAFETY PRECAUTIONS ................................................................... GB-2
• INCLUDED ........................................................................................... GB-3
• PART NAMES ...................................................................................... GB-4
• INSTALLATION AND REMOVAL OF EXHAUST HOSE ..................... GB-6
• USING THE REMOTE CONTROL ....................................................... GB-8
• NOTE ON OPERATION ....................................................................... GB-9
USE FOR AIR CONDITIONER
• COOL MODE ....................................................................................... GB-10
• DRY MODE .......................................................................................... GB-10
• FAN MODE .......................................................................................... GB-11
• VENTILATION MODE .......................................................................... GB-11
• TO CHANGE AIR FLOW DIRECTION ................................................. GB-12
• TURBO COOL OPERATION ................................................................ GB-13
• SLEEP OPERATION ............................................................................ GB-13
• TIMER OPERATION ............................................................................ GB-14
USE FOR ION GENERATOR
• ION GENERATOR MODE ................................................................... GB-15
• TO CHANGE AIR FLOW DIRECTION ................................................. GB-16
• MAX DENSITY OPERATION ............................................................... GB-16
• REFRESH OPERATION ...................................................................... GB-17
• OFF TIMER OPERATION .................................................................... GB-17
• MAIN UNIT OPERATION ..................................................................... GB-18
• DRAINAGE .......................................................................................... GB-18
• MAINTENANCE ................................................................................... GB-19
• BEFORE CALLING FOR SERVICE ..................................................... GB-20
GB-1
01_CV-P10PR_OM_EN.indd 1 14/08/29 16:42
SAFETY PRECAUTIONS
This appliance can be used by children aged from 8 years and above and persons with
reduced physical, sensory or mental capabilities or lack of experience and knowledge if
they have been given supervision or instruction concerning use of the appliance in a safe
way and understand the hazards involved. Children shall not play with the appliance.
Cleaning and user maintenance shall not be made by children without supervision.
WARNINGS
• Do not modify any part of this product. It will cause electric shock, water leak, re etc.
• Do not pull or deform the power supply cord. Pulling and misuse of the power supply cord
can result in damage to the unit and cause electric shock.
• Be careful not to expose your body directly to the outlet air for a long time. It may affect
your physical conditions.
• When using the air conditioner for infants, children, elderly, bedridden, or disabled people
make sure the room temperature is suitable for those in the room.
• Never insert objects into the unit. Inserting objects can result in injury due to the high
speed rotation of internal fans.
• If anything is abnormal with the air conditioner (ex. a burning smell), stop the operation
immediately and disconnect the power plug from the wall socket.
• If the supply cord is damaged, it must be replaced by the manufacturer or its service
agent or a similarly qualied person in order to avoid a hazard. Use only the manufacture-
specied power cord for replacement.
• Do not splash or pour water directly on the unit. Water can cause electric shock or
equipment damage.
• This power plug must only be plugged into an appropriate wall socket. Do not use in con-
junction with any extension cords.
• Push the power plug securely into the socket and make sure it is not loose.
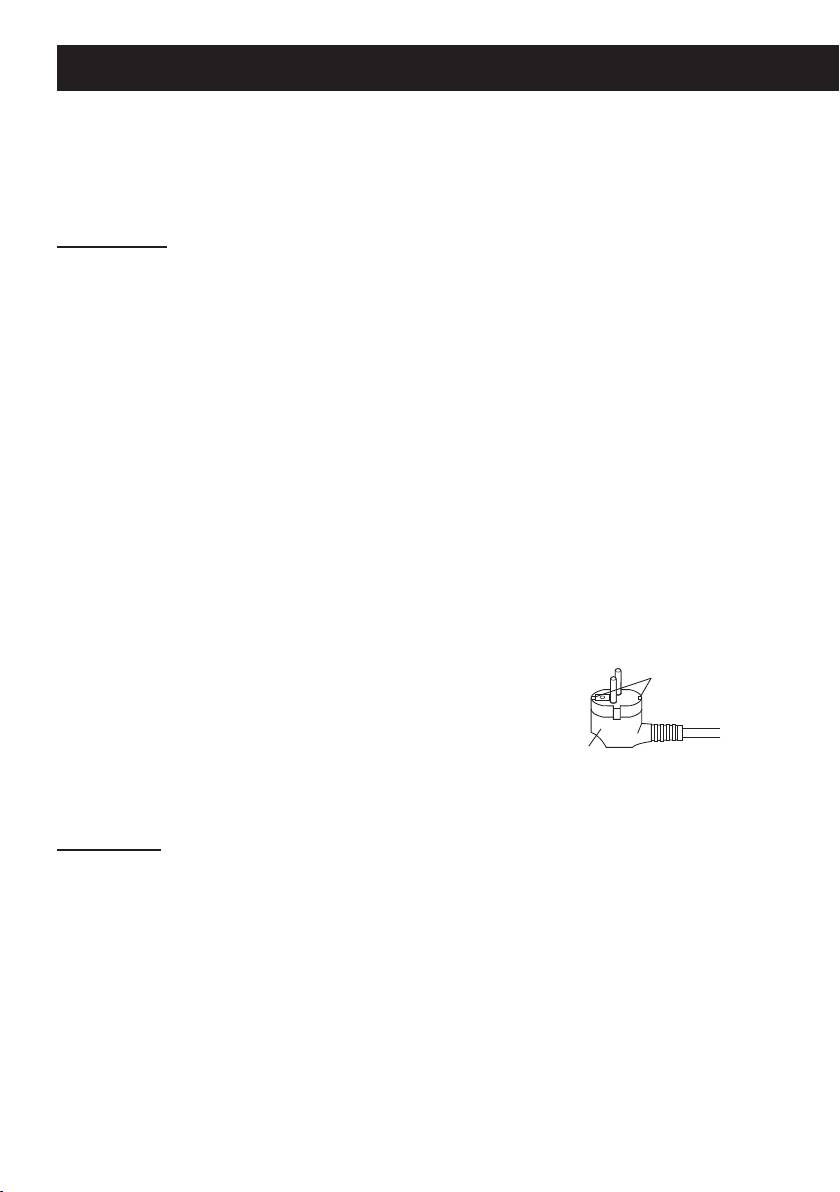
• This appliance must be grounded. This appliance is equipped
with a cord having a grounding wire with a grounding tab.
Grounding tab
The plug must be plugged into an outlet that is properly in-
stalled and grounded.
• The appliance shall be installed in accordance with national
wiring regulations.
Plug
• The appliance must be positioned so that the plug is accessi-
ble.
CAUTIONS
• Open a window or door periodically to ventilate the room, especially when using gas
appliances. Insufcient ventilation may cause oxygen shortage.
• Do not operate the buttons with wet hand. It may cause electric shock.
• For safety, disconnect the power plug from the wall socket when not using the unit for an
extended period of time.
• This unit is designed for residential use. Do not use for other applications such as in a
kennel or greenhouse to raise animals or grow plants.
• Do not place a vessel with water on the unit. If water penetrates into the unit, electrical
insulations may deteriorate and cause electric shock.
• Drainage should be performed whenever moving the unit. If any water remains in the
tank, it may spill out while being moved.
• Do not block the exhaust air outlet with obstacles. Cooling performance may be reduced
or stop completely.
GB-2
01_CV-P10PR_OM_EN.indd 2 14/08/29 16:42
• Be sure to turn the unit off and disconnect the power plug from the wall socket before
ENGLISH
performing any maintenance or cleaning. A fan is rotating inside the unit and you may get
injured.
• Place the unit on a level surface to avoid water spilling out into the room.
• Make sure to connect the air conditioner to power supply of the rated voltage and fre-
quency. Use of a power supply with improper voltage and frequency can result in equip-
ment damage and possible re.
• Do not use the unit in a place where inammable gas may leak. It may cause re.
Use the unit in a place with minimal dust, fumes and moisture in the air.
• Make sure a leak breaker or a circuit breaker is installed, depending on the installation
location, to avoid electrical shock.
• Install an earth leakage breaker to avoid electric shock in case of leak.
Use the current-activated, high-sensitivity, high-speed type breaker with a rated sensitivity
current of below 30 mA and an operating time of below 0.1 second.
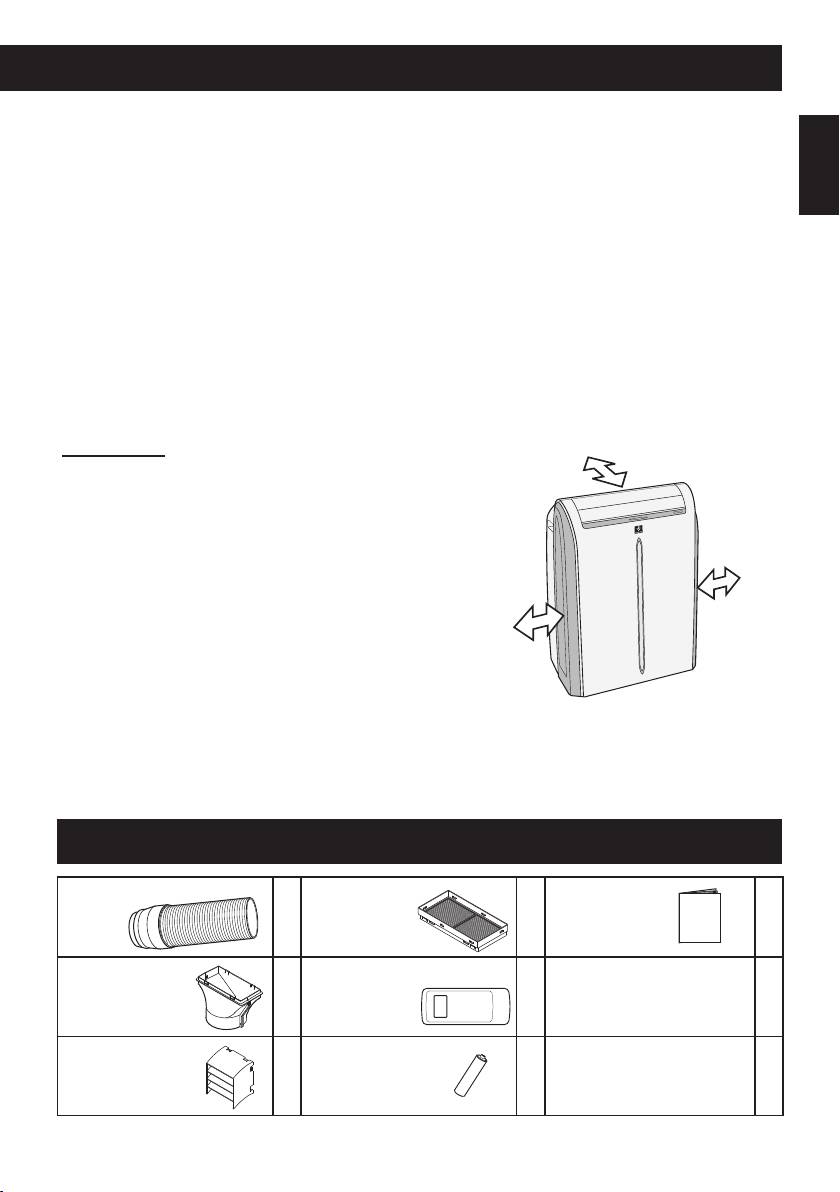
LOCATION
30 cm
• The unit should be placed on a rm foundation to
minimize noise and vibration. For safe and secure
positioning, place the unit on a smooth, level oor
strong enough to support the unit. This will also
help to avoid water spilling out into the room
• The unit has casters to aid placement, but it
should only be rolled on smooth, flat surfaces.
Use caution when rolling on carpet surfaces. Do
30 cm
not attempt to roll the unit over objects.
• The unit must be placed within reach of a properly
30 cm
rated grounded socket.
• Never place any obstacles around the air inlet or
outlet of the unit.
• Allow at least 30 cm of space from the wall for ef-
cient air-conditioning.
INCLUDED
Exhaust hose
Insect guard net
Manual
1
1
1
Window adapter
Remote control
1
1
Rain guard
Battery
(R03)
2
2
GB-3
01_CV-P10PR_OM_EN.indd 3 14/08/29 16:42
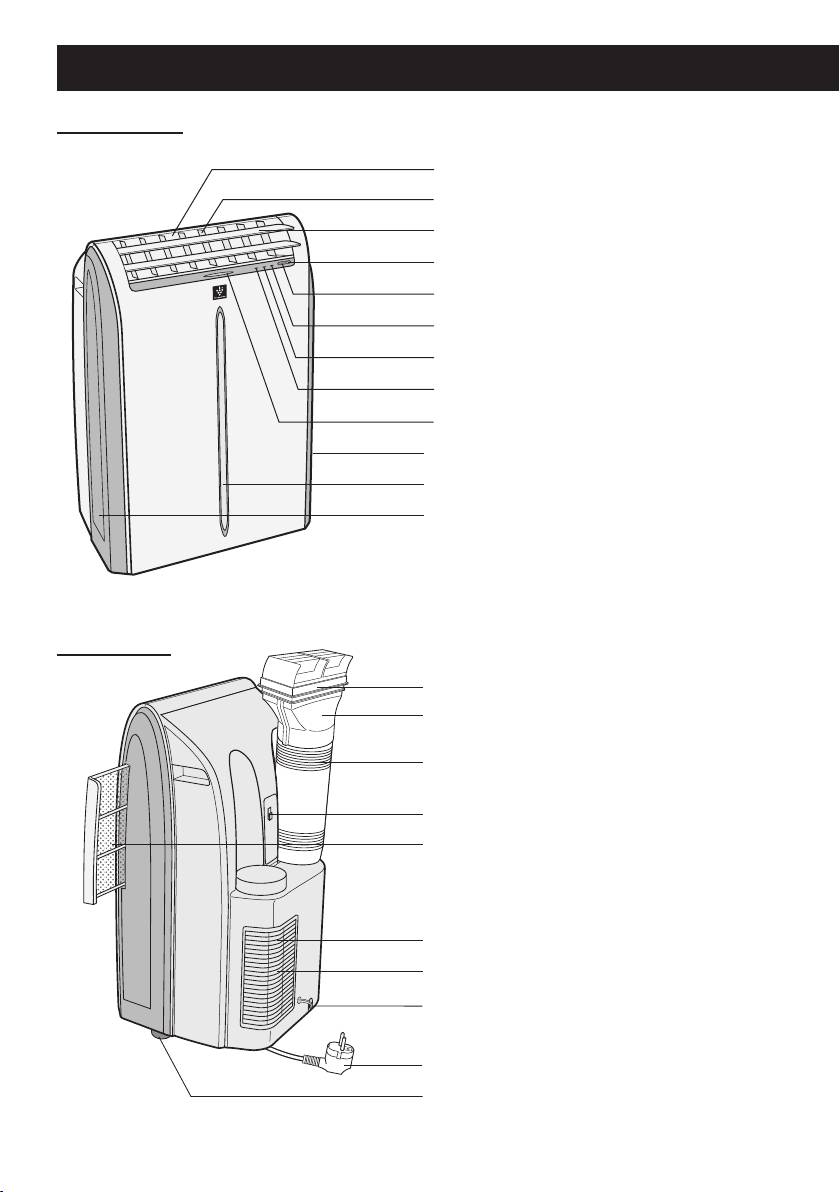
PART NAMES
FRONT VIEW
1
1 Air Outlet
2
2 Vertical louvers
3
3 Horizontal louvers
4
4 POWER Button
5
5 Signal receiver for remote
control
6
6 AIR CON Lamp (green)
7
7 TIMER Lamp (orange)
8
8 MAXIMUM Lamp (red)
9
9 ION GENERATOR Lamp
10
(blue)
10
10 Air inlet
10
REAR VIEW
11
11 Exhaust air outlet
12
12
Window adapter
13 Exhaust hose
13
14 Remote control hook
14
15 Airlter
15
16 Grille
17 Air inlet
18 Drainpipe and stopcock
16
19 Power plug
17
20 Casters(4)
18
19
20
NOTE: Actual unit might vary slightly from above illustration.
GB-4
01_CV-P10PR_OM_EN.indd 4 14/08/29 16:42
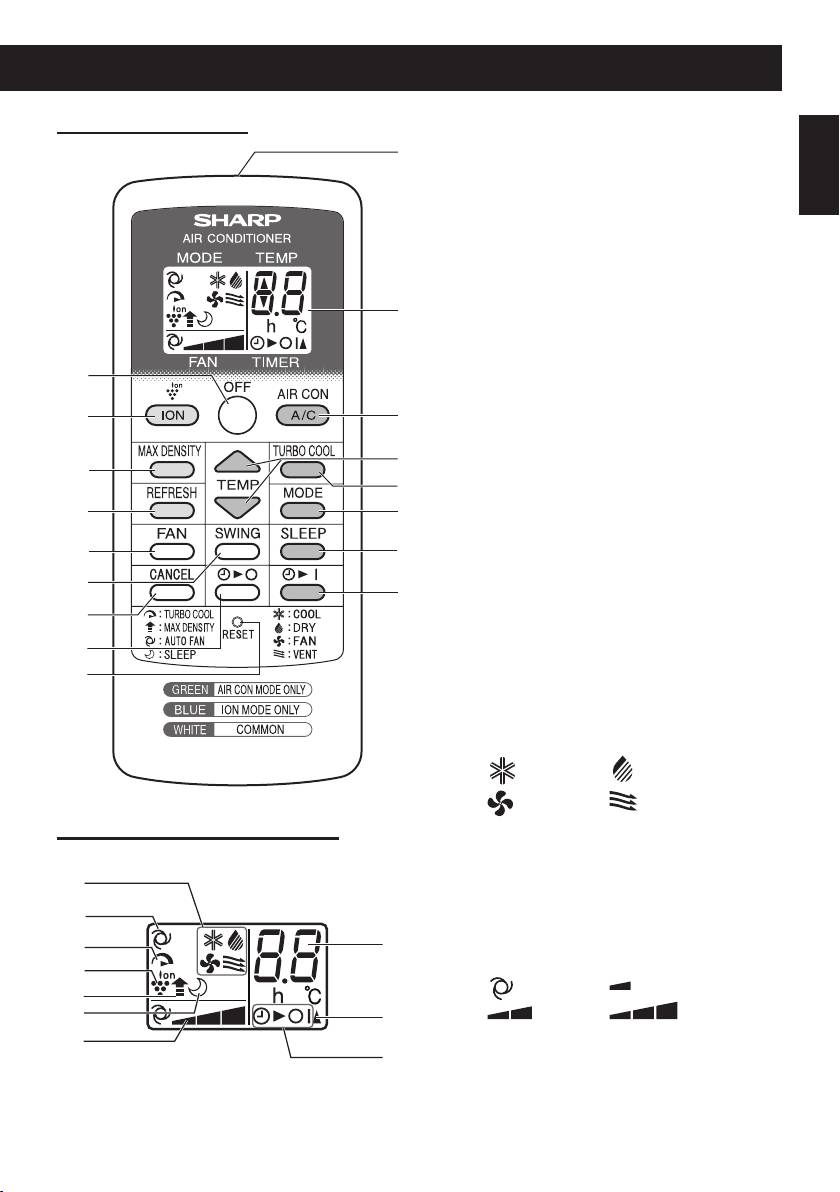
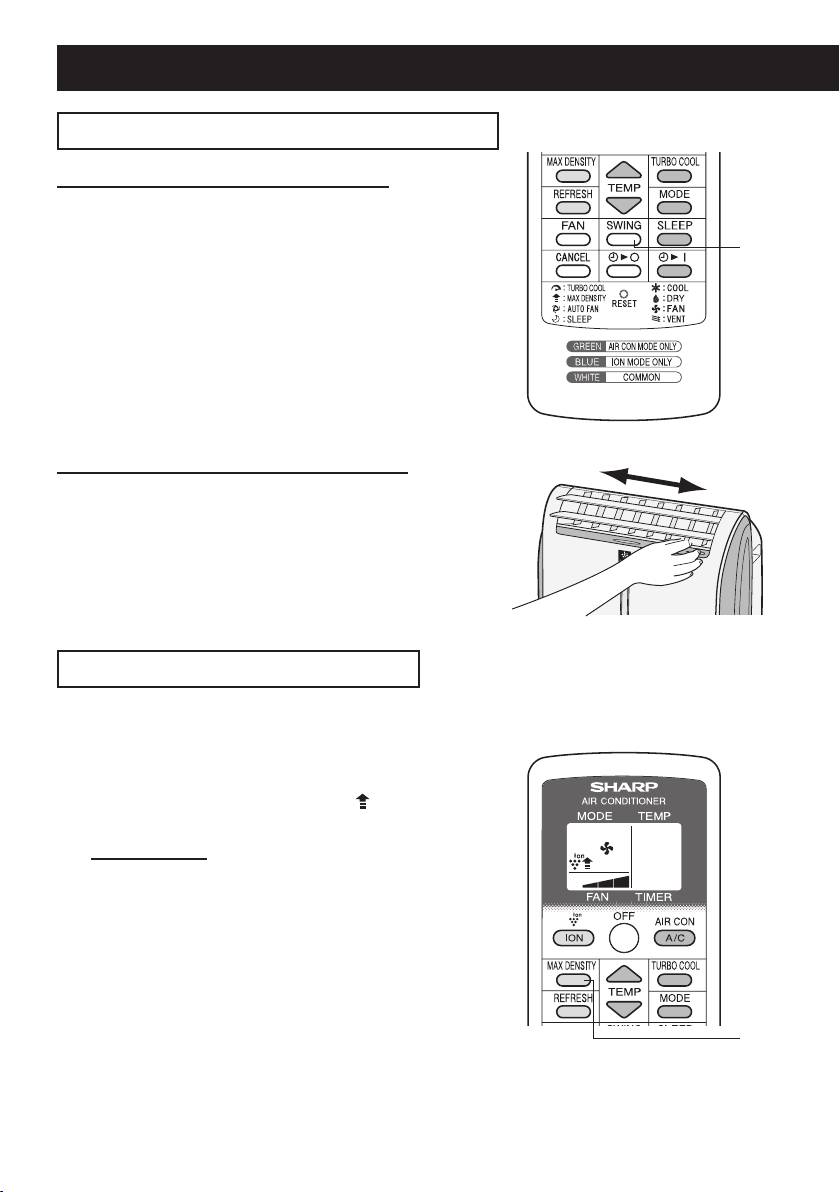
REMOTE CONTROL
ENGLISH
1
1 Tramsmitter
2 Display
AIR CON MODE ONLY
3 A/C Button
4 TEMP Button
5 TURBO COOL Button
2
6 MODE Button
7 SLEEP Button
8 TIMER ON Button
12
ION MODE ONLY
9
3
9 ION Button
10 MAX DENSITY Button
4
10
11 REFRESH Button
5
11
6
COMMON
12 OFF Button
13
7
13 FAN Button
14
14 SWING Button
8
15
15 CANCEL Button
16 TIMER OFF Button
16
17 RESET Button
17
18 MODE Symbols
: COOL : DRY
: FAN : VENTILATION
REMOTE CONTROL DISPLAY
19 REFRESH Symbol
20 TURBO COOL Symbol
18
21 ION GENERATOR Symbol
22 MAX DENSITY Symbol
19
23 SLEEP Symbol
25
20
24 FAN SPEED Symbols
21
: AUTO : SOFT
22
: LOW : HIGH
23
26
25 Temperature and timer count
24
down indicator
27
26 Transmitting Symbol
27 TIMER ON/TIMER OFF Symbol
GB-5
01_CV-P10PR_OM_EN.indd 5 14/08/29 16:42
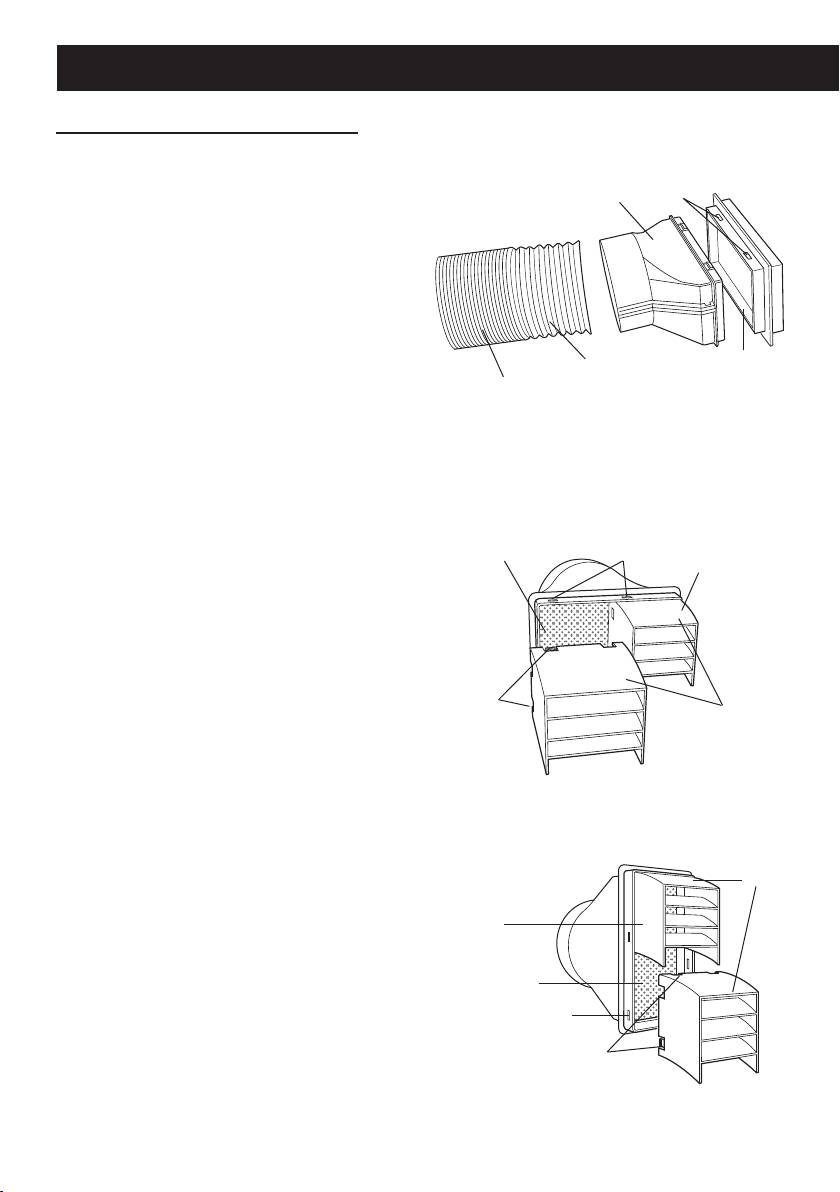
INSTALLATION AND REMOVAL OF EXHAUST HOSE
Installation of the exhaust hose
Attach the insect guard net to the
1
window adapter.
Hole
Window adapter
Push the insect guard net rmly to en-
sure that four projections on the window
adapter t into the four holes on it.
Attach the window adapter to the
2
exhaust hose.
Extend one end of the exhaust hose and
Extend
Insect guard net
insert it into the window adapter, and
Exhaust hose
turn it (approx. three times) until it stops.
Make sure they are securely attached.
Attach the rain guards to the in-
Horizontally placed
3
sect guard net.
Insert all three projections on each rain
Insect guard net
Hole
Rain guard
guard into the holes in the insect guard
net.
Side “A” will now be at the top, as indi-
cated in the diagram.
Projection
"A"
Vertically placed
"A"
Rain guard
Insect guard net
Hole
Projection
GB-6
01_CV-P10PR_OM_EN.indd 6 14/08/29 16:42
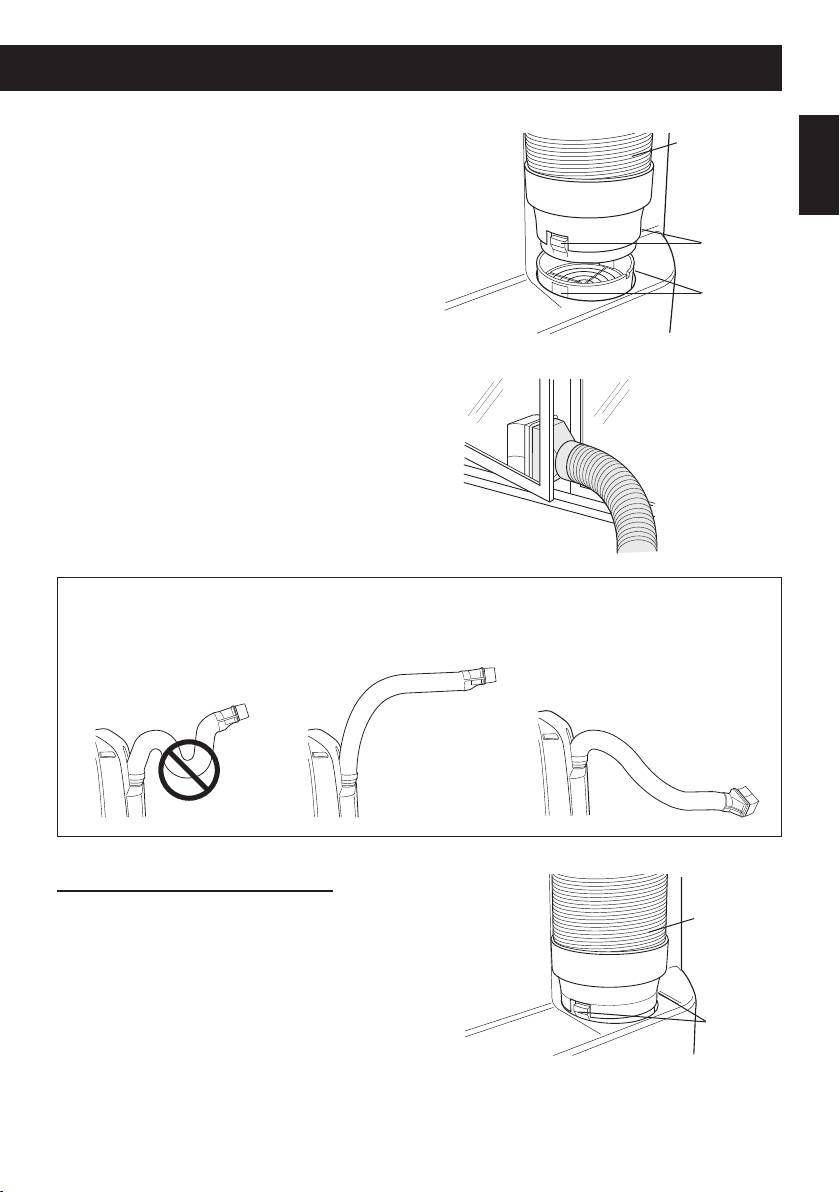
ENGLISH
Exhaust hose
Attach the exhaust hose to the
4
unit.
Insert the two projections into the two
holes on the unit, and rmly attach them
to each other until they click.
Projection
Hole
Lead the exhaust hose outdoors.
5
The exhaust hose should be as short as possible for operational
efciency;however,itmustnotbetwistedorbent.
Unacceptable
Acceptable
Acceptable
Removal of the exhaust hose
Exhaust hose
Remove the exhaust hose from the unit.
Lift up and remove the exhaust hose from the
unit by pushing on the two projections.
Projection
GB-7
01_CV-P10PR_OM_EN.indd 7 14/08/29 16:42
USING THE REMOTE CONTROL
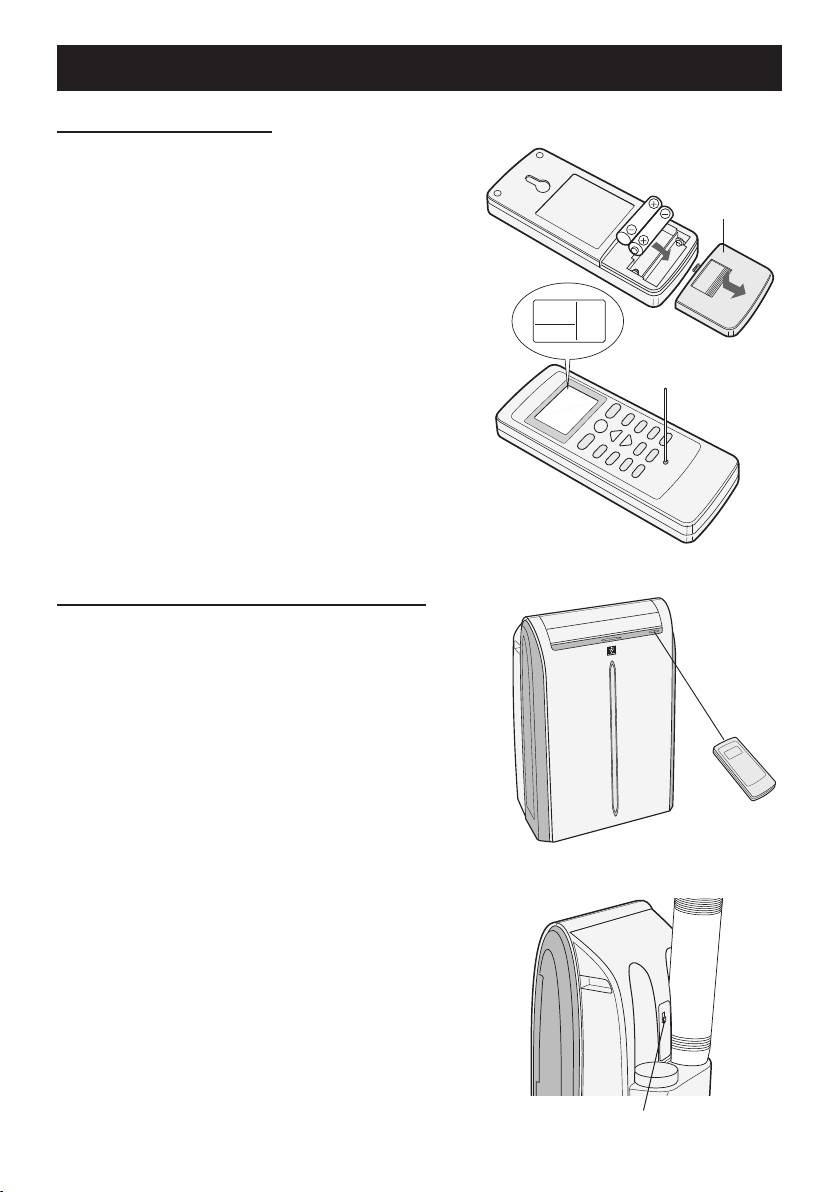
LOADING BATTERIES
Remove the battery cover.
1
Insert two batteries.
(AAA(R03))
Battery cover
2
• Make sure the (+) and (-) polarities are cor-
rectly aligned.
• Lines will appear on the display when bat-
teries are properly installed.
Reattach the battery cover.
3
Press the RESET button using a thin
4
pointed implement.
NOTES:
• The battery life is approximately 1 year in normal
use.
• When replacing the batteries, always change
both and use the same type.
• If you will not be using the unit for a long time, re-
move the batteries from the remote control.
HOW TO USE THE REMOTE CONTROL
Point the remote control toward the Signal re-
ceiver and press the desired button. The unit
generates a beep when it receives the signal.
• Make sure nothing, such as curtains, blocks the
signal receiver window.
• The signal effective distance is 7 m.
CAUTION:
• Do not expose the receiver window to direct sun-
light. This may adversely affect its operation.
• Use of certain uorescent lamp in the same room
may interfere with transmission of the signal.
• Do not leave the remote control in direct sunlight
or near a heater. Protect the remote control from
moisture and shock.
To prevent the remote control from being
misplaced,hookittotheunitwhennotin
use.
When attached, to remove the remote control from
the unit, lift the remote control up slightly and pull it
out.
Remote control hook
GB-8
01_CV-P10PR_OM_EN.indd 8 14/08/29 16:42
NOTE ON OPERATION
NOTES ON OPERATION
ENGLISH
•Allow3minutesforthecompressortorestartcooling.
If you turn the unit off and immediately restart it, allow three minutes for the compressor
to restart cooling. There is an electronic device in the unit that keeps the compressor
turned off for three minutes for safety.
•Whenpowerfailureoccurs
This air conditioner has a memory function to store settings when a power failure occurs.
After power recovery, the unit will automatically re-start in the same settings which were
active before the power failure, except for timer settings.
If a power failure occurs while the timer is set, the timer setting will be cancelled and will
not be retrieved even after the power is restored.
•Lowtemperatureoperation:Isyourunitfreezingup?
Freezing may occur when the unit is set close to 18°C in low ambient temperature condi-
tions, especially at night.
In these conditions, a further temperature drop may cause the unit to freeze.
Setting the unit to a higher temperature will prevent it from freezing.
•Drymodeincreasesroomtemperature.
The unit generates heat during dry mode and the room temperature will rise. Warm air
will be blown out from the Exhaust air outlet, but this is normal and does not indicate a
problem with the unit.
•Thisunitblowsthewarmairgeneratedbytheunitoutsidetheroomviatheex-
haust hose while in cool mode.
Accordingly, the same amount of air as that is blown out will enter the room from outside
through any openings into the room.
•Whencoolingoperationis performedathighhumidityconditions, watertank in-
side the unit may frequently become full.
When water tank inside the unit is full, the unit stops operating and the orange TIMER,
the green AIR CON and the red MAXIMUM lamps will blink. In this case, perform
drainage to drain out water within the unit.
OPERATING CONDITIONS
•Theunitmustbeoperatedwithinthefollowingtemperaturerange.
Mode Room temperature
Cool 18°C - 40°C
Dry 15°C - 40°C
• A built-in safety device may cut off operation if the temperature exceeds these limits.
• When cooling operation is performed at high room temperature, the fan may run at a
slower speed.
ENERGY EFFICIENCY TIPS
•Avoiddirectsunlight.
Close blinds, drapes or shades to keep out direct sunlight while in cooling mode.
•Keepthelterclean.
Keeping the lter clean greatly aids efcient operation. A dirty lter blocks the ow of air,
making your unit work harder and less efciently.
GB-9
01_CV-P10PR_OM_EN.indd 9 14/08/29 16:42
USE FOR AIR CONDITIONER
Use when the unit operates with the cool, dry, fan or ventilation mode. During operation,
Plasmacluster ions are always released into the room.
• The exhaust hose must be installed in these modes.
• Ensure that the stopcock is securely attached the drainpipe.
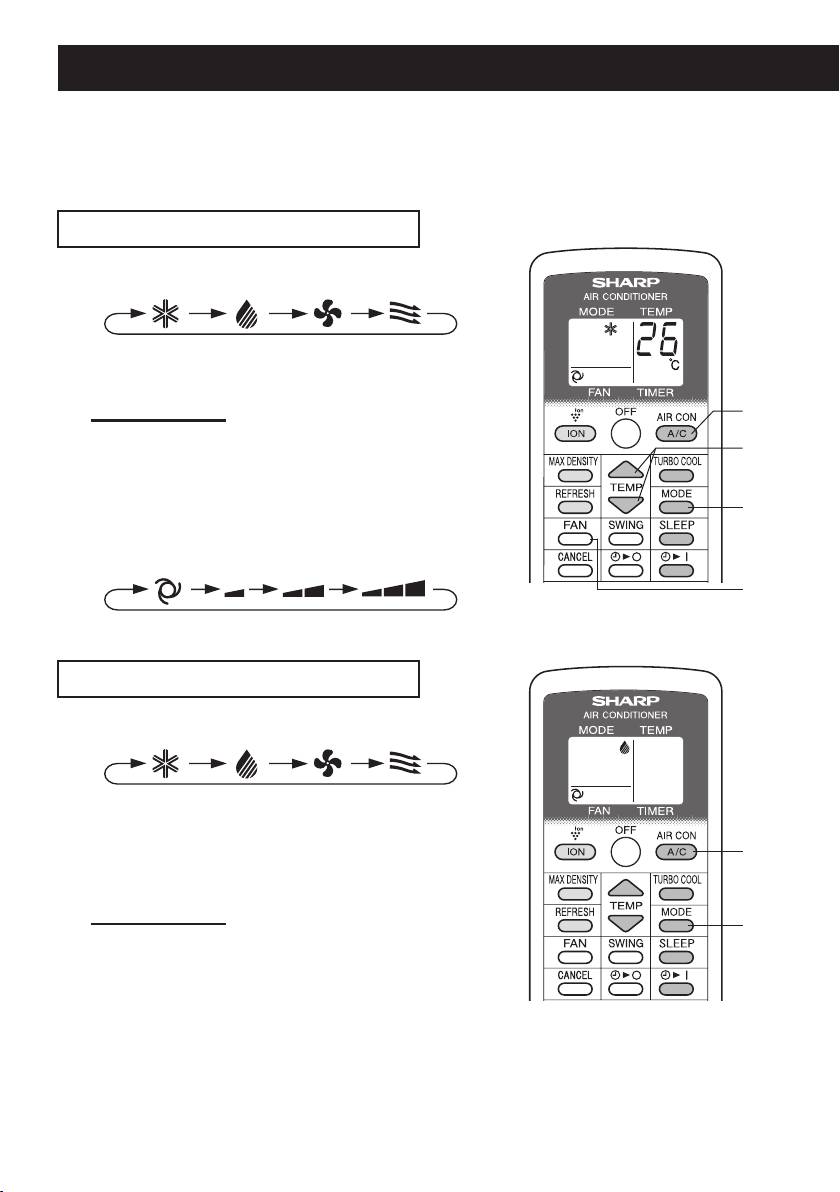
COOL MODE
Press the MODE button to select COOL mode.
1
COOL DRY FAN VENT
Press the A/C button to start operation.
2
• The green AIR CON lamp will light.
TO TURN OFF
2
Press the OFF button.
• The green AIR CON lamp will turn off.
3
Press the TEMP button to set temperature.
3
• The temperature setting range: 18°C to 32°C.
1
Press the FAN button to set fan speed.
4
AUTO SOFT LOW HIGH
4
DRY MODE
Press the MODE button to select DRY mode.
1
COOL DRY FAN VENT
Press the A/C button to start operation.
2
• The green AIR CON lamp will light.
• The temperature cannot be set.
2
• The fan speed is preset to AUTO and cannot be
changed.
TO TURN OFF
1
Press the OFF button.
• The green AIR CON lamp will turn off.
NOTES:
• Although you can also operate dry mode without the exhaust hose, the unit generates heat during
operation and the room temperature will rise.
• It is also possible to operate in dry mode with hose (not included) attached.
Remove the stopcock and attach the hose to the drainpipe and lead to a oor drain to allow water to
drain from the unit.
GB-10
01_CV-P10PR_OM_EN.indd 10 14/08/29 16:42
ENGLISH
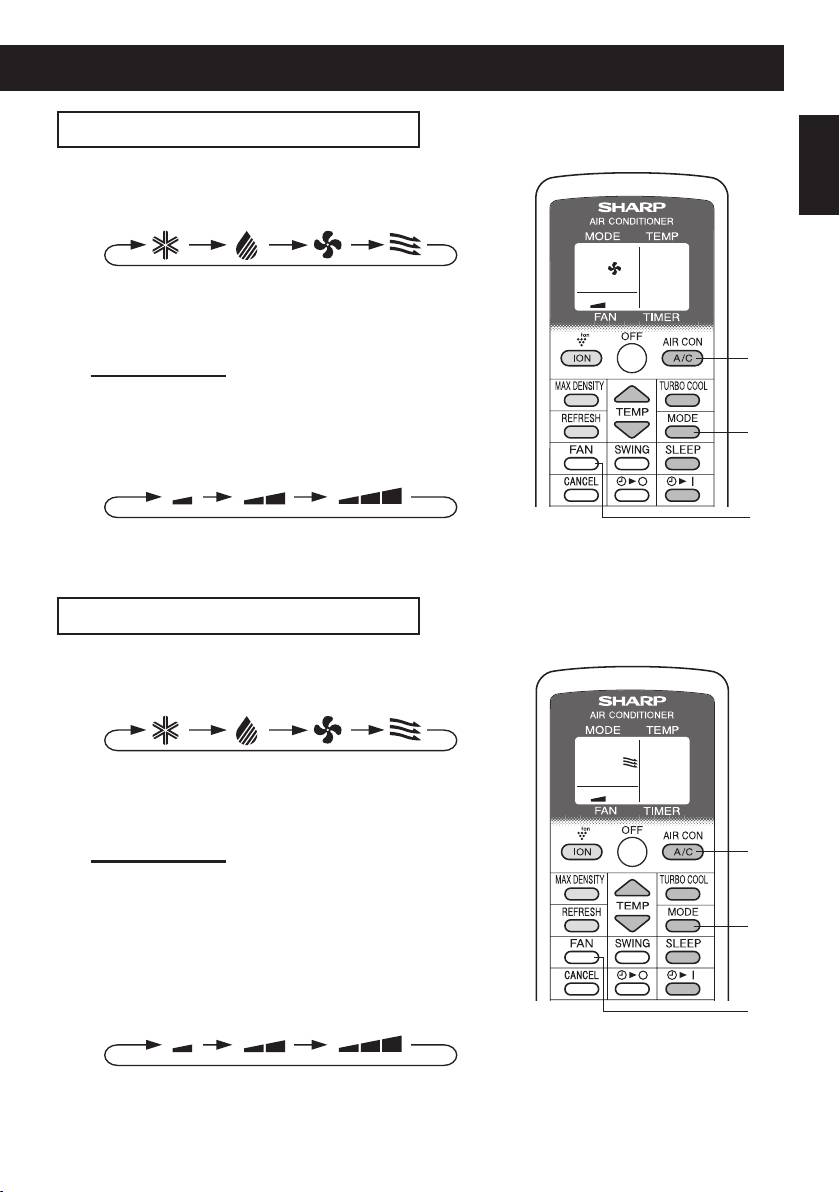
FAN MODE
The unit simply circulates the air.
Press the MODE button to select FAN mode.
1
COOL DRY FAN VENT
Press the A/C button to start operation.
2
• The green AIR CON lamp will light.
• The temperature cannot be set.
2
TO TURN OFF
Press the OFF button.
• The green AIR CON lamp will turn off.
1
Press the FAN button to set fan speed.
3
SOFT LOW HIGH
3
VENTILATION MODE
The unit ventilates the air to outdoors.
Press the MODE button to select VENT mode.
1
COOL DRY FAN VENT
Press the A/C button to start operation.
2
• The green AIR CON lamp will light.
• The temperature cannot be set.
TO TURN OFF
2
Press the OFF button.
• The green AIR CON lamp will turn off.
1
Press the FAN button to set fan speed.
3
• Although the louvers are closed and no air blows
out into the room, the external ventilation fan speed
changes.
3
SOFT LOW HIGH
GB-11
01_CV-P10PR_OM_EN.indd 11 14/08/29 16:42
USE FOR AIR CONDITIONER
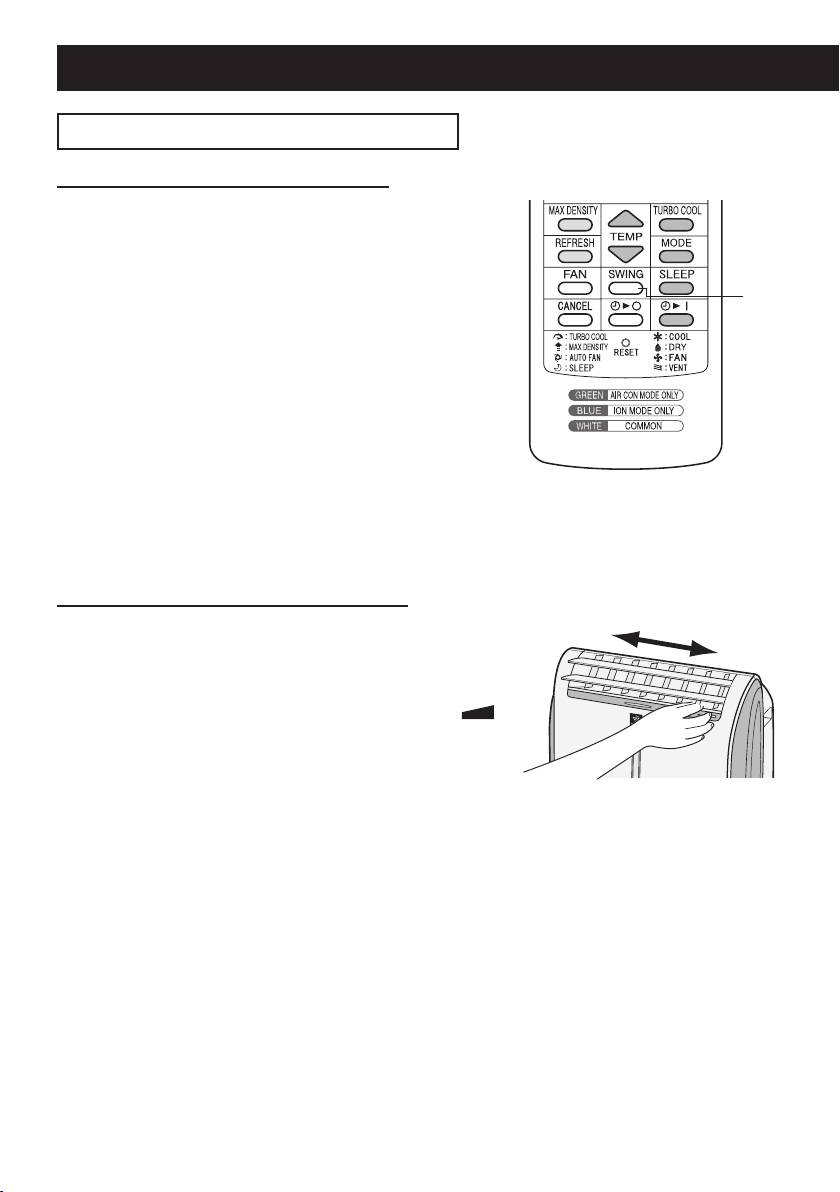
TO CHANGE AIR FLOW DIRECTION
UP / DOWN AIR FLOW DIRECTION
Press the SWING button.
1
• The horizontal louvers will swing.
Press the SWING button again to stop the
1
2
desired position.
2
CAUTIONS:
Never attempt to adjust the horizontal louvers manually.
• Manual adjustment of the horizontal louvers can cause the
unit to malfunction when the remote control is used for ad-
justment.
• When the horizontal louvers are positioned at the lowest po-
sition in the COOL or DRY mode for an extended period of
time, condensation may result.
NOTE:
• During VENTILATION mode, UP/DOWN air ow direction
cannot be changed.
LEFT / RIGHT AIR FLOW DIRECTION
Hold the vertical louver as shown in the diagram
and adjust the air ow direction.
CAUTION:
• Do not adjust the vertical louvers to the extreme left or right
in the COOL mode with the fan speed set to "SOFT (
)"
for an extended period of time.
Condensation may form on the louvers.
GB-12
01_CV-P10PR_OM_EN.indd 12 14/08/29 16:42
ENGLISH
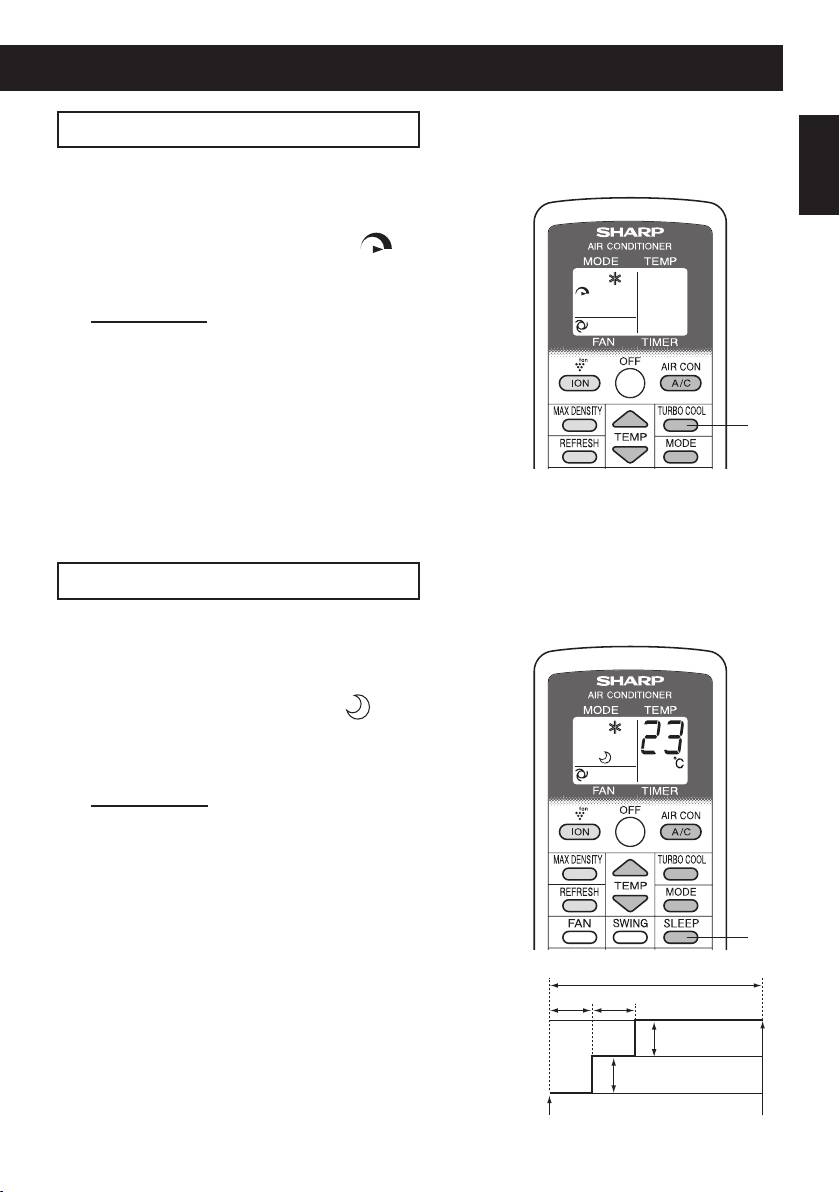
TURBO COOL OPERATION
The unit fan works at extra high speed with a setting temperature of 15°C.
Press the TURBO COOL button during
1
cooling mode.
• The remote control will display " ".
• The temperature display will go off.
• The red MAXIMUM lamp will light.
TO CANCEL
Press the TURBO COOL button again.
• The red MAXIMUM lamp will turn off.
NOTES:
• You cannot set the temperature or fan speed during TURBO
COOL operation.
1
• The fan returns to the HIGH speed setting after the unit has
run for 30 minutes in TURBO COOL mode.
• The extra high fan speed may automatically slow down to protect the unit.
• TURBO COOL operation and SLEEP operation can not be used together.
SLEEP OPERATION
When SLEEP operation is set, the temperature setting is automatically adjusted to prevent
the room from becoming too cold.
Press the SLEEP button during cooling
1
mode.
• The remote control displays “ ”.
• The orange TIMER lamp will light.
• The unit will stop operating after 8 hours.
• The fan speed setting is set to AUTO.
TO CANCEL
Press the SLEEP button.
• The orange TIMER lamp will turn off.
NOTES:
• One hour after the SLEEP operation is started, the tempera-
ture setting rises by 1˚C and after another hour it rises by
an additional 1˚C. Temperature display on the remote control
will not change from its original setting.
1
• SLEEP operation and TURBO COOL operation can not be
8hours
used together.
1hour 1hour
• The TIMER OFF, TIMER ON and SLEEP operation can not
be set together. Only the most recent settings will be used.
1˚C
1˚C
Start of SLEEP operation
Unit shuts off
GB-13
01_CV-P10PR_OM_EN.indd 13 14/08/29 16:42
GB-14
0.5h 1.0h 1.5h 10h 11h 12h
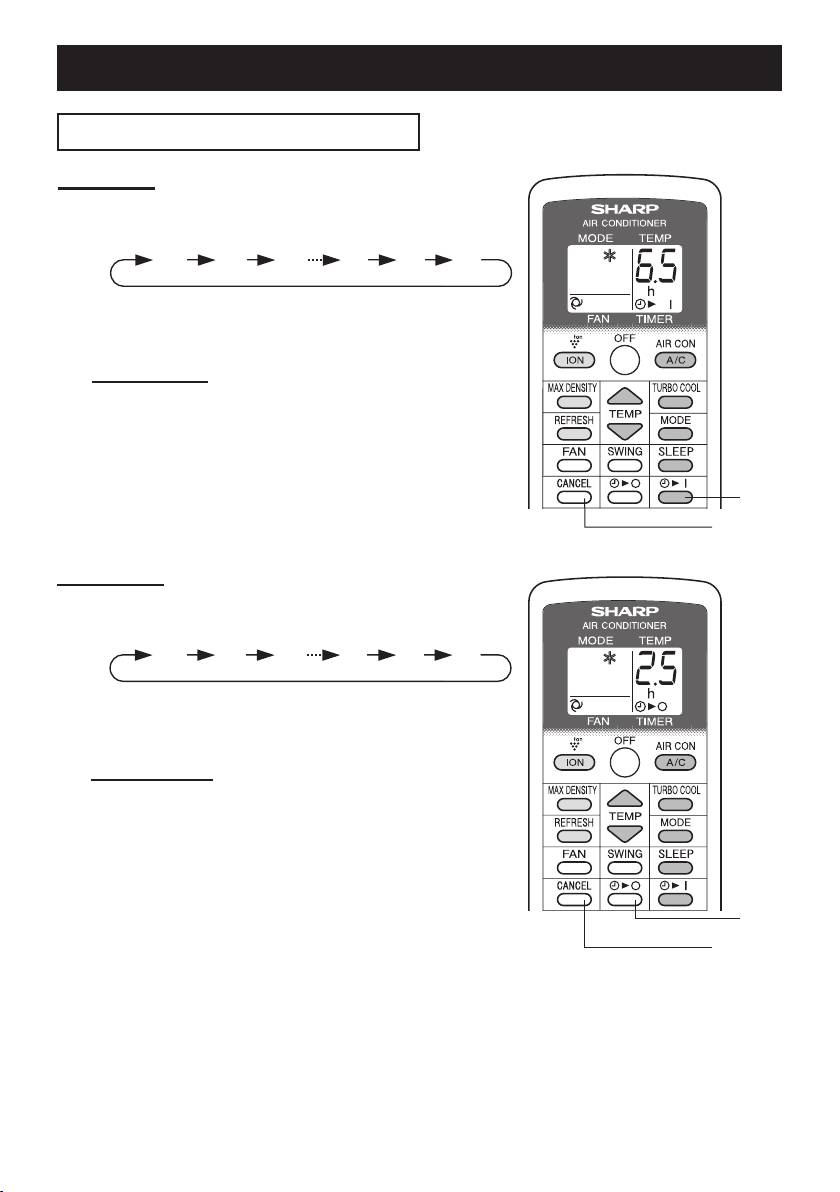
TIMER ON
Press the TIMER ON button and set the
1
time as desired.
• The orange TIMER lamp will light.
• The time setting will count down to show the re-
maining time.
TO CANCEL
Press the CANCEL button.
• The orange TIMER lamp will turn off.
0.5h 1.0h 1.5h 10h 11h 12h
USE FOR AIR CONDITIONER
TIMER OPERATION
1
CANCEL
TIMER OFF
Press the TIMER OFF button and set the
1
time as desired.
• The orange TIMER lamp will light.
• The time setting will count down to show the re-
maining time.
TO CANCEL
Press the CANCEL button.
• The orange TIMER lamp will turn off.
1
CANCEL
NOTES:
• Timer duration can be set from a minimum of half an hour to a maximum of 12 hours.
Up to 9.5 hours, you can set in half-hour increments and from 10 to 12 hours, in 1-hour increments.
• The TIMER OFF and TIMER ON can not be set together.
• If a power failure occurs while the TIMER OFF or TIMER ON is set, the TIMER setting will be can-
celled and will not be retrieved even after the power is restored.
• When the temperature is set during timer setting, the temperature will show in the display for 5 sec-
onds and then return to the timer display.
01_CV-P10PR_OM_EN.indd 14 14/08/29 16:42
USE FOR ION GENERATOR
Use when the unit operates with ION GENERATOR independently.
ENGLISH
There is no need to install the exhaust hose. Hot air will not come out from the exhaust
hose during ION GENERATOR mode.
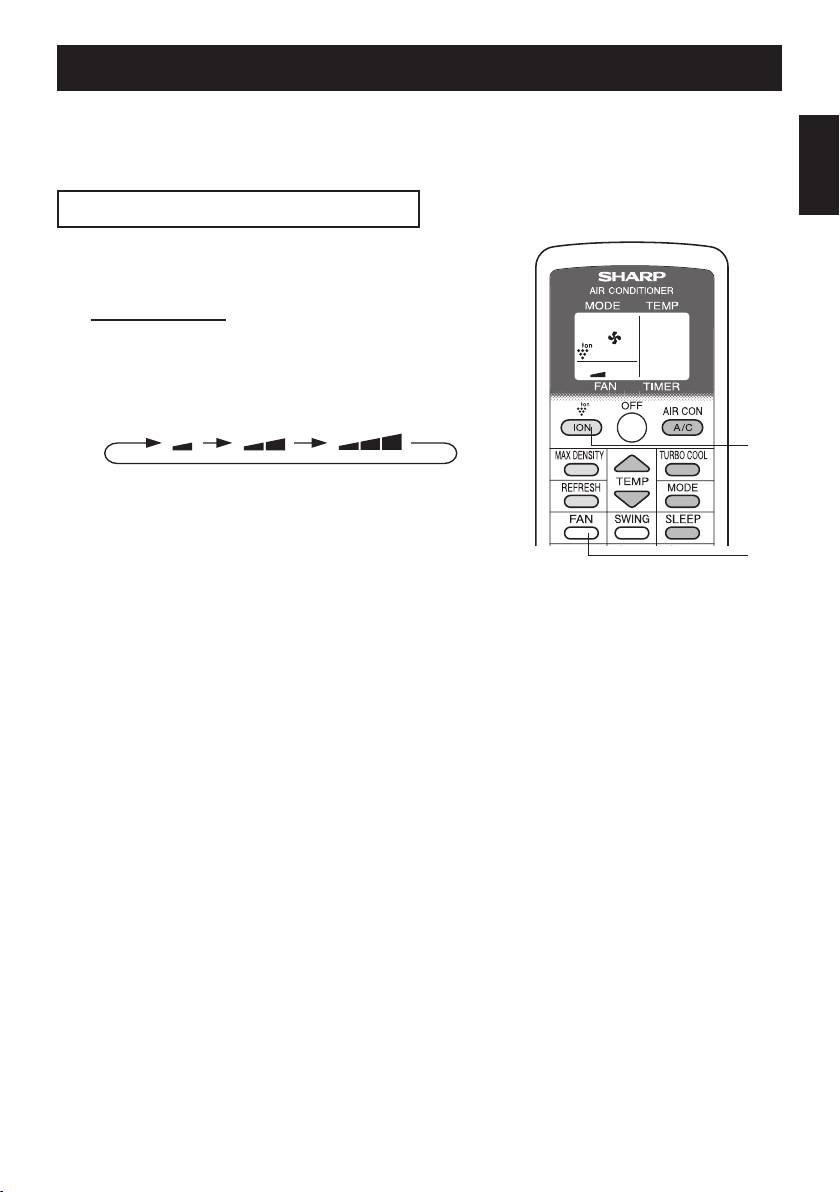
ION GENERATOR MODE
Press the ION button to start operation.
1
• The blue ION GENERATOR lamp will light.
TO TURN OFF
Press the OFF button.
• The blue ION GENERATOR lamp will turn off.
Press the FAN button to set fan speed.
2
SOFT LOW HIGH
1
2
Note for ION GENERATOR MODE
The ion generator inside the unit releases Plasmacluster ions into the room. Plasmacluster
ions will reduce airborne mold.
Plasmacluster is SHARP’s original technology.
For more information, please check our press release such as:
http://www.sharp-pci.com/
The website is subject to change without notice.
GB-15
01_CV-P10PR_OM_EN.indd 15 14/08/29 16:42
USE FOR ION GENERATOR
TO CHANGE AIR FLOW DIRECTION
UP / DOWN AIR FLOW DIRECTION
Press the SWING button.
1
• The horizontal louvers will swing.
1
Press the SWING button again to stop the
2
2
desired position.
CAUTION:
Never attempt to adjust the horizontal louvers manually.
• Manual adjustment of the horizontal louvers can cause the
unit to malfunction when the remote control is used for ad-
justment.
LEFT / RIGHT AIR FLOW DIRECTION
Hold the vertical louver as shown in the diagram
and adjust the air ow direction.
MAX DENSITY OPERATION
The unit releases max density Plasmacluster ions. By continuously discharging “extra high”
airow for 30 minutes, the unit discharges the ions throughout the room more effectively.
Press the MAX DENSITY button during Ion
1
generator operation.
• The remote control will display " ".
• The red MAXIMUM lamp will light.
TO CANCEL
Press the MAX DENSITY button again.
• The red MAXIMUM lamp will turn off.
NOTES:
• You cannot set the fan speed during MAX DENSITY opera-
tion.
• The MAX DENSITY operation will be automatically can-
celled in 30 minutes, and the unit will return to the original
settings.
• MAX DENSITY operation and REFRESH operation can not
1
be used together.
GB-16
01_CV-P10PR_OM_EN.indd 16 14/08/29 16:42

ENGLISH
REFRESH OPERATION
REFRESH operation will reduce odors of clothes with Plasmacluster ions. It is recommend-
ed to use this function in front of the wardrobe, closet, laundry room or hanging cloth.
Press the REFRESH button during Ion
1
generator operation.
• The orange TIMER lamp will light.
• The remote control will display " ".
• The horizontal louvers will swing.
• The unit will stop operating after 5 hours.
TO CANCEL
Press the REFRESH button again.
• The orange TIMER lamp will turn off.
NOTES:
• Adjust the louvers so that air from the unit is blown to the
clothes.
• REFRESH operation and MAX DENSITY operation can not
be used together.
• REFRESH operation and TIMER OFF can not be set together.
• With this operation, Plasmacluster ion is effective for reducing smell of tobacco smoke etc., but may
not always be effective for every kinds of odor.
• Depending on the volume of odor, distance between this unit and clothes, and operating time, this
unit may not reduce the odor enough.
TIMER OFF OPERATION
Press the TIMER OFF button and set the
1
time as desired.
• The orange TIMER lamp will light.
• The time setting will count down to show the re-
maining time.
TO CANCEL
Press the CANCEL button.
• The orange TIMER lamp will turn off.
NOTES:
• Timer duration can be set from a minimum of half an hour to a
maximum of 12 hours.
Up to 9.5 hours, you can set in half-hour increments and from
10 to 12 hours, in 1-hour increments.
• In ION GENERATOR mode, TIMER ON can not be set.
• If a power failure occurs while the TIMER OFF is set, the
TIMER setting will be cancelled and will not be retrieved even
after the power is restored.
GB-17
0.5h 1.0h 1.5h 10h 11h 12h
1
1
CANCEL
01_CV-P10PR_OM_EN.indd 17 14/08/29 16:42
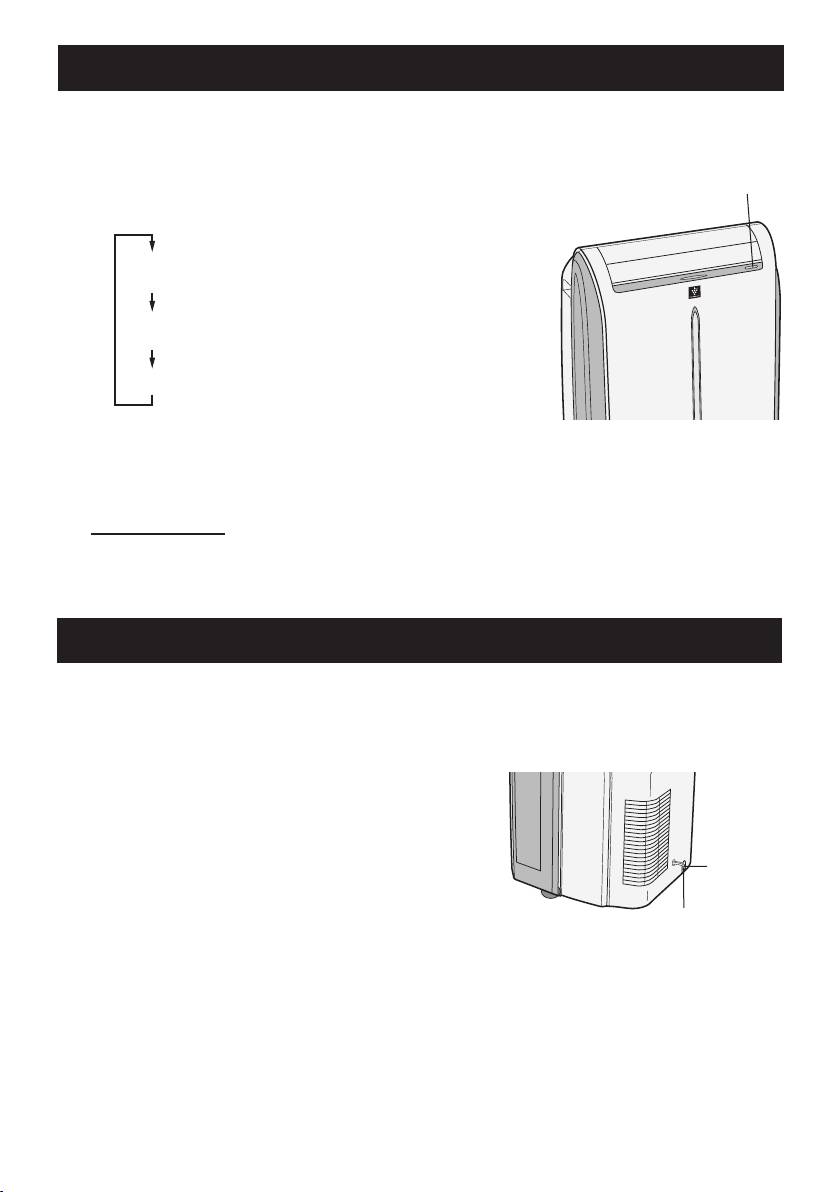
MAIN UNIT OPERATION
Use this operation when the remote control is not available.
Press the POWER button to start opera-
1
tion.
1
• The mode will change as you press the button
within 5 seconds.
COOL
(The green AIR CON lamp will light)
ION GENERTOR
(The blue ION GENERATOR lamp will light)
OFF
• In cool mode, the unit will operate at its last
cooling settings. If the unit has been unplugged
since it was last operated, it will resume opera-
tion in the cooling mode, set at 20˚C. The fan
speed set to AUTO.
TO TURN OFF
Press the POWER button during opera-
tion.
DRAINAGE
Drain out water within the unit in the following cases.
• When the unit stops operating and the orange TIMER lamp, the green AIR CON lamp
and the red MAXIMUM lamp are blinking, the water tank is full and need to be drained.
• When the unit is not used for a long time.
Unplug the power plug and carefully move
1
the unit to a drain or outside to avoid wa-
ter spilling out into the room.
Stopcock
Removethestopcockfromthedrainpipe,
2
and drain water within the unit.
Drainpipe
Attach the stopcock securely to the drain-
3
pipe.
GB-18
01_CV-P10PR_OM_EN.indd 18 14/08/29 16:42
