Russell Hobbs 15129-56: инструкция
Раздел: Бытовая, кухонная техника, электроника и оборудование
Тип: Утюг


Характеристики, спецификации
Инструкция к Утюгу Russell Hobbs 15129-56

instructions 2
инструкции (Русский) 46
Bedienungsanleitung 6
pokyny (Čeština) 50
mode d’emploi 10
pokyny (Slovenčina) 54
instructies 14
instrukcja 58
istruzioni per l’uso 18
upute 62
instrucciones 22
navodila 66
instruções 26
οδηγίες 70
brugsanvisning 30
utasítások 76
bruksanvisning 34
talimatlar 80
instruksjoner 38
instrucţiuni 84
käyttöohjeet 42
инструкции (Български) 88
2
Read the instructions, keep them safe, pass them on if you pass the appliance on.
Remove all packaging before use.
A IMPORTANT SAFEGUARDS
Follow basic safety precautions, including:
he appliance, including its cord, must not be used, played with, cleaned or maintained by
T
persons under eight years old and should at all times be kept out of their reach.
se, cleaning or maintenance of the appliance by children over eight or by anyone with a lack
U
of knowledge, experience or with reduced physical, sensory or mental capabilities should
only be undertaken after receiving appropriate instruction and under the adequate supervision
of a responsible adult to ensure that they do so safely and that the hazards involved are
understood and avoided.
on’t leave the iron unattended while plugged in, or while it’s standing on the ironing board.
D
nplug the iron before filling, before cleaning, and after use.
U
se the iron, or set it on its heel, on a stable, level, heat-resistant surface, preferably an ironing
U
board.
on’t operate the appliance if it’s dropped or damaged, or if it malfunctions or leaks.
D
1 Don’t put the appliance in liquid, don’t use it in a bathroom, near water, or outdoors.
2 Don’t iron clothing while it’s being worn – you’ll injure the wearer.
3 Don’t touch the soleplate, and keep away from the steam it emits.
4 Don’t use the iron in the vicinity of children.
5 Sit the iron upright when you’re not ironing.
6 Don’t fill the iron directly from the tap, use the jug.
7 Don’t use accessories or attachments other than those we supply.
8 Don’t use the appliance for any purpose other than those described in these instructions.
9 Don’t scratch the soleplate – avoid buttons, zips, etc.
10 The appliance has a protective thermal fuse, which will blow if it overheats. If this happens,
the appliance will stop working, and must be returned for repair.

3
instructions
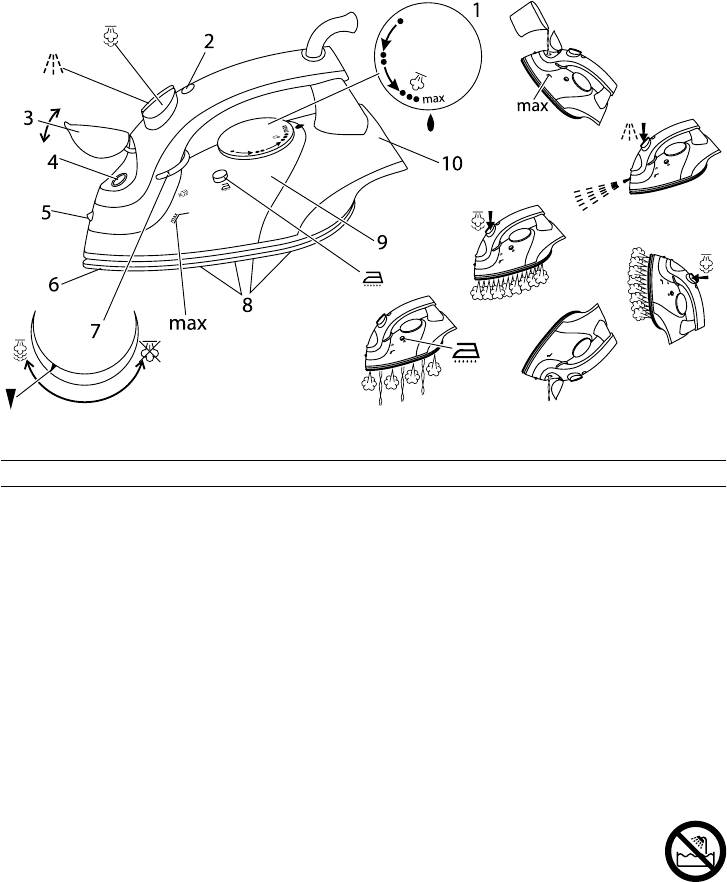
diagrams
4 water inlet
S no steam
1 temperature control
5 spray nozzle
8 steam vents
5 mark
6 soleplate
9 reservoir
S steam available
7 steam control
10 heel
2 light
) mark
3 water inlet cover
# high steam
11 If the cable is damaged, it must be replaced by the manufacturer, its service agent, or
someone similarly qualified, in order to avoid hazard.
household use only
U BEFORE USING FOR THE FIRST TIME
1 Remove any labels, stickers or packaging from the iron and soleplate.
2 Don’t worry if the iron smokes a bit at first, it’ll stop as the element cures.
3 Iron an old piece of cotton fabric, to clean the soleplate.
4 Press the S and * buttons 3 or 4 times, to check them.
C PREPARATION
5 Check for textile care symbols (i j k l).
6 Iron fabrics needing low temperatures j first, then those that need medium temperatures
k, and finish with those needing high temperatures l.
X FILLING
7 The iron may be used with tap-water, but if you live in a hard-water area, you should use
distilled water (not chemically descaled water).
8 If you buy distilled water, check that it is marketed as suitable for irons.
9 Don’t add anything to the water – you’ll damage the iron.
10 Unplug the appliance.
11 Set the temperature control to •. Set the steam control to S.
12 Open the water inlet cover.
13 Tilt the iron till the water inlet cover is vertical.
14 Pour water from the jug into the water inlet.
15 Pour slowly, to allow the air in the reservoir to escape, and avoid an airlock.
16 Don’t fill past the max mark on the reservoir, or water will escape in use.
17 Close the water inlet cover. Wipe up any spillage.
C SWITCH ON
18 Set the temperature control to •. Set the steam control to S.
19 Sit the iron on its heel.
20 Put the plug into the power socket.
21 Turn the temperature control to bring the setting you want (see the guide below) next to the
5 mark. The light will glow.
22 When the iron reaches the set temperature, the light will go off. It will then cycle on and off as
the thermostat operates to maintain the temperature.
temperature setting guide
label marking temperature setting
j cool – nylon, acrylics, polyester •
k warm – wool, polyester mixtures ••
l hot – cotton, linen •••/max
i do not iron
, If the instructions on the fabric label differ from this guide, follow the instructions on the
label.

4
C REDUCING TEMPERATURE
23 Reducing temperature takes longer, as the appliance has to lose heat.
24 Organise your ironing so you don’t need to reduce the temperature (“preparation” point 2).
h STEAM IRONING
25 If you intend to use steam, the temperature setting must be S or higher.
26 If you don’t, you’ll get water on your clothes, not steam.
27 Set the steam control, to the setting you want (S = no steam, # = high).
28 Wait till the light goes off, then start ironing.
k SPRAY
, Water spotting affects some fabrics. Test this on a hidden part of the fabric.
29 This function works with dry or steam ironing, as long as there is water in the reservoir.
30 Lift the iron off the fabric.
31 Aim the spray nozzle at the fabric.
32 Press the * button.
33 You may have to press it 2 or 3 times to pump water through the system.
i SHOT OF STEAM
34 This function works with dry or steam ironing, as long as there is water in the reservoir.
35 If you intend to use steam, the temperature setting must be S or higher.
36 Lift the iron off the fabric.
37 Press the ~ button.
38 You may have to press it 2 or 3 times to pump water through the system.
39 Leave 4 seconds between shots, to let the steam build up.
n DRY IRONING
, If you’re going to be dry ironing for 20 minutes or more, empty the reservoir first, to avoid
spontaneous bursts of steam.
40 Set the steam control to S.
41 Wait till the light goes off, then start ironing.
l VERTICAL STEAMING
42 Remove wrinkles from hanging clothes, hanging curtains, and furnishing fabrics.
43 Check that there is adequate ventilation behind the fabric, otherwise moisture may build up,
causing mildew.
44 Check that there is nothing behind the fabric that may be damaged by the steam.
45 Check that pockets, turn-ups, and cuffs are empty.
46 Check that there is water in the reservoir.
47 Set the temperature control to max. Set the steam control to S.
48 Lift the iron off the fabric.
49 Press the ~ button.
50 You may have to press it 2 or 3 times to pump water through the system.
51 Leave 4 seconds between shots, to let the steam build up.
C AFTER USE
52 Set the temperature control to •. Set the steam control to S.
53 Unplug the appliance.
54 Open the water inlet cover.
55 Hold it over a sink, turn it upside down, and drain the water from the reservoir, via the water
inlet.
56 Close the water inlet cover.
57 Sit the iron on its heel.

5
58 Leave it to cool down completely.
59 When it’s cold, wipe off any moisture, and wind the cable round the heel.
60 Store the iron on its heel, to avoid corrosion and damage to the soleplate.
C SELF CLEAN
61 To prevent scale building up, use the self clean function at least monthly in normal water
areas, more often in hard water areas.
, Products returned under guarantee with faults due to scale will be subject to a repair charge.
62 You’ll need a basin or a large bowl to catch the water coming out of the soleplate.
63 Fill the reservoir to the max mark.
64 Set the temperature control to max. Set the steam control to S.
65 Sit the iron on its heel.
66 Put the plug into the power socket.
67 Wait till the light goes off.
68 Hold the iron over the basin or bowl, with the soleplate down.
69 Press the C button, and keep it pressed in.
70 Gently move the iron to and fro.
caution keep clear of the escaping water and steam
71 Water and steam will wash scale and dust through the soleplate.
72 Carry on till the reservoir is empty.
73 Set the steam control to S.
74 Release the C button.
75 Unplug the iron, and sit it on its heel to cool.
76 When it’s cold, wipe off any moisture, and wind the cable round the heel.
77 Store the iron on its heel, to avoid corrosion and damage to the soleplate.
e ANTI-SCALE
78 The anti-scale agent incorporated in the iron helps prevent the build-up of scale.
79 Don’t use a descaling solution, or you’ll destroy the anti-scale agent.
C CLEANING
80 Unplug the iron, and sit it on its heel to cool.
81 Clean the outside surfaces of the appliance with a damp cloth.
82 Remove spots from the soleplate with a little vinegar.
83 Store the iron on its heel, to avoid corrosion and damage to the soleplate.
H ENVIRONMENTAL PROTECTION
To avoid environmental and health problems due to hazardous substances in electrical
and electronic goods, appliances marked with this symbol mustn’t be disposed of with
unsorted municipal waste, but recovered, reused, or recycled.

6
Lesen Sie die Anleitung, bewahren Sie sie auf und falls Sie das Gerät an Dritte abgeben, geben
Sie auch die Anleitung mit.
Entfernen Sie die Verpackung vollständig, bevor Sie das Gerät einschalten.
A WICHTIGE SICHERHEITSHINWEISE
Beachten Sie bitte folgende grundlegende Vorsichtsmaßnahmen:
ieses Gerät und sein Stromkabel dürfen nicht von Personen unter 8 Jahren benutzt,
D
gereinigt, gewartet oder als Spielzeug verwendet werden. Bewahren Sie es stets außerhalb
der Reichweite von Kindern auf.
ie Verwendung, Reinigung oder Wartung des Geräts durch Kinder über acht Jahre oder
D
Personen, die dieses Gerät nicht kennen oder nicht damit vertraut sind bzw. durch
Personen mit eingeschränkten körperlichen, sensorischen oder geistigen Fähigkeiten, sollte
nur nach entsprechenden Anweisungen und unter der Aufsicht eines
verantwortungsbewussten Erwachsenen erfolgen, um sicherzustellen, dass die damit
verbundenen Gefahren verstanden und vermieden werden.
assen Sie das Bügeleisen nicht unbeaufsichtigt, während es angeschlossen ist oder während
L
es auf dem Bügelbrett steht.
iehen Sie den Stecker beim Befüllen, Reinigen und nach dem Gebrauch.
Z
utzen Sie das Bügeleisen oder stellen Sie es auf das Heck, auf einen planen, sicheren und
N
hitzebeständigen Untergrund, am besten auf ein Bügelbrett.
erwenden Sie das Gerät nicht, wenn es tropft oder beschädigt ist, Fehlfunktionen zeigt oder
V
undichte Stellen hat.
1 Gerät keinesfalls in Flüssigkeit tauchen, in einem Badezimmer, nahe Wasser oder im
Freien benutzen.
2 Bügeln Sie keine Kleidung direkt am Körper - Sie könnten sich oder andere Personen
verletzen.
3 Berühren Sie nie die Bügelsohle und halten Sie sich vom austretenden Dampf fern.
4 Benutzen Sie das Bügeleisen nicht in der Nähe von Kindern.
5 Stellen Sie das Bügeleisen aufrecht hin wenn Sie nicht bügeln.
6 Befüllen Sie das Bügeleisen nicht direkt vom Wasserhahn, benutzen Sie den Auffüllbecher.
7 Bitte keine Zubehörteile oder Aufsätze verwenden, die nicht von uns geliefert wurden.
8 Benutzen Sie das Gerät ausschließlich zu den in diesen Anweisungen beschriebenen
Zwecken.
9 Achten Sie darauf, dass Sie die Bügelsohle nicht verkratzen – vermeiden Sie Knöpfe,
Reißverschlüsse, etc.
10 Das Gerät hat eine Sicherheitsabschaltung, welche bei Überhitzung einsetzt. Wenn dies
geschieht stoppt das Gerät und muss zur Reparatur gegeben werden.
11 Weist das Kabel Beschädigungen auf, muss es vom Hersteller, einer Wartungsvertretung des
Herstellers oder einer qualifizierten Fachkraft ersetzt werden, um eine mögliche Gefährdung
auszuschließen.
Nur für den Gebrauch im Haushalt geeignet
U VOR ERSTMALIGEM GEBRAUCH
1 Entfernen Sie alle Etiketten, Aufkleber oder anderes Verpackungsmaterial vom Bügeleisen
und der Bügelsohle.
2 Keine Sorge, wenn das Bügeleisen zu Beginn etwas raucht, es wird aufhören, wenn das
Kleidungsstück trocknet.
3 Bügeln Sie ein altes Stück Baumwollstoff um die Bügelsohle zu reinigen.
4 Drücken Sie die Tasten S und * oder 4 Mal, um ihre Funktionstüchtigkeit zu überprüfen.


