Q&Q QUARTZ L105J: инструкция
Раздел: Безопасность
Тип:
Инструкция к Q&Q QUARTZ L105J
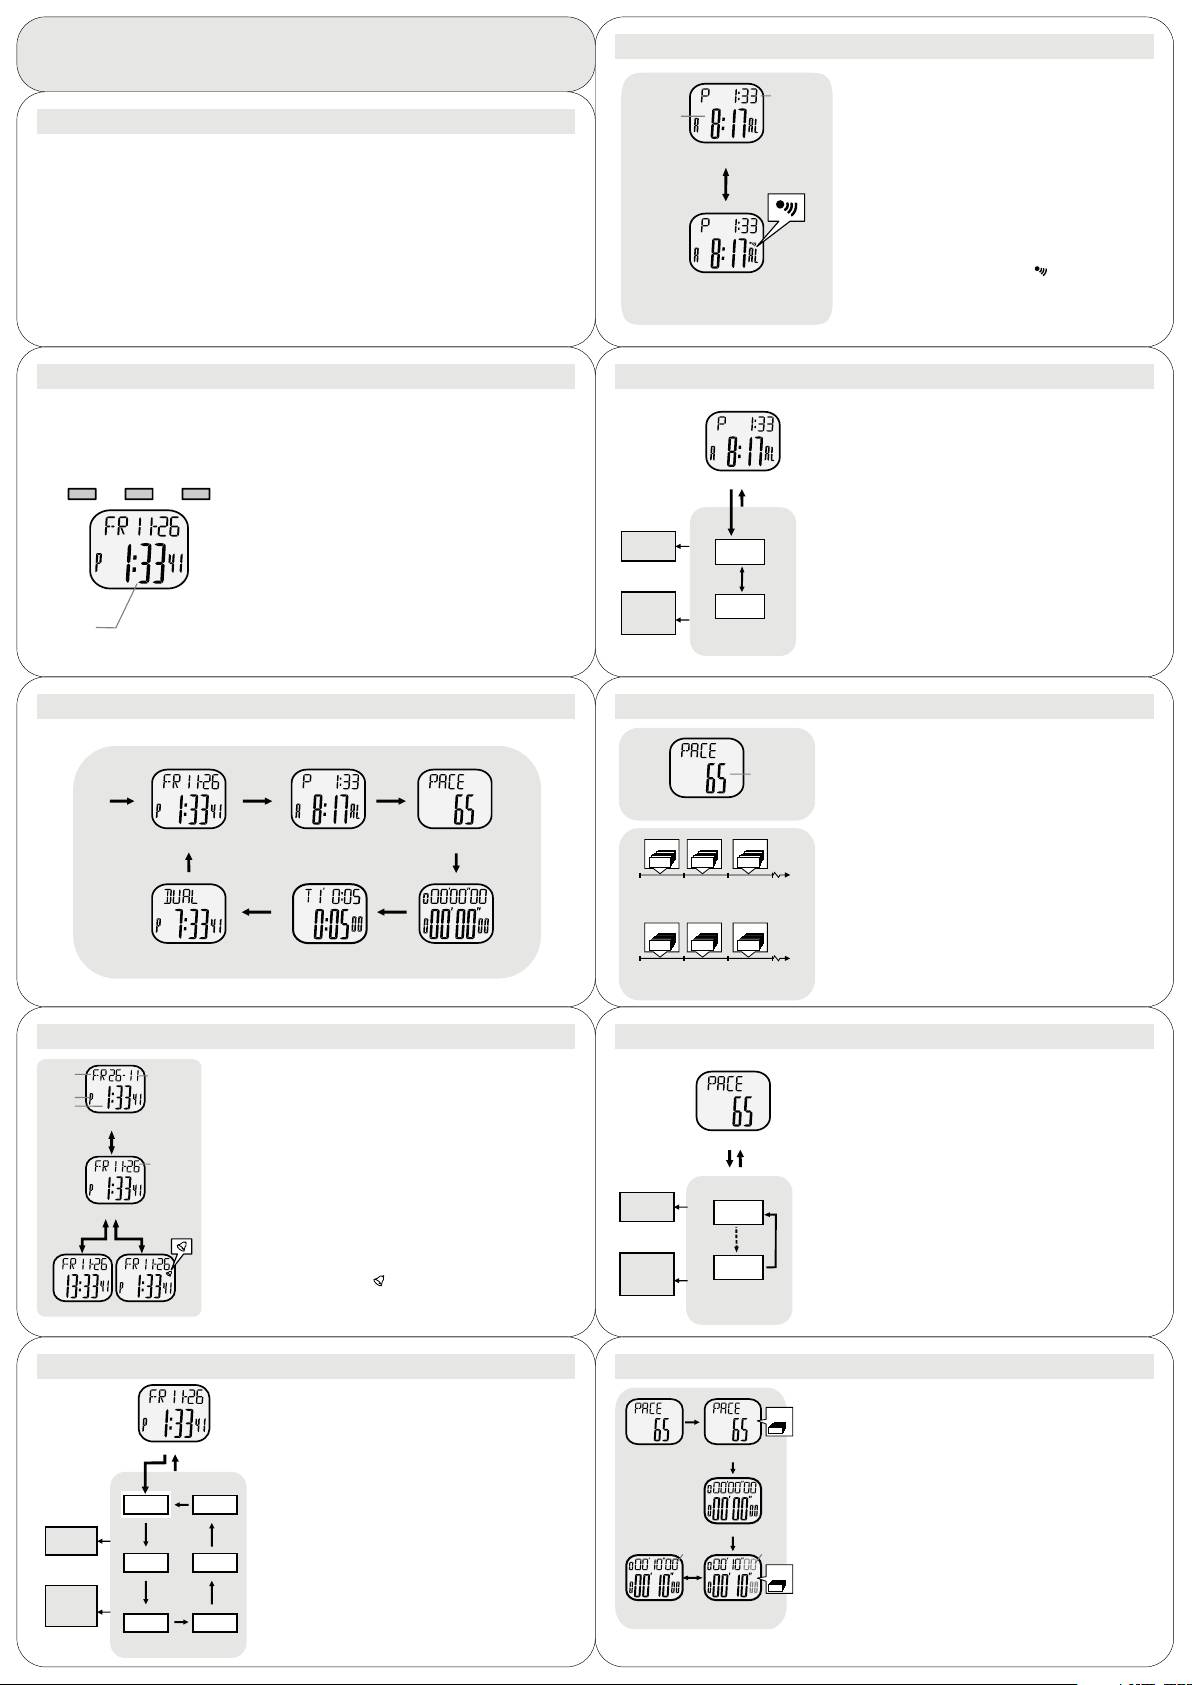
5.0 Daily Alarm Mode - Daily Alarm Mode
50 LAP Stopwatch
+ Daily Alarm Mode
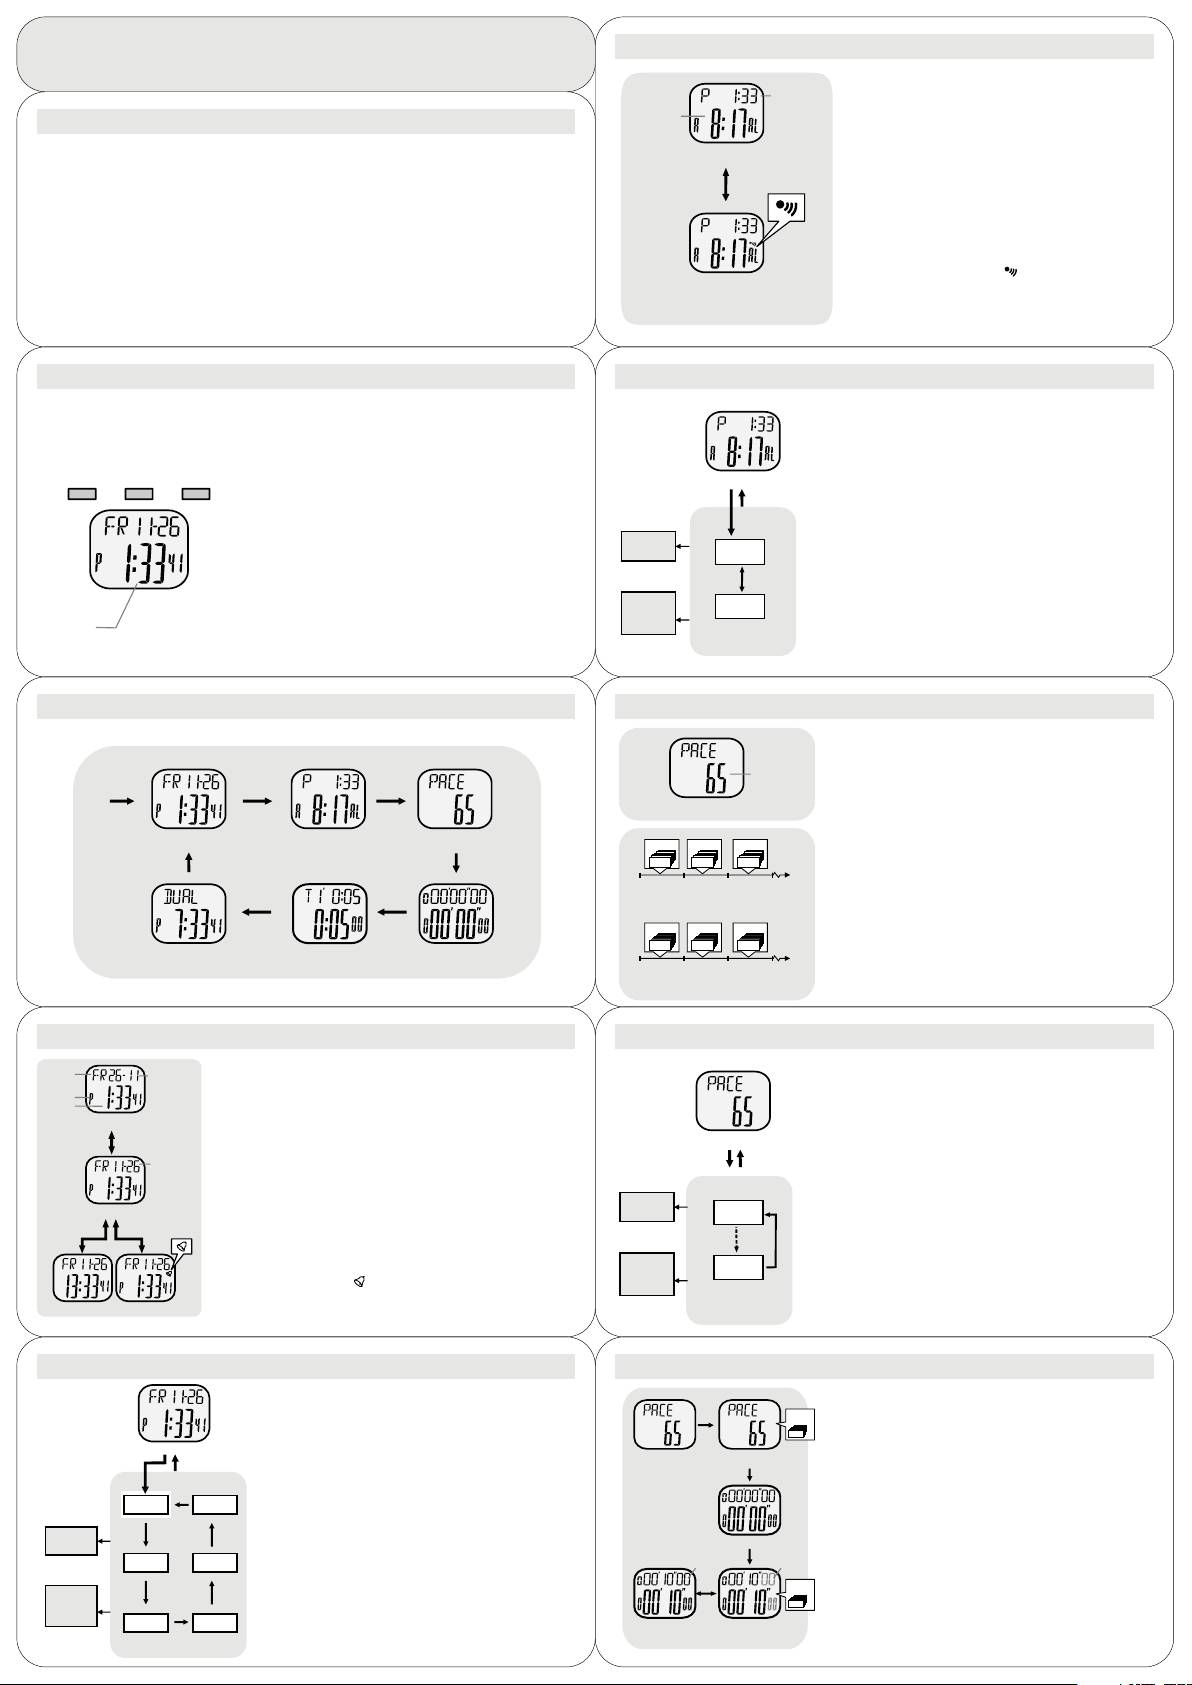
current time
(hour, minute)
+ This Watch includes a daily alarm function for the current time.
alarm time
+ When the daily alarm is ON, the Watch will beep for 20 seconds at
1.0 Introducti on
(hour, minute)
the alarm time every day.
+ Daily Alarm Display
+ Thank you for purchasing of this Watch.
Daily Alarm OFF
+ When the Daily Alarm Mode is selected, the Watch will show the
+ his Watch chronograph,
T provides current time, daily alarm, countdown timer, pacer and dual time function.
following items on the display:
+ In addition to normal timekeeping function, this Watch includes two special features, they are pacer watch
+ The current time (hour, minute) is exhibited on the 1st row of the
and multi-timer function.
[L/R]
display.
+
The Pacer Watch which combines the chronograph and the pacer function together, hence two functions can
+ The daily alarm time (hour, minute) is exhibited on the 2nd row of
be activated at the same time. While the
multi-timer which combines two or more timers together to extend
the display.
the time function to measure multi-phase elapse time.
+ To Set the Daily Alarm ON/OFF
+ Be
sure to carefully read this manual and keep it on hand for later reference when necessary.
daily alarm
+ To set the daily alarm between ON and OFF, press the
[L/R] button
+ To get the most of your purchase, i
t is advisable to use this watch in conformity with the below notes:
indicator
in the Daily Alarm Display.
+ Watch
Avoid exposing the to the extreme conditions for an unreasonable time.
+ When the daily alarm indicator ' ' is appeared, the daily alarm
+ Watch
Avoid rough uses or severe impacts to the .
Daily Alarm ON
is ON.
+ Watch
Do not open the case unless a certified service agency.
+ To Test the Daily Alarm Sound
+ ccasionally
Clean the Watch o with a soft and moistened cloth.
Daily Alarm Display
+ To test the alarm sound, hold down the [S/S] button in the Daily
Alarm Display. The Watch will beep as
long as the button is hold.
+ Store the Watch in a dry place when it is not in use for a long time.
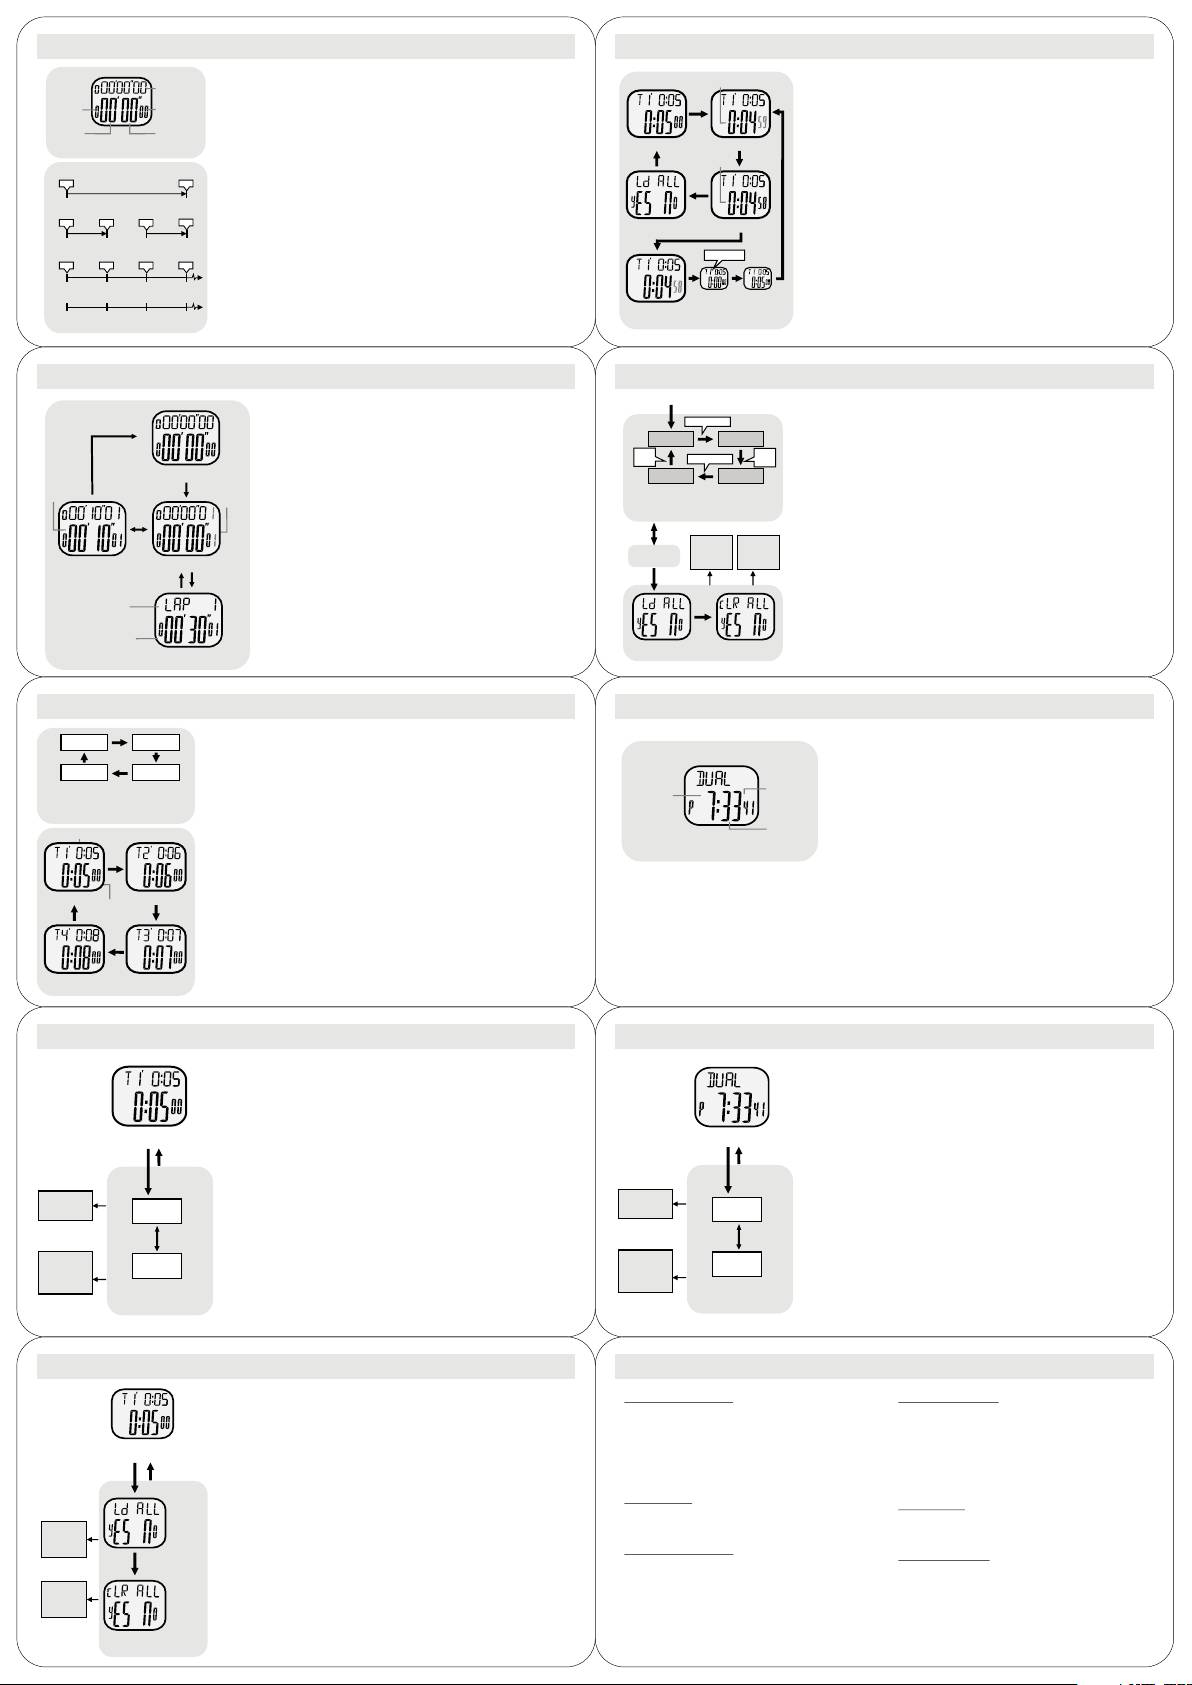
2.0 Button and its Functi on
5.1 Daily Alarm Mode - Setting the Daily Alarm
Mode Button [M]
How to Set the Daily Alarm
+ To select among the Current Tim e , Daily Alarm, Pacer,
+ To select the setting display, hold down the [MODE]
Chronograph, Timer and Dual Time Mode.
button for 2 seconds in the Daily Alarm Mode, and then
+ To select setting display.
the 'minute' digits will start flashing.
Start/Stop Button [S/S]
+ In setting display, press the [S/S] button to move the
[S/S][L/R] [M]
+ To select among the setting items during setting display.
Daily Alarm Display
flashing following the adjacent diagram to select among
+ To switch between 12 and 24 hour format.
hold [M]
[M]
different settings.
+ To activate the 'start' or 'stop' function during Chronograph Mode
+ During one of the settings (minute, hour) is flashing,
and Timer Mode.
[L/R]
press the [L/R] button to change the number; hold down
Lap/Reset Button [L/R]
Increase
the [L/R] button to change the number at a higher speed.
+ To view and activate 'lap' or 'reset' function during Chronograph
the number
minute
Mode.
+ When the setting is completed, press the [M] button once
to exit the setting display. The Watch will also exit the
+ To select between different timer displays. To load or clear the
starting value for the timer(s).
hold [L/R]
[S/S]
setting display if NO key-stoke has been activated for 1
minute.
+ To activate the 'start' or 'stop' Pacer function during Pacer mode.
increase
the number
hour
+ To set the hourly chime function ON or OFF.
at a higher
DISPLAY
speed
+ To increase the digits during setting display.
Setting Sequence
.
3.0 Major Functi on Modes
6.0 Pacer Mode - Pacer Display
Pacer Mode
pacer
+ This Watch includes a pacer function which generate
beeping rate
regular beeps at a pre-defined rate. That pre-defined rate
(in beats
can be set within in a range from 40 to 180 beats per
[M]
[M]
per minute)
minute (bpm).
Pacer Display
+ The pacer will sound more beeps within a minute for a
higher bpm rate (e.g. 80)
setting than a lower bpm rate
(e.g. 30) setting.
Current Time Mode
Daily Alarm Mode
Pacer Mode
30 beeps
30 beeps
30 beeps
Pacer Display
[M]
[M]
Beep
Beep
Beep
+ When the Pacer Display is selected, the beeping rate is
exhibited on the 2nd row of the display.
0
1
2
3
minute(s)
start
How to Use the Pacer
[M]
[M]
Example 1: Set 30 as the Pacer Beeping Rate .
+ When the pacer has been set with a beeping rate, for
example 65 bpm, press the [L/R]
button once will start
80 beeps
80 beeps
80 beeps
the beeping.
Beep
Beep
Beep
+ During the Watch is beeping, press the [L/R] button once
Dual Time Mode
Countdown Time r Mode
Chronograph Mode
again to stop the beeping.
0
1
2
3
minute(s)
start
Example 2: Set 80 as the Pacer Beeping Rate.
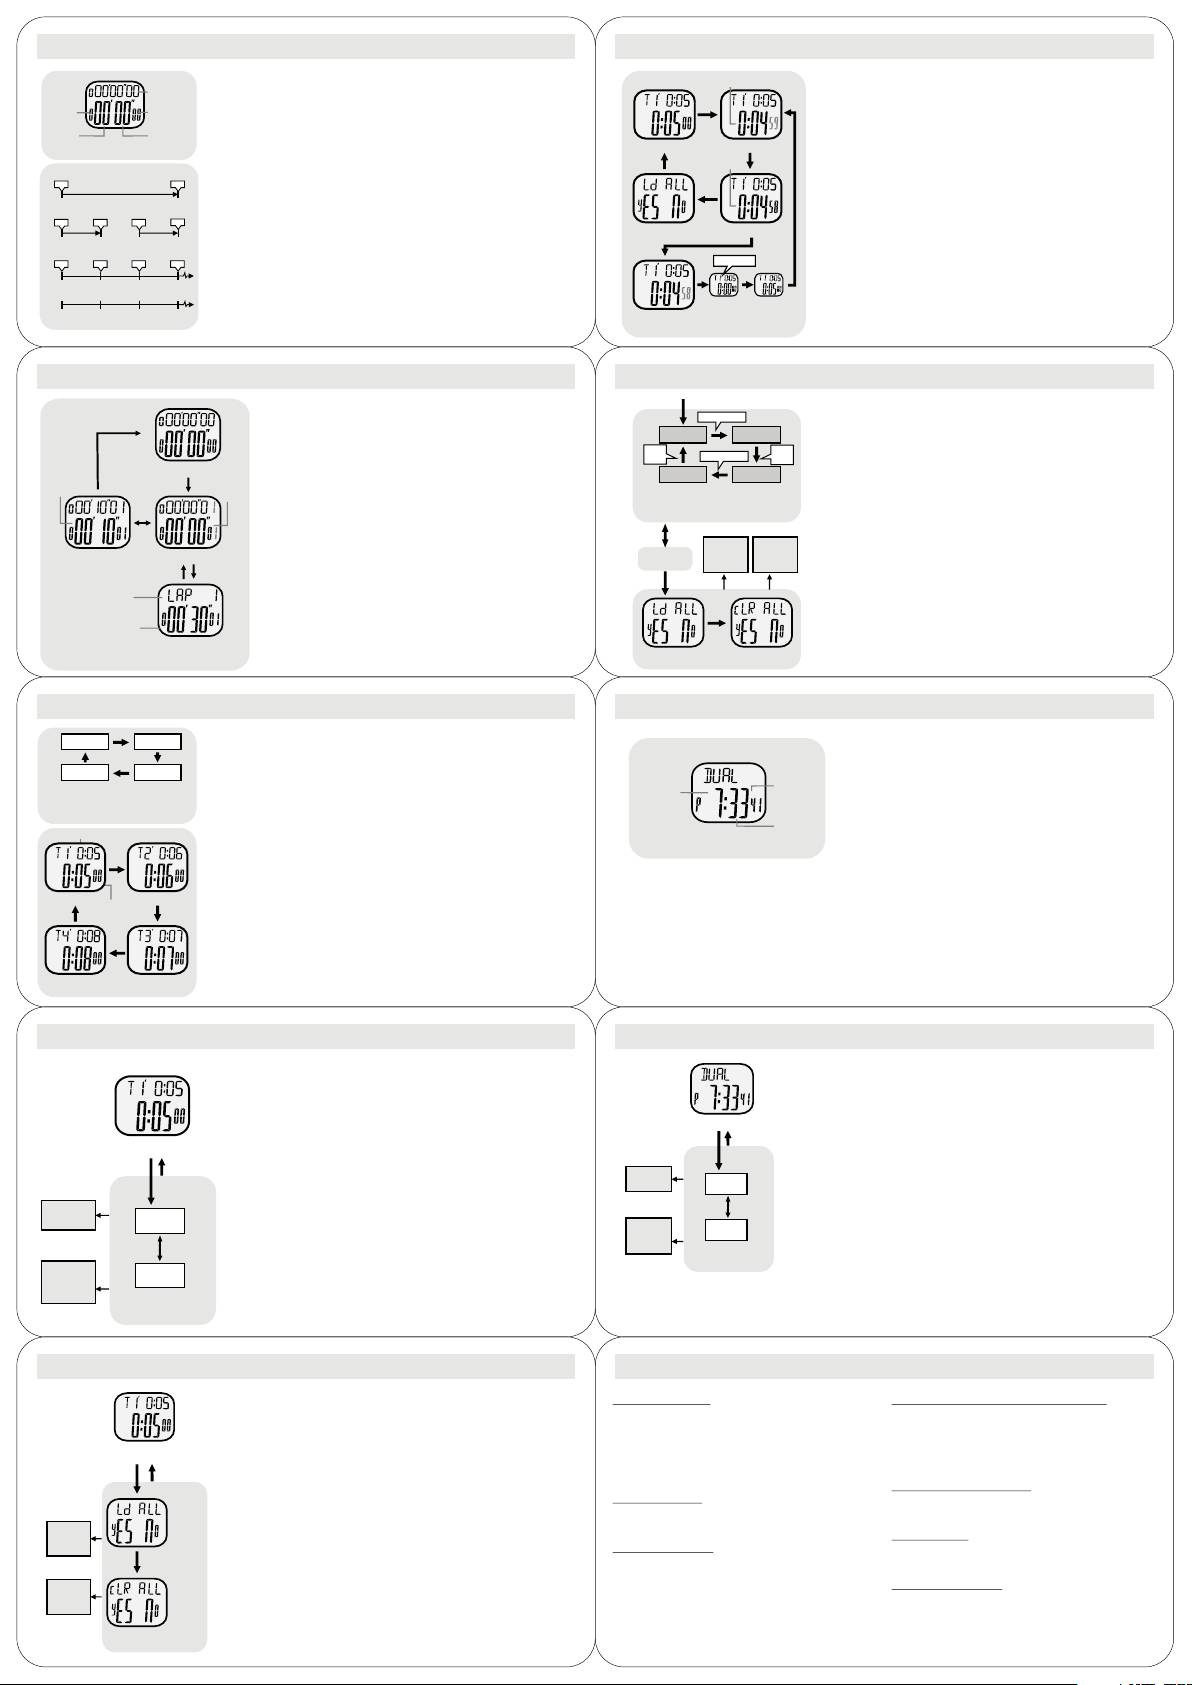
4.0 Current Time Mode - Current Time Display
6.1 Pacer Mode - Setting the Pacer Beeping Rate
day of
week
date
Current Time Display
To Set the Pacer Beeping Rate
(day, month)
AM/PM
+
When the Current Time Mode is selected, the Watch will show the
indicator
following items on the display:
+
To select the setting display, hold down the [M] button for 2
current
seconds in the Pacer Display, and then the beeping rate digits
time
+
The day of week and date of the current time are exhibited on the 1st
will start flashing.
12 hours Display
row of the display.
Chime OFF
+
+
The current time (hour, minute, second) is exhibited on the 2nd row
In the setting display, press the [L/R] button to change the
hold [S/S]
of the display.
Pacer Display
number; hold down the button to change the
number at a
How to Switch between 12 and 24 hour format
hold [M]
[M]
higher speed.
date
(month, day)
+
+
To switch between 12 and 24 hour format, press the [S/S] button
When the setting is completed, press the [M] button once to
following the adjacent diagram.
[L/R]
exit the setting display. The Watch will also exit the setting
display if NO key-stoke has been activated for 1 minute.
How to Switch between Month-day and day- month format
Increase
12 hours Display
Chime OFF
40
hourly
+
To switch between month-day and day-month format, hold down the
the number
[S/S]
[L/R]
chime
[S/S] button following
the adjacent diagram.
indicator
To Set the Hourly Chime ON/OFF
5 bpm
hold [L/R]
per step
+
To set the hourly chime between ON or OFF, press the [L/R] button
increase
following the adjacent diagram.
the number
180
+
When the chime indicator ' ' is appeared on the display, the chime is
at a higher
ON. During the hourly chime is ON, the Watch
will sound 'beep beep'
speed
every hour on the hour (e.g 1:00 00, 2:00 00, 3:00 00)
Setting Sequence
24 hours Display
Hourly chime ON
4.1 Current Time Mode - Setting the Current Time
6.2 Pacer Mode - Using the Watch as a Pacer Watch
How to Set the Current Time
How to Use the Watch as a Pacer Watch
+ To select the setting display, hold down the [M] button
[L/R]
65 beeps/
+ To use the Watch as a pacer watch following the below
for 2 seconds in the Current Tim e Mode, and then the
minute
steps:
'Second' digits will start flashing.
Beep
+ When the pacer Display is selected, press the [L/R] to
Current Time Mode
+ In setting display, press the [S/S] button to move the
Pacer Mode
turn on the pacer function.
hold [M]
[M]
Pacer Mode
flashing following the adjacent diagram to select among
Pacer OFF
Pacer ON
different
settings.
[M]
+ When Pacer function is on, press the [M] button to
switch the display to Chronograph
Mode, and then
[S/S]
+ During one of the settings (minute, hour, year, month,
press the [S/S] button once will start the pacer and
second
day
day) is flashing, press the [L/R] button to change the
chronograph function at the same time.
[L/R]
number (hold down the button to change the number at
a higher speed).
+ Then the watch will became a Pacer Watch which the
Increase
[S/S] [S/S]
chronograph is counting and the pacer is beeping at
+ When the second digits start flashing, press the [L/R]
Chronograph Mode
the number
the pre-defined rate.
button to reset them to zero.
stop
[S/S]
minute month
counting
counting
+ During the Pacer Watch is counting and beeping,
+ When
the setting is completed, press the [M] button
hold [L/R]
press the [S/S] button once will stop the beeping and
once to exit the setting display. The Watch will also exit
[S/S]
65 beeps/
minute
counting.
increase
[S/S] [S/S]
the number
the setting display if NO key-stoke has been activated
Beep
at a higher
[S/S]
for 1 minute.
speed
hour
year
Chronograph Mode
Chronograph Mode
Pacer Watch Stopped
Pacer Watch Started
Setting Sequence
7.0 Chronograph Mode - Chronograph Mode
8.3 Countdown Timer Mode - Using the Single Timer
current lap
Chronograph Mode
running time
counting
How to Use the Single Time r
accumulative
+ This Watch includes a stopwatch function which measures:
running time
accumulative
+ When using one timer only (Single Timer), excludes other
(hour)
running time
+ Elapsed time, accumulative elapsed time (multi-phase elapsed time)
[S/S]
timers by setting their starting values to 0:00.
(1/100 second)
accumulative
accumulate
and Lap time (get a elapsed time without stopping the counting).
running time
running time
+ Once the starting value has been set for the last timer, it must
(minute)
(second)
+ The measuring capacity of the chronograph:
be loaded into the counting sequence before it is ready for
Chronograph Display
Timer 1 Display
Counting Display
'All Zero'
+
Measuring unit: 1/100 second,
counting. Check
previous chapter 8.2 for more detail on how
stop
+
Measuring range: 9 hours, 59 minutes and 59.99 second,
[M]
counting
[S/S]
to load the starting value into the counting sequence.
1. Elapsed time
+
Lap
Memory: a maximum of 50 laps.
hold
+ Press the [S/S] button to start the counting. The counting will
300
[L/R]
Chronograph Display
be restarted automatically when it reaches zero unless the
[S/S]
[S/S]
counting is stopped by pressing the [S/S] button.
2. Accumulative elapsed time
+ When the Chronograph Display is selected, the Watch will show the
How to Re-load the Ti m er
10010
20
following items on the display:
Stop Counting Display
+ During the chronograph is counting: The current lap time and the
[S/S]
+
To re-load the timer to its original starting value during the
[S/S]
[S/S]
[S/S] [S/S]
accumulative elapsed time is exhibited on the 1st and 2nd row
timer is stopped, perform the loading process following the
3. Lap times
respectively. NOTE: The current lap
time will be the same as the
beep, beep
previous chapter 8.2.
10 10100
accumulative elapsed time for lap 1.
lap 1lap 2lap 3
Time r Alarm Sound
+ During the chronograph is stopped: The current lap time and lap
[S/S]
[L/R] [L/R] [L/R]
number are exhibited on the 1st row, and the accumulative elapsed
+ During the counting, the Watch will beep once when a timer
0102030
time is exhibited on the 2nd row.
Zero Display
Counting
counts to the last 1 and 0 second.
time
Counting Display
Display
Elapsed time, Accumulative
+ During the Lap Display is displaying: The current lap number and
Elapsed time and Lap time
the lap time is exhibited on the 1st and 2nd row respectively.
7.1 Chronograph Mode - Using the Chronograph
8.4 Countdown Timer Mode - Using the Multi-Tmer
How to Measure Elapse Time
[S/S]
How to Use the Multi-Timer
hold [L/R]
+ During the 'All Zero' Display, press the [S/S] button once will start
beep, beep
+ To use the Multi-Timer function which combines two or more
the counting, and press the [S/S] button again will stop the
Timer 1*
Timer 2*
timers to measure multi-phases elapse time, it must set the
counting.
+ The elapsed time between the above 2 key-stokes will be
beep,
beep,
starting value for each timer.
beep
beep, beep
beep
elapsed
exhibited on the 1st row of the display. Repeat the above key
+ Once the starting value has been set for the timer(s), they
All Zero Display
time
operations to get the accumulative elapsed time.
Timer 4*
Timer 3*
must be loaded into the counting sequence before it is ready
(stop
elapsed
[S/S]
for counting. Check the previous chapter 8.2 for more detail on
counting)
time
How to Get a Lap Time
Multi-Timer Counting Sequence
(counting)
+ When the chronograph is counting, press the [L/R] button to get
D
how to load the timer into the counting sequence.
If timer 1, 2, 3 or 4 which set 0:00 as the
and view the Lap Display for 5 seconds. In the Lap Display, the
starting value, that timer will be
+ Pressing the [S/S] button will start the counting sequence. The
[S/S]
excluded from the counting sequence.
current lap number and lap time will appear on the 1st and 2nd
Multi-Timers will starts the counting from Timer 1 to another
row of the display respectively.
[S/S]
timers following the adjacent diagram. Pressing the [S/S]
Confirm
Abort
+ After the 5 seconds, the Watch will return to counting display
button once again will stop the counting.
automatically. Then the new lap time and the accumulative
The counting
the loading
the loading
or
Counting Display
is stopped
or
+ The Watch will count repeatingly unless it is stopped by
Stop Counting Display
elapsed time will be exhibited on the 1st and 2nd row of the
resetting
resetting
pressing the [S/S] button.
5 seconds
[L/R]
display respectively. Repeat the above key operations to get
hold [L/R]
[M]
[L/R]
Time r Alarm Sound
another lap time.
+ During the counting, the Watch will beep once when a timer
How to Recall/Reset the Lap Time
hold
lap
+ During the chronograph is stopped:
[L/R]
counts to the last 1 and 0 second.
number
How to Re-load/Reset the Starting Values
+
Press the [L/R] button one by one to review the recorded lap
times, or
+ To re-load
or reset the Starting Values during the timer is
lap time
+
paused, perform the loading or resetting process which
Hold down the [L/R] button for about 2 seconds to clear the lap
Load the
Reset the
Lap Time Display
time, and reset the display to 'All Zero' display.
Starting Values
Starting Values
mentioned in the adjacent diagram to re-load or reset the
starting vales.
8.0 Countdown Timer Mode - Countdown Timer Display
9.0 Dual Time Mode - Dual Time Mode
Timer 1*
Timer 2*
Countdown Timer Mode
+
This Watch includes 4 countdown timers. They are Timer 1, 2, 3 and 4.
Dual Tim e Mode
Using one timer (Single Timer) which can run normal timer function. But
Timer 4*
+ This Watch includes a dual time which show the current
Timer 3*
combines two or more timers (Multi-Timer) can extend the timer function to
time of the second time zone.
Multi-Timer Counting Sequence
measure multi-phase elapse time.
dual time
D
dual time
(second)
If Timer 1, 2, 3 or 4 which set 0:00 as the
+
The measurement unit of these timers is 1 second, and the starting value of
+ The second digits are same as the one of current time.
(hour)
starting value, that timer will be excluded
from the counting sequence.
these timers can be set up to a maximum of 23 hours and 59 minutes.
Dual Tim e Display
+
When a timer which set 0:00 as the starting value, that timer will be excluded
dual time
starting value (hour, mintue)
from the counting sequence.
(minute)
+ When the Dual Time Display is selected, the dual time
Dual Time Mode
(hour, minute, second) is exhibited on the 2nd
row of the
+
[L/R]
When the timer is started, the Watch will count repeatingly unless it is
display.
stopped by pressing the [S/S] button. During the counting, the Watch will
beep once when a timer counts to the last 1 and 0 second
Single Timer and Multi-Timer
Timer 1 Display Timer 2 Display
+
When using Single Timer (one timer), it must excludes other timers from the
counting
time
[L/R][L/R]
counting
sequence by setting their starting value to 0:00.
+
When using Multi-Timer, it is counting on a sequence which starts the
counting from Timer 1 to another timers following the adjacent diagram.
[L/R]
How to Select Different Timer Display
+
To select different countdown timer display during the timer is stopped, press
the [L/R] button one by one following the adjacent diagram.
Timer 4 Display Timer 3 Display
Countdown Timer Mode
8.1 Countdown Timer Mode - Setting the Countdown Timer
9.1 Dual Time Mode - Setting the Dual Time
How to Set the Countdown Time r
To Set the Dual Time
+ The following paragraphs will illustrate the procedure for
+ To select the setting display, hold down the [M] button for 2
setting the timer 1. Even so, setting the other timers will work
seconds in the Dual Time Mode, and then the 'Minute' digits
start flashing.
on the similar procedure.
Countdown Time r Display
+ To select the setting display, hold down the [M] button for 2
Dual Time Mode
+ In the setting display, press the [S/S] button to select the
flashing (setting item) as shown in the diagram.
seconds in the Timer 1 Display, and then
the 'Minute' digits
hold [M]
[M]
hold [M]
[M]
start flashing on the display.
+ When
one of the settings (minute, hour) is flashing, press the
[L/R] button to change the number; hold down the button to
+ In setting display, press the [S/S] button to move the flashing
[L/R]
[L/R]
change the number at a higher speed.
following the adjacent diagram to select among different
Increase
settings.
Increase
+ When the setting is completed, press the [M] button once to
the number
minute
the number
minute
exit the setting display. The Watch will also exit the setting
+ When one of the settings (minute, hour) is flashing, press the
display if NO key-stoke has been activated for 1 minute.
[L/R] button to change the number (hold down the button to
hold [L/R]
[S/S]
change the number at a higher speed).
hold [L/R]
[S/S]
increase
+ When the setting is completed, press the [M] button once to
increase
the number
hour
exit the setting display. The Watch will also exit the setting
the number
hour
at a higher
display if NO key-stoke has been activated for 1 minute.
at a higher
speed
speed
Setting Sequence
Setting Sequence
8.2 Countdown Timer Mode - Loading and Resetting the Timer
10.0 Specifications
How to Load the Timers
Current Tim e Mode
Countdown Tim e r
+ If the starting value has been set for the timer(s), they must be
+ Ti m e System: AM, PM, Hour, minute,
+ Timer: 4 timers
loaded into the counting sequence before it is ready for
second
counting.
+ Resolution: 1 second
Countdown Timer Display
+ Time Format: 12-hour or 24-hour format
Stop Counting
+ To load the timer(s) into counting sequence, hold down the [L/R]
+ Measuring Range: 23 hours 59 minutes
hold
button in Timer Display (when the timer is stopped) until
the 'Ld
+ Calendar: Mont h, date and day of week
+ Timer Sounds: the Watch will beep once
[L/R]
[L/R]
ALL' indicator appeared following the adjacent diagram.
display (Auto-Calendar function for leap year
and day of week)
when a timer counts to the last 1 and 0
+ When the 'Ld ALL' indicator is appeared, press the [M] or [L/R]
second.
to confirm or abort the loading.
Alarm Mode
load the
Pacer Mode
[M]
timer(s)
+ Daily alarm and hourly chime
Confirm
into the
+ If the Timer Display is returned after the loading, the timer(s) is
+ Setting Range: 40 bpm to 180 bpm
the loading
counting
ready to count.
or
sequence
+ Alarm sound: 20 seconds
+ Setting step: 5 bpm
resetting
How to Reset the Timers
Chronograph Mode
hold
Dual Tim e Mode
[L/R]
+ During
the 'Ld ALL' indicator is appeared, hold down the [L/R]
+ Resolution: 1/100 second
[L/R]
button until the 'cLR ALL' indicator appeared following the
+ Time System:AM,
PM, Hour, minute, second
Abort
+ Measuring Range: 9
hours 59 minutes 59.99
the loading
reset all
adjacent diagram.
starting
seconds
or
+ When the 'cLR ALL' indicator is appeared, press the [M] or
resetting
values
to zero
[L/R] to confirm or abort the resetting.
+ Lap memory: 50 lap memories
+ If the Timer has been reset, all
starting values will be reset to
Setting Sequence
0:00.
5.0 Modo de alarma diaria - Modo de alarma diaria
Cronómetro de 50 REGAZOS
Modo de alarma diaria
hora actual
●
Este reloj incluye una función de alarma diaria para la hora
(hora, minuto)
actual.
●
Cuando la alarma está conectada sonará durante 20 segundos
hora de alarma
un bip todos los días a la hora determinada.
1.0 Introducción
(hora, minuto)
Pantalla alarma diaria
●
Con el modo alarma diaria seleccionado, el reloj
+ Gracias por haber adquirido este modelo.
Alarma diaria
enseñará los siguientes ítems en la
pantalla:
+ El reloj incluye la hora actual, alarma diaria, Cronómetro, temporizador de cuenta atrás
●
La hora actual (horas, minutos) aparece en la primera
con Contador de pasos y función de doble tiempo.
Línea de la pantalla.
●
La hora de la alarma (horas y minutos) aparece en la
+ Además de su función normal como reloj, este Modelo incluye dos características
[L/R]
Segunda Línea de la pantalla.
especiales: El contador de pasos (PACER) y una función
multi-temporizador.
+ El reloj PACER combina las funciones de cronómetro y contador de pasos, pudiendo ser
Para activar / desactivar la alarma diaria
activadas simultáneamente. El multi-temporizador incluye dos o más temporizadores para
●
En el modo alarma diaria, pulse el botón (L / R) para
que sea posible ampliar la función y medir el tiempo transcurrido en varias etapas.
Conectar y
desconectar la alarma.
●
Si el indicador de alarma " “ aparece es porque la
+ Lea este manual cuidadosamente y téngalo Siempre a mano
para consultarlo.
alarma diaria
Alarma está activada.
+ Para sacar el máximo rendimiento de su compra utilice el reloj de la siguiente forma:
indicador
Para testar el sonido de la alarma diaria
● Evite exponer su reloj a condiciones adversas durante largos periodos de tiempo.
●
Para testar el sonido de la alarma diaria mantenga
● Evite usarlo en circunstancias adversas Y fuertes golpes.
● Sólo un agente certificado deberá abrir el reloj.
Alarma diaria en
Pulsado el botón (S / S) en la pantalla de la alarma diaria. La
alarma emitirá un bip mientras el botón este presionado.
● Limpie su reloj de vez en cuando con un paño suave ligeramente humedecido.
● Guarde su reloj en un lugar seco cuando no lo esté utilizando.
Alarma diaria de pantalla
2.0 Botones y funci ones
5.1 Modo de alarma diaria - Ajuste el modo de alarma diária
Botón modo (M)
Ajustar el modo de alarma diaria
●
Para elegir entre la hora actual, la alarma diaria, Contador de
●
En el modo de alarma diaria, mantenga
pasos, cronógrafo, temporizador y modo de tiempo doble.
Pulsado el botón (M) durante 2 segundos para elegir la pantalla de ajuste,
●
Para seleccionar la visualización ajustar.
los dígitos de los minutos quedarán intermitentes.
Botón de inicio / fin (S / S)
●
Para elegir entre los ítems que queremos ajustar
●
Pulse(S / S) para elegir los ítems que quiere ajustar de acuerdo con el
●
Para alternar entre el formato 12 y 24
horas.
Alarma diaria de pantalla
diagrama lateral.
[S/S][L/R] [M]
●
Para activar la función iniciar / terminar en el modo cronógrafo y
hold [M]
[M]
●
Con uno de
los ítems que quiere ajustar intermitente
modo temporizador.
(Minutos, horas) presione el botón (L / R) para cambiar
Botón volver / Reset (L / R)
[L/R]
el número (Mantenga el botón (L / R) presionado Para cambiar los números
●
Para ver y activar la función volver y restablecer el modo
más rápidamente).
Cronógrafo.
Aumentar
●
Para elegir entre diferentes pantallas del temporizador.
el número
minute
●
Cuando haya terminado de ajustar, pulse el botón (M)
●
Para cargar o borrar el
valor de la partida del temporizador.
una vez, para salir de la función ajustar. El reloj también
●
Para activar el inicio y el final del contador de pasos en el modo
contador de pasos.
hold [L/R]
[S/S]
saldrá de este modo si durante 1 minuto no se presiona ninguna tecla.
●
Para activar o desactivar la función de la señal horaria sonora.
●
Para aumentar los dígitos dentro de la pantalla de ajuste.
increase
the number
hour
EL botón (EL)
at a higher
●
Para conectar la luz
EL de atrás durante unos 3 segundos.
Secuencia de ajuste
DISPLAY
NOTA: Las principales funciones de las teclas se encuentran
resumidas en estos párrafos. Sin embargo, le aconsejamos que lea
los capítulos que siguen para obtener más detalles
en todas las operaciones.
3.0 Principal es modos funci onales
6.0 Modo contador de pasos - pantalla contador de pasos
Modo contador de pasos de Pasos
●
Este reloj incluye una función de conteo de pasos que emite bips
PACER pitido
[M]
[M]
regulares con una frecuencia predefinida. Esta frecuencia puede ser
tasa (en
tiempos por
establecida entre 40 y
minuto)
180 latidos por minuto (BPM).
●
El contador de pasos emitirá más bips por minuto con una frecuencia
Mostrar Pacer
bpm superior (Por
ejemplo, 80) que si la frecuencia es menor(Por
ejemplo, 30 bpm).
Modo Hora actual
modo de alarma diaria
Modo contador de pasos
Pantalla contador de pasos
30 beeps
30 beeps
30 beeps
●
Con el contador de pasos seleccionado la frecuencia de bips aparece en
[M]
[M]
Beep
Beep
Beep
la segunda línea de la pantalla.
0
1
2
3
minuto (s)
Como utilizar el contador de pasos
start
●
Después de ajustar una frecuencia de bips en el contador
Ejemplo 1: Establecer 30 como la Tasa de Pacer pitido.
de pasos, por ejemplo, 65 bpm, pulse de nuevo el botón (L / R) para
[M]
[M]
iniciar los bips.
80 beeps
80 beeps
80 beeps
●
Mientras el reloj esté emitiendo bips pulse el botón (L / R) de nuevo para
Beep
Beep
Beep
parar los bips.
0
1
2
3
minuto (s)
Modo tiempo doble
start
Modo contador decreciente
Modo cronógrafo
Ejemplo 2: Conjunto de 80 como la Tasa de Pacer pitido.
4.0 Modo Hora Actual - pantalla de la hora actual
6.1 Modo contador de Pasos - Ajustar la frecuencia de los bips del contador de pasos
Día de la
Pantalla hora actual
semana
Fecha
●
Con el modo hora actual seleccionado, el reloj enseñará en la pantalla los siguientes
Cómo ajustar la frecuencia de los bips del contador de Pasos
(día, mes)
ítems:
Indicador de
●
El día de la semana y la fecha actual aparecerán en la primera fila de la pantalla.
AM / PM
●
Para seleccionar la pantalla de ajuste mantenga pulsado el botón (M) durante
●
La hora actual (horas, minutos y segundos) aparecerán en la segunda fila de la pantalla
Hora
2 segundos, los dígitos de la frecuencia del
actual
Cómo
alternar entre el formato 12h y 24h
contador de pasos quedarán intermitentes.
Enseñar 12 horas BEEP OFF
●
Para cambiar entre el formato 12h y 24h mantenga pulsado el botón (start / stop), de
Mostrar Pacer
●
En el modo ajuste, pulse el botón (L / R) para cambiar el número. Mantenga
acuerdo con eldiagrama.
el botón pulsado para cambiar el número más
Pulse [SS] y presione
hold [M]
[M]
Cómo alternar entre el formato mes-día y día-mes
Rápidamente.
●
Para cambiar entre el formato mes-día y día-mes mantenga pulsado el botón (start /
●
Cuando haya terminado pulse el botón (M)una vez, para salir de la función de
Fecha
stop), de
acuerdo con el diagrama.
[L/R]
ajuste. El reloj también
(día, mes)
Para activar / desactivar la señal horaria-sonora
saldrá de este modo si durante 1 minuto no se presiona ninguna tecla.
●
La hora actual (horas, minutos y segundos) aparecerán en la segunda fila de la pantalla
Aumentar
el número
40
Enseñar 12 horas BEEP OFF
Cómo alternar entre el formato 12h y 24h
5 bpm
por hora
●
Para cambiar entre el formato 12h y 24h mantenga
hold [L/R]
per step
[S/S]
[L/R]
Carillón
pulsado el botón (start / stop), de acuerdo
con el diagrama.
indicador
aumentar el
Cómo alternar entre el formato mes-día y día-mes
número a
180
●
Para cambiar entre el formato mes-día y día-mes
un mayor
mantenga pulsado el botón (start / stop), de acuerdo con el
velocidad
diagrama.
Secuencia de ajuste
Para activar / desactivar la señal horaria-sonora
●
Para activar o desactivar la señal horaria sonora " "
pulse el
botón (L / R) de acuerdo con el diagrama.
●
Cuando el indicador de la señal sonora aparece en la pantalla, el sonido está activado.
Pantalla de 24 horas
Señal horaria con ectad a
Mientras la señal sonora esté conectada el reloj emitirá un "bip, bip" a cada hora (por
ejemplo, 1:00 00, 2:00 00...)
4.1. Modo de Hora Actual - ajustar hora actual
6-2 Modo contador de Pasos - Usar el reloj como reloj contador de pasos.
Como ajustar la hora actual
Como usar el reloj como reloj contador de pasos.
●
Para seleccionar la pantalla de ajuste mantenga
[L/R]
65 beeps/
●
Para usar el reloj como reloj contador de pasos deberá seguir el
pulsado el botón (M) durante 2 segundos,
minute
siguiente procedimiento:
dentro del modo hora actual, los dígitos de los segundos quedarán
Beep
Con la pantalla del contador de pasos seleccionada, pulse el botón (L
intermitentes.
Hora Actual
/ R) para conectar la función.
Pacer Mode
[M]
Pacer Mode
Pulse [M]
●
Dentro de la pantalla de ajuste, pulse
Pacer OFF
Pacer ON
●
Después de conectar el conteo de pasos, pulse el botón (M) para
(S / S) para elegir entre los ítems siguiendo el diagrama.
[M]
cambiar para el modo cronómetro, a continuación, pulse el botón (S /
[S/S]
●
Con uno de los elementos para ajustar intermitentes (hora, minutos o
S) una vez para iniciar el recuento de
second
day
segundos), pulse el botón (L / R) para cambiar el
pasos y la función cronómetro al mismo tiempo.
Número (Mantenga pulsado el botón para cambiar el número más
[L/R]
rápidamente).
●
De este modo, el reloj se convierte en un contador de pasos y en un
Aumentar
[S/S] [S/S]
cronómetro al mismo tiempo.
el número
●
Cuando el número de los segundos quede intermitente
Chronograph Mode
pulse el botón (L / R) para poner los segundos a cero
●
Cuando el reloj con contador de pasos está contando y emitiendo
minute month
stop
[S/S]
bips pulse el botón (S / S) una vez para poner fin a esta función.
hold [L/R]
●
Cuando termine de ajustar pulse el botón (M) una vez, para salir del
counting
counting
modo ajuste. El reloj también
aumentar el
[S/S] [S/S]
saldrá de este modo si durante 1 minuto no se presiona ninguna tecla.
[S/S]
65 beeps/
número a
minute
un mayor
[S/S]
Beep
velocidad
hour
year
Chronograph Mode
Chronograph Mode
Secuencia de ajuste velocidad
Pacer Watch Stopped
Pacer Watch Started
7.0 Modo cronómetro - Modo Cronómetro
8.3 Modo temporizador conteo decreciente - Utilizar el temporizador único
actual regazo
Modo de cronógrafo
contar
Como Utilizar el temporizador único
tiempo de
acumulativo
ejecución
+ Este reloj incluye una función de cronómetro, que mide:
+ Al utilizar sólo un temporizador (temporizador único) los
tiempo de
acumulativo
El tiempo transcurrido, el tiempo transcurrido acumulado
[S/S]
ejecución
tiempo de ejecución
(tiempo transcurrido Multi-etapas) y tiempo de vuelta
demás temporizadores quedan excluidos si pone sus valores
(hora)
(1 / 100 segundos)
(Obtención de un tiempo transcurrido sin detener el
en cero
acumulativo
acumular
+ Una vez definido el valor de inicio para el último
tiempo de
tiempo de
Cronómetro).
ejecución
ejecución
+ Capacidad para medir del cronómetro:
(minutos)
Mostrar cronógrafo
(segundo)
1 Visualice temporizador
Mostrar contar
temporizador es necesario cargar la secuencia de conteo
'Tod os Cero’
+ Unidad de medida: 1 / 100 segundos
parar
Para que quede listo para contar. Vea el punto 8.2
+
Rango de medición: 9 horas, 59 minutos y 59,99
[M]
contar
[S/S]
para obtener más información acerca de cómo cargar el
1. Tiempo transcurrido
Segundos.
temporizador.
300
+ Memoria de vuelta: un máximo de 50 vueltas.
Mantener
[L/R]
+ ón(S / S) para iniciar el conteo. Un conteo vuelve a
[S/S]
[S/S]
Pantalla del cronógrafo
empezar automáticamente cuando
2. Tiempo transcurrido acumulativo
+ Cuando la pantalla del cronómetro está seleccionada, el reloj enseñará los
+ Llega a cero, a no ser que se pulse el
10010
20
siguientes ítems:
Botón (S / S).
Detener el conteo de pantalla
[S/S]
[S/S]
[S/S] [S/S]
+ Con el cronómetro en marcha, el tiempo de vuelta actual
[S/S]
Y el tiempo transcurrido
acumulado aparecen,
Cómo volver a cargar el temporizador
3. Tiempos de vuelta
respectivamente, en la primera y segunda líneas.
10 10100
bip, bip
+ Para recargar el temporizador a su valor inicial de
lap 1lap 2lap 3
NOTA: el tiempo de vuelta y el tiempo transcurrido acumulado
de salida mientras el temporizador está parado siga los
serán iguales en la primera vuelta.
[S/S]
[L/R] [L/R] [L/R]
Pasos del punto 8.2.
0102030
+ Con el cronómetro parado, el tiempo de vuelta actual aparecen en la
Tiempo
primera línea, y el tiempo transcurrido aparecen en la segunda línea.
Muestra cero
Contando
Sonido de la alarma del temporizador
El tiempo transcurrido, acumulativo
Mostrar contar
Exponer
+ Mientras cuenta, el reloj emitirá un bip cuando el
El tiempo transcurrido y tiempo de vuelta
+
En la pantalla de vuelta: el número de la vuelta actual
y el tiempo de vuelta son enseñados en las líneas 1 y 2, respectivamente.
temporizador llegue a 1 y 0 segundos.
7.1 Modo cronómetro – Como usar el cronómetro
8.4 Modo temporizador conteo decreciente - Uso del multi-temporizador
Como medir el tiempo transcurrido
[S/S]
Como usar el multi-temporizador
+ En la pantalla cero, pulse el botón (S / S)
bip, bip
+ Para utilizar la función multi-temporizador, que combina
El [L/R]
una vez, para empezar a contar, pulse el botón
dos o más temporizadores para medir el tiempo transcurrido
(S / S) de nuevo para parar.
Timer 1*
Temporizador 2*
en múltiples etapas es necesario definir el tiempo de inicio
+ El tiempo transcurrido entre los dos movimientos aparece en
bip, bip
bip, bip
para cada temporizador.
la primera línea de la pantalla. Repita
bip, bip
Transcurrido
las operaciones descritas anteriormente, para obtener el tiempo
+ Después de definir el valor de inicio para los
tiempo
Mostrar todos Cero
transcurrido
transcurrido acumulado.
Temporizador 4*
Temporizador 3*
Temporizadores es necesario cargar la secuencia
de conteo
(parada
[S/S]
contar)
tiempo
(contando)
Para medir el tiempo de vuelta
Cuenta con te mporizador de múltip les secuencias
+ Con el cronómetro en marcha, pulse el botón (L / R)
D
Si el temporizador 1, 2, 3 o 4 que establece la
Ver el punto 8.2 para más detalles.
Para obtener y ver el tiempo de vuelta durante 5 segundos. En
0:00 como valor inicial, que temporizador serán
[S/S]
excluidos de la secuencia de contar.
+ Pulse el botón (S / S) para comenzar la secuencia
la pantalla de vuelta el número de vuelta actual y el tiempo de
vuelta aparecen en la primera y segunda líneas de la pantalla,
de conteo. La función Multi-temporizador iniciará el conteo
respectivamente.
[S/S]
con el temporizador 1 y así sucesivamente, según el
+ Después de 5 segundos el reloj volverá automáticamente a la
Confirmar
Cancelar
diagrama. Para parar el contador pulse de nuevo el botón (S /
S).
Detener el conteo
Mostrar contar
pantalla del contador.
El recuento
la carga
la carga
de pantalla
Después, el nuevo tiempo de vuelta y el tiempo acumulado
se detiene
o
o
[L/R]
aparecen en la primera y segunda líneas de la pantalla,
reajustar
reajustar
+
El reloj contará repetidamente si no pulsa el botón (S / S).
5 segundo
respectivamente.
Mantener [L/R]
Repita las operaciones descritas anteriormente para obtener
[M]
[L/R]
Sonido de la alarma del temporizador
Vuelta
otro tiempo de vuelta.
Mantener
+ Mientras cuenta el reloj emitirá un bip cuando
número
[L/R]
el temporizador llegue a 1 y 0 segundos.
Cómo volver a ver / restablecer el tiempo de vuelta
+ Con el cronómetro parado:
Tiempo de
Cómo volver a cargar / restaurar los valores iniciales
vuelta
+ Presione el botón (L / R), uno por uno para volver a ver los
+ Para volver a cargar y restaurar
los valores iniciales con el
Tiempo de vuelta
tiempos de vuelta registrados, o ]
de pantalla
+ Mantenga el botón (L /
R), presionado durante 2 segundos
Cargue el
Restablecer la
temporizador en pausa siga los pasos para cargar Y sustituir
para borrar el tiempo de vuelta y volver a cero
A partir de los valores
A partir de los valores
de acuerdo con el diagrama.
Pantalla temporizador de
8.0 Modo de temporizador conteo decreciente -
conteo decreciente
9.0 Modo tiempo Doble - Modo tiempo Doble
Temporizador 1*
Temporizador 2*
Modo de temporizador conteo decreciente
+
Este reloj incluye 4 temporizadores de conteo decreciente.
Modo Tie m p o Doble
Estos son los temporizadores 1, 2, 3 y 4.
+ El reloj incluye una línea de tiempo doble que enseña
Temporizador 4*
Temporizador 3*
+
Puede usar un temporizador (temporizador único) con las funciones normales del
la hora de un segundo huso horario.
temporizador, pero la combinación de dos o más temporizadores (Multi-
doble tiempo
Cuenta con temporizador
temporizador) puede ampliar la función del
temporizador para medir el tiempo
doble tiempo
(segundo)
+ El segundo dígito de la hora son las mismas
de múltiples secuencias
transcurrido en varias fases.
(hora)
Actual.
D
i Temporizador 1, 2, 3 o 4 que establece la 0:00
como valor inicial, que temporizador serán
+
La unidad de medición de estos temporizadores es de 1 segundo y el valor inicial
excluidos de la secuencia de conteo.S
puede fijarse en un máximo de 23 horas, 59 minutos.
doble tiempo
Pantalla doble tiempo
+
valor inicial (hora, mintue)
Cuando el temporizador está ajustado para que el valor inicial sea 0:00 ese
(minutos)
tiempo
será excluido de los resultados de conteo.
Hora doble Modo de
+ Cuando se selecciona la pantalla de tiempo doble el
+
Cuando el temporizador está activado el reloj contará repetidamente, a menos
segundo huso horario (horas, minutos, segundos)
[L/R]
que se detenga presionando el botón (S / S).
aparece en la segunda línea de la pantalla.
+
Durante el conteo, el reloj emitirá un único bip cuando el temporizador llegue a los
últimos 1 y 0 segundos.
Temporiz ador de pantalla 1
Temporizador de pantalla 2
Temporizador único
y Multi-temporizador
contar
tiempo
[L/R][L/R]
+
Cuando utilice el temporizador único (un único temporizador) debe excluir los
demás tiempos de la secuencia de conteo Colocándolos en 0:00.
+
Cuando utilice el Multi-temporizador, la secuencia de conteo empieza en 1 y así
[L/R]
sucesivamente, en conformidad con el diagrama lateral.
Cómo seleccionar las diferentes pantallas de
los temporizadores
+
Para seleccionar las diferentes pantallas del temporizador
Temporizador de pantalla 4
Temporizador de pantalla 3
de conteo decreciente con el temporizador desconectado, pulse el botón (L / R),
Modo de temporizador de cuenta regresiva
uno por uno según el diagrama lateral.
Ajustar el temporizador
8.1 Modo temporizador conteo decreciente -
de conteo decreciente
9.1. Modo tiempo doble – Ajustar el tiempo doble
Cómo ajustar el temporizador de conteo decreciente
Para ajustar el tiempo doble
+ En el modo tiempo doble mantenga pulsado el botón
+ En los párrafos que siguen se explican los procedimientos
(M) durante 2 segundos para seleccionar la pantalla de
para ajustar el temporizador 1. Los otros temporizadores se
ajuste, los dígitos de la hora quedarán intermitentes.
ajustan de la misma manera.
Hora doble Modo de
+ En la pantalla de ajuste, pulse el botón (S / S) para
+ En la pantalla del temporizador 1 mantenga pulsado el
Mantener [M]
[M]
seleccionar el ítem que quiere ajustar. Seguir el diagrama.
El contador de tiempo de pantalla
botón (M) durante 2 segundos para elegir la pantalla que
+ Cuando uno de los puntos que queremos ajustar (hora, minuto)
Mantener [M]
[M]
desea ajustar, los dígitos de los minutos quedaran
[L/R]
esté intermitente, pulse el botón (L / R) para cambiar los números.
intermitentes.
Aumentar
Mantenga presionado el botón para cambiar
+ Dentro de la pantalla de ajuste, pulse el botón (S / S) para
el número
Minuto
los números a mayor velocidad.
[L/R]
cambiar el ítem de ajuste de acuerdo con el diagrama.
+ Cuando haya terminado pulse el botón (M) un avez,
Aumentar
[S/S]
+ Cuando uno de los ítems (minutos, horas) está
Mantener [L/R]
para salir de la pantalla de ajuste. El reloj también
el número
Minutos
intermitente, pulse el botón (L / R) para cambiar el número
aumentar
saldrá de este modo si durante 1 minuto no se presiona ninguna
el número
Horas
tecla.
(mantenga Pulsado el botón para cambiar el número más
a un mayor
mantener [L/R]
[S/S]
rápidamente).
velocidad
Secuencia de ajuste
aumentar
+ Cuando haya terminado pulse el botón (M) una vez, para
el número
Horas
salir de la función de ajuste. El reloj también
a un mayor
saldrá de este modo si durante 1 minuto no se presiona
velocidad
Secuencia de ajuste
ninguna tecla.
Cargar y restablecer el temporizador
8.2 Modo temporizador conteo decreciente -
de conteo decreciente
10.0 Especificaciones
Cómo cargar los temporizadores
Modo hora actual
Temporizador con conteo decreciente
+ Si establece un valor inicial para los temporizadores debe
+ Sistema de tiempo: AM, PM, hora, minutos,
+ Temporizador: 4 temporizadores
cargarlos para la secuencia de conteo antes de empezar a
segundos
+ Resolución: 1 segundo
contar.
+ Formato de tiempo: 12 horas o 24 horas
+ Rango de medición: 23 horas, 59 minutos
El contador de tiempo de pantalla
Detener el conteo
+ Para cargar los temporizadores para la secuencia de Conteo,
+ Calendario: Mes, fecha y día de la semana
+ Sonidos del temporizador: 1 bip cuando el
Mantener
pulse el botón (L / R) (con el temporizador parado) hasta que
(función de calendario automático
temporizador llega a los últimos 1 y 0 segundos
[L/R]
[L/R]
aparezca la indicación «Ld ALL", de acuerdo con el diagrama al
los años bisiestos y el día de la semana)
lado.
Modo contador de pasos
+ Cuando aparezca la indicación «Ld All pulse (M) o (L / R)
Modo de alarma
+ Rango: 40 bpm a 180 bpm
la carga
[M]
tempo-
para confirmar o cancelar el proceso.
+ alarma diaria y la señal horaria sonora
+ Paso: 5 bpm
Confirmar
rizador (s)
+ Cuando la pantalla del temporizador aparece después de
+ Sonido de la alarma: 20 segundos
la carga o
en la
Tiem po doble
reajustar
contar
Cargar los temporizadores está listo para contar.
secuencia
Modo cronómetro
+ Sistema de tiempo: AM, PM, hora, minutos,
Mantener
Cómo restablecer los temporizadores
[L/R]
+ Resolución: 1 / 100 segundos
segundos
[L/R]
+ cuando aparezca 'Ld ALL', mantenga pulsado el botón (L / R)
+ Rango de medición: 9 horas, 59 minutos
Cancelar
Resta-
hasta aparecer la indicación
y 59,99 segundos.
Resistencia al agua
la carga o
blecer
reajustar
todos los
"CLR ALL", de acuerdo con el diagrama lateral.
+ Memoria de Vuelta: 50 memorias
+ Resistencia: 50M
a partir
valores
+ Cuando aparece la indicación "CLR ALL" pulse
a cero
(M) o (L / R) para confirmar o anular.
Secuencia de ajuste
+ Cuando el temporizador se restablece, todos los valores
iniciales vuelven a 0:00.
5.0 Mode quotidien d'alarme - mode quotidien d'alarme
Chronomètre de 50 RECOUVREMENTS
+ Mode quotidien d'alarme
current time
(hour, minute)
+ Cette montre inclut une fonction quotidienne d'alarme pendant le
temps courant.
alarm time
1.0 INTRODUCTION
+ Quand l'alarme quotidienne est allumée, la montre fera bip-bip
(hour, minute)
pendant 20 secondes au temps d'alarme journalier.
+ Merci pour votre achat de cette montre.
+ Affichage d'alarme quotidien
+ Cette montre PREVOIT heure actuelle, ALARME, CHRONOGRAPH, COUNTDOWN TIMER, PACER DEUX TEMPS ET
Daily Alarm OFF
+ Quand le mode quotidien d'alarme est choisi, la montre montrera
FONCTION.
les articles suivants sur l'affichage :
+ En plus des TimeKeeping FUNCTION, cette montre COMPREND DEUX DOSSIERS, ELLES SONT PACER WATCH ET
MULTI-TIMER FUNCTION.
[L/R]
+ Le
temps courant (heure, minute) est exhibé sur la �ère rangée
de l'affichage.
+ WATCH THE PACER qui combine les CHRONOGRAPHE ET LA FONCTION PACER ENSEMBLE,
DES LORS DEUX
fonctions peuvent être activées en même TIME.WHILE MULTI-TIMER associant deux ou plusieurs TIMERS ENSEMBLE
+ Le temps quotidien d'alarme (heure, minute) est exhibé sur la
POUR PROLONGER LE TEMPS DE MESURE DE LA FONCTION MULTI-PHASE s'écouler TEMPS.
2ème rangée de l'affichage.
+ Assurez-vous de LIRE ATTENTIVEMENT CE MANUEL ET KEEP IT ON PART DE REFERENCE PLUS TARD, si
+ Pour placer l'alarme quotidienne "MARCHE/ARRÊT"
nécessaire.
daily alarm
+ Pour placer l'alarme quotidienne entre marche-arrêt, appuyer sur
+ Pour tirer le maximum de
votre achat, il est conseillé d'utiliser cette montre EN CONFORMITE AVEC LES NOTES CI-
indicator
le bouton [L/R] dans l'affichage d'alarme quotidien.
DESSOUS:
+ Quand l'indicateur quotidien d'alarme
“ “ est apparue, l'alarme
+ Éviter d'exposer la montre à des conditions extrêmes POUR UN TEMPS DERAISONNABLE.
Daily Alarm ON
quotidienne est allumée.
+ ÉVITER LES UTILISATIONS BRUT OU DE GRAVES RÉPERCUSSIONS DE LA MONTRE.
+ Pour examiner le bruit quotidien d'alarme
+ NE PAS OUVRIR LE CAS QUE SI UN WATCH CERTIFIED SERVICE AGENCY.
+ Pour examiner le bruit d'alarme, maintenir le bouton [S/S] dans
+ NETTOYER
LA MONTRE de temps en temps avec une douce et humide.
Daily Alarm Display
l'affichage d'alarme quotidien. La montre fera bip-bip tant que le
+ CONSERVER LA MONTRE, dans un endroit sec lorsqu'il n'est pas utilisé pendant un long moment.
bouton est prise.
2.0 BOUTON ET DE SA FONCTION
5.1 Mode quoti dien d'al arme - établissement de l'alarme quoti dienne
Bouton de mode [M]
Comment placer l'alarme quotidienne
+ Pour choisir parmi le temps courant, l'alarme quotidienne, le meneur
+ Pour choisir l'affichage d'arrangement, maintenir [le
de train, le chronographe, le temporisateur et le mode duel de temps.
bouton de MODE] pendant 2 secondes en mode
+ Pour choisir l'affichage d'arrangement.
quotidien d'alarme, et alors les chiffres « minutieux »
Bouton de début et de fin [S/S]
commenceront à clignoter
[S/S][L/R] [M]
+ Pour choisir parmi les articles d'arrangement pendant l'affichage
Daily Alarm Display
d'arrangement.
+ L'affichage d'arrangement, appuyer sur le bouton [S/S]
hold [M]
[M]
+ Pour commuter entre 12 et 24 heures composer.
pour déplacer le clignotant après le diagramme adjacent
à choisir parmi différents arrangements.
+ Pour activer le « début » ou « cesser » la fonction pendant le mode
de chronographe et le mode de temporisateur.
[L/R]
+ Pendant l'un des arrangements (minute, heure) clignote,
Bouton de recouvrement/remise [L/R]
Increase
appuie sur le bouton [L/R] pour changer le nombre ;
+ Pour regarder et activer le « recouvrement » ou le "RESET"
the number
minute
maintenir le bouton [L/R] pour changer le nombre à une
fonctionnent pendant le mode de chronographe.
vitesse plus élevée.
+ Pour choisir entre différents affichages de temporisateur. Pour charger
hold [L/R]
[S/S]
+ Quand l'arrangement est accompli, appuyer sur le bouton
ou dégager la valeur commençante pour les temporisateurs.
increase
[M] une fois pour sortir l'affichage d'arrangement. La
+ Pour activer le « début » ou « cesser » la fonction de meneur de train
the number
hour
montre sortira également l'affichage d'arrangement si
pendant le mode de meneur de train. Pour placer la fonction horaire
at a higher
de carillon "Marche/Arrêt".
AUCUN clef-charger a été activé pendant 1 minute.
DISPLAY
speed
+ Pour augmenter les chiffres pendant l'affichage d'arrangement.
Setting Sequence
+
3.0 PRINCIPAUX MODES DE FONCTION
6.0 Mode de meneur de train - affichage de meneur de train
Mode de meneur de train
+ Cette montre inclut une fonction de meneur de train qui
pacer
beeping rate
produisent des signaux sonores réguliers à un taux
(in beats
prédéfini. Que le taux prédéfini peut être placé en
[M]
[M]
per minute)
dedans dans une gamme de 40 à 180 battements par
minute (bpm).
Pacer Display
+ Le meneur de train retentira plus
de signaux sonores
dans une minute pour un arrangement plus élevé du taux
Current Time Mode
Daily Alarm Mode
Pacer Mode
30 beeps
30 beeps
30 beeps
de bpm (par exemple 80) qu'un arrangement inférieur du
taux de bpm (par exemple 30).
[M]
[M]
Beep
Beep
Beep
Affichage de meneur de train
0
1
2
3
minute(s)
start
+ Quand l'affichage de meneur de train est choisi, le taux
[M]
[M]
Example 1: Set 30 as the Pacer Beeping Rate .
faisant bip-bip est exhibé sur la 2ème rangée
de
l'affichage.
80 beeps
80 beeps
80 beeps
Comment employer le meneur de train
+ Quand le meneur de train a été placé avec un taux
Beep
Beep
Beep
Dual Time Mode
Countdown Time r Mode
Chronograph Mode
faisant bip-bip, par exemple le bpm 65, appuient sur le
0
1
2
3
minute(s)
bouton [L/R] une fois commencera faire bip-bip.
start
+ Pendant la montre fait bip-bip, appuie sur le bouton [L/R]
Example 2: Set 80 as the Pacer Beeping Rate.
de nouveau pour arrêter
faire bip-bip.
4.0 MODE DE COURANT - CURRENT TIME DISPLAY
6.1
Mode de meneur de train - établissement du taux faisant bip-bip de meneur de train
day of
week
date
Affichage de temps courant
Pour placer le taux faisant bip-bip de meneur de train
(day, month)
AM/PM
+
Quand le mode de temps courant est choisi, la montre montrera les
+
indicator
articles suivants sur l'affichage :
Pour choisir l'affichage d'arrangement, maintenir le bouton [M]
current
pendant 2 secondes dans l'affichage de meneur de train, et
time
+
Le jour de la semaine et la date du temps courant sont exhibés sur la
alors les chiffres faisants bip-bip de taux commenceront à
12 hours Display
ère rangée de l'affichage.
Chime OFF
clignoter.
+
Le temps courant (heure, minute, deuxième) est exhibé sur la 2ème
hold [S/S]
rangée de l'affichage.
Pacer Display
+
Dans l'affichage d'arrangement, appuyer sur le bouton [L/R]
hold [M]
[M]
pour changer le nombre ;
maintenir le bouton pour changer le
date
Comment commuter entre 12 et 24 formats d'heure
(month, day)
nombre à une vitesse plus élevée.
+
Pour commuter entre 12 et 24 formats d'heure, appuyer sur le bouton
[S/S] après le diagramme adjacent.
[L/R]
+
Quand l'arrangement est accompli, appuyer sur le bouton [M]
une fois pour sortir l'affichage d'arrangement. La montre
Comment commuter entre le Mois-jour et le format de mois de jour
Increase
12 hours Display
sortira également l'affichage d'arrangement si AUCUN clef-
Chime OFF
hourly
+
Pour commuter entre le mois-jour et le format de jour-mois, maintenir
the number
40
charger a été activé pendant 1 minute.
[S/S]
[L/R]
chime
le bouton [S/S] après le diagramme adjacent.
indicator
+
Pour placer le carillon horaire "MARCHE/ARRÊT"
5 bpm
hold [L/R]
per step
+
Pour placer le carillon horaire entre "Marche/Arrêt", appuyer sur le
increase
bouton [L/R] après le diagramme adjacent.
the number
180
+
Quand l'indicateur de carillon ' ‘est apparu sur l'affichage, le carillon
at a higher
est allumé. Pendant le carillon horaire est allumée, la montre
retentira
speed
à « signal sonore de signal sonore » chaque heure sur l'heure (par
Setting Sequence
24 hours Display
Hourly chime ON
exemple 1:00 00, 2:00 00, 3:00 00)
4.1 Mode de temps courant - établissement du temps courant
6.2 Mode de meneur de train - Using la montre comme montre de meneur de train
Comment placer l'heure courante
Comment utiliser la montre comme montre de meneur de train
+ Pour choisir l'affichage d'arrangement, maintenir le
[L/R]
65 beeps/
minute
+ Pour utiliser la montre comme meneur de train observer après
bouton [M] pendant 2 secondes en mode de temps
Beep
les étapes ci-dessous :
courant, et alors « en second lieu » les chiffres
+ Quand l'affichage de meneur de train est choisi, presser
Current Time Mode
commenceront à clignoter.
Pacer Mode
Pacer Mode
Pacer OFF
Pacer ON
[L/R] pour allumer la fonction de meneur de train.
hold [M]
[M]
+ L'affichage d'arrangement, appuyer sur le bouton [S/S]
[M]
pour déplacer le clignotant après le diagramme
+ Quand la fonction de meneur de train est allumée,
appuyer
[S/S]
adjacent à choisir parmi différents
arrangements.
sur le bouton [M] pour commuter l'affichage au mode de
chronographe, et puis appuyer sur le bouton [S/S] une fois
second
day
+ Pendant l'un des arrangements (minute, heure, année,
commencera la fonction de meneur de train et de
[L/R]
mois, jour) clignote, appuie sur le bouton [L/R] pour
chronographe en même temps.
changer le nombre (maintenir le bouton pour changer le
[S/S] [S/S]
Chronograph Mode
Increase
nombre à une vitesse plus élevée).
+ Alors la montre est devenue une montre de meneur de train
the number
stop
[S/S]
counting
counting
que le chronographe compte et
le meneur de train fait bip-
+ Quand les deuxièmes chiffres commencent à clignoter,
minute month
bip au taux prédéfini.
appuyer sur le bouton [L/R] pour les remettre à zéro.).
[S/S]
65 beeps/
hold [L/R]
minute
+ Pendant le meneur de train la montre est comptante et en
+ Quand
l'arrangement est accompli, appuyer sur le
[S/S] [S/S]
Beep
faisant bip-bip, appuyer sur le bouton [S/S] une fois arrêtera
increase
the number
bouton [M] une fois pour sortir l'affichage
faire bip-bip et compter.
at a higher
[S/S]
d'arrangement. La montre sortira également l'affichage
Chronograph Mode
Chronograph Mode
Pacer Watch Stopped
Pacer Watch Started
speed
hour
year
d'arrangement si AUCUN clef-charger a été activé
pendant 1 minute.
Setting Sequence

7.0 Mode de chronographe - mode de chronographe
8.3 Mode de temporisateur de compte à rebours - Using le temporisateur simple
current lap
Mode de chronographe
running time
counting
Comment employer le temporisateur simple
+ Cette montre inclut une fonction de chronomètre qui mesure :
accumulative
running time
accumulative
+ En employant un temporisateur seulement (temporisateur
(hour)
running time
+ Temp s écoulé, temps écoulé cumulé (temps écoulé multiphasé) et
[S/S]
temps de recouvrement (obtenir un temps écoulé sans arrêter le
simple), exclut d'autres temporisateurs en plaçant leurs
(1/100 second)
accumulative
accumulate
compte).
valeurs commençantes à 0:00.
running time
running time
(minute)
(second)
+ La capacité de mesure du chronographe :
+ Une fois que la valeur commençante a été placée pour le
Chronograph Display
+
Unité de mesure : 1/100 seconde,
Timer 1 Display
Counting Display
'All Zero'
dernier temporisateur, elle doit être chargée dans l'ordre de
stop
+
Chaîne de mesure :
9 heures, 59 minutes et 59.99 seconde,
[M]
counting
[S/S]
compte avant qu'elle soit prête pour le compte.
Examiner le
1. Elapsed time
+
Mémoire de recouvrement : un maximum de 50 recouvrements.
chapitre précédent 8.2 pour assurer plus de détail sur la façon
hold
300
Affichage de chronographe
[L/R]
dont charger la valeur commençante dans l'ordre de compte.
[S/S]
[S/S]
+ Quand l'affichage de chronographe est choisi, la montre montrera les
+ Appuyer sur le bouton [S/S] pour commencer le compte. Le
2. Accumulative elapsed time
articles suivants sur l'affichage :
compte sera remis en marche automatiquement quand il
10010
20
+ Pendant le chronographe compte : Le temps de recouvrement
Stop Counting Display
atteint zéro à moins que le compte soit arrêté en
appuyant sur
courant et le temps écoulé cumulé est exhibé
sur la �ère et 2ème
[S/S]
le bouton [S/S].
[S/S]
[S/S]
[S/S] [S/S]
rangée respectivement. NOTE : Le temps de recouvrement courant
Comment recharger le temporisateur
3. Lap times
sera identique que le temps écoulé cumulé pour le recouvrement 1.
beep, beep
10 10100
+ Pour recharger le temporisateur à sa valeur commençante
lap 1lap 2lap 3
+ Pendant le chronographe est arrêté : Le temps de recouvrement et
le nombre courants de recouvrement sont exhibés sur la �ère
originale pendant le temporisateur est arrêté, effectue le
[S/S]
[L/R] [L/R] [L/R]
rangée, et le temps
écoulé cumulé est exhibé sur la 2ème rangée.
chargement après le chapitre précédent 8.2.
0102030
Zero Display
Counting
time
+ Pendant le recouvrement l'affichage montre : Le nombre courant de
+ Bruit d'alarme de temporisateur
recouvrement et le temps de recouvrement est exhibé sur la �ère
Counting Display
Display
Elapsed time, Accumulative
Elapsed time and Lap time
et 2ème rangée respectivement.
+ Pendant le compte, la montre fera bip-bip une fois quand un
temporisateur compte aux 1 dernier
et 0 seconde.
7.1 Mode de chronographe - Using le chronographe
8.4 Mode de temporisateur de compte à rebours - Using le Multi-Tmer
[S/S]
Comment employer le Multi-Temporisateur
Comment mesurer le temps de passage
beep, beep
+ Pendant le « tout le » affichage nul, appuyer sur le bouton [S/S] une fois
+ Pour employer la fonction de Multi-Temporisateur qui combine deux
hold [L/R]
commencera le compte, et appuie sur le bouton [S/S] encore arrêtera le
Timer 1*
Timer 2*
temporisateurs ou plus pour mesurer le temps de passage de multi-
compte.
beep,
beep,
phases, il doit placer la valeur commençante pour chaque
beep
beep, beep
+ Le temps écoulé entre les 2 ci-dessus clef-charge sera exhibé sur la
beep
temporisateur.
�ère rangée de l'affichage. Répéter
les opérations principales ci-dessus
Timer 4*
Timer 3*
+ Une fois que la valeur commençante a été placée pour les
elapsed
All Zero Display
pour obtenir le temps écoulé cumulé.
temporisateurs, elles doivent être chargées dans
l'ordre de compte
time
(stop
elapsed
Multi-Timer Counting Sequence
avant qu'il soit prêt pour le compte. Examiner le chapitre précédent
[S/S]
time
Comment obtenir un temps de recouvrement
D
If timer 1, 2, 3 or 4 which set 0:00 as
counting)
8.2 pour assurer plus de détail sur la façon dont charger le
(counting)
+ Quand le chronographe compte, appuyer sur le bouton [L/R] pour obtenir
the starting value, that timer will be
et regarder l'affichage de recouvrement pendant 5 secondes. Dans
excluded from the counting
temporisateur dans l'ordre de compte.
l'affichage de recouvrement, le nombre de recouvrement et le temps de
[S/S]
[S/S]
+ Appuyer sur le bouton [S/S] commencera l'ordre de compte. Les
recouvrement courants apparaîtront sur
la �ère et 2ème rangée de
Confirm
Abort
Multi-Temporisateurs veulent des débuts le compte du temporisateur
l'affichage respectivement.
The counting
the loading
the loading
1
à des autres temporisateurs après le diagramme adjacent. Appuyer
is stopped
or
or
resetting
resetting
sur le bouton [S/S] de nouveau arrêtera le compte.
+ Après les 5 secondes, la montre reviendra à compter l'affichage
+ La montre comptera repeatingly à moins qu'elle soit arrêtée en
Stop Counting Display
Counting Display
automatiquement. Puis le nouveau temps de recouvrement et le temps
hold [L/R]
[M]
[L/R]
appuyant sur le bouton [S/S].
écoulé cumulé seront exhibés sur la �ère et 2ème rangée de l'affichage
5 seconds
[L/R]
Bruit d'alarme de temporisateur
respectivement. Répéter les opérations principales ci-dessus pour obtenir
hold
[L/R]
une autre
heure de recouvrement.
+ Pendant le compte, la montre fera bip-bip une fois quand un
lap
Comment se rappeler/a remis à zéro le temps de recouvrement
temporisateur compte aux
1 dernier et 0 seconde.
number
+ Pendant le chronographe est arrêté :
Comment recharger/a remis à zéro les valeurs commençantes
+ Appuyer sur le bouton [L/R] un pour passer en revue les temps de
Load the
Reset the
+ Pour recharger ou remettre à zéro les valeurs commençantes
recouvrement enregistrés, ou
Starting Values
Starting Values
lap time
pendant le temporisateur est fait une pause, effectue le chargement
+
Maintenir le bouton [L/R] pendant environ 2 secondes pour dégager le
ou le procédé de rajustement qui a mentionné dans le diagramme
Lap Time Display
temps de recouvrement, et pour remettre à zéro l'affichage à « tout le
adjacent pour recharger ou remettre à zéro les
vallées
» affichage nul.
commençantes.
8.0 Mode de temporisateur de compte à rebours - affichage de temporisateur de compte à rebours
9.0 Mode duel de temps - mode duel de temps
Timer 1*
Timer 2*
Mode de temporisateur de compte à rebours
+
Cette montre inclut 4 temporisateurs de compte à rebours. Ils sont le
Mode duel de temps
temporisateur 1, 2, 3 et 4. Using un temporisateur (temporisateur simple) qui
Timer 4*
peut courir la fonction normale de temporisateur. Mais cartels deux
+ Cette montre inclut un temps duel qui montrent que la
Timer 3*
temporisateurs ou
plus (Multi-Temporisateur) peuvent prolonger la fonction
période courante de la deuxième fois répartissent en
Multi-Timer Counting Sequence
de temporisateur au temps de passage multiphasé de mesure.
dual time
dual time
zones.
+
(second)
D
If Timer 1, 2, 3 or 4 which set 0:00 as the
L'unité de mesure de ces temporisateurs est 1 seconde, et la valeur
(hour)
starting value, that timer will be excluded
commençante de ces temporisateurs peut être installée à un maximum de
Les deuxièmes chiffres correspondent celui de temps
from the counting sequence.
23 heures et de 59 minutes.
courant.
+
dual time
starting value (hour, mintue)
Quand un temporisateur qui a placé le
0:00 comme valeur commençante, ce
Affichage duel de temps
temporisateur sera exclu de l'ordre de compte.
(minute)
Dual Time Mode
+
Quand le temporisateur est commencé, la montre comptera repeatingly à
+ Quand l'affichage duel de temps est choisi, le temps duel
[L/R]
moins qu'elle soit arrêtée en appuyant sur le bouton [S/S]. Pendant le
(heure, minute, deuxième) est exhibé sur
la 2ème rangée
compte, la montre fera bip-bip une fois quand un temporisateur compte aux
de l'affichage.
1 dernier et 0
seconde
Chronométreur et Multi-Chronométreur simples
Timer 1 Display Timer 2 Display
+
En employant le chronométreur simple (un chronométreur), il doit exclut
counting
time
[L/R][L/R]
d'autres temporisateurs de l'ordre de compte en plaçant leur valeur
commençante à 0:00.
+
En employant le Multi-Temporisateur, il compte sur un ordre qui commence
[L/R]
le compte à partir du temporisateur 1 à des autres temporisateurs après le
diagramme adjacent.
Comment choisir l'affichage différent de temporisateur
+
Pour choisir le temporisateur différent de compte à rebours que l'affichage
Timer 4 Display Timer 3 Display
pendant le temporisateur est arrêté, appuie sur le bouton [L/R] un après le
Countdown Timer Mode
diagramme adjacent.
8.1 Mode de temporisateur de compte à rebours - établissement du temporis ateur de compte à rebours
9.1 Mode duel de temps - établissement du temps duel
Comment placer le temporisateur de compte à rebours
Pour placer l'heure duelle
+ Les paragraphes suivants illustreront la procédure pour placer
+ Pour choisir l'affichage d'arrangement, maintenir le bouton [M]
le temporisateur 1. néanmoins, plaçant les autres
pendant 2 secondes en mode duel de temps, et alors les
chiffres « minutieux » commencent à clignoter.
temporisateurs travailleront sur le procédé semblable.
Countdown Time r Display
+ Pour choisir l'affichage d'arrangement, maintenir le bouton [M]
Dual Time Mode
+ Dans l'affichage d'arrangement, appuyer sur le bouton [S/S]
pour choisir le clignotant (article d'arrangement) suivant les
pendant 2 secondes dans l'affichage du temporisateur 1, et
hold [M]
[M]
hold [M]
[M]
indications du diagramme.
alors les chiffres « minutieux
» commencent à clignoter sur
l'affichage.
+ Quand un
des arrangements (minute, heure) clignote, appuyer
[L/R]
[L/R]
sur le bouton [L/R] pour changer le nombre ; maintenir le
+ L'affichage d'arrangement, appuyer sur le bouton [S/S] pour
bouton pour changer le nombre à une vitesse plus élevée.
Increase
déplacer le clignotant après le diagramme adjacent à choisir
Increase
the number
minute
parmi différents arrangements.
the number
minute
+ Quand l'arrangement est accompli, appuyer sur le bouton [M]
une fois pour sortir l'affichage d'arrangement. La montre sortira
+ Quand un des arrangements (minute, heure) clignote, appuyer
également l'affichage d'arrangement si AUCUN
clef-charger a
[S/S]
sur le bouton [L/R] pour changer le nombre (maintenir le
[S/S]
hold [L/R]
hold [L/R]
été activé pendant 1 minute.
bouton pour changer le nombre à
une vitesse plus élevée).
increase
increase
the number
hour
+ Quand l'arrangement est accompli, appuyer sur le bouton [M]
the number
hour
at a higher
une fois pour sortir l'affichage d'arrangement. La montre
at a higher
speed
speed
sortira également l'affichage d'arrangement si AUCUN clef-
Setting Sequence
Setting Sequence
charger a été activé pendant 1 minute.
8.2 Mode de temporisateur de compte à rebours - chargement et rajustement du temporisateur
10.0 Caractéristiques
Comment charger les temporisateurs
Mode de temps courant
Temporisateur de compte à rebours
+ Si la valeur commençante a été placée pour les temporisateurs,
+ Système de temps : AM, P.M., heure,
+ Temporisateur : 4 temporisateurs
ils doivent être chargés dans l'ordre de compte avant qu'il soit
minute, deuxième
prêt pour le compte.
+ Résolution : 1 seconde
Countdown Timer Display
+ Format de temps : 12 heures ou format de
+ Pour charger les temporisateurs dans compter l'ordre, maintenir
Stop Counting
2$4$ heures
+ Chaîne de mesure : 23 heures 59 minutes
hold
le bouton [L/R] dans l'affichage de temporisateur (quand le
[L/R]
[L/R]
temporisateur est arrêté) jusqu'au TOU T
LE » indicateur de «
+ Calendrier : Mois, date et jour de l'affichage
+ Bruits de chronométreur : la montre fera bip-
LD est apparu après le diagramme adjacent.
de semaine (fonction d'Automatique-
bip une fois quand un temporisateur compte
Calendrier pour l'année bissextile et le jour
aux 1 dernier et 0 seconde.
+ Quand le « LD TOUT LE » indicateur est apparu, des pess [M]
load the
de la semaine)
Mode de meneur de train
[M]
timer(s)
ou [L/R] pour confirmer ou avorter le chargement.
Confirm
into the
Mode d'alarme
+ Chaîne d'arrangement : bpm
40 au bpm 180
the loading
counting
+ Si l'affichage de temporisateur est retourné après le
or
sequence
chargement, le temporisateur est prêt à compter.
+ Daily alarm and hourly
chime
+ Étape d'arrangement : bpm 5
resetting
hold
+ Comment remettre
à zéro les temporisateurs
+ Alarm sound: 20 seconds
Mode duel de temps
[L/R]
[L/R]
+ Pendant le « LD que TO UT LE » indicateur est apparu,
Mode de chronographe
+ Système de temps : AM, P.M ., heure,
Abort
maintient le bouton [L/R] jusqu'au « cLR TOU T LE » indicateur
minute, deuxième
the loading
reset all
+ Resolution: 1/100 second
starting
est apparu après le diagramme adjacent.
or
resetting
values
+ Measuring Range: 9 hours 59 minutes 59.99
to zero
+ Quand le « cLR TOU T LE » indicateur est apparu, presser [M]
seconds
ou [L/R] pour confirmer ou avorter
le rajustement.
+ Lap memory: 50 lap memories
Setting Sequence
+ Si le temporisateur a été remis à zéro, toutes les valeurs
commençantes seront remises à zéro à 0:00.

5.0 Täglicher Warnungs-Modus - täglicher Warnungs-Modus
50 SCHOSS Stoppuhr
+ Täglicher Warnungs-Modus
current time
(hour, minute)
+ Diese Uhr schließt eine tägliche Warnungsfunktion während der
aktuellen Uhrzeit ein.
alarm time
1.0 Einleitung
+ Wenn die tägliche Warnung eingeschaltet ist, piept die Uhr für 20
(hour, minute)
Sekunden zur täglichen Warnungszeit.
+ Für den Kauf dieser Uhr danke.
+ Tägliche Warnungs-Anzeige
+ Diese Uhr liefert aktuelle Uhrzeit, tägliche Warnung, Chronographen, Count-downtimer, Schrittmacher und
Daily Alarm OFF
+ Wenn der tägliche Warnungs-Modus vorgewählt wird, zeigt die
Doppeltageszeitfunktion.
Uhr die folgenden Einzelteile auf der Anzeige:
+ Zusätzlich zur normalen Timekeepingfunktion einschließt diese Uhr zwei spezielle Eigenschaften le, sind sie
[L/R]
+ Die aktuelle Uhrzeit (Stunde, Minute)
wird auf der 1. Reihe der
Schrittmacheruhr und Multitimer Funktion.
Anzeige aufgewiesen.
+
Die Schrittmacher-Uhr, die den Chronographen und die Schrittmacherfunktion zusammen kombiniert, folglich
+ Die tägliche Warnungszeit (Stunde, Minute) wird auf der 2. Reihe
zwei Funktionen kann gleichzeitig aktiviert werden. Während der Multitimer, der zwei kombiniert oder mehr
der Anzeige aufgewiesen.
Timer zusammen, um die Tageszeitfunktion auf Mehrphasen- Zeitaufwand des Masses zu verlängern.
+ Zu die tägliche Warnung AN/AUS einstellen
+
Sicher sein, dieses Handbuch sorgfältig zu lesen und es als neuere Referenz an Hand zu halten
erforderlichenfalls.
daily alarm
+ Um die tägliche Warnung zwischen AN und zu beginnen,
+
Um die die meisten deines Kaufs zu erhalten, ist es ratsam diese Uhr in Übereinstimmung mit den below
indicator
betätigen Sie den Knopf [L/R] in der täglichen Warnungs-Anzeige.
Anmerkungen zu benutzen:
+ Wenn die tägliche Warnungsanzeige
' ‘ wird, die tägliche
+
Vermeiden, die Uhr den extremen Bedingungen während einer unvernünftigen Zeit auszusetzen.
Daily Alarm ON
Warnung eingeschaltet ist erschienen.
+
Rauen Gebrauch oder strenge Auswirkungen zur Uhr vermeiden.
+ Zu den täglichen Warnungs-Ton prüfen
+
Den Uhrkasten nicht öffnen es sei denn eine zugelassene Service-Agentur.
+ Um den Warnungston zu prüfen, halten Sie den Knopf [S/S] in der
+
Die Uhr mit einem Weiche und einem befeuchteten Tuch gelegentlich säubern.
Daily Alarm Display
täglichen Warnungs-Anzeige nieder. Die Uhr piept, solange der
+ Die Uhr in einem trockenen Platz speichern, wenn sie für eine
lange Zeit nicht verwendet ist.
Knopf Einfluss ist.
2.0 Knopf und seine Funkti on
5.1 Täglicher Warnungs-Modus
- Einstellung der täglichen Warnung
Modus-Knopf [M]
Wie man die tägliche Warnung einstellt
+ Zu unter der aktuellen Uhrzeit, der täglichen Warnung, dem
Schrittmacher, dem Chronographen, dem Timer und Doppeldem
+ Um die Einstellungsanzeige vorzuwählen, halten Sie den
zeit-Modus vorwählen.
[MODUS] Knopf für 2 Sekunden im täglichen Warnungs-
+ Zu Einstellung Anzeige vorwählen.
Modus und dann das ' nieder; minute' Stellen fangen an
Anfangs-/STOPP-Taste [S/S]
zu blitzen.
[S/S][L/R] [M]
+ Zu unter den Einstellung Einzelteilen während der Einstellung
Daily Alarm Display
+ In der Einstellungsanzeige betätigen Sie den Knopf
Anzeige vorwählen.
hold [M]
[M]
[S/S], um das unter verschiedenen Einstellungen
+ Um zwischen 12 und 24 Stunde zu schalten formatieren.
vorzuwählende Blitzen nach dem angrenzenden
+ Um den „Anfang“ zu aktivieren oder
Funktion während des
[L/R]
Diagramm zu verschieben.
Chronograph-Modus und des Timer-Modus „stoppen“.
Increase
+ Während ein der Einstellungen (Minute, Stunde) blitzt,
Reset-Taste des Schoss-/[L/R]
the number
minute
betätigt den Knopf [L/R], um die Zahl zu ändern; halten
+ Zu „Schoss“ oder "RESET" anzusehen und zu aktivieren arbeiten
Sie den Knopf [L/R] nieder, um die Zahl mit einer
während des Chronograph-Modus.
hold [L/R]
[S/S]
höheren Geschwindigkeit zu ändern.
+ Zu zwischen verschiedenen Timer-Anzeigen vorwählen. Zu den
Anfangswert für die Timer laden oder löschen.
increase
+ Wenn die Einstellung abgeschlossen wird, betätigen Sie
the number
hour
den Knopf [M] einmal, um die Einstellungsanzeige
+ Um den „Anfang“ zu aktivieren oder Schrittmacherfunktion
at a higher
herauszunehmen. Die Uhr nimmt auch die
DISPLAY
während des Schrittmachermodus „stoppen“.
speed
Einstellungsanzeige heraus, wenn KEIN ist aktiviert
+ Zu die stündliche
Glockenspielfunktion AN/AUS einstellen.
Setting Sequence
worden für 1 Minute Schlüssel-schüren Sie.
+ Zu die Stellen während der Einstellung Anzeige erhöhen.
3.0 Hauptfunkti on Modi
6.0 Pacer Mode - Pacer Display
Pacer Mode
pacer
+ This Watch includes a pacer function which generate
beeping rate
regular beeps at a pre-defined rate. That pre-defined rate
(in beats
can be set within in a range from 40 to 180 beats per
[M]
[M]
per minute)
minute (bpm).
Pacer Display
+ The pacer will sound more beeps within a minute for a
higher bpm rate (e.g. 80)
setting than a lower bpm rate
(e.g. 30) setting.
Current Time Mode
Daily Alarm Mode
Pacer Mode
30 beeps
30 beeps
30 beeps
Pacer Display
[M]
[M]
Beep
Beep
Beep
+ When the Pacer Display is selected, the beeping rate is
exhibited on the 2nd row of the display.
0
1
2
3
minute(s)
start
How to Use the Pacer
[M]
[M]
Example 1: Set 30 as the Pacer Beeping Rate .
+ When the pacer has been set with a beeping rate, for
example 65 bpm, press the [L/R]
button once will start
80 beeps
80 beeps
80 beeps
the beeping.
Beep
Beep
Beep
+ During the Watch is beeping, press the [L/R] button once
Dual Time Mode
Countdown Time r Mode
Chronograph Mode
again to stop the beeping.
0
1
2
3
minute(s)
start
Example 2: Set 80 as the Pacer Beeping Rate.
4.0 Aktuelle Uhrzeit-Modus - aktuelle Uhrzeit-Anzeige
6.1 Schrittmacher-Modus - Schrittmacher-Anzeige
day of
week
date
Aktuelle Uhrzeit-Anzeige
Zu die Schrittmacher-piepende Rate einstellen
(day, month)
AM/PM
+
When the Current Time Mode is selected, the Watch will show the
indicator
following items on the display:
+
Um die Einstellungsanzeige vorzuwählen, halten Sie den
current
Knopf [M] für 2 Sekunden in der Schrittmacher-Anzeige
time
+
The day of week and date of the current time are exhibited on the
nieder, und dann fangen die piependen Ratenstellen an zu
12 hours Display
1st row of the display.
Chime OFF
blitzen.
+
The current time (hour, minute, second) is exhibited on the 2nd row
hold [S/S]
of the display.
Pacer Display
+
In der Einstellungsanzeige betätigen Sie den Knopf [L/R], um
die Zahl zu ändern; halten Sie den Knopf nieder, um die Zahl
Wie man zwischen 12 und 24 Stunde Format schält
hold [M]
[M]
date
(month, day)
mit einer höheren Geschwindigkeit zu ändern.
+
Um zwischen 12 und 24 Stunde Format zu schalten, den Knopf [S/S]
nach dem angrenzenden Diagramm betätigen.
[L/R]
+
Wenn die Einstellung abgeschlossen wird, betätigen Sie den
Knopf [M] einmal, um die Einstellungsanzeige
Wie man zwischen Monat-Tag und Tagesmonat Format schält
Increase
12 hours Display
herauszunehmen. Die Uhr nimmt auch die
Chime OFF
+
Um zwischen Monattag und Tagmonat Format zu schalten, den Knopf
the number
40
hourly
Einstellungsanzeige heraus, wenn KEIN ist aktiviert worden
[S/S]
[L/R]
chime
[S/S] nach dem angrenzenden Diagramm
niederhalten.
indicator
für 1 Minute Schlüssel-schüren Sie.
Zu das stündliche Glockenspiel AN/AUS einstellen
5 bpm
hold [L/R]
per step
+
Um das stündliche Glockenspiel zwischen AN/AUS einzustellen, den
increase
Knopf [L/R] nach dem angrenzenden Diagramm betätigen.
the number
180
+
Wenn die Glockenspielanzeige “ “ auf der Anzeige erschienen,
at a higher
eingeschaltet ist das Glockenspiel. Während des stündlichen
speed
Glockenspiels, eingeschaltet ist die Uhr klingt „Signaltonsignalton“ jede
Setting Sequence
24 hours Display
Hourly chime ON
Stunde auf der Stunde
(z.B. 1:00 00, 2:00 00, 3:00 00)
4.1 Aktuelle Uhrzeit-Modus - Einstellung der aktuellen Uhrzeit
6.2 Schrittmacher-Modus - u nter Verwendung der Uhr als Schrittm acher-Uhr
Wie man die aktuelle Uhrzeit einstellt
Wie man die Uhr als Schrittmacher-Uhr benutzt
+ Um die Einstellungsanzeige vorzuwählen, halten Sie
[L/R]
65 beeps/
+ Um die Uhr als Schrittmacher zu benutzen passen Sie
den Knopf [M] für 2 Sekunden im aktuelle Uhrzeit-
minute
nach den untengenannten Schritten auf:
Modus und dann das ' nieder; Second' Stellen fangen
Beep
+ Wen n die Schrittmacher Anzeige vorgewählt wird,
Current Time Mode
an zu blitzen.
Pacer Mode
Pacer Mode
betätigen Sie sich [L/R] um die Schrittmacherfunktion
hold [M]
[M]
+ In der Einstellungsanzeige betätigen Sie den Knopf
Pacer OFF
Pacer ON
einzuschalten.
[S/S], um das unter verschiedenen Einstellungen
[M]
+ Wenn Schrittmacherfunktion eingeschaltet ist,
[S/S]
vorzuwählende Blitzen nach dem angrenzenden
betätigen Sie den Knopf [M], um die Anzeige zum
second
day
Diagramm zu verschieben.
Chronograph-Modus zu schalten,
und betätigen Sie
[L/R]
+ Während ein der Einstellungen (Minute, Stunde, Jahr,
dann den Knopf [S/S] einmal beginnt die
Monat, Tag) blitzt, betätigt den Knopf [L/R], um die Zahl
Schrittmacher- und Chronographfunktion gleichzeitig.
Increase
[S/S] [S/S]
zu ändern (halten Sie den Knopf nieder, um die Zahl
Chronograph Mode
the number
mit einer höheren Geschwindigkeit zu ändern).
+ Dann wird die Uhr wurde eine Schrittmacher-Uhr, die
stop
[S/S]
minute month
der Chronograph zählt und der Schrittmacher mit der
+ Wenn die zweiten Stellen anfangen zu blitzen,
counting
counting
vorbestimmten Rate piept.
hold [L/R]
betätigen Sie den Knopf [L/R], um sie
bis null
[S/S]
65 beeps/
+ Während des Schrittmachers ist die Uhr zählend und
increase
[S/S] [S/S]
zurückzustellen
minute
the number
+ Wenn die Einstellung abgeschlossen wird, betätigen Sie
Beep
piepend, betätigen Sie den Knopf [S/S] einmal stoppt
at a higher
[S/S]
das
Piepen und die Zählung.
speed
hour
year
den Knopf [M] einmal, um die Einstellungsanzeige
Chronograph Mode
Chronograph Mode
herauszunehmen. Die Uhr nimmt auch die
Pacer Watch Stopped
Pacer Watch Started
Setting Sequence
Einstellungsanzeige heraus, wenn KEIN ist aktiviert
worden für 1 Minute Schlüssel-schüren Sie.

7.0 Chronograph-Modus - Chronograph-Modus
8.3 Count-down-Time r-Modus - unter Verwendung des einzelnen Timers
current lap
Chronograph-Modus
counting
Wie man den einzelnen Time r benutzt
running time
+ Diese Uhr schließt eine Stoppuhrfunktion ein, die misst:
accumulative
running time
accumulative
+ Gesamtverarbeitungszeit, wachsende Gesamtverarbeitungszeit
+ Wenn, nur einen Timer verwendend (einzelner Timer), schließt
(hour)
running time
[S/S]
(Mehrphasen- Gesamtverarbeitungszeit) und Schosszeit (erhalten
andere Timer indem die Einstellung ihrer Anfangswerte auf
(1/100 second)
accumulative
accumulate
Sie eine Gesamtverarbeitungszeit, ohne die Zählung zu stoppen).
0:00 aus.
running time
running time
(minute)
(second)
+ Die messende Kapazität des Chronographen:
+ Sobald der Anfangswert für den letzten Timer eingestellt
Chronograph Display
+
Messende Maßeinheit: 1/100 zweites,
Timer 1 Display
Counting Display
'All Zero'
worden ist, muss er in die zählenreihenfolge geladen werden,
+
Messende Strecke: 9 Stunden, 59 Minuten und 59.99 zweite,
[M]
stop
counting
[S/S]
bevor er zur Zählung bereit ist. Überprüfen
Sie
1. Elapsed time
+
Schoss-Gedächtnis: ein Maximum von 50 Schößen.
vorhergehendes Kapitel 8.2 auf weiteren Einzelheiten über,
300
Chronograph-Anzeige
hold
[L/R]
wie man den Anfangswert in die zählenreihenfolge lädt.
+ Wenn die Chronograph-Anzeige vorgewählt wird, zeigt die Uhr die
[S/S]
[S/S]
+ Betätigen Sie den Knopf [S/S], um die Zählung zu beginnen.
folgenden Einzelteile auf der Anzeige:
2. Accumulative elapsed time
Die Zählung wird automatisch wiederbegonnen, wenn es null
+ Während des Chronographen zählt: Die laufende Schosszeit und
10010
20
die wachsende Gesamtverarbeitungszeit wird auf der 1. und 2.
Stop Counting Display
erreicht, es sei denn die Zählung den Knopf [S/S] betätigend
[S/S]
kurz aufgehalten bei wird.
[S/S]
[S/S]
[S/S] [S/S]
Reihe beziehungsweise aufgewiesen. ANMERKUNG: Die laufende
Schosszeit ist die selbe wie die wachsende
Wie man den
Time r neu lädt
3. Lap times
Gesamtverarbeitungszeit für Schoss 1.
beep, beep
10 10100
+ Zu den Timer zu seinem ursprünglichen Anfangswert während
lap 1lap 2lap 3
+ Während des
Chronographen wird gestoppt: Die gegenwärtige
des Timers neu zu laden wird gestoppt, den Ladevorgang
[S/S]
[L/R] [L/R] [L/R]
Schosszeit und die Schosszahl werden auf der 1. Reihe
nach dem vorhergehenden Kapitel 8.2 durchführt.
aufgewiesen, und die wachsende Gesamtverarbeitungszeit wird auf
0102030
der 2. Reihe aufgewiesen.
Zero Display
Counting
time
Counting Display
Display
Timer-Warnungs-Ton
Elapsed time, Accumulative
+ Während des Schoßes zeigt die Anzeige an: Die gegenwärtige
+ Während der Zählung piept die Uhr einmal, wenn ein Timer zu
Elapsed time and Lap time
Schosszahl und die Schosszeit wird auf der 1. und 2. Reihe
dem letzten 1 und 0 zweiten zählt.
beziehungsweise aufgewiesen.
7.1 Chronograph-Modus - unter Verwendung des Chronographen
8.4 Count-down-Timer-Modus - unter Verwendung des Multi-Tmer
Wie man Zeitaufwand misst
[S/S]
Wie man den Multi-Timer benutzt
+ Während des ' Alles Zero' Anzeige, betätigen den Knopf [S/S] einmal
beep, beep
hold [L/R]
+ Um die Multi-Timer Funktion zu verwenden die zwei kombiniert oder
beginnt die Zählung und betätigt den Knopf [S/S] wieder stoppt die
Timer 2*
mehr Timer um Multiphasen Zeitaufwand zu messen, muss es den
Zählung.
Timer 1*
Anfangswert für jeden Timer einstellen.
+ Die Gesamtverarbeitungszeit zwischen den oben genannten 2 Schlüssel-
beep,
beep,
schürt wird ausgestellt auf der 1. Reihe der Anzeige. Wiederholen Sie die
beep
beep, beep
beep
+ Sobald der Anfangswert für die Timer eingestellt worden ist, müssen
elapsed
All Zero Display
oben genannten Schlüsselvorgänge, um
die wachsende
sie in die zählenreihenfolge geladen werden, bevor sie zur Zählung
time
Timer 4*
Gesamtverarbeitungszeit zu erhalten.
Timer 3*
(stop
elapsed
bereit ist. Überprüfen Sie das vorhergehende Kapitel 8.2 auf weiteren
[S/S]
counting)
time
Wie man eine Schoss-Zeit erhält
Multi-Timer Counting Sequence
Einzelheiten über, wie man den Timer in die zählenreihenfolge lädt.
(counting)
+ Wenn der Chronograph zählt, betätigen Sie den Knopf [L/R], um die
D
If timer 1, 2, 3 or 4 which set 0:00 as the
+ Das Betätigen des Knopfes [S/S] beginnt die zählenreihenfolge. Die
Schoss-Anzeige für 5 Sekunden zu erhalten und anzusehen. In der
starting value, that timer will be
Multi-Timer willen Anfänge die Zählung von Timer 1 zu einen anderen
[S/S]
Schoss-Anzeige erscheinen die laufende Schosszahl und die Schosszeit
excluded from the counting sequence.
Timern nach dem angrenzenden Diagramm. Das Betätigen des
auf der 1. und 2. Reihe der Anzeige beziehungsweise. Nach den 5
[S/S]
Knopfes [S/S] noch einmal stoppt die Zählung.
Sekunden geht die Uhr zu Anzeige automatisch zählen zurück. Dann
Confirm
Abort
+ Die Uhr zählt repeatingly, es sei denn sie den Knopf [S/S] betätigend
werden die neue Schosszeit und die wachsende
The counting
the loading
the loading
or
or
kurz aufgehalten bei wird.
Stop Counting Display
Counting Display
+ Gesamtverarbeitungszeit auf der 1. und 2. Reihe der Anzeige
is stopped
resetting
resetting
+ Timer-Warnungs-Ton
beziehungsweise aufgewiesen. Wiederholen Sie die oben genannten
5 seconds
[L/R]
Schlüsselvorgänge, um eine andere Schosszeit zu erhalten.
hold [L/R]
[M]
[L/R]
+ Während der Zählung piept die Uhr einmal, wenn ein Timer zu dem
Wie man/zurückstellte die Schoss-Zeit zurückruft
letzten 1 und 0 zweiten zählt.
hold
Wie man/zurückstellte die Anfangswerte neu lädt
lap
+ Während des Chronographen wird gestoppt:
number
+
Betätigen Sie den Knopf [L/R] eins nach dem anderen, um die
[L/R]
+ Zu die Anfangswerte während des
Tim ers neu zu laden oder
notierten Schosszeiten zu wiederholen oder
zurückzustellen wird pausiert, das Laden oder Zurückstellenprozeß
+
Halten Sie den Knopf [L/R] nieder, damit ungefähr 2 Sekunden die
durchführt der im angrenzenden Diagramm erwähnte um die
lap time
Schosszeit löschen und die Anzeige zu ' zurückstellen; Alles Zero'
beginnenden Täler neu zu laden oder zurückzustellen.
Load the
Reset the
Lap Time Display
Anzeige.
Starting Values
Starting Values
8.0 Count-down-Timer-Modus - Count-down-Timer-Anzeige
9.0 Doppelzeit-Modus - Doppelzeit-Modus
Timer 1*
Timer 2*
Count-down-Timer-Modus
+
Diese Uhr schließt 4 Count-downtimer mit ein. Sie sind Timer 1, 2, 3 und 4. Unter
Doppelzeit-Modus
Verwendung eines Timers (einzelner Timer) der normale Timer-Funktion laufen
Timer 4*
+ Diese Uhr schließt eine Doppelzeit ein, die sich zeigen,
Timer 3*
lassen kann. Aber Mähdrescher können zwei oder mehr Timer (Multi-Timer) die
Timer-Funktion auf Mehrphasen- Zeitaufwand des Masses verlängern.
dass die aktuelle Uhrzeit von das zweite mal in Zonen
Multi-Timer Counting Sequence
dual time
+
(second)
aufteilen.
D
If Timer 1, 2, 3 or 4 which set 0:00 as the
Die Maßmaßeinheit dieser Timer ist 1 zweite,
und der Anfangswert dieser Timer
dual time
kann zu einem Maximum von 23 Stunden und von 59 Minuten gegründet werden.
(hour)
starting value, that timer will be excluded
+ Die zweiten Stellen sind selben wie die der aktuellen
from the counting sequence.
+
Wenn ein Timer, der 0:00 als der Anfangswert einstellte, dieser Timer von der
Uhrzeit.
zählenreihenfolge ausgeschlossen wird.
dual time
starting value (hour, mintue)
(minute)
Doppelzeit-Anzeige
+
Wenn der Timer begonnen wird, zählt die Uhr repeatingly, es sei denn sie den
Dual Time Mode
[L/R]
Knopf
[S/S] betätigend kurz aufgehalten bei wird. Während der Zählung piept die
+ Wen n die Doppelzeit-Anzeige vorgewählt wird, wird die
Uhr einmal, wenn ein Timer zu dem letzten 1 und 0 zweiten zählt
Doppelzeit (Stunde, Minute, zweite) auf der 2. Reihe der
Einzelner Timer und Multi-Timer
Anzeige aufgewiesen.
+
Wenn es einzelnen Timer (einen Timer) verwendet, muss es ausschließt andere
Timer 1 Display Timer 2 Display
Timer von der zählenreihenfolge, indem es ihren Anfangswert auf 0:00 einstellt.
counting
time
[L/R][L/R]
+
Wenn es Multi-Timer verwendet, zählt es auf einer Reihenfolge, die die Zählung
von Timer 1 zu einen anderen Timern nach dem angrenzenden Diagramm
beginnt.
[L/R]
Wie man unterschiedliche Timer-Anzeige vorwählt
+
Um unterschiedlichen Count-downtimer vorzuwählen, den Anzeige während des
Timers gestoppt, den Knopf [L/R betätigend Sie wird] eins nach dem anderen
Timer 4 Display Timer 3 Display
nach dem angrenzenden Diagramm.
Countdown Timer Mode
8.1 Count-down-Timer-Modus - Einstellung des Count-down-Timers
9.1 Doppelzeit-Modus - Einstellung der Doppelzeit
Wie man den Count-down-Timer einstellt
Zu die Doppelzeit einstellen
+ Die folgenden Punkte veranschaulichen das Verfahren für den
+ Um die Einstellungsanzeige vorzuwählen, halten Sie den Knopf
Ti mer 1. allerdings einstellen und stellen die anderen Timer
[M] für 2 Sekunden im Doppelzeit-Modus und dann das '
ein, arbeiten an dem ähnlichen Verfahren.
nieder; Minute' Stellen fangen an zu blitzen.
+ Um die Einstellungsanzeige vorzuwählen, halten Sie den
Countdown Time r Display
+ In der Einstellungsanzeige betätigen Sie den Knopf [S/S], um
Knopf [M] für 2 Sekunden in der Anzeige des Timer-1 und
Dual Time Mode
das Blitzen (Einstellungseinzelteil) wie in dem Diagramm
hold [M]
[M]
dann das ' nieder; Minute'
Stellen fangen an, auf der Anzeige
hold [M]
[M]
gezeigt vorzuwählen.
zu blitzen.
+ Wenn eine der
Einstellungen (Minute, Stunde) blitzt, betätigen
[L/R]
+ In der Einstellungsanzeige betätigen Sie den Knopf [S/S], um
[L/R]
Sie den Knopf [L/R], um die Zahl zu ändern; halten Sie den
das unter verschiedenen Einstellungen vorzuwählende Blitzen
Knopf nieder, um die Zahl mit einer höheren Geschwindigkeit
Increase
nach dem angrenzenden Diagramm zu verschieben.
Increase
the number
minute
the number
minute
zu ändern.
+ Wenn eine der Einstellungen (Minute, Stunde) blitzt, betätigen
+ Wenn die Einstellung abgeschlossen wird, betätigen Sie den
Sie den Knopf [L/R], um die Zahl zu ändern (halten Sie den
Knopf [M] einmal, um die Einstellungsanzeige
hold [L/R]
[S/S]
Knopf
nieder, um die Zahl mit einer höheren Geschwindigkeit
hold [L/R]
[S/S]
herauszunehmen. Die Uhr nimmt auch die Einstellungsanzeige
increase
zu ändern).
increase
heraus,
wenn KEIN ist aktiviert worden für 1 Minute Schlüssel-
the number
hour
+ Wenn die Einstellung abgeschlossen wird, betätigen Sie den
the number
hour
schüren Sie.
at a higher
at a higher
speed
Knopf [M] einmal, um die Einstellungsanzeige
speed
Setting Sequence
herauszunehmen. Die Uhr nimmt auch die Einstellungsanzeige
Setting Sequence
heraus, wenn KEIN ist aktiviert worden für 1 Minute Schlüssel-
schüren Sie.
8.2 Count-down-Timer-Modus - Laden und Zurückstellen des Timers
10.0 Spezifikationen
Wie man die Tim er lädt
Aktuelle Uhrzeit-Modus
Count-down-Timer
+ Wenn der Anfangswert für die Timer eingestellt worden ist,
+ Zeit-System: Morgens, P.M. , Stunde, Minute,
+ Timer: 4 Timer
müssen sie in die zählenreihenfolge geladen werden, bevor sie
zweite
zur Zählung bereit ist.
+ Entschließung: 1 zweites
Countdown Timer Display
+ Um die Timer in die Zählung von Reihenfolge zu laden, halten
+ Zeit-Format: 12 Stunde oder 24-stündiges
Stop Counting
Sie den Knopf [L/R] in der Timer-Anzeige (wenn der Timer
Format
+ Messende Strecke: 23 Stunden 59 Minuten
hold
[L/R]
gestoppt wird)
bis das ' nieder; Ld ALL' Anzeige erschien nach
Kalender: Monat, Datum und Tag der
+ Timer-Töne: die Uhr piept einmal, wenn ein
[L/R]
dem angrenzenden Diagramm.
Wochenanzeige (Selbst-Kalender Funktion für
Ti mer zu dem letzten 1 und 0 zweiten zählt.
+ Wenn das ' Ld ALL' Anzeige wird erschienen, betätigt sich [M]
Schaltjahr und Tag der Woche)
Schrittmacher-Modus
load the
oder [L/R] um das Laden zu bestätigen oder abzubrechen.
[M]
timer(s)
Warnungs-Modus
+ Einstellungs-Strecke: bpm 40 zu bpm 180
Confirm
into the
+ Wenn die Timer-Anzeige nach dem Laden zurückgebracht wird,
the loading
counting
+ Tägliche Warnung und stündlicher
+ Einstellungsschritt: bpm 5
or
sequence
ist der Timer bereit zu zählen.
Glockenspiel
resetting
Wie man die Ti me r zurückstellt
Doppelzeit-Modus
hold
+ Warnungston: 20 Sekunden
+ Während des ' Ld ALL' Anzeige wird erschienen, den Knopf
[L/R]
+ Zeit-System: Morgens, P. M., Stunde, Minute,
[L/R]
[L/R] bis das ' niederhält; cLR ALL' Anzeige erschien nach dem
Chronograph-Modus
zweite
Abort
angrenzenden Diagramm.
the loading
reset all
+ Entschließung: 1/100 zweites
or
starting
+ Wenn das ' cLR ALL' Anzeige wird erschienen, betätigt sich [M]
resetting
values
oder [L/R] um das Zurückstellen zu bestätigen oder
+ Messende Strecke: 9 Stunden 59 setzt
to zero
abzubrechen.
59.99 Sekunden
auf
+ Wenn der Tim e r zurückgestellt worden ist, werden
alle
+ Schossgedächtnis: Gedächtnisse mit 50
Setting Sequence
Anfangswerte zum 0:00 zurückgestellt.
Schößen
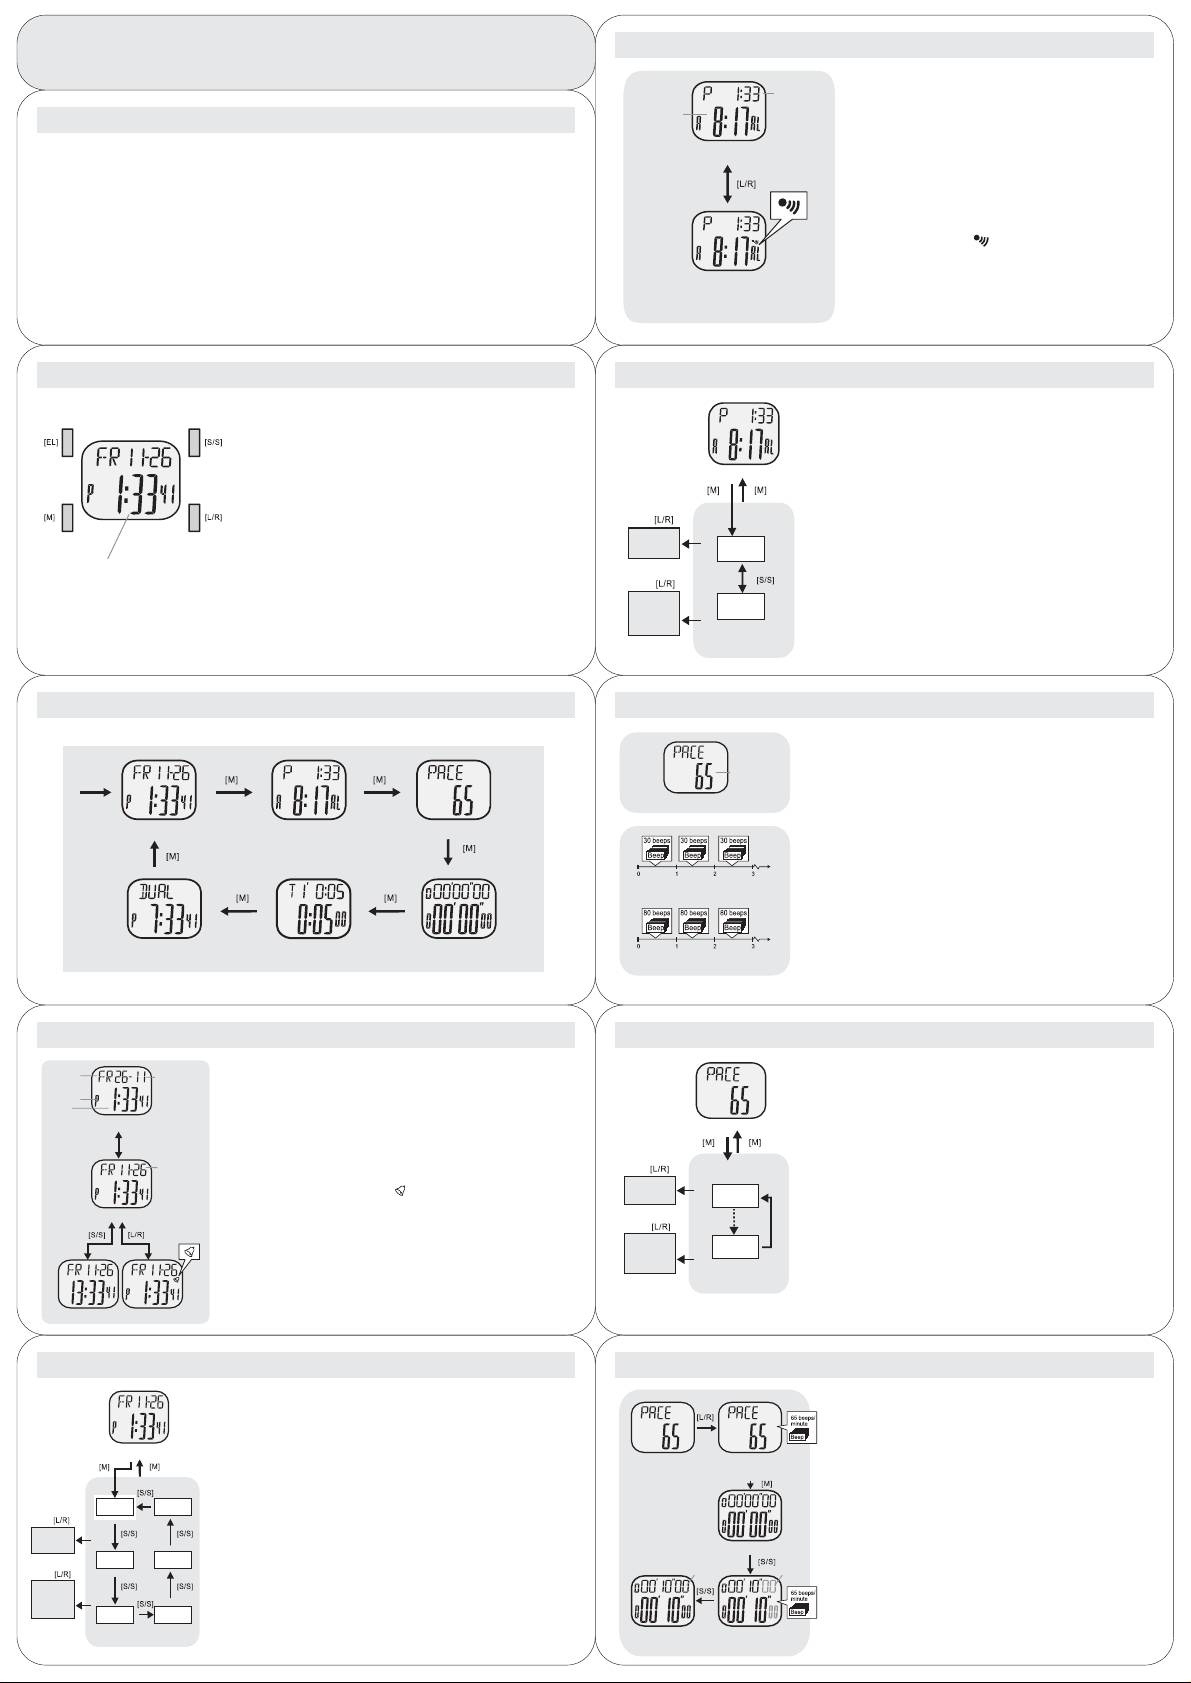
5.0 Modo alarme diário –
Modo alarme diário
50 LAP STOPWATCH
• Modo alarme diário
• Este relógio inclui uma função de alarme diário para a hora
hora actual
actual.
(hora, minuto)
• Quando o alarme está ligado o relógio emitirá um bip durante
hora do
1.0 Introdução
alarme
20 segundos à hora definida, todos os dias.
(hora, minuto)
• Mostrador de Alarme Diário
• Com o Modo Alarme Diário seleccionado, o relógio mostrará os
• Obrigado por ter comprado este modelo.
Alarme diário desligado
seguintes itens no mostrador:
• O seu relógio inclui Hora Actual, Alarme Diário, Cronómetro, Timer com contagem decrescente,
• A hora actual (horas, minutos) aparece na primeira linha do
contador de passos e função Tempo Duplo.
mostrador.
• Além da sua função normal como relógio, este modelo inclui duas características especiais:
• A hora do alarme (horas minutos) aparece na segunda linha do
o contador de passos (Pacer) e uma função multi-timer.
mostrador.
• O Relógio Pacer combina as funções de cronómetro e contador de passos, daí ser possível activar estas duas
• Para ligar/desligar o Alarme Diário
funções ao mesmo tempo. O multi-timer agrupa dois ou mais timers para que lhe seja possível alargar a função
• No Modo Alarme Diário, prima o botão (L/R) para ligar e desligar
e medir o tempo decorrido em múltiplas fases.
o alarme.
• Leia este manual cuidadosamente e mantenha-o sempre à mão para consulta em caso de neces sidade.
• Se o indicador do alarme” “aparecer é porque o alarme está
• Para melhor aproveitamento da sua compra deve utilizar o relógio de acordo com as notas que se seguem:
indicador de
ligado.
-Evite expor o relógio a condições adversas durante grandes períodos de tempo.
alarme diário
• Para testar o som do alarme diário
-Evite a sua utilização em circunstâncias adversas e fortes pancadas.
• Para testar o som do alarme diário mantenha pressionado o
-Somente um agente certificado deverá abrir a caixa do relógio.
Alarme diário ligado
botão (S/S) no mostrador do
-Limpe o seu relógio de vez em quando com um tecido macio ligeiramente humedecido.
alarme diário. O alarme emitirá um bip enquanto
-Guarde o seu relógio num local seco quando não tencionar utilizá-lo durante um longo período de tempo.
o botão estiver pressionado.
Mostrador de alarme diário
2.0 Botões e funções
5.1 Modo alarme diário –
Acertar o Modo alarme diário
Botão Modo (M)
• Para escolher entre Hora Actual, Alarme Diário,
Acertar o Modo alarme diário
Contador de Passos, Cronógrafo, Timer e Modo
Templo Duplo.
• Dentro do modo alarme diário, mantenha pressionado o botão
• Para escolher o mostrador de acertar.
(M) durante 2 segundos para escolher o mostrador de acertar;
Botão Início/Fim (S/S)
os dígitos dos minutos começarão a piscar.
• Para escolher entre os itens a acertar dentro do
mostrador de acertar.
Mostrador de alarme diário
• Dentro do mostrador de acertar, prima o botão (S/S) para
• Para alternar entre o formato 12 e 24 horas.
• Para activar a função iniciar/terminar no Modo ]
pressione
escolher os itens a acertar, de acordo com o diagrama ao lado.
Cronógrafo e Modo Timer.
• Com um dos itens que quer acertar a piscar (minuto, horas)
Botão Volta/Repor (L/R)
prima o botão (L/R) para mudar o número (Mantenha o botão
• Para ver e activar a função volta e repor no Modo
Cronógrafo.
(L/R) pressionado para mudar o número mais rapidamente).
• Para escolher entre os diferentes mostradores do timer.
Aumentar
• Para carregar ou limpar o valor de partida do(s) timer(s).
o número
minuto
• Quando terminar de acertar, prima o botão (M) uma vez para
• Para activar o início e fim da função de contador de
MOSTRADOR
sair da função acertar. O relógio também sairá do mostrador
passos dentro do Modo Contagem de Passos.
• Para ligar ou desligar a função de sinal horário sonoro.
de acertar se nenhuma tecla for activada durante 1 minuto.
• Para aumentar os dígitos dentro do mostrador de acertar.
pressione
Aumentar
Botão EL (EL)
o número
hora
• Para ligar a luz EL traseira durante cerca de 3 segundos.
mais
rapidamente
NOTA: As principais funções das teclas encontram--se
resumidas nestes parágrafos. No entanto, aconselha-se a
Sequência para acertar
leitura dos capítulos que se seguem para mais detalhes
sobre todas as operações.
3.0 Principais Modos funcionais
6.0 Modo Contador de Passos –
Mostrador do Contador de Passos
Modo Contador de Passos
frequência de
• Este relógio inclui uma função de contagem de passos que emite bips
bips do contador
regulares com uma frequência pré definida. Essa frequência pré-
de passos
(em batimentos
definida pode ser estabelecida entre 40 e 180 batimentos por minuto
por minuto)
(BPM).
Mostrador de contagem de passos
• O contador de passos emitirá mais bips por minuto com uma frequência
bpm superior (ex. 80) do que se a frequência for inferior (ex. 30 bpm).
Modo Hora Actual Modo Alarme Diário
Modo Contador de Passos
Mostrador do contador de passos
• Com o contador de passos seleccionado a frequência de bips aparece
na segunda linha do mostrador.
minutos
partida
Como utilizar o contador de passos
Exemplo 1: Acertado para 30 como
• Após definir uma frequência de bips no contador de passos, por exemplo
Frequência do Ritmo dos Bips
65 bpm, prima de novo o botão (L/R) para iniciar os bips.
• Enquanto o relógio está a emitir bips pressione o botão (L/R) de novo
para parar os bips.
minutos
Modo Tempo Duplo
Modo Contagem Decrescente Modo Cronógrafo
partida
Exemplo 2: Acertado para 80 como
Frequência do Ritmo dos Bips
4.0 Modo Hora Actual –
Mostrador da hora actual
6.1 Modo Contador de Passos
– Acertar a frequência de bips do Contador de Passos
dia da
Mostrador da hora actual
semana
data
• Com o Modo Hora Actual seleccionado o relógio terá no mostrador os seguintes itens:
Como acertar a frequência de bips do Contador de Passos
(dia, mês)
• O dia da semana e a data do tempo actual aparecem na primeira linha do mostrador.
Indicador
• Para seleccionar o mostrador de acertar mantenha pressionado o
AM / PM
• A hora actual (horas, minutos e segundos) aparecem na segunda linha do mostrador
botão (M) durante 2 segundos, dentro do Modo Mostrador de Contagem
Hora
Actual
Como alternar entre o formato 12h e 24h
de Passos; os dígitos da frequência do contador de passos começarão
Mostrador 12 horas
• Para alternar entre o formato 12h e 24h mantenha pressionado o botão (start/stop) de
Sinal Sonoro desligado
Mostrador de contagem de passos
a piscar.
acordo com o diagrama ao lado.
• Dentro do modo de acertar, prima o botão (L/R) para mudar o número.
prima [SS]
e pressione
Como alternar entre o formato mês-dia e dia- mês
pressione
Mantenha o botão pressionado para mudar o número mais rapidamente.
• Para alternar entre o formato mês-dia e dia-mês mantenha pressionado o botão (start/stop)
• Quando terminar de acertar prima o botão (M) uma vez para sair da
data
de acordo com o diagrama ao lado.
função acertar. O relógio também sairá do mostrador de acertar se
(dia, mês)
Para ligar/desligar o sinal horário sonoro
nenhuma tecla for activada durante 1 minuto.
• Para ligar/desligar o sinal horário sonoro “ “ pressione o botão (L/R) de acordo com
Aumentar
o número
o diagrama ao lado.
40
Mostrador 12 hora
• Quando o indicador de sinal sonoro aparece no mostrador, o sinal sonoro está ligado.
Sinal sonoro desligado
Enquanto o sinal sonoro estiver ligado o relógio emitirá um "bip, bip” a cada hora (ex. 1:00
5 bpm
por passo
horário
00, 2:00 00…)
pressione
Indicador
sonoro
Aumentar
o número
180
mais
rapidamente
Sequência para acertar
Mostrador 24 horas Sinal horário ligado
4.1. Modo Hora Actual –
Acertar a hora actual
6.2 Modo Contador de Passos
– Utilizar o relógio como Relógio com Contador de Passos
Como acertar a hora actual
Como utilizar o relógio como relógio com Contador de Passos
• Para usar o relógio como relógio com Contador de Passos siga
• Para escolher o mostrador de acertar mantenha pressionado o botão (M)
o procedimento seguinte:
durante 2 segundos, dentro do Modo hora actual; os dígitos dos segundos
• Com o mostrador de contagem de passos seleccionado, prima
começarão a piscar.
o botão (L/R) para ligar a função de contagem de passos.
Hora actual
• Dentro do mostrador de acertar, prima o botão (S/S) para escolher entre
Modo contagem
Modo contagem
• Após ligar a função de contagem de passos, prima o botão (M)
pressione
de passos
de passos
os itens seguindo o diagrama ao lado.
Contagem de passos
Contagem de passos
para mudar o mostrador para Modo Cronómetro e, em seguida,
Desligada
Ligada
prima o botão (S/S) uma vez para iniciar a contagem de passos
e a função cronómetro ao mesmo tempo.
• Com um dos itens a acertar a piscar (hora, minutos ou segundos) prima
• Deste modo, o seu relógio transforma-se num relógio com contagem
segundo
dia
o botão (L/R) para mudar o número (Mantenha o botão pressionado para
de passos, com o cronómetro a correr e o contador de passos a
mudar o número mais rapidamente).
emitir bips de acordo com a frequênciapré-definida.
• Quando o relógio com contagem de passos está a contar e a
Aumentar
• Quando o dígito dos segundos começar a piscar prima o botão (L/R) para
o número
Modo cronógrafo
emitir bips, prima o botão (S/S) uma vez para parar esta função.
colocar os segundos a zero
minuto mês
• Quando terminar de acertar prima o botão (M) uma vez para sair da função
contagem parada
contagem
acertar. O relógio também sairá do mostrador de acertar se nenhuma tecla
Aumentar o
for activada durante 1 minuto.
número mais
rapidamente
hora ano
Sequência de acerto
Modo cronógrafo
Modo cronógrafo
Relógio com Contagem
Relógio com Contagem
de Passos ligado
de Passos parado
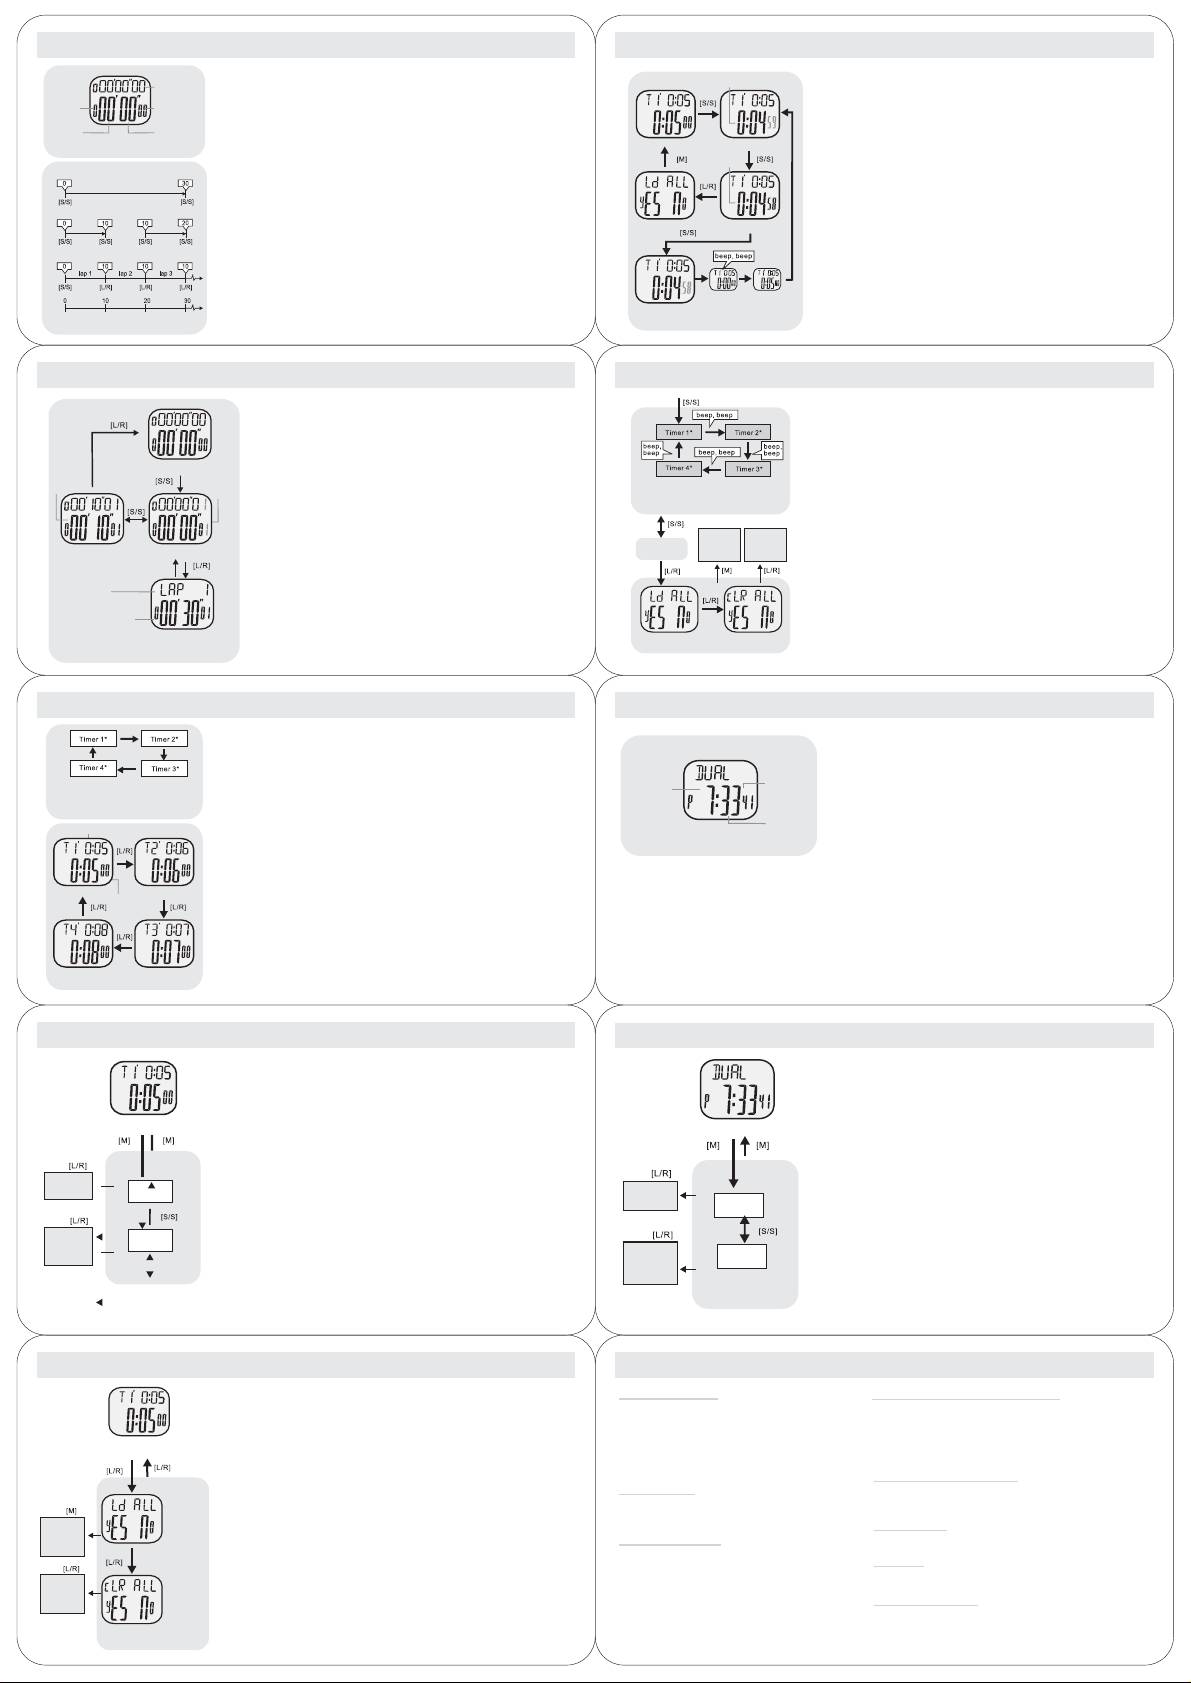
7. 0 Modo Cronómetro -
Modo Cronómetro
8.3 Modo Timer Contagem Decrescente –
Utilizar o Timer único
volta actual
Modo Cronógrafo
tempo a correr
• Este relógio inclui uma função cronómetro que mede:
contagem
Como utilizar o Timer único
tempo a
tempo a correr
O tempo decorrido, o tempo decorrido acumulado (tempo decorrido multi-
• Quando usar só um timer (Timer único) os outros timers ficam
correr
cumulative
cumulative
faseado) e tempo de volta (obtenção de um tempo decorrido sem parar
hora
1/100
excluídos se colocar os seus valores de início a zero
segundo
o cronómetro).
• Após ter definido o valor de início para o último timer é preciso
tempo a
correr
tempo a correr
• Capacidade de medição do cronómetro:
carregar a sequência de contagem para ficar pronto a contar. Verifique
cumulative
acumulado
• Unidade de medida: 1/100 segundos
(segundo)
Mostrados de ContagemMostrador Timer 1
o ponto 8.2 atrás para mais detalhes sobre como fazer esse
minuto
• Alcance de medição: 9 horas, 59 minutos e 59.99 segundos.
carregamento.
• Memória de volta: máximo de 50 voltas.
parar a contagem
• Prima o botão (S/S) para começar a contar. A contagem recomeça
1. Tempo decorrido
automaticamente quando chegar a zero se não for parada premindo
Mostrador do cronógrafo
pressione
o botão (S/S).
• Quando o mostrador do cronómetro é seleccionado, o relógio mostrará
os seguintes itens:
Como recarregar o timer
2. Tempo decorrido cumulativo
• Com o cronómetro a correr: o tempo de volta actual e o tempo decorrido
• Para recarregar o timer para o seu valor inicial de partida enquanto
acumulado aparecem, respectivamente, na primeira e segunda linhas.
Parar o Mostrador
de Contagem
o timer está parado siga os passos descritos em 8.2.
NOTA: O tempo de volta e o tempo decorrido acumulado
serão iguais na primeira volta.
Som de alarme do timer
3. Tempos por volta
• Enquanto conta, o relógio emitirá um bip quando o timer chega aos
• Com o cronómetro parado: o tempo de volta actual e
1 e 0 segundos.
o número da volta aparecem na primeira linha e o
tempo decorrido acumulado aparece na segunda linha.
tempo
Mostrador
Mostrador
• Dentro do mostrador de volta: o número da volta
a Zero
de Contagem
actual e o tempo de volta são mostrados nas linhas
Mostrador de
Tempo decorrido, Cumulativo
Contagem
Tempo decorrido e Tempo por Volta
1 e 2, respectivamente.
7.1 Modo cronómetro –
Utilizar o cronómetro
8.4 Modo Timer Contagem Decrescente –
Utilizar o Multi-Timer
Como medir o tempo decorrido
• Dentro do Mostrador Zero, prima o botão (S/S) uma vez para
Como utilizar o Multi-Timer
pressione
começar a contar; prima o botão (S/S) de novo para parar a
• Para utilizar a função multi-timer que combina dois ou mais timers para
contagem.
medir o tempo decorrido em múltiplas fases é necessário definir o tempo
• O tempo decorrido entre os dois movimentos aparecerá na primeira
de início para cada timer.
linha do mostrador. Repita as operações acima descritas para
• Após ter definido o valor de início para o(s) timer(s) é preciso carregar
tempo
Tudo com o
decorrido
mostrador a zero
obter o tempo decorrido acumulado.
a sequência de contagem para ficar pronto a contar. Verifique o ponto
(para a
tempo
8.2 atrás para mais detalhes sobre como fazer esse carregamento.
contagem)
decorrido
(a contar)
Para medir o tempo de volta
Sequência de Contagem Multi-Timer
• Prima o botão (S/S) para começar a sequência de contagem. A função
* Se o Timer 1, 2, 3 ou 4 estiver defindo para
• Com o cronómetro a correr, prima o botão (L/R) para obter e ver
0:00 como valor de início, esse timer será excluído
Multi-timer iniciará a contagem com o timer 1 e assim por diante, de
da sequência de contagem.
o tempo de volta durante 5 segundos. No mostrador de volta o
acordo com o diagrama ao lado. Para parar a contagem volte a premir
número de volta actual e o tempo de volta aparecem nas primeira
o botão (S/S).
e segunda linhas do mostrador, respectivamente.
Confirmar o
Abortar o
• O relógio contará repetidamente se não for parado o timer premindo--
• Após 5 segundos o relógio voltará automaticamente ao mostrador
A contagem
processo de
processo de
se o botão (S/S).
Parar o Mostrador de
Mostrador
está parada
carrregar ou
carrregar ou
Contagem
Contagem
de contagem. Depois, o novo tempo de volta e tempo decorrido
repor o timer
repor o timer
pressione
Som de alarme do timer
5 segundos
acumulado aparecerão nas primeira e segunda linhas do mostrador,
respectivamente. Repita as operações acima descritas para obter
• Enquanto conta, o relógio emitirá um bip quando o timer chega aos 1
e 0 segundos.
número
outro tempo de volta.
pressione
de voltas
Como rever/repor o tempo de volta
Como recarregar/repor os valores de início
tempo por volta
• Com o cronómetro parado:
• Para recarregar/repor os valores de início com o timer em pausa siga
• Prima o botão (L/R) um a um para voltar a ver os tempos de volta
os passos para carregamento e reposição de acordo com o diagrama
Carregar os
Repor os
registados; ou
valores de início
Valores de Início
ao lado.
Mostrador do Tempo por Volta
• Mantenha o botão (L/R) pressionado durante 2 segundos para
limpar o tempo de volta e repor o mostrador a zeros.
8.0 Modo Timer Contagem Decrescente
– Mostrador do Timer Contagem Decrescente
9.0 Modo Tempo Duplo –
Modo Tempo Duplo
Modo Timer Contagem Decrescente
Modo Tempo Duplo
• Este relógio inclui 4 Timers de Contagem Decrescente. São eles o Timer 1, 2, 3 e 4.
• Pode usar um timer (Timer único) com funções normais de timer, mas a combinação de
• O relógio inclui uma função tempo duplo que mostra a hora de um
dois ou mais timers (Multi-timer) pode alargar a função do timer para medir o tempo decorrido
segundo fuso horário.
multi-faseado.
• Os dígitos dos segundos são os mesmos da hora actual.
• A unidade de medida destes timers é 1 segundo e o valor de início pode ser fixado a um
Tempo
Sequência de Contagem Multi-Timer
máximo de 23 horas, 59 minutos.
Tempo
duplo
* Se o Timer 1, 2, 3 ou 4 estiver defindo para
• Quando um timer está definido para 0:00 como valor de início, esse timer será excluído
duplo
(segundo)
Mostrador de tempo duplo
0:00 como valor de início, esse timer será
da sequência de contagem.
• Quando é seleccionado o mostrador de tempo duplo o segundo
excluído da sequência de contagem.
(hora)
• Quando o timer é activado o relógio contará repetidamente, a não ser que seja parado
Tempo
fuso horário (horas, minutos, segundos) é mostrado na segunda
premindo o botão (S/S).
duplo
linha do mostrador.
valor de início (hora, minuto)
• Durante a contagem, o relógio emitirá um único bip quando a contagem do timer chegar
(minuto)
aos últimos 1 e 0 segundos.
Modo Tempo Duplo
Timer Único e Multi-timer
• Quando utilizar o Timer único (um único timer) tem que excluir os outros timers da sequência
de contagem colocando-os a 0:00.
• Quando utilizar o Multi-timer, a sequência de contagem começa do timer 1 e assim
Mostrador Timer 1 Mostrador Timer 2
sucessivamente de acordo com o diagrama ao lado.
a contar tempo
Como seleccionar os diferentes mostradores dos timers
• Para seleccionar os diferentes mostradores de timer de contagem decrescente com o timer
desligado, prima o botão (L/R) um a um de acordo com o diagrama ao lado.
Mostrador Timer 3 Mostrador Timer 4
Modo Timer Contagem Decrescente
8.1 Modo Timer Contagem Decrescente – Acertar o Timer de Contagem Decrescente
9.1. Modo tempo duplo -
Acertar o Tempo Duplo
Como acertar o Timer de Contagem Decrescente
Para acertar o Tempo Duplo
• No Modo tempo Duplo mantenha pressionado o botão (M) durante 2
• Os parágrafos que se seguem mostram quais os procedimentos para
segundos para escolher o mostrador de acertar; os dígitos da hora
acertar o timer 1. Os outros timers acertam-se da mesma forma.
começarão a piscar.
Mostrador de Timer de Contagem
• Dentro do Mostrador do Timer 1 mantenha o botão (M) pressionado
Decrescente
durante 2 segundos para escolher o mostrador de acertar; os dígitos dos
Modo Tempo Duplo
• No mostrador de acertar, prima o botão (S/S) para seleccionar o item
minutos começarão a piscar.
• Dentro do mostrador de acertar, prima o botão (S/S) para mudar o item
pressione
a acertar segundo o diagrama à esquerda.
a acertar de acordo com o diagrama ao lado.
• Quando um dos itens a acertar (hora, minuto) estiver a piscar, prima
• Quando um dos itens (minuto, hora) estiver a piscar, prima o botão (L/R)
o botão (L/R) para mudar o valor. Mantenha pressionado o botão para
para mudar o número (mantenha o botão pressionado para mudar o
mudar os números a maior velocidade.
pressione
número mais rapidamente).
Aumentar
• Quando terminar de acertar prima o botão (M) uma vez para sair da
o número
minuto
• Quando terminar de acertar prima o botão (M) uma vez para sair do
função acertar. O relógio também sairá do mostrador de acertar se
mostrador de acertar. O relógio também sairá do mostrador de acertar
nenhuma tecla for activada durante 1 minuto.
se nenhuma tecla for activada durante 1 minuto.
Aumentar
o número
minuto
pressione
Aumentar
o número
hora
pressione
mais
rapidamente
Aumentar
o número
hora
Sequência para acertar
mais
rapidamente
Sequência para acertar
8.2 Modo Timer Contagem Decrescente – Carregar e repor o Timer de Contagem Decrescente
10.0 Especificações
Como carregar os timers
Modo Hora Actual
Timer com contagem decrescente
• Se já estabeleceu um valor de início para o(s) timer(s), tem que os
•Sistema de Tempo: AM, PM, Hora, minutos,
•Timer: 4 timers
carregar para a sequência de contagem antes de poder dar início à
segundos
•Resolução: 1 segundo
contagem.
•Formato de tempo: 12 horas ou 24 horas
•Alcance de medição: 23 horas, 59 minutos
Mostrador de Timer de
• Para carregar o(s) timer(s) para a sequência de contagem, dentro do
Contagem Decrescente
•Calendário: Mês, data e dia da semana
•Sons do timer: 1 bip quando o timer chega
Contagem Parada
mostrador do Timer mantenha pressionado o botão (L/R) (com o timer
(função de calendário automático para
aos últimos 1 e 0 segundos
parado) até que apareça a indicação ‘Ld ALL’, de acordo com o diagrama
pressione
anos bissextos e dia da semana)
ao lado.
Modo contador de passos
• Quando aparecer a indicação ‘Ld ALL’ prima (M) ou (L/R) para confirmar
Modo Alarme
•Alcance: 40 bpm a 180 bpm
ou abortar o processo.
• Quando o mostrador do timer reaparece depois de carregar o(s) timer(s)
•Alarme diário e sinal horário sonoro
•Passo: 5 bpm
carregue o(s)
timer(s) na
Confirmar o
sequência de
está pronto para contar.
•Som do alarme: 20 segundos
processo
contagem
Tempo Duplo
de carrregar
ou repor o
Como repor os timers
Modo Cronómetro
•Sistema de tempo: AM, PM, Hora, minuto, segundos
timer
pressione
• Enquanto é mostrada a indicação ‘Ld ALL’, mantenha pressionado o
•Resolução: 1/100 segundos
botão (L/R) até aparecer a indicação 'cLR ALL' de acordo com o diagrama
•Alcance de medição: 9 horas, 59 minutos
Luz atrás
ao lado.
Abortar o
• Quando aparecer a indicação 'cLR ALL' pressione (M) ou (L/R) para
e 59.99 segundos.
•Tipo de luz: Luz electro-luminescente (EL) atrás
processo de
repor todos
•Memória de volta: 50 memórias
carrregar
os valores
confirmar ou abortar.
ou repor o
de início a
Resistência à água
timer
zero
• Quando o timer é reposto todos os valores de início ficam em 0:00.
•Resistência: 50M
Sequência para acertar

5.0 Ежедневный режим сигнала тревоги - ежедневный режим сигнала тревоги
Секундомер 50 ВНАПУСКОВ
+ Ежедневный режим сигнала тревоги
current time
(hour, minute)
+ Этот вахта включает ежедневную функцию сигнала тревоги на
текущий момент времени.
alarm time
+ Когда ежедневный сигнал тревоги ДАЛЬШЕ, вахта beep на 20
1.0 Введение
(hour, minute)
секунд на изо дня в день продолжительности подачи сигнала.
+ Ежедневный дисплей сигнала тревоги
+ Вы для закупать этого вахты.
Daily Alarm OFF
+ Когда ежедневный режим сигнала тревоги будет выбран, вахта
+ Этот вахта обеспечивает текущий момент времени, ежедневный сигнал тревоги, хронограф, отметчик
покажет следующие пункты на дисплее:
времени комплекса предпусковых операций, лидер и двойную функцию времени.
+ Текущий момент времени (час, минута) показан на 1-ом рядке
+ В дополнение к нормальной функции timekeeping, этот вахта включает 2 специальных характеристики,
[L/R]
дисплея.
они вахта лидера и функция multi-отметчика времени.
+ Ежедневная продолжительность подачи сигнала (час, минута)
+
Вахту лидера который совмещает хронограф и функцию лидера совместно, следовательно 2 функции
можно активировать в тоже время. Пока multi-отметчик времени который совмещает два или больше
показана на 2-ом рядке дисплея.
отметчики времени совместно для того чтобы расширить функцию времени к времени elapse измерения
+ Установить ежедневный сигнал тревоги ВКЛЮЧЕНО-
многофазовому.
ВЫКЛЮЧЕНО
+
Уверено тщательно прочитать это руководство и сдержать его в наличии для более последней справки
+ Для того чтобы установить ежедневный сигнал тревоги
когда необходимо.
daily alarm
ДАЛЬШЕ и, отожмите кнопку [L/R] в ежедневном дисплее
+
Для того чтобы получить большую часть из вашей покупкы, целесообразно использовать этот вахту в
indicator
сигнала тревоги.
соответствии с внизу примечаниями:
+ Когда ежедневный индикатор '
‘ , появлен ежедневный
+
Во избежание подвергнуть действию вахта к весьма условиям на неразумное время.
Daily Alarm ON
сигнал тревоги ДАЛЬШЕ.
+
Во избежание грубые пользы или строгие удары к вахте.
+ Испытать ежедневный звук сигнала тревоги
+
Не будет раскрывать случай вахты если аттестованное агенство обслуживания.
Daily Alarm Display
+ Для того чтобы испытать звук сигнала тревоги, держите вниз
+
Очищайте вахту изредка с нежностью и увлажненной тканью.
кнопку [S/S] в ежедневном дисплее сигнала тревоги. Вахта
beep покуда кнопка владение.
+ Храньте
вахта в сухом месте когда нет внутри пользы в течение длительного времени.
2.0 Кнопка и своя функция
5.1 Ежедневный режим сигна ла тревоги - устанавливать ежедневный сигнал тревоги
Кнопка режима [m]
Как установить ежедневный сигнал тревоги
+ Выбрать среди тек ущего момента времени, ежедневного
сигнала тревоги, лидера, хронографа, отметчика времени и
+ Для того чтобы выбрать дисплей установки, держите
двойного режима времени.
вниз кнопку [РЕЖИМА] на 2 секунды в ежедневном
+ Выбрать дисплей устан овк и.
режиме сигнала тревоги, и после этого ' minute' числа
Кнопка старта/стопа [S/S]
начнут блеснуть.
[S/S][L/R] [M]
+ Выбрать среди деталей установки во время дисплея
Daily Alarm Display
+ В дисплее уста нов ки , отож м и т е кнопку [S/S] для того
установки.
hold [M]
[M]
чтобы двинуть проблескивать после смежной
+ Для того чтобы переключить между 12 и 24 часами
форматируйте.
диаграммы, котор нужно выбрать среди различных
+ Активировать ' start' или ' stop' фун кци я во время режима
[L/R]
установок.
хронографа и режима от метчика времени.
Increase
+ Во время одно й из установок (минуты, часа)
Кнопка внапуска/возврата [L/R]
the number
minute
проблескивает, ото ж м и те кнопку [L/R] для того чтобы
+ Осмотр еть и активировать ' lap' или ' reset' функция во время
изменить номер; держите вниз кнопку [L/R] для того
режима хронографа.
+ Выбрать между различными дисплеями отметчик а времени.
hold [L/R]
[S/S]
чтобы изменить номер на более высокой ск орости.
Нагрузить или освободить начиная значение для отметчиков
+ Когда установка завершена, отожми те кнопку [m] раз
времени.
increase
the number
hour
для того чтобы выйти дисплей установки. Вахта та кже
+ Активировать ' start' или ' stop' Функция лидера во время
at a higher
выйдет дисплей установки если НИКАК ключ-
DISPLAY
режима лидера.
speed
погладьте рук ой ак тивирует на 1 минута.
+ Установить всечасную функци ю перезвона включено-
Setting Sequence
выключено.
+ Увеличить числа во время дисплея установки.
3.0 Главны е режимы функции
6.0 Режи м лидера - дисплей лидера
Ре жим лидера
pacer
+ Этот вахта включает функ цию лидера которые
beeping rate
производят регулярн beeps на предопределенном
(in beats
тарифе. Что предопределенный тариф можно
[M]
[M]
per minute)
установить внутри в ряд от 40 до 180 ударов согласно
Pacer Display
с минута (bpm).
+ Лидер будет звучать больше beeps в пределах минуты
для более высок ой установки тарифа bpm (например
Current Time Mode
Daily Alarm Mode
Pacer Mode
30 beeps
30 beeps
30 beeps
80) чем более низкая
установка тарифа bpm
(например 30).
[M]
[M]
Beep
Beep
Beep
Дисплей лидера
0
1
2
3
minute(s)
start
+ Когда дисплей лидера выбран, beeping тариф показан
[M]
[M]
Example 1: Set 30 as the Pacer Beeping Rate .
на 2-ом ря дк е дисплея.
Как использовать лидер
80 beeps
80 beeps
80 beeps
+ Когда лидер был ус тановлен с beeping та рифо м,
Beep
Beep
Beep
например bpm 65, отжим а ет кнопку [L/R] раз буд ет
Dual Time Mode
Countdown Time r Mode
Chronograph Mode
начинать beeping.
0
1
2
3
minute(s)
start
+ Во время ва хты beeping, отожм и т е кнопку [L/R] еще
Example 2: Set 80 as the Pacer Beeping Rate.
раз для того чтобы остановить
beeping.
4.0 тек у щ и х моментов времени - дисплей текущего момента времени
6.1 Режи м лидера - устанавливать тариф лидера Beeping
day of
week
date
Дисплей текущего момен та времени
Установить тариф лидера Beeping
(day, month)
AM/PM
+
Когда режим тек ущего момента времени будет выбран, ва хта
indicator
покажет следующие пункты на дисплее:
+
Для того чтобы выбрать дисплей установки, держите вниз
current
кнопку [m] на 2 секунды в дисплее лидера, и после этого
time
+
День недели и дата теку щего момента времени показаны на 1-ом
beeping числа тарифа начнут блеснуть.
12 hours Display
рядке дисплея.
Chime OFF
+
+
Текущий момент времени (час, минута, второе) показан на 2-ом
В дисплее установки, от ожмите кнопку [L/R] для того чтобы
hold [S/S]
рядке дисплея.
Pacer Display
изменить номер; держите вниз кнопку для того чтобы
[M]
изменить номер на более высок ой скорости.
date
Как переключить между 12 и 24 формами часа
hold [M]
(month, day)
+
+
Для того
чтобы переключить между 12 и 24 формами часа,
Когда установка завершена, отожмите кнопку [m] раз для
отожмите кнопку [S/S] после смежной диаграммы.
[L/R]
того чтобы выйти дисплей установки. Вахта также выйдет
дисплей установ ки если НИКАК ключ-погладьте рук ой
Как переключить между Месяц-днем и формо й месяца дня
Increase
12 hours Display
активирует на 1 минута.
Chime OFF
hourly
+
Для то го чтобы переключить между месяц-днем и формой дн-
the number
40
[S/S]
[L/R]
chime
месяца, держите вниз кнопку [S/S] после смежной диаграммы.
indicator
Установить всечасный перезвон ВКЛЮЧЕНО-ВЫКЛЮЧЕНО
5 bpm
hold [L/R]
per step
+
Для того чтобы устан ови ть всечасный перезвон между включено-
increase
выключено, отожмите кнопк у [L/R] после смежной диаграммы.
the number
180
+
Когда индикатор ' перезвона; ‘ появлен на дисплей, перезвон
at a higher
ДАЛЬШЕ. Во время всечасного перезвона ДА ЛЬШЕ, вахта будет
speed
звучать ' beep beep' каждый час на часе (например 1:00 00, 2:00
Setting Sequence
24 hours Display
Hourly chime ON
00, 3:00 00)
4.1 тек у щ и х моментов времени - устанавливать текущий момент времени
6.2 Режи м лидера - используя вахту как вах т а лидера
Как установить текущий моме нт времени
Как использовать ва хт у как вахта лидера
+ Для то го чтобы выбрать дисплей установки, держите
[L/R]
65 beeps/
+ Для использования ва хты как лидер наблюдайте
вниз кнопку [m] на 2 секунды в режиме теку щего
minute
после внизу шагов:
момента времени, и после этого ' Second' числа
Beep
Current Time Mode
начнут блеснуть.
+ Когда дисплей лидера выбран, отожм и т е [L/R] для
Pacer Mode
Pacer Mode
того чтобы повернуть дальше фун кци ю лидера.
hold [M]
[M]
+ В дисплее ус тано вки , отожм и т е кнопку [S/S] для то го
Pacer OFF
Pacer ON
чтобы двинуть проблескивать после смежной
[M]
+ Когда функция лидера дальше, отож м и те кнопку [m]
для того чтобы переключить дисплей к режиму
[S/S]
диаграммы, котор нужно выбрать среди различных
установок.
хронографа, и после этого от ож м и т е кнопк у [S/S]
second
day
раз начнет
функцию лидера и хронографа в тоже
[L/R]
+ Во время одной из установок (минуты, часа, года,
время.
месяца, дня) проблескивает, отожмите кнопку [L/R]
Increase
[S/S] [S/S]
для того чтобы изменить номер (держите вниз кнопку
+ После это го вахта будет стал вахтой лидера
Chronograph Mode
the number
для того чтобы изменить номер на более высок ой
который хронограф подсчитывает и лидер beeping
stop
[S/S]
minute month
скорости).
на предопределенном тарифе.
counting
counting
hold [L/R]
+ Когда вторые числа начинают блеснуть, ото ж м и те
+ Во время лидера вахта подсчитывающ и beeping,
[S/S]
65 beeps/
increase
кнопку [L/R] для того чтобы установить их на нуль.
отожмите кнопку [S/S] раз остановит beeping и
[S/S] [S/S]
minute
the number
Beep
подсчитывать.
at a higher
[S/S]
+ Когда установка
завершена, ото ж м и те кнопк у [m] раз
speed
hour
year
для того чтобы выйти дисплей устано вки . Вахта
Chronograph Mode
Chronograph Mode
также выйдет дисплей устано вки если НИКАК ключ-
Pacer Watch Stopped
Pacer Watch Started
Setting Sequence
погладьте рук ой активирует на 1 минута.
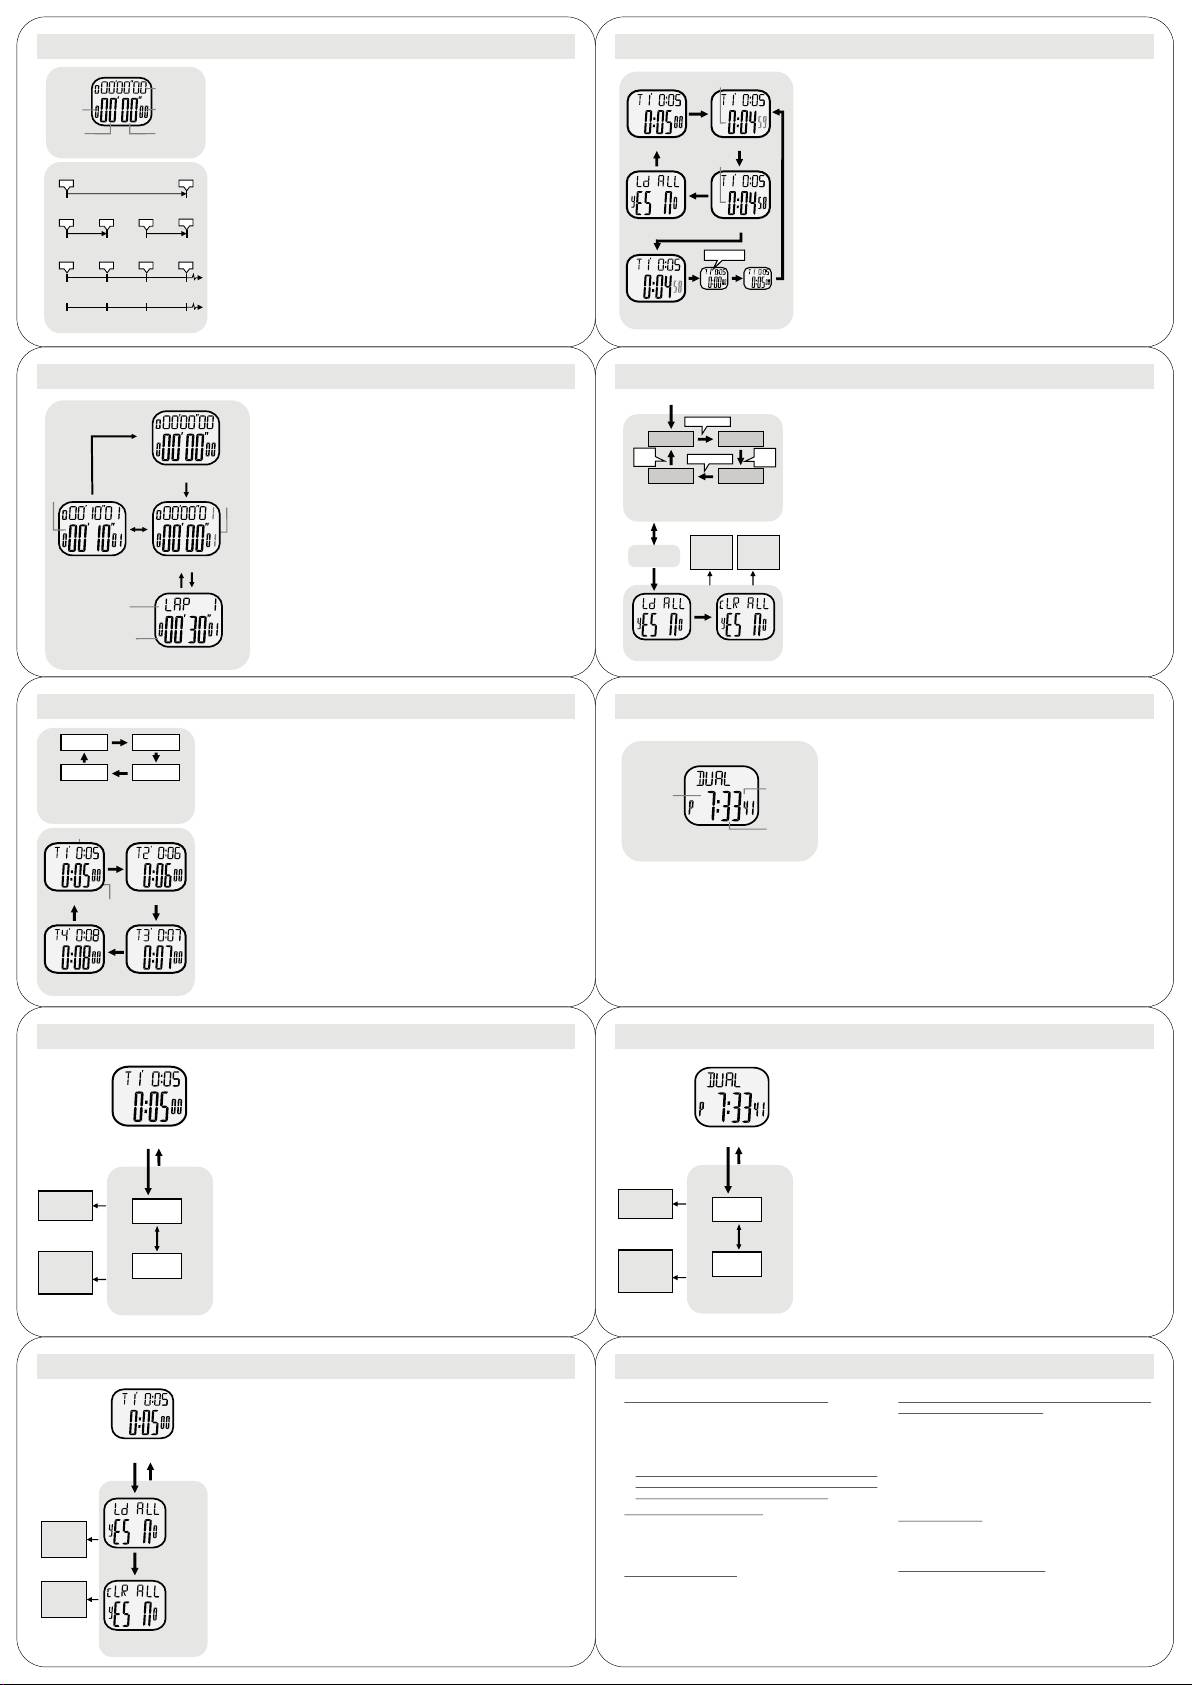
8.3 Режим отметчика времени комплекса предпусковых операций -
7.0 Режи м хронографа - режим хронографа
используя одиночный отметчик времени
current lap
Режим хронографа
Как использовать одиночный отметчик времени
running time
counting
+ Этот вахта включает функцию секундомера которая измеряет:
accumulative
+ При использовании од но го от метч ик а времени только
running time
accumulative
+ Истекшее време, аккумулятивное истекшее време
(hour)
running time
[S/S]
(одиночный отметчик времени), исключает другие
(1/100 second)
(многофазовое истекшее време) и время внапуска (получите
отметчики времени путем устана вливать их начиная
accumulative
accumulate
истекшее време без останавливать подсчитывать).
значения к 0:00.
running time
running time
(minute)
(second)
+ Измеряя емк ость хронографа:
+ Как тольк о начиная значение было установлено для
Chronograph Display
+
Измеряя блок: 1/100 вторых,
Timer 1 Display
Counting Display
'All Zero'
последнего отметч и ка времени, его необходимо нагрузить
+
Измеряя ряд: 9 часов, 59 минут и 59.99 второго ,
[M]
stop
counting
[S/S]
в подсчитывая последовательность прежде чем оно гото в о
8.2 для
1. Elapsed time
+
Память внапуска: мак симум 50 внапусков.
для подсчитывать. Проверите предыдущую главу
больше детали на как нагрузить начиная значение в
300
Дисплей хронографа
hold
[L/R]
подсчитывая последовательность.
+ Когда
дисплей хронографа буд ет выбран, ва хта пок ажет
[S/S]
[S/S]
+ Отожмите кнопку [S/S] для того чтобы начать
следующие пункты на дисплее:
2. Accumulative elapsed time
подсчитывать. Подсчитывать будет повторен старт
+ Во время хронографа подсчитывает: Настоящее время внапуска
10010
20
автоматически когда оно достигает нул если подсчитывать
и аккумулятивное истекшее време показаны на 1-ом и 2-ом
Stop Counting Display
[S/S]
не остановлен путем отжи м ат ь кнопку [S/S].
[S/S]
[S/S]
[S/S] [S/S]
рядке соответственно. ПРИМЕЧАНИЕ: Настоящее время
Как перезарядить отметчик времени
3. Lap times
внапуска будет эт и м же как аккумулятивное истекшее време на
внапуск 1.
beep, beep
+ Остановлен, выполняет перезарядить отм етч и к времени к
10 10100
своему первоначально начиная
значению во время
lap 1lap 2lap 3
+ Во время хронографа останавливает: Настоящие время
отмет ч и ка времени процесс нагрузки после предыдущей
[S/S]
[L/R] [L/R] [L/R]
внапуска и
номер внапуска показаны на 1-ом рядке, и
главы 8.2.
аккумулятивное истекшее време показано на 2-ом рядке.
0102030
Звук сигнала тревоги отметчика времени
time
+ Во время внапуска дисплей показывает: Настоящий номер
Zero Display
Counting
Display
+ Во время подсчитывать, вахта буд ет beep раз когда
Elapsed time, Accumulative
внапуска и время внапуска пок азаны на 1-ом и 2-ом рядке
Counting Display
отмет ч и к времени подсчитает к последнее 1 и 0 вторых.
Elapsed time and Lap time
соответственно.
8.4 Режим отметчика времени комплекса предпусковых операций
7.1 Режи м хронографа - используя хронограф
- используя multi-Tmer
Как измерить время Elapse
[S/S]
Как использовать Multi-Отметчик времени
+ Во время ' Все Zero' Дисплей, отжимает кнопку [S/S] раз будет
beep, beep
+ Для использования функции Multi-Отметчик а времени которая
hold [L/R]
начинать подсчитывать, и отжимает кнопку [S/S] снова будет
совмещает два или больше отметчики времени для то го чтобы
останавливать подсчитывать.
Timer 1*
Timer 2*
измерить время elapse multi-участков, она должно установить
начиная значение для каждого отметчика времени.
+ Истекшее време между вышеуказанные 2 ключ-гладит рукой
beep,
beep,
будет показано на 1-ом ря дке дисплея. Повторите
beep
beep, beep
beep
+ Как тольк о начиная значение было установл ено для отметчиков
elapsed
All Zero Display
вышеуказанные ключевые деятельности для того чтобы
времени, их необходимо нагрузить в подсчитывая
time
получить аккумулятивное истекшее време.
Timer 4*
Timer 3*
elapsed
последовательность прежде чем она
готова для подсчитывать.
(stop
[S/S]
time
Проверите предыдущую главу 8.2 для больше детали на как
counting)
Как получить время внапуска
Multi-Timer Counting Sequence
(counting)
нагрузить отметчик времени в подсчитывая последовательность.
+ Когда хронограф подсчитывает, отожмите кнопку [L/R] для того
D
If timer 1, 2, 3 or 4 which set 0:00 as the
чтобы получить и осмотреть дисплей внапуска на 5 секунд. В
starting value, that timer will be
+ Отжимать кнопку [S/S] начнет подсчитывая последовательность.
[S/S]
дисплее внапуск а, настоящие номер внапуск а и время
excluded from the counting sequence.
Multi-Отметчики времени завещают старты подсчитывать от
внапуска появятся на 1-ый и 2-ой рядок дисплея
соответственно.
[S/S]
отмет чик а времени 1 к другим отметчикам времени после
смежной диаграммы. Отжимать кнопку [S/S] еще раз будет
Confirm
Abort
+ После 5 секунд, вахта возвратит к подсчитывать дисплей
останавливать подсчитывать.
автоматически. После это го новое время внапуска
и
The counting
the loading
the loading
or
or
+ Вахта подсчитает repeatingly
если он не остановлен путем
Stop Counting Display
Counting Display
аккумулятивное истекшее време будут показаны на 1-ом и 2-
is stopped
resetting
resetting
отжимать кнопк у [S/S].
ом рядке дисплея соответственно. Повторите вышеуказанные
[L/R]
hold [L/R]
5 seconds
ключевые деятельности для того чтобы получить другое время
[M]
[L/R]
Звук сигнала тревоги отметчика времени
внапуска.
+ Во время подсчитывать, вахта будет beep раз когда отметчик
hold
времени подсчитает к последнее 1 и 0 вторых.
lap
Как вспомнить/переустановил время внапуска
+ Во время хронографа останавливает:
[L/R]
Как перезарядить/переустановил начиная значения
number
+
Отожмите кнопку [L/R] по-одному для того чтобы
+ Сделаны паузу, выполняют перезарядить или переустановить
рассмотреть записанные времена внапуска, или
начиная значения во время отметчика времени нагрузку или
lap time
процесс переустановить который
упомянул в смежной диаграмме
+
Держите вниз кнопку [L/R] на около
2 секунды для того
Load the
Reset the
для того чтобы перезарядить или переустановить начиная Вейл.
Lap Time Display
чтобы освободить время внапуска, и переустан ови ть
Starting Values
Starting Values
дисплей к ' Все Zero' дисплей.
8.0 Режим отметчика времени комплекса предпусковых операций -
дисплей отметчика времени комплекса предпусковых операций
9.0 Двойной режим времени - двойной режим времени
Timer 1*
Timer 2*
Режим отметчика времени комплекса предпусковых операций
+
Этот вахта включает 4 отметчика времени комплекса предпусковых
Двойной режим времени
операций. Они отметчик времени 1, 2, 3 и 4. Используя один отметчик
Timer 4*
времени (одиночный отметчик времени) который может побежать
+ Этот вахта включает двойное время которые
Timer 3*
нормальная функция отметчика времени. Но совме щает два или
показывают что тек ущи й момент времени the second
Multi-Timer Counting Sequence
больше отметчики времени (Multi-Отметчик времени) смогите
dual time
расширить функцию отметчика времени к времени elapse измерения
dual time
(second)
time разделяет на зоны.
D
If Timer 1, 2, 3 or 4 which set 0:00 as the
многофазовому.
(hour)
starting value, that timer will be excluded
+
+ Вторые числа такие же как оди н из тек уще го момента
from the counting sequence.
Блок измерения этих отметчи ков времени 1 второе, и начиная значение
этих отметчиков времени можно setup к максимуму 23 часов и 59 минут.
времени.
+
dual time
starting value (hour, mintue)
Когда отметчик времени который установил 0:00 как начиная значение,
(minute)
Двойной дисплей времени
тот отметчик времени будет исключен от подсчитывая
Dual Time Mode
последовательности.
[L/R]
+ Когда двойной дисплей времени выбран, двойное
+
Когда отметчик времени будет начат, вахта подсчитает repeatingly если
он не остановлен путем отжимать кнопку [S/S]. Во время подсчитывать,
время (час, минута, второе) показано на 2-ом рядке
вахта будет beep раз когда отметчик времени подсчитает к последнее 1
дисплея.
и 0 вторых
Timer 1 Display Timer 2 Display
Одиночные отметчик времени и Multi-Отметчик времени
counting
+
При испол ьзовании одиночного отметчика времени (одного отметчика
time
[L/R][L/R]
времени), оно исключает другие отметчики времени от подсчитывая
последовательности
путем устан авливать их начиная значение к 0:00.
+
При использовании Multi-Отметчика времени, оно подсчитывает на
[L/R]
последовательности которая начинает подсчитывать от отметчика
времени 1 к другим отметчикам времени после смежной диаграммы.
Как выбрать различный дисплей отметчика времени
+
Для того чтобы выбрат ь различный отметчик времени к омплекса
Timer 4 Display Timer 3 Display
предпусковых операций дисплей во время отметч ик а времени
Countdown Timer Mode
остановлен, отожмите кнопку [L/R] по-одному после смежной
диаграммы.
8.1 Режим отметчика времени комплекса предпусковых операций -
9.1Когда двойной дисплей времени выбран, двойное время
устанавливать отметчик времени комплекса предпусковых операций
(час, минута, второе) показано на 2-ом рядке дисплея.
Как установить отметчик времени комплекса
Установить двойное время
предпусковых операций
+ Для того чтобы выбрать дисплей установки, держите вниз
+ Следующие параграфы проиллюстрируют процедуру для
кнопку [m] на 2 секунды в двойном режиме времени, и
устанавливать отметчик времени 1. Даже так,
после это го ' Minute' числа начинают блеснуть.
устанавливать другие от м ет ч и к и времени будет р а ботать на
Countdown Time r Display
подобной процедуре.
Dual Time Mode
+ В дисплее установки, от ож м и т е кнопк у [S/S] для того чтобы
выбрать проблескивать (деталь установки) как пок азано в
hold [M]
[M]
+ Для того чтобы выбрать дисплей установки, держите вниз
hold [M]
[M]
диаграмме.
кнопку [m] на 2 секунды в дисплее отмет ч и ка времени 1, и
+ Когда одна из ус тано вок (минуты,
часа) проблескивает,
после это го ' Minute' числа
начинают блеснуть на дисплее.
[L/R]
[L/R]
отожмите кнопку [L/R] для то го чтобы изменить номер;
+ В дисплее устан овк и, отожм и т е кнопку [S/S] для того чтобы
держите вниз кнопк у для того чтобы изменить номер на
Increase
Increase
двинуть проблескивать после смежной диаграммы, котор
более высокой скорости.
the number
minute
the number
minute
нужно выбрать среди различных установок.
+ Когда установ к а завершена, отожми т е кнопку [m] раз для
+ Когда од н а из ус тано вок (минуты, часа) проблескивает,
того чтобы выйти дисплей установки. Вахта также выйдет
hold [L/R]
[S/S]
отожм и т е кнопк у [L/R] для того чтобы изменить номер
hold [L/R]
[S/S]
дисплей установ ки если НИКАК ключ-погладьте руко й
increase
(держите вниз кнопк у для того чтобы изменить номер на
increase
активирует на 1 минута.
the number
hour
более высокой
скорости).
the number
hour
at a higher
at a higher
speed
+ Когда установка завершена, ото ж м и те кнопку [m] раз для
speed
Setting Sequence
того чтобы выйти дисплей установки. Вахта также выйдет
Setting Sequence
дисплей устано вки если НИКАК ключ-погладьте рук ой
активирует на 1 минута.
8.2 Режим отметчика времени комплекса предпусковых операций -
нагрузка и переустановить отметчик времени
10.0 Спецификации
Как нагрузить отметчики времени
Ре жим текущего мом ен та времени
Отметчик времени комплекса
+ Если начиная значение было установлено для отмет ч и ков
предпусковых операций
+ Система времени: AM, PM, час, минута,
времени, то их необходимо нагрузить в подсчитывая
второе
+ Отметчик времени: 4 отмет ч и ка времени
последовательность прежде чем она готова для
Countdown Timer Display
подсчитывать.
+ Форма времени: 12 часа или 24-часовой
+ Разрешение: 1 второе
Stop Counting
+ Для того чтобы нагрузить отм етч и к и времени в подсчитывать
форма
hold
+ Измеряя ряд : 23 часов 59 минут
[L/R]
[L/R]
последовательность, не будет держать вниз кнопку [L/R] в
+ Календар: Месяц, дата и день дисплея
дисплее отмет чик а времени (когда отметч ик времени
остановлен) до '
Ld ALL' индикатор появился после смежной
недели (функции Автоматическ-Календара
+ Звуки отметч ик а времени: вахта будет
диаграммы.
на високосный год и день недели)
beep раз когда отметчик времени
load the
подсчитает к последнее 1 и 0 вторых.
[M]
timer(s)
+ Когда ' Ld ALL' индикатор появлен, отжимает [m] или [L/R]
Режим сигнала тревоги
Ре жим лидера
Confirm
into the
для того чтобы подтвердить или выкинуть нагрузку.
the loading
counting
+ Ежедневный сигнал тревоги и всечасный
or
sequence
+ Если дисплей от м етч и ка времени воз вра щен после нагрузки,
перезвон
+ Ряд установки: bpm 40 к bpm 180
resetting
то от м етчик времени гото в подсчитать.
hold
+ Звук сигнала тревоги: 20 секунд
+ Шаг ус тано вки : bpm 5
[L/R]
Как переустановить отметчики времени
Двойной режим
времени
[L/R]
+ Во время ' Ld ALL' индикатор не появлен, держит вниз кнопк у
Ре жим хронографа
Abort
[L/R] до ' cLR ALL' индикатор появился после смежной
+ Разрешение: 1/100
вторых
+ Система времени: AM, PM, час, минута,
the loading
reset all
or
starting
диаграммы.
второе
resetting
values
+ Измеряя ряд: 9 час ов 59 рассчитают
to zero
+ Когда ' cLR ALL' индикатор появлен, от ж и м а ет [m] или [L/R]
поминутно 59.99 сек унды
для того чтобы подтвердить или выкинуть переустановить.
+ Если отм етч и к времени был переуста новле н, то вс е начиная
+ Память внапуск а: памяти 50 внапусков
Setting Sequence
значения буду т переустановлены к 0:00.
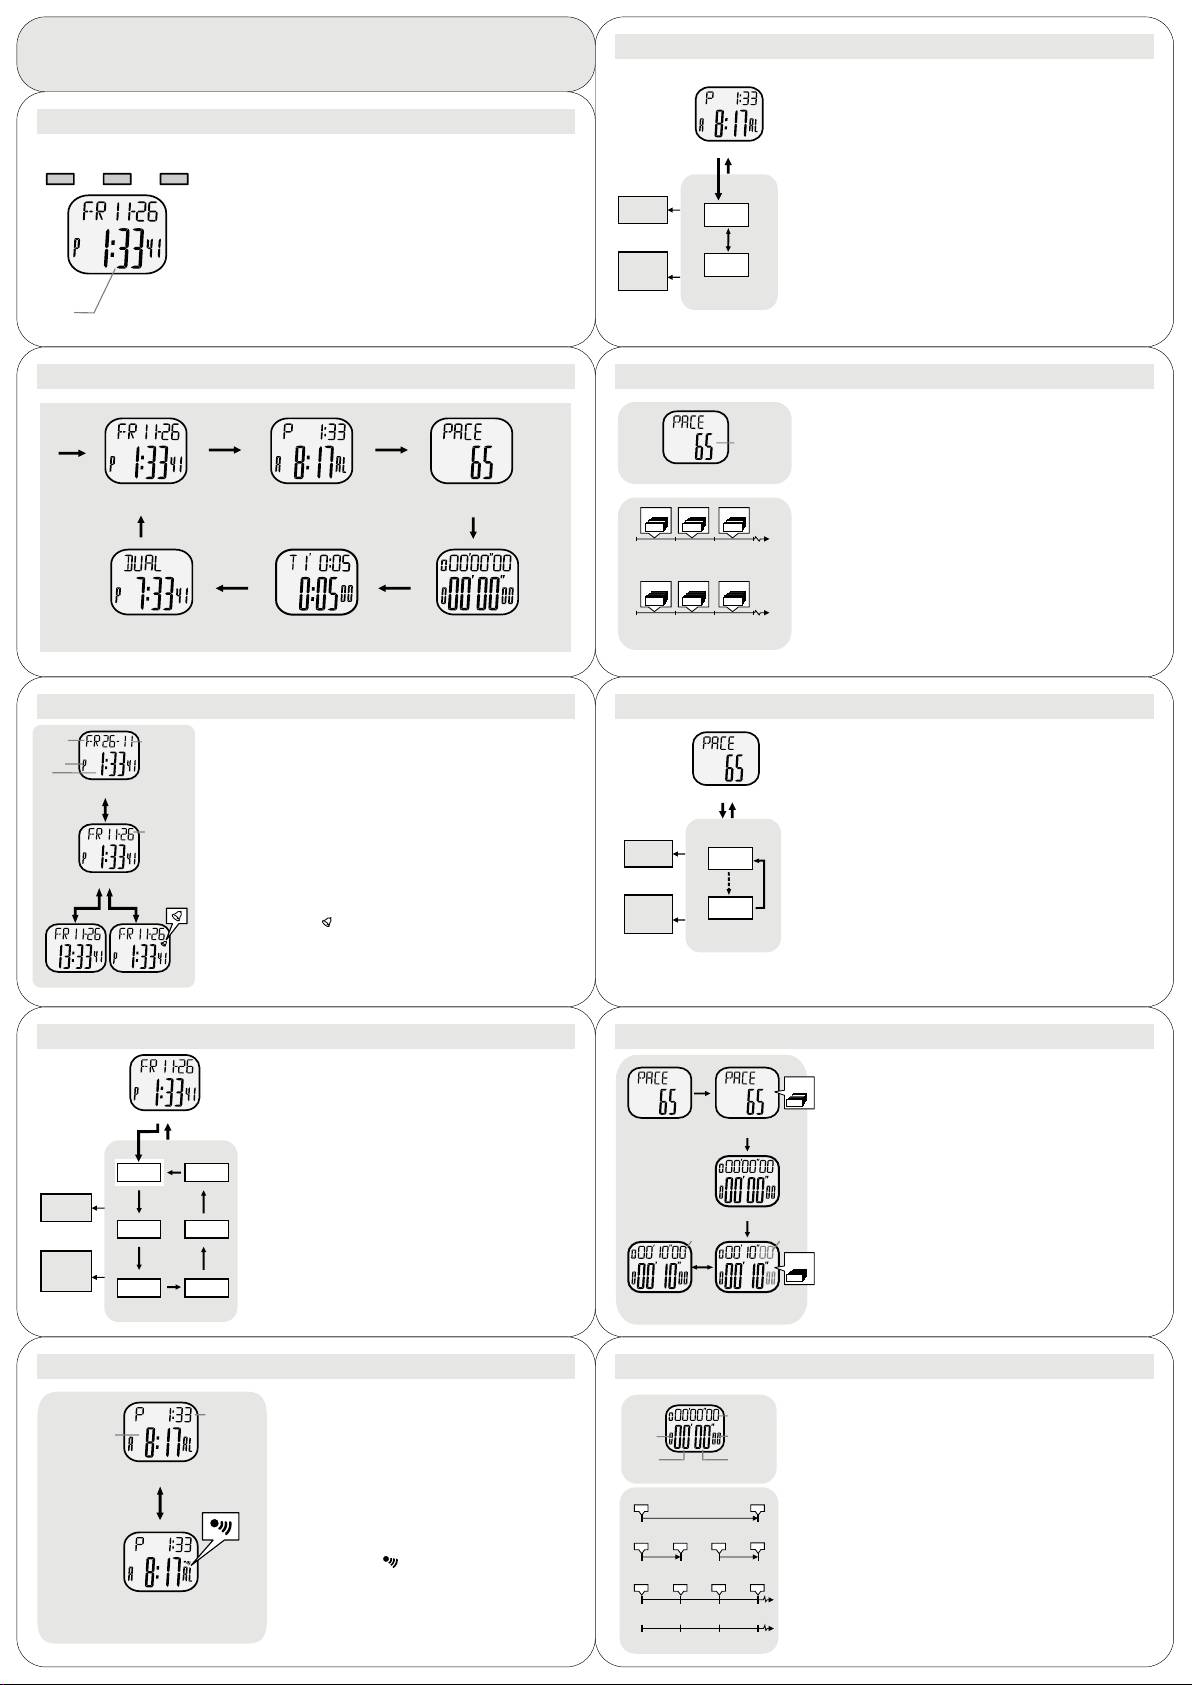
4.1 每日响闹模式设置每日响闹时间
50 LAP Stopwatch
如何设置每日响闹时间
+ 在每日响闹模式下,按住[M]键2秒,“分”字符开始闪动,进入每日响闹时间
设置.
1.0 按制及其功能
+ 显示设置中,按如图所示,按[S/S]键选择不同的设置。
模式[M]
+ 当分,时字符闪动时,按[L/R]键改变数值,按住此键可快速改变数值。
Alarma diaria de pantalla
+ 当前时间模式、每日响闹模式、步测模式、跑秒模式、倒计时模式和异地时
+ 当设置完成后,按[M]键退出设置模式。如果1分钟内没有任何按制操作,系
[S/S][L/R] [M]
间模式。
hold [M]
[M]
统也将会自动退出设置模式
+ 可进入设置显示项目。
[L/R]
开启/关闭[S/S]
+ 在显示设置中选择所要设置的项目。
Aumentar
+ 可在12小时制和24小时制之间进行转换。
el número
minute
+ 在跑秒模式和倒计时模式下,开启或关闭跑秒及倒计时功能。
hold [L/R]
[S/S]
分圈/复位[L/R]
+ 在跑秒模式下,可查看跑秒时间,可进行跑秒的分圈及复位跑秒时间。
increase
the number
hour
+ 可在多组倒计时显示中任意选择。可设置和复位倒计时时间。
at a higher
+ 在步测模式下,开启/关闭步测功能。
+ 可开启/关闭整点响闹功能。
Secuencia de ajuste
+ 在设置模式中,按此键可使数值增加。
DISPLAY
注:以上为按制大概操作方法,请继续阅读以下章节了解更详细的操作内容。
2.0 主要功能模式
5.0 步测模式步测显示
步测模式
PACER pitido
+ 此款表有步测功能,根据预先设置的频率会发出嘀嘀声。预设定频率可
[M]
[M]
tasa (en
以在40bpm到180bpm之间设定。
tiempos por
minuto)
+ 当设置为较高频率时(比如80bpm),步测每分钟内发出的响声将会比低
频率(比如30bpm)多。
Mostrar Pacer
步测显示
当前时间模式
每日响闹模式 步测模式
+ 步测显示模式时,步测频率将会在屏幕的第二行显示。
30 beeps
30 beeps
30 beeps
[M]
[M]
Beep
Beep
Beep
如何使用步测
0
1
2
3
minuto (s)
+ 当已设置了步测频率后,比如65bpm,按[L/R]键一次可开始步测。
start
Ejemplo 1: Establecer 30 como la Tasa de Pacer pitido.
+ 步测过程中,按[L/R]键可停止步测。
[M]
[M]
80 beeps
80 beeps
80 beeps
Beep
Beep
Beep
0
1
2
3
minuto (s)
异地时间模式 倒计时模式 跑秒模式
start
Ejemplo 2: Conjunto de 80 como la Tasa de Pacer pitido.
3.0 当前时间模式显示当前时间
5.1 步测模式设置步测频率
Día de la
semana
Fecha
当前时间显示
如何设置步测频率
(día, mes)
Indicador de
+ 在当前时间模式下,有以下项目显示:
+
在步测模式下,按住[M]键2秒,步测频率将会闪动。
AM / PM
+ 显示屏第一行显示当前的星期和日期。
Hora
+
设置模式下,按[L/R]键改变数值,按住此键可快速改变数值。
actual
第二行显示为当前时间(小时,分,秒)。
Enseñar 12 horas BEEP OFF
+
当设置完成后,按[M]键一次可退出设置模式。如果1分钟内没有任何按
Mostrar Pacer
Pulse [SS] y presione
如何进行12小时制/24小时制的转换
制操作,系统也将会自动退出设置模式。
hold [M]
[M]
+ 按照如图所示,按[S/S]键进行12小时制/24小时制的转换。
Fecha
(día, mes)
[L/R]
如何进行月-日/日-月显示格式的转换
Aumentar
+ 按照如图所示,按住[S/S]键进行月-日/日-月格式的转换。
el número
40
Enseñar 12 horas BEEP OFF
por hora
整点响闹的开启/关闭设置
5 bpm
hold [L/R]
per step
[S/S]
[L/R]
Carillón
indicador
+ 按照如图所示,按[L/R]键可开启/关闭整点响闹。
aumentar el
+ 当有整点响闹符号“ ”显示时,说明已经开启整点响闹。手表将
número a
180
un mayor
会在整点发出“嘀嘀”声响(例如:1:00,2:00,3:00)
velocidad
Secuencia de ajuste
Pantalla de 24 horas
Señal horaria con ectad a
3.1 当前时间模式设置当前时间
5.2
步测模式使用表的步测功能
如何设置当前时间
如何使用表的步测功能
+ 在当前时间模式下,按住[M]键2秒,“秒”字符开始闪动,进
[L/R]
65 beeps/
+
参照以下步骤来操作表的步测功能:
minute
入设置显示.
+
在步测显示模式时,按[L/R]键开启步测功能。
Beep
+ 设置显示时,按如图所示,按[S/S]键选择不同的设置。
+
步测功能开启后,按[M]键直到进入跑秒模式,再按[S/S]键可同时
Hora Actual
Pulse [M]
[M]
+ 当(分,时,年,月,日)任一字符闪动时,按[L/R]键改
Pacer Mode
Pacer Mode
开始步测和跑秒功能。
Pacer OFF
Pacer ON
变数值(按住此键可快速改变数值)。
[M]
+
此时已开启手表的步测功能并伴随跑秒的运行,将以预设频率进
[S/S]
+ 当秒字符开始闪动时,按[L/R]键可使数值清零。
行步测并发出嘀嘀声响。
second
day
+ 当设置完成后,按[M]键一次可退出设置模式。如果1分钟
+
在手表跑秒和步测过程中,按[S/S]键一次可关闭步测和跑秒。
[L/R]
内没有任何按制操作,系统也将会自动退出设置模式。
Aumentar
[S/S] [S/S]
el número
Chronograph Mode
minute month
stop
[S/S]
counting
counting
hold [L/R]
aumentar el
[S/S] [S/S]
[S/S]
65 beeps/
número a
minute
un mayor
[S/S]
Beep
velocidad
hour
year
Chronograph Mode
Chronograph Mode
Secuencia de ajuste velocidad
Pacer Watch Stopped
Pacer Watch Started
4.0 每日响闹模式每日响闹
6.0 跑秒模式跑秒模式
每日响闹模式
hora actual
actual regazo
tiempo de
跑秒模式
(hora, minuto)
+ 此款表有当前时间的每日响闹功能。
acumulativo
ejecución
+
此款手表包含跑秒功能,可计量:
hora de alarma
+ 每日响闹开启后,当正常时间到达响闹时间时,手表将会
tiempo de
acumulativo
ejecución
tiempo de ejecución
(hora, minuto)
有20秒的嘀嘀声。
(hora)
(1 / 100 segundos)
+
跑秒时间,累积跑秒时间(多种情况下的过去时间)和分圈时间(跑秒没
acumulativo
acumular
tiempo de
有停止的情况下)。
tiempo de
ejecución
每日响闹显示
ejecución
(minutos)
Mostrar cronógrafo
(segundo)
+
跑秒计量参数:
Alarma diaria
'Tod os Cero’
+ 在每日响闹模式下,表有以下项目显示:
+
计量精度:1/100秒
+ 第一行显示现在时间(时,分)。
1. Tiempo transcurrido
+
计量范围:9时59分59.99秒
[L/R]
+ 第二行显示每日响闹时间(时,分)。
300
[S/S]
[S/S]
跑秒显示
设置每日响闹的开启/关闭
2. Tiempo transcurrido acumulativo
+
20
当选择跑秒模式后,有以下项目显示:
+ 在每日响闹模式下,按[L /R]键设置每日响闹的开启/关闭。
10010
+
跑秒计时下:分圈时间和累积时间将会分别在显示屏的第一行和第二行显
alarma diaria
+ 当有每日响闹符号“ ”显示时,表示已开启每日响闹。
[S/S]
[S/S]
[S/S] [S/S]
示。注:第一组分圈计时时,现在时间和累积时间是相同的。
indicador
3. Tiempos de vuelta
+
检测每日响闹声响
10 10100
当跑秒停止后,分圈时间和数值将会显示在显示屏的第一行,累积时间显
lap 1lap 2lap 3
Alarma diaria en
+ 在每日响闹模式下,按住[S/S]键测试响闹声响。按制被按
示在第二行。
[S/S]
[L/R] [L/R] [L/R]
住时,表将会一直发出嘀嘀声响。
在分圈显示中,分圈数值和时间将会分别在显示屏的第一行和第二行显示
0102030
Alarma diaria de pantalla
Tiempo
。
El tiempo transcurrido, acumulativo
El tiempo transcurrido y tiempo de vuelta
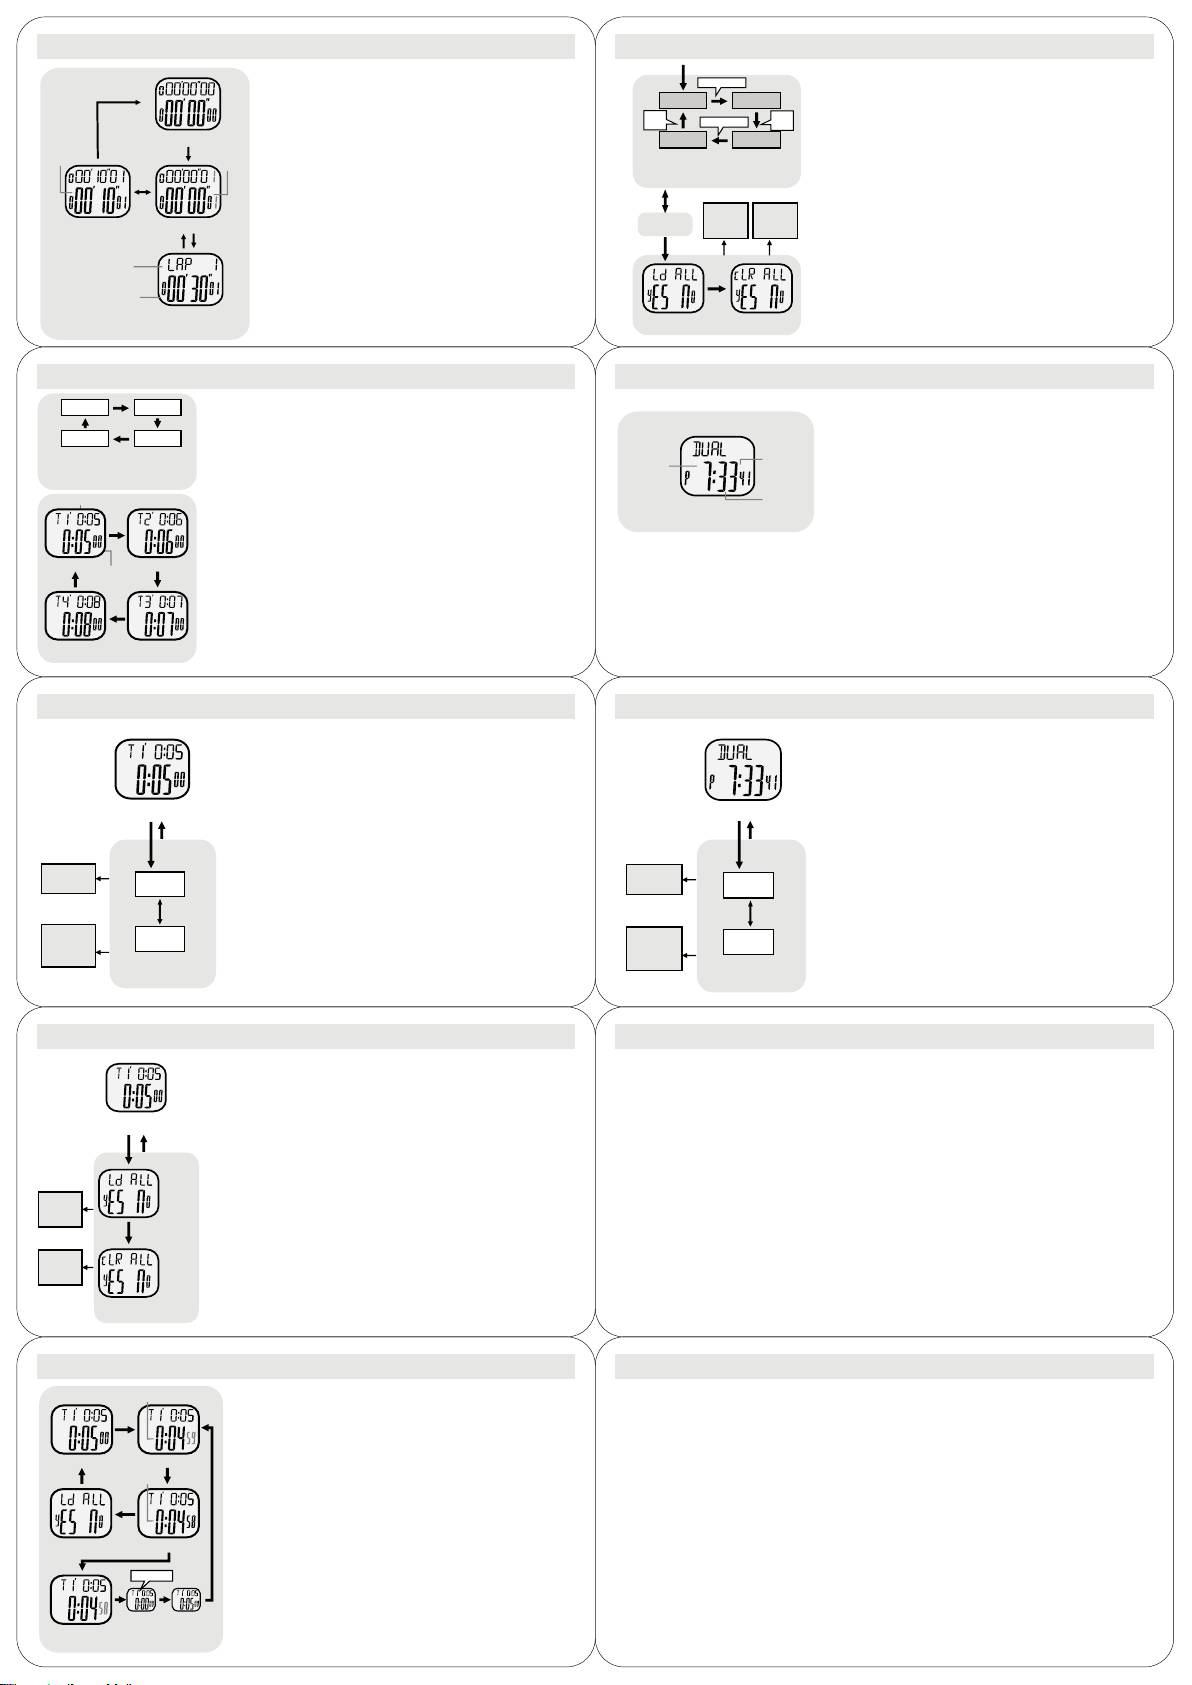
6.1 跑秒模式使用跑秒功能
7.4 倒计时模式多组倒计时
[S/S]
如何测量跑秒时间
bip, bip
如何使用多组倒计时
El [L/R]
+ 当出现“ALL Zero”显示后,按[S/S]键开始计时,按[S/S]两次可停止
计时。
Timer 1*
Temporizador 2*
+ 使用2组或更多组的倒计时来计量多种过去时间的多组倒计时功能
+ 操作以上两个按制之间的时间将会显示在显示屏的第一行。重复以
bip, bip
,必须设定好每组倒计时的开始时间。
bip, bip
bip, bip
Transcurrido
上按制操作可以得到累积时间。
+ 一旦设定好倒计时的开始时间,在计时之前必须先进行复位。查
tiempo
Mostrar todos Cero
Temporizador 4*
Temporizador 3*
看8.2节了解关于如何复位的详细内容。
(parada
transcurrido
[S/S]
contar)
tiempo
如何进行跑秒分圈
Cuenta con te mporizador de múltip les secuencias
+ 按[S/S]键开始计时。多组倒计时将从Timer1开始,然后到其它组
(contando)
+ 当跑秒开始计时后,按[L/R]键可以进入并浏览分圈显示,持续5秒。
D
Si el temporizador 1, 2, 3 o 4 que establece la
的倒计时,如图所示。再按[S/S]一次可停止计时。
0:00 como valor inicial, que temporizador serán
[S/S]
在分圈显示下,分圈数值和分圈时间将会分别在显示屏的第一行和
excluidos de la secuencia de contar.
+ 若没有按[S/S]停止计时,系统将会重复倒计时。
第二行显示。
[S/S]
+ 5秒过后,系统会自动返回计时。新的分圈时间和累积计时将会分别
Confirmar
Cancelar
la carga
la carga
倒计时响闹
Detener el conteo
Mostrar contar
显示在显示屏的第一行和第二行。重复以上操作进入新的分圈。
El recuento
se detiene
o
o
+ 倒计时最后一秒和计时为0时会有嘀嘀声。
de pantalla
reajustar
reajustar
5 segundo
[L/R]
如何查看/复位分圈时间
Mantener [L/R]
[M]
[L/R]
Vuelta
+ 当跑秒停止计时时:
如何复位/复位开始时间
Mantener
número
+ 逐个按[L/R]键可以查看跑秒分圈记录,或
[L/R]
+ 倒计时暂停后,可复位/复位倒计时开始时间,按如图所示步骤复
+ 按住[L/R]键2秒,清除跑秒分圈记忆,复位将会显示“ALL Zero”.
位或复位开始时间。
Tiempo de
vuelta
Tiempo de vuelta
de pantalla
Cargue el
Restablecer la
A partir de los valores
A partir de los valores
7.0 倒计时模式倒计时显示
8.0 异地时间模式异地时间
Temporizador 1*
Temporizador 2*
倒计时模式
异地时间
+ 此款表包含4组倒计时。分别为倒计时1,倒计时2,倒计时3和倒计时4。使用
+ 此款表有异地时间显示功能。
Temporizador 4*
一组倒计时(单独倒计时)可以运行正常的倒计时功能。但是组合两组或两组
Temporizador 3*
+ 异地时间的秒字符数和当前时间的秒字符显示相同。
以上的倒计时功能将会测量多组的过去时间。
Cuenta con temporizador
de múltiples secuencias
+ 倒计时的测量精度为1sec,此四组的倒计时开始时间可最大设定为23小时59分
doble tiempo
doble tiempo
(segundo)
D
i Temporizador 1, 2, 3 o 4 que establece la 0:00
。
(hora)
异地时间显示
como valor inicial, que temporizador serán
excluidos de la secuencia de conteo.S
+ 当倒计时开始时间设定为0:00时,倒计时将不会包括计时先后。
+ 当选择异地时间显示后,异地时间(时,分,秒)显示在显示
+ 当倒计时开始计时后,若没有按[S/S]停止倒计时,系统将会重复倒计时。倒计
doble tiempo
屏的第二行。
valor inicial (hora, mintue)
(minutos)
时最后一秒和计时为0时会有嘀嘀声。
Hora doble Modo de
[L/R]
单组倒计时和多组倒计时
+ 当选择单组倒计时时,必须确保其他三组倒计时的开始时间为0:00。
Temporiz ador de pantalla 1
Temporizador de pantalla 2
+ 当选择多组倒计时时,将倒计时的开始时间以先后顺序从Timer1依次排列,
contar
tiempo
[L/R][L/R]
如图所示。
如何选择不同的倒计时显示
[L/R]
+ 当倒计时计时停止后,按[L/R]键依次选择不同的倒计时显示,如图所示。
Temporizador de pantalla 4
Temporizador de pantalla 3
Modo de temporizador de cuenta regresiva
7.1 倒计时模式设置倒计时
8.1 异地时间模式设置异地时间
如何设置倒计时
如何设置异地时间
+ 以下将说明设置Timer1.的设置程序。同样,其他组的倒计时设
〈 在异地时间显示模式下,按[M]键2秒,分字符开始闪
置也和Timer1.类似。
动。
+ 在有Timer1.显示时,按住[M]键2秒进行设置,此时“分”字符开始
〈 按如图所示,按[S/S]键转换将要设置的项目。
闪动。
〈 当分,时字符闪动时,按[L/R]键改变数值,按住此
El contador de tiempo de pantalla
+ 按[S/S]键,按如图所示选择不同的设置项目。
Hora doble Modo de
键可快速改变数值。
Mantener [M]
[M]
+ 当分,时字符闪动时,按[L/R]键改变数值(按住此键可快速改
Mantener [M]
[M]
当设置完成后,按[M]键退出设置模式。如果1分钟内没
变数值)。
有任何按制操作,系统也将会自动退出设置模式。
[L/R]
+ 当设置完成后,按[M]键退出设置模式。如果1分钟内没有任何按
[L/R]
Aumentar
制操作,系统也将会自动退出设置模式。
Aumentar
el número
Minutos
el número
Minuto
mantener [L/R]
[S/S]
Mantener [L/R]
[S/S]
aumentar
aumentar
el número
Horas
el número
Horas
a un mayor
a un mayor
velocidad
Secuencia de ajuste
velocidad
Secuencia de ajuste
7.2 倒计时模式复位和复位倒计时
9.0 说明:
如何对倒计时进行复位
当前模式
倒计时模式
+ 如果已设置好倒计时的开始时间,在开始计时之前必须先进行复位
+ 系统时间:上午,下午,时,分,秒
+ 倒计时:4组倒计时
。
+ 时间格式:12小时制或24小时制
+ 精度:1秒
El contador de tiempo de pantalla
+ 倒计时模式下,按住[L /R]键(倒计时停止计时),直到显示如图所
+ 日历:月,日和星期的显示(闰年和星期的自动
+ 倒计时范围:23时59分
Detener el conteo
示的‘Ld ALL'。
日历功能)
Mantener
+ 倒计时提示音:在倒计时结束的最后1秒将会发出
[L/R]
[L/R]
+ 出现‘Ld ALL'显示后,按[M]或[L/R]键来确认或停止复位。
嘀嘀声。
+ 经复位之后,恢复倒计时显示,可以重新进行倒计时。
每日响闹
la carga
+ 每日响闹和整点响闹
步测模式
[M]
tempo-
rizador (s)
如何复位倒计时
+ 响闹时间:20秒
+ 设置范围:40bpm-180bpm
Confirmar
la carga o
en la
reajustar
contar
+ 在有‘Ld ALL'显示时,按住[L/R ]键,直到显示如图所示的‘cLR ALL'.
+ 设置步数:5bpm
secuencia
+ 当出现‘cLR ALL'显示时,按[M]或[L /R]键来确认或停止复位。
跑秒模式
Mantener
[L/R]
+ 如果倒计时已被复位,所有的开始时间将会变为0:00。
+ 精度:1 /100秒
异地时间模式
[L/R]
Cancelar
Resta-
跑秒范围:9时59分59.99秒
+ 异地时间:上午,下午,时,分,秒
la carga o
blecer
reajustar
todos los
a partir
valores
a cero
Secuencia de ajuste
7.3 倒计时模式复位和复位倒计时
contar
如何使用单组倒计时
[S/S]
+ 当使用单组倒计时时,把其它组的倒计时开始时间设置为0:00。
+ 当设置好倒计时开始时间后,在开始计时之前必须先要复位。查看
8.2节了解关于如何复位开始时间的详细内容。
1 Visualice temporizador
Mostrar contar
+ 按[S/S]键开始倒计时。在没有按[S /S]停止计时的情况下,计时归
[M]
parar
0后将自动开始重新倒计时。
contar
[S/S]
Mantener
[L/R]
如何进行倒计时复位
+ 倒计时停止后,把倒计时开始时间复位为原先的开始时间,其操作
方法见第8.2节。
Detener el conteo de pantalla
[S/S]
倒计时响闹
bip, bip
+ 倒计时最后一秒和计时为0时会有嘀嘀声。
Muestra cero
Contando
Mostrar contar
Exponer
