Husqvarna T425 – страница 2
Инструкция к Бензиновому Триммеру Husqvarna T425
WORKING TECHNIQUES
Before use:
Basic safety rules
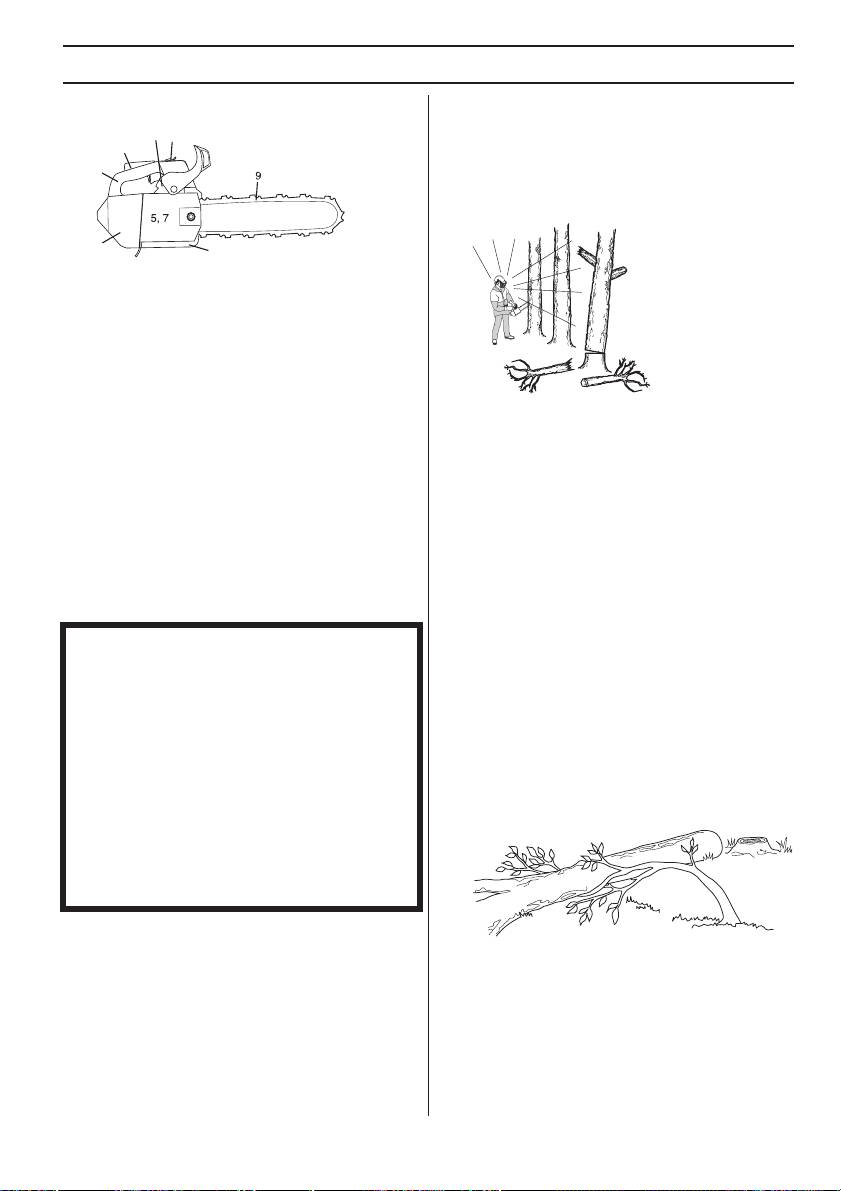
1 Look around you:
1
3
2
• To ensure that people, animals or other things cannot
4
affect your control of the machine.
• To make sure that none of the above might come
within reach of your saw or be injured by falling trees.
6
8
1 Check that the chain brake works correctly and is not
damaged.
2 Check that the throttle lockout works correctly and is
not damaged.
3 Check that the stop switch works correctly and is not
damaged.
4 Check that all handles are free from oil.
CAUTION! Follow the instructions above, but do not use a
5 Check that the anti vibration system works and is not
chain saw in a situation where you cannot call for help in
damaged.
case of an accident.
6 Check that the muffler is securely attached and not
2 All tree maintenance work above ground level must be
damaged.
carried out by two or more persons with the right
7 Check that all parts of the chain saw are tightened
training (see instructions under the heading
correctly and that they are not damaged or missing.
Important). At least one person should be on the
8 Check that the chain catcher is in place and not
ground to carry out safe rescue procedures and/or get
damaged.
help should an emergency arise.
9 Check the chain tension.
3 During tree maintenance work above ground level, the
working area should always be secured and marked
General working instructions
out with signs, tape or the like. The person(s) on the
ground should always inform the person(s) working
above before they enter the secure working area.
IMPORTANT!
4 Do not use the machine in bad weather, such as
This section describes basic safety rules for using a
dense fog, heavy rain, strong wind, intense cold, etc.
chain saw. This information is never a substitute for
Working in bad weather is tiring and often brings
professional skills and experience. If you get into a
added risks, such as icy ground, unpredictable felling
situation where you feel unsafe, stop and seek expert
direction, etc.
advice. Contact your chain saw dealer, service agent or
an experienced chain saw user. Do not attempt any task
5 Take great care when removing small branches and
that you feel unsure of!
avoid cutting bushes (i.e. cutting many small branches
at the same time). Small branches can be grabbed by
Before using a chain saw you must understand the
the chain and thrown back at you, causing serious
effects of kickback and how to avoid them. See
injury.
instructions under the heading How to avoid kickback.
Before using a chain saw you must understand the
difference between cutting with the top and bottom
edges of the bar. See instructions under the headings
How to avoid kickback and Machine’s safety equipment.
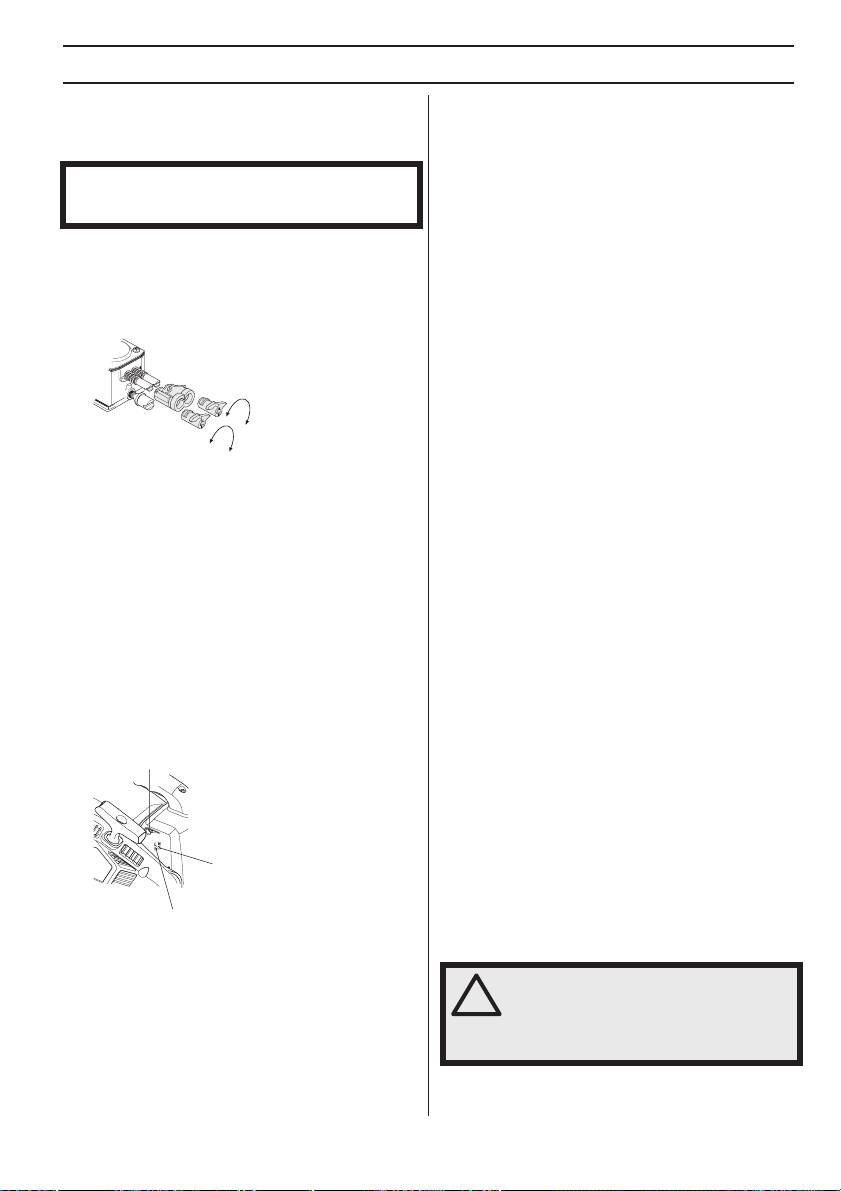
During tree maintenance work above ground level the
chain saw must be secured. Secure the chain saw by
attaching a safety line to the fixing eye on the chain saw.
Wear personal protective equipment. See instructions
under the heading Personal protective equipment.
English – 21
WORKING TECHNIQUES
6 Make sure you can move and stand safely. Check the
effect of kickback and lets you keep the chain saw
area around you for possible obstacles (roots, rocks,
under control.
branches, ditches, etc.) in case you have to move
suddenly. Take great care when working on sloping
ground.
3 Most kickback accidents happen during limbing. Make
sure you are standing firmly and that there is nothing
in the way that might make you trip or lose your
balance.
Lack of concentration can lead to kickback if the
kickback zone of the bar accidentally touches a
branch, nearby tree or some other object.
7 Take great care when cutting a tree that is in tension.
A tree that is in tension may spring back to its normal
position before or after being cut. If you position
yourself incorrectly or make the cut in the wrong place
the tree may hit you or the machine and cause you to
lose control. Both situations can cause serious
personal injury.
Have control over the workpiece. If the pieces you
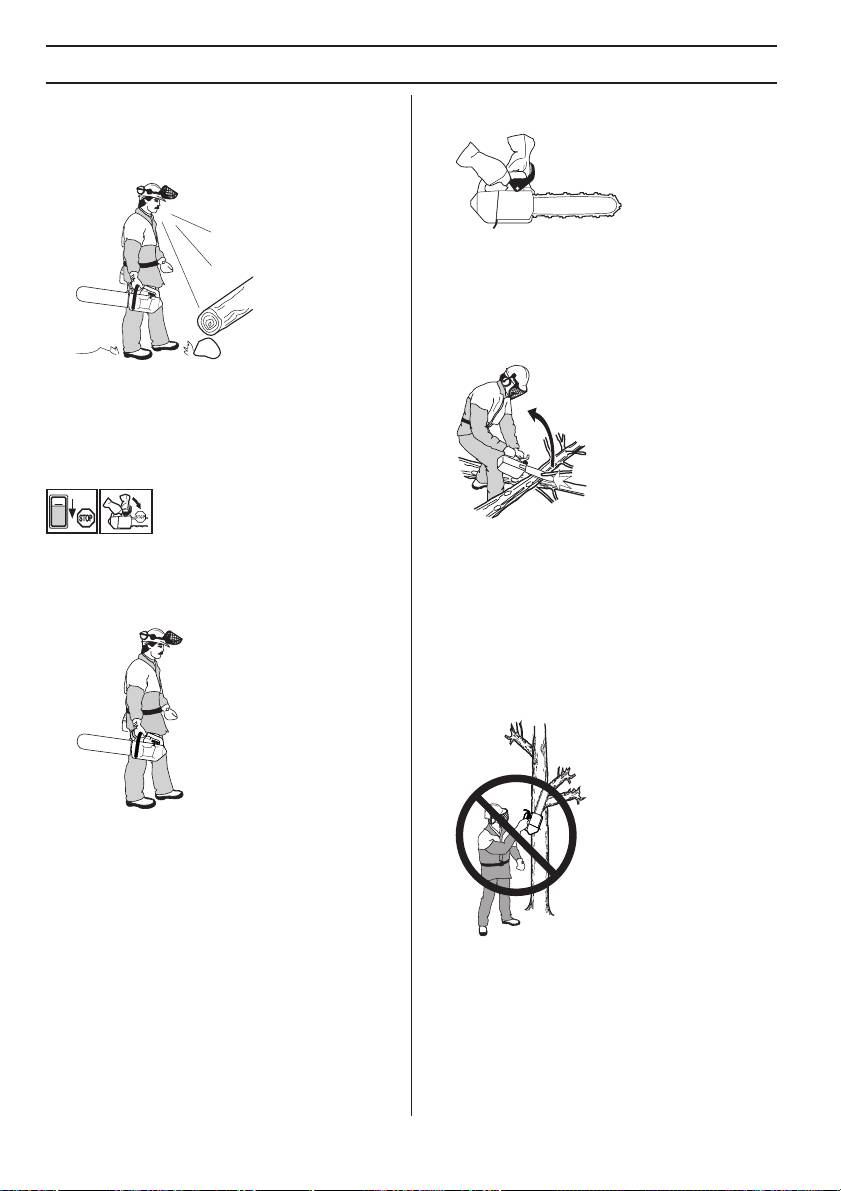
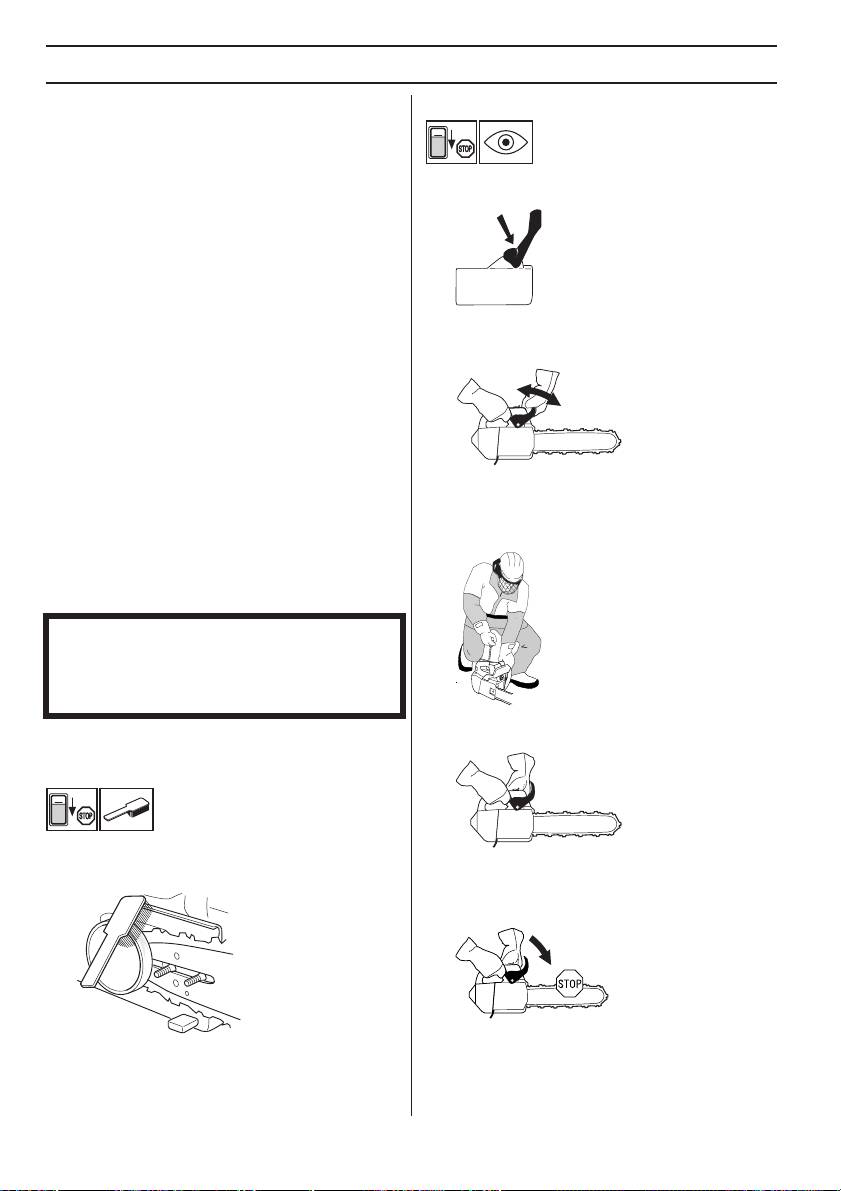
8 Before moving your chain saw switch off the engine
intend to cut are small and light, they can jam in the
and lock the chain using the chain brake. Carry the
saw chain and be thrown towards you. Even if this
chain saw with the bar and chain pointing backwards.
does not need to be a danger, you may be surprised
Fit a guard to the bar before transporting the chain
and lose control of the saw. Never saw stacked logs or
saw or carrying it for any distance.
branches without first separating them. Only saw one
log or one piece at a time. Remove the cut pieces to
keep your working area safe.
4 Never use the chain saw above shoulder height
and try not to cut with the tip of the bar. Never use
the chain saw one-handed!
9 When you put the chain saw on the ground, lock the
saw chain using the chain brake and ensure you have
a constant view of the machine. Switch the engine off
before leaving your chain saw for any length of time.
General rules
1 If you understand what kickback is and how it happens
then you can reduce or eliminate the element of
5 Always use a fast cutting speed, i.e. full throttle.
surprise. By being prepared you reduce the risk.
Kickback is usually quite mild, but it can sometimes be
very sudden and violent.
2 Always hold the chain saw firmly with your right hand
on the top handle and your left hand on the front
handle. Wrap your fingers and thumbs around the
handles. You should use this grip whether you are
right-handed or left-handed. This grip minimises the
22 – English
WORKING TECHNIQUES
6 If you have to cut branches or the like that are above
Working with tree service chain-saws
shoulder height, a working platform or scaffold tower
from a rope and harness
is recommended.
This chapter sets out working practices to reduce the risk
of injury from tree service chainsaws when working at
height from a rope and harness. While it may form the
basis of guidance and training literature, it should not be
regarded as a substitute for formal training.
General requirements working at height
Operators of tree service chainsaws working at height
from a rope and harness should never work alone. A
competent ground worker trained in appropriate
emergency procedures should assist them.
Operators of tree service chainsaws for this work should
be trained in general safe climbing and work positioning
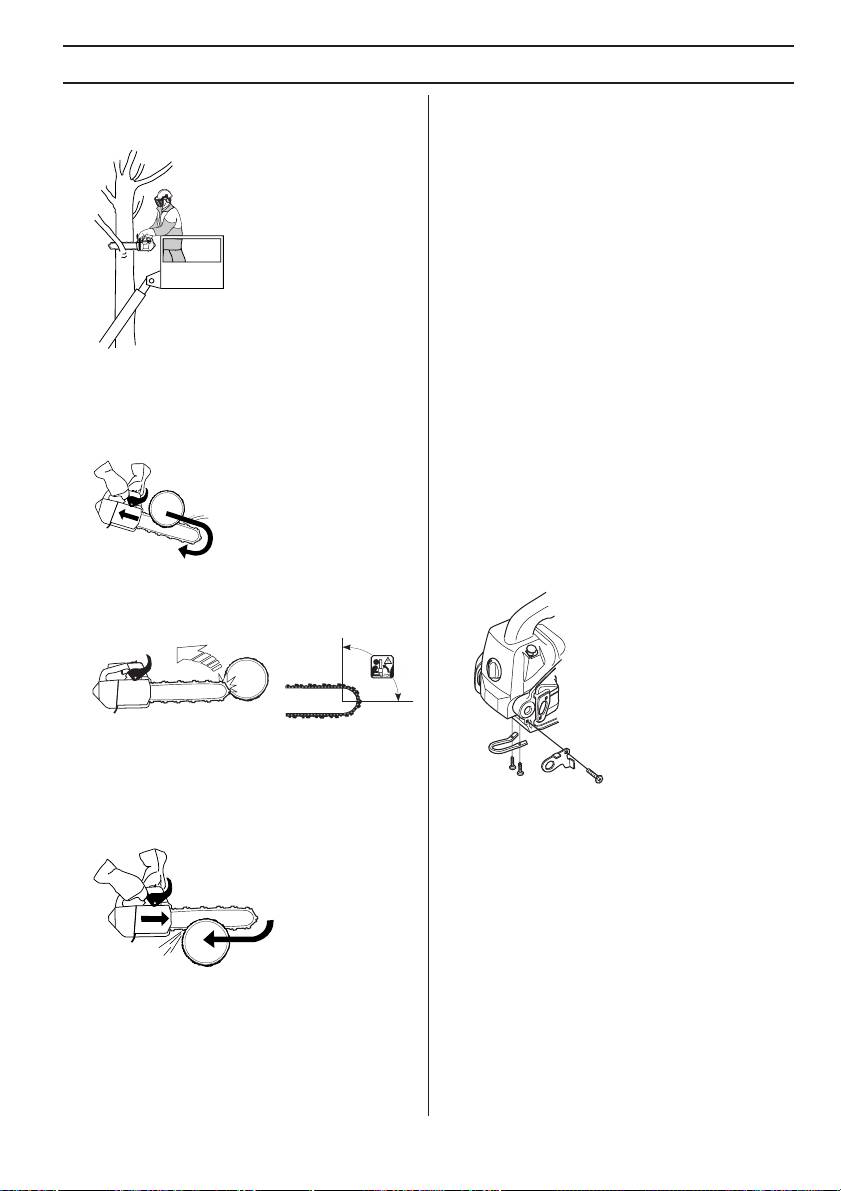
7 Take great care when you cut with the top edge of the
techniques and shall properly equipped with harnesses,
bar, i.e. when cutting from the underside of the object.
ropes, strops, karabiners and other equipment for
This is known as cutting on the push stroke. The chain
maintaining secure and safe working positions for both
tries to push the chain saw back towards the user. If
themselves and the saw.
the saw chain is jamming, the saw may be pushed
back at you.
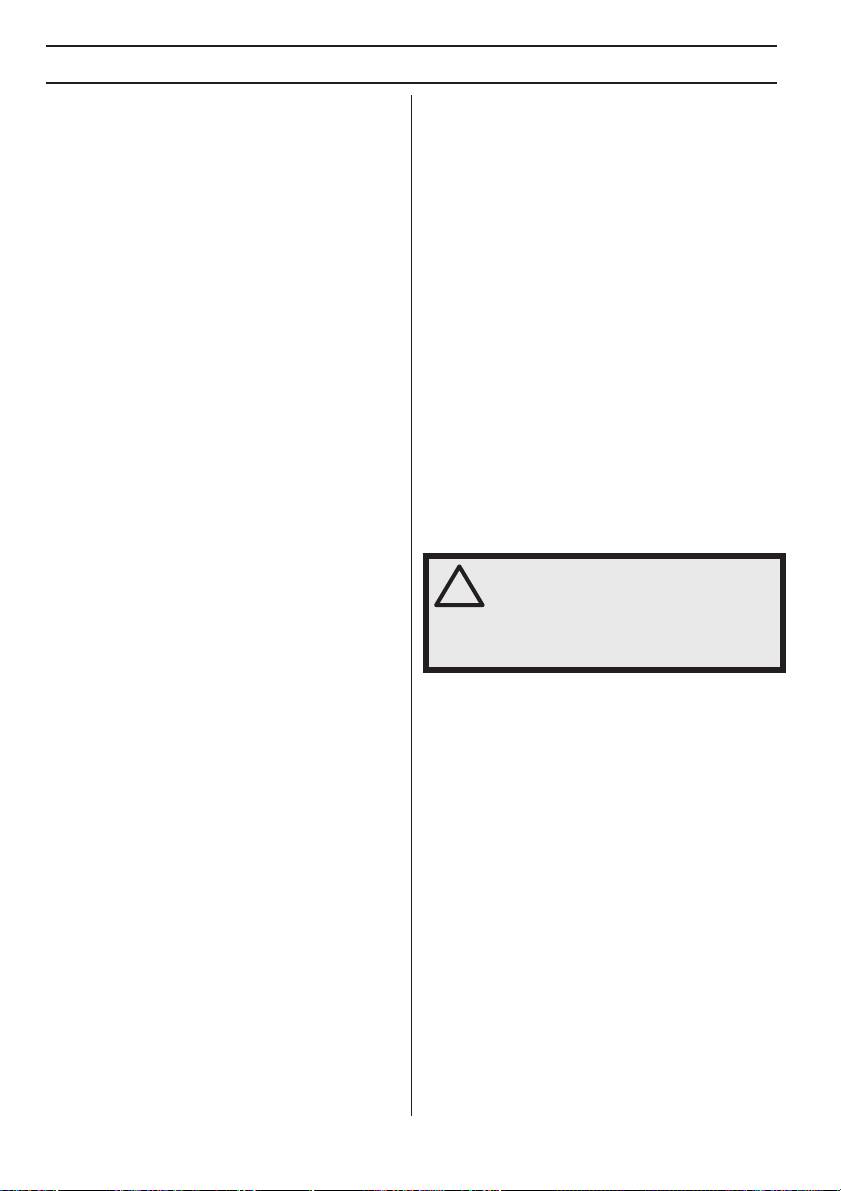
Preparing to use the saw in the tree
The chain saw should be checked, fuelled, started and
warmed up by the ground worker and the chain brake
should be engaged before it is sent up to the operator in
the tree. The chainsaw should be fitted with a suitable
strop for attaching to the operator’s harness:
a) choke the strop around the attachment point on the rear
8 Unless the user resists this pushing force there is a
of the saw.
risk that the chain saw will move so far backwards that
only the kickback zone of the bar is in contact with the
tree, which will lead to a kickback.
Cutting with the bottom edge of the bar, i.e. from the
top of the object downwards, is known as cutting on
the pull stroke. In this case the chain saw pulls itself
towards the tree and the front edge of the chain saw
body rests naturally on the trunk when cutting. Cutting
b) provide suitable karabiners to allow indirect (i.e. via the
on the pull stroke gives the operator better control over
strop) and direct attachment (i.e. at the attachment point
the chain saw and the position of the kickback zone.
on the saw) of saw to the operators harness.
c) ensure the saw is securely attached when it is being
sent up to the operator.
d) ensure the saw it secured to the harness before it is
disconnected from the means of ascent.
The saw should only be attached to the recommended
attachment points on the harness. These may be at mid-
point (front or rear) or at the sides. Where possible
9 Follow the instructions on sharpening and maintaining
attaching the saw to centre rear mid-point will keep it clear
your bar and chain. When you replace the bar and
of climbing lines and support its weight centrally down the
chain use only combinations that are recommended
operator’s spine.
by us. See instructions under the headings Cutting
When moving the saw from any attachment point to
equipment and Technical data.
another, operators should ensure it is secured in the new
position before releasing it from the previous attachment
point.
English
–
23
WORKING TECHNIQUES
Using the chainsaw in the tree
• ‘hold and cut’ sections.
An analysis of accidents with these saws during tree
• attempt to catch falling sections.
service operations shows the primary cause as being
• Cut in the tree when he/she is only secured with one
inappropriate one-handed use of the saw. In the vast
rope, always use 2 secured lines.
majority of accidents, operators fail to adopt a secure
• check condition of harness, belt and ropes at regular
work position witch allows them to hold both handles of
frequent intervals.
the saw. This results in an increased risk of injury due to:
Freeing a trapped saw
• not having a firm grip on the saw if it kicks back.
• a lack of control of the saw such that it is more liable
If the saw should become trapped during cutting,
to contact climbing lines and operators body
operators should:
(particularly the left hand and arm)
• switch off the saw and attach it securely to the tree
• losing control from insecure work position resulting in
inboard (i.e. towards the truck side) of the cut or to a
contact with the saw (unexpected movement during
separate tool line.
operation of the saw)
• pull the saw from the kerf whilst lifting the branch as
necessary.
Securing the work position for two-handed use
• if necessary, use a handsaw or second chain saw to
To allow the operator to hold the saw with both hands,
release the trapped saw by cutting a minimum of 30
they should as general rule, aim for secure work position
cm away from the trapped saw.
where they are operating the saw at:
Whether a handsaw or a chainsaw is used to free a stuck
• hip level when cutting horizontal sections.
saw, the release cuts should always be outboard (toward
• solar plexus level when cutting vertical sections.
the tips of the branch), in order to prevent the saw being
Where the operator is working close into vertical stems
taken with the section and further complicating the
with a low lateral forces on their work position, then a good
situation.
footing may be all that is needed to maintain a secure
Basic cutting technique
work position. However as operators move away from the
stem, they will need to take steps to remove or counteract
the increasing lateral forces by, for example, a re-direct of
the main line via a supplementary anchor point or using
an adjustable strop direct from the harness to a
supplementary anchor point.
Gaining a good footing at the working position can be
assisted by use of a temporary foot stirrup created from
an endless sling.
General
Starting the saw in the tree
• Always use full throttle when cutting!
When starting the saw in the tree, the operator should:
• Reduce the speed to idle after every cut (running the
a) apply the chain brake before starting.
engine for too long at full throttle without any load, i.e.
b) hold saw on either the left or right of the body when
without any resistance from the chain during cutting,
starting:
can lead to serious engine damage).
1 on the left side hold the saw with the left hand on the
• Cutting from above = Cutting on the pull stroke.
front handle and thrust the saw away from the body
• Cutting from below = Cutting on the push stroke.
while holding the pull starter cord in the other hand.
Cutting on the push stroke increases the risk of kickback.
2 on the right side, hold the saw with the right hand on
See instructions under the heading How to avoid
either handle and thrust the saw away from the body
kickback.
while holding the pull starter cord in the left hand.
Terms
The chain brake should always be engaged before
Cutting = General term for cutting through wood.
lowering a running saw onto its strop. Operators should
always check the saw has sufficient fuel before
Limbing = Cutting branches off a felled tree.
undertaking critical cuts.
Splitting = When the object you are cutting breaks off
One-hand use of the chainsaw
before the cut is complete.
Operators should never use a chain saw onehanded.
Operators should never:
• cut with the kickback zone at the tip of the chainsaw
guide bar
24 – English
!
WARNING! Never use a chain saw by
holding it with one hand. A chain saw is
not safely controlled with one hand; you
can cut yourself. Always have a secure,
firm grip around the handles with both
hands.
WORKING TECHNIQUES
There are five important factors you should consider
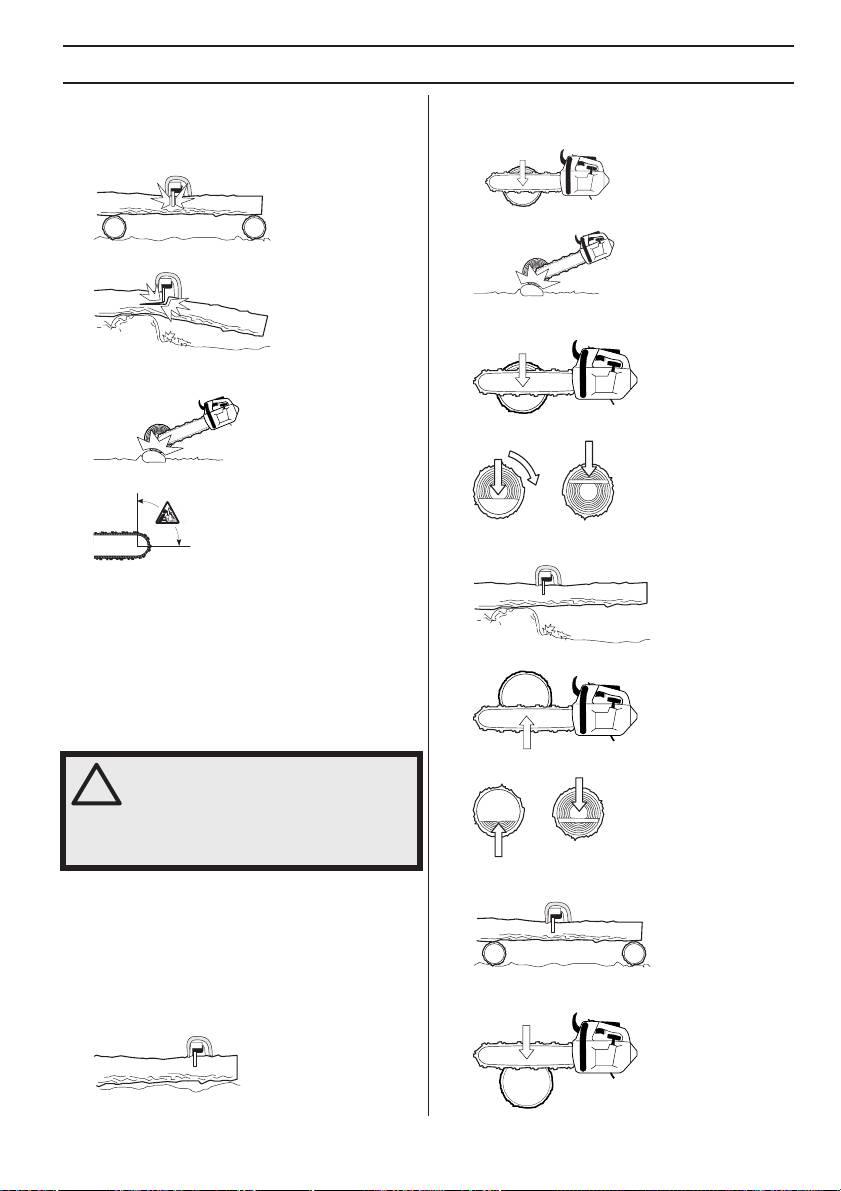
Cut all the way through the log from above. Avoid letting
before making a cut:
the chain touch the ground as you finish the cut. Maintain
full throttle but be prepared for what might happen.
1 Make sure the cutting equipment will not jam in the
cut.
2 Make sure the object you are cutting will not split.
- If it is possible (can you turn the log?) stop cutting about
2/3 of the way through the log.
3 Make sure the chain will not strike the ground or any
other object during or after cutting.
- Turn the log and finish the cut from the opposite side.
4 Is there a risk of kickback?
The log is supported at one end. There is a high risk
that it will split.
5 Do the conditions and surrounding terrain affect how
safely you can stand and move about?
Two factors decide whether the chain will jam or the object
that you are cutting will split: the first is how the object is
supported before and after cutting, and the second is
Start by cutting from below (about 1/3 of the way through).
whether it is in tension.
In most cases you can avoid these problems by cutting in
two stages; from the top and from the bottom. You need to
support the object so that it will not trap the chain or split
during cutting.
- Finish by cutting from above so that the two cuts meet.
WARNING! If the chain jams in the cut:
stop the engine! Don’t try to pull the
!
chain saw free. If you do you may be
injured by the chain when the chain saw
suddenly breaks free. Use a lever to open
up the cut and free the chain saw.
The log is supported at both ends. There is a high risk
The following instructions describe how to handle the
that the chain will jam.
commonest situations you are likely to encounter when
using a chain saw.
Cutting
The log is lying on the ground. There is little risk of the
- Start by cutting from above (about 1/3 of the way
chain jamming or the object splitting. However there is a
through).
risk that the chain will touch the ground when you finish
the cut.
English – 25
WORKING TECHNIQUES
- Finish by cutting from below so that the two cuts meet.
Several factors affect this:
• Lean of the tree
• Bend
• Wind direction
• Arrangement of branches
• Weight of snow
Limbing
When limbing thick branches you should use the same
approach as for cutting.
Cut difficult branches piece by piece.
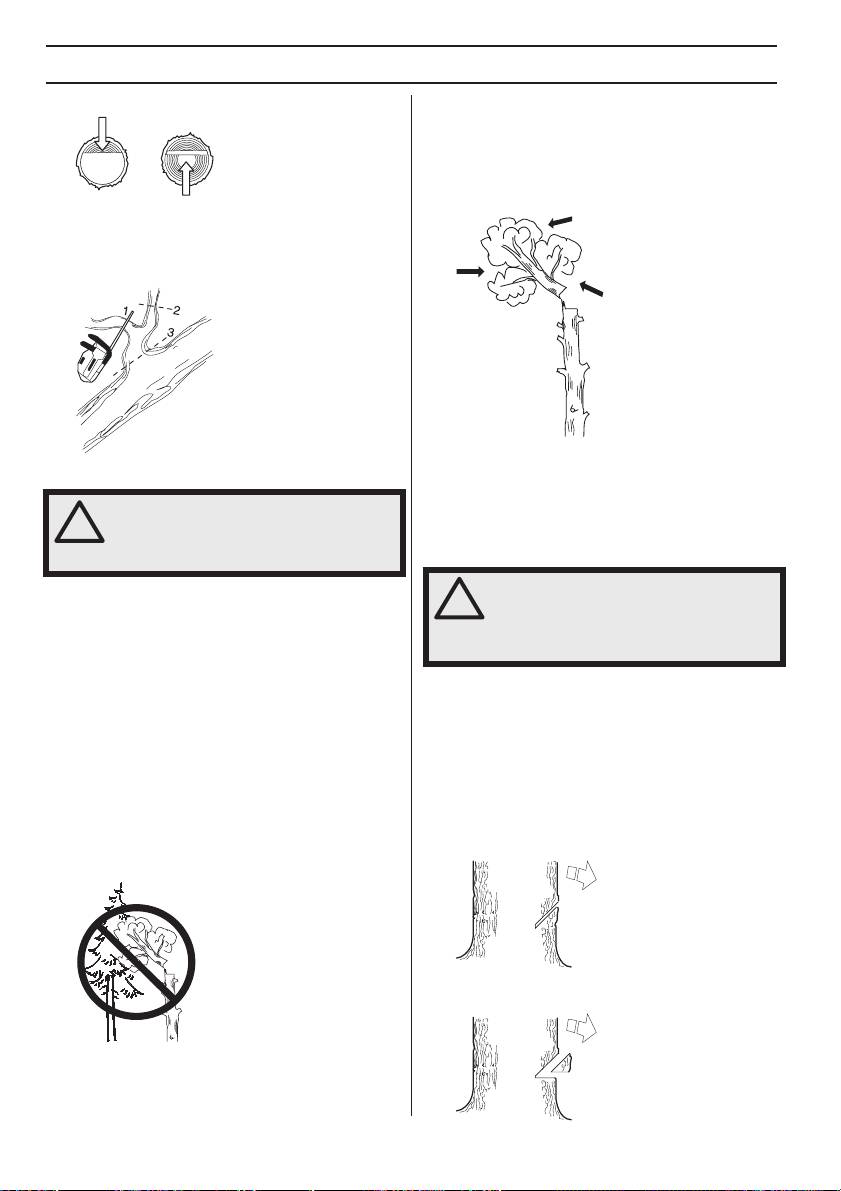
You may find you are forced to let the tree-top fall in its
natural direction because it is impossible or dangerous to
Felling technique for tree tops
try to make it fall in the direction you first intended.
Another very important factor, which does not affect the
WARNING! It takes a lot of experience to
felling direction but does affect your safety, is to make sure
fell a tree. Inexperienced users of chain
!
the tree has no damaged or dead branches that might
saws should not fell trees. Do not
attempt any task that you feel unsure of!
break off and hit you during felling.
Safe distance
During tree maintenance work above ground level, the
working area must always be secured and marked out
with signs, tape or the like. The safe distance between the
top of the tree that is to be felled and the nearest
workplace must be at least 2 1/2 times the height of the
Topping a tree
tree. Make sure that no-one else is in this risk zone before
Topping a tree is done using three cuts. First you make the
or during felling.
directional cuts, which consist of the top cut and the
bottom cut, then you finish with the felling cut. By placing
Felling direction
these cuts correctly you can control the felling direction
The aim is to fell the tree in a position where you can limb
very accurately.
and cross-cut the log as easily as possible. You want it to
Directional cuts
fall in a location where you can stand and move about
To make the directional cuts you begin with the top cut. Try
safely. The main thing to avoid is that the falling tree top
to take your position in the tree on the right side and cut
should get jammed in another tree. Taking down a
on the pull stroke.
”jammed” tree top is very dangerous (see point 4 in this
section).
Next make the bottom cut so that it finishes exactly at the
end of the top cut.
Once you have decided which way you want the top of the
tree to fall you must assess which way the top of the tree
would fall naturally.
26 – English
!
WARNING! During critical felling
operations, hearing protectors should be
lifted immediately when sawing is
completed so that sounds and warning
signals can be heard.
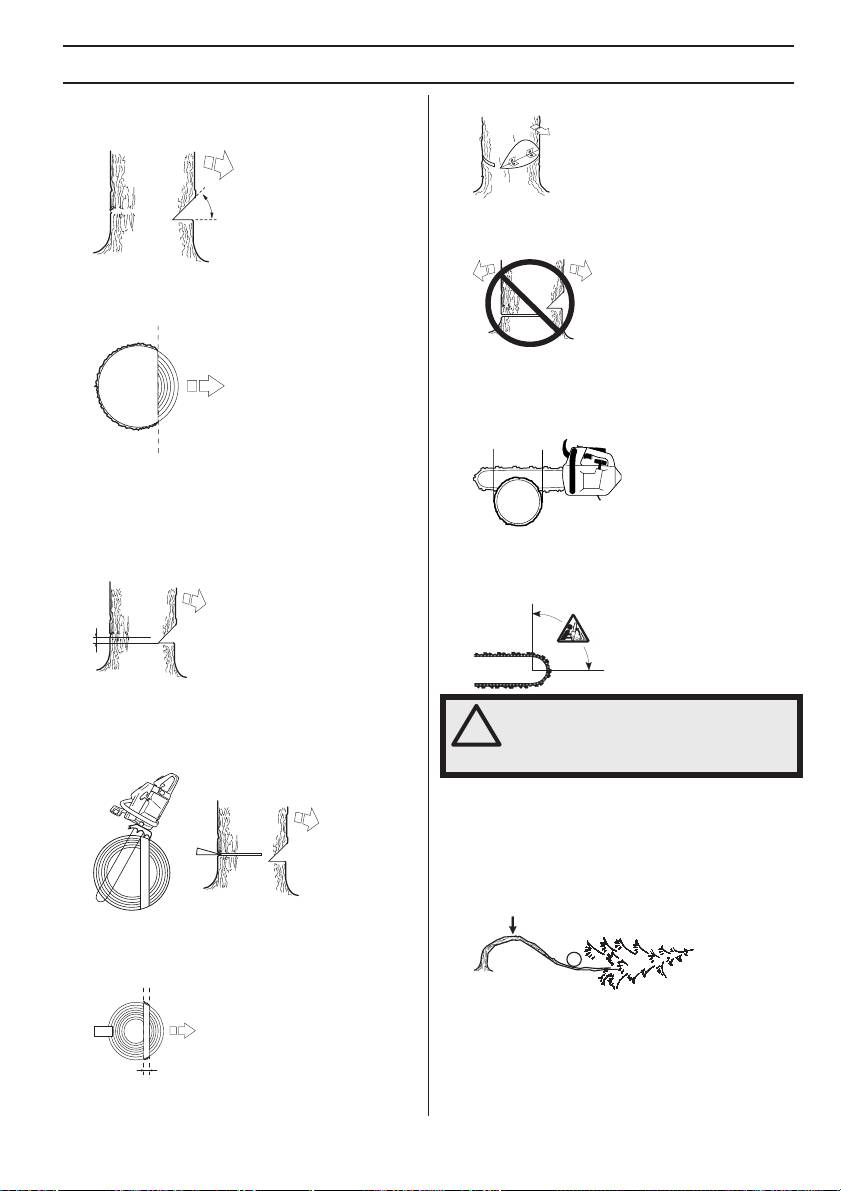
WORKING TECHNIQUES
The directional cuts should run 1/4 of the diameter
The felling hinge controls the direction that the tree falls in.
through the trunk and the angle between the top cut and
bottom cut should be 45°.
All control over the felling direction is lost if the felling
hinge is too narrow or non-existent, or if the directional
cuts and felling cut are badly placed.
The line where the two cuts meet is called the directional
cut line. This line should be perfectly horizontal and at
right angles (90°) to the chosen felling direction.
We recommend that you use a bar that is longer than the
diameter of the tree, so that you can make the felling cut
and directional cuts with single cutting strokes. See the
Technical data section to find out which lengths of bar are
recommended for your saw.
Felling cut
The felling cut is made from the opposite side of the tree
and it must be perfectly horizontal. Try to take a correct
position so you are able to cut on the pull stroke.
There are methods for felling trees with a diameter larger
Make the felling cut about 3-5 cm (1.5-2 inches) above the
than the bar length. However these methods involve a
bottom directional cut.
much greater risk that the kickback zone of the bar will
come into contact with the tree.
Set the spike bumper (if one is fitted) just behind the felling
hinge. Use full throttle and advance the chain/bar slowly
into the tree. Make sure the tree-top does not start to
move in the opposite direction to your intended felling
direction.
Freeing a tree that has fallen badly
Cutting trees and branches that are in tension
Preparations:
Work out which side is in tension and where the point of
maximum tension is (i.e. where it would break if it was
bent even more).
Finish the felling cut parallel with the directional cut line so
that the distance between them is at least 1/10 of the
trunk diameter. The uncut section of the trunk is called the
felling hinge.
Decide which is the safest way to release the tension and
whether you are able to do it safely. In complicated
situations the only safe method is to put aside your chain
saw and use a winch.
English – 27
!
WARNING! Unless you have special
training we advise you not to fell trees
with a diameter larger than the bar length
of your saw!
WORKING TECHNIQUES
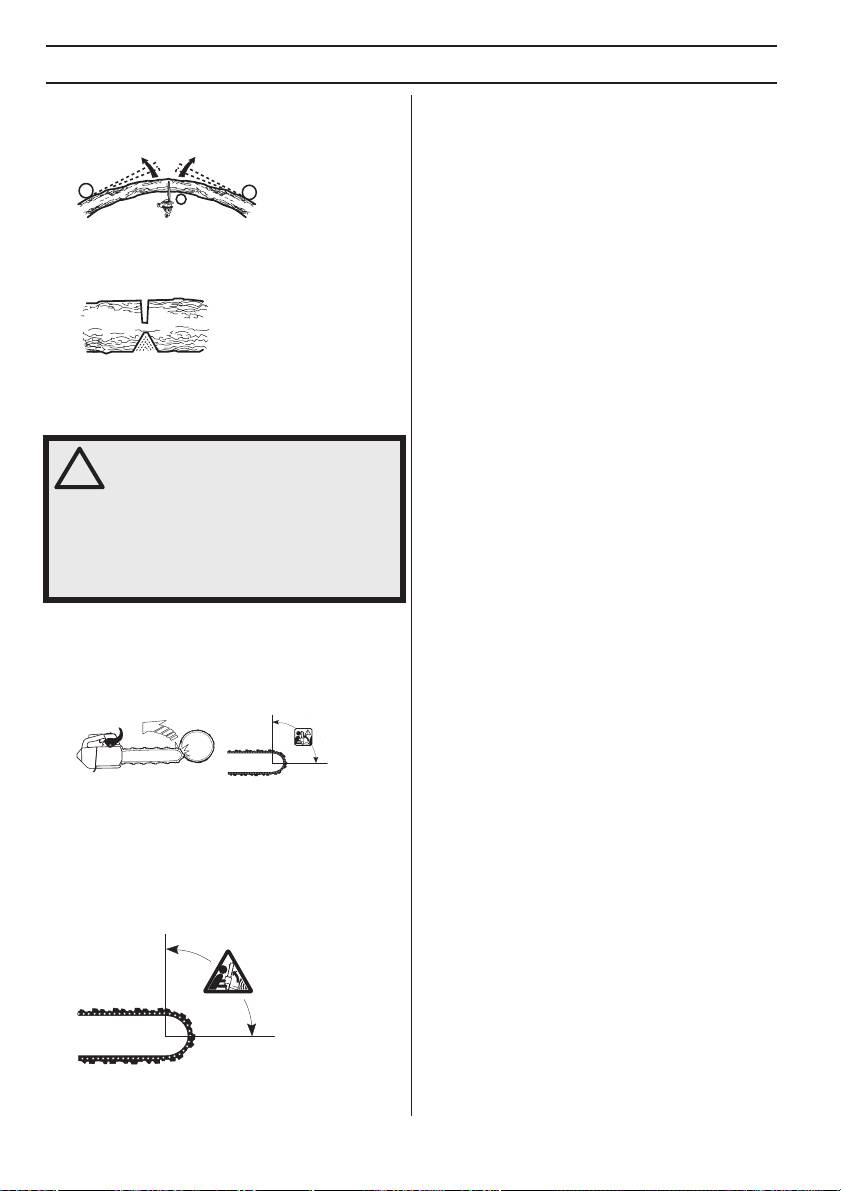
General advice:
Cutting the trunk into logs
Position yourself so that you will be clear of the tree or
See instructions under the heading Basic cutting
branch when the tension is released.
technique.
Make one or more cuts at or near the point of maximum
tension. Make as many cuts of sufficient depth as
necessary to reduce the tension and make the tree or
branch break at the point of maximum tension.
Never cut straight through a tree or branch that is in
tension!
How to avoid kickback
WARNING! Kickback can happen very
suddenly and violently; kicking the chain
!
saw, bar and chain back at the user. If
this happens when the chain is moving it
can cause very serious, even fatal
injuries. It is vital you understand what
causes kickback and that you can avoid
it by taking care and using the right
working technique.
What is kickback?
The word kickback is used to describe the sudden
reaction that causes the chain saw and bar to jump off an
object when the upper quadrant of the tip of the bar,
known as the kickback zone, touches an object.
Kickback always occurs in the cutting plane of the bar.
Normally the chain saw and bar are thrown backwards
and upwards towards the user. However, the chain saw
may move in a different direction depending on the way it
was being used when the kickback zone of the bar
touched the object.
Kickback only occurs if the kickback zone of the bar
touches an object.
28 – English
MAINTENANCE
General
Basic settings and running in
The user must only carry out the maintenance and
The basic carburettor settings are adjusted during testing
service work described in this manual.
at the factory. Avoid running at a too high speed during the
first 10 hours.
IMPORTANT! Any maintenance other than that
CAUTION! If the chain rotates while idling the T-screw
described in this manual must be carried out by your
must be turned anti-clockwise until the chain stops.
servicing dealer (retailer).
Rec. idle speed: 2900 rpm
Carburettor adjustment
Fine adjustment
Due to existing environmental and emissions legislation
When the machine has been ”run-in” the carburettor
your chain saw is equipped with movement limiters on the
should be finely adjusted. The fine adjustment should be
carburettor adjuster screws. These limit the adjustment
carried out by a qualified person. First adjust the L-jet,
possibilities to a maximum of a 1/4 turn.
then the idling screw T and then the H-jet.
H
Changing the type of fuel
L
Fine tuning may be required if the chain saw, after
1/4
changing the type of fuel, performs differently with regard
to starting, acceleration, maximum speed, etc.
1/4
Conditions
Your Husqvarna product has been designed and
• Before any adjustments are made the air filter should
manufactured to specifications that reduce harmful
be clean and the cylinder cover fitted. Adjusting the
emissions.
carburettor while a dirty air filter is in use will result in
a leaner mixture next time the filter is cleaned. This
Function
can give rise to serious engine damage.
•
The carburettor governs the engine’s speed via the
• Do not attempt to adjust the L and H jets beyond either
throttle control. Air and fuel are mixed in the carburettor.
stop as this could cause damage.
The air/fuel mixture is adjustable. Correct adjustment is
essential to get the best performance from the machine.
• Now start the machine according to the starting
instructions and let it warm up for 10 minutes.
• Adjusting the carburettor means that the engine is
adapted to local operating conditions, e.g. climate,
• Place the machine on a flat surface so that the bar
altitude, petrol and the type of 2-stroke oil.
points away from you and so that the bar and chain do
• The carburettor has three adjustment controls:
not come into contact with the surface or other
objects.
- L = Low speed jet
- H = High speed jet
Low speed jet L
- T = Idle adjustment screw
Turn the low speed jet L clockwise until it stops. If the
engine accelerates poorly or idles unevenly, turn the low
T
speed jet L anticlockwise until good acceleration and
idling are achieved.
Fine adjustment of the idle speed T
Adjust the idle speed with the T-screw. If it is necessary to
H
re-adjust, turn the T-screw clockwise while the engine is
running, until the chain starts to rotate. Then turn anti-
clockwise until the chain stops. When the idle speed is
correctly adjusted the engine should run smoothly in
L
every position and the engine speed should be safely
•
The L and H-jets are used to adjust the supply of fuel
below the speed at which the chain starts to rotate.
to match the rate that air is admitted, which is
controlled with the throttle. If they are screwed
clockwise the air/fuel ratio becomes leaner (less fuel)
and if they are turned anti-clockwise the ratio becomes
richer (more fuel). A lean mixture gives a higher engine
speed and a rich mixture gives a lower engine speed.
• The T-screw regulates the throttle setting at idle
speed. If the T-screw is turned clockwise this gives a
higher idle speed; turning it anti-clockwise gives a
lower idle speed.
English – 29
!
WARNING! Contact your servicing
dealer, if the idle speed setting cannot be
adjusted so that the chain stops. Do not
use the chain saw until it has been
properly adjusted or repaired.
MAINTENANCE
High speed jet H
Checking the front hand guard
At the factory the engine is adjusted at sea level.
When working at a high altitude or in different
weather conditions, temperatures and atmospheric
humidity, it may be necessary to make minor
Make sure the front hand guard is not damaged and that
adjustments to the high speed jet.
there are no visible defects such as cracks.
CAUTION! If the high speed jet is screwed in too far,
it may damage the piston/cylinder.
When test run at the factory, the high speed jet is set so
that the engine satisfies the applicable legal requirements
at the same time as achieving maximum performance.
The carburettor’s high speed jet is then locked using a
limiter cap in the fully screwed out position. The limiter cap
Move the front hand guard forwards and back to make
limits the potential to adjust the high speed jet to at most
sure it moves freely and that it is securely anchored to the
half a turn.
clutch cover.
Correctly adjusted carburettor
When the carburettor is correctly adjusted the machine
accelerates without hesitation and 4-cycles a little at full
throttle. It is also important that the chain does not rotate
at idle. If the L-jet is set too lean it may cause starting
difficulties and poor acceleration. If the H-jet is set too
Checking the brake trigger
lean the machine will have less power, poor acceleration
Place the chain saw on firm ground and start it. Make sure
and could suffer damage to the engine.
the chain does not touch the ground or any other object.
See the instructions under the heading Start and stop.
Checking, maintaining and
servicing chain saw safety
equipment
Note! All service and repair work on the machine
demands special training. This is especially true of the
machine’s safety equipment. If your machine fails any of
the checks described below we recommend that you
take it to your service workshop.
Grasp the chain saw firmly, wrapping your fingers and
thumbs around the handles.
Chain brake and front hand guard
Checking brake band wear
Brush off any wood dust, resin and dirt from the chain
brake and clutch drum. Dirt and wear can impair operation
Apply full throttle and activate the chain brake by tilting
of the brake.
your left wrist forward onto the front hand guard. Do not let
go of the front handle. The chain should stop
immediately.
Regularly check that the brake band is at least 0.6 mm
thick at its thinnest point.
30 – English
MAINTENANCE
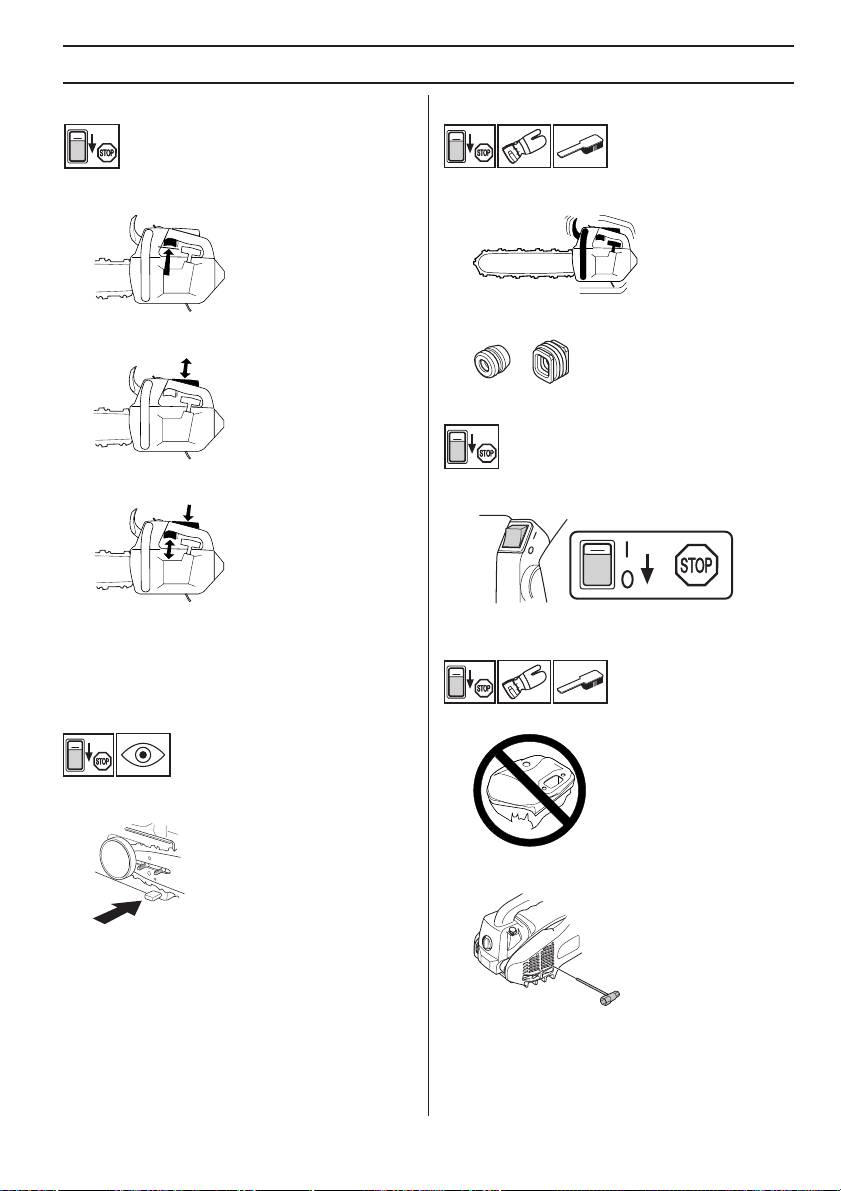
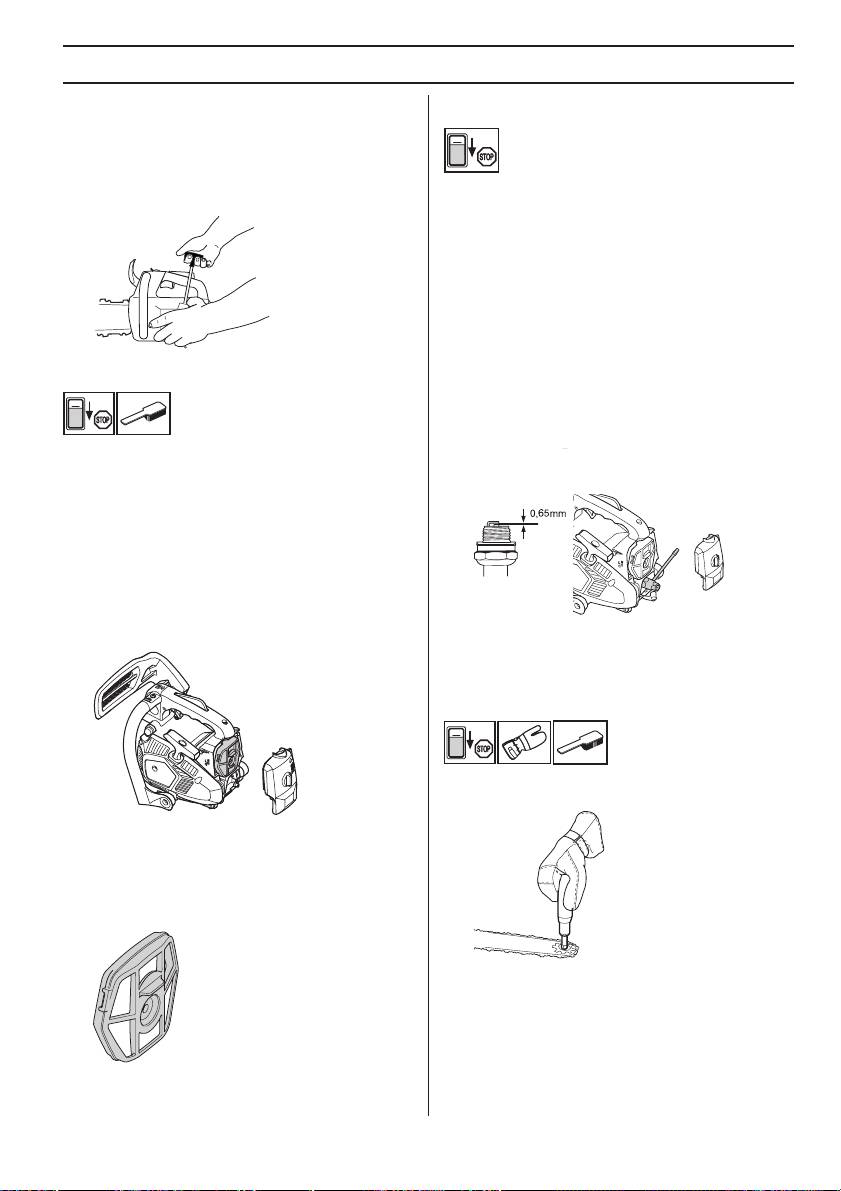
Throttle lockout
Vibration damping system
• Make sure the throttle control is locked at the idle
Regularly check the vibration damping units for cracks or
setting when the throttle lockout is released.
deformation.
Make sure the vibration damping units are securely
• Press the throttle lockout and make sure it returns to
attached to the engine unit and handle unit.
its original position when you release it.
Stop switch
• Check that the throttle control and throttle lockout
Start the engine and make sure the engine stops when
move freely and that the return springs work properly.
you move the stop switch to the stop setting.
• Start the chain saw and apply full throttle. Release the
throttle control and check that the chain stops and
Muffler
remains stationary. If the chain rotates when the
throttle control is in the idle position you should check
the carburettor idle adjustment.
Chain catcher
Never use a machine that has a faulty muffler.
Check that the chain catcher is not damaged and is firmly
attached to the body of the chain saw.
Regularly check that the muffler is securely attached to
the machine.
The muffler is designed to reduce the noise level and to
direct the exhaust gases away from the operator. The
exhaust gases are hot and can contain sparks, which may
cause fire if directed against dry and combustible
material.
English – 31
MAINTENANCE
handle. Make a secure knot in the end of the starter
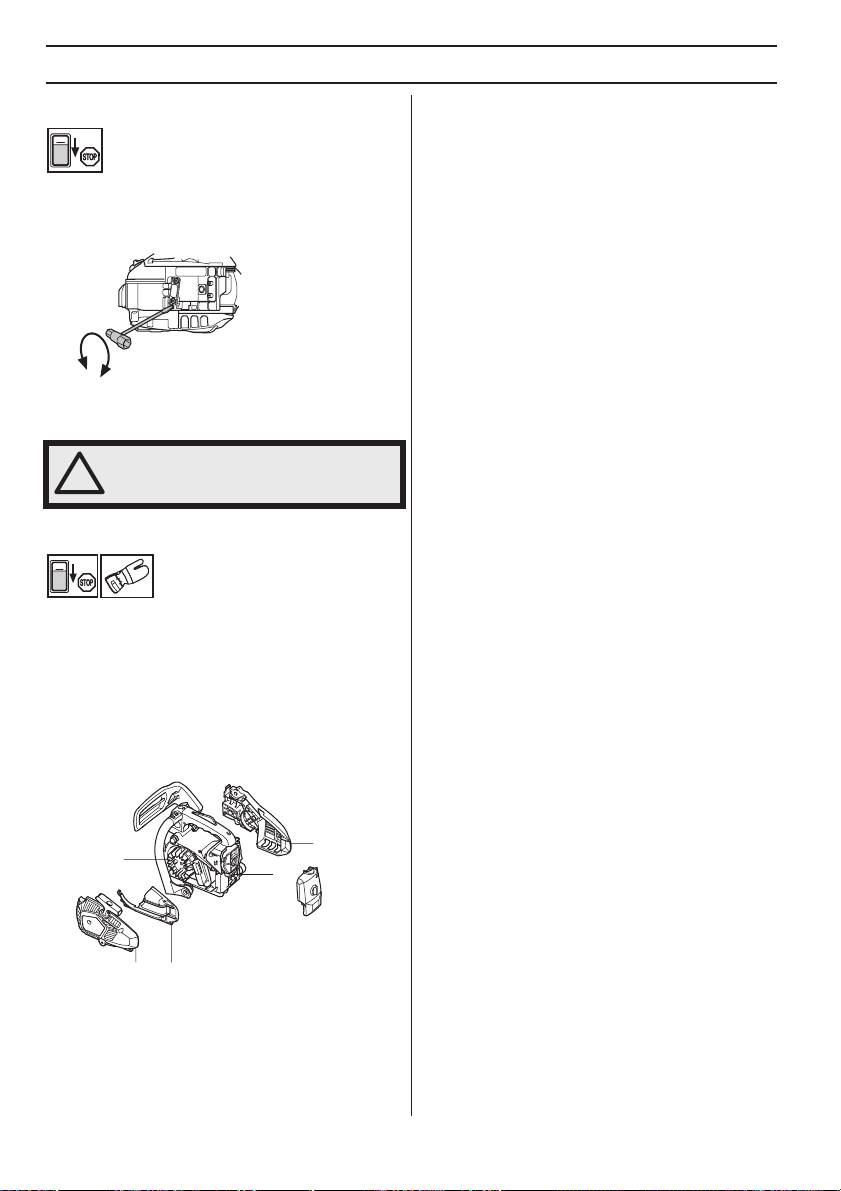
Starter
cord.
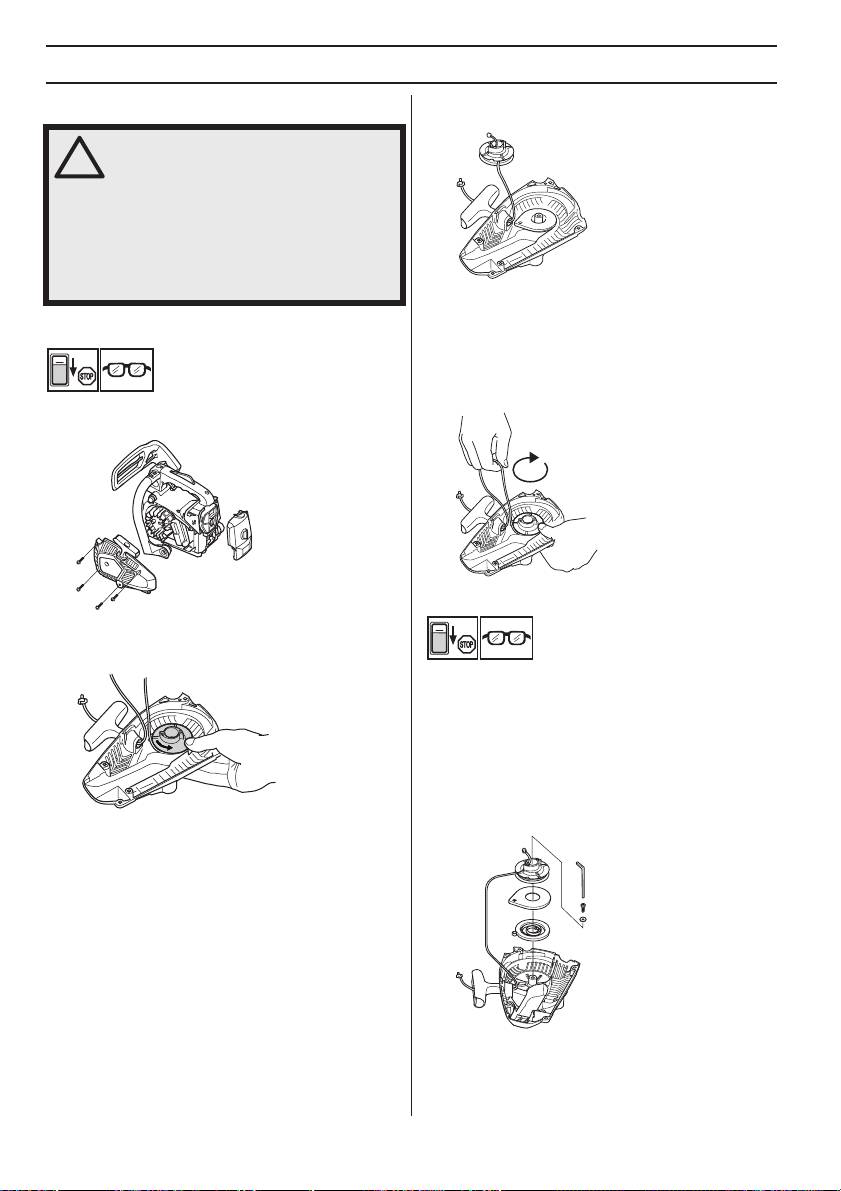
WARNING! When the recoil spring is
wound up in the starter housing it is
!
under tension and can, if handled
carelessly, pop out and cause personal
injury.
Care must be exercised when replacing
the return spring or the starter cord.
Wear protective glasses and protective
gloves.
Tensioning the recoil spring
Changing a broken or worn starter cord
• Hook the starter cord in the notch in the pulley and
turn the starter pulley about 2 turns clockwise.
Note! Check that the pulley can be turned at least a
further 1/2 turn when the starter cord is pulled all the
way out.
• Loosen the screws that hold the starter against the
crankcase and remove the starter.
Changing a broken recoil spring
• Pull out the cord approx. 30 cm and hook it into the
notch in the rim of the pulley. Release the recoil spring
by letting the pulley rotate slowly backwards.
• Lift up the starter pulley. See instructions under the
heading Changing a broken or worn starter cord.
Remember that the recoil spring is coiled under
tension in the starter housing.
• Remove the cassette with the recoil spring from the
starter.
• Lubricate the recoil spring with light oil. Fit the
cassette with recoil spring in the starter. Fit the starter
pulley and tension the recoil spring.
• Undo the screw in the centre of the pulley and remove
the pulley. Insert and fasten a new starter cord to the
pulley. Wind approx. 3 turns of the starter cord onto
the pulley. Connect the pulley to the recoil spring so
that the end of the spring engages in the pulley. Fit the
screw in the centre of the pulley. Insert the starter cord
through the hole in the starter housing and the starter
32 – English
MAINTENANCE
Fitting the starter
Spark plug
• To fit the starter, first pull out the starter cord and place
the starter in position against the crankcase. Then
slowly release the starter cord so that the pulley
engages with the pawls.
The spark plug condition is influenced by:
• Fit and tighten the screws that hold the starter.
• Incorrect carburettor adjustment.
• An incorrect fuel mixture (too much or incorrect type of
oil).
• A dirty air filter.
These factors cause deposits on the spark plug
electrodes, which may result in operating problems and
starting difficulties.
If the machine is low on power, difficult to start or runs
Air filter
poorly at idle speed: always check the spark plug first
before taking any further action. If the spark plug is dirty,
clean it and check that the electrode gap is 0.65 mm. The
spark plug should be replaced after about a month in
operation or earlier if necessary.
The air filter must be regularly cleaned to remove dust and
dirt in order to avoid:
• Carburettor malfunctions
• Starting problems
• Loss of engine power
• Unnecessary wear to engine parts.
• Excessive fuel consumption.
• Remove the air filter after taking off the air filter cover.
When refitting make sure that the air filter seals tightly
against the filter holder. Clean the filter by brushing or
shaking it.
Note! Always use the recommended spark plug type! Use
of the wrong spark plug can damage the piston/cylinder.
Check that the spark plug is fitted with a suppressor.
Lubricating the bar tip sprocket
Lubricate the bar tip sprocket each time you refuel. Use
the special grease gun and a good quality bearing grease.
The filter can be cleaned more thoroughly by washing it in
water and detergent.
An air filter that has been in use for a long time cannot be
cleaned completely. The filter must therefore be replaced
with a new one at regular intervals. A damaged air filter
must always be replaced.
A HUSQVARNA chain saw can be equipped with different
types of air filter according to working conditions, weather,
season, etc. Contact your dealer for advice.
English – 33
MAINTENANCE
Adjustment of the oil pump
The oil pump is adjustable. Adjustments are made by
turning the screw with a screwdriver. Turning the screw
clockwise will increase the oil flow, turning it anticlockwise
will reduce the oil flow.
The oil tank should become nearly empty by time fuel is
used up. Be sure to refill the oil tank every time when
refueling the saw.
WARNING! The engine must not be
running when making adjustments.
!
Cooling system
To keep the working temperature as low as possible the
machine is equipped with a cooling system.
The cooling system consists of:
1 Air intake on the starter.
2 Air guide plate.
3 Fins on the flywheel.
4 Cooling fins on the cylinder.
5 Clutch cover
5
3
4
12
Clean the cooling system with a brush once a week, more
often in demanding conditions. A dirty or blocked cooling
system results in the machine overheating which causes
damage to the piston and cylinder.
34 – English

MAINTENANCE
Maintenance schedule
The following is a list of the maintenance that must be performed on the machine. Most of the items are described in the
Maintenance section.
Daily maintenance Weekly maintenance Monthly maintenance
Check the brake band on the chain
On chain saws without a catalytic
brake for wear. Replace when less than
Clean the outside of the machine.
converter, check the cooling system
0.6 mm (0,024 inch) remains at the
weekly.
most worn point.
Check that the components of the
Check the starter, starter cord and
Check the clutch centre, clutch drum
throttle control work safely. (Throttle
return spring.
and clutch spring for wear.
lockout and throttle control.)
Clean the chain brake and check that
it operates safely. Make sure that the
Check that the vibration damping
Clean the spark plug. Check that the
chain catcher is undamaged, and
elements are not damaged.
electrode gap is 0.65 mm.
replace it if necessary.
The bar should be turned daily for
more even wear. Check the
lubrication hole in the bar, to be sure
File off any burrs from the edges of
Clean the outside of the carburettor.
it is not clogged. Clean the bar
the bar.
groove. If the bar has a sprocket tip,
this should be lubricated.
Check that the bar and chain are
Clean or replace the spark arrestor
Check the fuel filter and the fuel hose.
getting sufficient oil.
mesh on the muffler.
Replace if necessary.
Check the saw chain with regard to
visible cracks in the rivets and links,
whether the saw chain is stiff or
Empty the fuel tank and clean the
Clean the carburettor compartment.
whether the rivets and links are
inside.
abnormally worn. Replace if
necessary.
Sharpen the chain and check its
tension and condition. Check the
Clean the air filter. Replace if
Empty the oil tank and clean the inside.
drive sprocket for excessive wear
necessary.
and replace if necessary.
Clean the starter units air intake. Check all cables and connections.
Check that nuts and screws are tight.
Check that the stop switch works
correctly.
Check that there are no fuel leaks
from the engine, tank or fuel lines.
On chain saws with a catalytic
converter, check the cooling system
daily.
Check the airfilter and clean it when
it´s necessary.
English – 35

TECHNICAL DATA
Technical data
T425
Engine
3
Cylinder displacement, cm
25,4
Cylinder bore, mm 34
Stroke, mm 28
Idle speed, rpm 2900
Recommended max. fast idle speed, rpm 12500
Power, kW/ rpm 0,96/9000
Ignition system
Manufacturer of ignition system Ikeda Denso
Type of ignition system CD
Spark plug NGK BPMR 7A/
Champion RCJ 7Y
Electrode gap, mm 0,65
Fuel and lubrication system
Manufacturer of carburettor Walbro
Carburettor type WT 804
Fuel tank capacity, litre 0,23
Oil pump capacity at 8,500 rpm, ml/min 3-9
Oil tank capacity, litre 0,16
Type of oil pump Automatic
Weight
Chain saw without bar or chain, empty tanks, kg 2,99
Noise emissions
(see note 1)
Sound power level, measured dB(A) 109
Sound power level, guaranteed L
WA
dB(A) 110
Sound levels
(see note 2)
Equivalent sound pressure level at operator’s ear, measured
according to relevant international standards, dB(A) 96
Vibration levels
(see note 3)
2
Front handle, m/s
6,2
2
Rear handle, m/s
5,9
Chain/bar
Standard bar length, inch/cm 10”/25
Recommended bar lengths, inch/cm 10”/25
Usable cutting length, inch/cm
Chain speed at max. power, m/sec 17,1 or 15,2
Pitch, inch/mm 3/8” /9,52 or 1/4” /6,25
Thickness of drive links, inch/mm 0,050/1,3
Number of teeth on drive sprocket 6 or 8
Note 1: Noise emissions in the environment measured as sound power (L
WA
) in conformity with EC directive 2000/14/EC.
Note 2: Equivalent sound pressure level, according to ISO 22868, is calculated as the time-weighted energy total for
noise pressure levels under various working conditions with the following time distribution: 1/3 idling, 1/3 max. load,
1/3 max. speed.
Note 3: Equivalent vibration level, according to ISO 22867, is calculated as the time-weighted energy total for vibration
levels under various working conditions with the following time distribution: 1/3 idling, 1/3 max. load, 1/3 max. speed.
36 – English

TECHNICAL DATA
Bar and chain combinations
The following combinations are CE approved.
Bar Chain
Length, inch Pitch, inch Gauge, mm Max. nose radius Type Length, drive links (no.)
10 1/4 1,3 R10 Husqvarna H00 60
10 3/8 1,3 7 T Husqvarna H36 40
Saw chain filing and file gauges
7
EC-declaration of conformity
(Applies to Europe only)
Husqvarna AB
, SE-561 82 Huskvarna, Sweden, tel +46-36-146500, declares under sole responsibility that the chain
saw
Husqvarna T425
from 2008’s serial numbers and onwards (the year is clearly stated in plain text on the type plate
with subsequent serial number), is in conformity with the requirements of the COUNCIL’S DIRECTIVES:
- of June 22, 1998 ”relating to machinery”
98/37/EC
, annex IIA.
- of December 15, 2004 ”relating to electromagnetic compatibility”
2004/108/EC
.
- of May 8, 2000 ”relating to the noise emissions in the environment”
2000/14/EC
.
For information relating to noise emissions, see the chapter Technical data. The following standards have been applied:
CISPR 12:1997, EN ISO 11681-2.
Notified body: TÜV Rheinland InterCert kft. Production Certification - H-1061, Budapest, Paulay Eden, 52 Hungary, has
carried out EC type examination in accordance with the machinery directive’s (98/37/EC) article 8, point 2c. The
certificates for EC type examination in accordance with annex VI, have the numbers:
U3 2892008 01
The supplied chain saw conforms to the example that underwent EC type examination.
Huskvarna January 21, 2008
Bengt Frögelius, Development director chainsaw R&D
English – 37
SYMBOLERKLÄRUNG
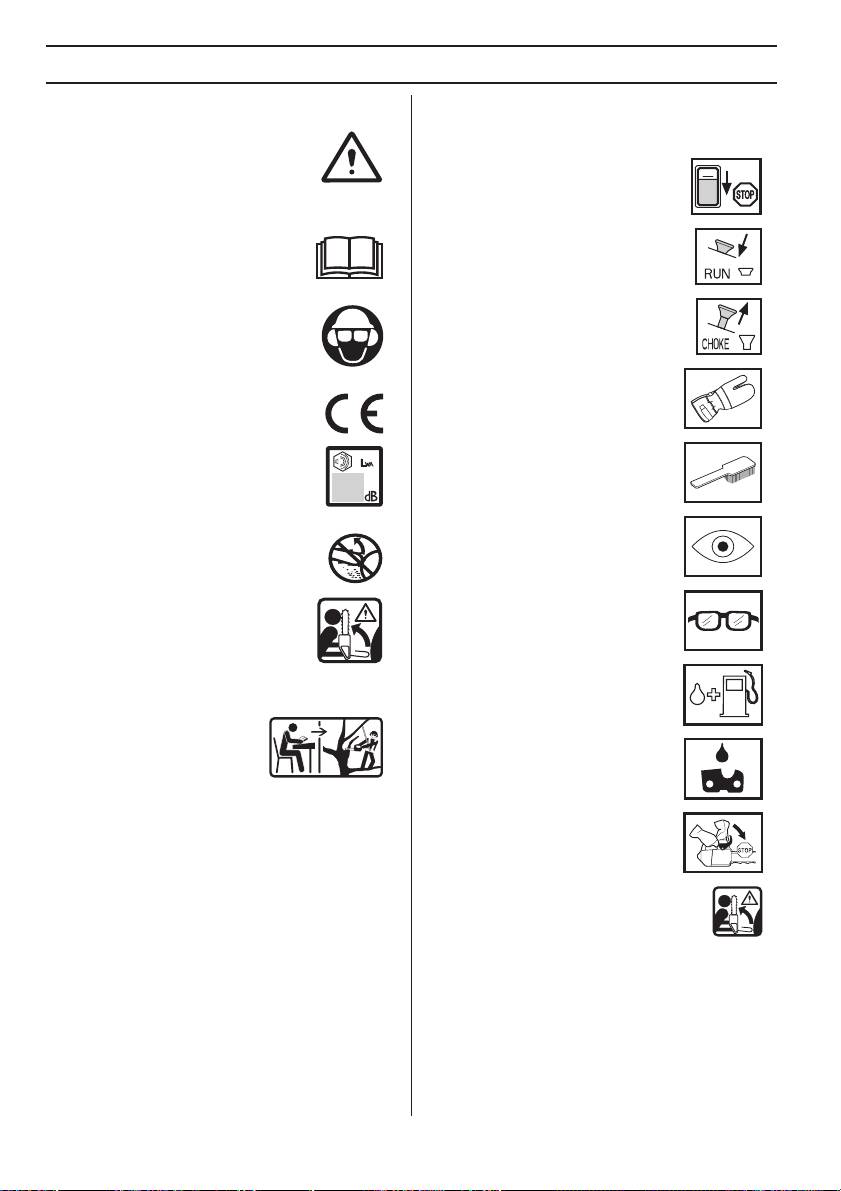
Symbole am Gerät:
Symbole in der
WARNUNG! Motorsägen können
Bedienungsanweisung:
gefährlich sein! Durch unsachgemäße
Eine Kontrolle und/oder Wartung ist bei
oder nachlässige Handhabung können
abgestelltem Motor vorzunehmen, wenn
schwere Verletzungen oder sogar tödliche
der Stoppschalter in Stellung STOP
Unfälle von Anwendern oder anderen
steht.
Personen verursacht werden.
Lesen Sie die Bedienungsanweisung
sorgfältig durch und machen Sie sich mit
Betriebslage
dem Inhalt vertraut, bevor Sie das Gerät
benutzen.
Benutzen Sie immer:
• Einen zugelassenen Schutzhelm
Choke
• Einen zugelassenen Gehörschutz
• Schutzbrille oder Visier
Dieses Produkt stimmt mit den geltenden
Stets zugelassene Schutzhandschuhe
CE-Richtlinien überein.
tragen.
Umweltbelastende Geräuschemissionen
gemäß der Richtlinie der Europäischen
Regelmäßige Reinigung ist notwendig.
Gemeinschaft. Die Emission des Gerätes
ist im Kapitel Technische Daten und auf
dem Geräteschild angegeben.
Die Führungsschienenspitze darf niemals
Visuelle Kontrolle.
Gegenstände berühren.
WARNUNG! Sollte die
Schutzbrille oder Gesichtsschutz
Führungsschienenspitze einen
müssen benutzt werden.
Gegenstand berühren, kann dies zu
einem Rückschlag führen, sodass die
Schiene nach oben und zurück zum
Bediener geschleudert wird. Schwere
Verletzungen können die Folge sein.
Tanken.
Diese Säge darf nur von
Personen benutzt werden, die
speziell für Waldarbeiten
Nachfüllen von Öl und Einstellen des
ausgebildet wurden. Siehe
Ölflusses.
Bedienungsanweisung!
Sonstige Symbole/Aufkleber am Gerät beziehen sich
auf spezielle Zertifizierungsanforderungen, die in
Die Kettenbremse soll eingeschaltet
bestimmten Ländern gelten.
sein, wenn die Motorsäge gestartet
wird.
WARNUNG! Sollte die
Führungsschienenspitze einen
Gegenstand berühren, kann dies zu einem
Rückschlag führen, sodass die Schiene
nach oben und zurück zum Bediener
geschleudert wird. Schwere Verletzungen können die
Folge sein.
38 – German

INHALT
Inhalt
SYMBOLERKLÄRUNG
Symbole am Gerät: 38
Symbole in der Bedienungsanweisung: 38
INHALT
Inhalt 39
EINLEITUNG
Sehr geehrter Kunde! 40
WAS IST WAS?
Was ist was an der Motorsäge? 41
ALLGEMEINE SICHERHEITSVORSCHRIFTEN
Maßnahmen vor der Benutzung einer neuen
Motorsäge 42
Wichtig 42
Stets mit gesundem Menschenverstand arbeiten! 43
Persönliche Schutzausrüstung 43
Sicherheitsausrüstung des Gerätes 44
Schneidausrüstung 47
MONTAGE
Montage von Schiene und Kette 53
UMGANG MIT KRAFTSTOFF
Kraftstoff 54
Tanken 55
Sicherer Umgang mit Kraftstoff 55
STARTEN UND STOPPEN
Starten und stoppen 56
ARBEITSTECHNIK
Vor jeder Anwendung: 58
Allgemeine Arbeitsvorschriften 58
Vorbeugende Maßnahmen gegen Rückschlag 66
WARTUNG
Allgemeines 67
Vergasereinstellung 67
Kontrolle, Wartung und Service der
Sicherheitsausrüstung der Motorsäge 68
Schalldämpfer 69
Startvorrichtung 70
Luftfilter 71
Zündkerze 71
Schmierung des Umlenksterns der
Führungsschiene 71
Einstellen der Ölpumpe 72
Kühlsystem 72
Wartungsschema 73
TECHNISCHE DATEN
Technische Daten 74
Führungsschienen- und Kettenkombinationen 75
Feilen und Schärflehren der Sägekette 75
EG-Konformitätserklärung 75
German – 39

EINLEITUNG
Sehr geehrter Kunde!
Herzlichen Glückwunsch zu Ihrem Kauf eines Husqvarna-Produkts!Husqvarnas Geschichte reicht bis ins Jahr 1689
zurück, als König Karl XI eine Fabrik an den Ufern des Flusses Huskvarna errichten ließ, in der Musketen gefertigt
werden sollten.Die Lage am Huskvarna bot sich an, da der Fluss zur Erzeugung von Wasserkraft verwendet wurde und
so als Wasserkraftwerk diente.In den mehr als 300 Jahren seit dem Bestehen des Husqvarna-Werks wurden unzählige
Produkte hergestellt, angefangen von Holzöfen bis hin zu modernen Küchenmaschinen, Nähmaschinen, Fahr- und
Motorrädern usw.1956 wurde der erste Motorrasenmäher auf den Markt gebracht, gefolgt von der Motorsäge 1959, und
in diesem Bereich ist Husqvarnas auch heute tätig.
Husqvarna ist gegenwärtig einer der weltführenden Hersteller von Forst- und Gartenmaschinen und legt vor allem Wert
auf Qualität und Leistungskraft.Das Unternehmenskonzept umfasst die Entwicklung, Herstellung und den Vertrieb von
Produkten für den Einsatz in Wald und Garten sowie in der Bauindustrie.Husqvarnas Ziel ist es, auch in den Bereichen
Ergonomie, Benutzerfreundlichkeit, Sicherheit und Umwelt führend zu sein – dies lässt sich an vielen Details erkennen,
die aus diesen Gesichtspunkten heraus entwickelt wurden.
Wir sind überzeugt, dass Sie mit der Qualität und Leistung unserer Produkte über lange Jahre mehr als zufrieden sein
werden. Mit dem Erwerb unserer Produkte erhalten Sie professionelle Hilfe bei Reparaturen und Service, falls doch
einmal etwas passieren sollte. Haben Sie die Maschine nicht bei einem unserer Vertragshändler gekauft, fragen Sie dort
nach der nächsten Servicewerkstatt.
Wir hoffen, dass Sie mit Ihrer Maschine über lange Jahre zufrieden sein werden. Denken Sie daran, diese
Bedienungsanleitung sicher aufzubewahren.Die genaue Befolgung ihres Inhalts (Verwendung, Service, Wartung usw.)
verlängert die Lebensdauer der Maschine erheblich und erhöht zudem ihren Wiederverkaufswert.Sollten Sie Ihre
Maschine verkaufen, händigen Sie dem neuen Besitzer bitte auch die Bedienungsanleitung aus.
Vielen Dank, dass Sie sich für ein Husqvarna-Produkt entschieden haben.
Die Husqvarna AB arbeitet ständig an der Weiterentwicklung ihrer Produkte und behält sich daher das Recht auf
Änderungen ohne vorherige Ankündigung, z. B. von Form und Aussehen, vor.
40 – German
