Flymo Contour Power Plus Cordless Trimmer: инструкция
Раздел: Садовая техника
Тип:
Инструкция к Flymo Contour Power Plus Cordless Trimmer
CONTOUR
POWER PLUS
CORDLESS
FONTOS INFORMÁCIÓ
IMPORTANT INFORMATION
GB
HU
Használat előtt olvassa el, és tartsa meg
Read before use and retain for future reference
későbbi felhasználásra
WICHTIGE INFORMATION
UWAGA
Bitte vor dem Benutzen des Gerätes durchlesen
DE
PL
Zapoznać się z treścią niniejszej instrukcji przed
und gut aufbewahren
użyciem i zachować ją do dalszego użytkowania
RENSEIGNEMENTS IMPORTANTS
urządzenia
A lire avant usage et à conserver pour référence
FR
DŮLEŽITÁ INFORMACE
ultérieure
CZ
Než začnete stroj používat, přečtěte si pozorně tento
BELANGRIJKE INFORMATIE
návod a uschovejte jej pro další použití v budoucnu
Leest u deze informatie voor het gebruik en
NL
DÔLEŽITÉ INFORMÁCIE
bewaar ze voor toekomstige raadpleging
SK
Pred použitím si prečítajte nasledovné informácie
VIKTIG INFORMASJON
a odložte si ich pre budúcu potrebu
Les bruksanvisningen nøye før bruk og
NO
POMEMBNA INFORMACIJA
oppbevar den for senere bruk
SI
Preberite pred uporabo in shranite za prihodnjo
TÄRKEÄÄ TIETOA
uporabo
Lue tämä ennen käyttöä ja säilytä myöhempää
FI
Operatoriaus instrukcijÅ rinkinys
tarvetta varten
Perskaitykite |¡ instrukcijÅ rinkin¡ labai atidãiai,
VIKTIG INFORMATION
LT
kad pilnai suprastum>te turin¡, prie| prad>dami
Läs anvisningarna före användningen och spara
SE
naudoti vejos/ ãol>s pjov>jƒ.
dem för framtida behov
ВАЖНАЯ ИНФОРМАЦИЯ
VIGTIGE OPLYSNINGER
RU
Прочитайте перед тем, как включить триммер,
Du bør læse brugsanvisningen før brug og
DK
и сохраните для дальнейшего использования.
gemme til senere henvisning
OLULINE TEAVE
INFORMACIÓN IMPORTANTE
EE
Enne seadme kasutuselevõtmist lugege
Léase antes de utilizar y consérvela como
ES
kasutusjuhend läbi ning säilitage see tuleviku tarbeks.
referencia en el futuro
SVARŒGA INFORM÷CIJA
INFORMAÇÕES IMPORTANTES
LV
Pirms lieto|anas izlasiet un saglab◊jiet
Leia antes de utilizar e guarde para consulta
PT
turpm◊k◊m uzziª◊m
futura
Manual de instrucţiuni
RO
Inainte să folosiţi mașina de tuns pentru prima
INFORMAZIONI IMPORTANTI
oară, citiţi cu atenţie manualul de instrucţiuni
Leggere prima dell’uso e conservare per
IT
pentru a-i înţelege conţinutul.
ulteriore consultazione
2
13
1
12
3
5
11
4
10
9
6
8
7
GB - CONTENTS
DE - INHALT
FR - CONTENU DU
NL - INHOUD
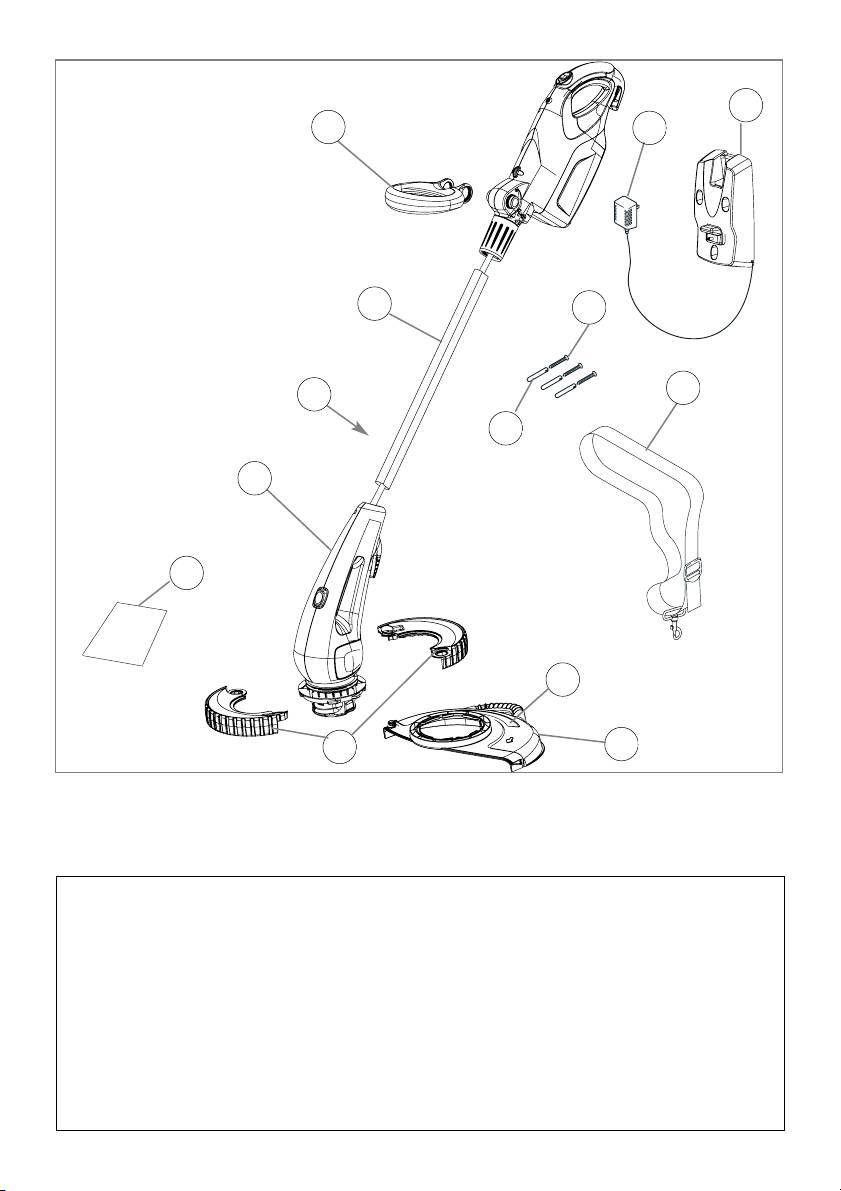
1. Integrated Battery
1. Integriertes Ladegerät
CARTON
1. Geïntegreerde
Charger
2. Wandbefestigung
1. Chargeur de batterie
Batterijoplader
2. Wall Bracket
3. Schrauben
intégré
2. Ophangbeugel
3. Screws
4. Befestigungsdübel
2. Support mural
3. Schroeven
4. Fixing Plugs
5. Schultergurt
3. Vis
4. Schraper
5. Shoulder Harness
6. Warnetikett
4. Chevilles
5. Schouderharnas
6. Warning Label
7. Schutz
5. Bandoulière
6. Waarschuwingsetiket
7. Guard
8. Rad
6. Etiquette d’avertissement
7. Beschermkap
8. Wheel
9. Bedienungsanweisung
7. Carter
8. Wiel
9. Instruction Manual
10. Trimmerkopf
8. Roue
9. Handleiding
10. Trimmer Head
11. Produkttypenschild
9. Manuel d’Instructions
10. Trimmerkop
11. Product Rating Label
12. Rohr
10. Tête de la désherbeuse
11. Product-informatielabel
12. Tube
13. Führungsgriff
12. Plaquette des
12. Buis
13. Steady Handle
Caractéristiques du
13. Handvat
Produit
12. Tube
13. Poignée auxiliaire

NO - INNHOLD
PT - LEGENDA
CZ - OBSAH KARTONU
RU - СОДЕРЖИМОЕ:
1 Integrert Batterilader
1. Carregador de bateria
1. Integrovaná nabíječka
1. Встроенное зарядное
2. Veggholder
integrado
baterie
устройство батареи
3. Skruer
2. Suporte de parede
2. Nástěnná konzola
2. Кронштейн
4. Festepropper
3. Parafusos
3. Šrouby
3. Винты
5. Skuldersele
4. Buchas de fixação
4. Upevńovací kolíky
4. Крепежные втулки
6. Advarselsetikett
5. Alça de Ombro
5. Ramenní popruh
5. Плечевой ремень
7 Sprutskjerm
6. Etiqueta de Aviso
6. Štítek s výstražnými
6. Предупреждающая
8. Hjul
7. Protecção
symboly
этикетка
9. Bruksanvisning
8. Roda
7. Kryt
7. Предохранитель
10. Trimmerhode
9. Manual de Instrucções
8. Kolo
8. Колесо
11. Produktmerking
10. Cabeça de corte
9. Návod k používání
9. Руководство по
12. Rør
11. Rótulo de Avaliação do
10. Hlava vyžínače
использованию
13. Håndtaksbøyle
Produto
11. Výrobní štítek
10. Головка триммера
12. Tubo
12. Trubice
11. Этикетка с
FI - SISÄLTÖ
13. Pega fixa
13. Pevná rukoje
характеристиками
1. Laturi
изделия
2. Seinäteline
IT - INDICE CONTENUTI
SK - OBSAH
12. Трубка
3. Ruuvi
1. Caricabatterie integrato
1. Integrovaná nabíjačka
13. Стабилизационная
4. Kiinnitystulpat
2. Mensola a muro
batérií
рукоятка
5. Olkahihna
3. Viti
2. Konzola na stenu
6. Varoitusnimike
4. Maschi di fissaggio
3. Skrutky
EE - OSAD
7. Suojus
5. Tracolla
4. Upevňovacie
1. Integreeritud akulaadija
8. Pyörä
6. Etichetta di pericolo
hmoždinky
2. Seinakinniti
9. Käyttöopas
7. Protezione
5. Popruhy na plece
3. Kruvid
10. Siistijän pää
8. Ruota
6. Varovný štítok
4. Kinnituse tüüblid
11. Ruohonleikkurin arvokilpi
9. Manuale di istruzioni
7. Kryt
5. Õlarihm
12. Varsi
10. Testa tagliabordi
8. Koleso
6. Hoiatusmärgis
13. Etukahva
11. Etichetta dati del
9. Príručka
7. Kaitse
prodotto
10. Hlava kosačky
8. Ketas
SE - INNEHÅLL
12. Tubo
11. Prístrojový štítok
9. Kasutusjuhend
1. Inbyggd Batteriladdare
13. Impugnatura di guida
12. Trubica
10. Trimmeri pea
2. Väggfäste
13. Oporná rukovä
11. Toote kasutusvõimsuse
3. Skruvar
HU - TARTALOMJEGYZÉK
tabel
4. Pluggar
1. Integrált teleptöltő
SI - VSEBINA
12 Toru
5. Axelsele
2. Falitartó
1. Vgrajeni polnilec
13. Tugev käepide
6. Varningsetikett
3. Csavarok
baterije
7. Sköld
4. Tiplik
2. Stenski nosilec
LV - IEPAKOJUMA
8. Hjul
5. Tartóheveder
3. Vijaki
SATURS
9. Bruksanvisning
6. Figgelmeztető címke
4. Plastični čep
1. Ieb·v]tais akumulatora
10. Trimmerhuvud
7. Védőlemez
5 Naramnica
l◊d]t◊js
11. Produktmärkning
8. Kerék
6. Opozorilna Oznaka
2. Sienas kron|teins
12. Skaft
9. Kezelési útmutató
7. Ščitnik
3. Skr·ves
13. Stödhandtag
10. Trimmelő fej
8. Kolesce
4. Fiks]|anas tapas
11. Termékminősítő címke
9. Priročnik
5. Plecu siksna
DK - INDHOLD
12. Cső
10. Glava trimerja
6. Eti∑ete ar brœdin◊jumu
1. Integreret batterilader
13. Alsó fogantyú
11. Napisna Tablica
7. Aizsargs
2. Vægophæng
12. Cev
8.
Rats
3. Skruer
PL - ZAWARTOSC
13. Ravnotežno držalo
9. Lieto|anas
4. Fastgøringsprop
KARTONU
rokasgr◊mata
5. Skuldersele
1. Ładowarka
LT - SUDEDAMOSIOS
10. Trimmera galva
6. Advarselsmœrkat
2. Uchwyt mocujący na
DALYS
11. Izstr◊d◊juma datu
7. Skærm
ścianę
1. Integruotas baterijos
uzlœme
8. Hjul
3. Śrubki
įkroviklis
12. Caurule
9. Brugsvejledning
4. Zaślepki mocujące
2. Sieninis laikytuvas
13. Stingrs rokturis
10. Trimmerhoved
5. Uprząż na ramiona
3. Varžtai
11. Produktets mærkeskilt
6. Znaki bezpieczeństwa
4. Fiksavimo kištukai
RO - COMPONENTELE
12. Rør
7. Osłona
5. Pečių diržai
1. Încărcător de baterie
13. Støttehåndtag
8. Koło
6. Įspėjimo etiketė
integrat
ES - CONTENIDO
9. Instrukcja Obsługi
7. Apsauga
2. Consolă de perete
1. Cargador de batería
10. Głowica tnąca
8. Ratas
3. Șuruburi
integral
11. Tabliczka znamionowa
9. Instrukcija
4. Dopuri de fixare
2. Escuadra de pared
12. Ramie
10. Smulkintuvo galvutė
5. Ham pentru umăr
3. Tornillos
13. Uchwyt
11. Gaminio klasės etiketė
6. Etichetă de avertizare
4. Espigas de fijación
12. Vamzdis
7. Dispozitiv de protecţie
5. Arnés de hombro
13. Stabilumo rankena
8. Roată
6. Etiqueta de Advertencia
9. Manual de instrucţiuni
7. Guarda
10. Cap de retezare
8. Rueda
11. Plăcuţa de identificare a
9. Manual de
produsului
instrucciones
12. Tub
10. Cabeza de recortadora
13. Mâner fix
11. Placa de
Características del
Producto
12. Tubo
13. Manilla del asa
A1 A2 B2
B1
C1 C2
D
H
F
G
2
4
1
3
1
H
2
J
K
1
AUTO FEED

L
M
N
2
1
P Q
S
T1R
T1
V
GB DO NOT use liquids for cleaning.
FI ÄLÄ käytä nesteitä puhdistamiseen.
PL NIE używać płynów do
DE Zur Reinigung KEINE Flüssigkeiten
SE ANVÄND INTE vätskor för
czyszczenia.
verwenden.
rengöring.
CZ K čištění NEPOUŽÍVEJTE
FR NE PAS utiliser de produit liquide
DK BRUG IKKE væske til rengøring.
kapaliny.
pour le nettoyage.
ES NO utilice líquidos para la limpieza.
SK NEPOUŽÍVAJTE na čistenie tekuté
NL Voor het reinigen NOOIT
PT NÃO use líquidos para limpar.
materiály.
vloeistoffen gebruiken.
IT NON usare liquidi per la pulizia.
SI NE uporabljajte raznih tekočin za
NO Flytende midler MÅ IKKE brukes til
HU NE használjon folyadékokat
čiščenje.
rengjøring.
tisztításra.
GB For further advice or repairs,
FI Tarkempia ohjeita tai tieto
IT Per ulteriori consigli o riparazioni
contact your local dealer.
korjauksista saat paikalliselta
contattare il rivenditore locale.
DE Für weitere Empfehlungen oder
jälleenmyyjältä.
HU További tanácsért vagy javítás
Reparaturarbeiten setzen Sie sich
SE För ytterligare rådgivning eller
szükségessége esetén forduljon a
bitte mit Ihrem örtlichen Händler in
reparationer, kontakta din lokala
helyi forgalmazóhoz.
Verbindung.
återförsäljare.
PL W sprawie porad lub napraw
FR Pour en savoir plus ou pour toute
DK For yderlige vejledning eller
skontaktować się z miejscowym
réparation, contacter votre revendeur
reparation skal du kontakte din
przedstawicielem.
local.
lokale forhandler.
CZ O radu nebo opravu požádejte
NL Voor nadere informatie over
ES Si desea consejos adicionales o
svého místního prodejce.
reparaties kunt u contact opnemen
reparación, contacte con su
SK Ďalšie informácie a opravy
met uw plaatselijke leverancier.
distribuidor local.
zabezpečí váš lokálny predajca.
NO Ta kontakt med din lokale
PT Para orientação adicional ou
SI Za nadaljnja navodila ali popravila
forhandler angående ytterligere
reparações, contacte o seu agente
kontaktirajte vasega lokalnega
opplysninger eller reparasjoner.
local.
prodajalca.
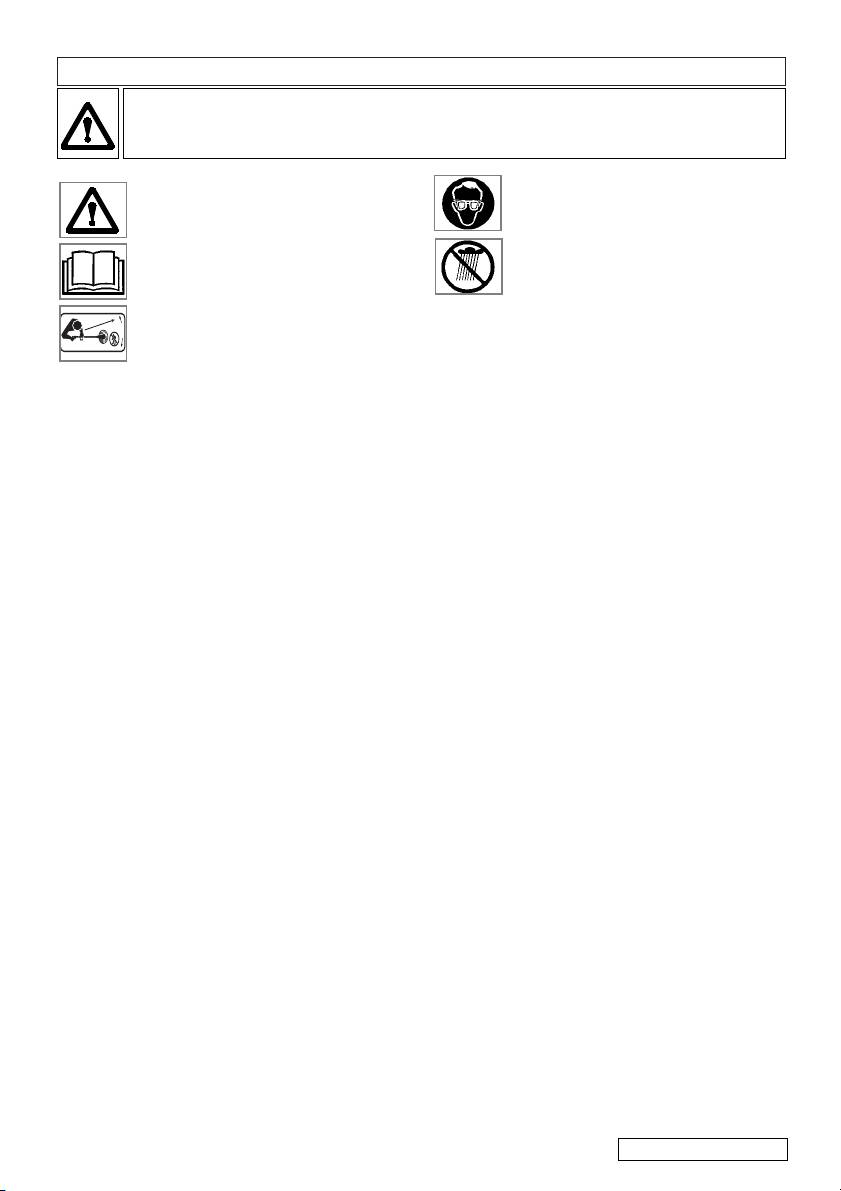
Explanation of Symbols on your product
The use of eye protection is
recommended to protect against
Warning
objects thrown by the cutting parts.
Read the user instructions carefully to
Do not operate in the rain or leave the
make sure you understand all the
product outdoors while it is raining.
controls and what they do.
Keep bystanders away. Do not
Warning
operate whilst people especially
The cutting line continues to rotate after the
children or pets are in the area.
machine has been switched off.
10m
360º
SAFETY PRECAUTIONS
If not used properly this product can be dangerous. The warnings and safety instructions must
be followed to ensure reasonable safety and efficiency in using this product. The operator is
responsible for following the warnings and instructions in this manual and on the product. Never
use the product unless the guards provided by the manufacturer are in the correct position.
General
impact, check for signs of wear or damage
1. Never allow children or people unfamiliar with
and repair as necessary.
these instructions to use the trimmer. Local
3. Inspect the area to be cut before each use.
regulations may restrict the age of the operator.
Remove all objects such as stones, broken glass,
2. Only use the trimmer in the manner and for
nails, wire, string etc, which can be thrown or
the functions described in these instructions.
become entangled in the trimmer head.
3. Never operate the trimmer when you are
4. Check that the cutting head, spool and cap
tired, ill or under the influence of alcohol,
are fitted correctly.
drugs or medicine.
Use
4. The operator or user is responsible for
1. Use the trimmer only in daylight or good
accidents or hazards occurring to other
artificial light.
people or their property.
2. Avoid operating your trimmer in wet grass,
Battery
where feasible.
Cordless Battery Powered Products require
3. Take care in wet grass, you may lose your footing.
special care.
4. On slopes, be extra careful of your footing
1. AVOID ACCIDENTAL STARTING KEEP HANDS
and wear non-slip footwear.
AND FINGERS AWAY FROM THE SWITCH
5. Do not walk backwards when trimming, you
LEVER WHILE CARRYING THE PRODUCT.
could trip. Walk never run.
2. Always charge the product indoors and store in
6. Keep cutting head below waist level.
a cool dry place - out of the reach of children.
7. Never operate the trimmer with damaged
3. Use only the charger provided with your unit.
guards or without guards in place.
Use of any other charger could permanently
8. Never fit metal cutting elements.
damage the battery and the product.
9. Keep hands and feet away from the cutting
4. Use the charger with standard domestic
means at all times and especially when
household electrical outlets only.
switching on the motor.
5. Do not abuse the charger or charger cord.
10.Do not lean over the trimmer guard - objects
6. Do not use the charger if the charger or
may be thrown by the cutting line.
charger cord is damaged.
11 If you hit an object. Do not use your trimmer
7. Use the charger indoors only.
until you are sure that the entire trimmer is in
8. Do not use the charger outdoors.
a safe operating condition;
9. Store and charge this unit in a cool, dry well
12 If the trimmer starts to vibrate abnormally.
ventilated location and out of the reach of children.
Check immediately. Excessive vibration can
10.Do not charge the battery or use the unit in
cause injury.
an explosive or corrosive environment. Avoid
Maintenance and storage
areas where flammable liquids or gases are
1. Keep all nuts, bolts and screws tight to be
present to avoid creating a fire or explosion.
sure the trimmer is in safe working condition.
11.Do not attempt to repair the unit including the
2. Replace worn or damaged parts for safety.
battery. Nylon line replacement and cleaning
3. Only use the replacement cutting line
the unit are the only items suitable for user
specified for this product.
maintenance.
4. Only use replacement parts and accessories
12.Do not insert any object into the motor area.
recommended by Husqvarna Outdoor Products.
Keep free of debris to avoid overheating.
5. To avoid the risk of injury keep fingers and
13.Do not incinerate or mutilate the battery.
hands clear of the line cutter on the leading
Batteries contain hazardous chemicals.
edge of the guard.
Dispose of properly.
6. Clean unit with a dry cloth. Never use metal
Preparation
objects to clean the unit.
1. While using your product always wear
7. Inspect and maintain the trimmer regularly.
substantial footwear and long trousers.
Any repairs must be carried out by an
2. Before using the machine and after any
authorised repairer.
ENGLISH - 1

Battery
Battery Care
Battery Replacement
1. If over a period of time the battery quickly runs
Should your battery need to be replaced contact
down after a full 24 hour charging period, a
your local approved service centre or dealer who
replacement battery is needed.
will remove your old battery and fit a genuine
2. There will be some charge present in the
Flymo replacement battery.
battery but to ensure maximum running time,
IMPORTANT
recharge your trimmer for 24 hours before use.
The red lead should always be connected to
3. Permanent connection to the charger in a well
the red terminal on the battery. The black
ventilated area will automatically keep your
lead should always be connected to the black
battery fully charged ready for use.
terminal on the battery.
4. To prevent permanent battery damage, never
Bench Top Re-charging
store in a discharged condition.
The wall bracket can also be used as a "bench
5. Contact your local approved service
top" stand for re-charging your cordless trimmer.
centre/dealer/distributor for a replacement
Winter Storage
battery and for safe disposal of your old
1. Fully charge for 24 hours before winter
battery.
storage.
6. Battery
2. If you are unable to leave your cordless
12 Volt 7 Amp/Hour "High Power"
trimmer on permanent charge, re-charge the
Sealed for Life No maintenance
battery every 3 to 4 months for a full 24 hour
required
charging period to top up the battery charge
• IMPORTANT
during winter storage.
DISPOSE OF YOUR OLD BATTERIES
3. Avoid extended storage without re-charge.
SAFELY
4. Store in a cool dry place.
DO NOT CUT OPEN, BURN OR
INCINERATE.
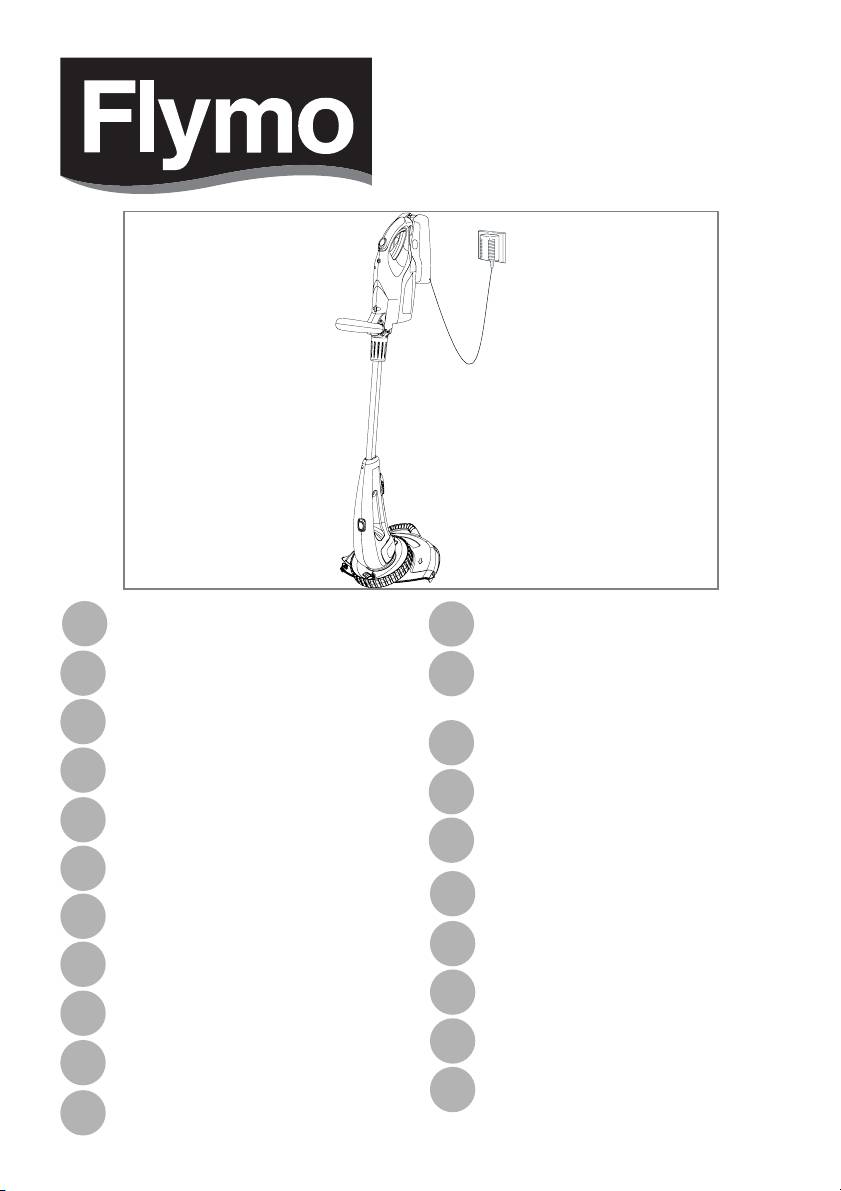
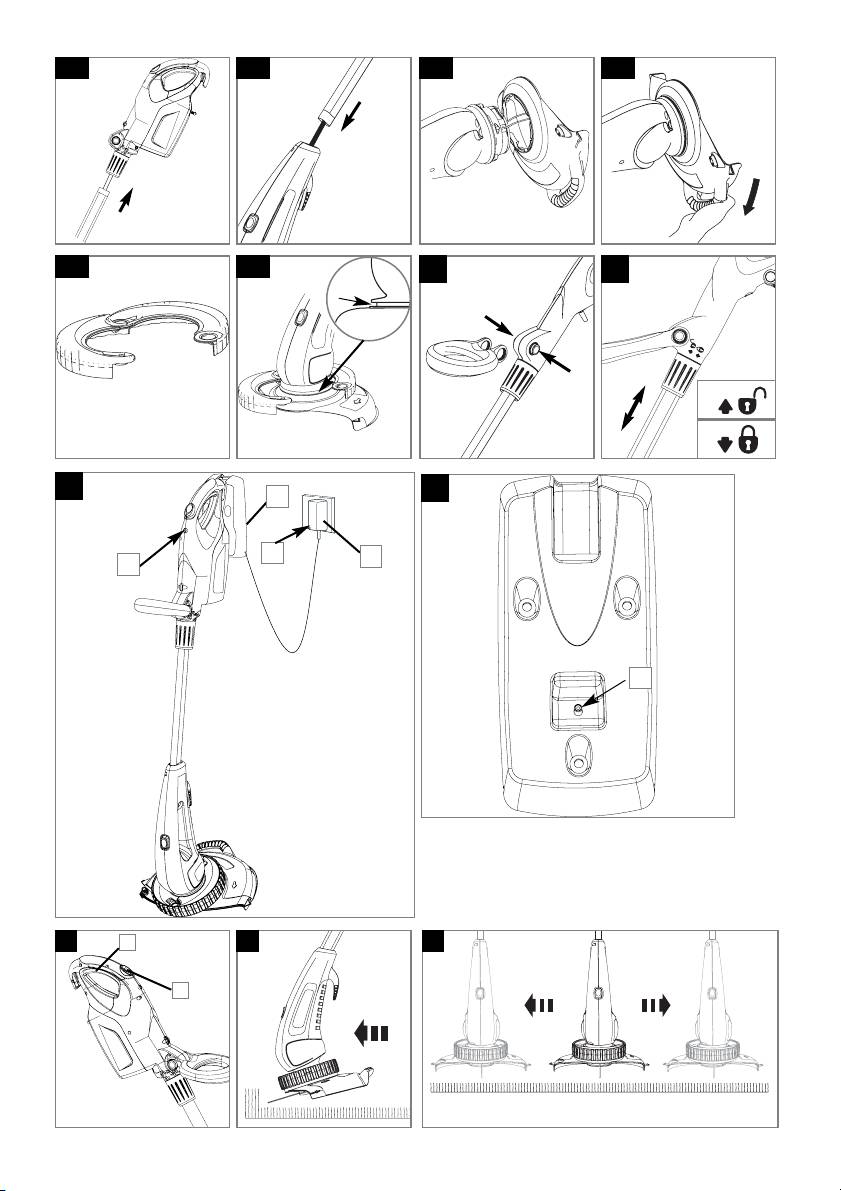
Fitting the Wall Bracket - Charging the Battery
• IMPORTANT !
red even when the battery is fully charged.
Switch charger off at the wall socket
6. Full charge will be achieved in 24 hours after
before connecting or disconnecting the
which the indicator lamp on the charger (F4)
trimmer to the wall bracket.
will turn to green. During charging the charger
1. It is recommended that the wall bracket (F2)
becomes warm. This is normal and means the
should be mounted on a smooth, vertical and
charger is operating correctly.
internal wall which is strong enough to hold the
Re-Charging Your Product
weight of the product, in a well ventilated area
1. Re-charge the battery as soon as the cutting
between 5°C and 25°C.
power of your product begins to die and slow
2. There are 3 holes on the wall bracket.
down.
Position the wall bracket with the two holes at
2. Avoid running the product into "deep"
the top. See Fig G.
discharge, i.e. avoid flattening the battery
3. Ensure that when the trimmer is attached the
completely.
bottom of the trimmer is within 4 inches (100
3. Follow the procedure outlined in the Initial
mm) of the ground, this will make it easier to
Charging Procedure.
hang the trimmer and will also ensure that the
4. Charging the battery according to these
wall bracket is within easy reach of an electric
instructions should ensure maximum battery
socket to allow the charger to be plugged in.
life.
4. Fix wall bracket securely to the wall with the
• The charger will automatically keep the
plugs and screws provided.
battery topped up with charge during
5. Your cordless trimmer can now be attached to
storage and will ensure that the cordless
the wall bracket for charging.
trimmer is ready for use.
Initial Charging Procedure
• The battery should be charged for 24 hours
1. Use the charger indoors only.
before use.
2. Ensure the charger is not exposed to moisture.
• Re-charge your cordless trimmer
Keep the charger and the trimmer dry at all
immediately after every use for the full 24
times. Keep the charger well ventilated during
hour charging period.
charging.
• The cordless trimmer can be left
3. Ensure the product is correctly located into the
connected to the charger permanently, with
wall bracket (F2) and the charge connector
the charger switched on, without fear of
(G1).
overcharging.
4. Plug the charger (F1) into a suitable household
electrical wall socket and switch on.
5. The red indicator lamps (F3, F4) glow
continuously during charging.
• The red indicator lamp on the product (F3) is
a power indicator and will continue to glow
ENGLISH - 2

Environmental Information
• Awareness of the environment must be
The symbol on the product or on its packaging
considered when disposing of ‘end-of-life’
indicates that this product may not be treated as
product.
household waste. Instead it shall be handed over to the
• If necessary, contact your local authority for disposal
applicable collection point for the recycling of electrical
information.
and electronic equipment. By ensuring this product is
BA
TTERY DISPOSAL
disposed of correctly, you will help prevent potential
• The battery should be taken to an Authorised
negative consequences for the environment and human
Service Centre or your local Recycling Station.
health, which could otherwise be caused by
• Do NOT dispose of used battery with household
inappropriate waste handling of this product. For more
waste.
detailed information about recycling of this product,
• Do NOT dispose of battery to water.
please contact your local council office, your household
• Lead/Acid batteries can be harmful and should
waste disposal service or the shop where you
be disposed of through the recognised
purchased the product.
recycling facility in accordance with European
Regulations.
• Do NOT incinerate.
Service Recomendations
• Your product is uniquely identified by a silver and black product rating label.
• We strongly recommend that your product is serviced at least every twelve months, more often in a
professional application.
Guarantee and Guarantee Policy
If any part is found to be defective due to faulty
Failures due to the following are not covered,
manufacture within the guarantee period,
therefore it is important that you read the
Husqvarna Outdoor Products, through its
instructions contained in this Operator's Manual
Authorised Service Repairers will effect the
and understand how to operate and maintain
repair or replacement to the customer free of
your machine:
charge providing:
Failures not covered by guarantee
(a) The fault is reported directly to the Authorised
* Failures as a result of not reporting an initial
Repairer.
fault.
(b) Proof of purchase is provided.
* Failures as a result of sudden impact.
(c)
* Failures as a result of not using the product in
The fault is not caused by misuse, neglect or
accordance with the instructions and
faulty adjustment by the user.
recommendations contained in this Operator's
(d) The failure has not occurred through fair wear
Manual.
and tear.
* Machines used for hire are not covered by this
(e) The machine has not been serviced or
guarantee.
repaired, taken apart or tampered with by any
* The following items listed are considered as
person not authorised by Husqvarna Outdoor
wearing parts and their life is dependent on
Products.
regular maintenance and are, therefore not
(f) The machine has not been used for hire.
normally subject to a valid warranty claim: Nylon
(g) The machine is owned by the original
Line, Spool & Line
purchaser.
* Caution!
(h) The machine has not been used
Husqvarna Outdoor Products does not accept
commercially.
liability under the warranty for defects caused in
* This guarantee is additional to, and in no way
whole or part, directly or indirectly by the fitting of
diminishes the customers statutory rights.
replacement parts or additional parts that are not
either manufactured or approved by Husqvarna
Outdoor Products, or by the machine having been
modified in any way.
ENGLISH - 3
Sicherheitsmaßnahmen
Ihre Maschine kann bei einem unsachgemäßen Gebrauch eine Gefahr darstellen und zu ernsthaften Verletzungen
des Bedieners und anderen Personen führen! Es müssen sämtliche Warnhinweise und Sicherheitsvorschriften
beachtet werden, um einen sicheren Gebrauch und eine angemessene Leistung Ihrer Maschine sicherstellen zu
können. Der Bediener ist für die Einhaltung aller in diesem Handbuch und auf der Maschine angegebenen
Warnhinweise und Sicherheitsvorschriften verantwortlich.
Erklärung der an der Maschine befindlichen Symbole
Es sollte immer eine Schutzbrille getragen
werden, um Ihre Augen vor von den
Achtung
Schneidvorrichtungen weggeschleuderten
Objekten zu schützen.
.
Die Betriebsanleitung muß sorgfältig
Die Maschine niemals im Regen
durchgelesen werden, um sicherstellen zu
verwenden oder im Freien lassen, während
können, daß alle Steuerelemente und deren
es regnet.
Funktion verstanden werden.
Immer darauf achten, dass sich niemand in
Achtung: Nach dem Ausschalten des Geräts dreht sich
Maschinennähe befindet. Die Maschine darf
das Schnittseil weiter.
niemals verwendet werden, während sich
Gemäß den Vorschriften zur Lärmverhütung Betrieb
Personen (insbesondere Kinder) oder Tiere
werktags nicht von 13.00 Uhr bis 15.00 Uhr und von 19.00
in der Nähe befinden.
Uhr bis 7.00 Uhr und auch nicht an Sonn- und Feiertagen.
Bitte beachten Sie außerdem mögliche zusätzliche
örtliche Vorschriften.
Allgemeines
12. Bringen Sie keinen Gegenstand in den Bereich des
1. Kinder oder Personen, die nicht mit der
Motors. Halten Sie sie von Verstopfungen frei, damit es
ordnungsgemäßen Benutzung dieses Rasentrimmers
nicht zu einer Überhitzung kommt. ersuchen Sie nicht, die
vertraut sind, dürfen auf keinen Fall erlaubt sein, den
Batterie zu verbrennen oder zu zerstören. Batterien
Rasentrimmer zu benutzen. Örtliche Vorschriften
enthalten gefährliche Chemikalien. Entsorgen Sie sie wie
enthalten ggf. Altersbeschränkungen.
gesetzlich vorgeschrieben.
2. Den Trimmer ausschließlich für in der vorliegenden
Vorbereitung
Gebrauchsanweisung vorgesehene Zwecke
1. Bei Arbeiten mit Ihrem Gerät müssen Sie immer
vorschriftsmäßig benutzen.
feste Schuhe und lange Hosen tragen.
3. Den Trimmer nie benutzen, wenn Sie müde oder
2. Vor der Verwendung und nach Erhalt eines kräftigen
krank sind bzw. unter Alkohol-, Drogen- oder
Stoßes muss die Maschine auf Anzeichen eines
Medikamenteneinfluß stehen.
Verschleisses oder einer Beschädigung überprüft
4. Der Bediener oder Benutzer ist für Unfälle anderer
und bei Bedarf die entsprechenden
Personen, und für die Gefahr, der sie oder deren
Reparaturarbeiten ausgeführt werden.
Eigentum ausgesetzt werden, verantwortlich.
3. Das zu mähende Areal jedesmal vorher
Batterie
begutachten. Alle Gegenstände wie z.B. Steine,
Kabellosen akkubetriebenen Geräten muß
Glasscherben, Nägel, Draht, Bindfäden usw., die
besondere Aufmerksamkeit beschenkt werden.
hochgeschleudert werden oder sich im Mähwerk
1. VERMEIDEN SIE ZUFÄLLIGES STARTEN. HALTEN
verfangen können, sind wegzuräumen.
SIE, WÄHREND SIE DEN TRIMMER TRAGEN, IHRE
4. Prüfen, daß schneidkopf, Spule und
HÄNDE UND FINGER VOM SCHALTHEBEL
Verschlußkappe korrekt eingebaut sind.
ENTFERNT.
Verwendung
2. Das Gerät darf niemals im Freien aufgeladen
1. Den Rasentrimmer nur bei Tageslicht oder guter
werden und muß an einem kühlen trockenen Ort -
künstlicher Beleuchtung verwenden.
außer Reichweite von Kindern - aufbewahrt werden.
2. Rasentrimmer sollten, wenn möglich, nicht in
3. Benutzen Sie nur das mit Ihrem Gerät mitgelieferte
nassem Gras verwendet werden.
Ladegerät. Durch Benutzung eines anderen Ladegeräts
3. In nassem Gras ist Vorsicht geboten, da Sie leicht
könnten Batterie und Trimmer permanent beschädigt
Ihren Halt verlieren können. Beim Mähen nur
werden.
gehen, niemals laufen.
4. Benutzen Sie das Ladegerät nur an
4. An Hängen muß sichergestellt werden, daß Sie einen
standardmäßigen Haushalts-Steckdosen.
sicheren Halt haben und rutschfeste Schuhe tragen.
5. Gehen Sie mit dem Ladegerät und dem Kabel des
5. Beim Trimmen nicht rückwärtsgehen, da Sie
Ladegeräts ordnungsgemäß um.
stolpern könnten.
6. Benutzen Sie das Ladegerät nicht, wenn das
6. Faden kopf unter Hüfthöhe halten.
Ladegerät bzw. das Kabel des Ladegeräts
7. Den Rasentrimmer nie verwenden, wenn die
beschädigt ist.
Schutzvorrichtungen beschädigt sind oder sich nicht
7. Benutzen Sie das Ladegerät nur drinnen.
an ihrer vorgesehenen Stelle befinden.
8. Benutzen Sie das Ladegerät nicht draußen.
8. Bringen Sie niemals Schneidvorrichtungen aus Metall an.
9. Die Aufbewahrung und Ladung dieses Gerät sollte
9. Niemals Hände oder Füße in die Nähe der
an einem kühlen, trockenen und gut gelüfteten Ort
Schneidvorrichtung bringen, insbesondere beim
außer Reichweite von Kindern erfolgen.
Einschalten des Motors.
10. Laden Sie die Batterie bzw. benutzen Sie das Gerät
10.Sich nicht über die Trimmerschutzschaube lehnen -
nicht in einer explosionsgefährdeten oder
Gegenstände könnten vom Fadenkopf
korrodierenden Umgebung. Meiden Sie Bereiche, in
hochgeschleudert werden.
denen sich entzündliche Flüssigkeiten oder Gase
11 Wenn Sie einen Gegenstand treffen. Der
befinden, damit es nicht zu einem Feuer oder einer
Rasentrimmer darf erst dann wieder verwendet
Explosion kommt.
werden, wenn absolut sichergestellt wurde, daß sich
11. Versuchen Sie nicht, das Gerät, einschl. Batterie, zu
der gesamte Rasentrimmer in einem sicheren
reparieren. Der Austausch des Nylonfadens und die
Betriebszustand befindet;
Reinigung des Geräts sind die einzigen
12 Wenn der Rasentrimmer anfängt, ungewöhnlich
Wartungsaufgaben, die vom Benutzer durchgeführt
stark zu vibrieren. In diesem Falle muß er sofort
werden dürfen.
überprüft werden. Ein übermäßiges Vibrieren kann
10m
360º
DEUTSCH - 1
Оглавление
- Fitting the Wall Bracket - Charging the Battery
- Pflege der Batterie
- Entretien de la batterie
- Informations Concernant L’environnement
- Akku onderhoud
