DOCTER DOCTER®sight C: инструкция
Раздел: Оптика
Тип:
Инструкция к DOCTER DOCTER®sight C
analytikjena
ROTPUNKT - REFLEXVISIER
RED - DOT REFLEX SIGHT
VISEUR REFLEX À POINT ROUGE
MIRA DE REFLEXIÒN DE PUNTO ROJO
Коллиматорный прицел
RED DOT
CELOWNIK REFLEKSYJNY Z CZERWONYM PUNKTEM
REFLEXNÍ ZAMĚŘOVAČ
s červeným bodem
RÖDPUNKS – REFLEXSIKTE
RØDPUNKT - REFLEKSSIKTE
PUNAPISTE - HEIJASTUSTÄHTÄIN
®
DOCTER
sight C
Gebrauchsanleitung
Operating Instructions
Mode d’emploi / Instruction d’utilisation
Instrucciones para el uso
Инструкции по эксплуатации
Manuale d'uso
Instrukcja obsługi
Návod k použití
Bruksanvisning
Brukerveiledning
Käyttöohje
Made in Germany
1
2
3
4

Achtung
Zur Montage der Visiereinrichtung muß die Waffe entladen und gesichert sein.
Vermeiden Sie den direkten Blick mit der Visiereinrichtung in Sonne,
Lichtbogen oder andere intensive Lichtquellen, um Augenschäden
auszuschließen. Zum Lieferumfang gehören Kleinteile, die nicht in
Kinderhände gehören.
Notice
Remove, where present, the magazine and all ammunition from your firearm.
Open the breech and ensure there is no round in the chamber. Point the
firearm in a safe direction and decock it. Engage, where possible, the safety.
Make sure to discharge the gun and put its safety catch on prior to mounting
the sight. Avoid looking directly into the sun, light arcs or other high-intensity
light sources to prevent eye damage. The equipment includes small
components. Keep away from children!
Attention
Avant le montage du viseur, il faut décharger l’arme et la mettre en sûreté.
Evitez la visée directe du soleil, d’un arc de lumière et de toutes autres sources
lumineuses intensives pour ne pas risquer un endommagement des yeux. La
livraison comprend de petites pièces qui n’appartiennent pas dans les mains
des enfants.
Atencion
Para montar la mira es absolutamente necesario que se haya descargado y
asegurado el arma. No dirija su mirada directamente hacia el sol, hacia arcos
de luz u otras fuentes luminosas intensas al usar el dispositivo para no
dañarse los ojos. El volumen de suministro incluye piezas pequeñas que
deben mantenerse fuera del alcance de los niños.
Внимание
Для монтажа прицела оружие следует разрядить и поставить на
предохранитель. Не смотрите через прицел на солнце, электрическую
дугу или на другие яркие источники света: это опасно для зрения. В
комплект поставки входят детали малого размера, которые следует
держать в недоступном для детей месте.
Hinweise zur Entsorgung von Zieleinrichtungen mit Elektronikanteil
Zieleinrichtungen die über ein beleuchtetes Absehen
verfügen und somit einen konstruktionsbedingten
Elektronikanteil aufweisen dürfen, wenn sie verbraucht
sind, nicht mit gewöhnlichem Haushaltsabfall
vermischt werden. Bringen Sie zur ordnungsgemäßen
Behandlung, Rückgewinnung und Recycling diese
Produkte zu den entsprechenden Sammelstellen, wo sie ohne
Gebühren entgegengenommen werden. Die ordnungsgemäße
Entsorgung dieses Produktes bei den entsprechenden
Sammelstellen dient dem Umweltschutz und verhindert mögliche
schädliche Auswirkungen auf Mensch und Umgebung, die aus
einer unsachgemäßen Handhabung von Abfall entstehen
können.
Hinweise zur Entsorgung von Batterien in Zieleinrichtungen
Batterien gehören nicht in den Hausmüll. Bitte
entsorgen sie verbrauchte Batterien über das dafür
vorgesehene Rücknahme- und Recyclingsystem. Der
Verbraucher ist gesetzlich verpflichtet entladene und
nicht mehr verwendungsfähige Batterien abzugeben.
Die Rücknahme erfolgt an ausgewiesenen
Sammelstellen.

Allgemeine Informationen
®
Die DOCTER
Reflexvisiere stellen hervorragende Zieloptiken modernster Bauart
dar. Sie bieten mit ihrer geringen Baugröße und Masse sowie der kompakten,
rohrlosen Bauform vielfältige Einsatzmöglichkeiten bei Jagd und Sport.
Die solide Verarbeitung, die hohe optische Leistung, ansprechendes Design und die
Funktionssicherheit auch bei extremen Witterungsbedingungen werden Ihnen Ihr
DOCTERsight C unentbehrlich machen.
Lieferumfang
Im Lieferumfang enthalten sind:
2 Senkschrauben M3x8 mit Innensechsrund (TORX) zur Befestigung auf der
Montageplatte
1 Stiftschlüssel T10 mit Innensechsrund (TORX) zum Anziehen der
Befestigungsschrauben
1 Schraubendreher 0,4x2,0
1 Skalenrad mit gerätespezifischer Skalenscheibe
2 Softcover
1 Knopfzelle 3 V, CR 2032
Gebrauchsanleitung
Technische Daten
Vergrößerung
1,07x
Sichtfenster
21 mm x 15 mm
Stellbereich Höhe
± 360 cm / 100 m
Stellbereich Seite
± 270 cm / 100 m
Stellwert je Skalenteil
3 cm / 100 m
Überdeckungsmaß bei Modell:
3,5 MOA
7,0 MOA
10 cm / 100 m
20 cm / 100 m
Parallaxefreie Beobachtungsentfernung
40 m
Stromversorgung
3 V, CR 2032 Lithiumknopfzelle
Abmessungen L x B x H
46,0 mm x 25,4 mm x 24,3 mm
Farbe Visierpunkt
Rot
Masse ohne Montage
25 g

Lassen Sie die Montage des DOCTERsight C und das Einschiessen der Waffe
durch einen Büchsenmacher vornehmen. Setzen Sie die Kappe erst nach der
Montage auf.
Inbetriebnahme
Zur Stromversorgung wird eine 3V – Lithiumbatterie CR 2032 benötigt. Jede andere
Art der Stromversorgung ist ausgeschlossen.
Setzen Sie die Batterie auf der Unterseite des Gehäuses so in das Batteriefach ein,
dass die Aufschrift der Batterie mit der Kennzeichnung des Plus-Pols zu erkennen
ist. Eine Gefahr zur Beschädigung der Elektronik durch ein verkehrtes Einlegen der
Knopfzelle besteht nicht. Die Batterie wird zur besseren Kontaktgabe von einem
Magnet an die vergoldete Kontaktplatte auf der Leiterplatine gezogen. Die
Kontaktfläche ist sauber zu halten (Reinigung mit Spiritus).
Batteriewechsel
Zum Batteriewechsel ist das DOCTERsight C von der Montageplatte zu lösen. Das
Batteriefach befindet an der Geräteunterseite. Die verbrauchte Batterie wird durch
Ansetzen des Stiftschlüssels (oder Schraubendrehers) an der Auskerbung, die sich
rechts auf der Unterseite befindet, herausgenommen. Nach dem Batteriewechsel
wird das Visier wieder auf die Montageplatte gesetzt und mit den 2 Senkschrauben
befestigt. Ein erneutes Einschießen ist aufgrund der Präzisionsverstiftung nicht
erforderlich.
Ein- /Ausschalten
Ein mechanischer Ein- und Ausschalter ist nicht vorhanden. Um die Elektronik
abzuschalten wird das Soft Cover aufgesetzt. Das Aufsetzen bewirkt ein Abschalten
der Elektronik.
Montage
Das DOCTERsight C lässt sich aufgrund einer Vielzahl verschiedener Adapterplatten
auf nahezu alle Waffentypen problemlos montieren. Zweckmäßigerweise wird Ihr
Büchsenmacher eine Montage entsprechend Ihren Bedürfnissen und dem Waffentyp
auswählen.
Unabhängig vom verwendeten Montagetyp verfügt die Adapterplatte oberseitig über
4 Präzisionsstifte.
Setzen Sie das DOCTERsight C entsprechend der Befestigungsgewinde und der
Verstiftung auf die Montageplatte auf und befestigen Sie das Gerät mit den
beigefügten Senkschrauben.
Die Kombination aus Schraubenbefestigung und Stiftsicherung verhindert ein
Verschieben der Treffpunktlage während des Gebrauchs.

Einschießen
Das optische System des DOCTERsight C ist ab Werk auf eine Entfernung von 40 m
parallaxefrei justiert. Es ist eine Einschießentfernung zu wählen, die Ihren
Anforderung an das DOCTERsight C gerecht wird.
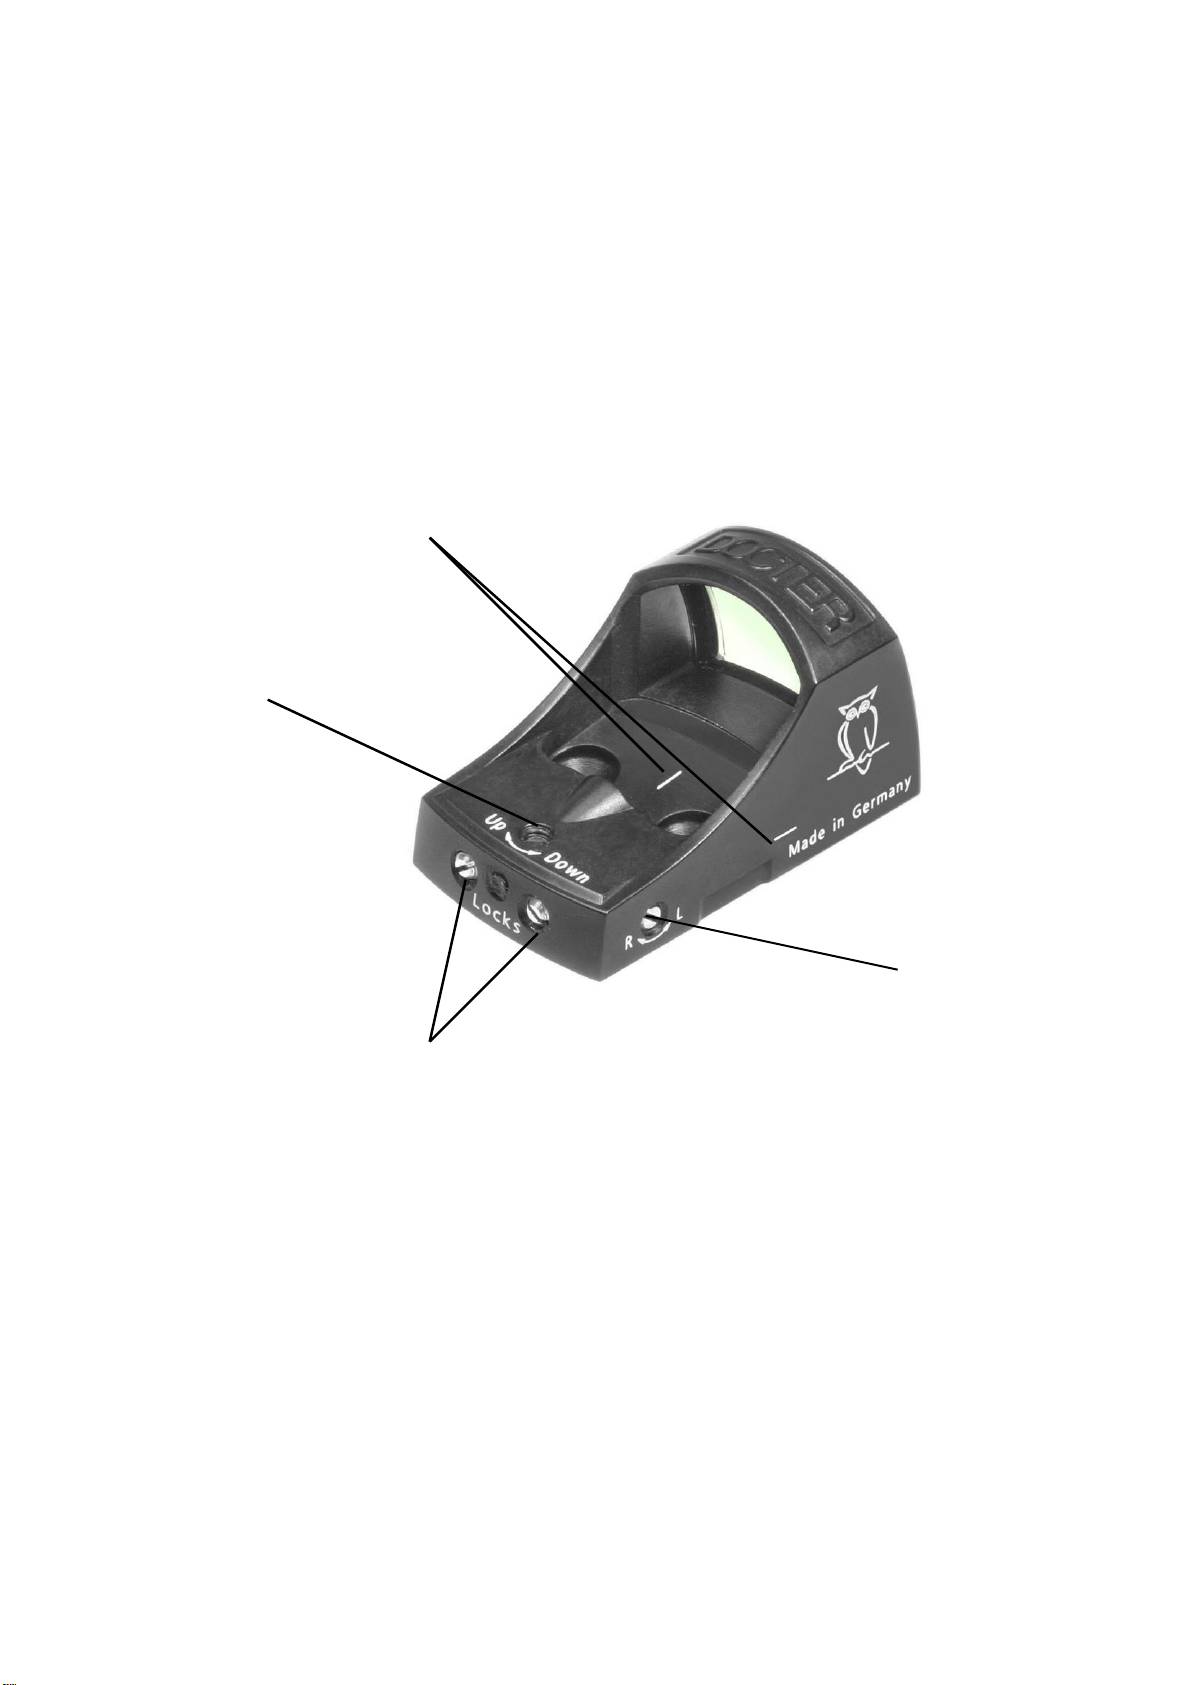
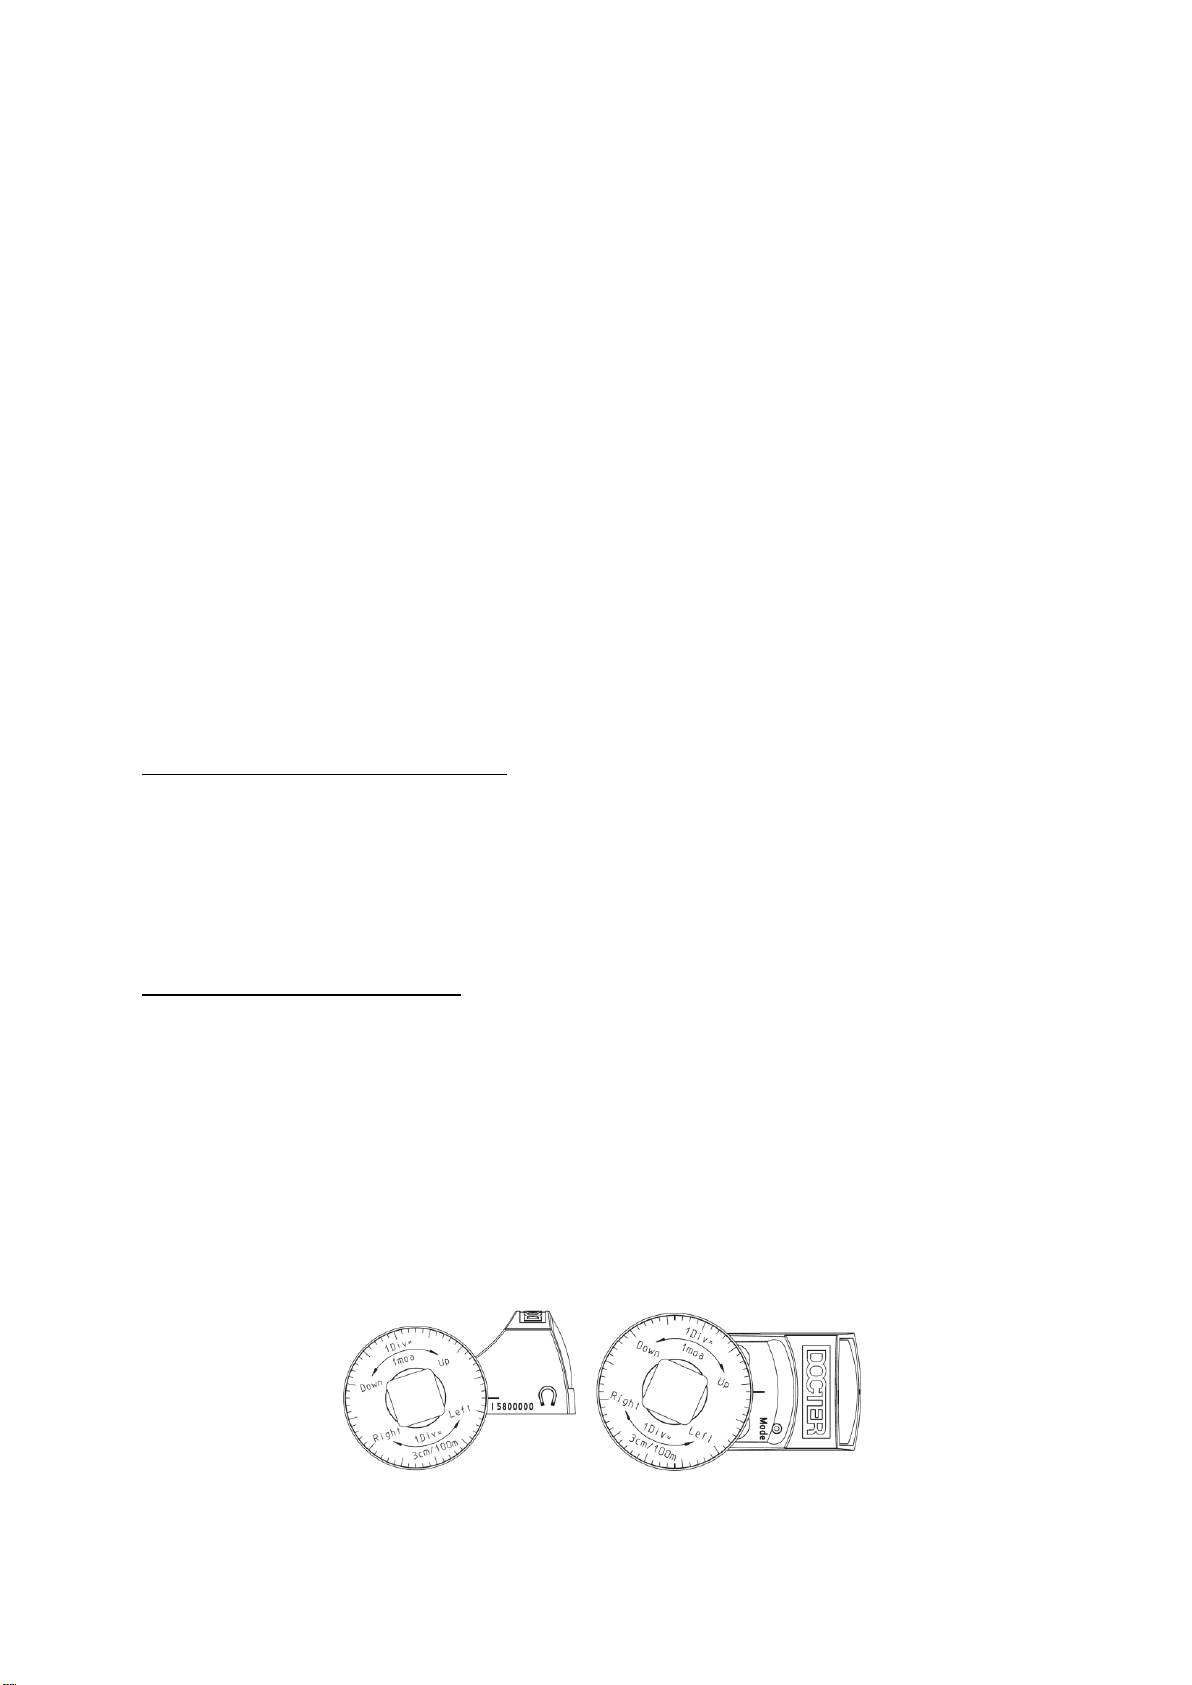
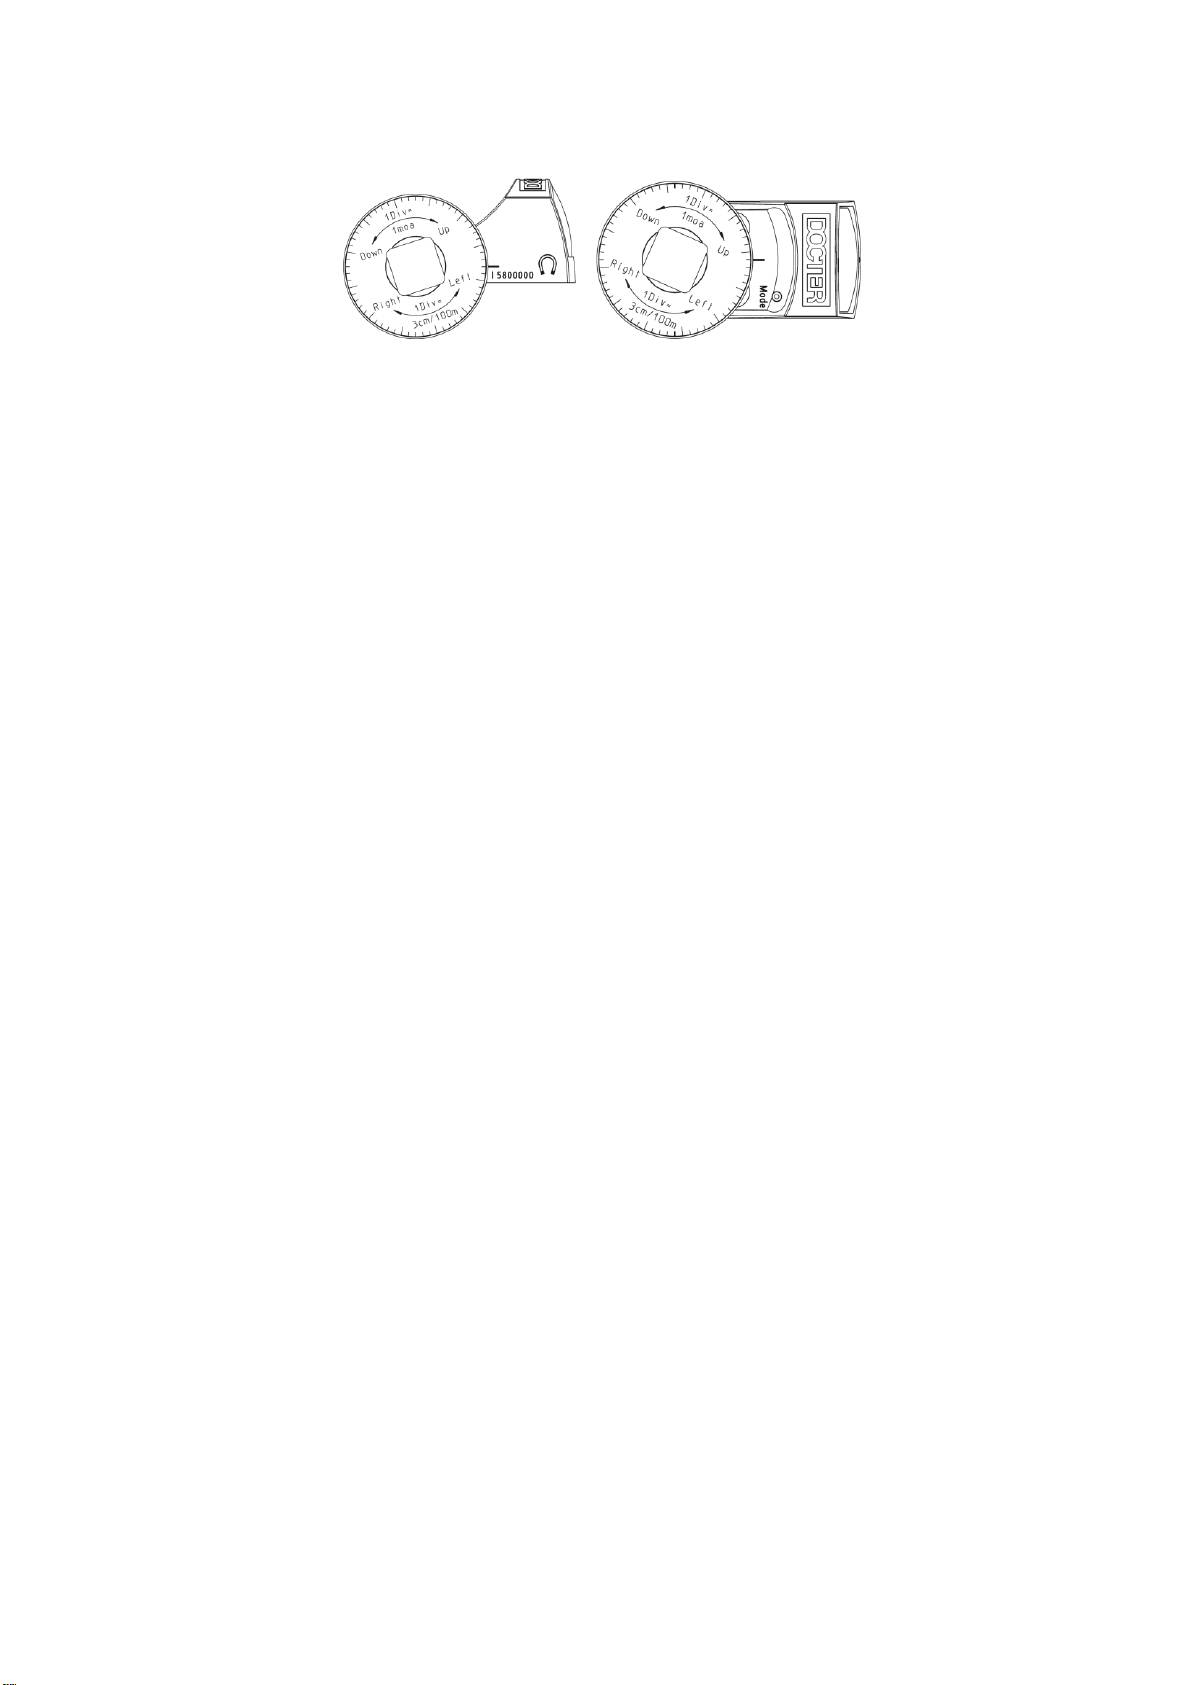
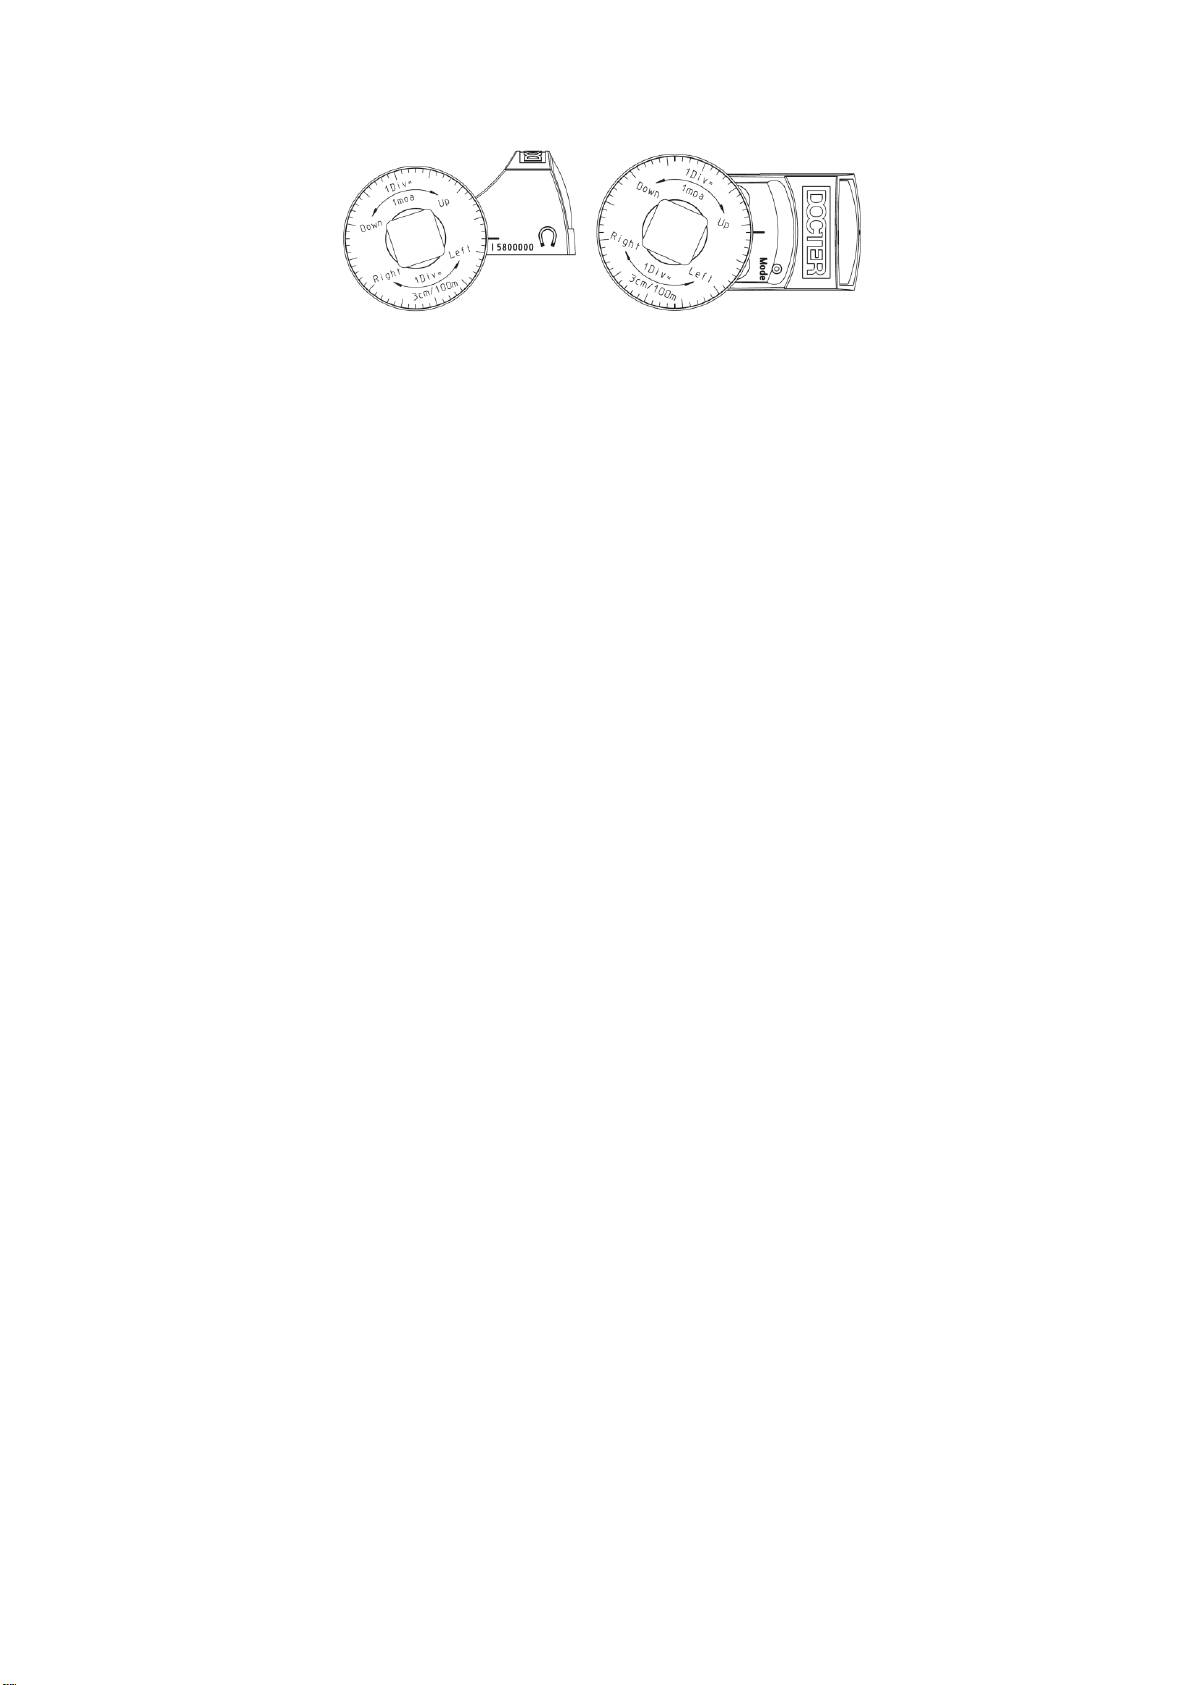
Das DOCTERsight C verfügt über eine getrennte Höhen- (1) und Seitenverstellung
(2). Diese sind oben und rechts am Gerät angeordnet und mit Drehrichtungspfeilen
markiert.
Die Einstellung nehmen Sie über die Schlitzschrauben mit beigefügtem Skalenrad
und Schraubendreher 0,4x2,0 vor.
Achtung: Vor jeder Verstellung Arretierungsschrauben (3) lösen.
Die Einstellungen für Höhe und Seite können unabhängig voneinander erfolgen. Der
vorhandene Stellbereich ermöglicht sowohl den Ausgleich von Ungenauigkeiten bei
der Montage als auch eine Ballistikkorrektur. Die Seitenverstellung hat in beiden
Richtungen Endanschläge.
Bei der Höhenverstellung ist zu beachten, das der Anschlag nach unten nur im
montierten Zustand vorhanden ist.
Beachten Sie, dass es zur Klemmung der Verstellungen kommt, wenn die jeweils
andere Stellrichtung auf Anschlag geschraubt worden ist.
Verstellung in Höhe und Seite
Um eine Beschädigung der Stellmechanik zu vermeiden, lösen Sie vor jeder
Verstellung in Höhe und Seite die Arretierung (3) des Stellmechanismus. Drehen Sie
dazu die zwei Klemmschrauben an der hinteren Seite des DOCTERsight eine viertel
Umdrehung vom Endanschlag zurück (entgegen dem Uhrzeigersinn). Verwenden Sie
dafür den beigefügten Schraubendreher 0,4x2,0. Die Verstellung muss sich
einwandfrei betätigen lassen.
Einstellung der Treffpunktlage
Zur Einstellung der Treffpunktlage ist eine Skalenscheibe im Lieferumfang enthalten.
Schieben Sie die Skalenscheibe mit der Skala zum Griff auf den mitgelieferten
Schraubendreher.
Setzen Sie nun den Schraubendreher auf die Höhen- (1) oder Seitenverstellung (2).
Entsprechend dem auf dem Gehäuse und dem Skalenrad angegeben Drehsinn,
erreichen Sie eine gerichtete Verstellung des Treffpunktes in Höhe oder Seite.
Zum Ablesen der Teilung verwenden Sie die Markierungen (4) neben den
Verstellungen oder eine markante Gehäusekante.

Stellen Sie nach der ersten Schußabgabe eine Abweichung von Zielpunkt (Absehen)
zu Treffpunkt fest, so ist diese wie folgt zu korrigieren:
Treffpunkt unterhalb des Zielpunktes (Waffe schießt tief):
Drehen der Verstellschraube in Richtung Up
Treffpunkt oberhalb des Zielpunktes (Waffe schießt hoch)
Drehen der Verstellschraube in Richtung Down
Treffpunkt links des Zielpunktes (Waffe schießt links):
Drehen der Verstellschraube in Richtung R / Right
Treffpunkt rechts des Zielpunktes (Waffe schießt rechts):
Drehen der Verstellschraube in Richtung L / Left
Ein Skalenteil entspricht einer Verstellung von 3 cm auf 100 m bzw. 1 Winkelminute.
Bei anderen Einschießentfernungen ändert sich der Stellwert proportional zur
Entfernung, zum Beispiel:
1,5 cm auf 50 m oder 3 mm auf 10 m
Helligkeitssteuerung des Absehens
Eine integrierte Regelelektronik trägt den unterschiedlichen Beleuchtungsverhält-
nissen im praktischen Einsatz Rechnung. Die Leuchtpunktintensität wird automatisch
entsprechend der Umgebungshelligkeit in Zielrichtung angepasst. Die Messung ist
analog der Augenempfindlichkeit. Ein Abdecken des an der Vorderseite des Visiers
befindlichen Sensors führt zu einer sichtbaren Helligkeitsreduzierung des
Leuchtpunktes. Der Sensor darf deshalb nicht von Waffenteilen verdeckt werden.
Wartung und Pflege
Benutzen Sie Brillenputztücher zur Reinigung der Optik. Die Optikflächen sollten
vorher gegebenenfalls mit einem weichen, sauberen Tuch oder Haarpinsel vorsichtig
gesäubert werden – dabei keine chemischen Lösungsmittel verwenden.
Starke Verschmutzungen sollten mit destilliertem Wasser entfernt werden, weil es
sonst zu Kalkablagerungen auf den Oberflächen kommen kann.
Bei etwaigen funktionsbeeinträchtigenden Beschädigungen muß das Gerät an eine
autorisierte Servicewerkstatt eingesandt werden.
Hinweise
DOCTER Rotpunkt Reflexvisiere besitzen aufgrund ihrer Bauweise keinen
Dioptrienausgleich oder ähnliche, die Sehfehler des menschlichen Auges
ausgleichende Funktionsbaugruppen.
Alle individuellen Sehfehler des jeweiligen Schützen wirken sich somit direkt auf die
Kontur des wahrgenommenen Leuchtpunktes aus.

Scheinbare Unrundheit, sichelförmige Verzeichnung, „Sternenhaufen“ oder
„ausgefranste“ Kontur des Punktes deuten nicht auf ein defektes Gerät, sondern
vielmehr und ausschließlich auf eine physiologische Veränderung des Auges hin
(Astigmatismus).
Empfehlenswert ist dann die Verwendung einer korrigierenden Sehhilfe oder die
Überprüfung der Augen durch den Augenarzt.
Garantie
Wir bürgen für zwei Jahre Garantie in folgendem Umfang:
1. In der Garantiezeit werden Beanstandungen, die auf Material- und
Verarbeitungsfehler beruhen, kostenlos behoben. Wir behalten uns vor, dieses
durch Instandsetzung, Austausch fehlerhafter Teile oder Umtausch in ein
gleichartiges, einwandfreies Erzeugnis zu tun.
2. Bei Inanspruchnahme der Garantie ist das optische Gerät zusammen mit dem
Kaufnachweis – versehen mit Adresse und Unterschrift – sowie
Verkaufsdatum Ihres Händlers und der Darstellung der vorliegenden
Beanstandung der zuständigen DOCTER-Vertretung auf eigene Kosten zu
übersenden.
3. Ansprüche auf Garantieleistung bestehen nicht bei unsachgemäßer
Behandlung, Eingriffen und Reparaturen durch einen von unserer Firma nicht
autorisierten Servicedienst.
4. Von einer Garantie ausgenommen sind Verschleißerscheinungen,
Verschleißteile und sonstiges Zubehör. Dies gilt auch für diverse
Beschädigungen der Oberfläche des Erzeugnisses.
Für weitergehende mittelbare oder unmittelbare Schäden, gleich welcher Art und
Umfang, wird keine Haftung übernommen. Das Recht der Bundesrepublik
Deutschland hat Gültigkeit: Gerichtsstand ist Jena.
Please note when disposing of sighting mechanisms with electronic parts:
Sighting mechanisms equipped with an illuminated
reticle, thus design-related containing electronic parts,
must not be mixed into general household garbage
when used up. Bring the material to the corresponding
collection points for proper handling, retrieval and
recycling; they will be taken from you without fee.
Properly disposing the product at the corresponding collection
points conduces to environmental protection, and prevents
potential repercussions on humans and environment resulting
from incorrect usage of waste.
Please note when disposing of batteries of sighting mechanisms:
Batteries must not be disposed in household garbage.
Please dispose spent batteries using the provided
retrieval and recycling system. The consumer is legally
required to turn in dead and no longer usable
batteries. Retrieval is possible at all marked collection
points.

General Information
®
The DOCTER
reflex sights are excellent aiming optics devices of up-to-date design.
With their small size and low weight as well as their compact shape without using a
tube, they offer various possibilities of use on hunting and sport.
The solid workmanship, the high optical performance, an attractive design and the
functional reliability even in case of extreme weather conditions will cause your
DOCTERsight C to become indispensable.
Delivery Extent
The delivery extent includes:
2 M3x8 countersunk socket screws (TORX) to fasten to the mounting plate
1 T10 hexagon wrench key (TORX) to tighten the fastening screws
1 screwdriver (0.4 x 2.0)
1 scale wheel with device-specific scale disc
2 soft covers
1 coin cell (3 V, CR 2032)
Operating instructions
Technical Data
Magnification
1.07x
Sight window
21 mm x 15 mm
Elevation adjustment range
± 360 cm / 100 m
Windage adjustment range
± 270 cm / 100 m
Adjustment value per scale division
3 cm / 100 m
Overlap measure in case of model:
3.5 MOA.
7.0 MOA
10 cm / 100 m
20 cm / 100 m
Parallax-free sighting distance
40 m
Power supply
3 V, CR 2032 lithium coin cell
Dimensions (L x W x H)
46.0 mm x 25.4 mm x 24.3 mm
Color of target dot
Red
Tightness
Water-tight
Weight (without mounting accessories)
25 g

Let a gunsmith do the DOCTERsight C mounting and the shooting adjustment
of the gun. Put on the cap not before the mounting has been completed.
Putting into Operation
For the power supply, one CR 2032 lithium battery (3 V) is needed. Any other kind of
power supply is excluded.
Insert the battery into the battery compartment at the bottom of the enclosure such
that the labeling of the battery with the marking of the plus pole is visible. A danger to
damage the electronics due to an incorrect insertion does not exist. For a better
contact, a magnet causes the battery to be pulled toward the gold-plated contact
plate on the circuit board. The contact area is to be kept clean (cleaning using spirit).
Replacing the battery
To replace the battery, the DOCTERsight C is to be removed from the mounting
plate. The battery compartment is located at the bottom of the device. The exhausted
battery is taken out by putting the wrench key (or the screwdriver) onto the notch
located at the right bottom side. When the battery has been replaced, the sight is put
back onto the mounting plate and is fastened with the 2 countersunk screws. Due to
the precision positioning pins, a new shooting adjustment is not required.
Switching on/off
A mechanical on/off switch is not present. To switch off the electronics, the soft cover
is put on. The putting-on effects a switching-off of the electronics.
Mounting
Due to multitude of different adapter plates, the DOCTERsight can be mounted to
nearly all gun types without any problems. Your gunsmith will choose a convenient
mounting according to your requirement and to the gun type.
Independently of the used mounting type, the upper side of the adapter plate has 4
precision positioning pins.
Put the DOCTERsight onto the mounting plate where you have to consider the
fastening threads and the positioning pins. Then, fasten the device using the
delivered countersunk screws.
The combination of screw fastening and precision positioning pins prevents the hit
point position from shifting during the use.
Shooting Adjustment
Ex factory, the optical system of the DOCTERsight III is parallax-freely adjusted to a
distance of 40 m. You have to choose a shooting adjustment distance that meets
your requirements to the DOCTERsight III.
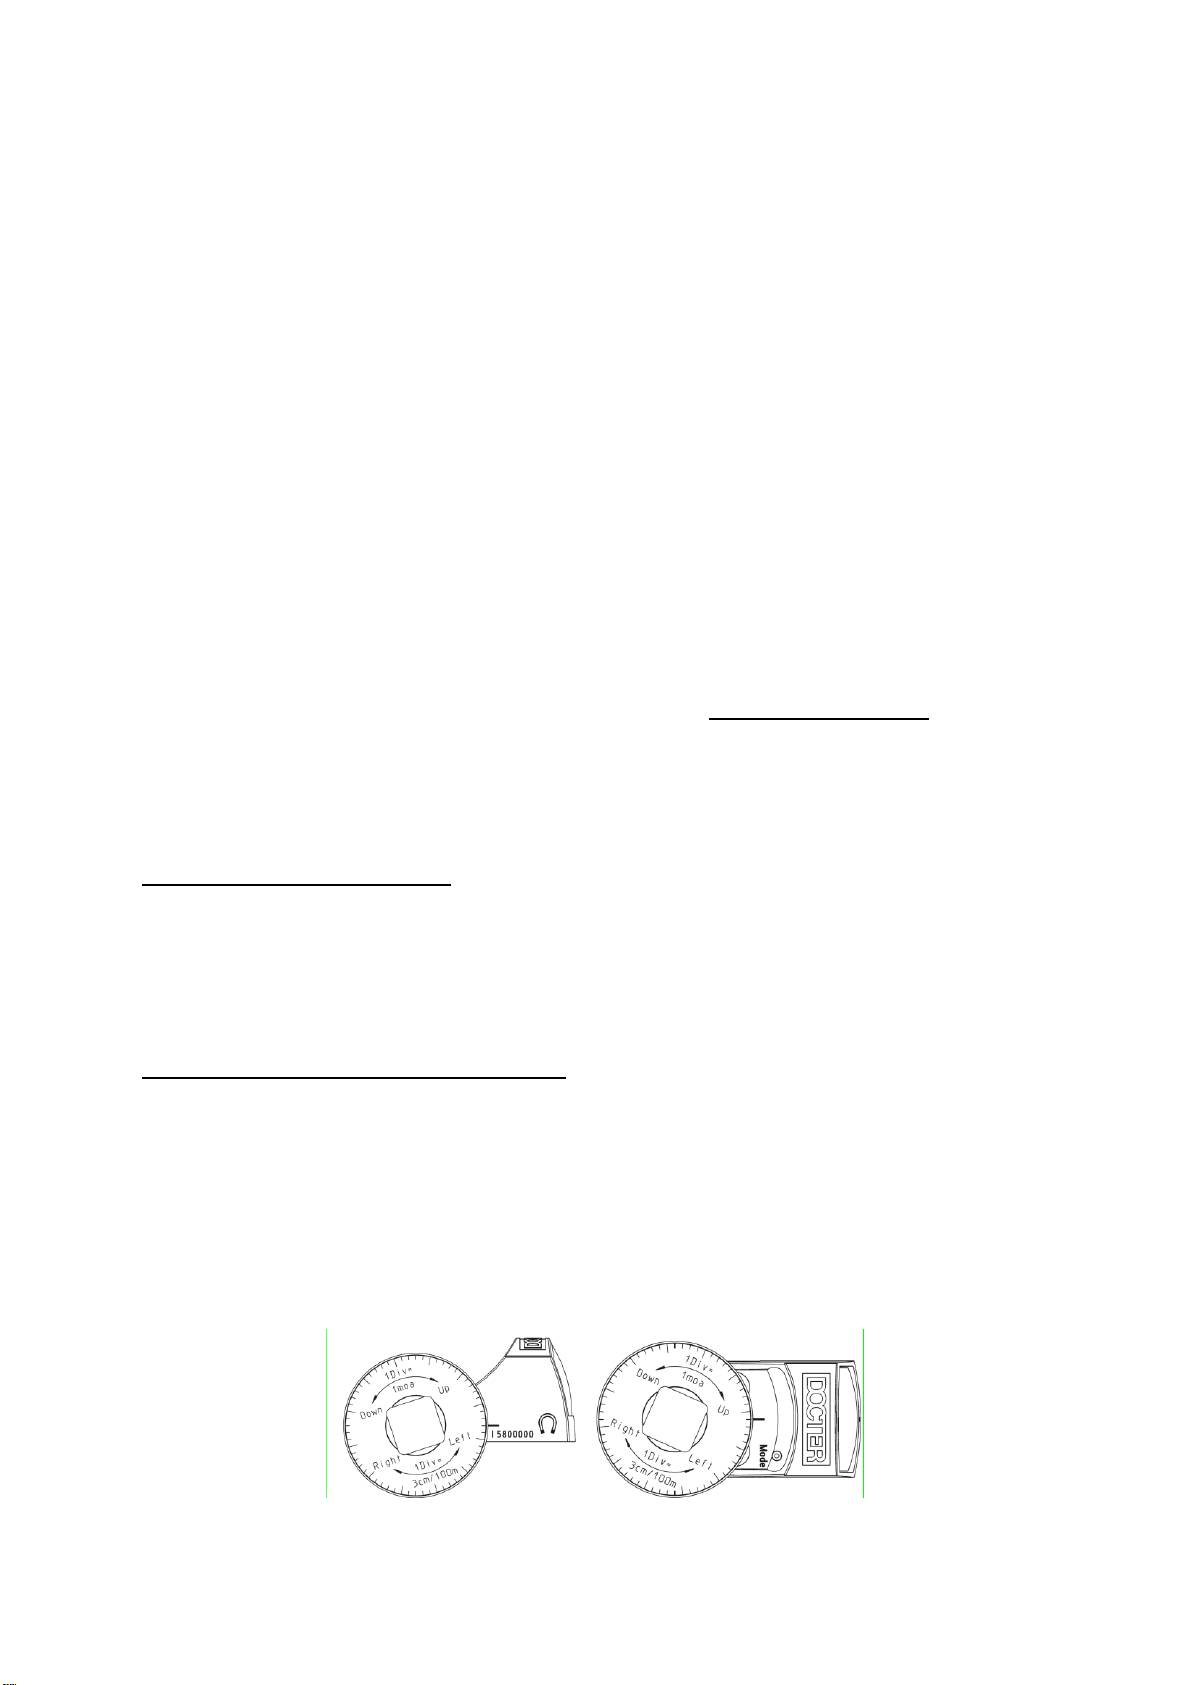
The DOCTERsight C has an elevation adjustment element (1) and a windage
adjustment element (2) that are separate from each other. These elements are
arranged at the top or at the right side of the device and are marked with rotation
direction arrows.
You will make the adjustment through of the slotted screws using the delivered scale
wheel and the delivered screwdriver (0.4 x 2.0).
Attention: Prior to each adjustment, the locking screws (3) have to be
loosened.
The elevation adjustment and the windage adjustment can be made independently of
each other. The available adjusting range allows the compensation of inaccuracies
on mounting as well as a ballistics correction. The windage adjustment has end stops
in both directions.
In case of the elevation adjustment, there has to be considered that the end stop in
downward direction is present in the mounted state only.
Please consider that the adjustments are clamped if there has been screwed up to
the end stop in the respective different adjusting direction.
Elevation and windage adjustment
To avoid the adjustment mechanism from being damaged, loosen the locking (3) of
the adjustment mechanism before doing any elevation and/or windage adjustment.
For that purpose, cause the two clamping screws at the rear of the DOCTERsight to
be moved back a quarter turn from the end stop (anticlockwise). To do that, use the
delivered screwdriver (0.4 x 2.0). The adjustment must be actuated without any
problems.
Adjusting the hit point position
To adjust the hit point position, a scale disc is included in the delivery extent. Push
the scale disc onto the delivered screwdriver where the scale has to be directed
toward the handle.
Now, cause the screwdriver to be set to the elevation adjustment (1) or to the
windage adjustment (2). According to the rotation sense shown on the enclosure and
on the scale wheel, you will get an aimed elevation or windage adjustment of the hit
point.
To read the division, use the markings (4) beside the adjustment elements or a
distinctive enclosure edge.

If you determine a deviation from the target point (light dot) to the hit point after the
first shoot, you can correct it as follows:
Hit point below the target point (gun shoots too deep):
Turn the adjustment screw in the Up direction.
Hit point above the target point (gun shoots too high):
Turn the adjustment screw in the Down direction.
Hit point to the left of the target point (gun shoots too far left):
Turn the adjustment screw in the R (Right) direction.
Hit point to the right of the target point (gun shoots too far right):
Turn the adjustment screw in the L (Left) direction.
One scale division corresponds to a shift of 3 cm at 100 m or to 1 angular minute. In
case of other shooting adjustment distances, the adjustment value changes
proportionally to the distance. For example:
1,5 cm at 50 m or 3 mm at 10 m
Brightness Control of Light Dot
Using an integrated control electronics, the different lighting conditions in the practical
use are considered. The light dot intensity is automatically adapted according to the
environmental brightness in target direction. The measurement is analog to the
sensitivity of the human eye. When the sensor at the front side of the sight is
covered, a visible brightness reduction of the light dot occurs. Therefore, the sensor
must not be covered by gun parts.
Maintenance and Care
To clean the optics, use glasses cleaning clothes. Before doing that, the optics
surfaces should be carefully cleaned using a soft and clean cloth or a hair brush
where no chemical solvents are to be applied.
Heavy dirt should be removed using distillated water. Otherwise, furrings can occur
on the surfaces.
In case of possibly function-affecting damages, the device has to be sent to an
authorized service workshop.
Hints
Due to their specific construction, DOCTER red-dot reflex sights do not have a
diopter compensation unit or other function units that compensate for the visual
defect of the human eye.
Thus, all individual visual defects of the respective shooter have a direct effect on the
contour of the perceived light dot.
Seeming ovality, sickle-shaped distortion, "star clusters" or a "frayed" contour of the
dot do not mean a defective device, but rather and exclusively mean a physiological
change of the eye (astigmatism).Then, it is recommended to use corrective glasses
or to have the eyes checked by an ophthalmologist.

Warranty
We grant a warranty of two years in the following extent:
1. In the warranty time, complaints that are based on material and processing
errors are cleared free of charge. We reserve the right to do such a clearance
by repair, by replacement of defective parts or by provision of a similar,
perfectly functioning product.
2. If the warranty is claimed, the optical device along with the proof of purchase
(with address and signature) as well as the date of selling by your dealer and a
description of the present complaint is to be sent to the responsible DOCTER
agency, at your own expense.
3. Claims for warranty performances do not exist in case of improper usage,
interventions and repairs by a service provider that is not authorized by our
company.
4. Wear and tear, wear parts and miscellaneous accessories are excluded from a
warranty. This also applies to diverse damages of the product surface.
We do not assume any liability for further-going direct or indirect damages,
irrespective of type and extent. It applies the law of the Federal Republic of Germany.
Place of jurisdiction is Jena.
Instructions pour l’élimination de systèmes de choix avec composants
électroniques
Systèmes de choix qui ont un réticule illuminé et donc
comportent par construction des composants
électroniques, quand ils sont usés, ne doivent pas
mélangés avec les déchets domestiques ordinaires
quand ils sont usés. Pour un traitement, une
récupération et un recyclage propres, apportez ces
produits aux pointes de collecte correspondants, là où ils sont
acceptés sans frais. L’élimination propre de ce produit chez les
déchetteries correspondantes contribuer à la protection de
l'environnement et empêche des éventuels effets négatifs sur
l’homme et les environs, qui peuvent dater d’une manipulation
inappropriée des déchets.
Instructions pour l’élimination des piles dans les systèmes de choix
Les piles ne font pas partie des déchets ménagers.
Veuillez éliminer les piles usées par le système de
reprise et de recyclage correspondant. Le
consommateur est légalement tenu de déposer des
piles déchargées et ne plus utilisables. La reprise
s’effectue aux points de collecte prévus.

Informations générales
®
Les viseurs reflex DOCTER
constituent d’excellents systèmes optiques de type
extrêmement pointu. Avec leurs dimensions et leur poids réduits et leur forme de
construction compacte et sans tube, ils offrent de nombreuses possibilités
d'utilisation pour la chasse et le sport.
Avec leur robustesse, leur performance optique élevée, leur design attrayant et leur
sécurité fonctionnelle, votre viseur DOCTERsight C vous deviendra indispensable
même dans des conditions météorologiques extrêmes.
Pièces fournies
Les pièces suivantes vous sont fournies :
2 vis à tête plate M3x8 à six pans internes (TORX) à fixer sur la plaque de
montage
1 clé mâle coudéeT10 à six pans internes (TORX) pour serrer les vis de
fixation
1 tournevis 0,4x2,0
1 molette avec cadran spécifique à l'appareil
2 couvertures flexibles
1 pile bouton 3 V, CR 2032
Mode d’emploi
Fiche technique
Grossissement
x1,07
Témoin
21 mm x 15 mm
Plage de réglage en hauteur
± 360 cm / 100 m
Plage de réglage latéral
± 270 cm / 100 m
Valeur de réglage par graduation
3 cm / 100 m
Cote de recouvrement pour modèle :
3,5 MOA
7.0 MOA
10 cm / 100 m
20 cm / 100 m
Distance d’observation sans parallaxe
40 m
Alimentation électrique
Pile bouton lithium 3 V, CR 2032
Dimensions L x l x H
46,0 mm x 25,4 mm x 24,3 mm
Couleur point de visée
Rouge
Etanchéité
Etanche à l’eau
Poids non monté
25 g

Faites procéder au montage du DOCTERsight C et au réglage de l’arme par un
armurier. Ne posez le capuchon qu’après le montage.
Mise en marche
Pour l’alimentation électrique, il faut une pile au lithium 3 V CR 2032. Tout autre type
d’alimentation électrique est exclu.
Insérez la pile dans le compartiment à pile de la face inférieure du boîtier de manière
à pouvoir voir la mention pôle plus de la pile. Une insertion à l'envers de la pile de
bouton ne risque pas d'abîmer l'électronique. Pour assurer un meilleur contact, la pile
est attirée par un aimant vers la plaque conductrice dorée de la platine conductrice.
La surface de contact doit rester propre (nettoyage à l'alcool).
Changement de la pile
Pour changer la pile, il faut détacher le DOCTERsight C de la plaque de montage. Le
compartiment à pile se trouve sur la face inférieure du boîtier. La pile usagée se
retire en insérant la clé mâle coudée (ou le tournevis) dans l’encoche située à droite
sur la face inférieure. Après changement de la pile, on repose le viseur sur la plaque
de montage et on le fixe avec les deux vis à tête plate. Un nouveau réglage n'est pas
nécessaire en raison de l'assemblage de précision.
Mise en route/arrêt
Il n’y a pas d’interrupteur mécanique de marche/arrêt. Pour arrêter le système
électronique, on pose la couverture flexible. Ceci provoque l'arrêt du système
électronique.
Montage
Le DOCTERsight peut se monter sans problème pratiquement sur tous les types
d'armes grâce à un grand nombre de plaques d’adaptation. Votre armurier choisira
judicieusement un montage adapté à vos besoins et au type d'arme.
Indépendamment du type de montage utilisé, la plaque d’adaptation est équipée sur
le dessus de 4 broches de précision.
Posez le DOCTERsight suivant le filetage de fixation et le goupillage sur le plaque de
montage sur la plaque de montage et fixez l’appareil à l’aide des vis à tête plate
jointes.
Le vissage et le goupillage combinés empêchent tout décalage de la position du
point d’impact en cours d’usage.
Réglage
Le système optique du DOCTERsight C est réglé en usine sans parallaxe sur une
distance de 40 m. Il faut choisir une distance de réglage de tir conforme à ce que
vous attendez du DOCTERsight III.
Le DOCTERsight C est équipé de systèmes séparés de réglage en hauteur (1) et
latéral (2). Ces systèmes sont placés en haut à droite de l'appareil et marqués de
flèches indiquant le sens de rotation.
Vous pouvez régler par les vis à fente avec la molette jointe et le tournevis 0,4x2,0.
Attention : avant tout réglage, enlever les vis de blocage (3).
Les réglages verticaux et latéraux peuvent se faire indépendamment. La plage de
réglage disponible permet aussi bien de compenser les imprécisions au montage que
de corriger la balistique. Le système de réglage latéral comporte des butées dans
les deux sens.
Lors du réglage en hauteur, il faut veiller à ce que la butée vers le bas ne soit en
place qu’après le montage.
Veillez à bloquer les réglages une fois que l’autre sens de réglage respectif est venu
en butée.
Réglage en hauteur et latéral
Pour éviter la détérioration du mécanisme de réglage, débloquez l'arrêt (3) du
mécanisme d'ajustement avant tout réglage. Pour ce faire, dévissez les vis de
serrage de la face arrière du DOCTERsight d’un quart de tour par rapport à la butée
(dans le sens inverse des aiguilles d'une montre). Utilisez à cet effet le tournevis
0,4x2,0 joint. Le système de réglage doit pouvoir s'actionner parfaitement.
Réglage de la position du point d'impact
Une molette est prévue pour régler la position du point d'impact. Glissez le cadran
gradué sur la poignée du tournevis fourni.
Positionnez maintenant le tournevis sur le système de réglage en hauteur (1) ou
latéral (2). Suivant le sens de rotation indiqué sur le boîtier et la molette, vous
obtenez un réglage directionnel du point d’impact en hauteur ou latéralement.
Pour lire le pas, utilisez les marquages (4) indiqués à côté des réglages ou un bord
marqué du boîtier.

Si, après le premier tir, vous constatez un écart entre le point visé (visée) et le point
d’impact, il faut le corriger comme suit :
Point d’impact en dessous du point visé (l’arme tire bas) :
tourner la vis de réglage vers le haut (Up)
Point d’impact au dessus du point visé (l’arme tire haut)
Tourner la vis de réglage vers le bas (Down)
Point d’impact à gauche du point visé (l’arme tire à gauche) :
tourner la vis de réglage vers la droite (R / Right)
Point d’impact à droite du point visé (l’arme tire à droite) :
tourner la vis de réglage vers la gauche (L / Left)
Un degré équivaut à un réglage de 3 cm sur 100 m ou 1 minute d’angle. Pour les
autres distances de tir, la valeur de réglage change proportionnellement à la
distance, par exemple : 1,5 cm à 50 m ou 3 mm à 10 m
Contrôle de luminosité de la visée
Un régulateur électronique intégré tient compte à l'usage des diverses conditions
d'éclairage. L’intensité du point lumineux s’adapte automatiquement en fonction de la
luminosité ambiante. La mesure est analogue à la sensibilité oculaire. Un
recouvrement du capteur placé à l'avant du viseur entraîne une diminution visible de
la luminosité du point lumineux. Le capteur ne doit donc pas être masqué par des
pièces de l’arme.
Maintenance et entretien
Utilisez des chiffons à lunettes pour nettoyer l’optique. Les surfaces optiques doivent
au préalable être nettoyées soigneusement avec un chiffon doux et humide ou au
pinceau -ne pas utiliser de solvants chimiques.
Les grosses impuretés doivent être éliminées à l’eau distillée, sinon des dépôts
calcaires peuvent se former sur les surfaces.
En cas d’éventuelles détériorations nuisant au fonctionnement, il faut envoyer
l'appareil à un atelier de SAV agréé.
Remarques
Les viseurs reflex DOCTER à point rouge, du fait de leur type de fabrication, n’ont
pas de compensation de dioptrie ou sous-ensembles fonctionnels corrigent les
défauts de vision de l'oeil humain.
Tous les défauts de vision particuliers du tireur concerné se reflètent ainsi
directement sur le contour du point lumineux perçu.
Un défaut de rotondité apparent, une distorsion en forme de faucille, des « étoiles »
ou un « contour frangé » du point n'indiquent pas que l'appareil est défectueux mais
signalent par contre exclusivement une altération physiologique de l’oeil
(astigmatisme).

Il est alors recommandé d'utiliser une correction visuelle ou de faire examiner ses
yeux par un ophtalmologiste.
Garantie
Nous accordons deux ans de garantie, couvrant :
1. Pendant la durée de la garantie, les réclamations dues à des défauts de
matière et de transformation sont couvertes gratuitement. Nous nous
réservons le droit d’y remédier par remise en état, échange des pièces
défectueuses ou échange contre un produit identique en bon état de marche.
2. En cas de demande de garantie, vous devez envoyer l’appareil optique
accompagné du justificatif d’achat - indiquant l'adresse et la signature – avec
la date de vente par votre revendeur et l’exposé de la réclamation à l'agence
DOCTER compétente à vos propres frais.
3. Il n’y a pas de droit en garantie en cas de manipulations, d’interventions et
réparations non professionnelles faites par un prestataire non agréé par notre
société.
4. Sont exclus de la garantie les phénomènes d’usure, les pièces d’usure et
autres accessoires. Ceci est valable aussi pour les diverses dégradations de
la surface du produit.
Pour tous autres dommages directs ou indirects dépassant ce cadre, quels qu’en
soient le type et l’étendue, aucune garantie n’est assumée. La législation de la
République Fédérale Allemande s’applique : la juridiction compétente est Jena.
Indicaciones para la eliminación de miras con componentes electrónicos
Las miras equipadas con una retícula iluminada y que,
por tanto, contienen componentes electrónicos, no
deben mezclarse con los desechos domésticos
comunes una vez gastadas. Para contribuir a su
correcta manipulación, recuperación y reciclaje, lleve
estos productos a los puntos de recogida
correspondientes, donde los recogerán de forma gratuita. La
eliminación correcta de este producto en los puntos de recogida
correspondientes contribuye a proteger el medio ambiente y
evita posibles efectos nocivos que una manipulación
incorrecta de los residuos podría provocar en las personas y en
el entorno.
Indicaciones para la eliminación de pilas para miras
Las pilas gastadas no deben eliminarse junto con los
residuos domésticos. Por favor, elimine las pilas
gastadas a través del sistema de recogida y reciclaje
previsto para ello. El consumidor tiene la obligación
legal de entregar las pilas descargadas que ya no son
aptas para su uso en los puntos de recogida
designados para ello.

Información general
®
Las miras de reflexión DOCTER
son extraordinarios sistemas ópticos de
modernísima construcción. Gracias a sus pequeñas dimensiones y a su bajo peso,
así como a su forma compacta y sin tubos, ofrecen múltiples posibilidades de uso en
la caza y en la práctica de otros deportes.
Su sólida ejecución, su alto rendimiento óptico, su atractivo diseño y la seguridad de
su función incluso en condiciones climáticas extremas harán que su DOCTERsight C
le resulte indispensable.
Volumen de suministro
En el volumen de suministro se incluyen:
2 tornillos avellanados M3x8 con hexágono interior (TORX) para la sujeción
en la placa de montaje
1 llave de pipa T10 con hexágono interior (TORX) para apretar los tornillos de
fijación
1 destornillador 0,4x2,0
1 rueda de escala con cuadrante específico para el aparato
2 cobertores flexibles1 pila de botón de 3 V, CR 2032
Instrucciones de uso
Datos técnicos
Aumento
1,07x
Ventana de visión
21 mm x 15 mm
Rango de ajuste vertical
± 360 cm / 100 m
Rango de ajuste horizontal
± 270 cm / 100 m
Valor de ajuste por división de escala
3 cm / 100 m
Medida de cobertura según modelo:
3,5 MOA
7,0 MOA
10 cm / 100 m
20 cm / 100 m
Distancia de observación sin paralaje
40 m
Alimentación
3 V, CR 2032 pila de botón de litio
Dimensiones L x A x A
46,0 mm x 25,4 mm x 24,3 mm
Color del punto de mira
Rojo
Impermeabilidad
Impermeable al agua
Peso sin montar
25 g

Solicite a un armero que realice el montaje de DOCTERsight C y el ajuste del
arma. No coloque la tapa hasta después del montaje.
Puesta en marcha
Para la alimentación de energía se necesita una pila de litio de 3V CR 2032. Queda
excluida cualquier otra forma de alimentación.
La pila se coloca en el compartimento de la parte inferior de la carcasa, teniendo en
cuenta la inscripción de la pila y la marca del polo positivo. No existe riesgo de dañar
el sistema electrónico por una colocación incorrecta de la pila. Para mejorar el
contacto, la pila queda atraída con un imán a la placa de contacto dorada en la
pletina conductora. La superficie de contacto deberá mantenerse siempre limpia
(limpieza con alcohol).
Cambio de pila
Para cambiar la pila, hay que soltar la mira DOCTERsight de la placa de montaje. El
compartimento de las pilas se encuentra en la parte inferior del aparato. La pila
gastada se saca poniendo la llave de pipa (o el destornillador) en la entalladura que
hay en la parte inferior derecha. Después de cambiar la pila, la mira se vuelve a
colocar en la placa de montaje y se fija con los dos tornillos avellanados. Gracias al
sistema de clavijas de precisión no es necesario volver a ajustar el arma.
Encendido/ Apagado
La mira no dispone de un interruptor mecánico de encendido y apagado. Para
apagar el sistema electrónico se coloca el cobertor flexible. De esta forma se
desconecta el sistema electrónico.
Montaje
Gracias a la gran diversidad de placas de adaptación, la mira DOCTERsight puede
montarse sin problemas en prácticamente todos los tipos de armas. Su armero
elegirá convenientemente una forma de montaje de acuerdo con sus necesidades y
el tipo de arma.
Independientemente del tipo de montaje, la placa de adaptación tiene en la parte
superior 4 clavijas de precisión
La mira DOCTERsight se coloca en la placa de montaje conforme a la rosca de
fijación y las clavijas y se fija en el aparato con los tornillos que se adjuntan.
La combinación de fijación con tornillos y aseguramiento con clavijas impide que la
posición del punto de impacto se desplace durante el uso.

Ajuste
El sistema óptico de DOCTERsight C viene ajustado de fábrica a una distancia de
40 m sin paralaje. Hay que seleccionar una distancia de ajuste que cumpla sus
expectativas en relación a la mira DOCTERsight C.
DOCTERsight C tiene un ajuste vertical (1) y un ajuste horizontal (2). Se encuentran
en la parte superior y a la derecha del aparato y están marcados con flechas de
sentido de giro.
El ajuste se realiza a través de los tornillos de cabeza ranurada con rueda de escala
y el destornillador 0,4x2,0.
Atención: Antes de realizar cualquier ajuste, hay que soltar los tornillos de
bloqueo (3).
Los ajustes en vertical y horizontal pueden realizarse independientemente entre sí.
El rango de ajuste existente hace posible tanto la compensación de imprecisiones
durante el montaje como una corrección balística. El ajuste horizontal tiene topes
finales en las dos direcciones.
En el ajuste en vertical hay que tener en cuenta que el tope hacia abajo sólo está
disponible en estado montado.
Hay que tener en cuenta que pueden producirse bloqueos en los ajustes si el otro
sentido de ajuste está atornillado hasta el tope.
Ajuste vertical y horizontal
Para evitar que el sistema mecánico de ajuste resulte deteriorado, antes de realizar
cualquier ajuste en vertical u horizontal hay que soltar el bloqueo (3) del mecanismo
de ajuste. Para ello hay que dar un cuarto de giro a los dos tornillos de apriete de la
parte trasera de DOCTERsight desde el tope (en sentido contrario a las agujas del
reloj). Para ello hay que utilizar el destornillador que se adjunta 0,4x2,0. El ajuste
tiene que poder accionarse sin ningún problema.
Ajuste del punto de impacto
Para ajustar el punto de impacto se ha incluido un cuadrante en el ámbito de
suministro. Este debe desplazarse con la escala hacia el mango encima del
destornillador (también incluido).
El destornillador debe colocarse ahora sobre el ajuste vertical (1) u horizontal (2).
Según el sentido de giro indicado en la carcasa y en la rueda de la escala, se
consigue ajustar el punto de impacto en horizontal o vertical.
Para leer la graduación hay que utilizar las marcas (4) junto a los ajustes o un canto
marcado de la carcasa.
Si después de realizar un primer disparo, se constata una divergencia del objetivo
(retícula) en relación al punto de impacto, esta divergencia debe corregirse según se
indica a continuación:
Punto de impacto por debajo del punto objetivo (disparo del arma bajo):
Girar el tornillo de ajuste en dirección Up
Punto de impacto por encima del punto objetivo (disparo del arma alto):
Girar el tornillo de ajuste en dirección Down
Punto de impacto a la izquierda del punto objetivo (disparo del arma a la
izquierda):
Girar el tornillo de ajuste en dirección R / Right
Punto de impacto a la derecha del punto objetivo (disparo del arma a la
derecha):
Girar el tornillo de ajuste en dirección L / Left
Una graduación de la escala corresponde a un ajuste de 3 cm a 100 m o a 1 minuto
de grado. Si se trata de otras distancias de tiro, el valor de ajuste varía
proporcionalmente según la distancia, por ejemplo:
1,5 cm a 50 m o 3 mm a 10 m
Control de claridad de la retícula
Un sistema electrónico de regulación integrado tiene en consideración las diferentes
condiciones de iluminación en el uso práctico. La intensidad del punto luminoso se
adapta automáticamente a la claridad del entorno en dirección al objetivo. La
medición es análoga a la sensibilidad ocular. Si se cubre el sensor que se encuentra
en la parte delantera de la mira, la claridad del punto luminoso queda visiblemente
reducida. Por ello, el sensor no podrá quedar cubierto por partes del arma.
Mantenimiento y cuidado
Para limpiar el sistema óptico hay que utilizar paños para la limpieza de gafas. Dado
el caso, las superficies ópticas deberán limpiarse con un paño suave y blando o un
pincel de pelo, pero no podrán utilizarse disolventes químicos.
En caso de suciedad fuerte, habrá que utilizar agua destilada, de otro modo podrán
producirse depósitos de cal en las superficies.
En caso de daños que menoscaben la función, el aparato deberá enviarse a un taller
de reparación autorizado.

Notas
Debido a su forma de construcción, las miras de reflexión de punto rojo DOCTER no
tienen una compensación de dioptrías o componentes de función similares que
puedan compensar los defectos visuales de las personas.
Todos los defectos visuales individuales del tirador tendrán, así, un efecto inmediato
sobre el contorno del punto luminoso percibido.
La falta de redondez aparente, la distorsión falciforme, los grupos de estrellas o el
contorno “deshilachado“ del punto no indican defectos en el aparato, sino, antes
bien, y exclusivamente, un cambio fisiológico en el ojo (astigmatismo).
En este caso, es recomendable utilizar una ayuda visual correctiva o solicitar al
oculista un examen de los ojos.
Garantía
Nuestra garantía es de dos años para el siguiente ámbito:
1. En el período de garantía se subsanarán gratuitamente aquellas
reclamaciones basadas en defectos de material o de fabricación. Nos
reservamos el derecho de subsanar dichos defectos mediante la puesta a
punto, el cambio de piezas defectuosas o el cambio por un producto
equivalente, en perfecto estado.
2. Al hacer uso de la garantía, el aparato óptico deberá enviarse a gastos
pagados conjuntamente con el justificante de compra, provisto de dirección y
firma, así como la fecha de venta de su vendedor y una descripción de la
reclamación por parte del distribuidor autorizado de DOCTER..
3. No habrá derecho a garantía en caso de un manejo incorrecto, intervenciones
y reparaciones por parte de un servicio no autorizado por nuestra empresa.
4. Quedan excluidas de la garantía las señales de desgaste, las piezas de
desgaste y otros accesorios. Lo mismo será de aplicación para diversos
daños en la superficie del producto.
No nos responsabilizaremos de otros daños directos o indirectos,
independientemente de su tipo o de su ámbito. Es de aplicación el Derecho de la
República Federal de Alemania. El Tribunal competente es el de la ciudad de Jena.
Указания по утилизации прицельных устройств с электронной частью
Прицельные устройства, располагающие
подсвеченной прицельной маркой и тем самым
имеющие обусловленную конструкцией
электронную часть, нельзя смешивать с обычными
бытовыми отходами, если они изношены. Для
надлежащей обработки, вторичного использования
и переработки отнесите эти изделия в соответствующие
приёмные пункты, где их примут без взимания сборов.
Надлежащая утилизация данного изделия в
соответствующих приёмных пунктах способствует защите
окружающей среды и предотвращает возможные опасные
воздействия на человека и внешнюю среду, которые могут
возникнуть из-за неправильного обращения с отходами.
Указания по утилизации батареек в прицельных устройствах
Батарейки не относятся к бытовым отходам.
Просим утилизировать использованные батарейки
через предусмотренную для этого систему
возврата и утилизации. Потребитель по закону
обязан сдать разряженные и более не пригодные к
использованию батарейки. Возврат
осуществляется в предусмотренных приёмных пунктах.

Общие сведения
®
Коллиматорные прицелы DOCTER
представляют собой отличные оптические
прицельные устройства современной конструкции. Благодаря своему малому
размеру и массе, а также компактной беструбной конструкции эти прицелы
предоставляют богатые возможности применения как для охоты, так и для
спорта.
Надежное исполнение, высокая оптическая мощность, привлекательный дизайн
и безотказность работы даже при экстремальных погодных условиях делают
прицел DOCTERsight C незаменимым.
Комплект поставки
В комплект поставки входят:
2 винта с потайной головкой M3x8 с внутренним TORX для крепления на
монтажной пластине
1 штифтовой гаечный ключ T10 с внутренним TORX для затяжки
крепежных винтов
1 отвертка 0,4x2,0
1 маховичок с индивидуально подобранным под прицел лимбом
2 мягкие крышки
1 миниатюрная батарея 3 V, CR 2032
инструкция по эксплуатации
Технические характеристики
Кратность увеличения
1,07x
Размер линзы
21 мм x 15 мм
Диапазон регулировки по высоте
± 360 см на 100 м
Диапазон регулировки по ширине
± 270 см на 100 м
Цена деления шкалы
3 см на 100 м
Величина зоны, перекрываемой
прицельной маркой, для модели:
3,5 MOA
7,0 MOA
10 см на 100 м
20 см на 100 м
Дистанция наблюдения без
параллактических искажений
40 м
Электропитание
Литиевая миниатюрная батарея 3 V,
CR 2032
Размеры, Д x Ш x В
46,0 мм x 25,4 мм x 24,3 мм
Цвет прицельной точки
Красный
Герметичность
Водонепроницаемый
Масса без монтажной пластины
25 г

Поручите выполнение монтажа DOCTERsight III и пристрелку оружия
оружейному мастеру. Установите колпачок только после монтажа.
Ввод в эксплуатацию
Для электропитания должна использоваться только литиевая батарея 3V CR
2032. Запрещается применять другие устройства электропитания.
Вставьте батарею на нижней стороне корпуса в ячейку для батареи таким
образом, чтобы была видна надпись с маркировкой анода. случае
неправильного размещения элемента питания нет опасности повреждения
электроники. Для лучшего контакта батарея притягивается магнитом к
позолоченной пластине контакта на плате провода. Поверхность контакта
следует держать в чистоте (прочищать спиртом).
Замена батареи
Для замены батареи нужно отсоединить DOCTERsight от монтажной пластины.
Ячейка для батареи находится на нижней стороне устройства. Чтобы вытащить
использованную батарею, надавите штифтовым гаечным ключом (или
отверткой) на выемку справа на нижней стороне. После замены батареи
следует снова установить прицел на монтажную пластину и закрепить двумя
винтами с потайной головкой. Поскольку штифтовое соединение выполнено с
высокой точностью, то повторная пристрелка не требуется.
Включение/выключение
Прицел не оснащен механическим выключателем. Для отключения электроники
надевается мягкая крышка. Надевание вызывает отключение электроники.
Монтаж
Прицел DOCTERsight можно без проблем установить на почти все типы оружия
благодаря большому количеству различных адаптерных пластин. Ваш
оружейный мастер выберет тот тип монтажа, который будет соответствовать
Вашим требованиям и типу оружия.
Независимо от применяемого типа монтажа на верхней части адаптерной
пластины размещены 4 прецизионных штифта.
Разместите прицел DOCTERsight на монтажной плате в соответствии с резьбой
крепежных винтов и отверстиями для штифтов и закрепите устройство
поставляемыми винтами с потайной головкой.
Благодаря комбинированному применению крепежных винтов и
предохранительных штифтов предотвращается смещение положения
прицельной марки при стрельбе.

Пристрелка
Оптическая система DOCTERsight C отрегулирована на заводе на дистанцию
наблюдения без параллактических искажений 40 м. Нужно выбрать такую
дистанцию для пристрелки, которая будет соответствовать Вашим требованиям
к DOCTERsight III.
Прицел DOCTERsight C имеет приспособления для раздельной регулировки по
высоте (1) и ширине (2). Приспособления для регулировки размещены сверху и
справа на устройстве и отмечены стрелками, указывающими направление
движения.
Регулировка выполняется через винты со шлицевой головкой с помощью
поставленного маховичка со шкалой и отвертки 0,4x2,0.
Внимание: Перед каждой регулировкой нужно открутить стопорные винты
(3).
Регулировку по высоте и ширине можно выполнять независимо друг от друга.
Существующий диапазон настройки позволяет как компенсировать
погрешности при монтаже, так и выполнить коррекцию баллистической
характеристики. Приспособление для регулировки по ширине оснащено
концевыми упорами в обоих направлениях.
При регулировке по высоте следует учитывать, чтобы нижний упор
устанавливался только тогда, когда прицел смонтирован.
Учтите, что если на упоре отмечено неправильное направление регулировки, то
это приведет к заклиниванию приспособлений для регулировки.
Регулировка по высоте и ширине
Чтобы избежать повреждения регулировочного механизма, ослабьте фиксатор
(3) механизма перед каждой настройкой по высоте и ширине. Для этого
открутите два зажимных винта на задней стороне DOCTERsight на четверть
оборота от концевого упора (против часовой стрелки). Воспользуйтесь
отверткой из комплекта поставки 0,4x2,0. Приспособление для регулировки
должно функционировать без затруднений.
Регулировка положения прицельной марки
Для настройки положения прицельной марки в комплекте поставки имеется
лимб. Сдвиньте лимб со шкалой к рукоятке на отвертке из комплекта поставки.
Установите теперь отвертку на приспособление по высоте (1) или ширине (2). В
соответствии с направлением вращения, указанным на корпусе и маховичке,
выполните регулировку расположения прицельной марки по высоте или
ширине.
Для считывания градуировки используйте метки (4) возле приспособлений или
заметный край корпуса.
После первого выстрела определите величину отклонения между точкой цели
(мушка) и прицельной маркой. Отклонение устраняется следующим образом:
Прицельная марка ниже точки цели (пули летят ниже):
Поверните регулировочный винт в направлении Up (вверх)
Прицельная марка выше точки цели (пули летят выше)
Поверните регулировочный винт в направлении Down (вниз)
Прицельная марка слева от точки цели (пули летят левее):
Поверните регулировочный винт в направлении R / Right (вправо)
Прицельная марка справа от точки цели (пули летят правее):
Поверните регулировочный винт в направлении L/ Left (влево)
Цена деления соответствует регулировке в 3 см на 100 м или 1 угловой минуте.
При других дистанциях пристрелки значение регулировки меняется
пропорционально расстоянию, например:
1,5 см на 50 м или 3 мм на 10 м
Регулировка яркости свечения прицельной марки
Интегрированное управляющее электронное устройство учитывает различные
условия освещенности при практическом применении. Яркость свечения
прицельной точки автоматически адаптируется в соответствии с
освещенностью окружающей среды в направлении цели. При измерении
прибор ориентируется на чувствительность глаз. Если расположенный на
передней стороне прицела датчик будет закрыт, то яркость свечения
прицельной марки заметно уменьшится. Поэтому детали оружия не должны
закрывать датчик.
Техобслуживание и уход
Для прочистки оптики используйте чистящие тряпочки для очков. При
необходимости поверхность оптики следует заранее осторожно прочистить
мягкой чистой тряпкой или волосяной кисточкой. При этом не используйте
химические растворители.
Сильные загрязнения нужно удалять только дистиллированной водой, в
противном случае на поверхности оптики могут возникнуть отложения извести.
В случае нанесения повреждений, нарушающих функциональность прицела,
устройство следует направить в авторизованную сервисную мастерскую.

Указания
Коллиматорные прицелы DOCTER с красной точкой ввиду своей конструкции
не обеспечивают компенсации диоптрий и не содержат элементов, которые
устраняют прочие проблемы со зрением.
Тем самым все индивидуальные проблемы со зрением непосредственно
влияют на контур воспринимаемой светящейся точки.
Кажущаяся овальность, серпообразное отображение, „кучка звездочек“ или
„обтрепанный“ контур точки свидетельствуют не о неисправности устройства, а
о физиологических изменениях зрения (астигматизм).
В этом случае рекомендуется носить очки или обратиться к врачу-
офтальмологу.
Гарантия
Мы обеспечиваем два года гарантии в следующем объеме:
1. Во время гарантийного обслуживания ущерб возмещается по
рекламациям, предметом которых являются дефекты материала или
исполнения. Мы оставляем за собой право удовлетворять требования по
рекламации путем ремонта, замены дефектных деталей или обмена на
такое же, безупречно функционирующее изделие.
2. В случае обращения по гарантии оптическое устройство следует
отправить за свой счет в компетентное представительство DOCTER. К
прибору нужно приложить документ, удостоверяющий покупку, с
адресом, Вашей подписью и датой продажи Вашего дилера и
рекламацию.
3. Гарантия производителя теряет свою силу в случае ненадлежащего
обращения с прибором, вмешательств и ремонта, который выполнен не
авторизованной нашей компанией сервисной службой.
4. Гарантия не распространяется на проявления естественного износа,
расходные детали и прочие принадлежности. Это относится также к
различным повреждениям поверхности изделия.
За иной прямой или косвенный ущерб любого вида и объема производитель не
несет ответственности. Применяется право Федеративной Республики
Германия. Местом судопроизводства является Йена.

Durch ständige Weiterentwicklung unserer Erzeugnisse können Abweichungen von
Bild und Text dieser Bedienungsanleitung auftreten.
Die Wiedergabe – auch auszugsweise – ist nur mit unserer Genehmigung gestattet.
Das Recht der Übersetzung behalten wir uns vor.
Für Veröffentlichungen stellen wir Reproduktionen der Bilder, soweit vorhanden, gern
zur Verfügung.
Because of the continuous, further development of our products, deviations from the
illustrations and the text of this prospect are possible. Its copy -even in extracts -is
oniy permitted with our authorization. We reserve the right of translation. For
publications we gladlly provide available reproductions of illustrations.
Par le perfectionnement continu de nos produits, des différences de dessin et de
texte concernant ce mode d‘emploi peuvent se présenter.
La reproduction de ces instructions d‘utilisation - même par extraits - n’est autorisée
que par notre permission.
Nous nous réservons le droit de traduction. Pour es publications, nous offrons
volontiers des reproductions des dessins, si disponibies.
Debido al constante perfeccionamiento de nuestros productos, puede haber
divergencias entre las representaciones y el texto de las presentes instrucciones.
La reproducción, aunque sólo sea parcial, sólo podrá realizarse con nuestra
aprobación.
Nos reservamos el derecho de traducción.
Estamos a su disposición para hacer reproducciones de las ilustraciones, si las
hubiera, para su publicación.
Так как наши продукты терпят постоянное развитие, возможны, в этом плане,
несоответствия в иллюстрациях и тексте. Копирование – даже части текста –
разрешается только после нашей авторизации. Мы сохраняем право перевода.
Для публикаций будем рады предоставить доступные репродукции
иллюстраций.
