Cisco WES610N: инструкция
Раздел: Профоборудование
Тип: Аппарат
Инструкция к Аппарату Cisco WES610N
User Guide
Linksys WET610N/WES610N
Dual-Band N Entertainment Bridge

i
Contents
Linksys E-Series
i
Product Overview
LED panel 2
Ports panel 3
Wireless Security Checklist
Change the default wireless network name or SSID
4
Change the default password
4
Enable MAC address filtering
4
Enable encryption
4
General Network Security Guidelines 4
Additional Security Tips 5
Advanced Configuration
How to access the browser-based utility 6
Setup > Basic Setup 7
Language
7
Network Setup
7
Wireless > Basic Wireless Settings 7
Basic Wireless Settings
8
Wireless Security
8
Wi-Fi Protected Setup
9
Wireless > Wireless Network Site Survey 10
Wireless Network Site Survey
10
Wireless > WMM® 11
WMM
12
Wireless > Advanced Wireless Settings 13
Advanced Wireless
13
Administration > Management 14
Management
14
Administration > Factory Defaults 15
Factory Defaults
15
Administration > Upgrade Firmware 15
Upgrade Firmware
15
Status > Bridge 15
Bridge Information
16
Local Network
16
Status > Wireless 16
Wireless
16
Troubleshooting
WES610N/WET610N
17
Specifications
WES610N 18
WET610N 19
Contents
2
Product Overview
Linksys WES610N/WET610N
2
Thank you for choosing the Linksys Dual-Band N Entertainment Bridge The
bridge can connect any wired, Ethernet device to your wireless network
The bridge is based on dual-band Wireless-N, so it is compatible with any
Wireless-N, -G, -A, or -B router or access point For first-time installation, follow
the steps on the CD folder To configure advanced settings, use the convenient,
browser-based utility
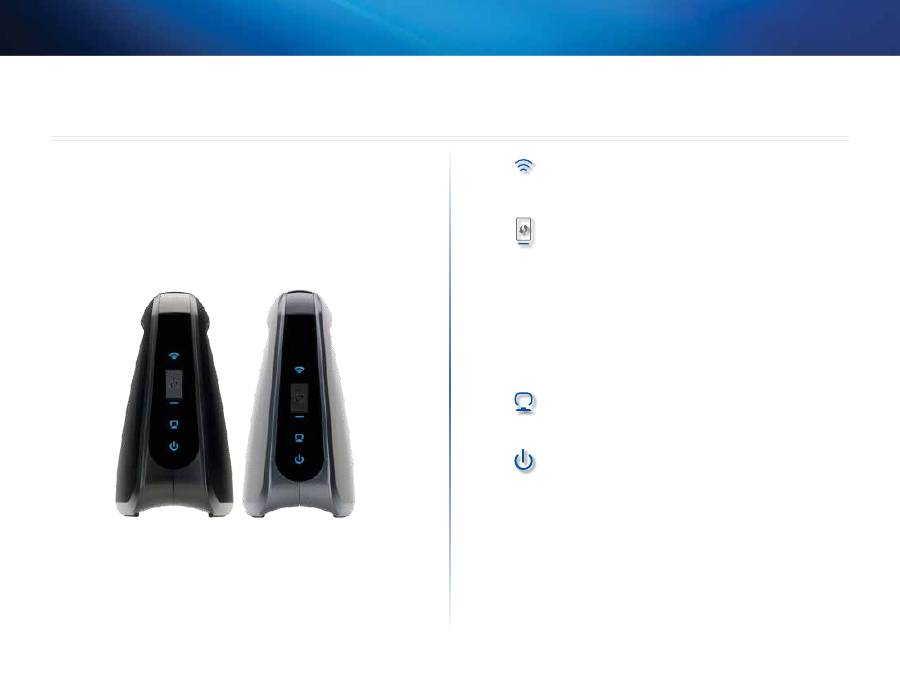
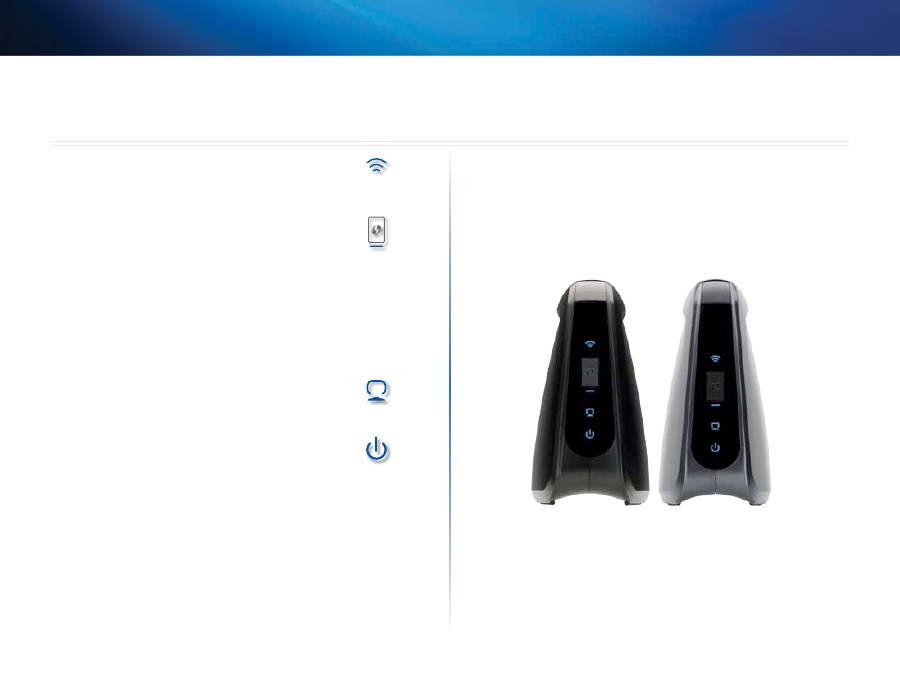
LED panel
WES610N
WET610N
Wireless
(Blue) The Wireless LED lights up when there is
a wireless connection The LED flashes when the bridge
is actively sending or receiving data over the wireless
network
Wi-Fi Protected Setup Button
If your router supports
Wi-Fi Protected Setup and uses WPA or WPA2 security,
then you can use Wi-Fi Protected Setup to automatically
connect the bridge To use Wi-Fi Protected Setup, refer to
“Wireless > Basic Wireless Settings” on page 7
Wi-Fi Protected Setup LED
(Blue/Amber) The LED flashes
blue for two minutes during Wi-Fi Protected Setup It
lights up blue when wireless security is enabled If there
is an error during the Wi-Fi Protected Setup process, then
the LED lights up amber Make sure the network router
supports Wi-Fi Protected Setup Wait until the LED is off,
and then try again
Ethernet
(Blue) The Ethernet LED lights up when there
is a wired connection The LED flashes when the bridge
is actively sending or receiving data over the Ethernet
port(s)
Power
(Blue) The Power LED lights up when the bridge
is powered on
Product Overview
3
Product Overview
Linksys WES610N/WET610N
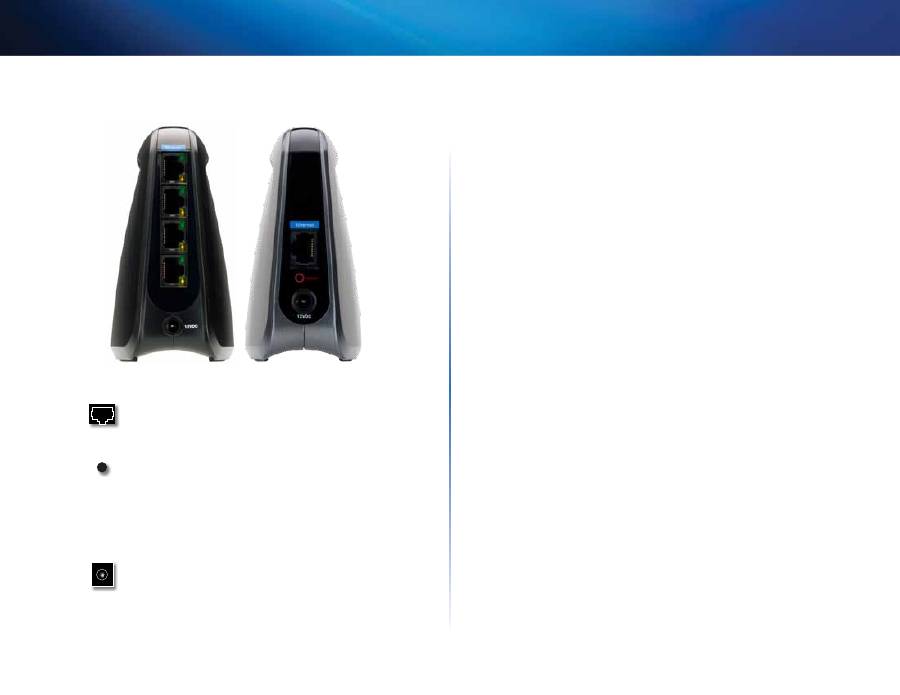
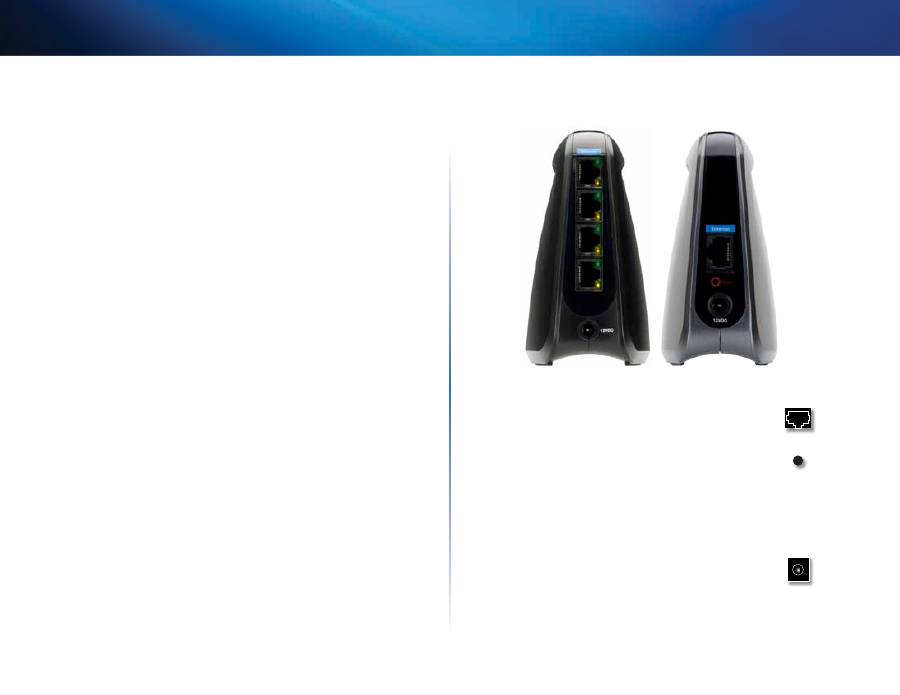
Ports panel
WES610N
WET610N
Ethernet
The Ethernet port(s) connects the bridge
to a computer or other Ethernet network device The
WES610N has four ports, and the WET610N has a single
port
Reset
There are two ways to reset the bridge’s factory
defaults Either press and hold the Reset button for
approximately five seconds, or restore the defaults
from Administration > Factory Defaults in the bridge’s
browser-based utility The WES610N has a reset button
on the bottom, and the WET610N has a reset button on
the back port panel
Power
The Power port connects the bridge to the
included power adapter

4
Wireless Security Checklist
Linksys WES610N/WET610N
4
Wireless networks are convenient and easy to install, so homes with high-
speed Internet access are adopting them at a rapid pace Because wireless
networking operates by sending information over radio waves, it can be more
vulnerable to intruders than a traditional wired network Like signals from your
cellular or cordless phones, signals from your wireless network can also be
intercepted Since you cannot physically prevent someone from connecting to
your wireless network, you need to take some additional steps to keep your
network secure
Change the default wireless network name or SSID
Wireless devices have a default wireless network name or Service Set Identifier
(SSID) set by the factory This is the name of your wireless network, and can
be up to 32 characters in length Linksys wireless products use
linksys
as the
default wireless network name You should change the wireless network name
to something unique to distinguish your wireless network from other wireless
networks that may exist around you, but do not use personal information (such
as your Social Security number) because this information may be available for
anyone to see when browsing for wireless networks
Change the default password
For wireless products such as access points and routers, you will be asked for
a password when you want to change their settings These devices have a
default password set by the factory The Linksys default password is
admin
Hackers know these defaults and may try to use them to access your wireless
device and change your network settings To thwart any unauthorized changes,
customize the device’s password so it will be hard to guess
Enable MAC address filtering
Linksys routers give you the ability to enable Media Access Control (MAC)
address filtering The MAC address is a unique series of numbers and letters
assigned to every networking device With MAC address filtering enabled,
wireless network access is provided solely for wireless devices with specific MAC
addresses For example, you can specify the MAC address of each computer in
your home so that only those computers can access your wireless network
Enable encryption
Encryption protects data transmitted over a wireless network Wi-Fi Protected
Access (WPA/WPA2) and Wired Equivalent Privacy (WEP) offer different levels of
security for wireless communication
A network encrypted with WPA/WPA2 is more secure than a network encrypted
with WEP, because WPA/WPA2 uses dynamic key encryption To protect the
information as it passes over the airwaves, you should enable the highest level
of encryption supported by your network equipment
WEP is an older encryption standard and may be the only option available on
some older devices that do not support WPA
General Network Security Guidelines
Wireless network security is useless if the underlying network is not secure
•
Password protect all computers on the network and individually
password protect sensitive files
•
Change passwords on a regular basis
•
Install anti-virus software and personal firewall software
•
Disable file sharing (peer-to-peer) Some applications may open file
sharing without your consent and/or knowledge
Wireless Security Checklist

5
Wireless Security Checklist
Linksys WES610N/WET610N
Additional Security Tips
•
Keep wireless routers, access points, or gateways away from exterior
walls and windows
•
Turn wireless routers, access points, or gateways off when they are not
being used (at night, during vacations)
•
Use strong passphrases that are at least eight characters in length
Combine letters and numbers to avoid using standard words that can be
found in the dictionary

6
Advanced Configuration
Linksys WES610N/WET610N
6
After setting up the bridge by following the steps on the CD folder, the bridge
will be ready for use However, if you want to change its advanced settings,
use the bridge’s browser-based utility This chapter describes each web page
of the utility and each page’s key functions You can access the utility via a web
browser on a computer networked with the bridge
The browser-based utility has these main tabs: Setup, Wireless, Administration,
and Status Additional tabs will be available after you click one of the main tabs
How to access the browser-based utility
Use a web browser to access the browser-based utility
If the bridge is connected to a network with a DHCP server (usually the network
router), then the bridge will obtain its IP address from the DHCP server If
there is no DHCP server, then the bridge will use its default static IP address,
169.254.1.250
(If you set a permanent static IP address on the bridge through
the browser-based utility, then enter the static IP address instead )
NOTE
If you do not know the bridge’s IP address, then find its IP
address in the DHCP clients table of your router (Refer to the
documentation for your router )
If you cannot locate the bridge’s IP address, you can reset the bridge;
press the
Reset
button on the bridge for approximately five seconds,
using a straightened paper clip This will reset the bridge back to
the factory default settings The bridge will request an IP address
from the DHCP server (usually the network router) If no DHCP
server is found, then the bridge will use its default static IP address,
169.254.1.250
, until it detects a DHCP server and is assigned a
dynamic IP address
If the bridge is not associated with a router and is using the factory default
settings, connect a computer to the bridge using an Ethernet connection to
access the web-based utility You will need to configure the Ethernet connection
on the computer with a static IP address and subnet mask
The IP address of your Ethernet adapter should be set to a specific IP address
1.
In the
IP address
field, enter
169.254.x.y
(x should be replaced by a
number between 1 and 254, and y should be replaced by a number
between 0 and 255)
2.
In the
Subnet mask
field, enter
255.255.0.0
NOTE
The steps to assign a static IP address to the Ethernet adapter on
your computer vary by operating system For instructions, please
refer to the help documentation of your specific operating system
After you have assigned your Ethernet adapter with a static IP address, launch
your web browser, and enter the Adapter’s IP address (the default setting is
169.254.1.250
)in the
Address
field Press
Enter
A password request screen appears (Non-Windows XP users will see a similar
screen ) Leave the
User name
field blank Enter the password you created
during the Setup Wizard If you did not create a new password, use the default
password
admin
(You can set a new password from the
Administration >
Management
screen ) Click
OK
to continue
NOTE
If the password request screen does not appear, wait two minutes
and try again
Advanced Configuration

7
Advanced Configuration
Linksys WES610N/WET610N
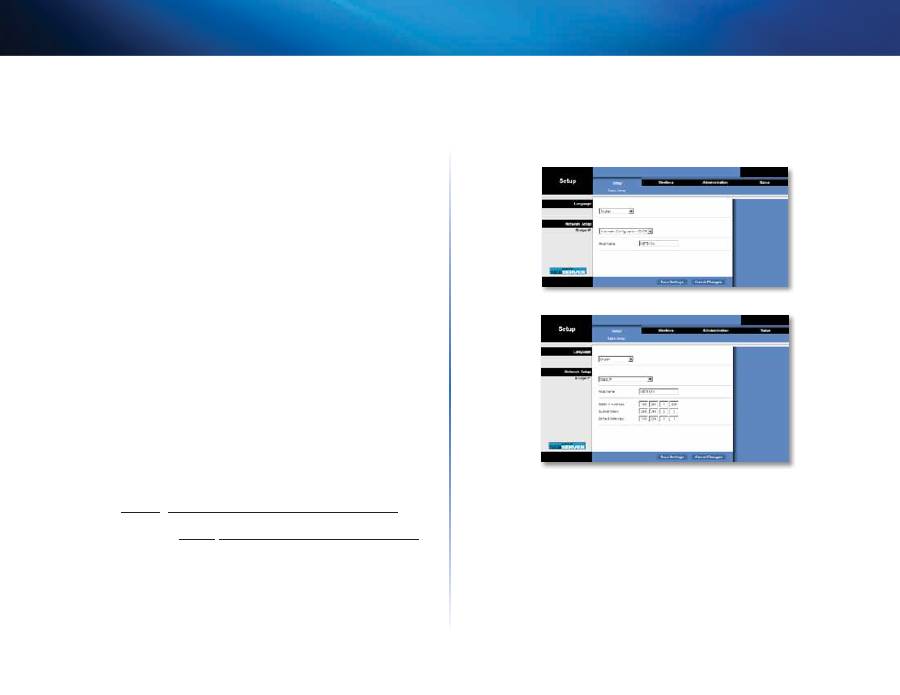
Setup > Basic Setup
The first screen that appears is the
Basic Setup
screen Use this screen to change
the browser-based utility’s language, or to change the bridge’s wired, Ethernet
network settings
Language
Language
This is used to set the language displayed by the browser-based
utility Select the desired language from the drop-down menu
Network Setup
This section determines if the bridge’s IP address is obtained automatically
from a DHCP server, such as your network router (Automatic Configuration -
DHCP), or set manually (Static IP)
Bridge IP
If your network has a DHCP server, such as your network router,
assigning IP addresses to your network devices, then keep the default,
Automatic Configuration - DHCP
The bridge will request an IP address from
the DHCP server (usually the network router) If no DHCP server is found, then
the bridge will use its default static IP address,
169.254.1.250
, until it detects a
DHCP server and is assigned a dynamic IP address
If you want to set a permanent static IP address for the bridge, then select
Static IP
If you select Static IP, then complete the following fields:
•
Static IP Address
Enter a unique IP address that will be used to access the
browser-based utility
•
Subnet Mask
Enter the subnet mask of your wired network
•
Default Gateway
Enter the IP address of the default gateway for your
network (in most cases, this is your router)
Click
Save Settings
to apply your changes, or click
Cancel Changes
to cancel
your changes
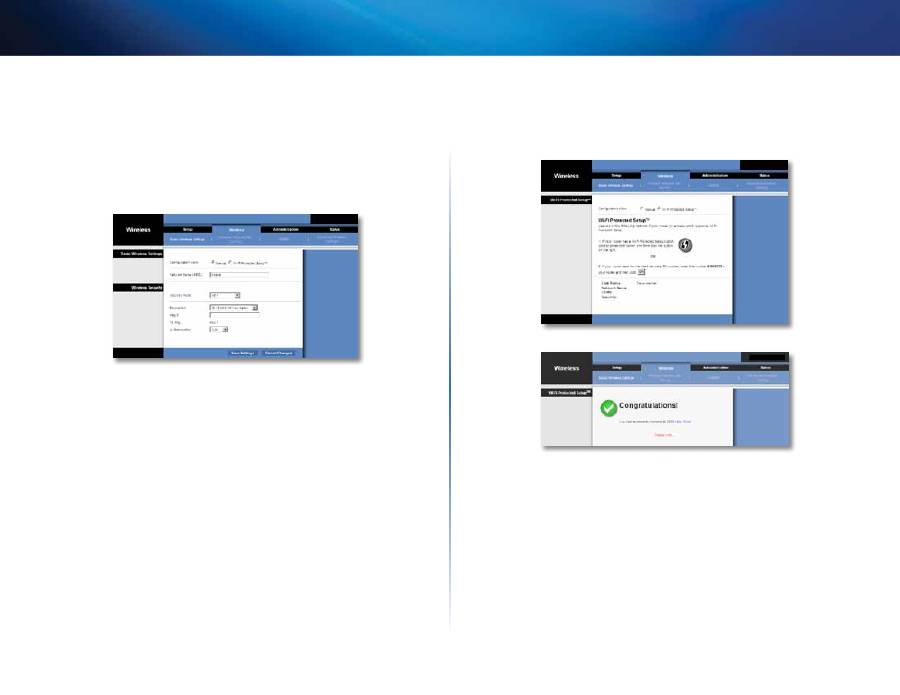
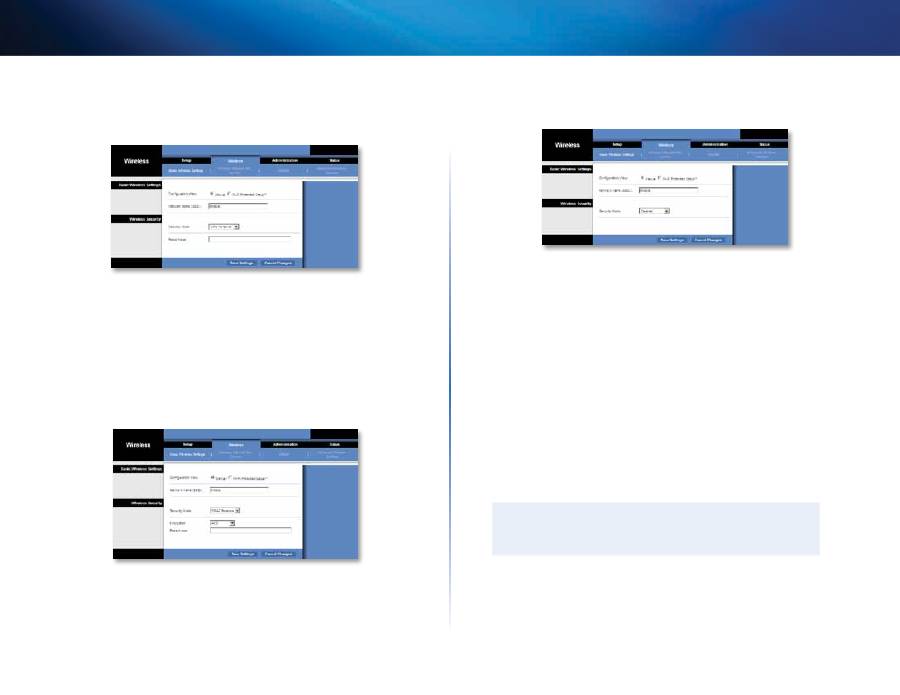
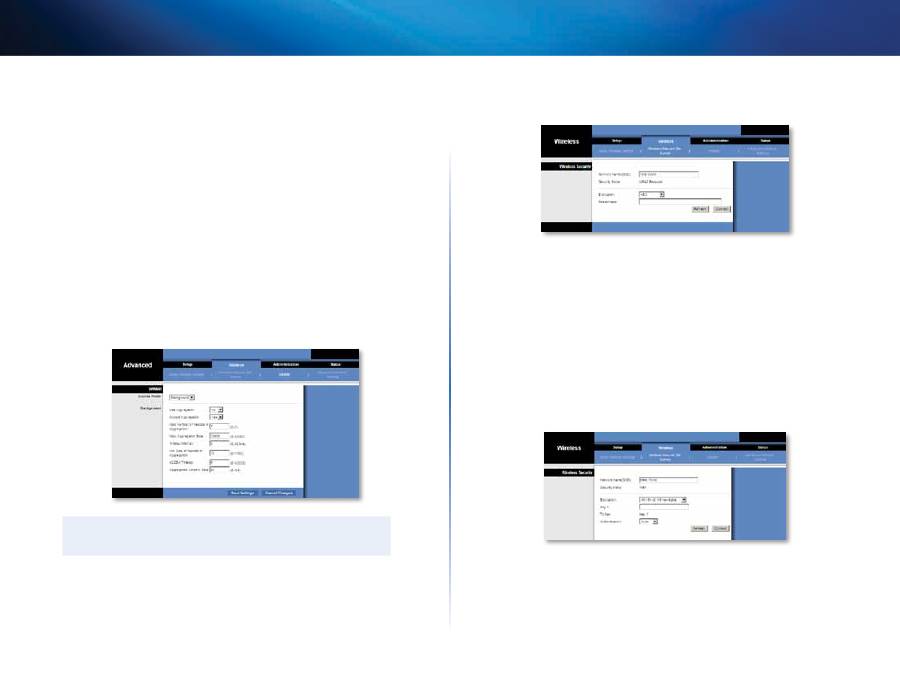
Wireless > Basic Wireless Settings
Use the
Basic Wireless Settings
screen to configure the bridge’s basic wireless
and security settings
There are two ways to configure the bridge’s settings, manual and Wi-Fi
Protected Setup Wi-Fi Protected Setup is a feature that makes it easy to set up
your wireless network If your network router supports Wi-Fi Protected Setup
and uses WPA or WPA2 security, then you can use Wi-Fi Protected Setup to
automatically connect the bridge
Configuration View
To manually configure your wireless network, select
Manual
Refer to
Basic Wireless Settings
,
page 8
To use Wi-Fi Protected
Setup, select
Wi-Fi Protected Setup
Refer to
Wi-Fi Protected Setup
,
page 9
8
Advanced Configuration
Linksys WES610N/WET610N
Basic Wireless Settings
Network Name (SSID)
The SSID is the network name shared among all
points in a wireless network The SSID must be identical for all devices in the
wireless network It is case-sensitive and must not exceed 32 characters (use
any characters on the keyboard) Make sure this setting matches the setting on
your wireless router or access point For added security, you should change the
default SSID (
linksys
) to a unique name
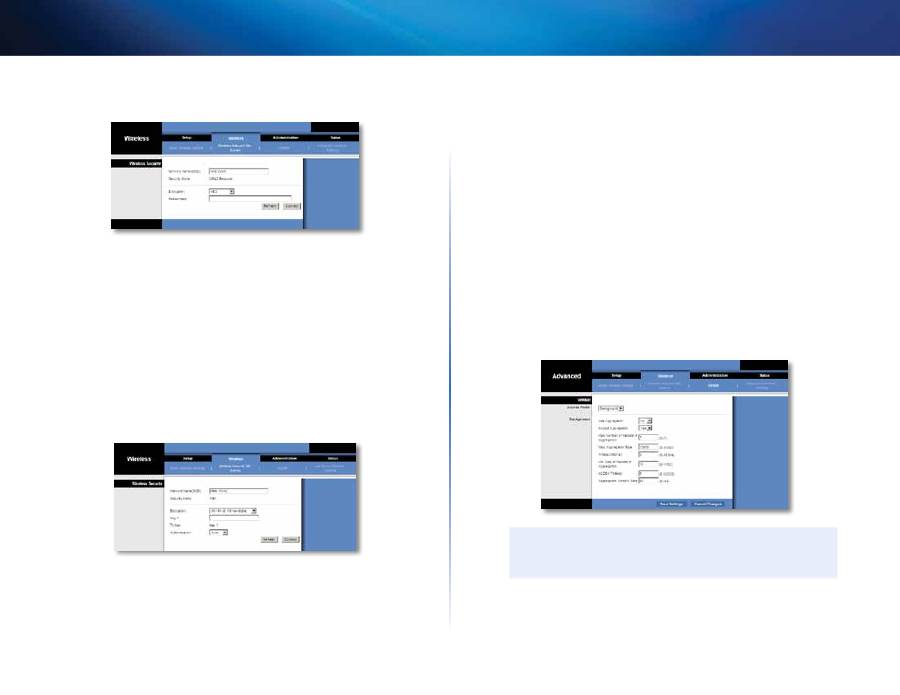
Wireless Security
The bridge supports the following wireless security options: WPA Personal,
WPA2 Personal, and WEP WPA (Wi-Fi Protected Access) and WPA2 are stronger
security methods than WEP (Wired Equivalent Privacy) For more information
about wireless security, refer to “Wireless Security Checklist” on page 4
Security Mode
Select the security method for your wireless network If you do not want to use
wireless security, keep the default,
Disabled
NOTE
Remember that each device in your wireless network MUST use
the same security method and passphrase/key, or else the wireless
devices will not be able to communicate with each other
WPA Personal
WPA is a security standard stronger than WEP encryption
Encryption
WPA supports the TKIP encryption method, with dynamic
encryption keys
Passphrase
Enter the key shared by the bridge and your wireless router or
access point It must have 8-63 characters
Click
Save Settings
to apply your changes, or click
Cancel Changes
to cancel
your changes
WPA2 Personal
WPA2 is a more advanced, more secure version of WPA
Encryption
WPA2 supports two encryption methods, TKIP and AES, with
dynamic encryption keys Select the encryption method,
AES
or
TKIP or AES
The default selection is
AES
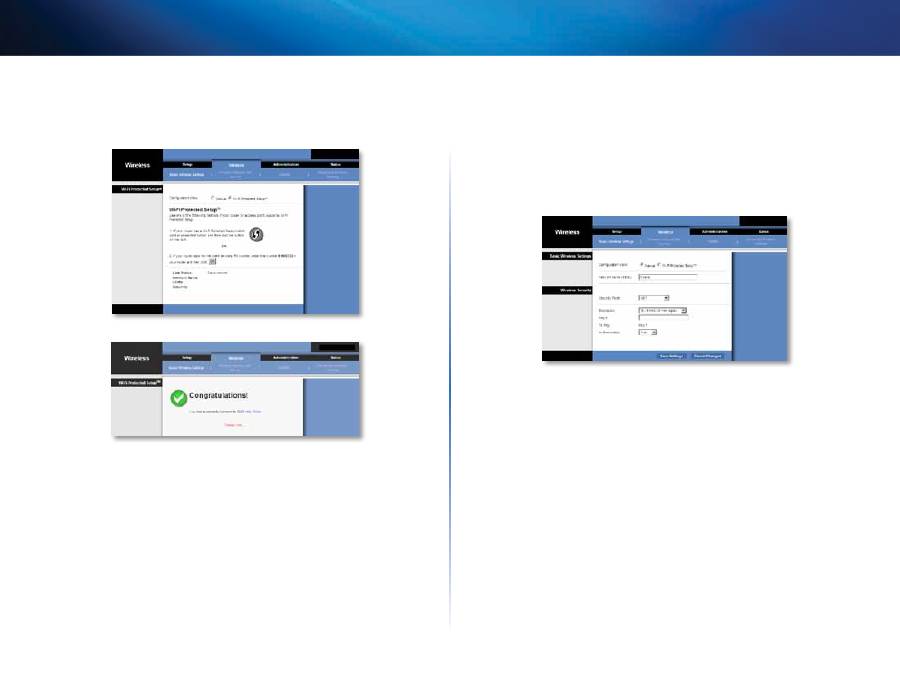
9
Advanced Configuration
Linksys WES610N/WET610N
Passphrase
Enter the key shared by the bridge and wireless router or access
point It must have 8-63 characters
Click
Save Settings
to apply your changes, or click
Cancel Changes
to cancel
your changes
WEP
WEP is a basic encryption method, which is not as secure as WPA or WPA2
Encryption
Select a level of WEP encryption,
40/64 bits (10 hex digits)
or
104/128 bits (26 hex digits)
The default is
40/64 bits (10 hex digits)
Key 1
Enter the WEP key of your network
Tx Key
Key 1
is the transmit key used by the bridge
Authentication
The default is
Auto
, which allows either Open system or Shared
key authentication to be used Select
Open
to use open system authentication;
the sender and recipient do not use a WEP key for authentication Select
Shared
to use shared key authentication; the sender and recipient use a WEP
key for authentication
Click
Save Settings
to apply your changes, or click
Cancel Changes
to cancel
your changes
Wi-Fi Protected Setup
There are two methods available Use the method that applies to the router
you are using
Method #1
Use this method if your router has a Wi-Fi Protected Setup button
1.
Click or press the
Wi-Fi Protected Setup
button on the router
2.
Within two minutes, click the
Wi-Fi Protected Setup
button on the
bridge’s
Wi-Fi Protected Setup
screen
3.
After the bridge has been configured, click
Close
The
Wi-Fi Protected Setup
screen displays the Link Status, Network Name (SSID),
and Security method
10
Advanced Configuration
Linksys WES610N/WET610N
Method #2
Use this method if your router requests the PIN number of the bridge
1.
On the
router’s
Wi-Fi Protected Setup
screen, enter the PIN number on
the
bridge’s
Wi-Fi Protected Setup
screen Then click
Register
or the
appropriate button (It is also listed on the label on the bottom of the
bridge )
2.
On the
bridge’s
Wi-Fi Protected Setup
screen, click
OK
3.
After the bridge has been configured, click
Close
The
Wi-Fi Protected Setup
screen displays the Link Status, Network Name (SSID),
and Security method
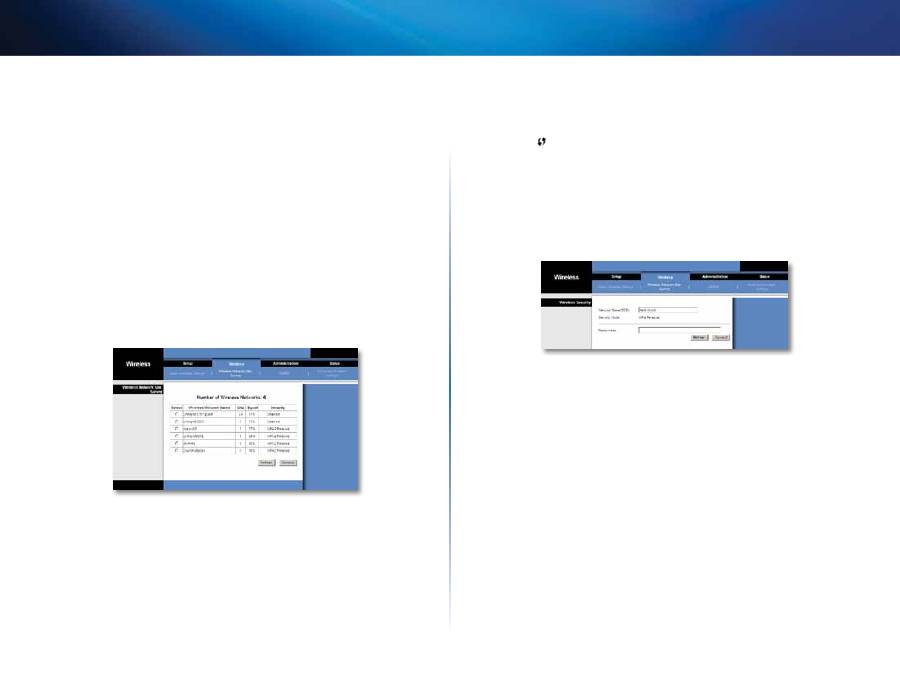
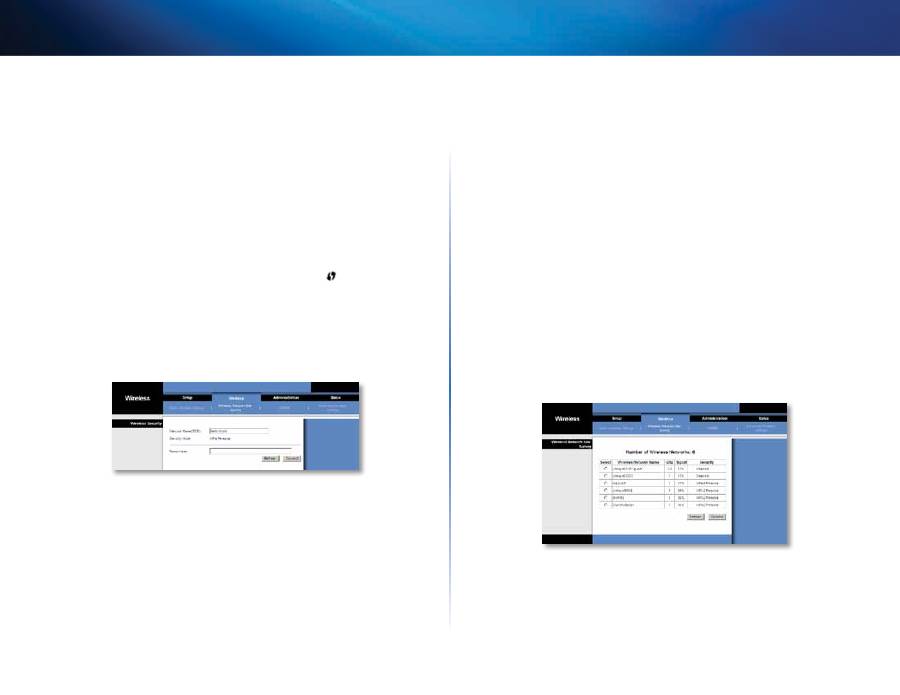
Wireless > Wireless Network Site Survey
Click the
Wireless Network Site Survey
tab to begin a site survey The
Wireless
Network Site Survey
screen lists the wireless networks detected by the bridge
Wireless Network Site Survey
Number of Wireless Networks
The number of wireless networks detected by
the bridge is displayed
Select
To connect to a wireless network, click
Select
Then click
Connect
Wireless Network Name
The network name or SSID of the wireless network
is displayed
GHz
The radio band of the wireless network is displayed
Signal
The percentage of signal strength is displayed 100% is the strongest
signal strength possible; 0% is the weakest possible
Security
If the network supports Wi-Fi Protected Setup, the Wi-Fi Protected
Setup icon
is displayed The security method used by the wireless network
is displayed
Click
Refresh
to update the on-screen information
After you have selected a network, click
Connect
A new screen appears Follow
the instructions for the security method of your network
WPA
Network Name (SSID)
The name of the network you selected is automatically
displayed
Security Mode
WPA Personal is automatically displayed
Encryption
WPA supports the TKIP encryption method, with dynamic
encryption keys
Passphrase
Enter the key shared by the bridge and wireless router or access
point It must have 8-63 characters
Click
Refresh
to update the on-screen information
After you have entered the security settings, click
Connect
11
Advanced Configuration
Linksys WES610N/WET610N
WPA2
Network Name (SSID)
The name of the network you selected is automatically
displayed
Security Mode
WPA2 Personal is automatically displayed
Encryption
WPA2 supports two encryption methods, TKIP and AES, with
dynamic encryption keys Select the encryption method,
AES
or
TKIP or AES
Passphrase
Enter the key shared by the bridge and wireless router or access
point It must have 8-63 characters
Click
Refresh
to update the on-screen information
After you have entered the security settings, click
Connect
WEP
Network Name (SSID)
The name of the network you selected is automatically
displayed
Security Mode
WEP is automatically displayed
Encryption
Select a level of WEP encryption,
40/64 bits (10 hex digits)
or
104/128 bits (26 hex digits)
Key 1
Enter the WEP key of your network
Tx Key
Key 1
is the transmit key used by the bridge
Authentication
The default is
Auto
, which allows either Open system or Shared
key authentication to be used Select
Open
to use open system authentication;
the sender and recipient do not use a WEP key for authentication Select
Shared
to use shared key authentication; the sender and recipient use a WEP
key for authentication
Click
Refresh
to update the on-screen information
After you have entered the security settings, click
Connect
Wireless > WMM®
Configure the Wireless MultiMedia (WMM) settings WMM prioritizes packets
depending on their respective access mode (traffic type): Background, Best
Effort, Video, or Voice These settings should only be adjusted by an expert
administrator as incorrect settings can reduce wireless performance
NOTE
The settings on the
WMM
screen are designed for advanced users
only

12
Advanced Configuration
Linksys WES610N/WET610N
WMM
Access Mode
You can assign different settings to the four access modes available Select the
mode you want to configure:
Background
,
Best Effort
,
Video
, or
Voice
Follow
the instructions for the mode you select
Background
Use Aggregation
This option defines whether or not the Media Access Control
(MAC) layer will set up an Add Block Acknowledgement (ADDBA) session The
default is
No
Select
Yes
to enable this option
Accept Aggregation
This option defines whether or not the MAC layer will
accept an ADDBA request The default is
Yes
Select
No
to disable this option
Max. Number of Packets in Aggregation
This option defines the maximum
number of packets (sub-frames) in the aggregate The range is
0
to
7
The
default is
7
Max. Aggregation Size
This option defines the maximum size of the
aggregate (in bytes) The range is
0
to
16000
The default is
12000
Timeout Internal
This option defines the timeout period in which the
aggregate should be closed with a “closing condition” before it is closed by the
timer The range is
0
to
100
ms The default is
3
Min. Size of Packet in Aggregation
This option defines the minimum size (in
bytes) of packets to be accumulated in the aggregate The range is
0
to
1500
The default is
10
ADDBA Timeout
This option defines the duration after which the ADDBA
setup is terminated, if there are no frame exchanges within this duration by the
Block Acknowledgement (ACK) agreement The range is
0
to
65535
ms The
default is
0
, which disables the timeout
Aggregation Window Size
This option defines the maximum number of
packets transmitted without getting ACKs The range is
0
to
64
The default is
64
Click
Save Settings
to apply your changes, or click
Cancel Changes
to cancel
your changes
Best Effort
Use Aggregation
This option defines whether or not the Media Access Control
(MAC) layer will set up an Add Block Acknowledgement (ADDBA) session The
default is
Yes
Select
No
to disable this option
Accept Aggregation
This option defines whether or not the MAC layer will
accept an ADDBA request The default is
Yes
Select
No
to disable this option
Max. Number of Packets in Aggregation
This option defines the maximum
number of packets (sub-frames) in the aggregate The range is
0
to
10
The
default is
10
Max. Aggregation Size
This option defines the maximum size of the
aggregate (in bytes) The range is
0
to
20000
The default is
16000
Timeout Internal
This option defines the timeout period in which the
aggregate should be closed with a “closing condition” before it is closed by the
timer The range is
0
to
100
ms The default is
3
Min. Size of Packet in Aggregation
This option defines the minimum size (in
bytes) of packets to be accumulated in the aggregate The range is
0
to
1500
The default is
10
ADDBA Timeout
This option defines the duration after which the ADDBA
setup is terminated, if there are no frame exchanges within this duration by the
Block Acknowledgement (ACK) agreement The range is
0
to
65535
ms The
default is
0
, which disables the timeout
Aggregation Window Size
This option defines the maximum number of
packets transmitted without getting ACKs The range is
0
to
64
The default is
64
Click
Save Settings
to apply your changes, or click
Cancel Changes
to cancel
your changes
Video
Use Aggregation
This option defines whether or not the Media Access Control
(MAC) layer will set up an Add Block Acknowledgement (ADDBA) session The
default is
Yes
Select
No
to disable this option
Accept Aggregation
This option defines whether or not the MAC layer will
accept an ADDBA request The default is
Yes
Select
No
to disable this option
Max. Number of Packets in Aggregation
This option defines the maximum
number of packets (sub-frames) in the aggregate The range is
0
to
7
The
default is
7

13
Advanced Configuration
Linksys WES610N/WET610N
Max. Aggregation Size
This option defines the maximum size of the
aggregate (in bytes) The range is
0
to
16000
The default is
12000
Timeout Internal
This option defines the timeout period in which the
aggregate should be closed with a “closing condition” before it is closed by the
timer The range is
0
to
100
ms The default is
3
Min. Size of Packet in Aggregation
This option defines the minimum size (in
bytes) of packets to be accumulated in the aggregate The range is
0
to
1500
The default is
10
ADDBA Timeout
This option defines the duration after which the ADDBA
setup is terminated, if there are no frame exchanges within this duration by the
Block Acknowledgement (ACK) agreement The range is
0
to
65535
ms The
default is
0
, which disables the timeout
Aggregation Window Size
This option defines the maximum number of
packets transmitted without getting ACKs The range is
0
to
64
The default is
64
Click
Save Settings
to apply your changes, or click
Cancel Changes
to cancel
your changes
Voice
Use Aggregation
This option defines whether or not the Media Access Control
(MAC) layer will set up an Add Block Acknowledgement (ADDBA) session The
default is
Yes
Select
No
to disable this option
Accept Aggregation
This option defines whether or not the MAC layer will
accept an ADDBA request The default is
Yes
Select
No
to disable this option
Max. Number of Packets in Aggregation
This option defines the maximum
number of packets (sub-frames) in the aggregate The range is
0
to
2
The
default is
2
Max. Aggregation Size
This option defines the maximum size of the
aggregate (in bytes) The range is
0
to
16000
The default is
10000
Timeout Internal
This option defines the timeout period in which the
aggregate should be closed with a “closing condition” before it is closed by the
timer The range is
0
to
100
ms The default is
10
Min. Size of Packet in Aggregation
This option defines the minimum size (in
bytes) of packets to be accumulated in the aggregate The range is
0
to
1500
The default is
10
ADDBA Timeout
This option defines the duration after which the ADDBA
setup is terminated, if there are no frame exchanges within this duration by the
Block Acknowledgement (ACK) agreement The range is
0
to
65535
ms The
default is
0
, which disables the timeout
Aggregation Window Size
This option defines the maximum number of
packets transmitted without getting ACKs The range is
0
to
64
The default is
64
Click
Save Settings
to apply your changes, or click
Cancel Changes
to cancel
your changes
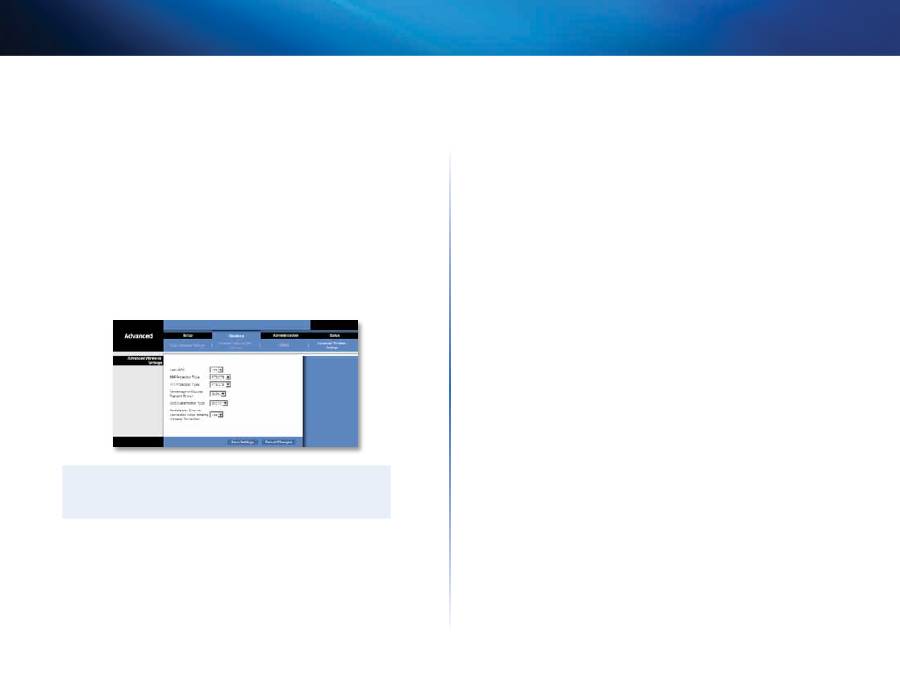
Wireless > Advanced Wireless Settings
Configure the bridge’s advanced wireless functions These settings should
only be adjusted by an expert administrator as incorrect settings can reduce
wireless performance
NOTE
The settings on the
Advanced Wireless Settings
screen are designed
for advanced users only
Advanced Wireless
Use LDPC
Low-Density Parity-Check Code (LDPC) enables or disables error
correction to reduce the probability of data loss in noisy channels The Rate
Adaptation algorithm automatically disabled LDPC coding when working at
high PHY rates (higher than 162) To use the LDCP advanced error correction
scheme, keep the default,
Yes
Otherwise, select
No
14
Advanced Configuration
Linksys WES610N/WET610N
ERP Protection Type
This option configures protection of OFDM packets
despite the presence of 802 11b stations within the wireless network By
sending RTS/CTS or CTS2Self packets in 802 11b rates, the bridge informs the
wireless network that OFDM packets are going to be transferred and protects
the packets in the wireless network The RTS/CTS and CTS2Self packets create
overhead, which may result in lower throughputs
The RTS/CTS option provides better coverage but lower throughputs when
compared to CTS2Self, because the RTS/CTS option includes acknowledgement
from the receiving device To use the RTS/CTS option, keep the default,
RTS/
CTS
The None option may cause collisions between OFDM and CCK packets To
use the None option, select
None
To use the CTS2Self option, select
CTS2Self
11n Protection Type
This option configures protection from non-High
Throughput (HT) devices within the wireless network In case the wireless
router (or access point) detects an association of a non-HT legacy device, it will
signal all the HT devices to use RTS/CTS or CTS2Self mechanisms before each
data transmission This feature also supports all 802 11n standard protections,
including MIMO
The RTS/CTS option provides better coverage but lower throughputs when
compared to CTS2Self, because the RTS/CTS option includes acknowledgement
from the receiving device To use the RTS/CTS option, keep the default,
RTS/
CTS
The None option may cause collisions between HT and legacy packets To
use the None option, select
None
To use the CTS2Self option, select
CTS2Self
Percentage of maximal transmit power
This option sets the percentage
of maximal transmit power relative to the regulatory domain restrictions For
example, if the regulatory domain restriction allows transmissions of up to
20 dB, then setting the percentage at 50% allows maximal transmit power of
10 dB Select the percentage you want to use:
12%
,
25%
,
50%
, or
100%
The
default is
100%
QoS Classification Type
This option sets 802 1D or 802 1Q mapping from the
IP DSCP/TOS field to WMM priorities (Background, Best Effects, Video, Voice)
Keep the default,
802.1D
, or select
802.1Q
, which is used by some IPTV streams
Re-establish Ethernet connection when initiating wireless connection
To
trigger DHCP discovery from the device that resides behind the bridge, the
bridge will reset the Ethernet link between the bridge and the device every
time a wireless connection is established To disable this behavior, select
No
Otherwise, keep the default,
Yes
Click
Save Settings
to apply your changes, or click
Cancel Changes
to cancel
your changes
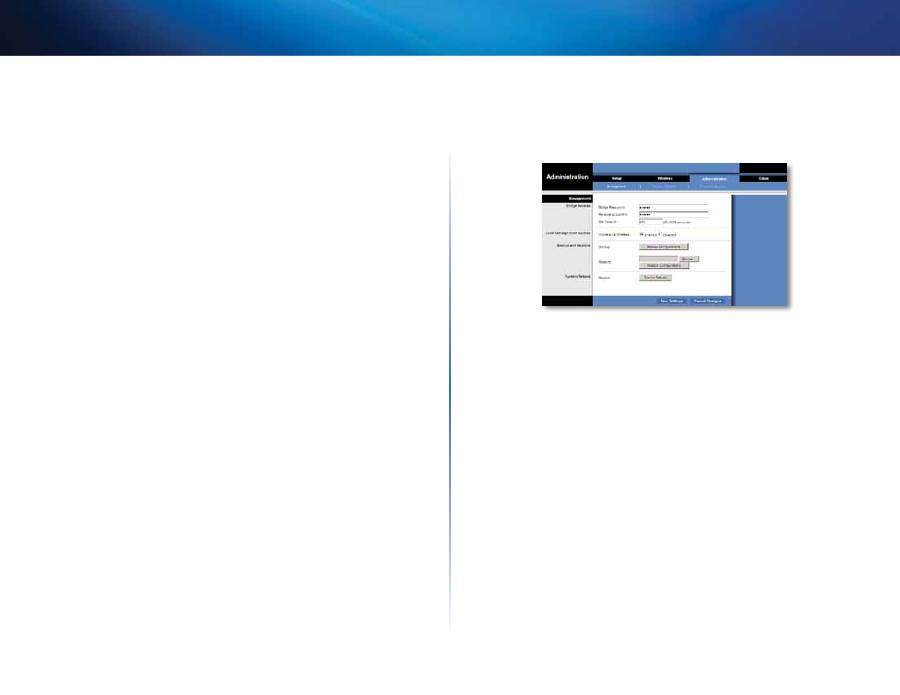
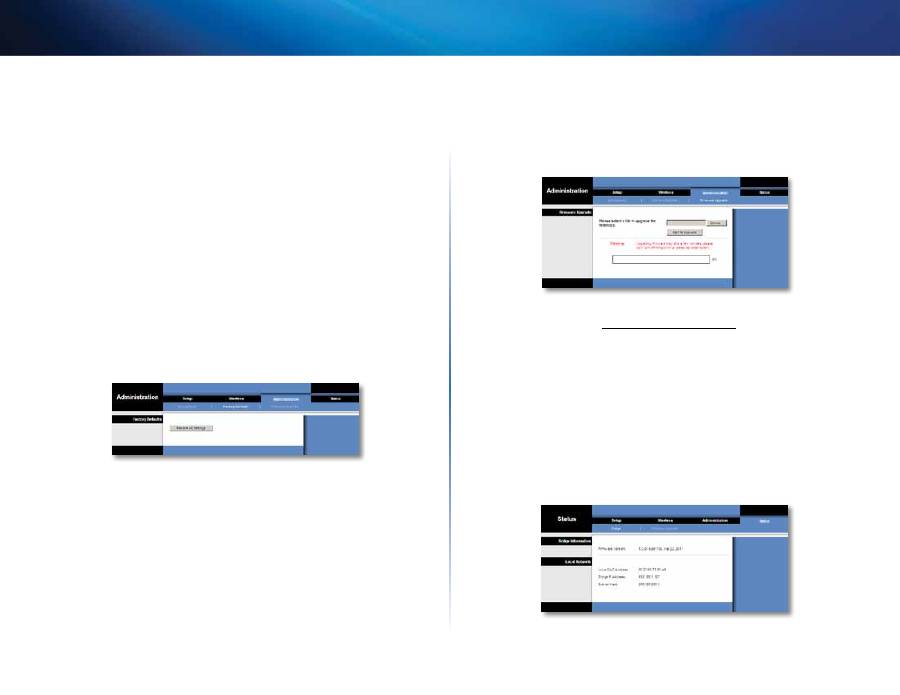
Administration > Management
Use this screen to manage specific bridge functions: access to the web-based
utility, backup of the configuration file, and reboot
Management
Bridge Access
Use a password to protect access to the browser-based utility
Bridge Password
Enter a new Password for the bridge
Re-enter to confirm
Enter the Password again to confirm
Idle Timeout
The login times out after a period of inactivity that you specify
The range is
60
to
3600
seconds The default is
600
Web Access
Access via Wireless
If you are using the bridge in a public domain where you
are giving wireless access to your guests, you can disable wireless access to
the bridge’s browser-based utility You will only be able to access the browser-
based utility via a wired connection if you disable the setting Keep the default,
Enabled
, to allow wireless access to the bridge’s browser-based utility, or select
Disabled
to block wireless access to the utility
Backup and Restore
Backup
To back up the bridge’s configuration file, click
Backup Configurations
Then follow the on-screen instructions
15
Advanced Configuration
Linksys WES610N/WET610N
Restore
Click
Browse
and select the configuration file Then click
Restore
Configurations
System Reboot
Reboot
To reboot or restart the bridge, click
Start to Reboot
Click
Save Settings
to apply your changes, or click
Cancel Changes
to cancel
your changes
Administration > Factory Defaults
Use this screen to restore the bridge’s configuration to its factory default
settings
Factory Defaults
Restore All Settings
To reset the bridge’s settings to the factory defaults, click
Restore All Settings
Any settings you have saved will be lost when the default
settings are restored
Administration > Upgrade Firmware
Use this screen to upgrade the bridge’s firmware Do not upgrade the firmware
unless you are experiencing problems with the bridge or the new firmware has
a feature you want to use
Before upgrading the firmware, download the bridge’s firmware upgrade file
from the Linksys website,
www.Linksys.com/support
Upgrade Firmware
Please select a file to upgrade the firmware
Click
Browse
and select the
firmware upgrade file Then click
Start to Upgrade
and follow the on-screen
instructions
Status > Bridge
The bridge’s current status information is displayed

16
Advanced Configuration
Linksys WES610N/WET610N
Bridge Information
Firmware Version
The bridge’s current firmware is displayed
Local Network
Local MAC Address
The bridge’s MAC Address, as seen on your local, Ethernet
network, is displayed
IP Address
The bridge’s IP Address, as seen on your local, Ethernet network,
is displayed
Subnet Mask
The Subnet Mask configured for your local network is displayed
Status > Wireless
Information about your wireless network is displayed
Wireless
Link Status
The status of the connection to your wireless network is displayed
MAC Address
The bridge’s MAC Address, as seen on your local, wireless
network, is displayed
Network Name (SSID)
The wireless network name or SSID is displayed
BSSID
The wireless MAC address of the connected wireless router (or access
point) is displayed
Radio Band
The radio band of your wireless network is displayed
Channel Width
The channel width, in MHz, used by your wireless network is
displayed
Wide Channel
Depending on the channel settings of your network router,
the Wide Channel is displayed If you selected Wide - 40MHz Channel for the
router’s Radio Band or Channel Width setting, then this will be your primary
Wireless-N channel
Standard Channel
The Standard Channel setting is displayed If you selected
Wide – 40MHz Channel for the router’s Radio Band or Channel Width setting,
then the Standard Channel will be a secondary channel for Wireless-N
Bit Rate
The data transmission rate is displayed
Signal
The percentage of signal strength is displayed 100% is the strongest
signal strength possible; 0% is the weakest possible
Security
The security method of your wireless network is displayed

17
Troubleshooting
Linksys WES610N/WET610N
17
WES610N/WET610N
Your computer or other wired, Ethernet device cannot communicate with the
wireless router.
1.
Access the bridge’s browser-based utility
2.
On the
Basic Wireless Settings
screen, make sure the Network Name (SSID)
matches the name of your wireless network
3.
Make sure the security settings (WPA, WPA2, or WEP) match the security
settings of your wireless network
The bridge’s IP address needs to be changed.
If the bridge is connected to a network with a DHCP server (usually the network
router), then the bridge will obtain its IP address from the DHCP server If
there is no DHCP server, then the bridge will use its default, static IP address,
169.254.1.250
If you want the bridge to always use a static IP address, then follow these
instructions:
1.
Access the bridge’s browser-based utility
2.
Click the
Network Setup
tab
3.
From the
Network Connection Type
drop-down menu, select
Static IP
4.
Complete the
Static IP Address
,
Subnet Mask
, and
Default Gateway
fields
5.
Click
Save Settings
The bridge-enabled computer or other wired, Ethernet device will not
communicate with another wireless-enabled device (such as a computer or
printer).
Check the following:
•
Make sure the wireless-enabled device is on the same wireless network
as the computer or other wired, Ethernet device connected to the bridge
•
Make sure that the same Network Name (SSID) is used for all devices on
the wireless network
•
Make sure all devices are on the same IP network, using compatible IP
addresses
The browser-based utility does not accept your password.
Check the following:
•
The password is case-sensitive Make sure that you are using the correct
case(s) when entering the password
•
If you forget your password, you can reset the bridge to its factory
defaults
Press and hold the bridge’s
Reset
button for approximately five seconds;
the password will be reset to its factory default,
admin
All other bridge
settings will be reset to the factory defaults as well (To access the
browser-based utility, enter
admin
in the
Password
field )
After you make changes through the browser-based utility, the new settings
are not displayed on-screen.
On your web browser, click
Refresh
If the new settings are not displayed, then
follow these instructions:
1.
Unplug the power adapter from the bridge
2.
Wait five seconds, and then plug the power adapter back into the bridge
3.
On your web browser, click
Refresh
WEB
If your questions are not addressed here, refer to the Linksys
website at
Linksys.com/support
Troubleshooting

18
Specifications
Linksys WES610N/WET610N
18
WES610N
Model
WES610N
Standards
IEEE 802 3u, 802 11g, 802 11b, 802 11a, 802 11n
LEDs
Power, Ethernet, Wi-Fi Protected Setup™,
Wireless, individual Ethernet link and activity
Ports
Ethernet (4), Power
Buttons
Reset, Wi-Fi Protected Setup
Cabling Type
CAT5e
Antennas
3 (internal)
Antenna Connector Type
N/A
Detachable (Yes/No)
No
Modulations
802 11a: OFDM/BPSK, QPSK, 16-QAM, 64-QAM
802 11b: CCK/QPSK, BPSK
802 11g: OFDM/BPSK, QPSK, 16-QAM, 64-QAM
802 11n: OFDM/BPSK, QPSK, 16-QAM, 64-QAM
RF Pwr (EIRP) in dBm
802 11a: 15 dBm (typical) @ 54Mbps
802 11b: 19 dBm (typical) @ 11 Mbps
802 11g: 16 dBm (typical) @ 54 Mbps
802 11n (2 4 GHz): 18 dBm (typical) @ MCS15
802 11n (5 GHz): 16 dBm (typical) @ MCS15
Receive Sensitivity
802 11a: -72 dBm (typical) @ 54 Mbps
802 11b: -85 dBm (typical) @ 11 Mbps
802 11g: -73 dBm (typical) @ 54 Mbps
802 11n (20 MHz): -75 dBm (typical) @ MCS15
802 11n (40 MHz): -69 dBm (typical) @ MCS15
Antenna Gain in dBi
1
Wireless Security
WEP, Wi-Fi Protected Access™ (WPA),
Wi-Fi Protected Access™ 2 (WPA2)
Security Key Bits
Up to 128-bit encryption
Environmental
Dimensions
6 97” x 5 04” x 2 68”
(177 x 128 x 68 mm)
Weight
0 65 lb (295 g)
Certification
FCC, UL/cUL, ICES-003, RSS210, CE, Wi-Fi
(IEEE 802 11a/b/g/draft n), WPA2™,
Wi-Fi Protected Setup, WMM®
Power
12V, 1A
Operating Temperature
32 to 104ºF (0 to 40ºC)
Storage Temperature
-4 to 140ºF (-20 to 60ºC)
Operating Humidity
10 to 85% Noncondensing
Storage Humidity
5 to 90% Noncondensing
Specifications are subject to change without notice
Specifications

19
Specifications
Linksys WES610N/WET610N
19
WET610N
Model
WET610N
Standards
IEEE 802 3u, 802 11g, 802 11b, 802 11a, 802 11n
LEDs
Power, Ethernet, Wi-Fi Protected Setup™,
Wireless
Ports
Ethernet, Power
Buttons
Reset, Wi-Fi Protected Setup
Cabling Type
CAT5e
Antennas
3 (internal)
Antenna Connector Type
N/A
Detachable (Yes/No)
No
Modulations
802 11a: OFDM/BPSK, QPSK,
16-QAM, 64-QAM
802 11b: CCK/QPSK, BPSK
802 11g: OFDM/BPSK, QPSK,
16-QAM, 64-QAM
802 11n: OFDM/BPSK, QPSK,
16-QAM, 64-QAM
RF Pwr (EIRP) in dBm
802 11a: 15 dBm (typical) @ 54Mbps
802 11b: 18 dBm (typical) @ 11 Mbps
802 11g: 16 dBm (typical) @ 54 Mbps
802 11n: 12 dBm (typical) @ 130 Mbps
(HT20), 270 Mbps (HT40)
Receive Sensitivity
802 11a: -72 dBm (typical) @ 54 Mbps
802 11b: -85 dBm (typical) @ 11 Mbps
802 11g: -73 dBm (typical) @ 54 Mbps
802 11n: -70 dBm (typical) @ MCS15/2 4 GHz,
-69 dBm (typical) @ MCS15/5 0 GHz
Antenna Gain in dBi
1
Wireless Security
WEP, Wi-Fi Protected Access™ (WPA), Wi-Fi
Protected Access™ 2 (WPA2)
Security Key Bits
Up to 128-bit encryption
Environmental
Dimensions
5 71” x 4 17” x 2 05”
(145 x 106 x 52 mm)
Weight
5 61 oz (159 g)
Certification
FCC, UL/cUL, ICES-003, RSS210, CE, Wi-Fi
(IEEE 802 11a/b/g/draft n), WPA2™,
Wi-Fi Protected Setup, WMM®
Power
12V, 1A
Operating Temperature
32 to 104ºF (0 to 40ºC)
Storage Temperature
-4 to 140ºF (-20 to 60ºC)
Operating Humidity
10 to 85% Noncondensing
Storage Humidity
5 to 90% Noncondensing
Specifications are subject to change without notice

3425-01249
Cisco, the Cisco logo, and Linksys are trademarks or registered trademarks of Cisco and/or its affiliates in the United States and other countries
A listing of Cisco’s trademarks can be found at www cisco com/go/trademarks All other trademarks mentioned in this document are the property of their respective owners
© 2011 Cisco and/or its affiliates All rights reserved
Linksys.com/support
مدختسملا ليلد
Linksys WET610N/WES610N
قاطنلا جودزم N هيفرتلا رسج

i
اامحتوملا
Linksys E-Series
جتنلما ىلع ةماع ةرظن
2 ءاحضلأا ةححل
3 ذفانلما ةححل
يكلسلالا ناملأا نم ققحتلا ةمئاق
4
SSID وأ يضارتفلاا ةيكلسلالا ةكبشلا مسا رييغت
4
ةيضارتفلاا رورلما ةملك رييغت
4
MAC ناحنع ةيفصت ينكتم
4
ريفشتلا ينكتم
4 ةكبشلا ناملأ ةماعلا ااداشرلإا
5 ناملأل ةّيفاضإ ااويملت
مّدقتلما نيوكتلا
6 ضرعتسم ىلإ ةدنتسلما ةدعاسلما ةادأ ىلإ لحصحلا ةيفيك
6 )يساسلأا دادعلإا( Basic Setup > )دادعلإا( Setup
7
)ةغللا( Language
7
)ةكبشلا دادعإ( Network Setup
7 )ةيساسلأا ةيكلسلالا اادادعلإا( Basic Wireless Settings > )يكلسلالا( Wireless
7
)ةيساسلأا ةيكلسلالا اادادعلإا( Basic Wireless Settings
8
)يكلسلالا ناملأا( Wireless Security
9
)Wi-Fi ةينقتب يملمحا دادعلإا( Wi-Fi Protected Setup
ةكبشلا عقحم حسم( Wireless Network Site Survey > )يكلسلالا( Wireless
9 )ةيكلسلالا
10
)ةيكلسلالا ةكبشلا عقحم حسم( Wireless Network Site Survey
11 WMM
®
> )يكلسلالا( Wireless
11
WMM
Advanced Wireless Settings > )يكلسلالا( Wireless
13 )ةمّدقتلما ةيكلسلالا اادادعلإا(
13
)ةمّدقتلما ةيكلسلالا اادادعلإا( Advanced Wireless
14 )ةرادإ( Management > )ةرادلإا( Administration
14
)ةرادإ( Management
Factory Defaults > )ةرادلإا( Administration
14 )ةعّنصلما ةكرشلل ةيضارتفلاا اادادعلإا(
15
)ةعّنصلما ةكرشلل ةيضارتفلاا اادادعلإا( Factory Defaults
15 )تباثلا جمانربلا ةيقرت( Upgrade Firmware > )ةرادلإا( Administration
15
)تباثلا جمانربلا ةيقرت( Upgrade Firmware
15 )رسلجا( Bridge > )ةلالحا( Status
15
)رسلجا اامحلعم( Bridge Information
15
)ةيللمحا ةكبشلا( Local Network
16 )يكلسلالا( Wireless > )ةلالحا( Status
16
)يكلسلالا( Wireless
اهحلاصإو ءاطخلأا فاشكتسا
17
WES610N/WET610N
تافصاولما
18 WES610N
19 WET610N
اامحتوملا
2
جتنملا ىلع ةماع ةرتن
Linksys WES610N/WET610N
Ethernet زاهج يأ ليصحت رسجلا عيطتسم Linksys نم قاطنلا جودزم N هيفرتلا رسج كرايتخلا كل ًاركش
يأ عم قفاحتم هنإف اذل قاطنلا ةجودزم N-يكلسلا ةينقت ىلع رسجلا دمتعم ةيكلسلالا كتكبشب يكلس
يف ةدحجحملا ااحطخلا عبتا ،ةرم لولأ تيبثتلل ةبسنلاب B وأ A وأ G وأ N-يكلسلا هّجحم وأ لحصو ةطقن
ضرعتسم ىلإ ةدنتسملا ةدعاسملا ةادأ مدختسا ،ةمّدقتملا اادادعلإا نمحكتل طحغضملا صرقلا دلجم
ةمئلاملا
ءاوضلأا ةحول
WES610N
WET610N
يكلسلا لاصتا كانه نحكم امدنع يكلسلالا ءحض ءيضم )قرزأ(
يكلسلا
ةكبشلا ربع اهاقلتم وأ اانايب ًايلعف رسجلا لسرم امدنع ءحضلا ضمحم
ةيكلسلالا
دادعلإا دمتعم كب صاخلا هّجحملا ناك اذإ
Wi-Fi ةينقتب يمحملا دادعلإا رز
مادختسا كنكميف ،WPA2 وأ WPA نامأ مدختسمو Wi-Fi ةينقتب يموملا
دادعلإا مادختسلا ًايئاقلت رسجلا ليصحتل Wi-Fi ةينقتب يموملا دادعلإا
Basic Wireless > )يكلسلالا( Wireless“ عجار ،Wi-Fi ةينقتب يموملا
7 ةوفصلا يف ”)ةيساسلأا ةيكلسلالا اادادعلإا( Settings
نحللاب ءحضلا ضمحم )ينامرهك/قرزأ(
Wi-Fi ةينقتب يمحملا دادعلإا ءوض
قرزلأا نحللاب ءيضم Wi-Fi ةينقتب يموملا دادعلإا ءانثأ نيتقيقد ةدمل قرزلأا
دادعلإا ةيلمع ءانثأ أطخ ثدح اذإ ًانّكمم يكلسلالا ناملأا نحكم امدنع
هّجحم نأ نم دكأت ينامرهكلا نحللاب ءحضلا ءيضيسف ،Wi-Fi ةينقتب يموملا
مث ءحضلا ئفطنم ىتح رتتنا Wi-Fi ةينقتب يموملا دادعلإا دمتعم ةكبشلا
ًاددجم لواح
ّيكلس لاصتا كانه نحكم امدنع Ethernet ءحض ءيضم )قرزأ(
Ethernet
)ذفانم( ذفنم ربع اهاقلتم وأ اانايب ًايلعف رسجلا لسرم امدنع ءحضلا ضمحم
Ethernet
ليغشتلا ديق رسجلا نحكم امدنع ةقاطلا ءحض ءيضم )قرزأ(
ةقاطلا
جتنملا ىلع ةماع ةرتن
3
جتنملا ىلع ةماع ةرتن
Linksys WES610N/WET610N
ذفانملا ةحول
WES610N
WET610N
زاهج وأ رتحيبمكب رسجلا ليصحتب Ethernet )ذفانم( ذفنم محقم
Ethernet
يحتوم امنيب ذفانم ةعبرأ ىلع WES610N يحتوم رخآ Ethernet ةكبش
دحاو ذفنم ىلع WET610N
ةكرشلل ةيضارتفلاا اادادعلإا نييعت ةداعلإ ناتقمرط كانه
نييعتلا ةداعإ
ةداعإ رز ىلع رارمتساب طغضلا امإ كنكمم رسجلاب ةصاخلا ةعّنصملا
نم ةيضارتفلاا اادادعلإا ةداعتسا وأ ،ًابمرقت ناحث سمخ ةدمل نييعتلا
ةيضارتفلاا اادادعلإا( Factory Defaults > )ةرادلإا( Administration
ةصاخلا ضرعتسم ىلإ ةدنتسملا ةدعاسملا ةادأ يف )ةعّنصملا ةكرشلل
امنيب ،يلفسلا ءزجلا ىلع نييعتلا ةداعإ رز دجحم ،WES610N يف رسجلاب
ةيفلخلا ذفانملا ةححل ىلع نييعتلا ةداعإ رز دجحم ،WET610N يف
نّمضملا ةقاطلا لّحومب رسجلا ليصحت ىلع ةقاطلا ذفنم لمعم
ةقاطلا

4
يكلسلالا ناملأا نم ققوتلا ةمئاق
Linksys WES610N/WET610N
ةدّوزملا لزانملا يف اهدامتعا ىلإ تفاهتلا متم كلذل تيبثتلا ةلهسو ةمئلام ةيكلسلالا ااكبشلا نإ
ربع اامحلعملا لاسرإ أدبمل ًاقفو لمعت ةيكلسلالا ااكبشلا نأ امبو تنرتنإ ىلإ ةعرسلا يلاع لحصحب
ااراشلإا نإ ةمديلقتلا ةيكلسلا ااكبشلا نم رثكأ نيلفطتملا اامجهل ةضرع يه كلذل ،حمدارلا ااجحم
هنأ امبو يكلسلالا وأ يحلخلا كفتاه ااراشإ نأش اهنأش بّقعتلل ةضرع ةيكلسلالا كتكبش نم ةرداصلا
ةّيفاضلإا ااحطخلا ضعب ذاختا كيلع ،ةيكلسلالا كتكبشب لاصتلاا نم ًايلعف ًادحأ عنمت نأ كيلع رّذعتم
ةنمآ كتكبش ىلع ءاقبلإل
SSID وأ يضارتفلاا ةيكلسلالا ةكبشلا مسا رييغت
لبق نم هنييعت متم )SSID( اامدخ ةعحمجم فّرعم وأ يضارتفا ةيكلسلا ةكبش مسا ةيكلسلالا ةزهجلأل
ىصقأ دوك ًافرح 32 نم هلحط فلأتم نأ نكممو ةيكلسلالا كتكبش مسا حه اذه ةعّنصملا ةكرشلا
رييغت كيلع يضارتفلاا ةيكلسلالا ةكبشلا مساك
linksys
ةملك ةيكلسلالا Linksys ااجتنم مدختست
ىرخلأا ةيكلسلالا ااكبشلا نع ةيكلسلالا كتكبش زييمتل دمرف مسا رايتخاو ةيكلسلالا ةكبشلا مسا
لثم نلأ )ًلاثم يعامتجلاا كنامض مقرك( ةيصخش اامحلعم مادختساب مقت لا نكلو ،كب طيوت دق يتلا
ةيكلسلالا ااكبشلا ضارعتسا دنع صخش يلأ ةحاتم اهتمؤر نحكت دق اامحلعملا هذه
ةيضارتفلاا رورملا ةملك رييغت
دمرت امدنع رورم ةملك لاخدإ كنم بلطُيس ،اا ّجحملاو لحصحلا طاقنك ةيكلسلالا ااجتنملل ةبسنلاب
ةيضارتفلاا رورملا ةملك نإ ةعّنصملا ةكرشلا اهنّيعت ةيضارتفا رورم ةملك ةزهجلأا هذهلو اهتادادعإ رييغت
نحلواوم دقو ةيضارتفلاا اادادعلإا هذهب ملع ىلع نحلفطتملا نحكم
admin
يه Linksys اهدمتعت يتلا
مق ،ةلّحخم ريغ اارييغت يأ طابحلإ كتكبش اادادعإ رييغتو يكلسلالا كزاهج ىلإ لحصحلل اهمادختسا
اهنيمخت بعصم ثيوب كزاهجب ةصاخلا رورملا ةملك صيصختب
MAC ناونع ةيفصت نيكمت
MAC ناحنع نإ )MAC( طئاسحلا ىلإ لحصحلاب مكوتلا ناحنع ةيفصت نيكمت Linksys ااه ّجحم كل حيتت
ةيفصت نيكمت عمو ةكبشلاب لصّتم زاهج لكل اهنييعت متم فرحلأاو ماقرلأا نم ةدمرف ةلسلس نع ةرابع
MAC نموانع اهل يتلا ةيكلسلالا ةزهجلأل ةيكلسلالا ةكبشلا ىلإ لحصحلا ريفحت متيس ،MAC ناحنع
ناكمإب نحكيف كلزنم يف رتحيبمك لكل MAC ناحنع دمدوت كنكمم ،لاثملا ليبس ىلع طقف ةددوم
ةيكلسلالا كتكبش ىلإ لحصحلا طقف هذه رتحيبمكلا ةزهجأ
ريفشتلا نيكمت
Wi-Fi ةينقتب يموملا لحصحلا رفحم ةيكلسلالا ةكبشلا ربع اهلاسرإ متم يتلا اانايبلا ريفشتلا يموم
يكلسلالا لاصتلال ناملأا نم ةفلتخم اامحتسم )WEP( ةيكلسلل ةيهاضملا ةيصحصخلاو )WPA/WPA2(
WPA/ نلأ WEP ةطساحب ةرفشملا ةكبشلا نم ًانامأ رثكأ WPA/WPA2 ةطساحب ةرّفشملا ةكبشلا نحكت
نيكمت كيلع ،ةيئاحهلا ااجحملا اهرحبع دنع اامحلعملا ةمامول ًامحيح حيتافم ريفشت مدختسم WPA2
ةكبشلاب لصّتملا كزاهج هدمتعم يذلا ريفشتلا نم ىحتسم ىلعأ
دمتعت لا يتلا ةممدقلا ةزهجلأا ضعب ىلع رفحتملا ديححلا رايخلا نحكم دقو ممدق ريفشت رايعم حه WEP نإ
WPA
ةكبشلا ناملأ ةماعلا تاداشرلإا
ةنمآ ريغ ةيساسلأا ةكبشلا تناك ام اذإ ةيكلسلالا ةكبشلا نامأ نم ةدئاف لا
•
ةمدرفلا رورملا ةملك يموت نيح يف ةكبشلا ىلع رتحيبمكلا ةزهجأ ةفاك رورملا ةملك يموت
ةساسولا اافلملا
•
ماتتناب رورملا ااملك رييغتب مق
•
يصخشلا ةمامولا رادج جمانربو ااسوريفلا نم ةمامولا جمانرب تيبثتب مق
•
نم اافلملا ةكراشم ااقيبطتلا ضعب حتفت دق )ريتن ىلإ ريتن( اافلملا ةكراشم ليطعتب مق
كتفرعم وأ/و كتقفاحم نود
يكلسلالا ناملأا نم ققوتلا ةمئاق

5
يكلسلالا ناملأا نم ققوتلا ةمئاق
Linksys WES610N/WET610N
ناملأل ةّيفاضإ تاحيملت
•
ذفاحنلاو ةيجراخلا ناردجلا نع ةديعب ةيكلسلالا ااراّبعلا وأ لحصحلا طاقن وأ ااه ّجحملا ءاقبإب مق
•
ءانثأ( اهمادختسا مدع ءانثأ ةيكلسلالا ااراّبعلا وأ لحصحلا طاقن وأ ااه ّجحملا ليغشت فاقمإب مق
)لطعلا مامأ للاخ ،ليللا
•
ماقرلأاو فرحلأا جمدب مق ّلقلأا ىلع فرحأ ةينامث نم اهلحط فّلأتم ةّمحق رورم لمج مدختسا
سحماقلا يف اهيلع رحثعلا نكمم يتلا ةيسايقلا ااملكلا مادختسا يدافتل

6
مّدقتملا نمحكتلا
Linksys WES610N/WET610N
ًازهاج رسجلا نحكم ،طحغضملا صرقلا دلجم يف ةوضحملا ااحطخلا عابتا قمرط نع رسجلا دادعإ دعب
ضرعتسم ىلإ ةدنتسملا ةدعاسملا ةادلأا مدختساف ،ةمّدقتملا هتادادعإ رييغت ادرأ نإ نكلو مادختسلال
زربأ عم ةدعاسملا ةادأب ةصاخلا بمو ااوفص نم ةوفص لك لصفلا اذه فصم رسجلاب ةصاخلا
رتحيبمك زاهج ىلع بمو ضرعتسم ربع ةدعاسملا ةادأ ىلإ لحصحلا كنكمم ةوفص لكب ةصاخلا فئاظحلا
رسجلاب لصتم
)دادعلإا( Setup :ةيلاتلا ةيساسلأا بمحبتلا ااملاع ىلع ضرعتسم ىلإ ةدنتسملا ةدعاسملا ةادأ يحتوت
نأ دعب ةّيفاضإ بمحبت ااملاع رفحتتسو )ةلاولا( Statusو )ةرادلإا( Administrationو )يكلسلالا( Wirelessو
ةّيسيئرلا بمحبتلا ااملاع ىدحإ قحف رقنت
ىلإ ةدنتسملا ةدعاسملا ةادأ ىلإ لوصولا ةيفيك
ضرعتسم
ضرعتسم ىلإ ةدنتسملا ةدعاسملا ةادأ ىلإ لحصحلل بمو ضرعتسم مدختسا
IP ناحنع ىلع رسجلا لصويسف ،)ةكبشلا ه ّجحم ةداع( DHCP مداخب ةدّوزم ةكبشب ًلاصتم رسجلا ناك اذإ
صاخلا يضارتفلاا تباثلا IP ناحنع رسجلا مدختسيس ،DHCP مداخ دحجو مدع ةلاح يف DHCP مداخ نم
ىلإ ةدنتسملا ةدعاسملا ةادأ ربع رسجلا ىلع مئاد تباث IP ناحنع نييعتب تمق اذإ(
169.254.1.250
،هب
)كلذ نم ًلادب تباثلا IP ناحنع لخدأف ،ضرعتسم
ةظحلام
ءلامع لودج يف هب صاخلا IP ناحنع نع ثوباف ،رسجلاب صاخلا IP ناحنع فرعت لا تنك اذإ
)كب صاخلا هّجحملا قئاثو عجار( هّجحملاب صاخلا DHCP
طغضا ؛رسجلا نييعت ةداعإ كنكميف ،رسجلاب صاخلا IP ناحنع عقحم دمدوت عطتست مل اذإ
ميقتسم قرو كبشم مادختساب ًابمرقت ٍناحث سمخ ةدمل رسجلا ىلع
نييعتلا ةداعإ
رز ىلع
ةعّنصملا ةكرشلاب ةصاخلا ةيضارتفلاا اادادعلإا ىلإ رسجلا نييعت ةداعإ ىلإ كلذ يدؤيس
ىلع رحثعلا مدع ةلاح يف )ةكبشلا هّجحم ةداع( DHCP مداخ نم IP ناحنع رسجلا بلطيس
ىتح ،
169.254.1.250
،هب صاخلا يضارتفلاا تباثلا IP ناحنع رسجلا مدختسم ،DHCP مداخ
رسجلل يحيح IP ناحنع نييعت متمو DHCP مداخ فشتكم
ليصحتب مقف ،ةعّنصملا ةكرشلل ةيضارتفلاا اادادعلإا مدختسم ناكو ه ّجحمب نرتقم ريغ رسجلا ناك اذإ
جاتوتس بمو ىلإ ةدنتسملا ةدعاسملا ةادأ ىلإ لحصحلل Ethernet لاصتا مادختساب رسجلاب رتحيبمكلا
ةيعرف ةكبش عانقو تباث IP ناحنع مادختساب رتحيبمكلا ىلع Ethernet لاصتا نمحكت ىلإ
ددوم IP ناحنع ىلع Ethernet لّحومب صاخلا IP ناحنع نييعت بجم
1
.
مقرب yو 254و 1 نيب مقرب x لادبتسا بجم(
169.254.x.y
لخدأ ،
)IP ناحنع( IP address
لقح يف
)255و 0 نيب
2
.
255.255.0.0
لخدأ ،
)ةيعرفلا ةكبشلا عانق( Subnet mask
لقح يف
ةظحلام
ًاعبت كب صاخلا رتحيبمكلا ىلع Ethernet لّحومل تباث IP ناحنع نييعت ااحطخ فلتخت
ليغشتلا ماتنل ااميلعتلا قئاثو ةعجارم ءاجرلا ،ااميلعتلا ىلع علاطلال ليغشتلا ماتنل
كب صاخلا
لّحوملاب صاخلا IP ناحنع لخدأو بمو ضرعتسم ليغشتب مق ،Ethernet لّحومل تباث IP ناحنع نييعت دعب
)لاخدإ( Enter
ىلع طغضا
)ناحنعلا( Address
لقح يف )
169.254.1.250
يضارتفلاا دادعلإا(
ةشاش Windows XP ةمتنأ نودمتعم لا نمذلا نحمدختسملا ىريس( رورملا ةملك بلط ةشاش رهتت
جلاعم ءانثأ اهتأشنأ يتلا رورملا ةملك لخدأ ًاغراف
)مدختسملا مسا( User name
لقح كرتا )ةهباشم
كنكمم(
admin
،ةيضارتفلاا رورملا ةملك مدختساف ،ةدمدج رورم ةملك اأشنأ دق نكت مل اذإ دادعلإا
OK
قحف رقنا )
)ةرادإ( Management
> )ةرادلإا( Administration
ةشاشلا نم ةدمدج رورم ةملك نييعت
ةعباتملل
)قفاوم(
ةظحلام
ىرخأ ةرم لواحو نيتقيقد رتتناف ،رورملا ةملك بلط ةشاش رهتت مل اذإ
مّدقتملا نمحكتلا
7
مّدقتملا نمحكتلا
Linksys WES610N/WET610N
)يساسلأا دادعلإا( Basic Setup > )دادعلإا( Setup
ةادأ ةغل رييغتل ةشاشلا هذه مدختسا
)يساسلأا دادعلإا( Basic Setup
ةشاش يه رهتت ةشاش لوأ
رسجلاب ةصاخلا ةيكلسلا Ethernet ةكبش اادادعإ رييغتل وأ ضرعتسم ىلإ ةدنتسملا ةدعاسملا
)ةغللا( Language
ضرعتسم ىلإ ةدنتسملا ةدعاسملا ةادأ ةطساحب ةضورعملا ةغللا نييعتل مدختسُت
)ةغللا( Language
ةلدسنملا ةمئاقلا نم ةبحلطملا ةغللا ددح
)ةكبشلا دادعإ( Network Setup
ه ّجحم لثم DHCP مداخ نم ًايئاقلت رسجلاب صاخلا IP ناحنع ىلع لحصولا مت اذإ ام مسقلا اذه ددوم
Static IP( ًامودم هنييعت مت وأ ))DHCP - يئاقلت نمحكت( Automatic Configuration - DHCP( ةكبشلا
))تباث IP(
نموانع نييعتب محقم ،ةكبشلا ه ّجحم لثم ،DHCP مداخب ةدوزم كتكبش تناك اذإ
)رسجلا IP( Bridge IP
نيوكت( Automatic Configuration - DHCP
يضارتفلاا دادعلإا ىلع ِقبأف ،كب ةصاخلا ةكبشلا ةزهجلأ IP
رحثعلا مدع ةلاح يف )ةكبشلا ه ّجحم ةداع( DHCP مداخ نم IP ناحنع رسجلا بلطيس
)DHCP - يئاقلت
فشتكم ىتح ،
169.254.1.250
،هب صاخلا يضارتفلاا تباثلا IP ناحنع رسجلا مدختسم ،DHCP مداخ ىلع
رسجلل يحيح IP ناحنع نييعت متمو DHCP مداخ
)تباث IP( Static IP
ددوف ،رسجلل مئاد تباث IP ناحنع نييعت ادرأ اذإ
:ةيلاتلا لحقولا لمكأف ،)تباث IP( Static IP اددح اذإ
•
ةادأ ىلإ لحصحلل همادختسا متيس ًادمرف IP ناحنع لخدأ
)تباث IP ناونع( Static IP Address
ضرعتسم ىلإ ةدنتسملا ةدعاسملا
•
ةيكلسلا ةكبشلاب صاخلا ةيعرفلا ةكبشلا عانق لخدأ
)ةيعرفلا ةكبشلا عانق( Subnet Mask
•
يف( كتكبشب ةصاخلا ةيضارتفلاا ةراّبعلل IP ناحنع لخدأ
)ةيضارتفلاا ةراّبعلا( Default Gateway
)كب صاخلا ه ّجحملا نحكم ،الااولا متعم
ءاغلإ( Cancel Changes
قحف رقنا وأ اارييغتلا قيبطتل
)تادادعلإا ظفح( Save Settings
قحف رقنا
اارييغتلا ءاغللإ
)تارييغتلا
Basic Wireless Settings > )يكلسلالا( Wireless
)ةيساسلأا ةيكلسلالا تادادعلإا(
ةيكلسلالا اادادعلإا نمحكتل
)ةيساسلأا ةيكلسلالا اادادعلإا( Basic Wireless Settings
ةشاش مدختسا
رسجلاب ةصاخلا ناملأا اادادعإو ةيساسلأا
يموملا دادعلإا( Wi-Fi Protected Setupو )يودم( manual امه ،رسجلا اادادعإ نمحكتل ناتقمرط كانه
ةيكلسلالا كتكبش دادعإ ليهست ىلع لمعت ةزيم حه Wi-Fi ةينقتب يموملا دادعلإاو )Wi-Fi ةينقتب
،WPA2 وأ WPA نامأ مدختسمو Wi-Fi ةينقتب يموملا دادعلإا دمتعم كب صاخلا ةكبشلا ه ّجحم ناك اذإ
ًايئاقلت رسجلا ليصحتل Wi-Fi ةينقتب يموملا دادعلإا مادختسا كنكميف
)يودي( Manual
ددح ،ًامودم ةيكلسلالا كتكبش نمحكتل
)نيوكتلا ضرع( Configuration View
دادعلإا مادختسلا
.8 ةحفص
,
)ةيساسلأا ةيكلسلالا تادادعلإا( Basic Wireless Settings
عجار
عجار
)Wi-Fi ةينقتب يمحملا دادعلإا( Wi-Fi Protected Setup
ددح ،Wi-Fi ةينقتب يموملا
.9 ةحفص
,
)Wi-Fi ةينقتب يمحملا دادعلإا( Wi-Fi Protected Setup
8
مّدقتملا نمحكتلا
Linksys WES610N/WET610N
)ةيساسلأا ةيكلسلالا تادادعلإا( Basic Wireless Settings
يف طاقنلا ةفاك نيب كرتشملا ةكبشلا مسا حه SSID
))SSID( ةكبشلا مسا( )SSID( Network Name
س ّسوتم حهو ةيكلسلالا ةكبشلا يف ةزهجلأا ةفاكل ًاقباطم SSID نحكم نأ بجم ةيكلسلا ةكبش
نأ نم دكأت )حيتافملا ةححل ىلع ةدحجحم فرحأ يأ مدختسا( ًافرح 32 نع دمزم لاأ بجمو فرحلأا ةلاول
بجم ،ناملأا نم دمزمل كمدل لحصحلا ةطقن وأ يكلسلالا ه ّجحملا ىلع دحجحملا دادعلإل قباطم دادعلإا اذه
دمرف مسا ىلإ )
linksys
( يضارتفلاا SSID رييغت
)يكلسلالا ناملأا( Wireless Security
WPA2( WPA2 Personalو )يصخش WPA( WPA Personal :ةيلاتلا يكلسلالا ناملأا اارايخ رسجلا دمتعم
ةيصحصخلا( WEP نم ىحقأ نامأ ابحلسأ WPA2و )Wi-Fi ةينقتب يموملا لحصحلا ( WPA WEPو )يصخش
نم ققوتلا ةمئاق“ عجار ،يكلسلالا ناملأا لحح اامحلعملا نم دمزم ىلع لحصولل )ةيكلسلل ةيهاضملا
4 ةوفصلا ,”يكلسلالا ناملأا
)ناملأا عضو( Security Mode
دادعلإا ىلع ِقبأف ،يكلسلالا ناملأا مادختسا دمرت لا تنك اذإ ةيكلسلالا كتكبشل ناملأا بحلسأ ددح
)ل ّطعم( Disabled
يضارتفلاا
ةظحلام
ةلمجو ناملأا بحلسأ سفن ةيكلسلالا كتكبش يف زاهج لك مدختسم نأ بجم هنأ ركذت
ضعبلا اهضعبب لاصتلاا ةيكلسلالا ةزهجلأا عيطتست نلف لاإو حاتفملا/رورملا
)يصخش WPA( WPA Personal
WEP ريفشت نم ىحقأ نامأ رايعم حه WPA
ةمحيح ريفشت حيتافم مادختساب ،TKIP ريفشتلا بحلسأ WPA دمتعم
)ريفشتلا( Encryption
لحصحلا ةطقن وأ يكلسلالا ه ّجحملاو رسجلا نيب كرتشملا حاتفملا لخدأ
)رورملا ةلمج( Passphrase
ًافرح 63 و 8 نيب نمضتت نأ بجم
ءاغلإ( Cancel Changes
قحف رقنا وأ اارييغتلا قيبطتل
)تادادعلإا ظفح( Save Settings
قحف رقنا
اارييغتلا ءاغللإ
)تارييغتلا
)يصخش WPA2( WPA2 Personal
ًانامأو ًامدقت رثكأ WPA نم رادصإ حه WPA2
ةمحيح ريفشت حيتافم مادختساب ،AESو TKIP ،ريفشتلا يبحلسأ WPA2 دمتعم
)ريفشتلا( Encryption
AES
حه يضارتفلاا دمدوتلا
)AES وأ TKIP( TKIP or AES
وأ
AES
،ريفشتلا بحلسأ ددح
9
مّدقتملا نمحكتلا
Linksys WES610N/WET610N
لحصحلا ةطقن وأ يكلسلالا ه ّجحملاو رسجلا نيب كرتشملا حاتفملا لخدأ
)رورملا ةلمج( Passphrase
ًافرح 63 و 8 نيب نمضتت نأ بجم
ءاغلإ( Cancel Changes
قحف رقنا وأ اارييغتلا قيبطتل
)تادادعلإا ظفح( Save Settings
قحف رقنا
اارييغتلا ءاغللإ
)تارييغتلا
WEP
WPA2 وأ WPA نامأ سفنب سيل هنكل ،يساسأ ريفشت بحلسأ حه WEP
ماقرأ 10( تب 40/64(
)10 hex digits( 40/64 bits
، WEP ريفشت ىحتسم ددح
)ريفشتلا( Encryption
دادعلإا
))ًايرشع ًايسادس ًامقر 26( تب 104/128( )26 hex digits( 104/128 bits
وأ ))ةمرشع ةيسادس
))ةيرشع ةيسادس ماقرأ 10( تب 40/64( )10 hex digits( 40/64 bits
يضارتفلاا
كتكبشل WEP حاتفم لخدأ
)1 حاتفملا( Key 1
رسجلا ةطساحب مدختسملا لاسرلإا حاتفم حه
)1 حاتفملا( Key 1
)لاسرلإا حاتفم( Tx Key
ةقداصم مادختساب حمسم يذلاو ،
)يئاقلت( Auto
حه يضارتفلاا دادعلإا
)ةقداصملا( Authentication
لا ؛ححتفملا ماتنلا ةقداصم مادختسلا
)حوتفم( Open
ددح كرتشملا حاتفملا وأ ححتفملا ماتنلا
حاتفملا ةقداصم مادختسلا
)كرتشم( Shared
ددح ةقداصملل WEP حاتفم يقلتملاو لسرملا مدختسم
ةقداصملل WEP حاتفم يقلتملاو لسرملا مدختسم ؛كرتشملا
ءاغلإ( Cancel Changes
قحف رقنا وأ اارييغتلا قيبطتل
)تادادعلإا ظفح( Save Settings
قحف رقنا
اارييغتلا ءاغللإ
)تارييغتلا
)Wi-Fi ةينقتب يمحملا دادعلإا( Wi-Fi Protected Setup
همدختست يذلا ه ّجحملا ىلع قبطنم يذلا بحلسلأا مدختسا نابحلسأ رفحتم
1 بولسلأا
Wi-Fi ةينقتب يموم دادعإ رز نمضتم ه ّجحملا ناك اذإ بحلسلأا اذه مدختسا
1
.
هيلع طغضا وأ ه ّجحملا ىلع دحجحملا
Wi-Fi ةينقتب يمحملا دادعلإا
رز قحف رقنا
2
.
يف دحجحملا
)Wi-Fi ةينقتب يمحملا دادعلإا( Wi-Fi Protected Setup
رز قحف رقنا ،نيتقيقد للاخ
رسجلاب ةصاخلا
)Wi-Fi ةينقتب يموملا دادعلإا( Wi-Fi Protected Setup
ةشاش
3
.
)قلاغإ( Close
قحف رقنا ،رسجلا نمحكت دعب
)طابترلاا ةلاح( Link Status
)Wi-Fi ةينقتب يموملا دادعلإا( Wi-Fi Protected Setup
ةشاش ضرعت
)ناملأا( Security بحلسأو ))SSID( ةكبشلا مسا( )SSID( Network Nameو
10
مّدقتملا نمحكتلا
Linksys WES610N/WET610N
2 بولسلأا
رسجلل يصخشلا فمرعتلا مقر ه ّجحملا بلط اذإ بحلسلأا اذه مدختسا
1
.
مقر لخدأ ،
ه ّجوملاب
ةصاخلا
)Wi-Fi ةينقتب يموملا دادعلإا( Wi-Fi Protected Setup
ةشاش يف
)Wi-Fi ةينقتب يموملا دادعلإا( Wi-Fi Protected Setup
ةشاش يف دحجحملا يصخشلا فمرعتلا
يصخشلا فمرعتلا مقر( بسانملا رزلا وأ
)ليجست( Register
قحف رقنا مث
رسجلاب
ةصاخلا
)رسجلا لفسأ يف قصلملا ىلع ًاضمأ جردم
2
.
قحف رقنا ،رسجلاب ةصاخلا
)Wi-Fi ةينقتب يموملا دادعلإا( Wi-Fi Protected Setup
ةشاش يف
)قفاوم( OK
3
.
)قلاغإ( Close
قحف رقنا ،رسجلا نمحكت دعب
)طابترلاا ةلاح( Link Status
)Wi-Fi ةينقتب يموملا دادعلإا( Wi-Fi Protected Setup
ةشاش ضرعت
)ناملأا( Security بحلسأو ))SSID( ةكبشلا مسا( )SSID( Network Nameو
Wireless Network Site Survey > )يكلسلالا( Wireless
)ةيكلسلالا ةكبشلا عقوم حسم(
حسم ءدبل
)ةيكلسلالا ةكبشلا عقوم حسم( Wireless Network Site Survey
بمحبتلا ةملاع قحف رقنا
ااكبشلا
)ةيكلسلالا ةكبشلا عقحم حسم( Wireless Network Site Survey
ةشاش درست عقحملل
رسجلا اهفشتكم يتلا ةيكلسلالا
)ةيكلسلالا ةكبشلا عقوم حسم( Wireless Network Site Survey
يتلا ةيكلسلالا ااكبشلا ددع ضرع متم
)ةيكلسلالا تاكبشلا ددع( Number of Wireless Networks
رسجلا اهفشتكم
)لاصتا( Connect
قحف رقنا مث
)ديدحت( Select
قحف رقنا ،ةيكلسلا ةكبشب لاصتلال
)ديدحت( Select
ةكبشلل SSID وأ ةكبشلا مسا ضرع متم
)ةيكلسلالا ةكبشلا مسا( Wireless Network Name
ةيكلسلالا
ةيكلسلالا ةكبشلل يكلسلالا ددرتلا قاطن ضرع متم
)زتره اغيغ( GHz
يه 0%و ،ةنكمم ةراشإ ةحق ىلعأ يه 100% ةراشلإا ةحقل ةمحئملا ةبسنلا ضرع متم
)ةراشلإا( Signal
ةنكمم ةراشإ فعضأ
دادعلإا زمر ضرع متيسف ،Wi-Fi ةينقتب يموملا دادعلإا دمتعت ةكبشلا تناك اذإ
)ناملأا( Security
ةيكلسلالا ةكبشلا ةطساحب مدختسُملا ناملأا بحلسأ ضرع متم Wi-Fi ةينقتب يموملا
ةشاشلا ىلع رهتت يتلا اامحلعملا ثمدوتل
)ثيدحت( Refresh
قحف رقنا
بحلسأب ةصاخلا ااميلعتلا عبتا ةدمدج ةشاش رهتتس
)لاصتا( Connect
قحف رقنا ،ةكبش دمدوت دعب
كتكبش يف ناملأا
WPA
ًايئاقلت اهدمدوتب تمق يتلا ةكبشلا مسا ضرع متم
) )SSID( ةكبشلا مسا( )SSID( Network Name
ًايئاقلت )يصخش WPA( WPA Personal ضرع متم
)ناملأا عضو( Security Mode
ةمحيح ريفشت حيتافم مادختساب ،TKIP ريفشتلا بحلسأ WPA دمتعم
)ريفشتلا( Encryption
لحصحلا ةطقن وأ يكلسلالا ه ّجحملاو رسجلا نيب كرتشملا حاتفملا لخدأ
)رورملا ةلمج( Passphrase
ًافرح 63 و 8 نيب نمضتت نأ بجم
ةشاشلا ىلع رهتت يتلا اامحلعملا ثمدوتل
)ثيدحت( Refresh
قحف رقنا
)لاصتا( Connect
قحف رقنا ،ناملأا اادادعإ لاخدإ دعب
11
مّدقتملا نمحكتلا
Linksys WES610N/WET610N
WPA2
ًايئاقلت اهدمدوتب تمق يتلا ةكبشلا مسا ضرع متم
) )SSID( ةكبشلا مسا( )SSID( Network Name
ًايئاقلت )يصخش WPA2( WPA2 Personal ضرع متم
)ناملأا عضو( Security Mode
ةمحيح ريفشت حيتافم مادختساب ،AESو TKIP ،ريفشتلا يبحلسأ WPA2 دمتعم
)ريفشتلا( Encryption
)AES وأ TKIP( TKIP or AES
وأ
AES
،ريفشتلا بحلسأ ددح
لحصحلا ةطقن وأ يكلسلالا ه ّجحملاو رسجلا نيب كرتشملا حاتفملا لخدأ
)رورملا ةلمج( Passphrase
ًافرح 63 و 8 نيب نمضتت نأ بجم
ةشاشلا ىلع رهتت يتلا اامحلعملا ثمدوتل
)ثيدحت( Refresh
قحف رقنا
)لاصتا( Connect
قحف رقنا ،ناملأا اادادعإ لاخدإ دعب
WEP
ًايئاقلت اهدمدوتب تمق يتلا ةكبشلا مسا ضرع متم
) )SSID( ةكبشلا مسا( )SSID( Network Name
ًايئاقلت WEP ضرع متم
)ناملأا عضو( Security Mode
ماقرأ 10( تب 40/64( )10 hex digits( 40/64 bits
، WEP ريفشت ىحتسم ددح
)ريفشتلا( Encryption
))ًايرشع ًايسادس ًامقر 26( تب 104/128 ( )26 hex digits( 104/128 bits
وأ
))ةيرشع ةيسادس
كتكبشل WEP حاتفم لخدأ
)1 حاتفملا( Key 1
رسجلا ةطساحب مدختسملا لاسرلإا حاتفم حه
)1 حاتفملا( Key 1
)لاسرلإا حاتفم( Tx Key
ةقداصم مادختساب حمسم يذلاو ،
)يئاقلت( Auto
حه يضارتفلاا دادعلإا
)ةقداصملا( Authentication
لا ؛ححتفملا ماتنلا ةقداصم مادختسلا
)حوتفم( Open
ددح كرتشملا حاتفملا وأ ححتفملا ماتنلا
حاتفملا ةقداصم مادختسلا
)كرتشم( Shared
ددح ةقداصملل WEP حاتفم يقلتملاو لسرملا مدختسم
ةقداصملل WEP حاتفم يقلتملاو لسرملا مدختسم ؛كرتشملا
ةشاشلا ىلع رهتت يتلا اامحلعملا ثمدوتل
)ثيدحت( Refresh
قحف رقنا
)لاصتا( Connect
قحف رقنا ،ناملأا اادادعإ لاخدإ دعب
WMM
®
> )يكلسلالا( Wireless
عضحل ًاعبت مزولا ةمحلوأ دمدوتب WMM محقت )WMM( ةيكلسلالا ةددعتملا طئاسحلا اادادعإ نمحكتب مق
Video وأ )دهج لضفأ( Best Effort وأ )ةيفلخلا( Background :)اانايبلا ةكرح عحن( اهب صاخلا لحصحلا
ةئطاخلا اادادعلإا ّنإ ذإ اادادعلإا هذه طبضب طقف ريبخ لوؤسم محقم نأ بجم )احص( Voice وأ )حمديف(
يكلسلالا ءادلأا نم ّدوت دق
ةظحلام
طقف نيمّدقتملا نيمدختسملل ةممصم
WMM
ةشاش يف ةدحجحملا اادادعلإا

12
مّدقتملا نمحكتلا
Linksys WES610N/WET610N
WMM
)لوصولا عضو( Access Mode
:هنمحكت دمرت يذلا عضحلا دّدح ةرفحتملا ةعبرلأا لحصحلا عاضولأ ةفلتخم اادادعإ نييعت كنكمم
ااميلعتلا عبتا
)توص( Voice
وأ
)ويديف( Video
وأ
)دهج لضفأ( Best Effort
وأ
)ةيفلخلا( Background
هددوت يذلا عضحلاب ةصاخلا
)ةيفلخلا( Background
ىلإ لحصحلاب مكوتلا ةقبط تناك اذإ ام رايخلا اذه ددوم
)عيمجتلا مادختسا( Use Aggregation
No
حه يضارتفلاا دادعلإا لا مأ )ADDBA( ع ّمجم رارقإ ةفاضإ لمع ةسلج دادعإب محقتس )MAC( طئاسحلا
رايخلا اذه نيكمتل
)معن( Yes
ددح
)لا(
ADDBA بلط لبقتس MAC ةقبط تناك اذإ ام رايخلا اذه ددوم
)عيمجتلا لوبق( Accept Aggregation
رايخلا اذه ليطعتل
)لا( No
ددح
)معن( Yes
حه يضارتفلاا دادعلإا لا مأ
رايخلا اذه ددوم
)عيمجتلا يف مزحلا ددعل ىصقلأا دحلا( Max. Number of Packets in Aggregation
يضارتفلاا دادعلإا
7
و
0
نيب ام قاطنلا حوارتم عيمجتلا يف )ةيعرفلا ااراطلإا( مزولا ددعل ىصقلأا دولا
7
حه
مجول ىصقلأا دولا رايخلا اذه ددوم
)عيمجتلا مجحل ىصقلأا دحلا( Max. Aggregation Size
12000
حه يضارتفلاا دادعلإا
16000
و
0
نيب ام قاطنلا حوارتم )تمابلاب( عيمجتلا
اهللاخ عيمجتلا قلاغإ بجم يتلا ةلهملا ةدم رايخلا اذه ددوم
)ةيلخاد ةلهم( Timeout Internal
ةيناث يللم
100
و
0
نيب ام قاطنلا حوارتم تقؤملا ةطساحب هقلاغإ متم نأ لبق ”قلاغإ طرش“ مادختساب
3
حه يضارتفلاا دادعلإا
دولا رايخلا اذه ددوم
)عيمجتلا يف مزحلا مجحل ىندلأا دحلا( Min. Size of Packet in Aggregation
يضارتفلاا دادعلإا
1500
و
0
نيب ام قاطنلا حوارتم عيمجتلا يف مكارتتس يتلا مزولا مجول )تمابلاب( ىندلأا
10
حه
يف ADDBA دادعإ ءاهنإ اهدعب متيس يتلا ةدملا رايخلا اذه ددوم
)ADDBA ةلهم( ADDBA Timeout
ام قاطنلا حوارتم )ACK( عّمجملا رارقلإا ةيقافتا بسح ةدملا هذه للاخ ااراطلإل الادابت دحجو مدع ةلاح
ةلهملا ليطعت ىلإ يدؤمو ،
0
يضارتفلاا دادعلإا ةيناث يللم
65535
و
0
نيب
متم يتلا مزولا ددعل ىصقلأا دولا رايخلا اذه ددوم
)عيمجتلا راطإ مجح( Aggregation Window Size
64
حه يضارتفلاا دادعلإا
64
و
0
نيب ام قاطنلا حوارتم ةعّمجم اارارقإ ىلع لحصولا نود نم اهلاسرإ
ءاغلإ( Cancel Changes
قحف رقنا وأ اارييغتلا قيبطتل
)تادادعلإا ظفح( Save Settings
قحف رقنا
اارييغتلا ءاغللإ
)تارييغتلا
)دهج لضفأ( Best Effort
ىلإ لحصحلاب مكوتلا ةقبط تناك اذإ ام رايخلا اذه ددوم
)عيمجتلا مادختسا( Use Aggregation
Yes
حه يضارتفلاا دادعلإا لا مأ )ADDBA( ع ّمجم رارقإ ةفاضإ لمع ةسلج دادعإب محقتس )MAC( طئاسحلا
رايخلا اذه ليطعتل
)لا( No
ددح
)معن(
ADDBA بلط لبقتس MAC ةقبط تناك اذإ ام رايخلا اذه ددوم
)عيمجتلا لوبق( Accept Aggregation
رايخلا اذه ليطعتل
)لا( No
ددح
)معن( Yes
حه يضارتفلاا دادعلإا لا مأ
رايخلا اذه ددوم
)عيمجتلا يف مزحلا ددعل ىصقلأا دحلا( Max. Number of Packets in Aggregation
يضارتفلاا دادعلإا
10
و
0
نيب ام قاطنلا حوارتم عيمجتلا يف )ةيعرفلا ااراطلإا( مزولا ددعل ىصقلأا دولا
10
حه
مجول ىصقلأا دولا رايخلا اذه ددوم
)عيمجتلا مجحل ىصقلأا دحلا( Max. Aggregation Size
16000
حه يضارتفلاا دادعلإا
20000
و
0
نيب ام قاطنلا حوارتم )تمابلاب( عيمجتلا
اهللاخ عيمجتلا قلاغإ بجم يتلا ةلهملا ةدم رايخلا اذه ددوم
)ةيلخاد ةلهم( Timeout Internal
ةيناث يللم
100
و
0
نيب ام قاطنلا حوارتم تقؤملا ةطساحب هقلاغإ متم نأ لبق ”قلاغإ طرش“ مادختساب
3
حه يضارتفلاا دادعلإا
دولا رايخلا اذه ددوم
)عيمجتلا يف مزحلا مجحل ىندلأا دحلا( Min. Size of Packet in Aggregation
يضارتفلاا دادعلإا
1500
و
0
نيب ام قاطنلا حوارتم عيمجتلا يف مكارتتس يتلا مزولا مجول )تمابلاب( ىندلأا
10
حه
يف ADDBA دادعإ ءاهنإ اهدعب متيس يتلا ةدملا رايخلا اذه ددوم
)ADDBA ةلهم( ADDBA Timeout
ام قاطنلا حوارتم )ACK( عّمجملا رارقلإا ةيقافتا بسح ةدملا هذه للاخ ااراطلإل الادابت دحجو مدع ةلاح
ةلهملا ليطعت ىلإ يدؤمو ،
0
يضارتفلاا دادعلإا ةيناث يللم
65535
و
0
نيب
متم يتلا مزولا ددعل ىصقلأا دولا رايخلا اذه ددوم
)عيمجتلا راطإ مجح( Aggregation Window Size
64
حه يضارتفلاا دادعلإا
64
و
0
نيب ام قاطنلا حوارتم ةعّمجم اارارقإ ىلع لحصولا نود نم اهلاسرإ
ءاغلإ( Cancel Changes
قحف رقنا وأ اارييغتلا قيبطتل
)تادادعلإا ظفح( Save Settings
قحف رقنا
اارييغتلا ءاغللإ
)تارييغتلا
)ويديف( Video
ىلإ لحصحلاب مكوتلا ةقبط تناك اذإ ام رايخلا اذه ددوم
)عيمجتلا مادختسا( Use Aggregation
Yes
حه يضارتفلاا دادعلإا لا مأ )ADDBA( ع ّمجم رارقإ ةفاضإ لمع ةسلج دادعإب محقتس )MAC( طئاسحلا
رايخلا اذه ليطعتل
)لا( No
ددح
)معن(
ADDBA بلط لبقتس MAC ةقبط تناك اذإ ام رايخلا اذه ددوم
)عيمجتلا لوبق( Accept Aggregation
رايخلا اذه ليطعتل
)لا( No
ددح
)معن( Yes
حه يضارتفلاا دادعلإا لا مأ
رايخلا اذه ددوم
)عيمجتلا يف مزحلا ددعل ىصقلأا دحلا( Max. Number of Packets in Aggregation
يضارتفلاا دادعلإا
7
و
0
نيب ام قاطنلا حوارتم عيمجتلا يف )ةيعرفلا ااراطلإا( مزولا ددعل ىصقلأا دولا
7
حه
13
مّدقتملا نمحكتلا
Linksys WES610N/WET610N
مجول ىصقلأا دولا رايخلا اذه ددوم
)عيمجتلا مجحل ىصقلأا دحلا( Max. Aggregation Size
12000
حه يضارتفلاا دادعلإا
16000
و
0
نيب ام قاطنلا حوارتم )تمابلاب( عيمجتلا
اهللاخ عيمجتلا قلاغإ بجم يتلا ةلهملا ةدم رايخلا اذه ددوم
)ةيلخاد ةلهم( Timeout Internal
ةيناث يللم
100
و
0
نيب ام قاطنلا حوارتم تقؤملا ةطساحب هقلاغإ متم نأ لبق "قلاغإ طرش" مادختساب
3
حه يضارتفلاا دادعلإا
دولا رايخلا اذه ددوم
)عيمجتلا يف مزحلا مجحل ىندلأا دحلا( Min. Size of Packet in Aggregation
يضارتفلاا دادعلإا
1500
و
0
نيب ام قاطنلا حوارتم عيمجتلا يف مكارتتس يتلا مزولا مجول )تمابلاب( ىندلأا
10
حه
يف ADDBA دادعإ ءاهنإ اهدعب متيس يتلا ةدملا رايخلا اذه ددوم
)ADDBA ةلهم( ADDBA Timeout
ام قاطنلا حوارتم )ACK( عّمجملا رارقلإا ةيقافتا بسح ةدملا هذه للاخ ااراطلإل الادابت دحجو مدع ةلاح
ةلهملا ليطعت ىلإ يدؤمو ،
0
يضارتفلاا دادعلإا ةيناث يللم
65535
و
0
نيب
متم يتلا مزولا ددعل ىصقلأا دولا رايخلا اذه ددوم
)عيمجتلا راطإ مجح( Aggregation Window Size
64
حه يضارتفلاا دادعلإا
64
و
0
نيب ام قاطنلا حوارتم ةعّمجم اارارقإ ىلع لحصولا نود نم اهلاسرإ
ءاغلإ( Cancel Changes
قحف رقنا وأ اارييغتلا قيبطتل
)تادادعلإا ظفح( Save Settings
قحف رقنا
اارييغتلا ءاغللإ
)تارييغتلا
)توص( Voice
ىلإ لحصحلاب مكوتلا ةقبط تناك اذإ ام رايخلا اذه ددوم
)عيمجتلا مادختسا( Use Aggregation
Yes
حه يضارتفلاا دادعلإا لا مأ )ADDBA( ع ّمجم رارقإ ةفاضإ لمع ةسلج دادعإب محقتس )MAC( طئاسحلا
رايخلا اذه ليطعتل
)لا( No
ددح
)معن(
ADDBA بلط لبقتس MAC ةقبط تناك اذإ ام رايخلا اذه ددوم
)عيمجتلا لوبق( Accept Aggregation
رايخلا اذه ليطعتل
)لا( No
ددح
)معن( Yes
حه يضارتفلاا دادعلإا لا مأ
رايخلا اذه ددوم
)عيمجتلا يف مزحلا ددعل ىصقلأا دحلا( Max. Number of Packets in Aggregation
يضارتفلاا دادعلإا
2
و
0
نيب ام قاطنلا حوارتم عيمجتلا يف )ةيعرفلا ااراطلإا( مزولا ددعل ىصقلأا دولا
2
حه
مجول ىصقلأا دولا رايخلا اذه ددوم
)عيمجتلا مجحل ىصقلأا دحلا( Max. Aggregation Size
10000
حه يضارتفلاا دادعلإا
16000
و
0
نيب ام قاطنلا حوارتم )تمابلاب( عيمجتلا
اهللاخ عيمجتلا قلاغإ بجم يتلا ةلهملا ةدم رايخلا اذه ددوم
)ةيلخاد ةلهم( Timeout Internal
ةيناث يللم
100
و
0
نيب ام قاطنلا حوارتم تقؤملا ةطساحب هقلاغإ متم نأ لبق ”قلاغإ طرش“ مادختساب
10
حه يضارتفلاا دادعلإا
دولا رايخلا اذه ددوم
)عيمجتلا يف مزحلا مجحل ىندلأا دحلا( Min. Size of Packet in Aggregation
يضارتفلاا دادعلإا
1500
و
0
نيب ام قاطنلا حوارتم عيمجتلا يف مكارتتس يتلا مزولا مجول )تمابلاب( ىندلأا
10
حه
يف ADDBA دادعإ ءاهنإ اهدعب متيس يتلا ةدملا رايخلا اذه ددوم
)ADDBA ةلهم( ADDBA Timeout
ام قاطنلا حوارتم )ACK( عّمجملا رارقلإا ةيقافتا بسح ةدملا هذه للاخ ااراطلإل الادابت دحجو مدع ةلاح
ةلهملا ليطعت ىلإ يدؤمو ،
0
يضارتفلاا دادعلإا ةيناث يللم
65535
و
0
نيب
متم يتلا مزولا ددعل ىصقلأا دولا رايخلا اذه ددوم
)عيمجتلا راطإ مجح( Aggregation Window Size
64
حه يضارتفلاا دادعلإا
64
و
0
نيب ام قاطنلا حوارتم ةعّمجم اارارقإ ىلع لحصولا نود نم اهلاسرإ
ءاغلإ( Cancel Changes
قحف رقنا وأ اارييغتلا قيبطتل
)تادادعلإا ظفح( Save Settings
قحف رقنا
اارييغتلا ءاغللإ
)تارييغتلا
Advanced Wireless Settings > )يكلسلالا( Wireless
)ةمّدقتملا ةيكلسلالا تادادعلإا(
هذه طبضب طقف ريبخ لوؤسم محقم نأ بجم رسجلاب ةصاخلا ةمّدقتملا ةيكلسلالا فئاظحلا نمحكتب مق
يكلسلالا ءادلأا نم ّدوت دق ةئطاخلا اادادعلإا ّنإ ذإ اادادعلإا
ةظحلام
ةيكلسلالا اادادعلإا( Advanced Wireless Settings
ةشاش يف ةدحجحملا اادادعلإا
طقف نيمّدقتملا نيمدختسملل ةممصم
)ةمّدقتملا
)ةمّدقتملا ةيكلسلالا تادادعلإا( Advanced Wireless
ليطعت وأ نيكمت ىلع )LDPC( ةفاثكلا ضفخنم لثامتلا قيقدت زمر لمعم
)LDPC مادختسا( Use LDPC
ةمءلام ةيمزراحخ لمعت ءاضحضلاب ةئيلملا ااحنقلا يف اانايبلا دقف ةيلامتحا ليلقتل ءاطخلأا حيوصت
مادختسلا )162 نم ىلعأ( ةعفترم PHY الادعمب لمعلا دنع ًايئاقلت LDPC زيمرت ليطعت ىلع لّدعملا
)لا( No
ددوف لاإو
)معن( Yes
،يضارتفلاا دادعلإا ىلع ِقبأ ،LDCP ـب صاخلا مّدقتملا ءاطخلأا حيوصت ماتن

14
مّدقتملا نمحكتلا
Linksys WES610N/WET610N
نم مغرلاب OFDM مزح ةمامح نمحكت ىلع رايخلا اذه لمعم
)ERP ةيامح عون( ERP Protection Type
الادعمب CTS2Self وأ RTS/CTS مزح لاسرإ دنع ةيكلسلالا ةكبشلا لخاد 802 11b ااطوم دحجو
ةكبشلا يف مزولا ةماموب محقمو OFDM مزح لقن متيس هنأ ةيكلسلالا ةكبشلا ُرسجلا مِلعم ،802 11b
ةكرح يف ضافخنا هنع مجنم دق امم دئاز لمح ءاشنإ ىلإ CTS2Selfو RTS/CTS مزح يدؤت ةيكلسلالا
اانايبلا
نمضتم RTS/CTS رايخ نلأ ،CTS2Self ـب ةنراقم لقأ اانايب ةكرح نكل لضفأ ةيطغت RTS/CTS رايخ رفحم
رايخلا يدؤم دق
RTS/CTS
،يضارتفلاا دادعلإا ىلع ِقبأ ،RTS/CTSرايخ مادختسلا يقلتملا زاهجلا نم ًارارقإ
مادختسلا
)لاب( None
ددح ،)لاب( None رايخلا مادختسلا CCKو OFDM مزح نيب اابراضت ىلإ )لاب( None
CTS2Self
ددح ،CTS2Self رايخلا
ةكرح ااذ ةزهجأ نم ةمامولا نمحكت ىلع رايخلا اذه لمعم
)11n ةيامح عون( 11n Protection Type
نارتقا )لحصحلا ةطقن وأ( يكلسلالا ه ّجحملا فشتكا اذإ ةيكلسلالا ةكبشلا لخاد ةعفترم ريغ اانايب
ةعفترملا اانايبلا ةكرح ااذ ةزهجلأا ةفاك ىلإ ةراشإ لسريسف ،ةعفترم ريغ اانايب ةكرح يذ ممدق زاهج
ةفاك ةزيملا هذه دمتعت امك اانايبلل لاسرإ ةيلمع لك لبق CTS2Self وأ RTS/CTS اايلآ مادختساب
MIMO كلذ يف امب ةيسايقلا 802 11n ةمامح اايلمع
نمضتم RTS/CTS رايخ نلأ ،CTS2Self ـب ةنراقم لقأ اانايب ةكرح نكل لضفأ ةيطغت RTS/CTS رايخ رفحم
رايخلا يدؤم دق
RTS/CTS
،يضارتفلاا دادعلإا ىلع ِقبأ ،RTS/CTSرايخ مادختسلا يقلتملا زاهجلا نم ًارارقإ
None رايخلا مادختسلا ةعفترملا اانايبلا ةكرح ااذ مزولاو ةممدقلا مزولا نيب اابراضت ىلإ )لاب( None
CTS2Self
ددح ،CTS2Self رايخلا مادختسلا
)لاب( None
ددح ،)لاب(
نييعتب رايخلا اذه محقم
)لاسرإ ةوق ىصقلأ ةيوئملا ةبسنلا( Percentage of maximal transmit power
ديق حمس اذإ ،لاثملا ليبس ىلع ةيميتنتلا قاطنلا دحيقل ةبسنلاب لاسرإ ةحق ىصقلأ ةمحئملا ةبسنلا
نأب حمسم 50% ىلع ةمحئملا ةبسنلا نييعت نإف ،لبيسمد 20 ىلإ لصت لاسرإ اايلمعب يميتنتلا قاطنلا
وأ
50%
وأ
25%
وأ
12%
:اهمادختسا دمرت يتلا ةمحئملا ةبسنلا دّدح لبيسمد 10 ىلإ لاسرإ ةحق ىصقأ لصت
100%
حه يضارتفلاا دادعلإا
100%
نم 802 1Q وأ 802 1D نييعت رايخلا اذه نّيعم
)ةمدخلا ةدوج فينصت عون( QoS Classification Type
Video ،)ااريثأت لضفأ( Best Effects ،)ةيفلخلا( Background( WMM اامحلوأ ىلع IP DSCP/TOS لقح
ضعب ةطساحب مدختسُم يذلا ،
802.1Q
ددح وأ ،
802.1D
،يضارتفلاا دادعلإا ىلع ِقبأ ))احص( Voice ،)حمديف(
IPTV ااقفدت
لاصتا ءاشنإ ةداعإ( Re-establish Ethernet connection when initiating wireless connection
رسجلا محقم ،رسجلا فلخ دجحم زاهج نم DHCP فاشتكا ليغشتل
)يكلسلا لاصتا ءدب دنع Ethernet
ليطعتل يكلسلا لاصتا ءاشنإ اهيف متم ةرم لك يف زاهجلاو رسجلا نيب Ethernet طابترا نييعت ةداعإب
)معن( Yes
،يضارتفلاا دادعلإا ىلع ِقبأف لاإو
)لا( No
ددح ،ةفيظحلا هذه
ءاغلإ( Cancel Changes
قحف رقنا وأ اارييغتلا قيبطتل
)تادادعلإا ظفح( Save Settings
قحف رقنا
اارييغتلا ءاغللإ
)تارييغتلا
)ةرادإ( Management > )ةرادلإا( Administration
بمو ىلإ ةدنتسملا ةدعاسملا ةادأ ىلإ لحصحلا :رسجلل ةددوم فئاظو ةرادلإ ةشاشلا هذه مدختسا
ديهمتلا ةداعإو نمحكتلا فلمل يطايتحلاا خسنلاو
)ةرادإ( Management
)رسجلا ىلإ لوصولا( Bridge Access
ضرعتسم ىلإ ةدنتسملا ةدعاسملا ةادأ ىلإ لحصحلا ةمامول رورم ةملك مدختسا
رسجلل ةدمدج رورم ةملك لخدأ
)رسجلا رورم ةملك( Bridge Password
ديكأتلل ًاددجم رورملا ةملك لِخدأ
)ديكأتلل لاخدلإا ةداعإ( Re-enter to confirm
قاطنلا حوارتم اهددوت يتلا لحمخلا ةدم دعب لحخدلا ليجست ةلهم يهتنت
)لومخلا ةلهم( Idle Timeout
600
حه يضارتفلاا دادعلإا ةيناث
3600
و
60
نيب ام
)بيو ىلإ لوصولا( Web Access
ريفحتب محقت ثيح ماع قاطن يف رسجلا مدختست تنك اذإ
)ًايكلسلا لوصولا( Access via Wireless
ىلإ ةدنتسملا ةدعاسملا ةادأ ىلإ يكلسلالا لحصحلا ليطعت كنكميف ،كفحيضل يكلسلالا لحصحلا
ضرعتسم ىلإ ةدنتسملا ةدعاسملا ةادأ ىلإ لحصحلا ىلع طقف ًارداق نحكتس رسجلاب ةصاخلا ضرعتسم
حامسلل ،
)ن ّكمم( Enabled
،يضارتفلاا دادعلإا ىلع ِقبأ دادعلإا اذه ليطعتب تمق اذإ يكلس لاصتا ربع
Disabled
ددح وأ ،رسجلاب ةصاخلا ضرعتسم ىلإ ةدنتسملا ةدعاسملا ةادأ ىلإ يكلسلالا لحصحلاب
ةدعاسملا ةادأ ىلإ يكلسلالا لحصحلا رتول
)ل ّطعم(
)ةداعتسلااو يطايتحلاا خسنلا( Backup and Restore
Backup Configurations
قحف رقنا ،ًايطايتحا رسجلا نمحكت فلم خسنل
)يطايتحلاا خسنلا( Backup
ةشاشلا ىلع رهتت يتلا ااداشرلإا عبتا ّمث
)ًايطايتحا تانيوكتلا خسن(
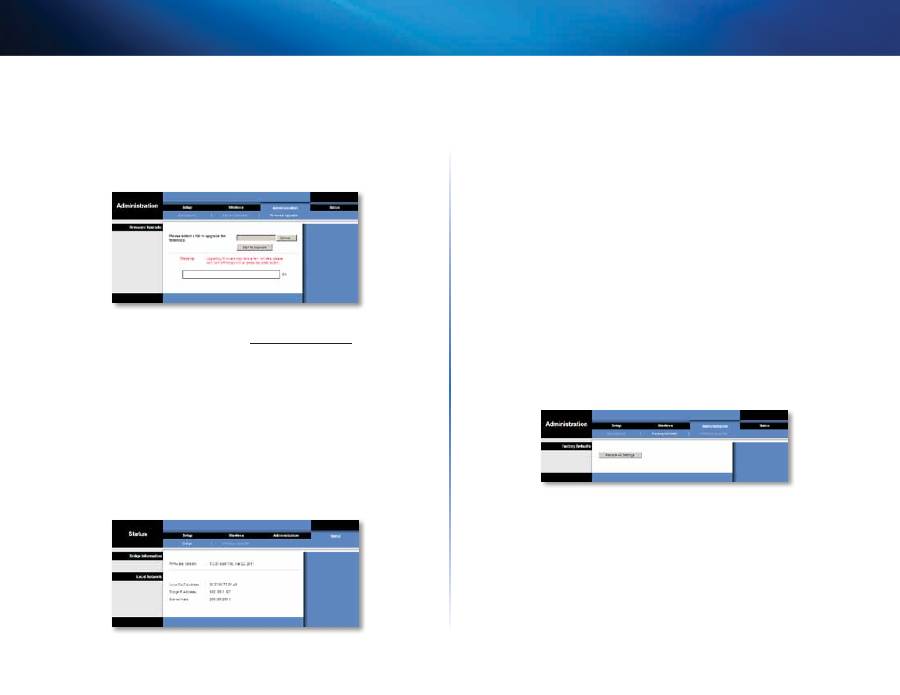
15
مّدقتملا نمحكتلا
Linksys WES610N/WET610N
Restore
قحف رقنا مث نمحكتلا فلم ددحو
)ضارعتسا( Browse
قحف رقنا
)ةداعتسلاا( Restore
)تانيوكتلا ةداعتسا( Configurations
)ماظنلا ديهمت ةداعإ( System Reboot
ةداعإ ءدب( Start to Reboot
قحف رقنا ،هليغشت ةداعإ وأ رسجلا ديهمت ةداعلإ
)ديهمتلا ةداعإ( Reboot
)ديهمتلا
ءاغلإ( Cancel Changes
قحف رقنا وأ اارييغتلا قيبطتل
)تادادعلإا ظفح( Save Settings
قحف رقنا
اارييغتلا ءاغللإ
)تارييغتلا
تادادعلإا( Factory Defaults > )ةرادلإا( Administration
)ةعّنصملا ةكرشلل ةيضارتفلاا
ةعّنصملا ةكرشلل ةيضارتفلاا اادادعلإا ىلإ رسجلا نمحكت ةداعتسلا ةشاشلا هذه مدختسا
)ةعّنصملا ةكرشلل ةيضارتفلاا تادادعلإا( Factory Defaults
ةيضارتفلاا اادادعلإا ىلإ رسجلا اادادعإ نييعت ةداعلإ
)تادادعلإا لك ةداعتسا( Restore All Settings
قبس اادادعإ يأ رسختس
)تادادعلإا لك ةداعتسا( Restore All Settings
قحف رقنا ،ةعّنصملا ةكرشلل
ةيضارتفلاا اادادعلإا ةداعتسا دنع اهتفوب تمق نأ
ةيقرت( Upgrade Firmware > )ةرادلإا( Administration
)تباثلا جمانربلا
تنك اذإ لاإ تباثلا جمانربلا ةيقرتب مقت لا رسجلاب صاخلا تباثلا جمانربلا ةيقرتل ةشاشلا هذه مدختسا
اهمادختسا دمرت ةزيم نمضتم دمدجلا تباثلا جمانربلا ناك اذإ وأ رسجلا عم لكاشم هجاحت
بمو عقحم نم رسجلاب صاخلا تباثلا جمانربلا ةيقرت فلم لمزنتب مق ،تباثلا جمانربلا ةيقرت لبق
www.Linksys.com/support
Linksys ـب صاخلا
)تباثلا جمانربلا ةيقرت( Upgrade Firmware
قحف رقنا
)تباثلا جمانربلا ةيقرتل فلم ديدحت ىجري( Please select a file to upgrade the firmware
عبتاو
)ةيقرتلا ءدب( Start to Upgrade
قحف رقنا مث تباثلا جمانربلا ةيقرت فلم ددحو
)ضارعتسا( Browse
ةشاشلا ىلع رهتت يتلا ااميلعتلا
)رسجلا( Bridge > )ةلاحلا( Status
رسجلل ةيلاولا ةلاولا اامحلعم ضرع متم

16
مّدقتملا نمحكتلا
Linksys WES610N/WET610N
)رسجلا تامولعم( Bridge Information
رسجلل يلاولا تباثلا جمانربلا ضرع متم
)تباثلا جمانربلا رادصإ( Firmware Version
)ةيلحملا ةكبشلا( Local Network
ىلع رهتم امك رسجلاب صاخلا MAC ناحنع ضرع متم
)يلحملا MAC ناونع( Local MAC Address
ةيلوملا Ethernet ةكبش
ةيلوملا Ethernet ةكبش ىلع رهتم امك رسجلاب صاخلا IP ناحنع ضرع متم
)IP ناونع( IP Address
كتكبشل هنمحكت مت يذلا ةيعرفلا ةكبشلا عانق ضرع متم
)ةيعرفلا ةكبشلا عانق( Subnet Mask
ةيلوملا
)يكلسلالا( Wireless > )ةلاحلا( Status
ةيكلسلالا كتكبش لحح اامحلعم ضرع متم
)يكلسلالا( Wireless
ةيكلسلالا كتكبشب لاصتلاا ةلاح ضرع متم
)طابترلاا ةلاح( Link Status
ةيكلسلالا كتكبش ىلع رهتم امك رسجلاب صاخلا MAC ناحنع ضرع متم
)MAC ناونع( MAC Address
ةيلوملا
SSID وأ ةيكلسلالا ةكبشلا مسا ضرع متم
))SSID( ةكبشلا مسا( )SSID( Network Name
)لحصحلا ةطقن وأ( لصتملا يكلسلالا ه ّجحملل يكلسلالا MAC ناحنع ضرع متم
BSSID
ةيكلسلالا كتكبشل يكلسلالا ددرتلا قاطن ضرع متم
)يكلسلالا ددرتلا قاطن( Radio Band
ةيكلسلالا كتكبش همدختست يذلا ،زتره اغيملاب ،ةانقلا ضرع ضرع متم
)ةانقلا ضرع( Channel Width
ةانقلا ضرع متم ،ةكبشلا ه ّجحمب ةصاخلا ةانقلا اادادعلإ ًاعبت
)ةعساولا ةانقلا( Wide Channel
Radio Band دادعلإ )ةعساو - زتره اغيم 40 ةانق( Wide - 40MHz Channel دمدوتب تمق اذإ ةعساحلا
N-يكلسلا ةانق يه هذه نحكتسف ،ه ّجحملل )ةانقلا ضرع( Channel Width وأ )يكلسلالا ددرتلا قاطن(
كب ةصاخلا ةيساسلأا
Wide - 40MHz دمدوتب تمق اذإ ةيسايقلا ةانقلا دادعإ ضرع متم
)ةيسايقلا ةانقلا( Standard Channel
Channel Width وأ )يكلسلالا ددرتلا قاطن( Radio Band دادعلإ )ةعساو - زتره اغيم 40 ةانق( Channel
N-يكلسلال ةمحناث ةانق يه ةيسايقلا ةانقلا نحكتسف ،ه ّجحملل )ةانقلا ضرع(
اانايبلا لاسرإ ةعرس ضرع متم
)تبلا ةعرس( Bit Rate
يه 0%و ،ةنكمم ةراشإ ةحق ىلعأ يه 100% ةراشلإا ةحقل ةمحئملا ةبسنلا ضرع متم
)ةراشلإا( Signal
ةنكمم ةراشإ فعضأ
ةيكلسلالا كتكبشب صاخلا ناملأا بحلسأ ضرع متم
)ناملأا( Security

17
اهحلاصإو ءاطخلأا فاشكتسا
Linksys WES610N/WET610N
WES610N/WET610N
.يكلسلالا هّجوملاب لاصتلاا رخآ يكلس Ethernet زاهج وأ رتويبمكلا ىلع رذعتي
1
.
رسجلاب ةصاخلا ضرعتسم ىلإ ةدنتسملا ةدعاسملا ةادأ ىلإ لحصحلاب مق
2
.
Network نأ نم دكأت ،
)ةيساسلأا ةيكلسلالا اادادعلإا( Basic Wireless Settings
ةشاش يف
ةيكلسلالا كتكبش مسلا قباطم ))SSID( ةكبشلا مسا( )SSID( Name
3
.
كتكبشب ةصاخلا ناملأا اادادعلإ ةقباطم )WEP وأ WPA2 وأ WPA( ناملأا اادادعإ نأ نم دكأت
ةيكلسلالا
.رييغت ىلإ ةجاحب رسجلاب صاخلا IP ناونع
IP ناحنع ىلع رسجلا لصويسف ،)ةكبشلا هّجحم ةداع( DHCP مداخب ةدّوزم ةكبشب ًلاصتم رسجلا ناك اذإ
صاخلا يضارتفلاا تباثلا IP ناحنع رسجلا مدختسيس ،DHCP مداخ دحجو مدع ةلاح يف DHCP مداخ نم
169.254.1.250
،هب
:ااميلعتلا هذه عبتاف ،ًامئاد ًاتباث IP ناحنع رسجلا مدختسم نأ دمرت تنك اذإ
1
.
رسجلاب ةصاخلا ضرعتسم ىلإ ةدنتسملا ةدعاسملا ةادأ ىلإ لحصحلاب مق
2
.
)ةكبشلا دادعإ( Network Setup
بمحبتلا ةملاع قحف رقنا
3
.
)تباث IP( Static IP
ددح ،
)ةكبشلا لاصتا عحن( Network Connection Type
ةلدسنملا ةمئاقلا نم
4
.
)ةيعرفلا ةكبشلا عانق( Subnet Mask
و
)تباث IP ناحنع( Static IP Address
لحقولا لمكأ
)ةيضارتفلاا ةراّبعلا( Default Gateway
و
5
.
)تادادعلإا ظفح( Save Settings
قحف رقنا
ةيصاخ هب ةنّكمم رخآ زاهجب رخآ يكلس Ethernet زاهج وأ رسجلا هب نّكمملا رتويبمكلا لصتي نل
.)ةعباط وأ رتويبمك لثم( يكلسلالا لاصتلاا
:يلم اّمم ققوتلا ىجرم
•
ةيكلسلالا ةكبشلا ىلع دحجحم يكلسلالا لاصتلاا ةيصاخ هب ةنّكمملا زاهجلا نأ نم دكأت
رسجلاب لصتملا رخلآا يكلسلا Ethernet زاهج وأ رتحيبمكلا اهيلع دحجحملا اهسفن
•
ةيكلسلالا ةكبشلا ىلع ةدحجحملا ةزهجلأا ةفاكل هسفن )SSID( ةكبشلا مسا مادختسا نم دكأت
•
ةقفاحتم IP نموانع مادختساب ،اهسفن IP ةكبش ىلع ةزهجلأا ةفاك دحجو نم دكأت
.رورملا ةملك ضرعتسم ىلإ ةدنتسملا ةدعاسملا ةادأ لبقت لا
:يلم اّمم ققوتلا ىجرم
•
)ةويوصلا( حيوصلا )فرحلأا( فرولا مادختسا نم دّكأت فرحلأا ةلاول ةس ّسوتم رورملا ةملك
رورملا ةملك لاخدإ دنع
•
ةعّنصملا ةكرشلل ةيضارتفلاا اادادعلإا ىلإ رسجلا نييعت ةداعإ نكميف ،رورملا ةملك تيسن اذإ
ةداعإ متتسو ،ًابمرقت ٍناحث سمخ ةدمل رسجلاب صاخلا
نييعتلا ةداعإ
رز ىلع رارمتساب طغضا
نييعت ةداعإ ًاضمأ متتس
admin
،ةعّنصملا ةكرشلل يضارتفلاا دادعلإا ىلإ رورملا ةملك نييعت
ةادأ ىلإ لحصحلل( ةعّنصملا ةكرشلل ةيضارتفلاا اادادعلإا ىلإ ىرخلأا رسجلا اادادعإ ةفاك
)
)رورملا ةملك( Password
لقح يف
admin
لخدأ ،ضرعتسم ىلإ ةدنتسملا ةدعاسملا
ضرع متي نل ،ضرعتسم ىلإ ةدنتسملا ةدعاسملا ةادأ للاخ نم ةمزلالا تارييغتلاب كمايق دعب
.ةشاشلا ىلع ةديدجلا تادادعلإا
هذه عبتا ،ةدمدجلا اادادعلإا ضرع متم مل لاح يف
)ثيدحت( Refresh
قحف رقنا بمو ضرعتسم يف
:ااميلعتلا
1
.
رسجلا نم ةقاطلا لّحوم لصفا
2
.
رسجلاب ةقاطلا لّحوم ليصحت دعأ مث ،ٍناحث سمخ رتتنا
3
.
)ثيدحت( Refresh
قحف رقنا بمو ضرعتسم يف
بيو
بمو ىلع Linksys عقحم ىلإ عحجرلا ىجرُيف ،انه كتلئسأ ةجلاعم متت مل اذإ
Linksys.com/support
اهحلاصإو ءاطخلأا فاشكتسا

18
اافصاحملا
Linksys WES610N/WET610N
WES610N
WES610N
زارطلا
802 11n ، 802 11a ، 802 11b ، 802 11g ، IEEE 802 3u
ريماعلما
،Wi-Fi Protected Setup™و Ethernetو ةقاطلا
ءاحضلأا
يدرفلا Ethernet طابتراو طاشنو ،يكلسلالا
ةقاطلا ،)4( Ethernet
ذفانلما
Wi-Fi ةينقتب يملمحا دادعلإا ،ينيعتلا ةداعإ
رارزلأا
CAT5e
الابكلا عحن
)ةيلخاد( 3
يئاحهلا ةزهجأ
رفحتم ريغ
يئاحهلا لصحم عحن
لا
)لا/معن( لصفلل لباق
64-QAM ، 16-QAM ، QPSK ، OFDM/BPSK :802 11a
الامدعتلا
BPSK ، CCK/QPSK :802 11b
64-QAM ، 16-QAM ، QPSK ، OFDM/BPSK :802 11g
64-QAM ، 16-QAM ، QPSK ، OFDM/BPSK :802 11n
)EIRP( يكلسلالا ددرتلا ةقاط
ةيناثلاب تباغيم 54 @ )يجذحنم( طاو يللم/لبيسمد 15 :802 11a
طاو يلليم/لبيسمدلاب
ةيناثلاب تباغيم 11 @ )يجذحنم( طاو يللم/لبيسمد 19 :802 11b
ةيناثلاب تباغيم 54 @ )يجذحنم( طاو يللم/لبيسمد 16 :802 11g
MCS15 @ )يجذحنم( طاو يللم/لبيسمد 18 :)زتره اغيغ 2 4( 802 11n
MCS15 @ )يجذحنم( طاو يللم/لبيسمد 16 :)زتره اغيغ 5( 802 11n
ةيناثلاب تباغيم 54 @ )يجذحنم( طاو يللم/لبيسمد -72 :802 11a
يقلتلا ةيساسح
ةيناثلاب تباغيم 11 @ )يجذحنم( طاو يللم/لبيسمد -85 :802 11b
ةيناثلاب تباغيم 54 @ )يجذحنم( طاو يللم/لبيسمد -73 :802 11g
MCS15 @ )يجذحنم( طاو يللم/لبيسمد -75 :)زتره اغيم 20( 802 11n
MCS15 @ )يجذحنم( طاو يللم/لبيسمد -69 :)زتره اغيم 40( 802 11n
ةبسن لبيسمدلاب يئاحهلا دادتما
1
يبورتوزمآ يئاحه ىلإ
، )WPA( Wi-Fi Protected Access™ ، WEP
يكلسلالا ناملأا
)WPA2( Wi-Fi Protected Access™ 2
تب 128 ىلإ لصم ريفشت
ناملأا حاتفم ااتب
ةيئيبلا تايطعلما
ةصحب 2 68 × 5 04 × 6 97
سيماقلما
)مم 68 × 128 × 177(
)مارغ 295( لطر 0 65
نزحلا
Wi-Fi ، CE ، RSS210 ، ICES-003 ، UL/cUL ، FCC
ااداهشلا
، WPA2™ ، )IEEE 802 11a/b/g/draft n (
WMM
®
، Wi-Fi ةينقتب يملمحا دادعلإا
ريبمأ 1 ،تلحف 12
ةقاطلا
)ةمحئم ةجرد 40 ىلإ 0( تماهنرهف ااجرد 104 ىلإ 32
ليغشتلا ةرارح ةجرد
)ةمحئم ةجرد 60 ىلإ -20( تماهنرهف ةجرد 140 ىلإ -4
نمزختلا ةرارح ةجرد
فثاكت نود نم 85% ىلإ 10 نم
ليغشتلا ءانثأ ةبحطرلا ةبسن
فثاكت نود نم 90% ىلإ 5 نم
نمزختلا ءانثأ ةبحطرلا ةبسن
راعشإ نود نم رييغتلل اافصاحلما عضخت نأ نكيم
اافصاحملا

19
اافصاحملا
Linksys WES610N/WET610N
WET610N
WET610N
زارطلا
802 11n ، 802 11a ، 802 11b ، 802 11g ، IEEE 802 3u
ريماعلما
،Wi-Fi Protected Setup™ ، Ethernet ،ةقاطلا
ءاحضلأا
يكلسلالا
ةقاطلاو Ethernet
ذفانلما
Wi-Fi ةينقتب يملمحا دادعلإا ،ينيعتلا ةداعإ
رارزلأا
CAT5e
الابكلا عحن
)ةيلخاد( 3
يئاحهلا ةزهجأ
رفحتم ريغ
يئاحهلا لصحم عحن
لا
)لا/معن( لصفلل لباق
، QPSK ، OFDM/BPSK :802 11a
الامدعتلا
64-QAM ، 16-QAM
BPSK ، CCK/QPSK :802 11b
، QPSK ، OFDM/BPSK :802 11g
64-QAM ، 16-QAM
، QPSK ، OFDM/BPSK :802 11n
64-QAM ، 16-QAM
ةيناثلاب تباغيم 54 @ )يجذحنم( طاو يللم/لبيسمد 15 :802 11a طاو يلليم/لبيسمدلاب )EIRP( يكلسلالا ددرتلا ةقاط
ةيناثلاب تباغيم 11 @ )يجذحنم( طاو يللم/لبيسمد 18 :802 11b
ةيناثلاب تباغيم 54 @ )يجذحنم( طاو يللم/لبيسمد 16 :802 11g
ةيناثلاب تباغيم 130 @ )يجذحنم( طاو يللم/لبيسمد 12 :802 11n
)HT40( ةيناثلاب تباغيم 270 ، )HT20 (
ةيناثلاب تباغيم 54 @ )يجذحنم( طاو يللم/لبيسمد -72 :802 11a
يقلتلا ةيساسح
ةيناثلاب تباغيم 11 @ )يجذحنم( طاو يللم/لبيسمد -85 :802 11b
ةيناثلاب تباغيم 54 @ )يجذحنم( طاو يللم/لبيسمد -73 :802 11g
،زتره اغيغ MCS15/2 4 @ )يجذحنم( طاو يللم/لبيسمد -70 :802 11n
زتره اغيغ MCS15/5 0 @ )يجذحنم( طاو يللم/لبيسمد -69
1 يبورتوزمآ يئاحه ىلإ ةبسن لبيسمدلاب يئاحهلا دادتما
Wi-Fi ، )WPA( Wi-Fi Protected Access™ ، WEP
يكلسلالا ناملأا
)WPA2( Protected Access™ 2
تب 128 ىلإ لصم ريفشت
ناملأا حاتفم ااتب
ةيئيبلا تايطعلما
ةصحب 2 05 × 4 17 × 5 71
سيماقلما
)مم 52 × 106 × 145(
)مارغ 159( ةصنوأ 5 61
نزحلا
Wi-Fi ، CE ، RSS210 ، ICES-003 ، UL/cUL ، FCC
ااداهشلا
، WPA2™ ، )IEEE 802 11a/b/g/draft n (
WMM
®
،Wi-Fi ةينقتب يملمحا دادعلإا
ريبمأ 1 ،تلحف 12
ةقاطلا
)ةمحئم ةجرد 40 ىلإ 0( تماهنرهف ااجرد 104 ىلإ 32
ليغشتلا ةرارح ةجرد
)ةمحئم ةجرد 60 ىلإ -20( تماهنرهف ةجرد 140 ىلإ -4
نمزختلا ةرارح ةجرد
فثاكت نود نم 85% ىلإ 10 نم
ليغشتلا ءانثأ ةبحطرلا ةبسن
فثاكت نود نم 90% ىلإ 5 نم
نمزختلا ءانثأ ةبحطرلا ةبسن
راعشإ نود نم رييغتلل اافصاحلما عضخت نأ نكيم
3425-01249
ىرخلأا لودلاو ةدوتملا ااملاحلا يف اهل ةعباتلا ااكرشلا وأ/و Cisco ـل ةلجسم ةمراجت ااملاع وأ ةمراجت ااملاع يه Linksysو Cisco راعشو Cisco
نيينعملا اهباوصلأ ةصاخ ةيكلم يه دنتسملا اذه يف ةدراحلا ىرخلأا ةمراجتلا ااملاعلا ةفاك www cisco com/go/trademarks عقحملا ىلع Cisco ةكرشب ةصاخلا ةمراجتلا ااملاعلاب ةمئاق دجحت
ةظحفوم قحقولا عيمج اهل ةعباتلا ااكرشلا وأ/و Cisco ةكرشل 2011 ماعلل © رشنلاو عبطلا قحقح
Linksys.com/support
Оглавление
- مدختسملا ليلد
- Ръководство за потребителя
- Uživatelská příručka
- Benutzerhandbuch
- Brugervejledning
- Guía del usuario
- Käyttöopas
- Guide de l'utilisateur
- Guide de l'utilisateur
- Οδηγός χρήσης
- Felhasználói kézikönyv
- Panduan Pengguna
- Guida per l'utente
- Gebruikershandleiding
- Brukerhåndbok
- Podręcznik użytkownika
- Manual do utilizador
- Ghidul utilizatorului
- Руководство пользователя
- Användarhandbok
- Navodila za uporabo
- คู่มือผู้ใช้
- Kullanıcı Kılavuzu
- Посібник користувача
- Hướng dẫn Sử dụng
