Peg-Perego Base Fissa: instruction
Class: Car Accessories
Type:
Manual for Peg-Perego Base Fissa

FI000601I76
ECE R44/03
Primo Viaggio
& Base Fissa
Istruzioni
d
ʼ
uso IT
Instructions for use EN
Notice
d
ʼ
emploi FR
Gebrauchsanleitung
DE
Instrucciones de uso ES
Instruções para uso PT
Gebruiksaanwijzing
NL
Brugsanvisning
DK
Käyttöohjeet
FI
Návod na použití CZ
Návod na použitie SK
Használati
útmutató
HU
Navodila za uporab SL
Инструкции
по
пользованию
RU
Kullanim
klavuzu
TR
ΟΔΗΓΙΕΣ
ΧΡΗΣΕΩΣ
EL
3
1
4
2
1
2
3
A
B
5
6
7
8
A
B
C
D
A
B
11
9
12
10
13
14
15
16
17
19
18
20
21
22
23
1
5
6
7
8
2
3
4
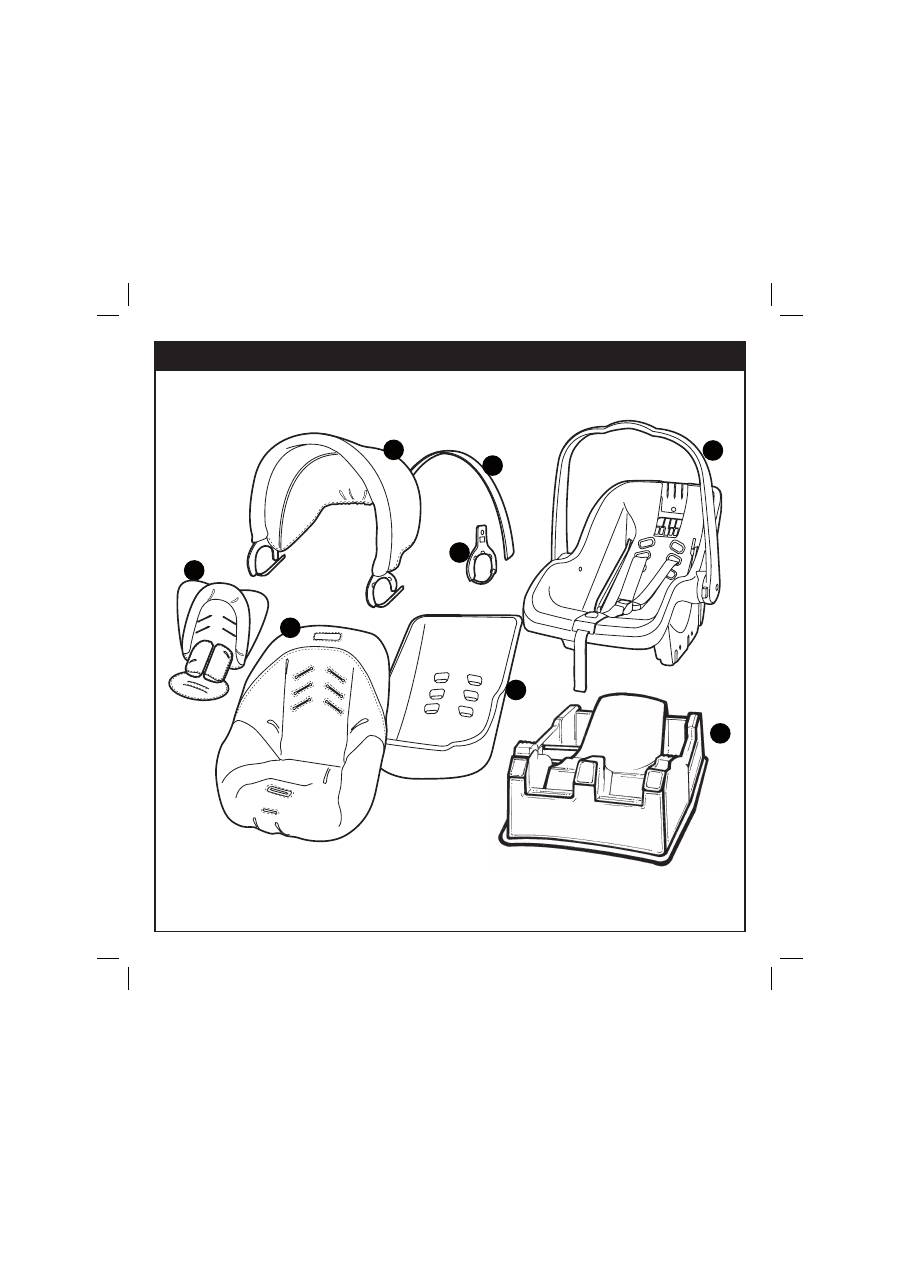
Primo Viaggio con Base Fissa
Primo Viaggio con Base Fissa
1
ARPI0413GGGRPEG
2
IRBACS00GG
3
MMSP0006
4
BRMACN•
5
BRCACS•
6
BAKRCS•
7
SPST5386GL
8
dx
)
SPST5303DGG•
8
sx
)
SPST5303SGG•
IT• Ricambi disponibili in piú colori da specificare nella richiesta.
EN• Spare parts available in different colours to be specified when ordering.
FR• Pièces de rechange disponibles en plusieurs couleurs à spécifier dans la demande.
DE• Ersatzteile in mehr Farben vorhanden, die in der Anfrage spezifiziert werden müssen.
ES• Repuestos disponibles en otros colores que se especificarán en el pedido.
PT• Peças de reposição disponíveis em cores alternativas a serem especificadas no pedido.
NL• Reserveonderdelen verkrijgbaar in meerdere kleuren, bij bestelling te specificeren.
DK• Reservedele kan leveres i flere farver som bør specificeres ved bestillingen.
FI•
Varaosia saatavana eri värisinä: ilmoita väri tilauksessa.
CZ• U náhradních díl
ů
, které jsou k dispozici ve více barvách, je nutné na objednávce
specifikovat p
ř
íslušnou barvu.
SK• Pri náhradných dieloch, ktoré sú k dispozícii vo viacerých farbách, je potrebné pri
objednávke špecifikova
ť
želanú farbu.
HU• A tartalék alkatrészek különböz
ő
színekben elérhet
ő
k, melyeket rendeléskor kell
kiválasztani.
SL• Rezervni deli so na voljo v ve
č
barvah, ki jih je treba navesti pri naro
č
ilu.
RU•
Запчасти
имеются
различных
цветов
,
необходимый
указать
в
запросе
.
TR• Sipari
ş
te belirtilen de
ğ
i
ş
ik renklerdeki yedek parçalari mevcuttur.
EL•
Ανταλλακτικά
διαθέσιμα
σε
διάψορα
χρώματα
.
Προσδιορίστε
όταν
παραγγείλετε
.
passeggini e carrelli Peg Perego con un gesto
semplicissimo.
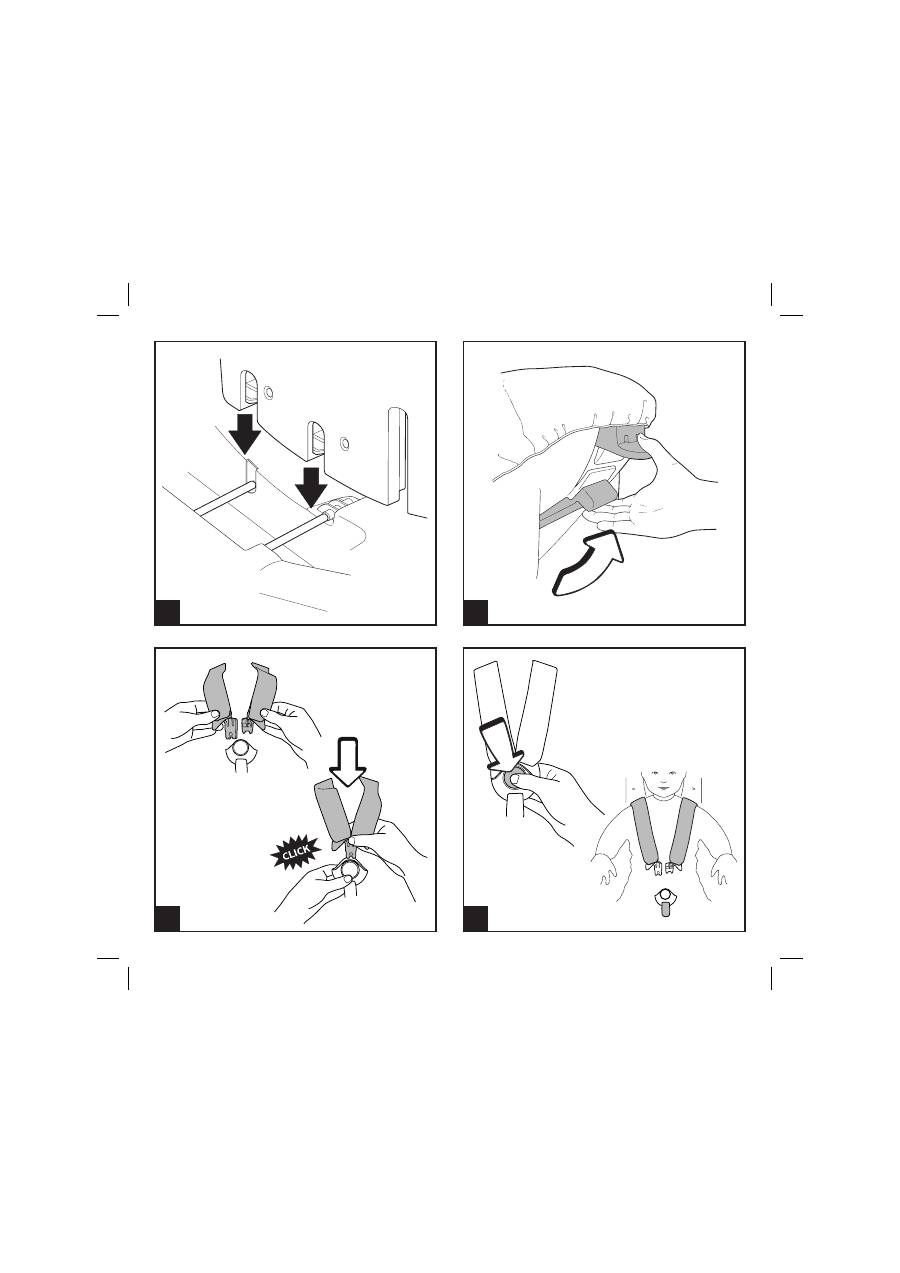
1• Per agganciare il seggiolino, posizionarlo in
corrispondenza degli agganci e spingerlo verso il
basso con entrambe le mani fino al click.
2• Per sganciare il seggiolino, occorre con una mano
tirare verso l'alto la maniglia posta dietro lo
schienale e contemporaneamente con l
ʼ
altra mano
alzare il seggiolino verso l'alto.
CINTURA DI SICUREZZA
3• Per agganciare la cintura di sicurezza sovrapporre
le due bretelle e inserirle nella fibbia fino al click.
4• Per sganciare la cintura di sicurezza premere il
pulsante rosso sulla fibbia.
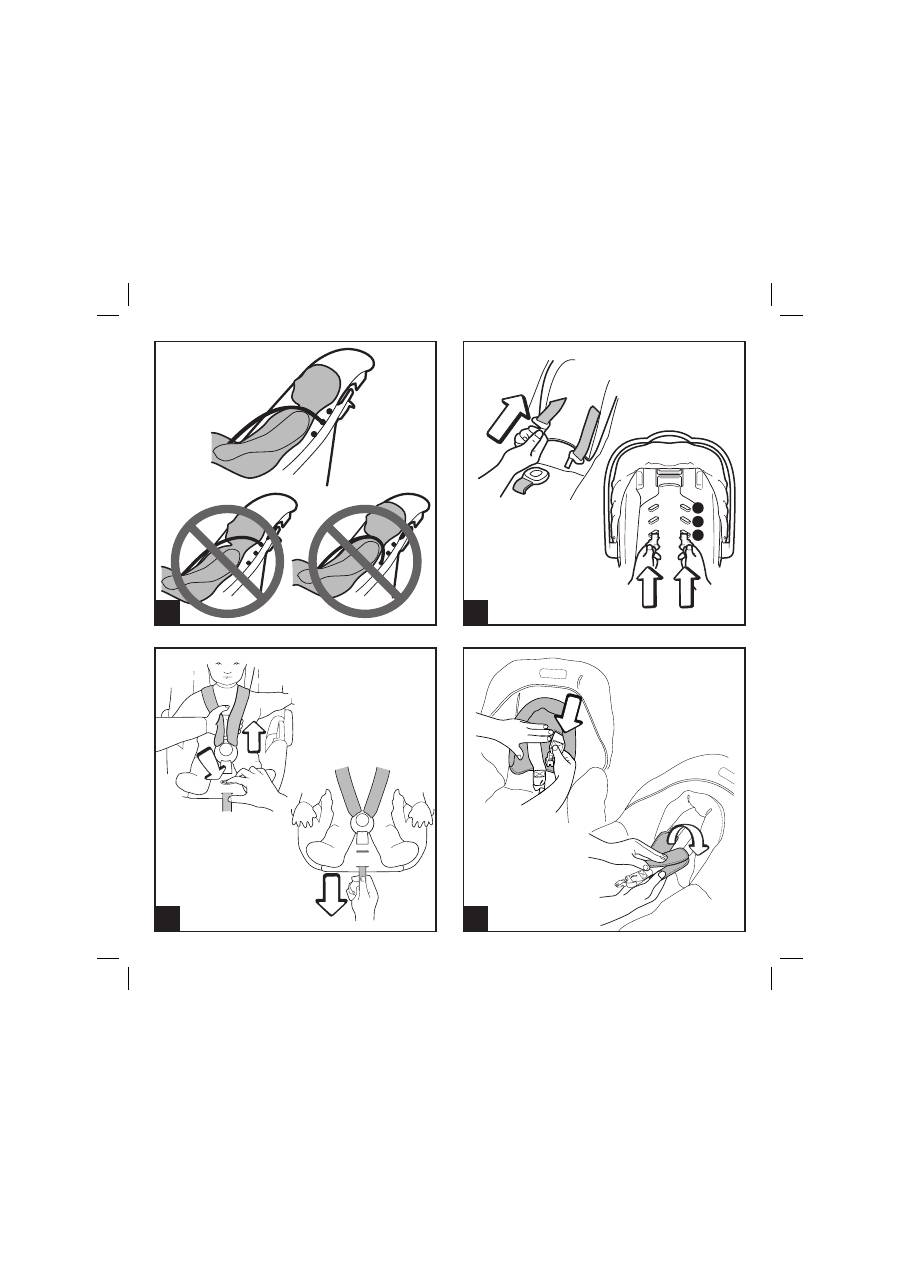
5• Il seggiolino è dotato di tre fori per la regolazione
dell
ʼ
altezza della cintura che è possibile scegliere
in base all
ʼ
altezza del bambino. La cintura non
deve essere né troppo alta, ne troppo bassa
rispetto alle spalle del bambino; la giusta
posizione è quella che le spalle del bambino siano
appena sopra al foro.
6• Per cambiare l
ʼ
altezza della cintura, slacciare
la cintura, sfilare le bretelle dai fori sul retro e
riposizionarle nel foro più adatto all
ʼ
altezza del
bambino.
7• Per allentare la tensione della cintura, infilare il
dito nell
ʼ
asola della seduta, premere il bottone
metallico e contemporaneamente con l
ʼ
altra mano
tirare in su le bretelle come in figura. Per far
aderire la cintura al bambino, tirare verso di sé la
cintura come in figura, facendo attenzione a non
stringerla troppo, lasciando un minimo di gioco.
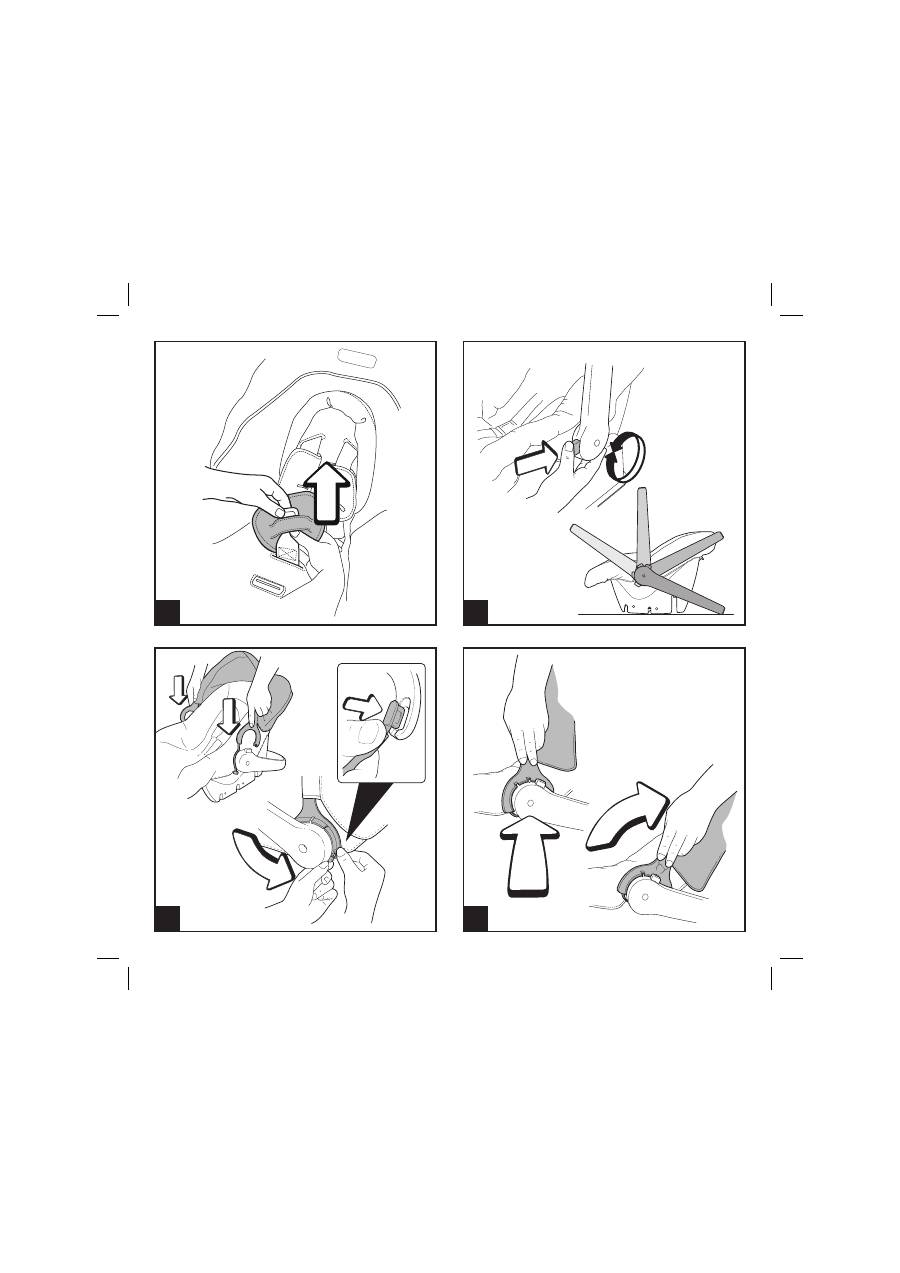
CUSCINETTI DI PROTEZIONE
8• Vengono forniti in dotazione, un cuscino riduttore
per la testa del bambino, due protezioni per le
spalle e un cuscinetto di protezione per le gambe.
Per montare il cuscino riduttore della testa
occorre infilare le bretelle nelle asole del cuscino
come in figura. Applicare le protezioni delle spalle
aprendo il velcro.
9• Per montare il cuscinetto di protezione delle
gambe infilare la fibbia del cinturino spartigambe
nel cuscino come in figura.
MANIGLIONE
10• Il maniglione del seggiolino ha quattro regolazioni;
per inclinarlo premere i due pulsanti posti sul
maniglione e contemporaneamente, posizionarlo
nella posizione desiderata fino a sentire il click di
posizionamento.
Posizione A: è la posizione del maniglione in auto.
Posizione B: è la posizione del maniglione per il
•
IMPORTANTE: leggere attentamente queste
istruzioni e conservarle per un futuro utilizzo.
La sicurezza del bambino potrebbe essere messa
a rischio se non si seguono queste istruzioni.
• Peg Perego potrà apportare in qualunque
momento modifiche ai modelli descritti in questa
pubblicazione, per ragioni di natura tecnica o
commerciale.
Peg Perego S.p.A. è certificata ISO 9001
.
La certificazione offre ai clienti e
ai consumatori la garanzia di una
trasparenza e fiducia nel modo di lavorare
dell'impresa.
SERVIZIO ASSISTENZA
Se fortuitamente parti del modello vengono perse o
danneggiate, usare solo pezzi di ricambio originali
Peg Perego. Per eventuali riparazioni, sostituzioni,
informazioni sui prodotti, la vendita di ricambi
originali e accessori, contatta il Servizio Assistenza
Peg-Perego:
tel.:0039-039-60.88.213,
fax: 0039-039-33.09.992,
e-mail: assistenza@pegperego.it,
www.pegperego.com
La Peg Perego è a disposizione dei suoi Consumatori
per soddisfare al meglio ogni loro esigenza. Per
questo, conoscere il parere dei ns. Clienti, è per noi
estremamente importante e prezioso. Le saremo
quindi molto grati se, dopo aver utilizzato un
ns. prodotto, vorrà compilare il QUESTIONARIO
SODDISFAZIONE CONSUMATORE che troverà in
internet al seguente indirizzo: www.pegperego.com/
SSCo.html.it,
segnalando eventuali osservazioni o suggerimenti.
ISTRUZIONI D
ʼ
USO
PRIMO VIAGGIO CON BASE FISSA
Primo Viaggio Car Seat è il seggiolino per auto
Gruppo 0+, cioè per bambini di peso da 0-13 kg
(0-12/14 mesi).
•
Primo Viaggio Car Seat è il seggiolino auto con
Sistema Ganciomatic che gli permette di essere
agganciato e sganciato alla sua Base auto, ai
IT•ITALIANO
trasporto a mano e per l
ʼ
aggancio alla base, ai
passeggini e ai carrelli.
Posizione C: è la posizione che permette al
seggiolino di dondolare.
Posizione D: è la posizione che permette al
seggiolino di non dondolare.
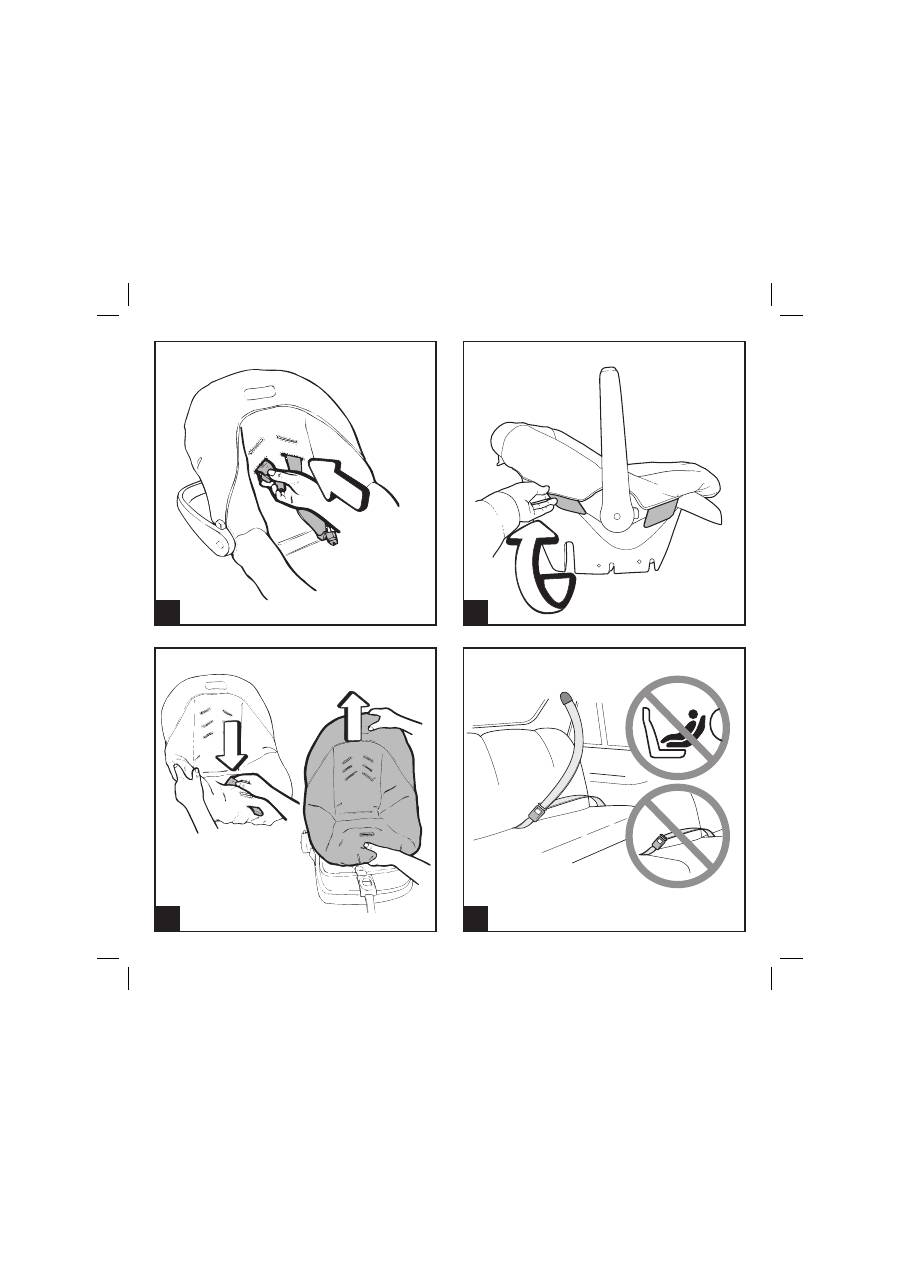
CAPOTTINA
11• Per montare la capottina ruotare il maniglione
indietro, posizionare i compassi della capottina
sul maniglione e agganciare i laccetti di tenuta dei
compassi come in figura. Per togliere la capottina,
agire in senso contrario.
12• La capottina può essere regolata in due posizioni,
per alzarla o abbassarla premere con entrambe le
mani verso l
ʼ
interno i compassi della capottina e
contemporaneamente spostarla in sù o in giù fino
allo scatto successivo.
SFODERABILITÁ
13• Per sfoderare il seggiolino, togliere la capottina,
sganciare e sfilare dal retro la cintura di sicurezza
dalla sacca.
14• Sfilare le alette di fissaggio della sacca da sotto il
seggiolino.
15• Sfilare la fibbia del cinturino spartigambe
dall
ʼ
asola della sacca.
•
È possibile lavare la capottina senza smontarla,
perchè le parti che la compongono sono in
plastica.
ISTRUZIONI D
ʼ
USO IN AUTO
IMPORTANTE:
16• Il seggiolino “Primo viaggio”con base fissa
può essere fissato sul sedile anteriore se è
sprovvisto di AIRBAG o sul sedile posteriore.
É consentito agganciare il seggiolino solo con
la cintura auto a tre punti (come disegno). Non
è consentito agganciare il seggiolino con la
cintura auto a due punti/addominale perchè
non permette la sicurezza del seggiolino.
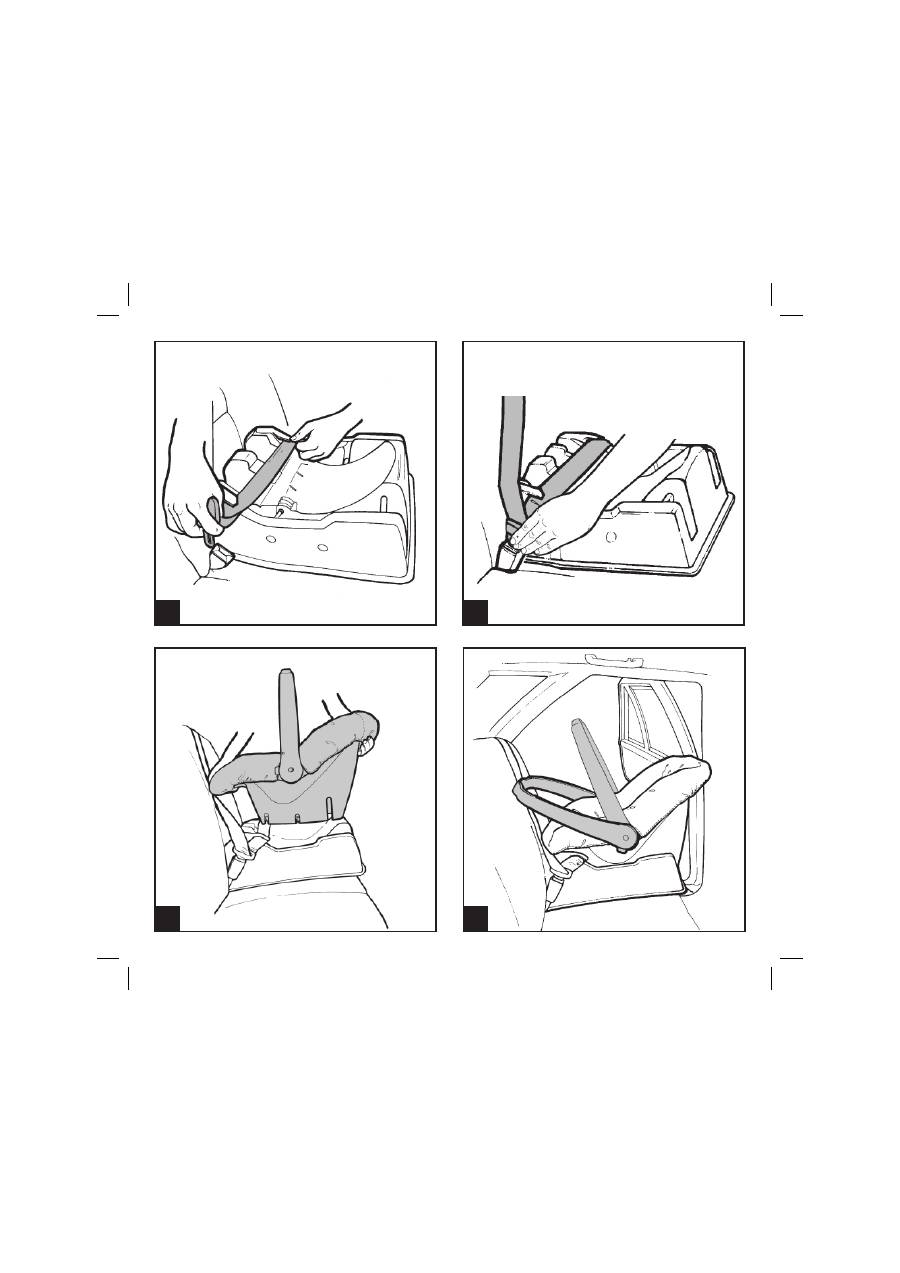
SEQUENZA DI POSIZIONAMENTO DELLA BASE FISSA
IN AUTO
17• Posizionare la base sul sedile e tirare la cintura di
sicurezza dell
ʼ
auto facendola passare nelle due
guide laterali tenendola ben tesa.
18• Agganciare la cintura dell
ʼ
auto.
SEQUENZA DI POSIZIONAMENTO DEL SEGGIOLINO
SULLA BASE FISSA IN AUTO
19• In auto il seggiolino deve essere installato in
senso contrario rispetto alla direzione di marcia.
Impugnare il seggiolino e agganciarlo alla base
premendo con entrambe le mani sul prodotto fino
al click.
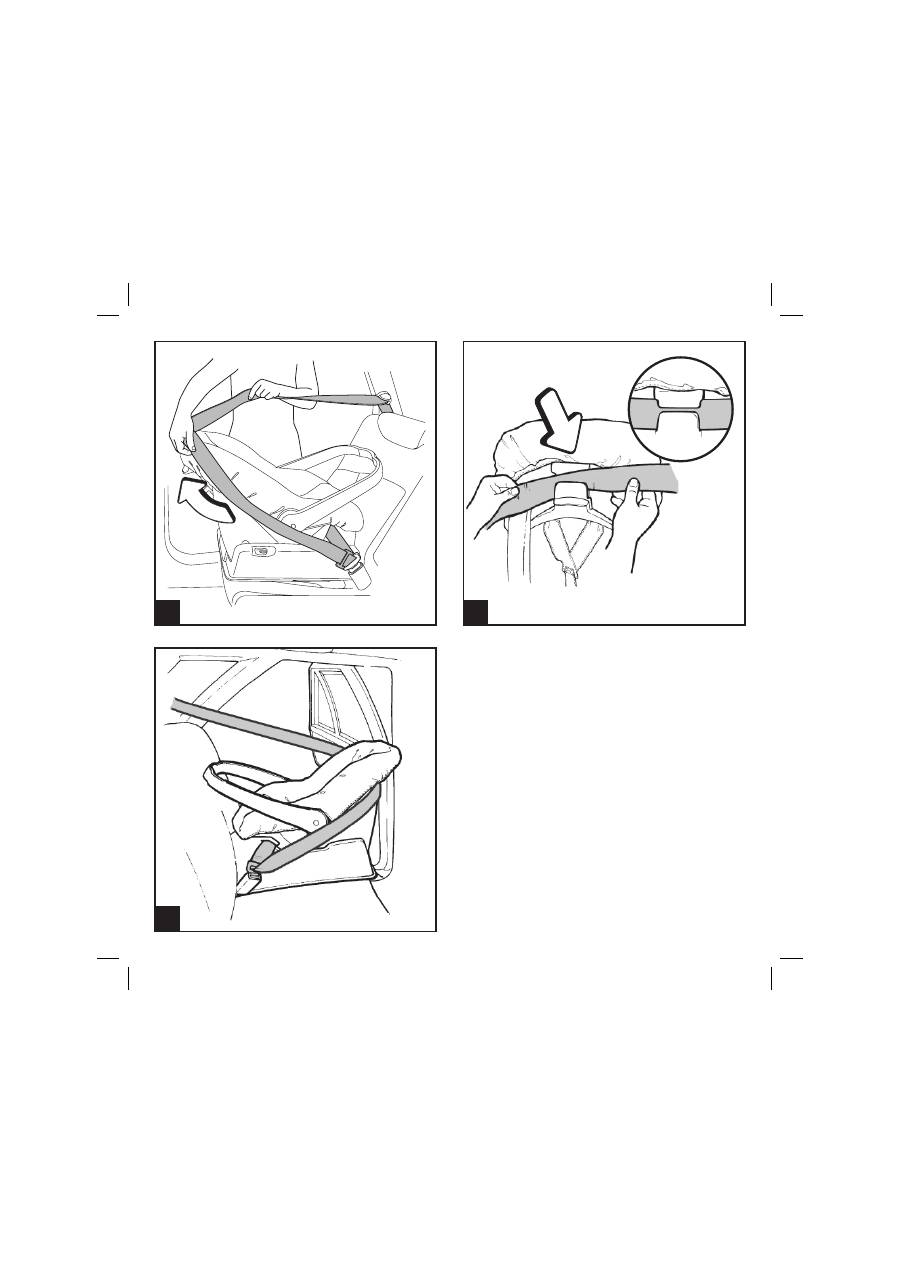
20• In auto il maniglione deve essere assolutamente
abbassato come in figura. Posizionando il
maniglione in avanti, assicurarsi del giusto
posizionamento dal “click”.
21• Impugnare nuovamente la cintura di sicurezza
dell
ʼ
auto e farla passare dietro lo schienale.
22• Inserire la cintura nella guida dietro lo schienale,
come in figura.
23• Verificare che la cintura risulti ben tesa e bloccata
per offrire un
ʼ
adeguata sicurezza.
•
Per togliere il seggiolino dall
ʼ
auto levare la cintura
di sicurezza dell
ʼ
auto dal retro del seggiolino,
reclinare il maniglione in posizione retta fino al
“click” e sganciare il seggiolino dalla base. La
base rimane in auto agganciata, pronta all
ʼ
uso.
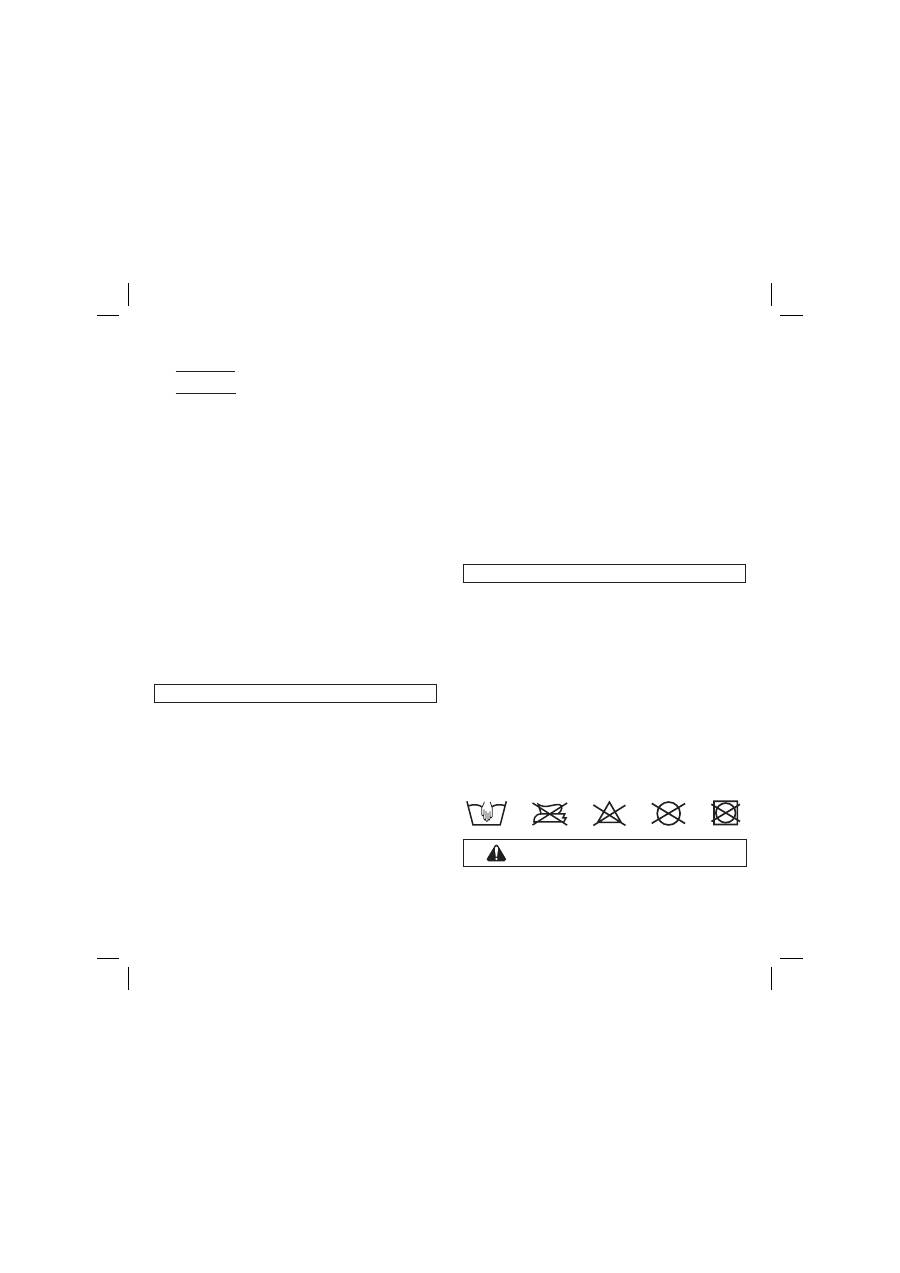
PULIZIA E MANUTENZIONE
Il vostro prodotto necessita un minimo di
manutenzione. Le operazioni di pulizia e
manutenzione devono essere effettuate solo da adulti.
• Si raccomanda di tenere pulite tutte le parti in
movimento e se occorre, lubrificarle con olio
leggero.
• Periodicamente pulire le parti in plastica con un
panno umido, non usare solventi o altri prodotti
simili.
• Spazzolare le parti in tessuto per allontanare la
polvere.
• Non pulire il dispositivo di assorbimento d
ʼ
urto in
polistirolo con solventi o altri prodotti simili.
• Proteggere il prodotto da agenti atmosferici, acqua,
pioggia o neve; l
ʼ
esposizione continua e prolungata
al sole potrebbe causare cambiamenti di colore in
molti materiali.
• Conservare il prodotto in un posto asciutto.
ATTENZIONE
• IMPORTANTE AVVISO DI PERICOLO: IL SEGGIOLINO-
AUTO NON E
ʼ
AMMESSO SU SEDILE DOTATO DI
AIRBAG.
• QUESTO SEGGIOLINO DI SICUREZZA AUTO GRUPPO
0+ DEVE SEMPRE ESSERE INSTALLATO IN SENSO
CONTRARIO RISPETTO ALLA DIREZIONE DI MARCIA.
• UTILIZZARE SEMPRE LE CINTURE DI SICUREZZA DEL
SEGGIOLINO E VERIFICARE CHE IL BAMBINO NON
SGANCI DA SOLO LA CINTURA.
• QUESTO PRODOTTO NON É STATO PROGETTATO
PER FARE DORMIRE IL BAMBINO.
• PER EVITARE IL RISCHIO DI CADUTA, IL BAMBINO
DEVE ESSERE SEMPRE LEGATO CON LA CINTURA DI
SICUREZZA.
• NELL
ʼ
AGGANCIARE LA BASE E IL SEGGIOLINO FAR
PASSARE LA CINTURA DELLA VETTURA A TRE PUNTI
NELLE SEDI APPOSITE.
• L
ʼ
AGGANCIO IN AUTO DI QUESTO SEGGIOLINO É
CONSENTITO SOLO CON CINTURE DI SICUREZZA A
TRE PUNTI, NON É CONSENTITO USARE LA CINTURA
A DUE PUNTI O ADDOMINALE (vedi Norme di
Sicurezza).
• SE LA VETTURA É IN MOVIMENTO, NON TOGLIERE
MAI IL BAMBINO DAL SEGGIOLINO DI SICUREZZA
AUTO.
• NON LASCIARE MAI INCUSTODITO IL VOSTRO
BAMBINO.
• NON LASCIARE IL SEGGIOLINO DI SICUREZZA PER
AUTO NELLA VETTURA SOTTO L
ʼ
ESPOSIZIONE
DEL SOLE. PRIMA DI COLLOCARE IL BAMBINO,
CONTROLLARE, PERCHÉ ALCUNE PARTI POTREBBERO
ESSERSI SURRISCALDATE.
• NON COLLOCARE MAI IL SEGGIOLINO DI SICUREZZA
PER AUTO SU SUPERFICI ALTE (tavoli, ripiani) SU
SUPERFICI MORBIDE (letti, divani) O SU SUPERFICI
INCLINATE.
• L
ʼ
UTILIZZO DEL SEGGIOLINO DI SICUREZZA AUTO
PER NEONATI PREMATURI POTREBBE COMPORTARE
AL NEONATO PROBLEMI DI RESPIRAZIONE
STANDO SEDUTI NEL SEGGIOLINO. É OPPORTUNO
CONSULTARE IL MEDICO PRIMA DI LASCIARE
L
ʼ
OSPEDALE.
• LE OPERAZIONI DI MONTAGGIO E/O ASSEMBLAGGIO
DEVONO ESSERE EFFETTUATE DA ADULTI.
• NON UTILIZZARE ACCESSORI CHE NON SIANO
APPROVATI DAL COSTRUTTORE O DALLE
COMPETENTI AUTORITÀ.
• EVITARE DI INTRODURRE LE DITA NEI MECCANISMI.
• NON EFFETTUARE MODIFICHE AL PRODOTTO E NON
UTILIZZARE IL PRODOTTO SE PRESENTA ROTTURE O
PEZZI MANCANTI.
• PER EVENTUALI RIPARAZIONI, SOSTITUZIONI DI PEZZI
E INFORMAZIONI SUL PRODOTTO, CONTATTARE
IL SERVIZIO ASSISTENZA POST-VENDITA. LE VARIE
INFORMAZIONI SONO ALL
ʼ
ULTIMA PAGINA DI
QUESTO MANUALE.
• NON UTILIZZARE IL SEGGIOLINO DI SECONDA
MANO, PERCHÈ POTREBBE AVERE SUBITO DEI DANNI
STRUTTURALI ESTREMAMENTE PERICOLOSI.
• NON UTILIZZARE IL SEGGIOLINO CON ETÀ SUPERIORE
AI CINQUE ANNI DALLA DATA DI PRODUZIONE
INDICATA SULLA SCOCCA, PERCHÈ POTREBBE NON
ESSERE PIÙ CONFORME AI SENSI DI NORMA.
• NON STACCARE LE ETICHETTE ADESIVE E CUCITE,
PERCHÈ SONO DI NORMATIVA E POTREBBERO
RENDERE IL PRODOTTO NON CONFORME AI SENSI DI
NORMA.
NORME DI SICUREZZA
• Seggiolino di sicurezza per auto, Gruppo 0+,
categoria “Universale” omologato secondo la
Normativa Europea ECE R44/03 per bambini di peso
da 0-13 kg (0-12/14 mesi). Adatto all
ʼ
impiego
generale nei veicoli e compatibile con la maggior
parte, ma non tutti i sedili di veicolo.
• Il seggiolino di sicurezza per auto può essere
correttamente installato se nel manuale d
ʼ
uso e
manutenzione del veicolo è indicata la compatibilità
di quest
ʼ
ultimo con sistemi di ritenuta “Universali” di
gruppo 0+.
• Primo Viaggio Car Seat è classificato “Universale”
secondo criteri di omologazione più severi
rispetto ai modelli precedenti che non dispongono
delll
ʼ
etichetta di omologazione.
• Il seggiolino di sicurezza per auto puó essere
utilizzato solo su veicoli approvati, dotati di cintura
a tre punti statica o con avvolgitore, omologati
secondo il regolamento UN/ECE n°16 o normative
equivalenti.
• In caso di dubbi, rivolgersi al costruttore o al
rivenditore di Primo Viaggio Car Seat.
• Assicurarsi che la cintura a tre punti del veicolo per
fissare la base e il seggiolino al veicolo sia sempre
tesa e non attorcigliata.
• Si raccomanda di sostituire il seggiolino e la cintura
a tre punti del veicolo nel caso di sollecitazioni
eccessive dovute ad un incidente.
• Regolare la cintura del seggiolino, assicurandosi che
lo spartigambe sia ben teso e aderente al corpo del
bambino senza stringerlo troppo.
• Seguire scrupolosamente le istruzioni fornite dal
fabbricante del sistema di tenuta del bambino.
• In auto prestare particolare attenzione a bagagli che
possono causare lesioni al bambino nel seggiolino
in caso di incidente.
• Si raccomanda di non utilizzare il seggiolino senza
il rivestimento di tessuto, tale rivestimento non
puó essere sostituito da uno non approvato dal
costruttore in quanto costituisce parte integrante del
seggiolino.
COME LEGGERE L
ʼ
ETICHETTA DI OMOLOGAZIONE
In questo paragrafo vi spieghiamo come leggere
l
ʼ
etichetta di omologazione (etichetta arancione).
• In alto all
ʼ
etichetta c
ʼ
è il marchio dell
ʼ
azienda
produttrice e il nome del prodotto.
• La scritta UNIVERSAL indica la compatibilità del
seggiolino di sicurezza auto su veicoli approvati,
dotati di cintura a tre punti statica o con avvolgitore,
omologati secondo il regolamento UN/ECE n°16 o
normative equivalenti.
• La lettera E in un cerchio indica il marchio di
omologazione Europea e il numero definisce il paese
che ha rilasciato l
ʼ
omologazione (1:Germania, 2:
Francia, 3:Italia, 4:Paesi Bassi, 11:Gran Bretagna e
13:Lussemburgo).
• Più sotto si trova il numero di omologazione, se
inizia con 03 vuol dire che è il terzo emendamento
della legge R44.
• Il numero progressivo di produzione, dal rilascio
dell
ʼ
omologazione, personalizza ogni seggiolino;
ognuno è contraddistinto dal proprio numero.
• Infine viene menzionata la normativa di riferimento:
ECE R44/03.
•
IMPORTANT: carefully read instructions and keep
for future use.
The child
ʼ
s safety could be put at risk if the
instructions are not followed.
• PEG PEREGO reserves the right to make any
necessary changes or improvements to the products
shown at any time without notice.
Peg Perego S.p.A. is an ISO 9001 certified
company.
The fact that we are certified provides
a guarantee of our honesty for our
customers, and fosters trust in the
company
ʼ
s way of working.
CUSTOMER SERVICE
If parts of the model are accidentally lost or damaged,
use only original Peg Perego spare parts. Contact
the Peg Perego Customer Service for all repair work,
replacements, information about products, and sale of
original spare parts and accessories, at the following:
tel.: 0039-039-60.88.213
fax: 0039-039-33.09.992
e-mail: assistenza@pegperego.it,
www.pegperego.com
Peg Perego is at the consumer's service, meeting
every need in the best way possible. This is why our
customers' opinions are so important and valuable
to us. We would be very grateful if you would kindly
fill in the CUSTOMER SATISFACTION QUESTIONNAIRE
after using one of our products. You will find the
questionnaire on the Internet at "www.pegperego.
com/SSCo.html.en-UK".
Please note any observations or suggestions you may
have on the questionnaire.
INSTRUCTIONS FOR USE
PRIMO VIAGGIO WITH FIXED BASE
The "Primo Viaggio" car seat has been designed
for Group 0+, or children weighing from 0 - 13
kg. (0 - 12/14 months of age).
•
The "Primo Viaggio" car seat has a Ganciomatic
system, which allows fastening and removing the
seat from its car base and Peg Perego strollers
and baby carriages, with a simple flick of the
hand.
EN•ENGLISH

1• To fasten the child car seat to the base, line up
the hooks and push down with both hands until
the seat clicks into place.
2• To remove the child car seat, pull the handle on
the backrest upwards and lift the seat.
SAFETY BELT
3• To fasten the safety belt, cross the two straps and
click the tabs into the buckle.
4• To loosen the safety belt, press the red button on
the buckle.
5• The child car seat is equipped with three notches
for adjusting the level of the safety belt to match
the child's height. The safety belt should be
neither too high nor too low in relation to the
child's shoulders. In the correct position, the
child's shoulders should be just above the notch.
6• To change the height of the safety belt, loosen
it and slip the straps out of the notches on the
back. Insert the straps into the appropriate
notches for the child's height.
7• To adjust the safety belt to a looser position, slip
a finger into the opening in the seat, and press
the metal button while pulling the straps upwards
with the other hand, as shown in the figure. To
tighten the safety belt so that it fits the child
snuggly, pull the belt towards you, as shown in
the figure. Be careful not to tighten the belt too
much; leave a slight amount of play in the belt.
PADDING
8• A pillow for the child's head, two shoulder pads,
and a protective cushion for the child's legs are
provided with the car seat. Insert the pillow by
slipping the straps through the openings in the
pillow as shown in the figure. Attach the shoulder
pads using the Velcro fasteners.
9• Position the protective leg cushion by slipping the
seat strap with the buckle through the cushion, as
shown in the figure.
REGULATOR HANDLE
10• The car seat regulator handle has four positions.
To incline the seat, press the two buttons on the
handle and simultaneously adjust the seat until it
clicks into the desired position.
Position A: Set the handle to this position when
the child car seat is mounted in the car.
Position B: Set the handle to this position when
carrying the child car seat by hand or while
attaching it to its base, to a stroller, or to a baby
carriage.
Position C: Set the handle to this position to allow
the car seat to rock.
Position D: Set the handle to this position to
prevent the child car seat from rocking.
HOOD
11• To fit the hood, push the handle rearwards, place
the hood adjusting couplings onto the handle,
then tie up the fastening strings as shown in the
figure. To remove the hood, reverse operations.
12• The hood can be adjusted to two positions: To
raise or lower it, push on the inner sides of the
adjusting couplings and bring the hood up or
down till the next click.
REMOVABLE LINING
13• To remove the lining from the car seat, detach the
hood. Unfasten the safety belt and slip it out of
the sack at the back.
14• Slip the fastener tabs on the sack out from under
the car seat.
15• Slip the leg-divider belt buckle out of the opening
in the sack.
•
The hood is made of plastic, and can be washed
without being removed.
INSTRUCTIONS FOR USE IN THE VEHICLE
IMPORTANT:
16•
The “Primo Viaggio” car seat with a fixed base
can be fastened to the front seat if there is no
AIRBAG or to the back seat.
The seat may be fastened using only three-
point safety belts (see figure). It is forbidden
to use a two-point or abdominal safety belt to
attach the child car seat, since these belts do
not guarantee the child's safety.
STEPS FOR PLACING THE FIXED BASE IN THE CAR
17•
Place the child car seat base on the seat of the
car. Pull the car safety belt through the two side
slits, taking care to keep the belt taut.
18•
Fasten the car safety belt.
STEPS FOR PLACING THE CAR SEAT ON THE FIXED
BASE IN THE CAR
19•
The child car seat must be mounted facing
backwards in relation to the direction the car
travels. Using both hands, place the car seat on
its base and press downwards until it clicks into
place.
20•
The regulator handle must be lowered to the last
position when the seat is mounted in the car, as
shown in the figure. Make sure the handle is in
the correct position by moving it forward until it
clicks.
21•
Pass the car safety belt behind the backrest on
