Acer AO533: Environment
Environment: Acer AO533
Table of contents

Series
Environment
Temperature:
Operating: 5 °C to 35 °C
Non-operating: -20 °C to 65 °C
Humidity(non-condensing):
Operating: 20% to 80%
Non-operating: 20% to 80%
7

Gamme
Guide rapide

Gamme
Guide rapide
Gamme
Guide rapide
© 2010 Tous droits réservés
Guide rapide de la gamme Aspire One
Première publication : 04/2010
Ordinateur notebook de la gamme Aspire One
Numéro de modèle : ___________________________
Numéro de série : ______________________________
Date d'achat : _________________________________
Lieu d'achat : __________________________________

Gamme
Guide rapide
Gamme
Guide rapide
Federal Communications Commission
Declaration of Conformity
This device complies with Part 15 of the FCC Rules. Operation is subject to the following two conditions: (1) this device may not
cause harmful interference, and (2) this device must accept any interference received, including interference that may cause
undesired operation.
The following local Manufacturer/Importer is responsible for this declaration:
Product name: Notebook PC
Brand: Acer
Model number: PAV01
Machine type:
Aspire one series; AO533 series
Name of Responsible Party: Acer America Corporation
Address of responsible party: 333 West San Carlos St., San Jose
CA 95110, U. S. A.
Contact person: Acer Representative
Phone No.: 1-254-298-4000
Fax No.: 1-254-298-4147
April 23, 2010

Gamme
Guide rapide
Gamme
Guide rapide
CE Declaration of Conformity
We,
Acer Incorporated
8F, 88, Sec. 1, Hsin Tai Wu Rd., Hsichih, Taipei Hsien 221, Taiwan
Contact Person: Mr. Easy Lai, e-mail:easy_lai@acer.com.tw
And,
Acer Europe SA
Via Cantonale, Centro Galleria 2 6928 Manno Switzerland
Hereby declare that:
Product: Notebook Computer
Trade Name: Acer
Model Number: PAV01
Machine Type: Aspire one series; AO533 series
Is compliant with the essential requirements and other relevant provisions of the following EC directives, and that all the
necessary steps have been taken and are in force to assure that production units of the same product will continue comply with
the requirements.
R&TTE Directive 1999/5/EC as attested by conformity with the following harmonized standard:
• Article 3.1(a) Health and Safety
-. EN60950-1
-. EN62311
• Article 3.1(b) EMC
-. EN301 489-1
-. EN301 489-3 (Applicable to non-bluetooth wireless keyboard mouse set).
-. EN301 489-7
-. EN301 489-17
-. EN301 489-24

Gamme
Guide rapide
Gamme
Guide rapide
• Article 3.2 Spectrum Usages
-. EN300 440-2 (Applicable to non-bluetooth wireless keyboard mouse set).
-. EN300 328
-. EN301 511
-. EN301 893 (Applicable to 5GHz high performance RLAN).
-. EN301 908-1
-. EN301 908-2
EMC Directive 2004/108/EC as attested by conformity with the following harmonized standards:
-. EN55022, AS/NZS CISPR22, Class B
-. EN55024
-. EN61000-3-2 Class D
-. EN61000-3-3
Low Voltage Directive 2006/95/EC as attested by conformity with the following harmonized standard:
-. EN60950-1
RoHS Directive 2002/95/EC on the Restriction of the Use of certain Hazardous Substances in Electrical and Electronic Equipment
-. The maximum concentration values of the restricted substances by weight in homogenous material are:
Lead
0.1%
Polybrominated Biphenyls (PBB’s)
0.1%
Mercury
0.1%
Polybrominated Diphenyl Ethers (PBDE’s)
0.1%
Hexavalent Chromium
0.1%
Cadmium
0.01%
Directive 2009/125/EC with regard to establishing a framework for the setting of ecodesign requirements for energy-related
product.
Year to begin affixing CE marking 2010.
Apr. 23, 2010
Easy Lai /Manager
Regulation Center, Acer Inc.
Date

Gamme
Guide rapide
Gamme
Guide rapide
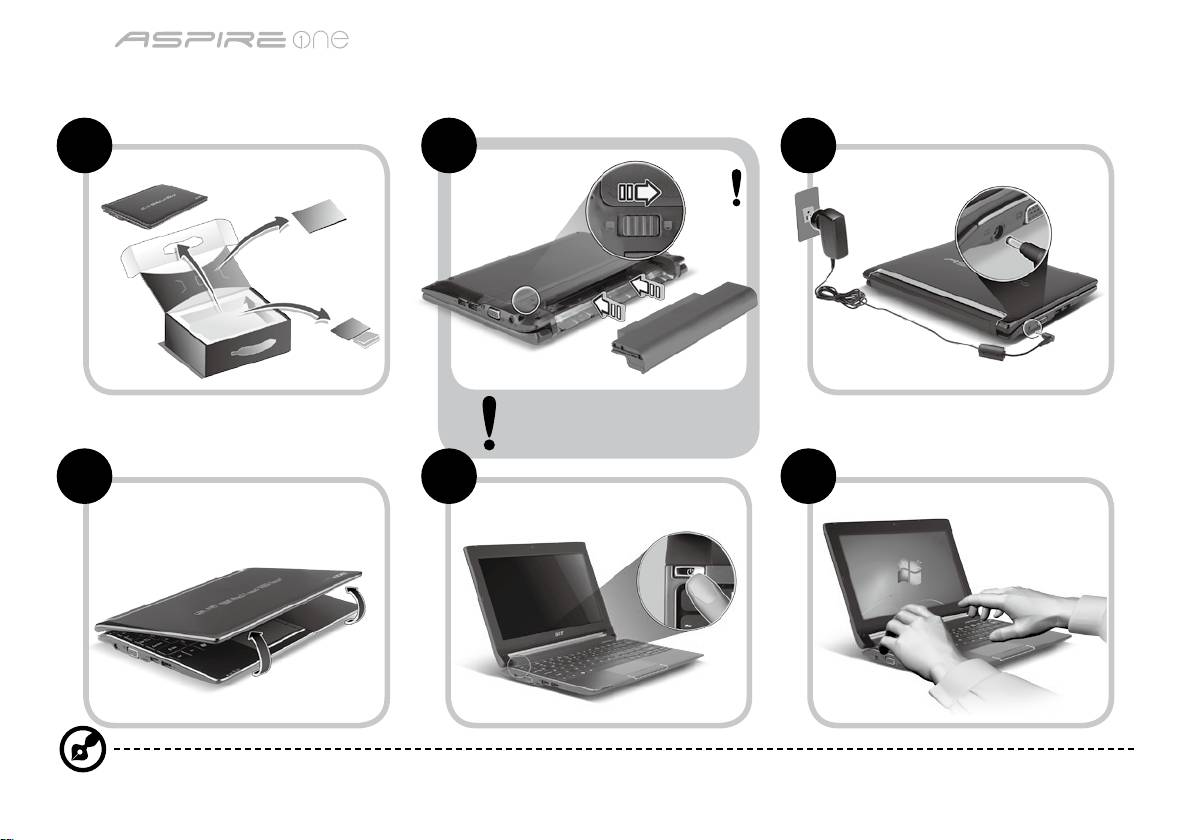
Pour partir du bon pied
1 2 3
2-2
3-2
3-1
2-1
Assurez que la batterie est
correctement verrouillée en
place, comme illustré à 2-2.
4 5 6
Les illustrations sont mises uniquement à titre de référence. Les caractéristiques réelles des produits peuvent changer.
1

Gamme
Guide rapide
Gamme
Guide rapide
Pour commencer
Nous désirons vous remercier d’avoir fait d’un notebook Acer votre choix pour répondre à vos besoins informatiques mobiles.
Vos guides
Pour vous aider à utiliser votre notebook Acer, nous avons conçu plusieurs guides* :
Tout d’abord, le Guide rapide vous aide à configurer votre ordinateur.
Pour plus d’information sur l’aide que peut vous apporter votre ordinateur pour être plus productif, veuillez vous reporter
au Guide utilisateur AcerSystem. Ce guide contient des informations détaillées sur des sujets tels que les utilitaires systèmes,
la récupération des données, les options d’extension et le dépannage. De plus, il contient des informations de garantie et les
réglementations générales et les avis de sécurité pour votre notebook. Il est disponible au format PDF (Portable Document
Format) et est préchargé sur votre notebook.
Remarque : L'affichage du fichier nécessite Adobe Reader. Si Adobe Reader n’est pas installé dans votre ordinateur, le clic
sur Guide utilisateur AcerSystem va exécuter le programme d’installation d’Adobe Reader. Suivez les instructions à l’écran
pour terminer l’installation. Pour des instructions sur l’utilisation de Adobe Reader, accédez au menu Aide et Support.
* AVIS IMPORTANT : Veuillez noter que les guides mentionnés ici, que ce soit imprimés ou au format électronique, sont
pour votre référence seulement et à l’exception de ce qui est indiqué dans les informations spécifiques à la garantie
contenue dans AcerSystem User Guide, rien de ce qui est contenu dans ces guides ne constitue une déclaration ou
garantie par Acer en ce qui concerne le produit que vous avez acheté. Acer rejette expressément toute responsabilité
pour les erreurs contenues dans les guides.
2

Gamme
Guide rapide
Gamme
Guide rapide
Configuration réseau
Ce guide vous aide à configurer les paramètres de votre réseau local et de votre réseau sans fil pour pouvoir vous connecter à
Internet.
Configurer la connexion réseau
Branchez simplement le câble réseau dans le port Ethernet RJ-45. Veuillez vous reporter « Vue droite » à la page 6 pour
l’emplacement du port Ethernet.
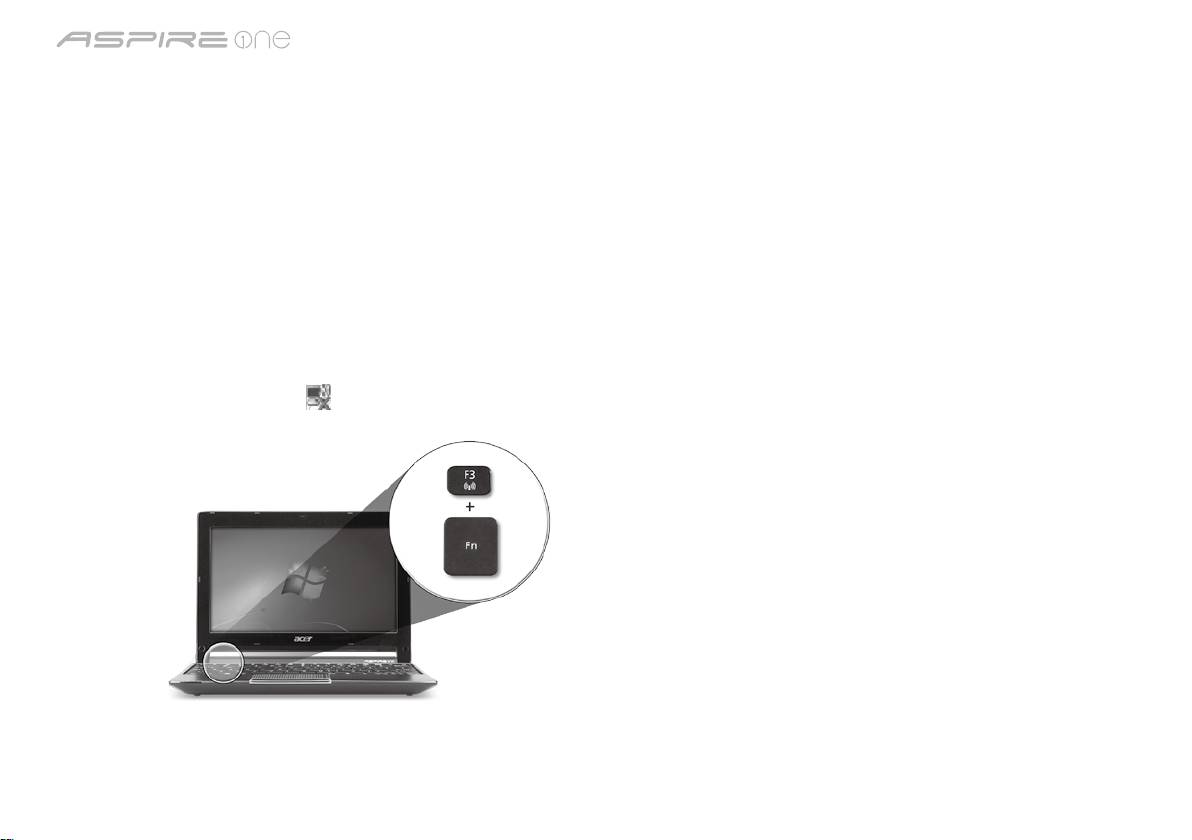
Configurer une connexion sans fil
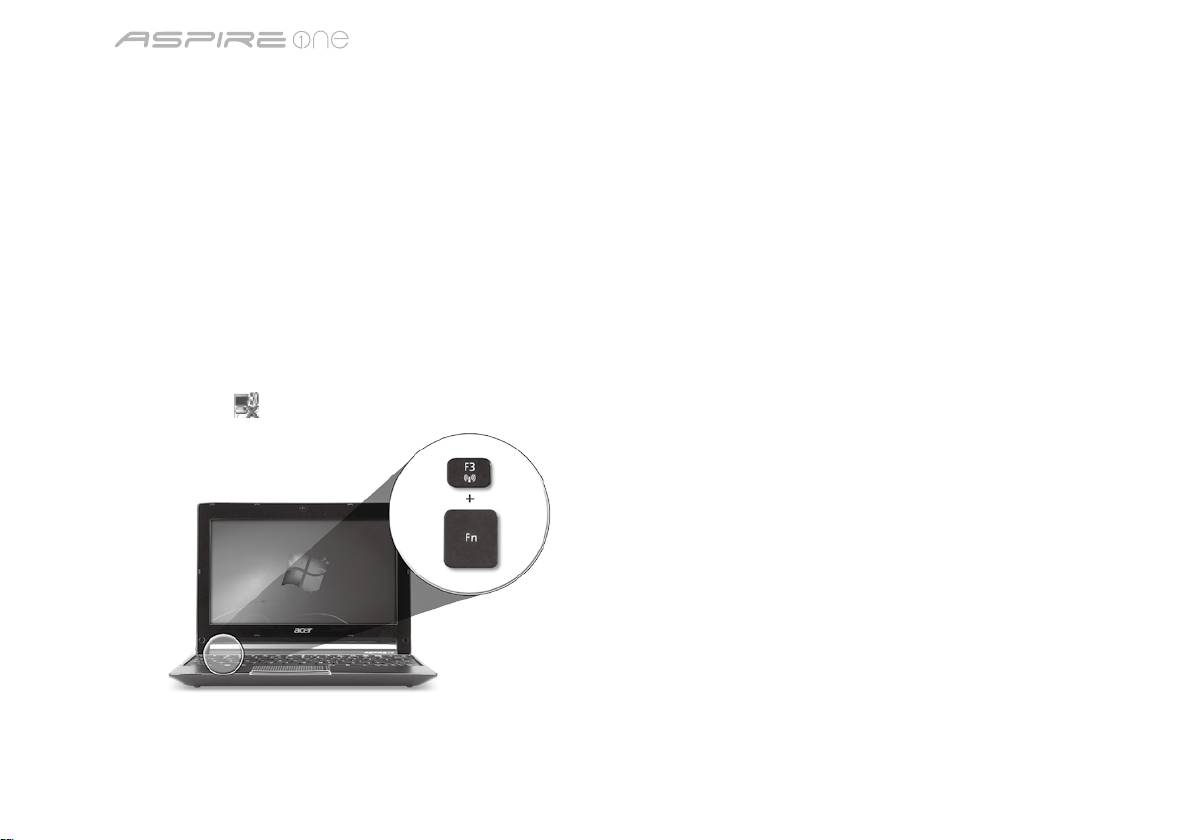
1. Appuyez <Fn> + <F3> pour accéder au gestionnaire de communication Ici vous pouvez activer la connexion Wi-Fi en cliquant
sur le bouton rouge à côté de Wi-Fi.
Remarque : 3G et Bluetooth sont également accessibles via le gestionnaire de communication. Les périphériques de
communication varient en fonction du modèle.
2. Cliquez sur l’icône
sur votre barre des tâches et choisissez le point d’accès sans fil auquel vous souhaitez vous connecter.
Insérer une carte SIM 3G (seulement pour certains modèles)
Retirez la batterie et insérez avec soin une carte SIM 3G dans le connecteur de carte SIM 3G. Veuillez consulter « Vue arrière &
Vue de la base » à la page 6 pour l’emplacement du connecteur de carte SIM 3G.
3
Gamme
Guide rapide
Gamme
Guide rapide
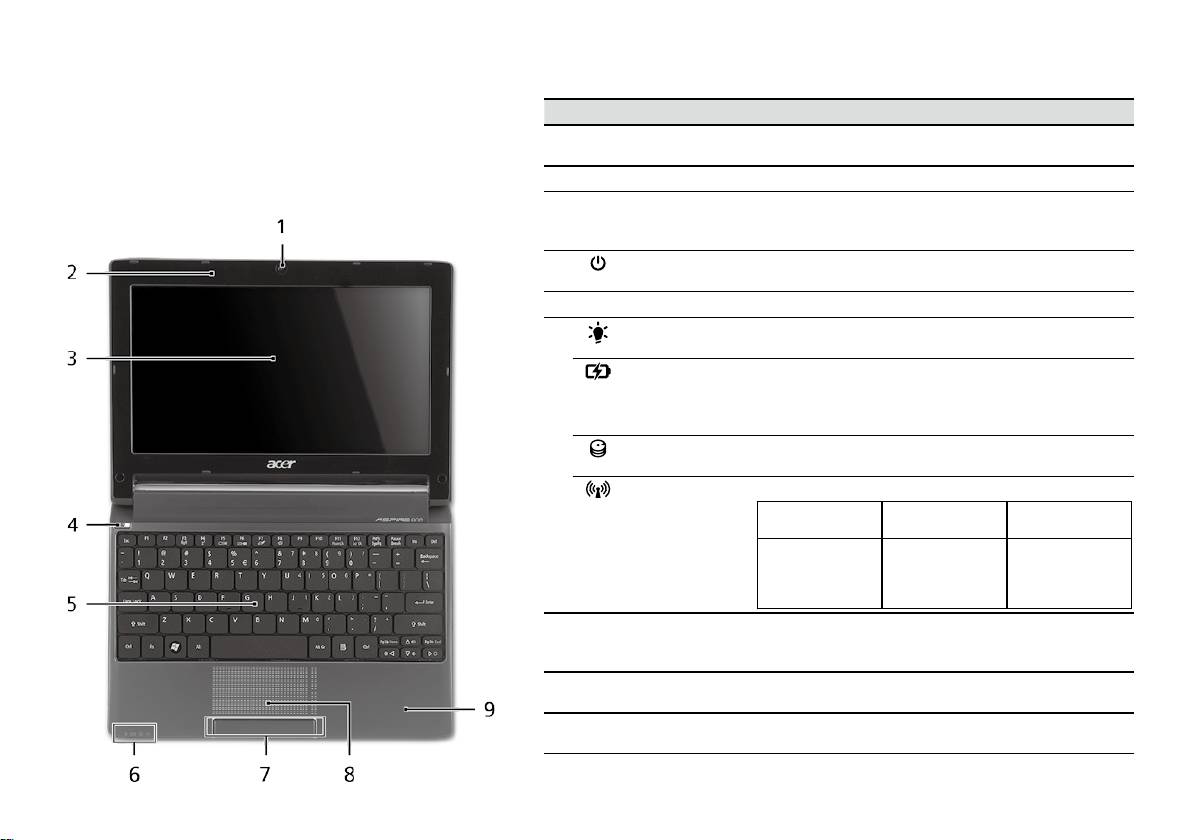
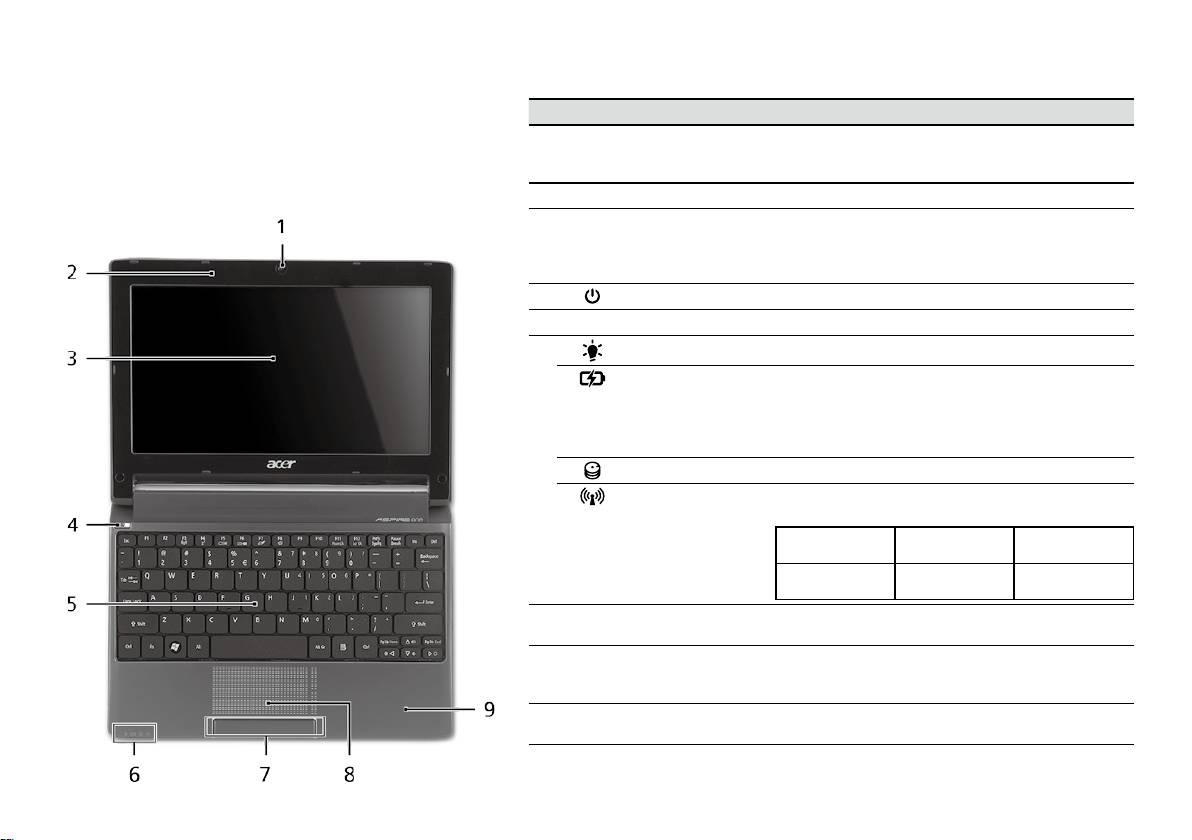
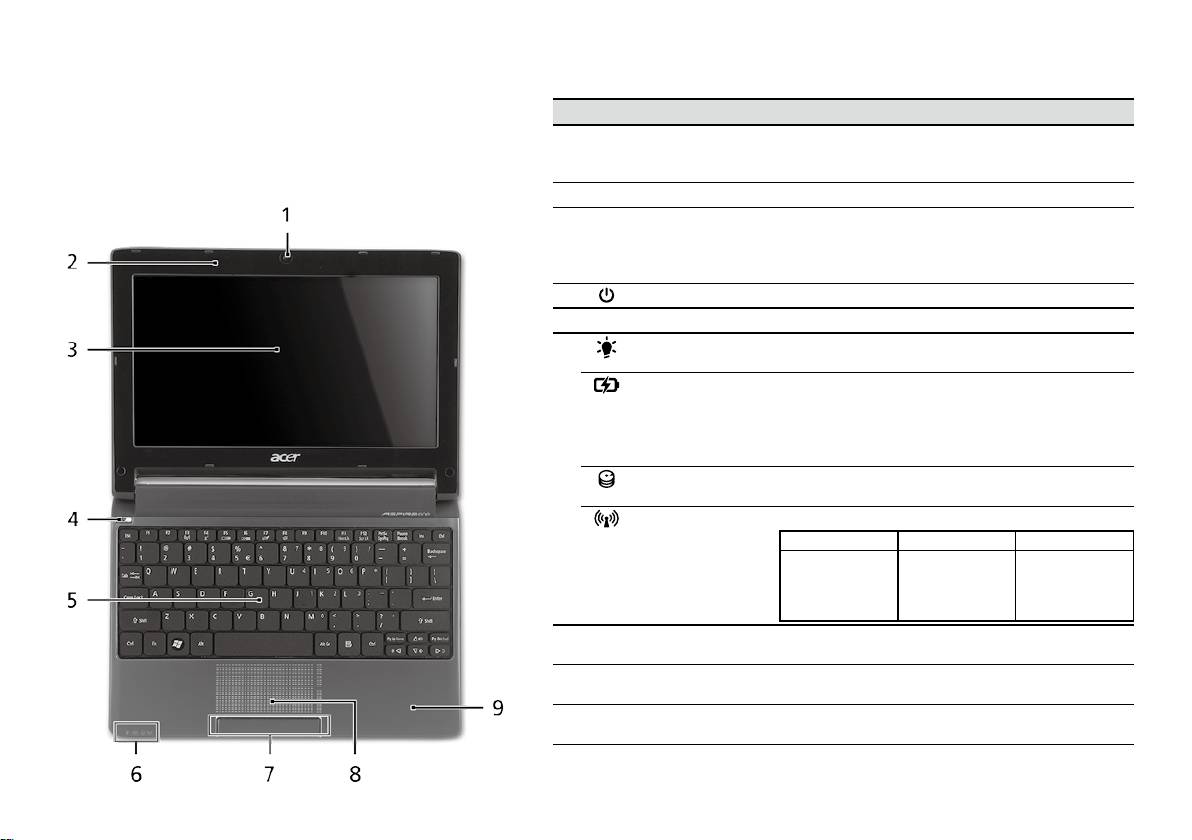
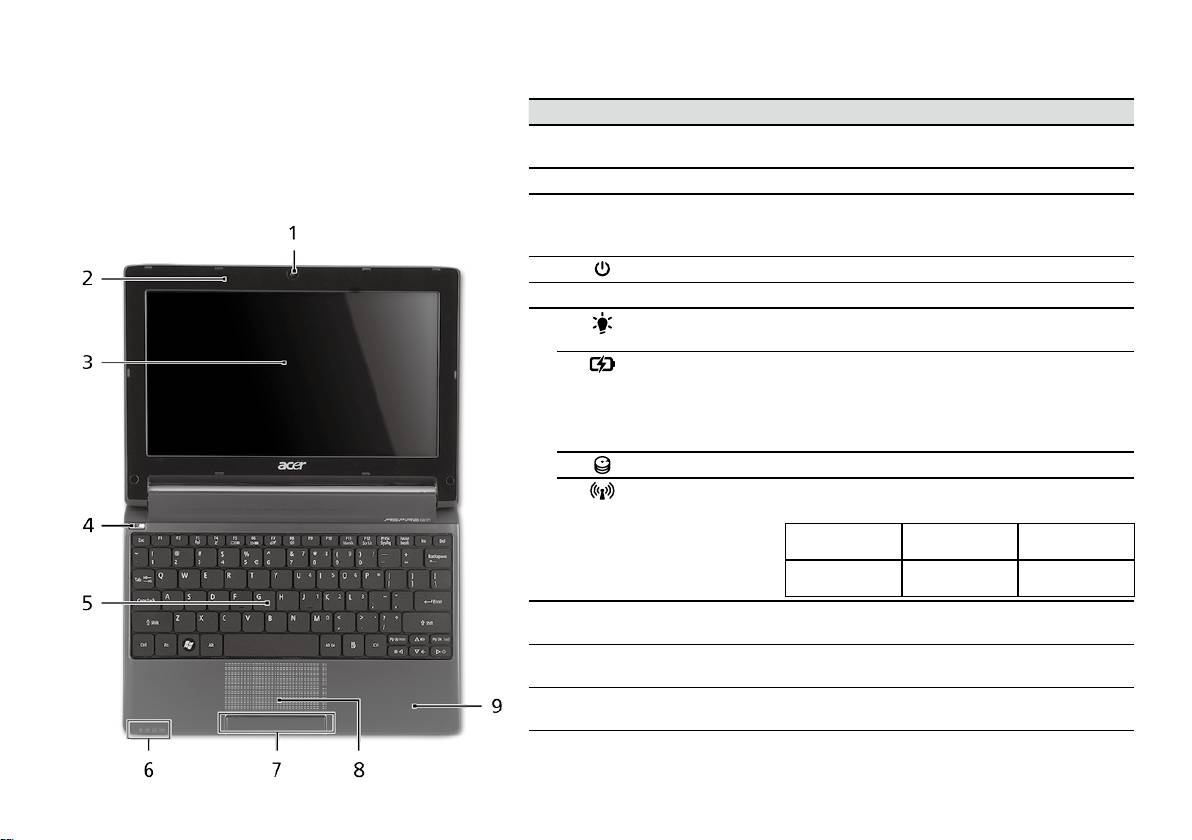
Vue supérieure
Visite guidée de votre
# Icône Élément Description
Aspire One
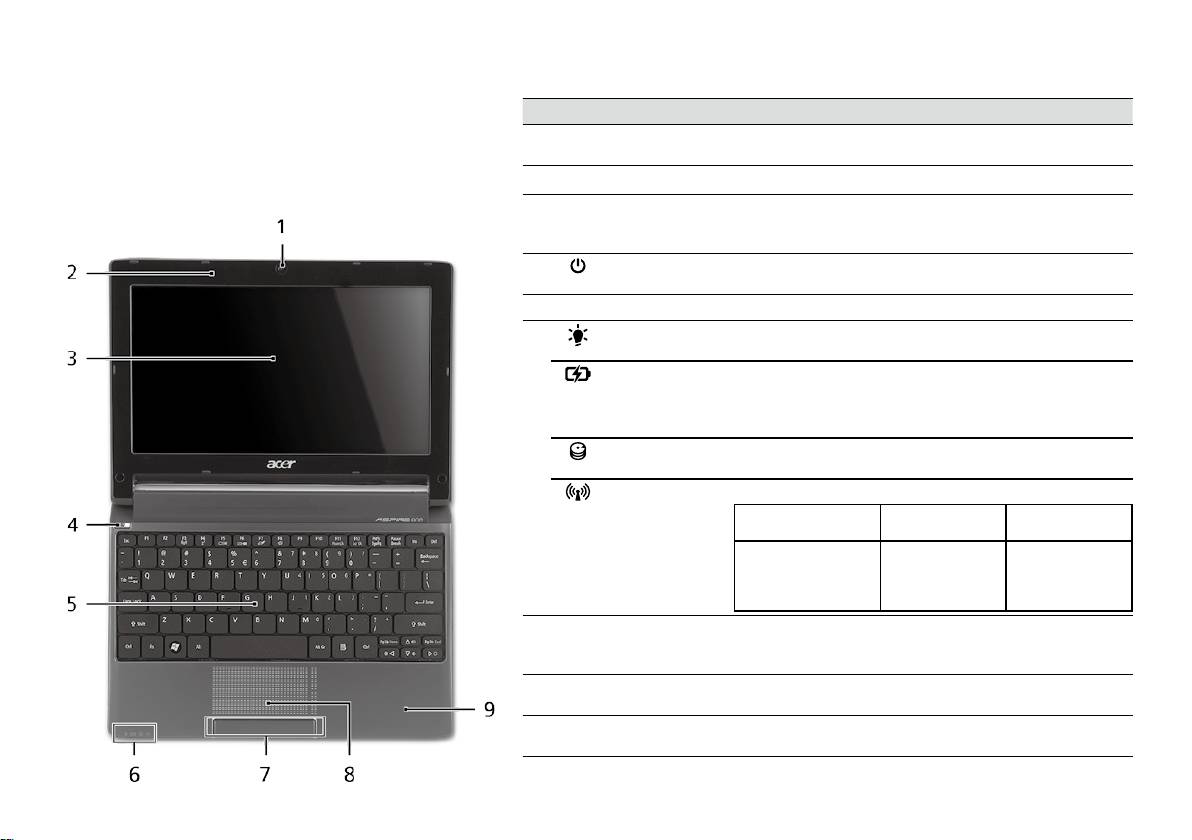
1
Webcam
Webcam pour communication video (la configuration
Acer Crystal Eye
peut varier en fonction des modèle).
Après avoir configuré votre ordinateur comme illustré
la section Pour partir du bon pied, nous allons vous
2
Microphone Microphone interne pour l’enregistrement sonore.
faire explorer votre nouveau notebook Acer.
3
Écran d’affichage Également appelé écran LCD (Liquid Crystal Display),
affiche les données de l’ordinateur (la configuration
peut varier en fonction des modèle).
4
Bouton
Met l’ordinateur sous tension et hors tension.
Marche/Arrêt
5
Clavier Pour l’entrée des informations dans votre ordinateur.
6
Indicateur
Indique l’état d’alimentation de l’ordinateur.
1
d’alimentation
Indicateur de
Indique l’état de la pile de l’ordinateur.
1
batterie
1. Charge : La lumière est orange lorsque la pile se
recharge.
2. Pleine charge : La diode est bleue en mode secteur.
Indicateur du
Indique l’activité du disque dur.
disque dur
Indique l’état de la communication réseau sans fil/3G.
Indicateur de
Lumière bleue
Lumière orange
Pas allumé
1
communication
allumée
allumée
3G activé /
WiFi activé
3G désactivé /
3G désactivé /
3G activé /
WiFi activé
WiFi désactivé
WiFi désactivé
7
Boutons
Le bouton gauche et le bouton droit fonctionnent
(gauche et droit)
comme le bouton gauche et le bouton droit d’une
souris.
8
Touchpad Périphérique de pointage sensible au touché qui
fonctionne comme une souris.
9
Repose mains Zone de support confortable pour vos mains lorsque
vous utilisez l’ordinateur.
1. Les indicateurs du panneau avant sont visibles même lorsque l’écran LCD est fermé.
4
Gamme
Guide rapide
Gamme
Guide rapide
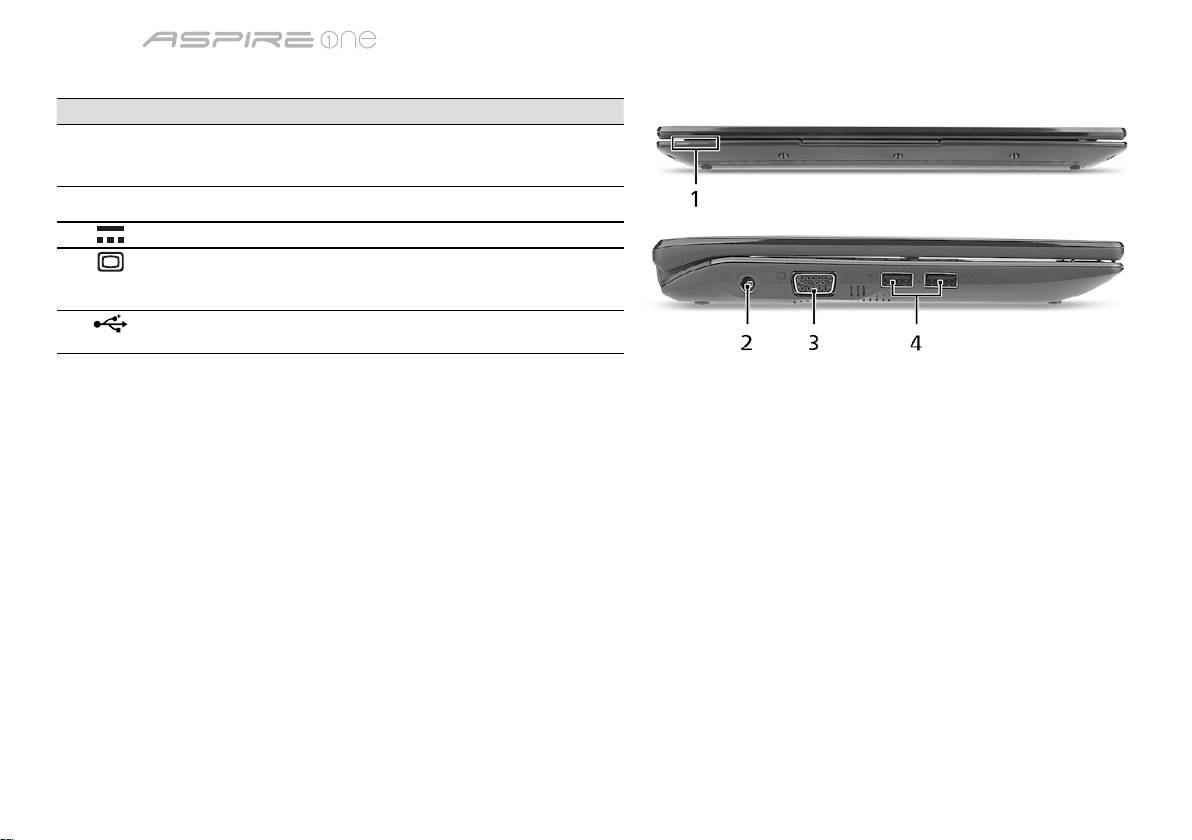
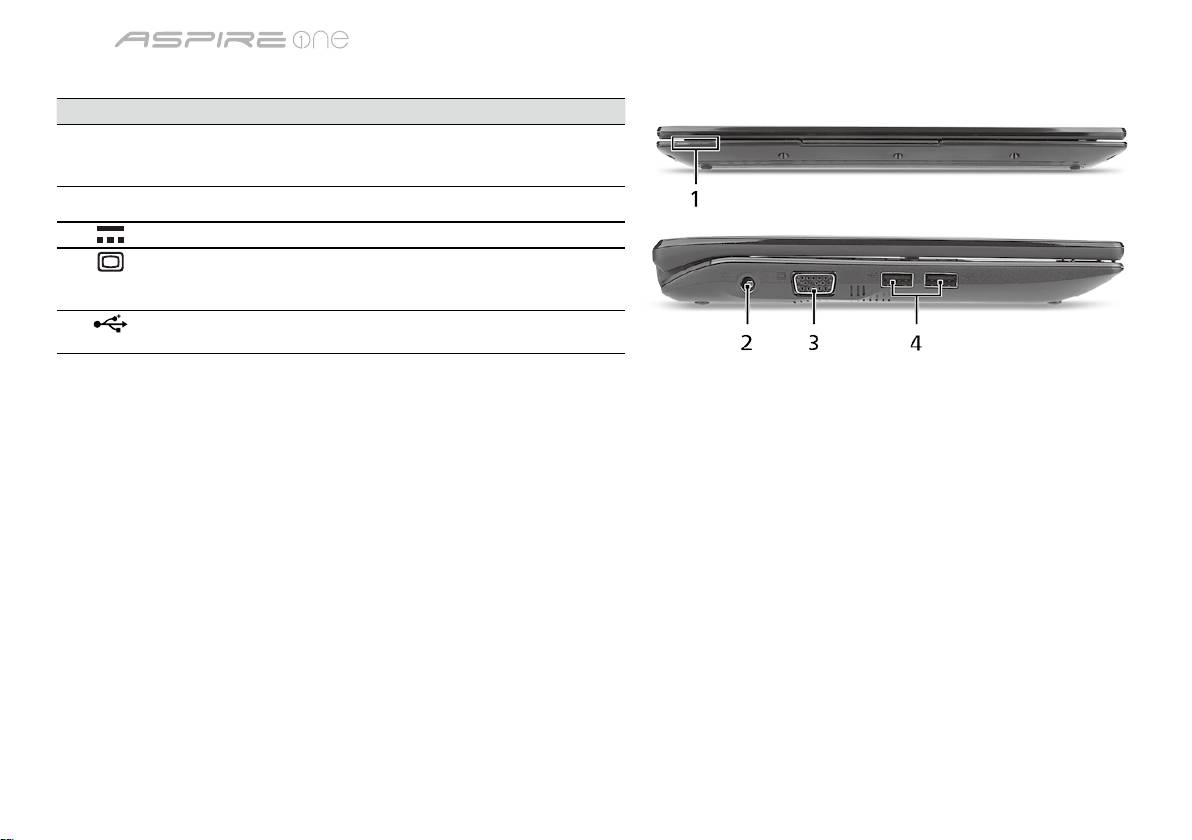
Vue frontale fermée
# Icône Élément Description
1
Indicateurs d’état Diodes électroluminescentes (DEL) qui
s’allume pour indiquer l’état des fonctions
et composants de l’ordinateur.
Vue gauche
2
Prise d’alimentation Se connecte à l’adaptateur secteur.
3
Port d’affichage
Se connecte à un périphérique d’affichage
(VGA) externe
(p.ex. un moniteur externe, un projecteur
LCD).
4
Port USB 2.0 Se connecte à des périphériques USB 2.0
(p.ex. une souris USB, une caméra USB).
5

Gamme
Guide rapide
Gamme
Guide rapide
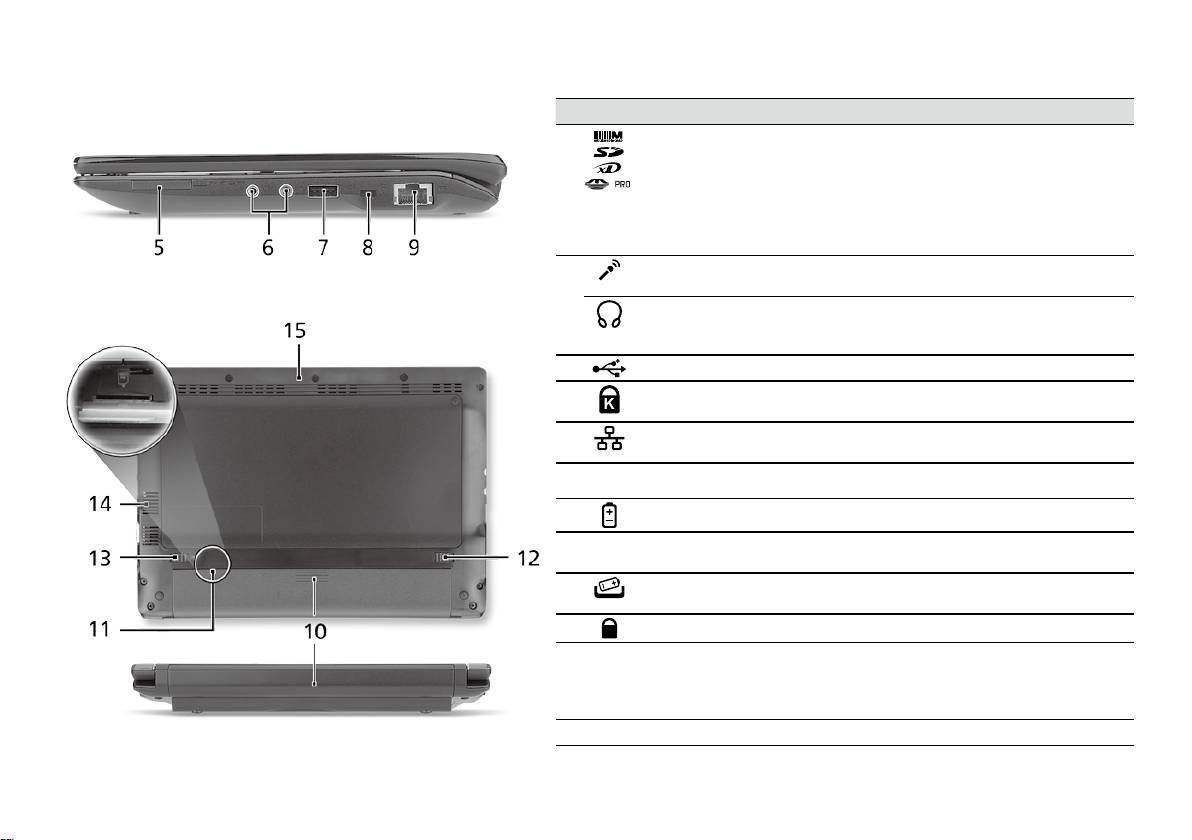
Vue droite
# Icône Élément Description
5
Lecteur de cartes
Accepte une carte mémoire Secure Digital (SD),
multiples en un
MultiMediaCard (MMC), Memory Stick (MS),
Memory Stick Pro (MS PRO), et xD-Picture (xD).
Remarque : Poussez pour retirer/installer la
carte. Seule une carte peut fonctionner à un
moment donné.
6
Prise d’entrée
Accepte les entrées de microphones externes.
microphone
Prise de sortie audio/
Se connecte à des périphériques audio en sortie
haut-parleurs/casque
(p.ex. haut-parleurs ou un casque stéréo).
7
Port USB 2.0 Se connecte à des périphériques USB 2.0
(p.ex. une souris USB).
8
Fente pour cadenas
Se connecte à un cadenas de sécurité pour
Kensington
ordinateur Kensington.
9
Port Ethernet RJ-45 Se connecte à un réseau Ethernet 10/100 Base.
Vue arrière & Vue de la base
10
Baie de la batterie Contient la batterie de l’ordinateur.
11
Connecteur de carte
Accepte une carte SIM 3G pour la connectivité
SIM 3G
3G (seulement pour certains modèles).
12
Loquet de libération
Libère la batterie pour le retrait.
de la batterie
13
Verrou de la batterie Verrouille la batterie en position.
14
Fentes de ventilation
Permettent à l’ordinateur de rester froid, même
et ventilateur de
après une longue utilisation.
refroidissement
Remarque : Ne couvrez pas et ne bloquez pas
l’ouverture du ventilateur.
15
Haut-parleur Émet le son de votre ordinateur.
6

Gamme
Guide rapide
Environnement
Température :
En marche : 5°C à 35°C
À l’arrêt : -20°C à 65°C
Humidité (sans condensation) :
En marche : 20% à 80%
À l’arrêt : 20% à 80%
7

Serie
Kurzanleitung

Serie
Kurzanleitung
Serie
Kurzanleitung
© 2010 Alle Rechte vorbehalten
Kurzanleitung für Aspire One Serie
Originalausgabe: 04/2010
Notebook-PC der Aspire One Serie
Modellnummer: _______________________________
Seriennummer: ________________________________
Kaufdatum: ___________________________________
Kaufort: ______________________________________

Serie
Kurzanleitung
Serie
Kurzanleitung
Federal Communications Commission
Declaration of Conformity
This device complies with Part 15 of the FCC Rules. Operation is subject to the following two conditions: (1) this device may not
cause harmful interference, and (2) this device must accept any interference received, including interference that may cause
undesired operation.
The following local Manufacturer/Importer is responsible for this declaration:
Product name: Notebook PC
Brand: Acer
Model number: PAV01
Machine type:
Aspire one series; AO533 series
Name of Responsible Party: Acer America Corporation
Address of responsible party: 333 West San Carlos St., San Jose
CA 95110, U. S. A.
Contact person: Acer Representative
Phone No.: 1-254-298-4000
Fax No.: 1-254-298-4147
April 23, 2010

Serie
Kurzanleitung
Serie
Kurzanleitung
CE Declaration of Conformity
We,
Acer Incorporated
8F, 88, Sec. 1, Hsin Tai Wu Rd., Hsichih, Taipei Hsien 221, Taiwan
Contact Person: Mr. Easy Lai, e-mail:easy_lai@acer.com.tw
And,
Acer Europe SA
Via Cantonale, Centro Galleria 2 6928 Manno Switzerland
Hereby declare that:
Product: Notebook Computer
Trade Name: Acer
Model Number: PAV01
Machine Type: Aspire one series; AO533 series
Is compliant with the essential requirements and other relevant provisions of the following EC directives, and that all the
necessary steps have been taken and are in force to assure that production units of the same product will continue comply with
the requirements.
R&TTE Directive 1999/5/EC as attested by conformity with the following harmonized standard:
• Article 3.1(a) Health and Safety
-. EN60950-1
-. EN62311
• Article 3.1(b) EMC
-. EN301 489-1
-. EN301 489-3 (Applicable to non-bluetooth wireless keyboard mouse set).
-. EN301 489-7
-. EN301 489-17
-. EN301 489-24

Serie
Kurzanleitung
Serie
Kurzanleitung
• Article 3.2 Spectrum Usages
-. EN300 440-2 (Applicable to non-bluetooth wireless keyboard mouse set).
-. EN300 328
-. EN301 511
-. EN301 893 (Applicable to 5GHz high performance RLAN).
-. EN301 908-1
-. EN301 908-2
EMC Directive 2004/108/EC as attested by conformity with the following harmonized standards:
-. EN55022, AS/NZS CISPR22, Class B
-. EN55024
-. EN61000-3-2 Class D
-. EN61000-3-3
Low Voltage Directive 2006/95/EC as attested by conformity with the following harmonized standard:
-. EN60950-1
RoHS Directive 2002/95/EC on the Restriction of the Use of certain Hazardous Substances in Electrical and Electronic Equipment
-. The maximum concentration values of the restricted substances by weight in homogenous material are:
Lead
0.1%
Polybrominated Biphenyls (PBB’s)
0.1%
Mercury
0.1%
Polybrominated Diphenyl Ethers (PBDE’s)
0.1%
Hexavalent Chromium
0.1%
Cadmium
0.01%
Directive 2009/125/EC with regard to establishing a framework for the setting of ecodesign requirements for energy-related
product.
Year to begin affixing CE marking 2010.
Apr. 23, 2010
Easy Lai /Manager
Regulation Center, Acer Inc.
Date

Serie
Kurzanleitung
Serie
Kurzanleitung
Für den Anfang
1 2 3
2-2
3-2
3-1
2-1
Stellen Sie sicher, dass der Akku
wie in Abbildung 2-2 gezeigt an
seinem Platz festsitzt.
4 5 6
Abbildung nur Referenz und kann zum Produkt variieren. Das tatsächliche Produkt kann sich von den Abbildungen
unterscheiden.
1

Serie
Kurzanleitung
Serie
Kurzanleitung
Das Wichtigste zuerst
Wir möchten uns bei Ihnen dafür bedanken, dass Sie sich in Bezug auf mobilen Computerbedarf für ein Acer-Notebook
entschieden haben.
Hilfen
Als Hilfe für Sie bei der Verwendung des Acer-Notebooks haben wir einen Satz von Richtlinien aufgestellt*:
Zuallererst hilft Ihnen die Kurzanleitung dabei, Ihren Computer das erste Mal in Betrieb zu nehmen.
Für weitere Informationen dazu, wie Ihnen Ihr Computer helfen kann, noch produktiver zu arbeiten, lesen Sie bitte
die AcerSystem Benutzeranleitung. Dieses Benutzerhandbuch enthält detaillierte Informationen zu Themen wie z. B.
Systemprogramme, Datenwiederherstellung, Erweiterungsoptionen und Problembehebung. Darüber hinaus enthält es
Informationen zur Garantie und allgemeine Bestimmungen und Sicherheitshinweise zu Ihrem Notebook. Das Benutzerhandbuch
steht in PDF (Portable Document Format) zur Verfügung und ist bereits in Ihrem Notebook installiert.
Hinweis: Zum Betrachten der Datei muß Adobe Reader installiert sein. Wenn Adobe Reader nicht auf Ihrem Computer
installiert ist, wird durch Klicken auf AcerSystem Benutzerhandbuch zuerst das Setup-Programm von Adobe Reader
ausgeführt. Folgen Sie zur Durchführung der Installation den Anweisungen auf dem Bildschirm. Hinweise über die
Verwendung von Adobe Reader finden Sie im Menü Hilfe und Support.
* WICHTIGER HINWEIS: Denken Sie daran, dass die beschriebenen Anleitungen, ob in ausgedruckter oder
elektronischer Form, nur zur Erläuterung dienen. Mit Ausnahme der Informationen zur Garantie, die in der AcerSystem
Benutzeranleitung enthalten ist, gibt Acer mit diesen Anleitungen keine Versprechungen oder Garantien hinsichtlich
des von Ihnen gekauften Produktes. Acer übernimmt ausdrücklich keine Haftung für Fehler, die in diesen Anleitungen
enthalten sein können.
2
Serie
Kurzanleitung
Serie
Kurzanleitung
Netzkonfiguration
Diese Anleitung hilft Ihnen bei der Konfiguration Ihrer LAN- und Drahtlos-Netzeinstellungen, damit Sie eine Verbindung mit
dem Internet herstellen können.
Herstellung einer LAN-Verbindung
Schließen Sie einfach das LAN-Kabel an den Ethernet (RJ-45)-Anschluss an. Siehe „Rechte Seite“ auf Seite 6, um den Ort der
Ethernet-Schnittstelle zu erfahren.
Einrichten einer Drahtlosverbindung
1. Drücken Sie auf <Fn> + <F3>, um auf den Kommunikationsmanager zuzugreifen Dort können Sie anschließend die WLAN-
Verbindung durch Klicken auf die rote Schaltfläche neben WLAN aktivieren.
Hinweis: Über den Kommunikationsmanager gelangen Sie auch nach 3G und Bluetooth. Kommunikationsgeräte können sich
je nach Modell unterscheiden.
2. Klicken Sie auf das Symbol
auf der Systemleiste und wählen Sie den Drahtlos-Zugriffspunkt aus, zu dem Sie eine
Verbindung herstellen möchten.
Einsetzen einer 3G-SIM-Karte (Nur für bestimmte Modelle)
Entfernen Sie den Akku und setzen Sie eine 3G-SIM-Karte vorsichtig in den 3G-SIM-Karteneinschub hinein. Unter „Rückseite &
Unterseite“ auf Seite 6 erfahren Sie den Ort des 3G SIM-Karteneinschubs.
3
Serie
Kurzanleitung
Serie
Kurzanleitung
Ansicht von oben
Eine Tour durch das
# Symbol Element Beschreibung
Aspire One
1
Acer Crystal Eye
Web-Kamera für Videokommunikation
webcam
(konfiguration kann sich von Modell zu Modell
Nachdem Sie Ihren Computer wie im Abschnitt Für den
unterscheiden).
Anfang gezeigt aufgestellt haben, lassen Sie uns nun
2
Mikrofon Internes Mikrofon für die Tonaufnahme.
Ihr neues Acer-Notebook vorstellen.
3
Anzeigebildschirm Wird auch als LCD (Liquid-Crystal-Display)
bezeichnet. Zeigt die Ausgabe des Computers
an (konfiguration kann sich von Modell zu
Modell unterscheiden).
4
Ein/Aus-Taste Schaltet den Computer ein und aus.
5
Tastatur Dient der Eingabe von Daten in den Computer.
1
6
Stromanzeige
Zeigt den Ein/Aus-Status des Computers an.
1
Akkuanzeige
Zeigt den Akkustatus des Computers an.
1. Aufladung: Die Leuchte erscheint gelb, wenn
der Akku aufgeladen wird.
2. Voll aufgeladen: Die Leuchte erscheint blau,
wenn Netzstrom verwendet wird.
HDD-Anzeige Leuchtet auf, wenn die Festplatte aktiv ist.
Anzeige für
Leuchtet auf, um den Status der WLAN-
1
Kommunikation
Kommunikation anzuzeigen.
Blaue Leuchte
Orangefarbene
Leuchtet nicht
ein
Leuchte ein
3G ein/WiFi ein
3G aus/WiFi ein 3G aus/WiFi aus
3G ein/WiFi aus
7
Anklicktasten
Die linken und rechten Tasten funktionieren
(links und rechts)
wie die linken und rechten Tasten einer Maus.
8
Touchpad Berührungssensibles Zeigegerät, das die
gleichen Funktionen besitzt wie eine Computer-
Maus.
9
Handablage Bequemer Ablagebereich für Ihre Hände
während der Bedienung des Computers.
1. Die Statusanzeigen auf der Vorderseite sind selbst dann zu sehen, wenn die
Computerklappe geschlossen ist.
4

Serie
Kurzanleitung
Serie
Kurzanleitung
Geschlossene Vorderseite
# Symbol Element Beschreibung
1
Statusanzeigen Diese LEDs (Light-Emitting Diodes)
leuchten auf, um Ihnen den Status der
Funktionen und Komponenten des
Computers anzuzeigen.
Linke Seite
2
DC-Eingangsbuchse Hier schließen Sie das Netzteil an.
3
Anschluss für
Dient dem Anschluss eines
externe Anzeige
Anzeigegerätes (z. B. einem externen
(VGA)
Monitor oder LCD-Projektor).
4
USB 2.0-Anschluss Hier schließen Sie USB 2.0-Geräte
(z. B. USB-Maus oder USB-Kamera) an.
5

Serie
Kurzanleitung
Serie
Kurzanleitung
Rechte Seite
# Symbol Element Beschreibung
5
Mehrere-in-1-
Eignet sich für Secure Digital (SD),
Kartenleser
MultiMediaCard (MMC), Memory Stick (MS),
Memory Stick PRO (MS PRO) und xD-Picture
Card (xD).
Hinweis: Drücken Sie hier, um die Karte
zu entfernen/einzusetzen. Es kann nicht
mehr als eine Karte gleichzeitig verwendet
werden.
6
Mikrofon-Eingangs-
Eignet sich für Eingaben aus externen
Buchse
Mikrofonen.
Lautsprecher/
Zum Anschluss von Audioausgabe-Geräten
Kopfhörer/Ausgabe-
(z.B. Lautsprechern, Kopfhörern).
Buchse
7
USB 2.0-Anschluss Hier schließen Sie USB 2.0-Geräte (z. B. USB-
Maus) an.
8
Steckplatz für
Hier können Sie ein Kensington-kompatibles
Kensington-Schloss
Sicherheitsschloss für den Computer
anbringen.
9
Ethernet (RJ-45)-
Zum Anschluss eines Ethernet
Anschluss
10/100-basierten Netzwerks.
Rückseite & Unterseite
10
Akkufach Enthält den Akku des Computers.
11
3G-SIM-
Eignet sich für eine 3G-SIM-Karte, um
Karteneinschub
3G-Konnektivität zu ermöglichen (Nur für
bestimmte Modelle).
12
Verriegelung des
Entsperrt den Akku für die Herausnahme.
Akkus
13
Akkuverschluss Sichert den Akku an seiner Position.
14
Belüftungsschlitze
Schützt den Computer vor Überhitzung,
und Ventilator
selbst bei längerem Einsatz.
Hinweis: Verdecken oder schließen Sie nicht
die Öffnungen des Ventilators.
15
Lautsprecher Gibt Ton vom Computer aus.
6

Serie
Kurzanleitung
Umgebung
Temperatur:
Betrieb: 5°C bis 35°C
Nichtbetrieb: -20°C bis 65°C
Luftfeuchtigkeit (nicht kondensierend):
Betrieb: 20% bis 80%
Nichtbetrieb: 20% bis 80%
7

Serie
Guida rapida

Serie
Guida rapida
Serie
Guida rapida
© 2010 Tutti i diritti riservati
Guida rapida per Serie Aspire One
Prima edizione: 04/2010
PC Notebook Serie Aspire One
Numero di modello: ___________________________
Numero di serie: _______________________________
Data di acquisto: ______________________________
Luogo d'acquisto: _____________________________

Serie
Guida rapida
Serie
Guida rapida
Federal Communications Commission
Declaration of Conformity
This device complies with Part 15 of the FCC Rules. Operation is subject to the following two conditions: (1) this device may not
cause harmful interference, and (2) this device must accept any interference received, including interference that may cause
undesired operation.
The following local Manufacturer/Importer is responsible for this declaration:
Product name: Notebook PC
Brand: Acer
Model number: PAV01
Machine type:
Aspire one series; AO533 series
Name of Responsible Party: Acer America Corporation
Address of responsible party: 333 West San Carlos St., San Jose
CA 95110, U. S. A.
Contact person: Acer Representative
Phone No.: 1-254-298-4000
Fax No.: 1-254-298-4147
April 23, 2010

Serie
Guida rapida
Serie
Guida rapida
CE Declaration of Conformity
We,
Acer Incorporated
8F, 88, Sec. 1, Hsin Tai Wu Rd., Hsichih, Taipei Hsien 221, Taiwan
Contact Person: Mr. Easy Lai, e-mail:easy_lai@acer.com.tw
And,
Acer Europe SA
Via Cantonale, Centro Galleria 2 6928 Manno Switzerland
Hereby declare that:
Product: Notebook Computer
Trade Name: Acer
Model Number: PAV01
Machine Type: Aspire one series; AO533 series
Is compliant with the essential requirements and other relevant provisions of the following EC directives, and that all the
necessary steps have been taken and are in force to assure that production units of the same product will continue comply with
the requirements.
R&TTE Directive 1999/5/EC as attested by conformity with the following harmonized standard:
• Article 3.1(a) Health and Safety
-. EN60950-1
-. EN62311
• Article 3.1(b) EMC
-. EN301 489-1
-. EN301 489-3 (Applicable to non-bluetooth wireless keyboard mouse set).
-. EN301 489-7
-. EN301 489-17
-. EN301 489-24

Serie
Guida rapida
Serie
Guida rapida
• Article 3.2 Spectrum Usages
-. EN300 440-2 (Applicable to non-bluetooth wireless keyboard mouse set).
-. EN300 328
-. EN301 511
-. EN301 893 (Applicable to 5GHz high performance RLAN).
-. EN301 908-1
-. EN301 908-2
EMC Directive 2004/108/EC as attested by conformity with the following harmonized standards:
-. EN55022, AS/NZS CISPR22, Class B
-. EN55024
-. EN61000-3-2 Class D
-. EN61000-3-3
Low Voltage Directive 2006/95/EC as attested by conformity with the following harmonized standard:
-. EN60950-1
RoHS Directive 2002/95/EC on the Restriction of the Use of certain Hazardous Substances in Electrical and Electronic Equipment
-. The maximum concentration values of the restricted substances by weight in homogenous material are:
Lead
0.1%
Polybrominated Biphenyls (PBB’s)
0.1%
Mercury
0.1%
Polybrominated Diphenyl Ethers (PBDE’s)
0.1%
Hexavalent Chromium
0.1%
Cadmium
0.01%
Directive 2009/125/EC with regard to establishing a framework for the setting of ecodesign requirements for energy-related
product.
Year to begin affixing CE marking 2010.
Apr. 23, 2010
Easy Lai /Manager
Regulation Center, Acer Inc.
Date

Serie
Guida rapida
Serie
Guida rapida
Per i principianti
1 2 3
2-2
3-2
3-1
2-1
Verificare che la batteria sia
bloccata in posizione, come
illustrato in 2-2.
4 5 6
Le illustrazioni sono di solo riferimento. Le specifiche dei prodotti possono differire.
1

Serie
Guida rapida
Serie
Guida rapida
Avvertenze preliminari
Grazie per aver scelto il notebook Acer, la scelta ideale per poter lavorare in piena libertà anche in movimento.
Le guide disponibili
Sono state realizzate delle guide per assistere l’utente nell’uso del notebook Acer*:
Innanzitutto, la Guida rapida aiuta a semplificare la configurazione del computer.
Per altre nozioni su come il vostro computer può aiutarvi a diventare ancora più produttivi, consultate la AcerSystem User
Guide. Questa guida contiene informazioni dettagliate su argomenti come utilità del sistema, ripristino dei dati, opzioni di
espansione e ricerca guasti. Contiene inoltre informazioni sulla garanzia, le norme e gli standard di riferimento e le avvertenze
per la sicurezza del vostro notebook. È disponibile nel formato PDF e viene fornita già caricata nel notebook.
Nota: Per visualizzare il file, è necessario che sul computer sia installato Adobe Reader. Se Adobe Reader non è installato
sul computer, fare clic su AcerSystem User Guide per eseguire il programma di installazione di Adobe Reader. Per
completare l'installazione, attenersi alle istruzioni visualizzate sullo schermo. Per istruzioni sull'uso di Adobe Reader,
consultare il menu Guida in linea e supporto tecnico.
* AVVISO IMPORTANTE: Notare che le guide menzionate in precedenza, sia informa stampata che elettronica, sono
solo per riferimento e a eccezione delle informazioni specifiche sulla garanzie contenute nella AcerSystem User Guide,
nulla di ciò che è contenuto nelle presenti guide costituisce una rappresentazione o una garanzia da parte di Acer
con riferimento al prodotto acquistato. Acer declina espressamente qualsiasi responsabilità per errori contenuti nelle
presenti guide.
2
Serie
Guida rapida
Serie
Guida rapida
Configurazione rete
Questa guida aiuta ad eseguire la configurazione delle impostazioni di rete LAN e wireless per poter eseguire l’accesso a
Internet.
Configurazione della connessione LAN
Semplicemente collegare il cavo LAN alla porta Ethernet (RJ-45). Fare riferimento a "Vista da destra" a pagina 6 per la posizione
della porta Ethernet.
Configurare una connessione wireless
1. Premere<Fn> + <F3> per accedere a Manager Comm Da qui è possibile attivare la connessione Wi-Fi facendo clic sul pulsante
rosso accanto a Wi-Fi.
Nota: È possibile effettuare l’accesso a 3G e a Bluetooth anche da Manager Comm. I dispositivi di comunicazione possono
variare da un modello all’altro.
2. Fare clic sull’icona
nella barra delle applicazioni e scegliere l’access point wireless a cui connettersi.
Inserire una carta 3G SIM (solo per alcuni modelli)
Rimuovere la batteria e inserire con attenzione la carta 3G SIM nello slot carta 3G SIM. Per la posizione dello slot carta 3G SIM,
fare riferimento a "Vista posteriore & base" a pagina 6.
3
Serie
Guida rapida
Serie
Guida rapida
Vista dall’alto
Presentazione di Aspire One
# Icona Elemento Descrizione
Dopo aver configurato il computer come illustrato nella
1
Webcam
Webcam per comunicazioni video
sezione Per i principianti, far riferimento alla presente
Acer Crystal Eye
(la configurazione può variare in relazione al
documentazione per la presentazione del nuovo
modello).
notebook Acer.
2
Microfono Microfono interno per la registrazione di audio.
3
Display Grande display a cristalli liquidi (Liquid-
Crystal Display; LCD), per una visualizzazione
confortevole (la configurazione può variare in
relazione al modello).
4
Tasto di accensione Accende/spegne il computer.
5
Tastiera Per l’immissione di dati sul computer.
6
Indicatore di
Indicano lo stato di accensione/alimentazione del
1
alimentazione
computer.
1
Indicatore batteria
Indicano lo stato della batteria del computer.
1. In carica: Luce di colore giallo quando la
batteria è in ricarica.
2. Completamente carica: Luce di colore blu
quando è nella modalità AC.
Indicatore disco
Si accende quando l'hard disk è attivo.
rigido
Indicatore
Indica lo stato della trasmissione wireless LAN/3G.
1
comunicazione
Luce blu Luce arancione Spento
3G attivo/
WiFi attivo
3G disattivo/
3G disattivo/
3G attivo/
WiFi attivo
WiFi disattivo
WiFi disattivo
7
Tasti clic
I tasti destra e sinistra hanno le stesse funzioni dei
(sinistra e destra)
tasti destra e sinistra del mouse.
8
Touchpad Dispositivo di puntamento sensibile al tocco con
funzioni simili a quelle di un comune mouse.
9
Poggiapolsi Comoda area su cui poggiare i polsi durante
l’utilizzo del computer.
1. Gli indicatori del pannello frontale sono visibili anche quando il coperchio del
computer è chiuso.
4
Serie
Guida rapida
Serie
Guida rapida
Vista frontale in dettaglio
# Icona Elemento Descrizione
1
Indicatori di stato LED (Light-Emitting Diodes) che si
illuminano per mostrare lo stato di
funzioni e componenti del computer.
Vista da sinistra
2
Jack CC-in Per il collegamento all’adattatore CA.
3
Porta display esterno
Effettua il collegamento a un dispositivo
(VGA)
di visualizzazione (ad es., monitor esterno,
proiettore LCD).
4
Porta USB 2.0 Effettua il collegamento ai dispositivi USB
2.0 (ad es., mouse USB, fotocamera USB).
5

Serie
Guida rapida
Serie
Guida rapida
Vista da destra
# Icona Elemento Descrizione
5
Lettore di schede
Supporta Secure Digital (SD),
multiplo
MultiMediaCard (MMC), Memory Stick (MS),
Memory Stick Pro (MS PRO), e xD-Picture
Card (xD).
Nota: Premere per rimuovere/installare la
scheda. è possibile utilizzare una sola scheda
di memoria alla volta.
6
Jack ingresso microfono Accetta ingressi proveniente da microfoni
esterni.
Jack auricolare/
Effettua il collegamento ai dispositivi audio
altoparlante/line-out
line-out (ad es., altoparlanti, auricolari).
7
Porta USB 2.0 Connette a dispositivi USB 2.0 (p.e., mouse
USB).
8
Slot blocco Kensington Per il collegamento al blocco di sicurezza dei
computer Kensington-compatibili.
9
Porta Ethernet (RJ-45) Effettua il collegamento a una rete con
Ethernet 10/100.
Vista posteriore & base
10
Alloggiamento della
Contiene il pacco batteria del computer.
batteria
11
Slot carta 3G SIM Accetta una carta 3G SIM per connettività 3G
(solo per alcuni modelli).
12
Gancio di rilascio della
Per togliere la batteria.
batteria
13
Blocco batteria Blocca la batteria al suo posto.
14
Aperture per la
Permettono il raffreddamento del computer,
ventilazione e ventola
anche dopo un uso prolungato.
di raffreddamento
Nota: Non coprire e non ostruire l’apertura
della ventola.
15
Altoparlanti Emette l’audio dal computer.
6

Serie
Guida rapida
Condizioni operative
Temperatura:
Di esercizio: 5°C e 35°C
Non di esercizio: -20°C e 65°C
Umidità (senza condensa):
Di esercizio: 20% e 80%
Non di esercizio: 20% e 80%
7

Serie
Guía rápida

Serie
Guía rápida
Serie
Guía rápida
© 2010 Reservados todos los derechos
Guía rápida de la Serie Aspire One
Versión original: 04/2010
Ordenador portátil Serie Aspire One
Número de modelo: ___________________________
Número de serie: ______________________________
Fecha de compra: ______________________________
Lugar de compra: ______________________________

Serie
Guía rápida
Serie
Guía rápida
Federal Communications Commission
Declaration of Conformity
This device complies with Part 15 of the FCC Rules. Operation is subject to the following two conditions: (1) this device may not
cause harmful interference, and (2) this device must accept any interference received, including interference that may cause
undesired operation.
The following local Manufacturer/Importer is responsible for this declaration:
Product name: Notebook PC
Brand: Acer
Model number: PAV01
Machine type:
Aspire one series; AO533 series
Name of Responsible Party: Acer America Corporation
Address of responsible party: 333 West San Carlos St., San Jose
CA 95110, U. S. A.
Contact person: Acer Representative
Phone No.: 1-254-298-4000
Fax No.: 1-254-298-4147
April 23, 2010

Serie
Guía rápida
Serie
Guía rápida
CE Declaration of Conformity
We,
Acer Incorporated
8F, 88, Sec. 1, Hsin Tai Wu Rd., Hsichih, Taipei Hsien 221, Taiwan
Contact Person: Mr. Easy Lai, e-mail:easy_lai@acer.com.tw
And,
Acer Europe SA
Via Cantonale, Centro Galleria 2 6928 Manno Switzerland
Hereby declare that:
Product: Notebook Computer
Trade Name: Acer
Model Number: PAV01
Machine Type: Aspire one series; AO533 series
Is compliant with the essential requirements and other relevant provisions of the following EC directives, and that all the
necessary steps have been taken and are in force to assure that production units of the same product will continue comply with
the requirements.
R&TTE Directive 1999/5/EC as attested by conformity with the following harmonized standard:
• Article 3.1(a) Health and Safety
-. EN60950-1
-. EN62311
• Article 3.1(b) EMC
-. EN301 489-1
-. EN301 489-3 (Applicable to non-bluetooth wireless keyboard mouse set).
-. EN301 489-7
-. EN301 489-17
-. EN301 489-24

Serie
Guía rápida
Serie
Guía rápida
• Article 3.2 Spectrum Usages
-. EN300 440-2 (Applicable to non-bluetooth wireless keyboard mouse set).
-. EN300 328
-. EN301 511
-. EN301 893 (Applicable to 5GHz high performance RLAN).
-. EN301 908-1
-. EN301 908-2
EMC Directive 2004/108/EC as attested by conformity with the following harmonized standards:
-. EN55022, AS/NZS CISPR22, Class B
-. EN55024
-. EN61000-3-2 Class D
-. EN61000-3-3
Low Voltage Directive 2006/95/EC as attested by conformity with the following harmonized standard:
-. EN60950-1
RoHS Directive 2002/95/EC on the Restriction of the Use of certain Hazardous Substances in Electrical and Electronic Equipment
-. The maximum concentration values of the restricted substances by weight in homogenous material are:
Lead
0.1%
Polybrominated Biphenyls (PBB’s)
0.1%
Mercury
0.1%
Polybrominated Diphenyl Ethers (PBDE’s)
0.1%
Hexavalent Chromium
0.1%
Cadmium
0.01%
Directive 2009/125/EC with regard to establishing a framework for the setting of ecodesign requirements for energy-related
product.
Year to begin affixing CE marking 2010.
Apr. 23, 2010
Easy Lai /Manager
Regulation Center, Acer Inc.
Date

Serie
Guía rápida
Serie
Guía rápida
Sólo para principiantes
1 2 3
2-2
3-2
3-1
2-1
Asegúrese de que la batería
queda bien fijada en su sitio, tal y
como se muestra en la figura 2-2.
4 5 6
Las ilustraciones son sólo una referencia. Las especificaciones reales del producto pueden ser diferentes.
1

Serie
Guía rápida
Serie
Guía rápida
Primero lo más importante
Le agradecemos que haya elegido el ordenador portátil de Acer para satisfacer sus necesidades de informática móvil.
Sus guías
Para ayudarle a utilizar su ordenador portátil de Acer, hemos diseñado un conjunto de guías*:
En primer lugar, la Guía Rápida le ayuda a empezar a configurar su ordenador.
Si desea más información sobre cómo puede su ordenador ayudarle a ser más productivo, consulte AcerSystem User Guide. Esta
guía contiene información detallada sobre temas como utilidades del sistema, recuperación de datos, opciones de ampliación y
solución de problemas. Además, contiene información sobre garantías y las normativas generales y advertencias de seguridad
para su ordenador portátil. Está disponible en PDF (Formato de Documento Portátil) y viene precargada en su ordenador
portátil.
Nota: Para ver los archivos debe tener Adobe Reader instalado en su ordenador. Si no tiene instalado Adobe Reader en
su ordenador, haga clic en AcerSystem User Guide para ejecutar en primer lugar el programa de instalación de Adobe
Reader. Siga las instrucciones en pantalla para completar la instalación. Para obtener instrucciones sobre cómo utilizar
Adobe Reader, acceda al menú de Soporte y Ayuda.
* AVISO IMPORTANTE: Tenga en cuenta que las guías mencionadas, en forma electrónica o impresa, sirven únicamente
de referencia y salvo que se especifique en la información de garantía específica que se incluye en AcerSystem User
Guide, nada de lo contenido en estas guías constituirá una representación o garantía de Acer en relación con el producto
adquirido. Acer rechaza expresamente cualquier responsabilidad por errores contenidos en las guías.
2

Serie
Guía rápida
Serie
Guía rápida
Configuración de red
Esta guía le ayudará a configurar los ajustes de red inalámbrica y LAN para que pueda conectarse a Internet.
Configurar una conexión LAN
Basta con conectar el cable LAN al puerto de Ethernet (RJ-45). Consulte "Vista derecha" en la página 6 para la ubicación del
puerto Ethernet.
Configurar una conexión inalámbrica
1. Pulse <Fn> + <F3> para acceder al administrador de comunicación. Aquí puede activar la conexión Wi-Fi haciendo clic en el
botón rojo que hay junto a Wi-Fi.
Nota: También se puede acceder a 3G y Bluetooth a través del administrador de comunicación. Los dispositivos de
comunicación varían según el modelo.
2. Haga clic en el icono
en la bandeja del sistema y seleccione el punto de acceso inalámbrico que desee conectar.
Insertar una tarjeta SIM 3G (sólo en determinados modelos)
Extraiga la batería e inserte con cuidado una tarjeta SIM 3G en la ranura para tarjeta SIM 3G. Consulte "Vista trasera & Vista de
la base" en la página 6 para ver dónde se encuentra la ranura para tarjeta SIM 3G.
3
Serie
Guía rápida
Serie
Guía rápida
Vista superior
Presentación de su
# Icono Elemento Descripción
Aspire One
1
Webcam
Cámara Web para comunicación de vídeo
Acer Crystal Eye
(la configuración puede variar según el modelo).
Después de configurar su ordenador tal y como se
indica en la sección Sólo para principiantes, permítanos
2
Micrófono Micrófono interno para la grabación del sonido.
enseñarle su nuevo ordenador portátil de Acer.
3
Visualización en
También denominada pantalla de cristal líquido (LCD)
pantalla
es el dispositivo de salida visual del ordenador (la
configuración puede variar según el modelo).
4
Botón de
Enciende o apaga el ordenador.
encendido
5
Teclado Para introducir datos en su ordenador.
6
Indicador de
Proporciona información sobre el estado de energía del
1
encendido
ordenador.
Indicador de
Proporciona información sobre el estado de la batería.
1
batería
1. Carga: La luz se vuelve ámbar cuando se carga la
batería.
2. Carga completa: La luz se vuelve azul en modo de CA.
Indicador de
Indica si la unidad de disco duro está activa.
disco duro
Indicador de
Indica el estado de la comunicación LAN inalámbrica/3G.
1
comunicación
Luz azul encendida Luz naranja
Apagado
encendida
Función 3G activada /
Función 3G
Función 3G
WiFi activada
desactivada /
desactivada /
Función 3G activada /
WiFi activada
WiFi desactivada
WiFi desactivada
7
Botones de clic
Los botones izquierdo y derecho funcionan como los
(izquierdo y
botones izquierdo y derecho del ratón.
derecho)
8
Teclado táctil Dispositivo apuntador táctil que funciona como un ratón
de ordenador.
9
Soporte para las
Área de soporte que permite reposar cómodamente las
palmas
palmas de las manos cuando se utiliza el ordenador.
1. Los indicadores del panel frontal son visibles aunque se cierre la tapa del ordenador.
4

Serie
Guía rápida
Serie
Guía rápida
Vista frontal cerrada
# Icono Elemento Descripción
1
Indicadores de
Diodos luminosos (LED) que se encienden
estado
para mostrar el estado de las funciones y
componentes del ordenador.
Vista izquierda
2
Conector de entrada
Permite conectar a un adaptador de CA.
de DC
3
Puerto de
Permite conectar a un dispositivo de
visualización externo
visualización (p.ej., monitor externo,
(VGA)
proyector de LCD).
4
Puerto USB 2.0 Permite conectar a dispositivos USB 2.0
(p.ej., ratón USB, cámara USB).
5

Serie
Guía rápida
Serie
Guía rápida
Vista derecha
# Icono Elemento Descripción
5
Lector de tarjetas
Admite la tarjeta Secure Digital (SD),
multifunción
MultiMedia (MMC), Memory Stick (MS),
Memory Stick PRO (MS PRO), xD-Picture (xD).
Nota: Presionar para extraer/instalar la
tarjeta. Sólo puede funcionar una tarjeta en
un momento dado.
6
Conector de entrada
Permite la entrada de audio de micrófonos
para micrófono
externos.
Auriculares/altavoz/
Conexión para dispositivos de salida de audio
conector de línea de
(p.ej., altavoces, auriculares, etc.).
salida
7
Puerto USB 2.0 Permite conectar a dispositivos USB 2.0
(p.ej., ratón USB).
8
Ranura de bloqueo
Permite conectar a un candado de seguridad
Kensington
para ordenador compatible con Kensington.
9
Puerto Ethernet (RJ-45) Permite conectar a una red basada en
Ethernet 10/100.
Vista trasera & Vista de la base
10
Compartimiento de la
Aloja la batería del ordenador.
batería
11
Ranura para tarjeta
Acepta una tarjeta SIM 3G para conectividad
SIM 3G
3G (sólo en determinados modelos).
12
Pestillo de liberación
Libera la batería para poder sacarla.
de la batería
13
Bloqueo de la batería Permite que la batería quede trabada.
14
Ranuras de ventilación
Permite que el ordenador esté frío, incluso
y ventilador de
tras un uso prolongado.
refrigeración
Nota: No tape ni obstruya la apertura del
ventilador.
15
Altavoz Emite el audio del ordenador.
6

Serie
Guía rápida
Medio ambiente
Temperatura:
Encendido: entre 5°C y 35°C
Apagado: entre -20°C y 65°C
Humedad (sin condensación):
Encendido: entre 20% y 80%
Apagado: entre 20% y 80%
7

Série
Guia rápido

Série
Guia rápido
Série
Guia rápido
© 2010 Todos os Direitos Reservados
Guia rápido da Série Aspire One
Edição Original: 04/2010
Computador Portátil Série Aspire One
Número de modelo: ___________________________
Número de série: ______________________________
Data da aquisição: _____________________________
Local de aquisição: _____________________________

Série
Guia rápido
Série
Guia rápido
Federal Communications Commission
Declaration of Conformity
This device complies with Part 15 of the FCC Rules. Operation is subject to the following two conditions: (1) this device may not
cause harmful interference, and (2) this device must accept any interference received, including interference that may cause
undesired operation.
The following local Manufacturer/Importer is responsible for this declaration:
Product name: Notebook PC
Brand: Acer
Model number: PAV01
Machine type:
Aspire one series; AO533 series
Name of Responsible Party: Acer America Corporation
Address of responsible party: 333 West San Carlos St., San Jose
CA 95110, U. S. A.
Contact person: Acer Representative
Phone No.: 1-254-298-4000
Fax No.: 1-254-298-4147
April 23, 2010

Série
Guia rápido
Série
Guia rápido
CE Declaration of Conformity
We,
Acer Incorporated
8F, 88, Sec. 1, Hsin Tai Wu Rd., Hsichih, Taipei Hsien 221, Taiwan
Contact Person: Mr. Easy Lai, e-mail:easy_lai@acer.com.tw
And,
Acer Europe SA
Via Cantonale, Centro Galleria 2 6928 Manno Switzerland
Hereby declare that:
Product: Notebook Computer
Trade Name: Acer
Model Number: PAV01
Machine Type: Aspire one series; AO533 series
Is compliant with the essential requirements and other relevant provisions of the following EC directives, and that all the
necessary steps have been taken and are in force to assure that production units of the same product will continue comply with
the requirements.
R&TTE Directive 1999/5/EC as attested by conformity with the following harmonized standard:
• Article 3.1(a) Health and Safety
-. EN60950-1
-. EN62311
• Article 3.1(b) EMC
-. EN301 489-1
-. EN301 489-3 (Applicable to non-bluetooth wireless keyboard mouse set).
-. EN301 489-7
-. EN301 489-17
-. EN301 489-24

Série
Guia rápido
Série
Guia rápido
• Article 3.2 Spectrum Usages
-. EN300 440-2 (Applicable to non-bluetooth wireless keyboard mouse set).
-. EN300 328
-. EN301 511
-. EN301 893 (Applicable to 5GHz high performance RLAN).
-. EN301 908-1
-. EN301 908-2
EMC Directive 2004/108/EC as attested by conformity with the following harmonized standards:
-. EN55022, AS/NZS CISPR22, Class B
-. EN55024
-. EN61000-3-2 Class D
-. EN61000-3-3
Low Voltage Directive 2006/95/EC as attested by conformity with the following harmonized standard:
-. EN60950-1
RoHS Directive 2002/95/EC on the Restriction of the Use of certain Hazardous Substances in Electrical and Electronic Equipment
-. The maximum concentration values of the restricted substances by weight in homogenous material are:
Lead
0.1%
Polybrominated Biphenyls (PBB’s)
0.1%
Mercury
0.1%
Polybrominated Diphenyl Ethers (PBDE’s)
0.1%
Hexavalent Chromium
0.1%
Cadmium
0.01%
Directive 2009/125/EC with regard to establishing a framework for the setting of ecodesign requirements for energy-related
product.
Year to begin affixing CE marking 2010.
Apr. 23, 2010
Easy Lai /Manager
Regulation Center, Acer Inc.
Date
Série
Guia rápido
Série
Guia rápido
Para começar
1 2 3
2-2
3-2
3-1
2-1
Certifique-se de que a bateria
está fixa no respectivo lugar,
tal como indicado em 2-2.
4 5 6
As ilustrações são apenas uma referência. As especificações reais do produto podem variar.
1

Série
Guia rápido
Série
Guia rápido
Primeiro que tudo
Gostaríamos de lhe agradecer por ter escolhido um computador portátil Acer para preencher as suas necessidades de
computador móvel.
Os seus manuais
Para o ajudar a usar o seu computador portátil Acer, preparámos uma série de manuais*:
Antes de mais, o Guia Rápido ajuda-o a ligar e configurar o seu computador.
Para mais detalhes sobre como o seu computador o pode ajudar a ser mais produtivo, consulte o AcerSystem User Guide
(Manual do Utilizador AcerSystem). Esse manual contém informações pormenorizadas sobre temas como utilitários do
sistema, recuperação de dados, opções de expansão e solução de problemas. Além disso, contém a informação da garantia
e as regulamentações gerais e notas de segurança para o seu computador portátil. Está disponível no formato PDF (Portable
Document Format) e vem já instalado no seu computador.
Nota: É necessário o Adobe Reader para visualizar o ficheiro. Se o Adobe Reader não estiver instalado no seu computador,
ao clicar em AcerSystem User Guide é executado o programa de instalação do Acrobat Reader. Siga as instruções do ecrã
para finalizar a instalação. Para obter instruções sobre como utilizar o Adobe Reader, vá ao menu Ajuda e Suporte.
* AVISO IMPORTANTE: Os guias aqui mencionados, seja em formato impresso ou electrónico, são apenas de natureza
informativa e, exceptuando quando referido nas informações de garantia específicas, incluídas no AcerSystem User
Guide, nada do que consta destes guias constitui uma representação ou garantia da Acer relativamente ao produto que
adquiriu. A Acer declina expressamente qualquer responsabilidade por erros contidos nos guias.
2

Série
Guia rápido
Série
Guia rápido
Configuração de rede
Este guia ajudá-lo(a)-á a configurar as definições da sua LAN e rede sem fios para que possa ligar-se à Internet.
Configurar uma ligação LAN
Basta ligar o cabo LAN ao porto Ethernet (RJ-45). Consulte "Vista direita" na página 6 para saber a localização do porto
Ethernet.
Configurar uma ligação sem fios
1. Prima <Fn> + <F3> para aceder ao gestor de comunicação. Aqui poderá activar a ligação WI-Fi clicando no botão vermelho
junto de Wi-Fi.
Nota: Também pode aceder a 3G e Bluetooth através do gestor de comunicação. Os dispositivos de comunicação variam
consoante o modelo.
2. Clique no
ícone no seu tabuleiro de sistema e escolha o ponto de acesso sem fios ao qual se deseja ligar.
Inserir um cartão SIM 3G (apenas em certos modelos)
Retire a bateria e insira com cuidado o cartão SIM 3G na respectiva ranhura. Consulte “Vista traseira & Vista da base” na página
6 quanto à localização da ranhura para o cartão SIM 3G.
3

Série
Guia rápido
Série
Guia rápido
Vista de cima
Visita guiada ao seu
# Ícone Item Descrição
Aspire One
1
Webcam
Webcam para comunicação por vídeo
Acer Crystal Eye
(a configuração pode variar consoante o modelo).
Depois de configurar o seu computador como ilustrado
2
Microfone Microfone interno para gravação de som.
na secção Para começar, deixe-nos dar-lhe a conhecer o
seu novo portátil Acer.
3
Ecrã Também chamado ecrã de cristais líquidos (LCD),
permite visualizar a informação do computador
(a configuração pode variar consoante o modelo).
4
Botão de
Liga e desliga o computador.
alimentação
5
Teclado Para introduzir informações no seu computador.
6
Indicador de
Indica o estado da alimentação do computador.
1
alimentação
Indicador da
Indica o estado da bateria do computador.
1
bateria
1. A carregar: A luz é âmbar quando a bateria está
a carregar.
2. Carga completa: A luz é azul no modo CA.
Indicador HDD Indica quando o disco rígido está activo.
Indicador de
Indica o estado de comunicação Sem Fios LAN/3G.
1
comunicação
Luz azul ligada Luz laranja
Sem luz
ligada
3G ligado/
WiFi ligado
3G desligado/
3G desligado/
3G ligado/
WiFi ligado
WiFi desligado
WiFi desligado
7
Botões de clique
Os botões esquerdo e direito funcionam como os
(esquerdo e
botões esquerdo e direito de um rato.
direito)
8
Teclado táctil Dispositivo apontador sensível ao toque, que
funciona como um rato de computador.
9
Descanso de mãos Área confortável de apoio para as suas mãos
enquanto utiliza o computador.
1. Os indicadores no painel dianteiro são visíveis mesmo com a tampa do monitor
fechada.
4

Série
Guia rápido
Série
Guia rápido
Vista frontal, fechado
# Ícone Item Descrição
1
Indicadores de
Díodos Emissores de Luz (LED) que se
estado
acendem para mostrar o estado das funções e
componentes do computador.
Vista esquerda
2
Tomada de
Liga a um adaptador CA.
entrada CC
3
Ligação a ecrã
Liga a um dispositivo de visualização
externo (VGA)
(por exemplo, monitor externo, projector LCD).
4
Entrada USB 2.0 Liga a dispositivos USB 2.0 (por ex. rato USB,
câmara USB).
5
Série
Guia rápido
Série
Guia rápido
Vista direita
# Ícone Item Descrição
5
Leitor de cartões
Aceita cartõesSecure Digital (SD),
vários-em-um
MultiMediaCard (MMC), Memory Stick (MS),
Memory Stick PRO (MS PRO), xD-Picture
Card (xD).
Nota: Empurre para remover/instalar o cartão.
Apenas pode ser utilizado um cartão de cada
vez.
6
Conector de entrada
Aceita entradas de microfones externos.
do microfone
Tomada de
Liga a dispositivos de saída de áudio
auscultadores/
(por exemplo, altifalantes, auscultadores).
altifalante/saída
7
Entrada USB 2.0 Liga a dispositivos USB 2.0 (por ex. rato USB).
8
Ranhura de bloqueio
Liga a um cadeado de segurança Kensington
Kensington
(ou compatível).
9
Entrada Ethernet
Liga a uma rede Ethernet de base 10/100.
(RJ-45)
Vista traseira & Vista da base
10
Baía da bateria Contém a bateria do computador.
11
Ranhura para o cartão
Aceita um cartão SIM 3G para conectividade
SIM 3G
3G (apenas em certos modelos).
12
Patilha de libertação
Liberta a bateria para remoção.
da bateria
13
Bloqueio da bateria Bloqueia a bateria, mantendo-a no sítio.
14
Ranhuras de
Permite ao computador manter-se fresco,
ventilação e ventoinha
mesmo após uso prolongado.
de arrefecimento
Nota: Não tape nem obstrua a abertura da
ventoinha.
15
Altifalante Emite áudio do seu computador.
6

Série
Guia rápido
Ambiente
Temperatura:
Funcionamento: 5°C a 35°C
Não em funcionamento: -20°C a 65°C
Humidade (não condensação):
Funcionamento: 20% a 80%
Não em funcionamento: 20% a 80%
7

Serie
Snelgids

Serie
Snelgids
Serie
Snelgids
© 2010 Alle rechten voorbehouden
Snelgids voor de Aspire One Serie
Oorspronkelijke uitgave: 04/2010
Aspire One Serie Notebook PC
Modelnummer: ________________________________
Serienummer: _________________________________
Aankoopdatum: _______________________________
Plaats van aankoop: ___________________________

Serie
Snelgids
Serie
Snelgids
Federal Communications Commission
Declaration of Conformity
This device complies with Part 15 of the FCC Rules. Operation is subject to the following two conditions: (1) this device may not
cause harmful interference, and (2) this device must accept any interference received, including interference that may cause
undesired operation.
The following local Manufacturer/Importer is responsible for this declaration:
Product name: Notebook PC
Brand: Acer
Model number: PAV01
Machine type:
Aspire one series; AO533 series
Name of Responsible Party: Acer America Corporation
Address of responsible party: 333 West San Carlos St., San Jose
CA 95110, U. S. A.
Contact person: Acer Representative
Phone No.: 1-254-298-4000
Fax No.: 1-254-298-4147
April 23, 2010

Serie
Snelgids
Serie
Snelgids
CE Declaration of Conformity
We,
Acer Incorporated
8F, 88, Sec. 1, Hsin Tai Wu Rd., Hsichih, Taipei Hsien 221, Taiwan
Contact Person: Mr. Easy Lai, e-mail:easy_lai@acer.com.tw
And,
Acer Europe SA
Via Cantonale, Centro Galleria 2 6928 Manno Switzerland
Hereby declare that:
Product: Notebook Computer
Trade Name: Acer
Model Number: PAV01
Machine Type: Aspire one series; AO533 series
Is compliant with the essential requirements and other relevant provisions of the following EC directives, and that all the
necessary steps have been taken and are in force to assure that production units of the same product will continue comply with
the requirements.
R&TTE Directive 1999/5/EC as attested by conformity with the following harmonized standard:
• Article 3.1(a) Health and Safety
-. EN60950-1
-. EN62311
• Article 3.1(b) EMC
-. EN301 489-1
-. EN301 489-3 (Applicable to non-bluetooth wireless keyboard mouse set).
-. EN301 489-7
-. EN301 489-17
-. EN301 489-24

Serie
Snelgids
Serie
Snelgids
• Article 3.2 Spectrum Usages
-. EN300 440-2 (Applicable to non-bluetooth wireless keyboard mouse set).
-. EN300 328
-. EN301 511
-. EN301 893 (Applicable to 5GHz high performance RLAN).
-. EN301 908-1
-. EN301 908-2
EMC Directive 2004/108/EC as attested by conformity with the following harmonized standards:
-. EN55022, AS/NZS CISPR22, Class B
-. EN55024
-. EN61000-3-2 Class D
-. EN61000-3-3
Low Voltage Directive 2006/95/EC as attested by conformity with the following harmonized standard:
-. EN60950-1
RoHS Directive 2002/95/EC on the Restriction of the Use of certain Hazardous Substances in Electrical and Electronic Equipment
-. The maximum concentration values of the restricted substances by weight in homogenous material are:
Lead
0.1%
Polybrominated Biphenyls (PBB’s)
0.1%
Mercury
0.1%
Polybrominated Diphenyl Ethers (PBDE’s)
0.1%
Hexavalent Chromium
0.1%
Cadmium
0.01%
Directive 2009/125/EC with regard to establishing a framework for the setting of ecodesign requirements for energy-related
product.
Year to begin affixing CE marking 2010.
Apr. 23, 2010
Easy Lai /Manager
Regulation Center, Acer Inc.
Date

Serie
Snelgids
Serie
Snelgids
Aan de slag
1 2 3
2-2
3-2
3-1
2-1
Zorg dat de accu correct is
geplaatst, zoals is aangegeven
in 2-2.
4 5 6
Illustraties zijn alleen ter verwijzing. Daadwerkelijke productspecificaties kunnen afwijken.
1

Serie
Snelgids
Serie
Snelgids
Om te beginnen
Bedankt dat u hebt gekozen voor een notebook van Acer als oplossing voor uw mobiele computereisen.
Uw gidsen
Om u te helpen met het werken op het Acer notebook hebben we een aantal gidsen ontworpen*:
Allereerst helpt de Snelgids u bij het instellen van uw computer.
Als u meer wilt weten over hoe uw computer u kan helpen productiever te werken, raadpleeg dan de AcerSystem User Guide.
Deze Gebruikershandleiding bevat gedetailleerde informatie over onderwerpen zoals systeemfuncties, gegevensherstel,
uitbreidingsopties en probleem oplossen. Daarnaast bevat het informatie over garantie en de algemene voorwaarden en
veiligheid voor uw notebook. Het is als Portable Document Format (PDF) beschikbaar en is al van te voren op uw notebook
gezet.
Opmerking: Als u het bestand wilt inzien, dient Adobe Reader te zijn geïnstalleerd. Als Adobe Reader nog niet op uw
computer is geïnstalleerd, wordt, als u op AcerSystem User Guide klikt, eerst het installatieprogramma van Adobe Reader
gestart. Volg de instructies op het scherm om het programma te installeren. Gebruiksaanwijzingen bij Adobe Reader
vindt u in het menu Help en Ondersteuning.
* BELANGRIJKE MEDEDELING: Neem voor kennisgeving aan dat de hier genoemde gidsen, hetzij gedrukt of in
elektronische vorm, slechts ter naslag dienen en dat niets in deze gidsen een vertegenwoordiging of garantie van de
kant van Acer impliceert met betrekking tot het door u gekochte product, met uitzondering van de specifieke
garantie-informatie in de AcerSystem User Guide. Acer wijst uitdrukkelijke elke aansprakelijkheid af voor fouten in de
gidsen.
2

Serie
Snelgids
Serie
Snelgids
Netwerkconfiguratie
Deze handleiding helpt u bij het configureren van de instellingen voor LAN en draadloos netwerk zodat u verbinding met
internet kunt maken.
Lan-verbinding instellen
Steek gewoon de lan-kabel in de ethernetpoort (RJ-45). Zie "Rechterkant" op pagina 6 voor de plek van de ethernet-poort.
Een draadloze verbinding instellen
1. Druk op <Fn> + <F3> om communicatiebeheer te openen. Hier kunt u de Wi-Fi-verbinding inschakelen door op de rode knop
naast Wi-Fi te drukken.
Opmerking: Via communicatiebeheer zijn ook 3g en Bluetooth toegankelijk. Communicatieapparaten kunnen verschillen per
model.
2. Klik op het pictogram
in het systeemvak en kies het draadloos toegangspunt waarmee u verbinding wilt maken.
Een 3G-simkaart plaatsen (alleen voor bepaalde modellen)
Verwijder de batterij en plaats voorzichtig een 3g-sim-kaart in de 3g-sim-kaartsleuf. Zie "Achterkant & Onderkant" op pagina 6
voor de plek van de 3g-sim-kaartsleuf.
3
Serie
Snelgids
Serie
Snelgids
Bovenkant
Rondleiding door de
# Pictogram Item Beschrijving
Aspire One
1
Acer Crystal Eye
Webcam voor videocommunicatie
webcam
(configuratie kan per model verschillen).
Na het instellen van de computer zoals aangegeven
2
Microfoon Interne microfoon voor geluidsopname.
in het onderdeel Aan de slag, bent u nu klaar voor
een rondleiding door het nieuwe Acer notebook.
3
Beeldscherm Ook wel Liquid-Crystal Display (LCD)
genoemd, geeft de output van de computer
weer (configuratie kan per model verschillen).
4
Aan/uit knop Schakelt de computer aan en uit.
5
Toetsenbord Om gegevens in te voeren in de computer.
1
6
Stroomindicator
Geeft de vermogenstatus van de computer
aan.
1
Accu-indicator
Geeft de batterijstatus van de computer aan.
1. Opladen: Het licht is oranje wanneer de
accu wordt opgeladen.
2. Volledig opgeladen: Het licht is blauw in de
AC-modus.
HDD-indicator Licht op wanneer de harde schijf actief is.
Communicatie-
Geeft de status van draadloze lan/3g-
1
indicator
communicatie aan.
Blauw lampje
Oranje lampje
Brandt niet
aan
aan
3G aan/WiFi aan
3G uit/WiFi aan 3G uit/WiFi uit
3G aan/WiFi uit
7
Kliktoetsen
De toetsen links en rechts functioneren als de
(links en rechts)
linker en rechter muistoetsen.
8
Touchpad Tastgevoelig aanwijsapparaat dat functioneert
als een computermuis.
9
Polssteun Comfortabele ondersteuning voor uw handen
wanneer u de computer gebruikt.
1. De statusindicatoren aan de voorkant zijn zelfs zichtbaar als het scherm gesloten is.
4

Serie
Snelgids
Serie
Snelgids
Voorkant gesloten
# Pictogram Item Beschrijving
1
Statusindicatoren Light-Emitting Diodes (leds)
die oplichten om de status van
functies en componenten van de
computer aan te geven.
Linkerkant
2
Gelijkstroomaansluiting Aansluiting voor een adapter.
3
Externe weergavepoort
Aansluiting voor een beeldscherm
(VGA)
(bijv. een externe monitor, LCD-
projector).
4
USB 2.0-poort Aansluiting voor usb
2.0-apparaten (bijv. usb-muis, usb-
camera).
5

Serie
Snelgids
Serie
Snelgids
Rechterkant
# Pictogram Item Beschrijving
5
Meer-in-één-
Accepteert Secure Digital (SD),
kaartlezer
MultiMediaCard (MMC), Memory Stick
(MS), Memory Stick PRO (MS PRO) en
xD-Picture Card (xD).
Opmerking: Duwen om de kaart te
verwijderen/plaatsen. Er kan één kaart
tegelijk worden gebruikt.
6
Aansluiting voor
Aansluitingen voor externe microfoon.
Microfoon-in
Aansluiting voor
Aansluiting voor lijn-uit audioapparaten
hoofdtelefoon/
(bijv. luidsprekers, hoofdtelefoon).
luidspreker/lijn-uit
7
USB 2.0-poort Aansluiting voor usb 2.0-apparaten
(bijv. usb-muis).
8
Sleuf voor
Aansluiting voor een Kensington-
Kensington-slot
compatibel computerbeveiligingsslot.
9
Ethernetpoort (RJ-45) Aansluiting voor een op Ethernet
10/100-gebaseerd netwerk.
Achterkant & Onderkant
10
Batterijnis Bevat de batterij van de computer.
11
3g-sim-kaartsleuf Accepteert een 3g-sim-kaart voor
3g-verbindingsmogelijkheden (alleen
voor bepaalde modellen).
12
Batterijvergrendeling Maakt de batterij los.
13
Batterijgrendel Vergrendelt de accu op z’n plaats.
14
Ventilatiesleuven en
Zorgen dat de computer koel blijft, zelfs
koelventilator
na langdurig gebruik.
Opmerking: Dek de opening van de
ventilator nooit af.
15
Luidspreker Laat het geluid van de computer horen.
6

Serie
Snelgids
Omgeving
Temperatuur:
In gebruik: 5°C tot 35°C
Niet in gebruik: -20°C tot 65°C
Vochtigheidsgraad (geen condensvorming):
In gebruik: 20% tot 80%
Niet in gebruik: 20% tot 80%
7

-serien
Hurtigguide

-serien
Hurtigguide
-serien
Hurtigguide
© 2010 Med enerett
Hurtigguide for Aspire One-serien
Opprinnelig utgave: 04/2010
Notebook-PC i Aspire One-serien
Modellnummer: _______________________________
Serienummer: _________________________________
Innkjøpsdato: _________________________________
Innkjøpssted: __________________________________

-serien
Hurtigguide
-serien
Hurtigguide
Federal Communications Commission
Declaration of Conformity
This device complies with Part 15 of the FCC Rules. Operation is subject to the following two conditions: (1) this device may not
cause harmful interference, and (2) this device must accept any interference received, including interference that may cause
undesired operation.
The following local Manufacturer/Importer is responsible for this declaration:
Product name: Notebook PC
Brand: Acer
Model number: PAV01
Machine type:
Aspire one series; AO533 series
Name of Responsible Party: Acer America Corporation
Address of responsible party: 333 West San Carlos St., San Jose
CA 95110, U. S. A.
Contact person: Acer Representative
Phone No.: 1-254-298-4000
Fax No.: 1-254-298-4147
April 23, 2010

-serien
Hurtigguide
-serien
Hurtigguide
CE Declaration of Conformity
We,
Acer Incorporated
8F, 88, Sec. 1, Hsin Tai Wu Rd., Hsichih, Taipei Hsien 221, Taiwan
Contact Person: Mr. Easy Lai, e-mail:easy_lai@acer.com.tw
And,
Acer Europe SA
Via Cantonale, Centro Galleria 2 6928 Manno Switzerland
Hereby declare that:
Product: Notebook Computer
Trade Name: Acer
Model Number: PAV01
Machine Type: Aspire one series; AO533 series
Is compliant with the essential requirements and other relevant provisions of the following EC directives, and that all the
necessary steps have been taken and are in force to assure that production units of the same product will continue comply with
the requirements.
R&TTE Directive 1999/5/EC as attested by conformity with the following harmonized standard:
• Article 3.1(a) Health and Safety
-. EN60950-1
-. EN62311
• Article 3.1(b) EMC
-. EN301 489-1
-. EN301 489-3 (Applicable to non-bluetooth wireless keyboard mouse set).
-. EN301 489-7
-. EN301 489-17
-. EN301 489-24

-serien
Hurtigguide
-serien
Hurtigguide
• Article 3.2 Spectrum Usages
-. EN300 440-2 (Applicable to non-bluetooth wireless keyboard mouse set).
-. EN300 328
-. EN301 511
-. EN301 893 (Applicable to 5GHz high performance RLAN).
-. EN301 908-1
-. EN301 908-2
EMC Directive 2004/108/EC as attested by conformity with the following harmonized standards:
-. EN55022, AS/NZS CISPR22, Class B
-. EN55024
-. EN61000-3-2 Class D
-. EN61000-3-3
Low Voltage Directive 2006/95/EC as attested by conformity with the following harmonized standard:
-. EN60950-1
RoHS Directive 2002/95/EC on the Restriction of the Use of certain Hazardous Substances in Electrical and Electronic Equipment
-. The maximum concentration values of the restricted substances by weight in homogenous material are:
Lead
0.1%
Polybrominated Biphenyls (PBB’s)
0.1%
Mercury
0.1%
Polybrominated Diphenyl Ethers (PBDE’s)
0.1%
Hexavalent Chromium
0.1%
Cadmium
0.01%
Directive 2009/125/EC with regard to establishing a framework for the setting of ecodesign requirements for energy-related
product.
Year to begin affixing CE marking 2010.
Apr. 23, 2010
Easy Lai /Manager
Regulation Center, Acer Inc.
Date

-serien
Hurtigguide
-serien
Hurtigguide
Før vi begynner
1 2 3
2-2
3-2
3-1
2-1
Kontroller at batteriet er låst på
plass som vist i 2-2.
4 5 6
Bildene er kun til illustrasjon. De faktiske produkt spesifikasjonene kan variere.
1

-serien
Hurtigguide
-serien
Hurtigguide
Begynne med begynnelsen
Vi vil gjerne takke deg for at du har valgt en Acer-notebook til dine mobile databehandlingsbehov.
Dine veiledere
Som hjelp til bruk av Acer-notebooken har vi utarbeidet et sett av guider*:
Den første er hurtigguiden, som hjelper deg i gang med oppsettet av datamaskinen.
Hvis du vil vite mer om hvordan datamaskinen kan hjelpe deg med å bli mer produktiv, vennligst slå opp i AcerSystem User
Guide. Denne guiden innholder detaljert informasjon om emner som systemverktøy, datagjenvinning, utbyggingsalternativer
og feilsøking/problemløsing. I tillegg finner du garantiopplysninger, generell informasjon og sikkerhetsmerknader for
notisbokmaskinen din. Boken er tilgjengelig som PDF-fil (Portable Document Format) og leveres forhåndslastet på maskinen.
Merk: Visning av filen krever Adobe Reader. Hvis Adobe Reader ikke er installert på datamaskinen, vil klikking på
AcerSystem User Guide føre til at installeringsprogrammet for Adobe Reader kjøres først. Følg instruksjonene på skjermen
for å fullføre installeringen. Hvis du vil ha instruksjoner i bruk av Adobe Reader, se menyen Hjelp og støtte.
* VIKTIG MERKNAD: Vennligst merk at guidene som nevnes her, enten de er i trykt eller elektronisk form, er beregnet på
dine referanseformål. Med unntak av det som er nevnt i den bestemte garantiinformasjonen i AcerSystem User Guide,
er det ingenting i disse guidene som utgjør en påstand eller en garanti fra Acer om produktet du har kjøpt.
Acer fraskriver seg uttrykkelig ethvert ansvar for feil som måtte forekomme i disse guidene og håndbøkene.
2

-serien
Hurtigguide
-serien
Hurtigguide
Nettverkskonfigurasjon
Denne guiden vil hjelpe deg med å konfigurere innstillinger for LAN og trådløst nettverk slik at du kan koble deg til Internett.
Sette opp en LAN-tilkobling
Plugg inn LAN-kabelen i Ethernet-porten (RJ-45). Se "Høyre visning" på side 6 hvis du vil finne Ethernet-portens plassering.
Sette opp en trådløs tilkobling
1. Trykk på <Fn> + <F3> for å få tilgang til kommunikasjonsstyring. Her kan du slå på Wi-Fi-tilkoblingen ved å klikke på den
røde knappen ved siden av Wi-Fi.
Merk: 3G og Bluetooth er også tilgjengelige gjennom kommunikasjonsstyring. Kommunikasjonsenheter kan variere avhengig
av modell.
2. Klikk på ikonet i systemskuffen, og velg det trådløse tilgangspunktet du vil koble deg til.
Sette inn et 3G SIM-kort (bare for visse modeller)
Fjern batteriet og sett forsiktig inn et 3G SIM-kort i 3G SIM-kortsporet. Under "Bakre visning & Bunnvisning" på side 6 kan du se
3G SIM-kortsporets plassering.
3
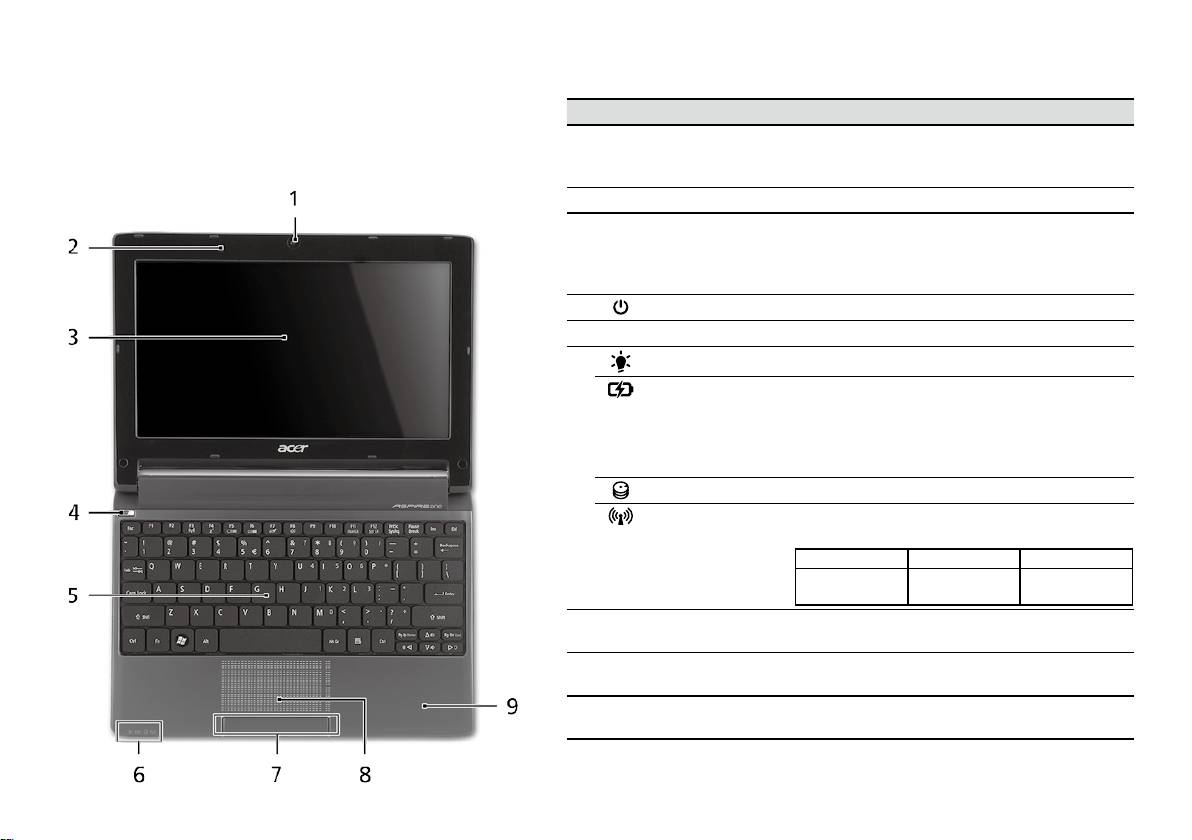
-serien
Hurtigguide
-serien
Hurtigguide
Visning ovenfra
Din Aspire One-omvisning
# Ikon Element Beskrivelse
Etter at du har satt opp datamaskinen som illustrert i
1
Acer Crystal Eye-
Webkamera til videokommunikasjon
avsnittet Før vi begynner, vil vi nå gjerne vise deg den nye
webkamera
(konfigurasjonen kan variere mellom
Acer-notebooken.
modellene).
2
Mikrofon Intern mikrofon for lydinnspilling.
3
Skjerm Kalles også LCD-skjerm (Liquid-Crystal
Display; LCD), viser utdata fra datamaskinen
(konfigurasjonen kan variere mellom
modellene).
4
Av/på-knapp Slår datamaskinen av og på.
5
Tastatur Legger inn data i datamaskinen.
1
6
Strømindikator
Angir datamaskinens strømstatus.
1
Batteriindikator
Angir datamaskinens batteristatus.
1. Lading: Lampen lyser gult når batteriet
lades.
2. Helt oppladet: Lampen lyser blått i
nettstrømmodus.
Harddiskindikator Lyser når harddisken er aktiv.
Kommunikasjon-
Angir statusen for trådløs LAN/3G-
1
sindikator
kommunikasjon.
Blått lys på Oransjelys på Ikke tent
3G på/WiFi på
3G av/WiFi på 3G av/WiFi av
3G på/WiFi av
7
Klikkeknapper
Venstre og høyre knapp fungere på samme
(venstre og høyre)
måte som venstre og høyre museknapp.
8
Pekeplate Pekeenhet som reagerer på berøring og
fungerer som en mus.
9
Håndleddshviler Komfortabelt støtteområde for hendene når
du bruker datamaskinen.
1. Frontpanelindikatorene er synlige selv når datamaskindekselet er lukket.
4

-serien
Hurtigguide
-serien
Hurtigguide
Lukket frontvisning
# Ikon Element Beskrivelse
1
Statusindikatorer Lamper (LED) som tennes for å vise
statusen for datamaskinens funksjoner og
komponenter.
Venstre visning
2
Strømtilkobling Kobler til en batterieliminator.
3
Port for ekstern
Kobler til en skjermenhet (f.eks. ekstern
skjerm (VGA)
skjerm, LCD-projektor).
4
USB 2.0-port Kobler til USB 2.0-enheter (f.eks. USB-mus,
USB-kamera).
5
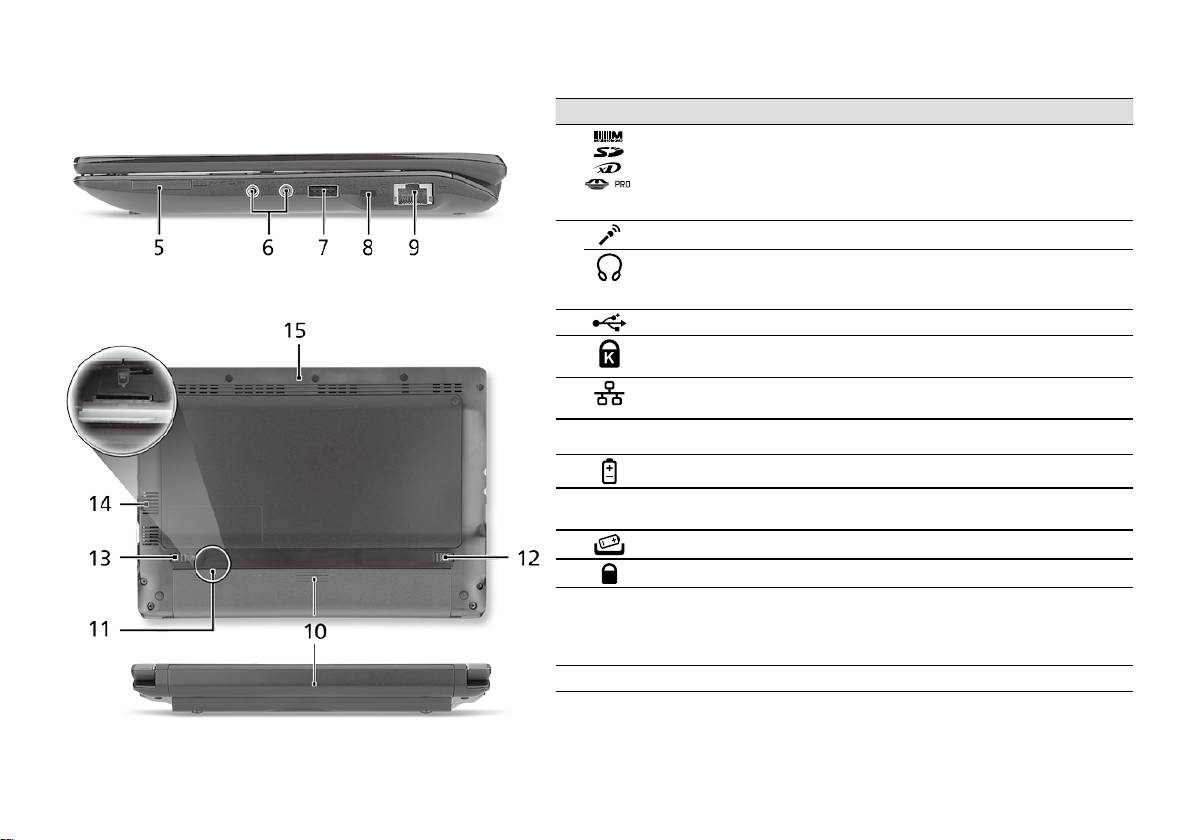
-serien
Hurtigguide
-serien
Hurtigguide
Høyre visning
# Ikon Element Beskrivelse
5
Multi-i-1-kortleser Godtar Secure Digital (SD), MultiMediaCard
(MMC), Memory Stick (MS), Memory Stick
Pro (MS PRO), og xD-Picture Card (xD).
Merk: Skyv inn for å fjerne/installere kortet.
Bare ett kort kan være i bruk til enhver tid.
6
Mikrofonplugg Mottar inndata fra eksterne mikrofoner.
Hodetelefon/
Kobler til utdataenheter for lyd
høyttalere/line-out-
(f.eks. høyttalere, hodetelefon).
port
7
USB 2.0-port Kobler til USB 2.0-enheter (f.eks. USB-mus).
8
Spor for Kensington-
Kobler til en Kensington-kompatibel
lås
sikkerhetslås for datamaskinen.
9
Ethernet-port (RJ-45) Kobler til et Ethernet 10/100-basert
nettverk.
Bakre visning & Bunnvisning
10
Batterirom Huser datamaskinens batterier.
11
3G SIM-kortspor Godtar et 3G SIM-kort for 3G-tilkoblinger
(bare for visse modeller).
12
Batterifrigivelsesbolt Frigir batteriet for fjerning.
13
Batterilås Låser batteriet på plass.
14
Ventilasjonsåpninger
Gir datamaskinen mulighet til å holde seg
og kjølevifte
kjølig, selv etter lang tids bruk.
Merk: Ikke dekk til eller blokker viftens
åpning.
15
Høyttaler Spiller av lyd fra datamaskinen.
6

-serien
Hurtigguide
Miljø
Temperatur:
Drift: 5°C til 35°C
Ikke i bruk: -20°C til 65°C
Luftfuktighet (ikke-kondenserende):
Drift: 20% til 80%
Ikke i bruk: 20% til 80%
7

Seriens
Hurtig-guide

Seriens
Hurtig-guide
Seriens
Hurtig-guide
© 2010 Alle rettigheder forbeholdes
Aspire One Seriens Hurtig-guide
Oprindeligt udgivet: 04/2010
Aspire One seriens notebook-pc
Modelnummer: ________________________________
Serienummer: _________________________________
Købsdato: _____________________________________
Købt hos: _____________________________________

Seriens
Hurtig-guide
Seriens
Hurtig-guide
Federal Communications Commission
Declaration of Conformity
This device complies with Part 15 of the FCC Rules. Operation is subject to the following two conditions: (1) this device may not
cause harmful interference, and (2) this device must accept any interference received, including interference that may cause
undesired operation.
The following local Manufacturer/Importer is responsible for this declaration:
Product name: Notebook PC
Brand: Acer
Model number: PAV01
Machine type:
Aspire one series; AO533 series
Name of Responsible Party: Acer America Corporation
Address of responsible party: 333 West San Carlos St., San Jose
CA 95110, U. S. A.
Contact person: Acer Representative
Phone No.: 1-254-298-4000
Fax No.: 1-254-298-4147
April 23, 2010

Seriens
Hurtig-guide
Seriens
Hurtig-guide
CE Declaration of Conformity
We,
Acer Incorporated
8F, 88, Sec. 1, Hsin Tai Wu Rd., Hsichih, Taipei Hsien 221, Taiwan
Contact Person: Mr. Easy Lai, e-mail:easy_lai@acer.com.tw
And,
Acer Europe SA
Via Cantonale, Centro Galleria 2 6928 Manno Switzerland
Hereby declare that:
Product: Notebook Computer
Trade Name: Acer
Model Number: PAV01
Machine Type: Aspire one series; AO533 series
Is compliant with the essential requirements and other relevant provisions of the following EC directives, and that all the
necessary steps have been taken and are in force to assure that production units of the same product will continue comply with
the requirements.
R&TTE Directive 1999/5/EC as attested by conformity with the following harmonized standard:
• Article 3.1(a) Health and Safety
-. EN60950-1
-. EN62311
• Article 3.1(b) EMC
-. EN301 489-1
-. EN301 489-3 (Applicable to non-bluetooth wireless keyboard mouse set).
-. EN301 489-7
-. EN301 489-17
-. EN301 489-24

Seriens
Hurtig-guide
Seriens
Hurtig-guide
• Article 3.2 Spectrum Usages
-. EN300 440-2 (Applicable to non-bluetooth wireless keyboard mouse set).
-. EN300 328
-. EN301 511
-. EN301 893 (Applicable to 5GHz high performance RLAN).
-. EN301 908-1
-. EN301 908-2
EMC Directive 2004/108/EC as attested by conformity with the following harmonized standards:
-. EN55022, AS/NZS CISPR22, Class B
-. EN55024
-. EN61000-3-2 Class D
-. EN61000-3-3
Low Voltage Directive 2006/95/EC as attested by conformity with the following harmonized standard:
-. EN60950-1
RoHS Directive 2002/95/EC on the Restriction of the Use of certain Hazardous Substances in Electrical and Electronic Equipment
-. The maximum concentration values of the restricted substances by weight in homogenous material are:
Lead
0.1%
Polybrominated Biphenyls (PBB’s)
0.1%
Mercury
0.1%
Polybrominated Diphenyl Ethers (PBDE’s)
0.1%
Hexavalent Chromium
0.1%
Cadmium
0.01%
Directive 2009/125/EC with regard to establishing a framework for the setting of ecodesign requirements for energy-related
product.
Year to begin affixing CE marking 2010.
Apr. 23, 2010
Easy Lai /Manager
Regulation Center, Acer Inc.
Date

Seriens
Hurtig-guide
Seriens
Hurtig-guide
Kun for begyndere
1 2 3
2-2
3-2
3-1
2-1
Sørg for, at batteriet er korrekt
låst på plads. Se tegning i 2-2.
4 5 6
Billederne er kun til illustration. De faktiske produktspecifikationer kan variere.
1

Seriens
Hurtig-guide
Seriens
Hurtig-guide
For det første
Vi vil gerne takke for, at du har valgt en Acer bærbar til at opfylde dine mobile computerbehov.
Dine vejledninger
Vi har designet et sæt vejledninger, som hjælper dig med at bruge din Acer bærbare*:
For det første hjælper hurtigvejledningen dig med at komme i gang med at konfigurere din computer.
Der henvises til AcerSystem-brugervejledningen, hvor du kan få flere oplysninger om, hvordan din computer kan hjælpe dig
med at blive mere produktiv. Denne vejledning indeholder detaljerede oplysninger om emner som systemhjælpeprogrammer,
datagenoprettelse, udvidelsesvalg og fejlfinding. Derudover indeholder den garantioplysninger og generelle regulativer
og sikkerhedsmeddelelser til din bærbare. Den findes i Portable Document Format (PDF) og leveres forudindstalleret på din
bærbare.
Bemærk: Visning af filen kræver Adobe Reader. Hvis Adobe Reader ikke er installeret på din computer, vil klik på
AcerSystem-brugervejledningen først køre installationsprogrammet til Adobe Reader. Følg instruktionerne på skærmen
for at fuldføre installationen. Instruktioner om, hvordan du bruger Adobe Reader, fås i menuen Hjælp og support.
* VIGTIGT: Bemærk, at de vejledninger, der nævnes heri, hvad enten de er trykt eller i elektronisk format, kun
er til referenceformål, og med undtaelse af det, som er angivet i bestemte garantioplysninger i AcerSystem-
brugervejledningen, vil intet i disse vejledninger udgøre en indsigelse eller garanti fra Acer med hensyn til det produkt,
du købte. Acer fraskriver sig udtrykkeligt ethvert ansvar for fejl i disse vejledninger.
2
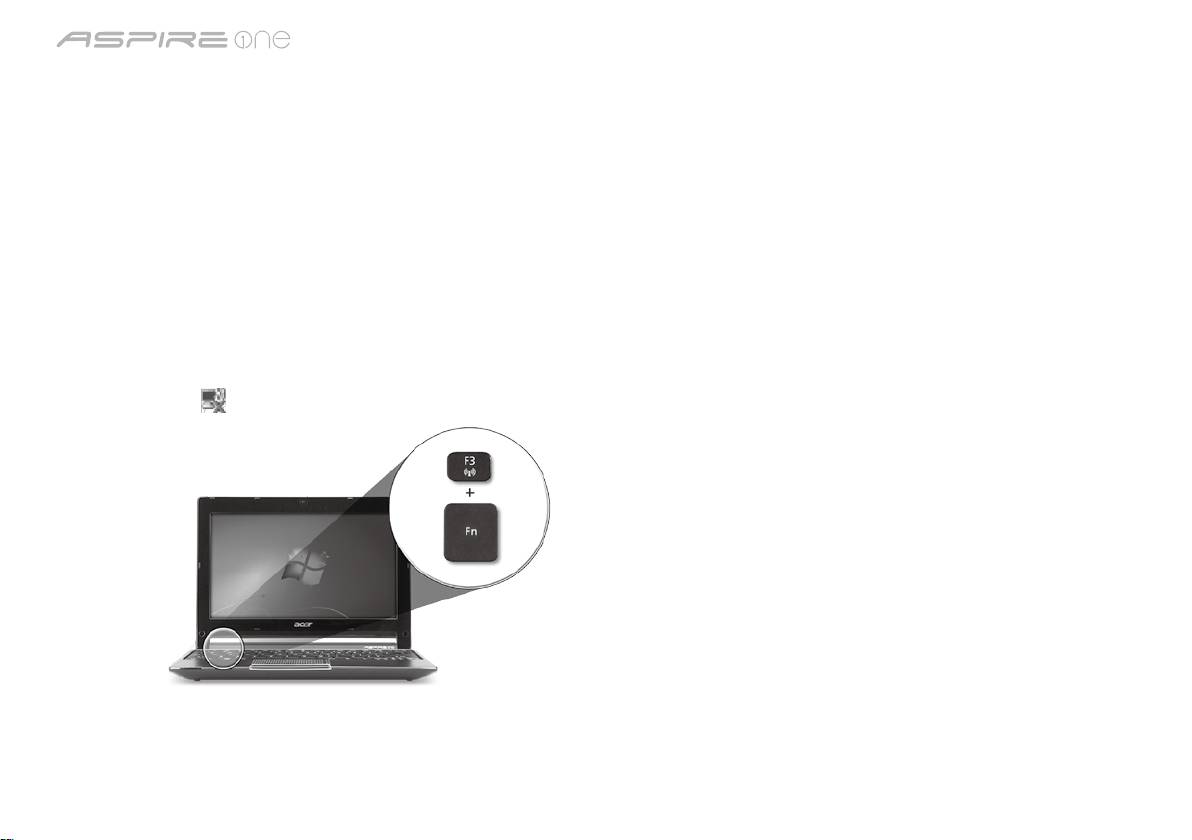
Seriens
Hurtig-guide
Seriens
Hurtig-guide
Netværkskonfiguration
Denne vejledning hjælper dig med at konfigurere dine indstillinger for LAN og trådløst netværk, så du sættes i stand til at
oprette forbindelse til internettet.
Opsætning af LAN-forbindelse
Indsæt LAN-kablet i Ethernet'ets (RJ-45)-port. Der henvises til "Fra højre" på side 6 for at se placerinen af Ethernet-porten.
Opsætning af en trådløs forbindelse
1. Tryk på <Fn> + <F3> for at få adgang til Kommunikationsadministrator. Her kan du tænde for Wi-Fi-forbindelsen ved at
klikke på den røde kan ved siden af Wi-Fi.
Bemærk: Der er også adgang til 3G og Bluetooth via kommunikationsadministratoren. Kommunikationsenheder kan variere
efter model.
2. Klik på ikonet
i din systembakke, og vælg det trådløse adgangspunkt, som du vil oprette forbindelse til.
Indsættelse af et 3G-SIM-kort (kun på visse modeller)
Fjern batteriet, og indsæt et 3G-SIM-kort forsigtigt i 3G-SIM-kortstikket. Der henvises til "Bagfra & Nedefra" på side 6, hvor du
kan se, hvor 3G-SIM-kortstikket sidder.
3
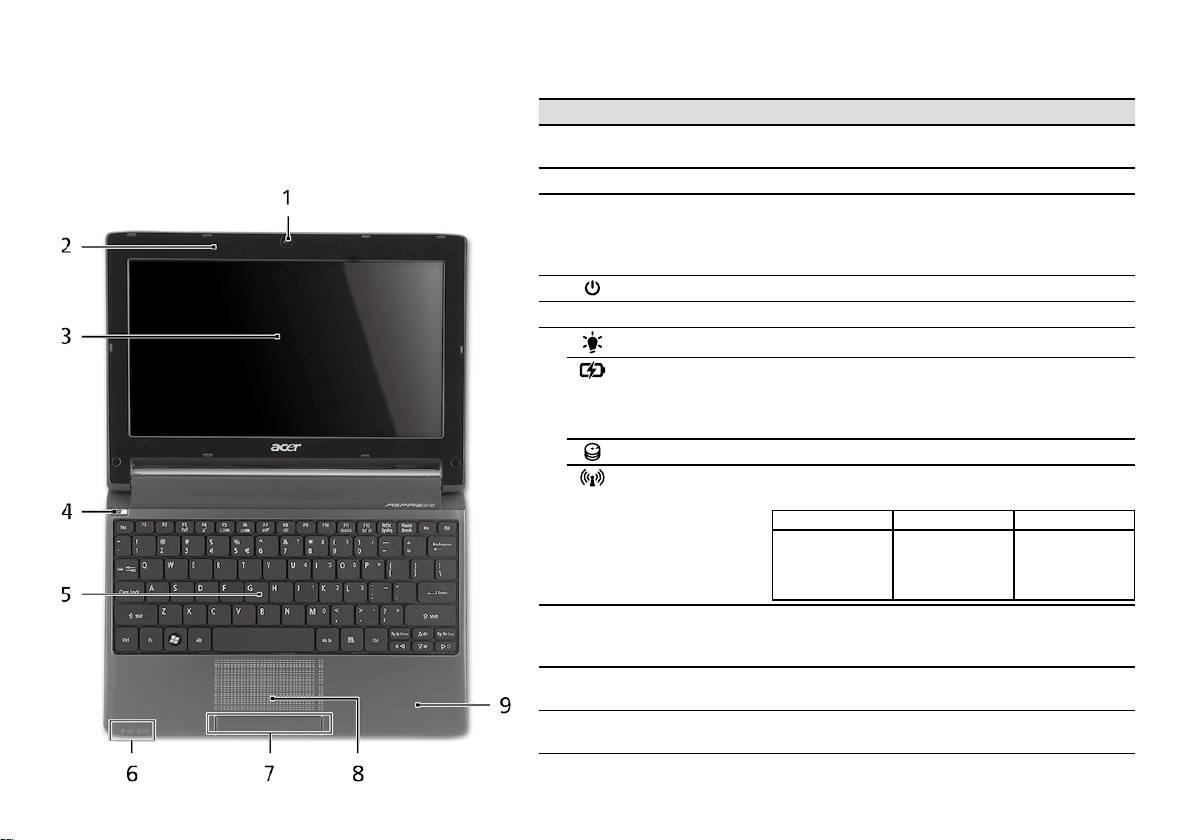
Seriens
Hurtig-guide
Seriens
Hurtig-guide
Fra oven
Din Aspire One-tur
# Ikon Emne Beskrivelse
Når du har konfigureret din computer som vist i
1
Acer Crystal Eye
Webkamera til videokommunikation
afsnittet Kun for begyndere, vil vi vise dig rundt på
webcam
(konfiguration kan varierer fra model til model).
din nye Acer Notebook.
2
Mikrofon Intern mikrofon til optagelse af lyd.
3
Skærm Det kaldes også for et LCD (Liquid-Crystal
Display - flydende krystaldisplay), og det viser
computerens output (konfiguration kan varierer
fra model til model).
4
Afbryderknap Tænder/slukker for computeren.
5
Tastatur Til indtastning af data på computeren.
1
6
Strømindikator
Angiver computerens strømstatus.
1
Batteriindikator
Angiver computerens batteristatus.
1. Oplader: Lampen lyser gult, når batteriet
oplader.
2. Fuldt opladet: Lampen lyser blåt i AC-tilstand.
Harddiskindikator Lyser, når harddisken er aktiv.
Kommunikation-
Angiver status for den trådløse LAN/3G-
1
sindikator
kommunikation.
Blåt lys tændt Orange lys tændt Ikke tændt
3G aktiveret/
WiFi aktiveret
3G deaktiveret/
3G deaktiveret/
3G aktiveret/
WiFi aktiveret
WiFi deaktiveret
WiFi deaktiveret
7
Klik-knapper (til
Knapperne til højre og venstre fungerer på
venstre og til højre)
samme måde som musens højre og venstre
knapper.
8
Touchpad
Et berøringsfølsomt pegeredskab, der fungerer
(pegefelt)
ligesom en computermus.
9
Håndfladestøtte Et komfortabelt støtteområde for dine hænder,
når du bruger computeren.
1. Frontpanelets indikatorer er synlige, selvom computerens låg er lukket.
4

Seriens
Hurtig-guide
Seriens
Hurtig-guide
Forfra - Lukket
# Ikon Emne Beskrivelse
1
Statusindikatorer LED'er (Light-Emitting Diodes), der lyser for
at vise status for computerens funktioner
og komponenter.
Fra venstre
2
Jævnstrøm ind-stik Tilslutter til en AC-adapter.
3
Stik til ekstern
Tilslutter til en skærmenhed
skærm (VGA)
(f.eks. ekstern skræm, LCD-projektor).
4
USB 2.0-port Tilslutter til USB 2.0-enheder
(f.eks. USB-mus, USB-kamera).
5

Seriens
Hurtig-guide
Seriens
Hurtig-guide
Fra højre
# Ikon Emne Beskrivelse
5
Flere-i-en-kortlæser Accepterer Secure Digital (SD),
MultiMediaCard (MMC), Memory Stick
(MS), Memory Stick PRO (MS PRO),
xD-Picture Card (xD).
Bemærk: Skub for at fjerne/installere
kortet. Der kan kun være et kort aktivt ad
gangen.
6
Mikrofonstik Accepterer input fra eksterne mikrofoner.
Hovedtelefoner/
Der kan tilsluttes ekstraudstyr
højttalere/linje ud-stik
(f. eks. højtalere, hovedtelefoner).
7
USB 2.0-port Tilslutter til USB 2.0-enheder
(f.eks. USB-mus).
8
Åbning til en
Tilslutter til en Kensington-kompatibel
Kensington-lås
computers sikkerhedslås.
9
Netværksport (RJ-45) Tilslutter til et Ethernet 10/100-baseret
netværk.
Bagfra & Nedefra
10
Batterirum Indeholder computerens batteri.
11
3G-SIM-kortstik Accepterer et 3G SIM-kort til
3G-forbindelse (kun på visse modeller).
12
Frigørelsesarm til
Frigør batteriet til udtagning.
batteri
13
Batterilås Låser batteriet på plads.
14
Ventilationshuller og
Lader computeren være kølig selv efter
køleblæser
lang tids brug.
Bemærk: Du må aldrig tildække eller
spærre åbningen til køleren.
15
Højtaler Udsender lyd fra computeren.
6

Seriens
Hurtig-guide
Omgivelser
Temperatur:
Under brug: 5°C til 35°C
Ikke i brug: -20°C til 65°C
Fugtighed (ikke-kondenserende):
Under brug: 20% til 80%
Ikke i brug: 20% til 80%
7

-serien
Snabbguide

-serien
Snabbguide
-serien
Snabbguide
© 2010 Med ensamrätt
Aspire One-serien - Snabbguide
Ursprunglig utgåva: 04/2010
Aspire One-serien – bärbar PC-dator
Modellnummer: _______________________________
Serienummer: _________________________________
Inköpsdatum: _________________________________
Inköpsställe: __________________________________

-serien
Snabbguide
-serien
Snabbguide
Federal Communications Commission
Declaration of Conformity
This device complies with Part 15 of the FCC Rules. Operation is subject to the following two conditions: (1) this device may not
cause harmful interference, and (2) this device must accept any interference received, including interference that may cause
undesired operation.
The following local Manufacturer/Importer is responsible for this declaration:
Product name: Notebook PC
Brand: Acer
Model number: PAV01
Machine type:
Aspire one series; AO533 series
Name of Responsible Party: Acer America Corporation
Address of responsible party: 333 West San Carlos St., San Jose
CA 95110, U. S. A.
Contact person: Acer Representative
Phone No.: 1-254-298-4000
Fax No.: 1-254-298-4147
April 23, 2010

-serien
Snabbguide
-serien
Snabbguide
CE Declaration of Conformity
We,
Acer Incorporated
8F, 88, Sec. 1, Hsin Tai Wu Rd., Hsichih, Taipei Hsien 221, Taiwan
Contact Person: Mr. Easy Lai, e-mail:easy_lai@acer.com.tw
And,
Acer Europe SA
Via Cantonale, Centro Galleria 2 6928 Manno Switzerland
Hereby declare that:
Product: Notebook Computer
Trade Name: Acer
Model Number: PAV01
Machine Type: Aspire one series; AO533 series
Is compliant with the essential requirements and other relevant provisions of the following EC directives, and that all the
necessary steps have been taken and are in force to assure that production units of the same product will continue comply with
the requirements.
R&TTE Directive 1999/5/EC as attested by conformity with the following harmonized standard:
• Article 3.1(a) Health and Safety
-. EN60950-1
-. EN62311
• Article 3.1(b) EMC
-. EN301 489-1
-. EN301 489-3 (Applicable to non-bluetooth wireless keyboard mouse set).
-. EN301 489-7
-. EN301 489-17
-. EN301 489-24

-serien
Snabbguide
-serien
Snabbguide
• Article 3.2 Spectrum Usages
-. EN300 440-2 (Applicable to non-bluetooth wireless keyboard mouse set).
-. EN300 328
-. EN301 511
-. EN301 893 (Applicable to 5GHz high performance RLAN).
-. EN301 908-1
-. EN301 908-2
EMC Directive 2004/108/EC as attested by conformity with the following harmonized standards:
-. EN55022, AS/NZS CISPR22, Class B
-. EN55024
-. EN61000-3-2 Class D
-. EN61000-3-3
Low Voltage Directive 2006/95/EC as attested by conformity with the following harmonized standard:
-. EN60950-1
RoHS Directive 2002/95/EC on the Restriction of the Use of certain Hazardous Substances in Electrical and Electronic Equipment
-. The maximum concentration values of the restricted substances by weight in homogenous material are:
Lead
0.1%
Polybrominated Biphenyls (PBB’s)
0.1%
Mercury
0.1%
Polybrominated Diphenyl Ethers (PBDE’s)
0.1%
Hexavalent Chromium
0.1%
Cadmium
0.01%
Directive 2009/125/EC with regard to establishing a framework for the setting of ecodesign requirements for energy-related
product.
Year to begin affixing CE marking 2010.
Apr. 23, 2010
Easy Lai /Manager
Regulation Center, Acer Inc.
Date

-serien
Snabbguide
-serien
Snabbguide
Komma igång
1 2 3
2-2
3-2
3-1
2-1
Se till att batteriet sitter
ordentligt på plats enligt
bilden 2-2.
4 5 6
Illustrationerna är endast avsedda för referensändamål. De faktiska produktspecifikationerna kan variera.
1

-serien
Snabbguide
-serien
Snabbguide
Först och främst
Vi vill tacka för att du valde en bärbar Acer-dator för att uppfylla dina behov av mobil databehandling.
Dina guider
Vi har framställt en rad guider som hjälper dig att använda den bärbara Acer-datorn*:
Snabbguiden hjälper dig att komma igång med installation av datorn.
Om du vill veta mer om hur datorn kan hjälpa dig att bli mer produktiv studerar du AcerSystem User Guide. I den här guiden
finns detaljerad information om ämnen som systemfunktioner, återställning av data, utbyggnadsalternativ och felsökning.
Dessutom innehåller den garantiinformation samt allmänna föreskrifter och säkerhetsmeddelanden angående den bärbara
datorn. Den finns i Portable Document Format (PDF) och har förladdats i den bärbara datorn.
Obs! Adobe Reader krävs för visning av filen. Om du inte har Adobe Reader i datorn klickar du på AcerSystem User Guide
för att köra installationsprogrammet för Adobe Reader. Följ anvisningarna på skärmen för att genomföra installationen.
Instruktioner om användning av Adobe Reader finns under menyn Hjälp och support.
* VIKTIGT MEDDELANDE: Observera att guiderna som nämns häri, oavsett om de är i tryckt eller elektroniskt format,
endast är avsedda för referensändamål och förutom vad som anges i den särskilda garantiinformationen i AcerSystem
User Guide ska inget i de här guiderna utgöra en uppgift eller garanti från Acer avseende den produkt du har köpt.
Acer friskriver sig uttryckligen ansvaret för fel i de här guiderna.
2

-serien
Snabbguide
-serien
Snabbguide
Nätverkskonfiguration
Den här guiden hjälper dig att konfigurera inställningar för LAN och trådlöst nätverk så att du kan ansluta till Internet.
Upprätta LAN-anslutning
Anslut bara LAN-kabeln till Ethernet-porten (RJ-45). I "Vy från höger" på sidan 6 finns uppgifter om Ethernet-portens placering.
Upprätta en trådlös anslutning
1. Tryck på <Fn> + <F3> för att komma åt kommunikationshanteraren. Här kan du slå på Wi-Fi-anslutningen genom att klicka
på den röda knappen bredvid Wi-Fi.
Obs! 3G och Bluetooth är också tillgängliga via kommunikationshanteraren. Kommunikationsenheterna kan variera mellan
olika modeller.
2. Klicka på ikonen i systemfältet och välj den trådlösa åtkomstpunkt som du vill ansluta till.
Sätta i ett 3G-SIM-kort (bara för vissa modeller)
Ta bort batteriet och för försiktigt in ett 3G-SIM-kort på kortplatsen för 3G-SIM-kort. 3G-SIM-kortplatsens placering visas i
“Vy över baksidan & Vy över basen” på sidan 6.
3
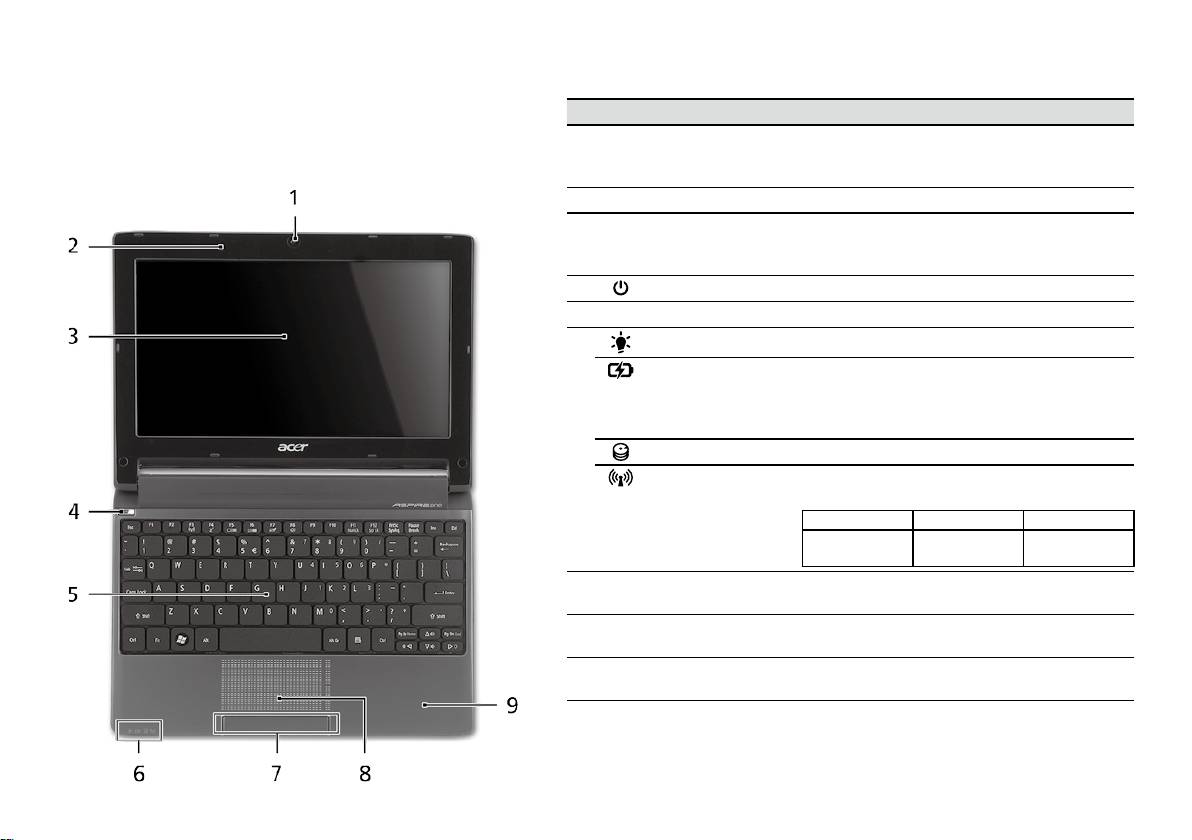
-serien
Snabbguide
-serien
Snabbguide
Vy över ovansidan
Visning av Aspire One
# Ikon Objekt Beskrivning
När du har ställt in datorn enligt beskrivning i avsnittet
1
Acer Crystal Eye
Webbkamera för videokommunikation
Komma igång vill vi gärna visa dig din nya bärbara dator
webbkamera
(konfigurationen kan variera med olika
från Acer.
modeller).
2
Mikrofon Inbyggd mikrofon för ljudinspelning.
3
Bildskärm Kallas även Liquid-Crystal Display (LCD),
visar utdata från datorn (konfigurationen
kan variera med olika modeller).
4
Av/på-knapp Slår på och stänger av datorn.
5
Tangentbord För inmatning av data i datorn.
1
6
På-indikator
Anger om datorn är av eller på.
1
Batteriindikator
Anger status för datorns batteri.
1. Laddar: Lyser orange när batteriet laddas.
2. Fulladdad: Lyser blått då datorn är
ansluten till nätström.
Hårddiskindikator Tänds när hårddisken arbetar.
Kommunikation-
Visar status för trådlös LAN-/3G-
1
sindikator
kommunikation.
Lyser blått Lyser orange Inte tänd
3G på/WiFi på
3G av/WiFi på 3G av/WiFi av
3G på/WiFi av
7
Klickknappar
Vänster och höger knapp fungerar som
(vänster och höger)
vänster och höger musknapp.
8
Pekplatta Beröringskänslig pekenhet som fungerar
som en datormus.
9
Handlovsstöd Handlovsstödet ger bekvämt stöd för
händerna när du använder datorn.
1. Indikatorerna på frontpanelen syns även när datorhöljet är stängt.
4
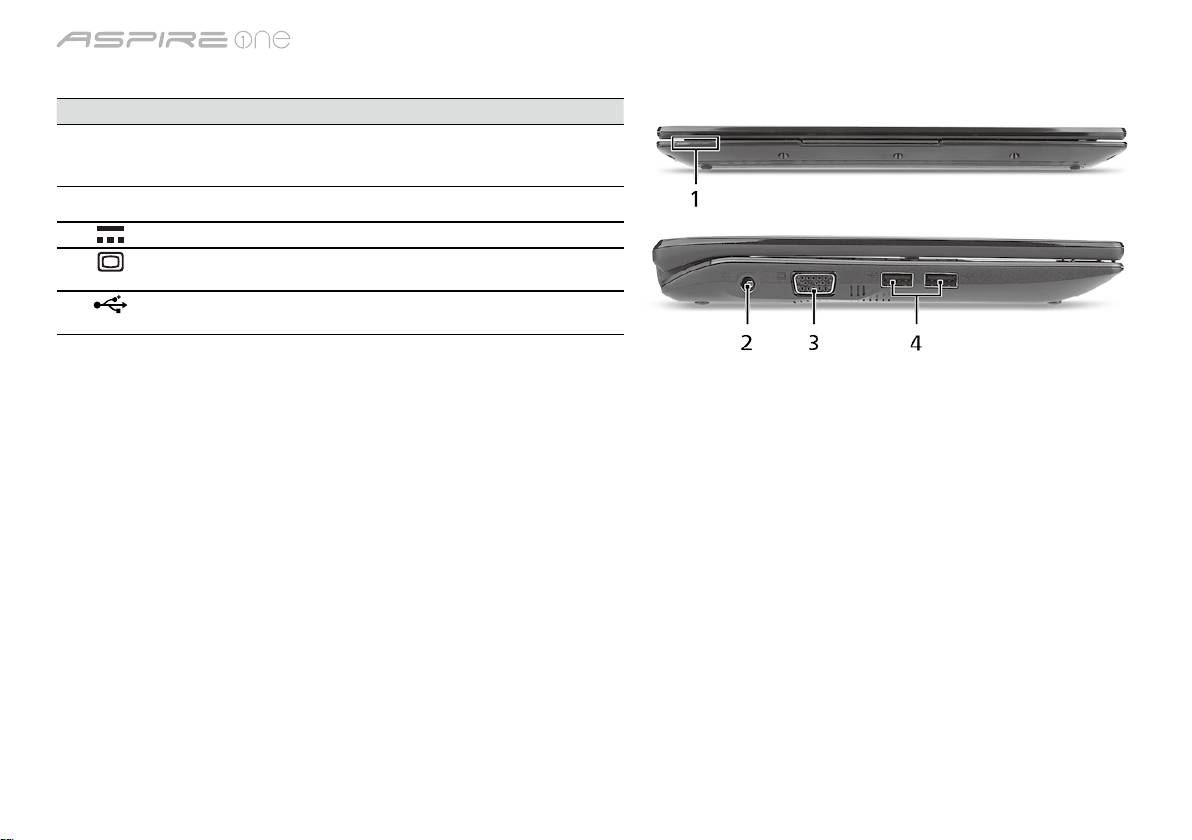
-serien
Snabbguide
-serien
Snabbguide
Vy över stängd framsida
# Ikon Objekt Beskrivning
1
Statusindikatorer Lysdioder (LED) som tänds för att visa
statusen för datorns funktioner och
komponenter.
Vy från vänster
2
DC in-anslutning Ansluts till en växelströmsadapter.
3
Port för extern
Anslutning till en visningsenhet (t.ex. extern
bildskärm (VGA)
bildskärm, LCD-projektor).
4
USB 2.0-port Ansluts till USB 2.0-enheter (t.ex. USB-mus,
USB-kamera).
5
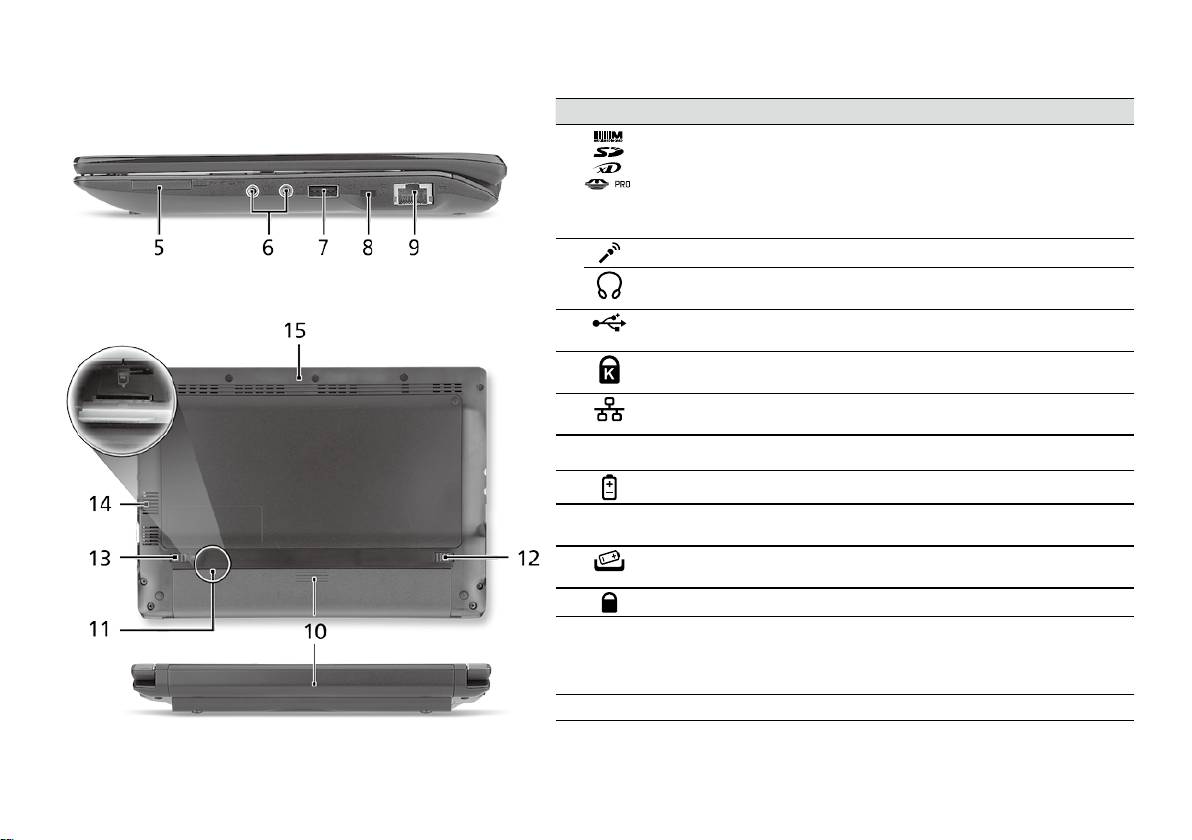
-serien
Snabbguide
-serien
Snabbguide
Vy från höger
# Ikon Objekt Beskrivning
5
Flera-i-1-kortläsare Avsedd för Secure Digital (SD),
MultiMediaCard (MMC), Memory Stick
(MS), Memory Stick PRO (MS PRO),
xD-Picture Card (xD).
Obs! Tryck för att ta bort/sätta i kortet.
Det går bara att använda ett kort i taget.
6
Ingång för mikrofon Anslutning för externa mikrofoner.
Utgång för hörlurar/
Anslutning för externa ljudenheter
högtalare/linje ut
(t.ex. högtalare, hörlurar).
7
USB 2.0-port Ansluts till USB 2.0-enheter
(t.ex. USB-mus).
8
Skåra för
Ansluts till ett Kensington-kompatibelt
Kensingtonlås
datorskyddslås.
9
Ethernet-port (RJ-45) Ansluts till ett Ethernet 10/100-baserat
nätverk.
Vy över baksidan & Vy över basen
10
Batterifack Avsett för datorns batteripack.
11
Kortplats för 3G-SIM-
Avsedd för ett 3G-SIM-kort som ger
kort
3G-anslutning (bara för vissa modeller).
12
Hake för frigöring av
Frigör batteriet före borttagning.
batteriet
13
Batterilås Låser batteriet på plats.
14
Ventilationsöppningar
Möjliggör att datorn håller sig sval, även
och kylfläkt
efter långvarig användning.
Obs! Täck inte över eller ställ något för
fläktöppningen.
15
Högtalare Avger ljud från datorn.
6

-serien
Snabbguide
Miljö
Temperatur:
Vid drift: 5°C till 35°C
Utom drift: -20°C till 65°C
Luftfuktighet (icke-kondenserande):
Vid drift: 20% till 80%
Utom drift: 20% till 80%
7

-sarja
Pikaohje

-sarja
Pikaohje
-sarja
Pikaohje
© 2010 Kaikki oikeudet pidätetään
Aspire One-sarjan Pikaohje
Alkuperäinen painos: 04/2010
Aspire One –sarjan Kannettava tietokone
Mallinumero: _________________________________
Sarjanumero: __________________________________
Ostopäivämäärä: ______________________________
Ostopaikka: ___________________________________

-sarja
Pikaohje
-sarja
Pikaohje
Federal Communications Commission
Declaration of Conformity
This device complies with Part 15 of the FCC Rules. Operation is subject to the following two conditions: (1) this device may not
cause harmful interference, and (2) this device must accept any interference received, including interference that may cause
undesired operation.
The following local Manufacturer/Importer is responsible for this declaration:
Product name: Notebook PC
Brand: Acer
Model number: PAV01
Machine type:
Aspire one series; AO533 series
Name of Responsible Party: Acer America Corporation
Address of responsible party: 333 West San Carlos St., San Jose
CA 95110, U. S. A.
Contact person: Acer Representative
Phone No.: 1-254-298-4000
Fax No.: 1-254-298-4147
April 23, 2010

-sarja
Pikaohje
-sarja
Pikaohje
CE Declaration of Conformity
We,
Acer Incorporated
8F, 88, Sec. 1, Hsin Tai Wu Rd., Hsichih, Taipei Hsien 221, Taiwan
Contact Person: Mr. Easy Lai, e-mail:easy_lai@acer.com.tw
And,
Acer Europe SA
Via Cantonale, Centro Galleria 2 6928 Manno Switzerland
Hereby declare that:
Product: Notebook Computer
Trade Name: Acer
Model Number: PAV01
Machine Type: Aspire one series; AO533 series
Is compliant with the essential requirements and other relevant provisions of the following EC directives, and that all the
necessary steps have been taken and are in force to assure that production units of the same product will continue comply with
the requirements.
R&TTE Directive 1999/5/EC as attested by conformity with the following harmonized standard:
• Article 3.1(a) Health and Safety
-. EN60950-1
-. EN62311
• Article 3.1(b) EMC
-. EN301 489-1
-. EN301 489-3 (Applicable to non-bluetooth wireless keyboard mouse set).
-. EN301 489-7
-. EN301 489-17
-. EN301 489-24

-sarja
Pikaohje
-sarja
Pikaohje
• Article 3.2 Spectrum Usages
-. EN300 440-2 (Applicable to non-bluetooth wireless keyboard mouse set).
-. EN300 328
-. EN301 511
-. EN301 893 (Applicable to 5GHz high performance RLAN).
-. EN301 908-1
-. EN301 908-2
EMC Directive 2004/108/EC as attested by conformity with the following harmonized standards:
-. EN55022, AS/NZS CISPR22, Class B
-. EN55024
-. EN61000-3-2 Class D
-. EN61000-3-3
Low Voltage Directive 2006/95/EC as attested by conformity with the following harmonized standard:
-. EN60950-1
RoHS Directive 2002/95/EC on the Restriction of the Use of certain Hazardous Substances in Electrical and Electronic Equipment
-. The maximum concentration values of the restricted substances by weight in homogenous material are:
Lead
0.1%
Polybrominated Biphenyls (PBB’s)
0.1%
Mercury
0.1%
Polybrominated Diphenyl Ethers (PBDE’s)
0.1%
Hexavalent Chromium
0.1%
Cadmium
0.01%
Directive 2009/125/EC with regard to establishing a framework for the setting of ecodesign requirements for energy-related
product.
Year to begin affixing CE marking 2010.
Apr. 23, 2010
Easy Lai /Manager
Regulation Center, Acer Inc.
Date

-sarja
Pikaohje
-sarja
Pikaohje
Aloittelijoille
1 2 3
2-2
3-2
3-1
2-1
Varmista, että akku on oikein
lukittu paikalleen, kuten
kohdassa 2-2 on esitetty.
4 5 6
Kuvat ovat viitteellisiä. Varsinainen tuote saattaa poiketa lehtisen kuvista.
1
-sarja
Pikaohje
-sarja
Pikaohje
Aloitetaan perusasioista
Haluamme kiittää sinua Acerin kannettavan tietokoneen valitsemisesta liikkuvien tietokonetarpeittesi täyttämisessä.
Ohjeet
Helpottaaksesi sinua Acer-tietokoneen käyttämisessä olemme suunnitelleet sarjan ohjekirjoja*:
Ihan aluksi Pikaohje auttaa sinua tietokoneen käyttöönotossa.
Lisätietoja siitä, miten tietokoneesi auttaa sinua lisäämään tuottavuutta, on annettu ohjeessa AcerSystem Käyttäjän opas.
Tässä oppaassa on yksityiskohtaiset ohjeet järjestelmätoiminnoista, tietojen palauttamisesta, tietokoneen laajentamisesta ja
ongelmanratkaisusta. Siinä on myös annettu yleisiä ohjeita, tietoja takuusta sekä turvallisuusohjeita. Se on saatavana Portable
Document Format (PDF) –muodossa, ja ja tulee esiasennettuna tietokoneellesi.
Ohje: Jotta voit katsella käyttöohjekirjan tiedostoa, Adobe Readerin on oltava asennettu. Jos Adobe Reader ei ole
asennettu tietokoneeseesi, sen asennus käynnistyy ennen AcerSystem User Guide avaamista. Noudata näytölle tulevia
ohjeita, kunnes asennus on valmis. Saat lisätietoja Adobe Readerin asennuksesta ja käytöstä valikosta Ohje ja Tuki.
* TÄRKEÄ HUOMAUTUS: Huomaa, että tässä mainitut, joko painetussa tai sähköisessä muodossa olevat oppaat,
ovat vain tulevaa käyttöä varten, ja AcerSystem Käyttäjän oppaaseen sisältyvää erityistä takuutiedotetta ja niitä
lukuunottamatta, jotka eivät sisälly näihin oppaisiin, vastaavat Acerin ostamallesi tuotteelle antamaa kuvausta ja
takuuta. Acer sanoutuu selvästi irti kaikesta vastuusta, joka koskee oppaisiin sisältyviä virheitä.
2

-sarja
Pikaohje
-sarja
Pikaohje
Verkkokonfigurointi
Tämä opas auttaa konfiguroimaan LANin ja langattomat verkoasetukset, jotta pääset Internet-yhteyteen.
LAN-yhteyden määrittäminen
Kytke LAN-kaapeli Ethernet (RJ-45) -porttiin. Katso Ethernet-portin sijaintia koskien "Oikea näkymä" sivulta 6.
Langattoman yhteyden määrittäminen
1. Paina <Fn> + <F3> päästäksesi tietoliikenteen hallintaan. Tässä voit käynnistää Wi-Fi-yhteyden napsauttamalla punaista
painiketta Wi-Fi:n vieressä.
Huomautus: 3G ja Bluetooth ovat saavutettavissa myös tietoliikenteen hallinnalla. Tietoliikennelaitteet voivat vaihdella
mallista riippuen.
2. Napsauta järjestelmätarjottimen
-kuvaketta ja valitse langaton liitäntäpiste, johon haluat yhteyden.
Laita 3G SIM -kortti sisään (vain valituille malleille)
Poista paristo ja laita 3G SIM -kortti varovasti sisään 3G SIM -kortin aukkoon. Katso "Taustanäkymä & Pohjanäkymä" sivulta 6
3G SIM -kortin aukon sijaintipaikan osalta.
3
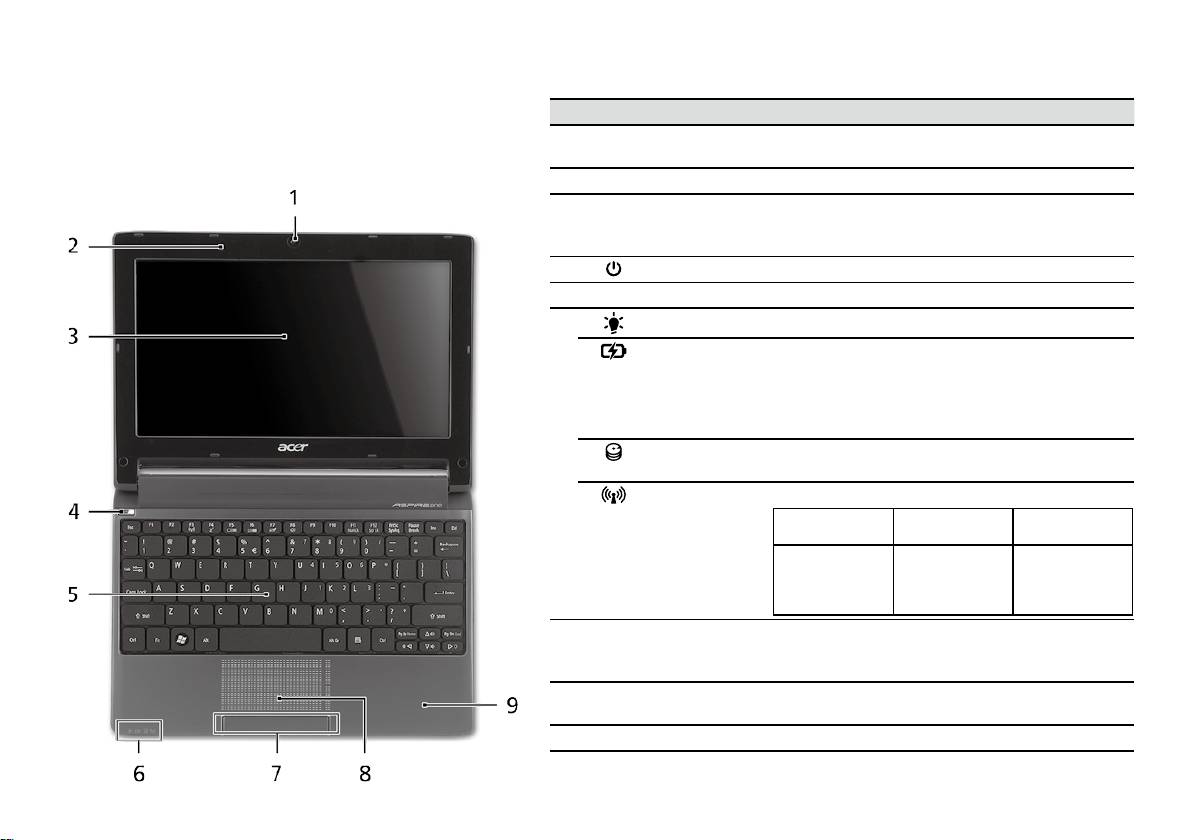
-sarja
Pikaohje
-sarja
Pikaohje
Näkymä ylhäältä
Aspire One -laitteen esittely
# Kuvake Osio Kuvaus
Kun olet määrittänyt tietokoneen, kuten Aloittelijoille
1
Acer Crystal Eye
Webkamera videotietoliikenteeseen
-osiossa on kuvattu, anna meidän esitellä uusi kannettava
-webkamera
(konfiguraatio voi vaihdella malleista riippuen).
Acer-tietokoneesi.
2
Mikrofoni Sisäinen mikrofoni äänen tallentamista varten.
3
Näyttöruutu Nimeltään myös nestekidenäyttö (Liquid-Crystal
Display ; LCD), näyttää tietokoneen ulostulon
(konfiguraatio voi vaihdella malleista riippuen).
4
Virtapainike Käynnistää ja sulkee koneen.
5
Näppäimistö Tiedon syöttämiseen tietokoneelle.
1
6
Virranilmaisin
Osoittaa tietokoneen virran tilan.
Akkutilan
Osoittaa tietokoneen akun tilan.
1
ilmaisin
1. Lataus meneillään: Valo palaa oranssina, kun
akku latautuu.
2. Täyteen ladattu: Valo palaa sinisenä, kun
tietokone toimii verkkovirralla.
Kiintolevyn
Palaa, kun kiintolevy on aktiivinen.
merkkivalo
Tietoliikenteen
Osoittaa langattoman LAN/3G-tietoliikenteen.
1
ilmaisin
Sininen valo
Oranssi valo
Ei syttynyt
päällä
päällä
3G päällä/
WiFi päällä
3G pois/
3G pois/
3G päällä/
WiFi päällä
WiFi pois
WiFi pois
7
Napsauta
Vasen ja oikea painike toimivat kuten hiiren
painikkeita
vasen ja oikea painike.
(vasen ja oikea)
8
Kosketusalusta Kosketusherkkä osoitinlaite, joka toimii kuten
tietokoneen hiiri.
9
Rannetuki Mukava tuki käsillesi konetta käyttäessäsi.
1. Etupaneelin tilailmaisimet näkyvät, vaikka tietokoneen kansi olisi suljettu.
4
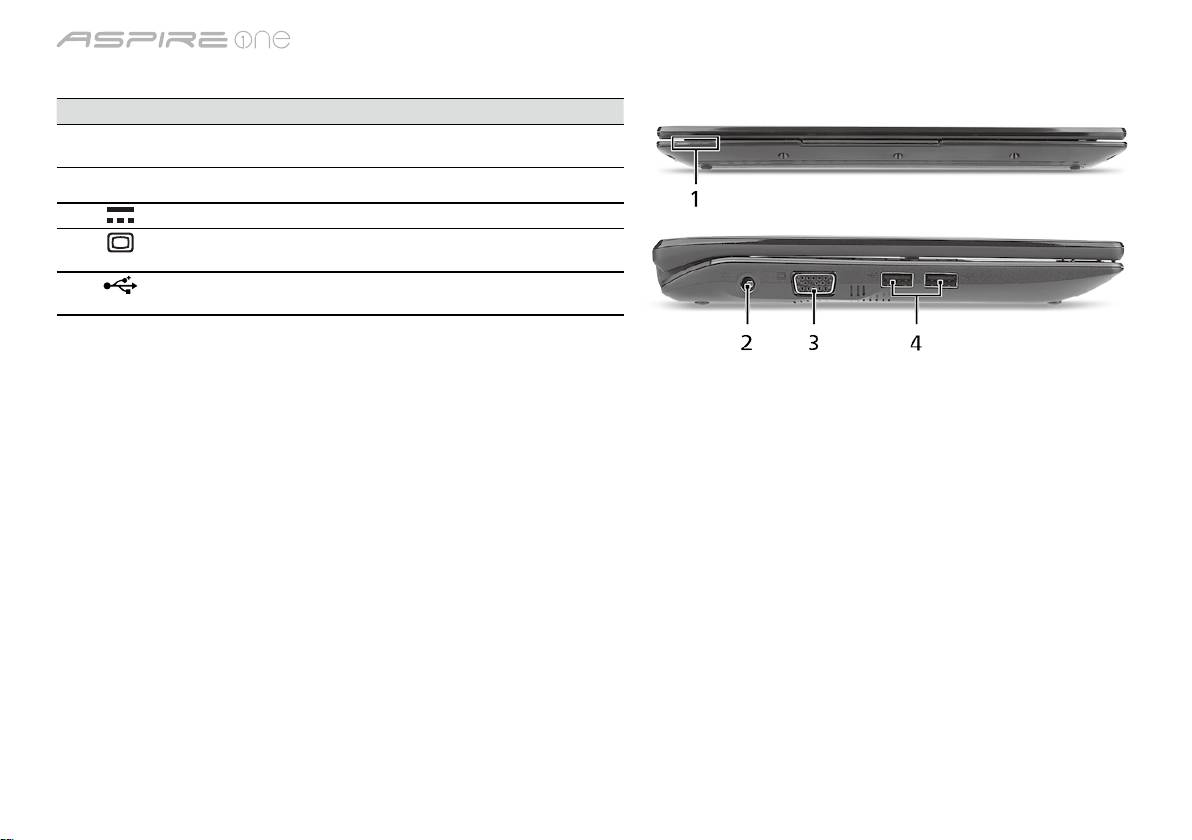
-sarja
Pikaohje
-sarja
Pikaohje
Etunäkymä suljettuna
# Kuvake Osio Kuvaus
1
Tilanosoittimet Loistediodit (LEDs), jotka ilmoittavat
tietokoneen toimintojen ja osien tilan.
Vasen näkymä
2
DC-tulolinja Yhdistää AC-sovittimeen.
3
Ulkoinen
Yhdistä näyttölaitteeseen (esim. ulkoinen
näyttöportti (VGA)
monitori, LCD-projektori).
4
USB 2.0 -portti Yhdistää USB 2.0 -laitteisiin (esim. USB-
hiiri, USB-kamera).
5

-sarja
Pikaohje
-sarja
Pikaohje
Oikea näkymä
# Kuvake Osio Kuvaus
5
Monta yhdessä
Hyväksyy seuraavat muistikortit: Secure
-kortinlukija
Digital (SD), MultiMediaCard (MMC),
Memory Stick (MS), Memory Stick PRO
(MS PRO) ja xD-Picture Card (xD).
Ohje: Poista/Asenna kortti työntämällä.
Vain yksi kortti voi toimia kerrallaan.
6
Mikrofonin tulolinja Hyväksyy syötteet ulkoisilta
mikrofoneilta.
Kuulokkeet/kaiutin/
Yhdistää audioliitäntälaitteisiin
jakkiliitäntä
(esim. kaiuttimet, kuulokkeet).
7
USB 2.0 -portti Yhdistää USB 2.0 -laitteisiin
(esim. USB-hiiri).
8
Kensington-lukon
Yhdistää Kensington-yhteensopivaan
paikka
tietokoneen turvalukkoon.
9
Ethernet (RJ-45)-
Yhdistää Ethernet 10/100-pohjaiseen
portti
verkkoon.
Taustanäkymä & Pohjanäkymä
10
Akkutila Sisältää tietokoneen akkuyksikön.
11
3G SIM -kortin
Hyväksyy 3G SIM -kortin
aukko
3G-liitettävyyteen (vain valituille
malleille).
12
Akun vapautussalpa Vapauttaa akun poistamista varten.
13
Akun lukko Lukitsee akun paikoilleen.
14
Tuuletusaukot ja
Mahdollistaa tietokoneen pysymisen
jäähdytystuuletin
viileänä jopa pitkitetyn käytön jälkeen.
Ohje: Älä peitä tai tuki tuulettimen
aukkoa.
15
Kaiutin Välittää äänet tietokoneestasi.
6

-sarja
Pikaohje
Ympäristö
Lämpötila:
Käyttö: 5°C:sta 35°C:een
Ei käytössä: -20°C:sta 65°C:een
Kosteus (ei kondensoitunut):
Käyttö: 20%:sta 80%:een
Ei käytössä: 20%:sta 80%:een
7

Cерия
Краткое руководство

Cерия
Краткое руководство
Cерия
Краткое руководство
© 2010 Все права защищены
Краткое руководство ноутбуков серии Aspire One
Первое издание: 04/2010
Портативный компьютер серии Aspire One
Номер модели: ____________________________
Серийный номер: __________________________
Дата покупки: ______________________________
Место покупки: ____________________________

Cерия
Краткое руководство
Cерия
Краткое руководство
Federal Communications Commission
Declaration of Conformity
This device complies with Part 15 of the FCC Rules. Operation is subject to the following two conditions: (1) this device may not
cause harmful interference, and (2) this device must accept any interference received, including interference that may cause
undesired operation.
The following local Manufacturer/Importer is responsible for this declaration:
Product name: Notebook PC
Brand: Acer
Model number: PAV01
Machine type:
Aspire one series; AO533 series
Name of Responsible Party: Acer America Corporation
Address of responsible party: 333 West San Carlos St., San Jose
CA 95110, U. S. A.
Contact person: Acer Representative
Phone No.: 1-254-298-4000
Fax No.: 1-254-298-4147
April 23, 2010

Cерия
Краткое руководство
Cерия
Краткое руководство
CE Declaration of Conformity
We,
Acer Incorporated
8F, 88, Sec. 1, Hsin Tai Wu Rd., Hsichih, Taipei Hsien 221, Taiwan
Contact Person: Mr. Easy Lai, e-mail:easy_lai@acer.com.tw
And,
Acer Europe SA
Via Cantonale, Centro Galleria 2 6928 Manno Switzerland
Hereby declare that:
Product: Notebook Computer
Trade Name: Acer
Model Number: PAV01
Machine Type: Aspire one series; AO533 series
Is compliant with the essential requirements and other relevant provisions of the following EC directives, and that all the
necessary steps have been taken and are in force to assure that production units of the same product will continue comply with
the requirements.
R&TTE Directive 1999/5/EC as attested by conformity with the following harmonized standard:
• Article 3.1(a) Health and Safety
-. EN60950-1
-. EN62311
• Article 3.1(b) EMC
-. EN301 489-1
-. EN301 489-3 (Applicable to non-bluetooth wireless keyboard mouse set).
-. EN301 489-7
-. EN301 489-17
-. EN301 489-24

Cерия
Краткое руководство
Cерия
Краткое руководство
• Article 3.2 Spectrum Usages
-. EN300 440-2 (Applicable to non-bluetooth wireless keyboard mouse set).
-. EN300 328
-. EN301 511
-. EN301 893 (Applicable to 5GHz high performance RLAN).
-. EN301 908-1
-. EN301 908-2
EMC Directive 2004/108/EC as attested by conformity with the following harmonized standards:
-. EN55022, AS/NZS CISPR22, Class B
-. EN55024
-. EN61000-3-2 Class D
-. EN61000-3-3
Low Voltage Directive 2006/95/EC as attested by conformity with the following harmonized standard:
-. EN60950-1
RoHS Directive 2002/95/EC on the Restriction of the Use of certain Hazardous Substances in Electrical and Electronic Equipment
-. The maximum concentration values of the restricted substances by weight in homogenous material are:
Lead
0.1%
Polybrominated Biphenyls (PBB’s)
0.1%
Mercury
0.1%
Polybrominated Diphenyl Ethers (PBDE’s)
0.1%
Hexavalent Chromium
0.1%
Cadmium
0.01%
Directive 2009/125/EC with regard to establishing a framework for the setting of ecodesign requirements for energy-related
product.
Year to begin affixing CE marking 2010.
Apr. 23, 2010
Easy Lai /Manager
Regulation Center, Acer Inc.
Date

Cерия
Краткое руководство
Cерия
Краткое руководство
Для пользователей-новичков
1 2 3
2-2
3-2
3-1
2-1
Убедитесь, что аккумулятор
правильно зафиксирован в
отсеке, как показано на рис. 2-2.
4 5 6
Иллюстрации носят ориентировочный характер. Реальные характеристики могут отличаться от указанных.
1

Cерия
Краткое руководство
Cерия
Краткое руководство
Вначале о главном
Благодарим вас за то, что для решения своих мобильных вычислительных задач вы выбрали ноутбук Acer.
Ваши руководства
Мы разработали ряд руководств, которые помогут вам в использовании ноутбука Acer*:
Прежде всего, Краткое руководство поможет вам настроить основные параметры компьютера.
Дополнительные сведения о том, как этот компьютер помогает повысить производительность работы, см. в Руководстве
пользователя AcerSystem. Это руководство содержит подробные сведения о системных функциях, восстановлении данных,
возможностях расширения и устранении неисправностей. В нем также приведена информация о гарантийном обслуживании,
а также общие предписания и правила безопасности при работе с ноутбуком. Это руководство в виде файла PDF изначально
загружено в компьютер.
Примечание: для просмотра этого файла требуется программа Adobe Reader. Если программа Adobe Reader не
установлена в вашем компьютере, то по щелчку по пункту "AcerSystem User Guide" сначала запустится утилита
установки программы Adobe Reader. Для завершения установки выполните отображаемые на экране инструкции.
Указания по работе с программой Adobe Reader см. в Справке и в меню Поддержка.
* ВАЖНОЕ ПРИМЕЧАНИЕ: Следует иметь в виду, что упоминаемые здесь руководства в печатной или в
электронной форме служат только для справки, и за исключением положений, изложенных в разделе
гарантийной информации в Руководстве пользователя AcerSystem, в этих руководствах никакие другие
положения не являются заявлением компании Acer или ее гарантией в отношении купленного вами продукта.
Компания Acer в прямой форме отказывается от всякой ответственности за возможные ошибки в этих
руководствах.
2

Cерия
Краткое руководство
Cерия
Краткое руководство
Конфигурация сети
Это руководство поможет вам настроить параметры локальной и беспроводной сети для подключения к Интернету.
Настройка подключения по локальной сети
Достаточно подключить кабель локальной сети к разъему Ethernet (RJ-45). Расположение разъема Ethernet см. на рис.
"Вид справа" на стр. 6.
Настройка подключения к беспроводной сети
1. Чтобы открыть диспетчер связи, нажмите <Fn> + <F3> Здесь можно включить модуль Wi-Fi, нажав красную кнопку рядом с
Wi-Fi.
Примечание: Диспетчер связи также позволяет включать модули 3G и Bluetooth. Типы модулей связи зависят от
конфигурации системы.
2. В системной области панели задач щелкните по значок
и выберите точку беспроводного доступа, к которой хотите
подключиться.
Установка SIM-карты сети 3G (только для определенных моделей)
Извлеките аккумулятор и осторожно вставьте SIM-карту 3G в гнездо для SIM-карты 3G. Местоположение гнезда для SIM-карты
3G см. на рисунке "Вид сзади & Вид снизу" на стр. 6.
3
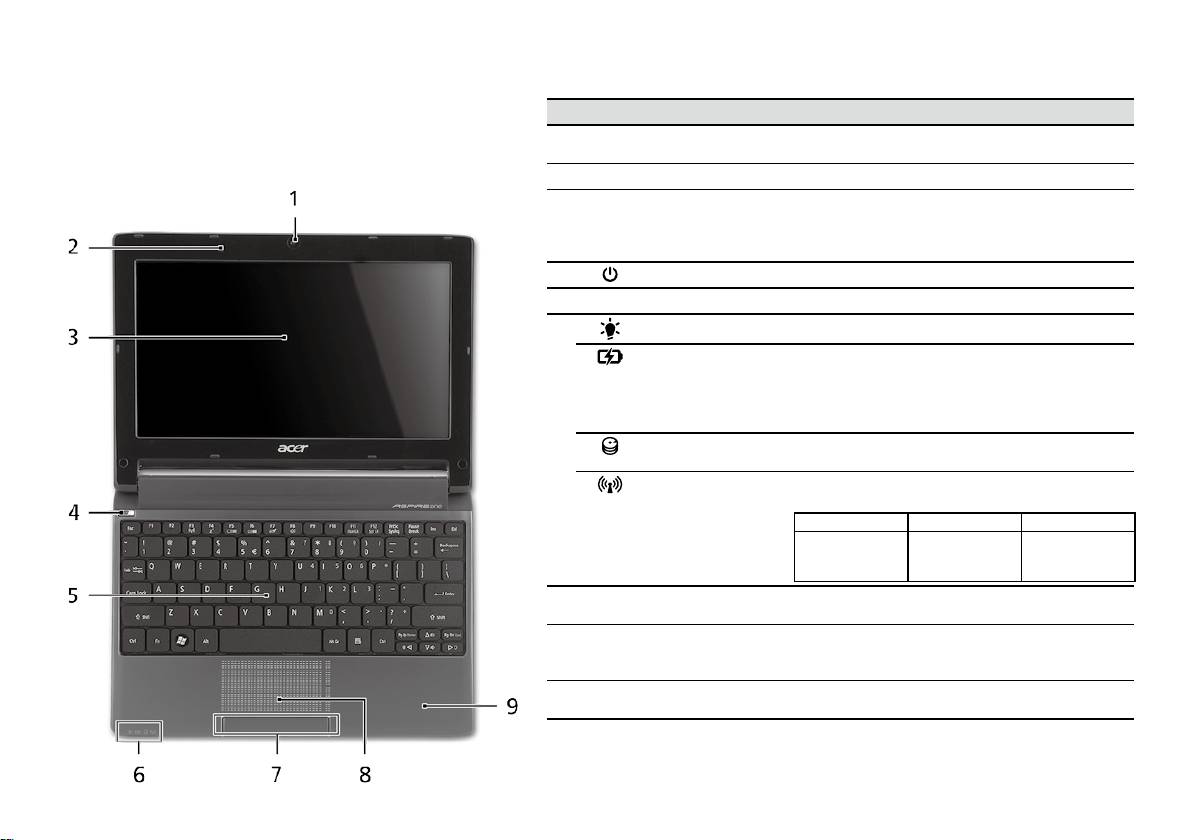
Cерия
Краткое руководство
Cерия
Краткое руководство
Вид сверху
Знакомство с Aspire One
# Значок Элемент Описание
Теперь, когда вы выполнили настройки, как показано в
1
Веб-камера
Веб-камера для видеосвязи (конфигурация может
разделе Для пользователей-новичков, давайте поближе
Acer Crystal Eye
отличаться в зависимости от модели).
познакомимся с вашим новым ноутбуком Acer.
2
Микрофон Внутренний микрофон для записи звука.
3
Экран дисплея Другое название - жидкокристаллический дисплей
(ЖК-дисплей); служит для вывода изображения,
формируемого компьютером (конфигурация может
отличаться в зависимости от модели).
4
Кнопка питания Служит для включения/выключения компьютера.
5
Клавиатура Служит для ввода данных в компьютер.
1
6
Индикатор питания
Отображает состояние питания компьютера.
Индикатор
Отображает состояние аккумулятора компьютера.
1
аккумулятора
1. Зарядка: этот индикатор горит желтым во время
зарядки аккумулятора.
2. Полностью заряжен: Этот индикатор горит
синим при питании от электросети.
Индикатор работы
Горит при обращении к жесткому диску.
жесткого диска
1
Индикатор связи
Указывает на состояние связи в беспроводной
сети/сети 3G.
Горит синим Горит оранжевым Не горит
3G вкл./WiFi вкл.
3G откл./
3G вкл./
3G откл/WiFi вкл.
Wi-Fi откл.
Wi-Fi откл.
7
Кнопки управления
Эти левая и правая кнопки действуют так же, как
(левая и правая)
левая и правая кнопки мыши.
8
Сенсорная панель Чувствительное к прикосновениям указательное
устройство, позволяющее управлять курсором на
экране так же, как и мышью.
9
Подставка для
Упорная площадка, на которую удобно положить
запястий
руки при работе на компьютере.
1. Индикаторы на передней панели видны даже при закрытой крышке компьютера.
4
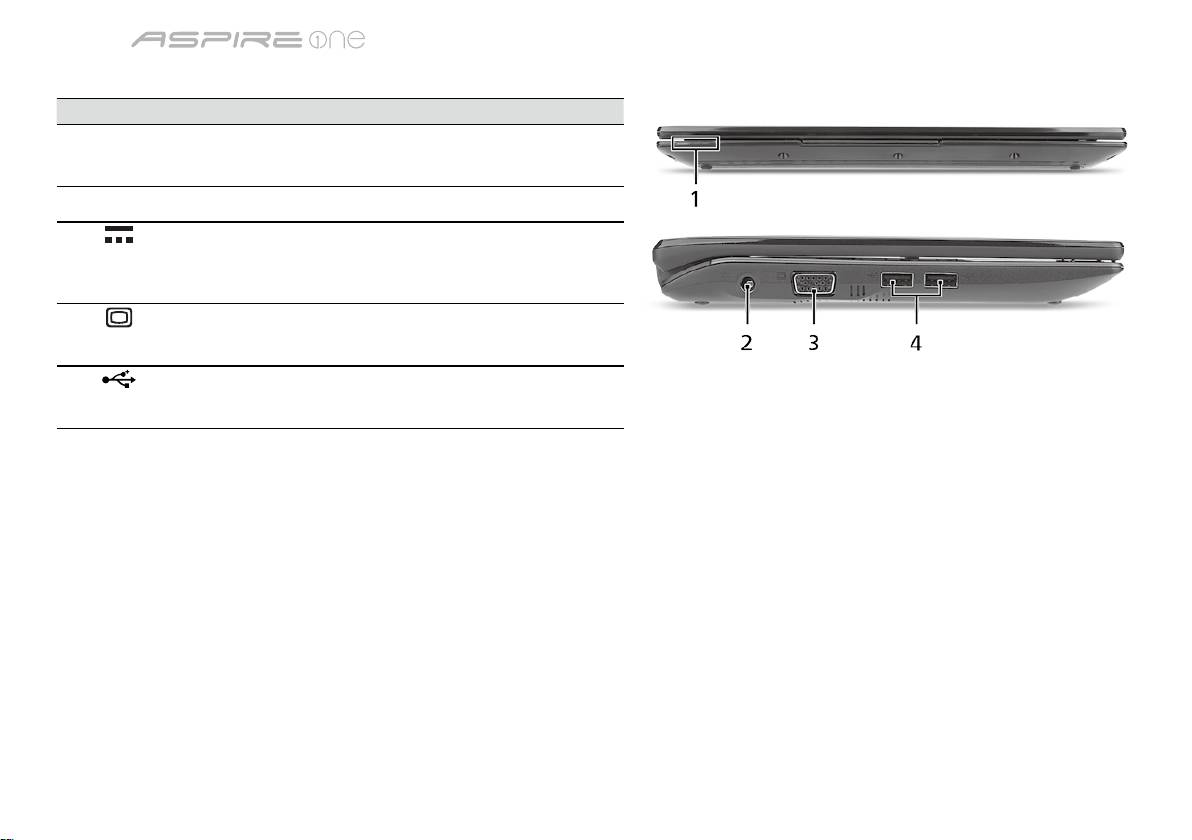
Cерия
Краткое руководство
Cерия
Краткое руководство
Вид спереди с закрытой крышкой
# Значок Элемент Описание
1
Индикаторы
Светодиодные индикаторы отображают
состояния
состояние функций и компонентов
компьютера.
Вид слева
2
Разъем для
Служит для подключения адаптера
подключения
переменного тока.
питания постоянного
тока
3
Разъем внешнего
Служит для подключения устройства
дисплея (VGA)
отображения (например, внешнего
монитора, ЖК-проектора).
4
Разъем USB 2.0 Служит для подключения устройств с
интерфейсом USB 2.0 (например, мыши
или камеры).
5
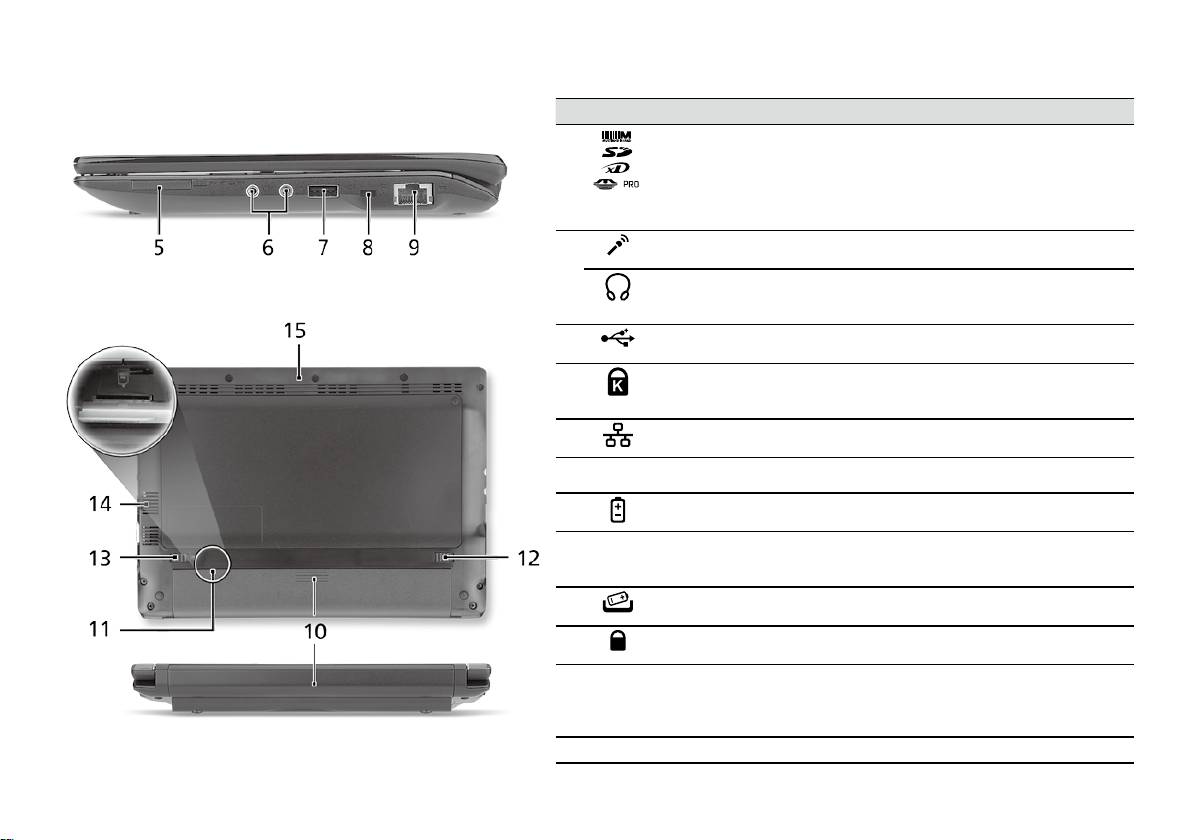
Cерия
Краткое руководство
Cерия
Краткое руководство
Вид справа
# Значок Элемент Описание
5
Комбинированное
Поддерживает форматы Secure Digital (SD),
устройство
MultiMediaCard (MMC), Memory Stick (MS),
считывания карт
Memory Stick PRO (MS PRO), xD-Picture Card (xD).
памяти различных
Примечание: надавите, чтобы извлечь/вставить
форматов
карту. Одновременно можно использовать только
одну карту памяти.
6
Гнездо микрофонного
Служит для подключения внешнего микрофона.
входа
Гнездо наушников/
Служит для подключения звуковых устройств
динамика/линейный
к линейному выходу (например, динамиков,
выход
наушников).
7
Разъем USB 2.0 Служит для подключения устройств с
интерфейсом USB 2.0 (например, мыши).
8
Замок типа
Служит для подсоединения защитного тросика
Kensington
с замком типа Kensington для предотвращения
кражи компьютера.
9
Разъем Ethernet
Служит для подключения к сети Ethernet 10/100
(RJ-45)
Мбит/с.
Вид сзади & Вид снизу
10
Отсек аккумулятора В этот отсек устанавливается аккумулятор
компьютера.
11
Гнездо для
Служит для установки SIM-карты 3G для
SIM-карты 3G
подключения к сетям 3G (только для
определенных моделей).
12
Защелка извлечения
Разблокирует аккумулятор для его извлечения.
аккумулятора
13
Защелка
Служит для фиксации аккумулятора в отсеке.
аккумулятора
14
Вентиляционные
Позволяют компьютеру не перегреваться даже
отверстия и
при длительной работе.
вентилятор
Примечание: не заслоняйте и не загораживайте
охлаждения
входное отверстие вентилятора.
15
Динамик Выводит звук из компьютера.
6

Cерия
Краткое руководство
Условия эксплуатации
Температура:
Рабочая: от 5°C до 35°C
Нерабочая: от -20°C до 65°C
Влажность (без конденсации):
Рабочая: от 20% до 80%
Нерабочая: от 20% до 80%
7

Komputer Serii
Skrócony poradnik

Komputer Serii
Skrócony poradnik
Komputer Serii
Skrócony poradnik
© 2010 Wszelkie prawa zastrzeżone
Skrócony poradnik komputera serii Aspire One
Wydanie oryginalne: 04/2010
Notebook PC serii Aspire One
Oznaczenie modelu: _________________________
Numer seryjny: _____________________________
Data zakupu: ______________________________
Miejsce zakupu: ____________________________

Komputer Serii
Skrócony poradnik
Komputer Serii
Skrócony poradnik
Federal Communications Commission
Declaration of Conformity
This device complies with Part 15 of the FCC Rules. Operation is subject to the following two conditions: (1) this device may not
cause harmful interference, and (2) this device must accept any interference received, including interference that may cause
undesired operation.
The following local Manufacturer/Importer is responsible for this declaration:
Product name: Notebook PC
Brand: Acer
Model number: PAV01
Machine type:
Aspire one series; AO533 series
Name of Responsible Party: Acer America Corporation
Address of responsible party: 333 West San Carlos St., San Jose
CA 95110, U. S. A.
Contact person: Acer Representative
Phone No.: 1-254-298-4000
Fax No.: 1-254-298-4147
April 23, 2010
Komputer Serii
Skrócony poradnik
Komputer Serii
Skrócony poradnik
CE Declaration of Conformity
We,
Acer Incorporated
8F, 88, Sec. 1, Hsin Tai Wu Rd., Hsichih, Taipei Hsien 221, Taiwan
Contact Person: Mr. Easy Lai, e-mail:easy_lai@acer.com.tw
And,
Acer Europe SA
Via Cantonale, Centro Galleria 2 6928 Manno Switzerland
Hereby declare that:
Product: Notebook Computer
Trade Name: Acer
Model Number: PAV01
Machine Type: Aspire one series; AO533 series
Is compliant with the essential requirements and other relevant provisions of the following EC directives, and that all the
necessary steps have been taken and are in force to assure that production units of the same product will continue comply with
the requirements.
R&TTE Directive 1999/5/EC as attested by conformity with the following harmonized standard:
• Article 3.1(a) Health and Safety
-. EN60950-1
-. EN62311
• Article 3.1(b) EMC
-. EN301 489-1
-. EN301 489-3 (Applicable to non-bluetooth wireless keyboard mouse set).
-. EN301 489-7
-. EN301 489-17
-. EN301 489-24

Komputer Serii
Skrócony poradnik
Komputer Serii
Skrócony poradnik
• Article 3.2 Spectrum Usages
-. EN300 440-2 (Applicable to non-bluetooth wireless keyboard mouse set).
-. EN300 328
-. EN301 511
-. EN301 893 (Applicable to 5GHz high performance RLAN).
-. EN301 908-1
-. EN301 908-2
EMC Directive 2004/108/EC as attested by conformity with the following harmonized standards:
-. EN55022, AS/NZS CISPR22, Class B
-. EN55024
-. EN61000-3-2 Class D
-. EN61000-3-3
Low Voltage Directive 2006/95/EC as attested by conformity with the following harmonized standard:
-. EN60950-1
RoHS Directive 2002/95/EC on the Restriction of the Use of certain Hazardous Substances in Electrical and Electronic Equipment
-. The maximum concentration values of the restricted substances by weight in homogenous material are:
Lead
0.1%
Polybrominated Biphenyls (PBB’s)
0.1%
Mercury
0.1%
Polybrominated Diphenyl Ethers (PBDE’s)
0.1%
Hexavalent Chromium
0.1%
Cadmium
0.01%
Directive 2009/125/EC with regard to establishing a framework for the setting of ecodesign requirements for energy-related
product.
Year to begin affixing CE marking 2010.
Apr. 23, 2010
Easy Lai /Manager
Regulation Center, Acer Inc.
Date

Komputer Serii
Skrócony poradnik
Komputer Serii
Skrócony poradnik
Na początek
1 2 3
2-2
3-2
3-1
2-1
Upewnij się, że bateria jest prawidłowo
zamocowana na swoim miejscu tak,
jak to przedstawiono na ilustracji 2-2.
4 5 6
Ilustracje są przykładowe. Faktyczne specykacje produktów mogą różnić się od przedstawionej.
1

Komputer Serii
Skrócony poradnik
Komputer Serii
Skrócony poradnik
Po kolei
Dziękujemy za wybranie komputera rmy Acer do spełnienia potrzeb w zakresie mobilnego przetwarzania.
Instrukcje
Aby pomóc w korzystaniu z komputera Acer, opracowaliśmy zestaw instrukcji*:
Jako pierwszy wymienić można Skrócony poradnik, który pomoże użytkownikom rozpocząć ustawianie komputera.
Aby uzyskać więcej informacji o tym, w jaki sposób nowy komputer może pomóc Ci być bardziej produktywnym, zapoznaj się z
AcerSystem User Guide. Przewodnik ten zawiera szczegółowe informacje dotyczące takich tematów, jak narzędzia systemowe,
odzyskiwanie danych, opcje rozszerzeń oraz rozwiązywanie problemów. Oprócz nich zawiera także informacje na temat gwarancji oraz
informacje dotyczące bezpieczeństwa pracy z Twoim komputerem przenośnym. Jest on dostępny w formie elektronicznej jako plik PDF
zapisany fabrycznie na dysku komputera.
Uwaga: Podgląd pliku wymaga zainstalowania programu Adobe Acrobat Reader. Jeżeli na komputerze nie ma zainstalowanego
programu Adobe Acrobat Reader, kliknięcie AcerSystem User Guide spowoduje uruchomienie instalatora programu Adobe
Acrobat Reader. Aby zakończyć instalację, należy postępować zgodnie z instrukcjami wyświetlanymi na ekranie. Instrukcje
dotyczące użytkowania programu Adobe Acrobat Reader znaleźć można w menu Pomoc i obsługa techniczna.
* WAŻNA UWAGA: Należy pamiętać, że wszelkie instrukcje opisane w niniejszej publikacji, zarówno w formie pisemnej,
jak i elektronicznej, mają charakter wyłącznie referencyjny, oraz że żadne informacje w niej zawarte nie stanowią
gwarancji na zakupiony produkt rmy Acer z wyjątkiem warunków gwarancyjnych określonych w podręczniku
użytkownika AcerSystem User Guide. Firma Acer zrzeka się odpowiedzialności za wszelkie błędy, jakie zawierać mogą
niniejsze instrukcje.
2

Komputer Serii
Skrócony poradnik
Komputer Serii
Skrócony poradnik
Konguracja sieci
Niniejszy przewodnik pomoże Ci skongurować ustawienia sieci LAN oraz bezprzewodowej tak, aby możliwe było nawiązanie
połączenia z Internetem.
Konguracja połączenia z siecią LAN
Po prostu podłącz kabel sieciowy LAN do gniazda Ethernet (RJ-45). Zajrzyj do sekcji "Widok z prawej" na stronie 6 aby dowiedzieć
się gdzie znajduje się gniazdo Ethernet.
Konguracja połączenia z siecią bezprzewodową
1. Naciśnij klawisze <Fn> + <F3>, aby uzyskać dostęp do menedżera komunikacji Można w nim włączyć połączenie Wi-Fi klikając
czerwony przycisk obok napisu Wi-Fi.
Uwaga: Menedżer komunikacji umożliwia również połączenia za pomocą 3G i Bluetooth. Urządzenia komunikacyjne różnią się w
zależności od modelu.
2. Kliknij ikonę
w zasobniku systemowym i wybierz bezprzewodowy punkt dostępowy, z którym chcesz się połączyć.
Wkładanie karty SIM 3G (w wybranych modelach)
Wyciągnij baterię i ostrożnie włóż kartę SIM 3G do gniazda karty SIM 3G. Patrz "Widok z tyłu & Widok od spodu" na stronie 6, aby
uzyskać informacje o lokalizacji gniazda karty SIM 3G.
3

Komputer Serii
Skrócony poradnik
Komputer Serii
Skrócony poradnik
Widok z góry
Opis komputera Aspire One
# Ikona Element Opis
Po przygotowaniu komputera do pracy według instrukcji
1
Kamera
Kamera internetowa do komunikacji wideo (konguracja
zawartych w sekcji Na początek zapoznaj się bliżej z
Acer Crystal Eye
może być różna w zależności od modelu).
notebookiem Acer.
2
Mikrofon Wewnętrzny mikrofon do rejestrowania dźwięku.
3
Ekran wyświetlacza Nazywany jest także wyświetlaczem
ciekłokrystalicznym (Liquid-Crystal Display;
LCD), wyświetla informacje wyjściowe komputera
(konguracja może być różna w zależności od modelu).
4
Przycisk zasilania Służy do włączania i wyłączania komputera.
5
Klawiatura Umożliwia wprowadzanie danych do komputera.
1
6
Wskaźnik zasilania
Wskazuje stan zasilania komputera.
Wskaźnik
Wskazuje stan akumulatora komputera.
1
akumulatora
1. Ładowanie: Świeci żółtym światłem, gdy akumulator
jest ładowany.
2. Pełne naładowanie: Świeci niebieskim światłem
podczas pracy w trybie zasilania prądem
przemiennym.
Wskaźnik dysku
Świeci, gdy działa dysk twardy.
twardego
Wskaźnik
Wskazuje stan komunikacji bezprzewodowej sieci
1
komunikacji
LAN/3G.
Świeci na
Świeci na
Nie świeci
niebiesko
pomarańczowo
Wł. 3G/wł. WiFi
Wył. 3G/wł. WiFi Wył. 3G/wył. WiFi
Wł. 3G/wył. WiFi
7
Przyciski kliknięć
Działanie lewego i prawego przycisku jest podobne do
(lewy i prawy)
działania lewego i prawego przycisku myszki.
8
Touchpad Dotykowe urządzenie wskazujące, które działa jak
myszka komputerowa.
9
Podparcie
Wygodne podparcie dłoni podczas używania
nadgarstków
komputera.
1. Wskaźniki panelu czołowego są widoczne nawet po zamknięciu pokrywy komputera.
4
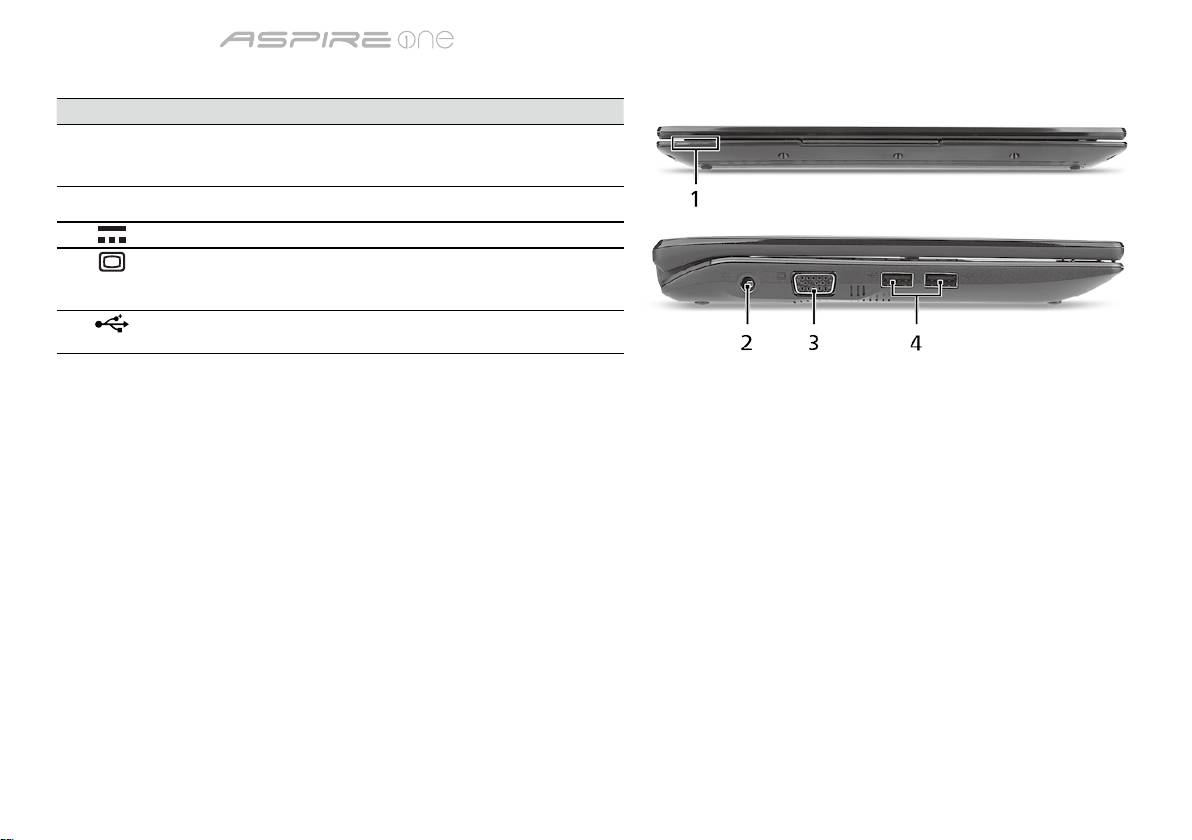
Komputer Serii
Skrócony poradnik
Komputer Serii
Skrócony poradnik
Widok z przodu (pokrywa zamknięta)
# Ikona Element Opis
1
Wskaźniki stanu Diody LED (ang. Light-Emitting Diodes), które
zapalają się i gasną, pokazując stan funkcji i
podzespołów komputera.
Widok z lewej
2
Gniazdo zasilania Gniazdo zasilacza.
3
Port zewnętrznego
Służy do przyłączania urządzenia
wyświetlacza (VGA)
wyświetlającego (np. zewnętrzny monitor,
projektor LCD).
4
Port USB 2.0 Służy do podłączania urządzeń USB
(np. mysz USB lub kamera USB).
5

Komputer Serii
Skrócony poradnik
Komputer Serii
Skrócony poradnik
Widok z prawej
# Ikona Element Opis
5
Wielofunkcyjny czytnik
Obsługuje następujące typy kart: Secure
kart pamięci
Digital (SD), MultiMediaCard (MMC), Memory
Stick (MS), Memory Stick PRO (MS PRO)
oraz xD-Picture Card (xD).
Uwaga: Aby wyjąć/zainstalować kartę, wciśnij
ją delikatnie. Jednorazowo można używać
tylko jednego rodzaju karty.
6
Gniazdo mikrofonowe Służy do przyłączania sygnału z
zewnętrznych mikrofonów.
Gniazdo słuchawki/
Służy do przyłączania urządzeń liniowego
głośniki/wyjścia
wyjścia audio (np. głośniki, słuchawki).
liniowego
7
Port USB 2.0 Służy do podłączania urządzeń USB 2.0
(np. mysz USB lub kamera USB).
8
Gniazdo blokady
Służy do podłączania blokady zgodnej ze
Kensington
standardem rmy Kensington.
9
Port Ethernet (RJ-45) Służy do łączenia z siecią Ethernet 10/100.
Widok z tyłu & Widok od spodu
10
Wnęka na baterię Przechowuje baterię komputera.
11
Gniazdo karty SIM 3G Akceptuje karty SIM 3G do połączeń 3G
(w wybranych modelach).
12
Blokada baterii Umożliwia zwolnienie i wyjęcie baterii.
13
Zatrzask baterii Pozwala zabezpieczyć baterię w prawidłowej
pozycji.
14
Otwory wentylacyjne
Umożliwiają chłodzenie komputera nawet
oraz wentylator
podczas długotrwałego użytkowania.
Uwaga: Nie wolno przykrywać lub blokować
wlotów powietrza.
15
Głośnik Emituje dźwięk z komputera.
6
Komputer Serii
Skrócony poradnik
Warunki środowiska
Temperatura:
Podczas pracy: 5°C do 35°C
Podczas przechowywania: -20°C do 65°C
Wilgotność (bez kondensacji pary):
Podczas pracy: 20% do 80%
Podczas przechowywania: 20% do 80%
7

sorozat
Rövid útmutató

sorozat
Rövid útmutató
sorozat
Rövid útmutató
© 2010 Minden jog fenntartva
Aspire One sorozat Rövid útmutató
Eredeti kiadás: 04/2010
Aspire One sorozatú hordozható számítógép
Modellszám: _______________________________
Sorozatszám: ______________________________
A vásárlás időpontja: ________________________
A vásárlás helye: ___________________________

sorozat
Rövid útmutató
sorozat
Rövid útmutató
Federal Communications Commission
Declaration of Conformity
This device complies with Part 15 of the FCC Rules. Operation is subject to the following two conditions: (1) this device may not
cause harmful interference, and (2) this device must accept any interference received, including interference that may cause
undesired operation.
The following local Manufacturer/Importer is responsible for this declaration:
Product name: Notebook PC
Brand: Acer
Model number: PAV01
Machine type:
Aspire one series; AO533 series
Name of Responsible Party: Acer America Corporation
Address of responsible party: 333 West San Carlos St., San Jose
CA 95110, U. S. A.
Contact person: Acer Representative
Phone No.: 1-254-298-4000
Fax No.: 1-254-298-4147
April 23, 2010

sorozat
Rövid útmutató
sorozat
Rövid útmutató
CE Declaration of Conformity
We,
Acer Incorporated
8F, 88, Sec. 1, Hsin Tai Wu Rd., Hsichih, Taipei Hsien 221, Taiwan
Contact Person: Mr. Easy Lai, e-mail:easy_lai@acer.com.tw
And,
Acer Europe SA
Via Cantonale, Centro Galleria 2 6928 Manno Switzerland
Hereby declare that:
Product: Notebook Computer
Trade Name: Acer
Model Number: PAV01
Machine Type: Aspire one series; AO533 series
Is compliant with the essential requirements and other relevant provisions of the following EC directives, and that all the
necessary steps have been taken and are in force to assure that production units of the same product will continue comply with
the requirements.
R&TTE Directive 1999/5/EC as attested by conformity with the following harmonized standard:
• Article 3.1(a) Health and Safety
-. EN60950-1
-. EN62311
• Article 3.1(b) EMC
-. EN301 489-1
-. EN301 489-3 (Applicable to non-bluetooth wireless keyboard mouse set).
-. EN301 489-7
-. EN301 489-17
-. EN301 489-24

sorozat
Rövid útmutató
sorozat
Rövid útmutató
• Article 3.2 Spectrum Usages
-. EN300 440-2 (Applicable to non-bluetooth wireless keyboard mouse set).
-. EN300 328
-. EN301 511
-. EN301 893 (Applicable to 5GHz high performance RLAN).
-. EN301 908-1
-. EN301 908-2
EMC Directive 2004/108/EC as attested by conformity with the following harmonized standards:
-. EN55022, AS/NZS CISPR22, Class B
-. EN55024
-. EN61000-3-2 Class D
-. EN61000-3-3
Low Voltage Directive 2006/95/EC as attested by conformity with the following harmonized standard:
-. EN60950-1
RoHS Directive 2002/95/EC on the Restriction of the Use of certain Hazardous Substances in Electrical and Electronic Equipment
-. The maximum concentration values of the restricted substances by weight in homogenous material are:
Lead
0.1%
Polybrominated Biphenyls (PBB’s)
0.1%
Mercury
0.1%
Polybrominated Diphenyl Ethers (PBDE’s)
0.1%
Hexavalent Chromium
0.1%
Cadmium
0.01%
Directive 2009/125/EC with regard to establishing a framework for the setting of ecodesign requirements for energy-related
product.
Year to begin affixing CE marking 2010.
Apr. 23, 2010
Easy Lai /Manager
Regulation Center, Acer Inc.
Date

sorozat
Rövid útmutató
sorozat
Rövid útmutató
Miután a Kezdők számára...
1 2 3
2-2
3-2
3-1
2-1
Győződjön meg arról, hogy az
akkumulátor biztosan rögzült a
helyén (lásd a 2-2 ábrát).
4 5 6
A képek csak illusztrációk. A termék műszaki leírásában eltérések lehetnek.
1

sorozat
Rövid útmutató
sorozat
Rövid útmutató
Az első lépések
Köszönjük, hogy mobil számítástechnikai feladatai elvégzéséhez egy Acer hordozható számítógépet választott.
Útmutatók
Minden segítséget szeretnénk megadni Önnek új Acer gépének használatához, ezért a következő útmutatókat dolgoztuk ki*:
Az első a Rövid útmutató, amely segítségére lesz a számítógép üzembe helyezésénél.
A számítógép hatékonyabb használatához az AcerSystem User Guide ad segítséget. Ez a kézikönyv részletes információkat tartalmaz
például az előre telepített segédprogramokról, az adat-helyreállításról, a bővítési lehetőségekről és a hibaelhárításról. Emellett ismerteti
a garanciával kapcsolatos tudnivalókat, valamint a számítógépre vonatkozó általános szabályokat és biztonsági előírásokat is.
A kézikönyv Portable Document Format (PDF) formátumú, és gyárilag telepítve van a számítógépre.
Megjegyzés: A fájl megtekintéséhez szükség van az Adobe Reader alkalmazásra. Ha az Adobe Reader nincs telepítve a
számítógépre, akkor az AcerSystem User Guide elemre kattintva először az Adobe Reader telepítőprogramja jelenik meg.
A telepítés elvégzéséhez kövesse a képernyőn megjelenő utasításokat. Az Adobe Reader használatához a Súgó és támogatás
menüben talál útmutatást.
* FONTOS MEGJEGYZÉS: Felhívjuk gyelmét arra, hogy az itt említett útmutatók, legyen szó akár elektronikus, akár
nyomtatott formátumú kiadványról, kizárólag tájékoztató célt szolgálnak, és hacsak az AcerSystem User Guide másként
nem rendelkezik, ezeknek az útmutatóknak a tartalma semmilyen kijelentést vagy garanciavállalást nem jelent az Acer
részéről az Ön által megvásárolt terméket illetően. Az Acer kifejezetten elhárít az útmutatókban található hibákkal
kapcsolatos minden felelősséget.
2
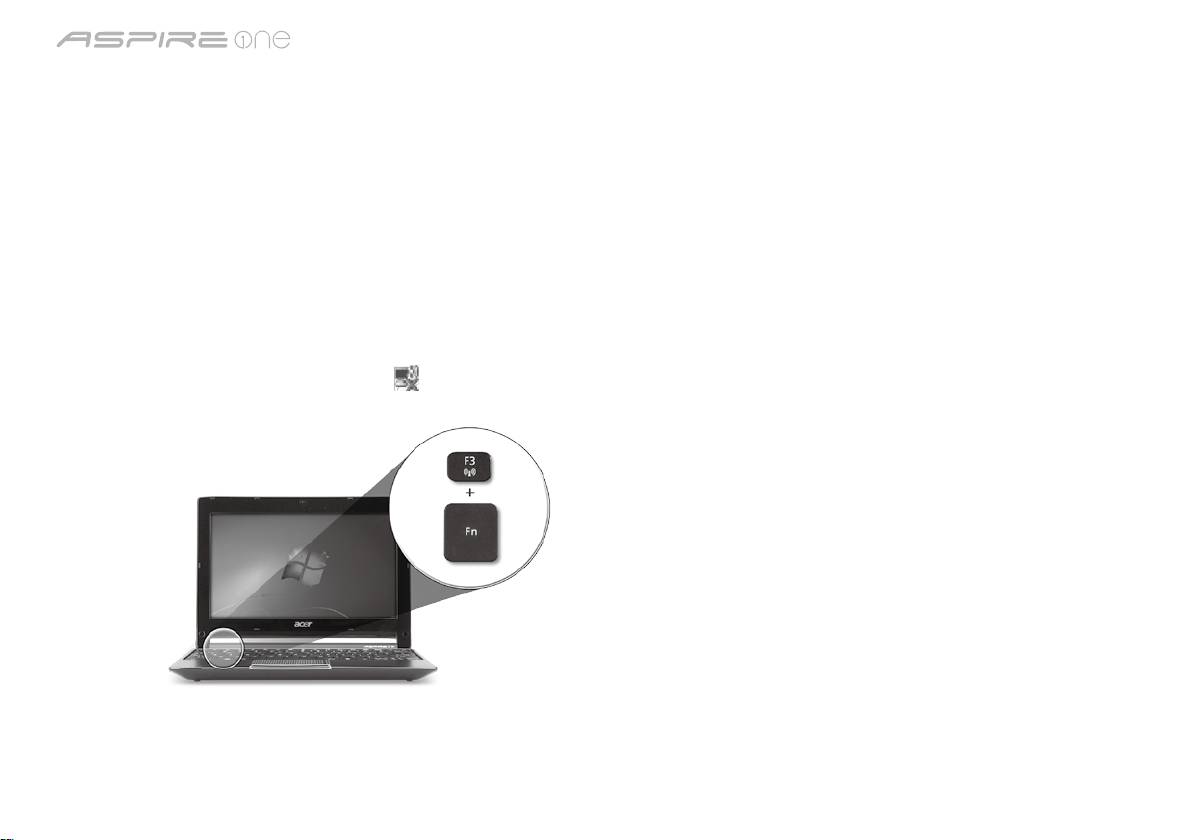
sorozat
Rövid útmutató
sorozat
Rövid útmutató
Hálózati konguráció
Ezen útmutató segítségével megadhatja a vezetékes és a vezeték nélküli hálózat beállításait; ezt követően csatlakozhat az Internetre.
LAN-kapcsolat beállítása
Egyszerűen csatlakoztassa a hálózati kábelt az Ethernet (RJ-45) portba. Az Ethernet port helyét illetően lásd „Jobb oldali nézet” a
6. oldalon.
Vezeték nélküli hálózati kapcsolat beállítása
1. Az <Fn> + <F3> billentyűkombinációval nyissa meg a Kommunikációkezelőt. Itt kapcsolható be a Wi-Fi-adapter; a bekapcsoláshoz
kattintson a Wi-Fi melletti vörös gombra.
Megjegyzés: A 3G és a Bluetooth ugyancsak a Kommunikációkezelővel érhető el. A kommunikációs modulok kongurációtól
függően eltérők lehetnek.
2. Kattintson a rendszer tálcáján található
ikonra, majd válassza ki, hogy melyik vezeték nélküli hozzáférési ponthoz kíván
csatlakozni.
3G SIM-kártya behelyezése (csak bizonyos típusok esetében)
Távolítsa el az akkumulátort, majd óvatosan tegye be a 3G SIM-kártyát a 3G SIM-kártyafoglalatba. A 3G SIM-kártyafoglalat helyét
illetően lásd: „Hátulnézet & Alulnézet” a 6. oldalon.
3
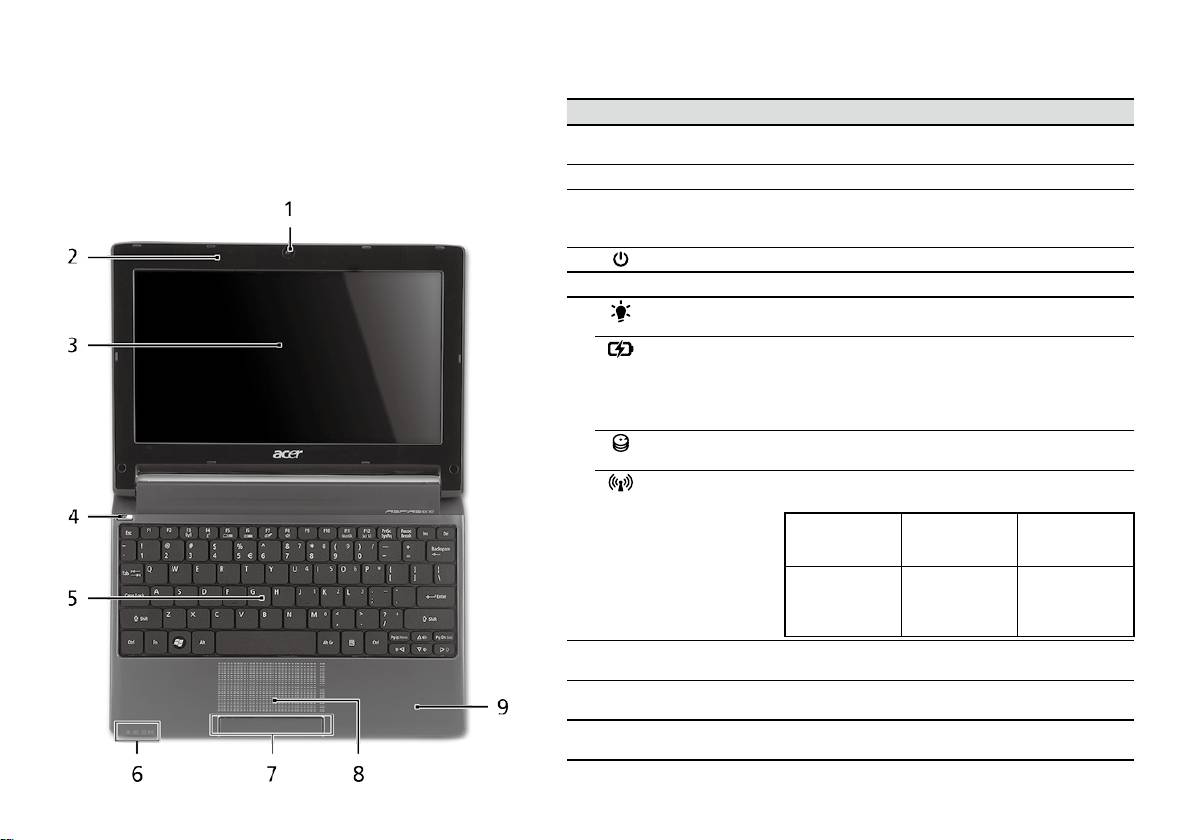
sorozat
Rövid útmutató
sorozat
Rövid útmutató
Felülnézet
Ismerkedés az Aspire One
# Ikon Elem Leírás
készülékkel
1
Acer Crystal Eye
Webkamera videokommunikációs célokra
webkamera
(a konguráció típustól függően változhat).
Miután a Kezdők számára... szakasz alapján üzembe helyezte
a számítógépet, ismerkedjen meg új Acer notebookjával!
2
Mikrofon Belső mikrofon hangfelvételek készítéséhez.
3
Kijelző Más néven folyadékkristályos kijelző (Liquid-Crystal
Display, LCD), a számítógép kimenetét jeleníti meg
(a konguráció típustól függően változhat).
4
Bekapcsoló gomb Be- és kikapcsolja a számítógépet.
5
Billentyűzet Az adatbevitel eszköze.
6
Üzemállapot
A számítógép üzemállapotát jelzi.
1
jelzőfénye
Akkumulátor
Az akkumulátor üzemállapotát jelzi.
1
állapotjelzője
1. Töltés: Sárgán világít, ha az akkumulátor töltése
folyamatban van.
2. Teljesen feltöltve: Hálózati tápellátás
használatakor kéken világít.
Merevlemez
Jelzi, ha a merevlemez használatban van.
jelzőfénye
Kommunikációs
A vezeték nélküli LAN/3G kommunikáció állapotát
1
állapotjelző
jelzi.
Kék jelzőfény
Narancssárga
Kikapcsolva
bekapcsolva
jelzőfény
bekapcsolva
3G bekapcsolva/
3G kikapcsolva/
WiFi bekapcsolva
3G kikapcsolva/
Wi-Fi
3G bekapcsolva/
WiFi kikapcsolva
bekapcsolva
WiFi kikapcsolva
7
Kattintógombok
A bal és a jobb gomb az egér bal és jobb gombjához
(bal és jobb)
hasonlóan működik.
8
Érintőpad Érintésérzékeny mutatóeszköz, a számítógépek
egeréhez hasonlóan működik.
9
Csuklótámasz Kényelmes támaszkodási felület a számítógép
használatának idejére.
1. Az előlap jelzői akkor is láthatók, ha a számítógép fedele le van hajtva.
4

sorozat
Rövid útmutató
sorozat
Rövid útmutató
Elölnézet lehajtott kijelzővel
# Ikon Elem Leírás
1
Állapotjelző fények Fénykibocsátó diódák (Light-Emitting Diode,
LED), fényükkel a számítógép funkcióinak és
összetevőinek állapotát jelzik.
Bal oldali nézet
2
Egyenáramú
A váltakozó áramú hálózati adapter
bemeneti aljzat
csatlakoztatását teszi lehetővé.
3
Külső kijelző (VGA)
Megjelenítő eszköz (pl. külső monitor vagy
port
LCD kivetítő) csatlakoztatását teszi lehetővé.
4
USB 2.0 port USB 2.0 eszközök (pl. USB-s egér vagy
kamera) csatlakoztatását teszi lehetővé.
5
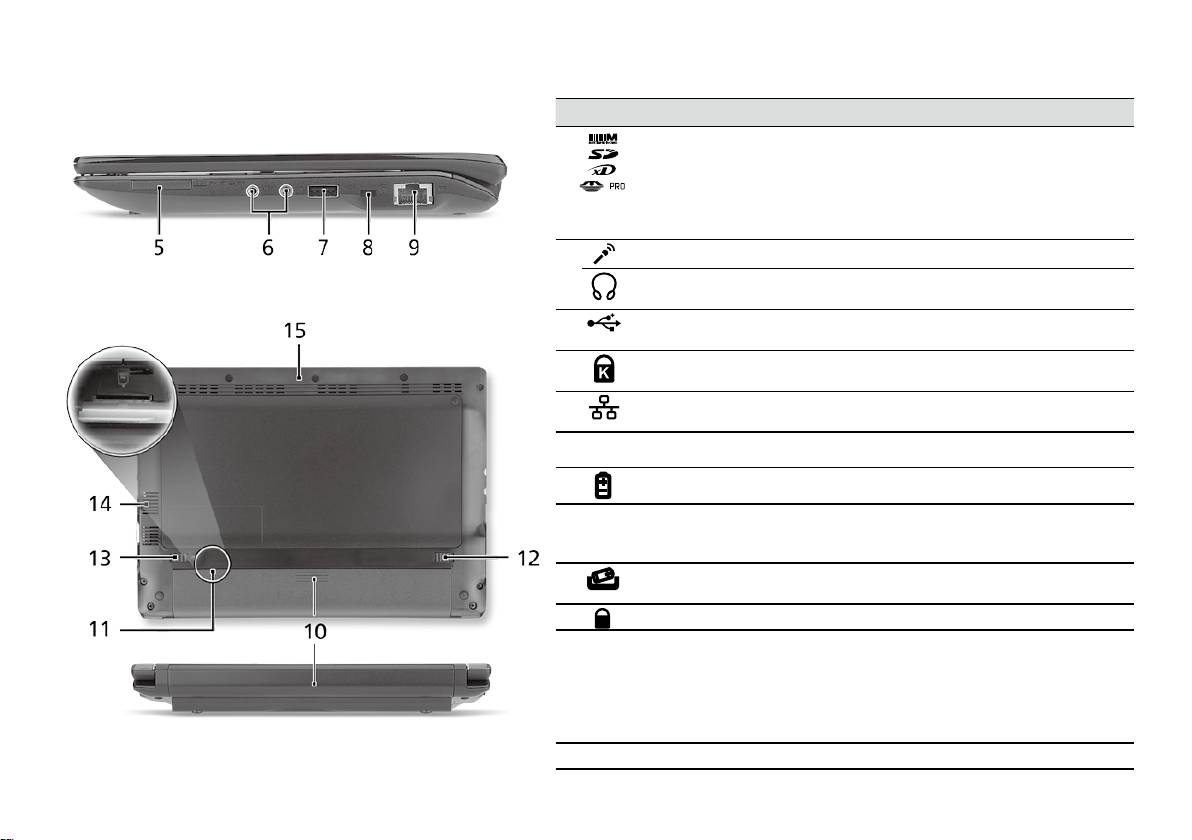
sorozat
Rövid útmutató
sorozat
Rövid útmutató
Jobb oldali nézet
# Ikon Elem Leírás
5
Multifunkciós
Secure Digital (SD), MultiMediaCard (MMC),
kártyaolvasó
Memory Stick (MS), Memory Stick PRO (MS PRO)
és xD-Picture Card (xD) kártyák fogadására képes.
Megjegyzés: A kártyák noman benyomva
helyezhetők be és vehetők ki. Egyszerre csak egy
kártya használatára van lehetőség.
6
Mikrofonbemenet aljzat Külső mikrofon csatlakoztatását teszi lehetővé.
Fejhallgató/hangszóró/
Hangkimeneti eszközök (pl. hangszórók,
vonali kimenet aljzat
fejhallgató) csatlakoztatását teszi lehetővé.
7
USB 2.0 port USB 2.0 eszközök (pl. USB-s egér)
csatlakoztatását teszi lehetővé.
8
Kensington záraljzat Kensington számítógépes biztonsági zár
alkalmazását teszi lehetővé.
9
Ethernet (RJ-45) port Ethernet 10/100 típusú hálózattal képes biztosítani
a kapcsolatot.
Hátulnézet & Alulnézet
10
Akkumulátorfoglalat A számítógép akkumulátorát fogadja be.
11
3G SIM-kártyafoglalat 3G-kapcsolat létesítésére használható 3G SIM-
kártya behelyezésére alkalmas (csak bizonyos
típusok esetében).
12
Akkumulátor
Az akkumulátor eltávolítását teszi lehetővé.
kioldógombja
13
Akkumulátor retesze Az akkumulátor rögzítését biztosítja.
14
Szellőzőnyílások és
Segítségükkel még hosszas használat esetén
hűtőventilátor
is fenntartható a számítógép megfelelő üzemi
hőmérséklete.
Megjegyzés: A ventilátor nyílását nem szabad
elfedni, illetve a levegő áramlását egyéb módon
sem szabad akadályozni.
15
Hangszóró Hangot bocsát ki számítógépéről.
6

sorozat
Rövid útmutató
Környezet
Hőmérséklet:
Üzemeltetés: 5°C – 35°C
Kikapcsolt állapotban: -20°C – 65°C
Páratartalom (kicsapódás nélkül):
Üzemeltetés: 20% – 80%
Kikapcsolt állapotban: 20% – 80%
7

Řada
Stručné pokyny

Řada
Stručné pokyny
Řada
Stručné pokyny
© 2010 Všechna práva vyhrazena
Stručné pokyny pro počítače řady Aspire One
Původní vydání: 04/2010
Notebook řady Aspire One
Číslo modelu: ______________________________
Sériové číslo: ______________________________
Datum zakoupení: __________________________
Místo zakoupení: ___________________________

Řada
Stručné pokyny
Řada
Stručné pokyny
Federal Communications Commission
Declaration of Conformity
This device complies with Part 15 of the FCC Rules. Operation is subject to the following two conditions: (1) this device may not
cause harmful interference, and (2) this device must accept any interference received, including interference that may cause
undesired operation.
The following local Manufacturer/Importer is responsible for this declaration:
Product name: Notebook PC
Brand: Acer
Model number: PAV01
Machine type:
Aspire one series; AO533 series
Name of Responsible Party: Acer America Corporation
Address of responsible party: 333 West San Carlos St., San Jose
CA 95110, U. S. A.
Contact person: Acer Representative
Phone No.: 1-254-298-4000
Fax No.: 1-254-298-4147
April 23, 2010

Řada
Stručné pokyny
Řada
Stručné pokyny
CE Declaration of Conformity
We,
Acer Incorporated
8F, 88, Sec. 1, Hsin Tai Wu Rd., Hsichih, Taipei Hsien 221, Taiwan
Contact Person: Mr. Easy Lai, e-mail:easy_lai@acer.com.tw
And,
Acer Europe SA
Via Cantonale, Centro Galleria 2 6928 Manno Switzerland
Hereby declare that:
Product: Notebook Computer
Trade Name: Acer
Model Number: PAV01
Machine Type: Aspire one series; AO533 series
Is compliant with the essential requirements and other relevant provisions of the following EC directives, and that all the
necessary steps have been taken and are in force to assure that production units of the same product will continue comply with
the requirements.
R&TTE Directive 1999/5/EC as attested by conformity with the following harmonized standard:
• Article 3.1(a) Health and Safety
-. EN60950-1
-. EN62311
• Article 3.1(b) EMC
-. EN301 489-1
-. EN301 489-3 (Applicable to non-bluetooth wireless keyboard mouse set).
-. EN301 489-7
-. EN301 489-17
-. EN301 489-24

Řada
Stručné pokyny
Řada
Stručné pokyny
• Article 3.2 Spectrum Usages
-. EN300 440-2 (Applicable to non-bluetooth wireless keyboard mouse set).
-. EN300 328
-. EN301 511
-. EN301 893 (Applicable to 5GHz high performance RLAN).
-. EN301 908-1
-. EN301 908-2
EMC Directive 2004/108/EC as attested by conformity with the following harmonized standards:
-. EN55022, AS/NZS CISPR22, Class B
-. EN55024
-. EN61000-3-2 Class D
-. EN61000-3-3
Low Voltage Directive 2006/95/EC as attested by conformity with the following harmonized standard:
-. EN60950-1
RoHS Directive 2002/95/EC on the Restriction of the Use of certain Hazardous Substances in Electrical and Electronic Equipment
-. The maximum concentration values of the restricted substances by weight in homogenous material are:
Lead
0.1%
Polybrominated Biphenyls (PBB’s)
0.1%
Mercury
0.1%
Polybrominated Diphenyl Ethers (PBDE’s)
0.1%
Hexavalent Chromium
0.1%
Cadmium
0.01%
Directive 2009/125/EC with regard to establishing a framework for the setting of ecodesign requirements for energy-related
product.
Year to begin affixing CE marking 2010.
Apr. 23, 2010
Easy Lai /Manager
Regulation Center, Acer Inc.
Date

Řada
Stručné pokyny
Řada
Stručné pokyny
První kroky...
1 2 3
2-2
3-2
3-1
2-1
Zkontrolujte, zda je baterie zajištěná
na svém místě, viz obr. 2-2.
4 5 6
Ilustrace jsou pouze orientační. Skutečná specikace produktu se může lišit.
1
Řada
Stručné pokyny
Řada
Stručné pokyny
Stručné pokyny
Děkujeme vám, že jste si k uspokojení svých potřeb v oblasti přenosných počítačů vybrali notebook Acer.
Uživatelské příručky
Abychom vám při používání notebooku Acer pomohli, vytvořili jsme pro vás sadu příruček*:
Stručná příručka vám pomůže při úvodním nastavení počítače.
Další informace o tom, jak můžete pomocí počítače zvýšit svou produktivitu, naleznete v příručce AcerSystem User Guide. Tato
příručka obsahuje podrobné informace týkající se například systémových nástrojů, obnovování dat, možností rozšíření a odstraňování
potíží. Dále obsahuje záruční informace, informace týkající se všeobecných předpisů a bezpečnostní upozornění k notebooku. Příručka
je k dispozici ve formátu PDF (Portable Document Format) a je již uložena do notebooku.
Poznámka: K zobrazení tohoto souboru je vyžadován program Adobe Reader. Pokud v počítači není program Adobe Reader
nainstalován, klepnutím na položku AcerSystem User Guide nejprve spustíte instalační program. Dokončete instalaci podle
pokynů na obrazovce. Pokyny týkající se používání programu Adobe Reader jsou k dispozici v nabídce Nápověda a odborná
pomoc.
* DŮLEŽITÉ UPOZORNĚNÍ: Upozorňujeme, že uvedené příručky, ať tištěné nebo elektronické, slouží pouze pro
referenci a s výjimkou informací uvedených ve zvláštních informacích o záruce v AcerSystem User Guide nepředstavují
žádná ujištění nebo záruky společnosti Acer v souvislosti s vámi zakoupeným produktem. Společnost Acer výslovně
odmítá jakoukoli odpovědnost za chyby uvedené v těchto příručkách.
2
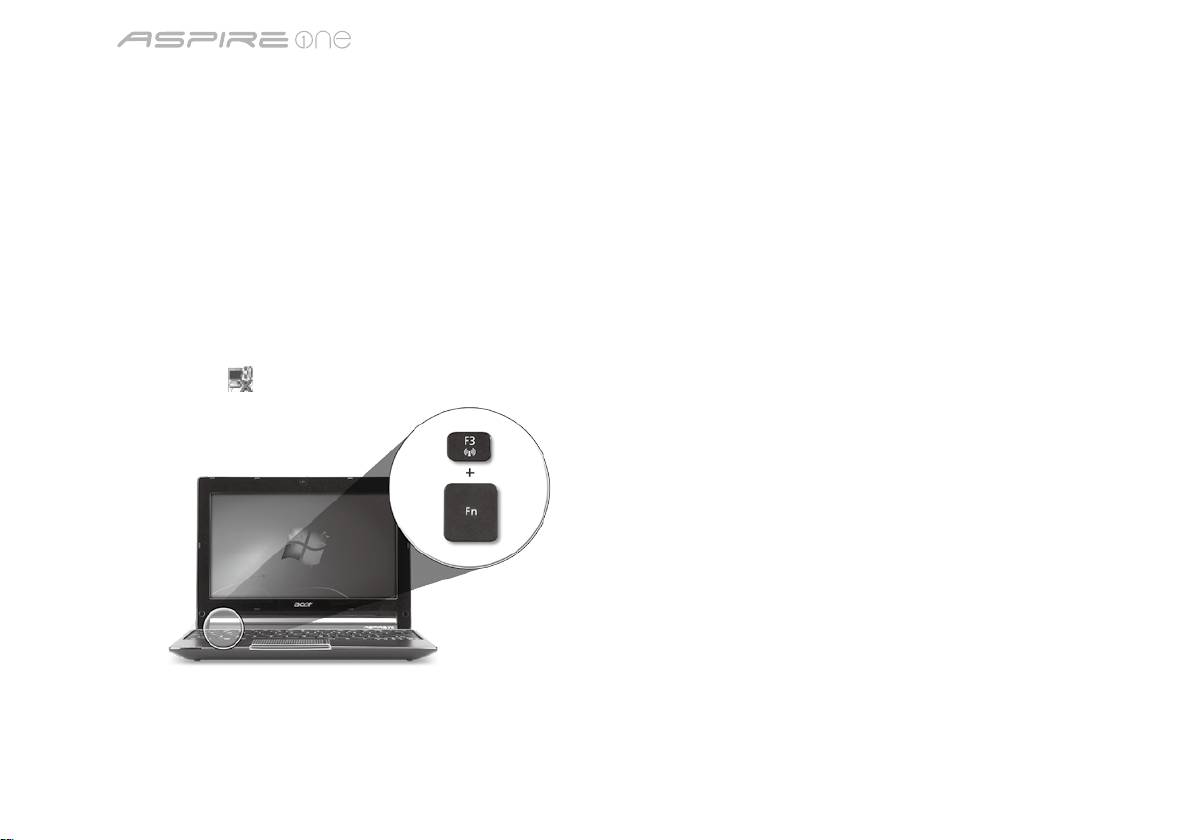
Řada
Stručné pokyny
Řada
Stručné pokyny
Kongurace sítě
Tento průvodce vám pomůže kongurovat nastavení sítě LAN nebo bezdrátové sítě, aby bylo možné se připojit k Internetu.
Nastavení připojení k síti LAN
Stačí připojit síťový kabel LAN do portu Ethernet (RJ-45). Umístění portu Ethernet naleznete na obrázku „Pohled zprava“ na straně 6.
Nastavení bezdrátového připojení
1. Stisknutím kláves <Fn> + <F3> otevřete správce komunikace. Zde můžete zapnout připojení Wi-Fi klepnutím na červené tlačítko
vedle Wi-Fi.
Poznámka: Prostřednictvím správce komunikace jsou dostupné také možnosti 3G a Bluetooth. Komunikační zařízení se liší podle
modelu.
2. Klepněte na ikonu
na hlavním panelu a vyberte přístupový bod bezdrátové sítě, k němuž se chcete připojit.
Vložení karty 3G SIM (pouze u vybraných modelů)
Vyjměte baterii a opatrně vložte kartu 3G SIM do patice pro kartu 3G SIM. Umístění patice pro kartu 3G SIM najdete na „Pohled
zezadu & Pohled zespodu“ na straně 6.
3

Řada
Stručné pokyny
Řada
Stručné pokyny
Pohled shora
Seznámení s počítačem
# Ikona Položka Popis
Aspire One
1
Webová kamera
Webová kamera pro obrazovou komunikaci
Po nastavení počítače podle pokynů znázorněných v části První
Acer Crystal Eye
(Kongurace se může lišit podle modelů).
kroky... vás seznámíme s vaším novým notebookem Acer.
2
Mikrofon Interní mikrofon pro nahrávání zvuku.
3
Displej Na displeji, označovaném také displej
z tekutých krystalů (Liquid-Crystal Display;
LCD), se zobrazuje gracký výstup počítače
(Kongurace se může lišit podle modelů).
4
Tlačítko napájení Slouží k zapnutí a vypnutí počítače.
5
Klávesnice Slouží k zadávání údajů do počítače.
1
6
Indikátor napájení
Indikuje stav napájení počítače.
1
Indikátor baterie
Indikuje stav baterie počítače.
1. Nabíjení: Při nabíjení baterie svítí indikátor
jantarově.
2. Plně nabití: V režimu napájení ze sítě svítí
indikátor modře.
Indikátor HDD Svítí, pokud je aktivní pevný disk.
Indikátor
Indikuje stav komunikace v bezdrátové síti
1
komunikace
LAN/3G.
Svítí modrá
Svítí oranžová
Nesvítí
kontrolka
kontrolka
3G zapnuto/
WiFi zapnuto
3G vypnuto/
3G vypnuto/
3G zapnuto/
Wi-Fi zapnuto
WiFi vypnuto
WiFi vypnuto
7
Tlačítka (levé a
Levé a pravé tlačítko funguje jako levé a
pravé)
pravé tlačítko myši.
8
Touchpad Polohovací zařízení citlivé na dotek, které má
podobnou funkci jako počítačová myš.
9
Podložka ruky Oblast k pohodlnému opření rukou při
používání počítače.
1. Stavové indikátory na předním panelu jsou viditelné i po zavření víka počítače.
4
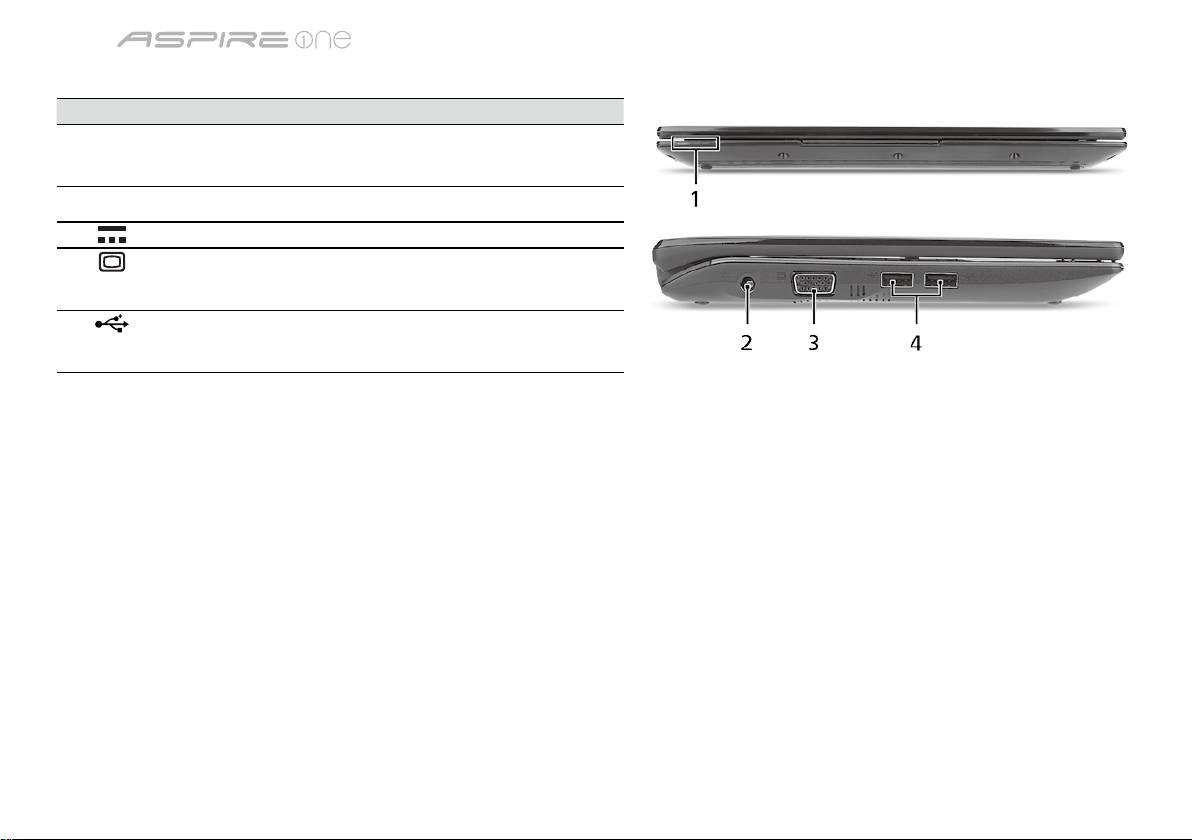
Řada
Stručné pokyny
Řada
Stručné pokyny
Pohled na zavřenou přední stranu
# Ikona Položka Popis
1
Stavové indikátory Diody LED (Light-Emitting Diodes; LED),
které se rozsvěcují a informují o stavu funkcí
a součástí počítače.
Pohled zleva
2
Napájecí konektor Zajišťuje připojení k síťovému adaptéru.
3
Port externího
Umožňuje připojení zobrazovacího zařízení
zobrazovacího
(například externího monitoru nebo
zařízení (VGA)
projektoru LCD).
4
Port USB 2.0 Umožňuje připojení zařízení s rozhraním
USB 2.0 (například myš nebo fotoaparát
USB).
5

Řada
Stručné pokyny
Řada
Stručné pokyny
Pohled zprava
# Ikona Položka Popis
5
Čtečka karet Více v 1 Podporuje karty Secure Digital (SD),
MultiMediaCard (MMC), Memory Stick (MS),
Memory Stick PRO (MS PRO) a xD-Picture
Card (xD).
Poznámka: Stisknutím vyjměte nebo vložte kartu.
V jednom okamžiku lze použít jen jednu kartu.
6
Konektor pro vstup
Slouží k připojení vstupů z externího mikrofonu.
mikrofonu
Konektor pro
Slouží k připojení vnějších výstupních zvukových
připojení sluchátek,
zařízení (například reproduktorů nebo sluchátek).
reproduktorů nebo
zvukového výstupu
7
Port USB 2.0 Umožňuje připojení zařízení s rozhraním USB 2.0
(například myš USB).
8
Patice pro zámek
Umožňuje připojení počítačového bezpečnostního
Kensington
zámku kompatibilního s typem Kensington.
9
Port Ethernet (RJ-45) Umožňuje připojení k síti Ethernet 10/100.
Pohled zezadu & Pohled zespodu
10
Pozice pro baterii Zde je uložena baterie počítače.
11
Patice pro kartu
Přijímá kartu 3G SIM pro konektivitu 3G (pouze u
3G SIM
vybraných modelů).
12
Uvolňovací západka
Uvolňuje baterii k vyjmutí.
baterie
13
Zámek baterie Zamkne baterii na místě.
14
Ventilační otvory a
Umožňují chlazení počítače i při dlouhodobém
ventilátor
používání.
Poznámka: Nezakrývejte ani neblokujte otvor
ventilátoru.
15
Reproduktor Vydává zvuk z vašeho počítače.
6

Řada
Stručné pokyny
Prostředí
Teplota:
Provozní: 5°C až 35°C
Neprovozní: -20°C až 65°C
Vlhkost (nekondenzující):
Provozní: 20% až 80%
Neprovozní: 20% až 80%
7

Séria
Stručná príručka

Séria
Stručná príručka
Séria
Stručná príručka
© 2010 Všetky práva vyhradené
Stručná príručka séria Aspire One
Pôvodné vydanie: 04/2010
Prenosný počítač séria Aspire One
Číslo modelu: ______________________________
Sériové číslo: ______________________________
Dátum zakúpenia: ___________________________
Miesto zakúpenia: ___________________________

Séria
Stručná príručka
Séria
Stručná príručka
Federal Communications Commission
Declaration of Conformity
This device complies with Part 15 of the FCC Rules. Operation is subject to the following two conditions: (1) this device may not
cause harmful interference, and (2) this device must accept any interference received, including interference that may cause
undesired operation.
The following local Manufacturer/Importer is responsible for this declaration:
Product name: Notebook PC
Brand: Acer
Model number: PAV01
Machine type:
Aspire one series; AO533 series
Name of Responsible Party: Acer America Corporation
Address of responsible party: 333 West San Carlos St., San Jose
CA 95110, U. S. A.
Contact person: Acer Representative
Phone No.: 1-254-298-4000
Fax No.: 1-254-298-4147
April 23, 2010

Séria
Stručná príručka
Séria
Stručná príručka
CE Declaration of Conformity
We,
Acer Incorporated
8F, 88, Sec. 1, Hsin Tai Wu Rd., Hsichih, Taipei Hsien 221, Taiwan
Contact Person: Mr. Easy Lai, e-mail:easy_lai@acer.com.tw
And,
Acer Europe SA
Via Cantonale, Centro Galleria 2 6928 Manno Switzerland
Hereby declare that:
Product: Notebook Computer
Trade Name: Acer
Model Number: PAV01
Machine Type: Aspire one series; AO533 series
Is compliant with the essential requirements and other relevant provisions of the following EC directives, and that all the
necessary steps have been taken and are in force to assure that production units of the same product will continue comply with
the requirements.
R&TTE Directive 1999/5/EC as attested by conformity with the following harmonized standard:
• Article 3.1(a) Health and Safety
-. EN60950-1
-. EN62311
• Article 3.1(b) EMC
-. EN301 489-1
-. EN301 489-3 (Applicable to non-bluetooth wireless keyboard mouse set).
-. EN301 489-7
-. EN301 489-17
-. EN301 489-24
Séria
Stručná príručka
Séria
Stručná príručka
• Article 3.2 Spectrum Usages
-. EN300 440-2 (Applicable to non-bluetooth wireless keyboard mouse set).
-. EN300 328
-. EN301 511
-. EN301 893 (Applicable to 5GHz high performance RLAN).
-. EN301 908-1
-. EN301 908-2
EMC Directive 2004/108/EC as attested by conformity with the following harmonized standards:
-. EN55022, AS/NZS CISPR22, Class B
-. EN55024
-. EN61000-3-2 Class D
-. EN61000-3-3
Low Voltage Directive 2006/95/EC as attested by conformity with the following harmonized standard:
-. EN60950-1
RoHS Directive 2002/95/EC on the Restriction of the Use of certain Hazardous Substances in Electrical and Electronic Equipment
-. The maximum concentration values of the restricted substances by weight in homogenous material are:
Lead
0.1%
Polybrominated Biphenyls (PBB’s)
0.1%
Mercury
0.1%
Polybrominated Diphenyl Ethers (PBDE’s)
0.1%
Hexavalent Chromium
0.1%
Cadmium
0.01%
Directive 2009/125/EC with regard to establishing a framework for the setting of ecodesign requirements for energy-related
product.
Year to begin affixing CE marking 2010.
Apr. 23, 2010
Easy Lai /Manager
Regulation Center, Acer Inc.
Date

Séria
Stručná príručka
Séria
Stručná príručka
Práve začíname
1 2 3
2-2
3-2
3-1
2-1
Skontrolujte, či je batéria správne
vložená na svojom mieste, ako je
znázornené na obrázku v časti 2-2.
4 5 6
Ilustrácie sú len orientačné. Parametre aktuálneho výrobku môžu byť odlišné.
1
Séria
Stručná príručka
Séria
Stručná príručka
Hneď na úvod
Radi by sme vám poďakovali za rozvoj prenosných počítačov Acer – vašej voľby pre svoje mobilné počítačové potreby.
Vaše príručky
Pomôžeme vám s používaním prenosného počítača Acer – vytvorili sme kvôli tomu niekoľko príručiek*:
Najprv vám Stručná príručka pomôže začať s nastavením počítača.
Informácie o tom, ako vám počítač pomôže byť produktívnejší, nájdete v AcerSystem User Guide. Táto príručka obsahuje podrobné
informácie o systémových programoch, obnove údajov, možnostiach rozšírenia a riešenie problémov. Okrem toho obsahuje informácie
o záruke a všeobecné vyhlásenia k predpisom a bezpečnosti. Je dostupná vo formáte PDF a je umiestnená vo vašom prenosnom
počítači.
Poznámka: Prezeranie súboru vyžaduje Adobe Reader. Ak na vašom počítači nie je Adobe Reader nainštalovaný, kliknutím na
AcerSystem User Guide sa najprv spustí inštalácia programu Adobe Reader. Inštaláciu dokončíte podľa pokynov, ktoré uvidíte
na obrazovke. Inštrukcie ako používať Adobe Reader nájdete v ponuke Pomocník a Podpora.
* DÔLEŽITÁ POZNÁMKA: Majte na pamäti, že všetky tu uvedené príručky, či už v tlačenej alebo elektronickej podobe,
sú len orientačné a žiadne informácie, ktoré sú v nich uvedené, nenahrádzajú ani nereprezentujú záruku spoločnosti
Acer týkajúcu sa zakúpeného výrobku, okrem výslovne uvedených informácií o záruke nachádzajúcich sa v dokumente
AcerSystem User Guide. Spoločnosť Acer vyhlasuje, že nenesie žiadnu zodpovednosť za prípadné chyby v týchto
príručkách.
2

Séria
Stručná príručka
Séria
Stručná príručka
Kongurácia siete
Tento návod vám pomôže nakongurovať nastavenia siete LAN a bezdrôtovej siete, aby bolo možné pripojiť sa k internetu.
Nastavenie pripojenia k sieti LAN
Stačí zapojiť kábel siete LAN do portu Ethernet (RJ-45). Informácie o umiestnení portu siete Ethernet nájdete v časti„Pohľad sprava“
na strane 6.
Nastavenie bezdrôtového pripojenia
1. Stlačením klávesov <Fn> + <F3> otvoríte správcu komunikácie Kliknutím na červené tlačidlo vedľa Wi-Fi môžete zapnúť pripojenie
Wi-Fi.
Poznámka: Pripojenie k sieti 3G a Bluetooth je k dispozícii aj prostredníctvom správcu komunikácie. Komunikačné zariadenia sa
môžu líšiť v závislosti od modelu.
2. Kliknite na ikonu v oznamovacej oblasti
a vyberte prístupový bod bezdrôtovej siete, ku ktorej sa chcete pripojiť.
Vloženie karty 3G SIM (len určité modely)
Vyberte batériu a opatrne vložte 3G SIM kartu do zásuvky pre 3G SIM kartu. Umiestnenie zásuvky pre 3G SIM kartu nájdete na
obrázku „Pohľad zozadu & Pohľad zdola“ na strane 6.
3
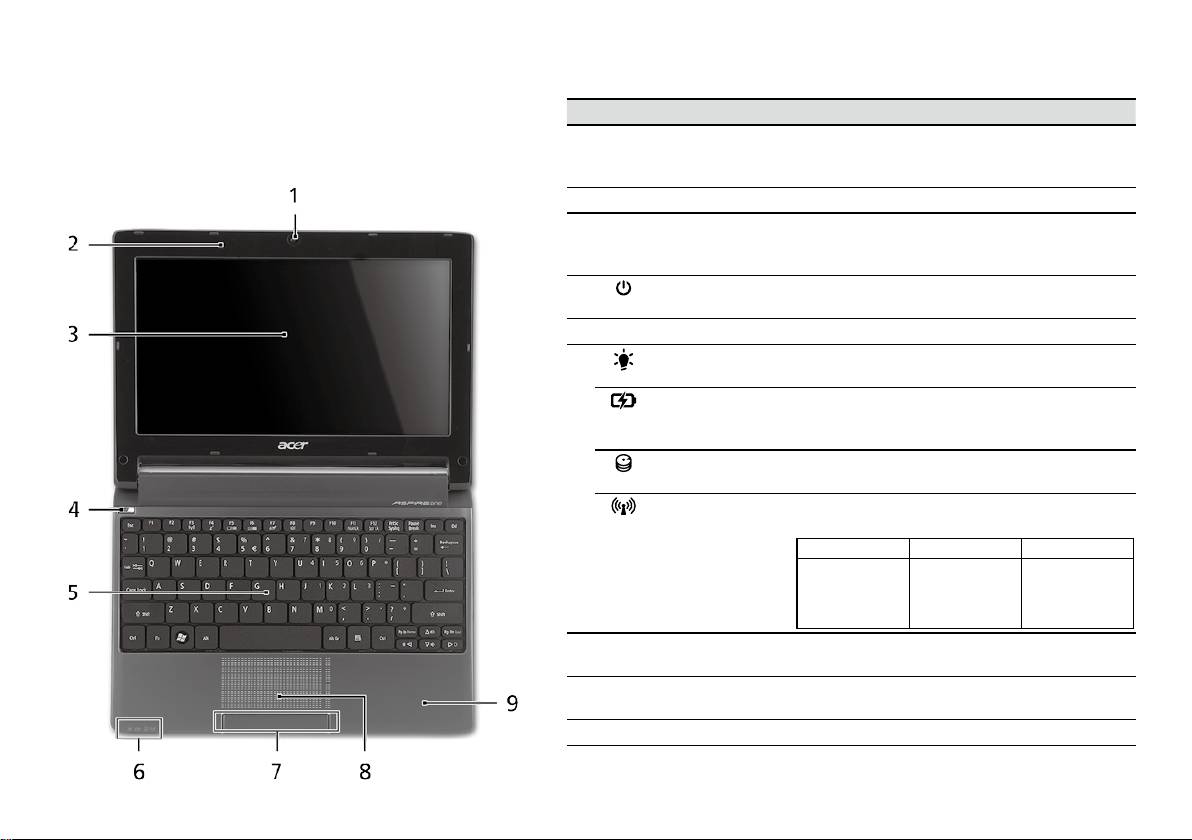
Séria
Stručná príručka
Séria
Stručná príručka
Pohľad zhora
Spoznajte Aspire One
# Ikona Položka Popis
Po nastavení počítača podľa časti Práve začíname, nám
1
Webkamera
Webová kamera na video komunikáciu
dovoľte, aby sme vás zoznámili s novým prenosným
Acer Crystal Eye
(kongurácia sa môže v závislosti od modelu
počítačom Acer.
líšiť).
2
Mikrofón Interný mikrofón na nahrávanie zvuku.
3
Obrazovka Nazýva sa tiež Liquid-Crystal Display (LCD),
zobrazuje výstup z počítača (kongurácia sa
môže v závislosti od modelu líšiť).
4
Tlačidlo Power
Zapína a vypína počítač.
(Zapnúť)
5
Klávesnica Slúži na zadávanie údajov do počítača.
6
Kontrolka
Signalizuje stav napájania počítača.
1
napájania
1
Kontrolka batérie
Signalizuje stav batérie počítača.
1. Nabíjanie: Pri nabíjaní batérie svieti žltá.
2. Nabité: V režime AC svieti modrá.
Kontrolka pevného
Svieti, keď je jednotka pevného disku aktívna.
disku
Kontrolka
Signalizuje stav komunikácie siete 3G/
1
komunikácie
bezdrôtovej siete LAN.
Svieti modrá Svieti oranžová Nesvieti
3G zapnuté/
WiFi zapnuté
3G vypnuté/
3G vypnuté/
3G zapnuté/
Wi-Fi zapnuté
WiFi vypnuté
WiFi vypnuté
7
Tlačidlá na klikanie
Funkcia ľavého a pravého tlačidla je podobná
(ľavé a pravé)
ako funkcia ľavého a pravého tlačidla myši.
8
Dotyková plocha Zariadenie s citlivosťou na dotyk, ktoré funguje
ako počítačová myš.
9
Podložka rúk Pohodlná opora rúk pri práci s počítačom.
1. Kontrolky na prednom paneli sú viditeľné, aj keď je veko počítača zatvorené.
4
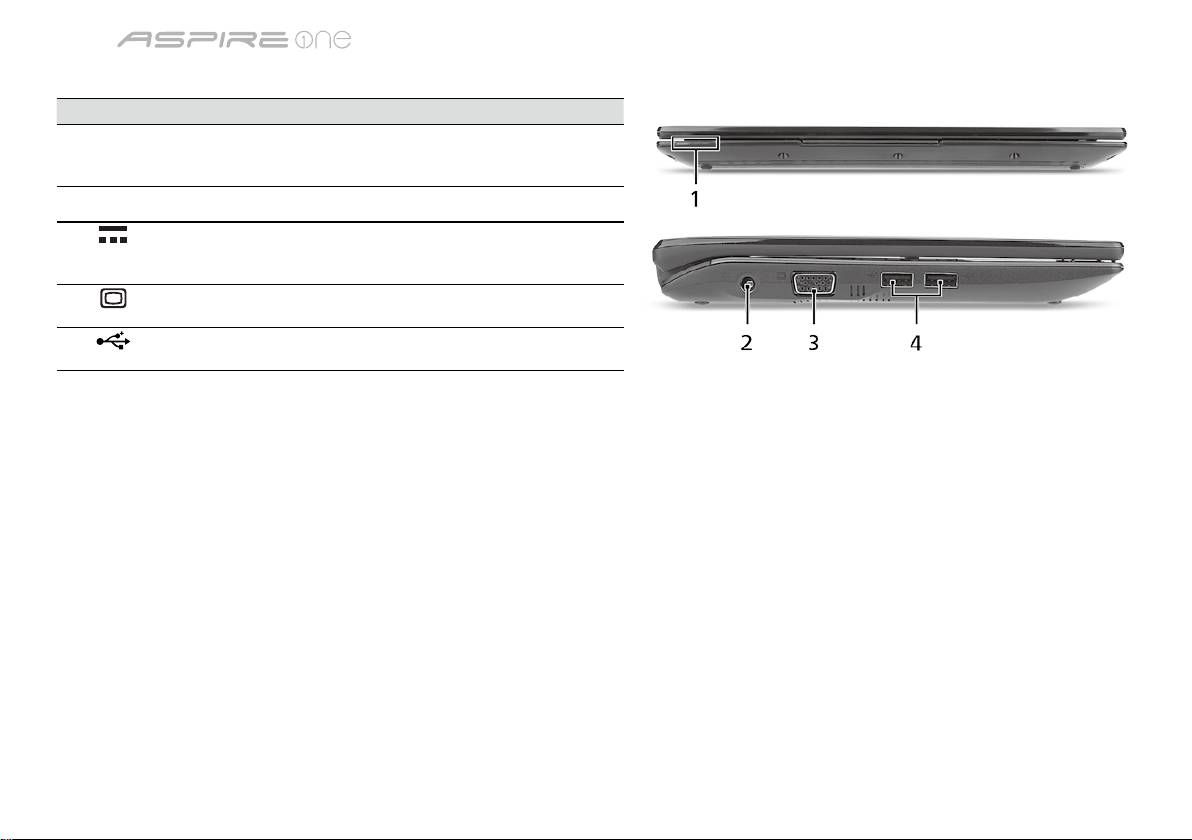
Séria
Stručná príručka
Séria
Stručná príručka
Pohľad spredu (zatvorený)
# Ikona Položka Popis
1
Indikátory stavu Diódy LED (Light-Emitting Diodes), ktoré
svetlom indikujú stav funkcií počítača a jeho
súčastí.
Pohľad zľava
2
Konektor vstupu
Pripojenie adaptéra striedavého napätia.
jednosmerného
napätia
3
Port externej
Pripojenie zobrazovacieho zariadenia
obrazovky (VGA)
(napr. externého monitora, LCD projektora).
4
Port USB 2.0 Pripojenie zariadení cez rozhranie USB 2.0
(napr. USB myš, USB fotoaparát).
5

Séria
Stručná príručka
Séria
Stručná príručka
Pohľad sprava
# Ikona Položka Popis
5
Čítačka kariet Multi-in-1 Podporuje karty Secure Digital (SD),
MultiMediaCard (MMC), Memory Stick (MS),
Memory Stick PRO (MS PRO) a xD-Picture
Card (xD).
Poznámka: Stlačením vytiahnete/vložíte
kartu. Nie je možné pracovať s viacerými
kartami naraz.
6
Konektor vstupu
Slúži na vstup zvuku z externých
mikrofónu
mikrofónov.
Konektor na slúchadlá/
Výstup zvuku do zvukových zariadení
reproduktor/audio
(napr. reproduktorov, slúchadiel).
výstup
7
Port USB 2.0 Pripojenie zariadení cez rozhranie USB 2.0
(napr. USB myš).
8
Zásuvka na zámok
Pripojenie počítačového bezpečnostného
Kensington
kľúča Kensington.
9
Port siete Ethernet
Pripojenie k sieti Ethernet 10/100.
(RJ-45)
Pohľad zozadu & Pohľad zdola
10
Jednotka batérie Slúži na uloženie batérie počítača.
11
Zásuvka pre 3G SIM
Akceptuje 3G SIM kartu pre 3G
kartu
pripojiteľnosť (len určité modely).
12
Západka uvoľnenia
Slúži na uvoľnenie batérie pri jej vyberaní.
batérie
13
Zámok batérie Uzamyká batériu na jej mieste.
14
Otvory na ventiláciu a
Pomáha udržať pri dlhom používaní počítač
ventilátor chladenia
chladný.
Poznámka: Neuzatvárajte ani neupchávajte
otvor vetráka.
15
Reproduktor Výstup zvuku z počítača.
6

Séria
Stručná príručka
Prostredie
Teplota:
Prevádzková: od 5°C do 35°C
Mimoprevádzková: od -20°C do 65°C
Vlhkosť (nekondenzačná):
Prevádzková: od 20% do 80%
Mimoprevádzková: od 20% do 80%
7

Serija
Hitri vodič

Serija
Hitri vodič
Serija
Hitri vodič
© 2010 Vse pravice pridržane
Hitri vodič za serijo Aspire One
Originalna izdaja: 04/2010
Prenosni računalnike serije Aspire One
Številka modela: ____________________________
Serijska številka: ____________________________
Datum nakupa: _____________________________
Kraj nakupa: _______________________________

Serija
Hitri vodič
Serija
Hitri vodič
Federal Communications Commission
Declaration of Conformity
This device complies with Part 15 of the FCC Rules. Operation is subject to the following two conditions: (1) this device may not
cause harmful interference, and (2) this device must accept any interference received, including interference that may cause
undesired operation.
The following local Manufacturer/Importer is responsible for this declaration:
Product name: Notebook PC
Brand: Acer
Model number: PAV01
Machine type:
Aspire one series; AO533 series
Name of Responsible Party: Acer America Corporation
Address of responsible party: 333 West San Carlos St., San Jose
CA 95110, U. S. A.
Contact person: Acer Representative
Phone No.: 1-254-298-4000
Fax No.: 1-254-298-4147
April 23, 2010

Serija
Hitri vodič
Serija
Hitri vodič
CE Declaration of Conformity
We,
Acer Incorporated
8F, 88, Sec. 1, Hsin Tai Wu Rd., Hsichih, Taipei Hsien 221, Taiwan
Contact Person: Mr. Easy Lai, e-mail:easy_lai@acer.com.tw
And,
Acer Europe SA
Via Cantonale, Centro Galleria 2 6928 Manno Switzerland
Hereby declare that:
Product: Notebook Computer
Trade Name: Acer
Model Number: PAV01
Machine Type: Aspire one series; AO533 series
Is compliant with the essential requirements and other relevant provisions of the following EC directives, and that all the
necessary steps have been taken and are in force to assure that production units of the same product will continue comply with
the requirements.
R&TTE Directive 1999/5/EC as attested by conformity with the following harmonized standard:
• Article 3.1(a) Health and Safety
-. EN60950-1
-. EN62311
• Article 3.1(b) EMC
-. EN301 489-1
-. EN301 489-3 (Applicable to non-bluetooth wireless keyboard mouse set).
-. EN301 489-7
-. EN301 489-17
-. EN301 489-24

Serija
Hitri vodič
Serija
Hitri vodič
• Article 3.2 Spectrum Usages
-. EN300 440-2 (Applicable to non-bluetooth wireless keyboard mouse set).
-. EN300 328
-. EN301 511
-. EN301 893 (Applicable to 5GHz high performance RLAN).
-. EN301 908-1
-. EN301 908-2
EMC Directive 2004/108/EC as attested by conformity with the following harmonized standards:
-. EN55022, AS/NZS CISPR22, Class B
-. EN55024
-. EN61000-3-2 Class D
-. EN61000-3-3
Low Voltage Directive 2006/95/EC as attested by conformity with the following harmonized standard:
-. EN60950-1
RoHS Directive 2002/95/EC on the Restriction of the Use of certain Hazardous Substances in Electrical and Electronic Equipment
-. The maximum concentration values of the restricted substances by weight in homogenous material are:
Lead
0.1%
Polybrominated Biphenyls (PBB’s)
0.1%
Mercury
0.1%
Polybrominated Diphenyl Ethers (PBDE’s)
0.1%
Hexavalent Chromium
0.1%
Cadmium
0.01%
Directive 2009/125/EC with regard to establishing a framework for the setting of ecodesign requirements for energy-related
product.
Year to begin affixing CE marking 2010.
Apr. 23, 2010
Easy Lai /Manager
Regulation Center, Acer Inc.
Date

Serija
Hitri vodič
Serija
Hitri vodič
Za začetek
1 2 3
2-2
3-2
3-1
2-1
Preverite, ali je baterija pravilno
nameščena na svojem mestu, kot
je prikazano na sliki 2-2.
4 5 6
Ilustracije so le del splošnih napotkov. Dejanski tehnični podatki izdelka so lahko drugačni.
1

Serija
Hitri vodič
Serija
Hitri vodič
Začnimo pri začetku
Želimo se vam zahvaliti, ker ste za zadovoljevanje prenosnih računalniških potreb izbrali prenosnik Acer.
Vaša navodila
Za pomoč pri uporabi vašega prenosnika Acer smo izdelali paket navodil*:
Hitri vodič vam pomaga pri nastavljanju vašega računalnika.
Za več infromacije o tem kako vam lahko računalnik pomaga postati bolj produktive, prosimo glejte na AcerSystem User Guide.
Ta navodila vsebujejo podrobne informacije o sistemskih pripomočkih, obnovi podatkov, možnostih razširitve in odpravljanju težav.
Poleg tega vsebuje garancijske informacije in splošne uredbe in varnostna obvestila za vaš prenosnik. Navodila so na voljo v obliki
prenosnega dokumenta (PDF) in so naložena na vaš prenosnik.
Opomba: Za pregledovanje datoteke potrebujete Adobe Reader. Če Adobe Reader ni nameščen na računalnik se bo zagnal
namestitveni program Adobe Reader, ko kliknete na AcerSystem User Guide. Za zaključek postopka sledite navodilom na
zaslonu. Za navodila o uporabi Adobe Reader, odprite meni Pomoč in podpora.
* POMEMBNA OPOMBA: Prosimo pomnite, da so smernice, ki so omenjene tukaj bodisi v tiskani ali v elektronski
obliki, le v informacijo in da njihova vsebina, razen če je to navedeno v posebnih informacijah o garanciji, vključenih v
AcerSystem User Guide, v nobenem primeru ne predstavlja garancija ali jamstev s strani podjetja Acer glede izdelka, ki
ste ga kupili. Acer izrecno zavrača vsakršno odgovornost za napake iz priročnikov.
2

Serija
Hitri vodič
Serija
Hitri vodič
Konguracija omrežja
Ta vodič vam bo pomagal kongurirati nastavitve vašega LAN in brezžičnega omrežja, da bi se lahko povezali z internetom.
Vzpostavitev povezave preko LAN
Kabel LAN vključite v vrata za eternet (RJ-45). Glejte naslov „Pogled iz desne strani“ na strani 6 za lokacijo vrat eterneta.
Nastavitev brezžične povezave
1. Za dostop do upravitelja komunikacijskih nastavitev pritisnite <Fn> + <F3>. V tem upravitelju lahko povezavo WLAN vključite s
klikom na rdeči gumb ob zadevni povezavi.
Opomba: V upravitelju komunikacijskih storitev lahko dostopate tudi do nastavitev za povezave 3G in Bluetooth. Komunikacijske
naprave se lahko razlikujejo glede na model vašega računalnika.
2. Kliknite na ikono
v sistemski vrstici in izberite brezžično točko dostopa, s katero se želite povezati.
Vstavljanje kartice 3G SIM (le za določene modele)
Odstranite baterijo in v režo za kartice 3G SIM previdno vstavite kartico 3G SIM. Glejte naslov to „Pogled od zadaj in spodaj“ na
strani 6, da bi našči režo za kartice 3G SIM.
3
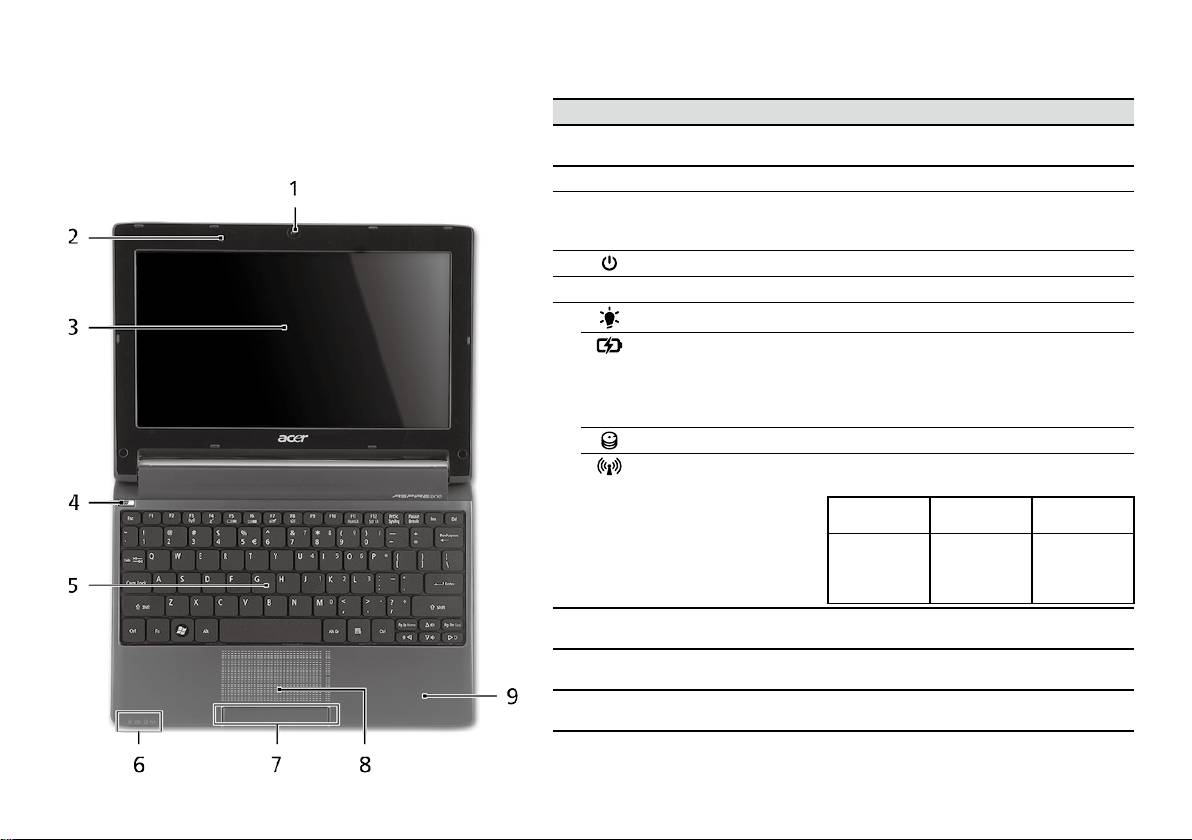
Serija
Hitri vodič
Serija
Hitri vodič
Pogled od zgoraj
Izlet po Aspire One
# Ikona Predmet Opis
Ko ste nastavili računalnik, kot je prikazano v oddelku Za
1
Integrirana spletna kamera
Spletna kamera za video komunikacijo
začetek, naj vam predstavimo vaš prenosnik Acer.
Acer Crystal Eye
(konguracija je za različne modele različna).
2
Mikrofon Notranji mikrofon za snemanje zvoka.
3
Zaslon Takoimenovani zaslon s tekoèimi kristali
(LCD), prikazuje izhod vašega raèunalnika
(konguracija je za razliène modele razlièna).
4
Tipka za vklop/izklop Vklop in izklop računalnika.
5
Tipkovnica Za vnos podatkov v računalnik.
1
6
Indikator stanja napajanja
Označuje stanje napajanja računalnika.
1
Indikator stanja baterije
Označuje stanje baterije računalnika.
1. Polnjenje: Lučka sveti rumenkasto rjavo,
ko se baterija polni.
2. V celoti napolnjena: V načinu AC lučka
sveti modro.
Indikator trdega diska Označuje, ko je trdi disk aktiven.
1
Indikator komunikacije
Označuje stanje brezžične komunikacije
LAN/3G.
Sveti modra luč Sveti oranžna
Ne sveti
luč
Vključen 3G/
vključen WiFi
Izključen 3G/
Izključen 3G/
Vključen 3G/
vključen WiFi
izključen WiFi
izključen WiFi
7
Tipke (levo in desno) Leva in desna tipka delujejo kot leva in desni
tipka na miški.
8
Sledilna plošča Na dotik občutljiva naprava, ki deluje kot
računalniška miška.
9
Podpora za dlan Udobna podpora za vaše roke, ko uporabljate
računalnik.
1. Indikatorji na sprednji plošči so vidni tudi, ko je pokrov računalnika zaprt.
4
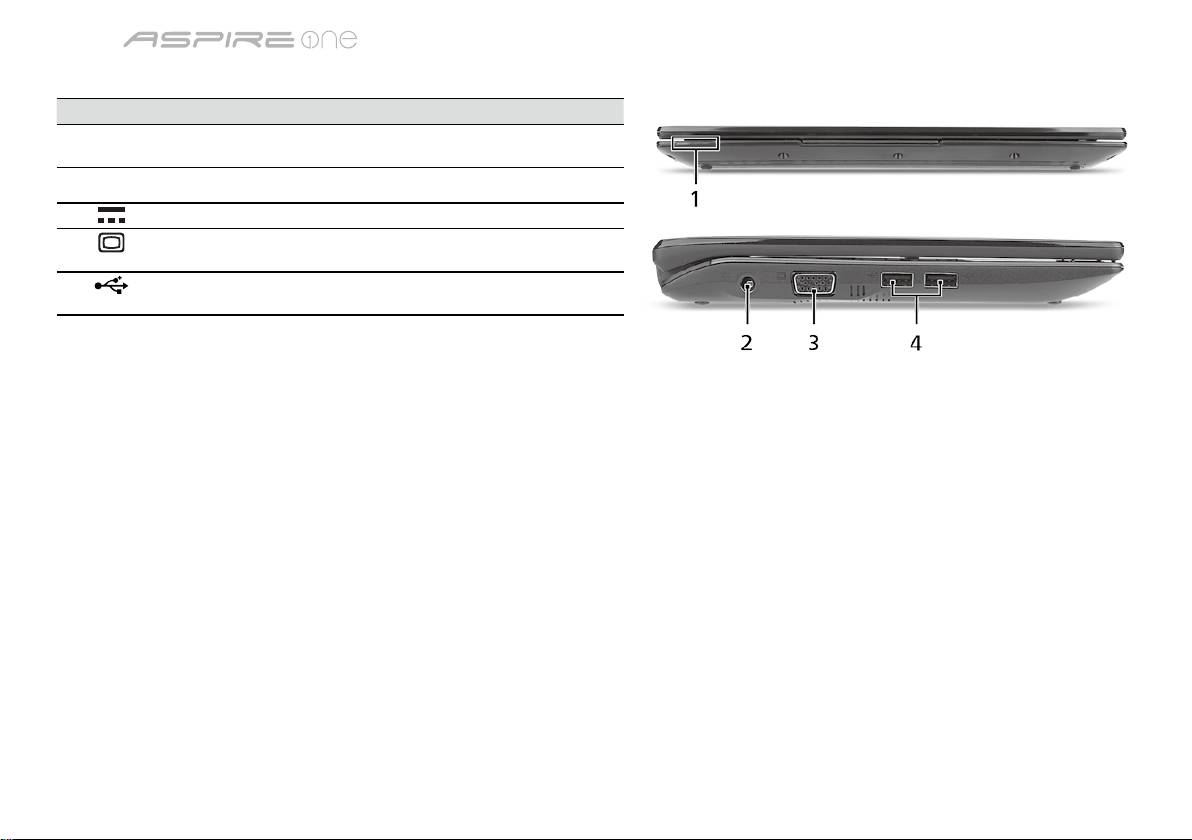
Serija
Hitri vodič
Serija
Hitri vodič
Zaprt pogled od spredaj
# Ikona Predmet Opis
1
Indikatorji stanja Diode (LED), ki zasvetijo, da prikažejo stanje
funkcij in komponent računalnika.
Pogled iz leve strani
2
Priključek napajalnika Priključek na AC napajalnik.
3
Priključek za zunanji
Priključitev na prikazovalno napravo
zaslon (VGA)
(npr. zunanji monitor, projektor LCD).
4
Vrata USB 2.0 Priključek za naprave USB 2.0
(npr., USB miška, USB fotoaparat).
5

Serija
Hitri vodič
Serija
Hitri vodič
Pogled iz desne strani
# Ikona Predmet Opis
5
Čitalec kartic več-v-1 Za kratice Secure Digital (SD),
MultiMediaCard (MMC), Memory Stick (MS),
Memory Stick Pro (MS PRO), in xD Picture
Card (xD).
Opomba: Pritisnite, da bi odstranili/vstavili
kartico. Naenkrat lahko uporabljate le eno
kartico.
6
Vtičnica za mikrofon Sprejema vhode iz zunanjih mikrofonov.
Vtičnica za slušalke/
Priključek za avdio naprave (npr. zvočniki,
zvočnik/napravo
slušalke).
7
Vrata USB 2.0 Priključek za naprave USB 2.0 (npr. USB
miška).
8
Reža za zaklep
Priključek za Kensington združljivo
Kensington
računalniško ključavnico.
9
Priključek Ethernet
Priključek na omrežja Ethernet 10/100.
(RJ-45)
Pogled od zadaj in spodaj
10
Nosilec za baterijo Hrani baterijo računalnika.
11
Reža za kartice 3G SIM Združljivo s karticami 3G SIM za
povezljivost preko standarda 3G
(le za določene modele).
12
Zapah za sprostitev
Sprostitev baterije za odstranjevanje.
baterije
13
Zaklep za baterijo Zaklene baterijo na mesto.
14
Reže za prezračevanje
Omogočajo, da računalnik ostane hladen
in hladilni ventilator
tudi po dolgotrajni uporabi.
Opomba: Odprtine ventilatorja ne prekrivajte
ali zapirajte.
15
Zvočnik Predvaja zvok z vašega računalnika.
6

Serija
Hitri vodič
Okolje
Temperatura:
Delovanje: 5°C do 35°C
Mirovanje: -20°C do 65°C
Vlažnost (brez kondenza):
Delovanje: 20% do 80%
Mirovanje: 20% do 80%
7

serija
Kratki vodič

serija
Kratki vodič
serija
Kratki vodič
© 2010 Sva prava pridržana
Aspire One serije - kratki vodič
Izvorno izdanje: 04/2010
Aspire One serije prijenosno osobno računalo
Broj modela: _______________________________
Serijski broj: _______________________________
Datum kupovine: ____________________________
Mjesto kupnje: _____________________________

serija
Kratki vodič
serija
Kratki vodič
Federal Communications Commission
Declaration of Conformity
This device complies with Part 15 of the FCC Rules. Operation is subject to the following two conditions: (1) this device may not
cause harmful interference, and (2) this device must accept any interference received, including interference that may cause
undesired operation.
The following local Manufacturer/Importer is responsible for this declaration:
Product name: Notebook PC
Brand: Acer
Model number: PAV01
Machine type:
Aspire one series; AO533 series
Name of Responsible Party: Acer America Corporation
Address of responsible party: 333 West San Carlos St., San Jose
CA 95110, U. S. A.
Contact person: Acer Representative
Phone No.: 1-254-298-4000
Fax No.: 1-254-298-4147
April 23, 2010

serija
Kratki vodič
serija
Kratki vodič
CE Declaration of Conformity
We,
Acer Incorporated
8F, 88, Sec. 1, Hsin Tai Wu Rd., Hsichih, Taipei Hsien 221, Taiwan
Contact Person: Mr. Easy Lai, e-mail:easy_lai@acer.com.tw
And,
Acer Europe SA
Via Cantonale, Centro Galleria 2 6928 Manno Switzerland
Hereby declare that:
Product: Notebook Computer
Trade Name: Acer
Model Number: PAV01
Machine Type: Aspire one series; AO533 series
Is compliant with the essential requirements and other relevant provisions of the following EC directives, and that all the
necessary steps have been taken and are in force to assure that production units of the same product will continue comply with
the requirements.
R&TTE Directive 1999/5/EC as attested by conformity with the following harmonized standard:
• Article 3.1(a) Health and Safety
-. EN60950-1
-. EN62311
• Article 3.1(b) EMC
-. EN301 489-1
-. EN301 489-3 (Applicable to non-bluetooth wireless keyboard mouse set).
-. EN301 489-7
-. EN301 489-17
-. EN301 489-24

serija
Kratki vodič
serija
Kratki vodič
• Article 3.2 Spectrum Usages
-. EN300 440-2 (Applicable to non-bluetooth wireless keyboard mouse set).
-. EN300 328
-. EN301 511
-. EN301 893 (Applicable to 5GHz high performance RLAN).
-. EN301 908-1
-. EN301 908-2
EMC Directive 2004/108/EC as attested by conformity with the following harmonized standards:
-. EN55022, AS/NZS CISPR22, Class B
-. EN55024
-. EN61000-3-2 Class D
-. EN61000-3-3
Low Voltage Directive 2006/95/EC as attested by conformity with the following harmonized standard:
-. EN60950-1
RoHS Directive 2002/95/EC on the Restriction of the Use of certain Hazardous Substances in Electrical and Electronic Equipment
-. The maximum concentration values of the restricted substances by weight in homogenous material are:
Lead
0.1%
Polybrominated Biphenyls (PBB’s)
0.1%
Mercury
0.1%
Polybrominated Diphenyl Ethers (PBDE’s)
0.1%
Hexavalent Chromium
0.1%
Cadmium
0.01%
Directive 2009/125/EC with regard to establishing a framework for the setting of ecodesign requirements for energy-related
product.
Year to begin affixing CE marking 2010.
Apr. 23, 2010
Easy Lai /Manager
Regulation Center, Acer Inc.
Date

serija
Kratki vodič
serija
Kratki vodič
Tek za početak
1 2 3
2-2
3-2
3-1
2-1
Provjerite je li baterija sigurno
i pravilno postavljena, kao na
slici 2-2.
4 5 6
Slikovni prikazi služe samo za ilustraciju. Stvarne specikacije proizvoda mogu varirati.
1
serija
Kratki vodič
serija
Kratki vodič
Prvo osnovne stvari
Željeli bismo vam zahvaliti na izboru Acer prijenosnog računala koje će vam poslužiti kamo god krenuli.
Vaši vodiči
Kako bismo vam pomogli pri uporabi vašeg Acer prijenosnog računala, pripremili smo skupinu vodiča*:
Na prvom mjestu, poster Kratki vodič pomaže pri početnim postupcima i postavljanju vašeg računala.
Za više informacija o tome kako vam vaše računalo može pomoći da budete produktivniji, molimo, pogledajte AcerSystem User
Guide. Priručnik sadrži detaljne informacije o temama kao što su uslužni programi sustava, vraćanje podataka, opcije za proširivanje
i rješavanje problema. Nadalje, sadrži informacije o jamstvima i osnovne obavijesti o propisima i sigurnosti za vaš prijenosnik. On je
dostupan u Portable Document Formatu (PDF) i dolazi prethodno učitan u Vaš prijenosnik.
Napomena: Pregled dokumenta zahtijeva Adobe Reader. Ako Adobe Reader nije instaliran na vaše računalo, klik na AcerSystem
User Guide najprije će pokrenuti program za instalaciju Adobe Readera. Slijedite upute na zaslonu da biste završili instalaciju.
Za upute kako koristiti Adobe Reader, pristupite izborniku Pomoć i podrška.
* VAŽNA NAPOMENA: Molimo primite na znanje da su spomenuti priručnici, bilo u ispisanom ili elektronskom obliku,
ovdje samo za vašu obavijest te da, osim spomenutog u izričitim jamstvenim informacijama sadržanim u AcerSystem
User Guide, ništa sadržano u njima ne predstavlja Acer-ova jamstva ili uvjete vezane uz proizvod koji se kupili. Acer se
izričito odriče bilo kakve odgovornosti za greške sadržane u priručnicima.
2

serija
Kratki vodič
serija
Kratki vodič
Konguracija mreže
Ovaj vodič pomoći će vam podesiti postavke vaše LAN i bežične mreže kako bi bilo moguće spajanje na internet.
Podešavanje LAN veze
Jednostavno uključite LAN kabel na ulaz Ethernet (RJ-45). Pogledajte "Pogled s desne strane" na stranici 6 kako bi uočili položaj
Ethernet ulaza.
Podešavanje bežične veze
1. Pritisnite <Fn> + <F3> kako biste pristupili upravitelju komunikacija. Wi-Fi vezu moguće je uključiti klikom na crvenu tipku kraj
oznake Wi-Fi.
Napomena: 3G i Bluetooth dostupni su preko upravitelja komunikacija. Konguracijski uređaji razlikuju se ovisno o modelu.
2. Kliknite na sličicu
u dijelu sustava i odaberite bežičnu pristupnu točku na koju se želite spojiti.
Umetanje 3G SIM kartice (samo za određene modeles)
Uklonite bateriju i pažljivo umetnite 3G SIM karticu u utor za 3G SIM karticu. Pogledajte "Pogled straga i odozdo" na stranici 6 za
lokaciju utora za 3G SIM karticu.
3
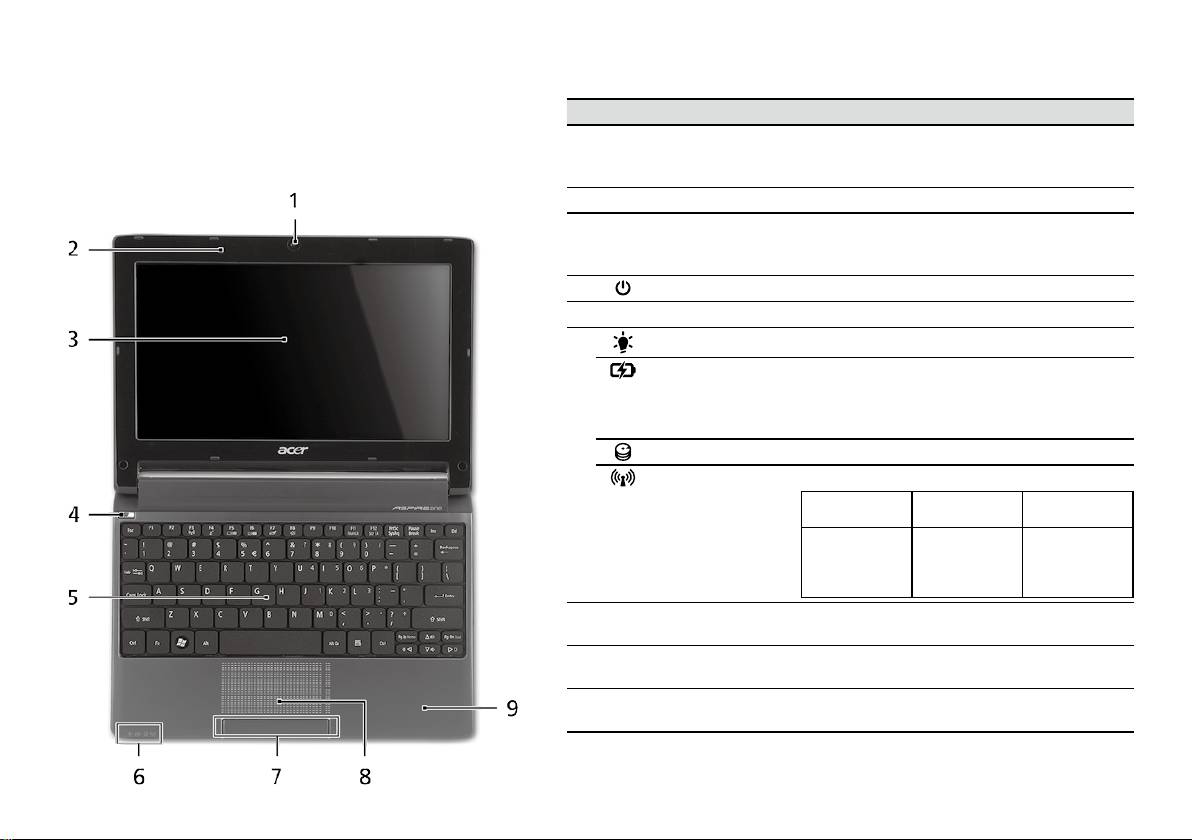
serija
Kratki vodič
serija
Kratki vodič
Pogled odozgo
Upoznajte vaš Aspire One
# Ikona Stavka Opis
Nakon podešavanja računala kako je prikazano u dijelu Na
1
Acer Crystal Eye
Web kamera za video komunikaciju
samom početku, dopustite nam kratki prikaz vašeg novog
web kamera
(Konguracija se može razlikovati ovisno o
Acer prijenosnog računala.
modelu).
2
Mikrofon Unutarnji mikrofon za snimanje zvuka.
3
Zaslon prikaza Također nazivan i Liquid-Crystal Display (LCD),
prikazuje izlaz računala (Konguracija se
može razlikovati ovisno o modelu).
4
Tipka napajanja Uključuje i isključuje računalo.
5
Tipkovnica Za unos podataka u vaše računalo.
1
6
Indikator napajanja
Pokazuje stanje napajanja računala.
1
Indikator baterije
Pokazuje stanje baterije računala.
1. Punjenje: Svijetli žuto kada se baterija puni.
2. Sasvim napunjeno: Svijetli plavo kada radi
na izmjeničnom napajanju.
HDD indikator Pokazuje kada je pogon tvrdog diska aktivan.
Indikator
Pokazuje stanje 3G/bežične LAN komunikacije
1
komunikacije
Plavo svjetlo
Narančasto
Ne svijetli
uključeno
svjetlo uključeno
3G uključeno/
WiFi uključeno
3G isključeno/
3G isključeno/
3G uključeno/
Wi-Fi uključeno
WiFi isključeno
WiFi isključeno
7
Tipke za klikanje
Lijeva i desna tipka funkcionira kao lijeva i
(lijeva i desna)
desna tipka miša.
8
Dodirna ploča Pokazivački uređaj osjetljiv na dodir koji
funkcionira kao računalni miš.
9
Oslonac za dlanove Udobno područje koje pruža potporu rukama
dok koristite računalo.
1. Indikatori na prednjoj ploči su vidljivi čak i kada je poklopac računala zatvoren.
4
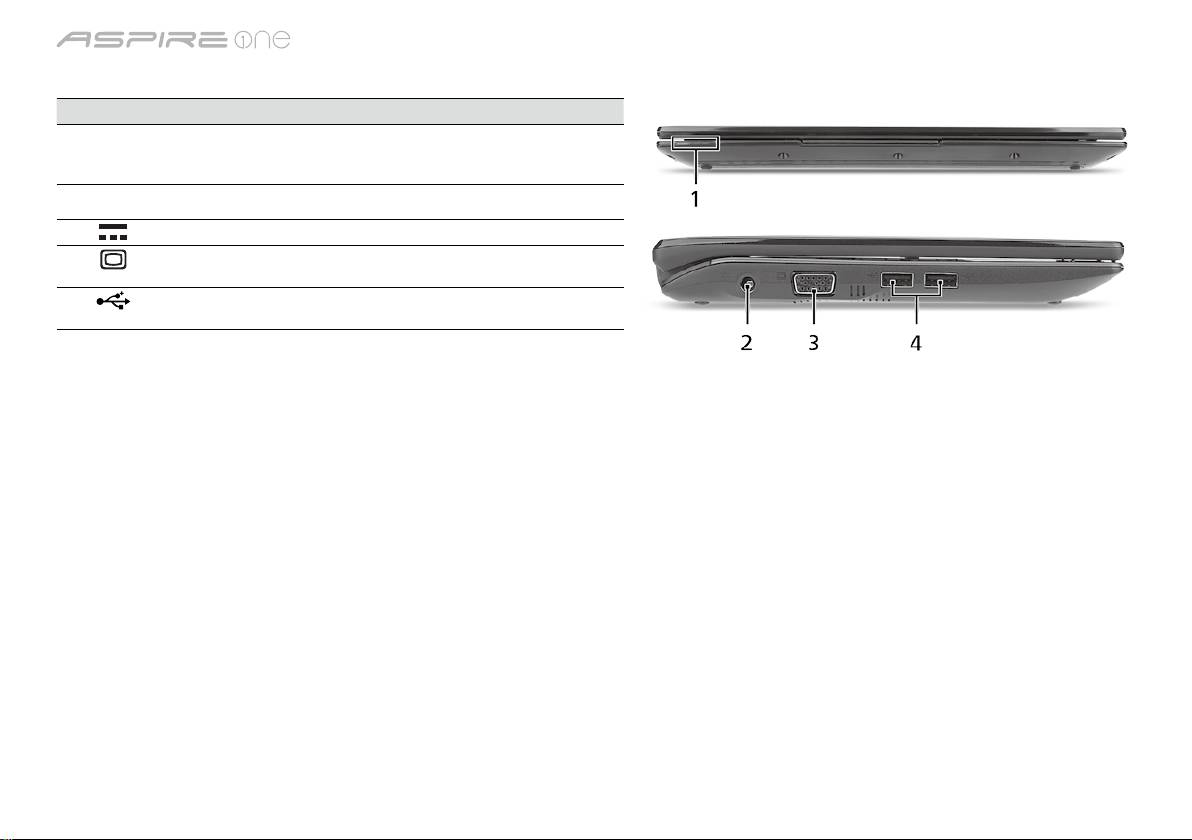
serija
Kratki vodič
serija
Kratki vodič
Pogled sprijeda izbliza
# Ikona Stavka Opis
1
Indikatori stanja Diode koje emitiraju svjetlo (LED) koje se
uključuju kako bi pokazale stanje funkcija i
komponenti računala.
Pogled s lijeve strane
2
DC-in utičnica Povezuje se s AC adapterom.
3
Priključak vanjskog
Povezuje se s uređajem za prikaz (primjerice
ekrana (VGA)
vanjskim monitorom, LCD projektorom).
4
USB 2.0 priključak Povezuju se s USB 2.0 uređajima (npr. USB
miš, USB kamera).
5
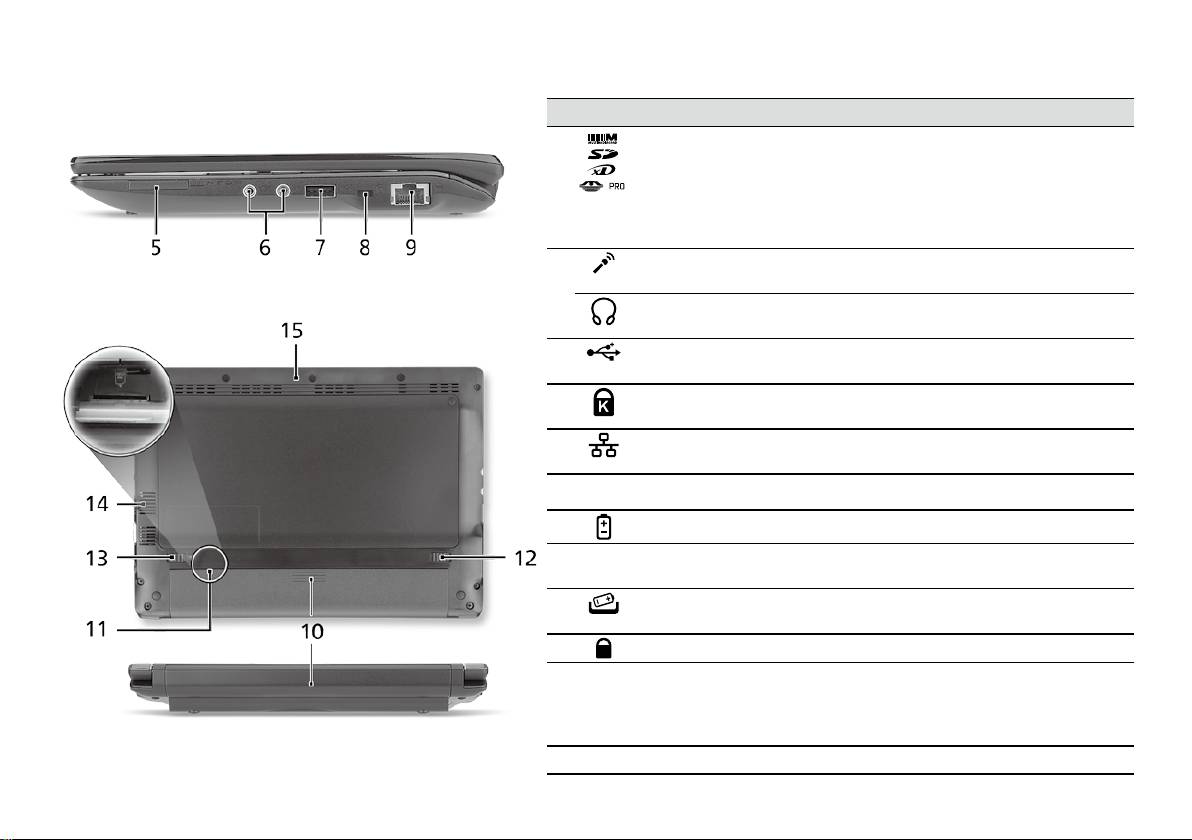
serija
Kratki vodič
serija
Kratki vodič
Pogled s desne strane
# Ikona Stavka Opis
5
Više-u-1 čitač kartica Prihvaća Secure Digital (SD), MultiMediaCard
(MMC), Memory Stick (MS), Memory Stick
PRO (MS PRO), xD-Picture Card (xD) kartice.
Napomena: Gurnite za uklanjanje/postavljanje
kartice. U bilo koje vrijeme samo jedna kartica
može biti stavljena u pogon.
6
Utičnica ulaza za
Prihvaća ulaze iz vanjskih mikrofona.
mikrofon
Utičnica za slušalice/
Povezuje se sa line-out audio uređajima
zvučnike/line-out
(npr. zvučnicima, slušalicama).
7
USB 2.0 priključak Povezuje se s USB 2.0 uređajima
(npr. USB miš).
8
Utor za Kensington
Povezuje se s Kensington - kompatibilnom
bravu
računalnom sigurnosnom bravom.
9
Ethernet (RJ-45)
Povezuje se na Ethernet 10/100-baziranu
priključak
mrežu.
Pogled straga i odozdo
10
Prostor za bateriju Sadrži baterijski komplet računala.
11
Utor za karticu 3G
Prihvaća 3G SIM karticu za 3G povezivanje
SIM
(samo za određene modele).
12
Bravica za
Oslobađa bateriju radi uklanjanja.
oslobađanje baterije
13
Brava baterije Zaključava bateriju u njen položaj.
14
Utori za provjetravanje
Omogućavaju rashlađivanje računala i prilikom
i ventilator za hlađenje
dugotrajne uporabe.
Napomena: Nemojte prekriti ili prepriječiti otvor
ventilatora.
15
Zvučnik Zvuk se emitira s vašeg računala.
6

serija
Kratki vodič
Okruženje
Temperatura:
Radna: 5°C do 35°C
Neradna: - 20°C do 65°C
Vlažnost (nekondenzirajuća):
Radna: 20% do 80%
Neradna: 20% do 80%
7

Seria
Ghid rapid

Seria
Ghid rapid
Seria
Ghid rapid
© 2010 Toate drepturile rezervate
Ghid rapid seria Aspire One
Prima ediţie: 04/2010
Computer portabil seria Aspire One
Număr model: ______________________________
Numărul seriei: _____________________________
Data achiziţiei: _____________________________
Locul achiziţiei: _____________________________

Seria
Ghid rapid
Seria
Ghid rapid
Federal Communications Commission
Declaration of Conformity
This device complies with Part 15 of the FCC Rules. Operation is subject to the following two conditions: (1) this device may not
cause harmful interference, and (2) this device must accept any interference received, including interference that may cause
undesired operation.
The following local Manufacturer/Importer is responsible for this declaration:
Product name: Notebook PC
Brand: Acer
Model number: PAV01
Machine type:
Aspire one series; AO533 series
Name of Responsible Party: Acer America Corporation
Address of responsible party: 333 West San Carlos St., San Jose
CA 95110, U. S. A.
Contact person: Acer Representative
Phone No.: 1-254-298-4000
Fax No.: 1-254-298-4147
April 23, 2010

Seria
Ghid rapid
Seria
Ghid rapid
CE Declaration of Conformity
We,
Acer Incorporated
8F, 88, Sec. 1, Hsin Tai Wu Rd., Hsichih, Taipei Hsien 221, Taiwan
Contact Person: Mr. Easy Lai, e-mail:easy_lai@acer.com.tw
And,
Acer Europe SA
Via Cantonale, Centro Galleria 2 6928 Manno Switzerland
Hereby declare that:
Product: Notebook Computer
Trade Name: Acer
Model Number: PAV01
Machine Type: Aspire one series; AO533 series
Is compliant with the essential requirements and other relevant provisions of the following EC directives, and that all the
necessary steps have been taken and are in force to assure that production units of the same product will continue comply with
the requirements.
R&TTE Directive 1999/5/EC as attested by conformity with the following harmonized standard:
• Article 3.1(a) Health and Safety
-. EN60950-1
-. EN62311
• Article 3.1(b) EMC
-. EN301 489-1
-. EN301 489-3 (Applicable to non-bluetooth wireless keyboard mouse set).
-. EN301 489-7
-. EN301 489-17
-. EN301 489-24

Seria
Ghid rapid
Seria
Ghid rapid
• Article 3.2 Spectrum Usages
-. EN300 440-2 (Applicable to non-bluetooth wireless keyboard mouse set).
-. EN300 328
-. EN301 511
-. EN301 893 (Applicable to 5GHz high performance RLAN).
-. EN301 908-1
-. EN301 908-2
EMC Directive 2004/108/EC as attested by conformity with the following harmonized standards:
-. EN55022, AS/NZS CISPR22, Class B
-. EN55024
-. EN61000-3-2 Class D
-. EN61000-3-3
Low Voltage Directive 2006/95/EC as attested by conformity with the following harmonized standard:
-. EN60950-1
RoHS Directive 2002/95/EC on the Restriction of the Use of certain Hazardous Substances in Electrical and Electronic Equipment
-. The maximum concentration values of the restricted substances by weight in homogenous material are:
Lead
0.1%
Polybrominated Biphenyls (PBB’s)
0.1%
Mercury
0.1%
Polybrominated Diphenyl Ethers (PBDE’s)
0.1%
Hexavalent Chromium
0.1%
Cadmium
0.01%
Directive 2009/125/EC with regard to establishing a framework for the setting of ecodesign requirements for energy-related
product.
Year to begin affixing CE marking 2010.
Apr. 23, 2010
Easy Lai /Manager
Regulation Center, Acer Inc.
Date

Seria
Ghid rapid
Seria
Ghid rapid
Doar pentru prima utilizare
1 2 3
2-2
3-2
3-1
2-1
Asiguraţi-vă că bateria este
bine xată în locaşul ei, conform
imaginii 2-2.
4 5 6
Imaginile sunt doar orientative. Specicaţiile reale ale produsului pot varia.
1
Seria
Ghid rapid
Seria
Ghid rapid
Înainte de toate
Dorim să vă mulţumim că aţi ales un computer portabil Acer pentru a răspunde nevoilor dvs de procesare mobilă.
Ghidurile dumneavoastră
Pentru a vă ajuta să folosiţi computerul portabil Acer, am conceput un set de ghiduri*:
Primul dintre acestea, Ghidul rapid vă ajută să începeţi congurarea computerului.
Pentru mai multe informaţii privind modul în care computerul vă poate ajuta să ţi mai productiv, consultaţi AcerSystem User Guide.
Acest ghid conţine informaţii detaliate despre astfel de subiecte, precum utilitarele de sistem, recuperarea datelor, opţiunile de extensie
şi depanarea. În plus, acesta conţine informaţii despre garanţie, reglementări generale şi note de siguranţă pentru computerul dvs
portabil. Este disponibil în Format de document portabil (PDF) şi vine preîncărcat pe computerul dvs. portabil.
Notă: Vizualizarea şierului necesită Adobe Reader. Dacă Adobe Reader nu este instalat pe computerul dvs., faceţi clic pe
AcerSystem User Guide şi se va executa mai întâi programul de congurare Adobe Reader. Pentru a încheia instalarea, urmaţi
instrucţiunile de pe ecran. Pentru instrucţiuni privind modul de utilizare a Adobe Reader, accesaţi meniul Ajutor şi asistenţă.
* NOTĂ IMPORTANTĂ: Ghidurile menţionate în acest document, în formă electronică sau pe suport hârtie, sunt doar
pentru referinţa dvs. şi, cu excepţia celor furnizate în informaţiile specice de garanţie din AcerSystem User Guide,
niciunul dintre aceste ghiduri nu va constitui o reprezentare sau o garanţie din partea Acer cu privire la produsul pe
care l-aţi achiziţionat. Acer îşi declină în mod expres orice răspundere pentru greşelile conţinute în ghiduri.
2

Seria
Ghid rapid
Seria
Ghid rapid
Conguraţie reţea
Acest ghid vă va ajuta să conguraţi reţeaua locală LAN şi pe cea wireless, pentru a vă permite conectarea la Internet.
Congurarea conexiunii LAN
Conectaţi cablul de reţea LAN la priza Ethernet (RJ-45). Consultaţi "Vedere din dreapta", la pagina 6, pentru a aa locaţia portului
Ethernet.
Congurarea conexiunii wireless
1. Apăsaţi <Fn> + <F3> pentru a accesa managerul de comunicaţii. Aici puteţi activa conexiunea Wi-Fi dând clic pe butonul roşu de
lângă Wi-Fi.
Notă: Sunt, de asemenea, accesibile conexiunile 3G şi Bluetooth prin intermediul managerului de comunicaţii. Dispozitivele de
comunicaţie diferă în funcţie de model.
2. Daţi clic pe pictograma
din bara de sistem şi selectaţi punctul de acces wireless la care doriţi conectarea.
Introducerea unei cartele SIM 3G (doar pentru anumite modele)
Scoateţi bateria şi introduceţi cu grijă o cartelă SIM 3G în slotul pentru cartele SIM 3G. Consultaţi "Vedere din spate şi din partea de
jos", la pagina 6, pentru a aa locaţia slotului pentru cartela SIM 3G.
3
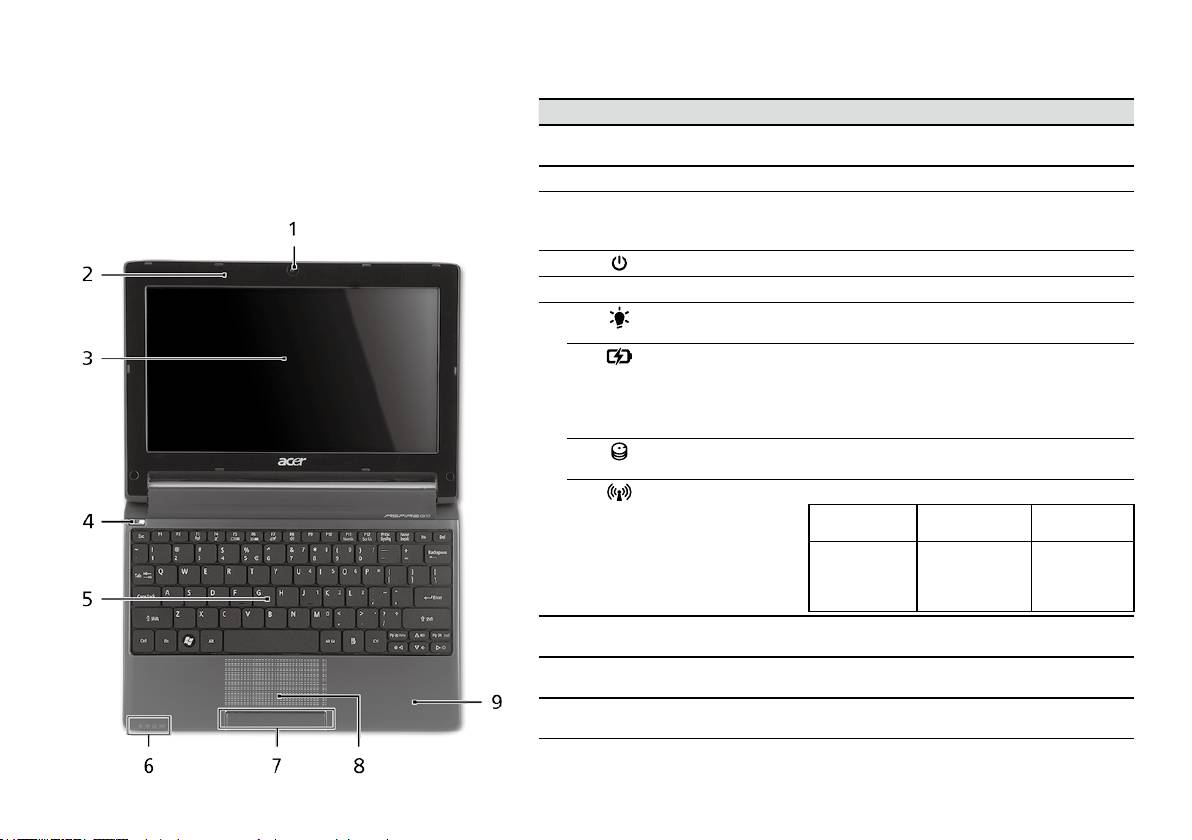
Seria
Ghid rapid
Seria
Ghid rapid
Vedere de sus
Turul computerului
# Pictogramă Element Descriere
dumneavoastră Aspire One
1
Cameră web
Cameră Web pentru comunicare video
Acer Crystal Eye
(conguraţia poate diferi în funcţie de model).
După congurarea computerului, aşa cum se arată în
secţiunea Doar pentru prima utilizare, permiteţi-ne să vă
2
Microfon Microfon intern pentru înregistrarea sunetului.
prezentăm noul dumneavoastră computer portabil Acer.
3
Ecran de aşaj Mai este numit şi Aşaj cu cristale lichide (LCD)
şi aşează activitatea computerului (conguraţia
poate diferi în funcţie de model).
4
Buton Pornire Porneşte şi opreşte computerul.
5
Tastatură Pentru introducerea datelor în computer.
6
Indicator de
Indică nivelul de alimentare al computerului.
1
alimentare
1
Indicator baterie
Indică starea bateriei computerului.
1. Încărcare: Lumina este galbenă când
acumulatorul se încarcă.
2. Complet încărcat: Lumina este albastre în
modul c.a.
Indicator HDD Indică atunci când unitatea de harddisc este
activă.
Indicator
Indică starea comunicării LAN wireless/3G.
1
comunicare
Indicator
Indicator luminos
Stins
luminos albastru
portocaliu
3G aprins/
WiFi aprins
3G stins/
3G stins/
3G aprins/
WiFi aprins
WiFi stins
WiFi stins
7
Butoane clic
Butoanele stânga şi dreapta funcţionează ca
(stânga şi dreapta)
butoanele stânga şi dreapta ale mausului.
8
Zona de atingere Dispozitiv de indicare sensibil la atingere care
funcţionează ca un mouse de computer.
9
Placă pentru
Zonă confortabilă de sprijin pentru mână atunci
sprijinirea palmei
când folosiţi computerul.
1. Indicatoarele de pe panoul frontal sunt vizibile chiar şi atunci când capacul computerului este
închis.
4
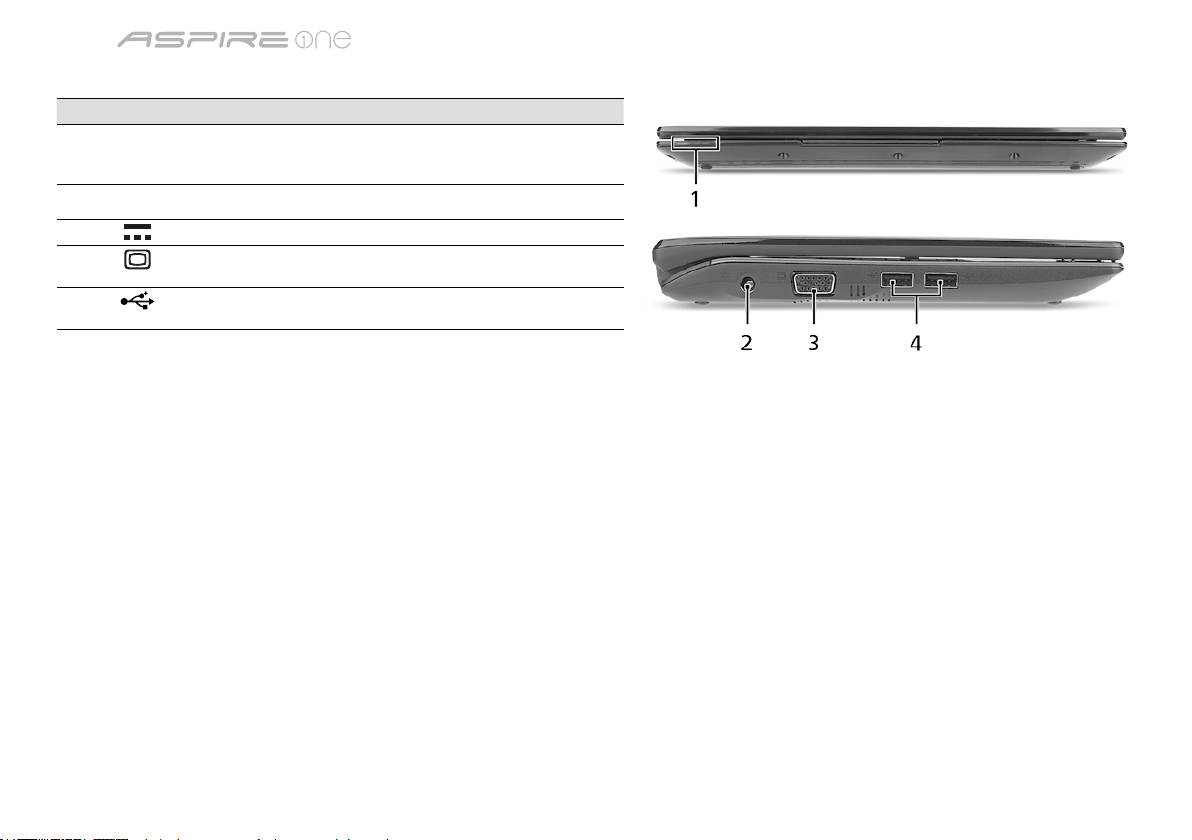
Seria
Ghid rapid
Seria
Ghid rapid
Vedere din faţă de aproape
# Pictogramă Element Descriere
1
Indicatoare de
Diode electroluminiscente (LED-uri), care
stare
se aprind pentru a indica starea funcţiilor
şi componentelor computerului.
Vedere din stânga
2
Mufă c.c. intrare Conectează la un adaptor de c.a.
3
Port pentru aşaj
Conectează la un dispozitiv de aşare
extern (VGA)
(de ex. monitor extern sau proiector LCD).
4
Port USB 2.0 Conectează la dispozitivele USB 2.0
(de ex. maus USB, cameră USB).
5

Seria
Ghid rapid
Seria
Ghid rapid
Vedere din dreapta
# Pictogramă Element Descriere
5
Cititor de cartele
Acceptă cartele Secure Digital (SD),
multi-in-1
MultiMediaCard (MMC), Memory Stick
(MS), Memory Stick PRO (MS PRO) şi
xD-Picture Card (xD).
Notă: Apăsaţi pentru a extrage/a
instala cartela. Nu poate citită decât o
singură cartelă la un moment dat.
6
Mufă intrare microfon Acceptă intrări de la microfoane
externe.
Mufă de căşti/difuzor/
Conectează la dispozitivele audio de
ieşire
ieşire (de ex. difuzoare, căşti).
7
Port USB 2.0 Conectează la dispozitivele USB 2.0
(de ex. mouse USB).
8
Slot de blocare
Conectează la un dispozitiv de
Kensington
securitate pentru computer compatibil
Kensington.
9
Port Ethernet (RJ-45) Conectează la o reţea Ethernet 10/100.
Vedere din spate şi din partea de jos
10
Nişa pentru
Adăposteşte setul de acumulatori ai
acumulator
computerului.
11
Slot cartelă SIM 3G Acceptă o cartelă SIM 3G, pentru
conectivitate 3G (doar pentru anumite
modele).
12
Zăvor de eliberare a
Eliberează acumulatorul pentru a
acumulatorului.
scos.
13
Blocaj acumulator Blochează acumulatorul în poziţie.
14
Oricii de ventilaţie şi
Permit computerului să rămână rece,
ventilator de răcire
chiar şi după utilizarea prelungită.
Notă: Nu acoperiţi şi nu obstrucţionaţi
deschiderea ventilatorului.
15
Difuzor Emite sunet din computerul dvs.
6

Seria
Ghid rapid
Mediu
Temperatură:
Funcţionare: 5°C - 35°C
Nefuncţionare: -20°C - 65°C
Umiditate (fără condensare):
Funcţionare: 20% - 80%
Nefuncţionare: 20% - 80%
7

Серия
Кратко ръководство

Серия
Кратко ръководство
Серия
Кратко ръководство
© 2010 Всички права запазени
Кратко ръководство за Серия Aspire One
Първоначално издание: 04/2010
Серия Aspire One Персонален ноутбук
Номер на модела: __________________________
Сериен номер: ____________________________
Дата на закупуване: ________________________
Място на покупка: __________________________

Серия
Кратко ръководство
Серия
Кратко ръководство
Federal Communications Commission
Declaration of Conformity
This device complies with Part 15 of the FCC Rules. Operation is subject to the following two conditions: (1) this device may not
cause harmful interference, and (2) this device must accept any interference received, including interference that may cause
undesired operation.
The following local Manufacturer/Importer is responsible for this declaration:
Product name: Notebook PC
Brand: Acer
Model number: PAV01
Machine type:
Aspire one series; AO533 series
Name of Responsible Party: Acer America Corporation
Address of responsible party: 333 West San Carlos St., San Jose
CA 95110, U. S. A.
Contact person: Acer Representative
Phone No.: 1-254-298-4000
Fax No.: 1-254-298-4147
April 23, 2010

Серия
Кратко ръководство
Серия
Кратко ръководство
CE Declaration of Conformity
We,
Acer Incorporated
8F, 88, Sec. 1, Hsin Tai Wu Rd., Hsichih, Taipei Hsien 221, Taiwan
Contact Person: Mr. Easy Lai, e-mail:easy_lai@acer.com.tw
And,
Acer Europe SA
Via Cantonale, Centro Galleria 2 6928 Manno Switzerland
Hereby declare that:
Product: Notebook Computer
Trade Name: Acer
Model Number: PAV01
Machine Type: Aspire one series; AO533 series
Is compliant with the essential requirements and other relevant provisions of the following EC directives, and that all the
necessary steps have been taken and are in force to assure that production units of the same product will continue comply with
the requirements.
R&TTE Directive 1999/5/EC as attested by conformity with the following harmonized standard:
• Article 3.1(a) Health and Safety
-. EN60950-1
-. EN62311
• Article 3.1(b) EMC
-. EN301 489-1
-. EN301 489-3 (Applicable to non-bluetooth wireless keyboard mouse set).
-. EN301 489-7
-. EN301 489-17
-. EN301 489-24

Серия
Кратко ръководство
Серия
Кратко ръководство
• Article 3.2 Spectrum Usages
-. EN300 440-2 (Applicable to non-bluetooth wireless keyboard mouse set).
-. EN300 328
-. EN301 511
-. EN301 893 (Applicable to 5GHz high performance RLAN).
-. EN301 908-1
-. EN301 908-2
EMC Directive 2004/108/EC as attested by conformity with the following harmonized standards:
-. EN55022, AS/NZS CISPR22, Class B
-. EN55024
-. EN61000-3-2 Class D
-. EN61000-3-3
Low Voltage Directive 2006/95/EC as attested by conformity with the following harmonized standard:
-. EN60950-1
RoHS Directive 2002/95/EC on the Restriction of the Use of certain Hazardous Substances in Electrical and Electronic Equipment
-. The maximum concentration values of the restricted substances by weight in homogenous material are:
Lead
0.1%
Polybrominated Biphenyls (PBB’s)
0.1%
Mercury
0.1%
Polybrominated Diphenyl Ethers (PBDE’s)
0.1%
Hexavalent Chromium
0.1%
Cadmium
0.01%
Directive 2009/125/EC with regard to establishing a framework for the setting of ecodesign requirements for energy-related
product.
Year to begin affixing CE marking 2010.
Apr. 23, 2010
Easy Lai /Manager
Regulation Center, Acer Inc.
Date

Серия
Кратко ръководство
Серия
Кратко ръководство
Като за начало
1 2 3
2-2
3-2
3-1
2-1
Уверете се, че батерията е
правилно поставена, както се
вижда на илюстрация в 2-2.
4 5 6
Илюстрации само за справка. Реалните технически характеристики на продукта може да се различават.
1

Серия
Кратко ръководство
Серия
Кратко ръководство
Преди всичко
Бихме желали да Ви благодарим, че сте избрали ноутбук на Acer за Вашите нужди в областта на мобилните компютри.
Вашите ръководства
За да Ви помогнем при употребата на Вашия ноутбук Acer, ние изготвихме следните ръководства*:
Първо, ръководството за бърз старт Ви помага с началните настройки на компютъра.
За повече информация за това как Вашият компютър може да Ви помогне да бъдете по-продуктивни, моля вижте
ръководството на потребителя на AcerSystem (AcerSystem User Guide). То съдържа подробна информация за теми като
системни инструменти, възстановяване на данни, опции за ъпгрейд и решаване на проблеми. В допълнение, то съдържа и
гаранционна информация, както и основните наредби и бележки за безопасност, свързани с Вашия ноутбук. То е в PDF формат
(Portable Document Format) и е предварително заредено на ноутбука Ви.
Бележка: За да отворите файла, Ви е нужен Adobe Reader. Ако Adobe Reader не е инсталиран на компютъра Ви,
натиснете ръководството на потребителя AcerSystem (AcerSystem User Guide), първо ще се стартира инсталационната
програма на Adobe Reader. Следвайте инструкциите на екрана, за да извършите инсталацията. За инструкции относно
това как се използва Adobe Reader, отворете менюто "Помощ и поддръжка".
* ВАЖНО СЪОБЩЕНИЕ: Моля имайте предвид, че ръководствата отбелязани в този документ, независимо
дали са напечатани или в електронна форма, са само за Ваша справка и с изключение на съдържанието,
предоставено в специфичната гаранция на ръководството на потребителя на AcerSystem (AcerSystem User
Guide), нищо друго от тези ръководства не представлява заверка или гаранция от Acer по отношение на
продукта, който сте закупили. Acer изрично отказва да поеме отговорност за грешките, съдържащи се в тези
ръководства.
2
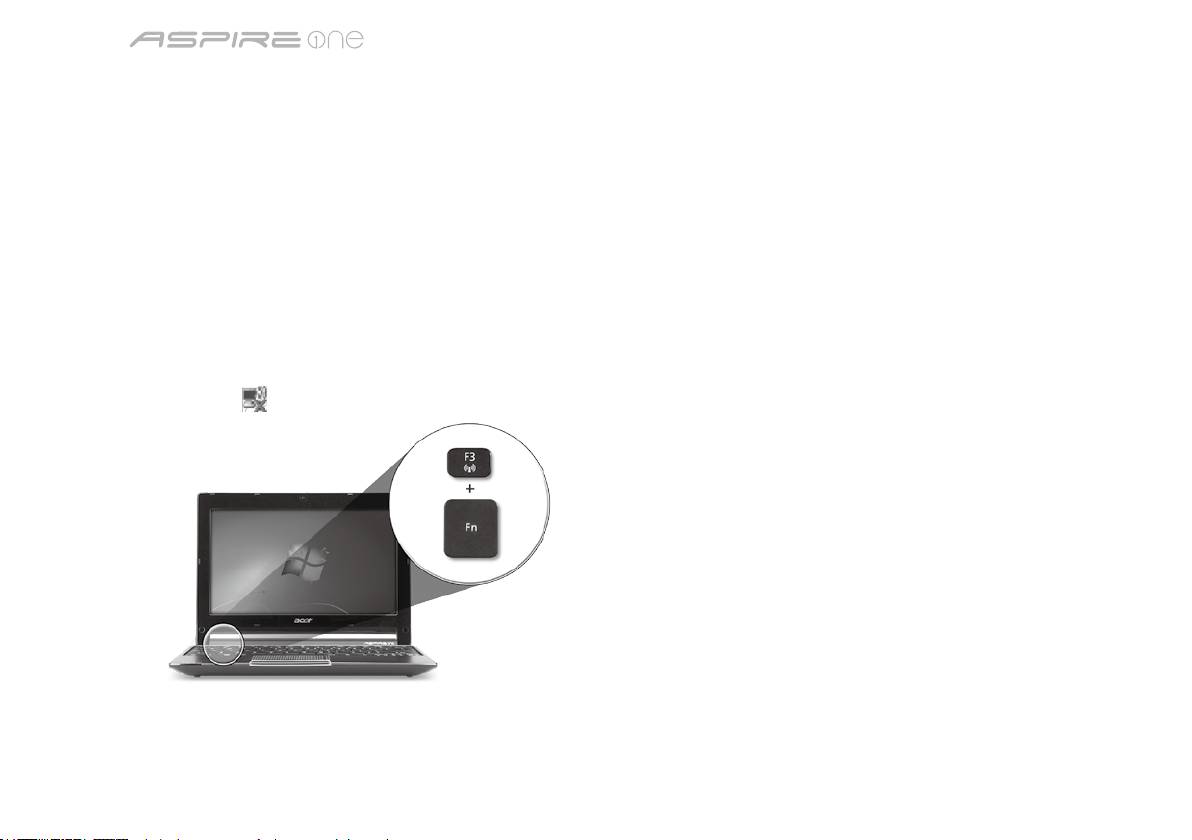
Серия
Кратко ръководство
Серия
Кратко ръководство
Мрежова настройка
Тези указания ще ви помогнат да зададете настройките за вашата локална (LAN) или безжична мрежа, за да получите достъп
до интернет.
Настройка на свързването към локална мрежа (LAN)
Просто пъхнете LAN кабела в мрежовия (RJ-45) порт. Моля, вижте "Изглед отдясно" на страница 6 за местоположението на
Ethernet порта.
Конфигуриране на безжична връзка
1. Натиснете <Fn> + <F3>, за да влезете в диспечера за комуникации Тук можете да включите Wi-Fi връзката като натиснете
червения бутон до Wi-Fi.
Забележка: 3G и Bluetooth са също достъпни от диспечера за комуникации. Комуникационните устройства варират според
модела.
2. Натиснете иконата
в системната област и изберете безжичната точка за достъп, към която желаете да се свържете.
Поставете 3G SIM карта (само за някои модели)
Отстранете батерията и внимателно поставете 3G SIM карта в гнездото за 3G SIM карта. Моля, вижте "Изглед отзад и отдолу"
на страница 6 за местоположението на гнездото на 3G SIM картата.
3
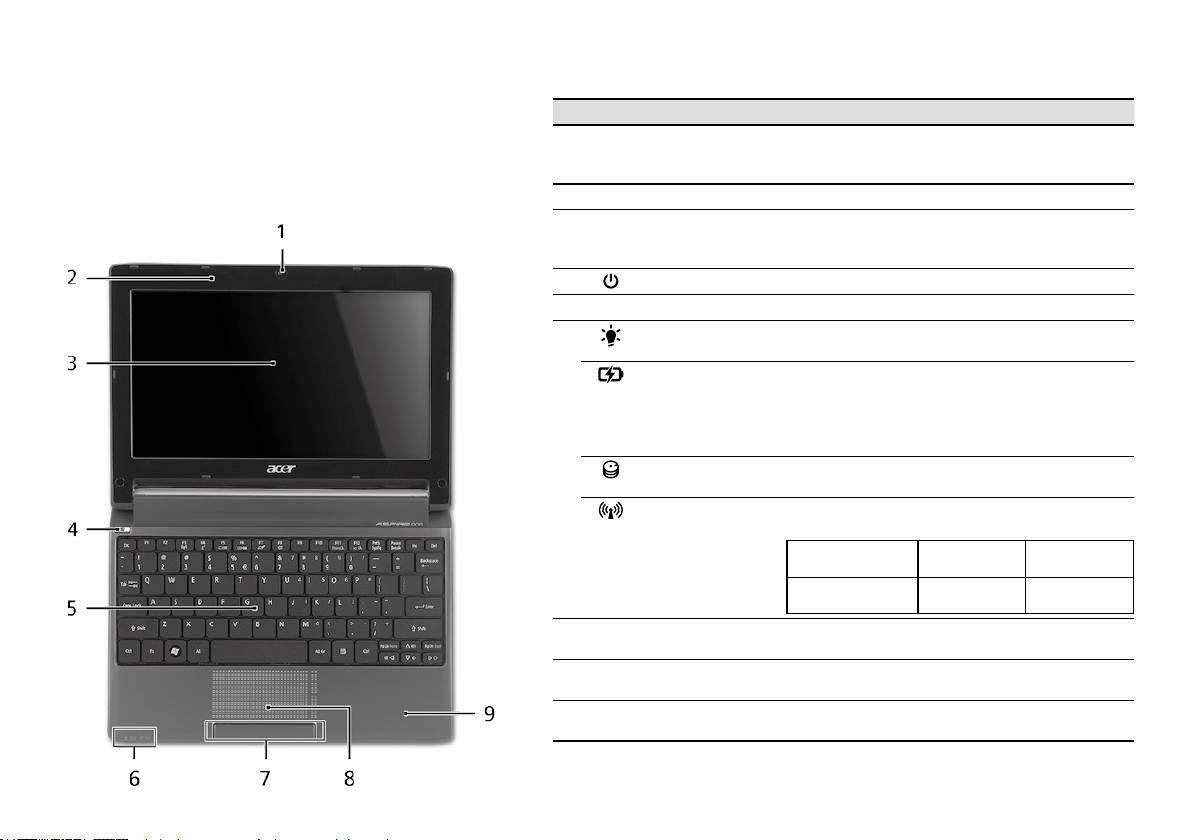
Серия
Кратко ръководство
Серия
Кратко ръководство
Изглед отгоре
Преглед на вашия
# Икона Обект Описание
Aspire One
1
Уеб камера
Уеб камера за видео комуникация
Acer Crystal Eye
(конфигурацията може да се различава в
След като настроите компютъра си, както е показано в
зависимост от моделите).
раздела "Като за начало...", ще Ви покажем какво прави
и какво има Вашият нов ноутбук Acer.
2
Микрофон Вътрешен микрофон за запис на звук.
3
Дисплей Нарича се още "Течнокристален дисплей" (LCD)
и е екранът на компютъра (конфигурацията може
да се различава в зависимост от моделите).
4
Бутон за вкл./изкл. С него компютърът се включва и изключва.
5
Клавиатура Служи за въвеждане на данни в компютъра Ви.
6
Индикатор на
Показва статуса на захранване на компютъра.
1
захранването
Индикатор
Посочва статуса на батерията на компютъра.
за нивото на
1. Зареждане: Индикаторът свети в жълто,
1
батерията
докато батерията се зарежда.
2. Напълно заредена: Индикаторът свети в
синьо, когато сте в режим AC.
Индикатор на
Посочва дали твърдият диск е активен.
твърдия диск
Индикатор за
Посочва статуса на 3G/безжичните LAN
1
комуникации
комуникации.
Синя светлина вкл. Оранжева
Не свети
светлина вкл.
3G вкл./WiFi вкл.
3G изкл./
3G изкл./
3G вкл./WiFi изкл.
WiFi вкл.
WiFi изкл.
7
Бутони за щракане
Левият и десният бутони функционират като ляв
(ляв и десен)
и десен бутон на мишка.
8
Тъчпад Чувствително на допир посочващо устройство,
което функционира като компютърна мишка.
9
Подложка за длани Удобно място, на което да поставите ръцете си,
когато използвате компютъра.
1. Индикаторите на предния панел остават видими дори, когато капакът на компютъра
е затворен.
4

Серия
Кратко ръководство
Серия
Кратко ръководство
Преден изглед при затворен лаптоп
# Икона Обект Описание
1
Статусни
Светодиоди (LED), които светят, за
индикатори
да показват статуса на функциите и
компонентите на компютъра.
Изглед отляво
2
Жак за DC вход За връзка с AC адаптер.
3
Порт за външен
За връзка с дисплейно устройство
дисплей (VGA)
(напр. външен монитор, LCD проектор).
4
USB 2.0 порт За връзка с USB 2.0 устройства
(напр. USB мишки, USB камери).
5

Серия
Кратко ръководство
Серия
Кратко ръководство
Изглед отдясно
# Икона Обект Описание
5
Четец на карти
Чете Secure Digital (SD), MultiMediaCard
Много-в-1
(MMC), Memory Stick (MS), Memory Stick
PRO (MS PRO) и xD-Picture Card (xD).
Бележка: Натиснете, за да извадите/
деинсталитюрате картата. Едновременно
може да работи само една карта.
6
Жак за вход за
Приема входящ сигнал от външни
микрофон
микрофони.
Жак за слушалки/изход
За връзка с изходни аудио устройства
за високоговорители
(напр. високоговорители, слушалки).
7
USB 2.0 порт За връзка с USB 2.0 устройства
(напр. USB мишки).
8
Слот за заключващ
За връзка с Kensington-съвместим
механизъм Kensington
компютърен заключващ механизъм.
9
Порт за Ethernet (RJ-45) За връзка с мрежа, базирана на Ethernet
10/100.
Изглед отзад и отдолу
10
Отделение за батерии Тук се поставя батерийният модул на
компютъра.
11
Гнездо за 3G SIM карта Приема 3G SIM карта за 3G комуникация
(само за определени модели).
12
Езиче за освобождаване
Освобождава батерията, за да можете да я
на батерията
извадите.
13
Придържащ механизъм
Държи батерията на мястото й.
на батерията
14
Вентилационни слотове
Позволява на компютъра да се охлажда
и охлаждащ вентилатор
дори и при продължителна употреба.
Бележка: Не покривайте и не препречвайте
отвора на вентилатора.
15
Високоговорител Излъчва аудио от Вашия компютър.
6

Серия
Кратко ръководство
Работна среда
Температура:
За работа: 5°C дo 35°C
За съхранение: -20°C дo 65°C
Влажност (без кондензация):
За работа: 20% дo 80%
За съхранение: 20% дo 80%
7

seeria
Lühijuhend

seeria
Lühijuhend
seeria
Lühijuhend
© 2010 Kõik õigused kaitstud
Aspire One seeria lühijuhend
Originaalväljaanne: 04/2010
Aspire One ’i seeria sülearvuti
Mudeli number: _____________________________
Seerianumber: _____________________________
Ostukuupäev: ______________________________
Ostukoht: _________________________________

seeria
Lühijuhend
seeria
Lühijuhend
Federal Communications Commission
Declaration of Conformity
This device complies with Part 15 of the FCC Rules. Operation is subject to the following two conditions: (1) this device may not
cause harmful interference, and (2) this device must accept any interference received, including interference that may cause
undesired operation.
The following local Manufacturer/Importer is responsible for this declaration:
Product name: Notebook PC
Brand: Acer
Model number: PAV01
Machine type:
Aspire one series; AO533 series
Name of Responsible Party: Acer America Corporation
Address of responsible party: 333 West San Carlos St., San Jose
CA 95110, U. S. A.
Contact person: Acer Representative
Phone No.: 1-254-298-4000
Fax No.: 1-254-298-4147
April 23, 2010

seeria
Lühijuhend
seeria
Lühijuhend
CE Declaration of Conformity
We,
Acer Incorporated
8F, 88, Sec. 1, Hsin Tai Wu Rd., Hsichih, Taipei Hsien 221, Taiwan
Contact Person: Mr. Easy Lai, e-mail:easy_lai@acer.com.tw
And,
Acer Europe SA
Via Cantonale, Centro Galleria 2 6928 Manno Switzerland
Hereby declare that:
Product: Notebook Computer
Trade Name: Acer
Model Number: PAV01
Machine Type: Aspire one series; AO533 series
Is compliant with the essential requirements and other relevant provisions of the following EC directives, and that all the
necessary steps have been taken and are in force to assure that production units of the same product will continue comply with
the requirements.
R&TTE Directive 1999/5/EC as attested by conformity with the following harmonized standard:
• Article 3.1(a) Health and Safety
-. EN60950-1
-. EN62311
• Article 3.1(b) EMC
-. EN301 489-1
-. EN301 489-3 (Applicable to non-bluetooth wireless keyboard mouse set).
-. EN301 489-7
-. EN301 489-17
-. EN301 489-24

seeria
Lühijuhend
seeria
Lühijuhend
• Article 3.2 Spectrum Usages
-. EN300 440-2 (Applicable to non-bluetooth wireless keyboard mouse set).
-. EN300 328
-. EN301 511
-. EN301 893 (Applicable to 5GHz high performance RLAN).
-. EN301 908-1
-. EN301 908-2
EMC Directive 2004/108/EC as attested by conformity with the following harmonized standards:
-. EN55022, AS/NZS CISPR22, Class B
-. EN55024
-. EN61000-3-2 Class D
-. EN61000-3-3
Low Voltage Directive 2006/95/EC as attested by conformity with the following harmonized standard:
-. EN60950-1
RoHS Directive 2002/95/EC on the Restriction of the Use of certain Hazardous Substances in Electrical and Electronic Equipment
-. The maximum concentration values of the restricted substances by weight in homogenous material are:
Lead
0.1%
Polybrominated Biphenyls (PBB’s)
0.1%
Mercury
0.1%
Polybrominated Diphenyl Ethers (PBDE’s)
0.1%
Hexavalent Chromium
0.1%
Cadmium
0.01%
Directive 2009/125/EC with regard to establishing a framework for the setting of ecodesign requirements for energy-related
product.
Year to begin affixing CE marking 2010.
Apr. 23, 2010
Easy Lai /Manager
Regulation Center, Acer Inc.
Date

seeria
Lühijuhend
seeria
Lühijuhend
Alustuseks
1 2 3
2-2
3-2
3-1
2-1
Veenduge, et aku on korralikult
kohale lukustunud, nagu kujutatud
joonisel 2-2.
4 5 6
Illustratsioonid on ainult üldiseks võrdlusaluseks. Toodete tegelikud tehnilised andmed võivad erineda.
1

seeria
Lühijuhend
seeria
Lühijuhend
Tähtsamad asjad kõigepealt
Täname teid, et valisite oma kaasaskantavaks arvutiks Aceri sülearvuti.
Teie teejuhid
Et aidata teil kasutada Aceri sülearvutit, oleme loonud komplekti juhiseid*:
Kõigepealt aitab Lühijuhend Teil alustada oma arvuti häälestamist.
Kui soovite rohkem teada saada, kuidas arvuti aitab Teil produktiivsem olla, vaadake AcerSystem User Guide. Teatmik sisaldab
täpsemat informatsiooni sellistel teemadel, nagu süsteemiutiilidid, andmete taastamine, laiendusvõimalused ja probleemide
lahendamine. Sellele lisaks sisaldab see garantiiteavet ning sülearvuti kohta kehtivaid üldiseid regulatsioone ja ohutuseeskirju. See on
saadaval PDF-formaadis (Portable Document Format) ning on laaditud teie sülearvutisse.
Märkus. Faili vaatamiseks on vajate programmi Adobe Reader. Kui Adobe Reader pole arvutisse installitud, käivitab AcerSystem
User Guide’i klõpsamine kõigepealt Adobe Readeri installimisprogrammi. Installimise lõpetamiseks järgige ekraanil olevaid
juhiseid. Juhiseid Adobe Readeri kasutamiseks leiate menüüst Spikker ja Tugi.
* TÄHTIS MÄRKUS: Palun pidage silmas, et ülalmainitud juhised, nii trükitud kui elektroonilisel kujul, on ainult
teavitava iseloomuga ning välja arvatud juhtudel, kui AcerSystem User Guide’is sisalduvas spetsiilises garantiiteabes
pole näidatud teisiti, ei kujuta miski neis juhistes toodud teabes endast Aceri esindatust või garantiid teie poolt ostetud
tootele. Acer vabastab end selgesõnaliselt igasugustest kohustustest seoses juhistes esineda võivate vigadega.
2
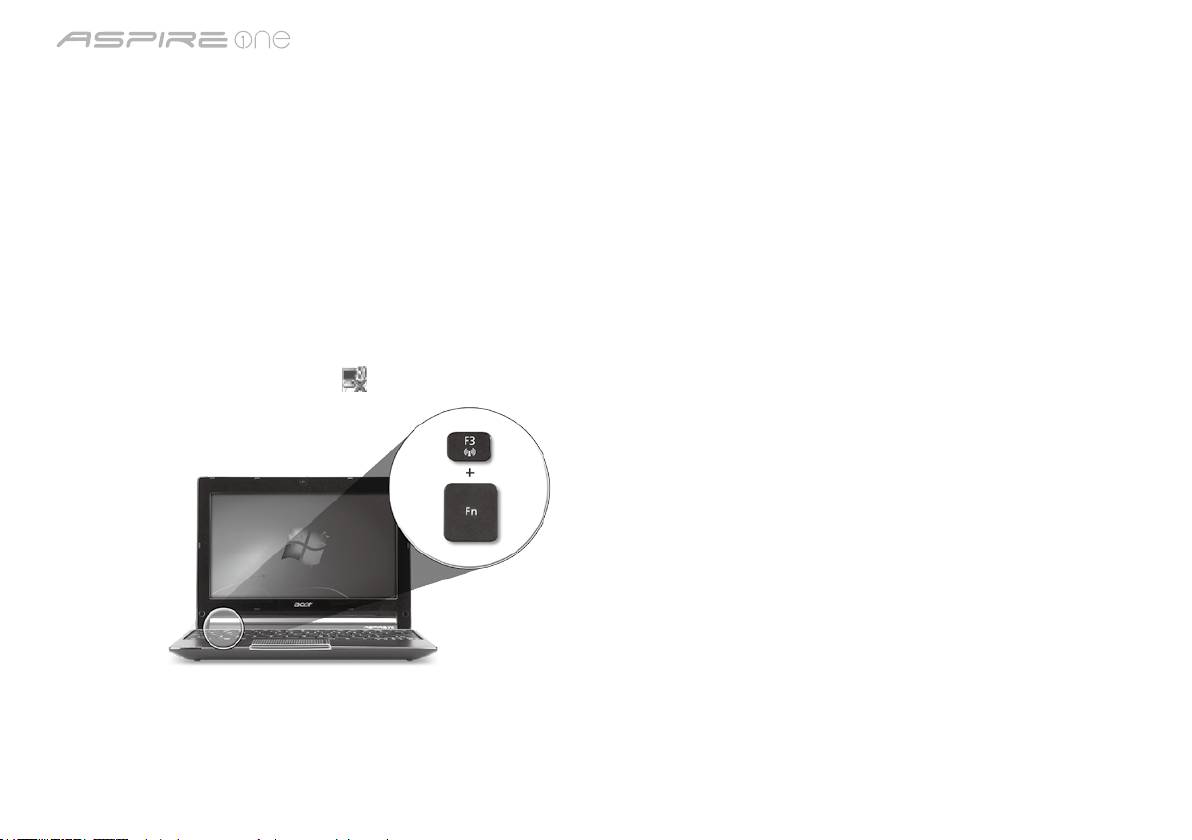
seeria
Lühijuhend
seeria
Lühijuhend
Võrgukonguratsioon
See juhend aitab teil LAN- ja traadita võrgu sätteid kongureerida, et saaksite luua Interneti-ühenduse.
LAN-ühenduse seadistamine
Lihtsalt ühendage LAN-kaabel Etherneti (RJ-45) porti. Vt Etherneti pordi asukohta osast „Vaade paremalt” lk 6.
Traadita ühenduse seadistamine
1. Pääsemaks juurde rakendusele Communication Manager vajutage <Fn> + <F3>. Nüüd saate lülitada sisse Wi-Fi-ühenduse,
klõpsates selle kõrval oleval punasel nupul.
Märkus: 3G-le ja Bluetoothile pääseb ligi ka rakenduse Communication Manager kaudu. Sideseadmed võivad vastavalt mudelile
erineda.
2. Klõpsake süsteemisalves ikoonil
ja valige traadita pääsupunkt, millega soovite ühendust luua.
3G SIM-kaardi sisestamine (ainult teatud mudelitel)
Eemaldage aku ja sisestage ettevaatlikult 3G SIM-kaart 3G SIM-kaardi pilusse. Vt 3G SIM-kaardi pilu asukohta osast „Tagant- ja
põhjavaade” lk 6.
3

seeria
Lühijuhend
seeria
Lühijuhend
Pealtvaade
Teie Aspire One ülevaade
# Ikoon Objekt Kirjeldus
Kui olete oma arvuti häälestanud jaotises Alustuseks
1
Veebikaamera
Veebikaamera videosuhtluseks (mudelite
kirjeldatud viisil, lubage meil tutvustada teie uut sülearvutit
Acer Crystal Eye
konguratsioon võib olla erinev).
Acer.
2
Mikrofon Sisseehitatud mikrofon heli salvestamiseks.
3
Kuvariekraan Seda nimetatakse ka vedelkristallekraaniks
(LCD) ning see kuvab arvuti pilti (mudelite
konguratsioon võib olla erinev).
4
Voolunupp Arvuti sisse- ja väljalülitamiseks.
5
Klaviatuur Andmete sisestamiseks arvutisse.
1
6
Vooluindikaator
Näitab arvuti olekut.
1
Aku indikaator
Näitab arvuti aku olekut.
1. Laadimine: kui akut laetakse, on tuli kollakat
värvi.
2. Täielikult laetud: kui arvuti on vooluvõrgus,
on tuli sinist värvi.
Kõvakettaindikaator Näitab kõvaketta aktiivsust.
1
indikaator
Näitab 3G või traadita võrguühenduse olekut.
Sinine tuli põleb Põleb oranž tuli Tuli ei põle
3G sees/
WiFi sees
3G väljas/
3G väljas/
3G sees/
WiFi sees
WiFi väljas
WiFi väljas
7
Klõpsunupud
Vasak ja parem nupp funktsioneerivad vasaku
(vasak ja parem)
ja parema hiirenupuna.
8
Puuteplaat Puutetundlik osutusseadis, mis töötab
arvutihiirena.
9
Randmetugi Mugav toetusala, kuhu saate arvutit kasutades
toetada oma käsi.
1. Esipaneelil asuvad indikaatorid on nähtavad ka siis, kui arvuti kaas on suletud.
4

seeria
Lühijuhend
seeria
Lühijuhend
Suletud eestvaade
# Ikoon Objekt Kirjeldus
1
Olekuindikaatorid Valgusdioodid (LED-id), mille süttimine näitab
arvuti funktsioonide ja komponentide olekut.
Vaade vasakult
2
Alalisvoolusisendi
Vahelduvvooluadapteri (toiteploki)
pistik
ühendamiseks.
3
Välise kuvari (VGA)
Kuvaseadme (nt välise kuvari või LCD-
port
projektori) ühendamiseks.
4
USB 2.0 port USB 2.0 seadmete ühendamiseks (nt USB-hiir
või USB-kaamera).
5

seeria
Lühijuhend
seeria
Lühijuhend
Vaade paremalt
# Ikoon Objekt Kirjeldus
5
Mitu-ühes kaardilugeja Võtab vastu järgmisi kaarte: Secure Digital
(SD), MultiMediaCard (MMC), Memory Stick
(MS), Memory Stick PRO (MS PRO) ja
xD-Picture (xD).
Märkus. Kaardi eemaldamiseks/
paigaldamiseks vajutage sellele. Korraga
saab töötada ainult üks kaart.
6
Mikrofonipesa Võtab vastu sisendheli välisest mikrofonist.
Kõrvaklappide/kõlarite/
Heliväljundseadmete ühendamiseks
heliväljundi pistik
(nt kõlarid, kõrvaklapid).
7
USB 2.0 port USB 2.0 seadmete ühendamiseks
(nt USB-hiir).
8
Kensington-luku pesa Kensington-tüüpi arvuti turvaluku
ühendamiseks.
9
Etherneti (RJ-45) port Ethernet 10/100-põhise võrguga
ühendamiseks.
Tagant- ja põhjavaade
10
Akusektsioon Siin asuvad arvuti akud.
11
3G SIM-kaardi pilu Loeb 3G-ühenduse saamiseks 3G SIM-
kaarti (ainult teatud mudelitel).
12
Aku vabastamise riiv Vabastab aku, et seda saaks välja võtta.
13
Akulukk Lukustab aku kohale.
14
Ventilatsiooniavad ning
Võimaldavad arvutil püsida jahedana ka
jahutusventilaator
pärast pikaajalist kasutamist.
Märkus. Ärge katke või blokeerige
ventilaatori avasid.
15
Kõlar Toob kuuldavale teie arvutist pärineva heli.
6

seeria
Lühijuhend
Keskkond
Temperatuur:
Töötamiseks sobiv: 5°C kuni 35°C
Sobimatu: -20°C kuni 65°C
Niiskus (mittekondenseeruv):
Töötamiseks sobiv: 20% kuni 80%
Sobimatu: 20% kuni 80%
7

sērija
Ātrais ceļvedis

sērija
© 2010 Visas tiesības aizsargātas
Aspire One sērija ātrais ceļvedis
Oriģinālizdevums: 04/2010
Aspire One Series piezīmjdators
Modeļa numurs: ____________________________
Sērijas numurs: _____________________________
Pirkuma datums: ____________________________
Pirkuma vieta: ______________________________

Ātrais ceļvedis
Federal Communications Commission
Declaration of Conformity
This device complies with Part 15 of the FCC Rules. Operation is subject to the following two conditions: (1) this device may not
cause harmful interference, and (2) this device must accept any interference received, including interference that may cause
undesired operation.
The following local Manufacturer/Importer is responsible for this declaration:
Product name: Notebook PC
Brand: Acer
Model number: PAV01
Machine type:
Aspire one series; AO533 series
Name of Responsible Party: Acer America Corporation
Address of responsible party: 333 West San Carlos St., San Jose
CA 95110, U. S. A.
Contact person: Acer Representative
Phone No.: 1-254-298-4000
Fax No.: 1-254-298-4147
April 23, 2010

sērija
CE Declaration of Conformity
We,
Acer Incorporated
8F, 88, Sec. 1, Hsin Tai Wu Rd., Hsichih, Taipei Hsien 221, Taiwan
Contact Person: Mr. Easy Lai, e-mail:easy_lai@acer.com.tw
And,
Acer Europe SA
Via Cantonale, Centro Galleria 2 6928 Manno Switzerland
Hereby declare that:
Product: Notebook Computer
Trade Name: Acer
Model Number: PAV01
Machine Type: Aspire one series; AO533 series
Is compliant with the essential requirements and other relevant provisions of the following EC directives, and that all the
necessary steps have been taken and are in force to assure that production units of the same product will continue comply with
the requirements.
R&TTE Directive 1999/5/EC as attested by conformity with the following harmonized standard:
• Article 3.1(a) Health and Safety
-. EN60950-1
-. EN62311
• Article 3.1(b) EMC
-. EN301 489-1
-. EN301 489-3 (Applicable to non-bluetooth wireless keyboard mouse set).
-. EN301 489-7
-. EN301 489-17
-. EN301 489-24

Ātrais ceļvedis
• Article 3.2 Spectrum Usages
-. EN300 440-2 (Applicable to non-bluetooth wireless keyboard mouse set).
-. EN300 328
-. EN301 511
-. EN301 893 (Applicable to 5GHz high performance RLAN).
-. EN301 908-1
-. EN301 908-2
EMC Directive 2004/108/EC as attested by conformity with the following harmonized standards:
-. EN55022, AS/NZS CISPR22, Class B
-. EN55024
-. EN61000-3-2 Class D
-. EN61000-3-3
Low Voltage Directive 2006/95/EC as attested by conformity with the following harmonized standard:
-. EN60950-1
RoHS Directive 2002/95/EC on the Restriction of the Use of certain Hazardous Substances in Electrical and Electronic Equipment
-. The maximum concentration values of the restricted substances by weight in homogenous material are:
Lead
0.1%
Polybrominated Biphenyls (PBB’s)
0.1%
Mercury
0.1%
Polybrominated Diphenyl Ethers (PBDE’s)
0.1%
Hexavalent Chromium
0.1%
Cadmium
0.01%
Directive 2009/125/EC with regard to establishing a framework for the setting of ecodesign requirements for energy-related
product.
Year to begin affixing CE marking 2010.
Apr. 23, 2010
Easy Lai /Manager
Regulation Center, Acer Inc.
Date

sērija
Tikai iesācējiem
1 2 3
2-2
3-2
3-1
2-1
Pārliecinieties, vai akumulators
ir pareizi noksēts vietā, kā
redzams attēlā 2-2.
4 5 6
Ilustrācijas ir tikai atsaucēm. Preces faktiskās tehniskās normas var atšķirties.
1

Ātrais ceļvedis
Galvenais vispirms
Mēs vēlamies jums pateikties, ka esat izvēlējies Acer piezīmjdatoru, lai nodrošinātu savas mobilās skaitļošanas vajadzības.
Jūsu rokasgrāmatas
Lai palīdzētu jums lietot Acer piezīmjdatoru, esam sagatavojuši rokasgrāmatu komplektu*:
Pirmkārt, Ātrais ceļvedis jums palīdz uzsākt datora iestatīšanu.
Lai uzzinātu vairāk, kā jūsu dators jums var palīdzēt būt vēl produktīvākam, lūdzu, skatiet AcerSystem User Guide. Šajā ceļvedī ir
detalizēta informācija par tādām tēmām kā sistēmas utilītas, datu atkopšana, paplašināšanas opcijas un problēmu novēršana. Bez tam
tajā ir iekļauta informācija par garantijām un piezīmjdatora lietošanas vispārīgas regulas un drošības paziņojumi. Tas ir pieejams PDF
(Portable Document Format - portatīvā dokumenta formāts) formātā un ir iepriekš ielādēts jūsu piezīmjdatorā.
Piezīme: lai skatītu failu, nepieciešama programma Adobe Reader. Ja jūsu datorā nav instalēta programma Adobe Reader,
pirmo reizi noklikšķinot uz AcerSystem User Guide (AcerSystem lietotāja ceļvedis), automātiski tiks palaista programmas
Adobe Reader instalēšana. Lai pabeigtu instalāciju, izpildiet ekrānā redzamos norādījumus. Lai iegūtu norādījumus, kā lietot
* SVARĪGS PAZIŅOJUMS: Lūdzam ņemt vērā, ka šeit minētie ceļveži, kas ir gan izdrukātā, gan elektroniskā formātā,
ir paredzēti tikai atsaucei, un nekas no šajos ceļvežos minētā nedod tiesības uz Acer garantiju attiecībā uz iegādāto
produktu izņemot to, kas norādīts attiecīgajā garantijas informācijā, kas ietverta AcerSystem lietotāja ceļvedī. Acer
neuzņemas nekādu atbildību par kļūdām, kuras satur ceļveži.
2

sērija
Tīkla kongurācija
Šis ceļvedis jums palīdzēs kongurēt jūsu LAN un bezvadu tīkla iestatījumus, lai ļautu jums izveidot interneta savienojumu.
LAN savienojuma iestatīšana
Vienkārši iespraudiet LAN kabeli Ethernet (RJ-45) portā. Lūdzu, skatiet "Skats no labās puses" 6. lappusē, lai noteiktu Ethernet porta
atrašanās vietu.
Bezvadu savienojuma iestatīšana
1. Nospiediet <Fn> + <F3>, lai piekļūtu sakaru pārvaldniekam. Šeit jūs varat iespējot Wi-Fi savienojumu, noklikšķinot sarkano pogu,
kas atrodas blakus Wi-Fi.
Piezīme: Izmantojot sakaru pārvaldnieku, var piekļūt arī 3G un Bluetooth. Sakaru ierīces var atšķirties atkarībā no modeļa.
2. Noklikšķiniet uz
ikonas sistēmas teknē un izvēlieties bezvadu piekļuves punktu, ar kuru vēlaties izveidot savienojumu.
3G SIM kartes ievietošana (tikai noteiktiem modeļiem)
Izņemiet akumulatoru un uzmanīgi ievietojiet 3G SIM karti 3G SIM kartes slotā. Lūdzu, skatiet "Aizmugure un apakšpuse" 6.
lappusē, lai noteiktu 3G SIM kartes slota atrašanās vietu.
3
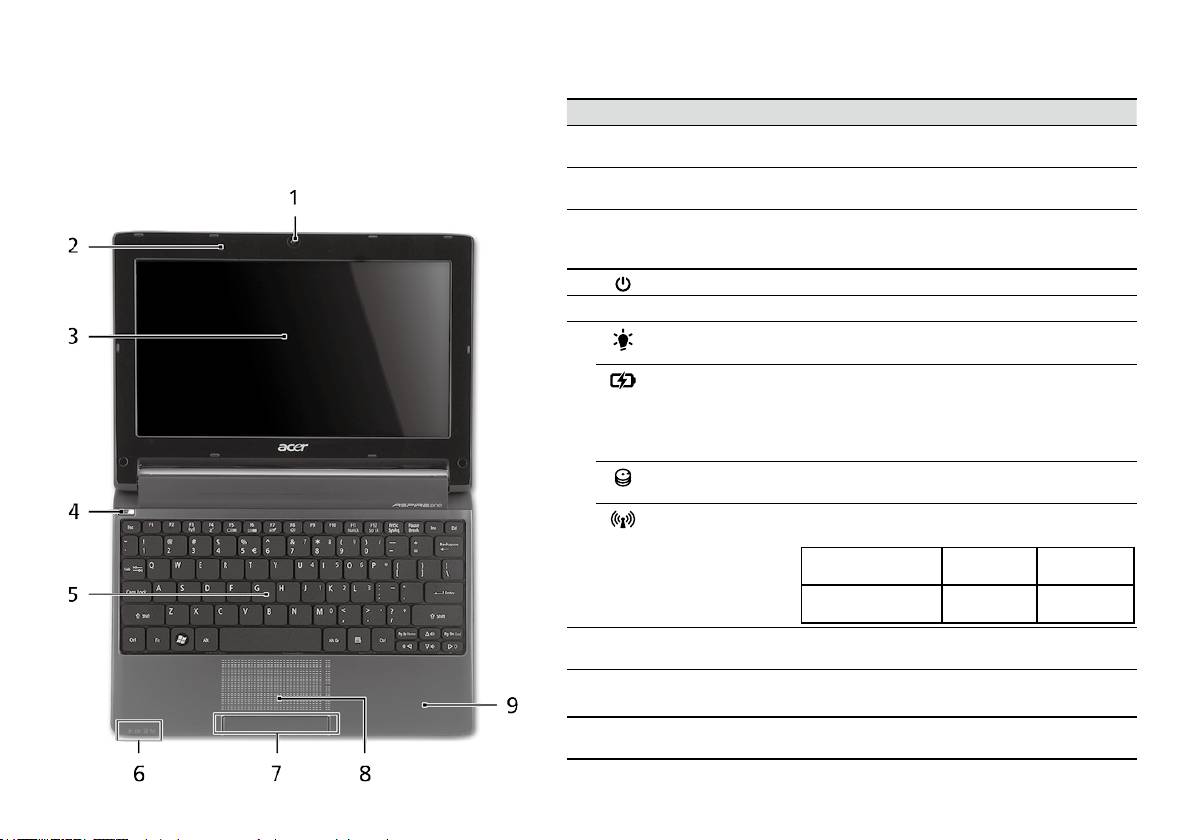
Ātrais ceļvedis
Skats no augšpuses
Jūsu Aspire One pārskats
# Ikona Elements Apraksts
Pēc tam, kad esat sagatavojis savu datoru, kā parādīts sadaļā
1
Acer Crystal Eye
Tīmekļa kamera videosakariem
Tikai iesācējiem, atļaujiet jūs iepazīstināt ar jūsu jauno Acer
tīmekļa kamera
(modeļu kongurācija var atšķirties).
piezīmjdatoru.
2
Mikrofons Iekšējais mikrofons skaņas ierakstīšanai.
3
Displeja ekrāns Saukts arī par šķidro kristālu displeju (LCD);
rāda datora izvadi (modeļu kongurācija var
atšķirties).
4
Barošanas poga Ieslēdz un izslēdz datoru.
5
Tastatūra Datu ievadīšanai datorā.
6
Barošanas
Norāda datora barošanas statusu.
1
indikators
Akumulatora
Norāda datora akumulatora statusu.
1
indikators
1. Uzlāde: Indikators ir oranžā krāsā,
akumulatoram lādējoties.
2. Pilnīgi uzlādēts: Datoram darbojoties no
maiņstrāvas, indikators ir zils.
Cietā diska
Norāda, ka cietais disks ir aktīvs.
indikators
Sakari
Norāda 3G/bezvadu lokālā tīkla sakaru
1
indikators
statusu.
Zilā gaisma iedegta Oranžā gaisma
Gaisma nedeg
iedegta
3G ieslēgts/WiFi ieslēgts
3G izslēgts/
3G izslēgts/
3G ieslēgts/WiFi izslēgts
WiFi ieslēgts
WiFi izslēgts
7
Klikšķināmas pogas
Kreisā un labā poga darbojas tāpat kā peles
(kreisā un labā)
kreisā un labā poga.
8
Skārienpanelis Skārienjutīga rādītājierīce, kas darbojas kā
datora pele.
9
Plaukstu atbalsta
Ērta atbalsta zona jūsu rokām, kad lietojat
zona
datoru.
1. Priekšējā paneļa indikatori ir redzami pat tad, kad datora vāks ir cieši aizvērts.
4
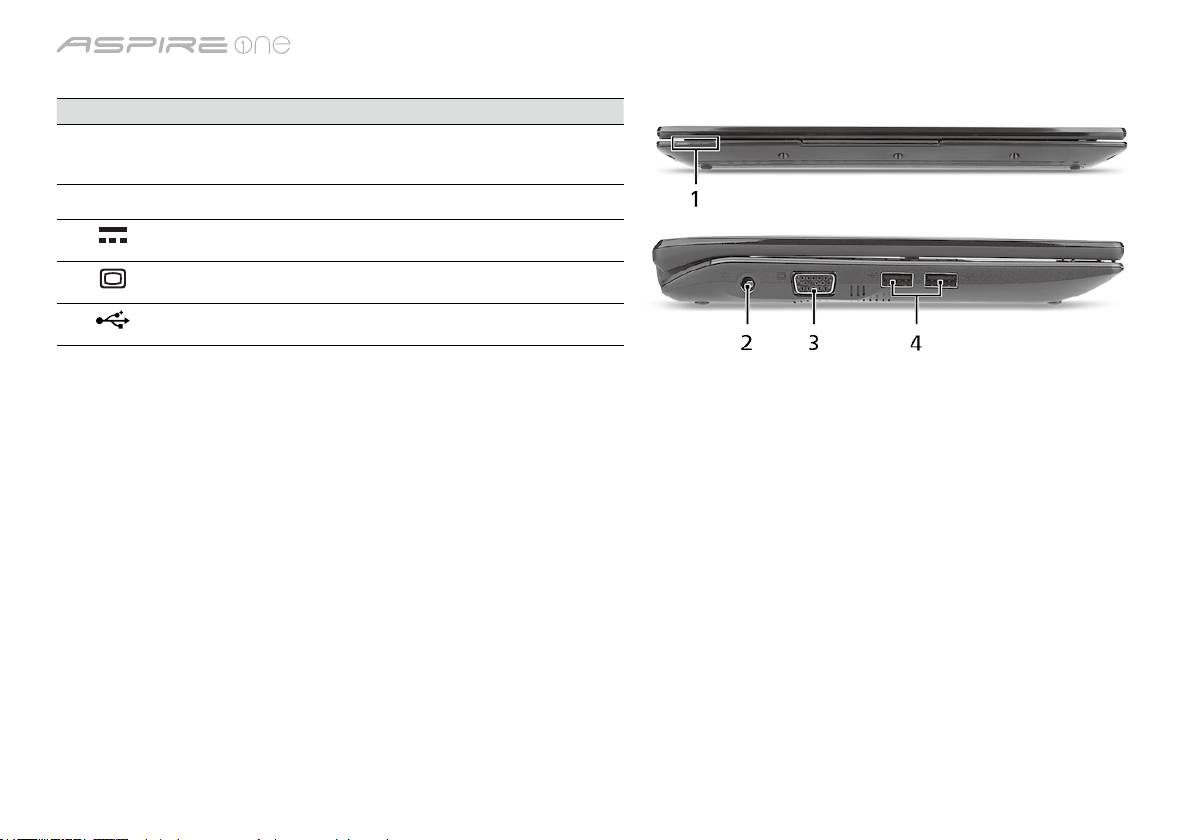
sērija
Skats no priekšpuses aizvērtā veidā
# Ikona Elements Apraksts
1
Statusa indikatori Gaismas diodes (LED), kas iedegas, lai
norādītu datora funkciju un komponentu
statusu.
Skats no kreisās puses
2
Līdzstrāvas ieejas
Šeit pieslēdz maiņstrāvas adapteru.
ligzda
3
Ārējā displeja (VGA)
Šeit pieslēdz displeja ierīci (piemēram, ārēju
ports
monitoru, LCD projektoru).
4
USB 2.0 ports Šeit pieslēdz USB 2.0 ierīces (piemēram,
USB peli, USB kameru).
5

Ātrais ceļvedis
Skats no labās puses
# Ikona Elements Apraksts
5
Karšu lasītājs "Vairāki
Pieņem datu nesējus Secure Digital (SD),
vienā"
MultiMediaCard (MMC), Memory Stick
(MS), Memory Stick PRO (MS PRO) un
xD-Picture Card (xD).
Piezīme: Nospiediet, lai izņemtu/ieliktu
karti. Vienlaikus var lietot tikai vienu karti.
6
Mikrofona ieejas ligzda Pieņem ievadi no ārējiem mikrofoniem.
Austiņas/skaļruņu/līnijas
Šeit pieslēdz audio līnijas izejas ierīces
izejas ligzda
(piemēram, skaļruņus, austiņas).
7
USB 2.0 ports Šeit pieslēdz USB 2.0 ierīces (piemēram,
USB peli).
8
Kensingtona atslēgas
Šeit pieslēdz Kensingtona atslēgu datora
slots
drošībai.
9
Ethernet (RJ-45) ports Šeit pieslēdz Ethernet 10/100 tīkla vadu.
Aizmugure un apakšpuse
10
Akumulatora nodalījums Šeit ievieto datora akumulatoru.
11
3G SIM kartes slots Pieņem 3G SIM kartes 3G savienojumam
(tikai noteiktiem modeļiem).
12
Akumulatora
Atbrīvo akumulatoru, lai to varētu izņemt.
atbrīvošanas slēdzis
13
Akumulatora ksators Noksē akumulatoru.
14
Ventilācijas atveres un
Neļauj datoram sakarst pat pēc ilgstošas
ventilators
lietošanas.
Piezīme: neaizsedziet un nenosprostojiet
ventilatora atveri.
15
Skaļrunis Izvada audio no datora.
6

sērija
Vide
Temperatūra:
Ieslēgtā stāvoklī: 5°C līdz 35°C
Izslēgtā stāvoklī: -20°C līdz 65°C
Mitrums (bez kondensācijas):
Ieslēgtā stāvoklī: 20% līdz 80%
Izslēgtā stāvoklī: 20% līdz 80%
7

serijų
Trumpa instrukcija

serijų
© 2010. Visos teisės saugomos
Aspire One serijų Trumpa instrukcija
Originalus leidimas: 04/2010
Aspire One serijų nešiojamasis kompiuteris
Modelio numeris: ___________________________
Serijos numeris: ____________________________
Pirkimo data: _______________________________
Pirkimo vieta: ______________________________

Trumpa instrukcija
Federal Communications Commission
Declaration of Conformity
This device complies with Part 15 of the FCC Rules. Operation is subject to the following two conditions: (1) this device may not
cause harmful interference, and (2) this device must accept any interference received, including interference that may cause
undesired operation.
The following local Manufacturer/Importer is responsible for this declaration:
Product name: Notebook PC
Brand: Acer
Model number: PAV01
Machine type:
Aspire one series; AO533 series
Name of Responsible Party: Acer America Corporation
Address of responsible party: 333 West San Carlos St., San Jose
CA 95110, U. S. A.
Contact person: Acer Representative
Phone No.: 1-254-298-4000
Fax No.: 1-254-298-4147
April 23, 2010

serijų
CE Declaration of Conformity
We,
Acer Incorporated
8F, 88, Sec. 1, Hsin Tai Wu Rd., Hsichih, Taipei Hsien 221, Taiwan
Contact Person: Mr. Easy Lai, e-mail:easy_lai@acer.com.tw
And,
Acer Europe SA
Via Cantonale, Centro Galleria 2 6928 Manno Switzerland
Hereby declare that:
Product: Notebook Computer
Trade Name: Acer
Model Number: PAV01
Machine Type: Aspire one series; AO533 series
Is compliant with the essential requirements and other relevant provisions of the following EC directives, and that all the
necessary steps have been taken and are in force to assure that production units of the same product will continue comply with
the requirements.
R&TTE Directive 1999/5/EC as attested by conformity with the following harmonized standard:
• Article 3.1(a) Health and Safety
-. EN60950-1
-. EN62311
• Article 3.1(b) EMC
-. EN301 489-1
-. EN301 489-3 (Applicable to non-bluetooth wireless keyboard mouse set).
-. EN301 489-7
-. EN301 489-17
-. EN301 489-24
Trumpa instrukcija
• Article 3.2 Spectrum Usages
-. EN300 440-2 (Applicable to non-bluetooth wireless keyboard mouse set).
-. EN300 328
-. EN301 511
-. EN301 893 (Applicable to 5GHz high performance RLAN).
-. EN301 908-1
-. EN301 908-2
EMC Directive 2004/108/EC as attested by conformity with the following harmonized standards:
-. EN55022, AS/NZS CISPR22, Class B
-. EN55024
-. EN61000-3-2 Class D
-. EN61000-3-3
Low Voltage Directive 2006/95/EC as attested by conformity with the following harmonized standard:
-. EN60950-1
RoHS Directive 2002/95/EC on the Restriction of the Use of certain Hazardous Substances in Electrical and Electronic Equipment
-. The maximum concentration values of the restricted substances by weight in homogenous material are:
Lead
0.1%
Polybrominated Biphenyls (PBB’s)
0.1%
Mercury
0.1%
Polybrominated Diphenyl Ethers (PBDE’s)
0.1%
Hexavalent Chromium
0.1%
Cadmium
0.01%
Directive 2009/125/EC with regard to establishing a framework for the setting of ecodesign requirements for energy-related
product.
Year to begin affixing CE marking 2010.
Apr. 23, 2010
Easy Lai /Manager
Regulation Center, Acer Inc.
Date

serijų
Tik pradedantiesiems
1 2 3
2-2
3-2
3-1
2-1
Įsitikinkite, kad baterija yra
tinkamai užksuota, kaip
parodyta 2-2.
4 5 6
Paveiksliukus naudoti tik informacijai. Konkrečios produkto specikacijos gali skirtis.
1

Trumpa instrukcija
Dalykai, kuriuos reikia atlikti pirmiausia
Leiskite padėkoti, kad pasirinkote „Acer“ nešiojamąjį kompiuterį – tikimės Jūsų nenuvilti ir užtikrinti visus nešiojamojo kompiuterio
teikiamus privalumus.
Instrukcijos Jums
Tam, kad palengvintume Jums naudojimąsi „Acer“ kompiuteriu, parengėme kelias instrukcijas*:
Pirmoji vadinasi Trumpa instrukcija - ši informacija padės pirmosiomis kompiuterio naudojimo minutėmis.
Išsamesnės informacijos apie tai, kaip padaryti kompiuterį produktyvesniu, rasite AcerSystem User Guide. Šioje instrukcijoje išsamiai
aprašoma tokia informacija, kaip sisteminiai failai, duomenų atstatymas, kompiuterio galimybių praplėtimas ir gedimų diagnostika. Be to,
šioje instrukcijoje yra ir garantinė informaciją, bendrieji reikalavimai ir su sauga susiję įspėjimai. Ši instrukcija yra „Portable Document
Format (PDF)“ formate ir ji jau bus kompiuteryje.
Pastaba: Failo peržiūrai reikės „Adobe Reader“. Jei kompiuteryje nėra „Adobe Reader“, paspaudus ant AcerSystem User Guide
bus pirmiausiai paleistas „Adobe Reader“ įdiegimas. Vadovaukitės ekrane esančiomis instrukcijomis įdiegimo užbaigimui.
Instrukcijų dėl „Adobe Reader“ naudojimosi ieškokite „Help and Support“ [Žinynas ir pagalba] meniu.
* SVARBI PASTABA: Įsidėmėkite, kad čia paminėtos instrukcijos, tiek spausdintine, tiek elektronine forma yra tik
jūsų informacijai ir išskyrus kaip numatyta specinėje garantijos informacijoje, kuri yra išdėstyta AcerSystem User
Guide, joks šių instrukcijų turinys nebus laikomas jūsų įsigyto Acer gaminio pateikimu ar garantija. Acer pabrėžia, kas
neprisiima jokios atsakomybės už instrukcijose esančias klaidas.
2

serijų
Tinklo kongūracija
Ši instrukcija padės jums sukongūruoti savo LAN ir belaidžio tinklo nustatymus, kad galėtumėte prisijungti prie interneto.
LAN ryšio nustatymas
Tiesiog įkiškite LAN kabelį į eterneto (RJ-45) prievadą. Žr. „Vaizdas iš dešinės“ 6 p., kad nustatytumėte eterneto prievado vietą.
Belaidžio ryšio nustatymas
1. Paspauskite <Fn> + <F3>, kad atidarytumėte ryšių valdymo priemonę. Čia galite įjungti belaidį ryšį spustelėdami raudoną mygtuką
prie belaidžio ryšio ženklo.
Pastaba: 3G ir „Bluetooth“ taip pat galima pasiekti per ryšių valdymo priemonę. Ryšių įrenginiai skiriasi priklausomai nuo modelio.
2. Spustelėkite
piktogramą ant sistemos užduočių juostos ir pasirinkite belaidės prieigos tašką, prie kurio norite jungtis.
3G SIM kortelės įdėjimas (tik tam tikriems modeliams)
Išimkite bateriją ir atidžiai įdėkite 3G SIM kortelę į 3G SIM kortelės lizdą. Žr. „Vaizdas iš galo ir apačios“ 6 p., kad nustatytumėte 3G
SIM kortelės lizdo vietą.
3
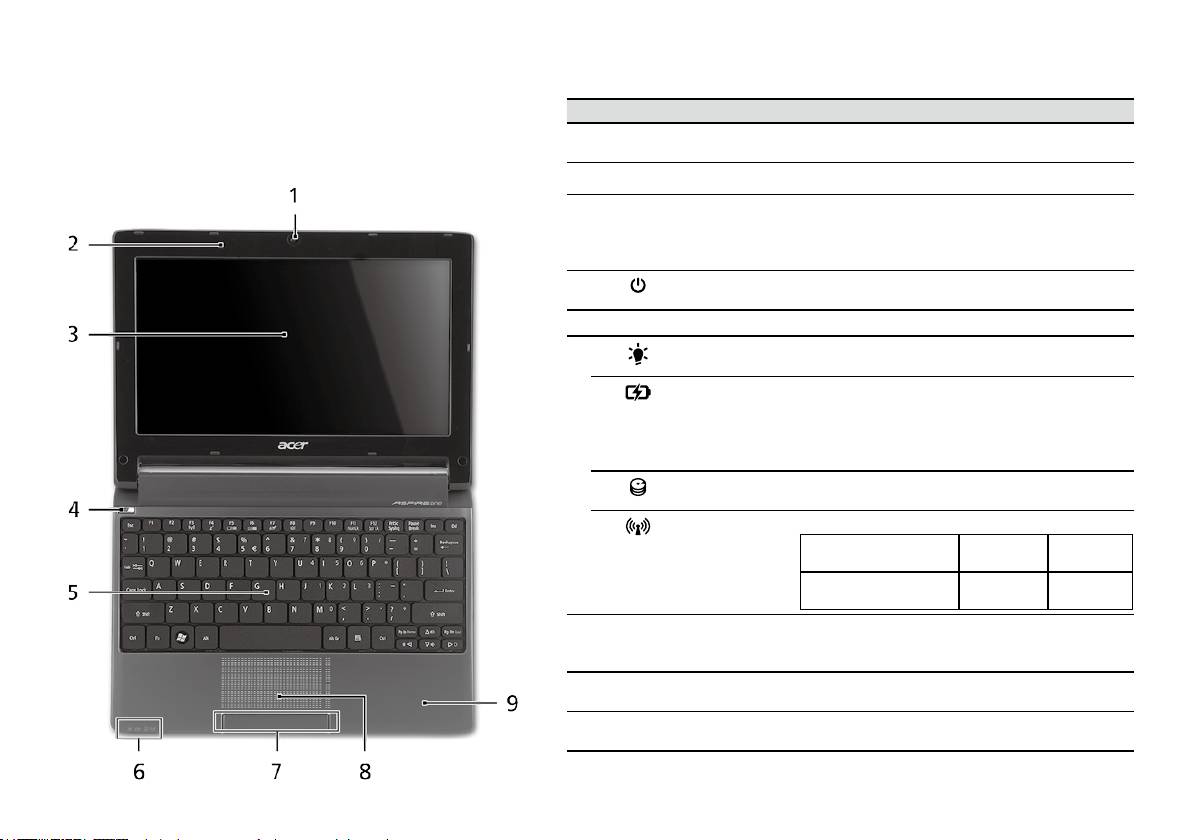
Trumpa instrukcija
Vaizdas iš viršaus
Ekskursija po jūsų Aspire One
# Piktograma Objektas Aprašymas
Atlikus kompiuterio sąranką kaip parodyta dalyje
1
Acer Crystal Eye
Interneto kamera vaizdinei komunikacija (kongūravimo
Pradedantiesiems, leiskite jus supažindinti su jūsų naujuoju
interneto kamera
tvarka gali kisti priklausomai nuo modelio).
Acer nešiojamuoju kompiuteriu.
2
Mikrofonas Vidinis mikrofonas garso įrašymui.
3
Ekranas Taip pat vadinamas skystųjų kristalų ekranu (angl.
Liquid-Crystal Display (LCD)), jame pateikiamas
kompiuterio rodomas vaizdas (kongūravimo tvarka
gali kisti priklausomai nuo modelio).
4
Energijos
Įjungia ir išjungia kompiuterį.
mygtukas
5
Klaviatūra Skirta duomenų įvedimui į kompiuterį.
6
Maitinimo
Nurodo kompiuterio energijos sistemos būklę.
1
indikatorius
Baterijos
Nurodo kompiuterio baterijos būklę.
1
indikatorius
1. Įkraunama: Kraunantis baterijai lemputė dega
gintaro spalva.
2. Pilnai pakrauta: Dirbant iš kintamos srovės (AC)
tinklo lemputė dega mėlynai.
HDD indikatorius Nurodo ar kietasis diskas yra naudojamas (į jį rašoma
ar skaitoma).
Komunikacija
Rodo 3G/belaidžio LAN ryšio būseną.
1
indikatorius
Dega mėlyna lemputė Dega oranžinė
Nedega
lemputė
3G įjungtas/WiFi įjungtas
3G išjungtas/
3G išjungtas/
3G įjungtas/WiFi išjungtas
WiFi įjungtas
WiFi išjungtas
7
Pelės klavišai
Kairysis ir dešinysis klavišai veikia kaip kairysis ir
(kairysis ir
dešinysis pelės mygtukai.
dešinysis)
8
Liečiamasis
Lietimui jautrus įrenginys, veikiantis kaip kompiuterio
laukelis
pelė.
9
Atrama delnui Patogi atramos vieta jūsų rankoms naudojimosi
kompiuteriu metu.
1. Priekinio pulto indikatoriai matomi ne tada, kai kompiuterio viršus yra uždarytas.
4
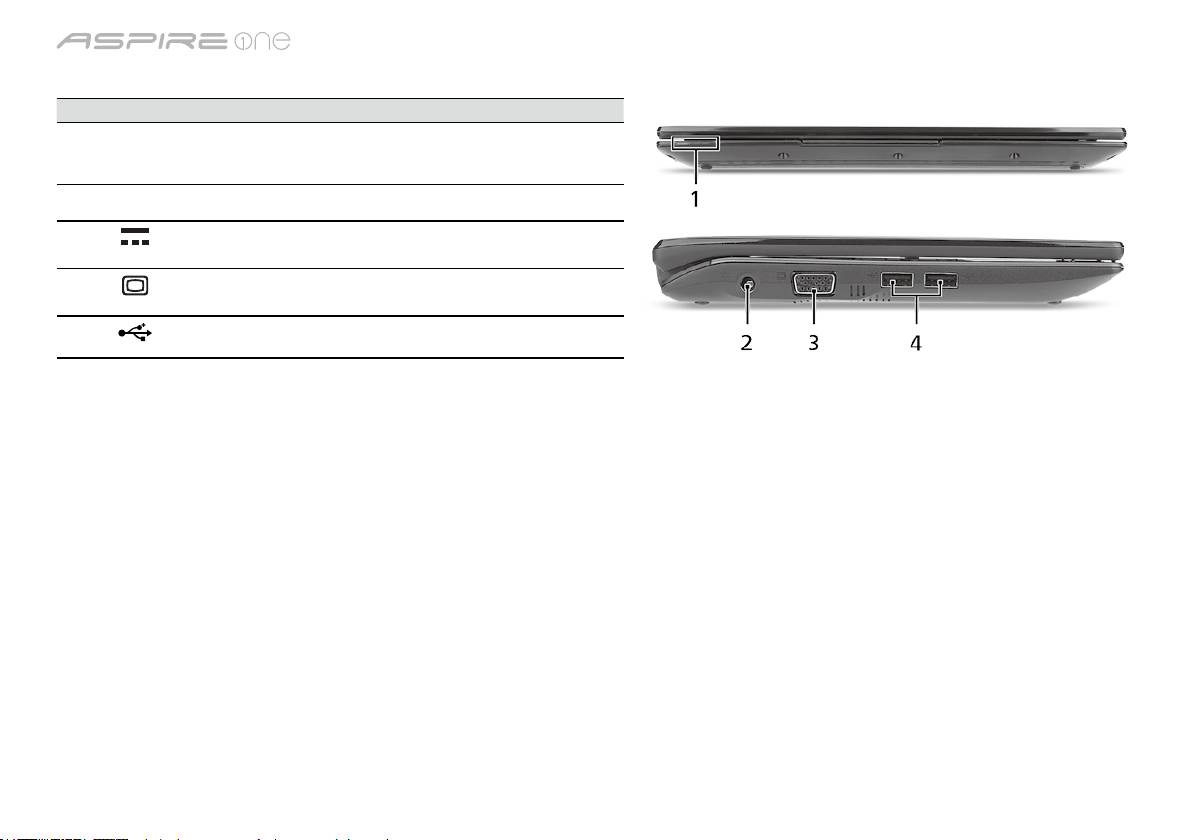
serijų
Uždaryto kompiuterio vaizdas iš priekio
# Piktograma Objektas Aprašymas
1
Būsenos indikatoriai Šviesos diodai (LED), užsidegantys,
kad parodytų kompiuterio funkcijų ir
komponentų būseną.
Vaizdas iš kairės
2
Nuolatinės srovės (DC)
Skirtas prijungti kintamos srovės (AC)
kištuko lizdas
adapteriui.
3
Išorinio ekrano (VGA)
Skirtas prijungti papildomą monitorių
lizdas
(pvz. išorinį monitorių, LCD projektorių).
4
USB 2.0 lizdas Skirtas USB 2.0 įrenginiams (pvz., USB
pelė, USB kamera) prijungti.
5

Trumpa instrukcija
Vaizdas iš dešinės
# Piktograma Objektas Aprašymas
5
„Multi-in-1“ atminties
Skaito Secure Digital (SD), MultiMediaCard
kortelių skaitytuvas
(MMC), Memory Stick (MS), Memory Stick
PRO (MS PRO), xD-Picture Card (xD) tipų
atminties korteles.
Pastaba: Spauskite norėdami įdėti/išimti
kortelę. Vienu metu galima naudotis tik viena
kortele.
6
Mikrofono kištuko
Skirtas prijungti išorinį mikrofoną.
lizdas
Ausinių/garsiakalbio/
Skirtas išoriniams linijiniams audio
linijinio išėjimo
prietaisams prijungti (pvz. garsiakalbiams,
kištukas
ausinėms).
7
USB 2.0 lizdas Skirtas USB 2.0 įrenginiams (pvz., USB
pelė) prijungti.
8
Kensington spynos
Skirtas užksuoti Kensington tipo
lizdas
kompiuterio užraktui.
9
Ethernet (RJ-45)
Skirtas prisijungti prie Ethernet 10/100 tipo
lizdas
tinklo.
Vaizdas iš galo ir apačios
10
Baterijos lizdas Skirtas montuoti kompiuterio baterijai.
11
3G SIM kortelės lizdas Priima 3G SIM kortelę 3G jungiamumui
(tik tam tikriems modeliams).
12
Baterijos ksatorius Atpalaiduoja baterijos ksavimą, leidžia ją
išimti.
13
Baterijos užraktas Fiksuoja įdėtą bateriją darbinėje padėtyje.
14
Ventiliacijos angos ir
Neleidžia kompiuteriui perkaisti net ir po ilgo
aušintuvas
naudojimo.
Pastaba: Neuždenkite ir neužblokuokite
ventiliatoriaus ertmės.
15
Garsiakalbis Transliuoja garsą iš jūsų kompiuterio.
6

serijų
Aplinka
Temperatūra:
Darbinė: nuo 5°C iki 35°C
Saugojimo: nuo -20°C iki 65°C
Drėgmė (be kondensacijos):
Darbinė: nuo 20% iki 80%
Saugojimo: nuo 20% iki 80%
7

Σειρά
Γρήγορος οδηγός

Σειρά
Γρήγορος οδηγός
Σειρά
Γρήγορος οδηγός
© 2010 Με επιφύλαξη κάθε νόμιμου δικαιώματος
Γρήγορος οδηγός σειράς Aspire One
Αρχική Έκδοση: 04/2010
Φορητό PC Σειρά Aspire One
Αριθμός Μοντέλου: __________________________
Σειριακός Αριθμός: __________________________
Ημερομηνία αγοράς: _________________________
Τόπος Αγοράς: _____________________________

Σειρά
Γρήγορος οδηγός
Σειρά
Γρήγορος οδηγός
Federal Communications Commission
Declaration of Conformity
This device complies with Part 15 of the FCC Rules. Operation is subject to the following two conditions: (1) this device may not
cause harmful interference, and (2) this device must accept any interference received, including interference that may cause
undesired operation.
The following local Manufacturer/Importer is responsible for this declaration:
Product name: Notebook PC
Brand: Acer
Model number: PAV01
Machine type:
Aspire one series; AO533 series
Name of Responsible Party: Acer America Corporation
Address of responsible party: 333 West San Carlos St., San Jose
CA 95110, U. S. A.
Contact person: Acer Representative
Phone No.: 1-254-298-4000
Fax No.: 1-254-298-4147
April 23, 2010

Σειρά
Γρήγορος οδηγός
Σειρά
Γρήγορος οδηγός
CE Declaration of Conformity
We,
Acer Incorporated
8F, 88, Sec. 1, Hsin Tai Wu Rd., Hsichih, Taipei Hsien 221, Taiwan
Contact Person: Mr. Easy Lai, e-mail:easy_lai@acer.com.tw
And,
Acer Europe SA
Via Cantonale, Centro Galleria 2 6928 Manno Switzerland
Hereby declare that:
Product: Notebook Computer
Trade Name: Acer
Model Number: PAV01
Machine Type: Aspire one series; AO533 series
Is compliant with the essential requirements and other relevant provisions of the following EC directives, and that all the
necessary steps have been taken and are in force to assure that production units of the same product will continue comply with
the requirements.
R&TTE Directive 1999/5/EC as attested by conformity with the following harmonized standard:
• Article 3.1(a) Health and Safety
-. EN60950-1
-. EN62311
• Article 3.1(b) EMC
-. EN301 489-1
-. EN301 489-3 (Applicable to non-bluetooth wireless keyboard mouse set).
-. EN301 489-7
-. EN301 489-17
-. EN301 489-24

Σειρά
Γρήγορος οδηγός
Σειρά
Γρήγορος οδηγός
• Article 3.2 Spectrum Usages
-. EN300 440-2 (Applicable to non-bluetooth wireless keyboard mouse set).
-. EN300 328
-. EN301 511
-. EN301 893 (Applicable to 5GHz high performance RLAN).
-. EN301 908-1
-. EN301 908-2
EMC Directive 2004/108/EC as attested by conformity with the following harmonized standards:
-. EN55022, AS/NZS CISPR22, Class B
-. EN55024
-. EN61000-3-2 Class D
-. EN61000-3-3
Low Voltage Directive 2006/95/EC as attested by conformity with the following harmonized standard:
-. EN60950-1
RoHS Directive 2002/95/EC on the Restriction of the Use of certain Hazardous Substances in Electrical and Electronic Equipment
-. The maximum concentration values of the restricted substances by weight in homogenous material are:
Lead
0.1%
Polybrominated Biphenyls (PBB’s)
0.1%
Mercury
0.1%
Polybrominated Diphenyl Ethers (PBDE’s)
0.1%
Hexavalent Chromium
0.1%
Cadmium
0.01%
Directive 2009/125/EC with regard to establishing a framework for the setting of ecodesign requirements for energy-related
product.
Year to begin affixing CE marking 2010.
Apr. 23, 2010
Easy Lai /Manager
Regulation Center, Acer Inc.
Date

Σειρά
Γρήγορος οδηγός
Σειρά
Γρήγορος οδηγός
Μόνο για αρχάριους
1 2 3
2-2
3-2
3-1
2-1
Φροντίστε η μπαταρία να είναι
κατάλληλα ασφαλισμένη στη θέση της,
όπως υποδεικνύεται στην εικόνα 2-2.
4 5 6
Οι απεικονίσεις είναι µόνο για αναφορά. Οι πραγµατικές προδιαγραφές των προϊόντων µπορεί να διαφοροποιηθούν.
1
Σειρά
Γρήγορος οδηγός
Σειρά
Γρήγορος οδηγός
Πρώτα από όλα
Θα επιθυμούσαμε να σας ευχαριστήσουμε που επιλέξατε το φορητό υπολογιστή της Acer με σκοπό την αντιμετώπιση των αναγκών σας
για φορητό υπολογιστή.
Οι οδηγοί σας
Για να σας διευκολύνουμε στη χρήση του φορητού υπολογιστή της Acer, έχουμε σχεδιάσει ένα σετ εγχειριδίων χρήσης*:
Πρώτα απ’ όλα, ο Γρήγορος Οδηγός Χρήσης σας διευκολύνει να ξεκινήσετε τη ρύθμιση του υπολογιστή σας.
Για περισσότερες πληροφορίες όσον αφορά τον τρόπο με τον οποίο ο υπολογιστής μπορεί να σας βοηθήσει να αυξήσετε την
παραγωγικότητά σας, ανατρέξτε στον AcerSystem User Guide. Ο οδηγός αυτός περιλαμβάνει λεπτομερείς πληροφορίες σχετικά με
θέματα όπως τα βοηθητικά προγράμματα του συστήματος, την επαναφορά δεδομένων, τις επιλογές επέκτασης και την αντιμετώπιση
προβλημάτων. Επιπλέον, περιλαμβάνει πληροφορίες σχετικά με την εγγύηση καλής λειτουργίας και τους γενικούς κανονισμούς όπως
και τις προειδοποιήσεις ασφαλείας για το φορητό υπολογιστή. Διατίθεται σε μορφή Portable Document Format (PDF) και έχει προ-
εγκατασταθεί στο φορητό υπολογιστή σας.
Σημείωση: Για την προβολή του αρχείου απαιτείται το πρόγραμμα Adobe Reader. Εάν το Adobe Reader δεν είναι εγκατεστημένο
στον υπολογιστή σας, κάνοντας κλικ στο AcerSystem User Guide, θα πραγματοποιηθεί εκτέλεση του προγράμματος
εγκατάστασης του Adobe Reader πρώτα. Ακολουθήστε τις οδηγίες στην οθόνη για να ολοκληρώσετε την εγκατάσταση. Για
οδηγίες σχετικά με το πώς θα χρησιμοποιήσετε το πρόγραμμα Adobe Reader, ανατρέξτε στο μενού Βοήθεια και Υποστήριξη.
* ΣΗΜΑΝΤΙΚΗ ΑΝΑΚΟΙΝΩΣΗ: Παρακαλούμε σημειώστε ότι οι οδηγοί που αναφέρονται στο παρόν, σε έντυπη ή
ηλεκτρονική μορφή, παρατίθενται για λόγους παραπομπής και μόνο και, εκτός αν ορίζεται διαφορετικά στις ειδικές
πληροφορίες εγγύησης που περιλαμβάνονται στο Οδηγός Χρήστη AcerSystem, τίποτα που περιλαμβάνεται σε αυτούς
τους οδηγούς δεν θα αποτελεί δήλωση ή εγγύηση της Acer σχετικά με το προϊόν που αγοράσατε. Η Acer αποποιείται
ρητά τυχόν ευθύνης σχετικά με σφάλματα που περιλαμβάνονται στους οδηγούς.
2
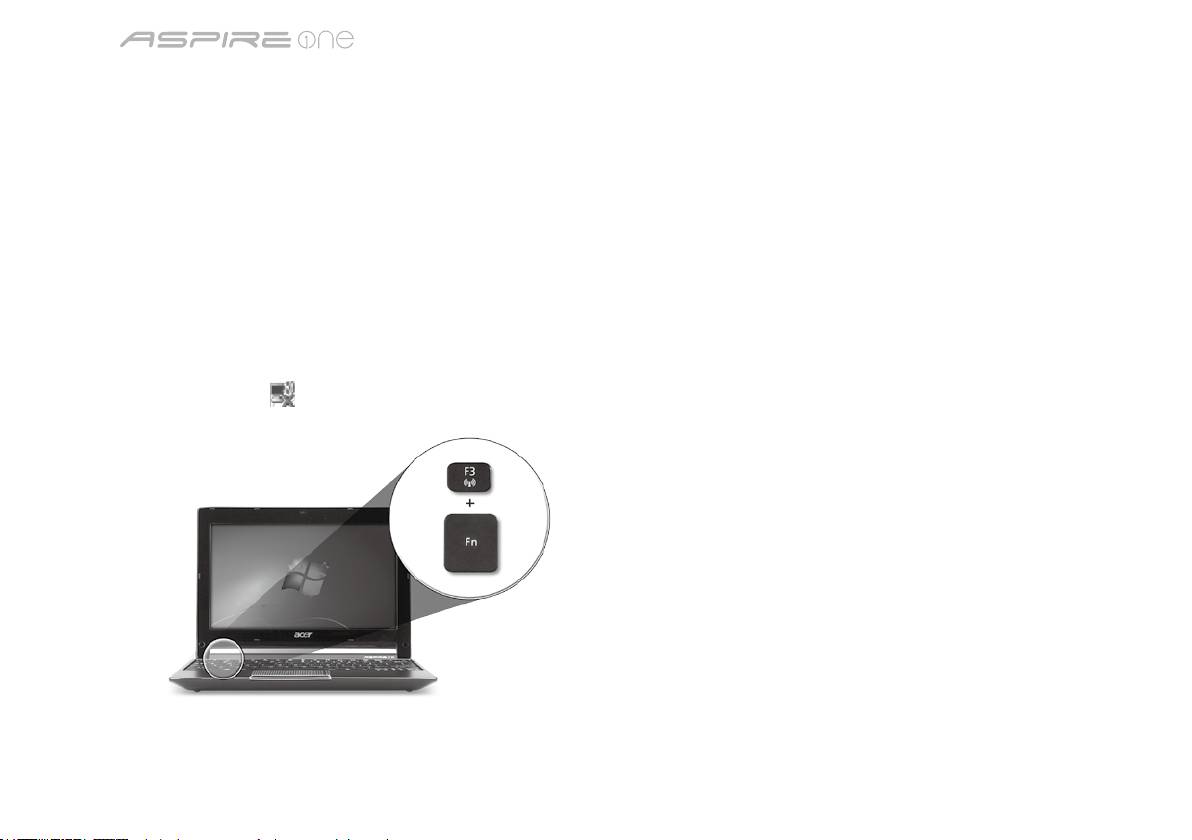
Σειρά
Γρήγορος οδηγός
Σειρά
Γρήγορος οδηγός
Ρύθμιση παραμέτρων δικτύου
Ο οδηγός αυτός θα σας βοηθήσει στον καθορισμό των παραμέτρων LAN και των ρυθμίσεων ασύρματου δικτύου, ώστε να
διευκολυνθείτε στη σύνδεσή σας στο Internet.
Εγκατάσταση σύνδεσης LAN
Απλά συνδέστε το καλώδιο LAN στη θύρα Ethernet (RJ-45). Παρακαλούµε ανατρέξτε στο "Δεξιά πλευρά" στη σελίδα 6 για τη θέση
της θύρας Ethernet.
Εγκατάσταση ασύρματης σύνδεσης
1. Πατήστε <Fn> + <F3> για πρόσβαση στη διαχείριση επικοινωνίας. Εδώ μπορείτε να ενεργοποιήσετε τη σύνδεση Wi-Fi κάνοντας κλικ
στο κόκκινο κουμπί δίπλα στο Wi-Fi.
Σημείωση: Η πρόσβαση στις λειτουργίες 3G και Bluetooth είναι εφικτή και από τη διαχείριση επικοινωνίας. Οι συσκευές επικοινωνίας
διαφέρουν ανάλογα με το μοντέλο.
2. Κάντε κλικ στο εικονίδιο στο συρτάρι του συστήματος και επιλέξτε το σημείο ασύρματης πρόσβασης στο οποίο επιθυμείτε να
συνδεθείτε.
Εισαγωγή κάρτας SIM 3G (ορισμένα μοντέλα μόνο)
Αφαιρέστε τη μπαταρία και τοποθετήστε με προσοχή μια κάρτα SIM 3G στην υποδοχή κάρτας SIM 3G. Παρακαλούμε ανατρέξτε στην
ενότητα "Πίσω όψη & Άποψη βάσης" στη σελίδα 6 για τη θέση της υποδοχής κάρτας SIM 3G.
3
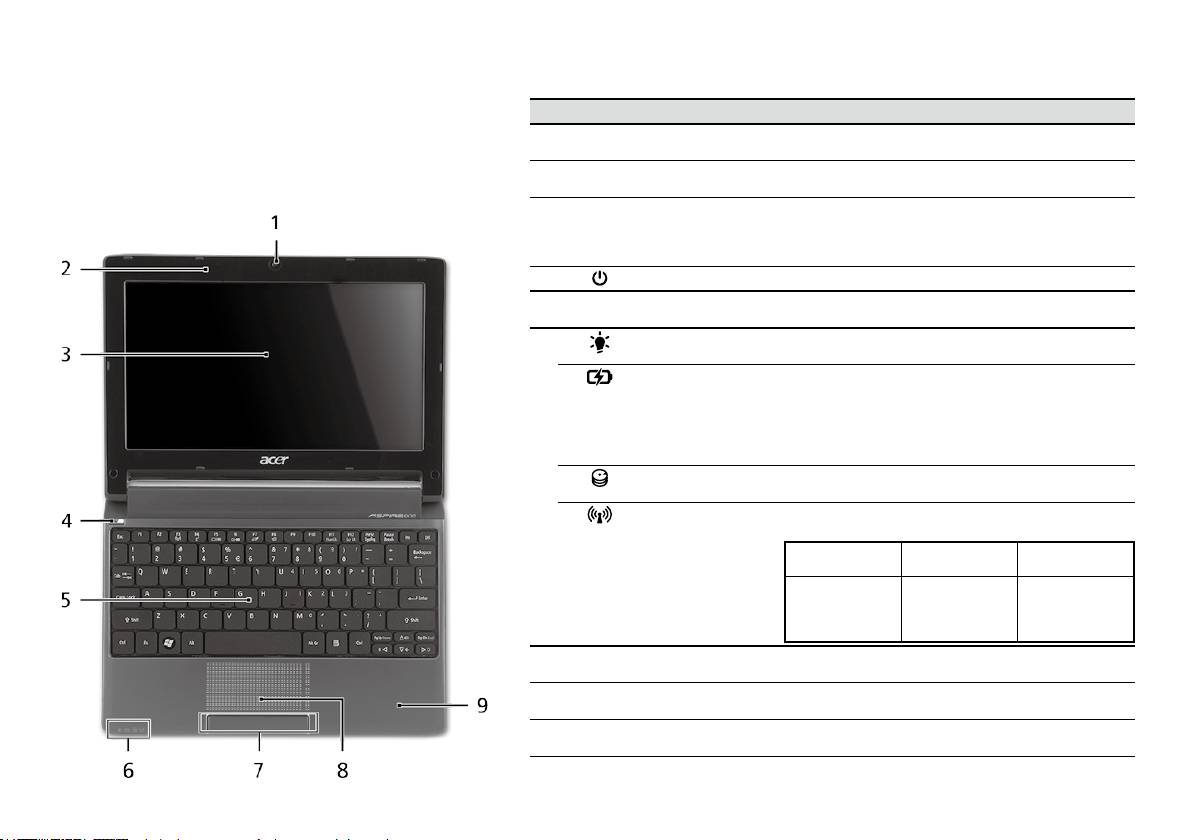
Σειρά
Γρήγορος οδηγός
Σειρά
Γρήγορος οδηγός
Κάτοψη
Ξενάγηση στο Aspire One
# Εικονίδιο Στοιχείο Περιγραφή
Μετά από την εγκατάσταση του υπολογιστή όπως
1
Κάμερα διαδικτύου
Κάμερα διαδικτύου για επικοινωνία βίντεο (Η σύνθεση
απεικονίζεται στην ενότητα Μόνο για αρχάριους, θα σας
Acer Crystal Eye
ενδέχεται να ποικίλλει ανάλογα με το μοντέλο).
περιγράψουµε τα διάφορα µέρη του νέου σας φορητού
2
Μικρόφωνο Εσωτερικό μικρόφωνο για στερεοφωνικές
ηχογραφήσεις.
υπολογιστή Acer.
3
Οθόνη απεικόνισης Αποκαλούμενη επίσης Οθόνη Υγρών Κρυστάλλων
(Liquid-Crystal Display; LCD), απεικονίζει την έξοδο του
υπολογιστή (Η σύνθεση ενδέχεται να ποικίλλει ανάλογα
με το μοντέλο).
4
Κουμπί τροφοδοσίας Ενεργοποιεί και απενεργοποιεί τον υπολογιστή.
5
Πληκτρολόγιο Χρησιμοποιείται για την καταχώρηση δεδομένων στον
υπολογιστή.
6
Ενδείκτης
Δηλώνει την κατάσταση τροφοδοσίας του υπολογιστή.
1
τροφοδοσίας
1
Ενδείκτης μπαταρίας
Δηλώνει την κατάσταση της μπαταρίας του υπολογιστή.
1. Φόρτιση: Η ενδεικτική λυχνία κατά τη φόρτιση της
μπαταρίας μετατρέπεται σε πορτοκαλί.
2. Πλήρως φορτισμένη: Η ενδεικτική λυχνία
μετατρέπεται σε μπλε όταν βρίσκεται σε λειτουργία
εναλλασσόμενου ρεύματος (AC).
Ενδείκτης HDD Δηλώνει πότε είναι ενεργοποιημένη η μονάδα του
σκληρού δίσκου.
Ενδεικτική λυχνία
Δηλώνει την κατάσταση της επικοινωνίας ασύρματου
1
επικοινωνίας
LAN/3G.
Μπλε λυχνία
Πορτοκαλί λυχνία
Όχι αναμμένη
αναμμένη
αναμμένη
3G ενεργό/
WiFi ενεργό
3G ανενεργό/
3G ανενεργό/
3G ενεργό/
WiFi ενεργό
WiFi ανενεργό
WiFi ανενεργό
7
Κουμπιά κλικ
Το κουμπιά, αριστερό και δεξιό, λειτουργούν σαν τα
(αριστερό και δεξιό)
κουμπιά, αριστερό και δεξιό, του ποντικιού.
8
Ταμπλέτα αφής Συσκευή κατάδειξης ευαίσθητη στην αφή που λειτουργεί
ως ποντίκι υπολογιστή.
9
Στήριγμα παλάμης Άνετος χώρος στήριξης των χεριών κατά τη χρήση του
υπολογιστή.
1.
Οι ενδεικτικές λυχνίες της πρόσοψης είναι ορατές ακόμη και όταν το καπάκι του υπολογιστή είναι κλειστό.
4
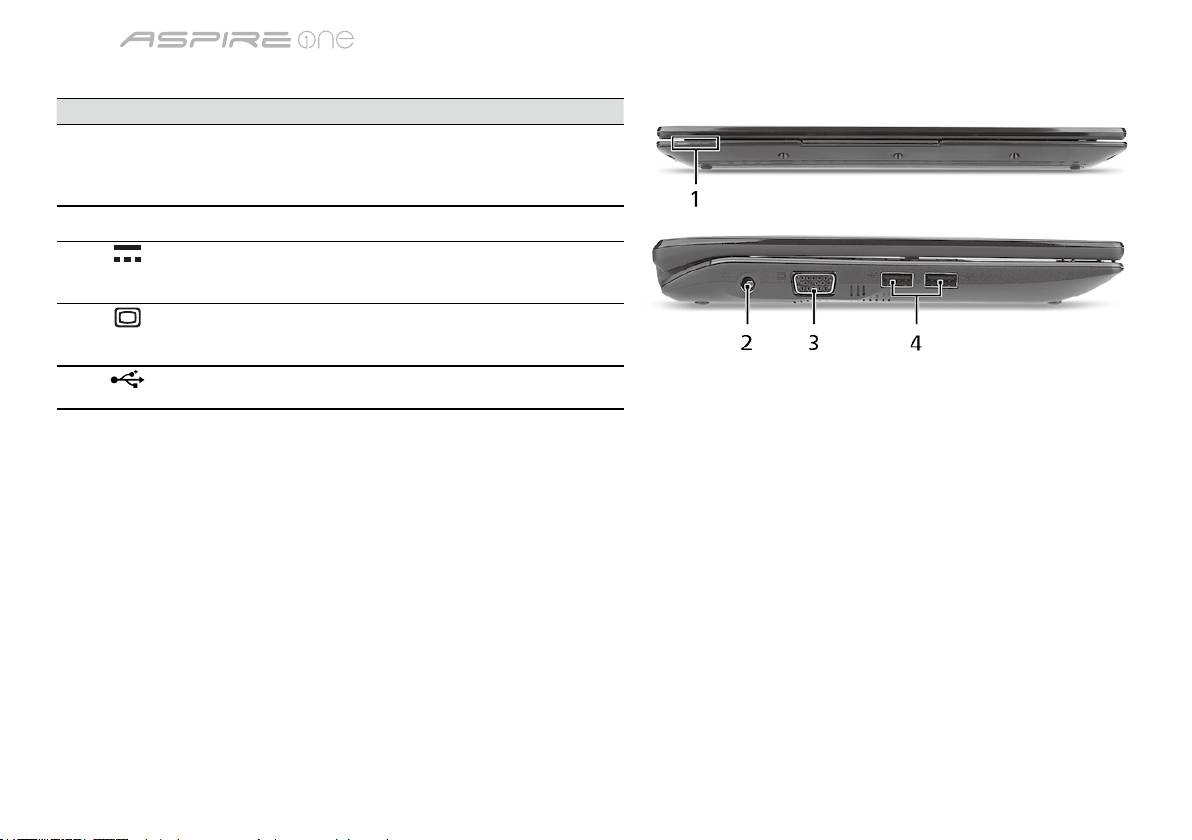
Σειρά
Γρήγορος οδηγός
Σειρά
Γρήγορος οδηγός
Πρόσοψη με το καπάκι κλειστό
# Εικονίδιο Στοιχείο Περιγραφή
1
Ενδεικτικές λυχνίες
Δίοδοι φωτοεκπομπής (LED) οι οποίες
κατάστασης
ανάβουν για να δηλώσουν την κατάσταση
των λειτουργιών του υπολογιστή και των
διαφόρων εξαρτημάτων.
Αριστερή πλευρά
2
Τζακ εισόδου
Συνδέεται σε προσαρμογέα
συνεχούς ρεύματος
εναλλασσόμενου ρεύματος (AC).
(DC)
3
Θύρα εξωτερικής
Συνδέεται σε συσκευή απεικόνισης
οθόνης απεικόνισης
(π.χ. εξωτερικό μόνιτορ, προβολέα LCD).
(VGA)
4
Θύρα USB 2.0 Συνδέεται σε συσκευές USB 2.0
(π.χ. ποντίκι USB, κάμερα USB).
5
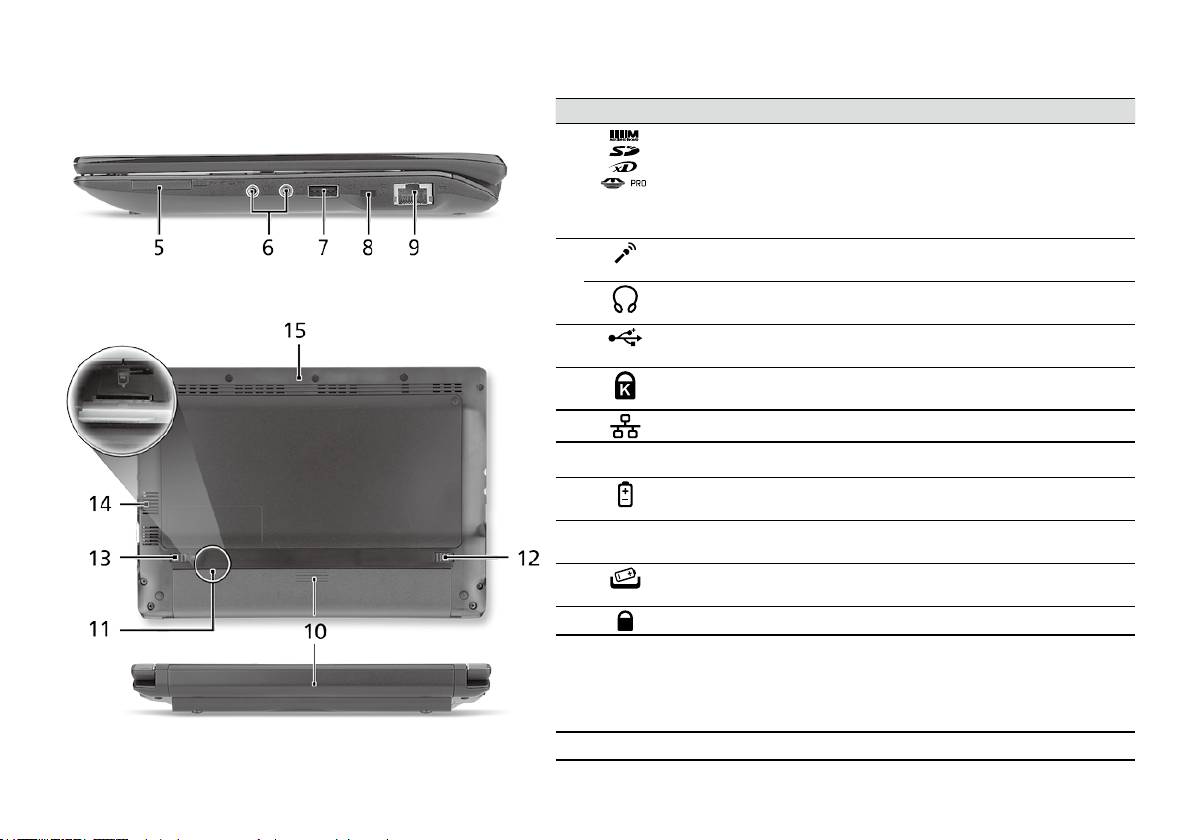
Σειρά
Γρήγορος οδηγός
Σειρά
Γρήγορος οδηγός
Δεξιά πλευρά
# Εικονίδιο Στοιχείο Περιγραφή
5
Αναγνώστης καρτών
Δέχεται Secure Digital (SD), MultiMediaCard
πολλών-σε-1
(MMC), Memory Stick (MS), Memory Stick
PRO (MS PRO)), και xD-Picture Card (xD).
Σημείωση: Πιέστε για αφαίρεση/τοποθέτηση
της κάρτας. Δυνατότητα λειτουργίας μόνο
μίας κάρτας κάθε φορά.
6
Τζακ εισόδου
Δέχεται εισόδους από εξωτερικά μικρόφωνα.
μικροφώνου
Τζακ ακουστικών/
Συνδέεται σε συσκευές με γραμμή εξόδου
ηχείου/γραμμής εξόδου
ακουστικού σήματος (π.χ. ηχεία, ακουστικά).
7
Θύρα USB 2.0 Συνδέεται σε συσκευές USB 2.0 (π.χ. ποντίκι
USB).
8
Υποδοχή λουκέτου
Συνδέεται σε λουκέτο ασφαλείας υπολογιστή
τύπου Kensington
συμβατό με Kensington.
9
Θύρα Ethernet (RJ-45) Συνδέεται σε δίκτυο Ethernet 10/100.
Πίσω όψη & Άποψη βάσης
10
Φατνίο μπαταρίας Περιέχει το πακέτο μπαταρίας του
υπολογιστή.
11
Υποδοχή κάρτας
Δέχεται κάρτα SIM 3G για δυνατότητα
SIM 3G
σύνδεσης 3G (ορισμένα μοντέλα μόνο).
12
Μάνδαλο απασφάλισης
Απασφαλίζει τη μπαταρία για αφαίρεση.
μπαταρίας
13
Λουκέτο μπαταρίας Ασφαλίζει τη μπαταρία στη θέση της.
14
Θυρίδες εξαερισμού και
Διατηρούν τον υπολογιστή σε χαμηλή
ανεμιστήρας ψύξης
θερμοκρασία, ακόμη και ύστερα από
παρατεταμένη χρήση.
Σημείωση: Μην καλύπτετε ή παρεμποδίζετε
το άνοιγμα του ανεμιστήρα.
15
Ηχείο Εκπέμπει ήχο από τον υπολογιστή σας.
6

Σειρά
Γρήγορος οδηγός
Περιβάλλον
Θερμοκρασία:
Λειτουργίας: 5°C έως 35°C
Μη λειτουργίας: -20°C έως 65°C
Υγρασία (µη συμπυκνούμενη):
Λειτουργίας: 20% έως 80%
Μη λειτουργίας: 20% έως 80%
7

Serisi
Hızlı Başlama Kılavuzu

Serisi
Hızlı Başlama Kılavuzu
Serisi
Hızlı Başlama Kılavuzu
© 2010 Tüm Hakları Saklıdır
Aspire One Serisi Hızlı Başlama Kılavuzu
Orijinal İhraç: 04/2010
Aspire One Serisi Dizüstü Bilgisayarı
Model numarası: ____________________________
Seri Numarası: _____________________________
Satın alma tarihi: ____________________________
Satın alma yeri: _____________________________

Serisi
Hızlı Başlama Kılavuzu
Serisi
Hızlı Başlama Kılavuzu
Federal Communications Commission
Declaration of Conformity
This device complies with Part 15 of the FCC Rules. Operation is subject to the following two conditions: (1) this device may not
cause harmful interference, and (2) this device must accept any interference received, including interference that may cause
undesired operation.
The following local Manufacturer/Importer is responsible for this declaration:
Product name: Notebook PC
Brand: Acer
Model number: PAV01
Machine type:
Aspire one series; AO533 series
Name of Responsible Party: Acer America Corporation
Address of responsible party: 333 West San Carlos St., San Jose
CA 95110, U. S. A.
Contact person: Acer Representative
Phone No.: 1-254-298-4000
Fax No.: 1-254-298-4147
April 23, 2010

Serisi
Hızlı Başlama Kılavuzu
Serisi
Hızlı Başlama Kılavuzu
CE Declaration of Conformity
We,
Acer Incorporated
8F, 88, Sec. 1, Hsin Tai Wu Rd., Hsichih, Taipei Hsien 221, Taiwan
Contact Person: Mr. Easy Lai, e-mail:easy_lai@acer.com.tw
And,
Acer Europe SA
Via Cantonale, Centro Galleria 2 6928 Manno Switzerland
Hereby declare that:
Product: Notebook Computer
Trade Name: Acer
Model Number: PAV01
Machine Type: Aspire one series; AO533 series
Is compliant with the essential requirements and other relevant provisions of the following EC directives, and that all the
necessary steps have been taken and are in force to assure that production units of the same product will continue comply with
the requirements.
R&TTE Directive 1999/5/EC as attested by conformity with the following harmonized standard:
• Article 3.1(a) Health and Safety
-. EN60950-1
-. EN62311
• Article 3.1(b) EMC
-. EN301 489-1
-. EN301 489-3 (Applicable to non-bluetooth wireless keyboard mouse set).
-. EN301 489-7
-. EN301 489-17
-. EN301 489-24
Serisi
Hızlı Başlama Kılavuzu
Serisi
Hızlı Başlama Kılavuzu
• Article 3.2 Spectrum Usages
-. EN300 440-2 (Applicable to non-bluetooth wireless keyboard mouse set).
-. EN300 328
-. EN301 511
-. EN301 893 (Applicable to 5GHz high performance RLAN).
-. EN301 908-1
-. EN301 908-2
EMC Directive 2004/108/EC as attested by conformity with the following harmonized standards:
-. EN55022, AS/NZS CISPR22, Class B
-. EN55024
-. EN61000-3-2 Class D
-. EN61000-3-3
Low Voltage Directive 2006/95/EC as attested by conformity with the following harmonized standard:
-. EN60950-1
RoHS Directive 2002/95/EC on the Restriction of the Use of certain Hazardous Substances in Electrical and Electronic Equipment
-. The maximum concentration values of the restricted substances by weight in homogenous material are:
Lead
0.1%
Polybrominated Biphenyls (PBB’s)
0.1%
Mercury
0.1%
Polybrominated Diphenyl Ethers (PBDE’s)
0.1%
Hexavalent Chromium
0.1%
Cadmium
0.01%
Directive 2009/125/EC with regard to establishing a framework for the setting of ecodesign requirements for energy-related
product.
Year to begin affixing CE marking 2010.
Apr. 23, 2010
Easy Lai /Manager
Regulation Center, Acer Inc.
Date

Serisi
Hızlı Başlama Kılavuzu
Serisi
Hızlı Başlama Kılavuzu
Başlayanlar için
1 2 3
2-2
3-2
3-1
2-1
2-2’de gösterildiği gibi pilin yerine
oturmuş olduğundan emin olun.
4 5 6
Resimler yalnızca referans içindir. Gerçek ürün spesikasyonları çeşitlilik gösterebilir.
1
Serisi
Hızlı Başlama Kılavuzu
Serisi
Hızlı Başlama Kılavuzu
İlk Yapılacaklar
Taşınabilir bilgisayar ihtiyacınızı karşılamak için Acer dizüstü bilgisayarı tercih ettiğiniz için teşekkür ederiz.
Kılavuzlarınız
Acer dizüstü bilgisayarınızı kullanırken kolaylık sağlaması amacıyla bir kaç kılavuz tasarladık*:
Hızlı Başvuru Kılavuzu, bilgisayarınızın kurulumuna başlarken size yardımcı olur.
Bilgisayarınızın üretkenliğiniz üzerindeki etkisini arttırmak için lütfen AcerSystem User Guide göz gezdirin. Bu kılavuz sistem hizmet
programları, veri düzeltme, genişletme seçenekleri ve arıza giderme üzerine detaylı bilgiler içermektedir. Buna ek olarak bilgisayarınızla
ilgili garanti bilgileri, genel kuralları ve güvenlik uyarılarını içerir. Bu, bilgisayarınıza önceden yüklenmiş şekilde PDF dosya formatında
gelmektedir.
Not: Dosyayı açabilmeniz için Adobe Reader gerekmektedir. Bilgisayarınızda Adobe Reader yüklü değilse AcerSystem User
Guide tıklayarak Adobe Reader kurulum programını çalıştırabilirsiniz. Yüklemeyi tamamlamak için ekrandaki talimatları izleyin.
Adobe Reader programını kullanma üzerinde talimatlar için Yardım ve Destek menüsüne erişin.
* ÖNEMLİ NOT: Gerek basılı gerek elektronik formatta olsun, burada adı geçen kılavuzlar sadece yol gösterme amaçlı
olup AcerSystem User Guide özel garanti bilgileri dışında Acer, satın aldığınız ürün ile ilgili kılavuz bilgileri üzerine
açıklama yapmak ya da güvence vermek sorumluluğunda değildir. Acer, bu kılavuzlarda bulunan hatalardan kaynaklı
hiçbir mesuliyeti kabul etmez.
2
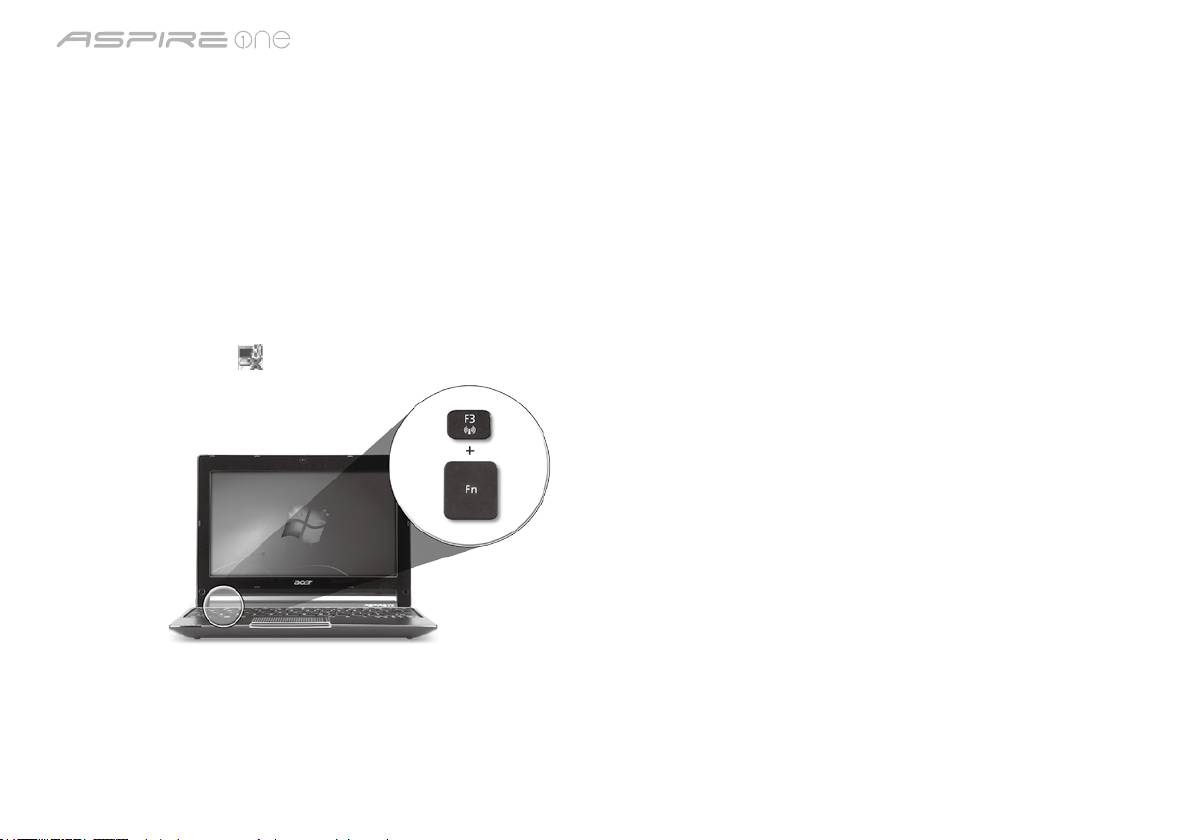
Serisi
Hızlı Başlama Kılavuzu
Serisi
Hızlı Başlama Kılavuzu
Şebeke yapılandırması
Bu kılavuz İnternete bağlanabilmeniz için LAN ve kablosuz ağ ayarlarınızı yapılandırmanıza yardımcı olur.
LAN bağlantısı kurulumu
LAN kablosunu Ethernet (RJ-45) portuna takın. Ethernet portunun yeri için lütfen sayfa 6’deki “Sağ görünüm” bölümüne bakın.
Kablosuz bağlantı kurulumu
1. <Fn> + <F3> tuşlarına basarak iletişim yöneticisine giriş yapın Buradan Wi-Fi’nin aynındaki kırmızı düğmeye tıklayarak Wi-Fi
bağlantısını açabilirsiniz.
Not: 3G ve Bluetooth’a iletişim yöneticisinden de ulaşılabilir. İletişim aygıtları modele göre farklılık gösterir.
2. Sistem tepsisindeki
simgesini tıklayın ve bağlantı yapmak istediğiniz kablosuz erişim noktasını seçin.
Bir 3G SIM kartı takma (sadece belli modellerde)
Pili çıkartın ve 3G SIM kartını dikkatli bir şekilde 3G SIM kartı yuvasına takın. 3G SIM kartı yuvasının yeri için lütfen sayfa 6’deki
“Arka görünüm & Taban görünümü” başlığına bakın.
3
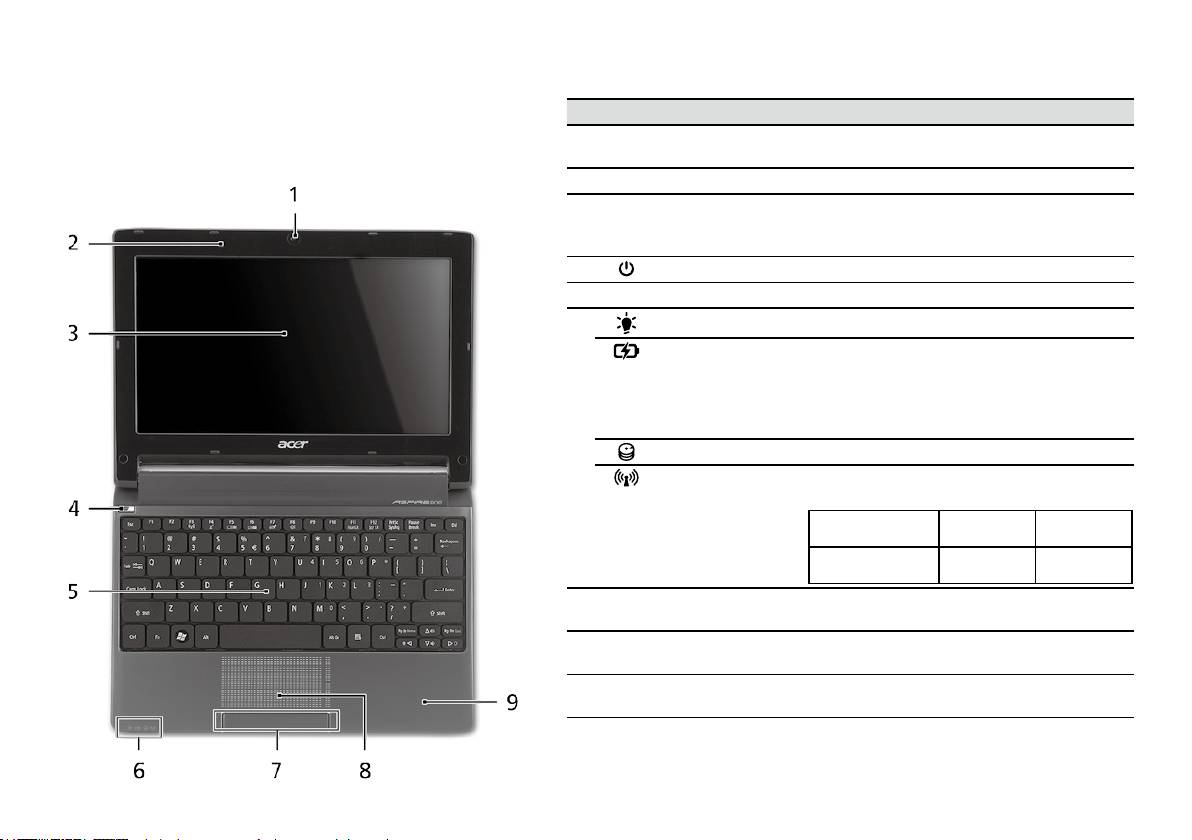
Serisi
Hızlı Başlama Kılavuzu
Serisi
Hızlı Başlama Kılavuzu
Üstten görünüş
Aspire One turunuz
# Simge Öğe Tanım
Başlayanlar için bölümünde gösterildiği gibi bilgisayarınızı
1
Acer Crystal Eye
Video iletişimi için Web kamerası
ayarladıktan sonra, yeni Acer dizüstü bilgisayarınızı daha
video kamera
(yapılandırma modellere göre farklı olabilir).
yakından tanıtalım.
2
Mikrofon Ses kaydı için dahili mikrofon.
3
Görüntü ekranı Sıvı Kristalli Görüntü (LCD) olarak da bilinir
ve bilgisayar çıktılarını gösterir (yapılandırma
modellere göre farklı olabilir).
4
Güç düğmesi Bilgisayarı açar ve kapatır.
5
Klavye Bilgisayarınıza veri girebilmek için.
1
6
Güç göstergesi
Bilgisayarın güç durumunu gösterir.
1
Batarya göstergesi
Bilgisayarın pil durumunu gösterir.
1. Şarj oluyor: Pil şarj olurken ışık kehribar
renginde yanar.
2. Tamamen şarj oldu: AC modundayken ışık
mavi yanar.
HDD göstergesi Sabit diskin etkin olduğunu gösterir.
1
İletişim göstergesi
Kablosuz LAN/3G iletişiminin durumunu
gösterir.
Mavi ışık açık Turuncu ışık
Yanmıyor
açık
3G açık/WiFi açık
3G kapalı/
3G kapalı/
3G açık/WiFi kapalı
WiFi açık
WiFi kapalı
7
Tuşlar (sol ve sağ) Sol ve sağ tuşlar, bilgisayar faresinin sağ ve
sol tuşları ile aynı fonksiyondadır.
8
Dokunmatik yüzey Bilgisayar faresi gibi fonksiyonu olan,
dokunmaya duyarlı işaret aygıtı.
9
Palmrest Bilgisayarı kullanırken ellerinizi destekleyen
rahat bir alan.
1. Ön panel göstergeleri bilgisayar kapağı kapalı olsa bile görülebilir.
4
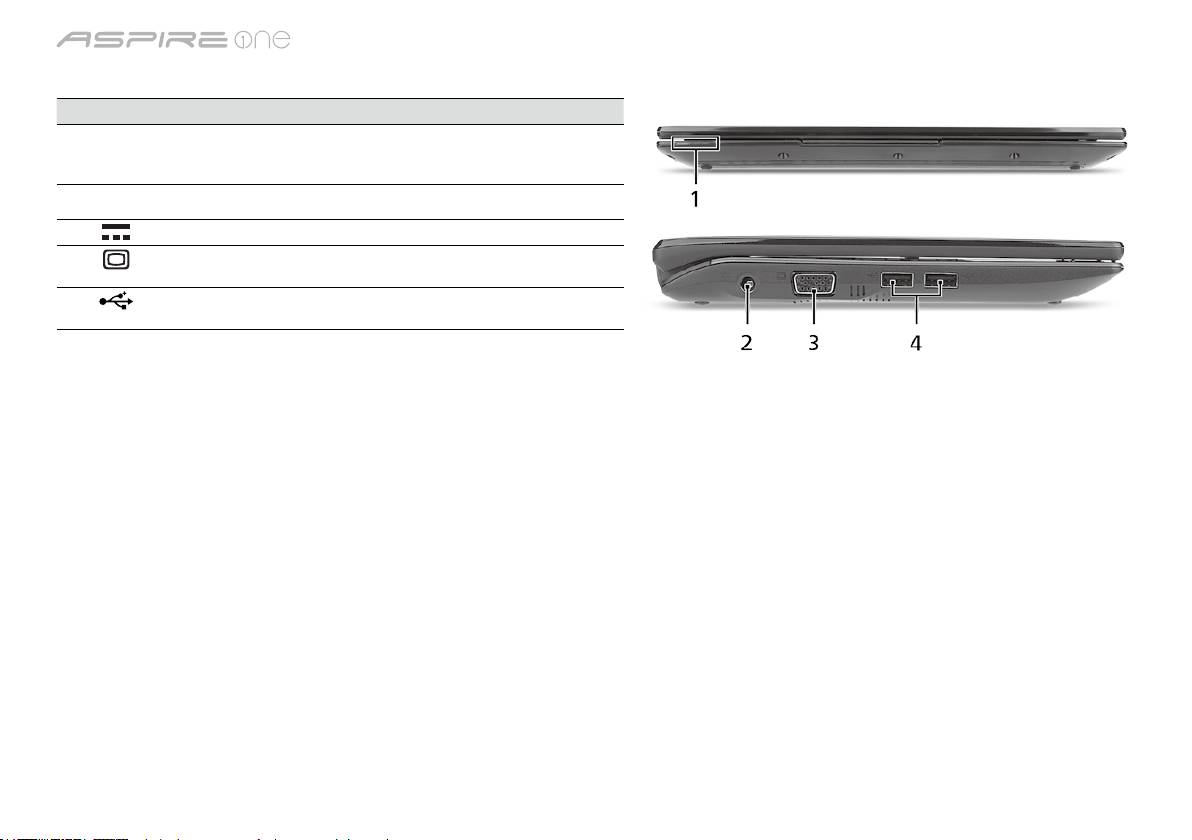
Serisi
Hızlı Başlama Kılavuzu
Serisi
Hızlı Başlama Kılavuzu
Kapalı ön görünüm
# Simge Öğe Tanım
1
Durum göstergeleri Bilgisayar fonksiyonu ve parçalarının
durumunu göstermek için yanan Elektro
Işıklı Diod (LED).
Sol görünüm
2
DC-in jakı AC adaptöre bağlanır.
3
Harici görüntü (VGA)
Bir görüntü aygıtına bağlar (örneğin, harici
portu
monitör, LCD projektör).
4
USB 2.0 portu USB 2.0 cihazlara bağlar (örneğin, USB
mouse, USB kamera).
5

Serisi
Hızlı Başlama Kılavuzu
Serisi
Hızlı Başlama Kılavuzu
Sağ görünüm
# Simge Öğe Tanım
5
Çoklu kart okuyucu Güvenli Dijital (SD), Çoklu Ortam
Kartı(MMC), Bellek Çubuğu (MS), Bellek
Çubuğu PRO (MS PRO), xD-Görüntü Kartı
(xD)’nı kabul eder.
Not: Kartı çıkartmak/takmak için itin.
Her hangi bir zamanda sadece bir kart
çalışabilir.
6
Mikrofon-in jakı Harici mikrofon girişlerini kabul eder.
Kulaklık/hoparlör/hat
Sesli line-out cihazlarına bağlantıyı sağlar
çıkışı jakı
(örneğin hoparlör, kulaklık).
7
USB 2.0 portu USB 2.0 cihazlara bağlar (örneğin, USB
mouse).
8
Kensington kilit yuvası Kensington-uyumlu bilgisayar güvenlik
kilidine bağlar.
9
Ethernet (RJ-45) portu Ethernet10/100-temelli ağa bağlar.
Arka görünüm & Taban görünümü
10
Pil bölmesi Bilgisayar pil takımının yeridir.
11
3G SIM kart yuvası 3G bağlantısı için 3G SIM kart kabul eder
(sadece belli modellerde).
12
Pil çıkarma mandalı Eskiyen pilleri çıkarmanız içindir.
13
Pil kilidi Pil yerine oturduğunda kilitler.
14
Havalandırma delikleri
Bilgisayarınızın uzun kullanımlar sonrası
ve soğutma fanı
bile ısınmamasını sağlarlar.
Not: Fanın girişini tıkamayın.
15
Hoparlör Bilgisayardan ses verir.
6

Serisi
Hızlı Başlama Kılavuzu
Ortam
Sıcaklık:
Çalışma: 5°C ila 35°C arasında
Çalışmadığı durumda: -20°C ila 65°C arasında
Nem (yoğunlaşmayan):
Çalışma: %20 ila %80 arasında
Çalışmadığı durumda: %20 ila %80 arasında
7

シリーズ
クイックガイド

シリーズ
© 2010 All Rights Reserved
Aspire One
シリーズ クイックガイド
初版:04/2010
Aspire One
シリーズノートブックコンピューター
モデル番号: _________________________________________________________
シリアル番号: ______________________________________________________
購入日: _______________________________________________________________
購入場所: ____________________________________________________________

クイックガイド
Federal Communications Commission
Declaration of Conformity
This device complies with Part 15 of the FCC Rules. Operation is subject to the following two conditions: (1) this device may not
cause harmful interference, and (2) this device must accept any interference received, including interference that may cause
undesired operation.
The following local Manufacturer/Importer is responsible for this declaration:
Product name: Notebook PC
Brand: Acer
Model number: PAV01
Machine type: Aspire one series; AO533 series
Name of Responsible Party: Acer America Corporation
Address of responsible party: 333 West San Carlos St., San Jose
CA 95110, U. S. A.
Contact person: Acer Representative
Phone No.: 1-254-298-4000
Fax No.: 1-254-298-4147
April 23, 2010

シリーズ
CE Declaration of Conformity
We,
Acer Incorporated
8F, 88, Sec. 1, Hsin Tai Wu Rd., Hsichih, Taipei Hsien 221, Taiwan
Contact Person: Mr. Easy Lai, e-mail:easy_lai@acer.com.tw
And,
Acer Europe SA
Via Cantonale, Centro Galleria 2 6928 Manno Switzerland
Hereby declare that:
Product: Notebook Computer
Trade Name: Acer
Model Number: PAV01
Machine Type: Aspire one series; AO533 series
Is compliant with the essential requirements and other relevant provisions of the following EC directives, and that all the
necessary steps have been taken and are in force to assure that production units of the same product will continue comply with
the requirements.
R&TTE Directive 1999/5/EC as attested by conformity with the following harmonized standard:
• Article3.1(a)HealthandSafety
-. EN60950-1
-. EN62311
• Article3.1(b)EMC
-. EN301 489-1
-. EN301 489-3 (Applicable to non-bluetooth wireless keyboard mouse set).
-. EN301 489-7
-. EN301 489-17
-. EN301 489-24

クイックガイド
• Article3.2SpectrumUsages
-. EN300 440-2 (Applicable to non-bluetooth wireless keyboard mouse set).
-. EN300 328
-. EN301 511
-. EN301 893 (Applicable to 5GHz high performance RLAN).
-. EN301 908-1
-. EN301 908-2
EMCDirective2004/108/ECasattestedbyconformitywiththefollowingharmonizedstandards:
-. EN55022, AS/NZS CISPR22, Class B
-. EN55024
-. EN61000-3-2 Class D
-. EN61000-3-3
LowVoltageDirective2006/95/ECasattestedbyconformitywiththefollowingharmonizedstandard:
-. EN60950-1
RoHSDirective2002/95/EContheRestrictionoftheUseofcertainHazardousSubstancesinElectricalandElectronicEquipment
-. The maximum concentration values of the restricted substances by weight in homogenous material are:
Lead
0.1%
Polybrominated Biphenyls (PBB’s)
0.1%
Mercury
0.1%
Polybrominated Diphenyl Ethers (PBDE’s)
0.1%
Hexavalent Chromium
0.1%
Cadmium
0.01%
Directive2009/125/ECwithregardtoestablishingaframeworkforthesettingofecodesignrequirementsforenergy-related
product.
Year to begin affixing CE marking 2010.
Apr. 23, 2010
Easy Lai /Manager
Regulation Center, Acer Inc.
Date
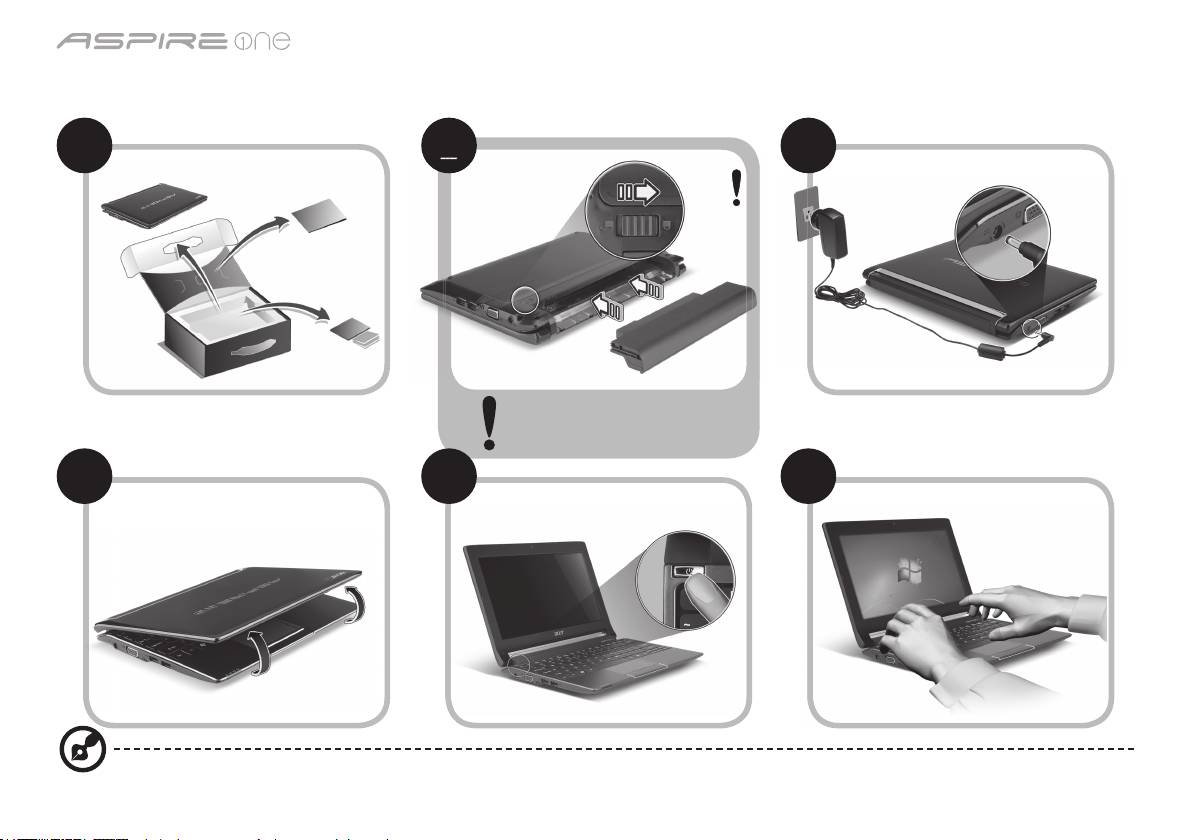
シリーズ
最初のセットアップ
1 2 3
3-2
3-1
図 2-2 に示すように、バッテリー
が正しくロックされていることを
確認してください。
4 5 6
ここに掲載する図は参照用です。実際の仕様は製品によって異なります。
1
2
2
2
2
2-2
2-1
クイックガイド
はじめに
Acer ノートブックをお買い上げいただきありがとうございます。
各種ガイドについて
Acer ノートブックを快適にお使いいただけるよう、数種類のガイド*をご用意いたしました*。
まず、コンピュータの設定手順を説明したガイドがクイックガイドです。
生産性を高めるためにノートブックを活用する方法については、AcerSystem User Guide をご参照ください。このガイドにはシステ
ムユーティリティ、データリカバリー、拡張オプション、トラブルシューティングなどの詳細情報が記載されています。その他、保
証情報および一般的な規制、安全のためのご注意なども記載されています。これは PDF (Portable Document Format) フォーマット
でもお読みいただけるよう、ノートブックにあらかじめプリロードされています。
注意:このファイルをご覧になるには、Adobe Reader が必要です。ノートブックに Adobe Reader がインストールされてい
ない場合は、[AcerSystem User Guide] をクリックすると Adobe Reader セットアッププログラムが起動されます。画面の指
示にしたがってインストールを完了してください。Adobe Reader の使い方については、ヘルプとサポートメニューを参照し
てください。
* 重要:本書 (印刷版およびデジタル版) の説明は参照を目的として記載されており、AcerSystem User Guide に特別に保証情
報が記載されている場合を除き、Acer はお客様が購入された製品についていかなる責任も保証も行いません。Acer はガイド
に含まれる誤りについて一切責任を負いません。
2
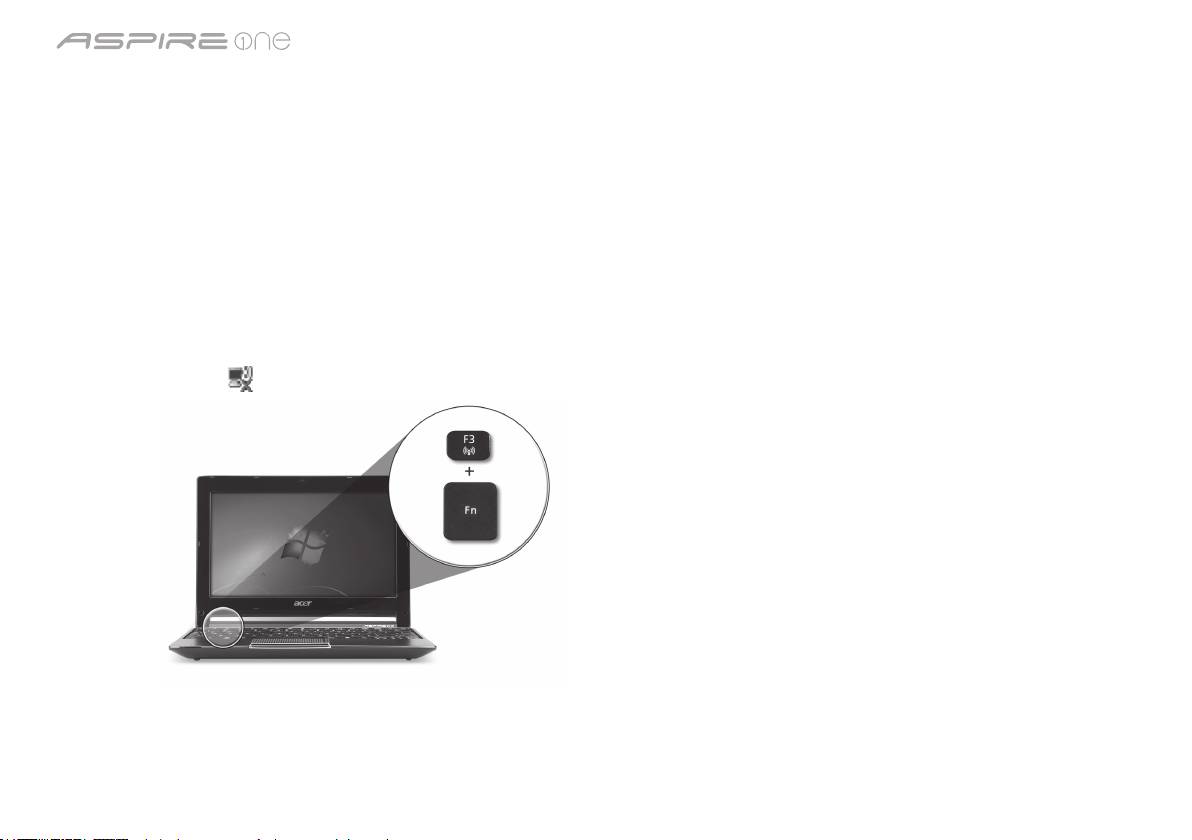
シリーズ
ネットワークの設定
本書には、インターネットに接続できるように LAN およびワイヤレスネットワークの設定を行うための手順が記載されています。
LAN 接続の設定
LAN ケーブルを Ethernet (RJ-45) ポートに接続するだけです。Ethernet ポートの位置については、
6 ページの「右面」
を参照してく
ださい。
ワイヤレス接続の設定
1. <Fn> + <F3> を押して、通信マネージャにアクセスします。Wi-Fi の隣にある赤いボタンをクリックして、Wi-Fi 接続をオンにでき
ます。
注意:
通信マネージャを通して、3G と Bluetooth も利用できます。通信機器は、モデルによって異なります。
2. システムトレイの
アイコンをクリックし、接続先となるワイヤレス アクセスポイントを選択します。
3G SIM カードの挿入 (特定モデルのみ)
バッテリーを外し、3G SIM カードスロットに慎重に 3G SIM カードを挿入します。3G SIM カードスロットの位置については、
6 ペー
ジの「背面 & 底面」
を参照してください。
3
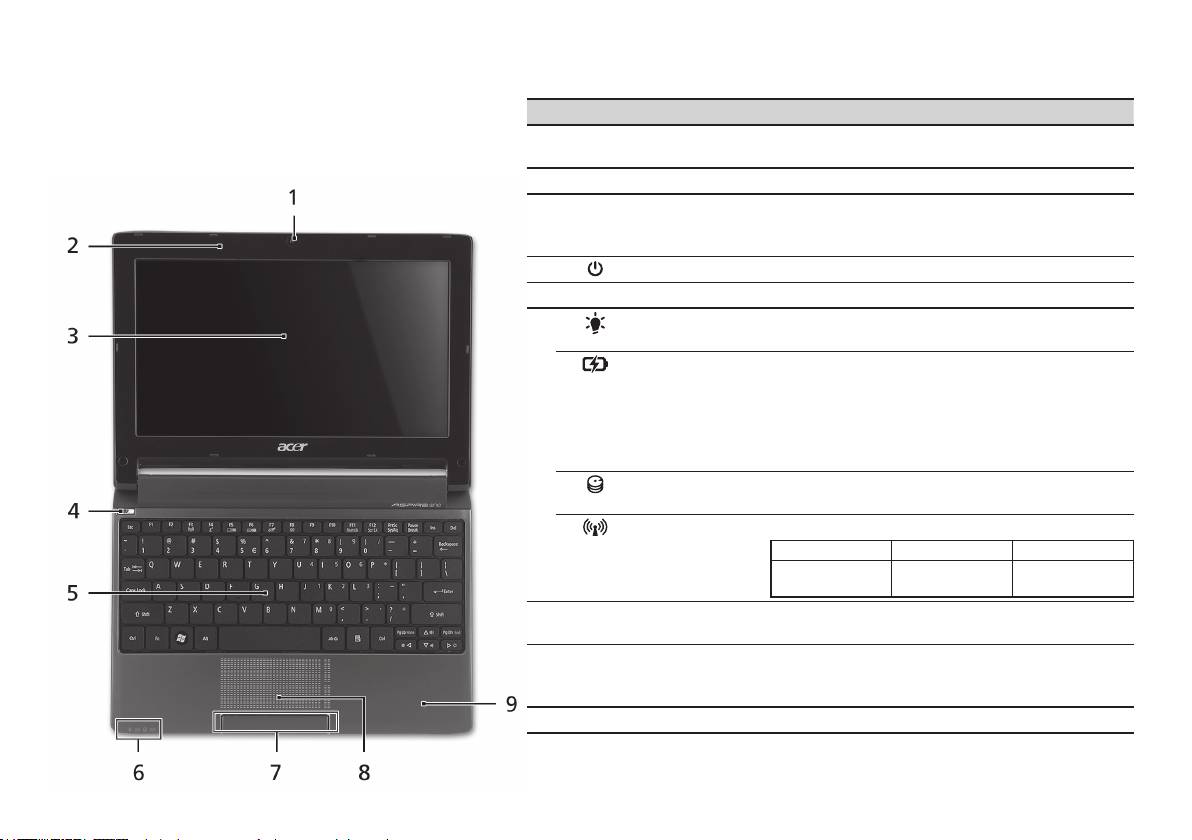
クイックガイド
上面
Aspire One
ツアー
# アイコン アイテム 説明
初心者の方へ セクションの図にしたがってコンピュー
1
Acer Crystal Eye
ビデオ通信用のウェブカメラです (構成はモデル
タを設定したら、これから新しい Acer ノートブック
ウェブカメラ
によって異なります)。
について紹介します。
2
マイクロフォン 録音用の内部マイクロフォンです。
3
ディスプレイス
液晶ディスプレイ (LCD) とも呼びます。コンピ
クリーン
ューター出力を表示します (構成はモデルによっ
て異なります)。
4
電源ボタン コンピュータの電源をオン/オフにします。
5
キーボード コンピュータにデータを入力します。
6
電源インジ
PC の電源がオンのときに点灯します。
1
ケータ
バッテリーイン
バッテリパックが充電されているときに点灯し
1
ジケータ
ます。
1. 充電中:バッテリーを充電している間、ランプ
は琥珀色に点灯します。
2. 完全に充電:AC モードでは、ライトが青くな
ります。
HDD インジ
ハードディスクドライブがアクティブになると点
ケータ
灯します。
通信インジ
3G/ワイヤレス LAN 通信の状態を表示します。
1
ケータ
青く点灯 オレンジ色に点灯 点灯しない
3G オン/WiFi オン
3G オフ/WiFi オン 3G オフ/WiFi オフ
3G オン/WiFi オフ
7
クリックボタン
左右のボタンはマウスの左右のボタンと同じよう
(左、右)
に機能します。
8
タッチパッド コンピュータマウスと同じように機能し、指を触
れることで反応するポインティングデバイスで
す。
9
パームレスト コンピュータ操作時に手を置く場所です。
1. フロントパネルのインジケータは、コンピュータカバーが閉じた状態でも見えるようになっ
ています。
4
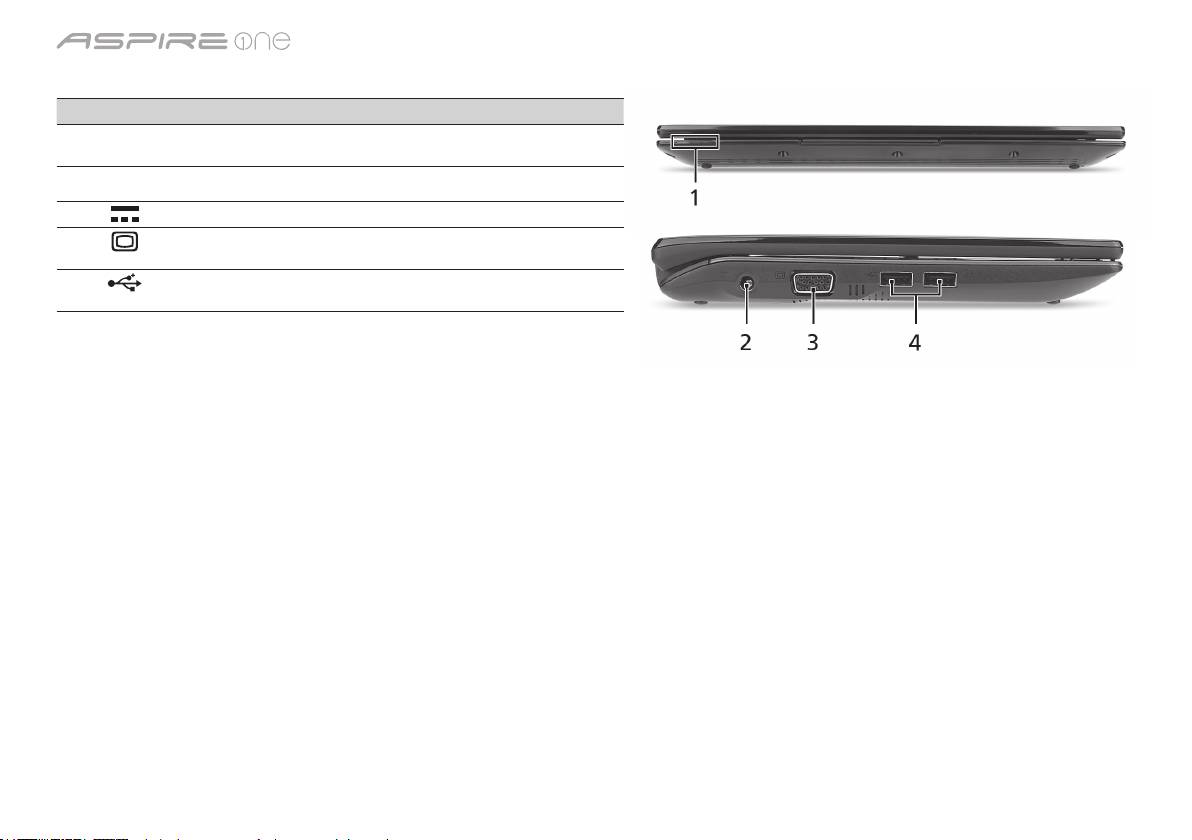
シリーズ
正面 (閉じた場合)
# アイコン アイテム 説明
1
状態インジケータ 点灯や点滅によりコンピュータの機能やコ
ンポーネントの状態を知らせる LED です。
左面
2
DC 入力ジャック AC アダプタに接続します。
3
外部ディスプレイ
ディスプレイデバイスに接続します
(VGA) ポート
(外付けモニタ、LCD プロジェクタなど)。
4
USB 2.0 ポート USB 2.0 デバイスに接続します (USB マウ
ス、USB カメラなど)。
5
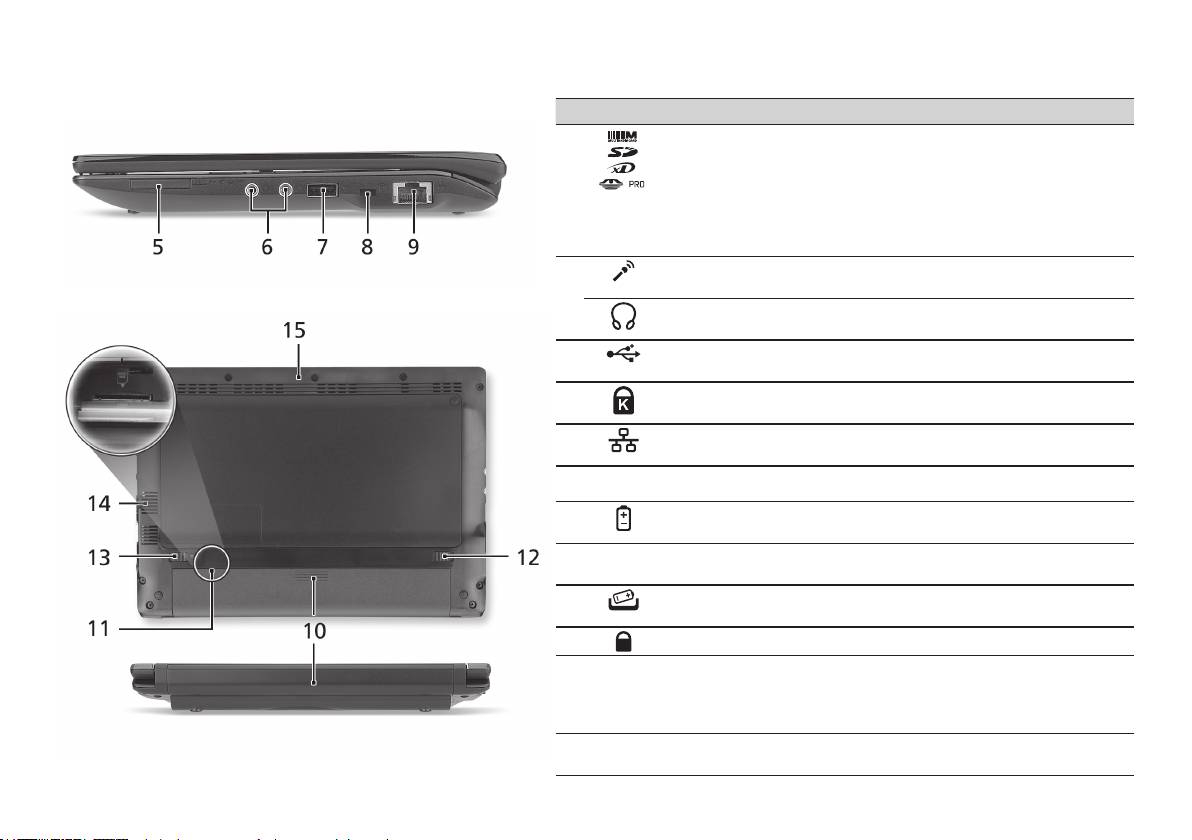
クイックガイド
右面
# アイコン アイテム 説明
5
1 台多機能のカード
Secure Digital (SD)、MultiMediaCard
リーダー
(MMC)、メモリスティック (MS)、メモリ
スティック PRO (MS PRO)、xD-Picture
Card (xD) に対応しています。
注意:カード押すとカードを取り出し/装
着することができます。一度に 1 個のカ
ードしか操作できません。
6
マイクロフォン入力
外部マイクロフォンを接続します。
ジャック
ヘッドフォン/スピー
オーディオ出力デバイスを接続します
カー/出力ジャック
(スピーカー、ヘッドフォンなど)。
7
USB 2.0 ポート USB 2.0 デバイスに接続します (USB マウ
スなど)。
8
Kensington ロックス
Kensington 対応コンピュータセキュリテ
ロット
ィロックに接続します。
9
Ethernet (RJ-45)
Ethernet 10/100 ベースのネットワークに
ポート
接続します。
背面 & 底面
10
バッテリーベイ コンピュータのバッテリーパックを装着
します。
11
3G SIM カードスロ
3G 接続を行うために 3G SIM カードを挿
ット
入します (特定モデルのみ)。
12
バッテリー取り外し
バッテリーを取り出します。
つまみ
13
バッテリーロック バッテリーを定位置にロックします。
14
通気孔スロットと冷
長時間使用してもコンピュータが過熱し
却ファン
ないよう冷却します。
注意: ファンの通気穴を塞いだり、異物
を詰め込んだりしないでください。
15
スピーカー コンピュータからオーディオを出力し
ます。
6

シリーズ
環境
温度:
操作時:5
°C
~ 35
°C
非操作時:-20
°C
~ 65
°C
湿度 (結露しないこと):
操作時:20% ~ 80%
非操作時:20% ~ 80%
7

시리즈
빠른 시작 설명서

시리즈
© 2010 All Rights Reserved
Aspire One
시리즈 빠른 시작 설명서
최초 발행일: 04/2010
Aspire One
시리즈 노트북 PC
모델 번호: _____________________________________
일련 번호: _____________________________________
구입 날짜: _____________________________________
구입 장소: _____________________________________

빠른 시작 설명서
Federal Communications Commission
Declaration of Conformity
This device complies with Part 15 of the FCC Rules. Operation is subject to the following two conditions: (1) this device may not
cause harmful interference, and (2) this device must accept any interference received, including interference that may cause
undesired operation.
The following local Manufacturer/Importer is responsible for this declaration:
Product name: Notebook PC
Brand: Acer
Model number: PAV01
Machine type: Aspire one series; AO533 series
Name of Responsible Party: Acer America Corporation
Address of responsible party: 333 West San Carlos St., San Jose
CA 95110, U. S. A.
Contact person: Acer Representative
Phone No.: 1-254-298-4000
Fax No.: 1-254-298-4147
April 23, 2010

시리즈
CE Declaration of Conformity
We,
Acer Incorporated
8F, 88, Sec. 1, Hsin Tai Wu Rd., Hsichih, Taipei Hsien 221, Taiwan
Contact Person: Mr. Easy Lai, e-mail:easy_lai@acer.com.tw
And,
Acer Europe SA
Via Cantonale, Centro Galleria 2 6928 Manno Switzerland
Hereby declare that:
Product: Notebook Computer
Trade Name: Acer
Model Number: PAV01
Machine Type: Aspire one series; AO533 series
Is compliant with the essential requirements and other relevant provisions of the following EC directives, and that all the
necessary steps have been taken and are in force to assure that production units of the same product will continue comply with
the requirements.
R&TTE Directive 1999/5/EC as attested by conformity with the following harmonized standard:
• Article3.1(a)HealthandSafety
-. EN60950-1
-. EN62311
• Article3.1(b)EMC
-. EN301 489-1
-. EN301 489-3 (Applicable to non-bluetooth wireless keyboard mouse set).
-. EN301 489-7
-. EN301 489-17
-. EN301 489-24

빠른 시작 설명서
• Article3.2SpectrumUsages
-. EN300 440-2 (Applicable to non-bluetooth wireless keyboard mouse set).
-. EN300 328
-. EN301 511
-. EN301 893 (Applicable to 5GHz high performance RLAN).
-. EN301 908-1
-. EN301 908-2
EMCDirective2004/108/ECasattestedbyconformitywiththefollowingharmonizedstandards:
-. EN55022, AS/NZS CISPR22, Class B
-. EN55024
-. EN61000-3-2 Class D
-. EN61000-3-3
LowVoltageDirective2006/95/ECasattestedbyconformitywiththefollowingharmonizedstandard:
-. EN60950-1
RoHSDirective2002/95/EContheRestrictionoftheUseofcertainHazardousSubstancesinElectricalandElectronicEquipment
-. The maximum concentration values of the restricted substances by weight in homogenous material are:
Lead
0.1%
Polybrominated Biphenyls (PBB’s)
0.1%
Mercury
0.1%
Polybrominated Diphenyl Ethers (PBDE’s)
0.1%
Hexavalent Chromium
0.1%
Cadmium
0.01%
Directive2009/125/ECwithregardtoestablishingaframeworkforthesettingofecodesignrequirementsforenergy-related
product.
Year to begin affixing CE marking 2010.
Apr. 23, 2010
Easy Lai /Manager
Regulation Center, Acer Inc.
Date
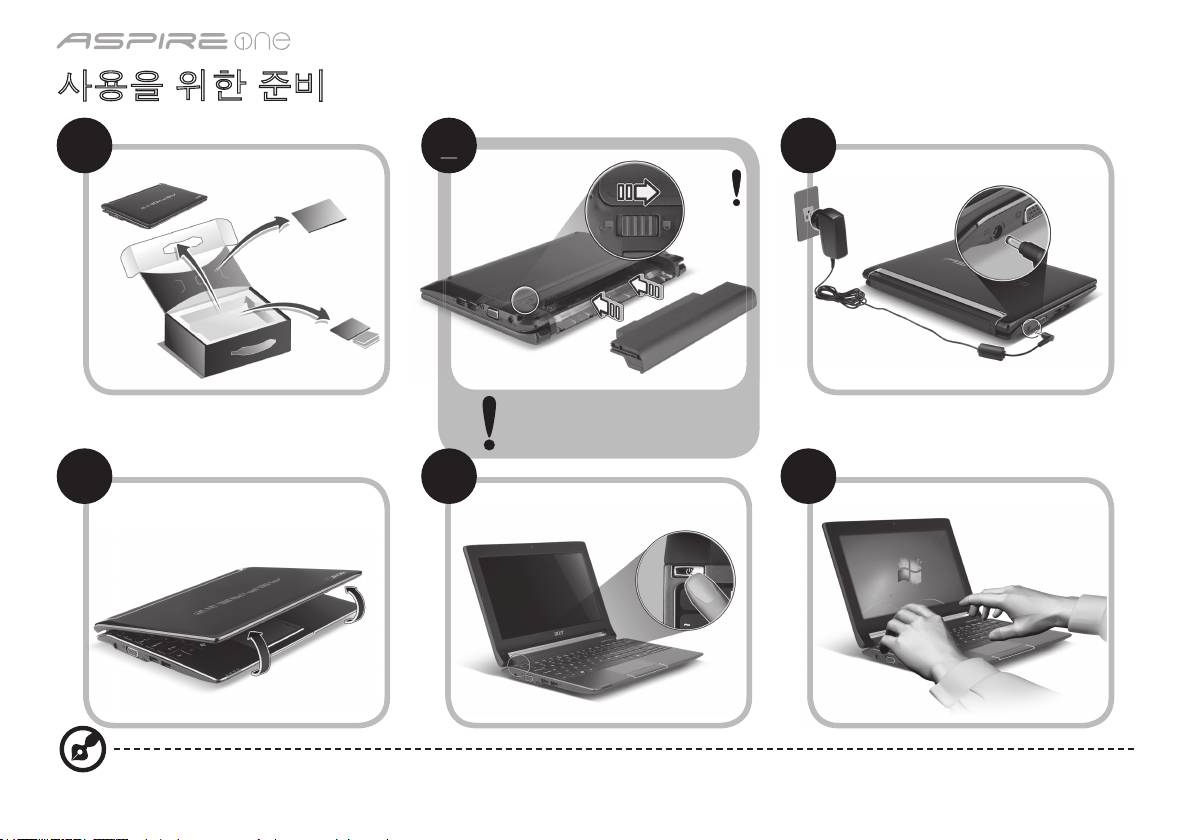
시리즈
사용을 위한 준비
1 2 3
3-2
3-1
그림 2-2 와 같이 배터리가 제자리
에 올바르게 잠겨 있는지 확인하
십시오.
4 5 6
이 그림들은 참고 목적으로만 제공되며. 실제 제품 사양은 이와 다를 수 있습니다.
1
2
2
2
2
2-2
2-1
빠른 시작 설명서
사용 전 유의 사항
Acer 노트북을 선택해주셔서 감사합니다. 이 노트북이 귀하의 모바일 컴퓨팅 요구를 충족시켜 드릴 것입니다.
제공되는 설명서
Acer 노트북을 사용하는 데 도움을 줄 수 있는 여러 설명서가 제공됩니다*.
우선 빠른 시작 설명서는 컴퓨터 설정을 시작하는 데 유용합니다.
컴퓨터를 좀더 생산적으로 활용하는 방법에 대한 자세한 내용은 AcerSystem User Guide를 참조하십시오. 이 설명서에서는 시스템 유틸
리티, 데이터 복구, 확장 옵션 및 문제 해결과 같은 주제를 자세하게 설명합니다. 또한 노트북에 대한 일반 규정과 안전 주의 사항 및 보증
정보가 포함되어 있습니다. 이 설명서는 PDF (Portable Document Format) 파일로 제공되며 노트북에 이미 설치되어 있습니다.
참고: 이 파일을 보려면 Adobe Reader가 필요합니다. 컴퓨터에 Adobe Reader가 설치되어 있지 않은 경우 AcerSystem User
Guide를 클릭하면 자동으로 Adobe Reader 설치 프로그램이 실행됩니다. 화면의 지시에 따라 나머지 설치 과정을 완료합니다.
Adobe Reader 사용 방법에 대한 지침을 보려면 Help and Support (도움말 및 지원) 메뉴에 액세스하십시오.
* 알림: 여기에 언급된 인쇄물 형태 또는 전자적 형태의 모든 설명서는 참고용으로만 제공됩니다. AcerSystem User Guide에 포
함된 특정 보증 정보에 제공된 사항을 제외하고, 이러한 설명서의 어떠한 부분도 귀하가 구매한 제품과 관련한 Acer의 책임이나
보증을 나타내지 않습니다. Acer는 이들 설명서에 포함된 오류에 대해 어떠한 책임도 지지 않습니다.
2

시리즈
네트워크 구성
여기에서는 인터넷에 연결할 수 있도록 LAN 및 무선 네트워크 설정을 구성하는 방법을 설명합니다.
LAN 연결 설정
LAN 케이블을 이더넷 (RJ-45) 포트에 연결하기만 하면 됩니다. 이더넷 포트의 위치를 알려면 6페이지의 "오른쪽 모습"을 참조하십시오.
무선 연결 설정
1. 통신 관리자에 액세스하려면 <Fn> + <F3>을 누르십시오. 여기에서 Wi-Fi 옆에 있는 빨간색 단추를 클릭하여 Wi-Fi 연결을 켤 수 있습
니다.
참고: 3G 및 Bluetooth는 통신 관리자를 통해 액세스할 수도 있습니다. 통신 장치는 모델에 따라 다를 수 있습니다.
2. 시스템 트레이에서
아이콘을 클릭하고 연결할 무선 액세스 지점을 선택하십시오.
3G SIM 카드 삽입 (특정 모델에만 해당)
배터리를 제거하고 3G SIM 카드 슬롯에 3G SIM 카드를 주의해서 삽입하십시오. 3G SIM 슬롯의 위치를 알려면 6페이지의 "뒤쪽 및 바닥
모습"을 참조하십시오.
3
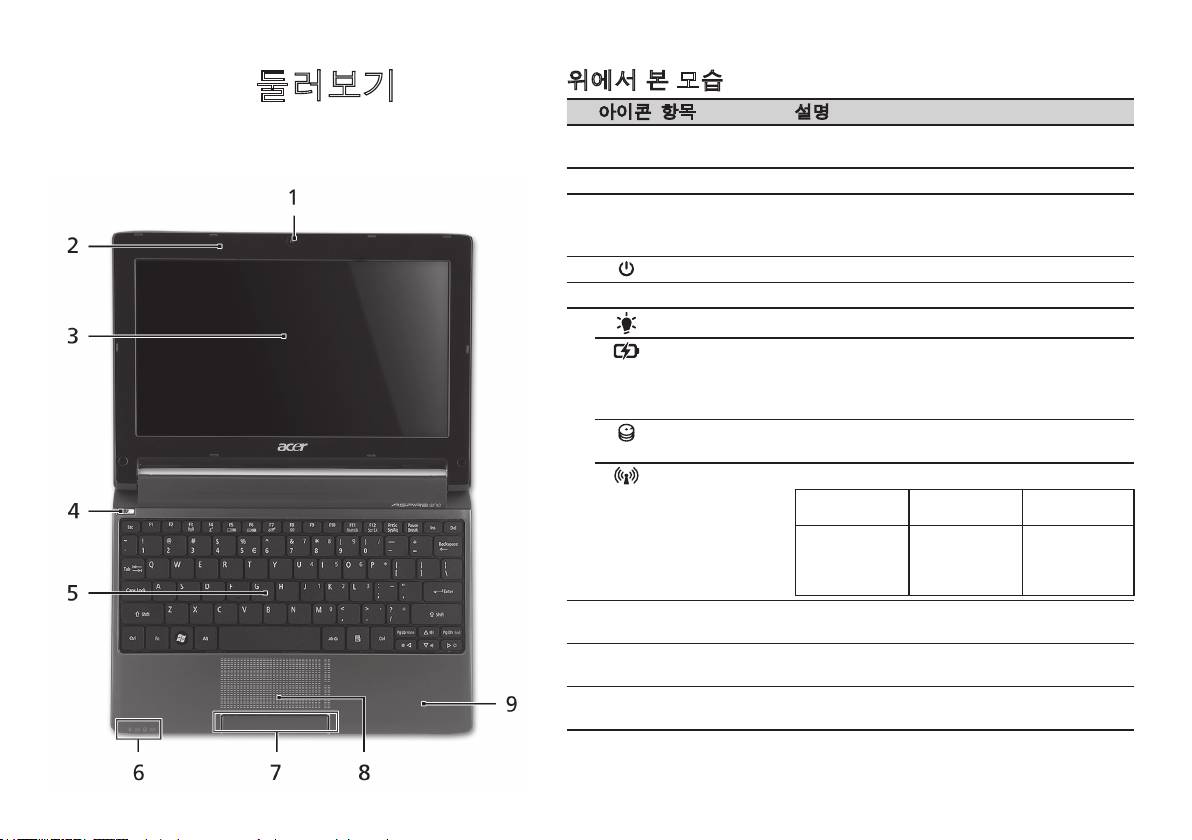
빠른 시작 설명서
위에서 본 모습
Aspire One
둘러보기
# 아이콘 항목 설명
사용을 위한 준비 단원에 설명된 대로 컴퓨터를 설정했으면
1
Acer Crystal Eye
비디오 통신용 웹 카메라입니다 (구성은 모델에
이제 새 Acer 노트북을 살펴볼 차례입니다.
웹캠
따라 다를 수 있습니다).
2
마이크 소리를 녹음할 수 있는 내부 마이크입니다.
3
디스플레이 화면 LCD (액정 디스플레이) 라고도 하며, 컴퓨터 출
력을 표시합니다 (구성은 모델에 따라 다를 수
있습니다).
4
전원 단추 컴퓨터를 켜고 끕니다.
5
키보드 컴퓨터에 데이터를 입력하는 데 사용됩니다.
1
6
전원 표시등
컴퓨터의 전원 상태를 표시합니다.
1
배터리 표시등
컴퓨터의 배터리 상태를 표시합니다.
1. 충전 중: 배터리가 충전 중이면 황색 불이 켜
집니다.
2. 충전 완료: AC 모드일 때 파란 불이 켜집니다.
HDD 표시등 하드 디스크 드라이브가 동작 중이면 불이 켜집
니다.
1
통신 표시등
3G/무선 LAN 통신 상태를 표시합니다.
파란색 표시등
주황색 표시등
불 켜지지 않음
켜짐
켜짐
3G 켜짐/
WiFi 켜짐
3G 꺼짐/
3G 꺼짐/
3G 켜짐/
WiFi 켜짐
WiFi 꺼짐
WiFi 꺼짐
7
누름 단추들
왼쪽과 오른쪽의 단추는 마우스의 왼쪽 및 오른
(왼쪽 및 오른쪽)
쪽 단추와 같은 역할을 합니다.
8
터치패드 컴퓨터 마우스와 같은 역할을 하는 접촉식 포인
팅 장치입니다.
9
손목 받침대 컴퓨터를 사용할 때 편안하게 손을 올려 놓는 영
역입니다.
1. 전면 패널 표시등은 컴퓨터 덮개를 닫은 상태에서도 볼 수 있습니다.
4
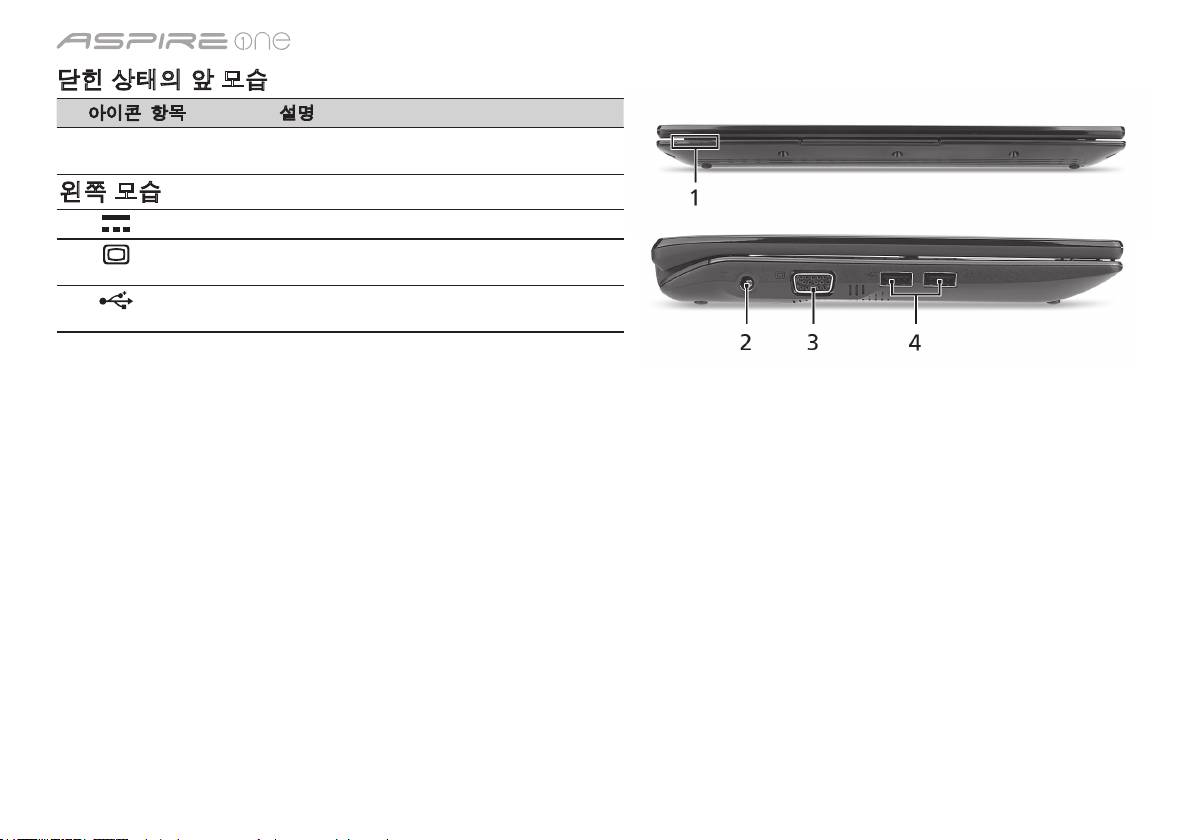
시리즈
닫힌 상태의 앞 모습
# 아이콘 항목 설명
1
상태 표시등 컴퓨터의 기능과 구성 요소의 상태를 알려주는
LED (발광 다이오드) 입니다.
왼쪽 모습
2
DC 입력 잭 AC 어댑터에 연결합니다.
3
외부 디스플레이
디스플레이 장치 (예: 외부 모니터, LCD 프로젝
(VGA) 포트
터)를 연결합니다.
4
USB 2.0 포트 USB 2.0 장치 (예: USB 마우스, USB 카메라)에 연
결합니다.
5
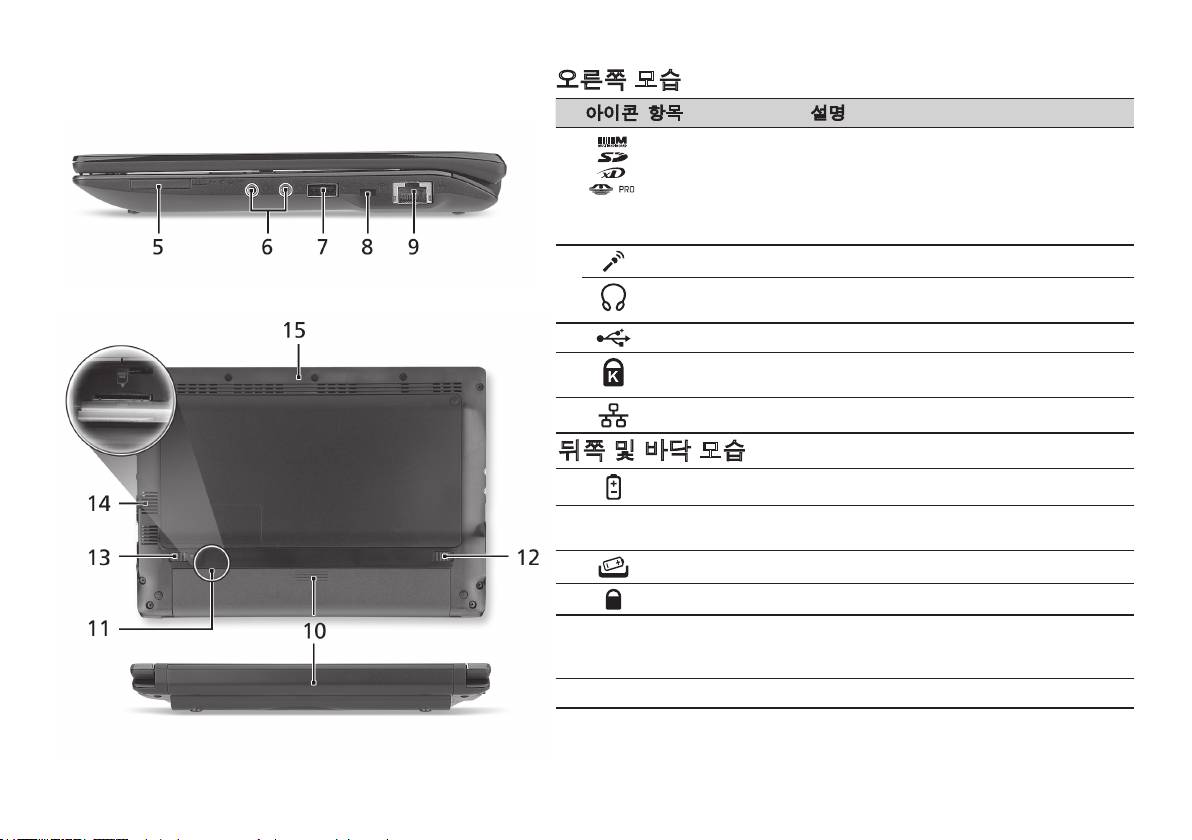
빠른 시작 설명서
오른쪽 모습
# 아이콘 항목 설명
5
멀티 카드 판독기 Secure Digital (SD), MultiMediaCard
(MMC), Memory Stick (MS), Memory Stick
PRO (MS PRO) 및 xD-Picture Card (xD)를 사
용할 수 있습니다.
참고: 카드를 눌러 제거 또는 설치합니다. 카
드를 한 번에 하나만 사용할 수 있습니다.
6
마이크 입력 잭 외부 마이크로 소리를 입력할 때 사용합니다.
헤드폰/스피커/출력 잭 오디오 출력 장치에 연결합니다 (예: 스피커,
헤드폰).
7
USB 2.0 포트 USB 2.0 장치 (예: USB 마우스)에 연결합니다.
8
Kensington 잠금 장치
Kensington 호환 컴퓨터 보호용 잠금 장치를
슬롯
연결합니다.
9
이더넷 (RJ-45) 포트 10/100 이더넷 네트워크에 연결합니다.
뒤쪽 및 바닥 모습
10
배터리 장착부 컴퓨터의 배터리 팩을 넣습니다.
11
3G SIM 카드 슬롯 3G 연결용 3G SIM 카드를 삽입합니다 (특정
모델에만 해당).
12
배터리 제거용 래치 제거를 위해 배터리를 뺄 때 사용합니다.
13
배터리 잠금 장착된 배터리를 빠지지 않도록 잠급니다.
14
통풍용 슬롯 및 냉각
장시간 사용한 후에도 컴퓨터를 차갑게 유지
팬
할 수 있습니다.
참고: 팬의 입구를 막거나 차단하지 마십시오.
15
스피커 컴퓨터에서 소리를 냅니다.
6

시리즈
환경
온도:
작동: 5°C ~ 35°C
비작동: -20°C ~ 65°C
습도 (비응축):
작동: 20% ~ 80%
비작동: 20% ~ 80%
7

系列
快速使用指南

系列
快速使用指南
系列
快速使用指南
© 2010 版權所有
Aspire One
系列快速使用指南
初版:04/2010
Aspire One
系列筆記型電腦
產品型號:_____________________________________
產品序號:_____________________________________
購買日期:_____________________________________
購買地點:_____________________________________

系列
快速使用指南
系列
快速使用指南
Federal Communications Commission
Declaration of Conformity
This device complies with Part 15 of the FCC Rules. Operation is subject to the following two conditions: (1) this device may not
cause harmful interference, and (2) this device must accept any interference received, including interference that may cause
undesired operation.
The following local Manufacturer/Importer is responsible for this declaration:
Product name: Notebook PC
Brand: Acer
Model number: PAV01
Machine type: Aspire one series; AO533 series
Name of Responsible Party: Acer America Corporation
Address of responsible party: 333 West San Carlos St., San Jose
CA 95110, U. S. A.
Contact person: Acer Representative
Phone No.: 1-254-298-4000
Fax No.: 1-254-298-4147
April 23, 2010

系列
快速使用指南
系列
快速使用指南
CE Declaration of Conformity
We,
Acer Incorporated
8F, 88, Sec. 1, Hsin Tai Wu Rd., Hsichih, Taipei Hsien 221, Taiwan
Contact Person: Mr. Easy Lai, e-mail:easy_lai@acer.com.tw
And,
Acer Europe SA
Via Cantonale, Centro Galleria 2 6928 Manno Switzerland
Hereby declare that:
Product: Notebook Computer
Trade Name: Acer
Model Number: PAV01
Machine Type: Aspire one series; AO533 series
Is compliant with the essential requirements and other relevant provisions of the following EC directives, and that all the
necessary steps have been taken and are in force to assure that production units of the same product will continue comply with
the requirements.
R&TTE Directive 1999/5/EC as attested by conformity with the following harmonized standard:
• Article3.1(a)HealthandSafety
-. EN60950-1
-. EN62311
• Article3.1(b)EMC
-. EN301 489-1
-. EN301 489-3 (Applicable to non-bluetooth wireless keyboard mouse set).
-. EN301 489-7
-. EN301 489-17
-. EN301 489-24

系列
快速使用指南
系列
快速使用指南
• Article3.2SpectrumUsages
-. EN300 440-2 (Applicable to non-bluetooth wireless keyboard mouse set).
-. EN300 328
-. EN301 511
-. EN301 893 (Applicable to 5GHz high performance RLAN).
-. EN301 908-1
-. EN301 908-2
EMCDirective2004/108/ECasattestedbyconformitywiththefollowingharmonizedstandards:
-. EN55022, AS/NZS CISPR22, Class B
-. EN55024
-. EN61000-3-2 Class D
-. EN61000-3-3
LowVoltageDirective2006/95/ECasattestedbyconformitywiththefollowingharmonizedstandard:
-. EN60950-1
RoHSDirective2002/95/EContheRestrictionoftheUseofcertainHazardousSubstancesinElectricalandElectronicEquipment
-. The maximum concentration values of the restricted substances by weight in homogenous material are:
Lead
0.1%
Polybrominated Biphenyls (PBB’s)
0.1%
Mercury
0.1%
Polybrominated Diphenyl Ethers (PBDE’s)
0.1%
Hexavalent Chromium
0.1%
Cadmium
0.01%
Directive2009/125/ECwithregardtoestablishingaframeworkforthesettingofecodesignrequirementsforenergy-related
product.
Year to begin affixing CE marking 2010.
Apr. 23, 2010
Easy Lai /Manager
Regulation Center, Acer Inc.
Date

系列
快速使用指南
系列
快速使用指南
新手入門
1 2 3
3-2
3-1
請確認電池是否正確裝入
(如圖 2-2 所示)。
4 5 6
所有插圖僅供參考。實際產品規格可能有所不同。
1
2
2
2
2
2-2
2-1

系列
快速使用指南
系列
快速使用指南
初步設定
首先,感謝您選擇 Acer 筆記型電腦,其會是滿足您行動運算需求的最佳首選。
使用指南
為了協助您了解使用 Acer 筆記型電腦的方式,我們設計了一系列的指南*:
首先,快速使用指南可協助您開始設定您的電腦。
如需更多關於讓電腦協助您提升生產力的資訊,請參閱 AcerSystem User Guide。本指南包含系統公用程式、資料復原、擴充選項及
疑難排解等主題的詳細資訊。此外,本指南也包含筆記型電腦的保固資訊、一般規範及安全注意事項。該文件以「可攜式文件格式」
(PDF)提供,並已預載在您的筆記型電腦上。
注意:您需要安裝 Adobe Reader 才可檢視此檔案。如果電腦尚未安裝 Adobe Reader,請先按一下 AcerSystem User Guide,
便會開始執行 Adobe Reader 設定程式。請遵循畫面上的指示完成安裝程序。如需了解使用 Adobe Reader 的方式,請存取說明
及支援功能表。
* 重要聲明:請注意,此處所提及之指南(無論是以印刷或電子版形式呈現)僅供參考之用;除了 AcerSystem User Guide 中所
包含的特定保固資訊以外,Acer 不會因為這些指南中的任何內容而針對您所購買的產品提供任何聲明或保固。明確來說,Acer
對於指南中所包含的任何錯誤均不負相關責任。
2
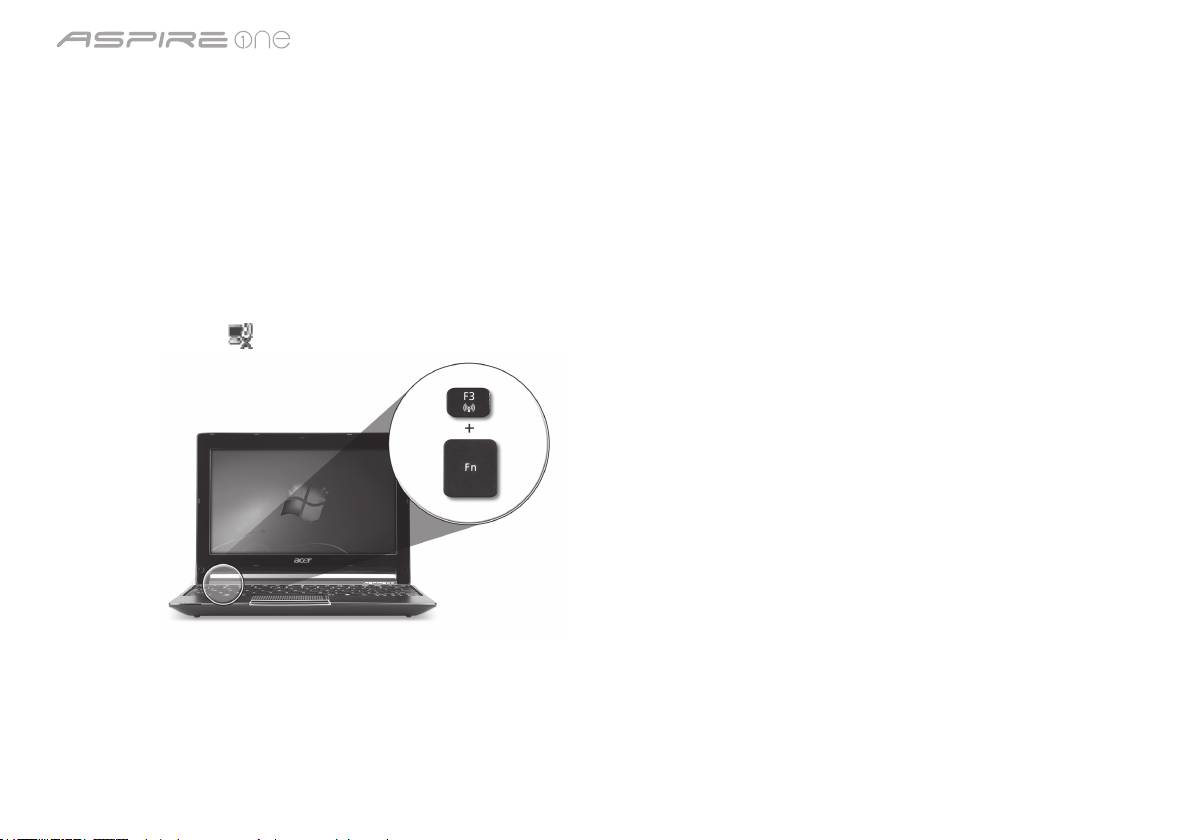
系列
快速使用指南
系列
快速使用指南
網路設定
本指南將會協助您配置區域網路及無線網路設定,讓您可連線到網際網路。
設定區域網路連線
只要將區域網路纜線插入乙太網路(RJ-45)連接埠即可。如需了解乙太網路連接埠之位置的資訊,請參閱第 6 頁的「右視圖」。
設定無線網路連線
1. 按下 <Fn> + <F3> 可存取通訊管理員。您可以在此處按一下 Wi-Fi 旁的紅色按鈕,開啟 Wi-Fi 連線功能。
注意:也可以透過通訊管理員存取 3G 和藍牙功能。通訊裝置將依機型而有所不同。
2. 按一下系統匣上的
圖示,然後選擇想要連線的無線網路存取點。
插入 3G SIM 卡(僅適用於特定機型)
將電池卸下,並將 3G SIM 卡小心地插入 3G SIM 卡插槽中。如需了解 3G SIM 卡插槽之位置的資訊,請參閱第 6 頁的「後視圖及底視
圖」。
3
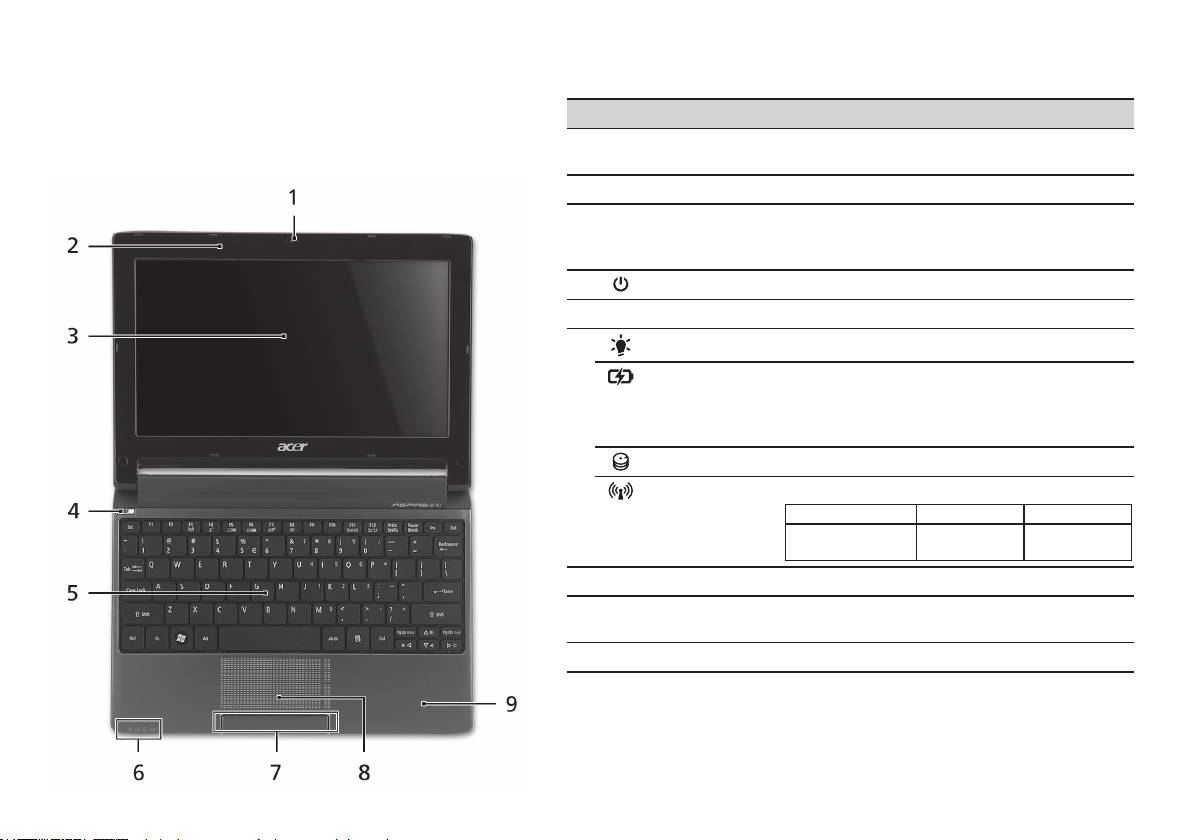
系列
快速使用指南
系列
快速使用指南
上視圖
Aspire One
導覽
# 圖示 項目 說明
在依照新手入門一節中所提及的說明完成電腦的設定之後,
1
Acer Crystal Eye
網路相機,可用於視訊通訊(設定將依機型而有
就讓我們為您展示一下全新 Acer 筆記型電腦的各項功能吧!
網路攝影機
所不同)。
2
麥克風 內建的麥克風,用於錄音。
3
顯示螢幕 亦稱為液晶顯示器(Liquid-Crystal Display;
LCD),用於顯示電腦資料的輸出(設定將依機
型而有所不同)。
4
電源鍵 開啟和關閉電腦。
5
鍵盤 可用來將資料輸入電腦。
1
6
電源指示燈
表示電腦的電源狀態。
1
電池指示燈
表示電腦的電池狀態。
1. 充電中:當電池充電時,指示燈會亮琥珀色。
2. 充電完畢:當使用 AC 電源模式時, 指示燈會亮
藍色。
硬碟指示燈 當存取硬碟時,指示燈會亮起。
1
通訊指示燈
指示 3G/無線區域網路通訊的狀態。
亮藍色 亮橘色 未亮起
3G 開啟 / WiFi 開啟
3G 關閉 /
3G 關閉 /
3G 開啟 / WiFi 關閉
WiFi 開啟
WiFi 關閉
7
點選鍵(左和右) 左鍵和右鍵的功能等同於滑鼠的左鍵和右鍵。
8
觸控板 觸控感應式移動游標裝置,功能等同於電腦的
滑鼠。
9
腕靠 讓您在使用電腦時,可舒適擺放手腕的位置。
1. 即使在電腦螢幕闔上時,您依然可看見位於前面板的狀態指示燈。
4
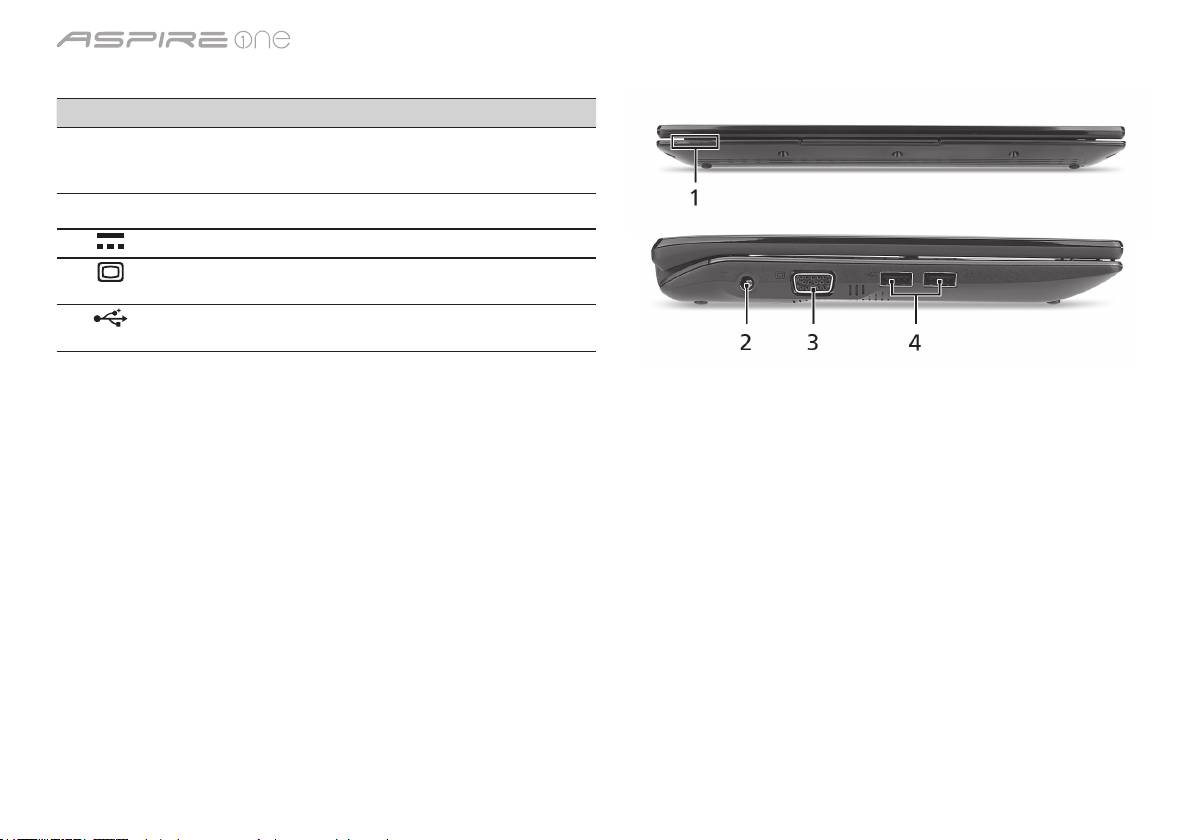
系列
快速使用指南
系列
快速使用指南
上蓋闔起的前視圖
# 圖示 項目 說明
1
狀態指示燈 以 LED(Light-Emitting Diodes;發光
二極體)亮燈的方式來顯示電腦功能及
元件的狀態。
左視圖
2
DC 輸入插孔 連接到 AC 變壓器。
3
外接顯示螢幕
連接到顯示器裝置(例如外接式顯示器、
(VGA)連接埠
LCD 投影機)。
4
USB 2.0 埠 連接至 USB 2.0 裝置(例如,USB 滑鼠、
USB 攝影機)。
5
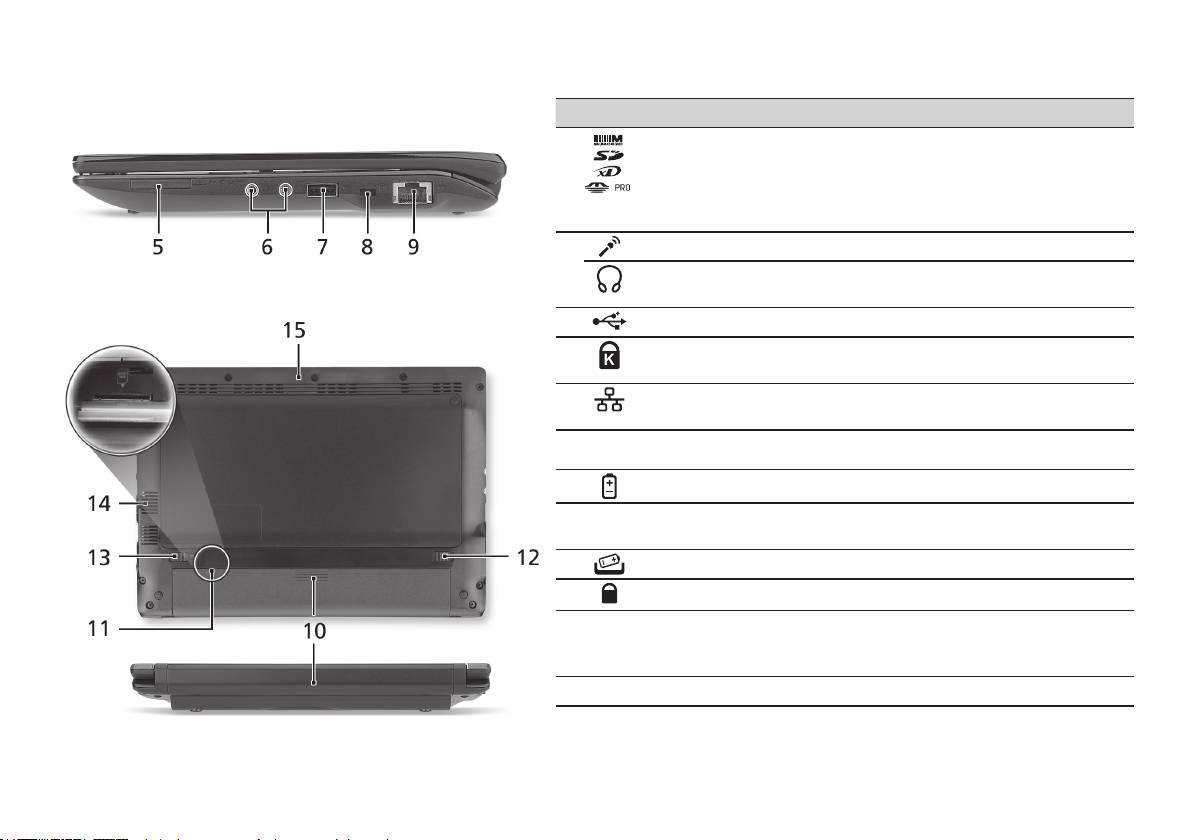
系列
快速使用指南
系列
快速使用指南
右視圖
# 圖示 項目 說明
5
多合一讀卡機 可支援 Secure Digital (SD)、MultiMediaCard
(MMC)、Memory Stick (MS)、Memory Stick
PRO (MS PRO)、xD-Picture Card (xD)。
注意:推一下即可取出/安裝記憶卡。任何時候
皆僅能夠使用一張記憶卡。
6
麥克風輸入插孔 接受從外接麥克風所輸入的聲音。
耳機 / 喇叭 / 線路輸
連接外接音訊輸出裝置的插孔(例如:喇叭、
出插孔
耳機)。
7
USB 2.0 埠 連接到 USB 2.0 裝置(例如 USB 滑鼠)。
8
Kensington 安全鎖
連接到與 Kensington 相容的電腦安全鎖。
插槽
9
乙太網路(RJ-45)
連線到 10/100 基礎的乙太網路。
連接埠
後視圖及底視圖
10
電池槽 用於安裝電腦的電池組。
11
3G SIM 卡插槽 可支援 3G 通訊的 3G SIM 卡(僅適用於特定
機型)。
12
電池卸除卡榫 用於卸下電池組。
13
電池組固定鎖 可將電池鎖到定位。
14
散熱孔和冷卻風扇 可讓電腦在長時間使用後仍然能夠保持冷卻
狀態。
注意:請勿阻塞或擋住風扇開口。
15
喇叭 從電腦輸出音訊。
6

系列
快速使用指南
環境
溫度:
操作中:5
°
C 到 35
°
C
非操作中:-20
°
C 到 65
°
C
溼度(非冷凝狀態):
操作中:20% 到 80%
非操作中:20% 到 80%
7

系列
快速指南

系列
快速指南
系列
快速指南
© 2010 保留所有权利
Aspire One
系列快速指南
初版发行日期:04/2010
Aspire One
系列笔记本电脑
产品型号:_____________________________________
产品序号:_____________________________________
购买日期:_____________________________________
购买地点:_____________________________________

系列
快速指南
系列
快速指南
Federal Communications Commission
Declaration of Conformity
This device complies with Part 15 of the FCC Rules. Operation is subject to the following two conditions: (1) this device may not
cause harmful interference, and (2) this device must accept any interference received, including interference that may cause
undesired operation.
The following local Manufacturer/Importer is responsible for this declaration:
Product name: Notebook PC
Brand: Acer
Model number: PAV01
Machine type: Aspire one series; AO533 series
Name of Responsible Party: Acer America Corporation
Address of responsible party: 333 West San Carlos St., San Jose
CA 95110, U. S. A.
Contact person: Acer Representative
Phone No.: 1-254-298-4000
Fax No.: 1-254-298-4147
April 23, 2010

系列
快速指南
系列
快速指南
CE Declaration of Conformity
We,
Acer Incorporated
8F, 88, Sec. 1, Hsin Tai Wu Rd., Hsichih, Taipei Hsien 221, Taiwan
Contact Person: Mr. Easy Lai, e-mail:easy_lai@acer.com.tw
And,
Acer Europe SA
Via Cantonale, Centro Galleria 2 6928 Manno Switzerland
Hereby declare that:
Product: Notebook Computer
Trade Name: Acer
Model Number: PAV01
Machine Type: Aspire one series; AO533 series
Is compliant with the essential requirements and other relevant provisions of the following EC directives, and that all the
necessary steps have been taken and are in force to assure that production units of the same product will continue comply with
the requirements.
R&TTE Directive 1999/5/EC as attested by conformity with the following harmonized standard:
• Article3.1(a)HealthandSafety
-. EN60950-1
-. EN62311
• Article3.1(b)EMC
-. EN301 489-1
-. EN301 489-3 (Applicable to non-bluetooth wireless keyboard mouse set).
-. EN301 489-7
-. EN301 489-17
-. EN301 489-24

系列
快速指南
系列
快速指南
• Article3.2SpectrumUsages
-. EN300 440-2 (Applicable to non-bluetooth wireless keyboard mouse set).
-. EN300 328
-. EN301 511
-. EN301 893 (Applicable to 5GHz high performance RLAN).
-. EN301 908-1
-. EN301 908-2
EMCDirective2004/108/ECasattestedbyconformitywiththefollowingharmonizedstandards:
-. EN55022, AS/NZS CISPR22, Class B
-. EN55024
-. EN61000-3-2 Class D
-. EN61000-3-3
LowVoltageDirective2006/95/ECasattestedbyconformitywiththefollowingharmonizedstandard:
-. EN60950-1
RoHSDirective2002/95/EContheRestrictionoftheUseofcertainHazardousSubstancesinElectricalandElectronicEquipment
-. The maximum concentration values of the restricted substances by weight in homogenous material are:
Lead
0.1%
Polybrominated Biphenyls (PBB’s)
0.1%
Mercury
0.1%
Polybrominated Diphenyl Ethers (PBDE’s)
0.1%
Hexavalent Chromium
0.1%
Cadmium
0.01%
Directive2009/125/ECwithregardtoestablishingaframeworkforthesettingofecodesignrequirementsforenergy-related
product.
Year to begin affixing CE marking 2010.
Apr. 23, 2010
Easy Lai /Manager
Regulation Center, Acer Inc.
Date

系列
快速指南
系列
快速指南
初学者入门
1 2 3
3-2
3-1
确保电池如图 2-2 所示正确锁定
到位。
4 5 6
图例仅供参考。产品实际规格将以用户实际购买为准。
1
2
2
2
2
2-2
2-1

系列
快速指南
系列
快速指南
使用入门
感谢您选购 Acer 笔记本电脑,让它满足您随时随地使用计算机的需要。
用户指南
为帮助您使用 Acer 笔记本电脑,我们专门设计了一套指南*:
首先,“快速指南”将指导您对电脑进行设置。
要了解关于您的电脑如何能够帮助您提高工作效率的详细信息,请参见“AcerSystem User Guide”。本指南包含了诸如系统实用程序、
数据恢复、扩展选项和疑难解答等详细信息。此外,它还包含了保修信息和笔记本电脑的一般规则和安全注意事项。我们也提供了 PDF
格式的用户指南并已预先安装在本电脑中供用户参考。
注:查看 PDF 文件需要安装 Adobe Reader。如果您的电脑上没有安装 Adobe Reader,单击“AcerSystem User Guide”将会
先启动 Adobe Reader 安装程序。依屏幕上指导完成安装程序。有关如何使用 Adobe Reader 的说明,请参见“帮助和支持”
菜单。
*重要须知:请注意,本手册中所提及的指南,无论是印刷或电子版本,均仅供参考,“AcerSystem User Guide”中包含的特定
保证信息除外。指南中包含的任何信息均不构成 Acer 对您所购产品的陈述或保证。Acer 对指南中包含的错误不承担任何责任。
2

系列
快速指南
系列
快速指南
网络配置
本指南将帮助您配置 LAN 和无线网络设置,以便连接至 Internet。
设置 LAN 连接
只需将 LAN 线缆插入以太网 (RJ-45) 端口即可。以太网端口位置请参见
第 6 页的“右视图”
。
设置无线连接
1. 按 <Fn> + <F3> 可进入通信管理器。在此处单击 Wi-Fi 旁的红色按钮可开启 Wi-Fi 连接。
注:
通过通信管理器还可以使用 3G 和蓝牙。通信设备根据型号有所不同。
2. 单击系统托盘上的
图标,选择要连接的无线接入点。
插入 3G SIM 卡 (仅限部分型号)
取出电池并将 3G SIM 卡小心地插入 3G SIM 卡槽。请参见
第 6 页的“后视图 & 底视图”
以了解 3G SIM 卡槽的位置。
3
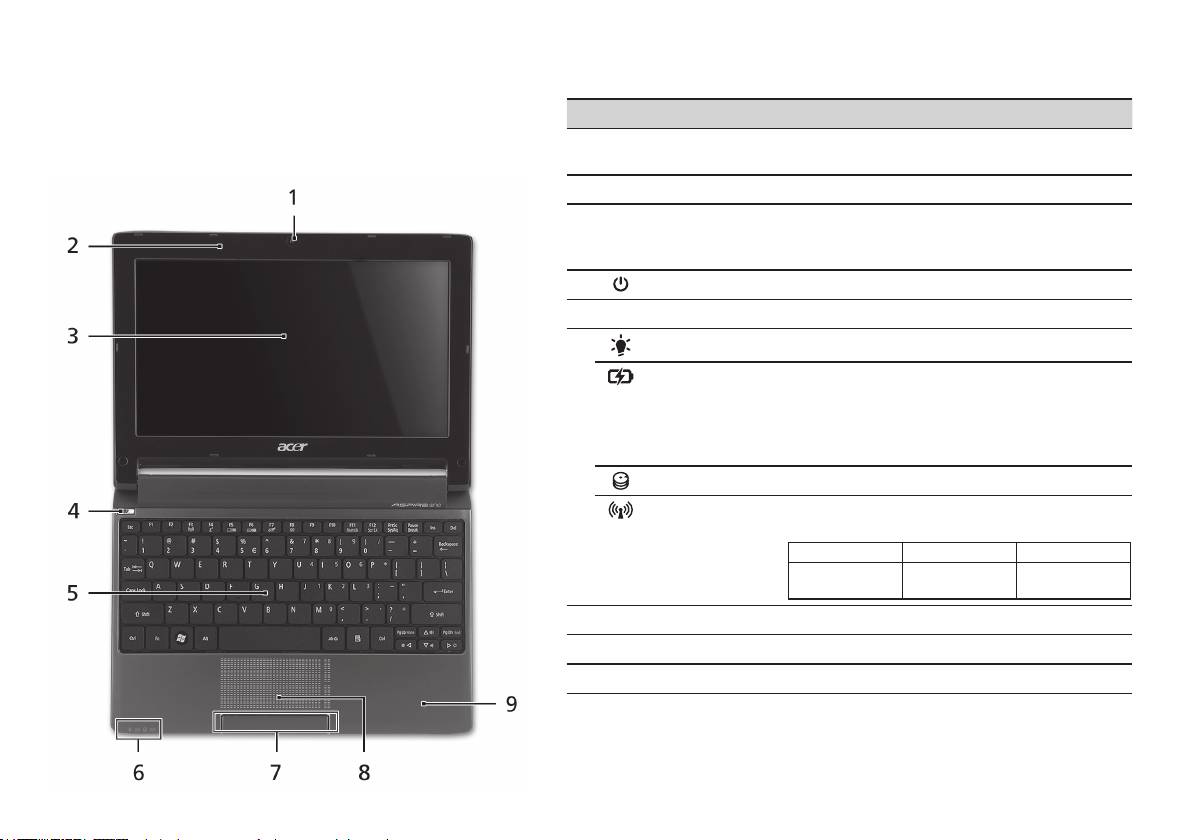
系列
快速指南
系列
快速指南
俯视图
了解
Aspire One
# 图标 项目 描述
按照初学者入门章节中的图示完成计算机安装后,让我们带您
1
Acer Crystal Eye
网络相机,用于视频通信 (不同型号配置可能有
认识一下您新购的 Acer 笔记本电脑。
摄像头
所不同)。
2
麦克风 用于录音的内置麦克风。
3
显示屏 也称液晶显示屏 (Liquid-Crystal Display;
LCD),用于显示电脑的输出内容 (不同型号配置
可能有所不同)。
4
电源键 用于打开和关闭计算机电源。
5
键盘 将数据输入到电脑中。
1
6
电源指示灯
表示计算机的电源状态。
1
电池指示灯
根据亮灯情况可检视目前电脑电池的状态。
1. 正在充电:当电池在充电时,指示灯显示
琥珀色。
2. 完全充电:当处在 AC 模式时,指示灯显示
蓝色。
硬盘指示灯 硬盘活动时,该指示灯亮。
1
通信指示灯
根据亮灯情况可检视目前无线 LAN/3G 通信的
状态。
蓝灯亮 橙灯亮 不亮
3G 开 / WiFi 开
3G 关/WiFi 开 3G 关/WiFi 关
3G 开/WiFi 关
7
单击按钮 (左和右) 左右按钮的功能与鼠标的左右键相同。
8
触控板 触摸式定位设备,功能和电脑鼠标相同。
9
掌垫板 当您使用电脑时,可舒适支撑手部的区域。
1. 即使计算机外盖合上,也能看到前面板的状态指示灯。
4
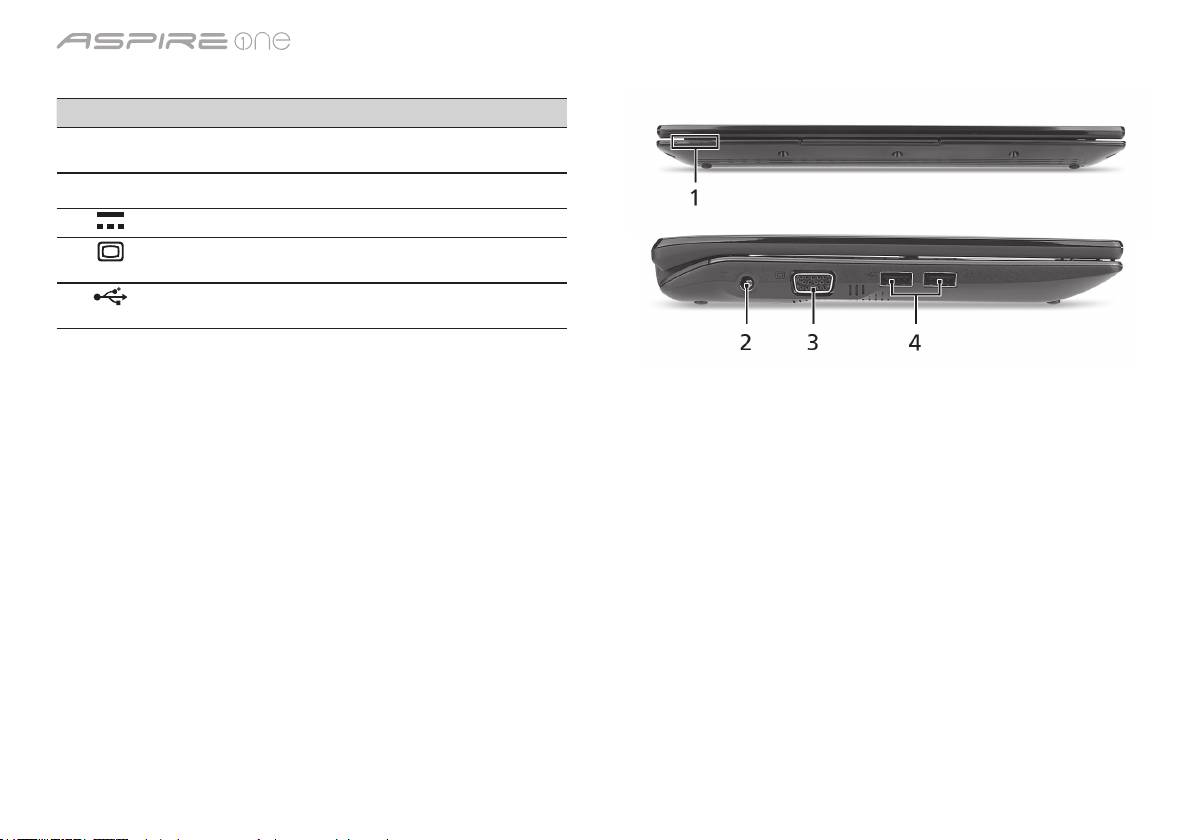
系列
快速指南
系列
快速指南
前视图
# 图标 项目 描述
1
状态指示灯 通过亮灭显示计算机功能及组件状态的
发光二极管 (LED)。
左视图
2
直流电源输入插孔 连接交流适配器。
3
外部显示器 (VGA)
连接显示设备 (例如外接显示器、LCD
端口
投影机)。
4
USB 2.0 端口 连接 USB 2.0 设备 (例如,USB 鼠标、
USB 相机)。
5

系列
快速指南
系列
快速指南
右视图
# 图标 项目 描述
5
多合一读卡器 可支持安全数码卡 (SD)、多媒体卡 (MMC)、
记忆棒 (MS)、PRO 记忆棒 (MS PRO) 及
xD-Picture 卡 (xD)。
注:轻推取下/安装存储卡。 一次只能使用
一张卡。
6
麦克风输入插孔 连接外接麦克风。
耳机/扬声器/
连接音频输出设备 (例如:扬声器、耳机)。
音频输出插孔
7
USB 2.0 端口 连接 USB 2.0 设备 (例如 USB鼠标)。
8
Kensington 安全锁
连接 Kensington 兼容电脑安全锁。
插槽
9
以太网 (RJ-45) 端口 连接 10/100 以太网。
后视图 & 底视图
10
电池槽 安装电池组。
11
3G SIM 卡槽 支持 3G SIM 卡进行 3G 连接 (仅限部分型号)。
12
电池释放闩锁 释放电池闩锁可取下电池组。
13
电池锁 可固定锁紧电池组。
14
通风槽和冷却风扇 可使电脑在长时间使用后仍保持低温。
注:请勿遮挡风扇口。
15
扬声器 从计算机输出音频。
6

系列
快速指南
环境
温度:
操作时:5
°
C - 35
°
C
不操作时:-20
°
C - 65
°
C
湿度 (非冷凝):
操作时:20% - 80%
不操作时:20% - 80%
7

Seri
Panduan cepat

Seri
Panduan cepat
Seri
Panduan cepat
© 2010 Hak Cipta Dilindungi Undang-Undang
Panduan Cepat Seri Aspire One
Edisi Pertama: 04/2010
PC Notebook Seri Aspire One
Nomor model: _________________________________
Nomor seri: ___________________________________
Tanggal pembelian: ___________________________
Alamat pembelian: ____________________________

Seri
Panduan cepat
Seri
Panduan cepat
Federal Communications Commission
Declaration of Conformity
This device complies with Part 15 of the FCC Rules. Operation is subject to the following two conditions: (1) this device may not
cause harmful interference, and (2) this device must accept any interference received, including interference that may cause
undesired operation.
The following local Manufacturer/Importer is responsible for this declaration:
Product name: Notebook PC
Brand: Acer
Model number: PAV01
Machine type:
Aspire one series; AO533 series
Name of Responsible Party: Acer America Corporation
Address of responsible party: 333 West San Carlos St., San Jose
CA 95110, U. S. A.
Contact person: Acer Representative
Phone No.: 1-254-298-4000
Fax No.: 1-254-298-4147
April 23, 2010

Seri
Panduan cepat
Seri
Panduan cepat
CE Declaration of Conformity
We,
Acer Incorporated
8F, 88, Sec. 1, Hsin Tai Wu Rd., Hsichih, Taipei Hsien 221, Taiwan
Contact Person: Mr. Easy Lai, e-mail:easy_lai@acer.com.tw
And,
Acer Europe SA
Via Cantonale, Centro Galleria 2 6928 Manno Switzerland
Hereby declare that:
Product: Notebook Computer
Trade Name: Acer
Model Number: PAV01
Machine Type: Aspire one series; AO533 series
Is compliant with the essential requirements and other relevant provisions of the following EC directives, and that all the
necessary steps have been taken and are in force to assure that production units of the same product will continue comply with
the requirements.
R&TTE Directive 1999/5/EC as attested by conformity with the following harmonized standard:
• Article 3.1(a) Health and Safety
-. EN60950-1
-. EN62311
• Article 3.1(b) EMC
-. EN301 489-1
-. EN301 489-3 (Applicable to non-bluetooth wireless keyboard mouse set).
-. EN301 489-7
-. EN301 489-17
-. EN301 489-24

Seri
Panduan cepat
Seri
Panduan cepat
• Article 3.2 Spectrum Usages
-. EN300 440-2 (Applicable to non-bluetooth wireless keyboard mouse set).
-. EN300 328
-. EN301 511
-. EN301 893 (Applicable to 5GHz high performance RLAN).
-. EN301 908-1
-. EN301 908-2
EMC Directive 2004/108/EC as attested by conformity with the following harmonized standards:
-. EN55022, AS/NZS CISPR22, Class B
-. EN55024
-. EN61000-3-2 Class D
-. EN61000-3-3
Low Voltage Directive 2006/95/EC as attested by conformity with the following harmonized standard:
-. EN60950-1
RoHS Directive 2002/95/EC on the Restriction of the Use of certain Hazardous Substances in Electrical and Electronic Equipment
-. The maximum concentration values of the restricted substances by weight in homogenous material are:
Lead
0.1%
Polybrominated Biphenyls (PBB’s)
0.1%
Mercury
0.1%
Polybrominated Diphenyl Ethers (PBDE’s)
0.1%
Hexavalent Chromium
0.1%
Cadmium
0.01%
Directive 2009/125/EC with regard to establishing a framework for the setting of ecodesign requirements for energy-related
product.
Year to begin affixing CE marking 2010.
Apr. 23, 2010
Easy Lai /Manager
Regulation Center, Acer Inc.
Date

Seri
Panduan cepat
Seri
Panduan cepat
Persiapan
1 2 3
2-2
3-2
3-1
2-1
Pastikan baterai terpasang
dengan benar di tempatnya,
seperti terlihat pada gambar 2-2.
4 5 6
Gambar ilustrasi hanya sebagai referensi. Spesifikasi produk sebenarnya mungkin berbeda.
1

Seri
Panduan cepat
Seri
Panduan cepat
Informasi penting
Kami mengucapkan terima kasih kepada Anda yang telah memilih notebook Acer untuk memenuhi kebutuhan Anda akan
komputer.
Panduan Anda
Kami telah mendesain serangkaian panduan guna membantu Anda menggunakan notebook Acer Anda*:
Pertama-tama, Panduan Cepat akan membantu Anda mulai melakukan pengaturan pada komputer Anda.
Untuk informasi lebih lanjut tentang cara komputer ini membantu Anda agar lebih produktif, lihat AcerSystem User Guide.
Panduan ini berisi informasi terinci mengenai hal-hal seperti utilitas sistem, pemulihan data, opsi-opsi ekspansi dan pemecahan
masalah. Di samping itu, panduan ini berisi informasi jaminan dan peraturan umum serta peringatan keselamatan untuk
notebook Anda. Panduan tersebut tersedia dalam format PDF dan sudah tersedia dalam notebook Anda.
Catatan: Diperlukan Adobe Reader untuk melihat file tersebut. Jika Adobe Reader belum diinstal dalam komputer Anda,
klik AcerSystem User Guide untuk terlebih dulu menjalankan program konfigurasi Adobe Reader. Ikuti petunjuk pada
layar untuk melakukan instalasi tersebut. Anda bisa mengakses menu Bantuan dan Dukungan untuk mendapatkan
petunjuk mengenai bagaimana menggunakan Adobe Reader.
* PEMBERITAHUAN PENTING: Harap diperhatikan bahwa panduan yang disebutkan dalam dokumen ini, apakah dalam
bentuk cetak atau elektronik, hanya untuk referensi dan kecuali sebagaimana diberikan dalam informasi jaminan
spesifik yang terdapat dalam AcerSystem User Guide, maka tidak satu hal pun dalam panduan ini yang merupakan
pernyataan atau jaminan oleh Acer berkenaan dengan produk yang Anda beli. Acer secara tersurat menyangkal segala
pertanggungjawaban atas kesalahan yang terdapat dalam panduan ini.
2
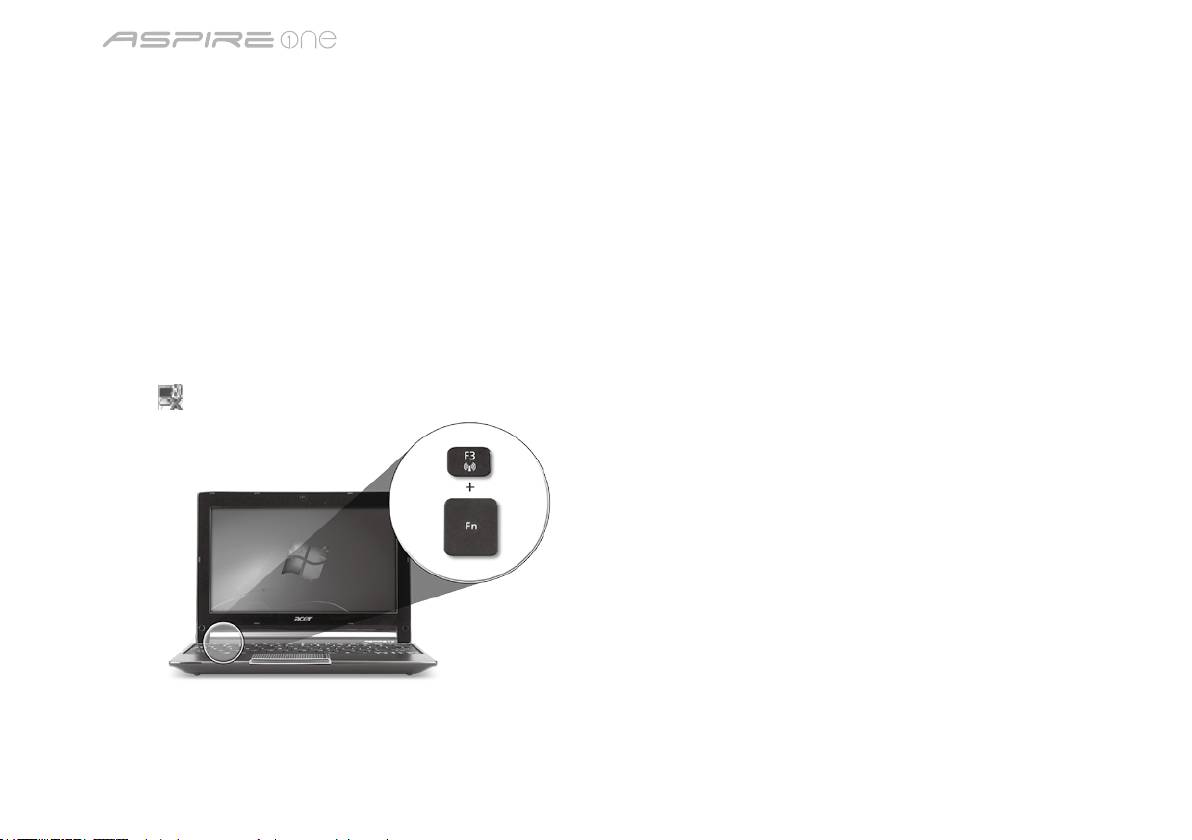
Seri
Panduan cepat
Seri
Panduan cepat
Konfigurasi jaringan
Panduan ini akan membantu Anda mengonfigurasikan pengaturan jaringan LAN dan nirkabel sehingga Anda bisa terhubung
ke Internet.
Mengatur koneksi LAN
Anda cukup mencolokkan kabel LAN ke port Ethernet (RJ-45). Harap lihat "Pandangan kanan" pada halaman 6 untuk
mengetahui lokasi port Ethernet.
Mengatur koneksi nirkabel
1. Tekan <Fn> + <F3> untuk mengakses manajer komunikasi. Di sini Anda dapat mengaktifkan koneksi W-Fi dengan mengklik
pada tombol merah di sebelah Wi-Fi.
Catatan: 3G dan Bluetooth juga dapat diakses melalui manajer komunikasi. Perangkat komunikasi berbeda-beda berdasarkan
model.
2. Klik ikon
pada sistem tray dan pilih titik akses nirkabel yang ingin Anda hubungkan.
Masukkan kartu SIM 3G (hanya untuk model-model tertentu)
Lepas baterai dan masukkan kartu SIM 3G dengan hati-hati ke dalam slot kartu SIM 3G. Lihat “Pandangan belakang &
Pandangan bawah” pada halaman 6 untuk melihat lokasi slot kartu SIM 3G.
3
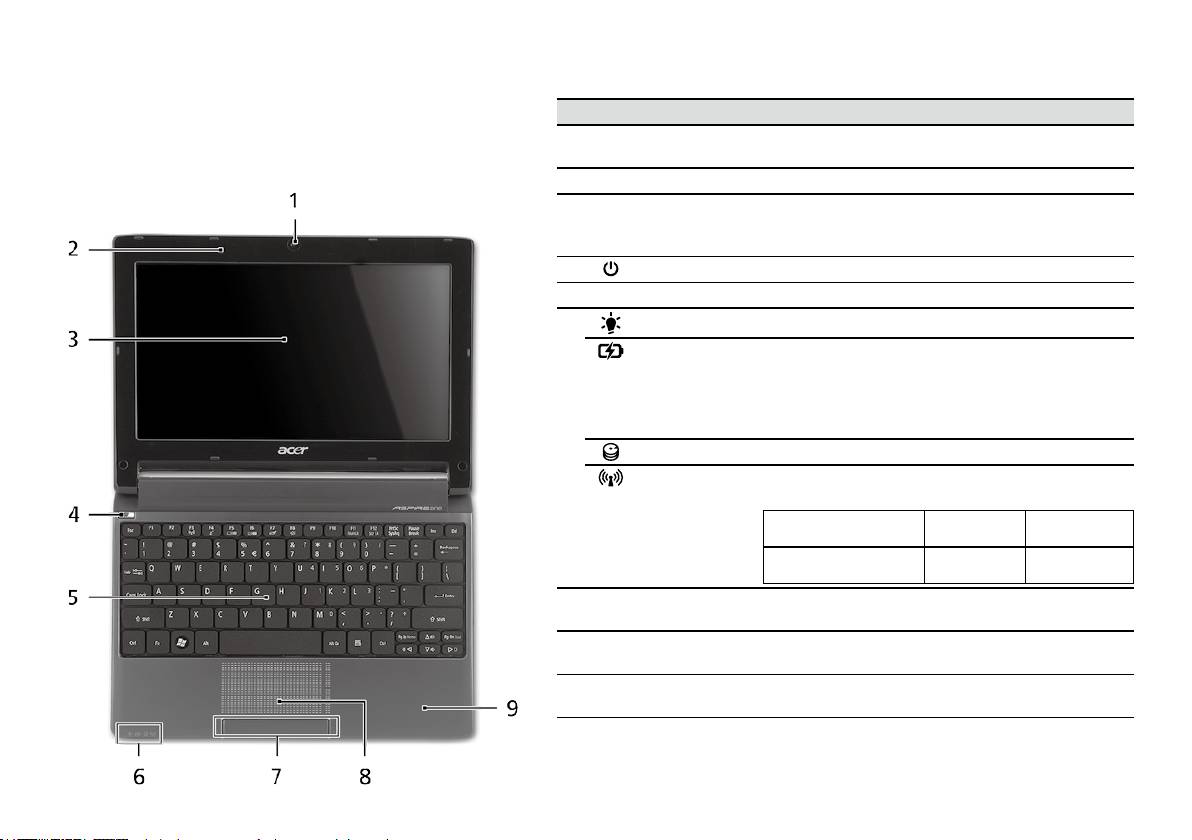
Seri
Panduan cepat
Seri
Panduan cepat
Pandangan atas
Tur Aspire One Anda
# Ikon Item Keterangan
Setelah Anda melakukan pengaturan pada komputer
1
Webcam
Kamera web untuk komunikasi video (konfigurasi
Anda seperti terlihat pada gambar di bagian Persiapan,
Acer Crystal Eye
mungkin berbeda tergantung model).
kami akan menunjukkan bagian-bagian notebook Acer.
2
Mikrofon Mikrofon internal untuk perekaman suara.
3
Layar tampilan Disebut juga sebagai LCD (Liquid-Crystal Display),
akan menampilkan output komputer (konfigurasi
mungkin berbeda tergantung model).
4
Tombol daya Menghidupkan/mematikan komputer.
5
Keyboard Untuk memasukkan data ke komputer.
1
6
Indikator daya
Menunjukkan status daya komputer.
Indikator
Menunjukkan status baterai komputer.
1
baterai
1. Mengisi daya: Lampu akan menyala kuning
kecokelatan bila daya baterai sedang diisi.
2. Daya terisi penuh: Lampu menyala biru bila
dalam mode AC.
Indikator HDD Menunjukkan bila drive hard disk aktif.
Indikator
Menunjukkan status komunikasi LAN Nirkabel/
1
komunikasi
3G.
Lampu biru menyala Lampu oranye
Tidak menyala
menyala
3G aktif/WiFi aktif
3G tidak aktif/
3G tidak aktif/
3G aktif/WiFi tidak aktif
WiFi aktif
WiFi tidak aktif
7
Tombol klik
Tombol kiri dan kanan berfungsi seperti tombol
(kiri dan kanan)
mouse kiri dan kanan.
8
Panel sentuh Perangkat penunjuk sensitif sentuhan yang
berfungsi seperti mouse komputer.
9
Tempat tangan Tempat nyaman untuk meletakkan tangan Anda
sewaktu menggunakan komputer.
1. Indikator panel depan akan terlihat meskipun penutup komputer dalam keadaan
tertutup.
4

Seri
Panduan cepat
Seri
Panduan cepat
Pandangan depan tertutup
# Ikon Item Keterangan
1
Indikator status Light-Emitting Diodes (LED) yang menyala
menunjukkan status fungsi dan komponen
komputer.
Pandangan kiri
2
Jack DC-in Menghubungkan ke Adaptor AC.
3
Port tampilan (VGA)
Menghubungkan perangkat tampilan
eksternal
(mis., monitor eksternal, proyektor LCD).
4
Port USB 2.0 Menghubungkan ke perangkat USB 2.0
(mis., mouse USB, kamera USB).
5
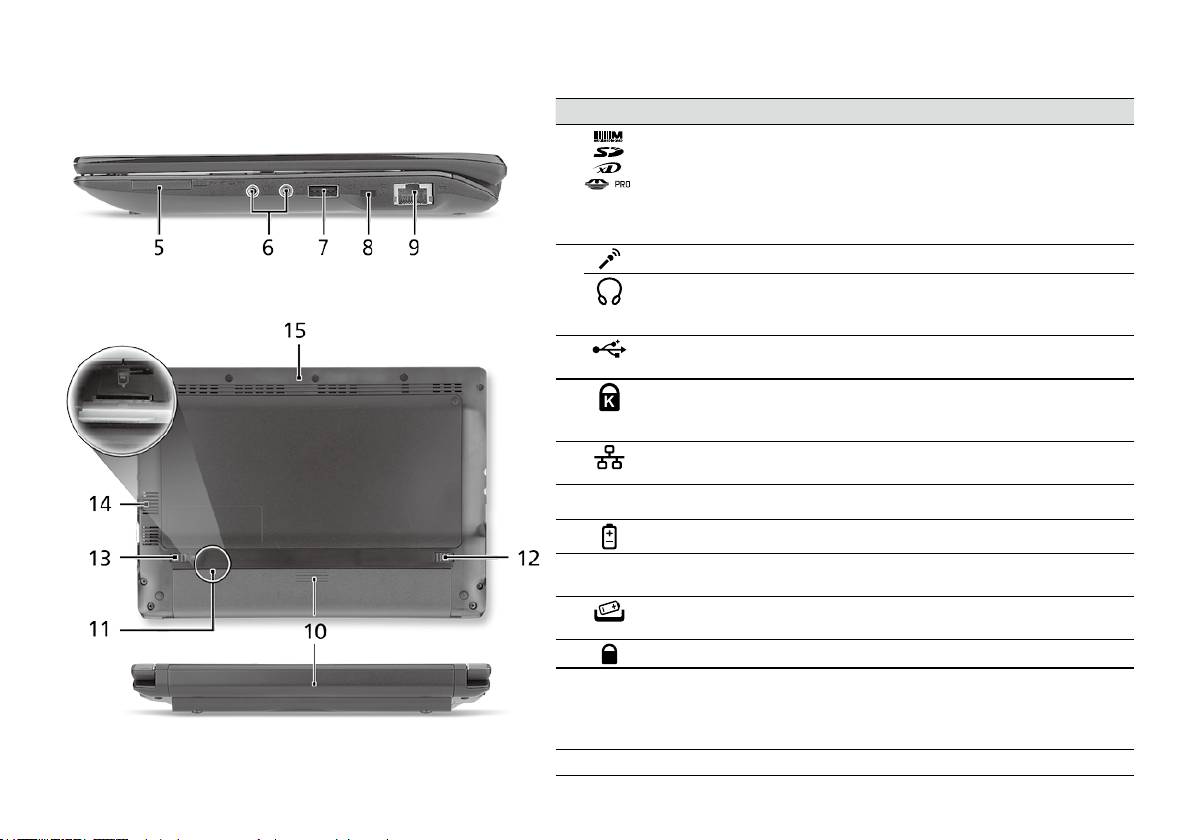
Seri
Panduan cepat
Seri
Panduan cepat
Pandangan kanan
# Ikon Item Keterangan
5
Pembaca kartu
Menerima Secure Digital (SD), MultiMediaCard
Multi-in-1
(MMC), Memory Stick (MS), Memory Stick PRO
(MS PRO), xD-Picture Card (xD).
Catatan: Tekan untuk melepas/memasang
kartu. Hanya satu kartu yang bisa beroperasi
saat Anda menggunakannya.
6
Jack mikrofon-in Menerima input dari mikrofon eksternal.
Jack headphone/
Menghubungkan ke perangkat line-out audio
pengeras suara/
(mis. pengeras suara, headphone).
line-out
7
Port USB 2.0 Menghubungkan ke perangkat USB 2.0
(mis., mouse USB).
8
Slot kunci
Menghubungkan ke kunci keamanan
Kensington
komputer yang kompatibel dengan kunci
Kensington.
9
Port ethernet
Menghubungkan ke jaringan berbasis Ethernet
(RJ-45)
10/100.
Pandangan belakang & Pandangan bawah
10
Tempat baterai Tempat kemasan baterai komputer.
11
Slot kartu SIM 3G Menerima kartu SIM 3G untuk konektivitas 3G
(hanya untuk model-model tertentu).
12
Penutup pelepas
Untuk melepaskan baterai.
baterai
13
Kunci baterai Mengunci baterai pada tempatnya.
14
Slot ventilasi dan
Membuat komputer tetap dingin, bahkan
kipas pendingin
setelah pemakaian yang lama.
Catatan: Lubang kipas jangan sampai tertutup
atau terhalang.
15
Pengeras suara Mengeluarkan audio dari komputer Anda.
6

Seri
Panduan cepat
Lingkungan
Suhu:
Beroperasi: 5°C hingga 35°C
Tidak beroperasi: -20°C hingga 65°C
Kelembaban (non-kondensasi):
Beroperasi: 20% hingga 80%
Tidak beroperasi: 20% hingga 80%
7

ซีรี่ส์
คู่มืออย่างย่อ

ซีรี่ส
คู่มืออย่างย่อ
ซีรี่ส
คู่มืออย่างย่อ
© 2010 สงวนลิขสิทธิ์
คู่มืออย่างย่อ
Aspire One
ซีรี่ส์
ฉบับดั้งเดิม: 04/2010
พีซีโน้ตบุ๊ก
Aspire One
ซีรี่ส์
หมายเลขรุ่น: ________________________________
ซีเรียลนัมเบอร์: _______________________________
วันที่ซื้อ: ____________________________________
สถานที่ซื้อ: _________________________________

ซีรี่ส
คู่มืออย่างย่อ
ซีรี่ส
คู่มืออย่างย่อ
Federal Communications Commission
Declaration of Conformity
This device complies with Part 15 of the FCC Rules. Operation is subject to the following two conditions: (1) this device may not
cause harmful interference, and (2) this device must accept any interference received, including interference that may cause
undesired operation.
The following local Manufacturer/Importer is responsible for this declaration:
Product name: Notebook PC
Brand: Acer
Model number: PAV01
Machine type:
Aspire one series; AO533 series
Name of Responsible Party: Acer America Corporation
Address of responsible party: 333 West San Carlos St., San Jose
CA 95110, U. S. A.
Contact person: Acer Representative
Phone No.: 1-254-298-4000
Fax No.: 1-254-298-4147
April 23, 2010

ซีรี่ส
คู่มืออย่างย่อ
ซีรี่ส
คู่มืออย่างย่อ
CE Declaration of Conformity
We,
Acer Incorporated
8F, 88, Sec. 1, Hsin Tai Wu Rd., Hsichih, Taipei Hsien 221, Taiwan
Contact Person: Mr. Easy Lai, e-mail:easy_lai@acer.com.tw
And,
Acer Europe SA
Via Cantonale, Centro Galleria 2 6928 Manno Switzerland
Hereby declare that:
Product: Notebook Computer
Trade Name: Acer
Model Number: PAV01
Machine Type: Aspire one series; AO533 series
Is compliant with the essential requirements and other relevant provisions of the following EC directives, and that all the
necessary steps have been taken and are in force to assure that production units of the same product will continue comply with
the requirements.
R&TTE Directive 1999/5/EC as attested by conformity with the following harmonized standard:
• Article 3.1(a) Health and Safety
-. EN60950-1
-. EN62311
• Article 3.1(b) EMC
-. EN301 489-1
-. EN301 489-3 (Applicable to non-bluetooth wireless keyboard mouse set).
-. EN301 489-7
-. EN301 489-17
-. EN301 489-24

ซีรี่ส
คู่มืออย่างย่อ
ซีรี่ส
คู่มืออย่างย่อ
• Article 3.2 Spectrum Usages
-. EN300 440-2 (Applicable to non-bluetooth wireless keyboard mouse set).
-. EN300 328
-. EN301 511
-. EN301 893 (Applicable to 5GHz high performance RLAN).
-. EN301 908-1
-. EN301 908-2
EMC Directive 2004/108/EC as attested by conformity with the following harmonized standards:
-. EN55022, AS/NZS CISPR22, Class B
-. EN55024
-. EN61000-3-2 Class D
-. EN61000-3-3
Low Voltage Directive 2006/95/EC as attested by conformity with the following harmonized standard:
-. EN60950-1
RoHS Directive 2002/95/EC on the Restriction of the Use of certain Hazardous Substances in Electrical and Electronic Equipment
-. The maximum concentration values of the restricted substances by weight in homogenous material are:
Lead
0.1%
Polybrominated Biphenyls (PBB’s)
0.1%
Mercury
0.1%
Polybrominated Diphenyl Ethers (PBDE’s)
0.1%
Hexavalent Chromium
0.1%
Cadmium
0.01%
Directive 2009/125/EC with regard to establishing a framework for the setting of ecodesign requirements for energy-related
product.
Year to begin affixing CE marking 2010.
Apr. 23, 2010
Easy Lai /Manager
Regulation Center, Acer Inc.
Date

ซีรี่ส
คู่มืออย่างย่อ
ซีรี่ส
คู่มืออย่างย่อ
สำหรับผู้เริ่มใช้
1 2 3
2-2
3-2
3-1
2-1
ตรวจดูให้แน่ใจว่าแบตเตอรี่่
ถูกล็อคในตำแหน่งที่ถูกต้อง
ดังที่แสดงในภาพประกอบที่ 2-2
4 5 6
ภาพประกอบมีเพื่อการอ้างอิงเท่านั้น ข้อมูลจำเพาะผลิตภัณฑ์ที่แท้จริงอาจแตกต่างกัน
1

ซีรี่ส
คู่มืออย่างย่อ
ซีรี่ส
คู่มืออย่างย่อ
ก่อนอื่น
ขอขอบคุณที่คุณเลือกโน้ตบุ๊กจาก Acer เพื่อรองรับการใช้งานแบบพกพาของคุณ
คู่มือ
เพื่อช่วยสอนการใช้โน้ตบุ๊ก Acer เราจึงได้จัดทำคู่มือชุดนี้ขึ้น*:
อันดับแรกคือ คู่มือฉบับย่อที่จะช่วยคุณในการเริ่มใช้คอมพิวเตอร์ของคุณ
สอบถามข้อมูลการใช้งานคอมพิวเตอร์เพื่อให้เกิดประสิทธิภาพสูงสุดได้จาก AcerSystem User Guide คู่มือนี้ประกอบด้วยข้อมูลรายละเอียดเกี่ยวกับยูทิ
ลิตี้ระบบ, การกู้คืนข้อมูล, ตัวเลือกเสริม, และวิธีในการแก้ไขปัญหา นอกจากนี้ยังประกอบด้วยข้อมูลการรับประกัน ข้อบังคับทั่วไป และการแจ้งเตือนด้าน
ความปลอดภัยสำหรับโน้ตบุ๊คของคุณ ซึ่งมีให้ในรูปแบบ Portable Document Format (PDF) และมาพร้อมกับโน้ตบุ๊คของคุณ
หมายเหตุ: การเรียกดูไฟล์ต้องการ Adobe Reader หากคอมพิวเตอร์ของคุณไม่มี Adobe Reader ติดตั้งอยู่ การคลิกที่ AcerSystem
User Guide จะเป็นการรันการติดตั้งโปรแกรม Adobe Reader ก่อน ทำตามคำแนะนำบนจอแสดงผลเพื่อติดตั้งให้เสร็จสมบูรณ์
สำหรับคำแนะนำในการใช้งาน Adobe Reader โปรดดูที่เมนูช่วยเหลือและสนับสนุน
* การแจ้งเตือนที่สำคัญ: คู่มือที่ได้กล่าวถึงไว้ในที่นี้ ทั้งในรูปแบบสิ่งพิมพ์หรืออิเล็คทรอนิกส์ มีเพื่ออ้างอิงเท่านั้นและไม่รวมถึงข้อมูล
การรับประกันเฉพาะที่กล่าวถึงใน AcerSystem User Guide ไม่มีส่วนใดในคู่มือนี้ที่จะแสดงถึงการเป็นตัวแทนหรือการรับประกันโด
ย Acer เกี่ยวกับผลิตภัณฑ์ที่คุณซื้อ Acer ขอปฏิเสธความรับผิดชอบอื่นๆทั้งหมดสำหรับข้อผิดพลาดที่มีในคู่มือนี้
2
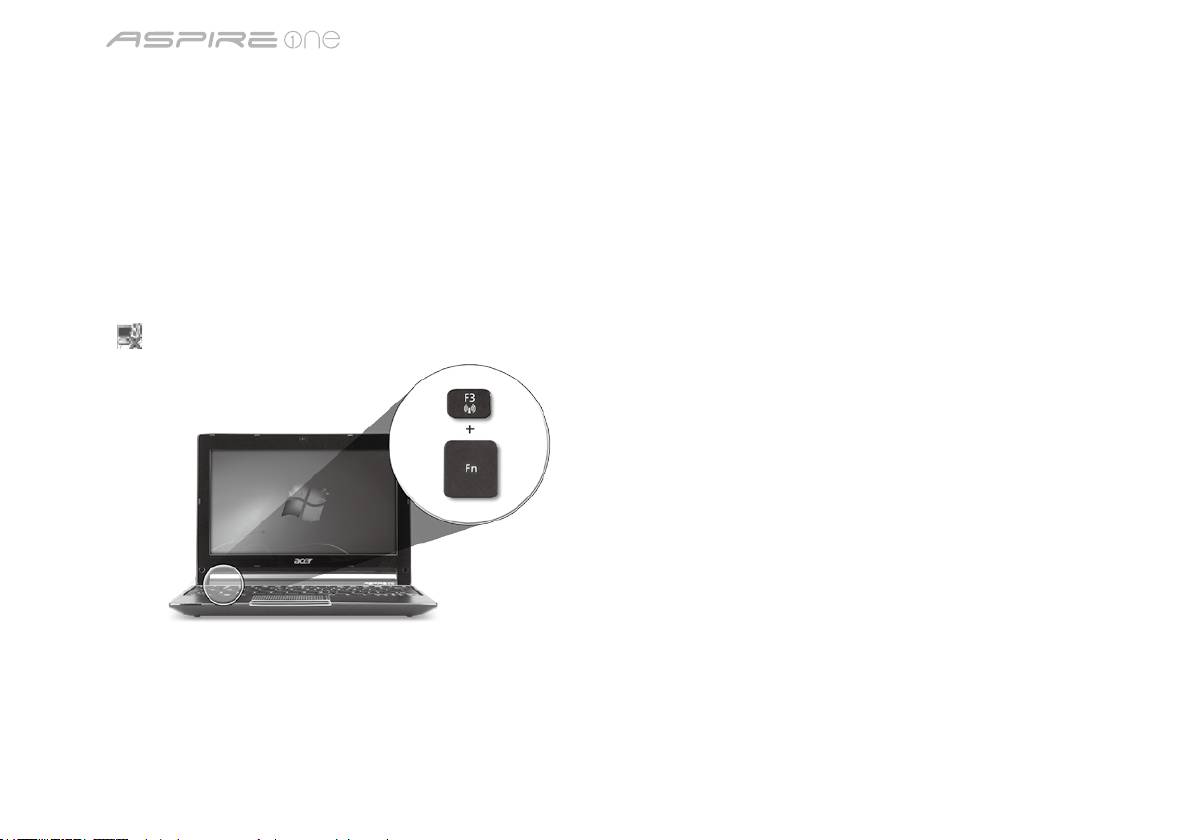
ซีรี่ส
คู่มืออย่างย่อ
ซีรี่ส
คู่มืออย่างย่อ
การปรับตั้งค่าเครือข่าย
คู่มือนี้จะช่วยคุณในการปรับตั้งค่า LAN และตั้งค่าเครือข่ายไร้สายของคุณเพื่อช่วยให้สามารถเชื่อมต่ออินเตอร์เน็ตได้
การตั้งค่าการเชื่อมต่อ LAN
ง่ายๆเพียงแค่เสียบสาย LAN เข้ากับพอร์ต Ethernet (RJ-45) โปรดดูที่ "มุมมองด้านขวา" บนหน้า 6 สำหรับตำแหน่งของพอร์ต Ethernet
การตั้งค่าการเชื่อมต่อไร้สาย
1. กด <Fn> + <F3> เพื่อเข้าถึงโปรแกรมจัดการสื่อสาร ที่นี่คุณจะสามารถเปิดการเชื่อมต่อ Wi-Fi ได้โดยการคลิกที่ปุ่มสีแดงถัดจาก Wi-Fi
หมายเหตุ: 3G และ Bluetooth สามารถเข้าถึงได้จากโปรแกรมจัดการสื่อสาร อุปกรณ์สื่อสารอาจแตกต่างกันขึ้นอยู่กับแต่ละรุ่น
2. คลิก
ไอคอนบนถาดระบบและเลือกจุดเชื่อมต่อไร้สายที่คุณต้องการเชื่อมต่อ
ใส่ซิมการ์ด 3G (สำหรับบางรุ่น)
ถอดแบตเตอรี่่ออกและใส่ซิมการ์ด 3G เข้าในสล็อตซิมการ์ด 3G อย่างระมัดระวัง โปรดดูที่ "มุมมองด้านหลังและด้านล่าง" ในหน้า 6
สำหรับตำแหน่งของสล็อตซิมการ์ด 3G
3
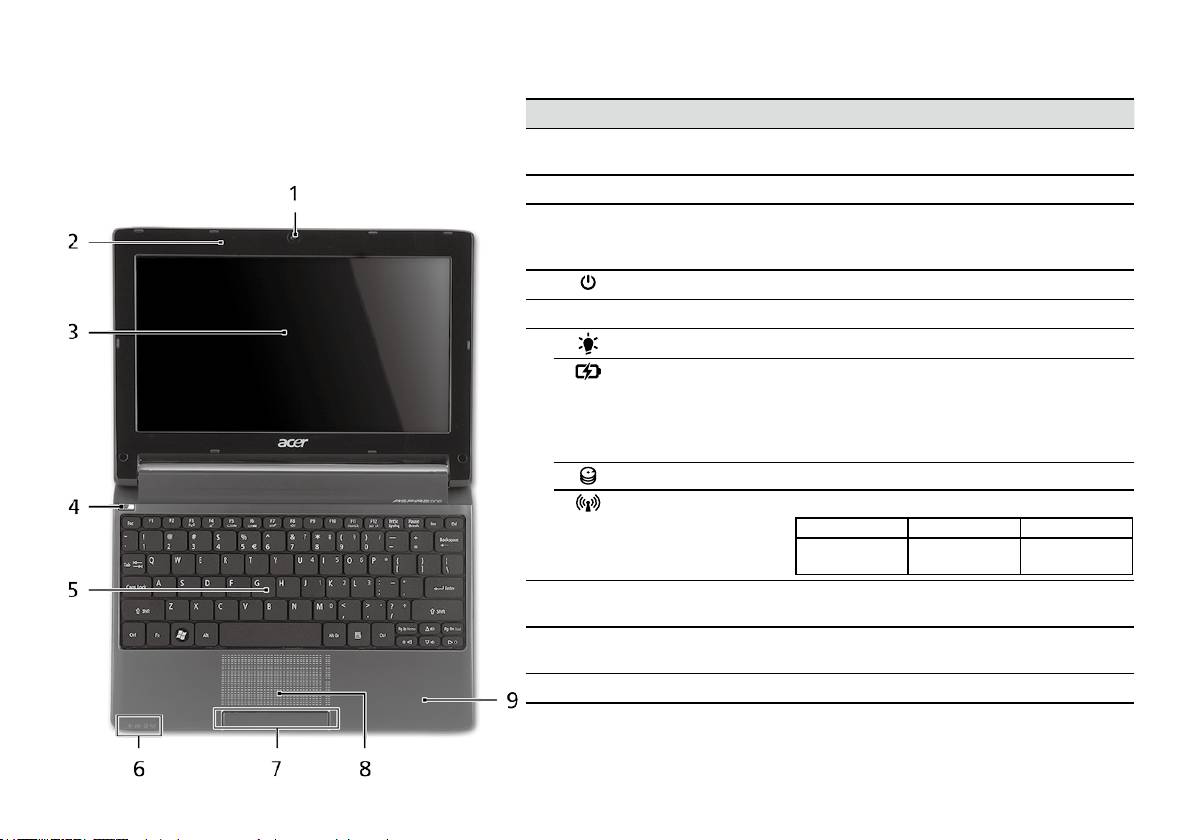
ซีรี่ส
คู่มืออย่างย่อ
ซีรี่ส
คู่มืออย่างย่อ
มุมมองด้านบน
ชม
Aspire One
ของคุณ
# ไอคอน รายการ คำอธิบาย
หลังจากตั้งค่าคอมพิวเตอร์ของคุณตามภาพประกอบในส่วนสำ
1
เว็บแคม
กล้องเว็บแคมสำหรับการสื่อสารด้วยวิดีโอ (ส่วนประก
หรับผู้เริ่มใช้ ใ้ห้เราได้พาคุณชมโน้ตบุ๊ก Acer ของคุณอย่าง
Acer Crystal Eye
อบอาจแตกต่างกันไปตามรุ่น)
ทั่วถึง
2
ไมโครโฟน ไมโครโฟนในตัวสำหรับการบันทึกเสียง
3
จอแสดงผล หรือที่เรียกว่า Liquid-Crystal Display (LCD) ซึ่งใช้
แสดงข้อมูลต่างๆ ของคอมพิวเตอร์ (ส่วนประกอบอา
จแตกต่างกันไปตามรุ่น)
4
ปุ่มเปิดปิด เปิดและปิดคอมพิวเตอร์
5
คีย์บอร์ด เพื่อป้อนข้อมูลเข้าสู่คอมพิวเตอร์ของคุณ
1
6
ไฟแสดงสถานะพลังงาน
ระบุสถานะการเปิดใช้งานคอมพิวเตอร์
1
ตัวแสดงสถานะแบตเตอรี่
แสดงถึงสถานะแบตเตอรี่ของคอมพิวเตอร์
1. กำลังชาร์จ: ไฟสว่างเป็นสีเหลืองอำพันเมื่อทำการ
ชาร์จแบตเตอรี่
2. ชาร์จไฟเต็ม: ไฟสีน้ำเงินติดสว่างขณะอยู่ในโหมด
AC
ตัวแสดงสถานะ HDD แสดงเมื่อฮาร์ดดิสก์ไดร์ฟมีการทำงาน
1
ตัวแสดงสถานะ
แสดงสถานะของการสื่อสาร 3G/Wireless LAN
ไฟสีน้ำเงินสว่าง ไฟสีส้มสว่าง ไม่มีไฟติด
3G เปิด/WiFi เปิด
3G ปิด/WiFi เปิด 3G ปิด/WiFi ปิด
3G เปิด/WiFi ปิด
7
ปุ่มคลิก (ซ้ายและขวา) ปุ่มซ้ายและขวาทำงานเหมือนกับปุ่มเมาส์ซ้า
ยและขวา
8
ทัชแพด อุปกรณ์ชี้ตำแหน่งแบบสัมผัส ซึ่งทำงานแบบ
เดียวกับเมาส์คอมพิวเตอร์
9
ที่วางมือ พื้นที่รองรับมือเพื่อให้รู้สึกสบายขณะใช้คอมพิวเตอร์
1. สัญลักษณ์ที่แผงด้านหน้าสามารถมองเห็นได้แม้ขณะปิดฝาพับคอมพิวเตอร์
4

ซีรี่ส
คู่มืออย่างย่อ
ซีรี่ส
คู่มืออย่างย่อ
ปิดมุมมองด้านบน
# ไอคอน รายการ คำอธิบาย
1
ตัวแสดงสถานะ Light-Emitting Diode (LED) ที่จะมีไฟปรากฏ
ขึ้นเพื่อแสดงสถานะการใช้งานของคอมพิวเตอ
ร์และส่วนประกอบต่างๆ
มุมมองด้านซ้าย
2
ช่องเสียบ DC-in เชื่อมต่อกับอแดปเตอร์ AC
3
พอร์ตจอแสดงผลต่อพ่วง
เชื่อมต่อกับจอแสดงผล (เช่น จอภาพภายนอก,
(VGA)
โปรเจคเตอร์ LCD)
4
พอร์ต USB 2.0 ต่ออุปกรณ์ USB 2.0 (เช่น เมาส์หรือกล้อง
USB)
5
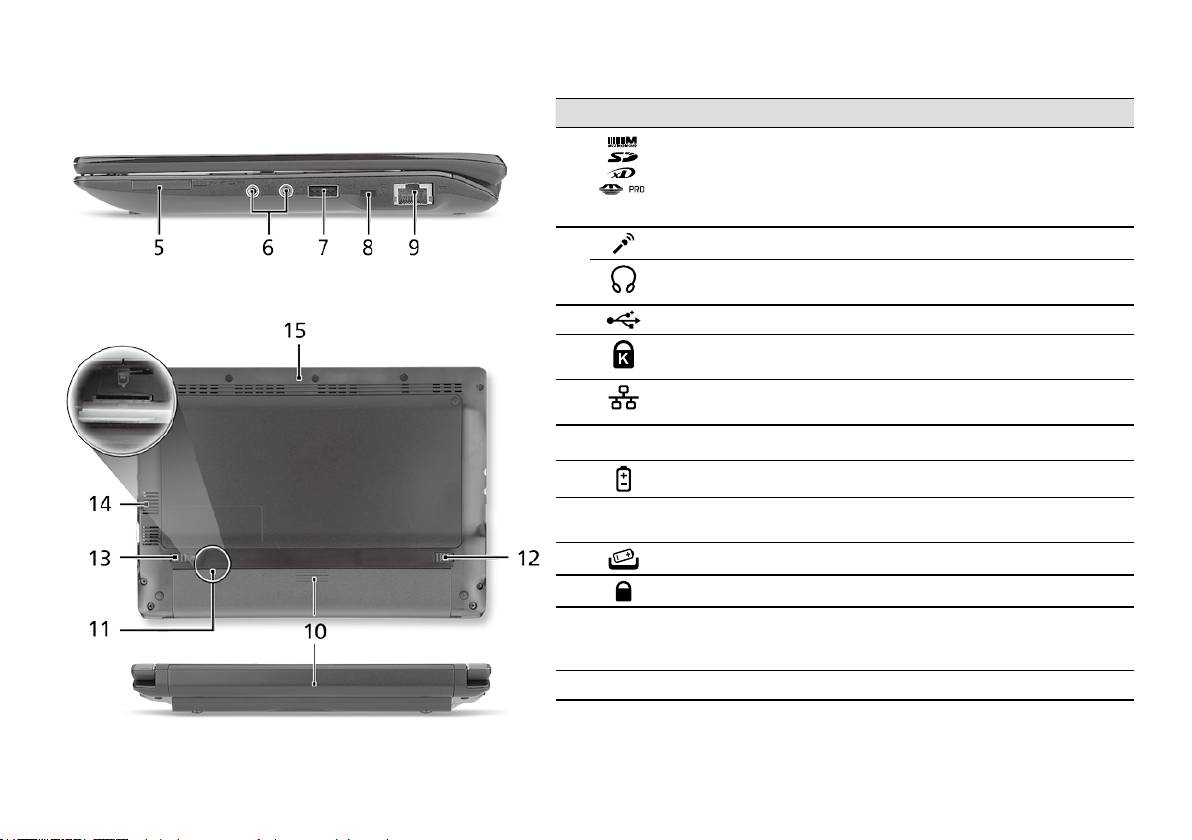
ซีรี่ส
คู่มืออย่างย่อ
ซีรี่ส
คู่มืออย่างย่อ
มุมมองด้านขวา
# ไอคอน รายการ คำอธิบาย
5
การ์ดรีดเดอร์มัลติอินวัน รับ Secure Digital (SD), MultiMediaCard
(MMC), Memory Stick (MS), Memory Stick
PRO (MS PRO), xD-Picture Card (xD)
หมายเหตุ: กดเพื่อถอด/ติดตั้งการ์ด ทำงานได้
ครั้งละหนึ่งการ์ดเท่านั้น
6
แจ็คเสียบไมโครโฟน ใช้สำหรับต่อไมโครโฟน
ช่องเสียบหูฟัง/ลำโพง/
เชื่อมต่อกับอุปกรณ์ระบบเสียงภายนอก
line-out
(เช่น ลำโพง ชุดหูฟัง)
7
พอร์ต USB 2.0 เชื่อมต่อกับอุปกรณ์ USB 2.0 (เช่น เมาส์ USB)
8
สล็อตล็อค Kensington พ่วงต่อกับระบบล็อคความปลอดภัยสำหรับคอม
พิวเตอร์ที่ใช้งานได้กับ Kensington
9
พอร์ต Ethernet (RJ-45) เชื่อมต่อไปยังเครือข่ายซึ่งใช้
Ethernet 10/100
มุมมองด้านหลังและด้านล่าง
10
ช่องใส่แบตเตอรี่ ใช้สำหรับเก็บแพ็คแบตเตอรี่ของคอมพิวเตอร์
11
สล็อตซิมการ์ด 3G รับซิมการ์ด 3G สำหรับการเชื่อมต่อแบบ 3G
(สำหรับบางรุ่น)
12
สลักปลดล็อคแบตเตอรี่ ปลดล็อคเพื่อนำแบตเตอรี่ออก
13
ล็อคแบตเตอรี่ ล็อคแบตเตอรี่ให้อยู่ในตำแหน่ง
14
สล็อตอุปกรณ์ระบายอา
ช่วยให้คอมพิวเตอร์เย็น แม้หลังจากใช้งานเป็น
กาศและพัดลมระบายควา
เวลานาน
มร้อน
หมายเหตุ: ห้ามปิดหรือกีดขวางช่องพัดลม
15
ลำโพง กระจายเสียงจากคอมพิวเตอร์ของคุณ
6

ซีรี่ส
คู่มืออย่างย่อ
สิ่งแวดล้อม
อุณหภูมิ:
ขณะทำงาน: 5°C ถึง 35°C
ขณะปิดเครื่อง: -20°C ถึง 65°C
ความชื้น (ไม่ควบแน่นเป็นไอน้ำ):
ขณะทำงาน: 20% ถึง 80%
ขณะปิดเครื่อง: 20% ถึง 80%
7
