Raymond Weil Хронографы кварцевые: инструкция
Раздел: Бытовая, кухонная техника, электроника и оборудование
Тип: Часы
Инструкция к Часам Raymond Weil Хронографы кварцевые

RAYMOND WEIL S.A.
Avenue Eugène-Lance 36-38
P.O. Box 1569
1211 Geneva 26
Switzerland
Tel +41 (0) 22 884 00 55
Fax +41 (0) 22 884 00 50
GENERAL INFORMATION
info@raymond-weil.ch
AFTER SALES SERVICE
INSTRUCTIONS FOR USE
customer-service@raymond-weil.ch
WEBSITE
QUARTZ CHRONOGRAPH
www.raymondweil.com
WATCHES
ZGU 704


INSTRUCTIONS FOR USE
QUARTZ CHRONOGRAPH WATCHES
Français 4
English
12
Deutsch
20
Español
28
Italiano
36
Português 44
52
Magyar 60
Polski 68
Český 76
Bahasa Indonesia 84
日本語 92
繁體中文 98
简体中文 104
117
125
WEEE Noti ce 126
3

INTRODUCTION
Nous vous félicitons d’avoir choisi une montre de la prestigieuse
collection RAYMOND WEIL, expression vivante d’un design
savamment maîtrisé et de la recherche permanente de qualité
qui caractérisent la Marque depuis sa création.
Votre montre RAYMOND WEIL est dotée d’un mouvement chrono-
graphe à quartz de haute qualité. Une montre à quartz présente
l’avantage d’être d’une très grande précision.
An de garantir le parfait état de marche de votre montre
RAYMOND WEIL, de longues années durant, nous vous remercions
de suivre attentivement les conseils contenus dans le présent mode
d’emploi ainsi que dans la garantie internationale.
4
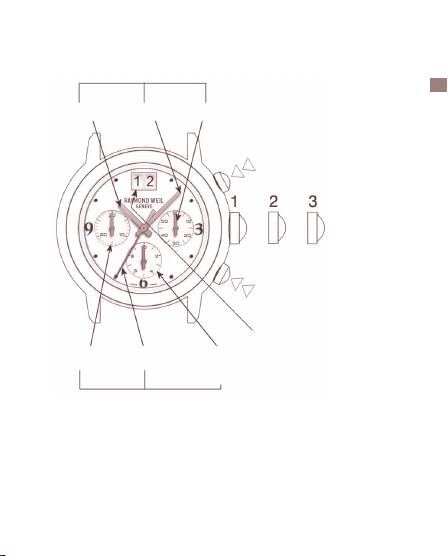
DESCRIPTION DU CADRAN
AIGUILLES DE LA MONTRE
AIGUILLE
AIGUILLE
AIGUILLE
DES HEURES
DES MINUTES
DES SECONDES
POUSSOIR A:
- DÉPART
- ARRÊT
COURONNE DE
MISE À L’HEURE
POUSSOIR B:
- REMISE À ZÉRO
- TEMPS INTERMÉDIAIRES
DATE
COMPTEUR
COMPTEUR
COMPTEUR
30 MINUTES
60 SECONDES
1/10 DE SECONDE
(compteur d’heures
après 30 minutes)
AIGUILLES DU CHRONOGRAPHE
Certains chronographes RAYMOND WEIL sont également équipés
d’une échelle tachymétrique, permettant de mesurer des vitesses
en km/h ou une autre unité.
5

CORRECTION DE lA DATE ET mISE à l’HEURE
1 Position normale
2 Correction rapide de la date
3 Mise à l’heure
Certains modèles RAYMOND WEIL sont équipés d’une couronne
vissée. Avant de procéder à la mise à l’heure ou à la correction de
la date, il est donc nécessaire de dévisser la couronne en tirant
dans l’axe et en tournant dans le sens contraire des aiguilles d’une
montre. La couronne est ainsi libérée grâce à un ressort. Après
tout réglage, appuyez légèrement sur la couronne en tournant
doucement dans le sens des aiguilles d’une montre, et revissez-la
soigneusement an de préserver l’étanchéité de votre montre.
6

Correction de la date
Pour corriger rapidement la date, tirez la couronne en position 2.
Ensuite, suivant le modèle de votre montre, tournez la couronne
en avant ou en arrière jusqu’à ce que la date désirée apparaisse
dans le guichet. La correction de la date s’eectue lors du passage
à minuit de l’aiguille des heures. Pendant cette opération, votre
montre continue de fonctionner et n’a donc pas besoin d’une
remise à l’heure.
Après toute correction, ramenez toujours la couronne en position 1,
an de préserver l’étanchéité de votre montre.
Mise à l’heure
Pour corriger l’heure, tirez la couronne en position 3 et tournez-la
en avant ou en arrière jusqu’à ce que les aiguilles indiquent l’heure
exacte.
Après la mise à l’heure, ramenez toujours la couronne en position
1, an de faire redémarrer les aiguilles et de préserver l’étanchéité
de votre montre.
7
UTIlISATION DU CHRONOGRAPHE
La fonction chronographe ne peut être utilisée que lorsque la
couronne est en position 1.
POUSSOIR A:
- DÉPART
- ARRÊT
POUSSOIR B:
- REMISE À ZÉRO
- TEMPS INTERMÉDIAIRES
Départ
Appuyez sur le poussoir A pour activer l’aiguille des secondes du
chronographe. Si l’action chronométrée dure plus de 60 secondes,
le temps apparaîtra ensuite sur le compteur de minutes et après 30
minutes sur le compteur de 1/10 de seconde, devenu compteur
d’heures.
Arrêt
Appuyez une seconde fois sur le poussoir A pour arrêter le
chronographe et obtenir le temps écoulé (minutes, secondes,
1/10 de seconde ou heures, minutes, secondes après 30 minutes).
En appuyant encore une fois sur le poussoir A, le chronométrage
reprendra immédiatement.
8

Vous pouvez ainsi eectuer plusieurs mesures de temps séquen-
tielles consécutives.
Remise à zéro
Appuyez sur le poussoir B pour remettre à zéro l’ensemble des
compteurs du chronographe, qui est maintenant prêt pour une
nouvelle utilisation. La remise à zéro ne peut se faire que lorsque
le chronographe a d’abord été arrêté.
Temps intermédiaires
Appuyez sur le poussoir A pour démarrer le chronographe.
Appuyez ensuite sur le poussoir B pour obtenir le premier temps
intermédiaire. Pendant l’arrêt du chronographe, l’action continue
d’être chronométrée. Appuyez à nouveau sur le poussoir B pour que
les aiguilles du chronographe rattrapent le temps écoulé depuis le
premier arrêt. Appuyez sur le poussoir A pour arrêter dénitivement
le chronographe et obtenir le temps total mesuré. Appuyez sur le
poussoir B pour remise à zéro.
Si une ou plusieurs des aiguilles du chronographe ne sont pas
exactement en position de départ, il est nécessaire de les ajuster.
Tirez donc la couronne en position 3. Appuyez simultanément
sur les poussoirs A et B pendant au moins 2 secondes. L’aiguille
des secondes du chronographe tourne alors de 360° et le mode
correction est ainsi activé. Appuyez ensuite sur le poussoir A pour
ajuster l’aiguille des secondes (une pression brève pour ajustage pas
à pas, une pression maintenue pour ajustage en continu). Appuyez
ensuite sur le poussoir B pour passer aux aiguilles suivantes
9

(1/10 de seconde, puis minutes) et ajustez les aiguilles comme
précédemment expliqué. Ramenez la couronne en position 1 à
la n de l’ajustage.
RECOmmANDATIONS
Votre montre RAYMOND WEIL est alimentée par une pile d’une
longévité moyenne d’environ 36 mois, durée variable en fonction
de la fréquence d’utilisation du chronographe. An de prolonger
la durée de vie de la pile, tirez la couronne en position 3 lorsque
vous avez l’intention de ne pas porter votre montre pendant un
certain temps.
Après épuisement, la pile doit être remplacée sans tarder, an
d’éviter tout risque d’endommagement du mouvement.
Veuillez coner le remplacement de la pile uniquement à un
concessionnaire agréé RAYMOND WEIL.
10

11

ENGlISH
INTRODUCTION
We congratulate you on having chosen a watch from the presti-
gious RAYMOND WEIL collection, the living expression of masterful
design and of the continuous quest for top quality, which have
been the hallmarks of the Brand since its creation.
Your RAYMOND WEIL watch is tted with a high-quality chrono-
graph quartz movement. A quartz watch enjoys the advantage of
being extremely precise.
In order to guarantee the perfect functioning of your
RAYMOND WEIL watch for many long years, we thank you to pay
close attention to the advice contained in these Instructions for
Use as well as in the International Guarantee booklet.
12
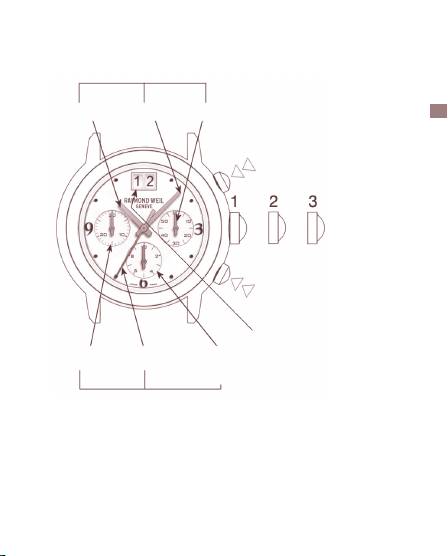
DESCRIPTION OF THE DIAl
WATCH HANDS
HOUR
MINUTE
SECONDS
HAND
HAND
HAND
PUSH-BUTTON A:
- START
- STOP
SETTING CROWN
PUSH-BUTTON B:
- ZERO RESET
- INTERMEDIATE TIMING
DATE
30 MINUTES
60 SECONDS
1/10 SECOND
COUNTER
COUNTER
COUNTER
(hours counter
after 30 minutes)
CHRONOGRAPH HANDS
Certain RAYMOND WEIL chronographs are also equipped with a
tachometric scale, enabling the measurement of speed in km/h
or other units.
13
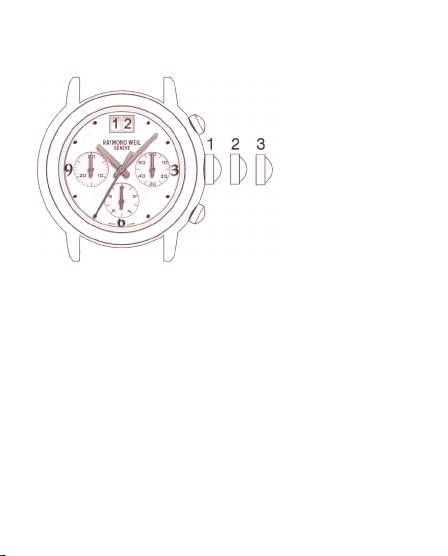
CHANGING THE DATE AND SETTING THE TImE
1 Normal position
2 Rapid date change
3 Time-setting
Your RAYMOND WEIL watch may be tted with a screw-down
crown. Before setting the time or changing the date, it is therefore
necessary to unscrew the crown by pulling it straight out and
turning it anti-clockwise. The crown will then be released by a
spring. After completing all settings, press lightly on the crown,
while turning it clockwise, and screw it back in gently in order to
preserve your watch’s water-resistance.
14

Changing the Date
In order to adjust the date rapidly, pull the crown out to position
2. Then, depending on the model of your watch, turn the crown
forwards or backwards until the desired date appears in the window.
The date changes as the hour hand passes midnight. During this
operation, your watch will continue to function and so will not
need to be reset.
After nishing your changes, always push the crown back in to
position 1, in order to preserve your watch’s water-resistance.
Setting the Time
In order to adjust the time, pull the crown out to position 3 and turn
it forwards or backwards until the hands indicate the desired time.
After setting the time, always push the crown back in to posi-
tion 1, in order to restart the hands and to preserve your watch’s
water-resistance.
15

USE OF THE CHRONOGRAPH
The chronograph function can only be used when the crown is
in position 1.
PUSH-BUTTON A:
- START
- STOP
PUSH-BUTTON B:
- ZERO RESET
- INTERMEDIATE TIMING
Start
Press push-button A to activate the seconds hand of the chro-
nograph. If the timed activity lasts longer than 60 seconds, the
time elapsed will next appear on the minutes counter and after a
further 30 minutes on the 1/10 second counter, which has by now
become an hours counter.
Stop
Press push-button A a second time to stop the chronograph and
obtain the time that has elapsed (in minutes, seconds and 1/10s
of a second; or in hours, minutes and seconds after 30 minutes). By
pressing push-button A again, timing restarts immediately. Thus
you can measure several consecutive time-durations.
16

Resetting to Zero
Press push-button B in order to reset all the chronograph counters
to zero. Your watch is now ready to start timing again. Resetting
to zero is only possible once the chronograph has been stopped.
Intermediate Timing
Press push-button A to start the chronograph. Then press
push-button B to obtain the rst intermediate time. While the
chronograph is stopped, the activity continues to be timed. Press
push-button B again to allow the chronograph hands to make up
the time elapsed since the rst stop. Press push-button A to stop
the chronograph and read o the total time. Press push-button B
to reset to zero.
If one or several of the chronograph hands are not in their exact
starting position, it is necessary to adjust them. Therefore pull the
crown out to position 3. Press push-buttons A and B simultaneously
for at least 2 seconds. The chronograph seconds hand then rotates
through 360° and the correction mode is activated. Next, press
push-button A to adjust the seconds hand (a short push to adjust
step by step, or a long push for continuous adjustment). Then press
push-button B to pass on to the following hands (1/10 second, then
minutes) and adjust them as previously explained. Push the crown
back in to position 1 when adjustment is completed.
17

RECOmmENDATIONS
Your RAYMOND WEIL watch is powered by a battery with an aver-
age life of approximately 36 months, which can vary according to
the frequency of chronograph usage. In order to make the battery
last longer, pull the crown out to position 3 whenever you do not
intend to wear your watch for a while.
Once exhausted, the battery should be replaced without delay, in
order to avoid any risk of damage to the movement.
Please have your watch battery changed only by an approved
RAYMOND WEIL dealer.
18

19

DEUTSCH
EINFÜHRUNG
ir gratulieren Ihnen zur Wahl einer Uhr aus der renommierten
W
RAYMOND WEIL Kollektion, welche dem meisterhaften Design
und der ständigen Suche nach Topqualität – das sind die Merkmale
der Marke seit ihrer Entstehung – richtig Ausdruck verleiht.
Ihre RAYMOND WEIL Uhr ist mit einem qualitativ hochwertigen
Chronograph Quarzwerk ausgestattet. Eine Quarzuhr hat den
Vorteil, äusserst präzise zu sein.
Um Ihnen die Funktionstüchtigkeit Ihrer RAYMOND WEIL Uhr für
viele Jahre zu garantieren, danken wir Ihnen, dass Sie den Empfeh-
lungen dieser Gebrauchsanweisung folgen, bzw. den Angaben auf
dem Internationalen Garantieschein.
20
